Fire Emblem Engage Logo
Guides

Fire Emblem Engage – Chapter 15 Walkthrough

by NightlyGamingBinge in

Below is a walkthrough for Chapter 15: Dancer in the Ruins in Fire Emblem Engage!

Paralogue: The Instructor

Location: Sacred Tomb

Head to the Sacred Tomb to trigger a dialog event with Byleth. You’ll need to face another trial to strengthen your bond with the professor. There will be an assortment of enemies you’ll have to face in this challenge including two Phantom Wyrm. You’ll also have to prevent Byleth’s forces from destroying crystals scattered around. The more you save the better reward you get. After defeating the northern enemies and approaching Byleth, the Martial Masters will warp the Halberdier and General Fabrications down to the open area. Byleth will then buff all of his allies and two more enemies will spawn in. Make note that the Wyvern Knight, General and Halberdier all have 2 health bars while Byleth has 3. Once you defeat Byleth a dialog event will trigger. You’ll then be free to explore the area collecting items and speaking with allies.

ItemObtained
1,000 GDropped by a Sage Fabrication
1,000 GDropped by a Wyvern Knight Fabrication
1,000 GDropped by a Halberdier Fabrication
1,000 GDropped by a General Fabrication
ElixirRewarded for protecting crystals
TalismanRewarded for protecting crystals

Skirmishes

Now might be a good time to do a couple of skirmishes if you wish. You can use them to level up units you normally don’t use or get others closer to promotion.

Northern Fortress

When you are ready to proceed with the story, make you way to the Northern Fortress. For this battle, you’ll need to fight your way to Seadall then lead him to safety. Speak with him using Alear. This will cause the doors near the entrance of the fortress to close and a new path will become available. Defeat the enemies while working your way through the fortress. When you reach the last room, the final enemy will have two health bars. Watch out for the miasma that will lower your stats if you stand in it. Once you reach the exit and choose to escape, the battle is won. After a dialog event, explore the area collecting items and adopting pets. When you are done, head to the Somniel.

ItemObtained
Energy DropLooted from a chest at the end of a hallway past a breakable wall in the northern part of the fortress
TalismanLooted from a chest near the end of the map

Intermission: The Somniel

Back at the Somniel make sure to speak with Seadall to get him added to the Ally Notebook. Also stock on any supplies you may need and collect the items scattered around the grounds. When you’re ready to proceed with the story, leave the Somniel in search of the next ring.

Click here for the next walkthrough on Chapter 16 in Fire Emblem Engage!
Marvel's Midnight Suns Logo
Game Guides

Marvel’s Midnight Suns Guides and Walkthroughs

by NightlyGamingBinge in

Below are our walkthroughs and guides on Marvel’s Midnight Suns!

Club Meetings

Club meetings?? You bet! Click on the below clubs to see what they’re doing!

Collectible Collections

The following are collectibles you can obtain throughout the game to complete your Collections:

Friendship Level / Dialog Choices

As you progress through Midnight Suns, you’ll come across dialog options that can increase, decrease or not change your friendship levels with the various heroes. Below are guides on these dialog choices!

Misc.

Mysteries

Mysteries are like side quests in Marvel’s Midnight Suns. Below are guides on how to complete these mysteries.

Trophies

Trophy guides to help you obtain those pesky trophies! 😉

God of War Ragnarok Guides and Walkthroughs
Game Guides

God of War Ragnarok Guides and Walkthroughs

by NightlyGamingBinge in

Below are our guides and walkthroughs for God of War Ragnarök (GOWR)!

Collectibles

In GOWR, collectibles can of course be found throughout the realms! Below are guides on the locations of these collectibles!

Area Completion Collectibles

Below are the area completion collectibles found in each area. These collectibles can include Nornir chests, legendary chests, lore, artifacts and Odin’s ravens.

Star Ocean The Divine Force Walkthrough
Guides

Star Ocean: The Divine Force – Castle Vey’l

by NightlyGamingBinge in

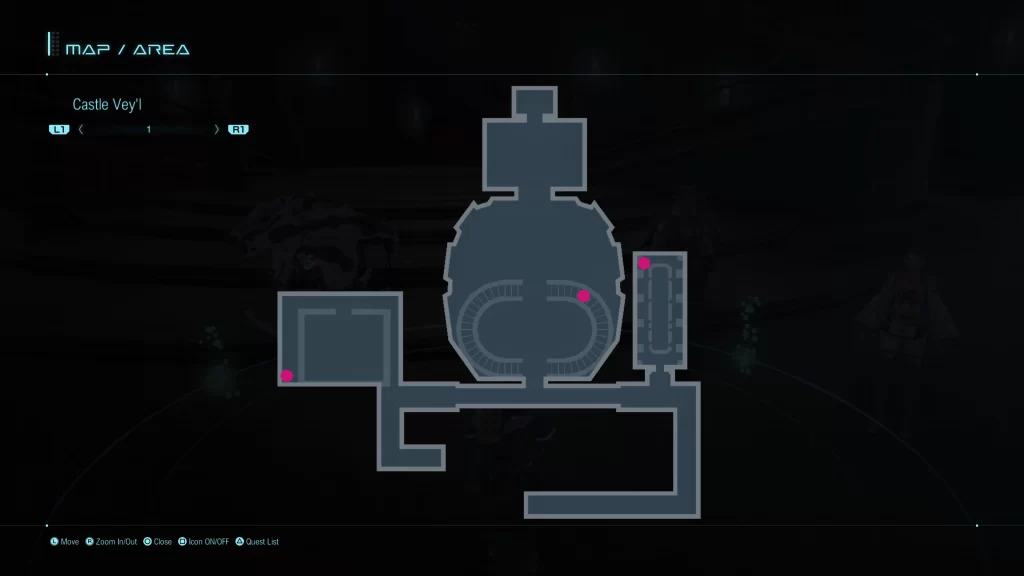
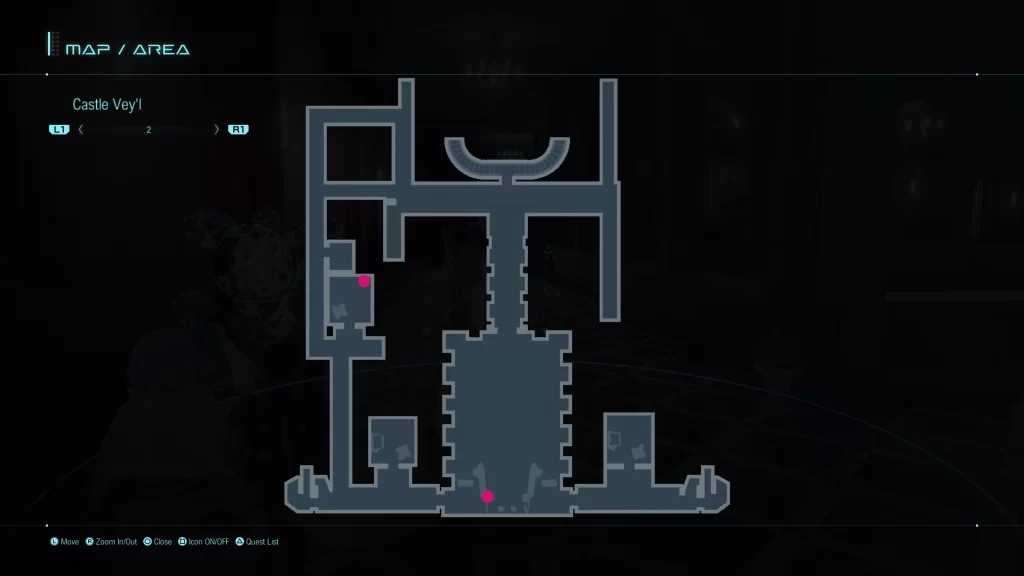
Below is a guide on the collectibles found in the Castle Vey’l of Star Ocean: The Divine Force. These collectibles could consist of mini-bunnies, treasure chests, gatherable materials and enemies!

Treasure Chests

  • Draconite Brooch
  • Miki
  • Symbol of Horror
  • Rainbow Diamond
  • Demi-lance Armor

Click here for the next walkthrough on Hybrid Research Vessel Terranus in Star Ocean: The Divine Force.

Star Ocean The Divine Force Walkthrough
Guides

Star Ocean: The Divine Force – Larcasse Region

by NightlyGamingBinge in

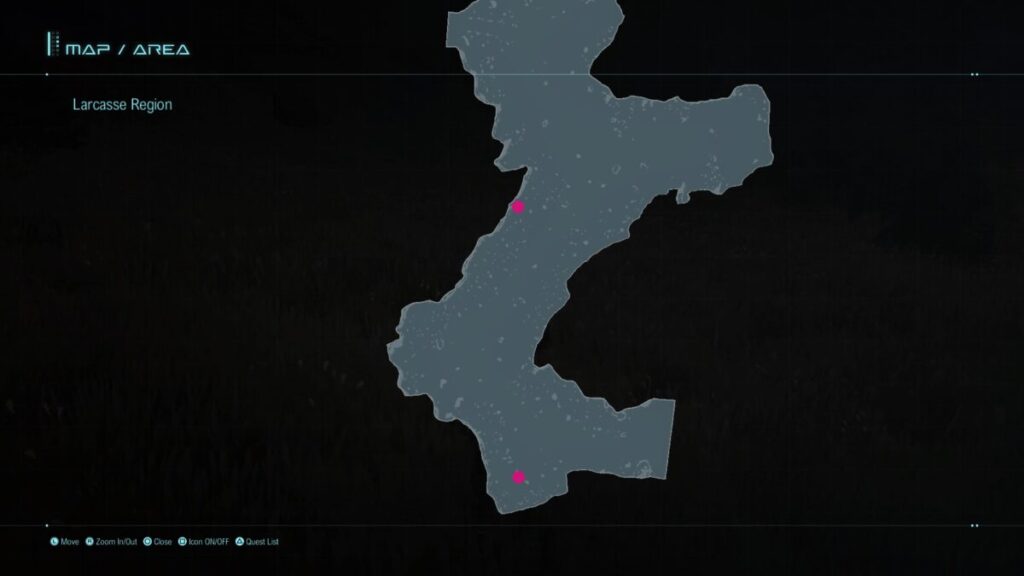
Below is a guide on the collectibles found in the Larcasse Region of Star Ocean: The Divine Force. These collectibles consist of mini-bunnies, treasure chests, gatherable materials and enemies!

Mini-Bunnies

  • Simply Pink Mini-Bunny – This mini-bunny can be found in the southeastern part of the area along the map’s edge.

Treasure Chests

  • Blueberry Potion – Northern part of area
  • Ring Mail – Near Mudman
  • Berserker – Near Larcette Village
  • 100 Fol – Central part of the area next to a boulder
  • Lucky Rabbit – Southern part of the area

Gatherable Materials

  • Ancient Coin
  • Iron
  • Panacea Leaf
  • Roly-Poly Bean
  • Scrap Iron
  • Scruffy Rag
  • Shoddy Paper

Enemies

  • Chimera
    • Lucky Fight Coin
  • Forest Fleuret
    • Fresh Sage
  • Gerel Rafflesia
  • Mudman
  • Peryton
    • Axe Beak’s Feather

Click here for the next guide on the collectibles found at Larcette Village in Star Ocean: The Divine Force.