Doom Eternal
Guides

Doom Eternal – Secret Encounters

by Chappie in


Mission 2: Exultia

Exultia (Travel Point – Central Rotunda)

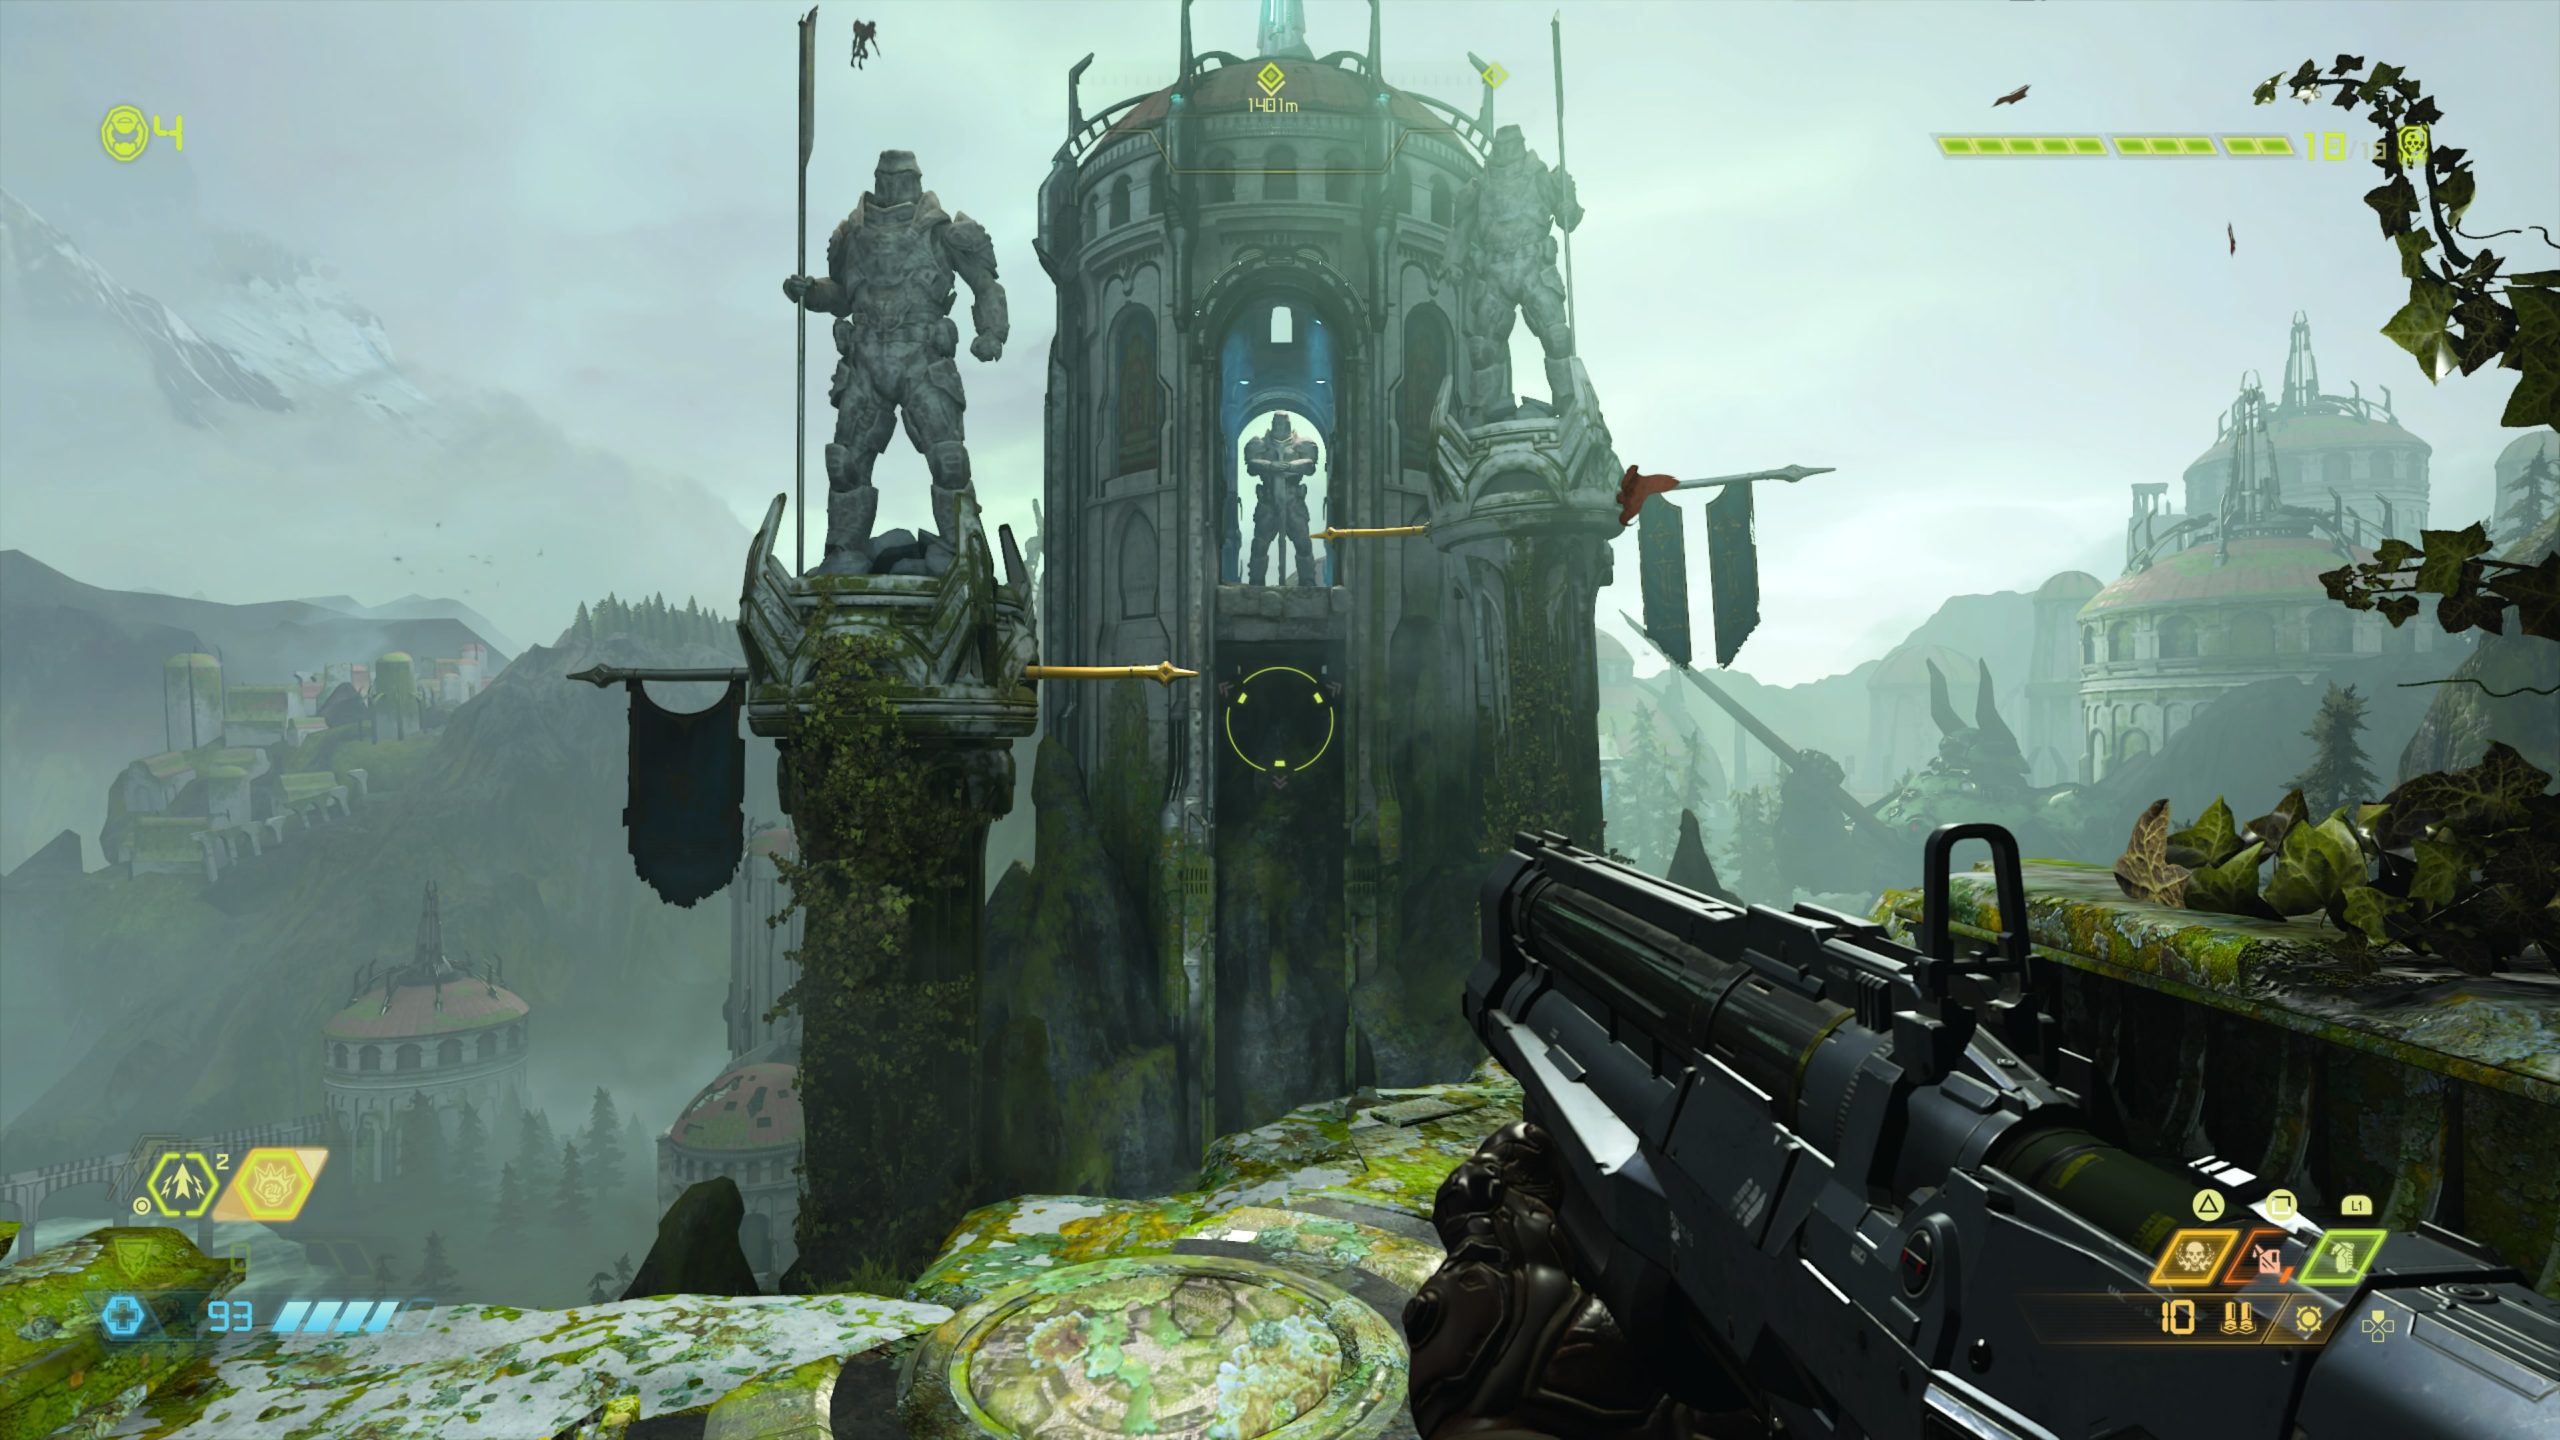
The secret encounter is located in the tower with a statue being guarded by two sentinel statues on pillars. Use the gold spin bars to reach the top of the tower. The secret encounter is located behind the statue.


Hell (Travel Point – Belphegor’s Gate)

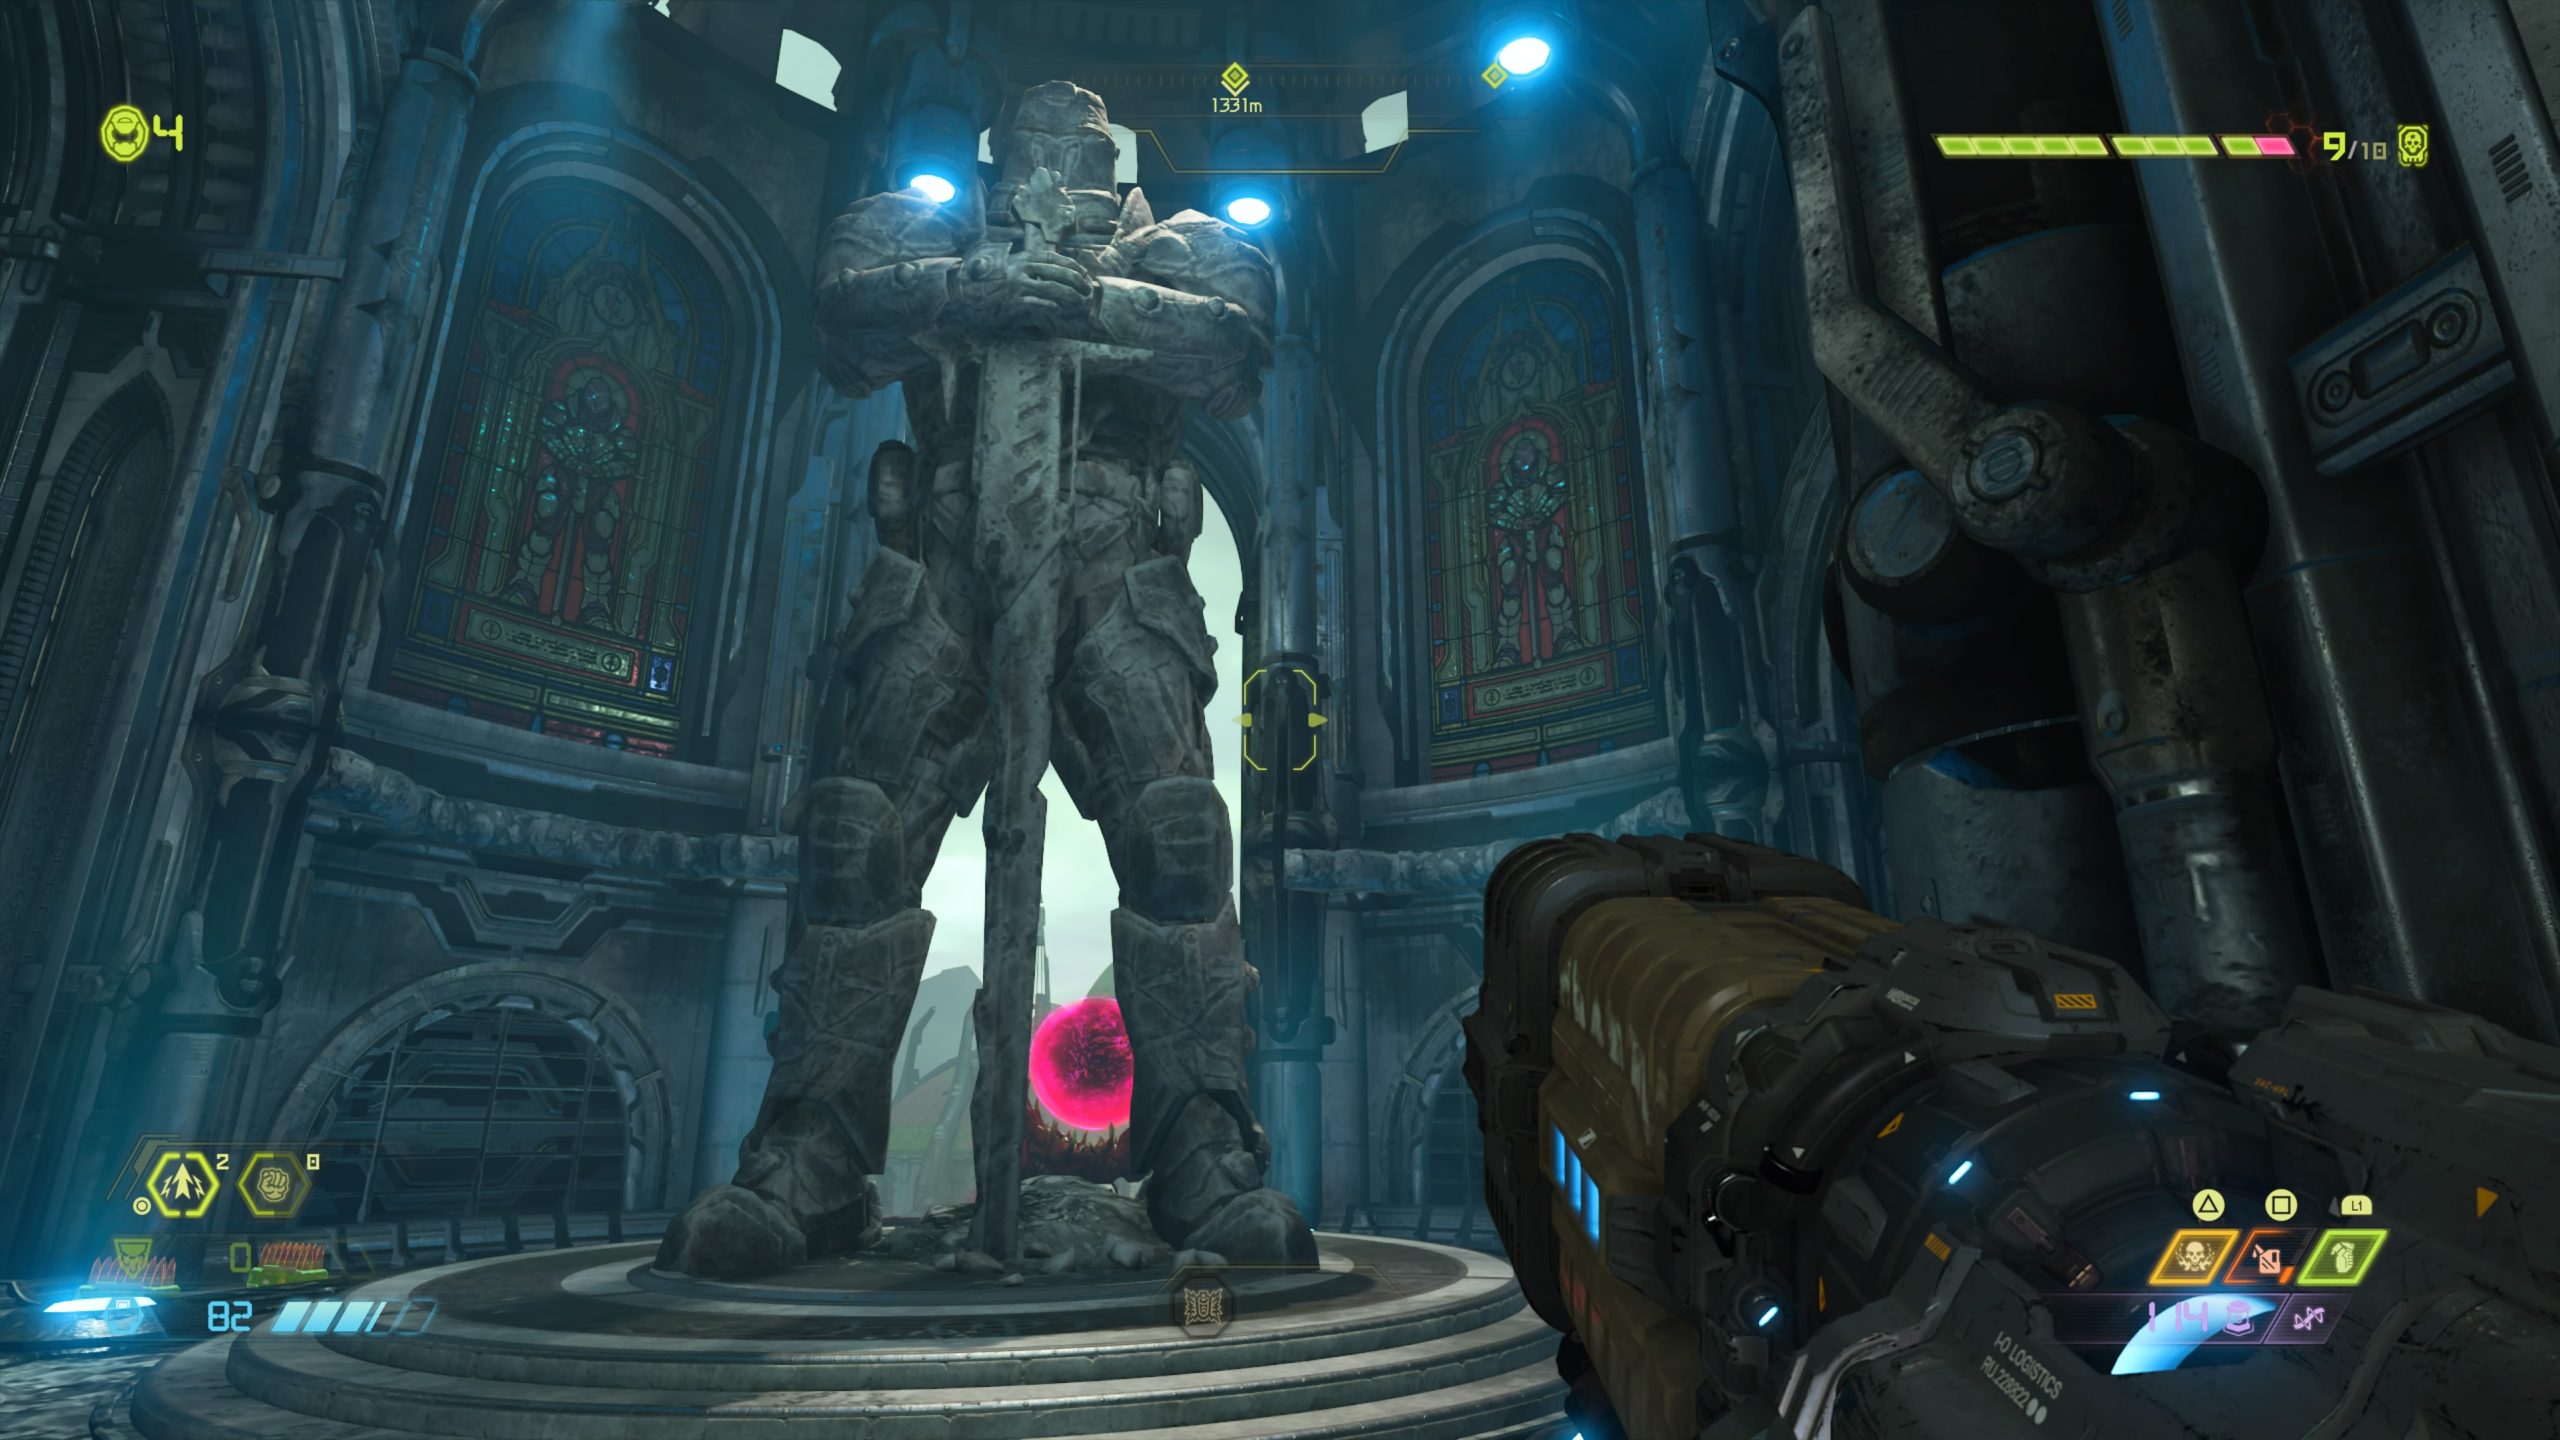
The secret encounter is located at the base of the giant sentinel robot holding the spear.


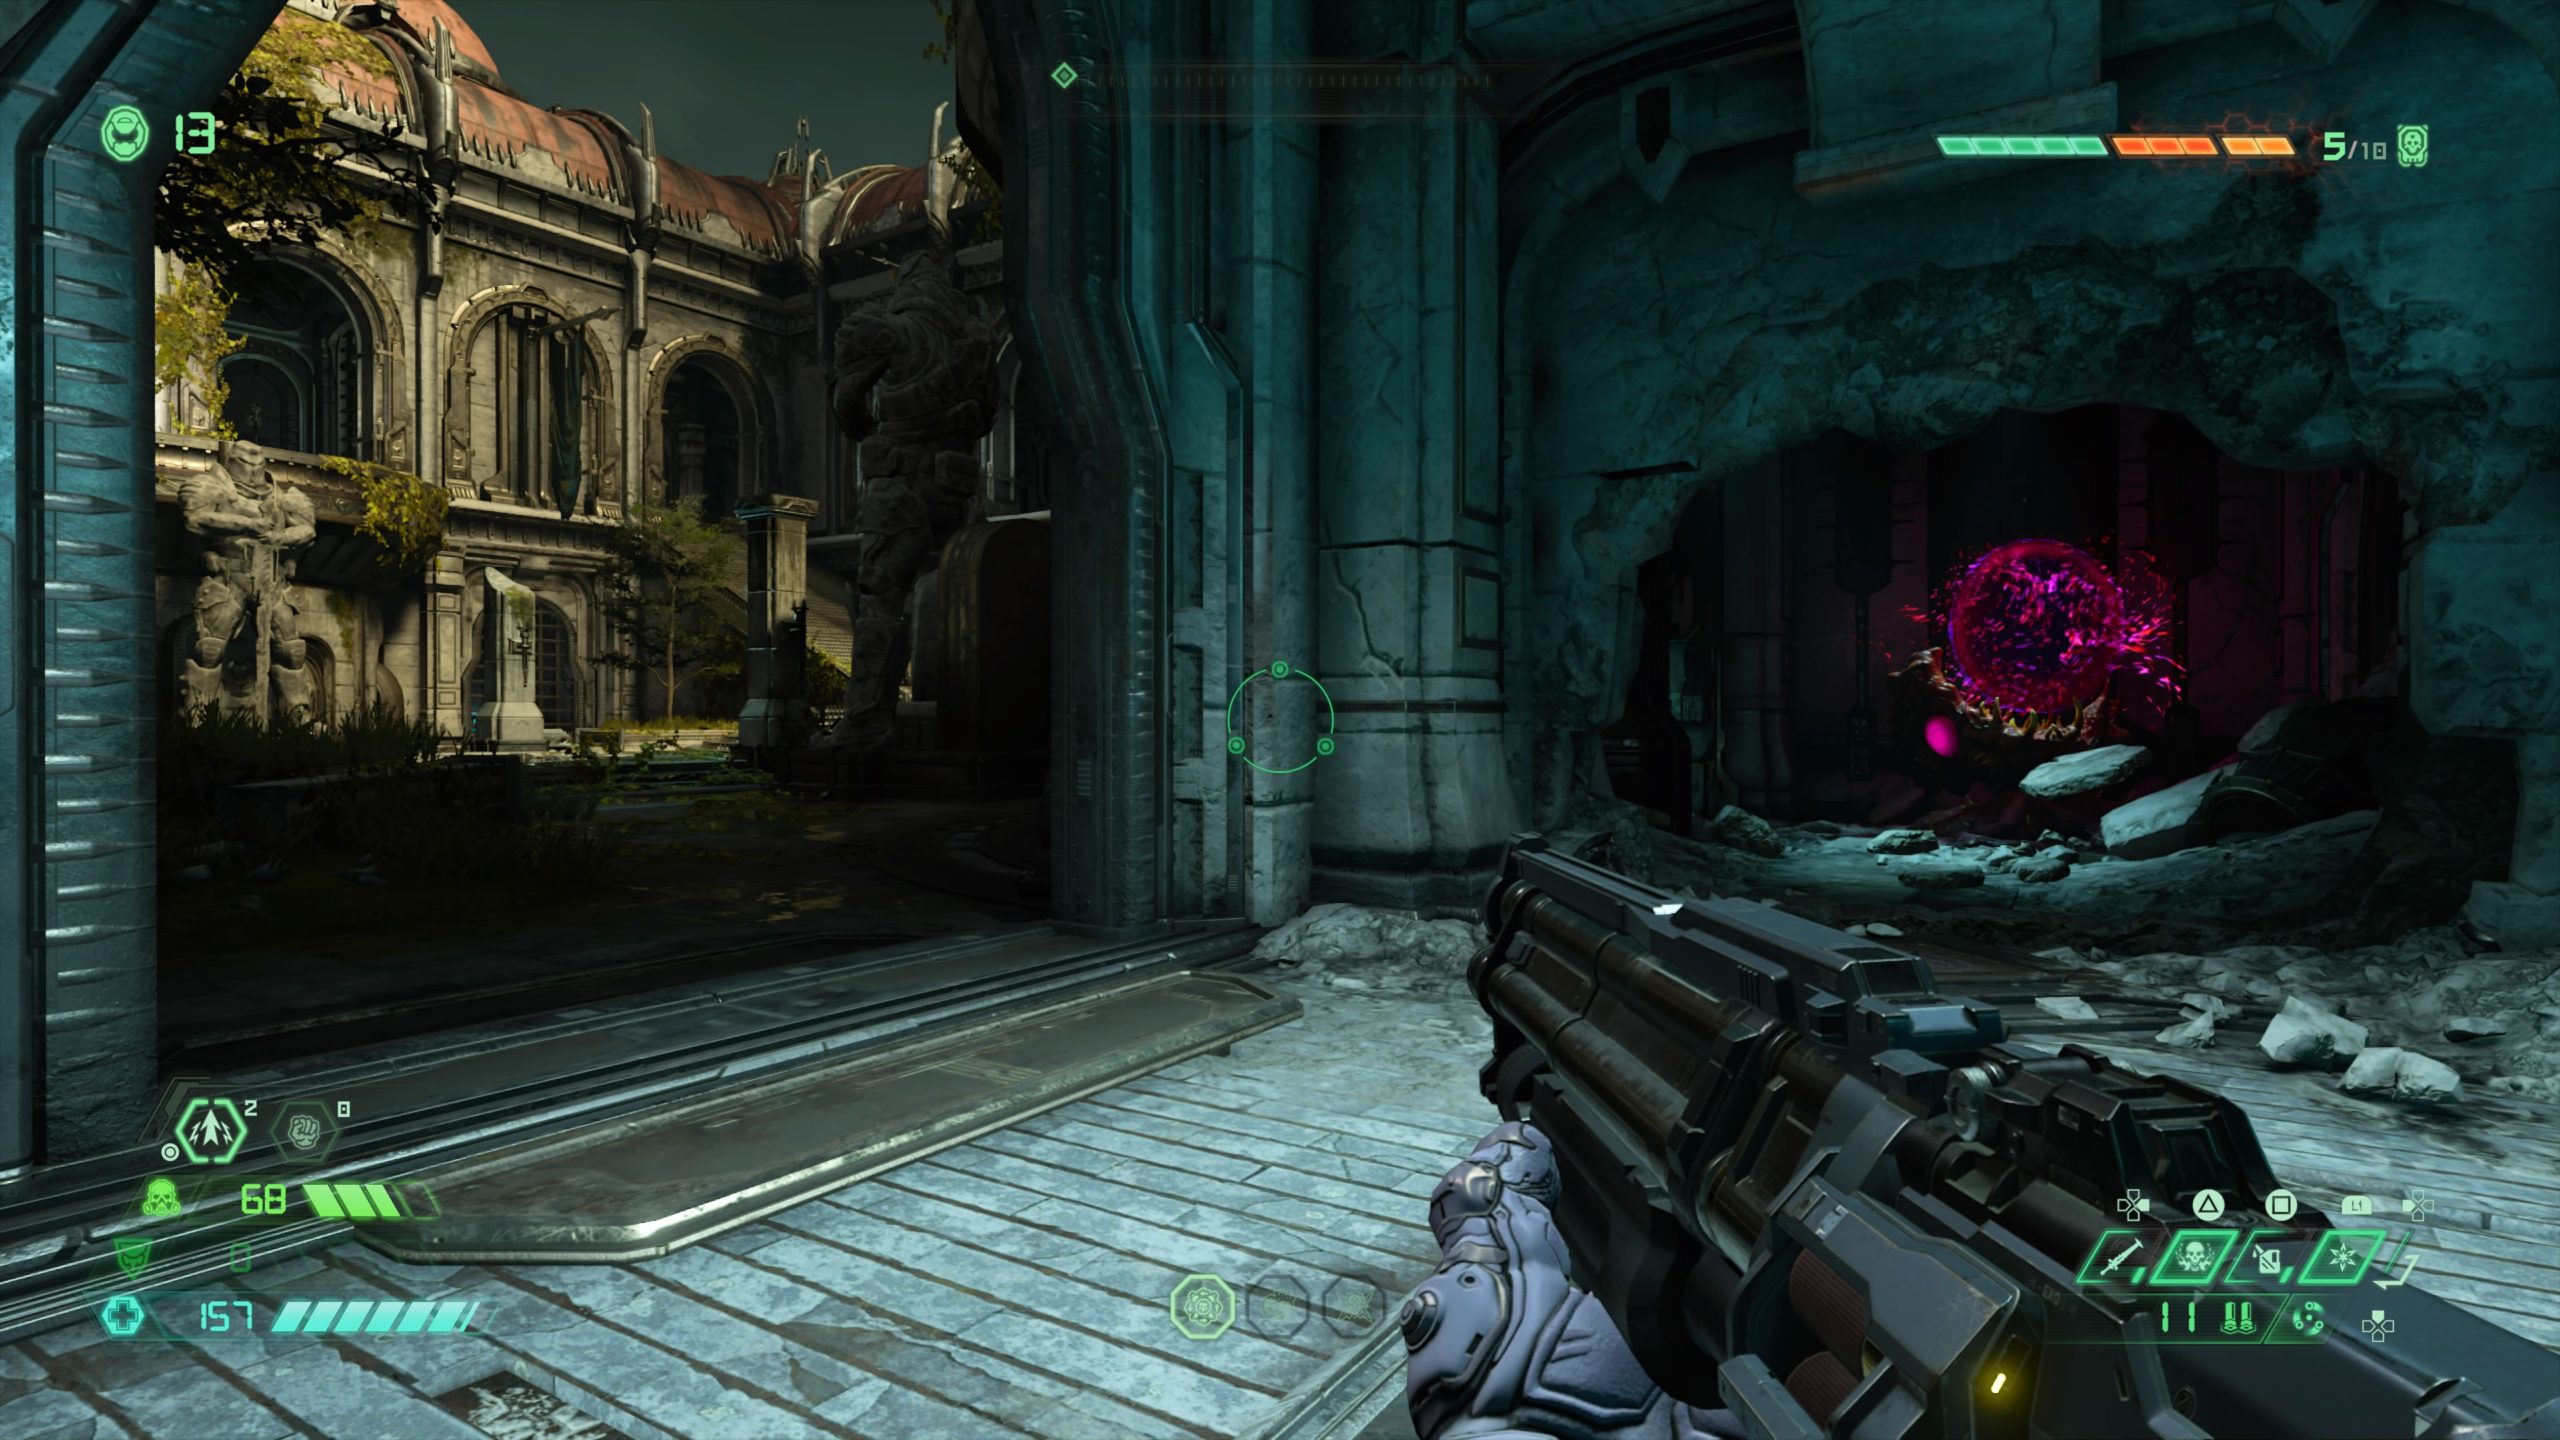
Mission 3: Cultist Base

Cultist Base (Travel Point – Basilica of Adjuration)

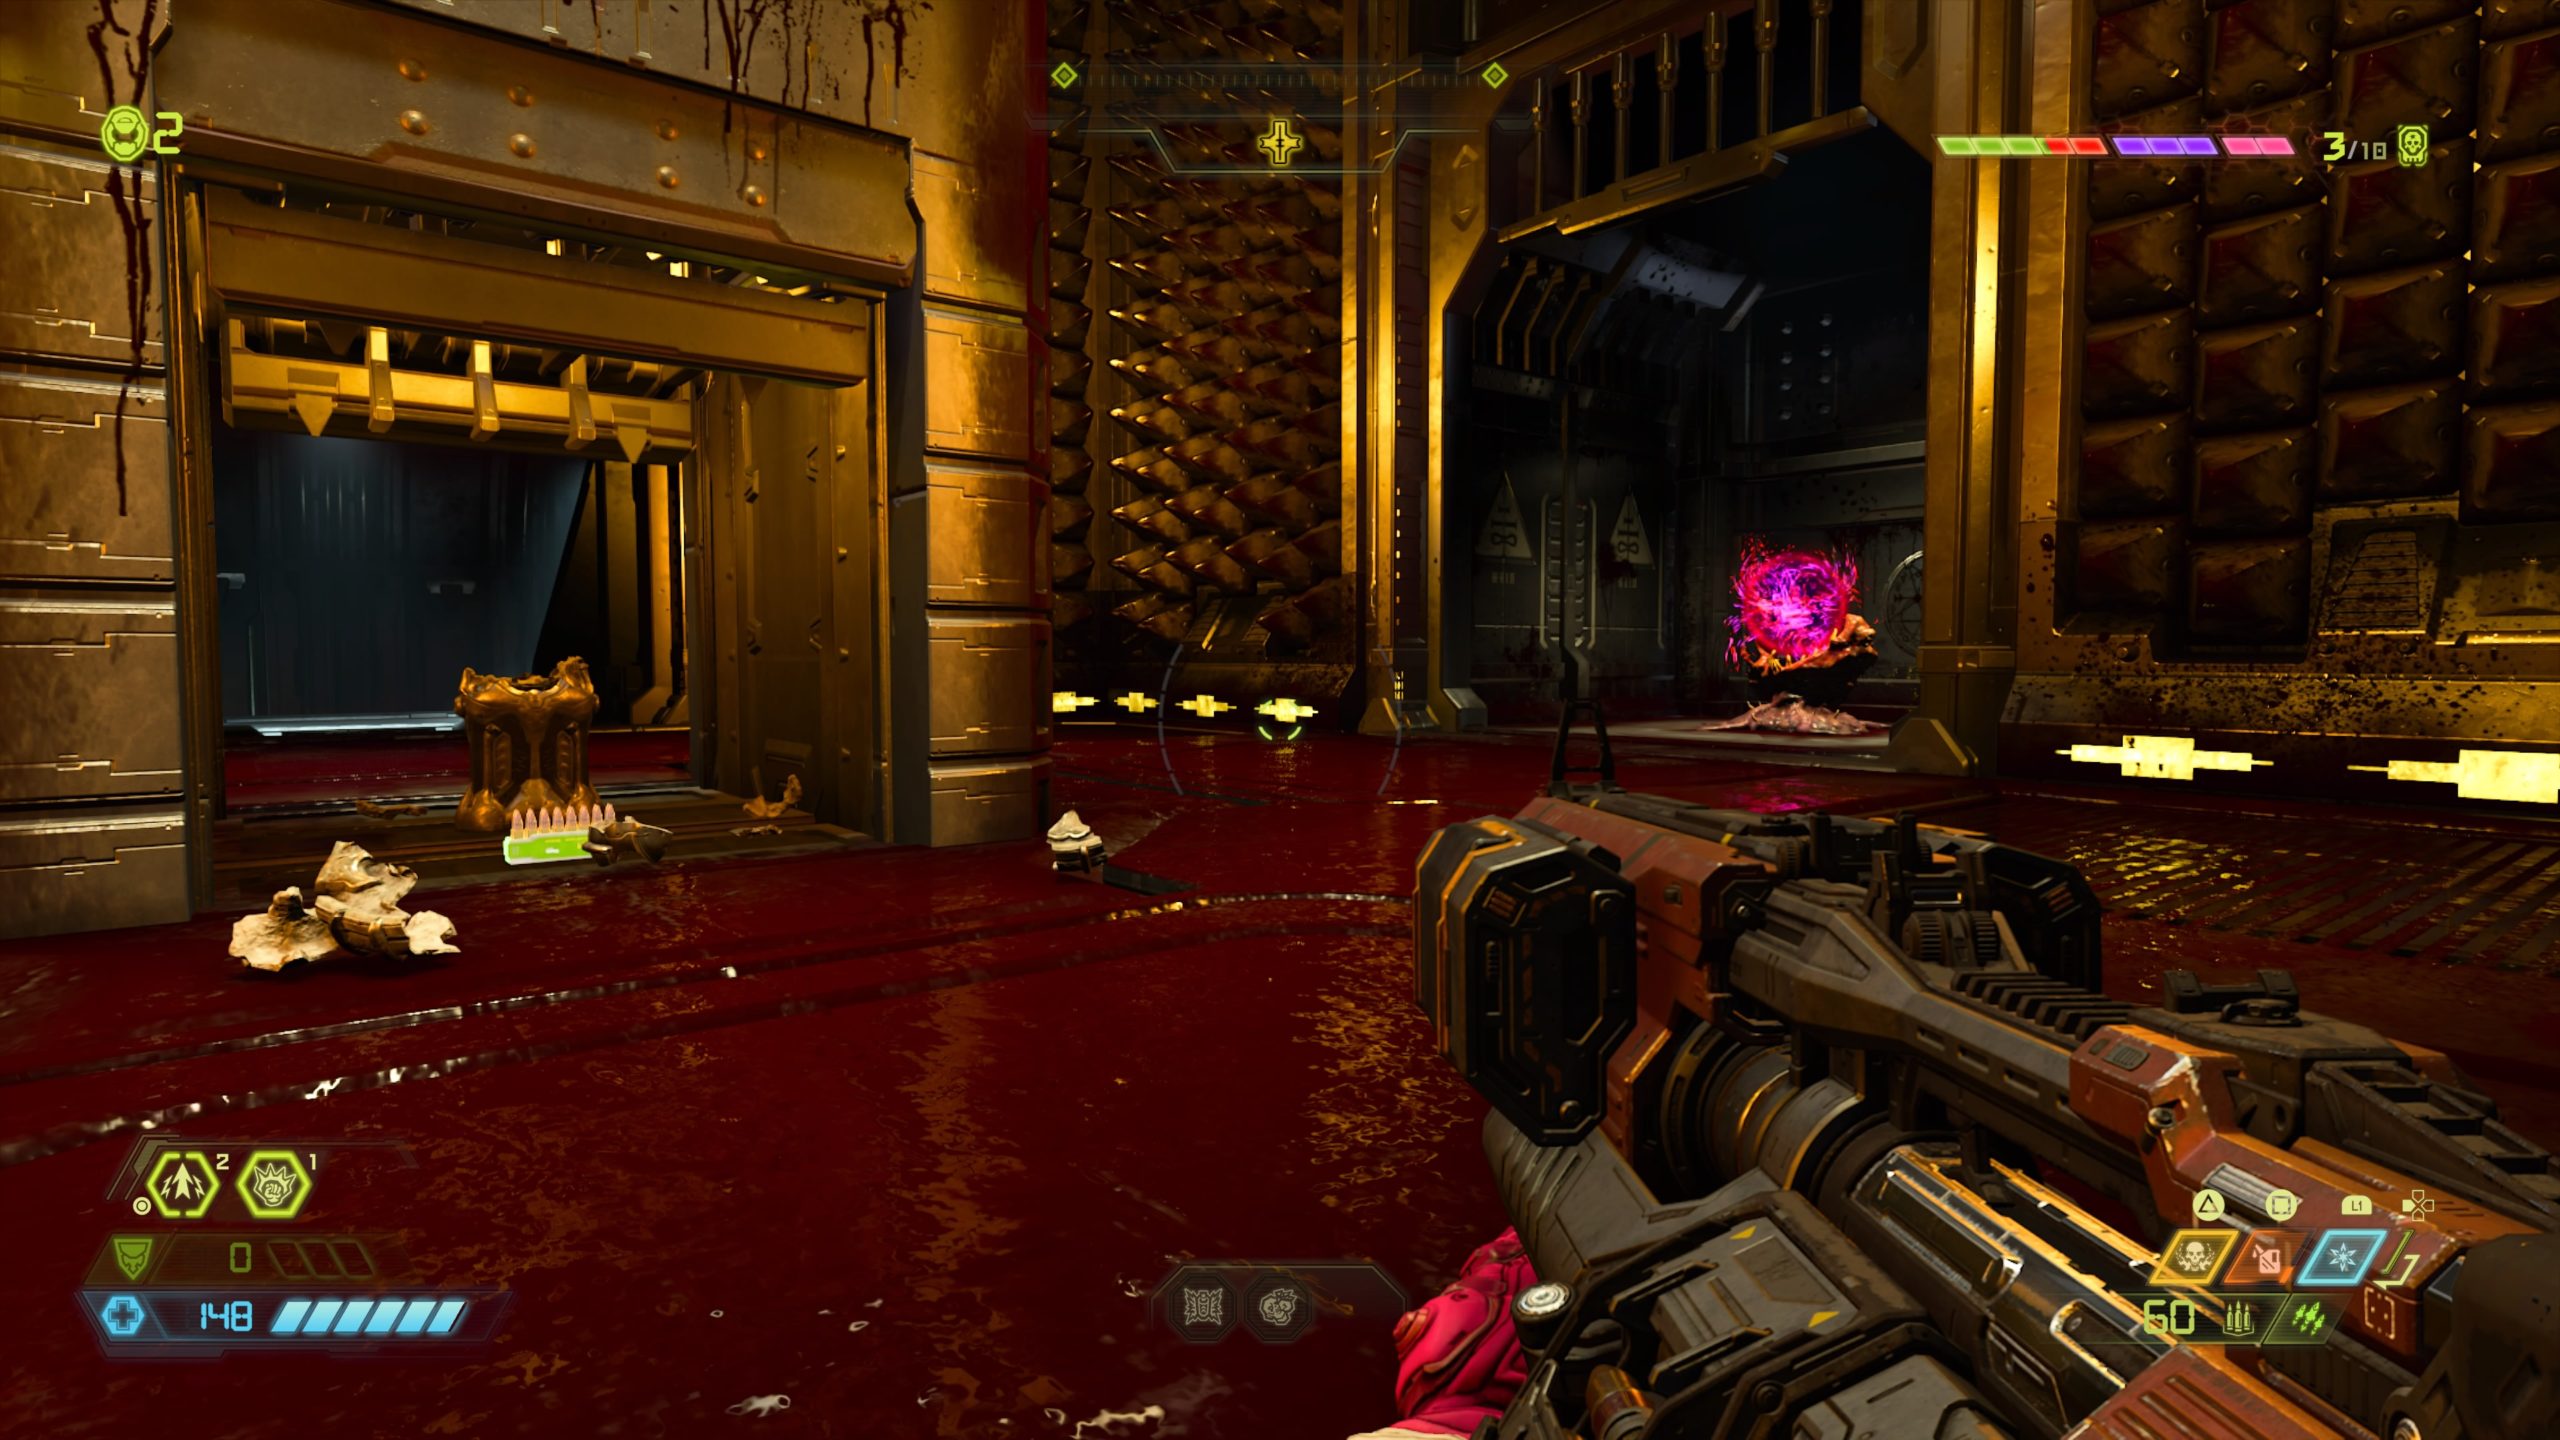
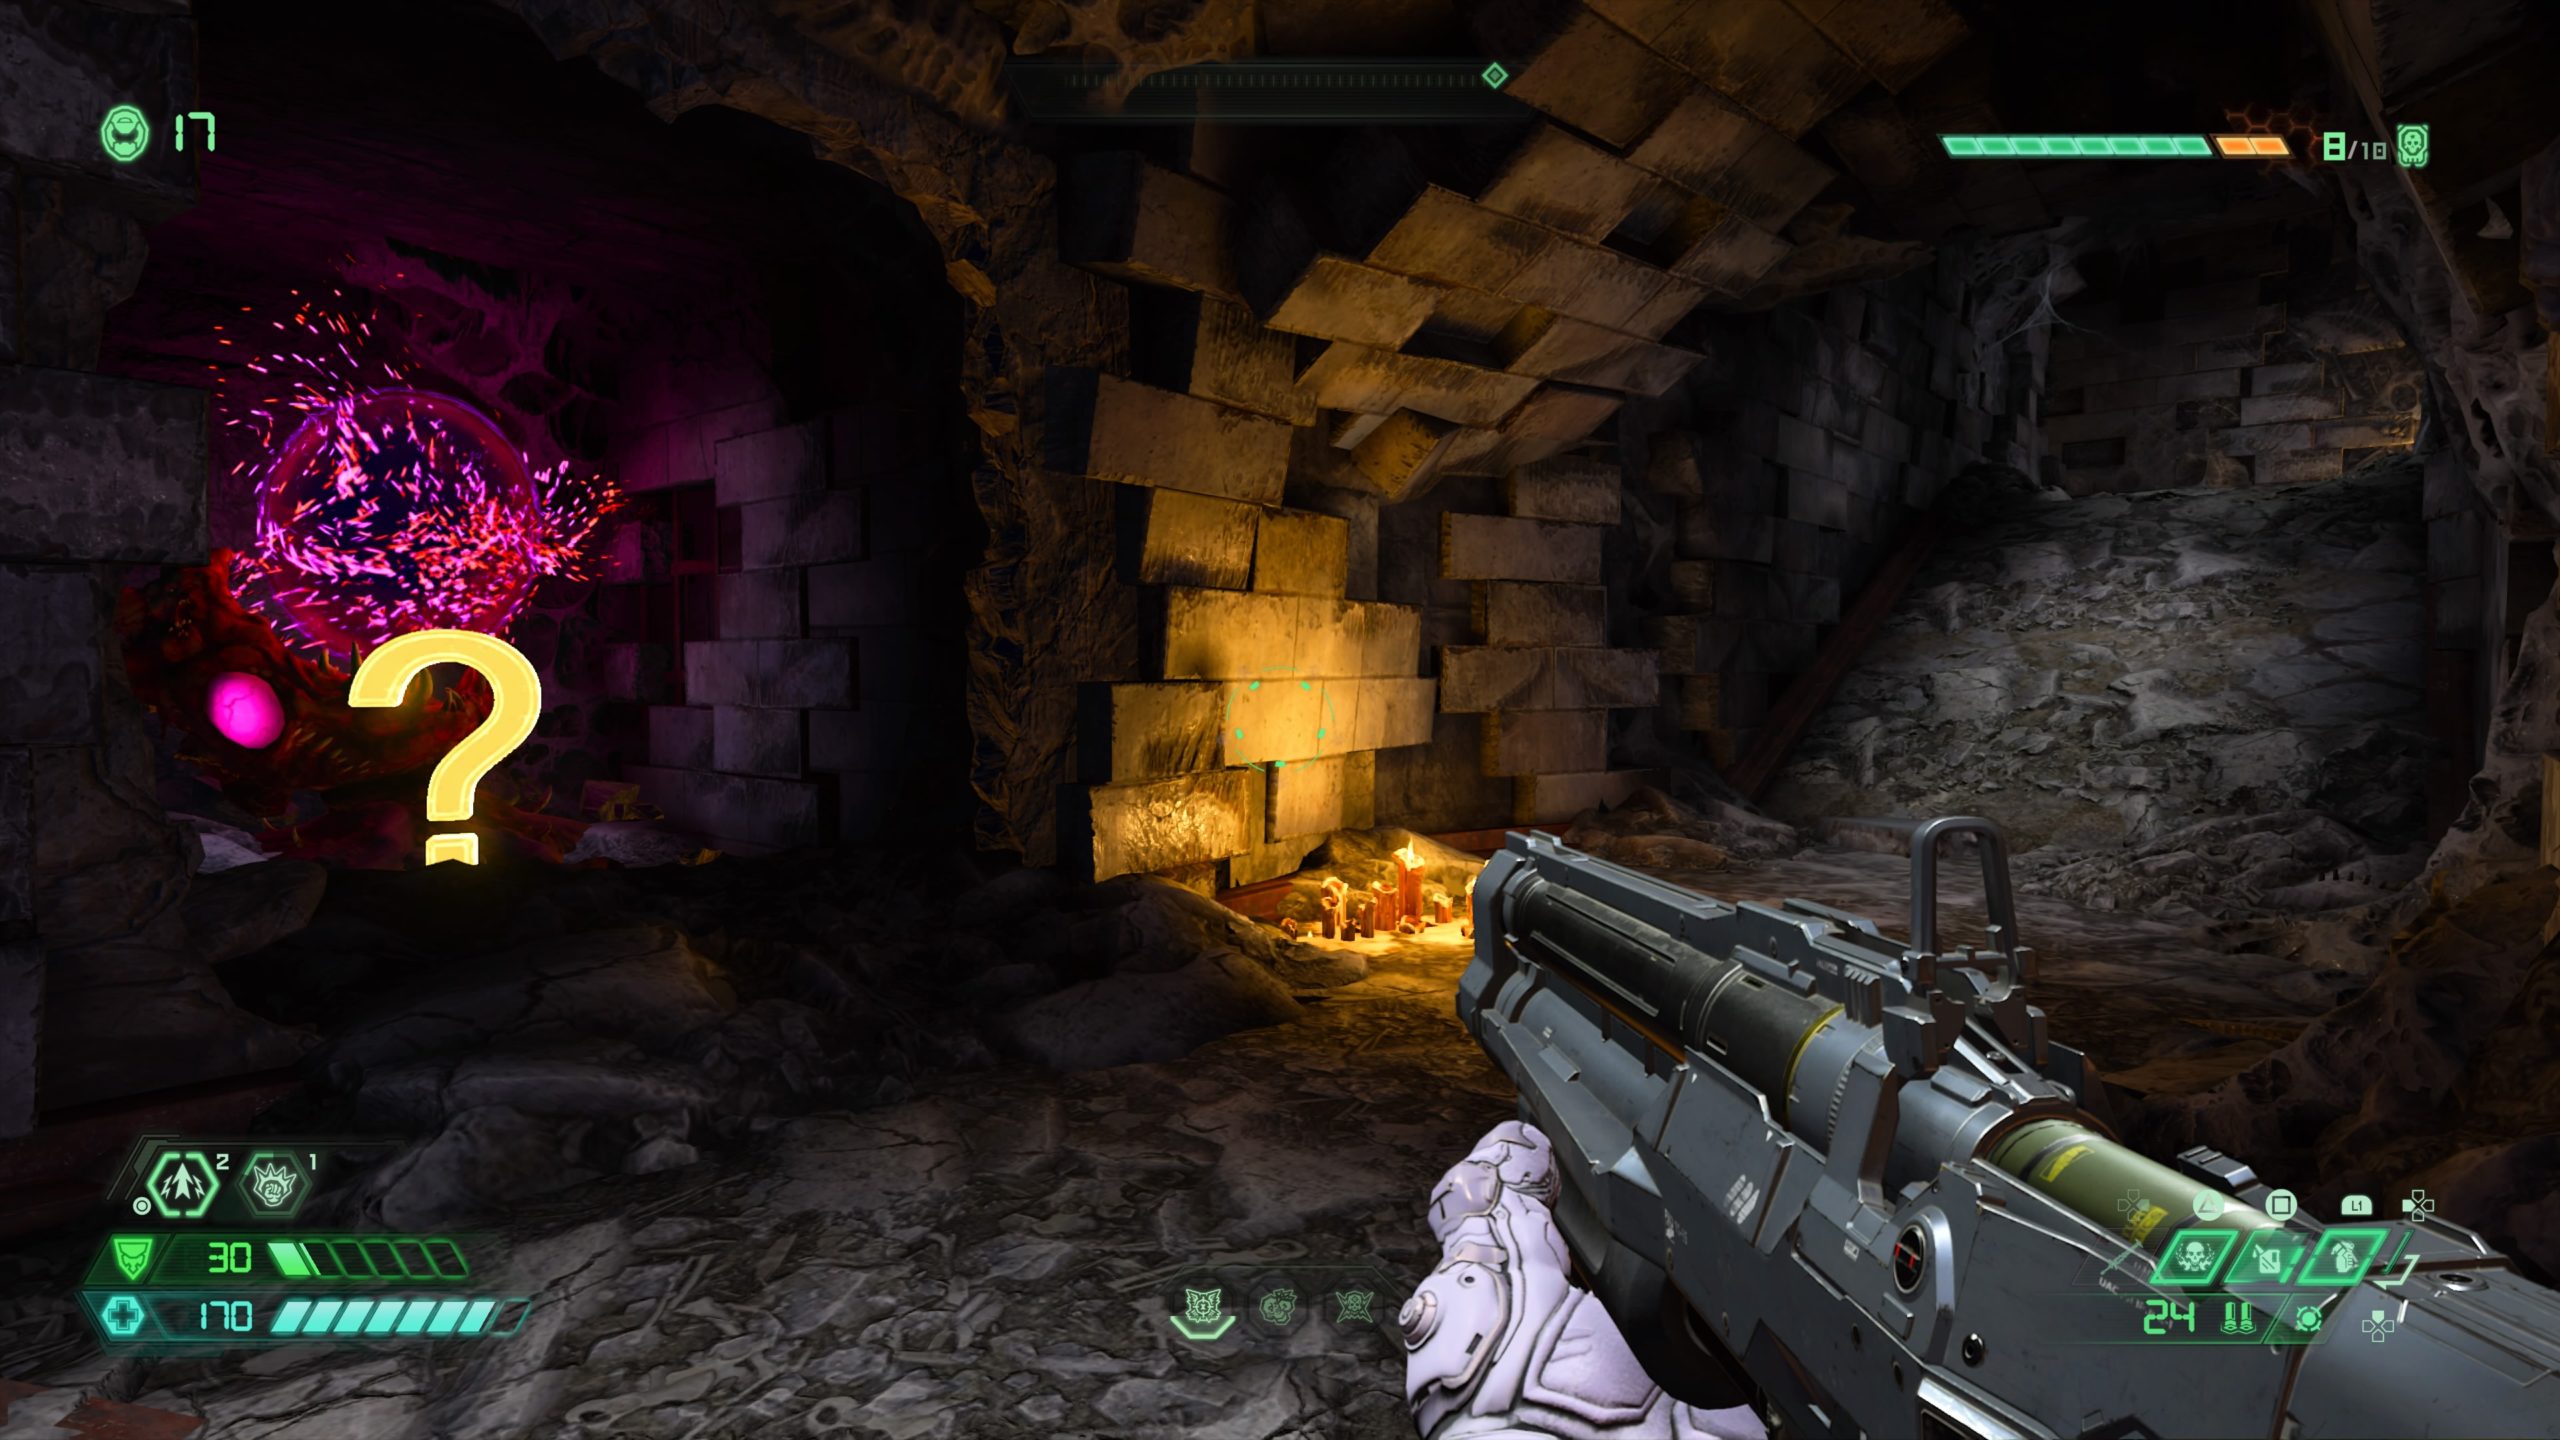
You’ll come across this encounter during the Obtain your Super Shotgun objective. To reach it, you will need to look for the room with the Automap Station to find a moat of red stuff. Wall jump through the moat without touching the red then climb up the wall at the end to reach a metal platform containing a skull switch. Use the switch to gain access to the encounter.


Cultist Base (Travel Point – Forge of Transfiguration)

After the guillotine hallway, you’ll reach a circular room with a skull slab in the middle. Head forward until you get to the two pillars with four climbable walls. Use them to climb to the very top. Once at the top climb up a ledge then take a right down a narrow tunnel. At the bottom, turn left and melee the cracked wall to reveal the secret encounter.


Mission 5: Super Gore Nest

Upper Area (Travel Point – Star Mall)

From the fast travel point, head to the center of the room with the moving gunk press. Head past the press and use the green portal to arrive in a gunk covered room. Head to the side of the room with three openings behind you. Take the right ramp up and turn right at the top to find the secret encounter.


Lower Area (Travel Point: Toxin Refinery)

From the fast travel point, head forward, jumping over the moat of toxic liquid, then head through a teeth covered doorway. This will bring you to a room filled with toxic waterfalls and fire cannon balls. Look to the right to spot a climbable wall. Use this wall to reach a platform the next level down. The secret encounter will be located on this platform.


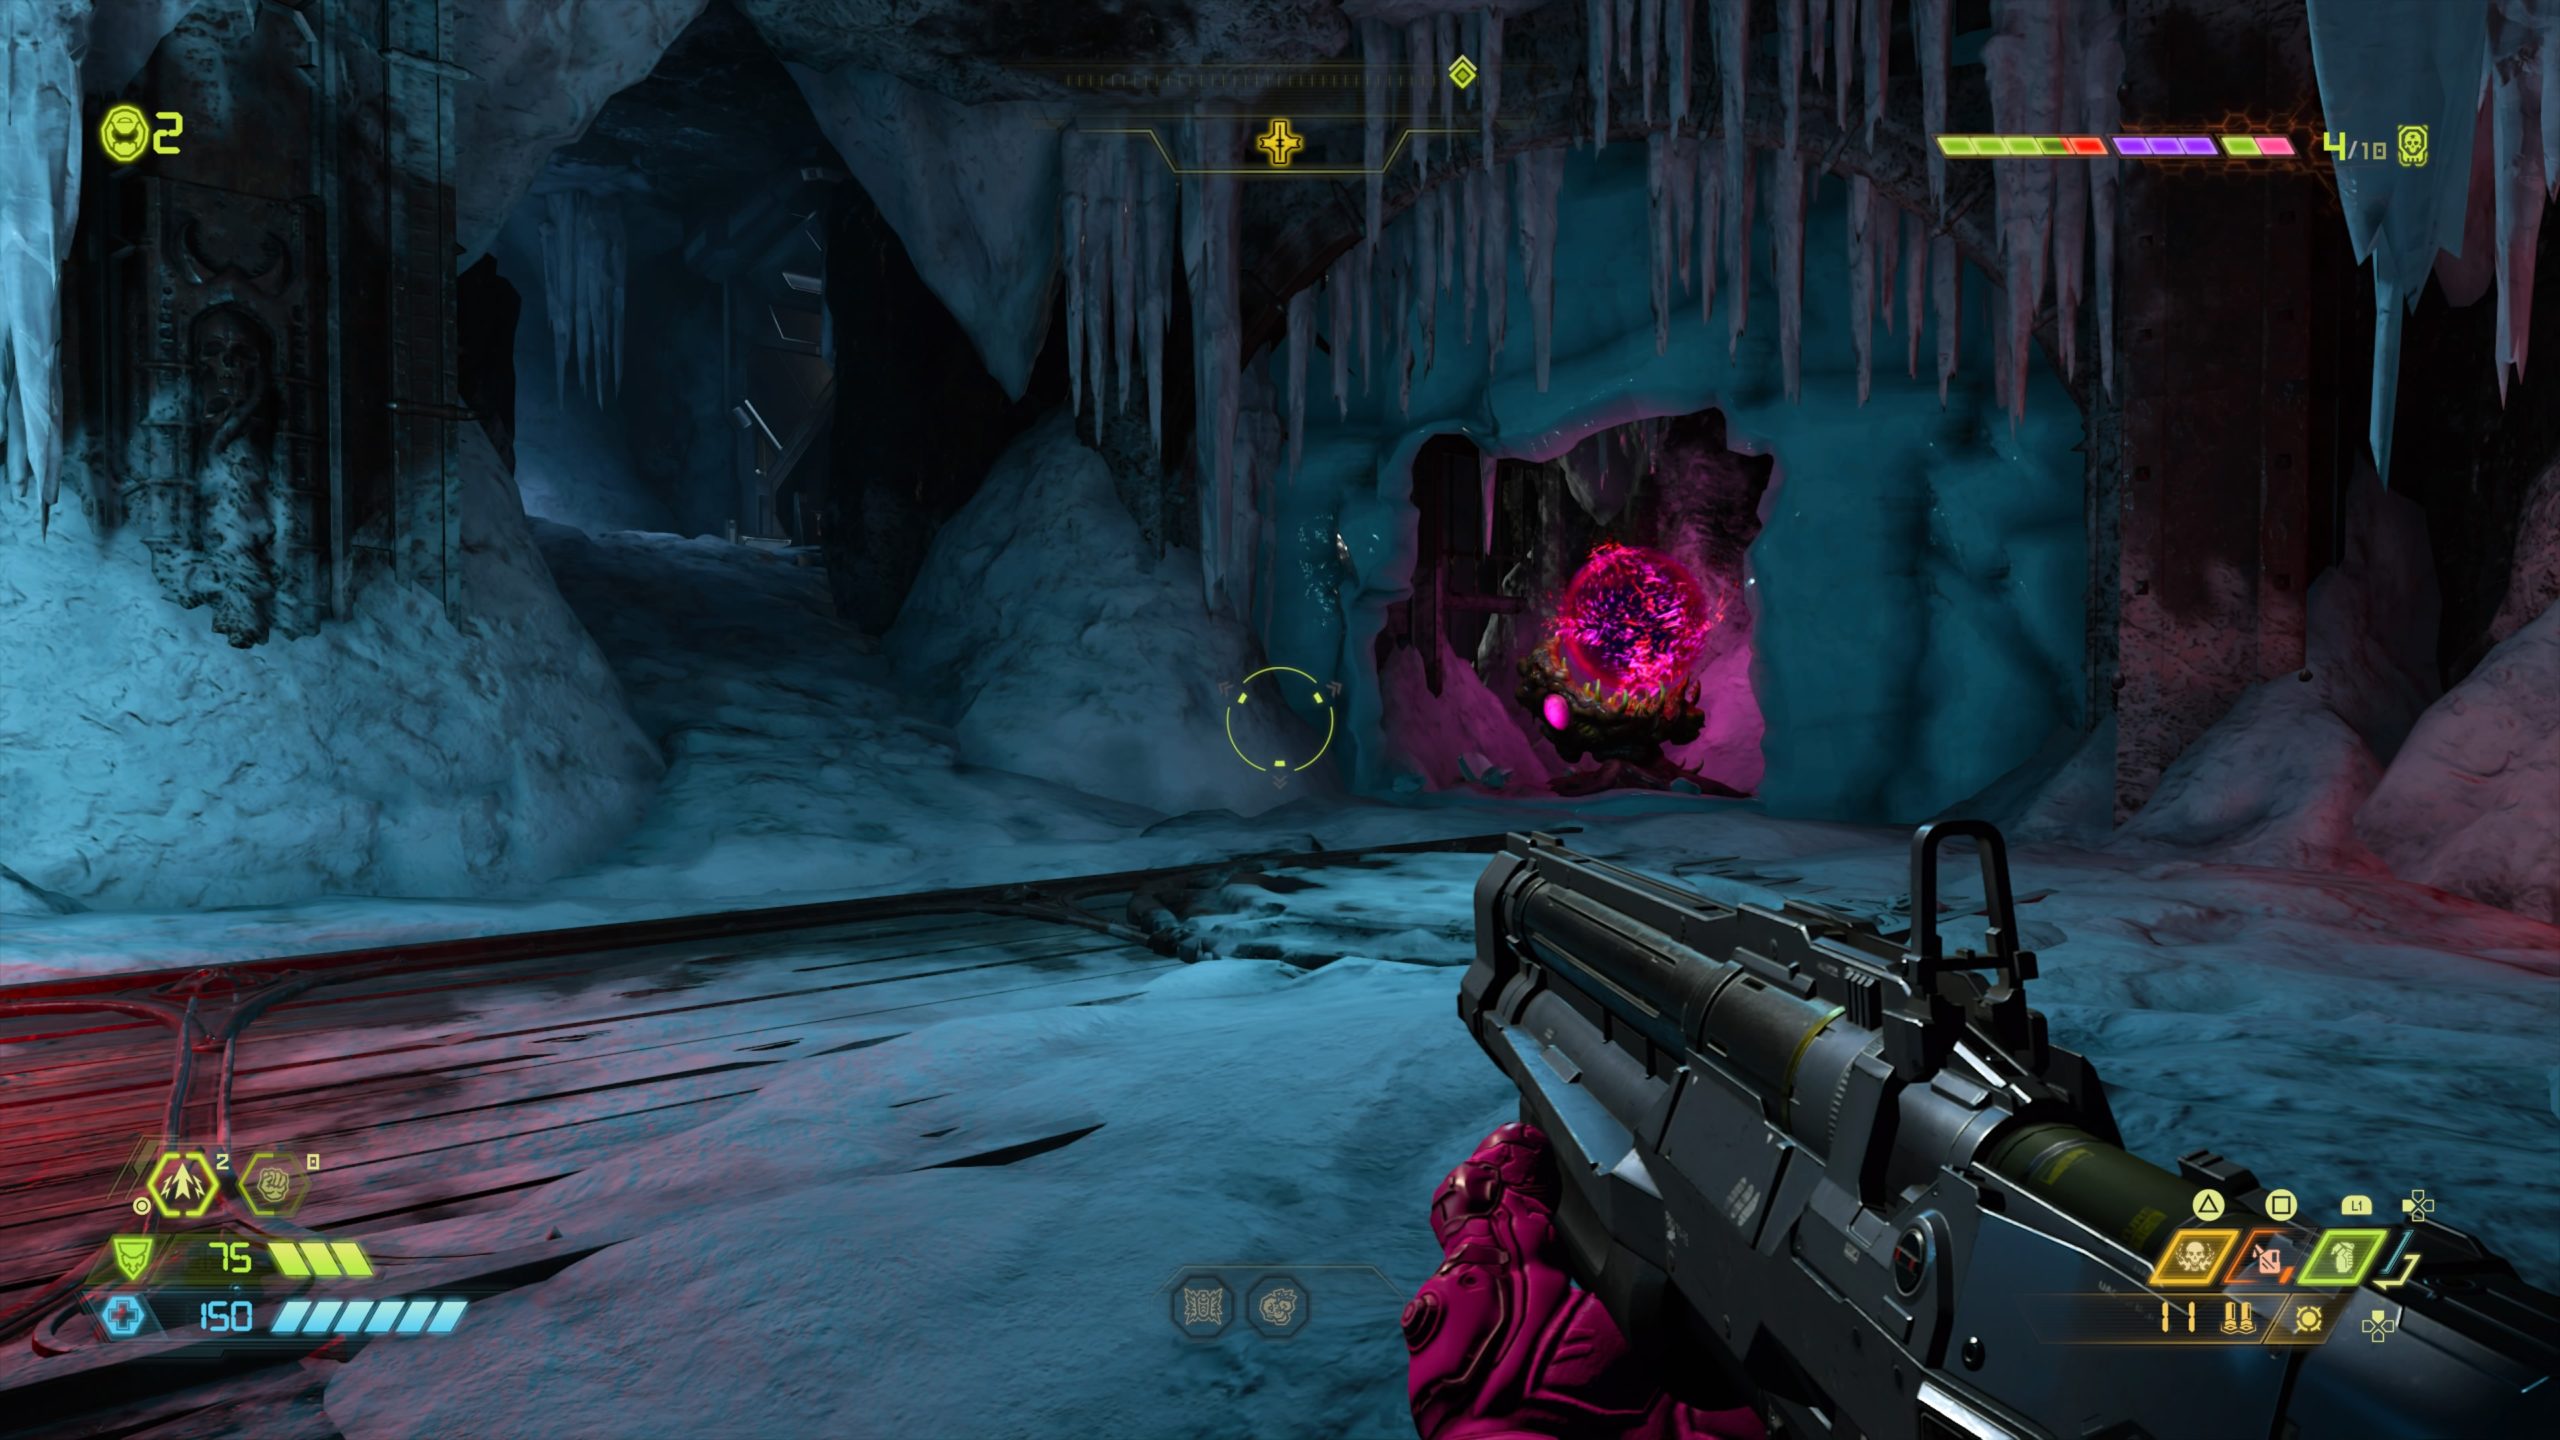
Mission 6: Arc Complex

The Waste Tunnels

From the fast travel point, head down the purple gunk filled tunnel and drop down into the room below. Climb on the platform a short distance away and use the gold spin bar and dashes to reach the platform in the corner of the room. Jump to the tunnel across from the platform and follow it to the end. Dodge the electric spikes along the way to eventually end up at an elevator. Take it up then exit the elevator to find yourself in another hallway. Follow it right dodging more electric spikes ending up at a door. Pass through the door and take a left heading through another door. Drop down the ledge on the right and head to the back of the room to find the secret encounter.

Moring Aeronautics

From the fast travel point, head right into the interior portion of the building to locate a set of stairs. Head up two flights of stairs then take a left. Follow the hallway to the end then jump across the way to the other side to find the secret encounter.


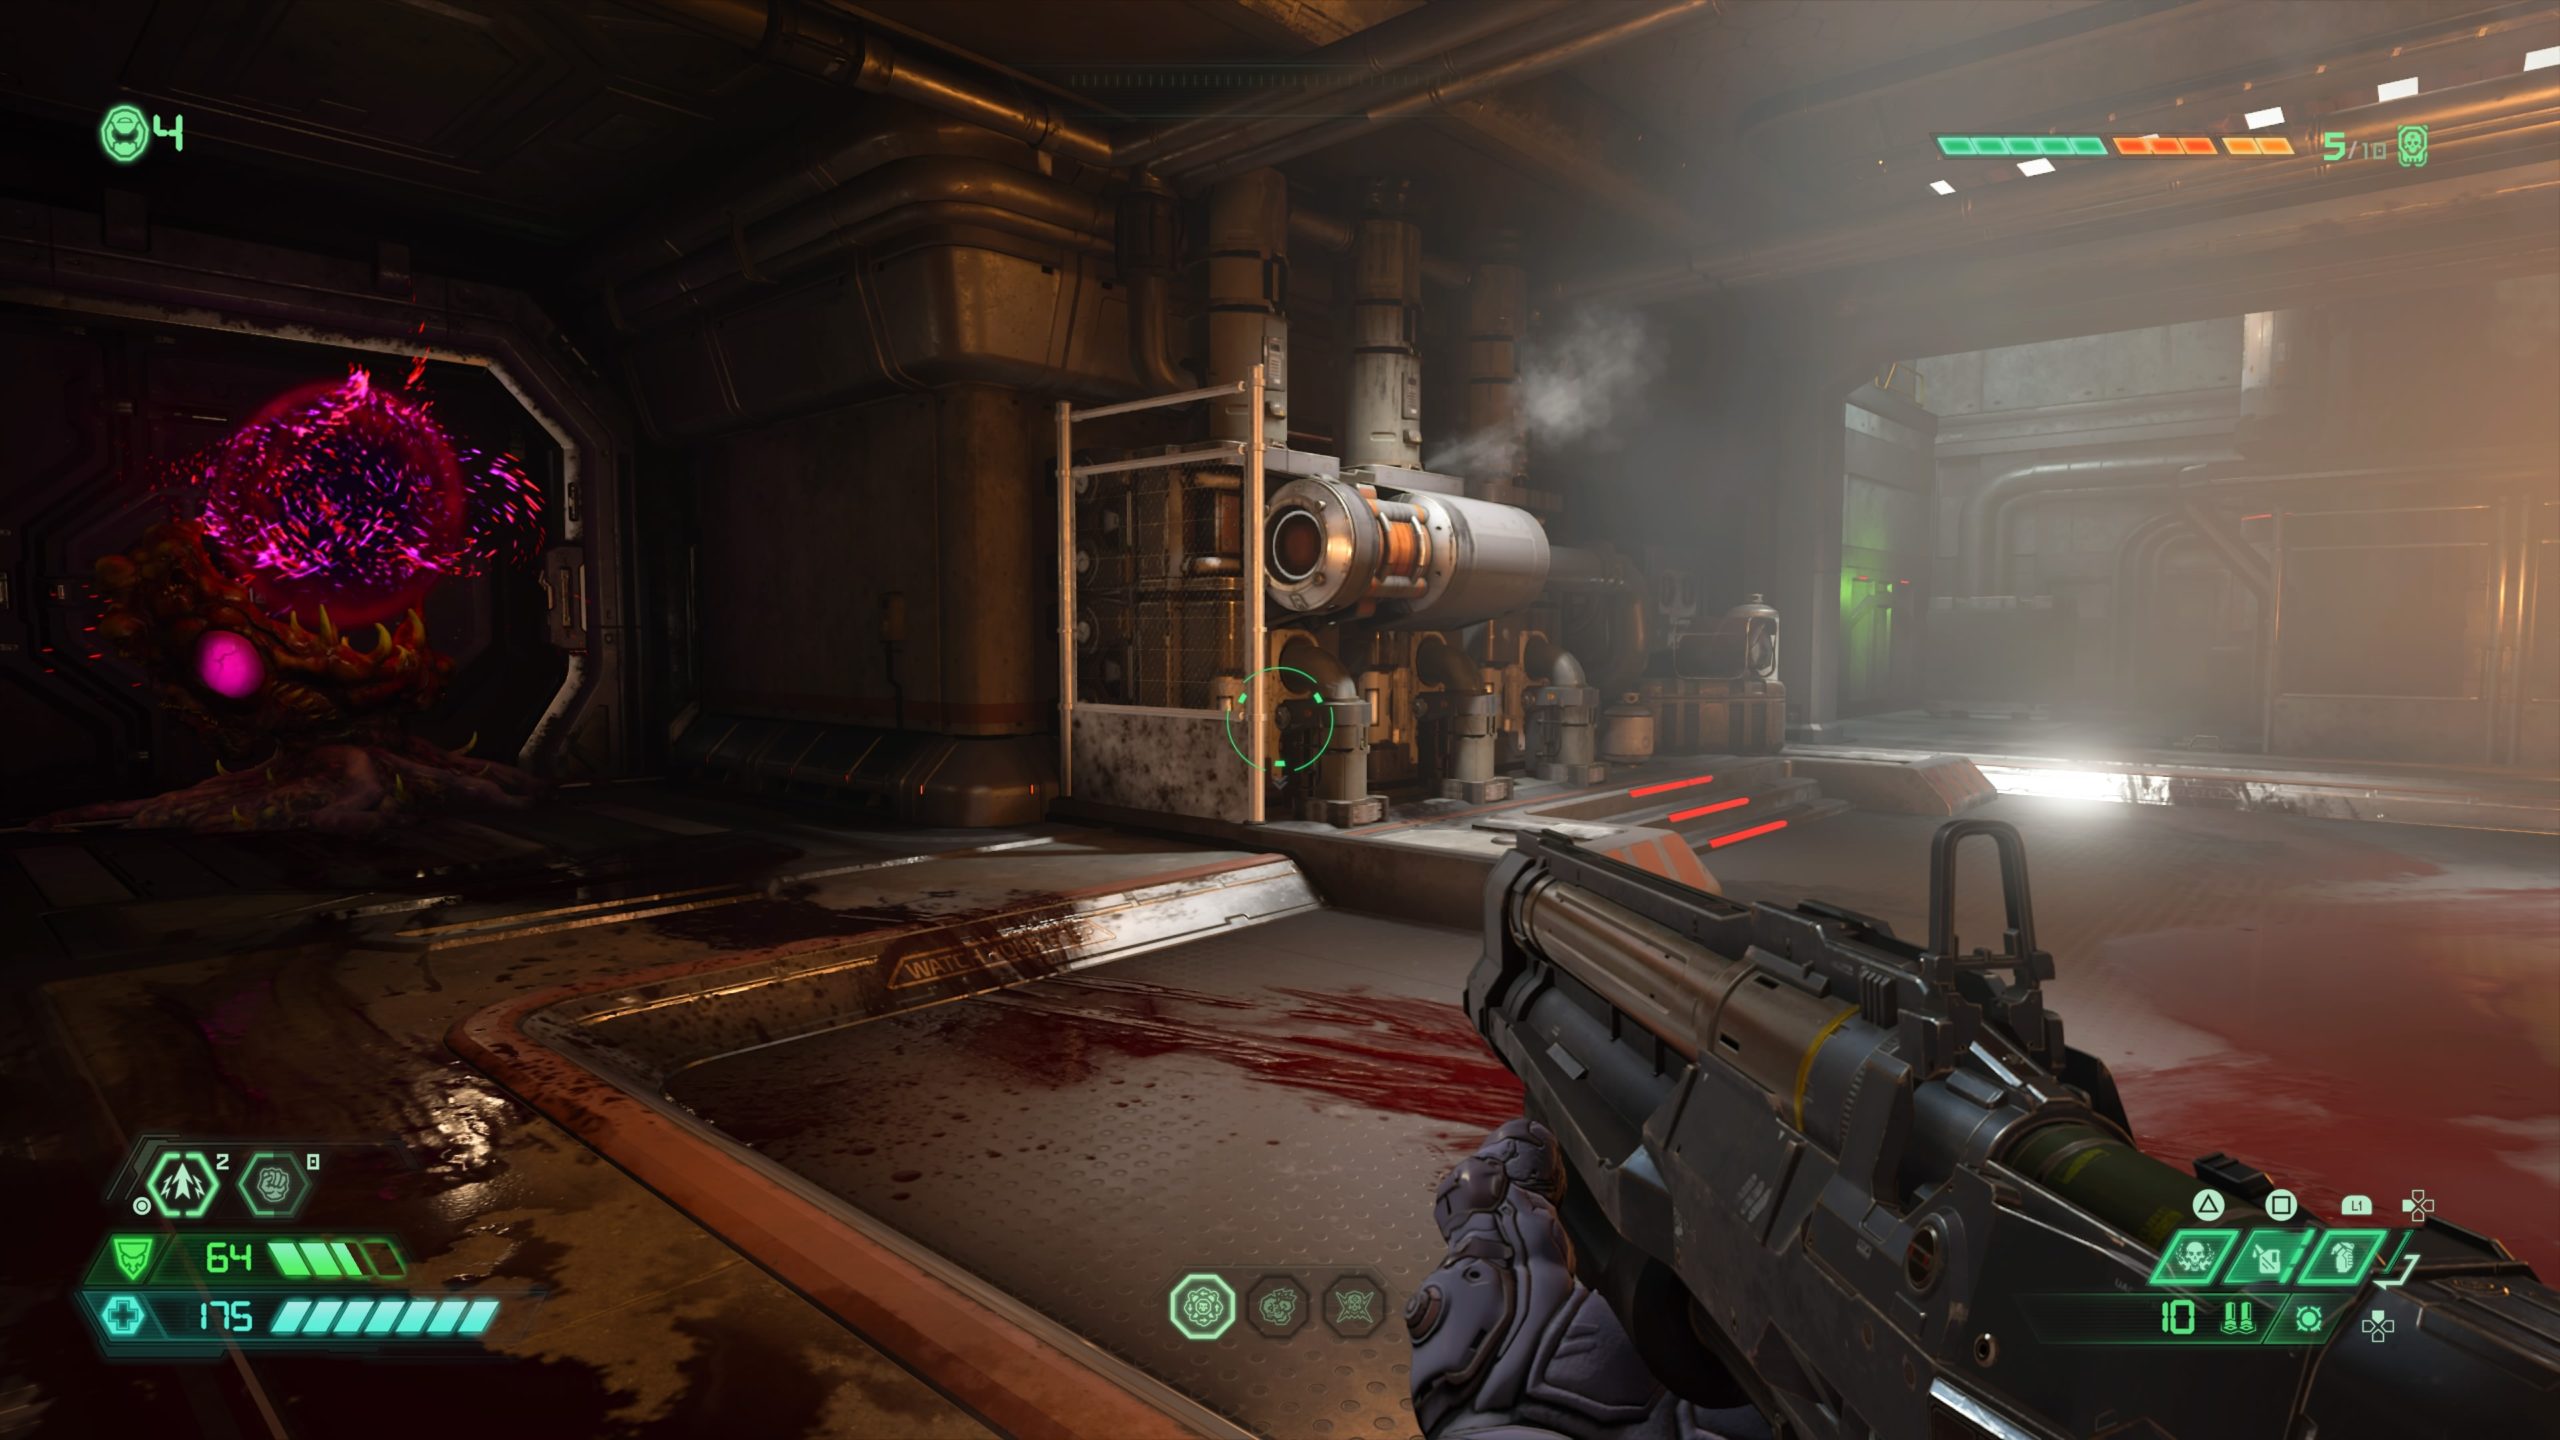
Mission 7: Mars Core

UAC – UAC Outpost LD

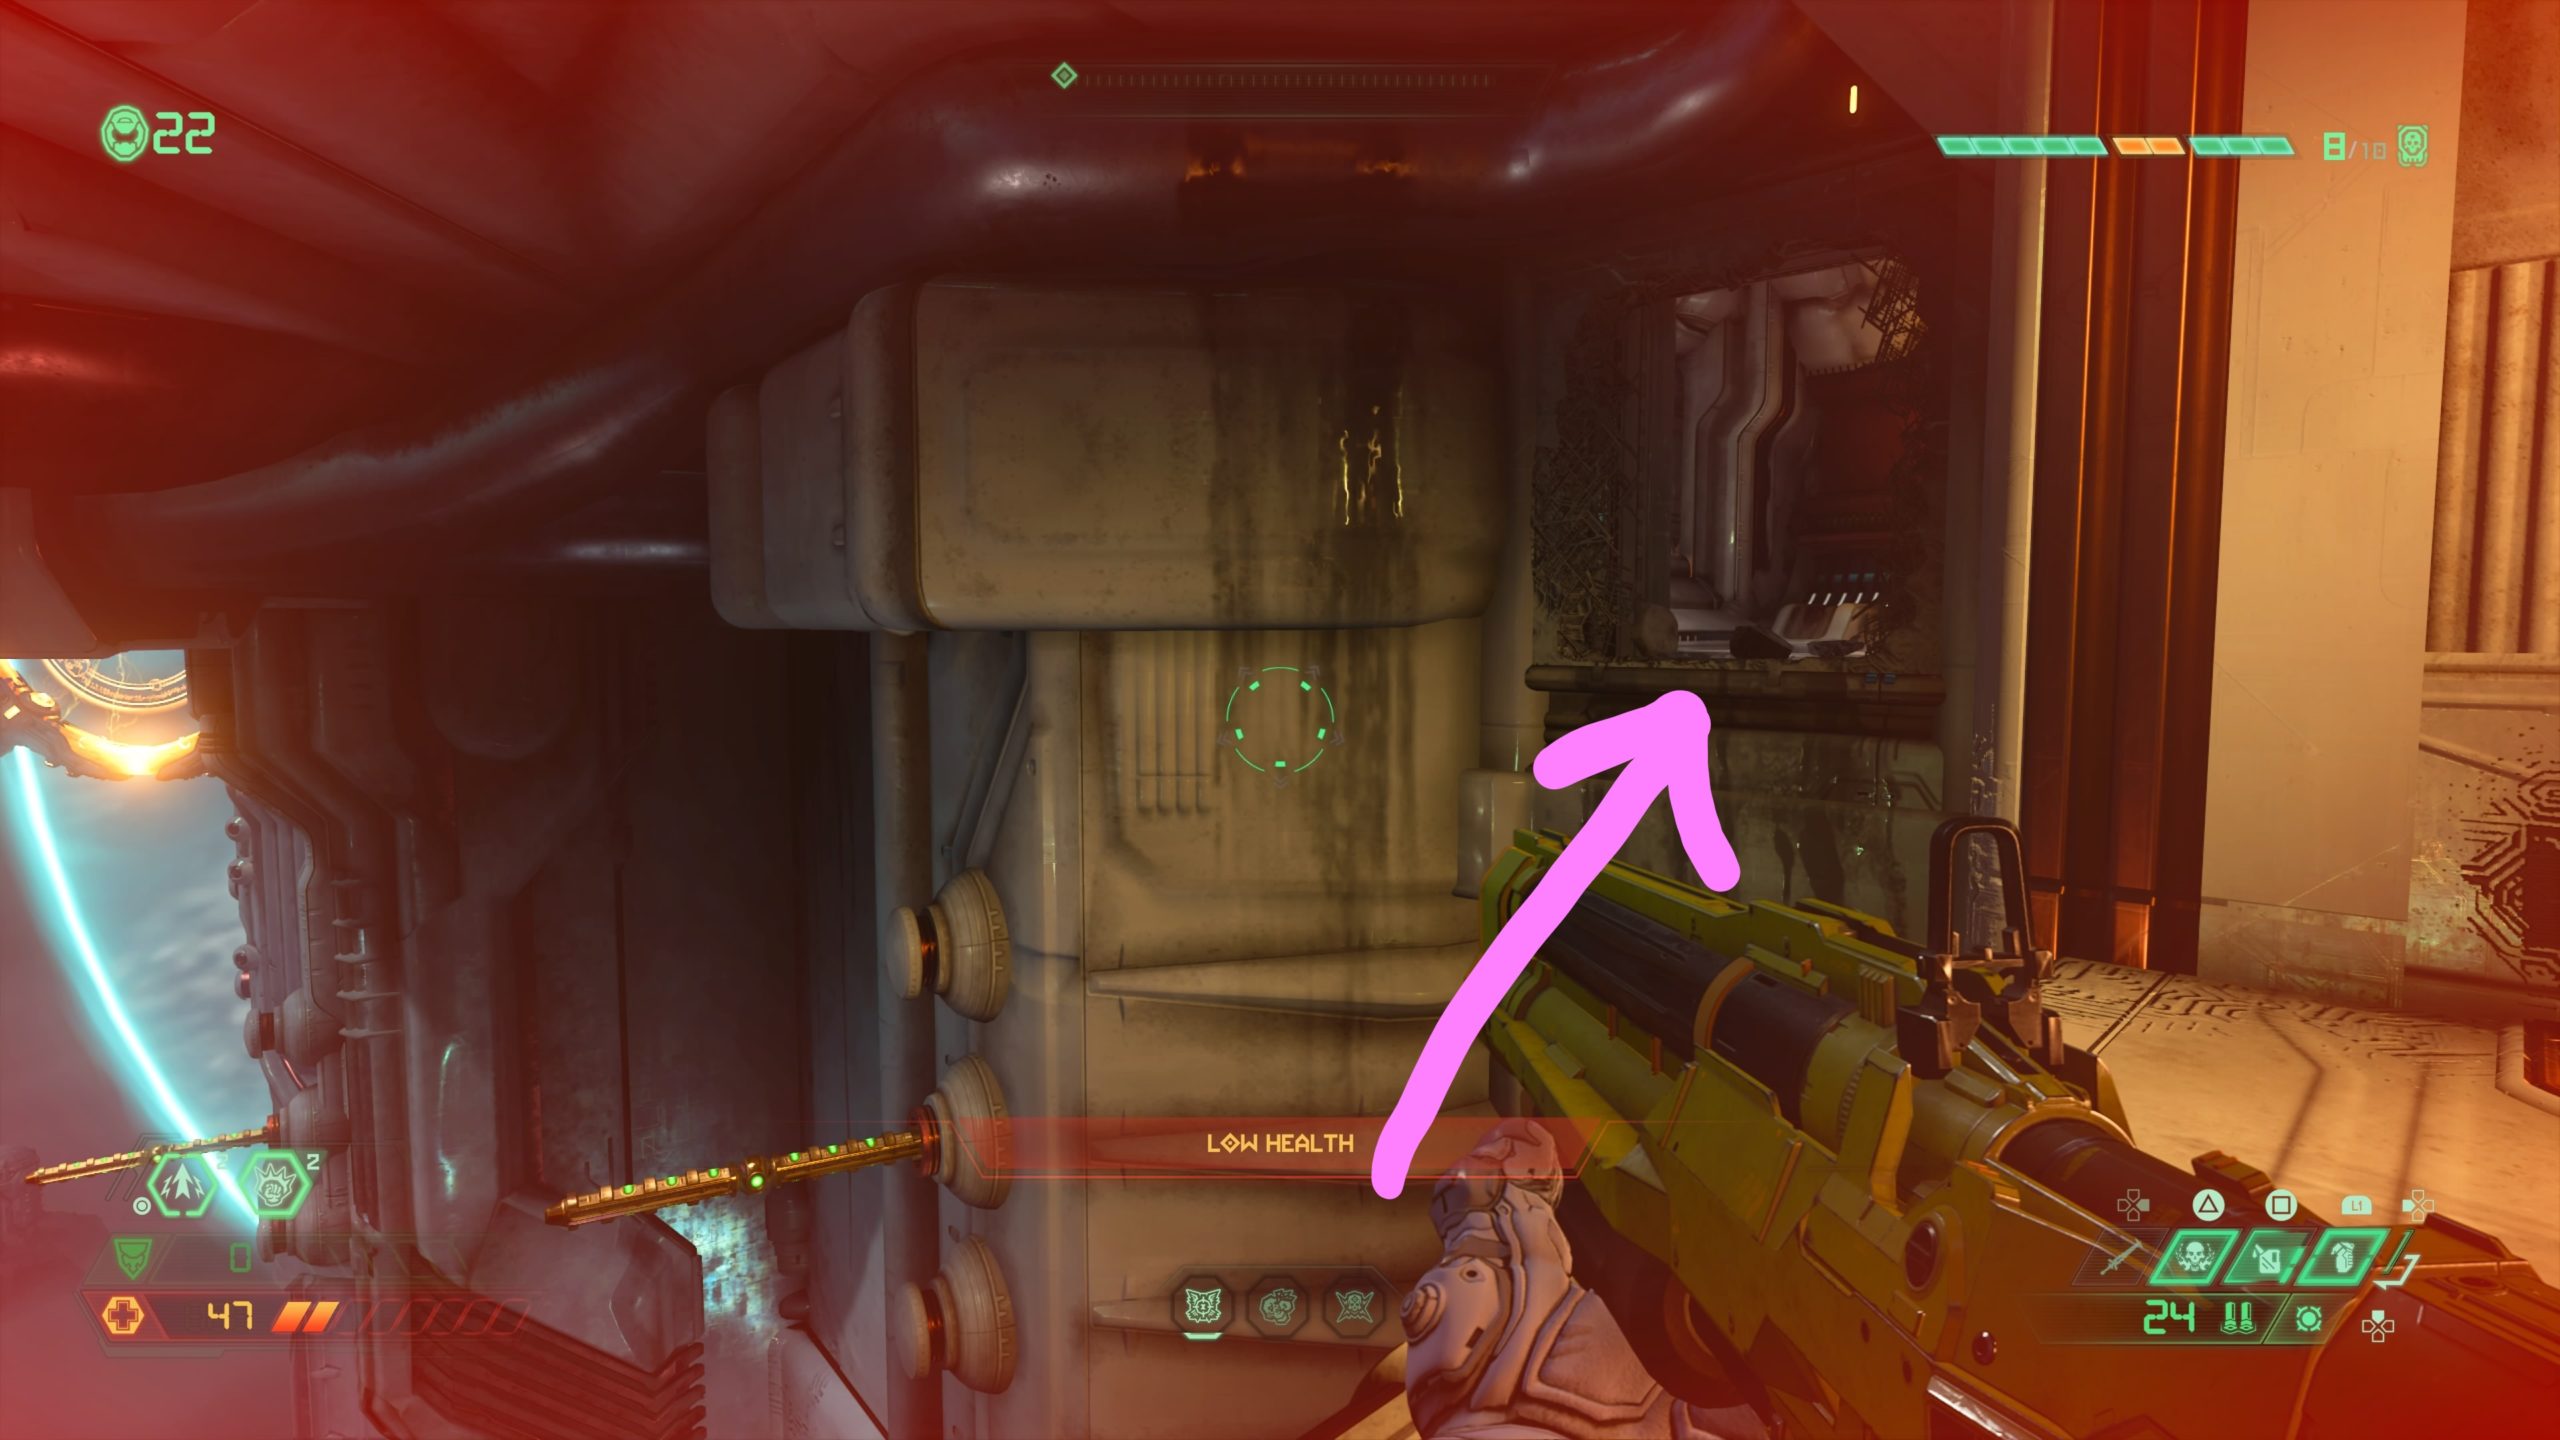
From the fast travel point, drop down onto the platform below and head to the walkway across from the portal near the edge of the platform. Drop down the hole under the walkway to locate the hallway leading further into the level. To the left of it will be a wall with a crack in it. Melee the wall, but don’t head through yet. Look down to the right to see a doorway. Jump to the doorway then climb up the stairs. At the top take a left to spot the secret encounter.


Meteor – Martian Chunks

From the fast travel point, turn around and head through the doorway with “MAINTENANCE 02” written above it. Head to the back of the room and melee the cracked vent to reveal another room with a portal in the floor. Jump into the portal to find the secret encounter.


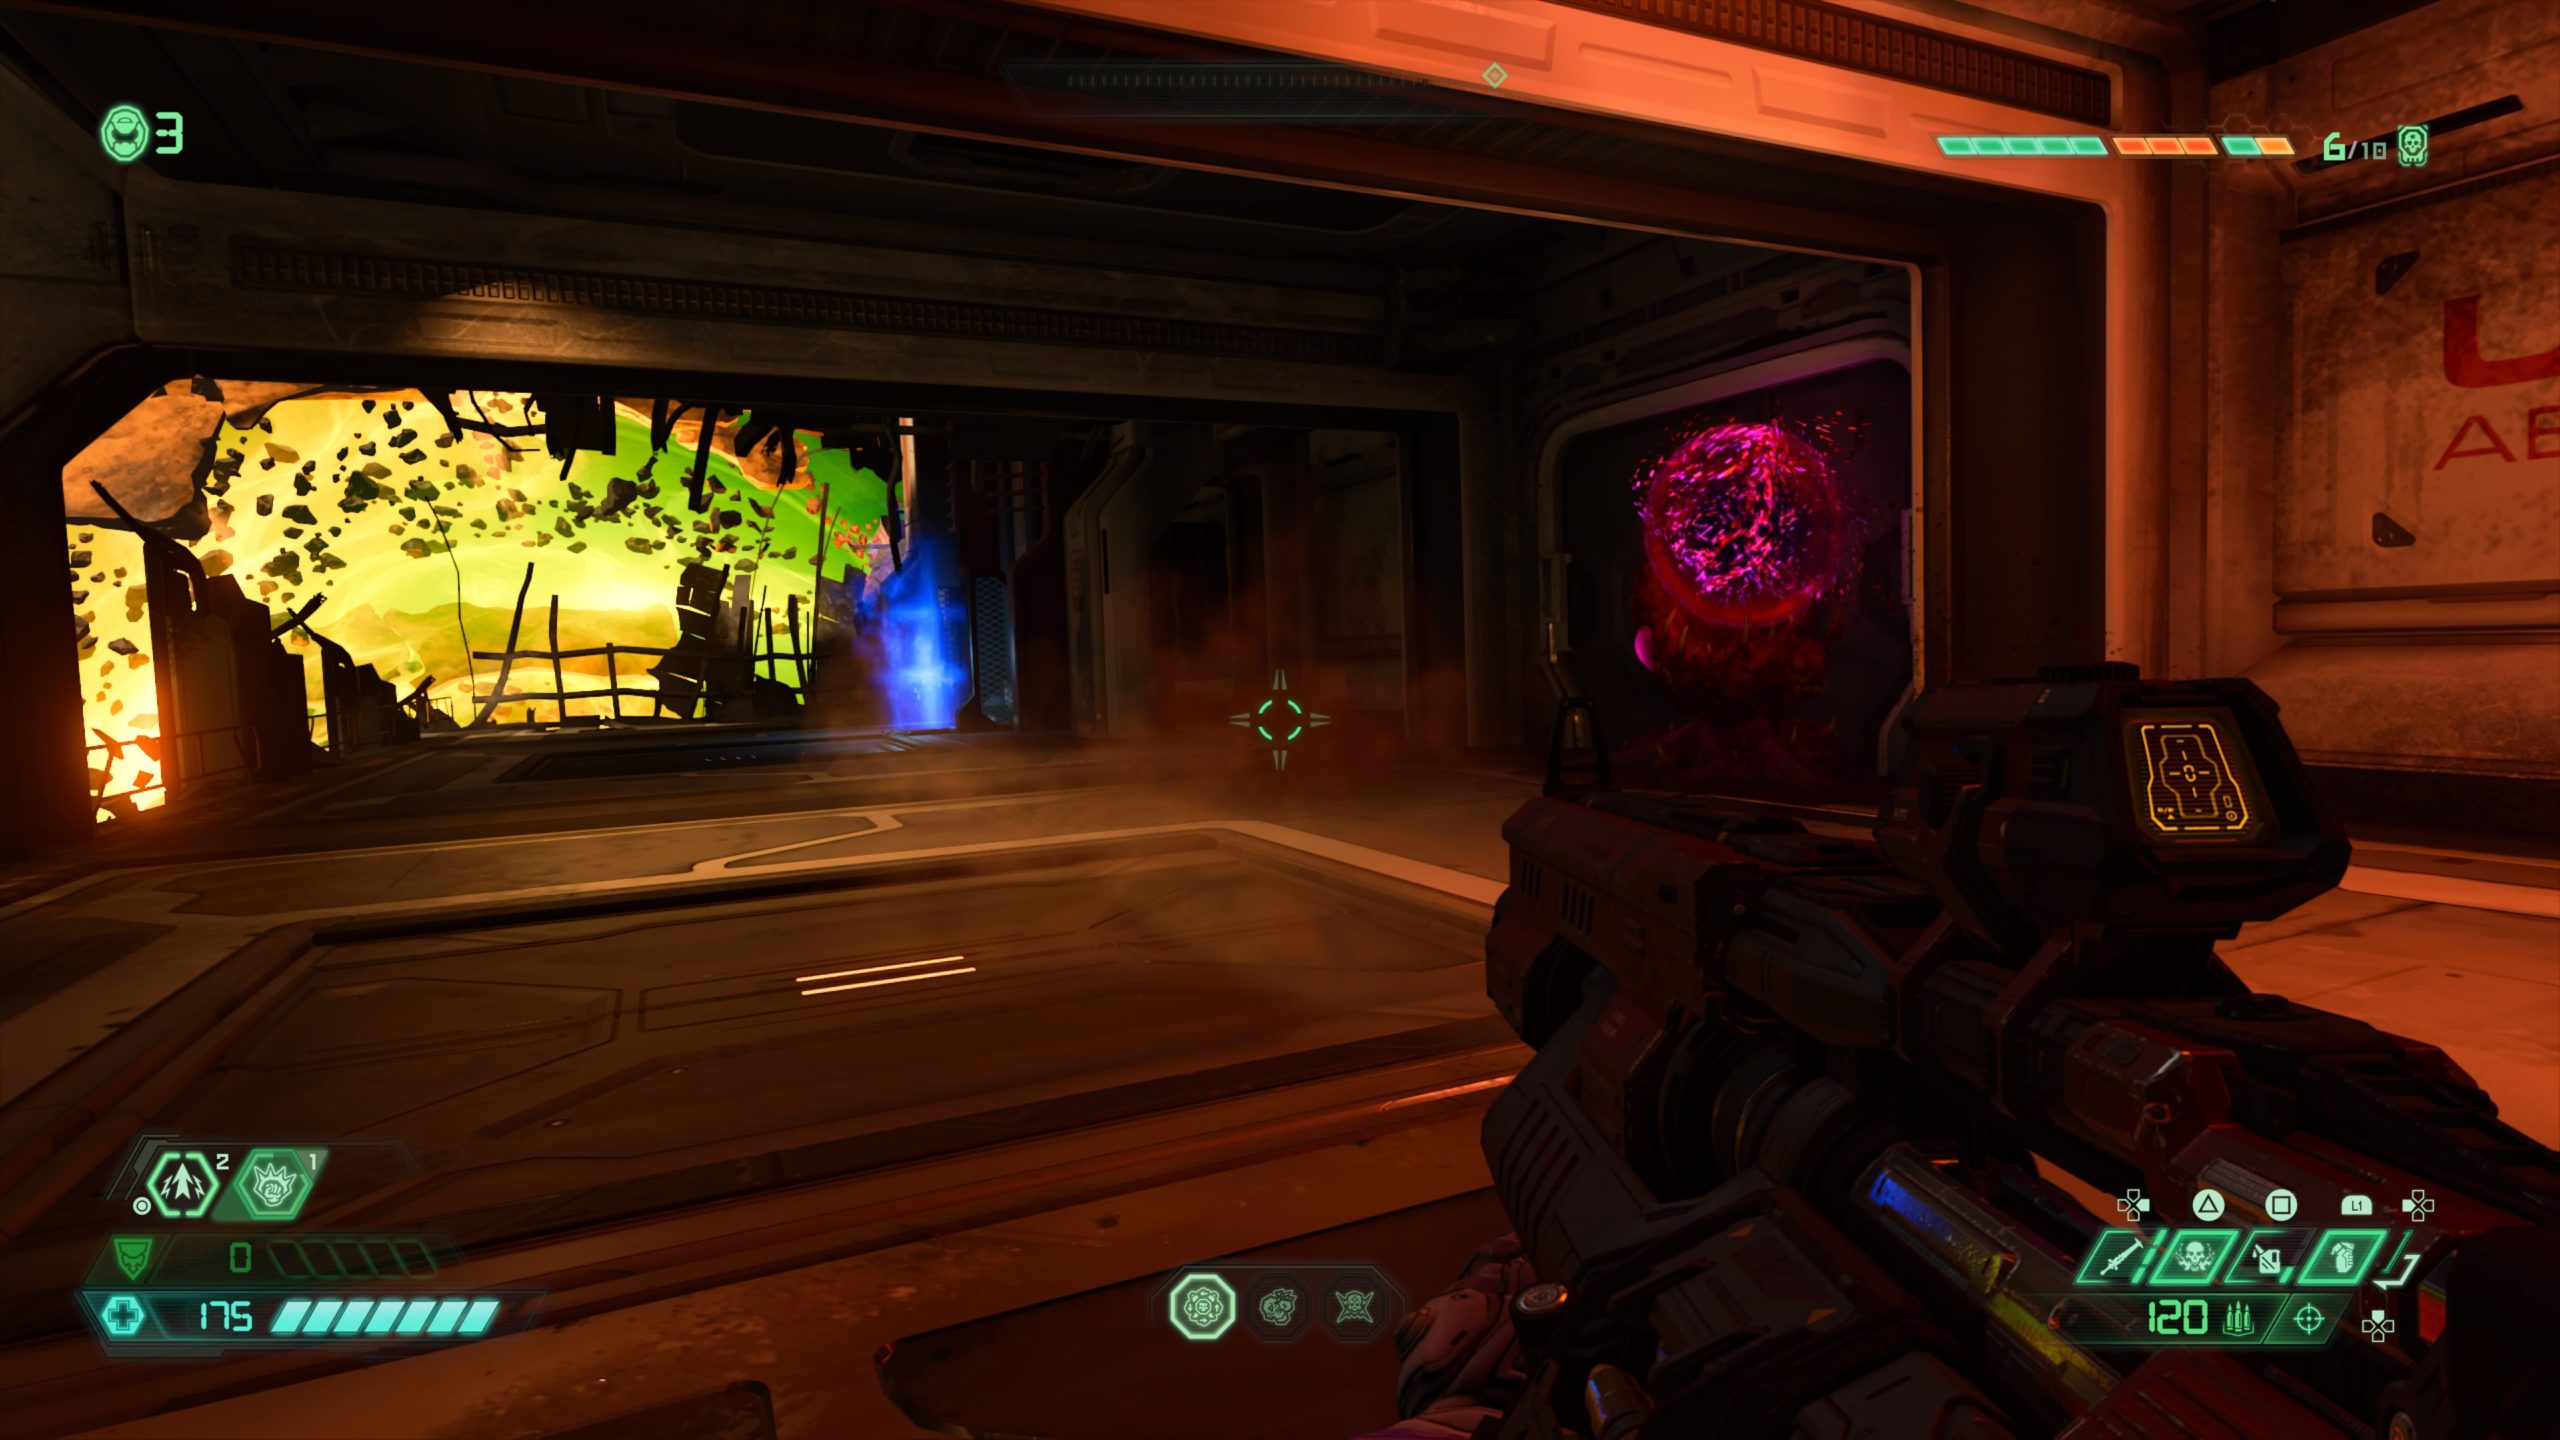
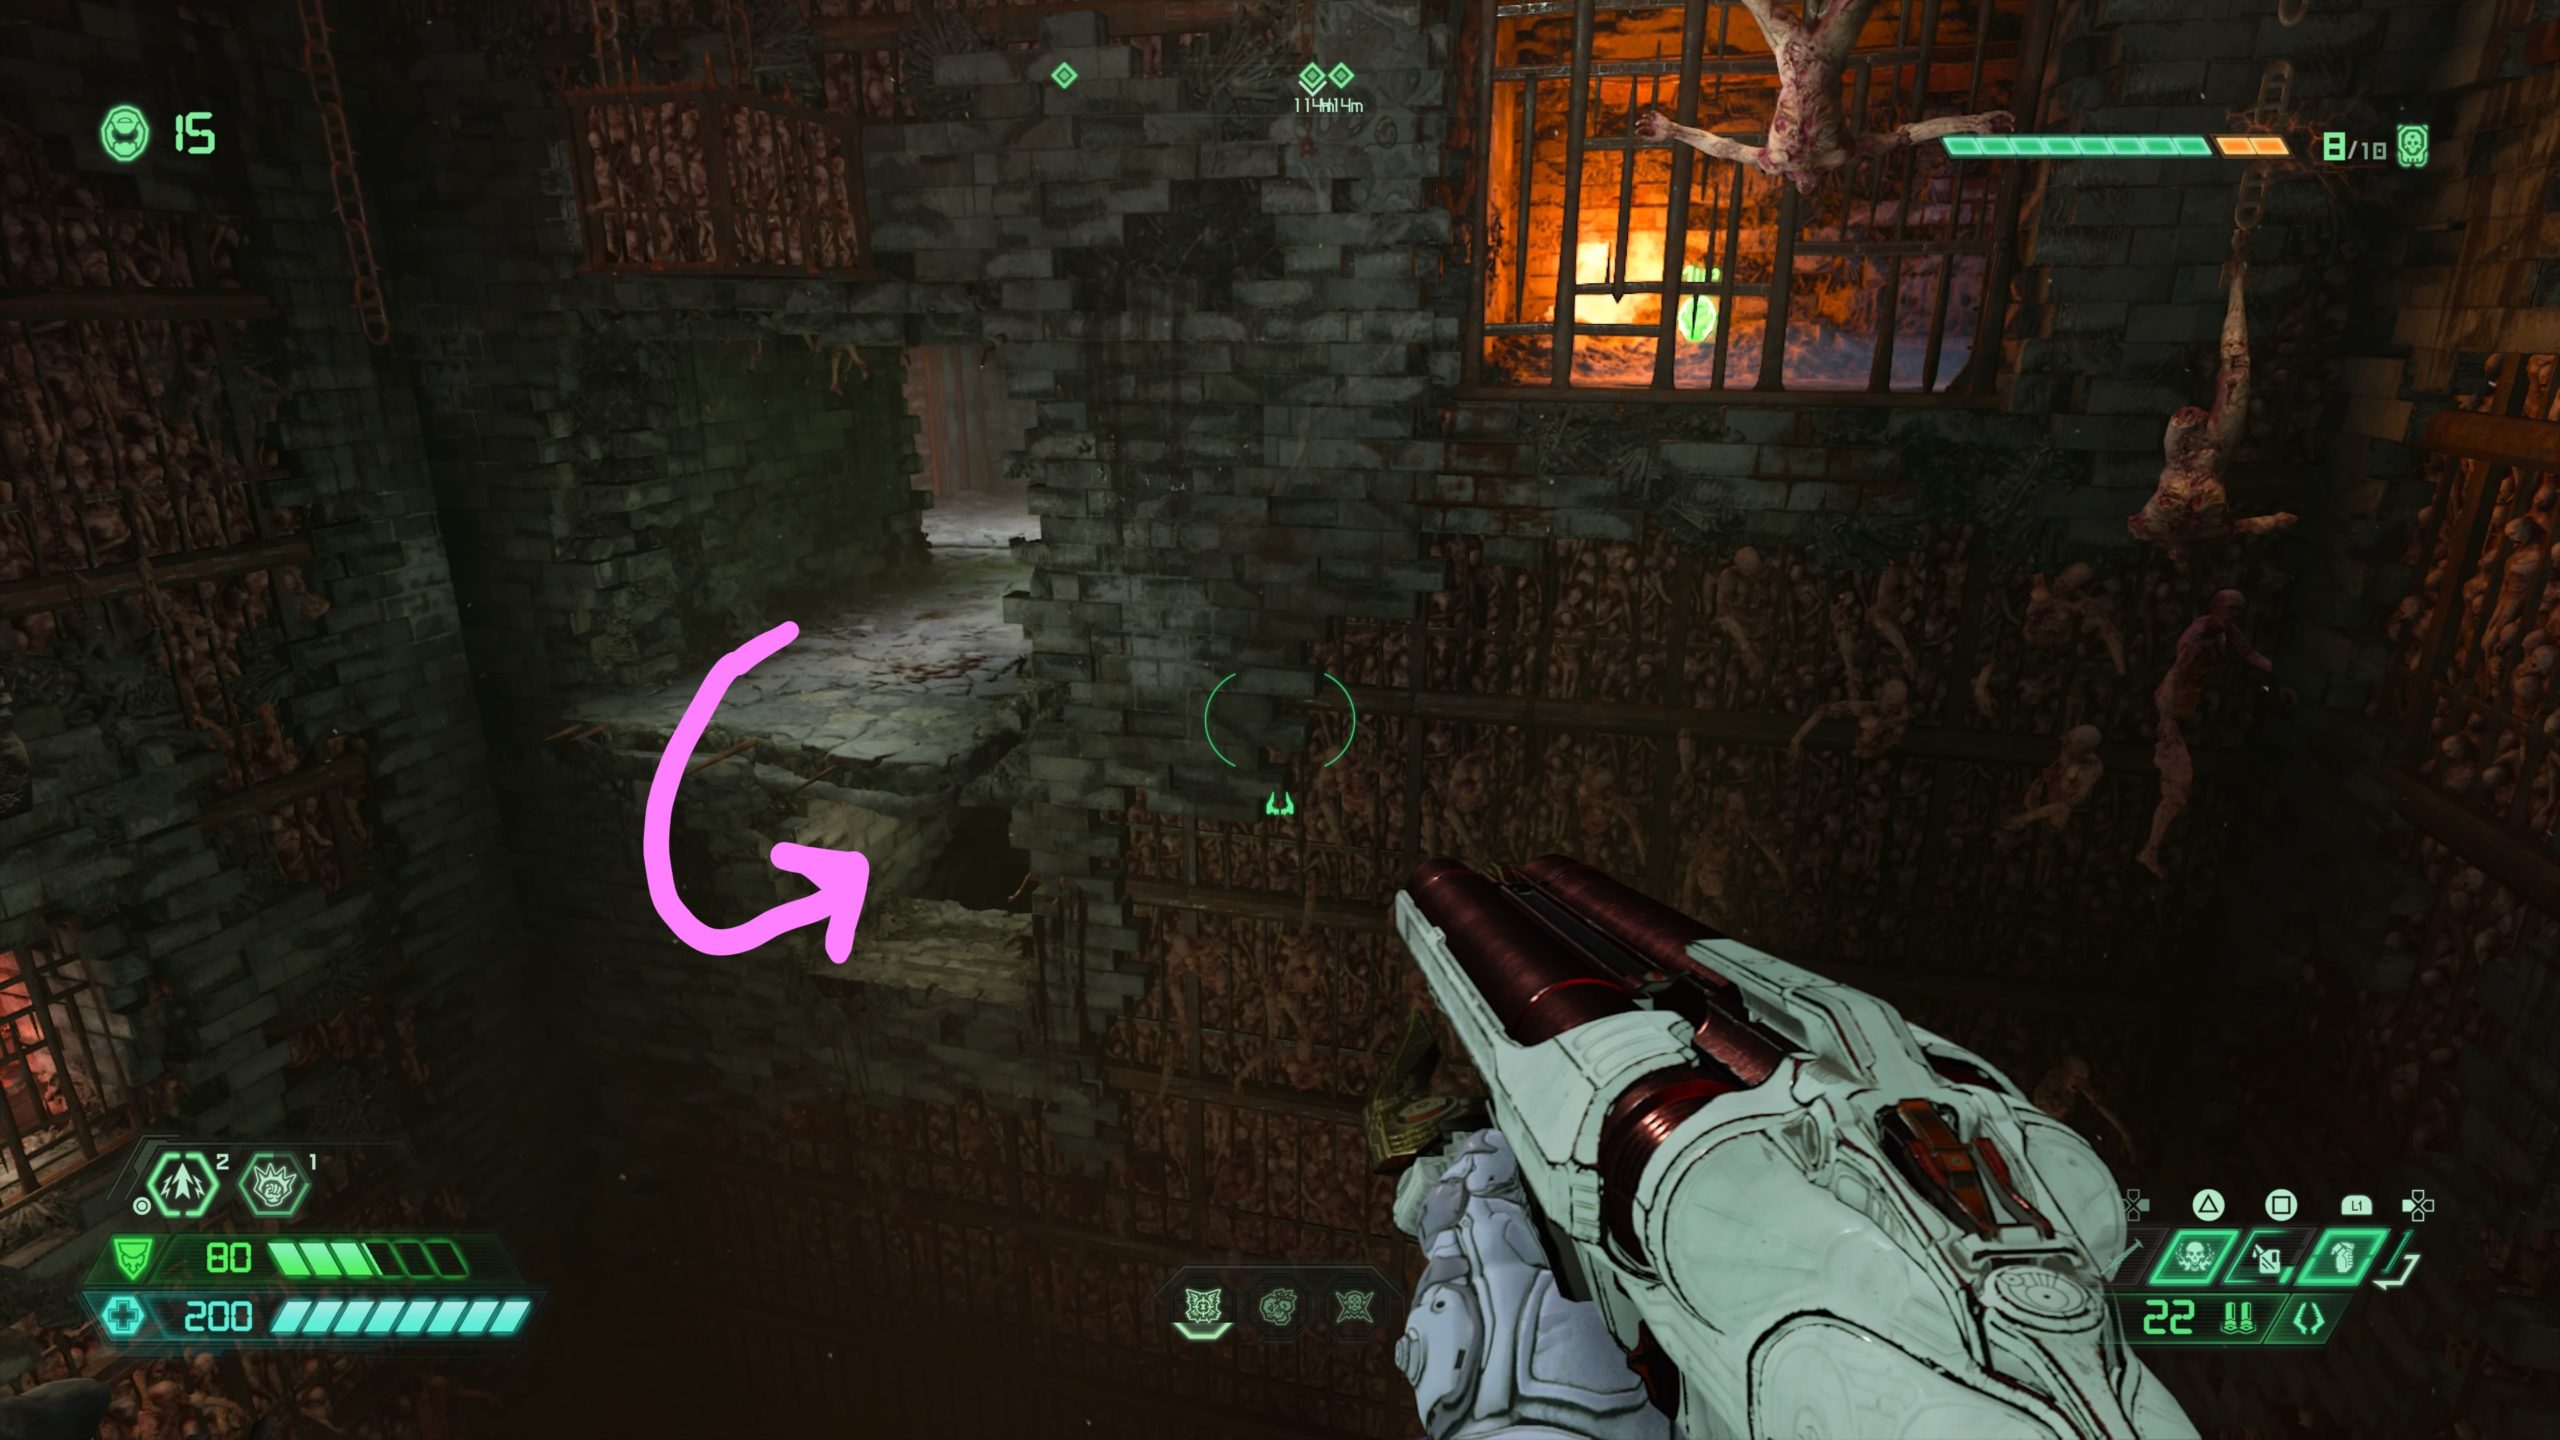
Mission 9: Taras Nabad

Atrium Plaza

From the fast travel point, enter the doorway in front of you and take a right, dropping down the hole in the hallway. Follow the path forward to arrive in a big open courtyard with multiple Sentinel statues. Head down the stairs in front of you and take a left past the rectangular pool. Take a left after the Sentinel statue to head under the above walkway lit by blue lights. Turn left and melee the cracked wall to find the secret encounter.


Catacombs

From the fast travel point, work your way through the sewer section of the catacombs. Exit the tunnels to arrive in a large open room filled with lift pads and spin bars. Head to the far right corner of the room to find a set of stairs leading up to a room filled with barrels. In that room, there will be a cracked wall on the left side of the room near a stack of barrels. Melee the wall and jump down into the cave to find the secret encounter.


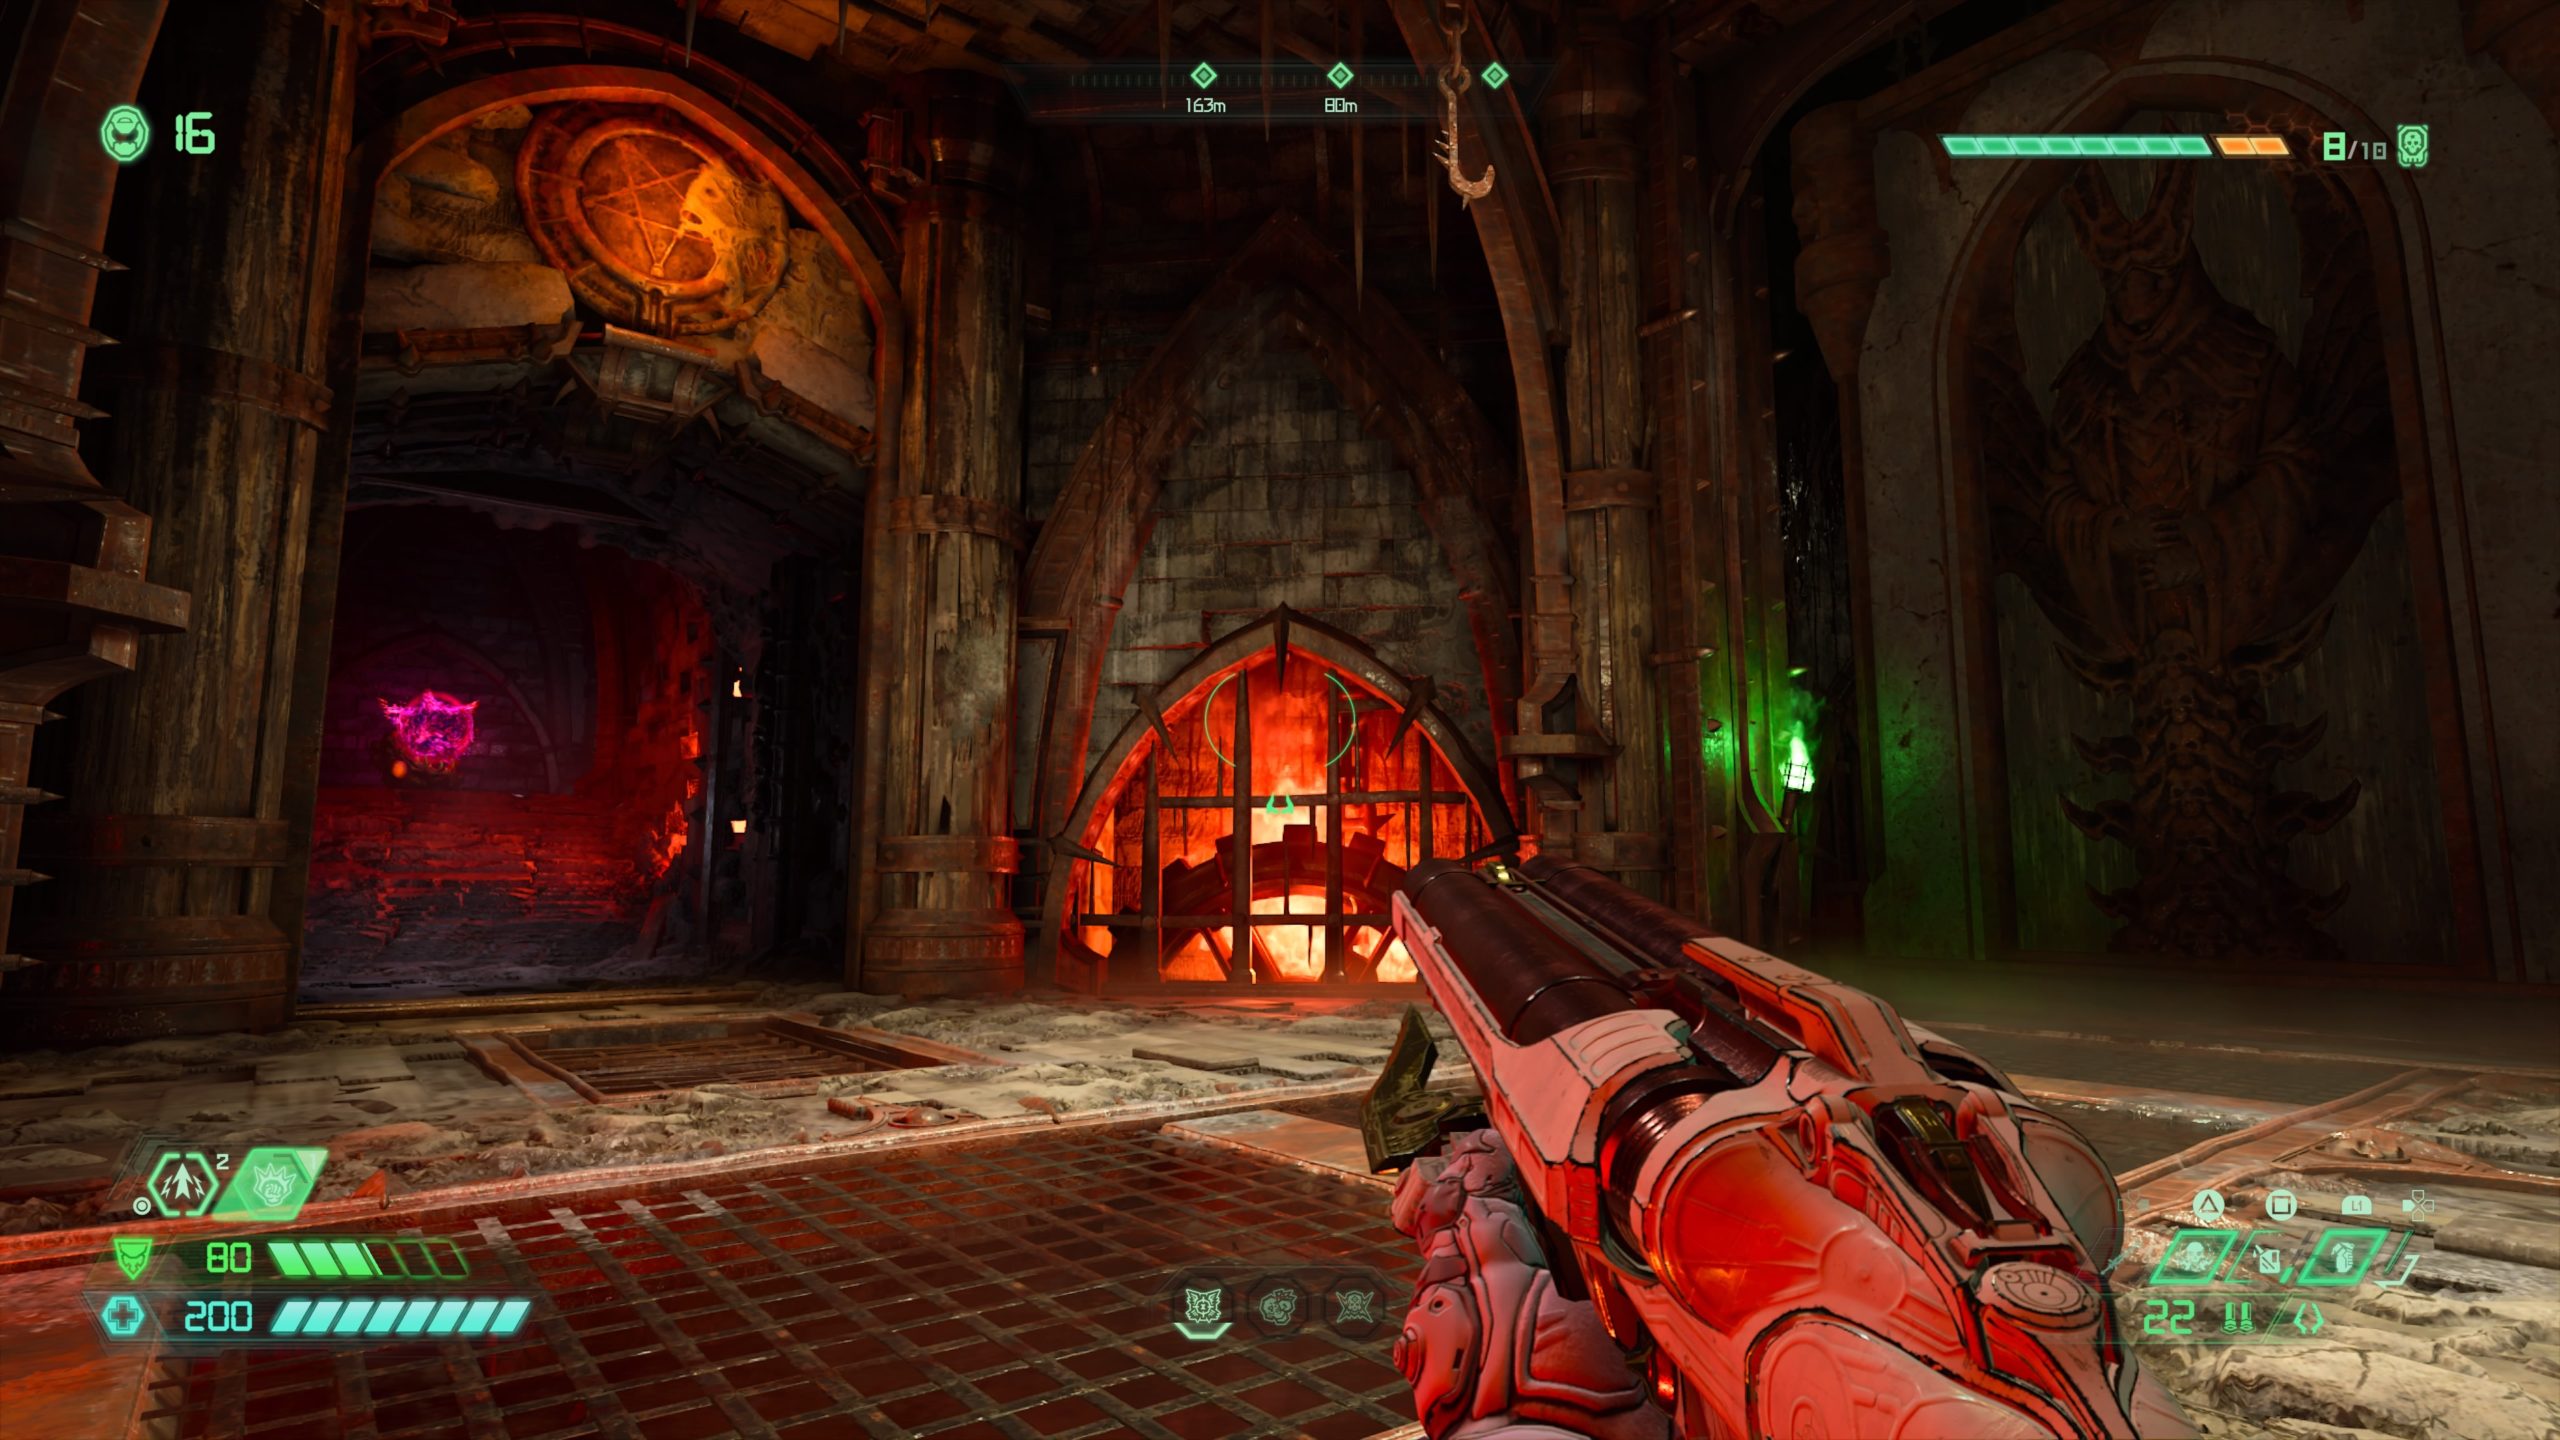
Mission 10: Nekravol – Part I

The Mill

From the fast travel point, take a right and follow the path to the end then head left past the green diamond and under a spiked ceiling. After the spiked ceiling, take a right up a flight of stairs to find a room. Once in the room, take the right doorway up a flight of stairs. Facing the Sentinel, take the left path to the end of the ledge. Under the ledge there will be a small opening that you will need to head through. The easiest way to reach this is to walk off with your back towards the gap. Once you walk off, you’ll need to dash onto the ledge below to reach the secret encounter.


Passage of the Damned

From the fast travel point, head right climbing a flight of bloody stairs. You will then need to head through the area with the spinning fire column via the climbable walls then jump on top of the moving metal cages on the left side of the room to reach the room above. The secret encounter will be located up the stairs on the left side.


Mission 11: Nekravol – Part II

Corpse Conveyor

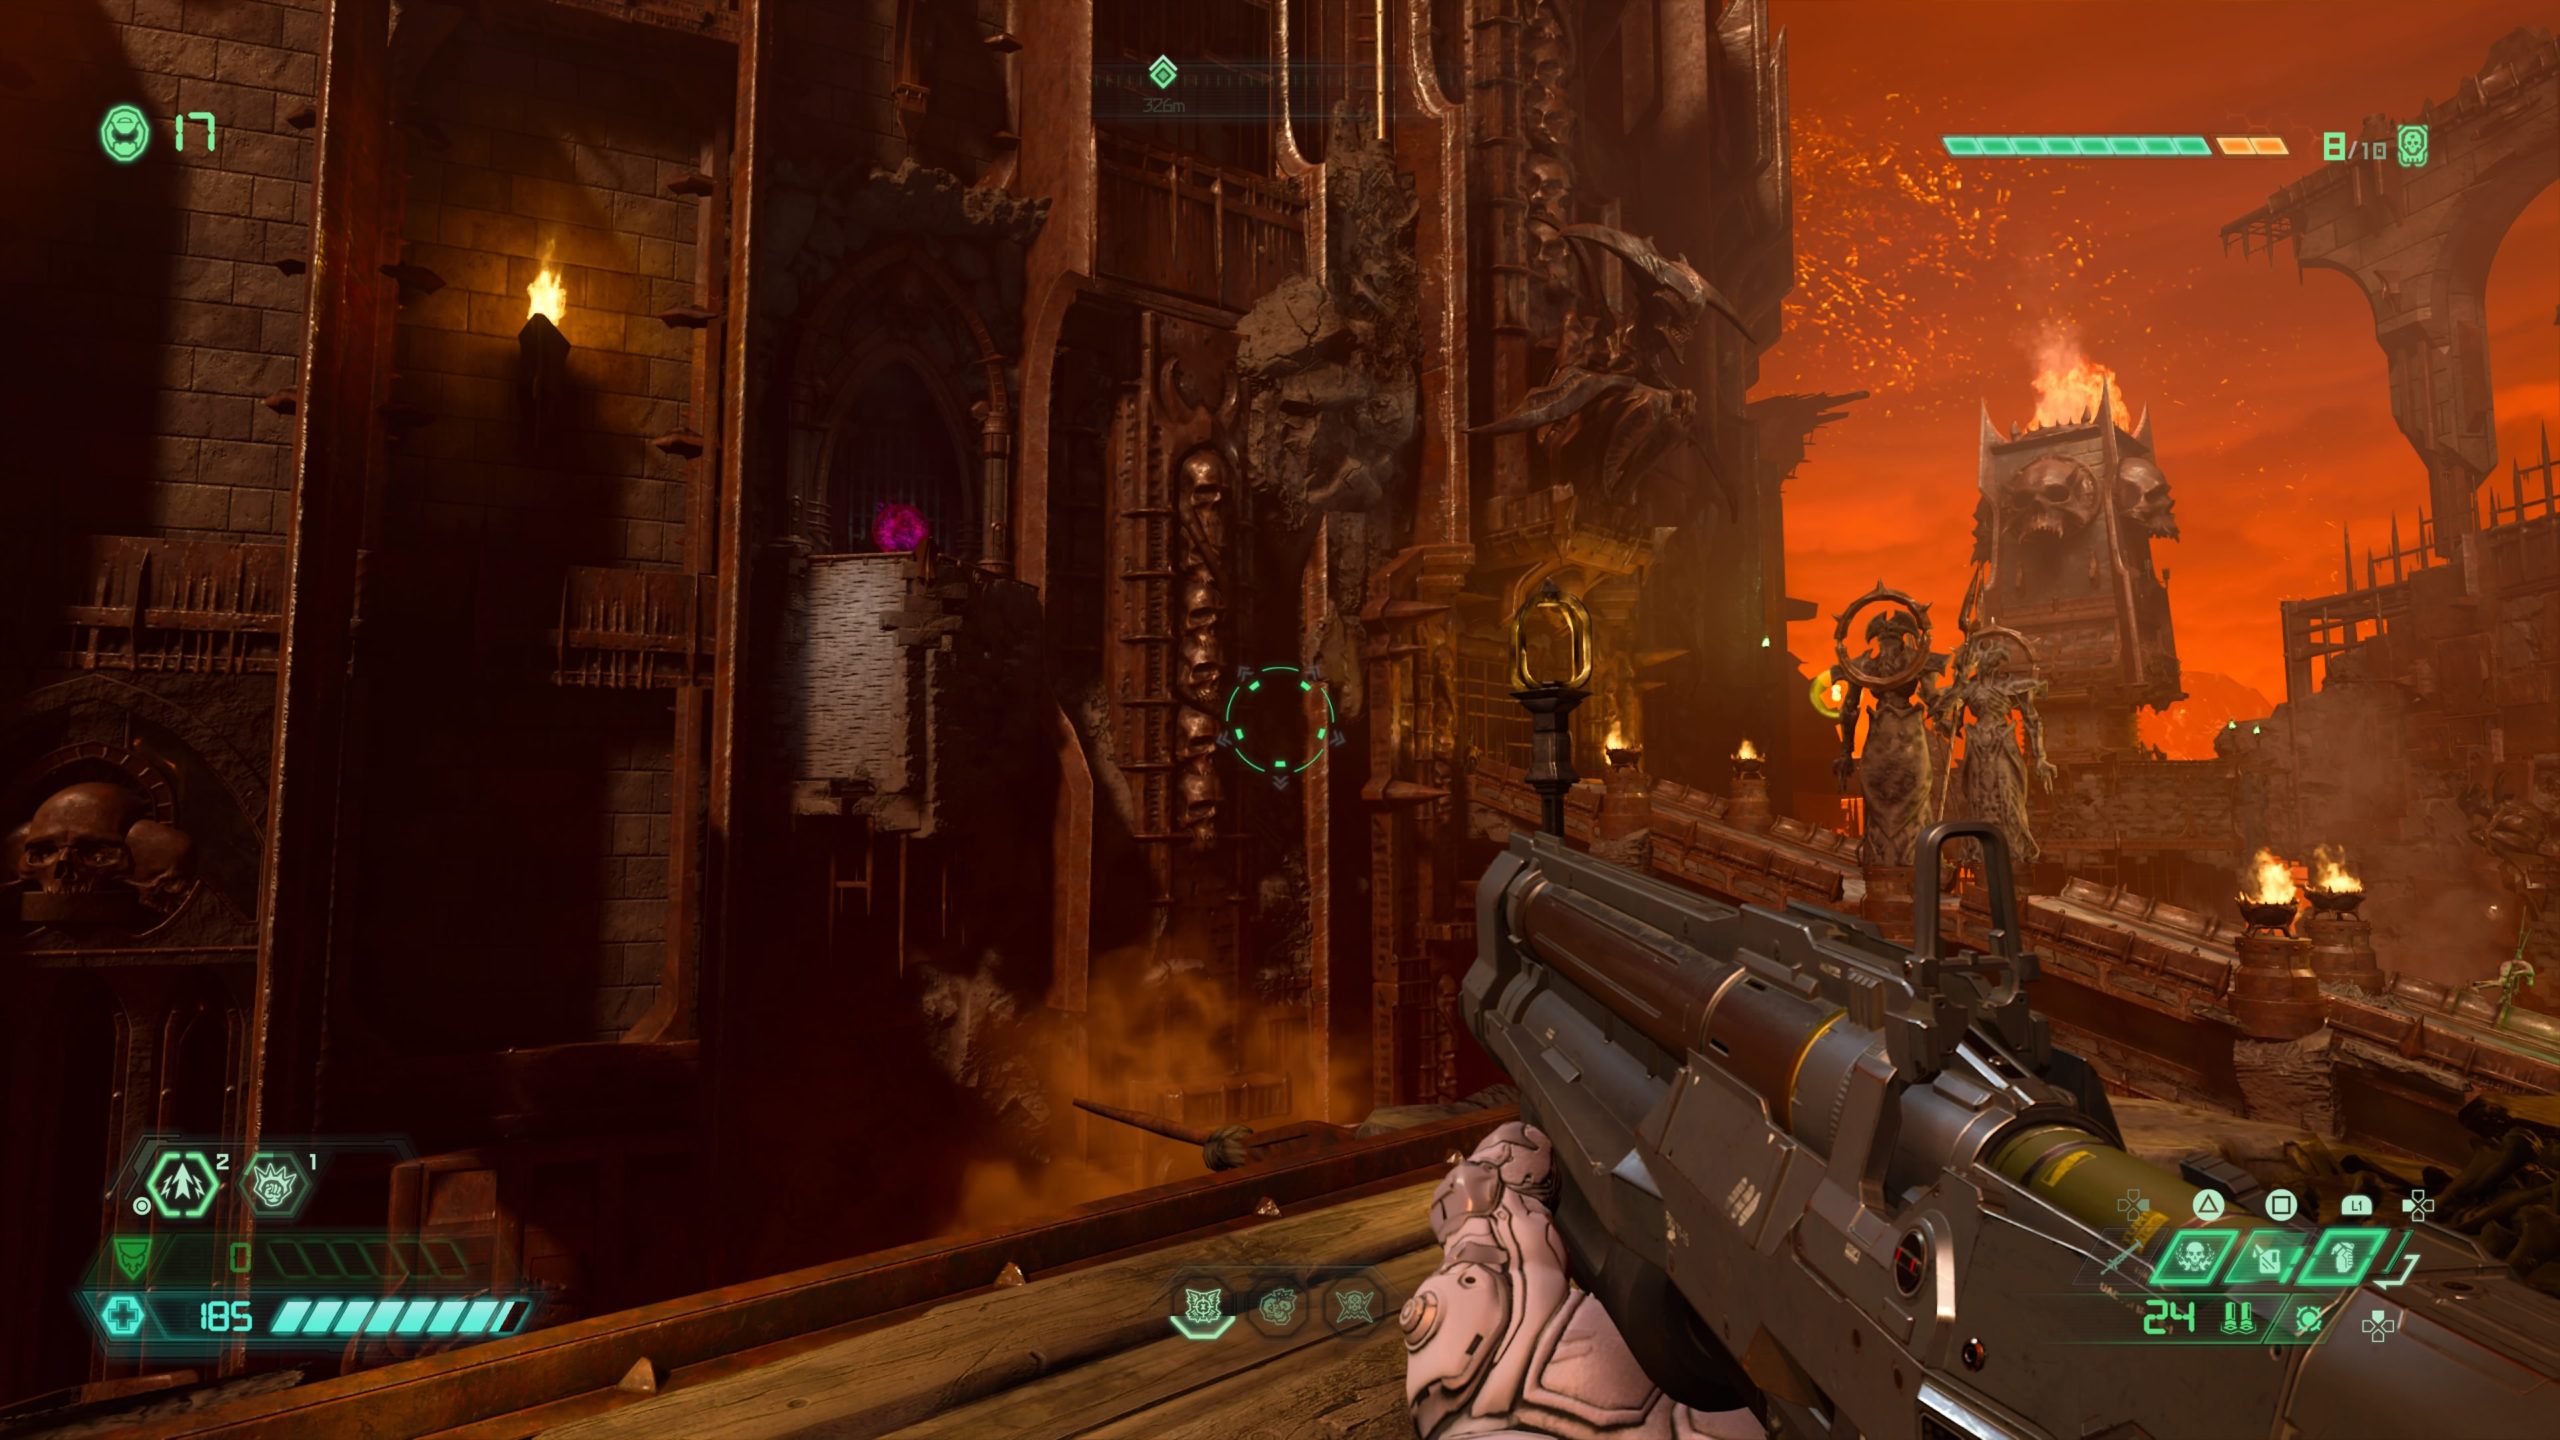
From the fast travel point, head down the bridge and about halfway across look to the left underneath the bridge to find a blue lift pad. Jump off the bridge and use dash to reach the lift pad to shoot towards a platform with a spinning cylinder shooting fire. Work your way around the platform to locate another platform with a climbable wall. Jump to the climbable wall to reach another platform. Follow the platform around to locate a climbable wall underneath a ledge. Jump to the wall and climb to the top to find the secret encounter.


Soul Extraction

From the fast travel point, head to the back left of the room to find a hallway leading deeper into the level. Take the first left in the hallway. At the end of the hallway, there will be a cracked wall. Melee the wall to reveal the secret encounter.


Mission 13: Urdak

Guardians of Sanctuary

From the fast travel point, jump down to the area below then head through the room. Use the metal cube in this room to jump through the oval shaped hole and follow it to a hidden room on the other side that contains the secret encounter.


Xanthous Harmonizer

From the fast travel point, turn around and head through the door on the left side of the building. This will bring you to a ledge overlooking the giant beam. Look immediately to the right side on the outside of the building just before the first gold spin bar to find a cracked wall. Dash through the wall to find the hidden area containing the secret encounter.


Guides

Metro Exodus – Sam’s Story Night Hunters’ Secret Stashes

by Chappie in

*NOTE: There are 8 Night Hunters’ secret stashes to collect in the Metro Exodus Sam’s Story DLC. The stashes are listed below in the order that they can be obtained during the main story. Please make sure to collect them as you go. If you progress too far in the story, you will be locked out of the locations that contain the stashes.


Secret Stash 1

As soon as you dock the boat, head up the stairs and take a left at the top. Follow the hallway to the end, passing through a doorway. Take a left through the doorway to reach an office-like room. Exit out the door on the other side of the room to come to a large open room filled with water. Head straight across the wooden plank to reach a stone platform (middle platform). On this platform, drop down to the wooden planks below and crouch through the small opening. Head across the flooded room then go up the stairway at the end to find the stash at the top of the stairs.


Secret Stash 2

After you dock the boat, head into the submerged building just past the red flag. Work your way through the partially submerged level until you reach a doorway with a white skull above the threshold. Enter through this doorway to find a red door on the left side of the room. To the left of the red door, look for the hole in the brick to find a rope. Cut the rope to gain access to the room behind the red door that contains the stash.


Secret Stash 3

From the previous stash, keep working your way through the partially submerged first level until you reach a ladder at the end. Take the ladder up to reach the second level of the building. Head through the doorway and take a right to find a set of stairs near a bookshelf. Take the stairs up to reach the third level. Enter the open doorway in the corner of the room near some yellow paint smudged on the wall. Head through the blue door straight ahead to enter a room with a workbench in the corner. Exit out of the right side of the room through a hole in the wall onto a balcony. Head past the first doorway to find a second doorway with a white skull painted on the right of it. Kick down the cabinet to enter this room. Shoot the middle jar on the bottom shelf to reveal the stash.


Secret Stash 4

After exiting the Captain’s boat, jump down into the half submerged bedroom and exit out of the doorway on the far right side of the room. Head down the hallway and take a left at the end to enter a big open room with stairs on the right side. Head up the stairs to come to a wall with a white skull on it. Take a right and pass through the cloth hanging from the ceiling to find a hidden ledge to climb up on. Enter this small room with some beat up furniture and a mattress. Crawl under the table to reach the room containing the stash.


Secret Stash 5

After your drunken adventures with the Captain, you will be tasked with setting up traps in his base. After you find the location for Trap 3, head down the hallway to reach wooden scaffolding. Pass over the scaffolding to enter another room on the same level. Head forward through a couple of rooms to reach a larger room at the end with a painting leaning against the wall. Kick the painting to find a secret room that contains the stash.


Secret Stash 6

Dock on the western tip of the building near a good section of the wall that is missing. There will be a wooden plank to walk up. Walk across the plank and take the first door on the right, passing through the next room, to arrive in a hallway. Take the first right then head behind a bookshelf to find a small opening underneath a table. Climb under there to reach a secret room containing the stash.


Secret Stash 7

During the main story, you’ll have to sneak through a bandit camp to reach the Fire Depot. You’ll enter the bandit camp by traveling along a makeshift wooden bridge that connects to a hole in the side of a building. Once in the building, head through a doorway to enter a hallway filled with can traps hanging from the ceiling. Head down the hallway disabling the traps as you go. When you reach the end, head through the doorway and take a right up a pair of stairs to get to the second floor. At the top of the stairs, swing right heading through two doorways and bringing you to a room with two open windows. Head through the window on the right to locate a building with a white skull across from it. Enter the doorway to the left of the white skull then take a right to head into a storage area that contains three switches on the wall. Turn on the switches in the following order: right, left then middle. This will unlock the metal door behind you, allowing you to gain access to the stash.


Secret Stash 8


After you dock the boat, head up the stairs and take a left to find a gas can near a couch. Use the gas can to fuel the generator in front of the bus. Head back down the stairs towards where your boat is docked and head towards the blue container hanging from the crane to locate a pipe. Approach the pipe for a prompt to climb through it. The pipe will lead you to a secret room containing the stash.


Guides

Metro Exodus – Sam’s Story Harmonica Melodies Sheet Music Collectibles

by Chappie in

*NOTE: There are 9 harmonic melodies (sheet music) to collect in the Metro Exodus Sam’s Story DLC. The melodies are listed below in the order that they can be obtained during the main story. Please make sure to collect them as you go. If you progress too far in the story, you will be locked out of the locations that contain the melodies.


Melody 01

After you dock the boat, enter the school via a window and work your way to the part of the building containing a set of stairs leading to the second level. Facing the stairwell leading up, follow the hallway right and take the first left into a classroom to find the sheet music hanging on the wall next to a piano.


Melody 02

Head to the theater occupied by bandits and make your way to the second level. Once on the second level, make your way to the east side of the building to find a room filled with bookshelves. Just outside this room, there will be a window in the hallway with planks connecting it to another window in a sealed off room. Head across the planks and enter the sealed off room to find the sheet music on a bulletin board near some triangular guitars.


Melody 03

After you defeat the sniper, exit the door and head towards the boat. Instead of entering the boat, take a left in front of the boat and follow the walkway to a blue door. Enter the door to find the sheet music on the wall straight ahead.


Melody 04

After your drunken adventures with the Captain, you will be tasked with setting up traps in his base. Head to the floor below his sleeping quarters via the stairwell. Next, head through the doorway, passing a red door on your right, and take a right to reach a brown sofa at the end of the room. Facing the sofa, jump over the wall to the left marked with yellow paint. Follow the path forward to reach a room with a piano and a corpse resting on a bed. The sheet music will be located on a pillar next to the piano.


Melody 05

The sheet music is located at the scout outpost. After you dock your boat, head towards the outpost and make your way to the ramps. The sheet music will be located on the wall next to a workbench.


Melody 06

The sheet music is located at the car dealership on the wall behind a blue door in a break room.


Melody 07

This sheet music is located on a wooden cabinet to the right of a piano.


Melody 08

The sheet music is located on the door of an outhouse which is reachable via a walkway connected to the roof of the medical building.


Melody 09

After you dock the boat, head up the stairs and take a left to find the note on the side of a large green container.


Code Vein
Guides

Code Vein – Asclepius Vestige Parts

by Chappie in


Asclepius Vestige Part A

Location: Depths – Fiery Oblivion

Defeat the Blazing Heretic mini-boss located in the northern part of the map.


Asclepius Vestige Part B

Location: Depths – Fiery Oblivion

Defeat the Abyssal Doppleganger mini-boss located in the southwestern part of the map.


Asclepius Vestige Part C

Location: Depths – Celestial Ice Prison

The vestige can be obtained from defeating the Mud Gorger (with the group of moneys that spawn).


Asclepius Vestige Part D

Location: Depths – Celestial Ice Prison

The vestige can be obtained from defeating Argent Wolf Berserker.


Asclepius Vestige Part E

Location: Sealed Depths – Eternal Abyss

Defeat the Dusty Cloud Bandit to receive this vestige.


Asclepius Vestige Part F

Location: Sealed Depths – Eternal Abyss

Defeat the Queen’s Vanuard Puppet to receive this vestige.


Asclepius Vestige Part G

Location: Crypt Spire – Upper Level

From the Crypt Spire mistle, head north passing the areas where you fought the Blade Bearer, Cannoneer and Juzo Mido. This will bring you to a long hallway with lights leading down it on both sides. Head through that hallway and make a left at the end going down a side set of stairs. (There is another set of stairs that keeps leading north. Don’t go that way!) The vestige will be at the bottom of the steps in the middle of the floor.


Guides

Borderlands 3 – The Handsome Jackpot Echo Log Locations

by Chappie in


Grand Opening

The Saga of Salty Jerms (Part 1)

This log is located in The Chump Slots area just past the entrance of the casino following the fight with the robots. Head through the doorway between two large Handsome Jack statues underneath the Hyperial lettering. Drop down to the casino floor and take a right heading north to find the Echo Log on the ground near a slot machine under a flashing yellow neon sign of cards.


The Saga of Salty Jerms (Part 2)

This log is located on a chair in front of a slot machine in Windfall Way just before Grand Opening Station.


The Spendopticon

High Roller (Part 1)

Located in Casa de Timothy underneath the platform where Timothy is standing.


High Roller (Part 2)

This log is located in Silky’s Soak (area with all the purple water) on a bar behind a waterfall.


Last Show

This log is located on a small stool in the karaoke section (northwestern corner) of Foxxxi’s Cabaret.


High Roller (Part 3)

This log is located in the J-Spot under the skag sculpture.


Ugly Mug

This log is located in the Welcome Turrents area (accessible during the All Bets Off main story mission) on the right side at the base of a wall support.


Impound Deluxe

The Last Doppelganger (Part 1)

This log is on a bench on the south side of Customer Care.


Loader Buds (Part 1)

This log is located in the ventilation shaft just before the Grav Locks.


Loader Buds (Part 2)

This log is located in a room on the second level in the hanger containing the La Femme Brulee Fast Travel Station on a desk.


The Last Doppelganger (Part 2)

This log is located on a desk in front of a toilet in the lower section just after the long bridge leading to Drifting Larboard.


The Compactor

Lover, Not a Fighter (Part 1)

This log is located in a VIP room in Garbage Gorge on the counter near a cash register.


Refuge in the Refuse

When you first enter Trashlantis by passing through the short tunnel, take an immediate right and swing around to find the log at then end of the narrow path on a bed.


Incorporated (Part 2)

This log is located in a broken metal pipe just before the entrance to Trash-Co. LLC which can be found to the eastern central part of the map.


What’s in a Name?

This log is resting on a chair under an umbrella in the northeastern part of the map.


Lost and Found (Part 4)

This log is located on a bench across from the entrance to Trash-Co. LLC.


Lost and Found (Part 3)

This log is on a couch located in Onfireton.


Lost and Found (Part 2)

This log is located at the base of a pipe in Stenching Meadows.


Trash Fire

This log is located in The Beam (north central part of the map) where you escort Clapstructor during the One Man’s Treasure main story mission. The log is underneath the metal ground and can be reachable by a ladder lit by a light (blue glow) in the image above.


Jack’s Secret

Too Easy

From the beginning area of Jack’s Secret, you will drop down into a vent. When you drop down a second time into the vent, turn around to find the log on the ground.


VIP Tower

Say Something Funny

This log is located near the VIP Tower Entrance fast travel station in the center of the room behind the counter to the left of the Hyperion sign.


Conception
Guides

Conception PLUS – Side Quests

by Chappie in


All-Purpose

Client: Scholar Naram

Condition: Obtain 10 Starbox Keys

Starbox keys can be found while exploring the labyrinth and defeating enemies.

Reward(s):

  • 3,000G
  • Panacea x3


Affecting Emotions

Client: Friar Marco

Condition: Obtain 5 Charms

The charms can be bought for 1000G each from the shop after clearing the 10th floor in the North Star Labyrinth. 

Reward(s):

  • 1,000G
  • Charm+ x1


Autumn Maiden

Client: Narcisstes

Condition: Defeat the Aeriae

Aeriae can be found on the last floor of the Virgo Labyrinth.

Reward(s):

  • 10,000G
  • Matryoshka MD x2
  • Matryoshka LT x2
  • Star Matryoshka  x2


Axe Forging SD

Client: Blacksmith Cydra

Condition: Collect 3 Bardiche

Reward(s):

  • 1,000G
  • Bardiche+


Between H and M

Client: Alchemist Weiss

Condition: Obtain 8 Mana Stone+

Dropped from monsters on North Star levels 6 thru 10.

Reward(s):

  • 2,000G
  • Star Drop+ x5


Eat First, Ask Later!

Client: Narcisstes

Condition: Defeat the Scelorum

Scelorum can found on the last level of the Cancer Labyrinth.

Reward(s):

  • 10,000G
  • Matryoshka LC x2
  • Matryoshka ET x2
  • Star Matryoshka x2


Eternal Surface

Client: Narcisstes

Condition: Defeat the Apostatae

Apostatae can be found on the last floor of the Aquarius Labyrinth.

Reward(s):

  • 10,000G
  • Matryoshka MA x2
  • Matryoshka WT x2
  • Star Matryoshka x2


Fast Steed

Client: Reporter Potalia

Condition: Defeat Equulaos

Can be found on North Star levels 6 thru 10.

Reward(s):

  • 3,000G
  • Chain Clothes+ x1


Fatal Despair

Client: Narcisstes

Condition: Defeat the Criminatores

Criminatores can be found on that last floor of the Scorpio Labyrinth.

Reward(s):

  • 10,000G
  • Matryoshka  SP x2
  • Matryoshka DK x2
  • Star Matryoshka x2


Find That Idol!

Client: Maika in Love

Condition: Obtain 1 Seiya No. 1

Seiya No. 1 can be found at the gift shop for 1900G. You may have to defeat the first labyrinth boss for it to show up in the shop.

Reward(s):

  • 2,000G
  • Carrot Cookie x2
  • Premium Herbal Tea x2
  • Stuffed Kitten x2


First Errand

Client: Trainee Sana

Condition: Obtain 3 Matryoshka TC

Can be found as items in the labyrinths or from other side quests as rewards.

Reward(s):

  • 2000G
  • Matryoshka WT
  • Matryoshka ET
  • Matryoshka WN


Fran’s Experiments

Client: Cleric Fran

Condition: Obtain 1 Matryoshka SP

Dropped off of a monster in the North Star Labyrinth.

Reward(s):

  • 1,000G
  • Matryoshka WN x1
  • Matryoshka LT x1


Free-Flowing Path

Client: Narcisstes

Condition: Defeat the Tentatores

Tentatores can be found on the final floor of the Sagittarius Labyrinth.

Reward(s):

  • 10,000G
  • Matryoshka AT x2
  • Matryoshka FR x2
  • Star Matryoshka x2


Glittering Talent

Client: Armorer Pollon

Condition: Collect 1 Chain Clothes+

Chain Clothes+ can be found while collecting items in the labyrinth.

Reward(s):

  • 2,000G
  • Scale Clothes+


Great Liar

Client: Liar Gaius

Condition: Defeat 5 Carina

 Carina can be found in the Autumn Wind Labyrinth.

Reward(s):

  • 2,000G
  • Hunting Lenses+ x1


Heart of Entertainment

Client: Questor

Condition: Collect 1 Tempar’s Belt

Reward(s):

  • Enterbladement x1


Here’s the Hero!

Client: Popular Charan

Condition: Collect 1 Cool Band++

Reward(s):

  • 2,000G
  • Super Resistor x1


Irregular Impurity

Client: Student Reita

Condition: Obtain 1 Human Pretzel

Can be found on the ground around the labyrinth. Mine was found in Spring Clouds 2F.

Rewards(s):

  • 2,000G
  • Scary Stories x1
  • Magic Hand x1
  • Hors D’oeuvres Set x1


King of Impurities

Client: Narcisstes

Condition: Defeat the Giatores

Giatores can be found on the final floor of the Leo Labyrinth.

Reward(s):

  • 10,000G
  • Matryoshka MA x2
  • Matryoshka FR x2
  • Star Matryoshka x2


Life and Death

Client: Narcisstes

Condition: Defeat the Furiae

Furiae can be located on the final floor of the Libra Labyrinth.

Reward(s):

  • 10,000G
  • Matryoshka TC x2
  • Matryoshka DK x2
  • Star Matryoshka  x2


Maniacal Wish

Client: Gentleman Regan

Condition: Obtain 1 Impurity Figurine

Reward(s):

  • 3,000G
  • Still Camera x1
  • Insect Guide x2
  • 128-Color Crayons x2


Mysterious Request

Client: Pallbearer Merode

Condition: Obtain 2 Matryoshka LT

The Matryoshka can found while exploring the labyrinths.

Reward(s):

  • 2,000G
  • Matryoshka MD x2
  • Matryoshka LC x2


Omitting Favor

Client: Narcisstes

Condition: Defeat the Infideles

Infideless can be found on the final level of the Pisces Labyrinth.

Reward(s):

  • 10,000G
  • Matryoshka LC x2
  • Matryoshka WT x2
  • Star Matryoshka x2


One Sheep

Client: Narcisstes

Condition: Defeat 1 Pseudothei

Reward(s):

  • 10,000G
  • Matryoshka MA x2
  • Matryoshka LT x2
  • Star Matryoshka x2


Over the Mountain

Client: Narcisstes

Condition: Defeat the Malefici

The monster can be found in the Taurus Labyrinth.

Reward(s):

  • 10,000G
  • Matryoshka DF x2
  • Matryoshka WN x2
  • Star Matryoshka x2


Oversleep/Reports

Client: Student Reita

Condition: Collect 1 Alarm Clock

You can collect an Alarm Clock in the Summer Fog Labyrinth.

Reward(s):

  • 1,000G
  • Marble Candy x1
  • Rainbow Ring x1


Queen of Summer

Client: Liar Gaius

Condition: Defeat 5 Cassopeia

Cassopeia can be found in the Summer Fog Labyrinth.

Reward(s):

  • 2,000G
  • High Gladius


Reading Strength

Client: Sickly Ashley

Condition: Obtain 5 Star Drop EX

Can be found while exploring the labyrinths.

Reward(s):

  • 5000G
  • Bond Block
  • Ancient Script
  • Mystic Teaching


Security’s Melancholy

Client: Head Medic Gunther

Condition: Obtain 10 Potions

Potions are commonly dropped by monsters in the Spring Clouds Labyrinth or can be collected from the labyrinth. You can also buy them for 500G in the shop.

Reward(s):

  • 1,000G
  • Bond Shard x2


Shock and Capture!

Client: Lady

Condition: Collect 5 Sheer Lingerie

Reward(s):

  • Polyoshka x1


Star Child Mystery

Client: Cleric Fran

Condition: Collect 5 Bone Shards

Bone Shards can be obtained by repeatedly completing the Security’s Melancholy quest.

Reward(s):

  • 2,000G
  • Matryoshka AT x2
  • Matryoshka FR x2


Summer Shadows

Client: Alchemist Weiss

Condition: Defeat 20 Lacertus

Reward(s):

  • 3,000G
  • Scale Plate+ x1


Teddy Slash

Client: Maika in Love

Condition: Defeat 20 Ursulaam

Reward(s):

  • 5000G
  • Hunter Armor


The Ox is No Fodder

Client: Narcisstes

Condition: Defeat the Medaciorum

Defeat the boss in the Taurus Labyrinth.

Reward(s):

  • 10,000G
  • Matryoshka AT x2
  • Matryoshka ET x2
  • Star Matryoshka x2


Unending Spring

Client: Armorer Pollon

Condition: Obtain 1 Silver Mail+

Reward(s):

  • 2,000G
  • Arches Shell+ x1


We are Two to One

Client: Narcisstes

Condition: Defeat 1 Iniquitatis

Iniquitatis can be found on the last level of the Gemini Labyrinth.

Reward(s):

  • 10,000G
  • Matryoshka LT x2
  • Matryoshka DK x2
  • Star Matryoshka  x2


Winter Clothes

Client: Marton Aimi

Condition: Collect 1 Clothes+

Clothes+ can be found while collecting items in the labyrinth.

Reward(s):

  • 1,000G
  • Cloak x1
  • Dalmatica+ x1


Winter Wishes

Client: Captain Gunther

Condition: Defeat 3 Sagitta

Sagitta are rare spawn enemies that you will come across as you explore the labyrinths.

Reward(s):

  • 3,000G
  • Lucky Charm+ x1


Guides

Borderlands 3 – Eridian Writing Locations

by Chappie in

*NOTE: If you did not receive The Tales From The Eridian Slab trophy, head back to the infirmary at Sanctuary and keep translating the Eridian writing until the trophy triggers.  (We inspected it approximately six times.)


Pandora

The Droughts

This writing is located on the east side of Varkid Valley in a cave near the Lavender Crawly Legendary Hunt.


The Droughts

This writing is located in the back of the Eridian Dig Site in a cave next to some scaffolding.


Ascension Bluff

This writing is located in the most northern part of the map, north of the most northern Catch-A-Ride.  We previously came here during the Golden Calves side mission.


Devil’s Razor

This writing is located in a small cave south of Roland’s Rest. You will need to shoot the boards off to enter the cave.


Devil’s Razor

This writing is located on a rock face overlooking a canyon north of Roland’s Rest.


The Splinterlands

This writing is located in a small cave northwest of the Chop Shop, past The Homestead.


Carnivora

This writing is located on a rock face next to the Azlan’s Stash Typhon Log in the north-central area.


Guts of Carnivora

This writing is located in the back of Mack’s Head Room near some computer monitors.


Konrad’s Hold

This writing is located in the These are No Mines area in the northern part of the map. You will need to start The Demon in the Dark side mission reach it.


Cathedral of the Twin Gods

This writing is located under the giant skull with a bridge coming out of its mouth. You will have to crouch walk under the partially opened gate then locate the hole in the back of the room and pass through. Follow the tunnel to the end where the writing can be found in the back wall.


Destroyer’s Rift

This writing is located in the Treacherous Path.  Take the path left of the fast travel station before boss fight to find it.


Promethea

Meridian Outskirts

This writing is can be found in Mt. Schuler Recovery Center located in the northwestern part of the Spillways on a rock behind the gurneys and privacy curtains.


Meridian Metroplex

This writing is located in Watershed Base on a post across from the fast travel station.


Lectra City

This writing is located in the tunnel that runs underneath Downtown Square.


Skywell-27

This writing is located on a wall a little southwest of the dead claptrap with an antenna just before the Tritanium Refinery area.


Atlas HQ

This writing is located on the wall in the CEO’s office near a door on the left side.


Neon Arterial

This writing is located just north of the Restricted Catacombs Typhon Log.


Athenas

This writing is located in Anchorhold in the room just after the boss fight with Captain Traunt.


Eden-6

Floodmoor Basin

This writing is located in the Primeval Grotto in the northwest section of the map near the Primeval Preserve Typhon Log.


Floodmoor Basin

This writing is located on a rock face at the base of a tree next to a lantern southeast of Knotty Peak.


The Anvil

This writing is located in a sewer tunnel just past the Hector’s Lament Typhon Log on the left.


Jakobs Estate

This writing is located in the Leery Hamlet at the base of a tree.


Voracious Canopy

This writing is located behind a waterfall in the Green Labyrinth on the path to the Family Jewel.


Ambermire

This writing is located near the Soggybog Rigs on the northwestern side of the map next to a crate with a light.


Ambermire

This writing is located at the base of a tree near the Tig’s Big Rig Typhon Log.


Blackbarrel Cellars

This writing is located next to a Typhon cache on a rock wall in a cave behind a waterfall in the Estate Gardens.


Nekrotafeyo

Desolation’s Edge

This writing is located in the Twilight Arcade in the southwest. See the map below for the exact location.


Desolation’s Edge

This writing is located in the Chancellor’s Throat where the Bad Vibrations side mission took place. See the map below for the exact location.


Tazendeer Ruins

This writing is located in Pertinence and Light near the elevator in the vault. See the map below for the exact location.


The Pyre of Stars

This writing is located in Hallowed Shame near the steam to Eden-6 Pedestal.


Borderlands 3
Guides

Borderlands 3 – Nekrotafeyo Typhon Logs and Dead Drop Crew Challenges

by Chappie in


Desolation’s Edge

A Testament to Longing

This log can be found at the back of the Testament to Longing on the south side of the map. See the map below for the exact location.


The Conqueror

This log can be found overlooking the eastern part of the Conqueror on a small cliff. To reach it you will have to head through the Strain on the southeast side of the map or enter the cave on the eastern part of the Conqueror that is used as the route to find Typhon. See the map below for the exact location.


The Wake of Doubt

This log can be found in Typhon’s camp on the way to the machine during the First Vault Hunter main mission. See the map below for the exact location.


Desolation’s Edge Dead Drop Cache

This cache is located under the Twilight Arcade in the southwestern part of the map. To reach it, you will have to melee some red vines on the side of the temple. The cache will be in a side room, through a waterfall.


Tazendeer Ruins

The Last House

This log can be found under a metal shack overlooking a lake in the Last House area located in the north of the map. See the map below for the exact location.


Charnel Keep

This log can be found in the northern part of the map, east of the fast travel station close to the path you travel during the Footsteps of Giants main mission near a stream. See the map below for the exact location.


Vault of the Serpent

This log can be found in the Vault of the Serpent near Typhon’s bed. See the map below for the exact location.


Tazendeer Ruins Dead Drop Cache

This cache is located in Charnel Keep at the central northern area of the map. It will be off the beaten path, so to reach it look for a small opening under some vegetation that will lead you to the cache. When you emerge, take a left and carefully drop down off the cliff to the ledge below.