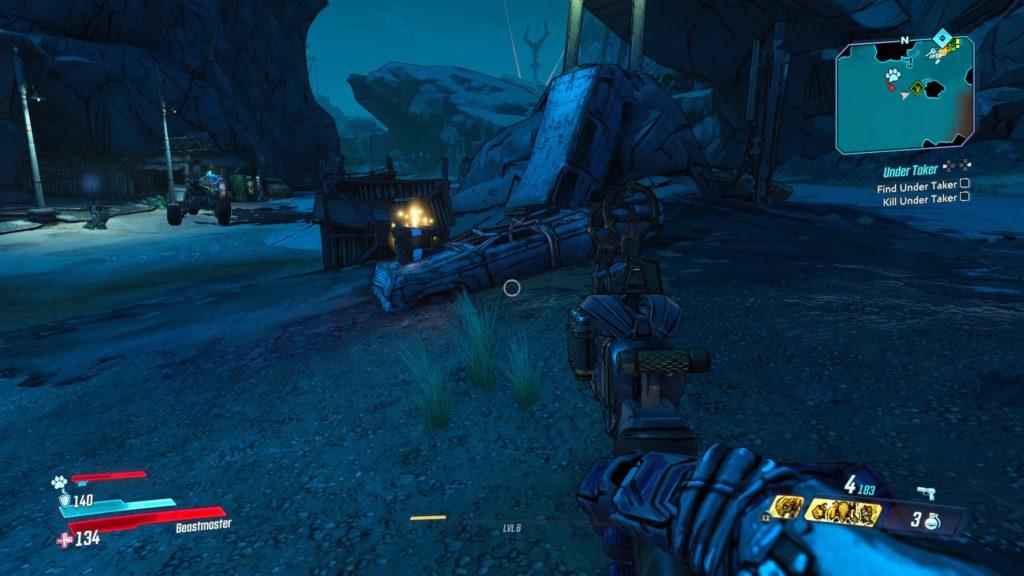
This dead claptrap is located in a cave between Meridian Outskirts drop pad and the Meridian Outskirts fast travel station.
Meridian Metroplex
Stairwell (Stair-Climbing Update)
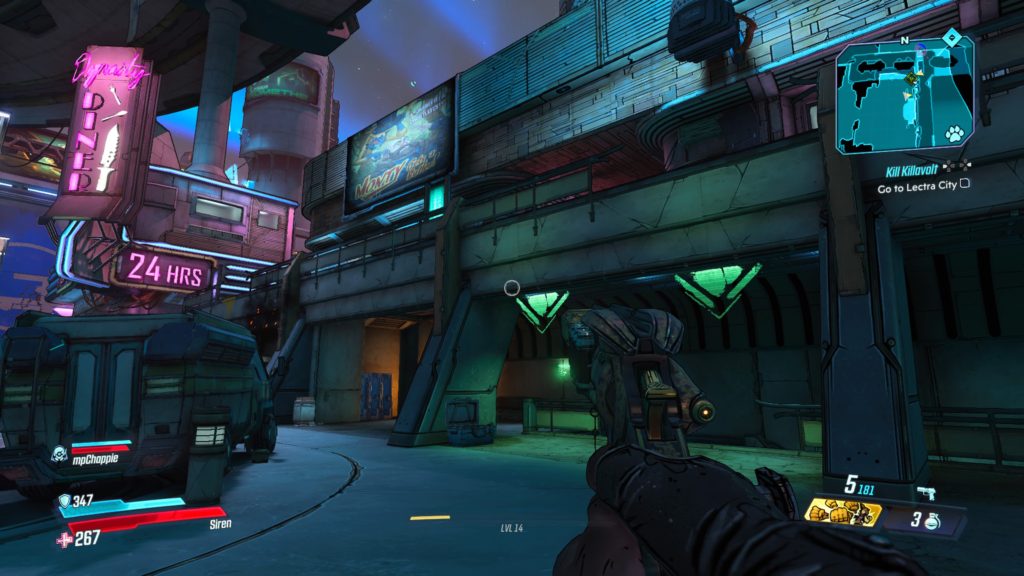
This dead claptrap is located in a stairwell to the right of Dynasty Diner (near the center of the map). Head below the green arrows in the image above to enter the stairwell containing the claptrap.
Lectra City
Downtown Square (8th Gen Emotive Resonator)
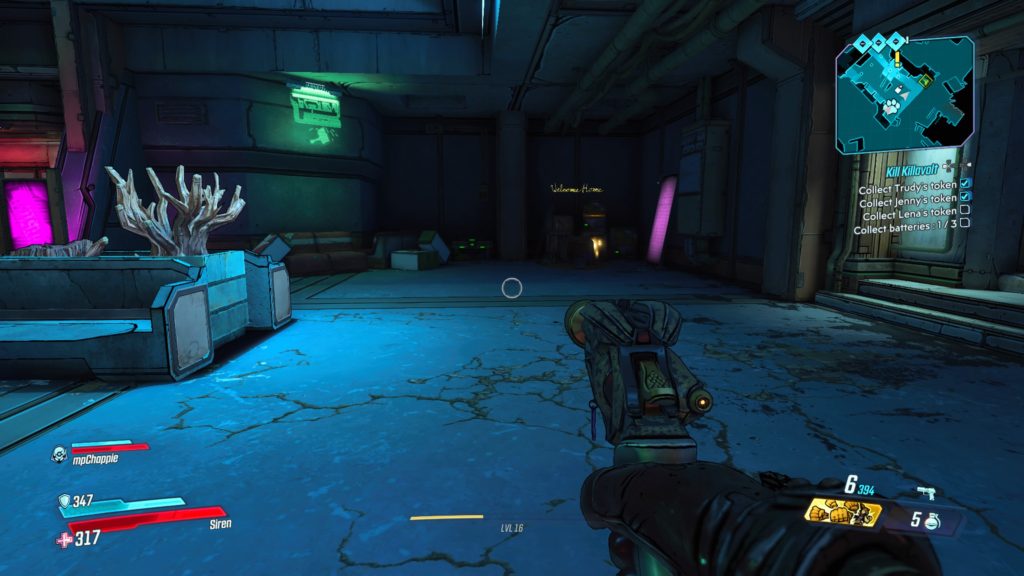
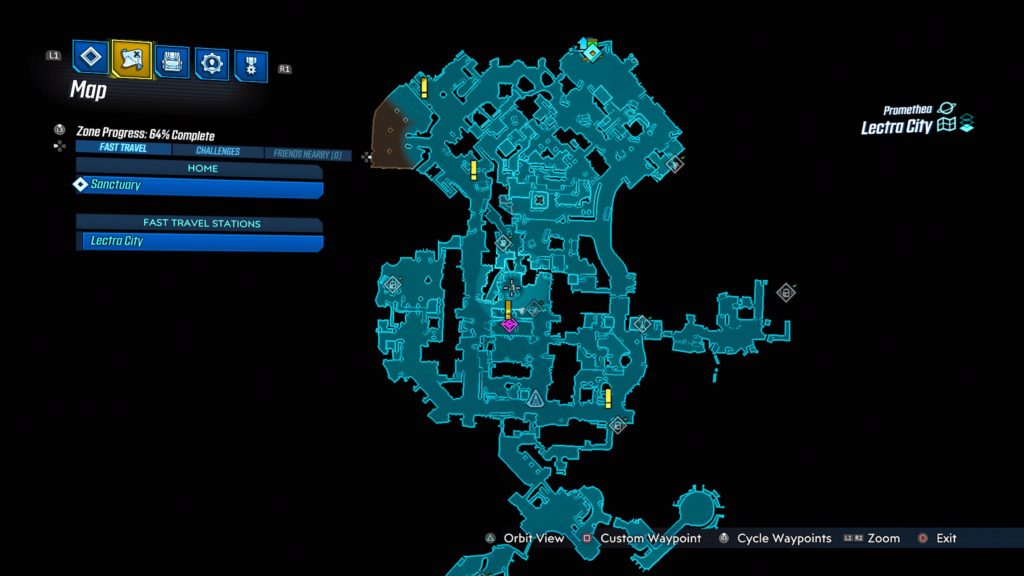
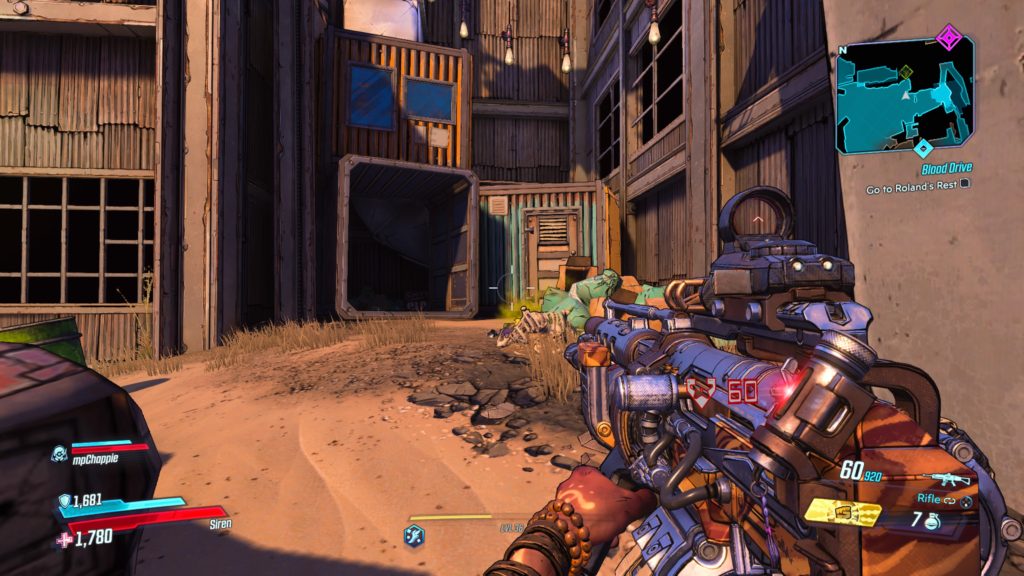
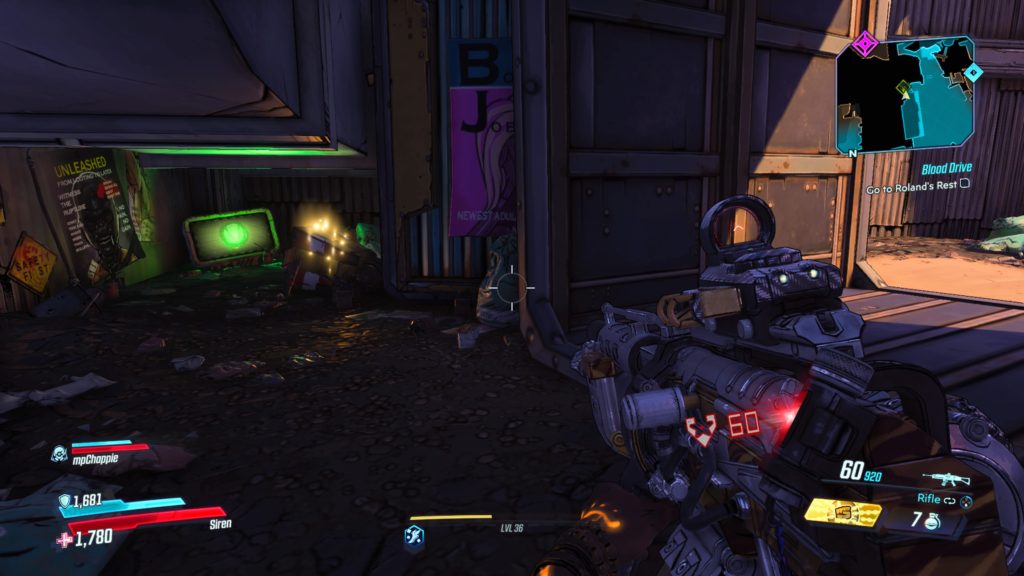
This dead claptrap is located under the Welcome Home neon sign in the Underpass in south-central Lectra City. To reach it, take the big concrete stairs in Downtown Square down to the area where you fight Jenny during the Kill Killavolt side mission. The dead claptrap is located in this room in the back corner.
Market Quarter (Eye Rotor)
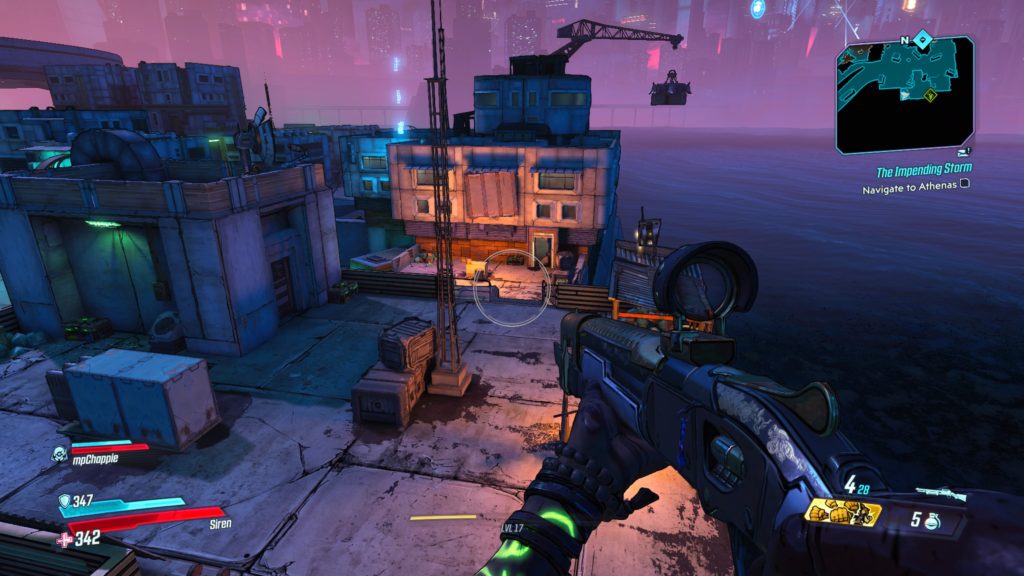
This dead claptrap is located directly south of the Lectra City fast travel station on the roof of a shack overlooking the docks.
Skywell-27
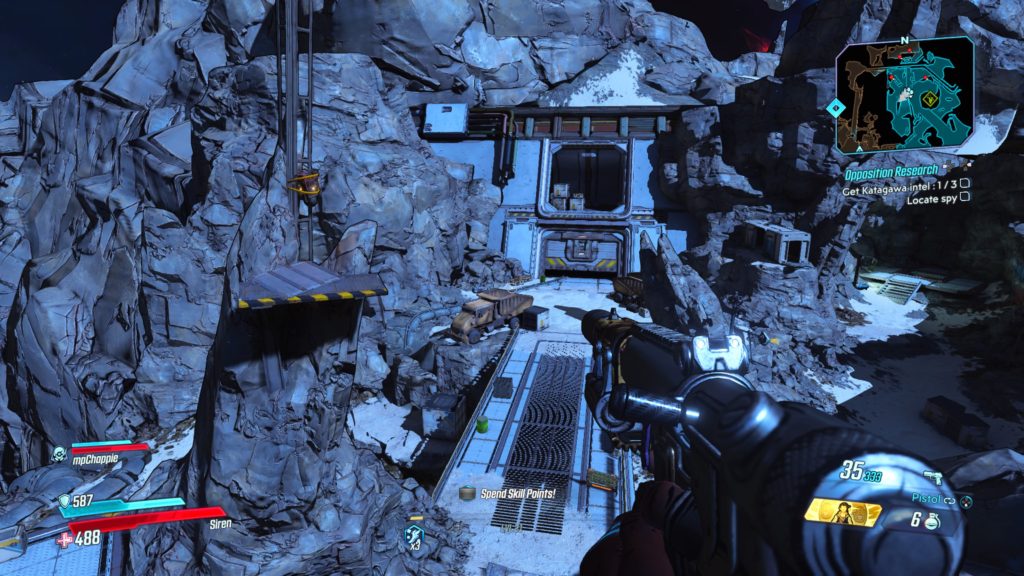
Sector 2 (Antenna)
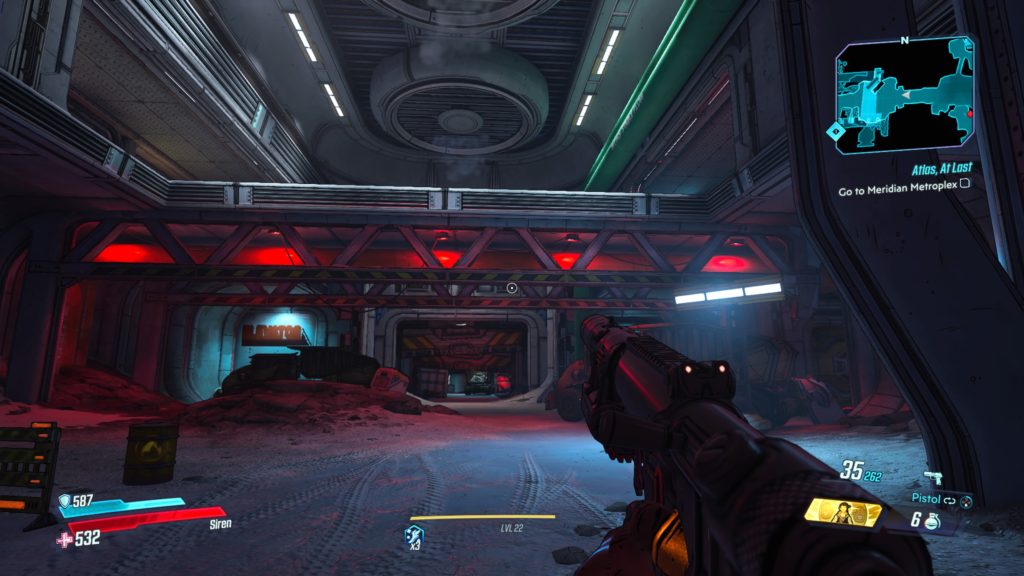
This dead claptrap is located in Sector 2 of the Maliwan base. This is after passing the large elevator that leads to the laser and climbing through the vents leading back outside. Claptrap will be tied to a metal radio tower connected to a rock just past a bridge in the middle of the path. You will need to climb up the big rock across from the tower to jump over to it.
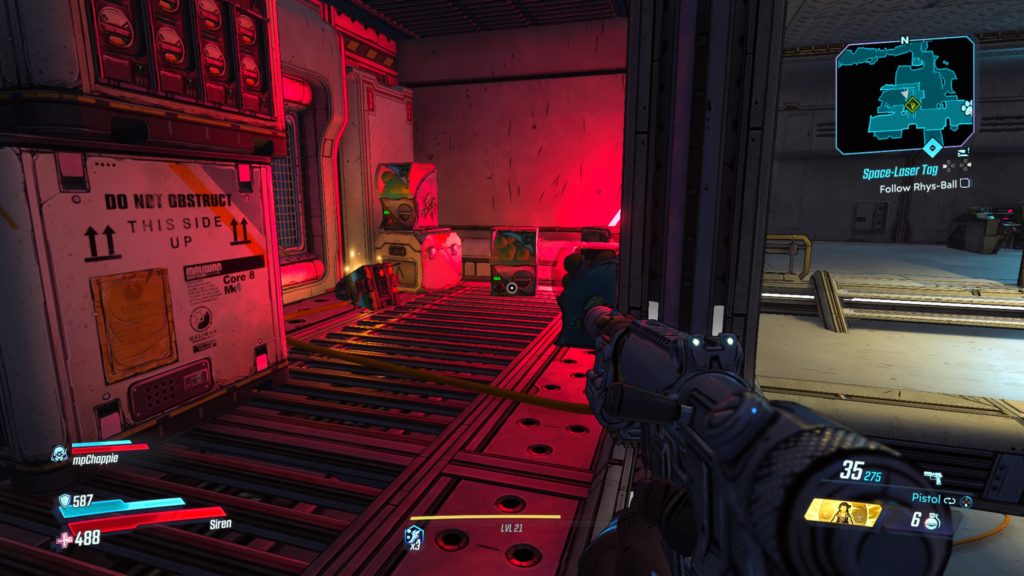
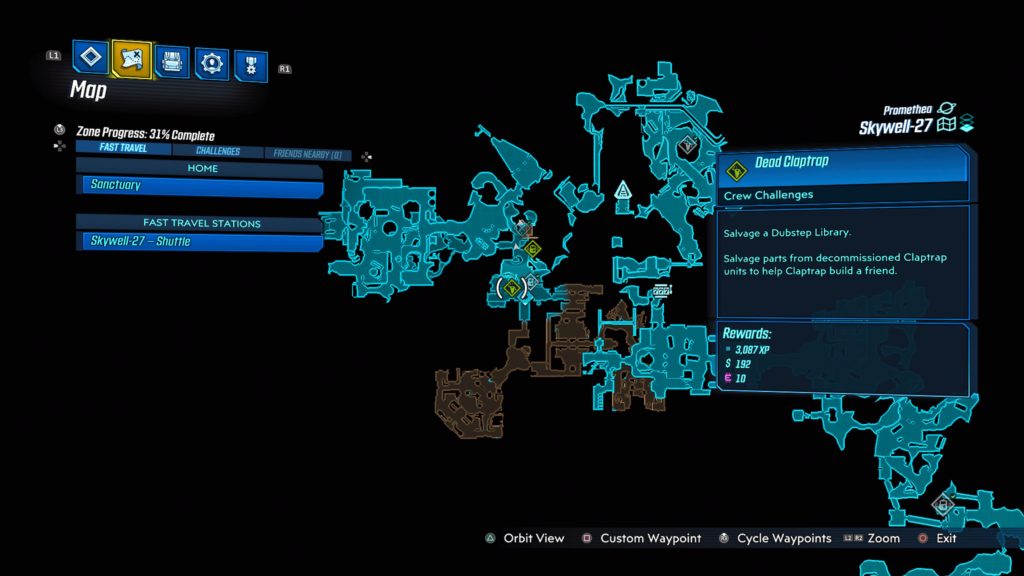
Observation Deck (Dubstep Library)
This claptrap is on the second level of a building in the Observation Deck. See the image below for the exact location. To reach it, you will need to jump down the long chute in Sector 4. This will place you in Fuel Processing. Exit through the door to enter a room containing a cylinder with a blue sphere in the middle of it. Take a right and follow the walkway down a couple of steps. Take another right and enter the building there. Climb up the two flights of stairs then jump through the open section of the wall to locate it.
Atlas HQ
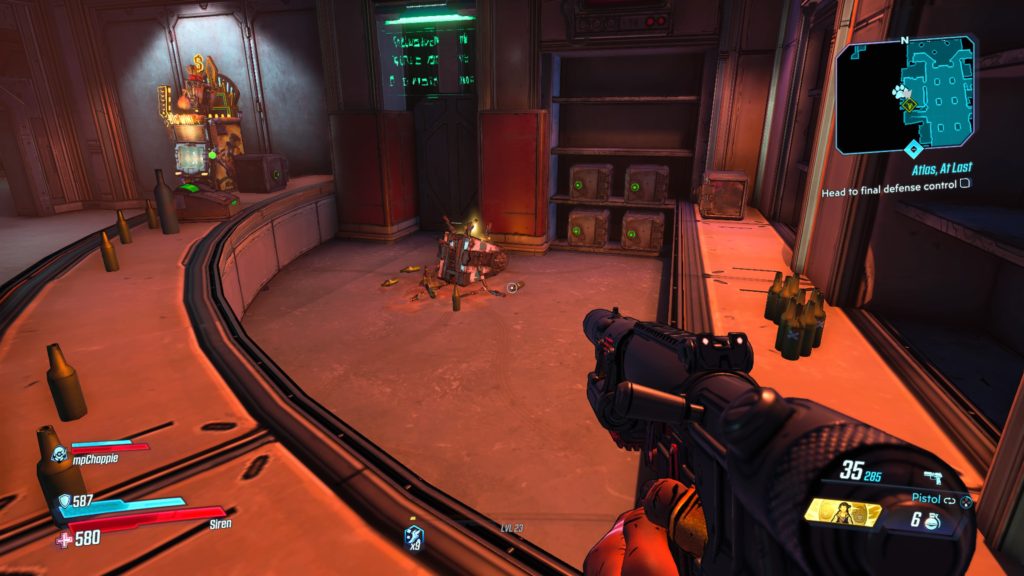
Lobby of Self-Actualization (Claptrap-VPN)
This dead claptrap is located in Atlas Tower behind a bar on the second floor. Enter Atlas and head forward, past the spinning gold ball, then under the red ATLAS sign in the middle of the walkway. Follow the walkway forward until you reach a set of double doors. Instead of heading through them, take the flight of stairs up on the left or right side of the doors to reach the second level in the Lobby of Self-Actualization. The bar will be in the room on the northeastern side of the walkway.
Neon Arterial
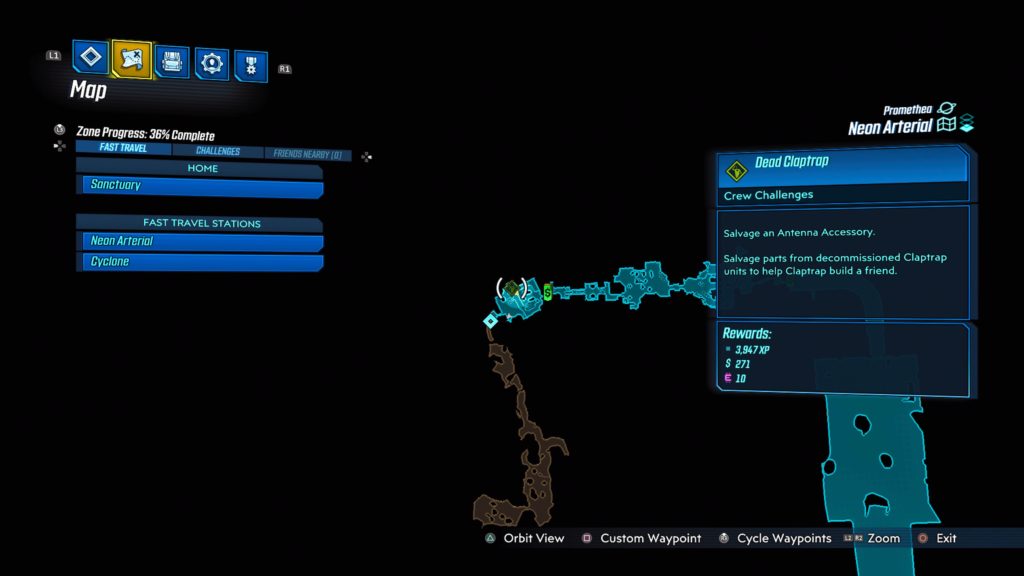
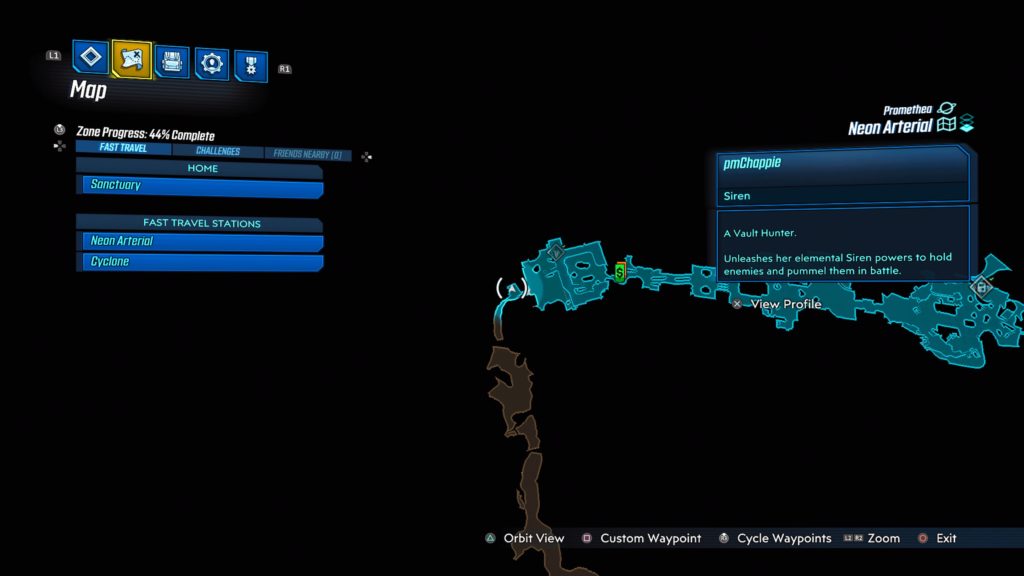
Green Diamond Platform (Antenna Accessory)
This dead claptrap is located on the train track in the middle of the Green Diamond Platform. See the map below for the exact location.
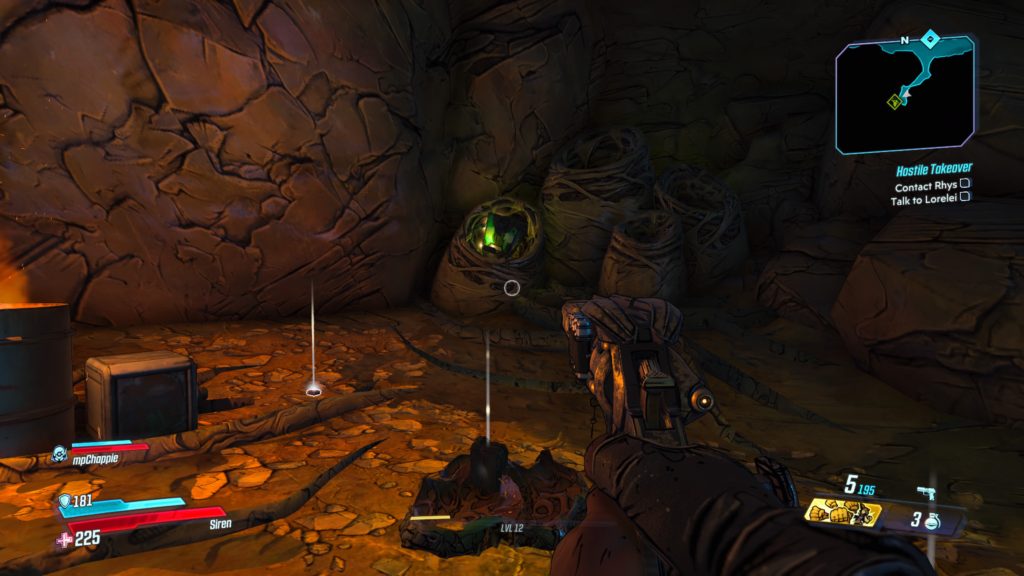
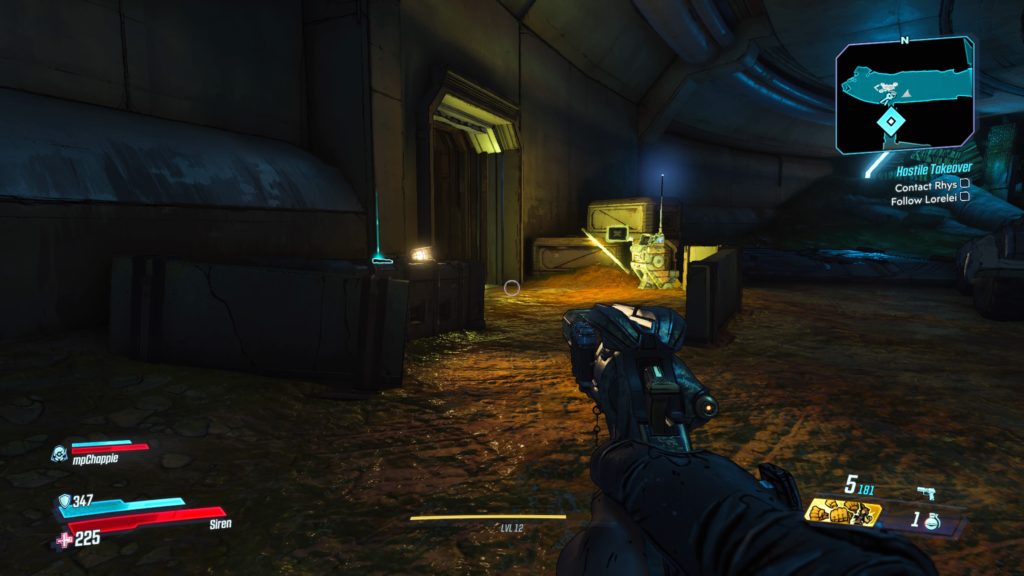
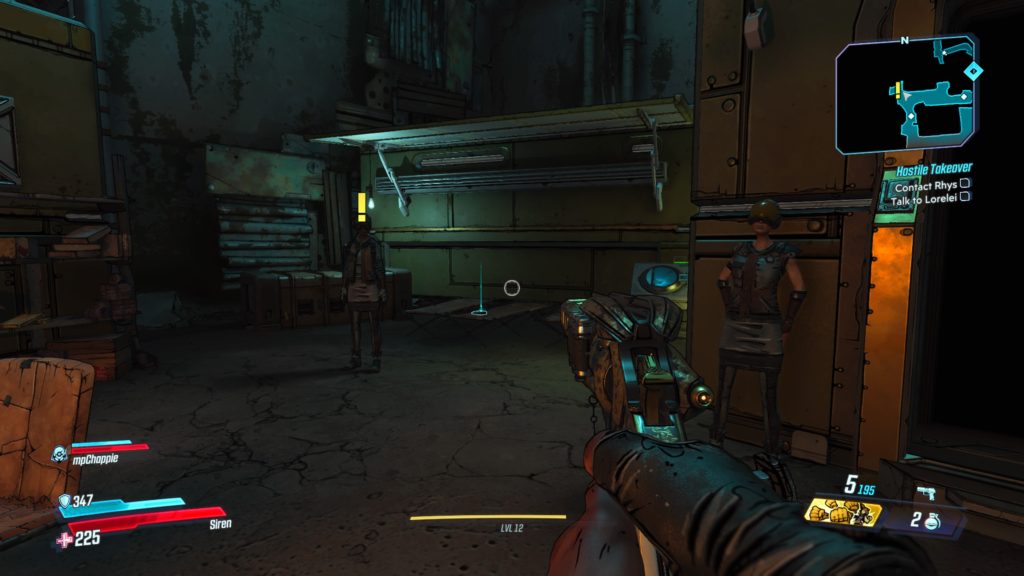
This log is located on a metal crate just before the civilian camp that Lorelei takes you to during the Hostile Takeover main mission (near a Catch-A-Ride).
Marcus Munitions (Part 1)
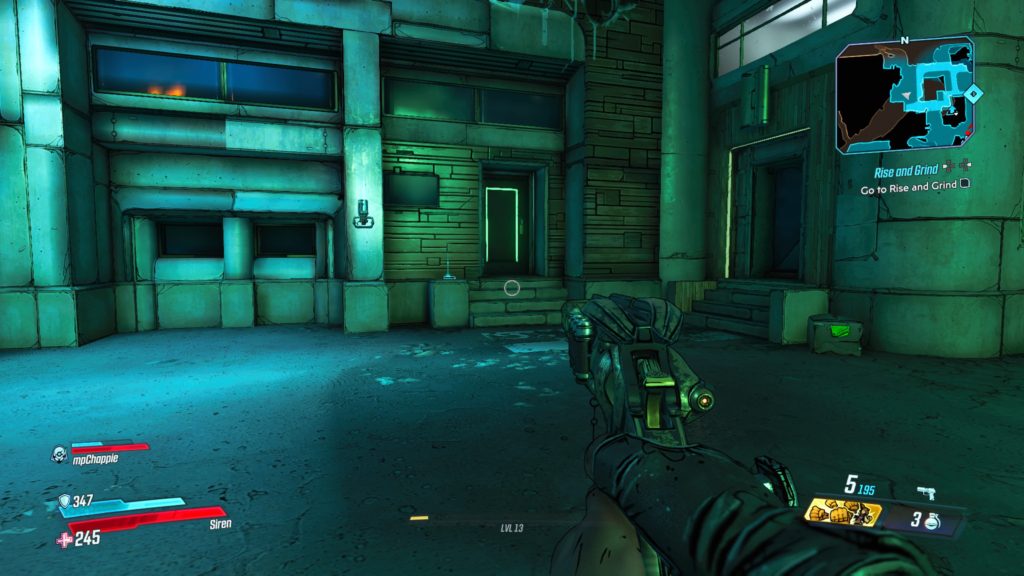
Located in a tunnel across (north) of Fort Pissoff (contains the Meridian Outskirts fast travel station) on a metal crate near the elevator leading to the top of the bridge. You can reach it after completing the Hostile Takeover main mission.
Occupational Hazard
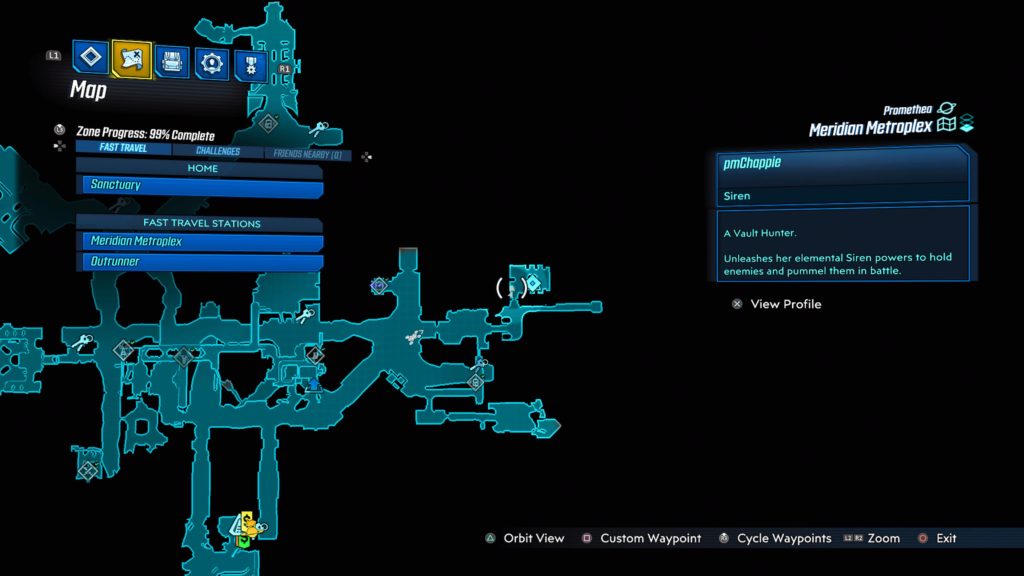
This log is located on a cot behind Ziff in the area just before the Meridian Metroplex map transition.
Meridian Metroplex
Sitrep
This log is located near some steps next to a door in the middle of a bunch of buildings directly north of the Meridian Metroplex fast travel station.
Morning Meridian
This log is located on the ground in front of a building with a billboard advertising Vault Hunters The Motion Picture. The building is on a bridge near the center of the map close to where you find Beau during the Dynasty Dinerside mission.
Daily Grind
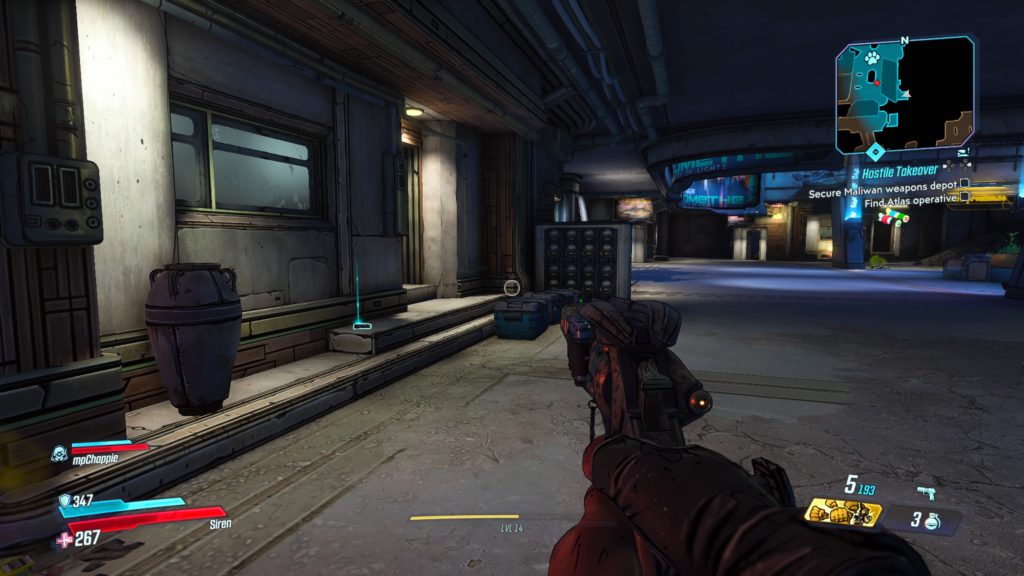
This log is located on the ground next to a door just before the Maliwan Weapons Depot in Meridian Mercantile on the western side of the map, which you access during the Hostile Takeover main mission.
Lectra City
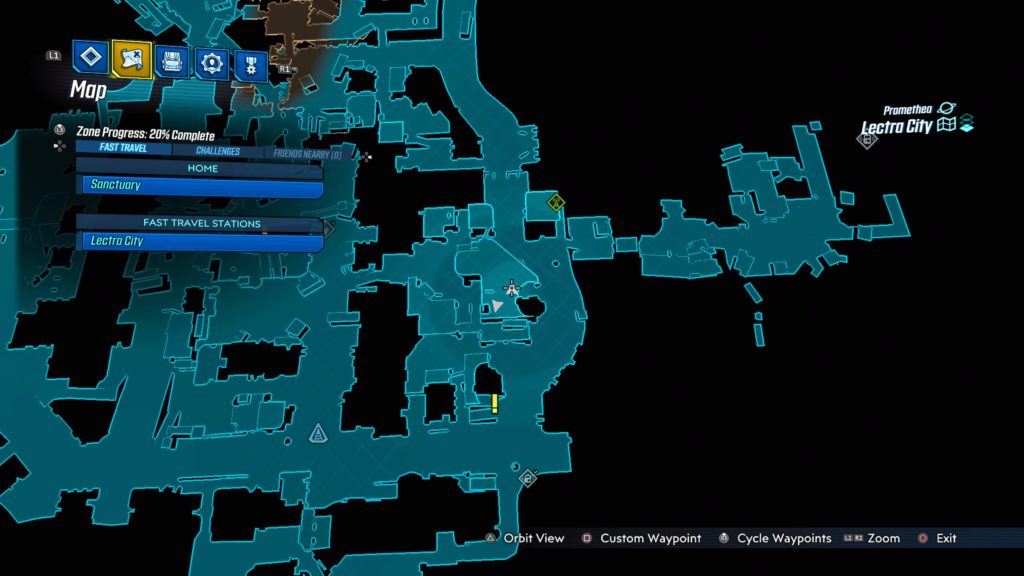
Lashley (Part 1)
This log is located near the center of the map on a platform near the top of a bridge support. See the map below for the exact location. To reach it, you will have to climb up to the roof of an adjacent building to jump across to it. This is close to where you fought Trudy during the Kill Killavolt side mission.
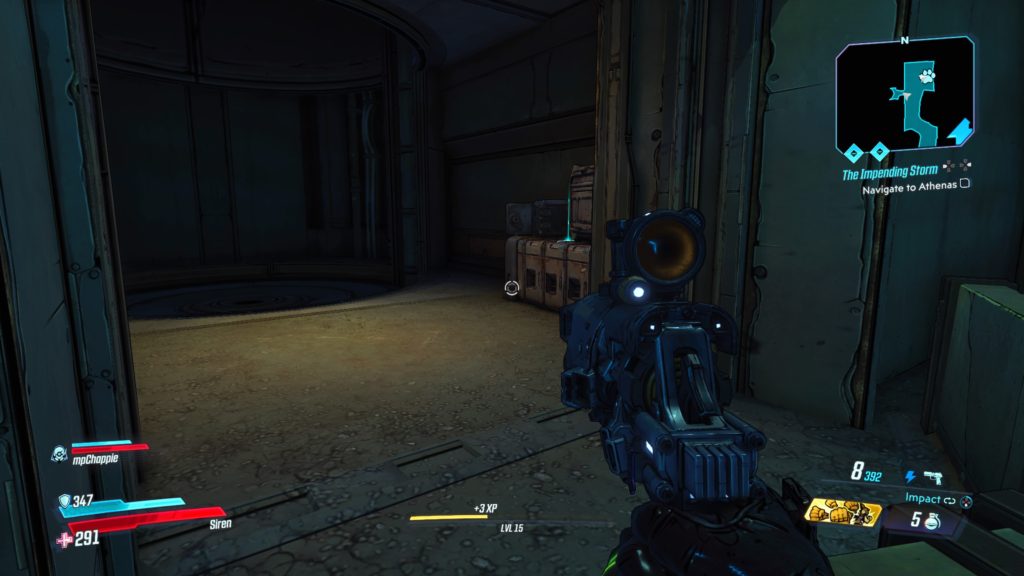
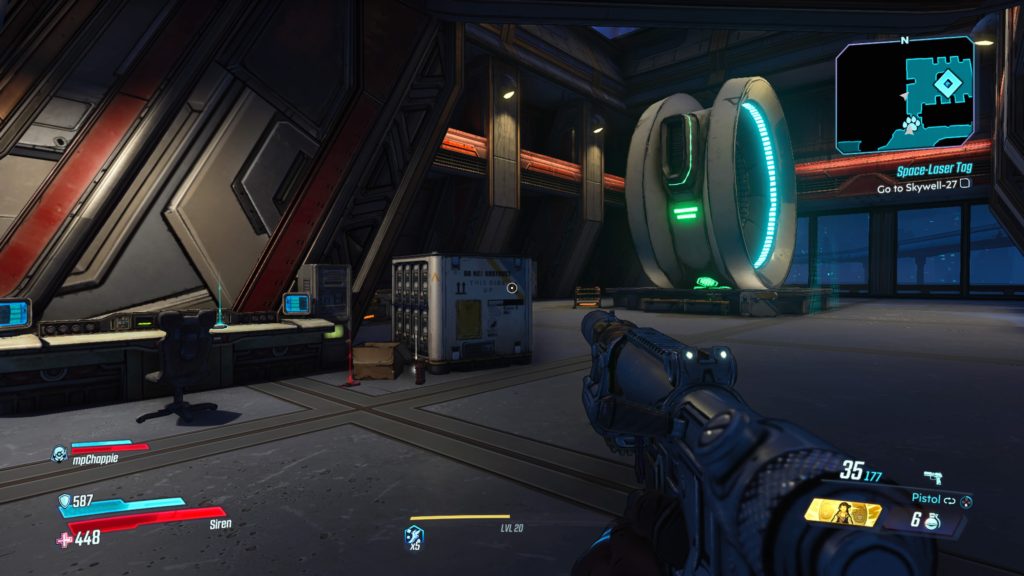
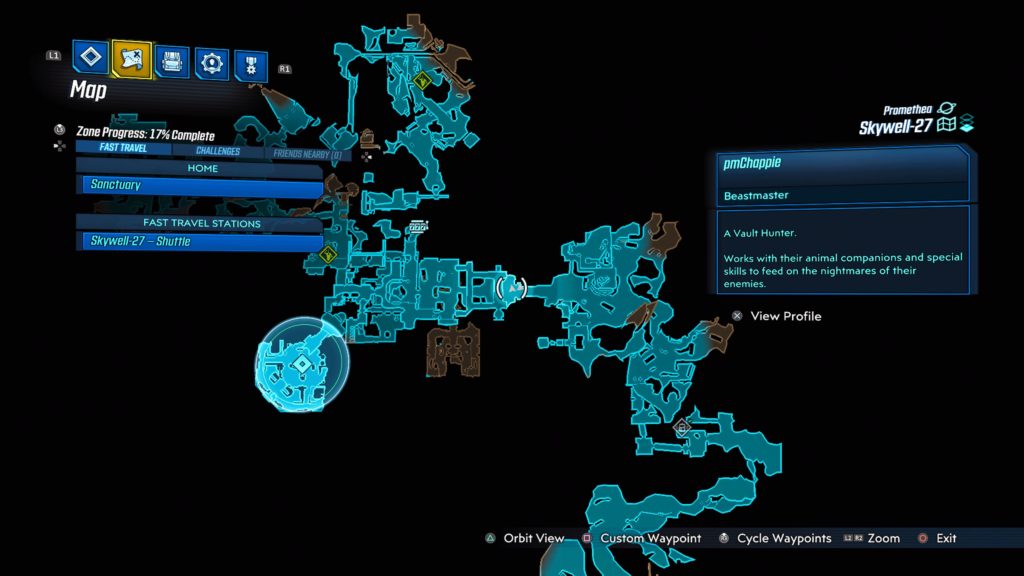
This log is located in the most northeastern building on the map where you borrow the Maliwan shuttle during the Space-Laser Tag main mission (at the Skywell-27 map transition) on a desk near the entrance. See the map below for the exact location.
Laser Technician
This log is located past the giant circular door in Sector 1 that leads to the elevator in the Maliwan facility. See map below for the exact location. To reach it, jump on top of the light located on the right side of the room next to a dump truck under a bridge. Jump on top of the bridge and head left to find the log laying on a table in a small room.
Atlas HQ
Bloodbath on the Zanara
This log is located near the entrance to the Courtyard of Innovation coming from the Atlas Campus. You will walk up a flight of stairs to arrive in the courtyard with giant turrets. Take a left (heading south) at the top of the stairs and follow the wall to the end. The log will be located on a metal crate.
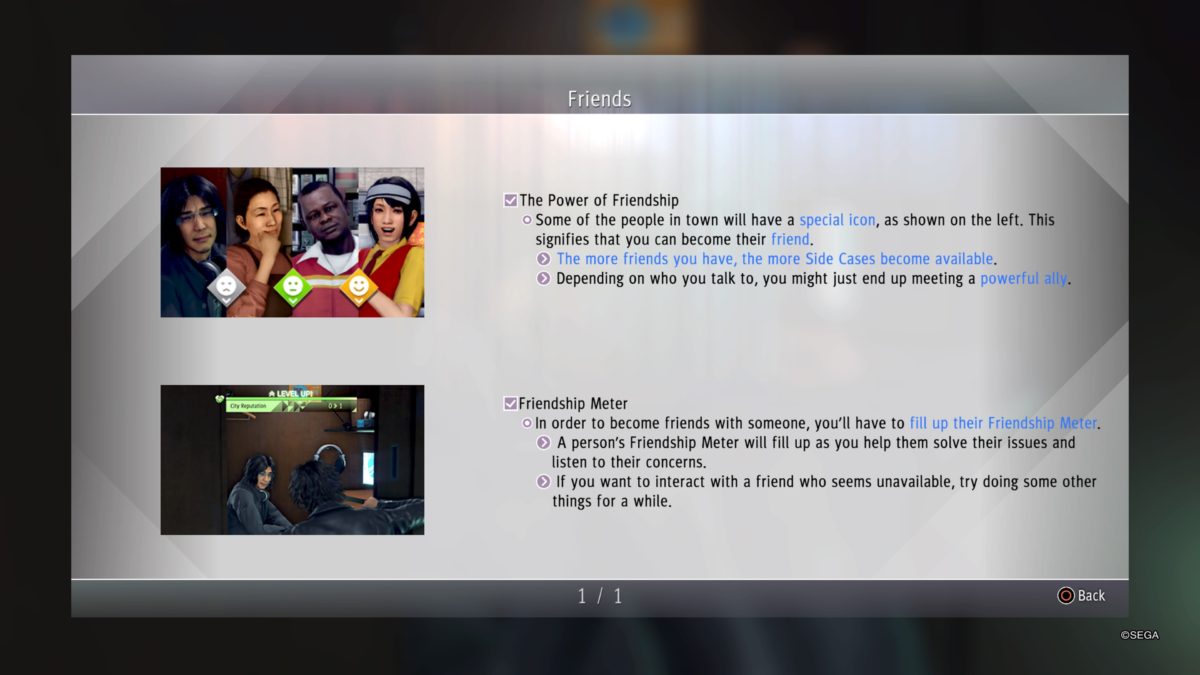
Friends in Invisible Places
This log is located in Atlas Tower. Enter Atlas and head forward, past the spinning gold ball, then under the red ATLAS sign in the middle of the walkway. Enter the first room on the right to find this log on a desk in the back of the room.
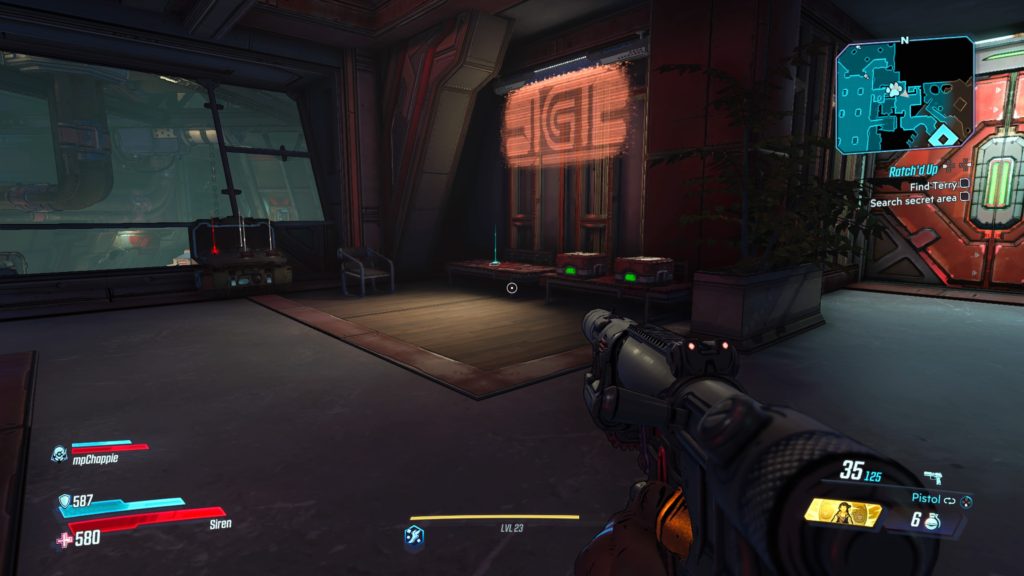
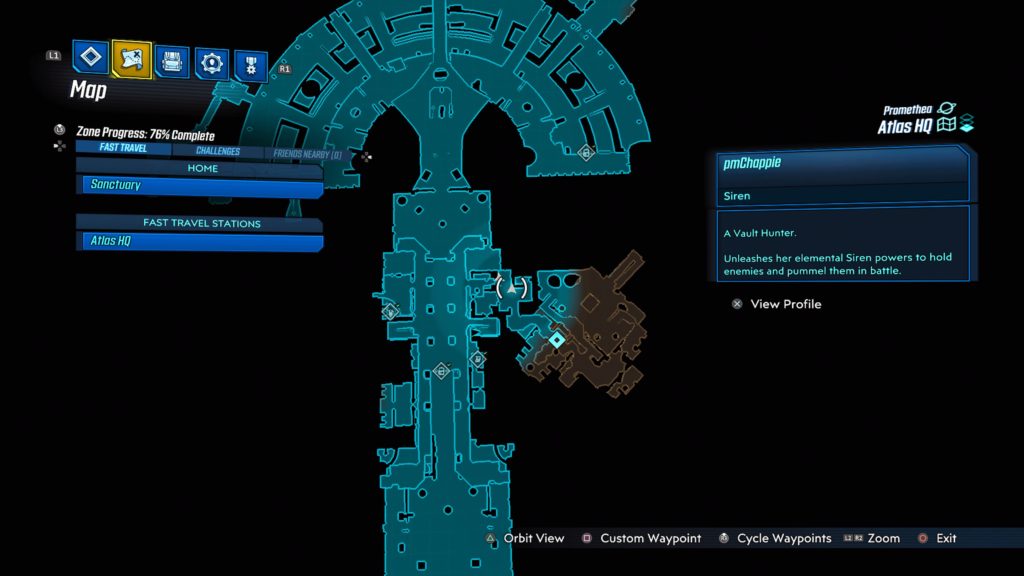
Terry’s Science Dairy (Part 1)
This log is located in the Skunkworks Lab. You can find it during the Ratch’d Up side mission on a cushioned bench. See map below for the exact location.
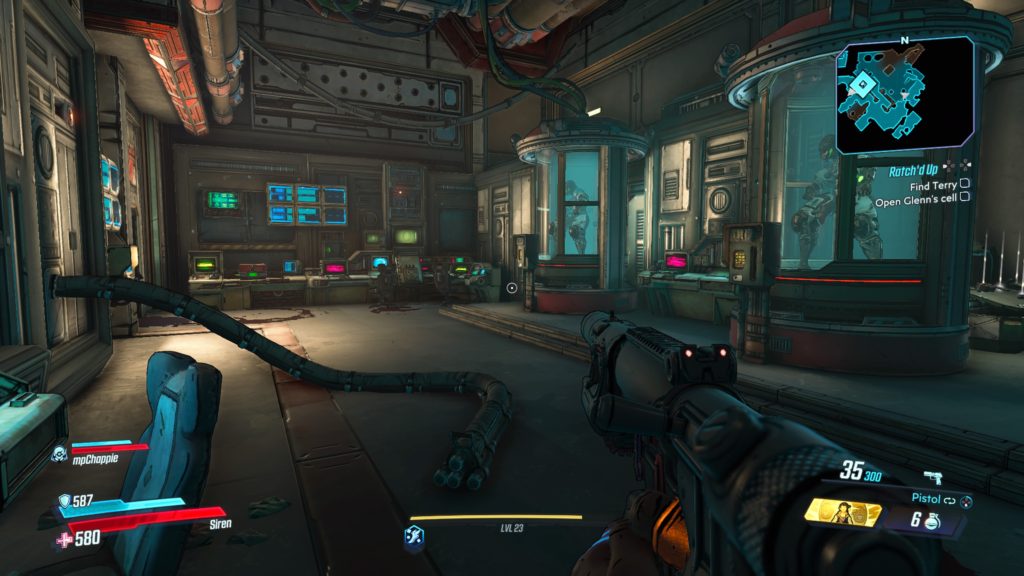
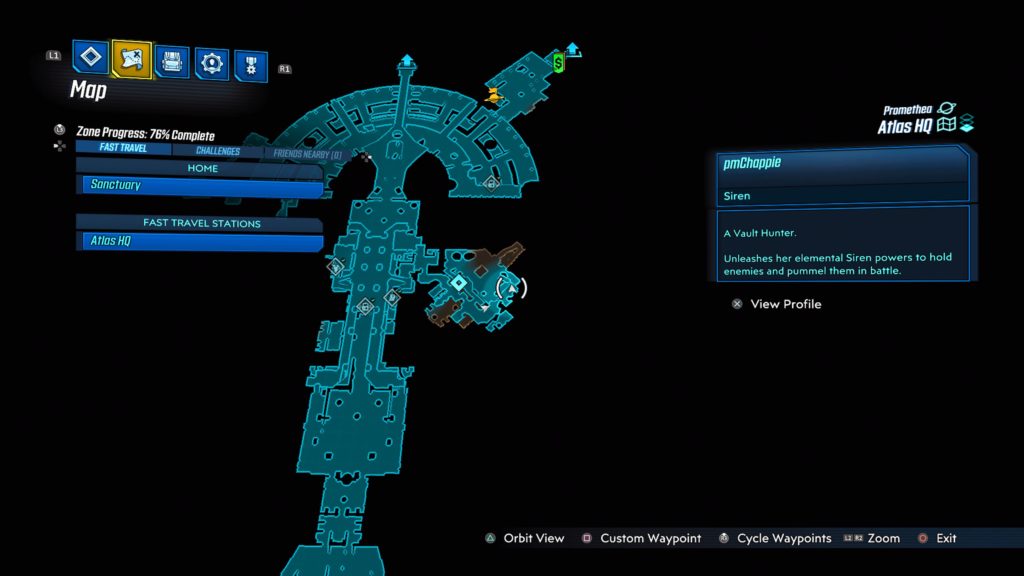
Terry’s Science Dairy (Part 2)
This log is located in the Skunkworks Lab. You can find it during the Ratch’d Up side mission laying on a console in a room with the two cylinder tanks. See map below for the exact location.
Neon Arterial
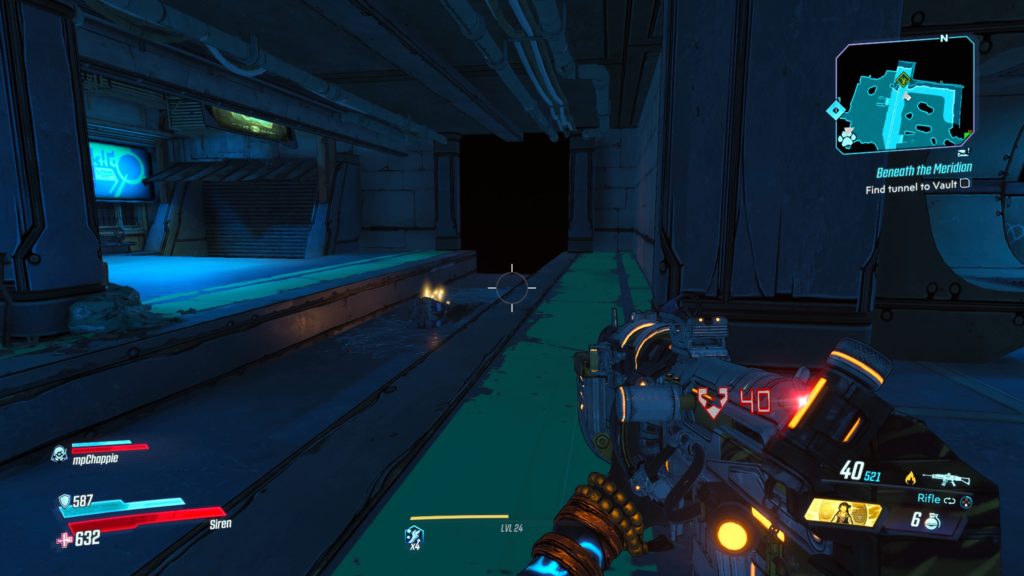
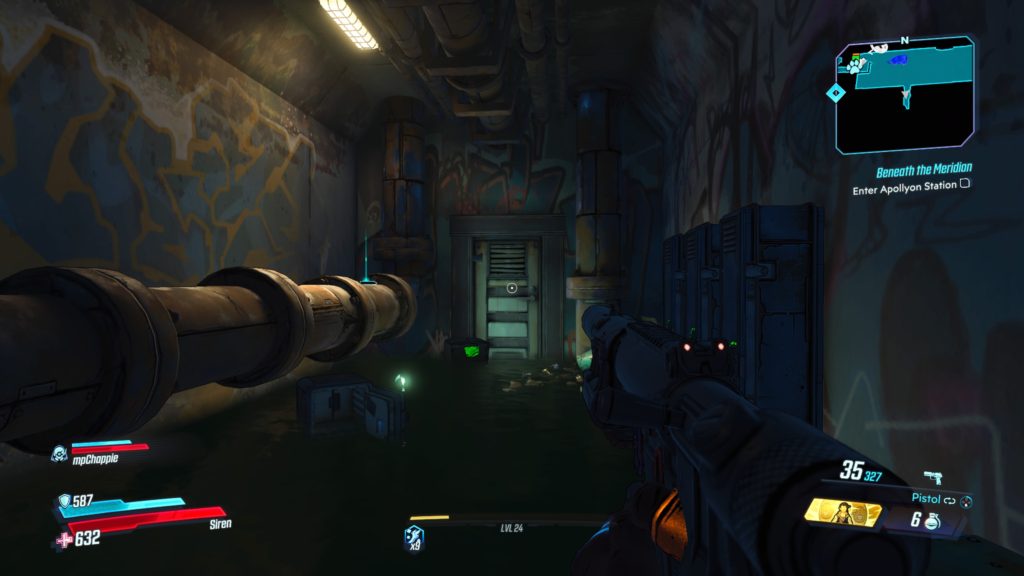
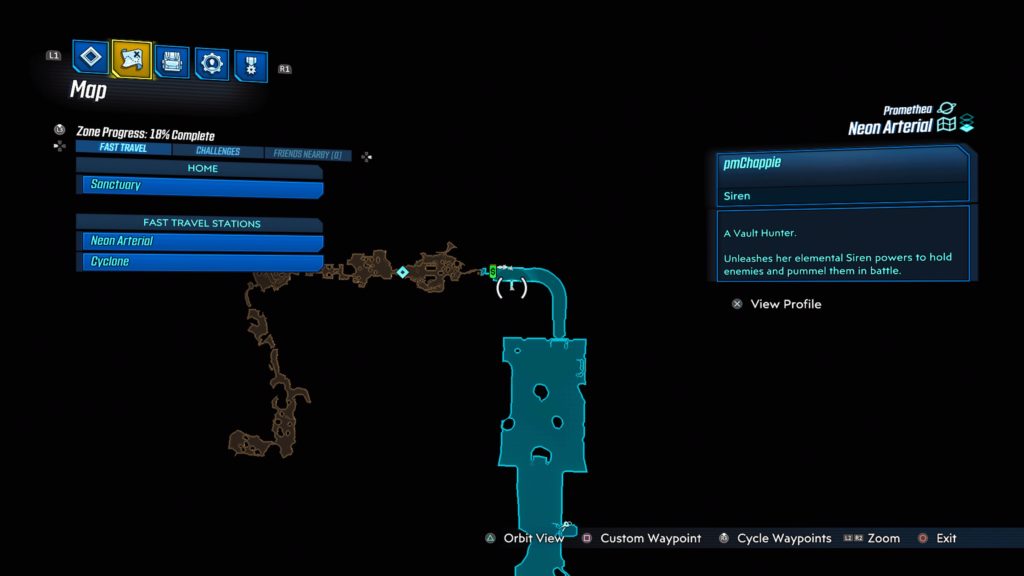
Below (Part 1)
This log is located on a pipe in a tunnel with a dead end just before Apollyon Station. You will come here during the Beneath the Meridian main mission. See the map below for the exact location.
Below (Part 2)
This log is in Apollyon Station on a couch next to some stairs just before the vending machines and Green Diamond Platform. See the map below for the exact location.
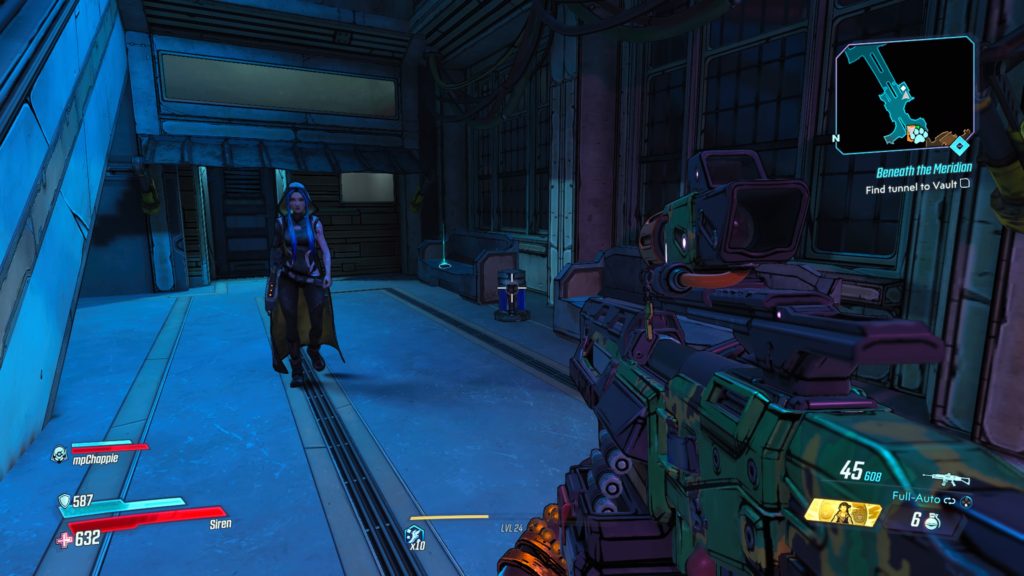
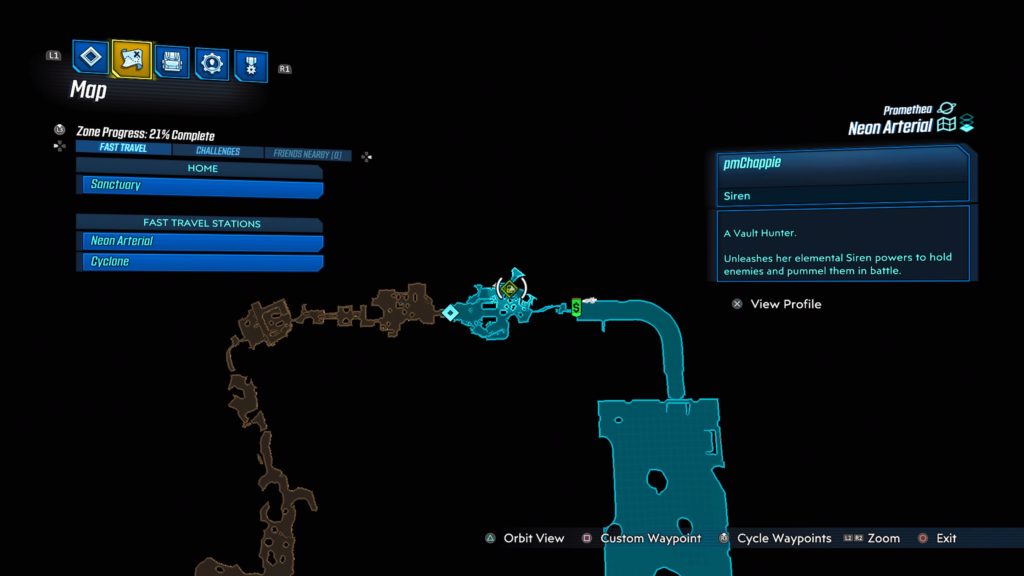
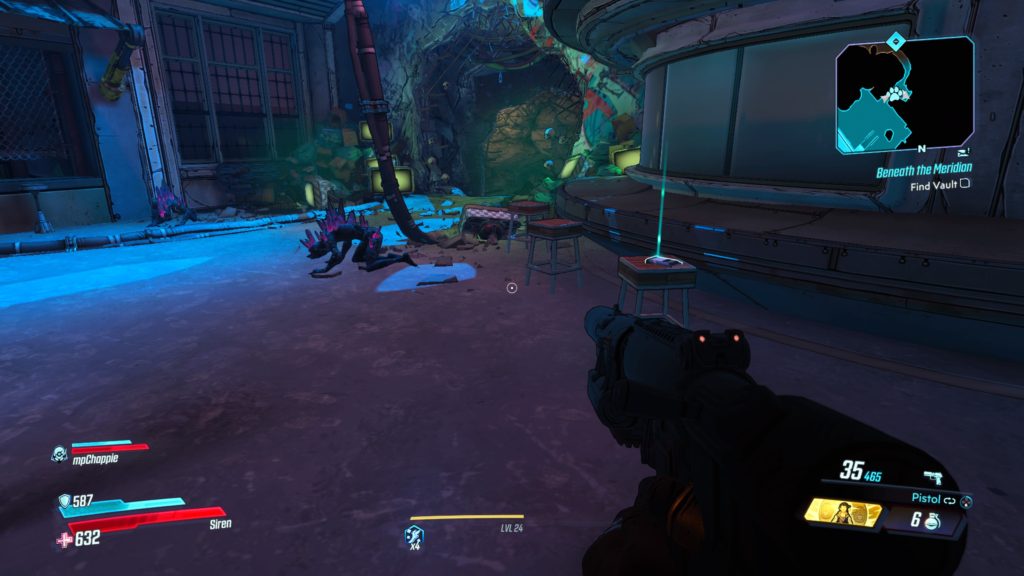
Below (Part 3)
This is log is located on a barstool just before the tunnel leading to the vault in the Green Diamond Platform. See the map below for the exact location.
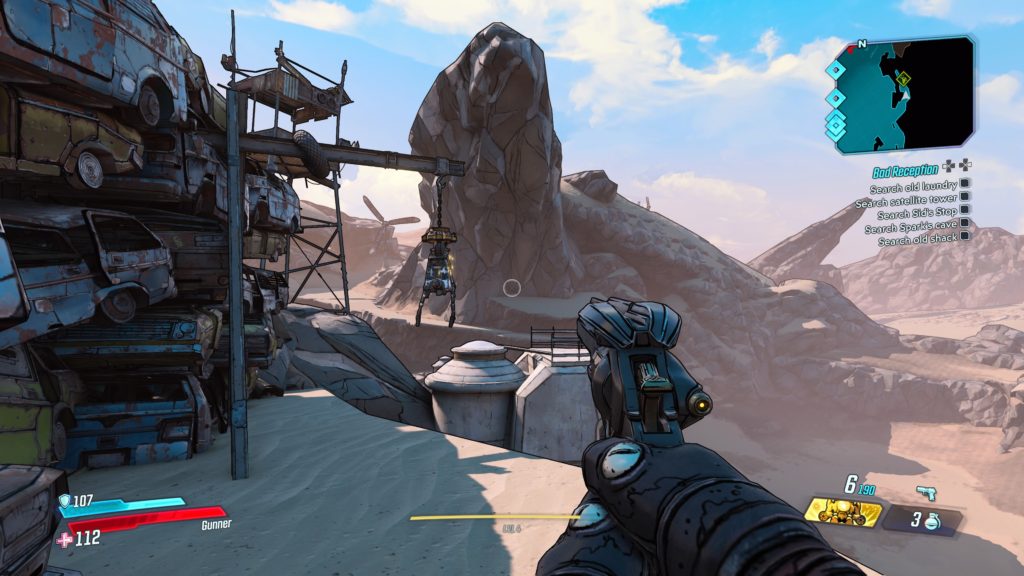
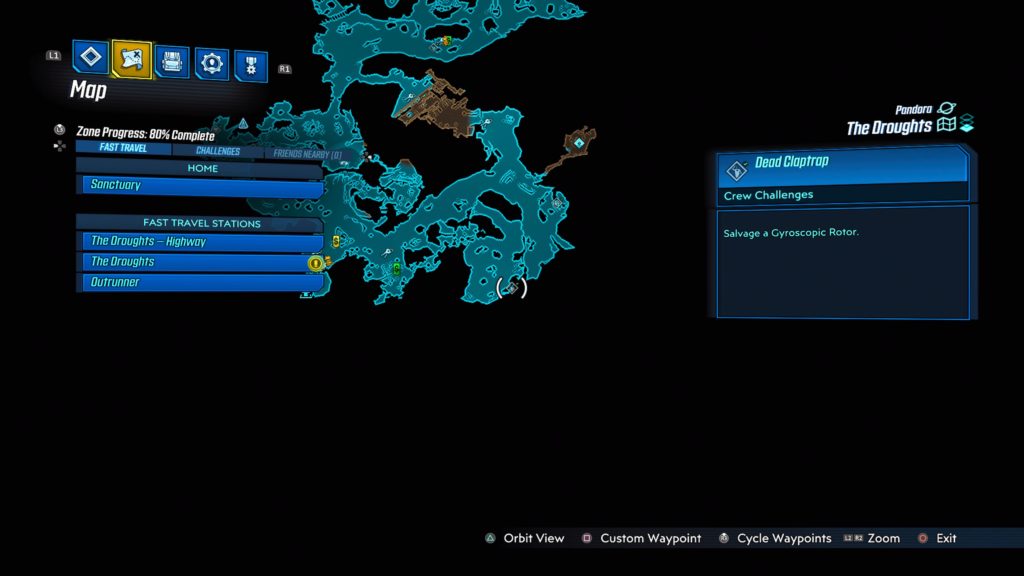
This dead claptrap can be found at the Super 87 Racetrack located in the Droughts on Pandora. See the map below for the exact location. To reach it, head to Ellie’s Scrapyard via Ellie’s Garage and follow the path under the Ellie’s Crap billboard to reach the racetrack. Once there, make your way to the northern part of the canyon to locate the wall of cars along a cliff. The Claptrap unit will be behind the wall, hanging upside down from a magnet.
The Droughts – Highway (Motor)
This dead claptrap is located on the hood of a car a short distance (southwest) from the Droughts – Highway fast travel station.
Ascension Bluff
The Path of Sacrifice (Supermax Deluxe 3D Surround System)
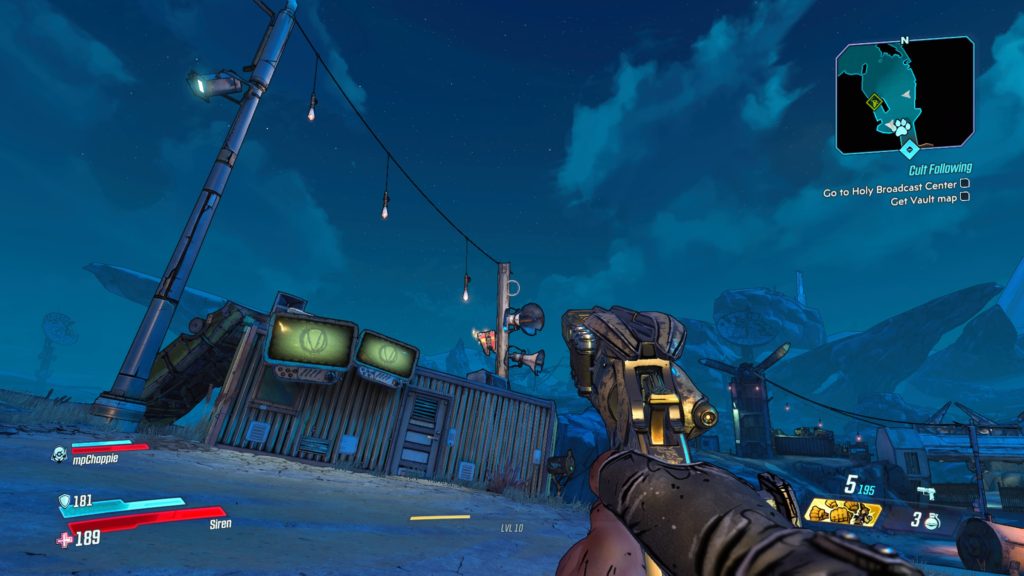
This dead claptrap can be found on the Path of Sacrifice leading to the Holy Broadcast Center at Ascension Bluff. See the map below for the exact location. It will be tied to a metal pole holding up some lights and speakers.
Devil’s Razor
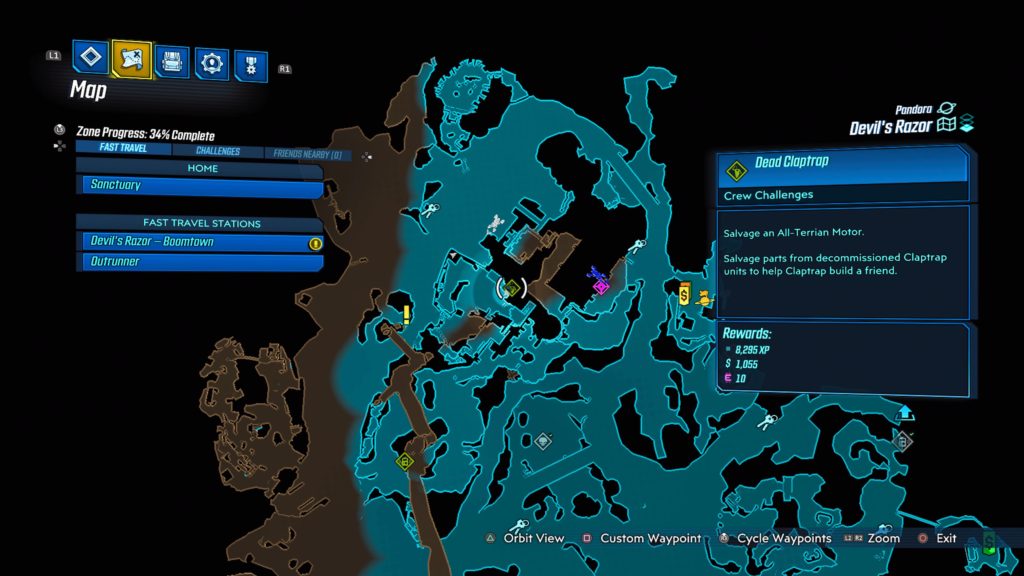
Sin-A-Plex (All-Terrain Motor)
This claptrap is behind some storage units stacked onto of each other in the Sin-A-Plex located in the northern section of the map. See the map below for the exact location.
The Splinterlands
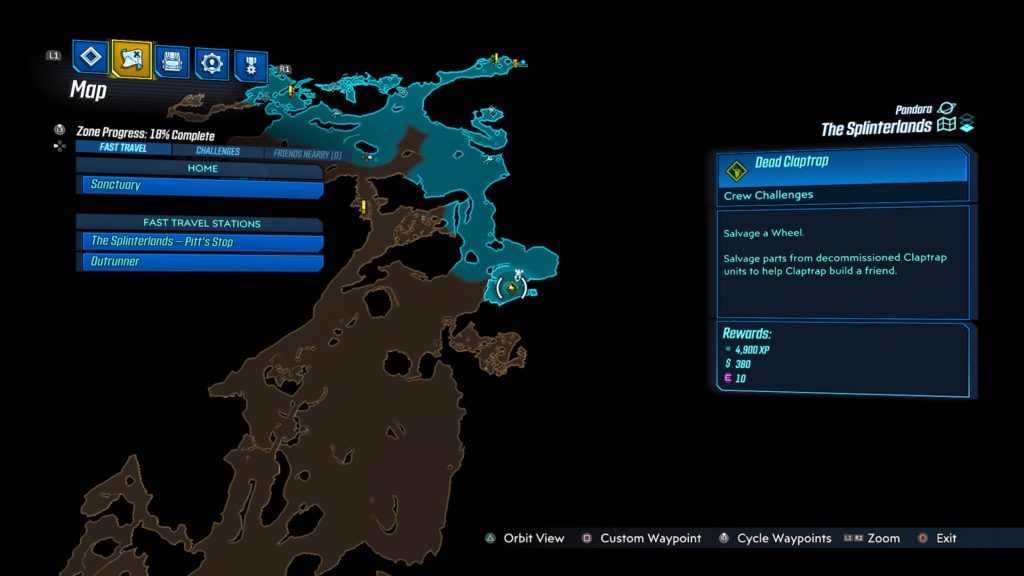
Wheel
This claptrap is located inside a wheel next to the giant roller coaster in the southeastern region of the map. See the map below for the exact location.
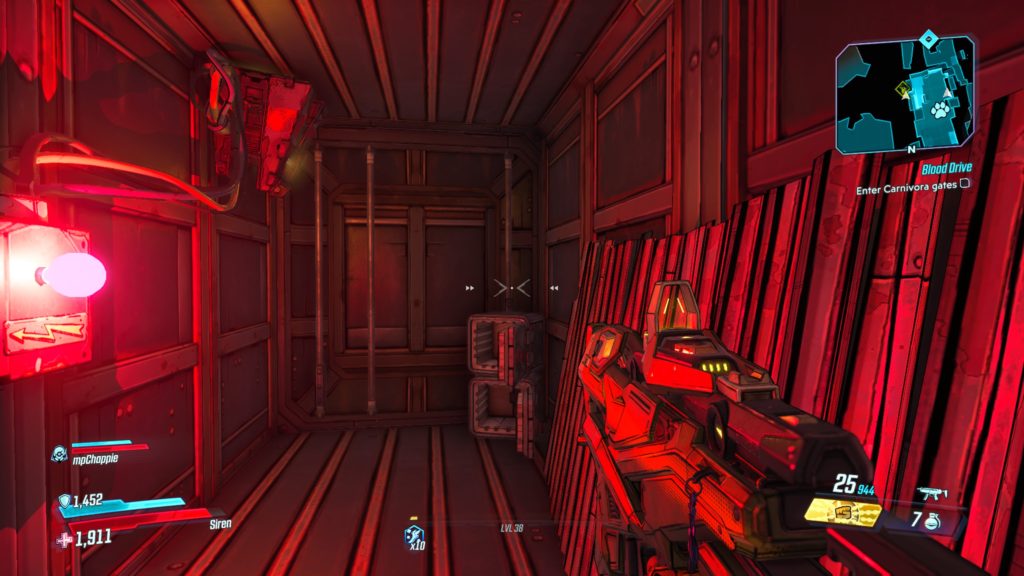
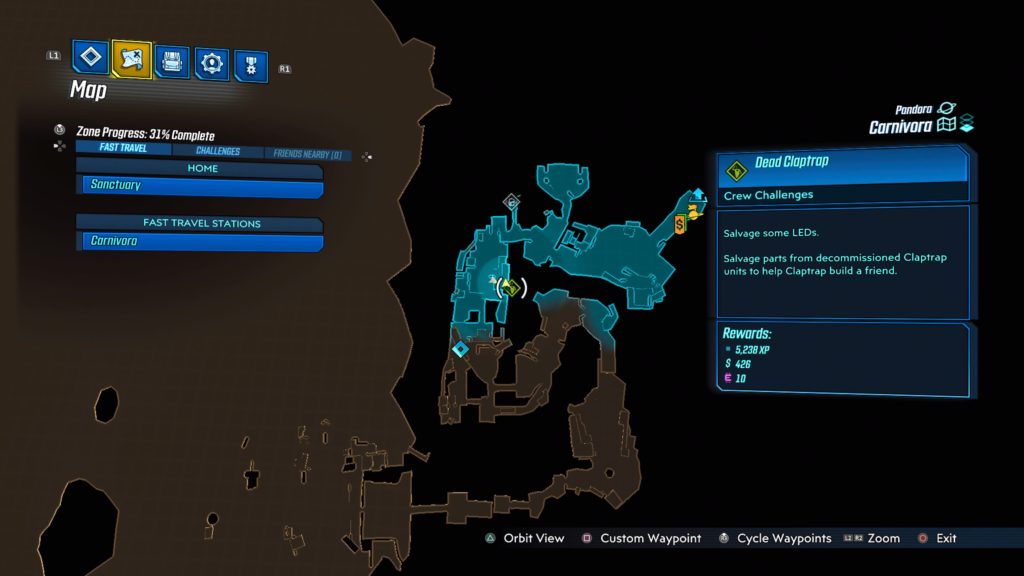
Carnivora
The Stacked Deck (LEDs)
Claptrap is located directly south of The Stacked Deck Typhon Log behind a bar like area in the bottom level of a storage unit that is lit with a red light. See the map below for the exact location.
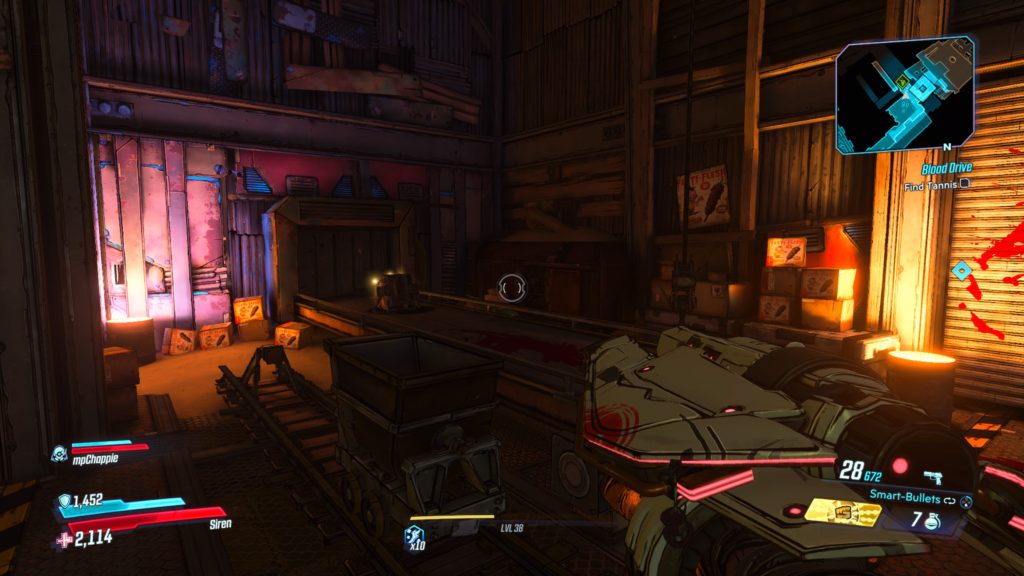
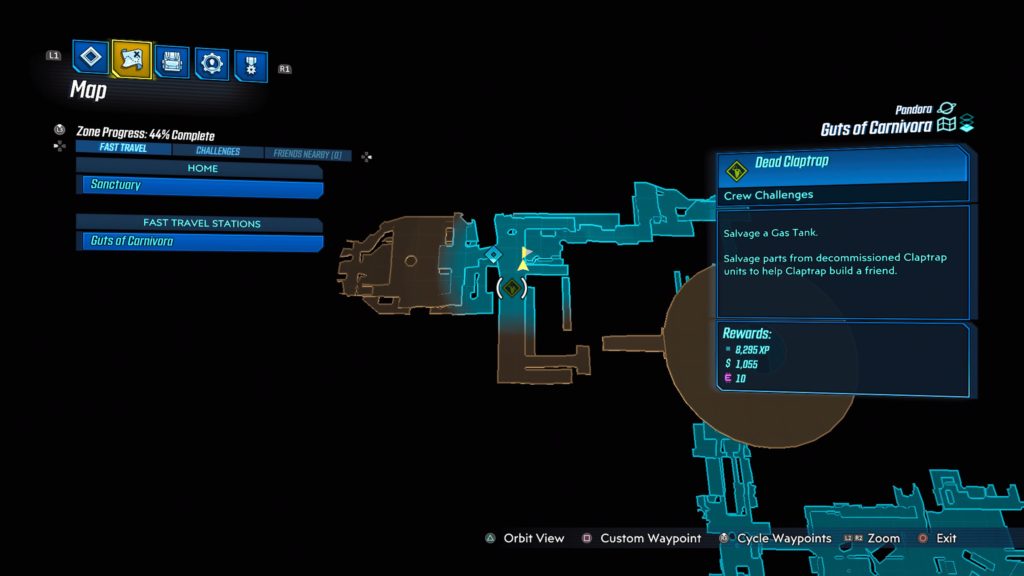
Guts of Carnivora
Windshaken Catwalks (Gas Tank)
Claptrap is located at the end of a conveyor belt just before Mack’s Head Room. See the map below for the exact location.
Konrad’s Hold
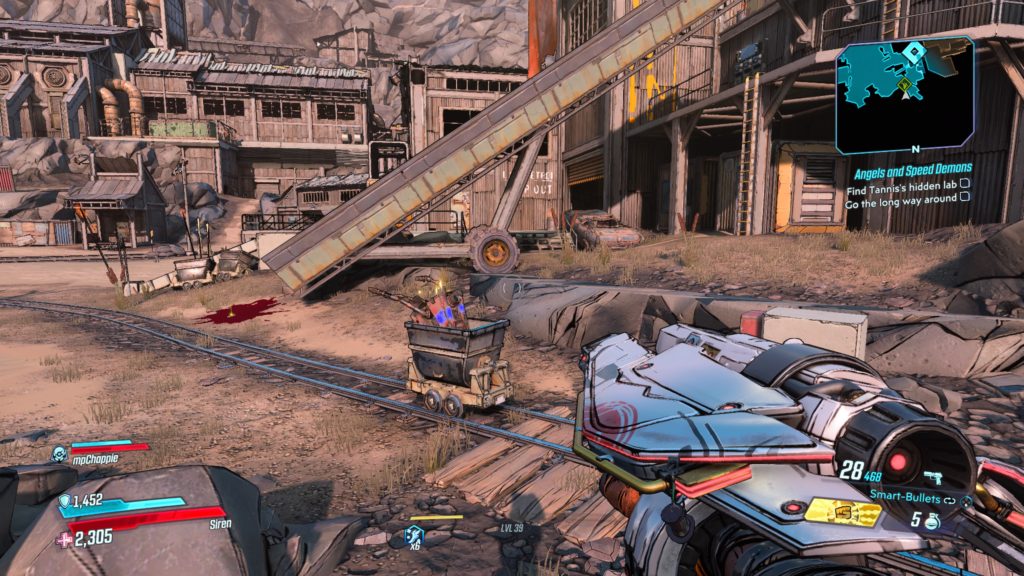
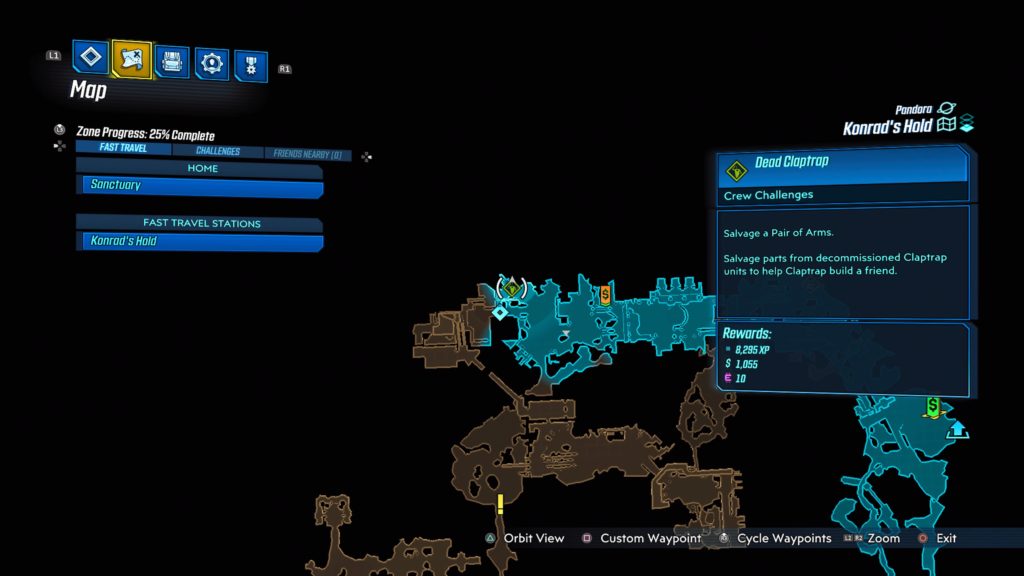
Fallback Tracks (Pair of Arms)
This claptrap is located in a mine car on the very top northwestern side of the map near Traitor’s Mess. See the map below for the exact location.
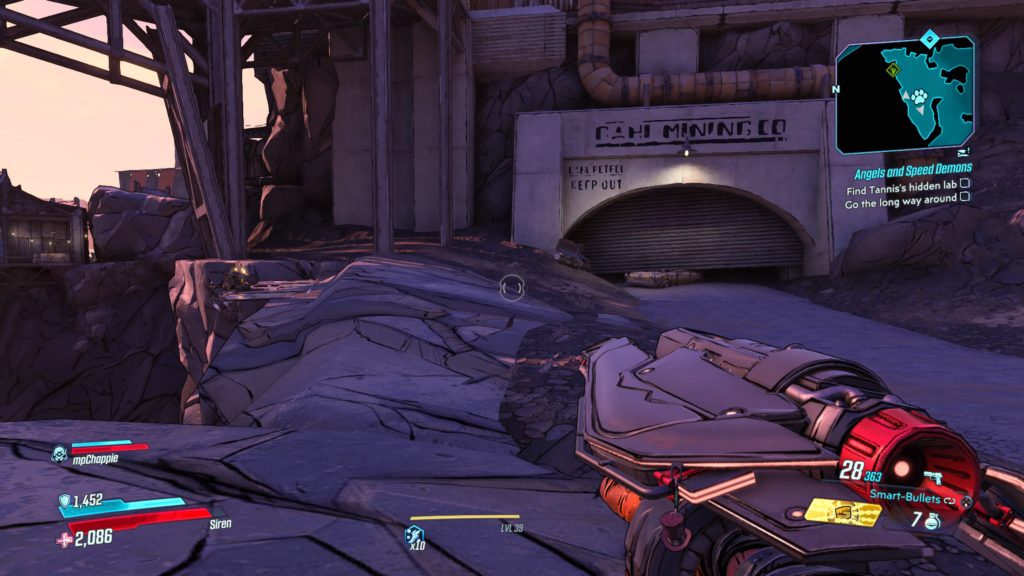
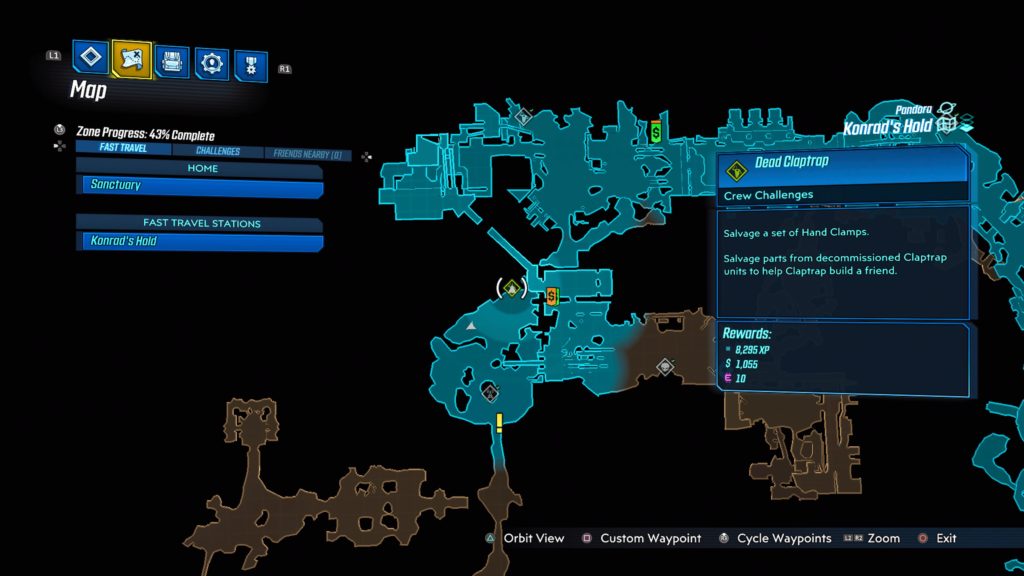
Last-Stand Yard (Hand Clamps)
This claptrap is located to the left of a sealed Dahl Mining Co door on the edge of the cliff across from the Konrad’s Hold Broadcast Tower. See the map below for the exact location.
Cathedral of the Twin Gods
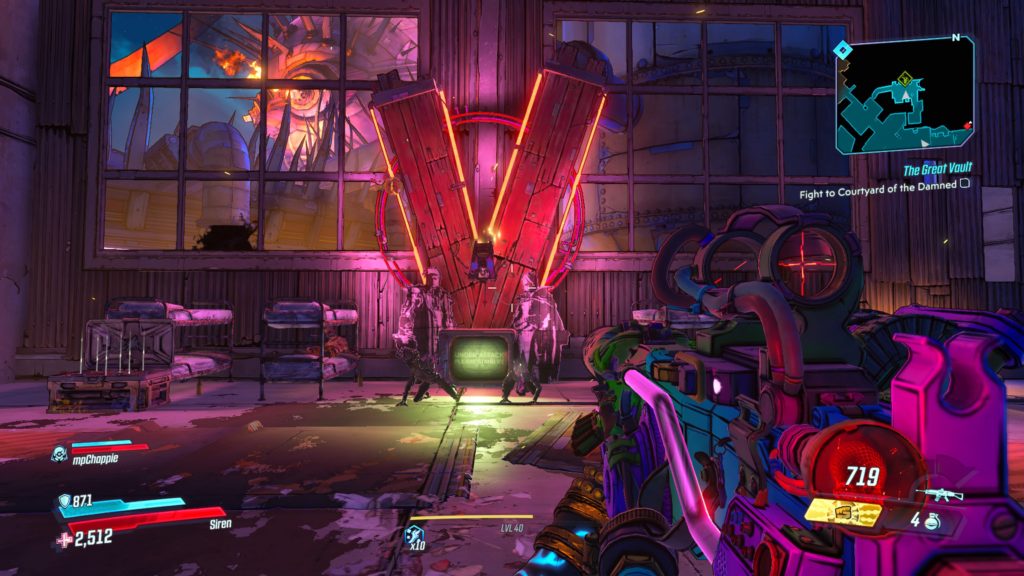
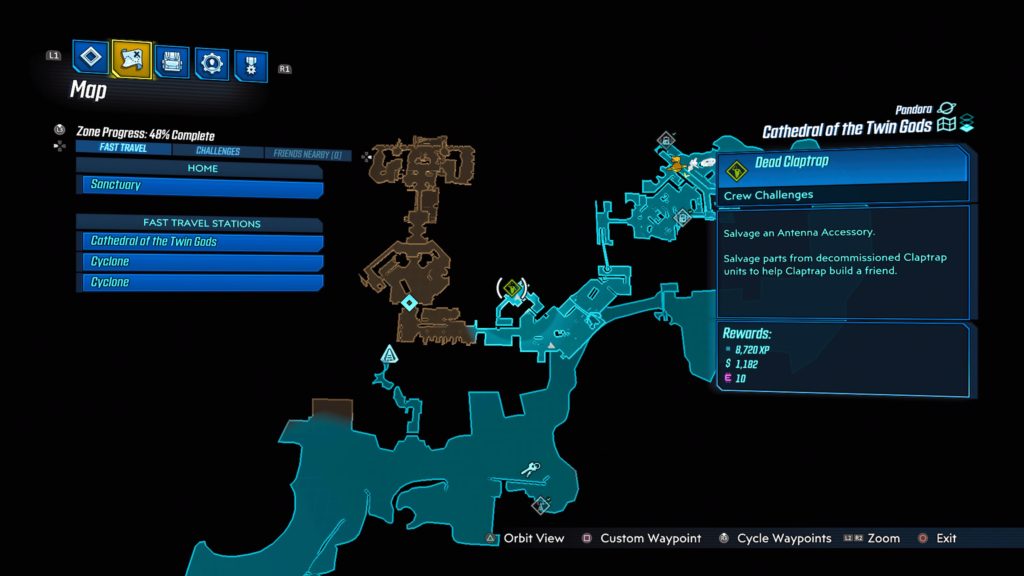
Outer Sanctum (Antenna Accessory)
This claptrap is hanging on a giant “V” in a bunkroom. After you crouch under a half-opened gate as part of the main story, you will enter a room with stained glass windows with images of Tyrene and Troy. Across from the stained glass, climb onto the raised metal platform and shoot the planks of wood on the door. Enter through this door to discover claptrap. See the map below for the exact location.
On B2 Main Floor in the Neuron HQ, use the middle stall in the bathroom near the elevator to acquire a tissue. This will trigger a dialog event with Bel, a Faerie who guards the toilets. Agree to hand over the tissue to obtain an empty can.
Nature Calls: File 01
Objective: Get the antiseptic wipes from the toilet in File 01
*NOTE: In order to be able to access this toilet, you must first talk to Bel in the HQ restroom.
The toilet can be found on the left side of the highway right before the Highway Rescue side case. It will be located on the other side of the median between the GOL Logistics and P.S.L. Line Mega Carrier trucks. You can use it to acquire the antiseptic wipes. Hand over the antiseptic wipes to Bel to receive an E-Save +6% and Auto-Sync Attack.
Nature Calls: File 02
Objective: Get the tarp from the toilet in File 02
During the File 02 story mission Out of the Gate on Z36 Grand Avenue 1F, follow the trail into the Rayleigh Plaza Parking Garage. After entering the garage, turn left past the first stone pillar and follow the trail to a wall with graffiti. Instead of following the trail left, take a right and crouch under the metal gate to find a porter potty. Use the porter potty to acquire the tarp. Hand over the tarp to Bel to receive a Common Material Code.
Nature Calls: File 03
Objective: Get the dead leaves from the toilet in File 03
The toilet in File 03 is located across from a makeshift medical room. You will reach this part of the level during the Red Case where you are following the chimera tracks and end up in a medical room that contains three people suffering from contamination. The blue shift tutorial will pop up on the screen after talking to the Caregiver in the room. Head back out the way you came and crouch under the metal gate of the building across the alleyway next to a van to enter a hallway. The toilet is located in a room at the end of the hallway. Use the toilet to acquire the dead leaves. Hand over the dead leaves to Bel to receive a Rare Material Code.
Nature Calls: File 04
Objective: Get old flyer the from the toilet in File 04
The toilet is located in Ark Mall 2F while pursing Jena after getting separated from your squad. From the spiral stairs, work your way through the second floor and eventually you will come to a hallway with a giant exit sign. Enter the hallway through the emergency exit door and take the first right to find the toilet at the end of the hallway. Use the toilet to acquire the old flyer.
Nature Calls: File 05
Objective:Get the subway schedule from the toilet in File 05
The toilet is located in the subway during the part of the main story after you and Alicia split up. Head past the stairs and take a left behind them. Follow along the tracks and up the metal plates being used as a ramp along track 4. You will come to a sitting area with some officers stationed there. Head past them and enter the train car next to track 6. Head down the train car dodging the lasers and take the first right to exit the car. Follow the path forward and jump down into the track to find the toilet at the end next to a chest (this area is before the spot where Alicia gets attacked by the chimera in the story). Use the toilet to acquire the subway schedule. Hand over the subway schedule to Bel to receive Red Matter Removal, Speed Boost and Item Drop Rate abilities.
Nature Calls: File 06
Objective: Get the hermit pamphlet from the toilet in File 06
After learning about the secret passageway to get to the Hermit Base, follow the objective, Get Into the Hermit Base, to arrive at a vent in the Forgotten Rooftops. Enter the vent and work your way forward until you come to a section filled with trash. You will have to use the Beast Legion to clear the trash so you can proceed forward. Proceed forward to hit a checkpoint. As soon as the game loads, turn around and bump into the vent grate a couple of times to knock it over. Head through and pick up the item to receive the hermit pamphlet.
Nature Calls: File 07
Objective: Get the emergency blanket from the toilet in File 07
After exiting the elevator, head to the helipad where the homunculus fight takes place. Instead of taking the ladder up to the helipad, head around the building on the left (facing the helipad) to find another ladder you can shoot down using the Arrow Legion. Climb up this ladder and chain jump to the roof behind you. The toilet will be located on the right behind a square structure with a ladder. Use the toilet to obtain the emergency blanket.
Nature Calls: File 08
Objective: Get the dirty rag from the toilet in File 08
During the Cleanup Crew red side case where the timer is running, Akira will jump into a gate leaving you to clean up the area. From the starting location, Chain Jump through a gap on the left side of the bridge to arrive at a section of the walkway near a platform. Chain Jump on the platform and use the Arm Legion to move it towards the floating gate. Destroy the gate and then move the platform to the left of where the gate near a giant wall. On the other side of the wall is another platform that you can move with the Arm Legion. Move it closer so you can Chain Jump onto it. The toilet will be located on the platform next to this one. Use it to obtain the dirty rag.
Nature Calls: File 09
Objective: Get the wet tissue from the toilet in File 09
To find the toilet head to the right side of the Harmony Media Center during the Search Harmony Square main story mission. Head past the steps leading down into the subway to find the toilet next to a metal scaffold. Use the toilet to acquire the wet tissue.
Nature Calls: File 10
Objective: Get the sandpaper from the toilet in File 10
The toilet is located in the section of the main story where you have to lower the water level in the sewers. After lowering the water level, exit the control room and climb down a yellow ladder. The toilet will be located at the end of the path before climbing up a ladder to continue with the mission. Use the toilet to acquire the sandpaper.
Nature Calls: File 11
Objective: Get the optical camo paper from the toilet in File 11.
The toilet is located at ARI Redshift Labs under the bridge leading from the landing pad to the entrance. Use the toilet to acquire the optical camo paper.
2. Lappy Arms– During the blue side case Lappy’s Lamentin File 05, you can obtain the arms after beating Jin in the fight by getting his mood to 100.
3. Lappy Wisdom – Finish theLappy’s Regard side case during File 07 to receive the wisdom.
4. Lappy Legs– In File 08 talk to Marie and agree to help her test out Lappy’s Balloon Bash mini-game. In order to receive the legs, you just need to play the game once.
5. Lappy Body – Finish theLappy’s Ultra Quizside case during File 08 to receive the body.
6. Lappy Head – Purchase the item from Brenda during File 12 for 100,000G.
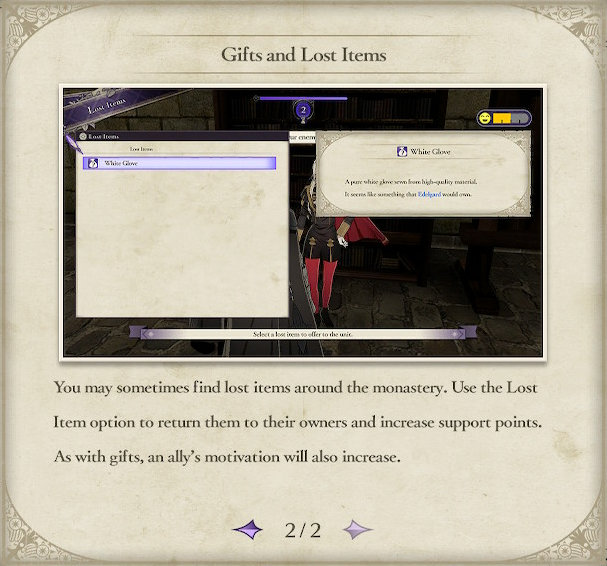
Lost items are found around the Monastery while exploring. They can be given to characters to increase their affection and motivate the members of your class.
Head into Poppo on Showa Street and talk to Alice. She will tell you that you will get 1 point for every 700 yen you spend and that you will receive a shiny new record at 10 points. Alice also mentions that each branch carries a different record. Spend 7,000 yen in this store to receive a Poppo Showa MFLP and max out the friendship meter.
Bantam Owner (Bantam on E Millennium Tower Street)
Head into Bantam and talk to the guy behind the counter. During the conversation, choose whatever dialog option you would like. The owner will tell you that it’s whatever he recommends.
When you walk by Bantam after some time passes, a couple will be standing near the entrance. After the dialog ends, head into Bantam and speak to the owner. Select the dialog option “It’s an original from another bar” to max out the owner’s friendship meter.
Dr. Goro Moroboshi (Sewer)
Yagami meets Dr. Moroboshi as part of the main story in Chapter 2 after chasing the burglary ring member. Talking to Homeless Kondo in Public Park Three will send you on an errand to meet Dr. Moroboshi in the Sewer. To get there, use the manhole in Children’s Park, which is located in northern Kamurocho. Head deeper into the Sewer until you reach a makeshift clinic fo find Dr. Moroboshi. He is standing next to a gurney. Talk with him and select the option “Kondo is calling for you” when prompted. This will cause a cutscene will trigger. When it’s over, you will be able to buy medkits from Dr. Moroboshi.
After some time passes from the last event, head down to the Sewers and check in with Dr. Moroboshi. During the conversation, one of the homeless will show up with Kondo saying he was in an accident. Dr. Moroboshi will ask Yagami to help. You will need to exit the Sewer and head to Public Park Three. Talk to the three guys standing around the burn barrel. One of them will agree to come back to Dr. Moroboshi’s clinic with you trigger a cutscene. When it completes, your friendship meter will be maxed out.
Dwayne Cruise (Poppo on Tenkaichi Street)
Head into the Poppo on Tenkaichi Street and talk to Dwayne. He will tell you that you will get 1 point for every 700 yen you spend and that you will receive a shiny new record at 10 points. He also mentions that each branch carries a different record. Spend 7,000 yen in this store to receive Poppo Tenkaichi MFLP and max out his friendship meter.
Ebisu Pawn Owner, Fukutsu (Ebisu Pawn, which is south of Yagami Detective Street)
You will unlock this friend event after selling a Fuka Shiranui’s painting to Fukutsu. To max out your friendship meter, sell him all 5 of Shiranui’s paintings. The below are where the paintings can be obtained:
Suzuran: Onodera’s Wares in the Sewer – 500 SP
Tsubaki: L’Amant – 5,000 chips
Ume: Dragon’s Palace 3F – 5,000 points
Botan: Dragon’s Palace 2F – 5,000 chips
Sakura: Paradice VR – Middle Course with Standard Rules. After defeating the course, we were given the painting by the attendant as a reward (we had 5 dice left).
Hanae Ida (Smile Burger on NW Theater Square)
After eating some food from Smile Burger, the employee will ask you to smile on the way out. When prompted choose to “Listen”, which will lead to Yagami and Ida taking a selfie in front of the building.
After some time passes, head back to Smile Burger to be greeted by Ida. She will tell you that your picture made it to the finals and that you have a smile rival. Select the “Let’s win this thing” dialog option to take another photo using the exuberant expression.
After some time passes, had back to Smile Burger to be greeted by Ida. Talking to her will max out her friendship meter.
Haoyu Xiu (Akaushimaru on Tenkaichi Street)
Visit Akaushimaru and buy some food or drinks to trigger the friend event. Keep coming back to the restaurant and buy things to gain more rep with Xiu.
Eventually after you have visited enough, another event will occur. As you enter the restaurant, a man will run out and Xiu will approach you out of breath. When prompted select “Someone ate and then booked it” promptoing Yagami to chase after the dine and dasher. After you catch him, you will receive the Art of Gluttony which unlocks the Bottomless Stomach skill and Xiu’s friendship meter will max out.
Hideaki Deguchi (Stardust on Tenkaichi Street)
This friend event is available after you complete the side case Reckless Aspirations. Head to the entrance of Stardust on Tenkaichi Street to trigger a cutscene. Select the dialog option “Let the battle begin”. During the flirting contest, talk to the lady wearing a red jacket standing in Tenkaichi Alley in front of Public Park Three. Select the dialog options “Going Somewhere?” and “I could always take you there”. After you escort her to Bar Tender, she will let you take a picture. After you snag the picture, head back to Seiya in front of Stardust to trigger another cutscene.
Afterwards, talk to Deguchi again and select the dialog option “Let the rematch begin”. First talk to the little boy standing in front of Club Sega on Nakamichi Street. Then talk to the lady in front of Akaushimauri (Tenkaichi Street) and select the dialog option “Is something wrong?”. The girl will follow you to her brother. After a brief cutscene, choose the dialog option “Step In” and then defend yourself against Okuda to trigger another cutscene. During this cutscene, select the dialog option “As long as you pay your debt…” to max out the friendship meter.
Hiroto Nasugawa (Akaushimaru in the Hotel District)
After eating at the restaurant a couple of times, Hiroto will tell you about a new item that will be coming to the menu soon.
On your second visit, Nasugawa tells you he lost the recipe for the new dish and wants you to find it. Nasugawa went to the following places:
Tenkaichi Street
M Side Cafe
Theater Avenue
Batting Center
Follow the path Nasugawa took to find the recipe at M Side Cafe on the floor near the magazine rack. Head back to Akaushimaru and hand the recipe to Nasugawa to max out his friendship meter.
Iyama, The Hermit of the Dragon’s Palace (Obtained as part of the story in Chapter 5)
When you first meet Iyama, he is incapacitated on the ground. The old man says that he needs some mugwort, so Yagami will retrieve it for him. Meeting Iyama will open up the usage of extracts.
On your second visit, talk with Iyama to hand over the ingredients you collected. Iyama will give Yagami recipes and request that you make them. Check under the Valuables tab in the Items Menu to see what recipe ingredients he needs. It will be flagged with a Request symbol to the right of the recipe.
After you obtain 2 Dented Carbon and 2 Bronze Plates, make the Extract Recipe: Power Attack and give it to Iyama. He will then want you to gather the materials for Extract Recipe: Stealth.
After you obtain 5 Tuna Onigiri (bought at Poppo on Tenkaichi Street), 5 Tuna & Egg Sandwiches (bought at Poppo on W Shichifuku St), 4 Fresh Tuna Cat Food (bought at Don Quijote) and 2 Sushi Sets (bought at Poppo on W Shichifuku St), talk to Iyama to deliver the materials. You will then want you to gather the materials for Extract Recipe: One-Two Knockout.
After you obtain 4 Exquisite Screws, 2 Old Circuits, 2 Mysterious Stones (received from Fumio Matsuzaki at Kanrai after maxing out his friendship meter) and 4 Gold Tuna Cat Food, craft the Extract Recipe: One-Two Knockout and give it to Iyama to max out his friendship meter.
Kaede Sanada (Quadra Garden)
Enter the Quadra Garden via Hotel New Deborah 1F to trigger a cutscene between an overseas tourist and the cashier. At the end of the cutscene, Kaede will introduce herself.
On our second visit, Kaede mentioned something about cabbage. Respond with the dialog option “Didn’t you mean baggage?”.
On our third visit, a customer asked for takeout and Kaede did not know what that meant. Tell her that it means “They wanted to take food to go.”
On your fourth visit, talk to Kaede to witness the fruits of your labor. When the conversation is over, you will max out her friendship meter.
Kanrai Owner, Fumio Matsuzaki (Kanrai on East Shichifuku Street)
Talk to the owner behind the counter and agree to take the challenge. The answers are as follows:
Small intestine
Stomach
Flank
Head to Kanrai to find Matsuzaki standing outside talking to a man wearing a black jacket and glasses. Defeat the Muscular Man to trigger another cutscene and max out his rep.
Kazufumi Kamaguchi (Tenkaichi Street near Turtle Financing)
During Chapter 6, Kamaguchi is being beaten up by some thugs. Choose to step in and defeat the Keihin Gang Thugs. Kamaguchi then wants you to track down two of the gang members to retrieve his money.
Wait for Honda to appear on the map and then defeat him to trigger a cutscene.
Wait for Kasai to appear on the map and then defeat him to trigger a cutscene. After defeating both thugs, Kamaguchi’s friendship meter will max out.
Kazuhisa Norimoto (Cafe Mijore on Nakamichi Street)
Talk to the clerk at Cafe Mijore to trigger a friend event.
After you meet Miharu Shima, head to Cafe Mijore and talk with Norimoto to trigger a cutscene where Yagami gives him the scoop on Miharu.
After you talk to Miharu a second time, talk to Norimoto after some time passes to trigger a cutscene.
After you talk to Miharu a third time, talk to Norimoto after some time passes to trigger a cutscene.
After you talk to Miharu a fourth time, talk to Norimoto after some time passes to trigger a cutscene, which will max out his friendship meter.
Kenji Tanago (Shichifuku Parking Lot on East Shichifuku Street)
Talk to the two guys standing in the parking lot. Spend 5,000 yen to try and hit Tanago. Try and hit Tanago within 30 seconds (we used Crane Stance to kick him).
On your second visit, spend 5,000 yen again to try and hit Tanago. You have 30 seconds to hit him (we backed him into the corner and used an Ex-Action, jumping off a car to slam down onto him). After a brief cutscene, Tanago’s friendship meter will max out and he will now help you in fights.
Kenta Uozumi (Sushi Gin on W Showa Street)
After eating a meal at Sushi Gin, a cutscene will trigger when Yagami gets up to leave. When prompted, choose the dialog option “tea” to help Uozumi out.
On your second visit, choose something to eat to trigger a cutscene. When prompted, choose the dialog option “soy sauce”.
On your third visit, eat something to trigger a cutscene. When prompted, choose the dialog option “the sushi plates, man”.
On your fourth visit, eat something to trigger a cutscene, maxing out Uozumi’s friendship meter.
Kim Won-soon (Beef Zone on Nakamichi Street)
During Chapter 8 this friend event will appear on the map. Keep heading back and talking to Kim as he will ask you if you can think of any other ideas. Suggest the following in whatever order you would like:
Family special
Free rice refills
Adding desserts
Dropping prices
On your fifth visit, talk to Kim to trigger a cutscene.
On your sixth visit, talk to Kim to trigger another cutscene to max out Kim’s friendship meter.
Kiyoshiro Asamura (Poppo on W Shichifuku Street)
Head into the Poppo on W Shichifuku Street and talk to Kiyoshiro. He will tell you that you will get 1 point for every 700 yen you spend and that you will receive a shiny new record at 10 points. He also mentions that each branch carries a different record. Spend 7000 yen in this story to receive Poppo W. Shichifuku MFLP and to max out his friendship meter.
Kunio Ichinose (Ikinari Steak near Hills Garden)
After purchasing some food, Yagami will head outside and be stopped by a guy in a chef’s outfit triggering a cutscene.
After some time passes, head back to Ikinari Steak and talk to Ichinose. Select any of the options.
After some more time passes, head to Ikinari Steak and talk to the man in the suit standing outside the main entrance. During the cutscene, select the “Motomura-san” dialog option.
Kyushu No. 1 Star Owner (Kyushu No. 1 Star on Pink Street)
After purchasing some food, Yagami will give his compliments to the chef. Choose the option “honey”.
As you reach Kyushu No. 1 Star, a cutscene is triggered between two patrons. Head into Kyusho No. 1 Star and talk to the owner to trigger a cutscene. Choose the dialog option “Make a fancy ramen of your own.”
Walk by Kyushu No. 1 Star after some time has passed to trigger a cutscene. After the cutscene, head inside the shop for another cutscene. The owner’s friendship meter will then be maxed out.
Makoto Tsukumo (Mantai Internet Cafe – Theater Square)
Yagami meets Makoto automatically during the main story in Chapter 1 after the cutscene introducing the prosecutors. He will ask you to go on an errand for him. Make your way to Ebisu Pawn located directly south of the Yagami Detective Agency. Talk to the employee and buy the Love Star Figure for 10,000 yen. Head back to the Mantai Internet Cafe (Theater Square) and talk to Tsukomo to max out his friendship meter.
Mami Sakuma (M Side Cafe in Kamuro Theater)
After purchasing food, Mami will stop you asking for feedback. Yagami will give her feedback on the four cakes the cafe has to offer.
After giving Mami feedback on all four of her cakes, visit her again after some time passes. She will tell Yagami that a new dessert has been added to the menu for him to try. Trying the dessert will max out her friendship meter.
Mari (Obtained as part of the story in Chapter 10)
When you enter Bar Tender, Mari’s friend event will automatically trigger. You guys will play a little game in which you need to examine the guy’s glass, face and suit. Guess that he will go after two more drinks.
On your second visit, interact with Mari. During the cutscene, she will get up to go to the bathroom. This will give Yagami the opportunity to call somebody to the bar. Choose Tsukumo to max out her friendship meter.
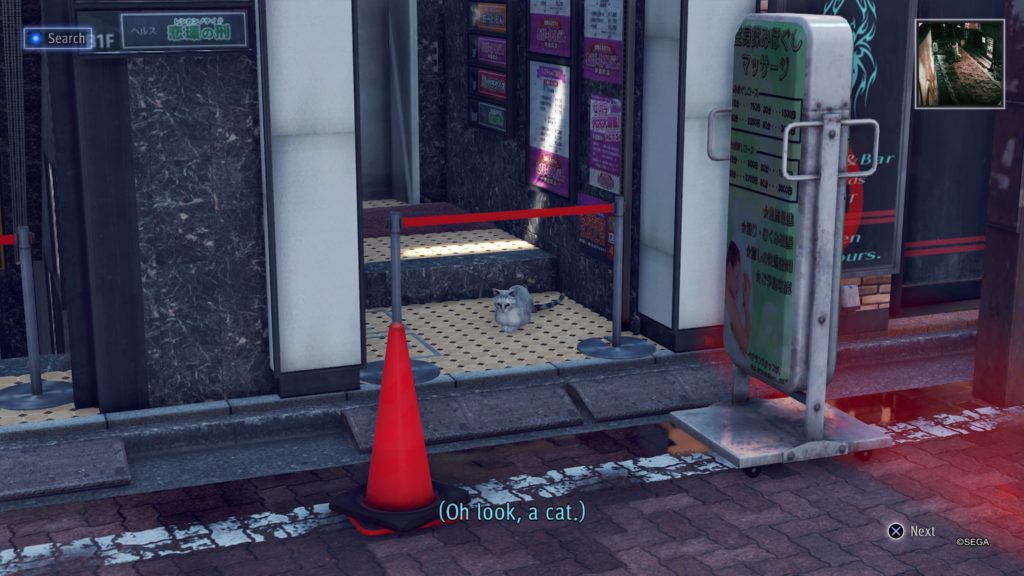
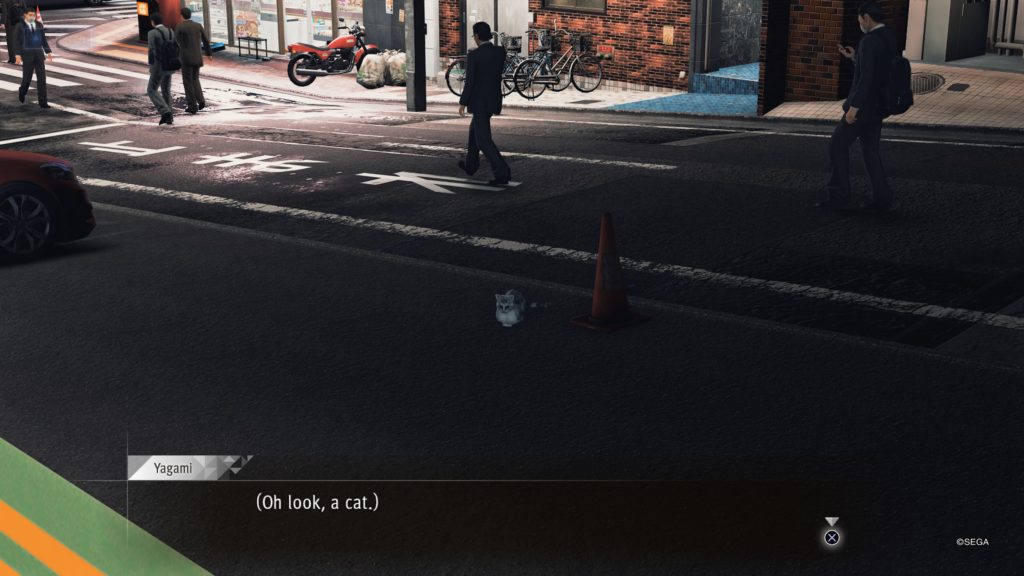
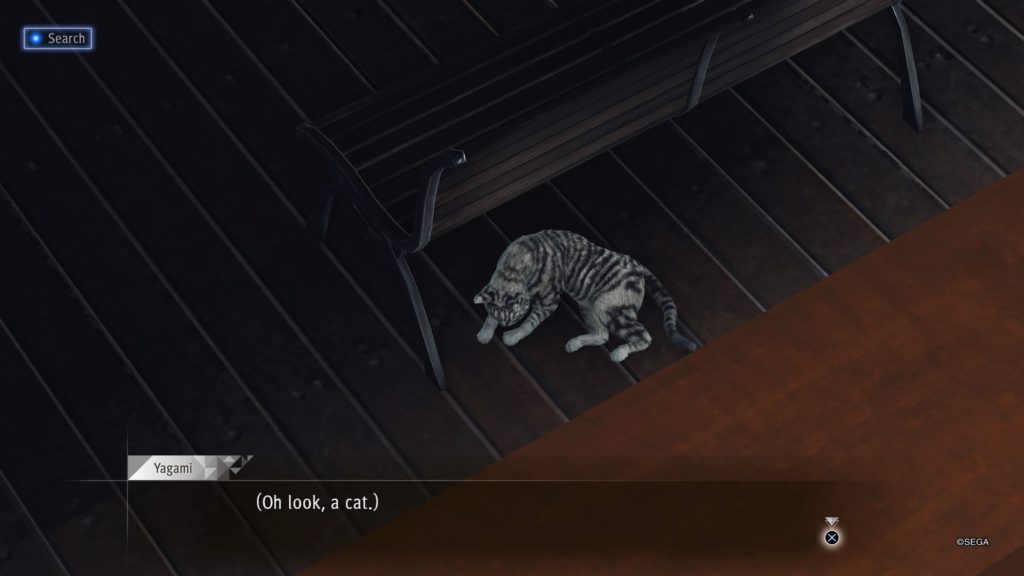
Masakazu Nekomiya (Nakamichi Alley)
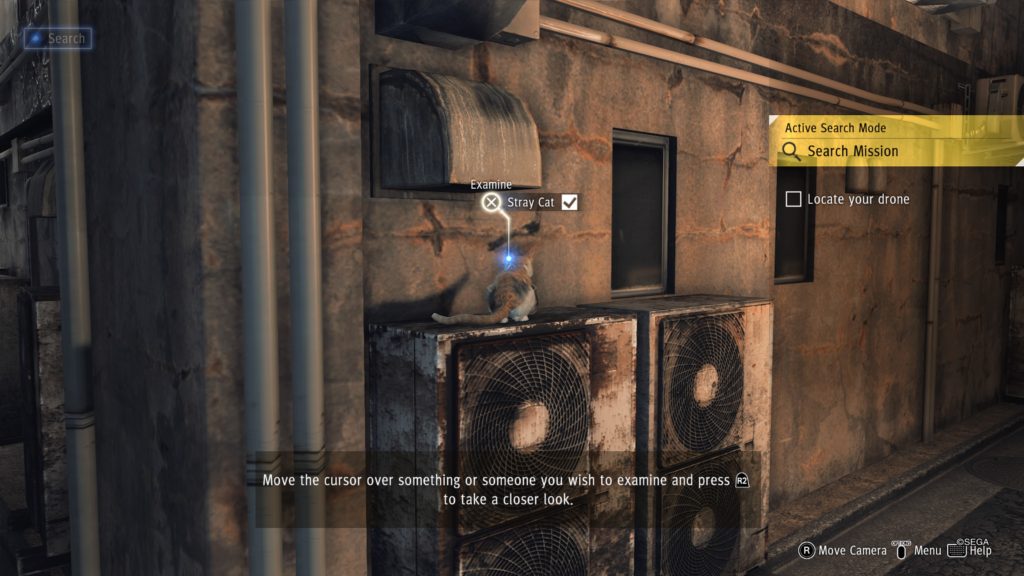
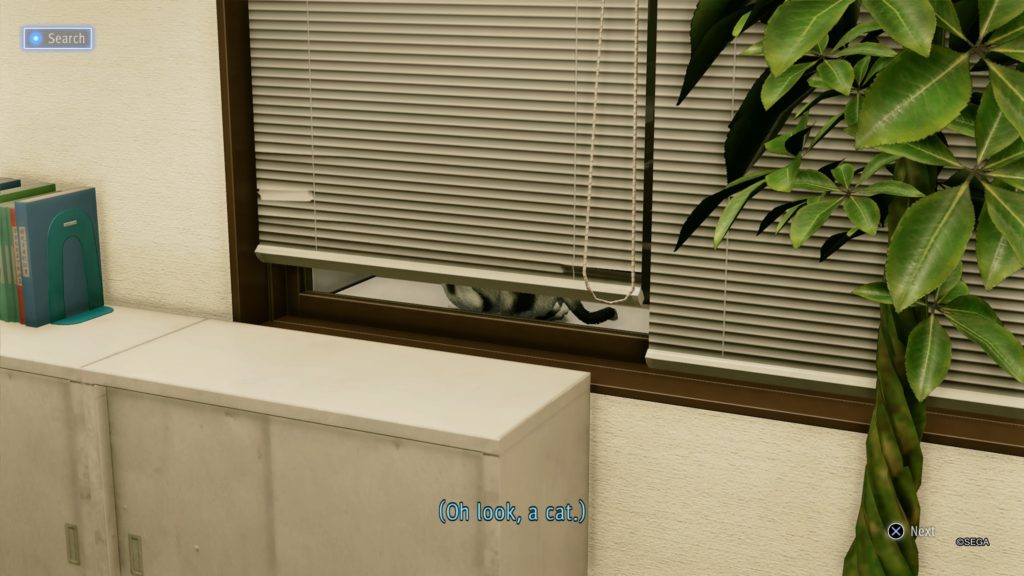
Talk to Nekomiya at the beginning of Chapter 2. You must agree to look for cats and send him pictures. He will want you to find a calico who didn’t go far. The cat is standing on the ground in the alley directly right (east) of Yagami Detective Agency underneath a Club Big Buddha 3F sign on a brick building.
Location of the Calico
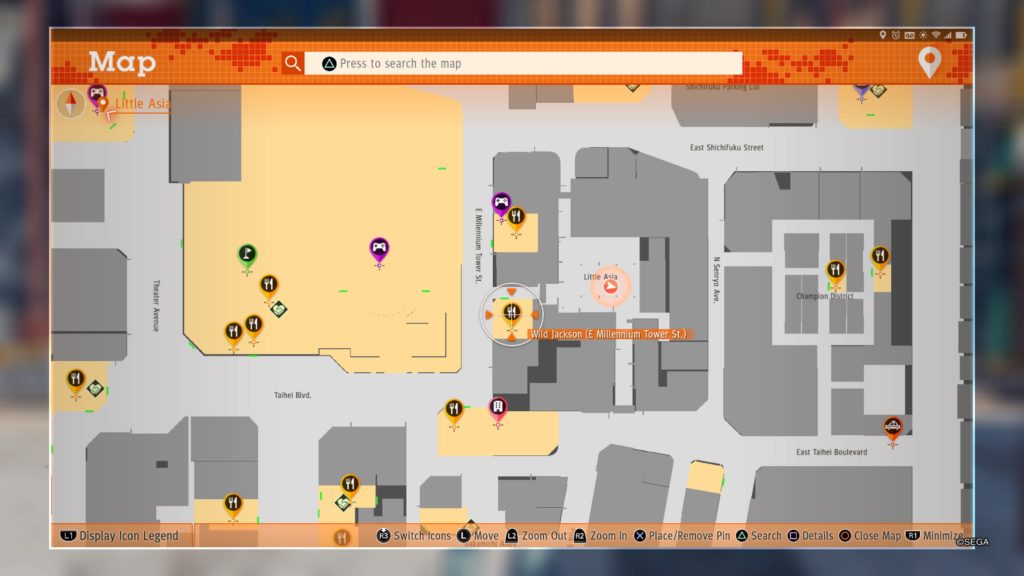
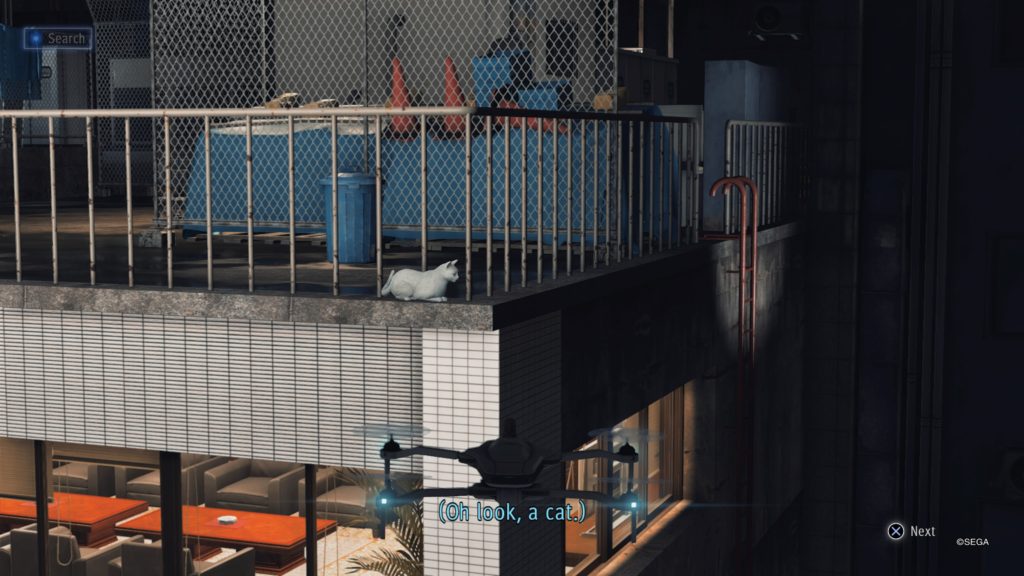
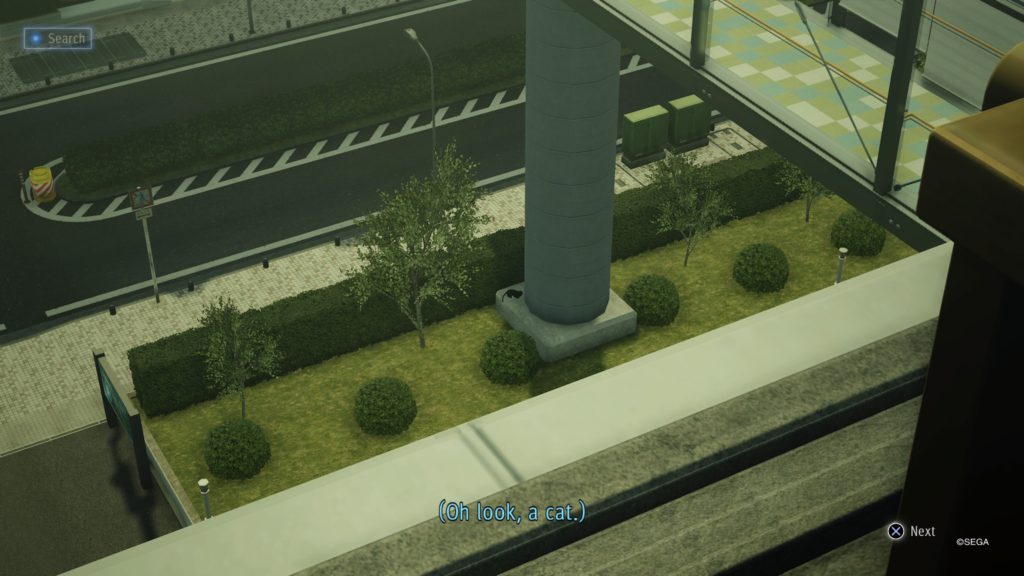
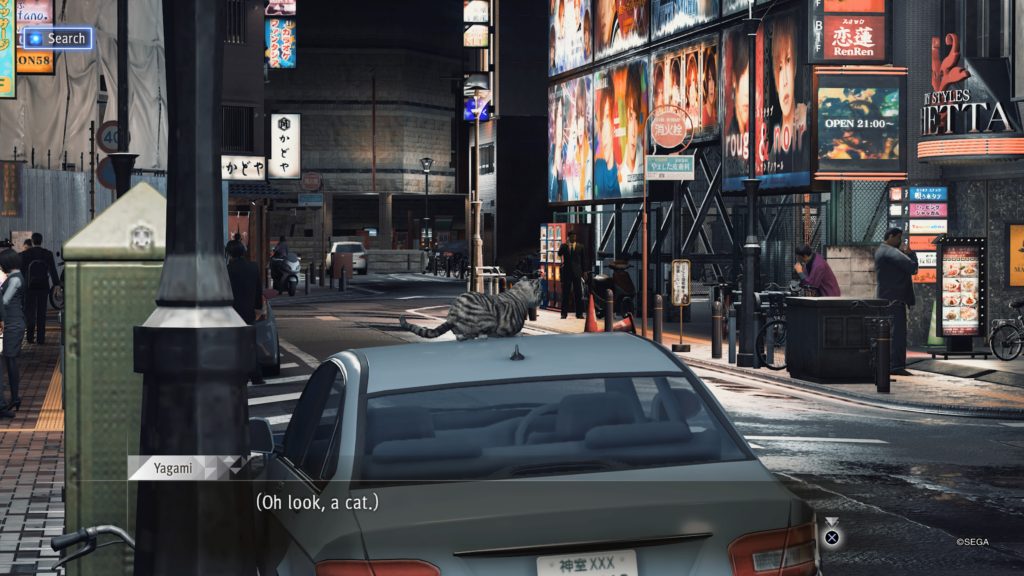
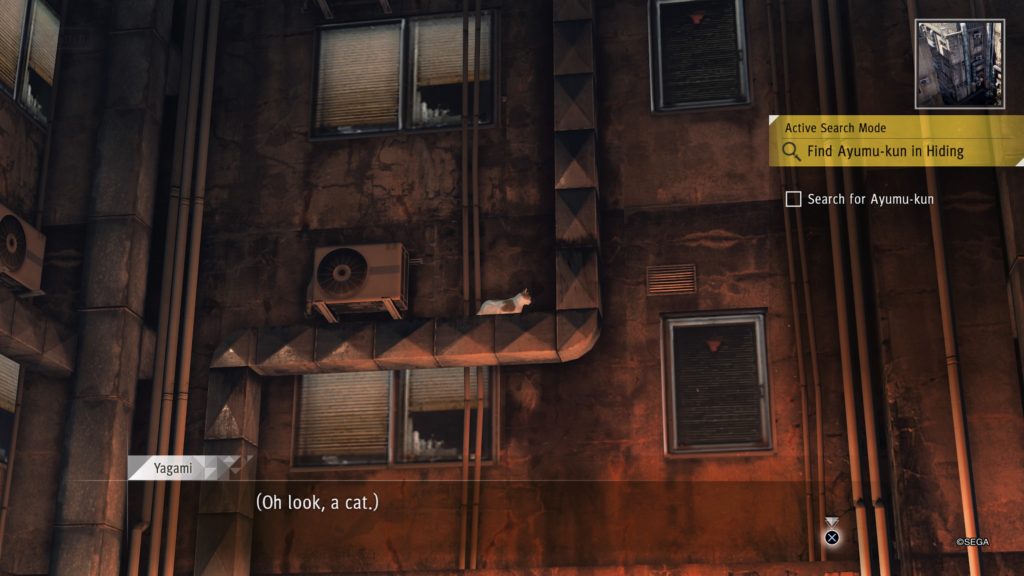
He will then want you to find a tabby in Little Asia who always ends up in some high, hard-to-reach spot. Use your drone to locate the cat who is on top of the scaffolding on the east side of Little Asia.
Location of Tabby
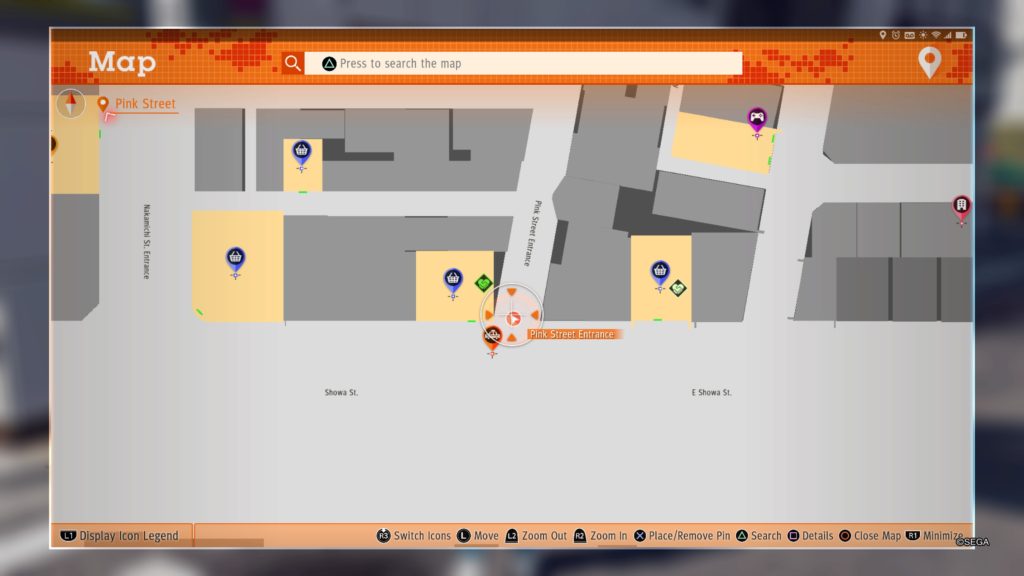
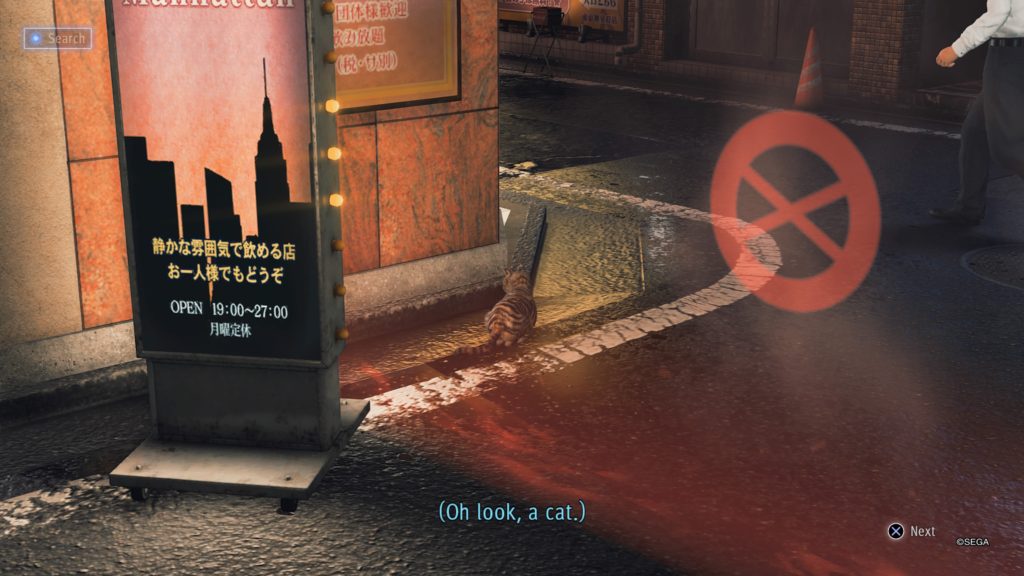
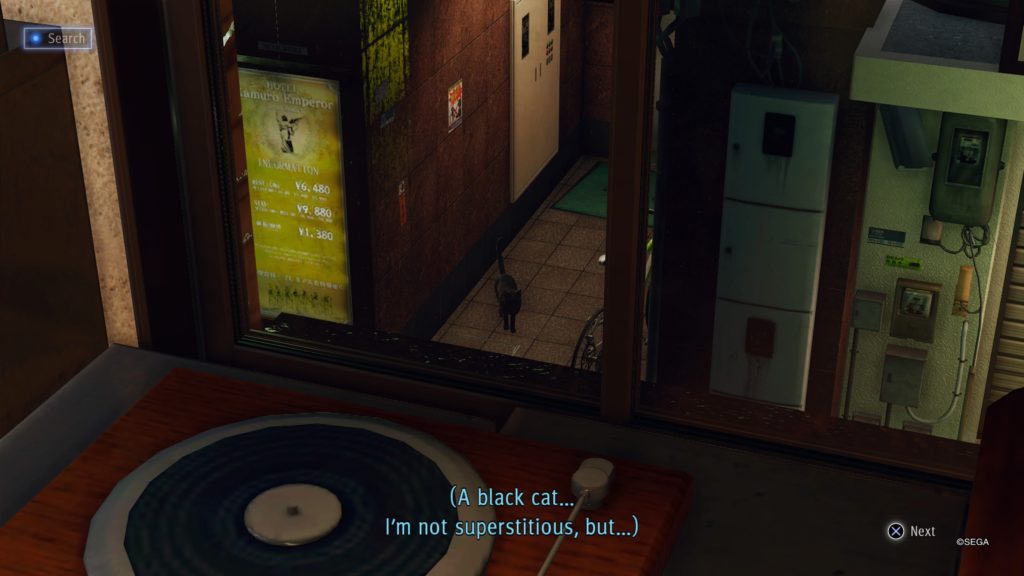
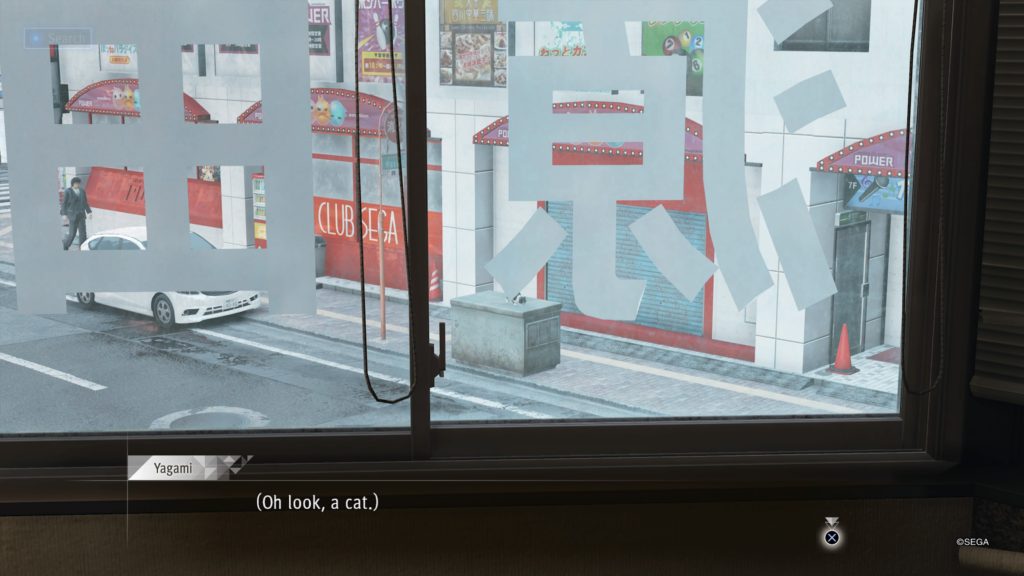
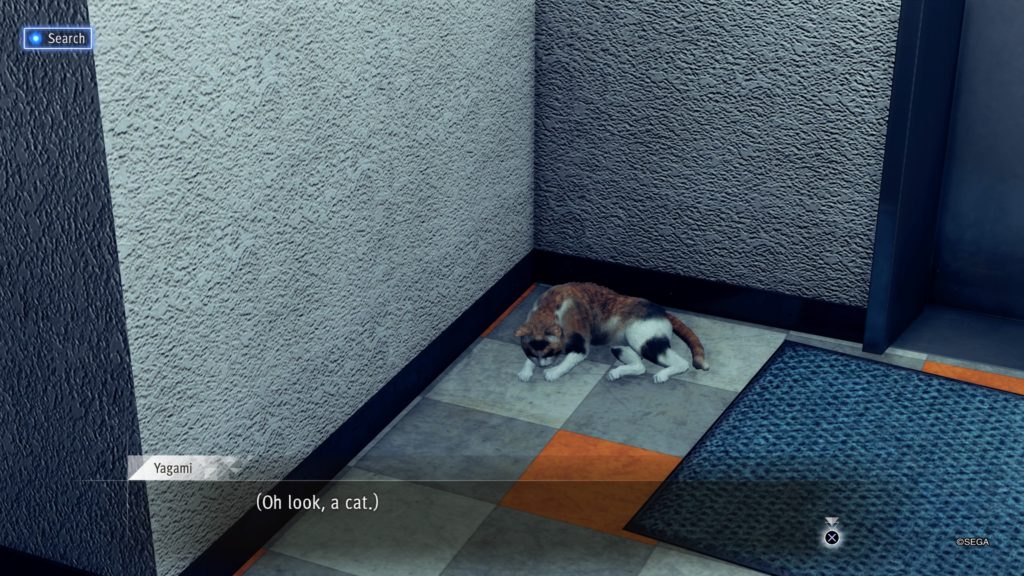
Lastly, he will want you to find a black cat who lives on Pink Street and is quite fond of the ladies. The cat is at the southern end of Pink Street Entrance next to a lady and a blue vending machine.
Location of Black Cat
Miharu Shima (Cafe Mijore on Nakamichi Street)
Head to Cafe Mijore again after some time has passed from meeting Kazuhisa Norimoto, another friend. You will be seated by Shima. Yagami will try and help Norimoto out by getting more information about her.
After talking to Norimoto a second time, wait for some time to pass and eventually Miharu will show up at the cafe again. Talk to her to trigger a cutscene.
After talking to Norimoto a third time, wait for some time to pass and talk to Miharu again to trigger another cutscene.
After talking to Norimoto a fourth time, wait for some time to pass and talk to Miharu again to trigger a cutscene.
After talking to Norimoto a fifth time, wait for some time to pass and talk to Miharu again to trigger a cutscene, which will max out her friendship meter.
Morio Onodera (Sewers under Children’s Park)
In Chapter 5, you will head down to the Sewers. Talk to the man sitting next to a make shift tent wearing a red jacket and red baseball hat. Keep purchasing his wares to max out his friendship meter. Maxing out his friendship meter will cause new items to be added to his inventory.
Naotaro Terahara (Le Marche)
After you purchase an item, return to Le Marche and speak with him to trigger the friend event.
On one of your trips to Le Marche, you will run into a Yakuza-esque man giving Terahara a hard time. After a brief conversation, the man challenges you to a fight outside. After you kick his butt, a cutscene will trigger.
Return to Le Marche after completing some other activities and talk with Terahara. He will tell Yagami that his suit is ready. This will be followed by a cutscene. When it ends, Terahara’s friendship meter will max out.
Noboru Hiranuma (Bar Shellac in the Champion District)
Talk to Hiranuma, who is sitting at the bar, and choose to accept the work.
Head to Senryo Avenue to find Higurashi (a friend event will be there). Interact with Higurashi to trigger a cutscene. At the end of the cutscene, snag the picture and then head back to Bar Shellac to give the picture to Hiranuma.
After some time passes, talk to Hiranuma to get another job. He wants you to look into Bram-sama, who you already know. Hiranuma would like you to get a picture of Bram-sama doing his community service. Head to Park Boulevard and interact with Bram-sama to snag the picture. Afterwards, head back to Bar Shellac to give the picture to Hiranuma.
On your third visit, Hiranuma will task you with getting a picture of the rare and fabled white crow. To find the bird, head behind Stardust on Tenkaichi Street (Cafe Alps Alley) at night and use the stairs to reach the roof of the building. Use your camera and zoom all the way in to capture a picture of the bird flying above the tallest building. Once you get the picture, head back to Hiranuma at Bar Shellac to max out his friendship meter.
Noboru Tateyama (Southern Tenkaichi Street)
Talk to the guy near the traffic to trigger a cutscene. Donate to the G.A. Labs: Basic Construction via Quickstarter to gain rep.
After the first G.A. Labs: Basic Construction is funded, talk to Tateyama to trigger a cutscene. During the cutscene, Tateyama’s mentions he started another Quickstarter campaign. To trigger the next event faster, donate to the campaign.
After the second project is funded, talk to Tateyama to trigger a cutscene. Take a picture of yourself with the building in the background at the request of Tateyama to max out his friendship meter.
Rie Tomioka (Smile Burger on Nakamichi Street)
After finishing a meal from Smile Burger, Yagami will leave the building and run into his landlady. After a cutscene, he will agree to try out some new recipes for her. Make sure to periodically check Yagami’s fridge at the Yagami Detective Agency.
Below is a list of food she will have Yagami try (and our responses to her food):
Curry with melon
Well, it’s got a … unique flavor.
Chicken karaage
It’s almost there.
Okonomiyaki
Delicious!
After you try all three of the above items, she will text you and her friendship meter will max out.
Ryan Acosta (Senryo Avenue near KJ Art)
Interact with the corner of the street on Senryo Avenue near KJ Art to trigger a cutscene. At the end of the scene, you will gain control of the drone. Fly the drone up to examine the ninja guy hanging on the side of the building. After another cutscene, talk to the ninja guy on the ground.
After some time passes, head to Club Sega and make your way to the second floor. Play a game of darts to get Ryan to appear afterwards triggering a cutscene. Accept his challenge and play a game of darts with Ryan. We chose to play Count Up and won. When you head outside of Club Sega, you will get attacked by Street Thugs. Defeat them and receive praise from Ryan. Ryan then challenges you to a duel. Accept the duel and beat Ryan. His friendship meter maxes out, and he will now show up to aid Yagami during fights around the city.
Ryo Suzaki (Earth Angel in Champion District)
During Chapter 11, Ryo’s icon will appear on the map. Make sure you have all the drinking perks unlocked before you talk to him. When you do talk to Ryo, accept his drinking challenge. After the first challenge, head back periodically to challenge Ryo to drinking contests. Some of these you will win and others you will lose. After you beat him three times, you will max out his friendship meter.
Sakura Amamiya (Pink Street)
During Chapter 11, Amamiya’s icon will appear on the map. Text her twice to do massages/acupuncture at Yagami Detective Agency. You will have the option on choosing where you would like to have the acupuncture done. Select whatever three body parts you want. On the third time, you will need to head to the Hotel District after texting her. Interact with her and the guy who is trying to pull her in to the hotel to trigger a cutscene. Defeat the grown-ass thug to trigger another cutscene in which her friendship meter will max out.
Sebastian Hutton (Millennium Tower on Taihei Boulevard)
You will be able to talk to Hutton after winning the Beginner Drone League. To level up his friendship meter, you will need to use your drone to find build codes. When you find ten build codes, head back to Hutton and he will explain how to make the part. If you need help locating the build codes, check out ourDrone Part QR Code Locations Guide! Hand in all 50 of the QR codes to max out his friendship meter.
Shin Fujimori (Obtained as part of the story in Chapter 6)
When you return from the ADDC, Fujimori stops you as you walk by. After a brief cutscene, Quickstarter will be added will be added to your phone.
Talk to Fujimori, who is standing on the corner, to trigger a cutscene. When it’s over, you will max out his friendship meter.
Shinzato Madoka (Tenkaichi Street)
Madoka’s friend event is triggered while visiting Sexy Club (Apple Pie) on Tenkaichi Stree during one of Yosuke Saotome’s friend events. During the conversation between her and Yagami, choose the dialog option “I’m just happy talking” to make her more friendly towards you. Note that we also had all of the alcohol tolerance skills maxed out so that we could drink longer with her.
On your second visit, Yagami will keep ordering drinks and after a certain point Madoka catches on that he is trying to help her out. This prompts a dialog choice. Choose either choice as both rewards the same amount of rep.
For the final visit, you will need to max out Yosuke Saotome’s friendship meter in order to make her appear at Apple Pie. When you see her icon, go talk to her to trigger a cutscene and max out her friendship meter.
Shuichi Hatano (Yoshida Batting Center)
Talk to the person sitting on the bench in a hallway next to the batting cages. Choose to spend 3,000 yen on the Batting Gloves.
After you complete five challenges, talk to Hatano and choose to spend 30,000 on the Golden Bat, maxing out his friendship meter.
Shun Isaka (Shichifuku Street)
During Chapter 11 Shun’s icon will appear on the map. After a brief cutscene, you will need to chase Shun until another cutscene triggers.
On your second visit, you will need to accept Shun’s challenge and chase him again until a cutscene triggers. This will max out Shun’s friendship meter.
Sota Nonomura (Poppo on E. Shichifuku Street)
Head into the Poppo on E Shichifuku Street and talk to Sota. He will tell you that you will get 1 point for every 700 yen you spend and that you will receive a shiny new record at 10 points. He also mentions that each branch carries a different record. Spend 7,000 yen in this store to receive Poppo E. Shichifuku MFLP and to max out Sota’s friendship meter.
Takemitsu Owner (East Shichifuku Street)
During Chapter 7 after visiting the Queen Rogue (second time), head to East Shichifuku Street and interact with the Takemitsu Owner. Select the dialog option to step in then defeat the Shakedown Yakuza to trigger a cutscene.
On your second visit, interact with the Takemitsu Owner again. Select the dialog option to step in then defeat the Shakedown Yakuza to trigger a cutscene and max out his friendship meter.
Takeo Inose (Wild Jackson on Tenkaichi Street)
When you get done eating food at Wild Jackson, head downstairs to trigger a cutscene. Choose the dialog option “Lend an ear” to talk to the manager. Following the cutscene, visit Tsukumo at the Mantai Internet Cafe. Choose the option “specials” then head back to Wild Jackson and speak with the manager.
When you enter Wild Jackson, a cutscene will trigger. Choose the dialog option “try to be optimistic”.
When you see Furuya and Inose’s icons together at Wette Kitchen, it’s time to head that way. Talk to them to max out their friendship meters.
Takumi Katagiri (Bar Shellac in the Champion District)
After completing The Mystery Writer’s Masterstroke side case, he can be found at Bar Shellac. Keep heading back to him to talk about the following side cases you have completed:
Zhuang Shi
Twisted Trio
Bomber
Haunted Apartment
Koi Bride
Wanted Criminal
Amane
Ono Michio
After telling him about all of the above side cases, Katagiri’s friendship meter will max out.
Tashiro-kun (West Shichifuku Street)
At the beginning of Chapter 12 an icon will appear on the map. Head to West Shichifuku Street and interact with the guy in gold to trigger a cutscene. Choose to step in and defeat the Dapper Yakuza.
After some time passes, talk to the guy on West Shichifuku Street where you met Tashiro to learn that he is in need of assistance. Head to the alley south of Poppo on Tenkaichi Street and interact with the group to trigger a cutscene. Afterwards, you will need to defeat the Dapper Yakuza again. After a brief cutscene, Tashiro’s friendship meter will max out.
Toshikazu Sagara (Cafe Alps on Nakamichi Street Entrance)
Upon entering Cafe Alps, speak to the manager standing near the back door. Each time you talk to him select the dialog option “Time for a nice little caffeine buzz.” For the tests, select the following options:
Java Robusta
Mocha
On the third visit, Sagara is sick and cannot tell which coffee is which. After tasting the two, select the second one to max out Sagara’s friendship meter.
Toshiro Koizuka (Kamuro Lock & Key on Senryo Avenue)
Talk to Rie Tomioka outside of Yagami Detective Agency for her to introduce you to Koizuka, who is a locksmith. Yagami will agree to do some side jobs for Koizuka, who’s office is on northern Senryo Avenue.
Head to Kamuro Lock and Key on northern Senryo Avenue to talk to Koizuka at his shop. Do any five jobs to max out his friendship meter. To get the jobs, talk to Koizuka then look for a key icon on the map where the client is located. After you pick the lock, head back to Koizuka to receive the location for the next client.
Voluptuous Woman (L’Amant on Shichifuku Street)
The Voluptuous Woman can be found in the casino after completing the main story in Chapter 8. Talk to her to trigger a friend event. Keep playing poker with her to max out her friendship meter. Upon maxing out her friendship meter, you will receive a Royal Joker Card.
Yasuhiro Furuya (Wette Kitchen at the corner of Theater Alley and West Taihei Boulevard)
Buy food at the Wette Kitchen and then you will be stopped by Furuya on the way out. Agree to “lend an ear” leading to some more dialog. You will be presented with the following three options: “A Fast Food Joint”, “A Cafe” and “A Cabaret Club”. Select all the options to continue the conversation.
After some time passes, head back to the Wette Kitchen and talk to Furuya out front. He mentions that corporate liked all the ideas and has agreed to move forward with them. Yagami mentions keeping an eye out for a business partner to team up with.
When you see Furuya and Inose’s icons together at Wette Kitchen, it’s time to head that way. Talk to them to max out their friendship meters.
Yoshida (Yoshida Batting Center)
You must complete all of the Home Run Courses and Challenge Courses in order to trigger this friend event. If you are like us and need to cheese the courses, click here for the Yoshida Batting Center Course Guide. After completing the courses, Yoshida will introduce himself and two new batting challenges will be unlocked. Talk to Yoshida again and select Home Run Hell Course. Once you successfully complete the course, you will receive a Free Pass Voucher 1. Talk to Yoshida again and select Chaotic Challenge Course. Once you successfully complete the course, you will receive Secret Technique: Bat Appropriation. Completing both courses will max out his friendship meter.
Yosuke Saotome (Kamuro Theater on Taihei Boulevard)
Head to Men’s Entertainment Box on Shichifuku Street after completing The Twisted Gropercase and talk to Yosuke. Select the dialog option “I could always take a quick peek”. Head to Sexy Club on Tenkaichi Street and take the pink neon light stairs to the second floor. Talk to the host behind the counter in Apple Pie to trigger a cutscene scene. Afterwards head to the Kamuro Theater (Smoking Area) at the Millennium Tower on Theater Avenue and talk to Yosuke.
Yosuke will ask you to refer people to him, however, he is very picky on which people you can refer. You can refer the following people to Yosuke once you unlock them as friends:
Ryan Acosta
Kenji Tanago
Ryo Suzaki
Tashiro-kun
After you refer all the above friends to Yosuke, head back and talk to him. After some time passes, talk to him again to trigger a cutscene. This will max out Yosuke’s friendship meter.
Yurika Tachibana (Tachibana Mahjong on Nakamichi Alley)
After you play a game of Mahjong at Lullaby Mahjong, she will interrupt everyone in the room to let them know that Tachibana Mahjong has officially opened. You will now be able to visit her there.
When you visit her at Tachibana Mahjong, talk to her to trigger a cutscene. Play a game of mahjong and try to become the “wareme” to increase her rep. You will then be able to max out her friendship meter if you win a round of mahjong as the wareme.
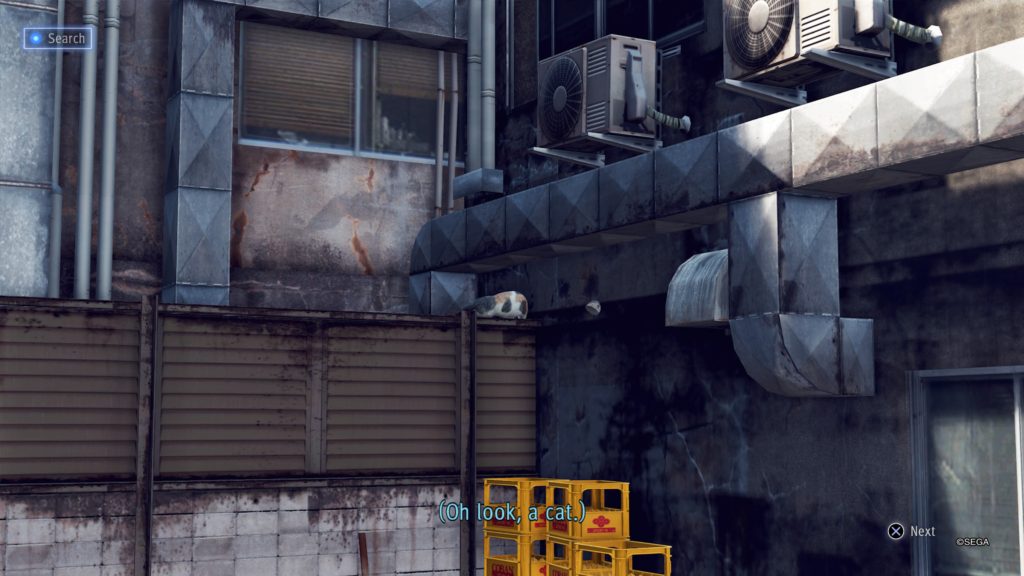
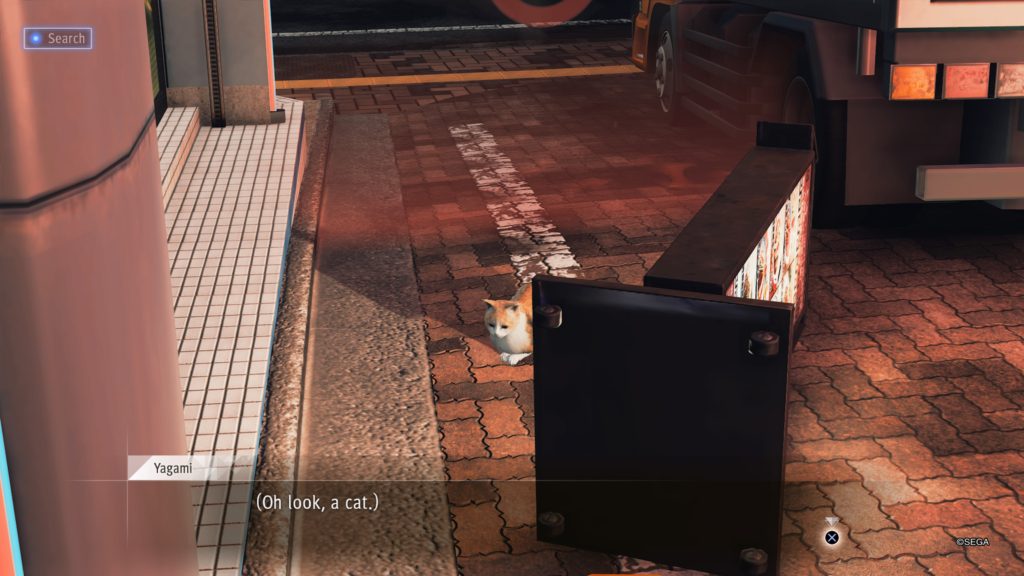
The cat is located in Theater Square to the left of the overflowing dumpster next to a pole.
Search
This site uses cookies. By continuing to use this website, you are giving consent to cookies being used. For more information on cookies, view our Privacy Policy.OkPrivacy Policy