
Extra lives are important to collect if you’re looking to platinum Doom Eternal as they are needed for 2 trophies. If you collect 20 extra lives in a single save slot, you will unlock the Extra Extra Lives trophy! If you complete the Extra Life Mode with 10 extra lives in your inventory, then you will unlock the Running up the High Score trophy!
Extra Life Locations:
- Mission 1: Hell on Earth
- Mission 2: Exultia
- Mission 3: Cultist Base
- Mission 4: Doom Hunter Base
- Mission 5: Super Gore Nest
- Mission 6: Arc Complex
- Mission 7: Mars Core
- Mission 8: Sentinel Prime
- Mission 9: Taras Nabad
- Mission 10: Nekravol – Part I
- Mission 11: Nekravol – Part II
- Mission 12: Urdak
- Mission 13: Final Sin
Mission 1: Hell on Earth
City (Travel Point: Ravaged Cathedral)
Head through the doorway of the building with the SCOTT sign, passing the UAC Spokesperson hologram. Make your way across the room towards the green light on the ceiling, passing through the door under it. Climb up a ledge and follow the path right to the broken section of the windows but don’t go out it. Facing the broken window, turn left to see another section of floor down a hallway. Use the double jump to reach that area.
Once there, drop down into the room below to find the extra life.
City (Travel Point: Metro Station)
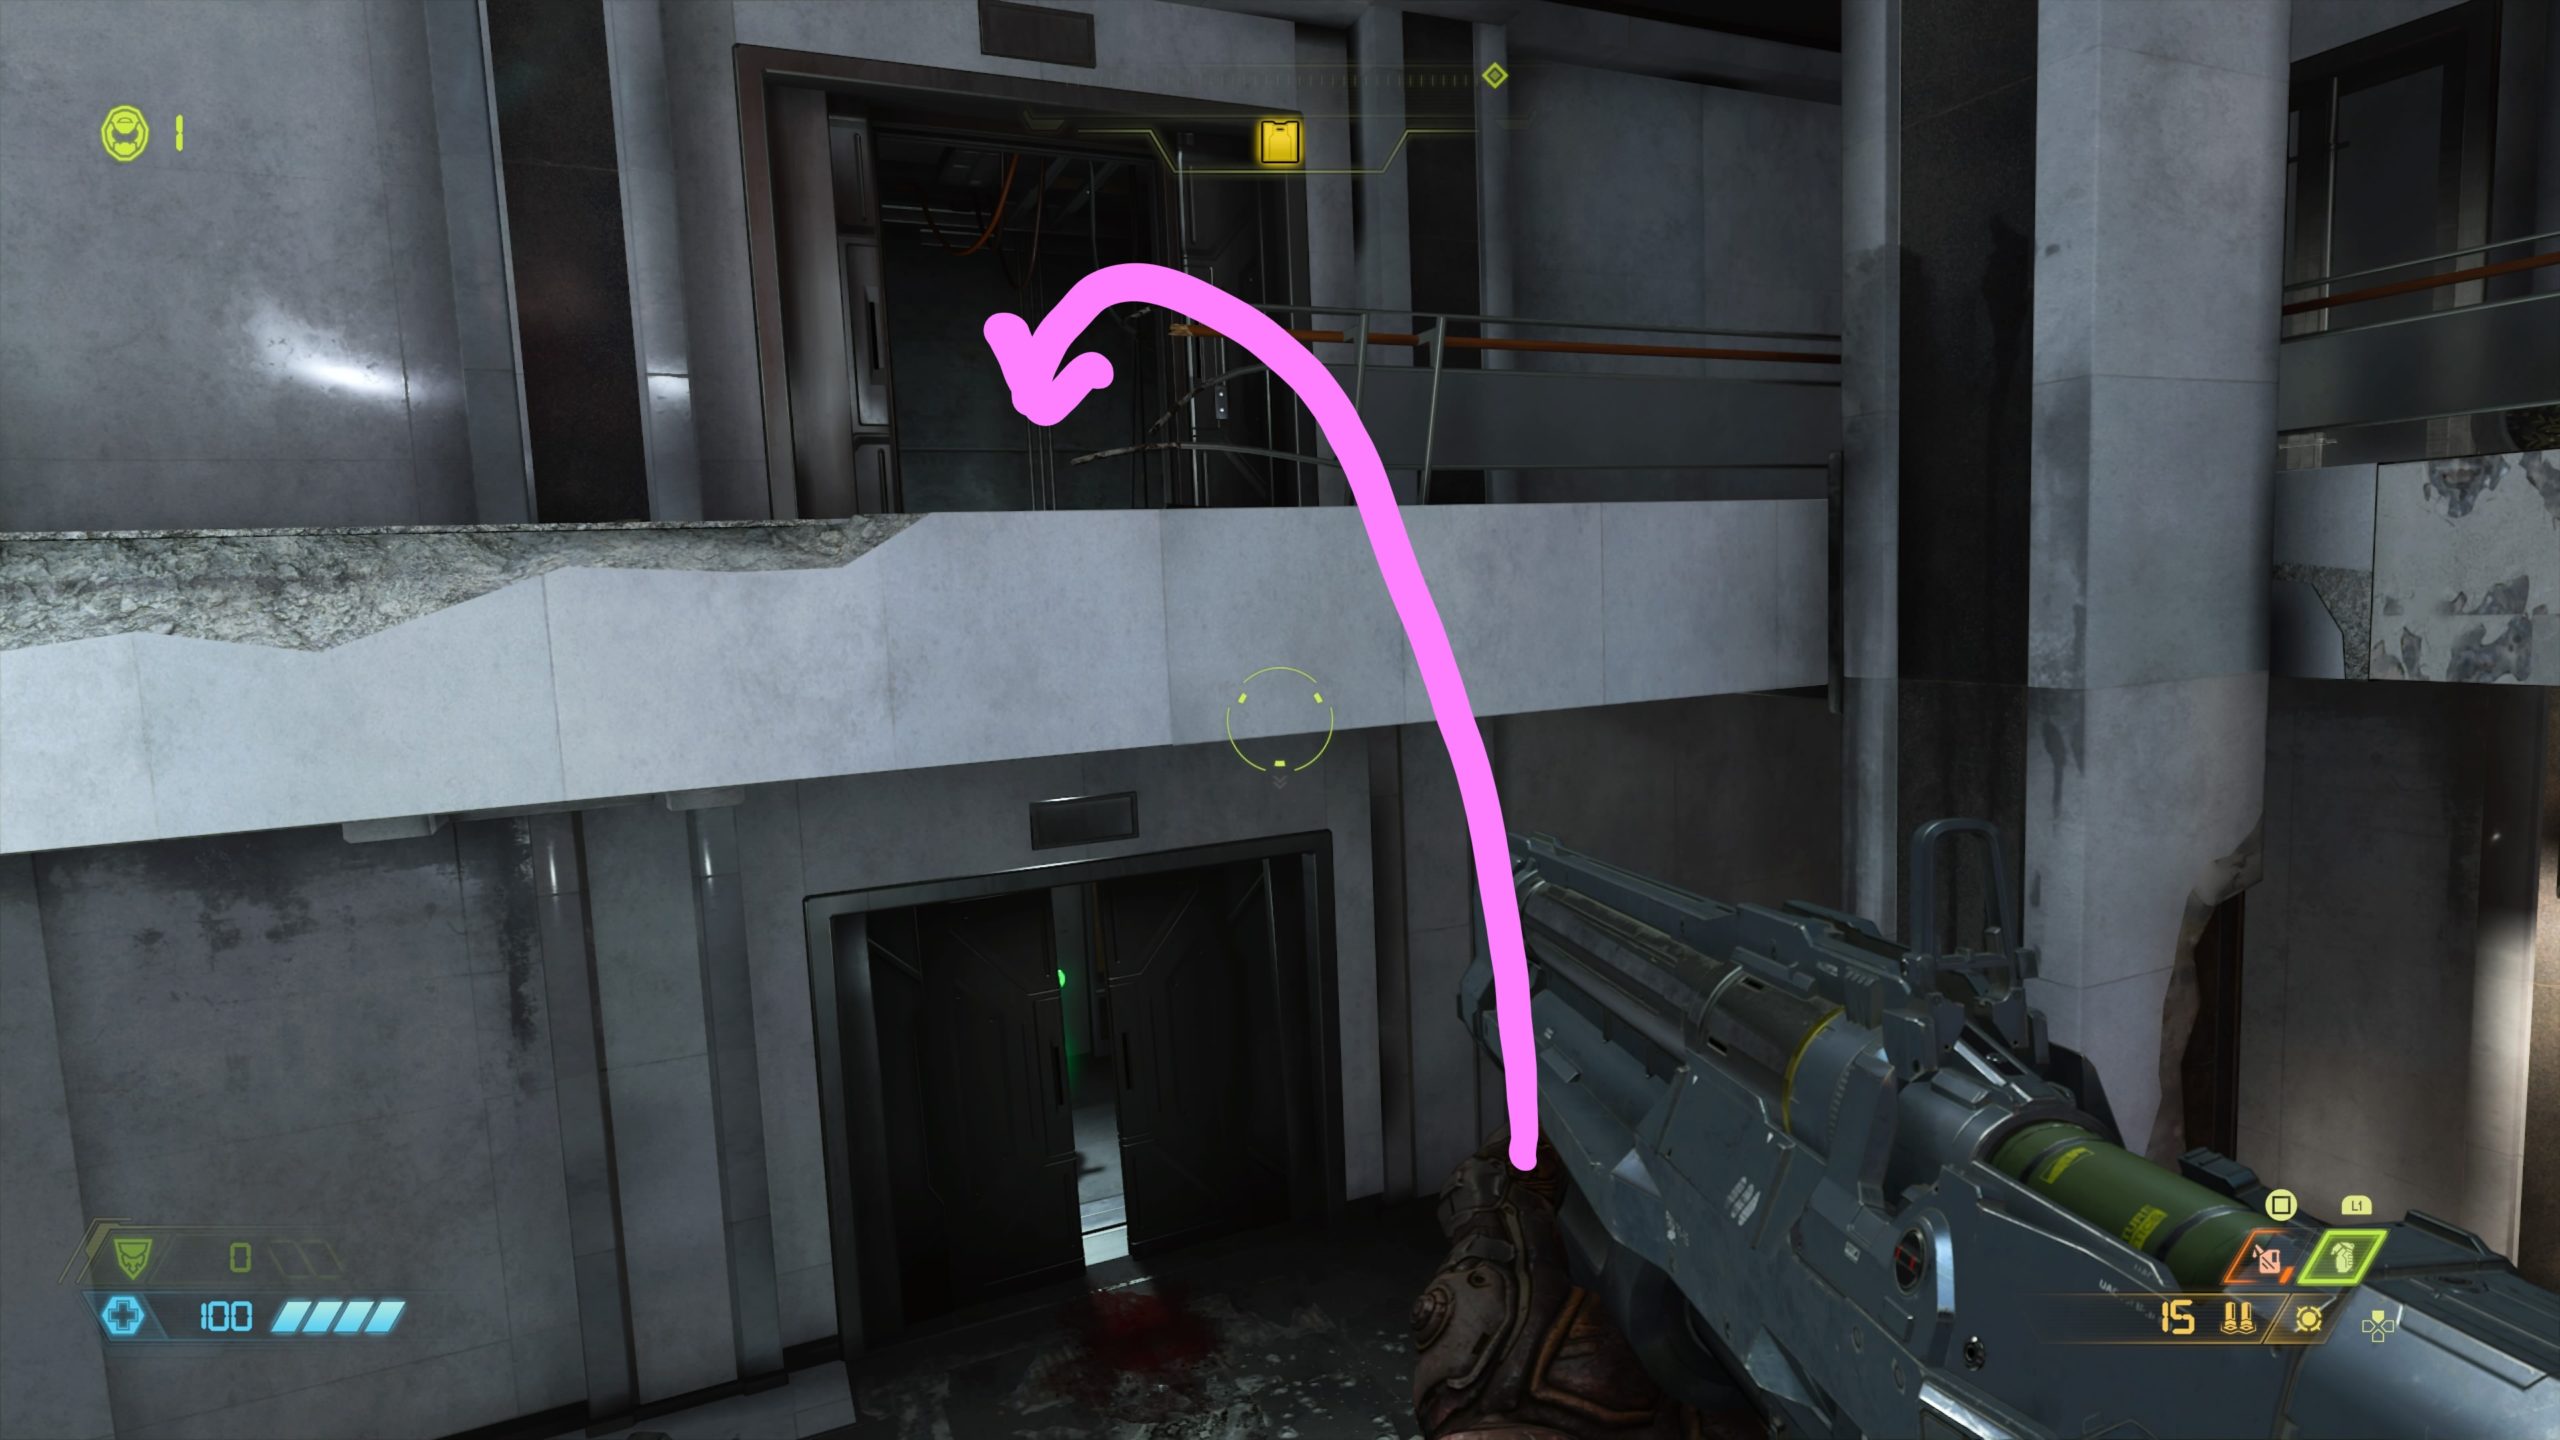
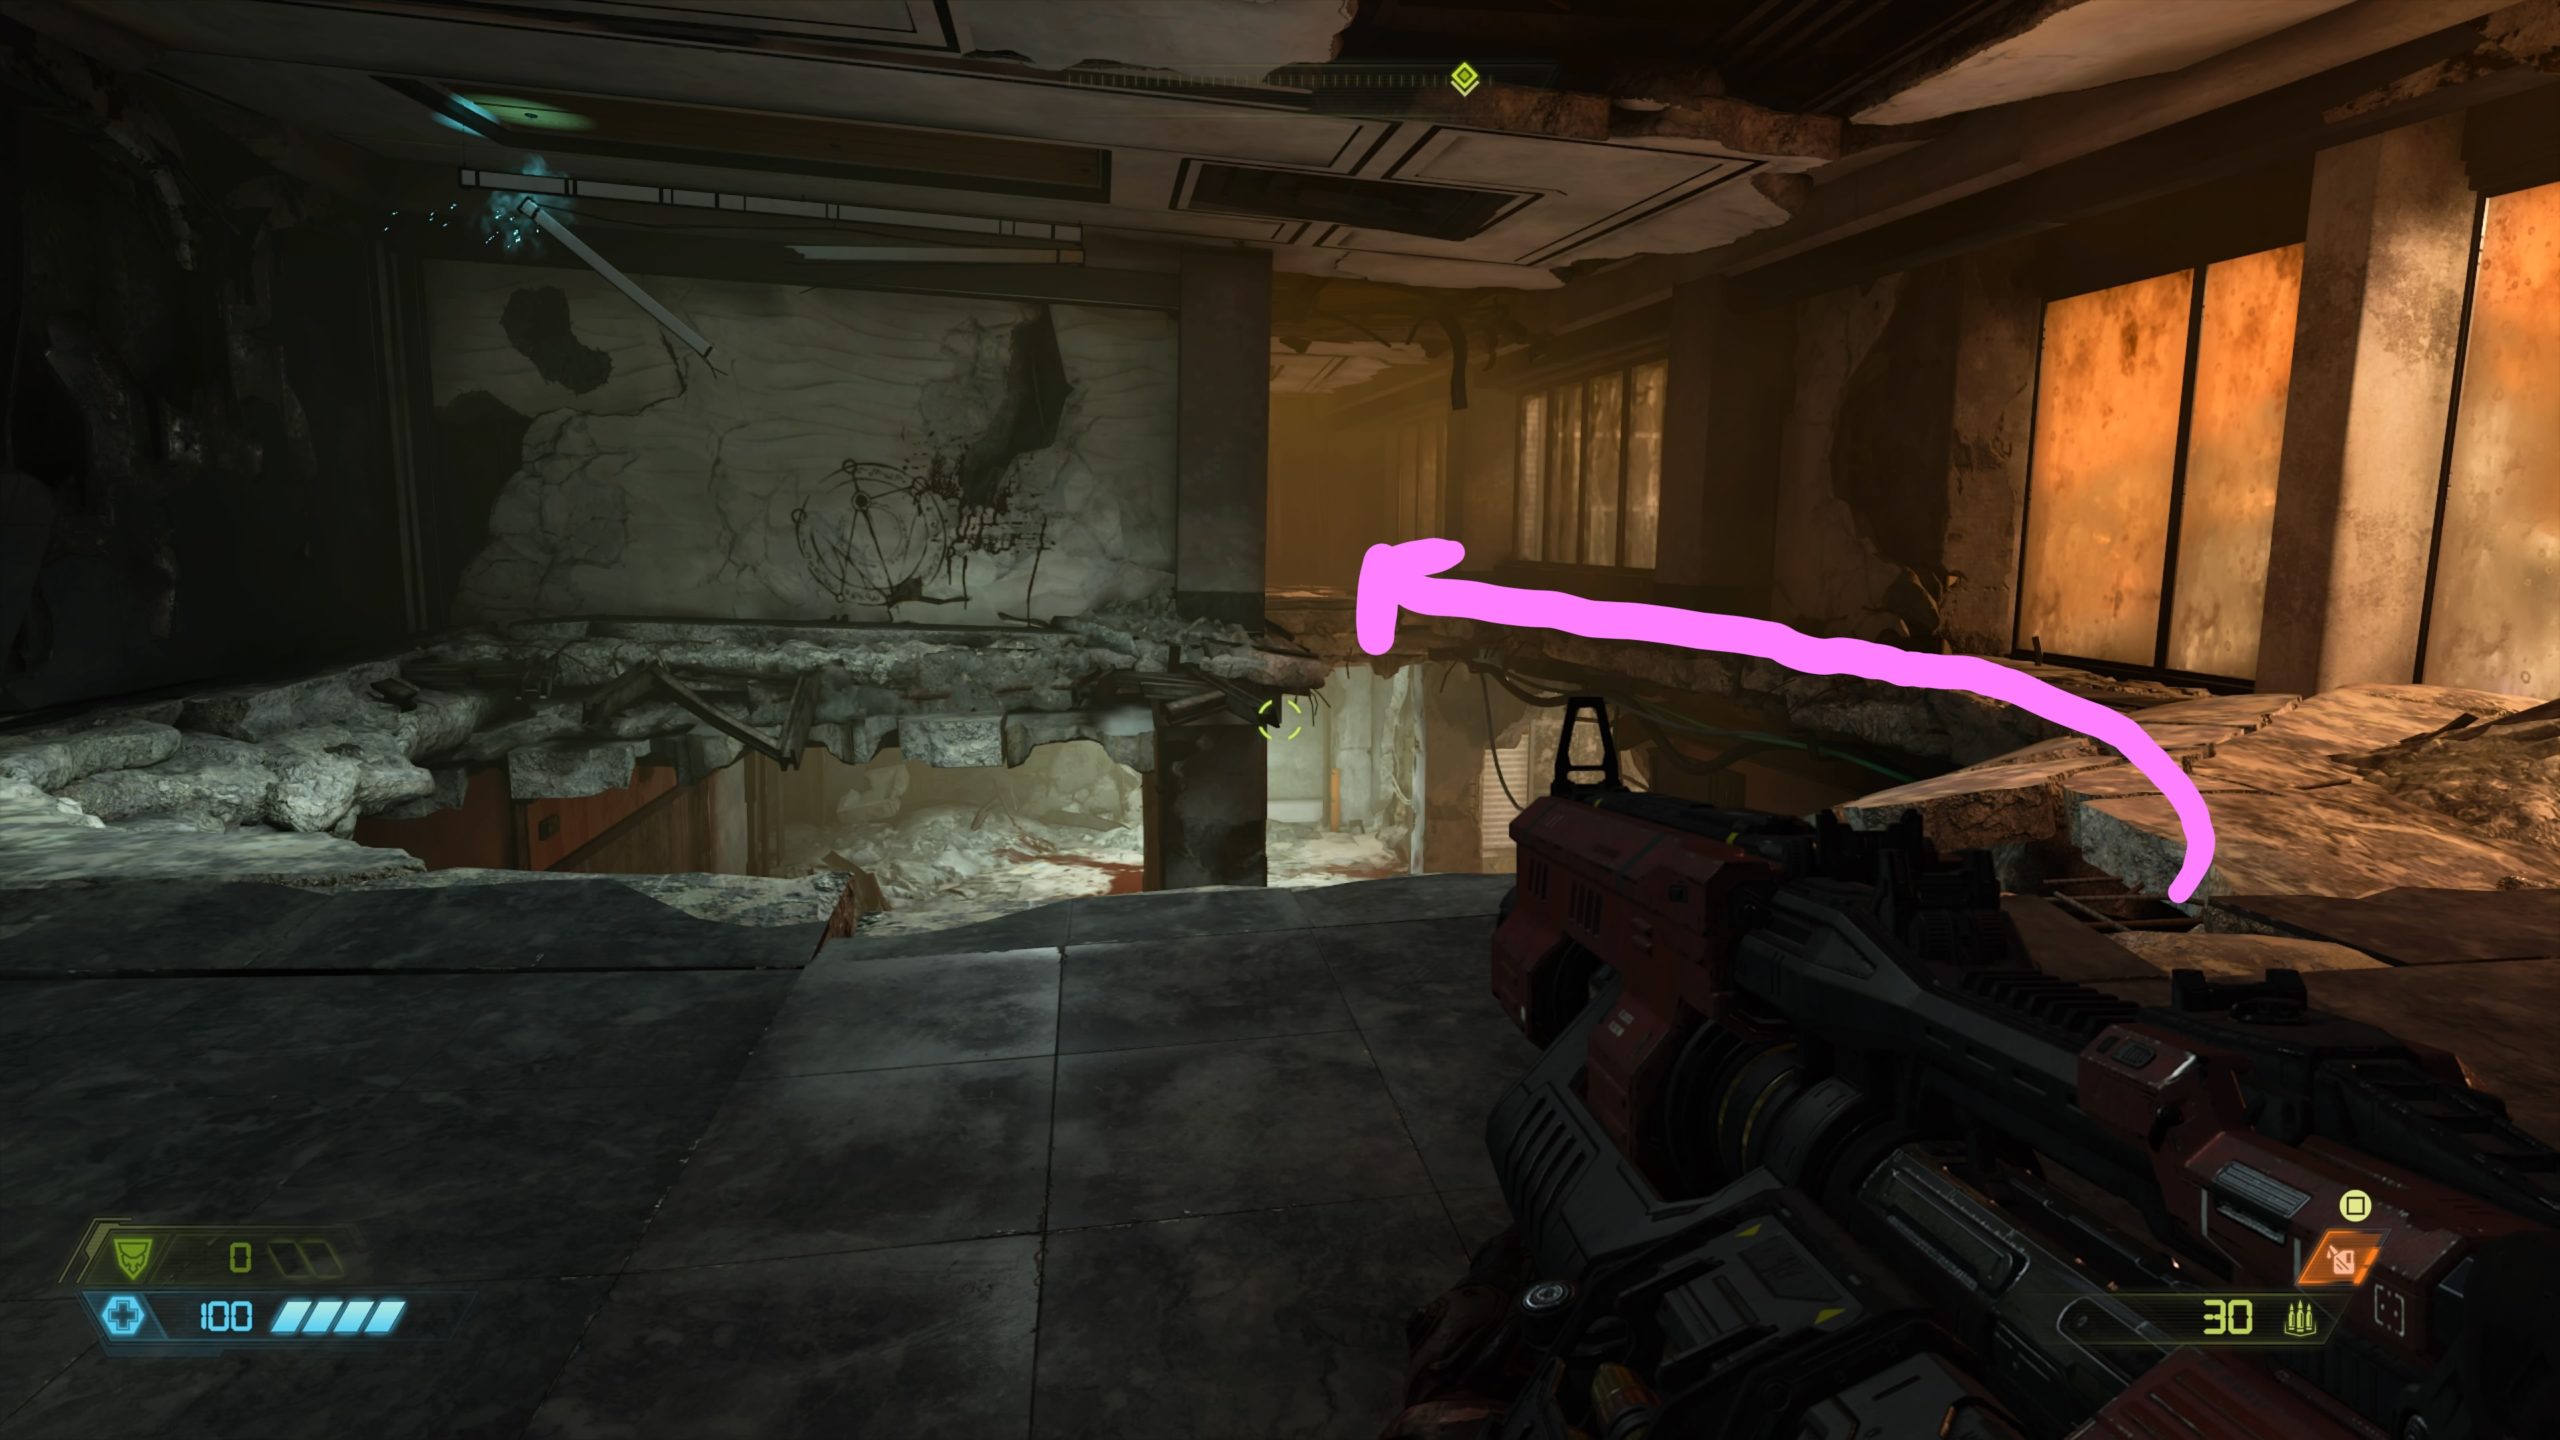
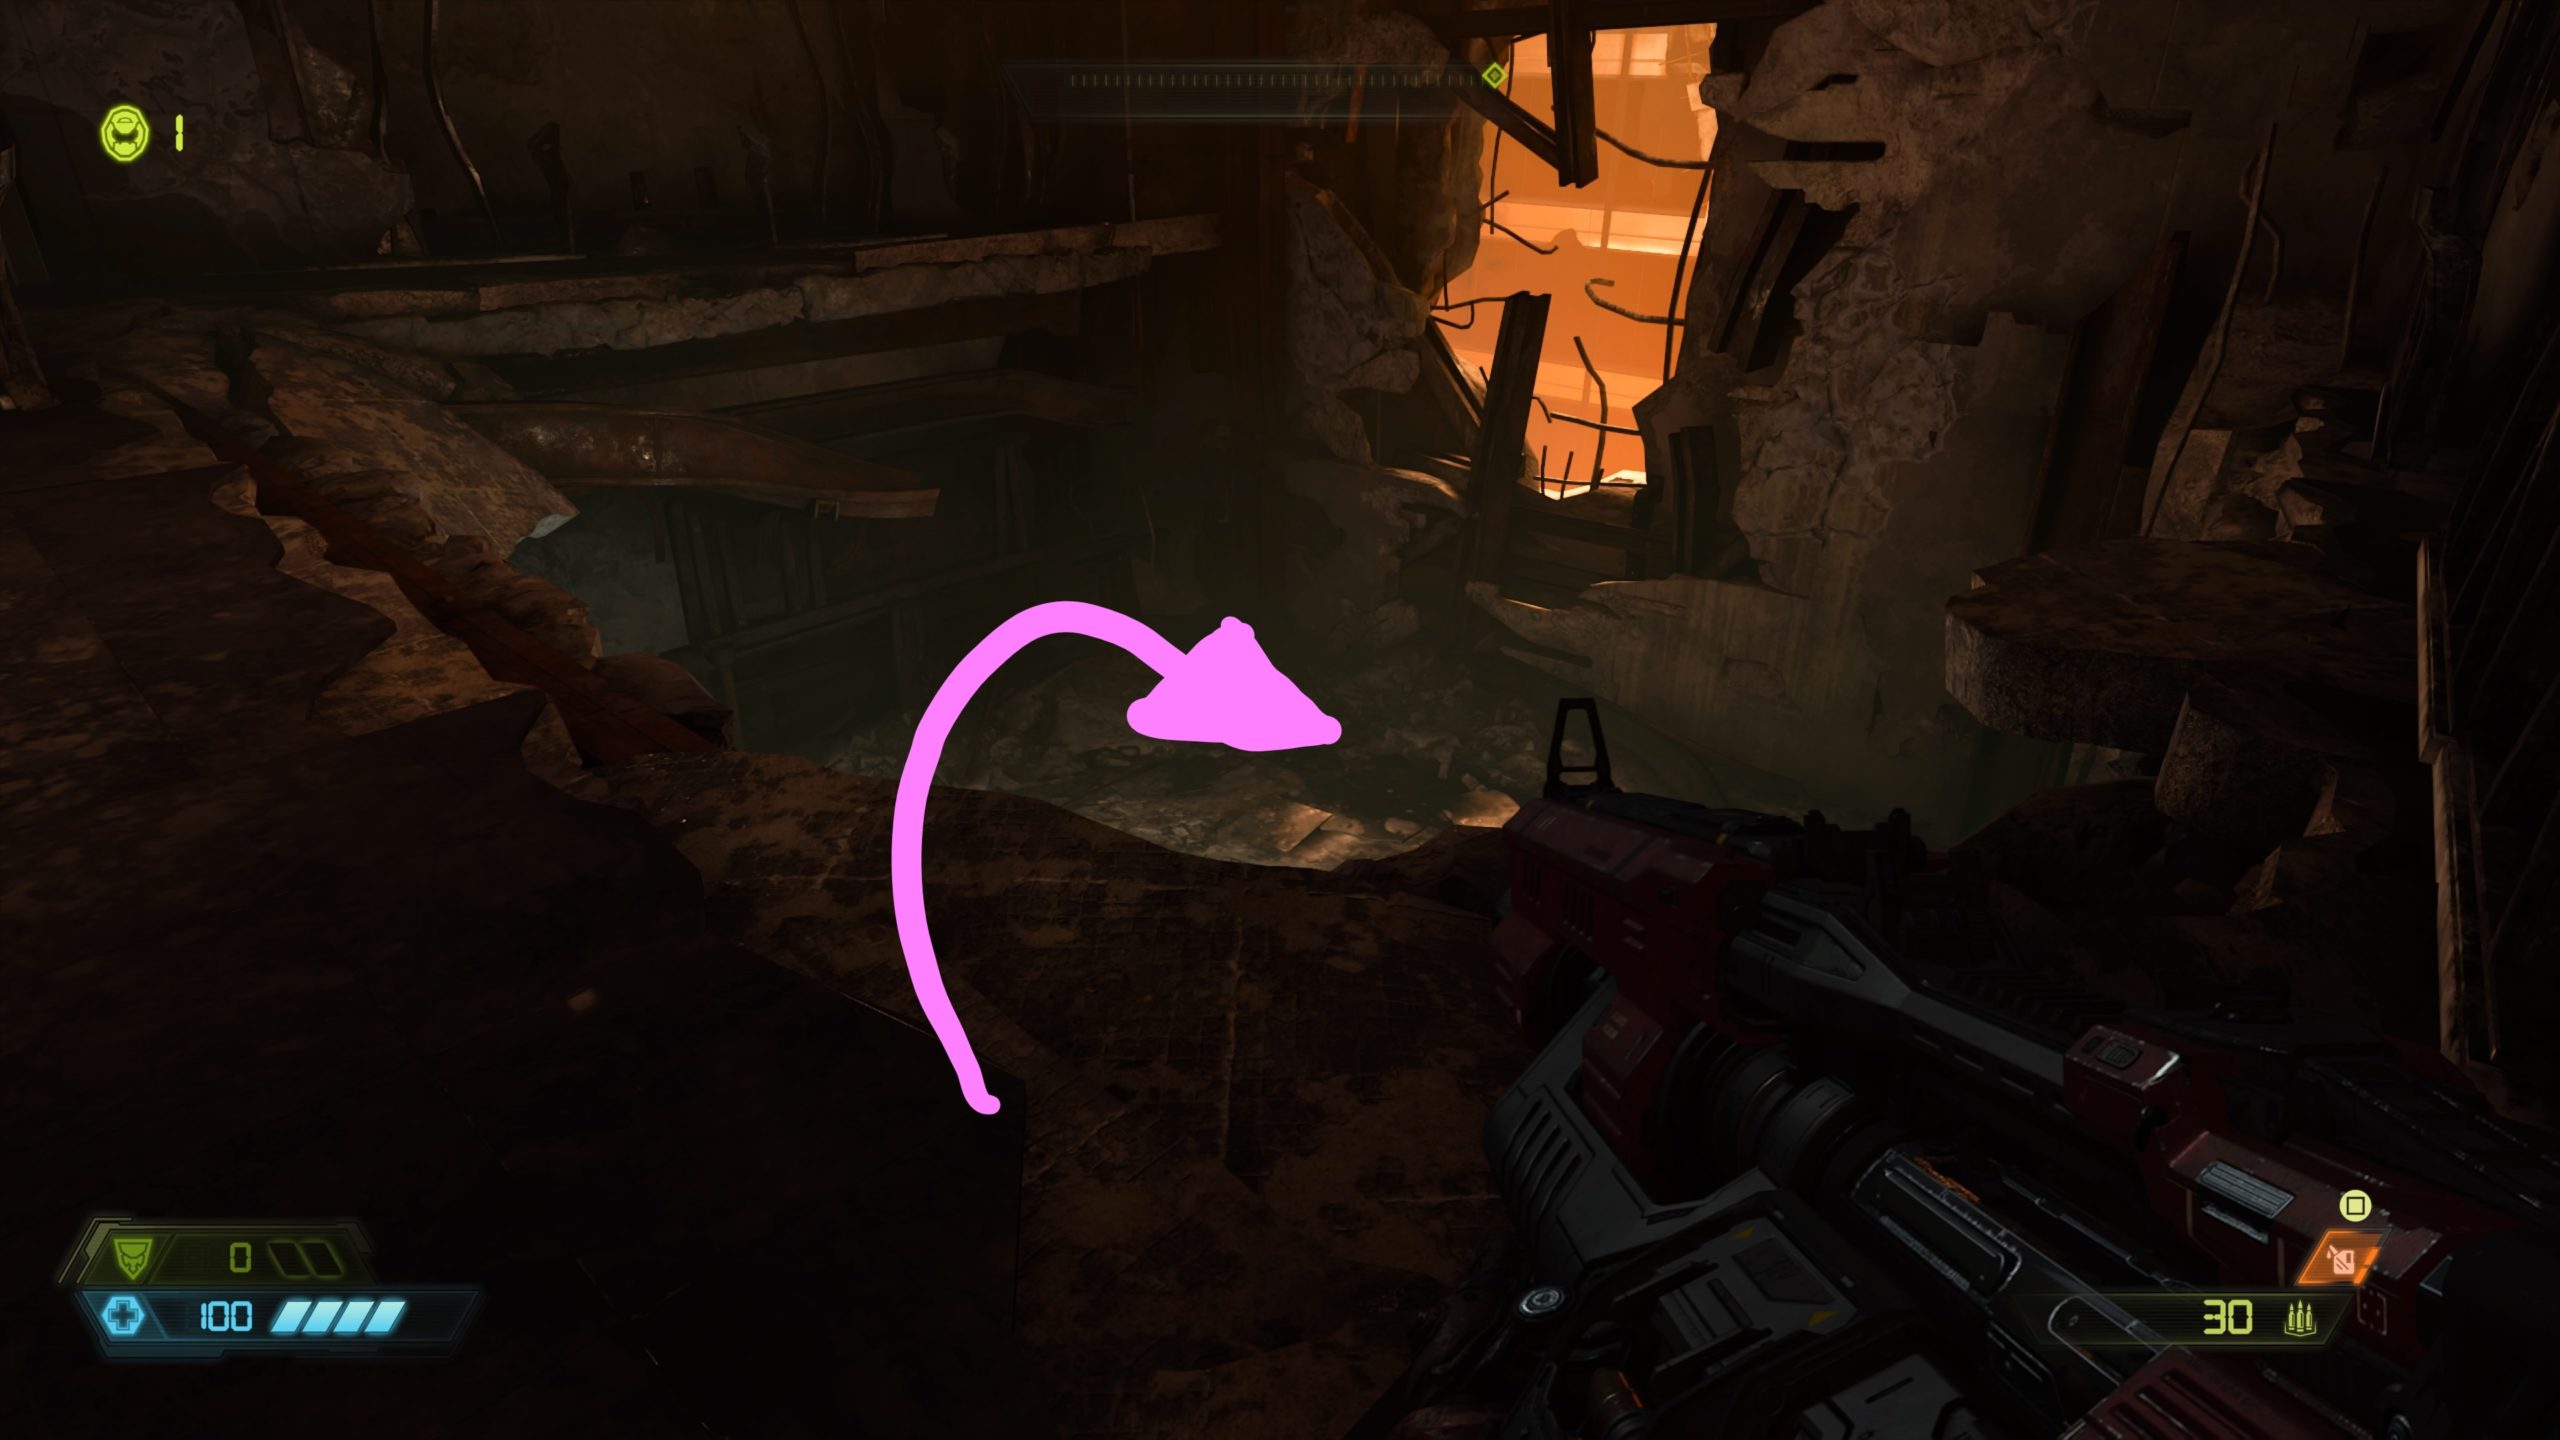
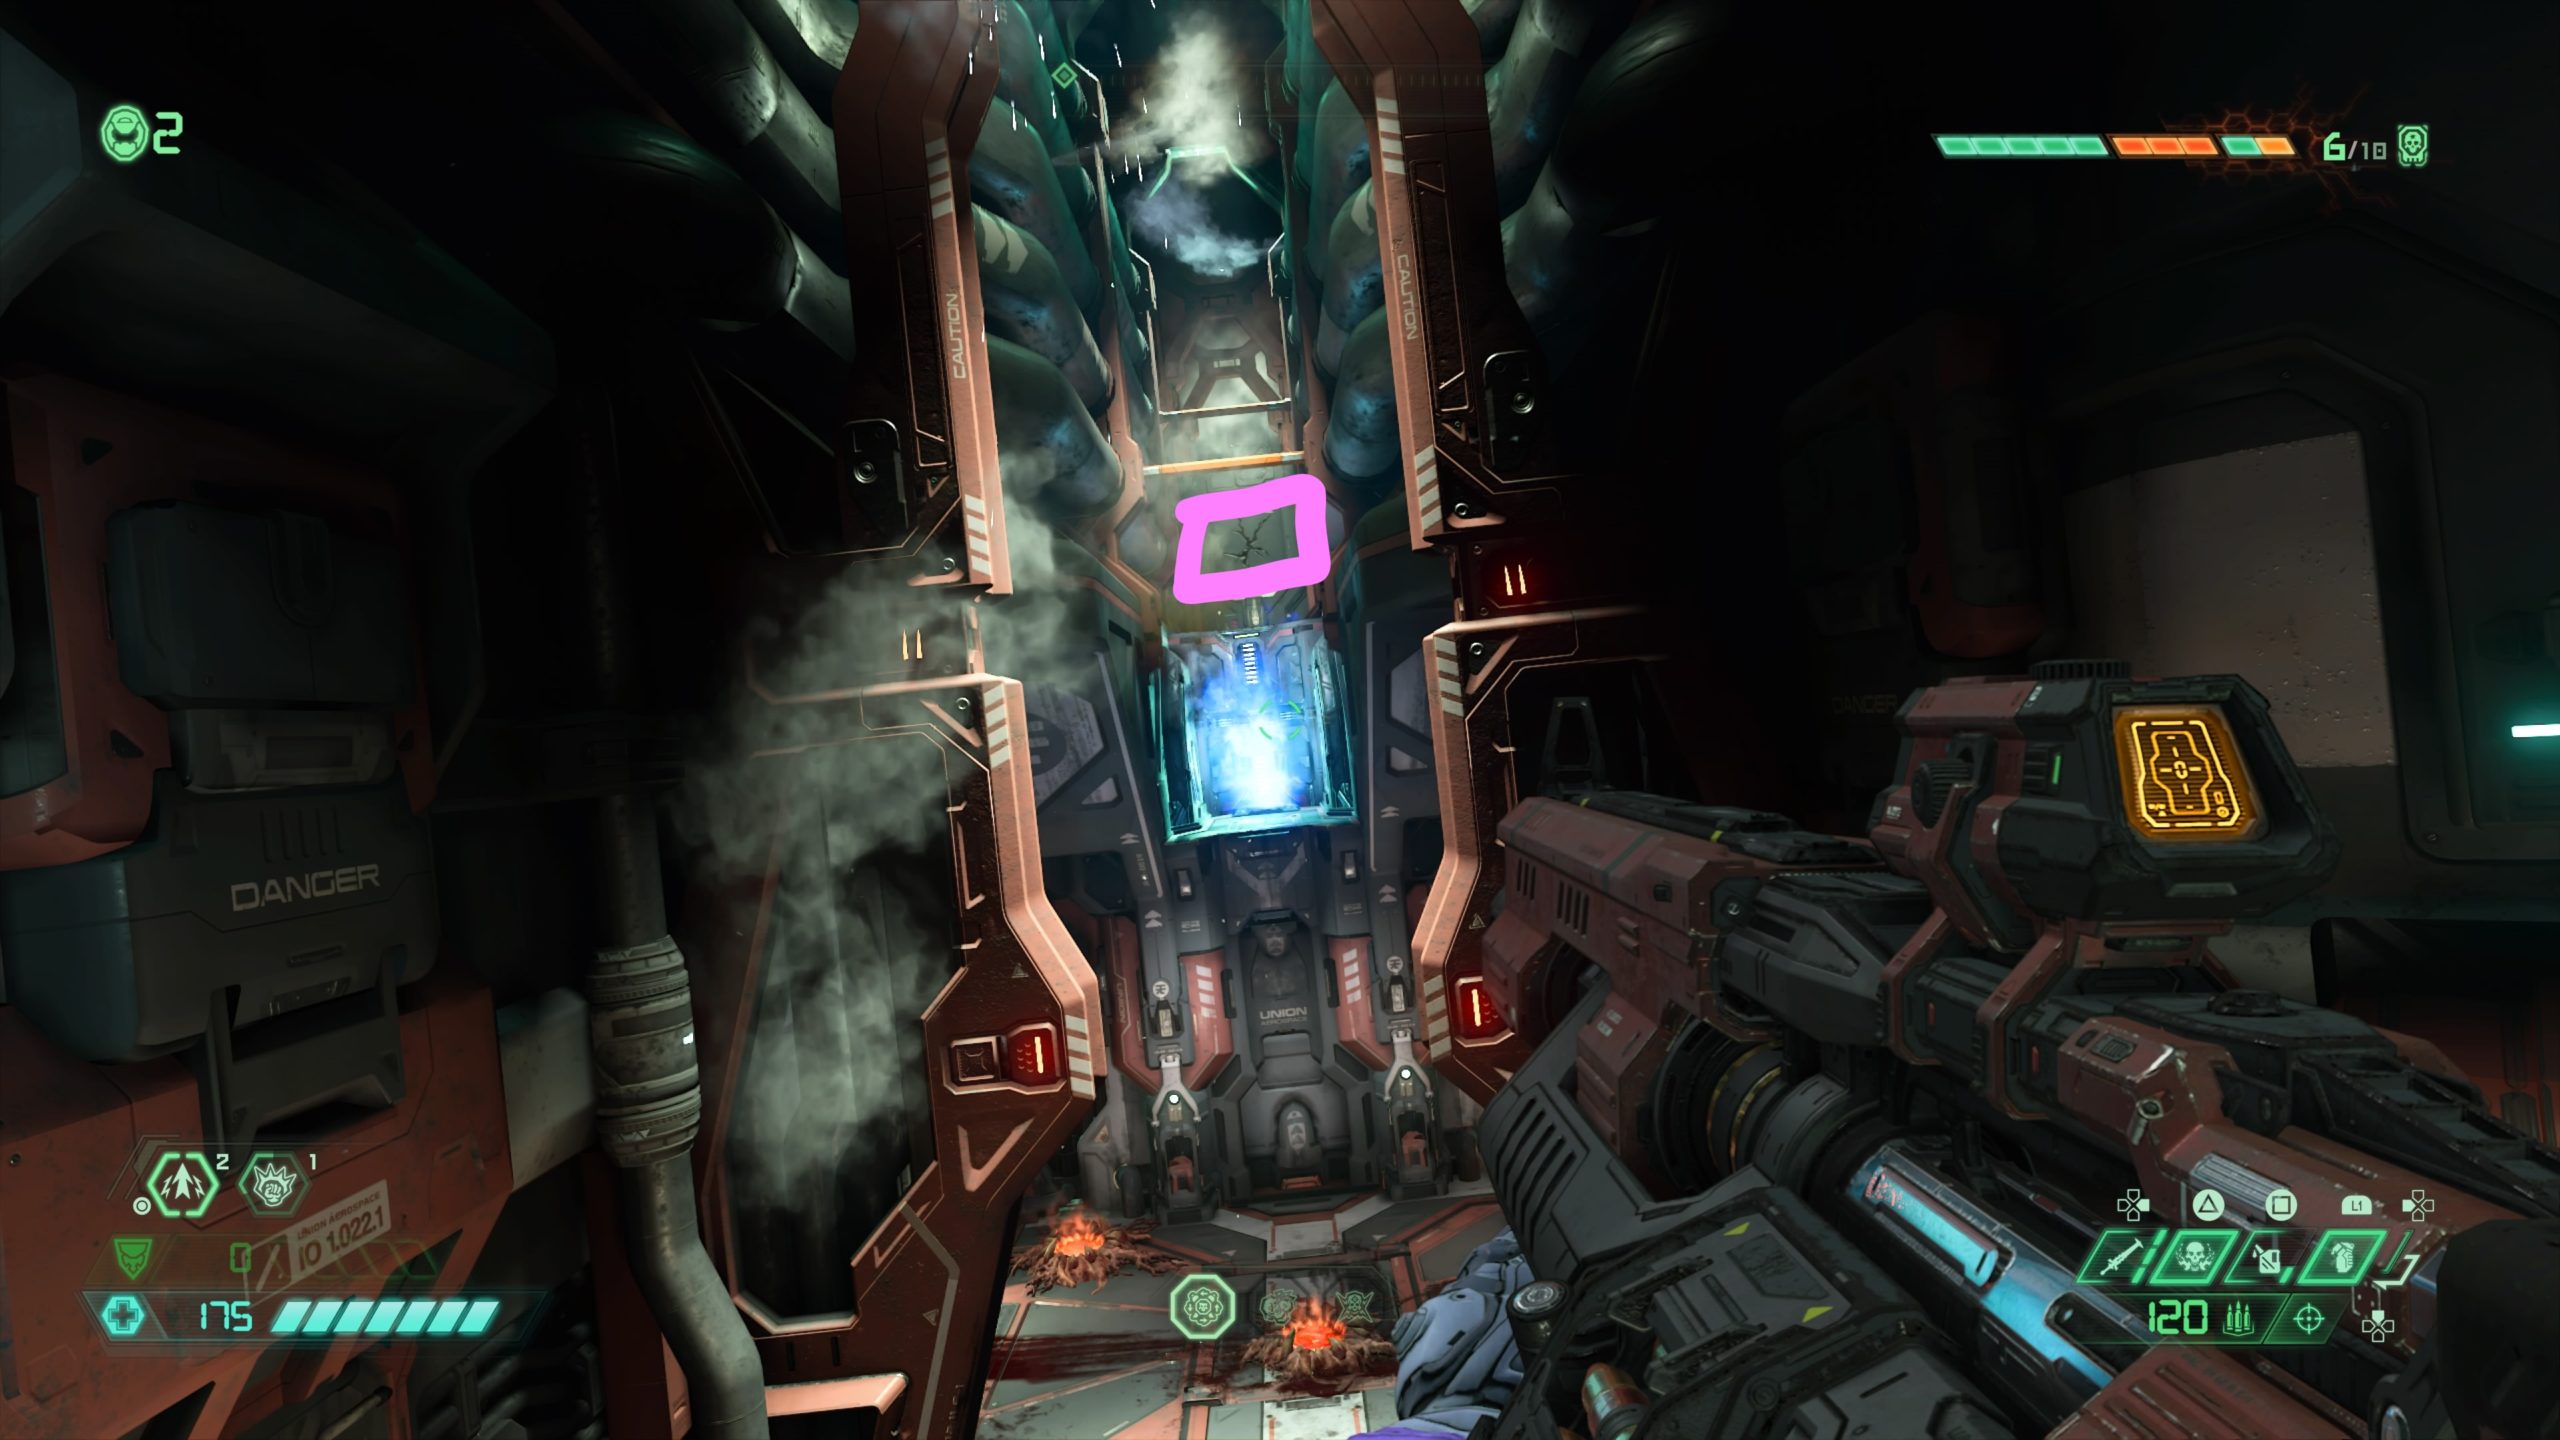
During the first mission, you’ll jump across a giant chasm and head through a subway train to reach a subway tunnel. If you head through the tunnel, you’ll find a maintenance room at the end. This will lead you to a large open room with a bunch of enemies. Once you defeat all the enemies, the red barrier will dissolve allowing you to continue forward. Before continuing forward, look for the elevator that contains the extra life. To reach it, head to the second level above the elevator then drop down the elevator shaft.
City (Travel Point: Metro Station)

From the previous extra life, exit the building by jumping out the window. This will bring you outside near a damaged overpass (you should see a pink billboard advertising Vitreous). Head under the overpass (right of the billboard) and dodge the fireballs as you pass through. When you emerge on the other side of the overpass, hang right and follow the ledge down where you’ll jump across a small gap. Keep following the ledge around to find the extra life floating in the air.
Mission 2: Exultia
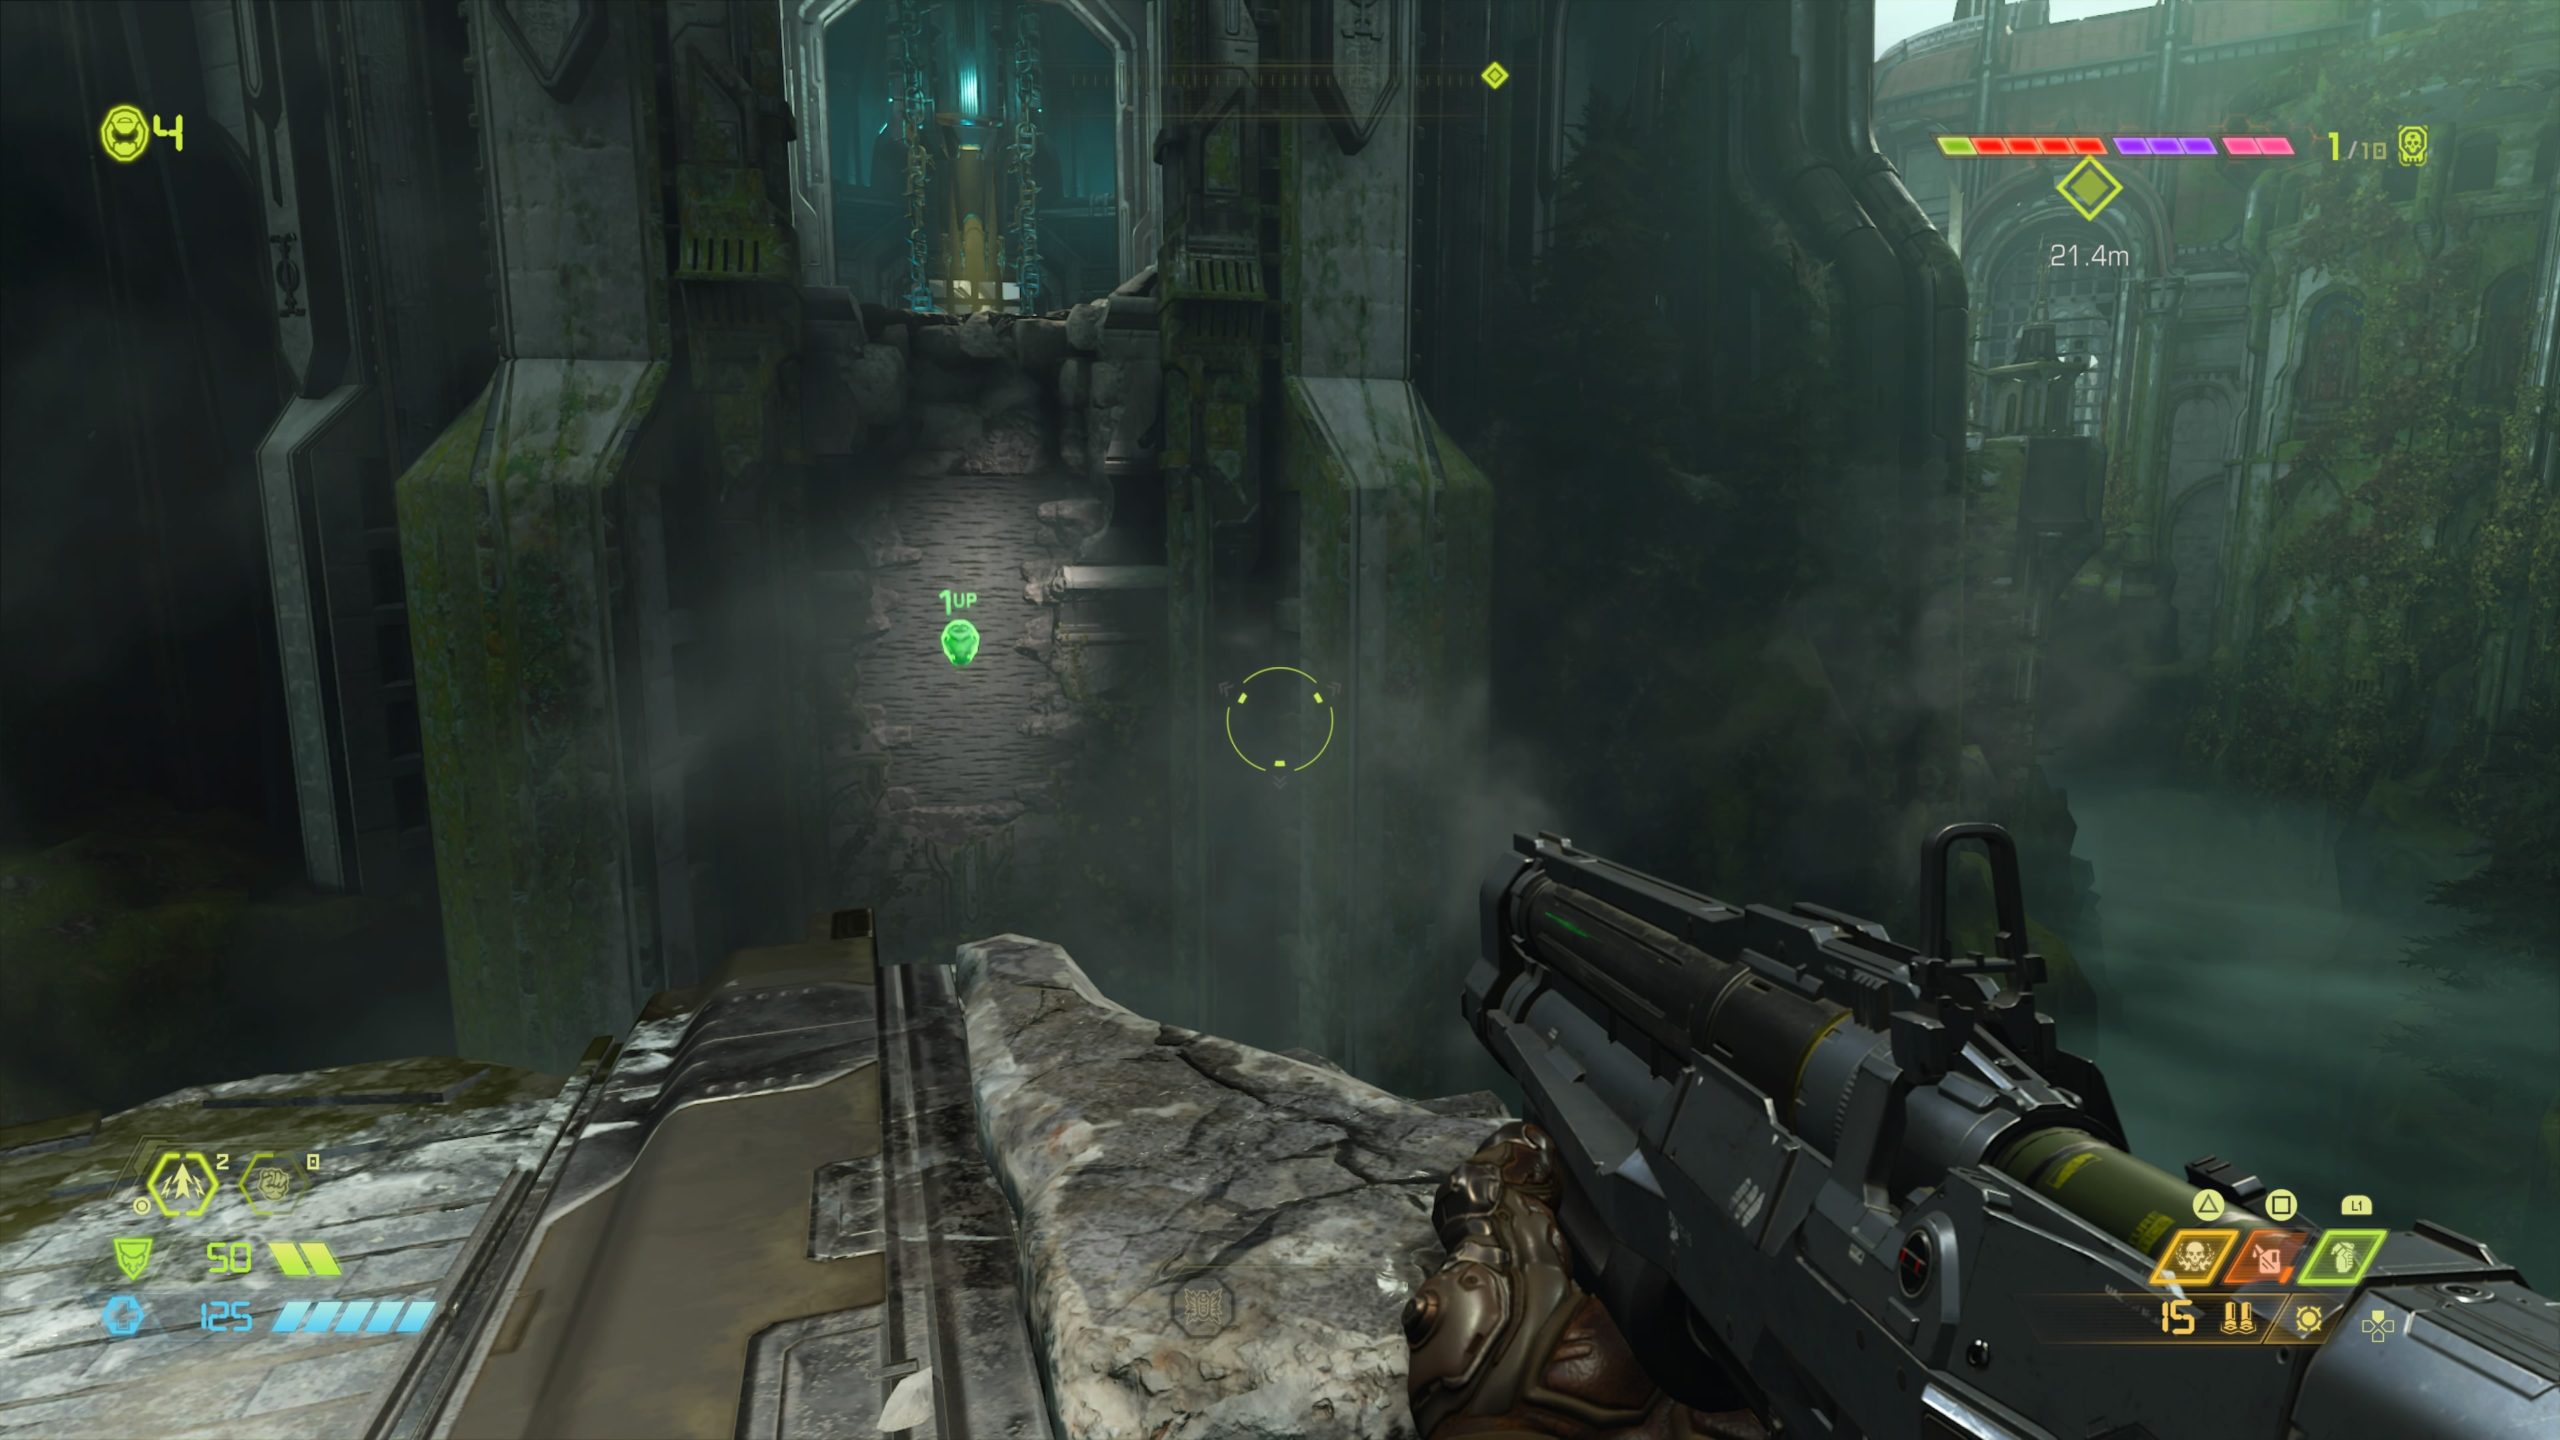
Exultia (Travel Point: Mourning Spire)
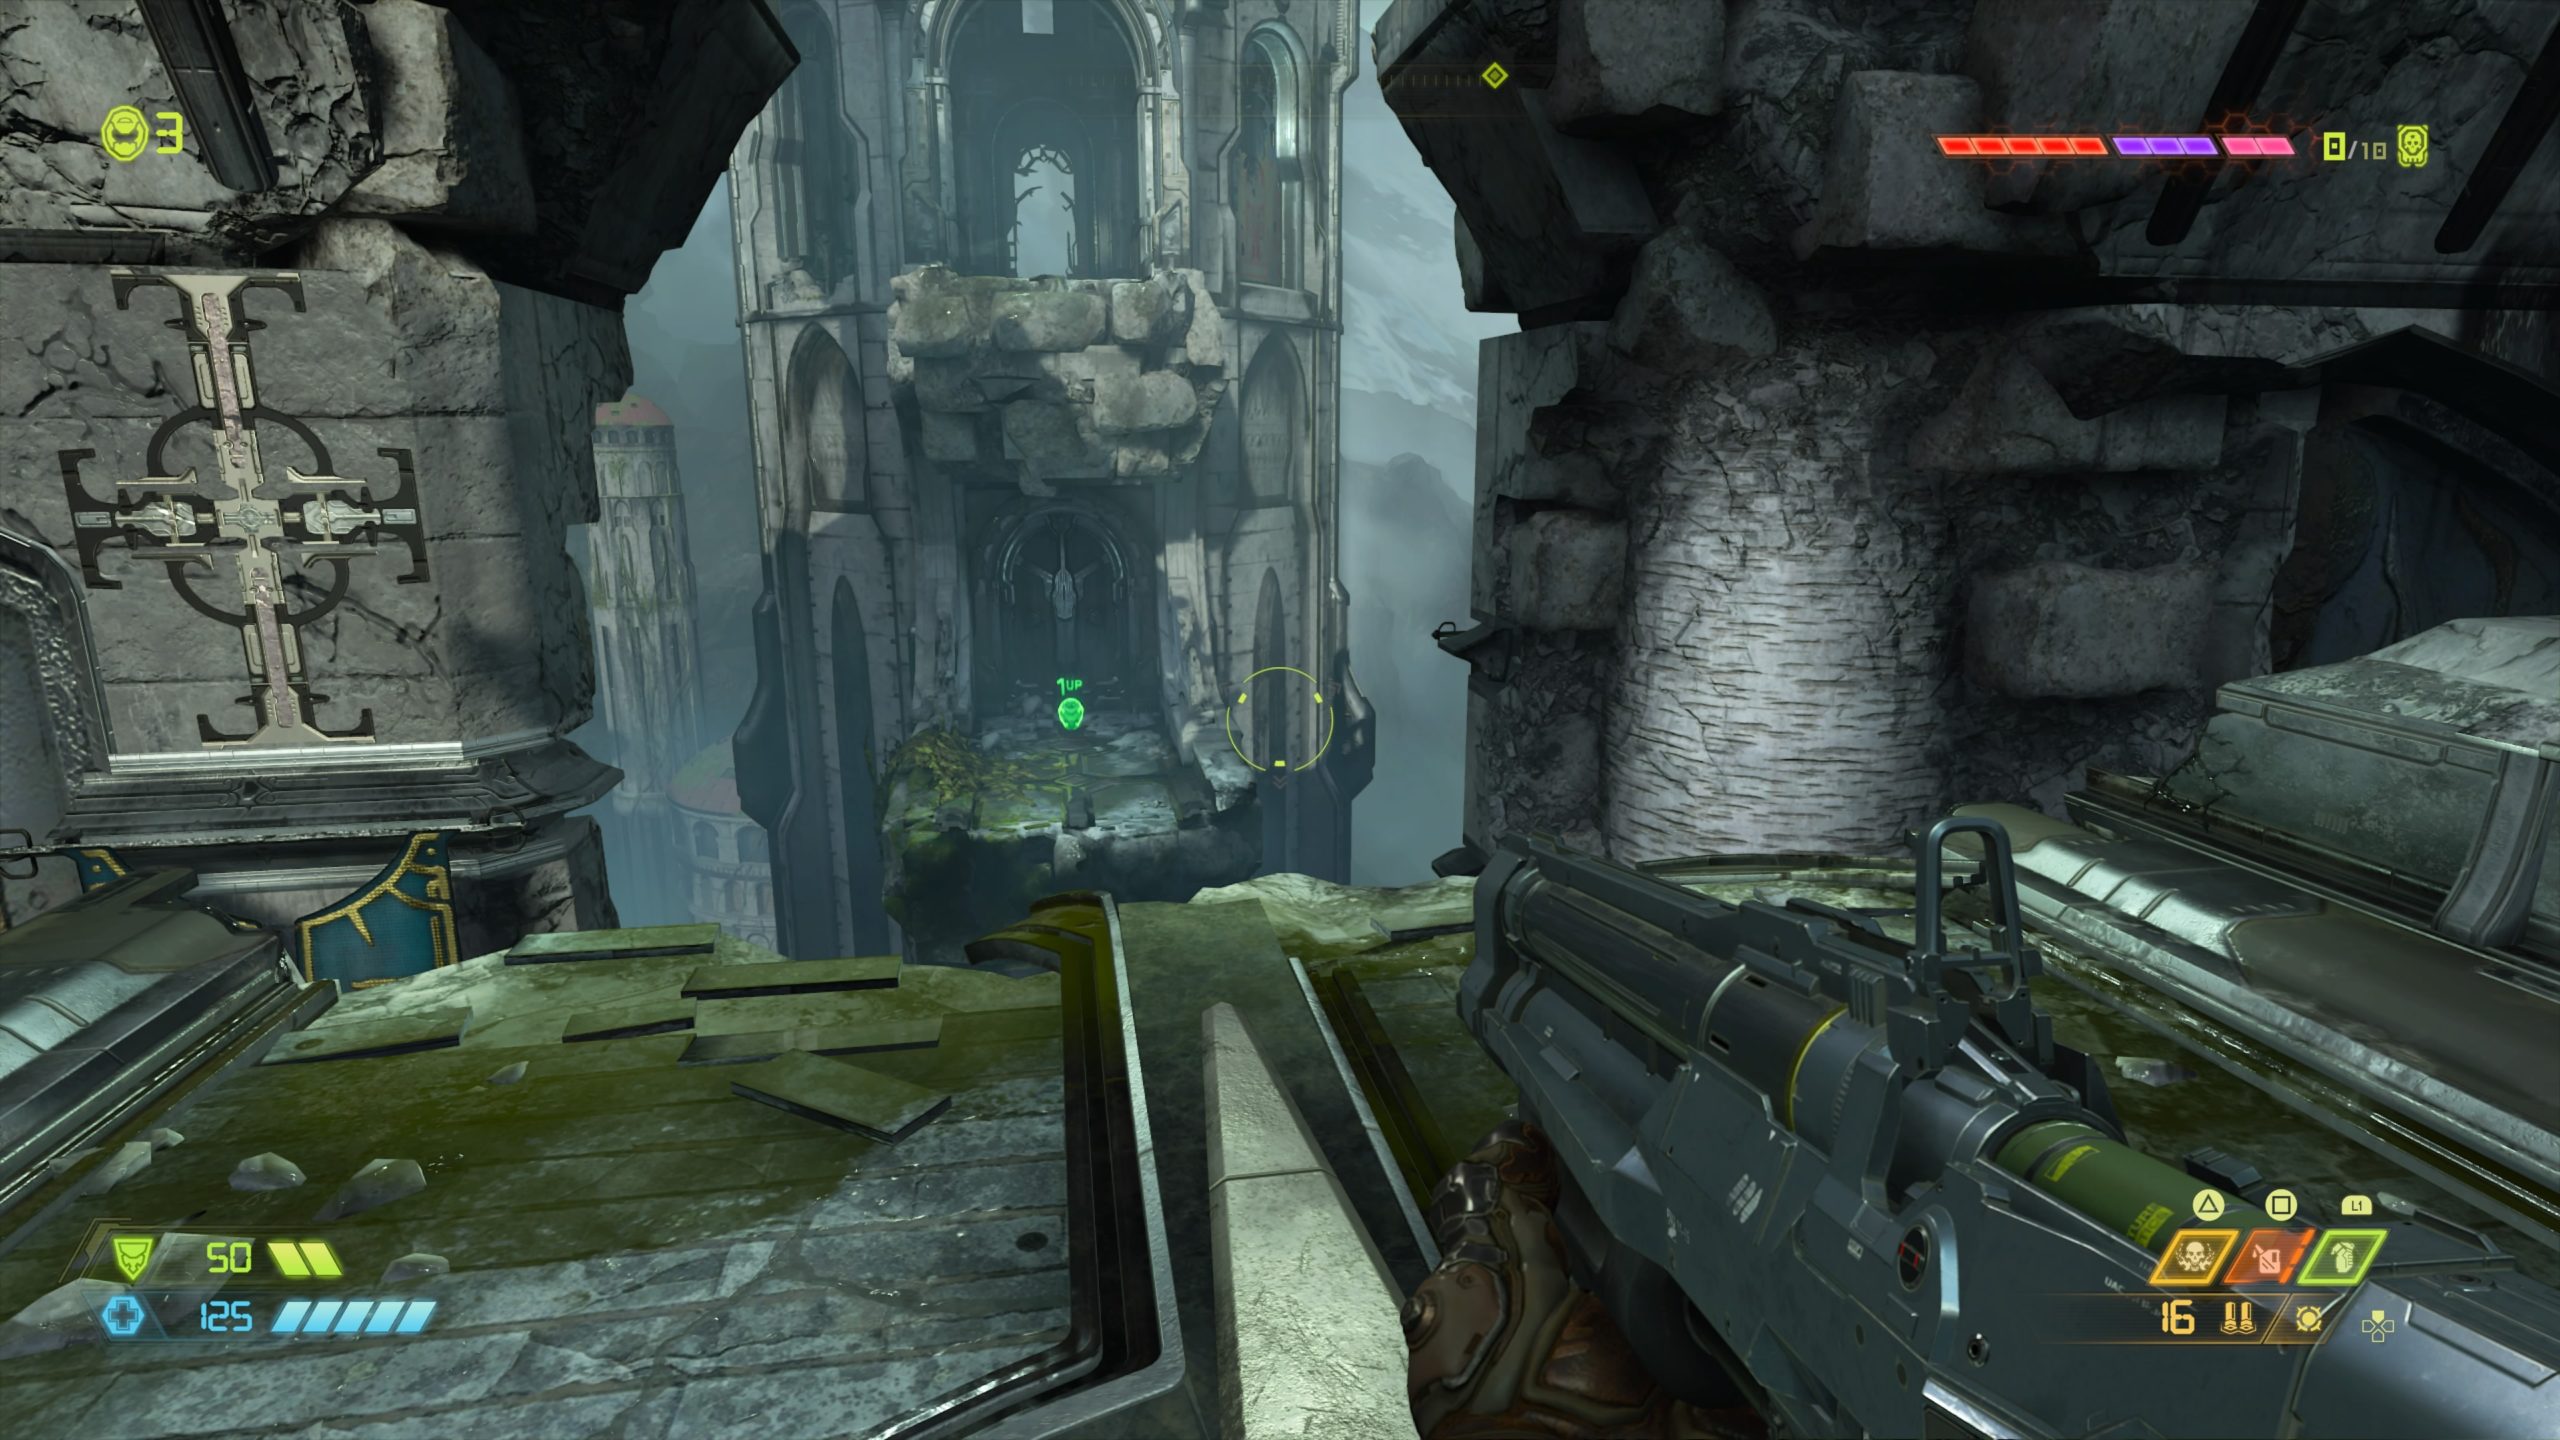
After traveling to Exultia from the Fortress of Doom, jump down to the platform below the starting area to locate this extra life.
Exultia (Travel Point: Mourning Spire)
From the previous extra life, keep working your way forward until you obtain the Blood Punch ability. Exit the elevator and jump down the hole at the end of the path. Follow the circular room around, dodging the lightning streaks, to reach a gold spinning bar at the end. Use the spin bar to reach the upper level where the extra life can be found on the left near the elevator.
Exultia (Travel Point: Central Rotunda)
The extra life is located just past the room where you unlocked the Dash ability. To reach it, you will need to use the Dash ability to jump to the section of broken bridge. From there, turn around and look towards the room you just came from to find a climbable wall. You will need to use a combination of Dash and Double Jump abilities to reach it.
Exultia (Travel Point: Central Rotunda)

The extra life is located behind the king’s throne.
Hell (Travel Point: Belphegor’s Gate)
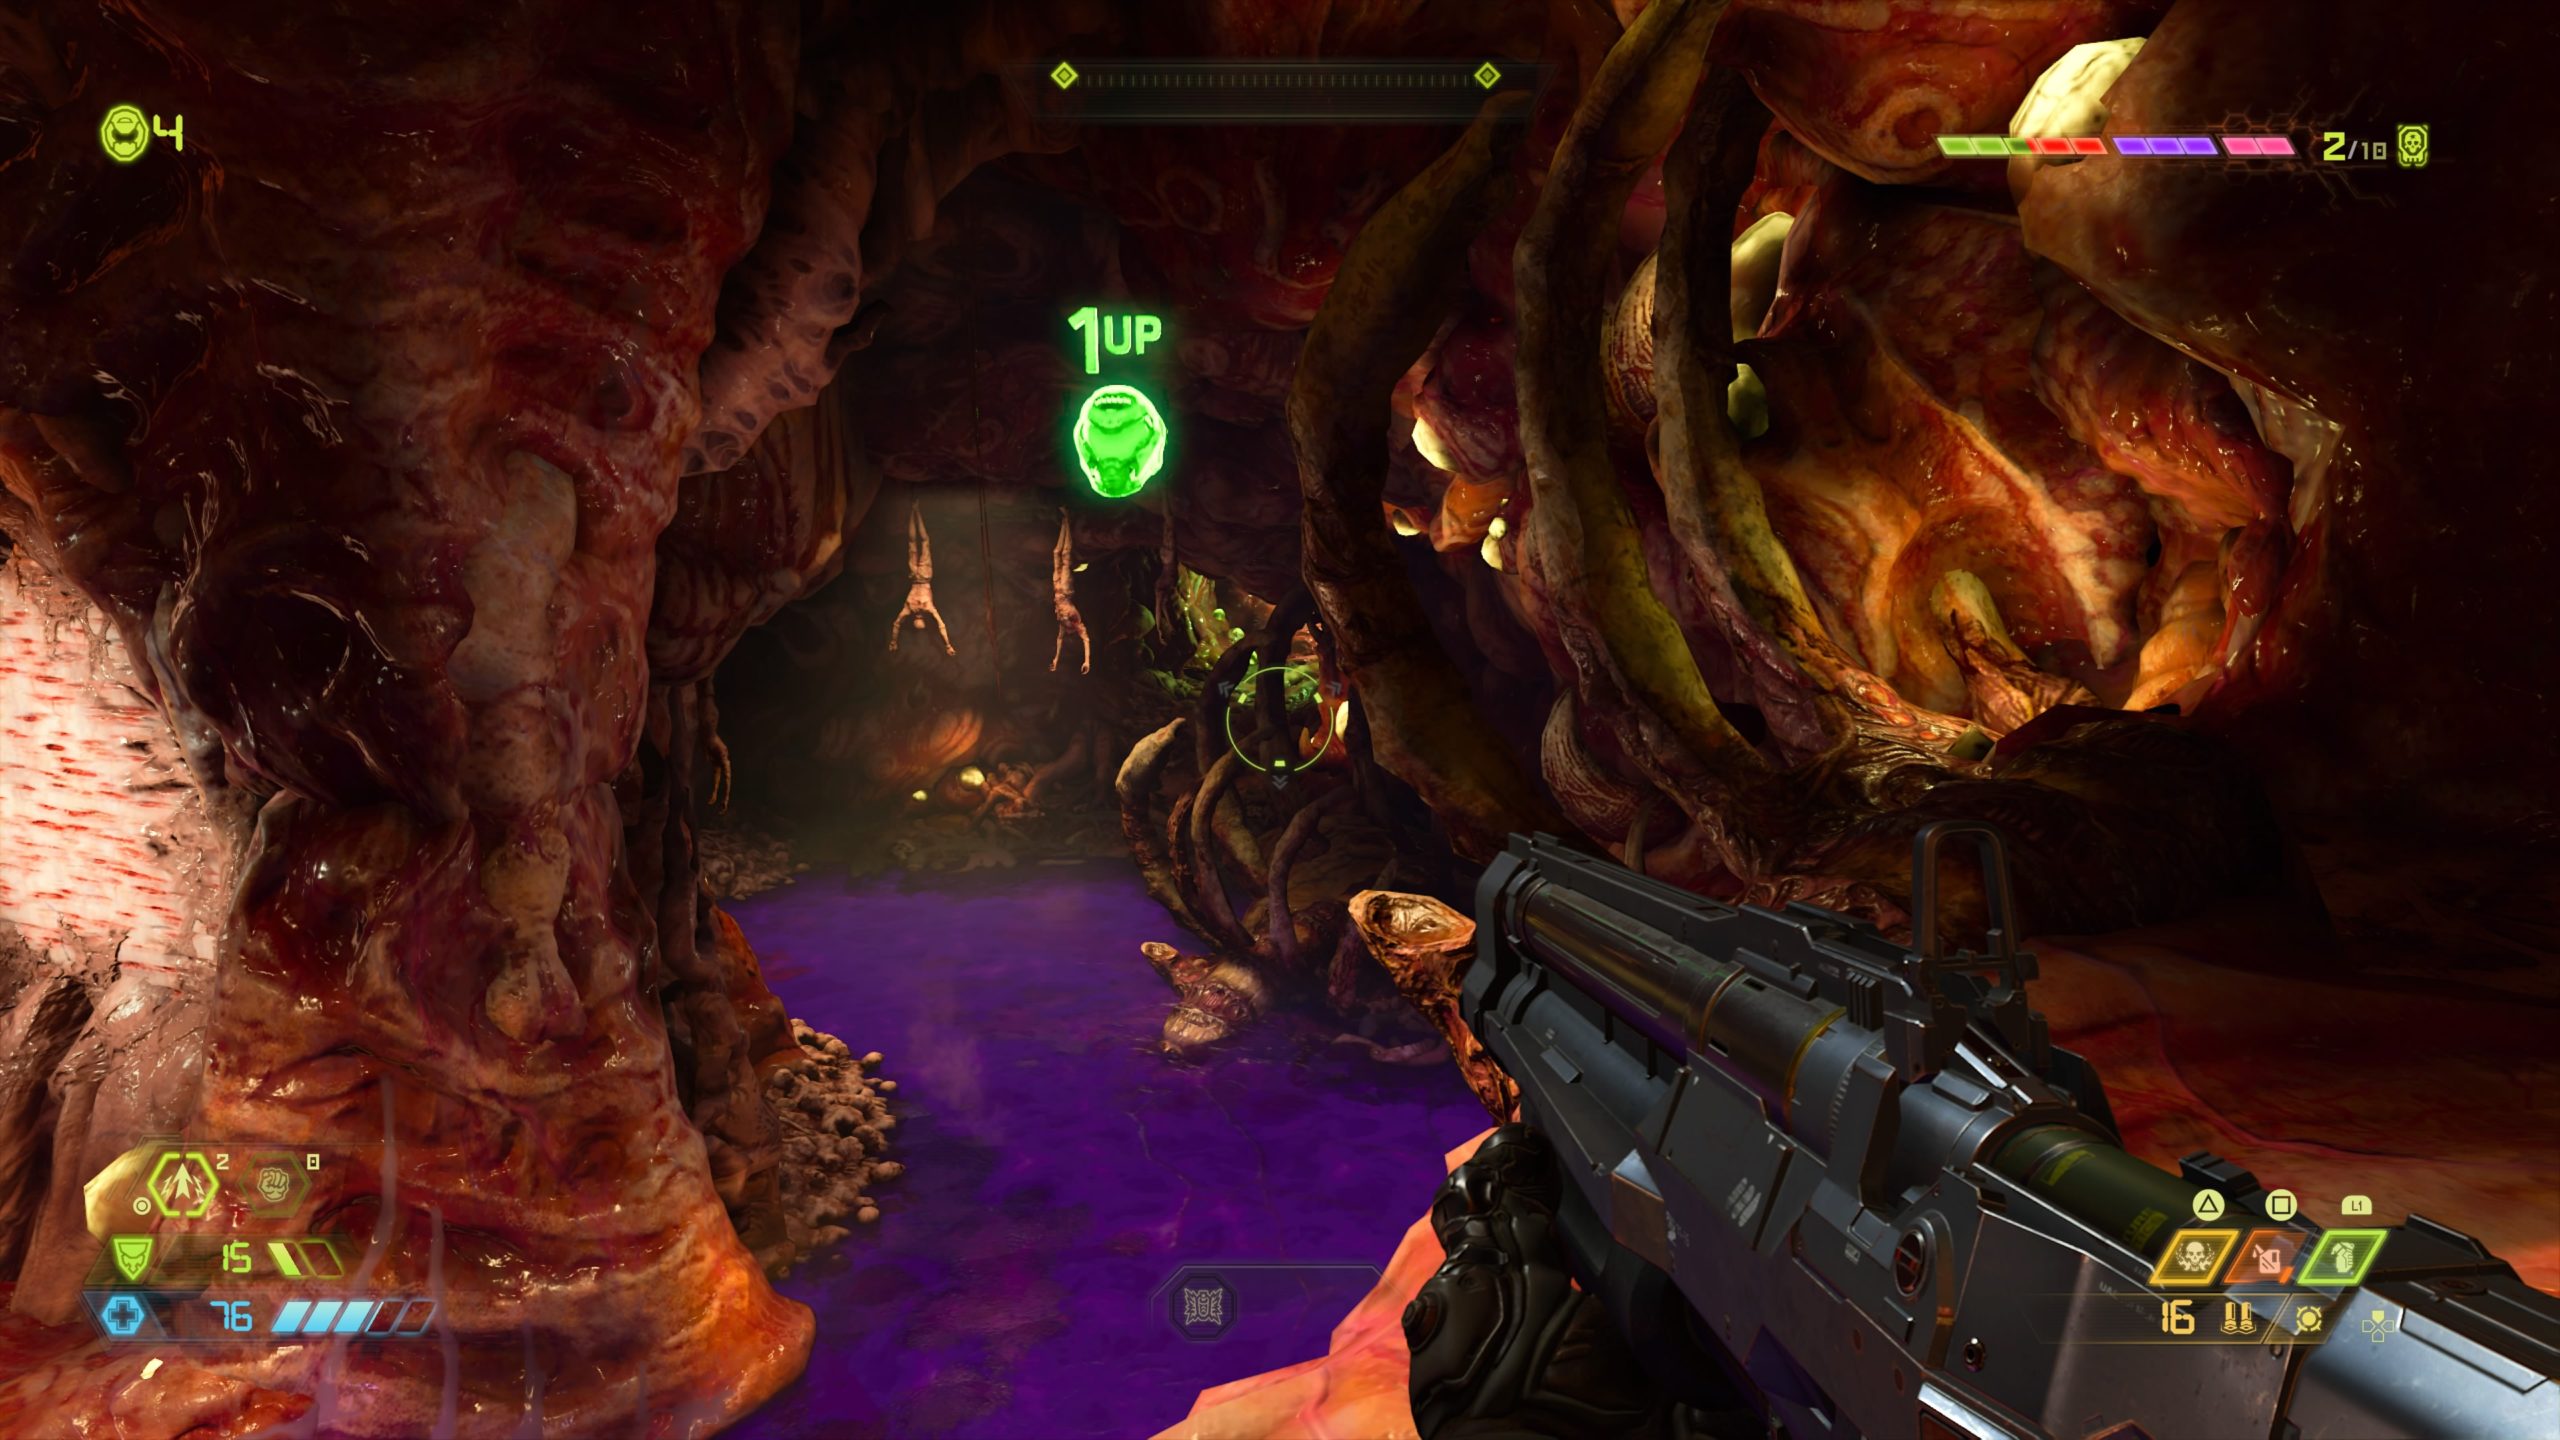
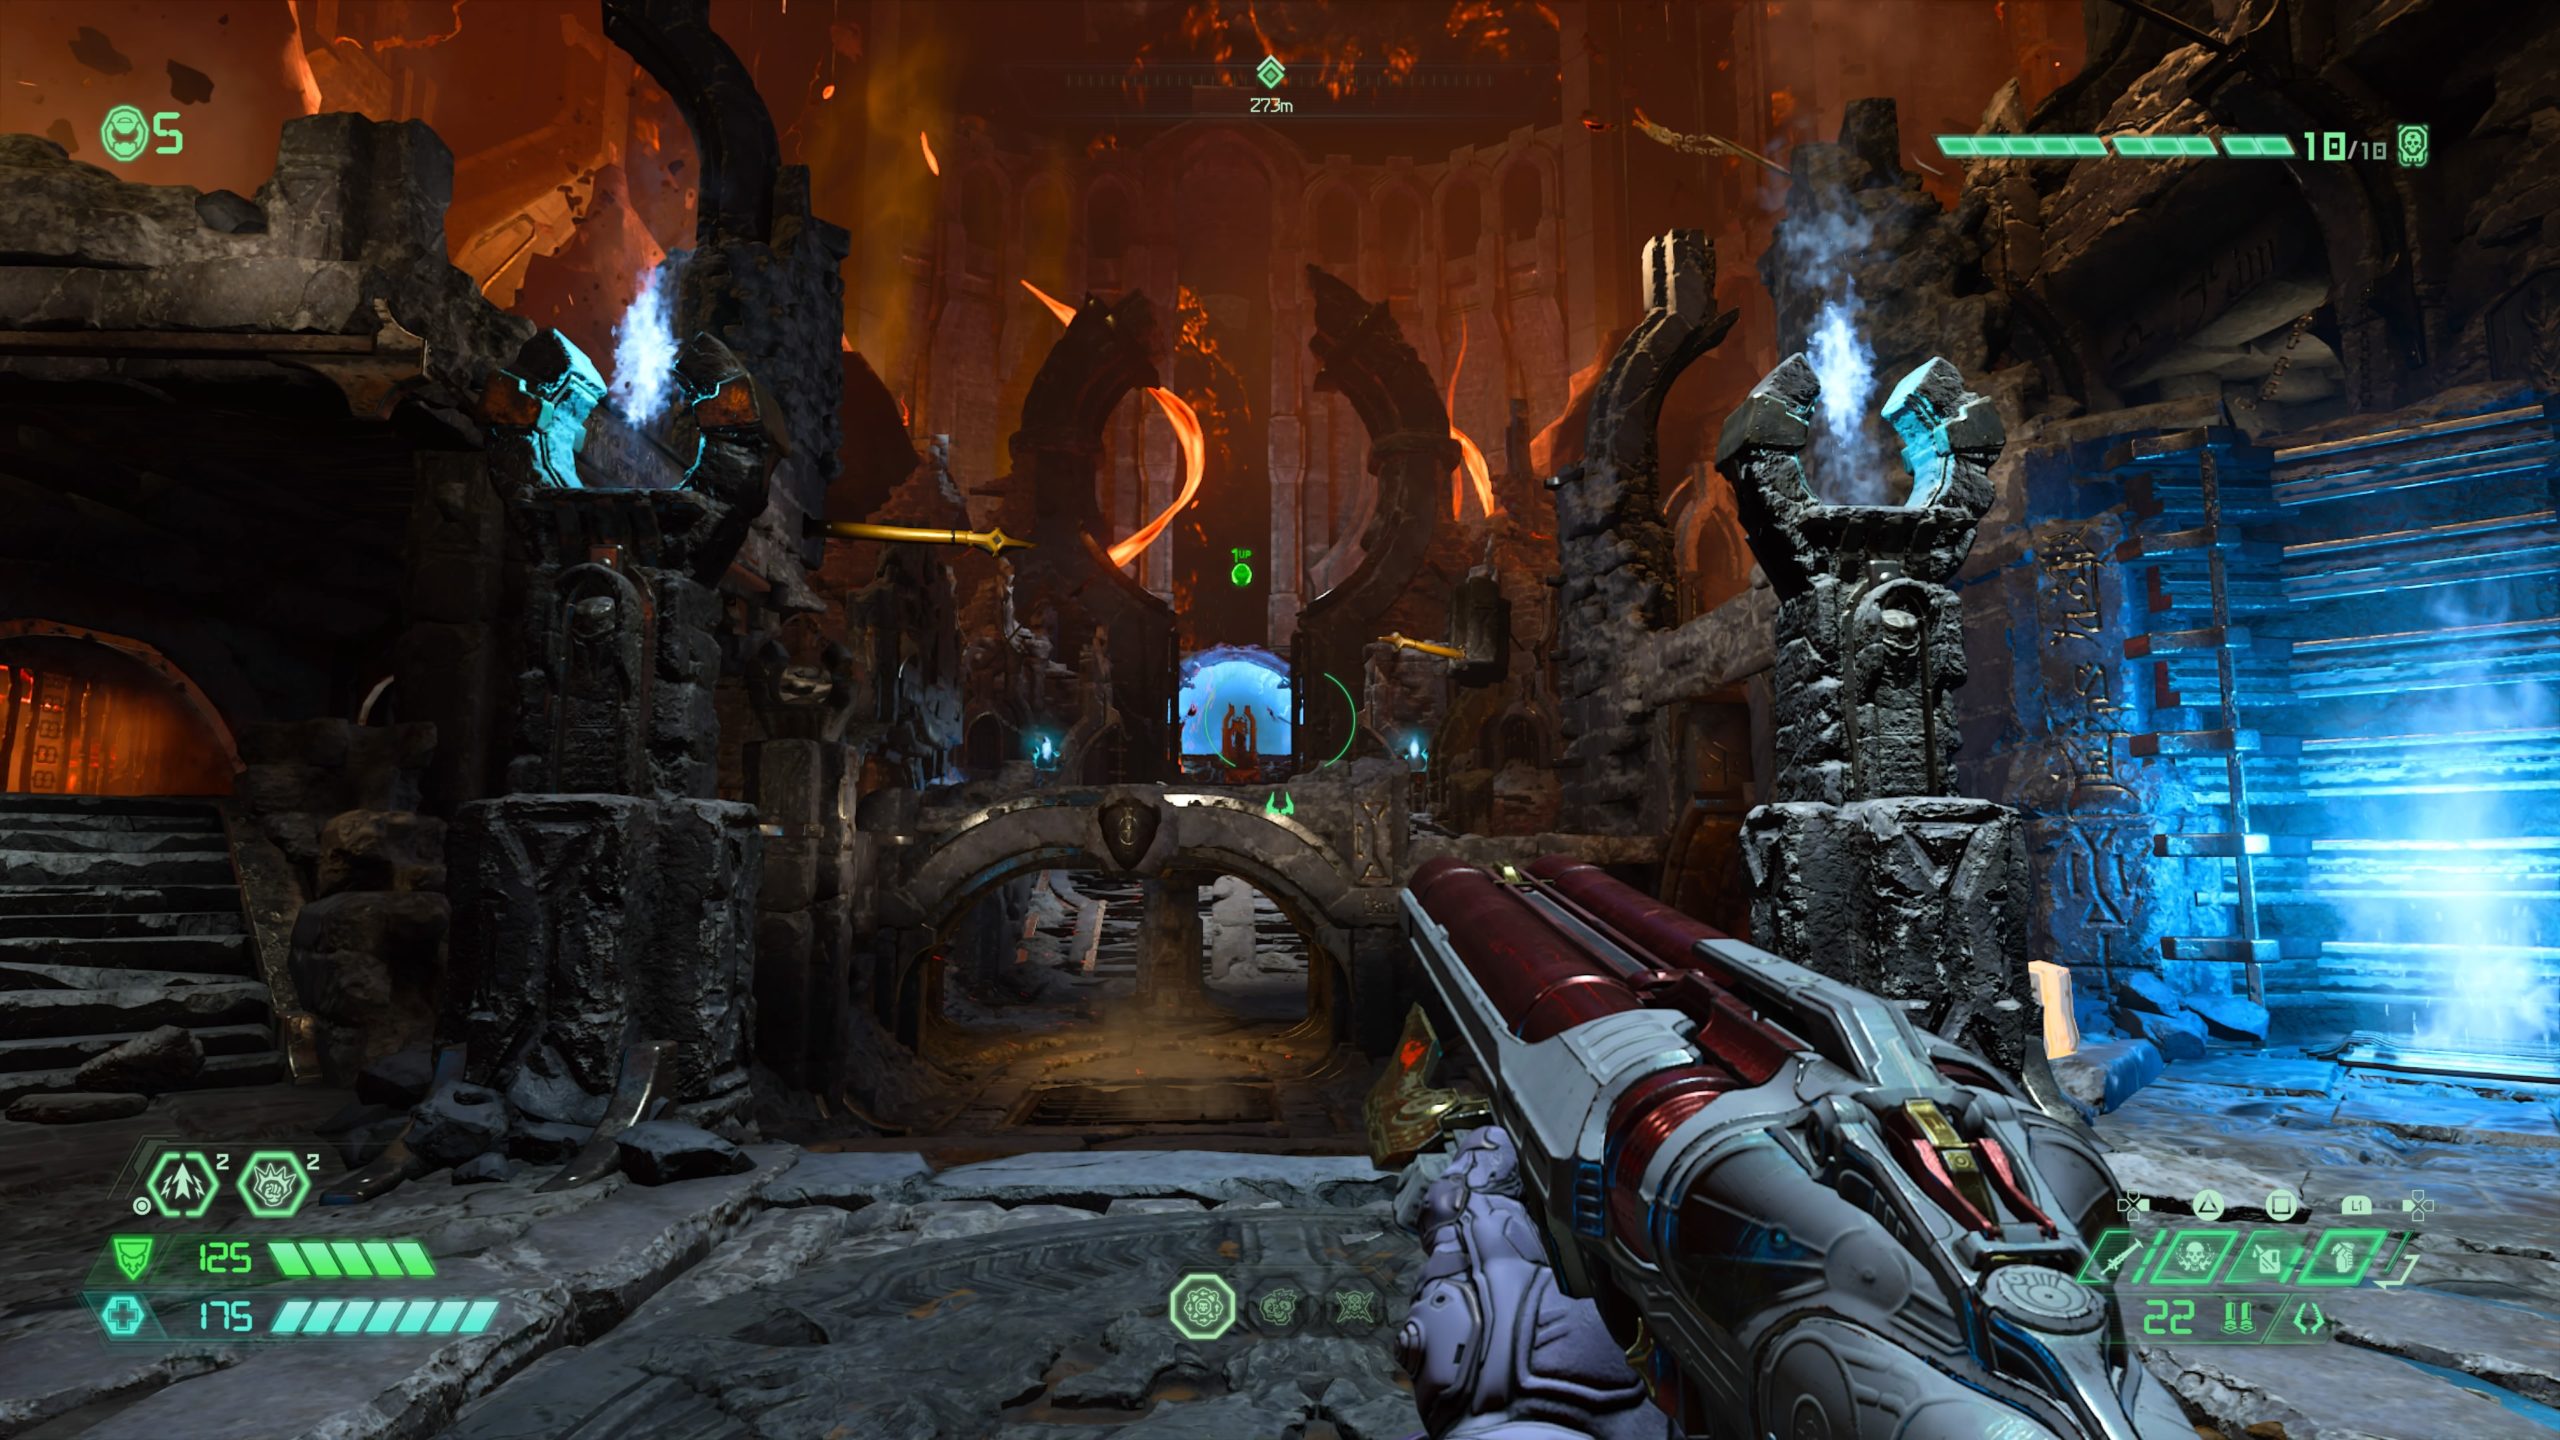
From the starting point in Hell, head down the stairs and keep moving forward passing by flaming demon skulls. Towards the end of the path, you will need to drop down to a lower level, which will lead you to an area with a giant robot hand. Defeat all the enemies to unseal the entrance to the cave on the other side of the hand. Proceed into the cave with purple liquid on the ground. This liquid will reduce your movement speed and prevent you from jumping. Watch out for the tentacles in the liquid as you work your way through the cave until you find a pillar in the center of the cave that you can use to wall climb. Use the wall climb to reach a higher level in the cave then turn around. Just past the rib cage you will find the extra life floating in the air.
Hell (Travel Point: Ichor Expanse)

After you pass the Slayer Gate, you’ll head through a cave and arrive at doorway with shooting lightning. To progress through this area, you will need to jump through two wall climb sections to reach a ledge near a lava waterfall. Look back the way you came to find the extra life floating behind the lightning next to a climbable wall.
Hell (Travel Point: Ichor Expanse)
The extra life can be found under one of the falling platforms near the extraction point in Hell. You will need to stand on the platform, causing it to fall, to collect the extra life.
Mission 3: Cultist Base
Cultist Base (Travel Point: Grotto of Penance)
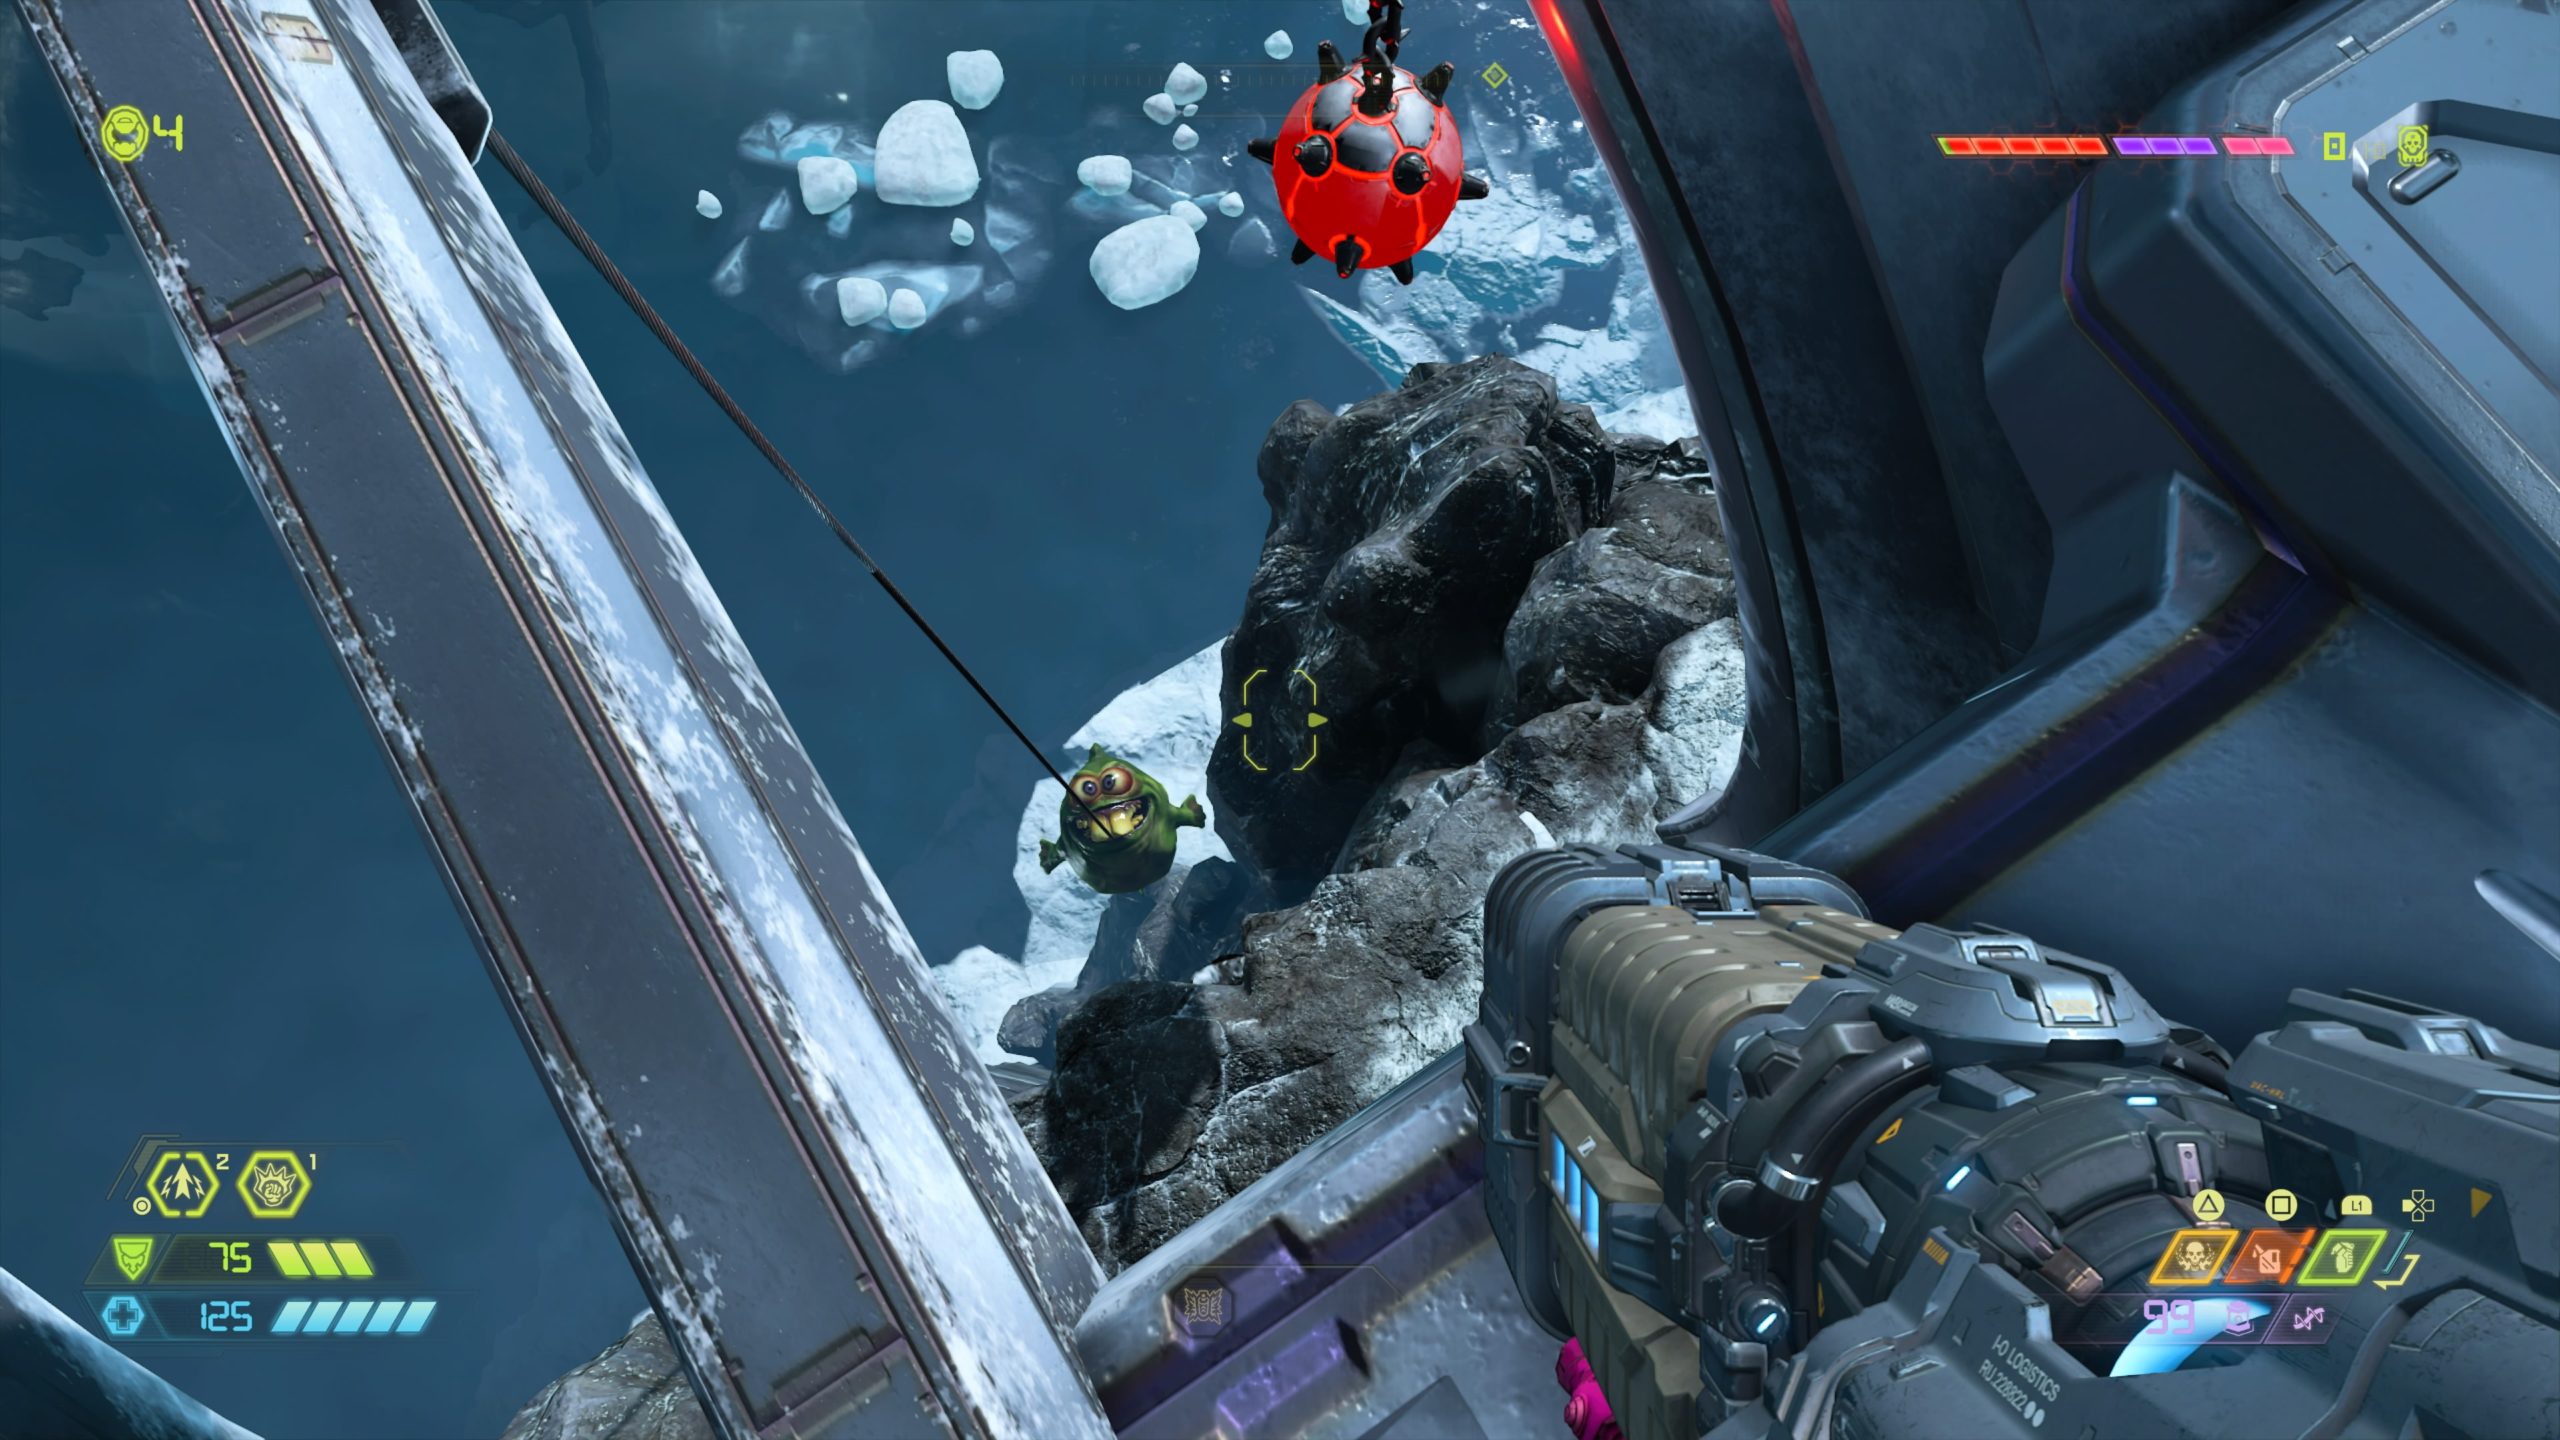
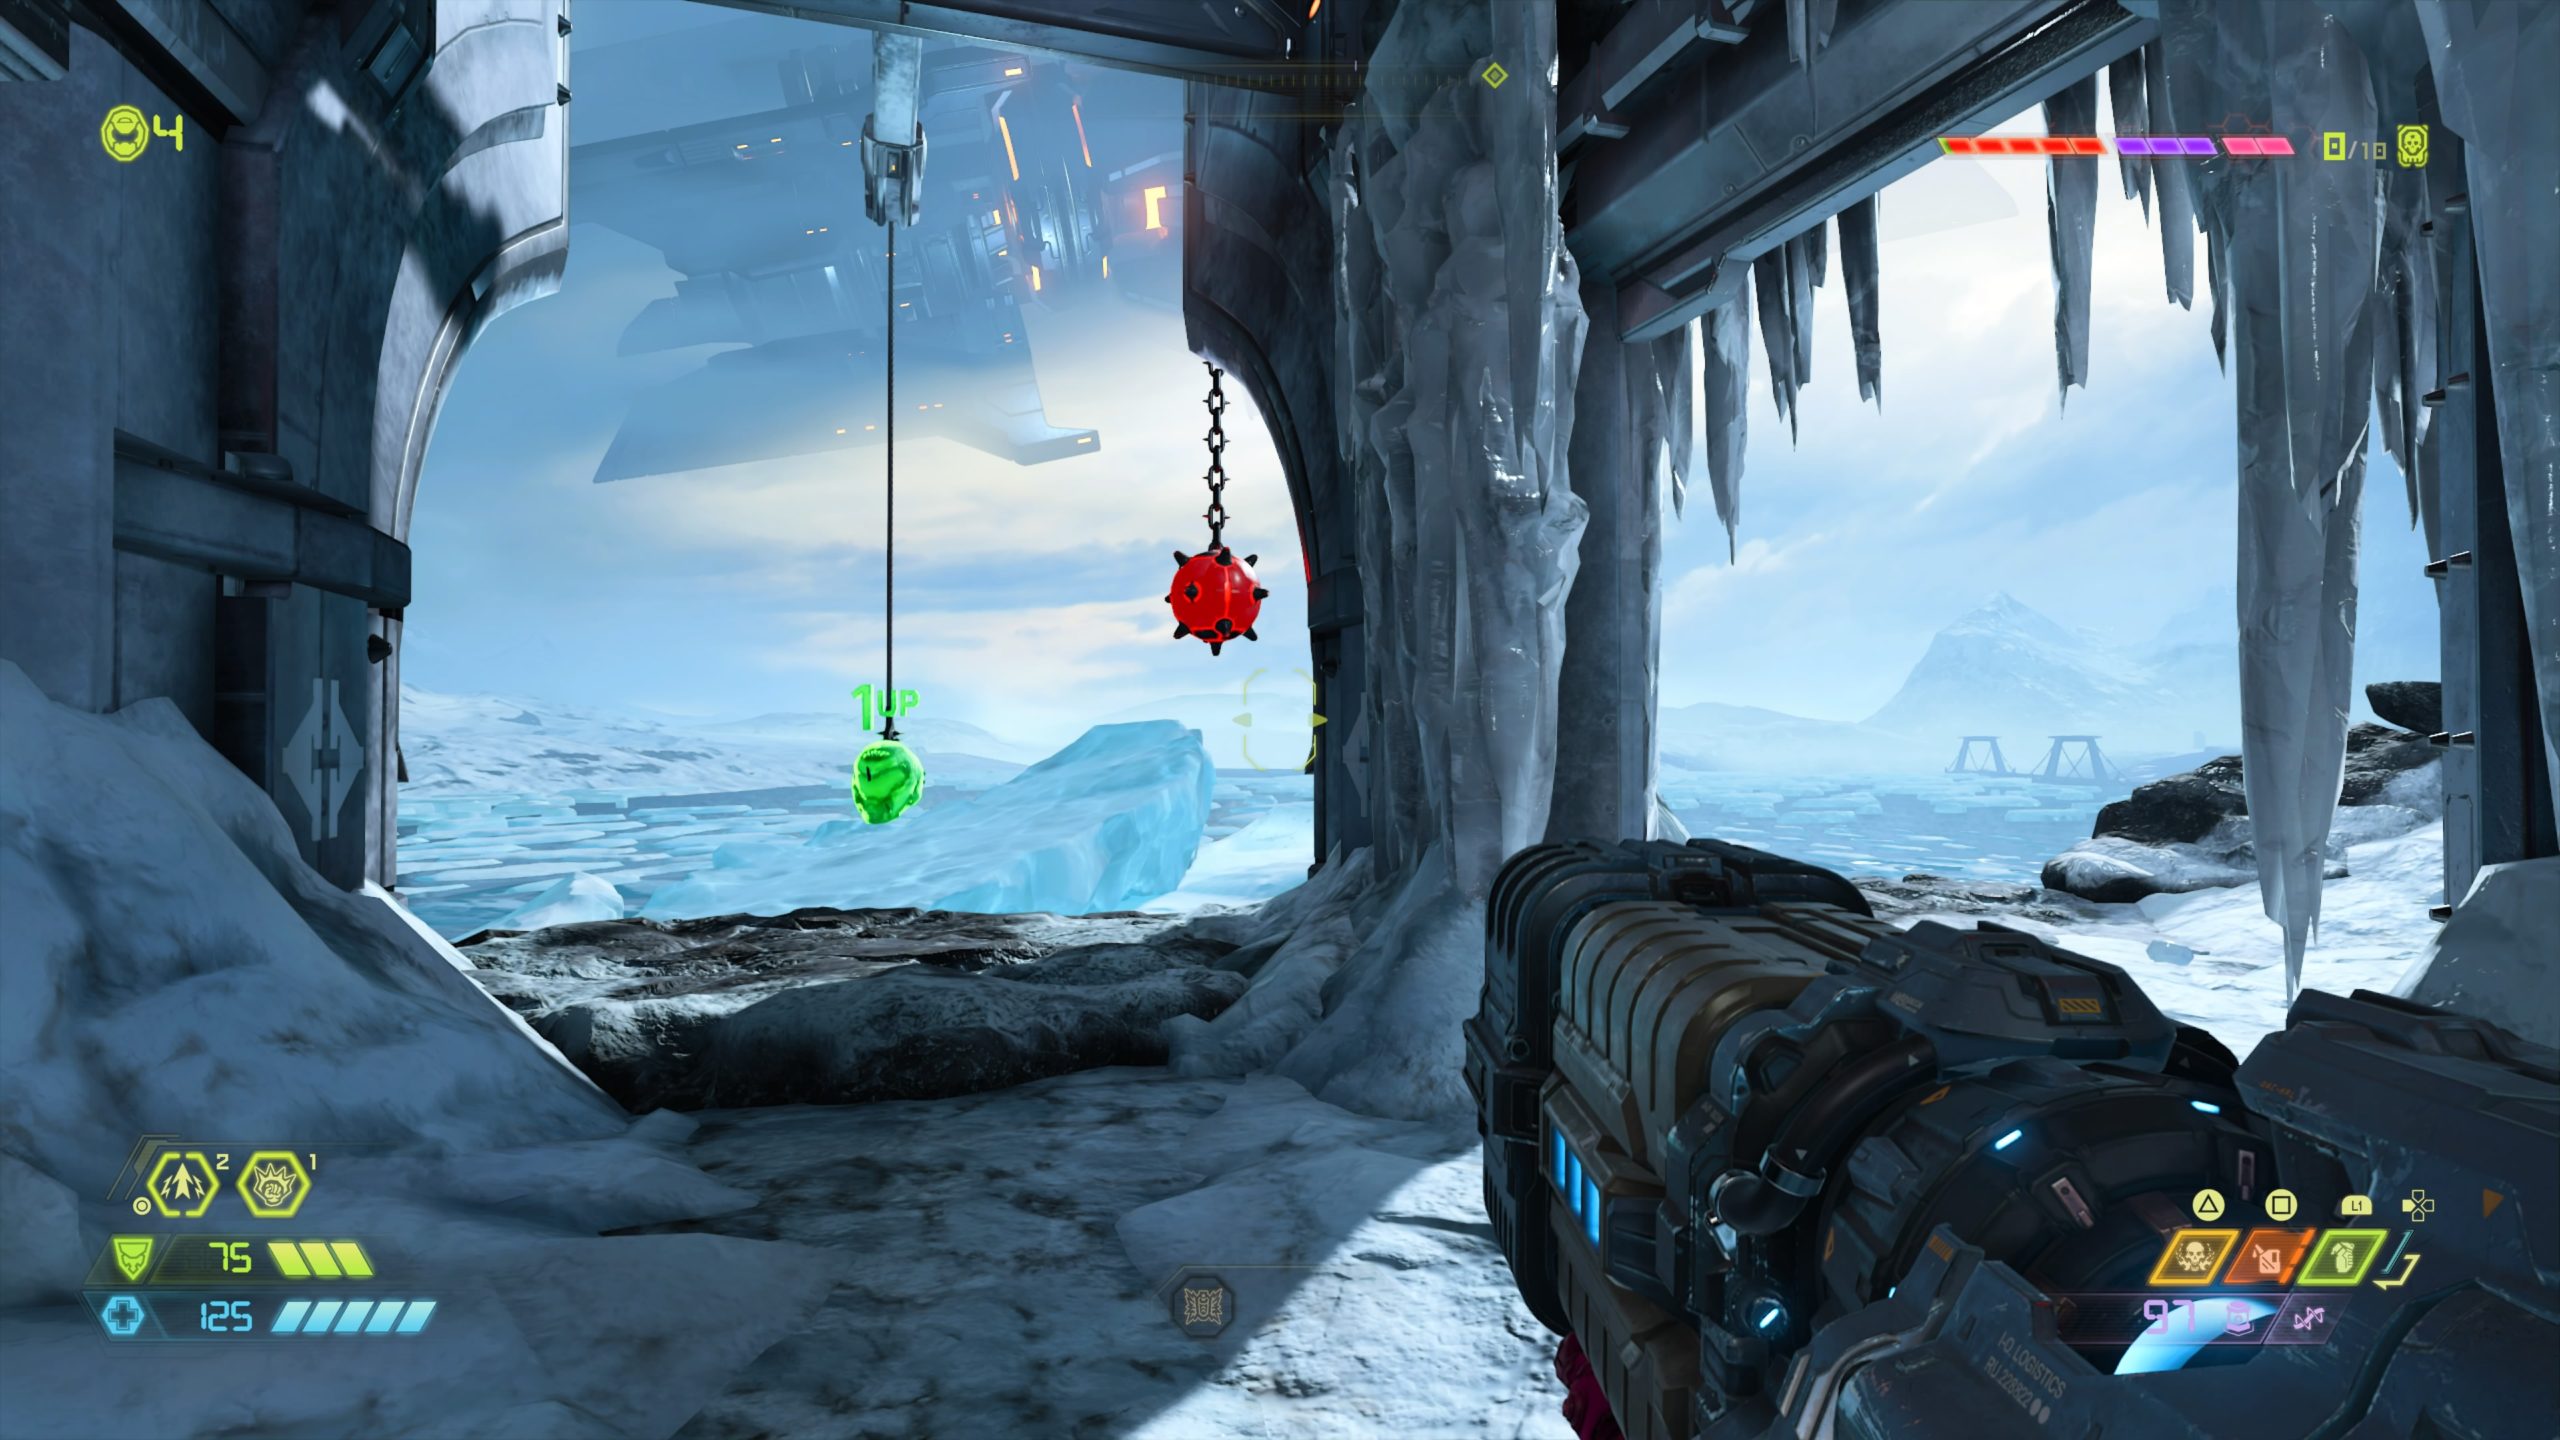
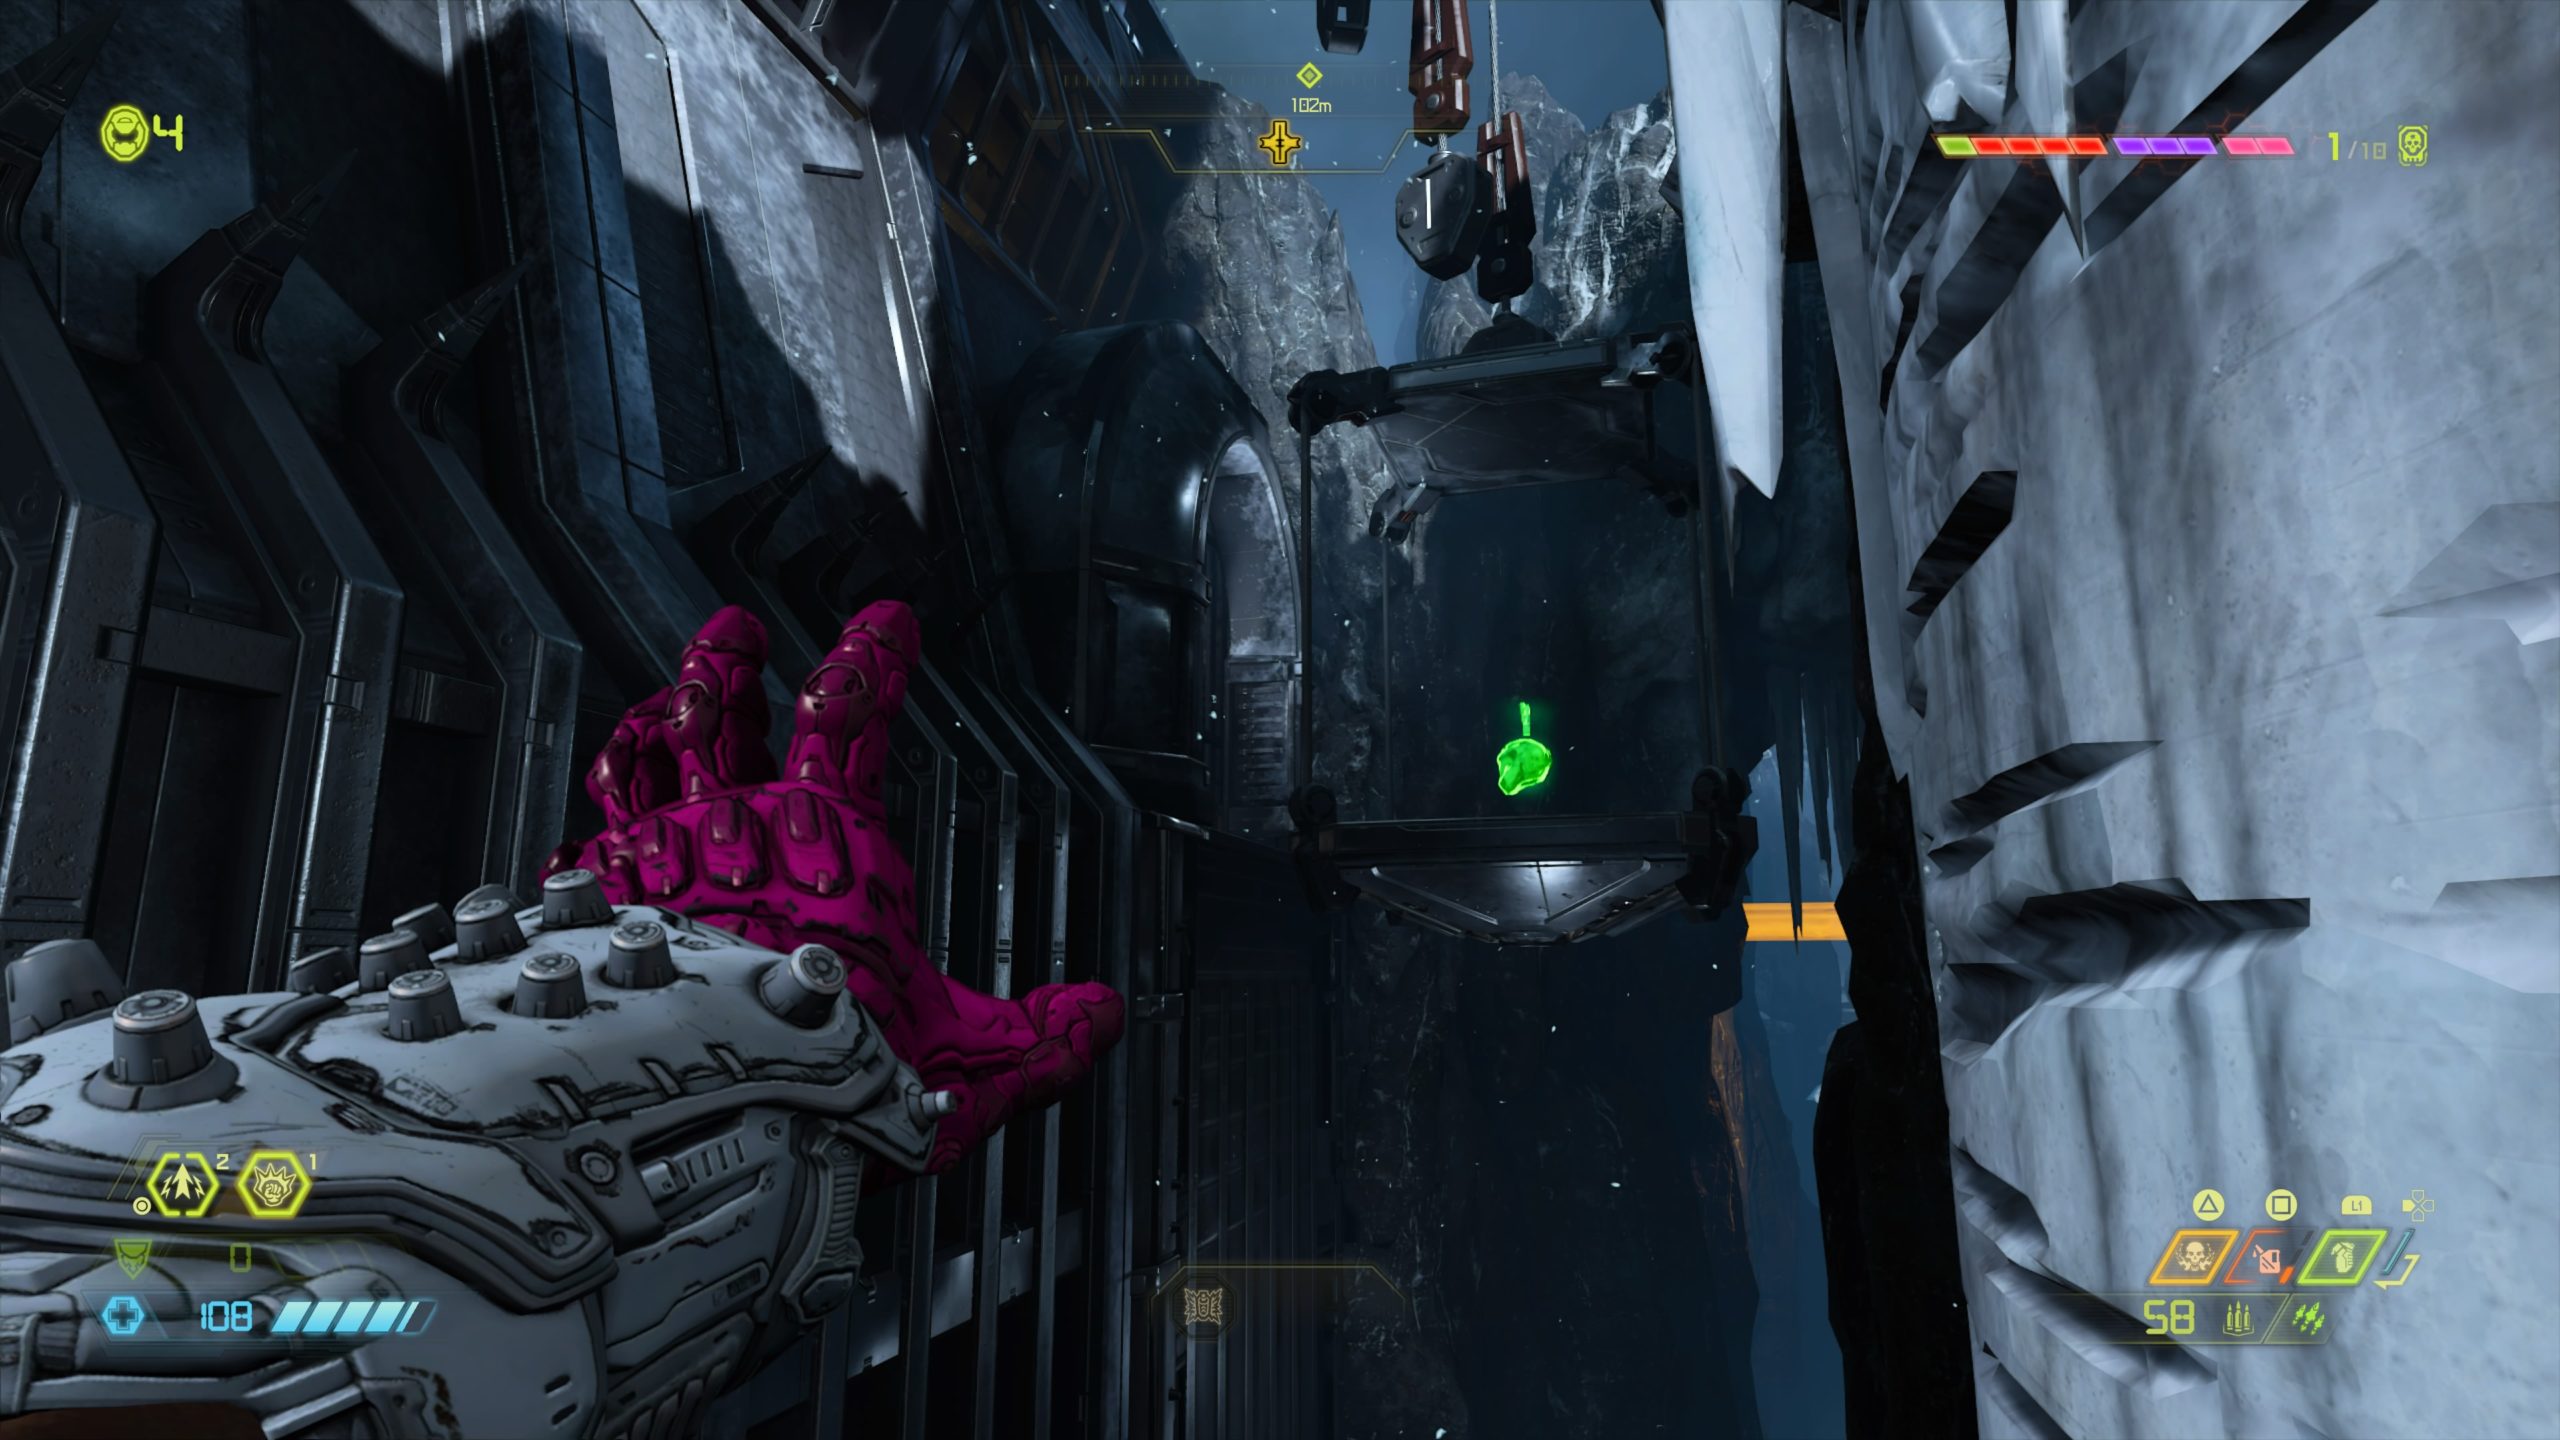
From the starting point of the map, work your way forward until you reach the rib cage jutting out from the cliff and a giant skull hanging on the left from a crane. Walk to the edge of the rib cage then jump towards the stream of air. When you fly up in air, dash to the climbable wall then look right to find another climbable wall with red damage dealing orbs underneath a doorway. Once you reach the top, melee the wall straight ahead then head through the opening to reach an open area in the mountains filled with enemies fighting. Drop down to the lower level then head straight past the blue air flow and walk under the icicles to arrive under the platform. Turn right and head to the cliff looking down to find a fishing line with some bait on the end. Shoot the red bomb to the left of the bait to release the line, revealing the extra life.
Cultist Base (Travel Point: Station of Inquisition)
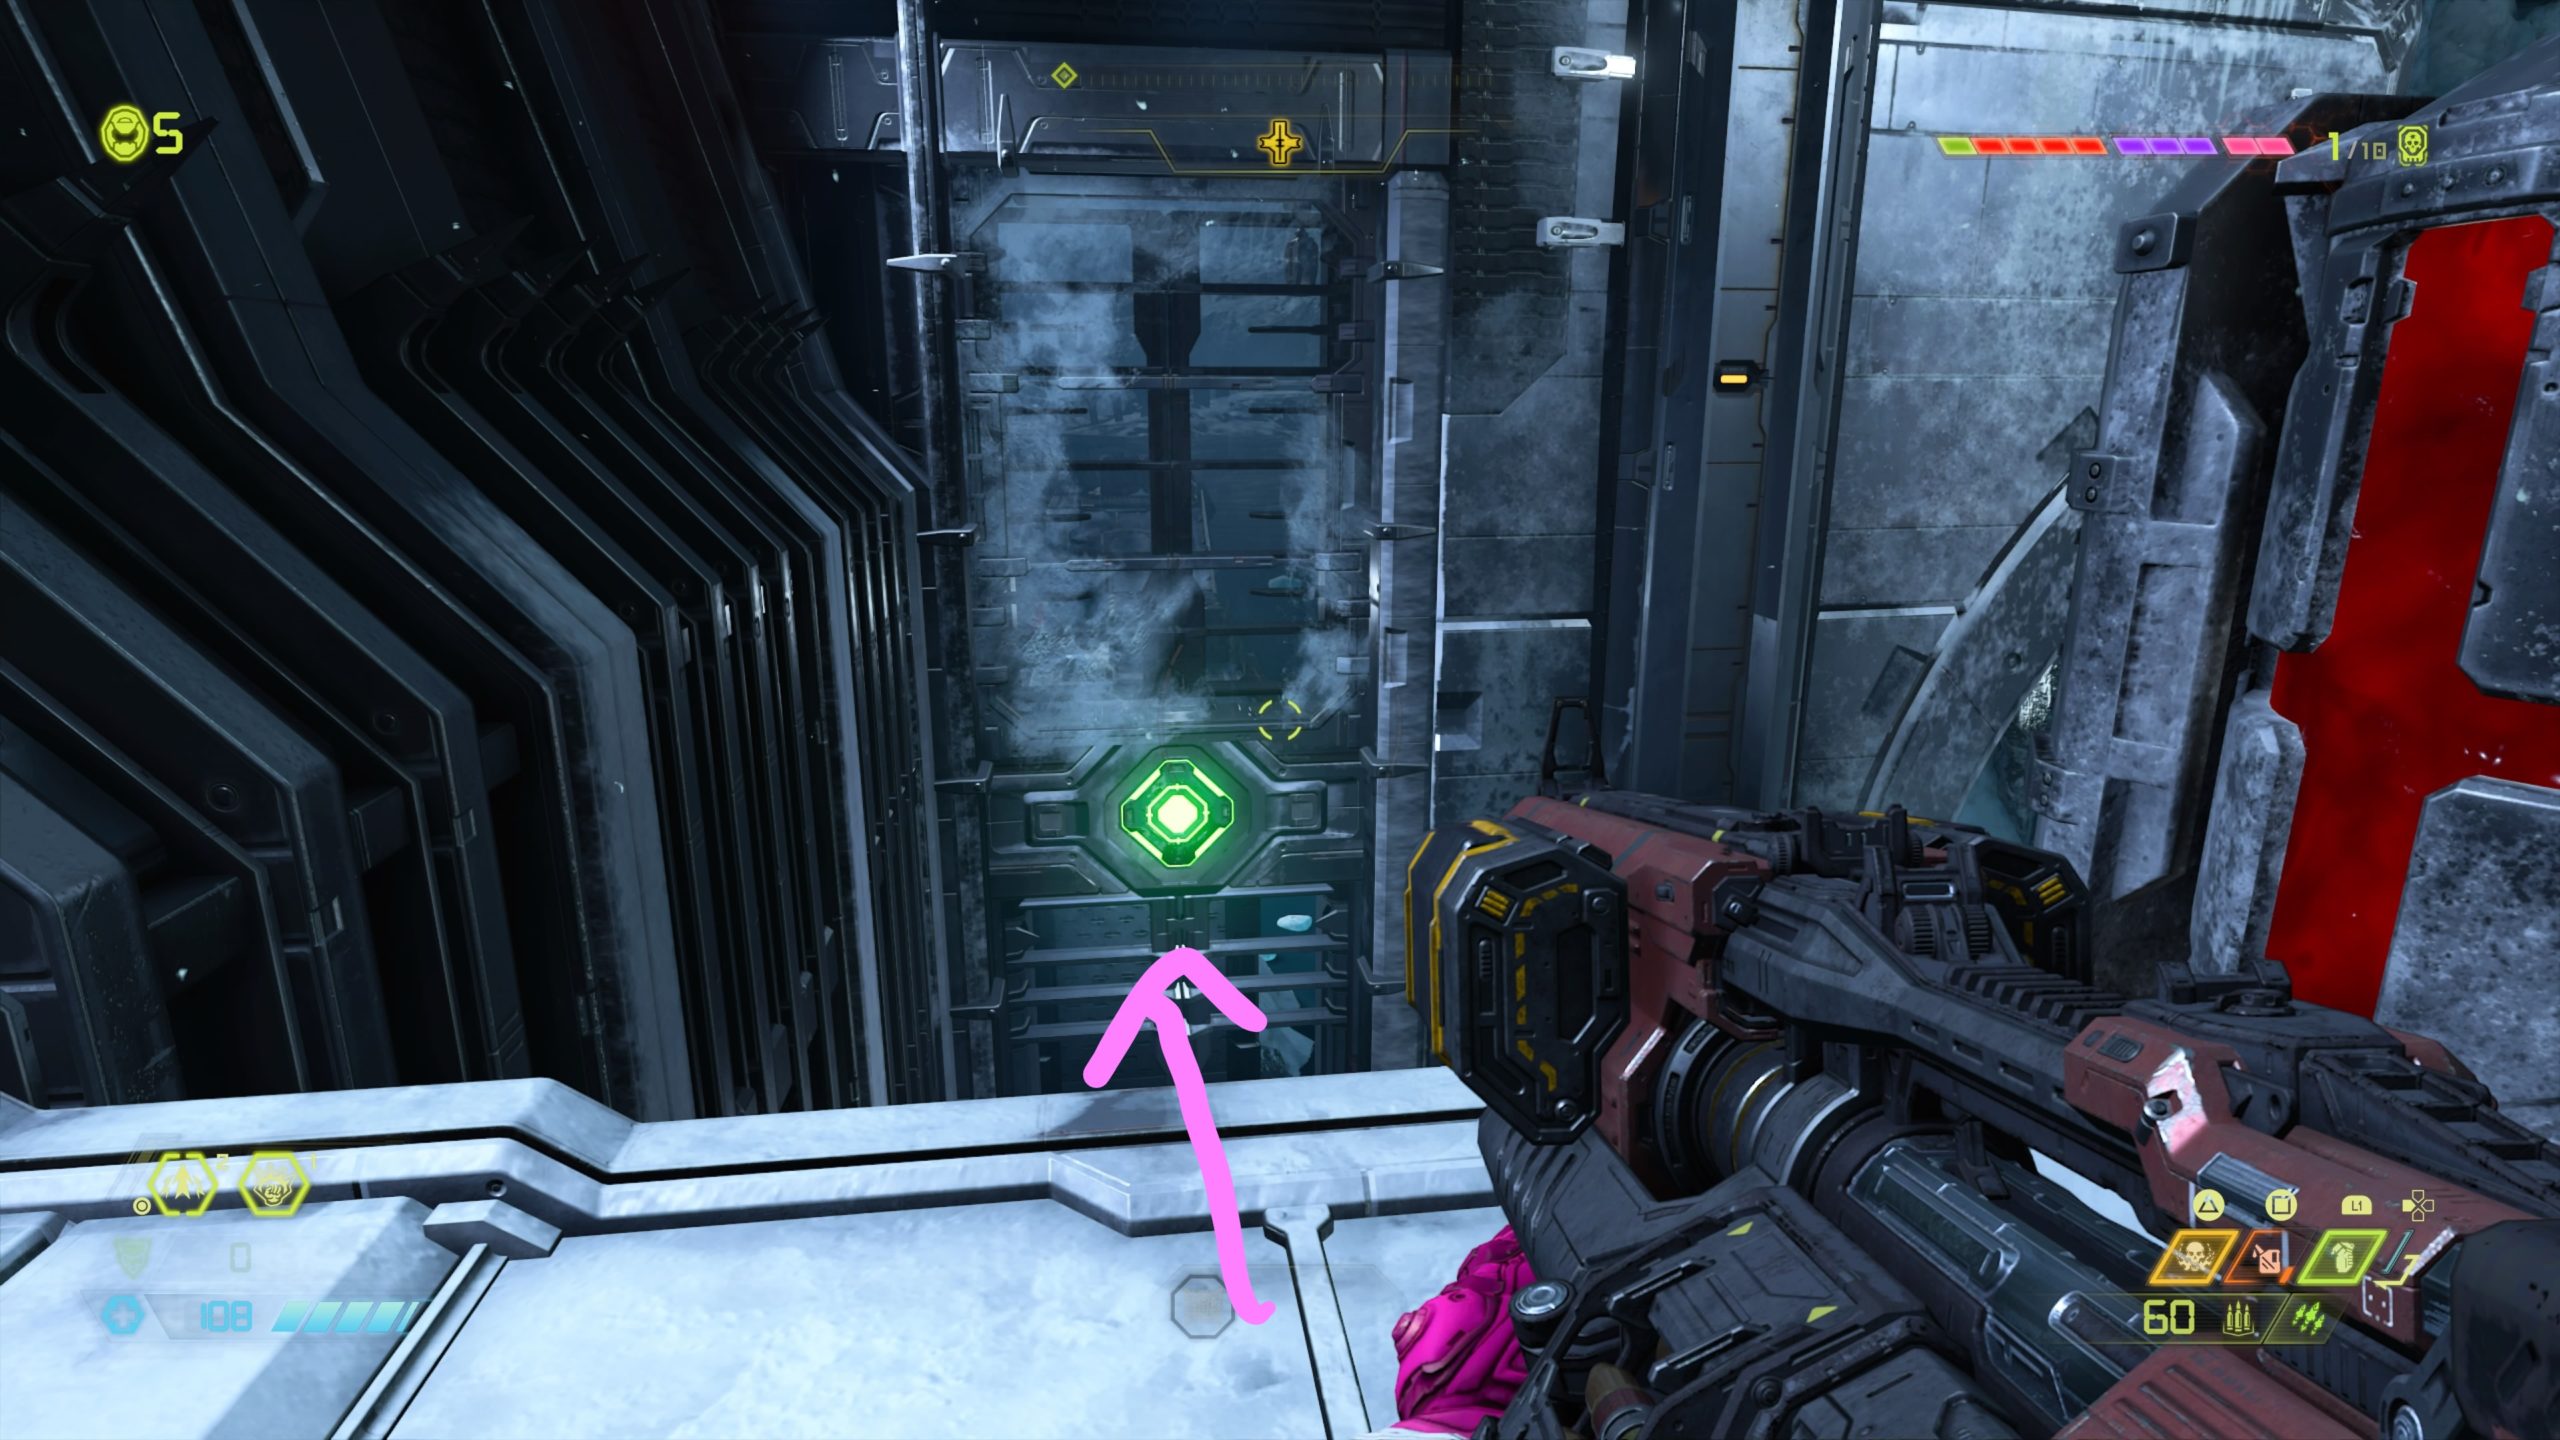
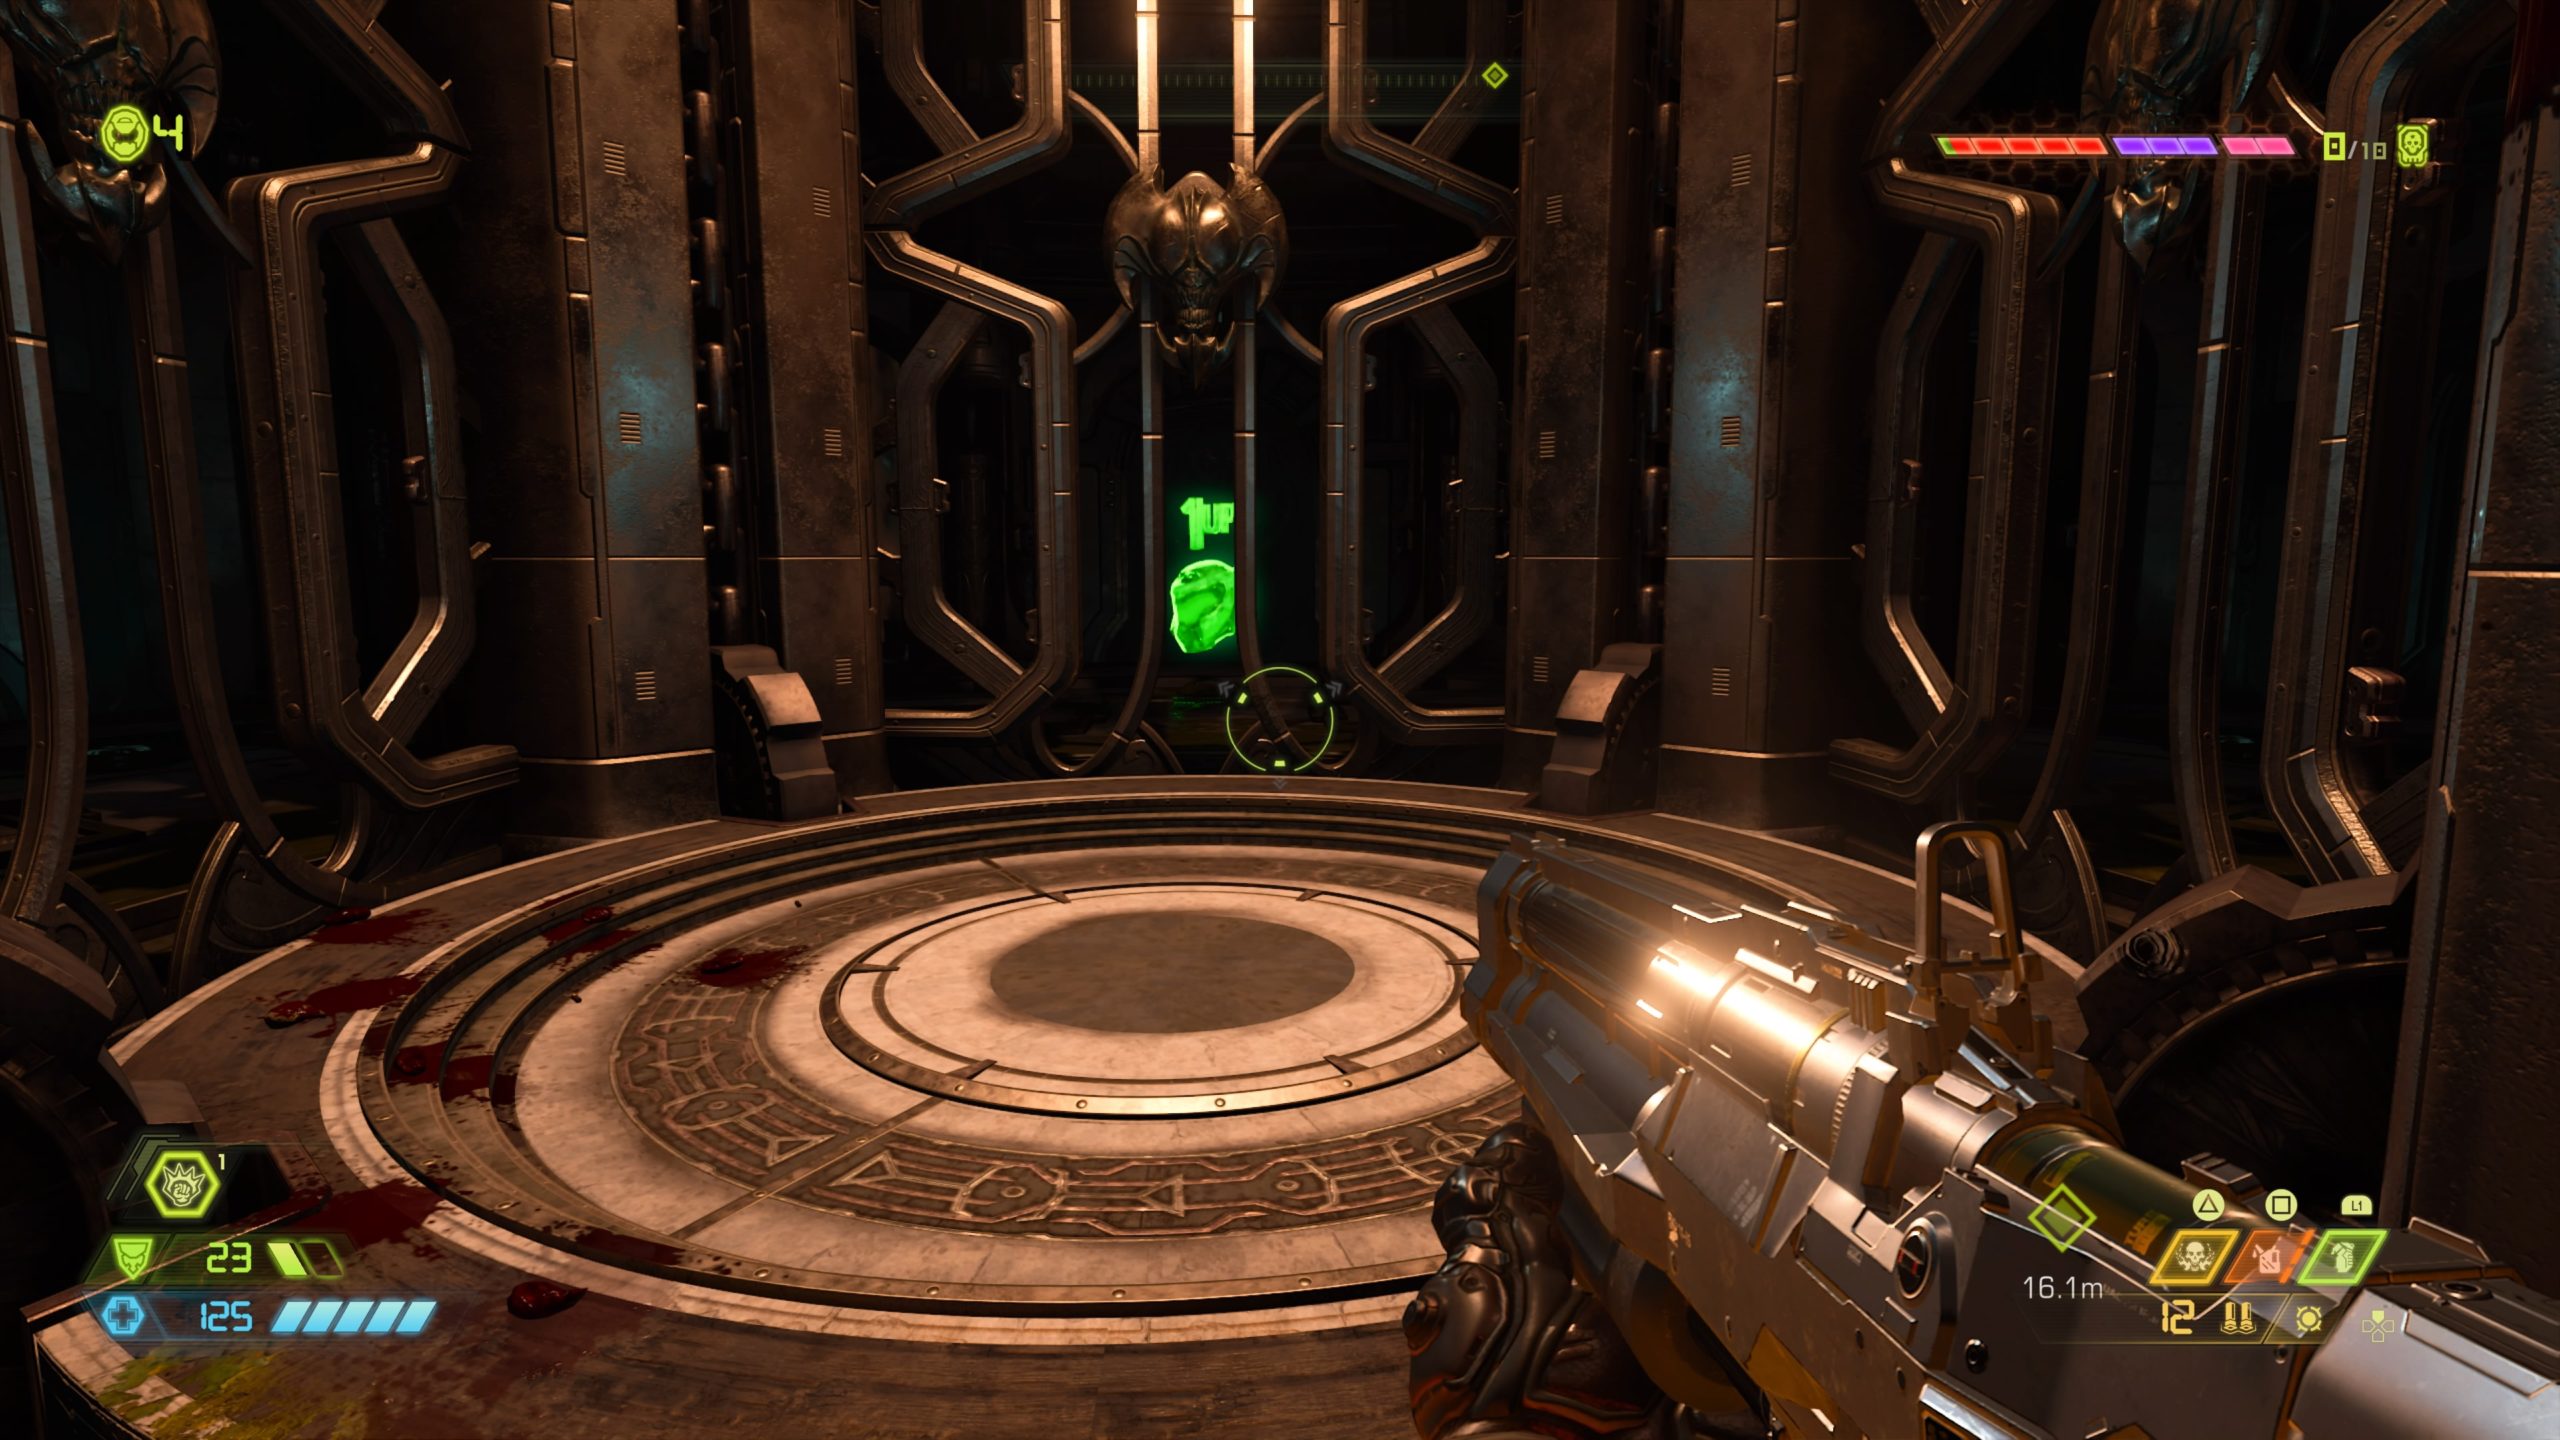
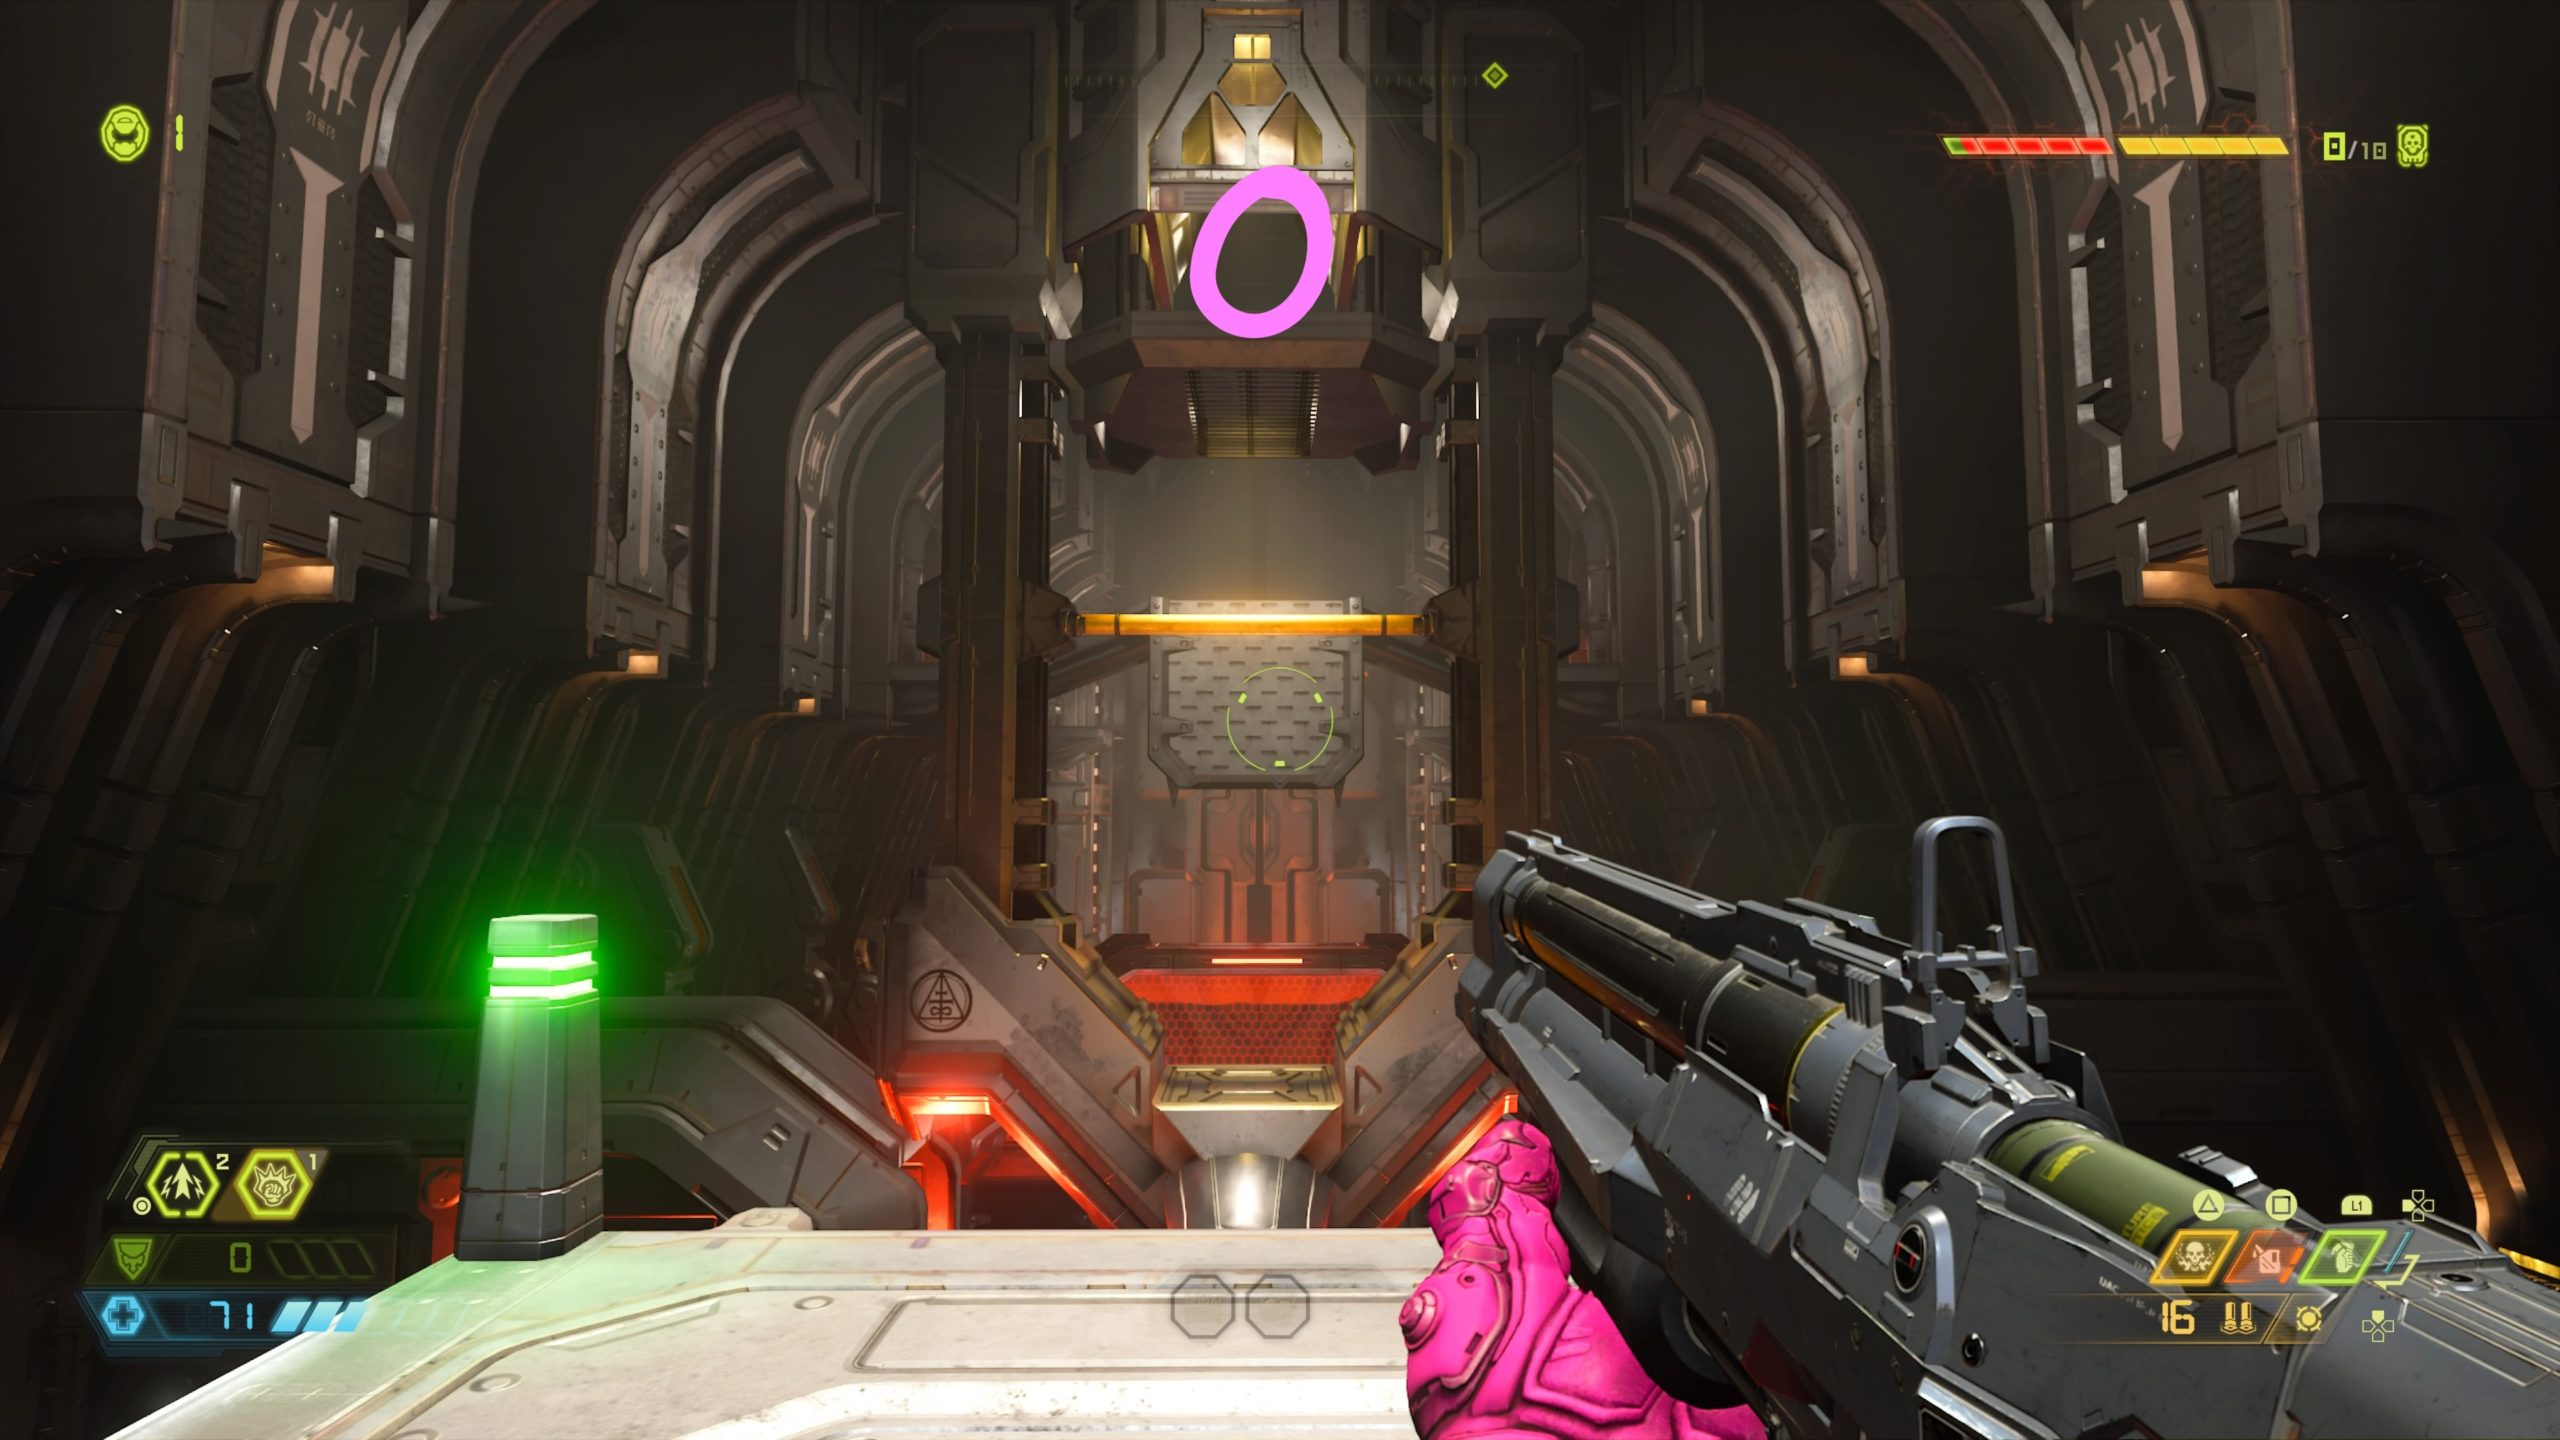
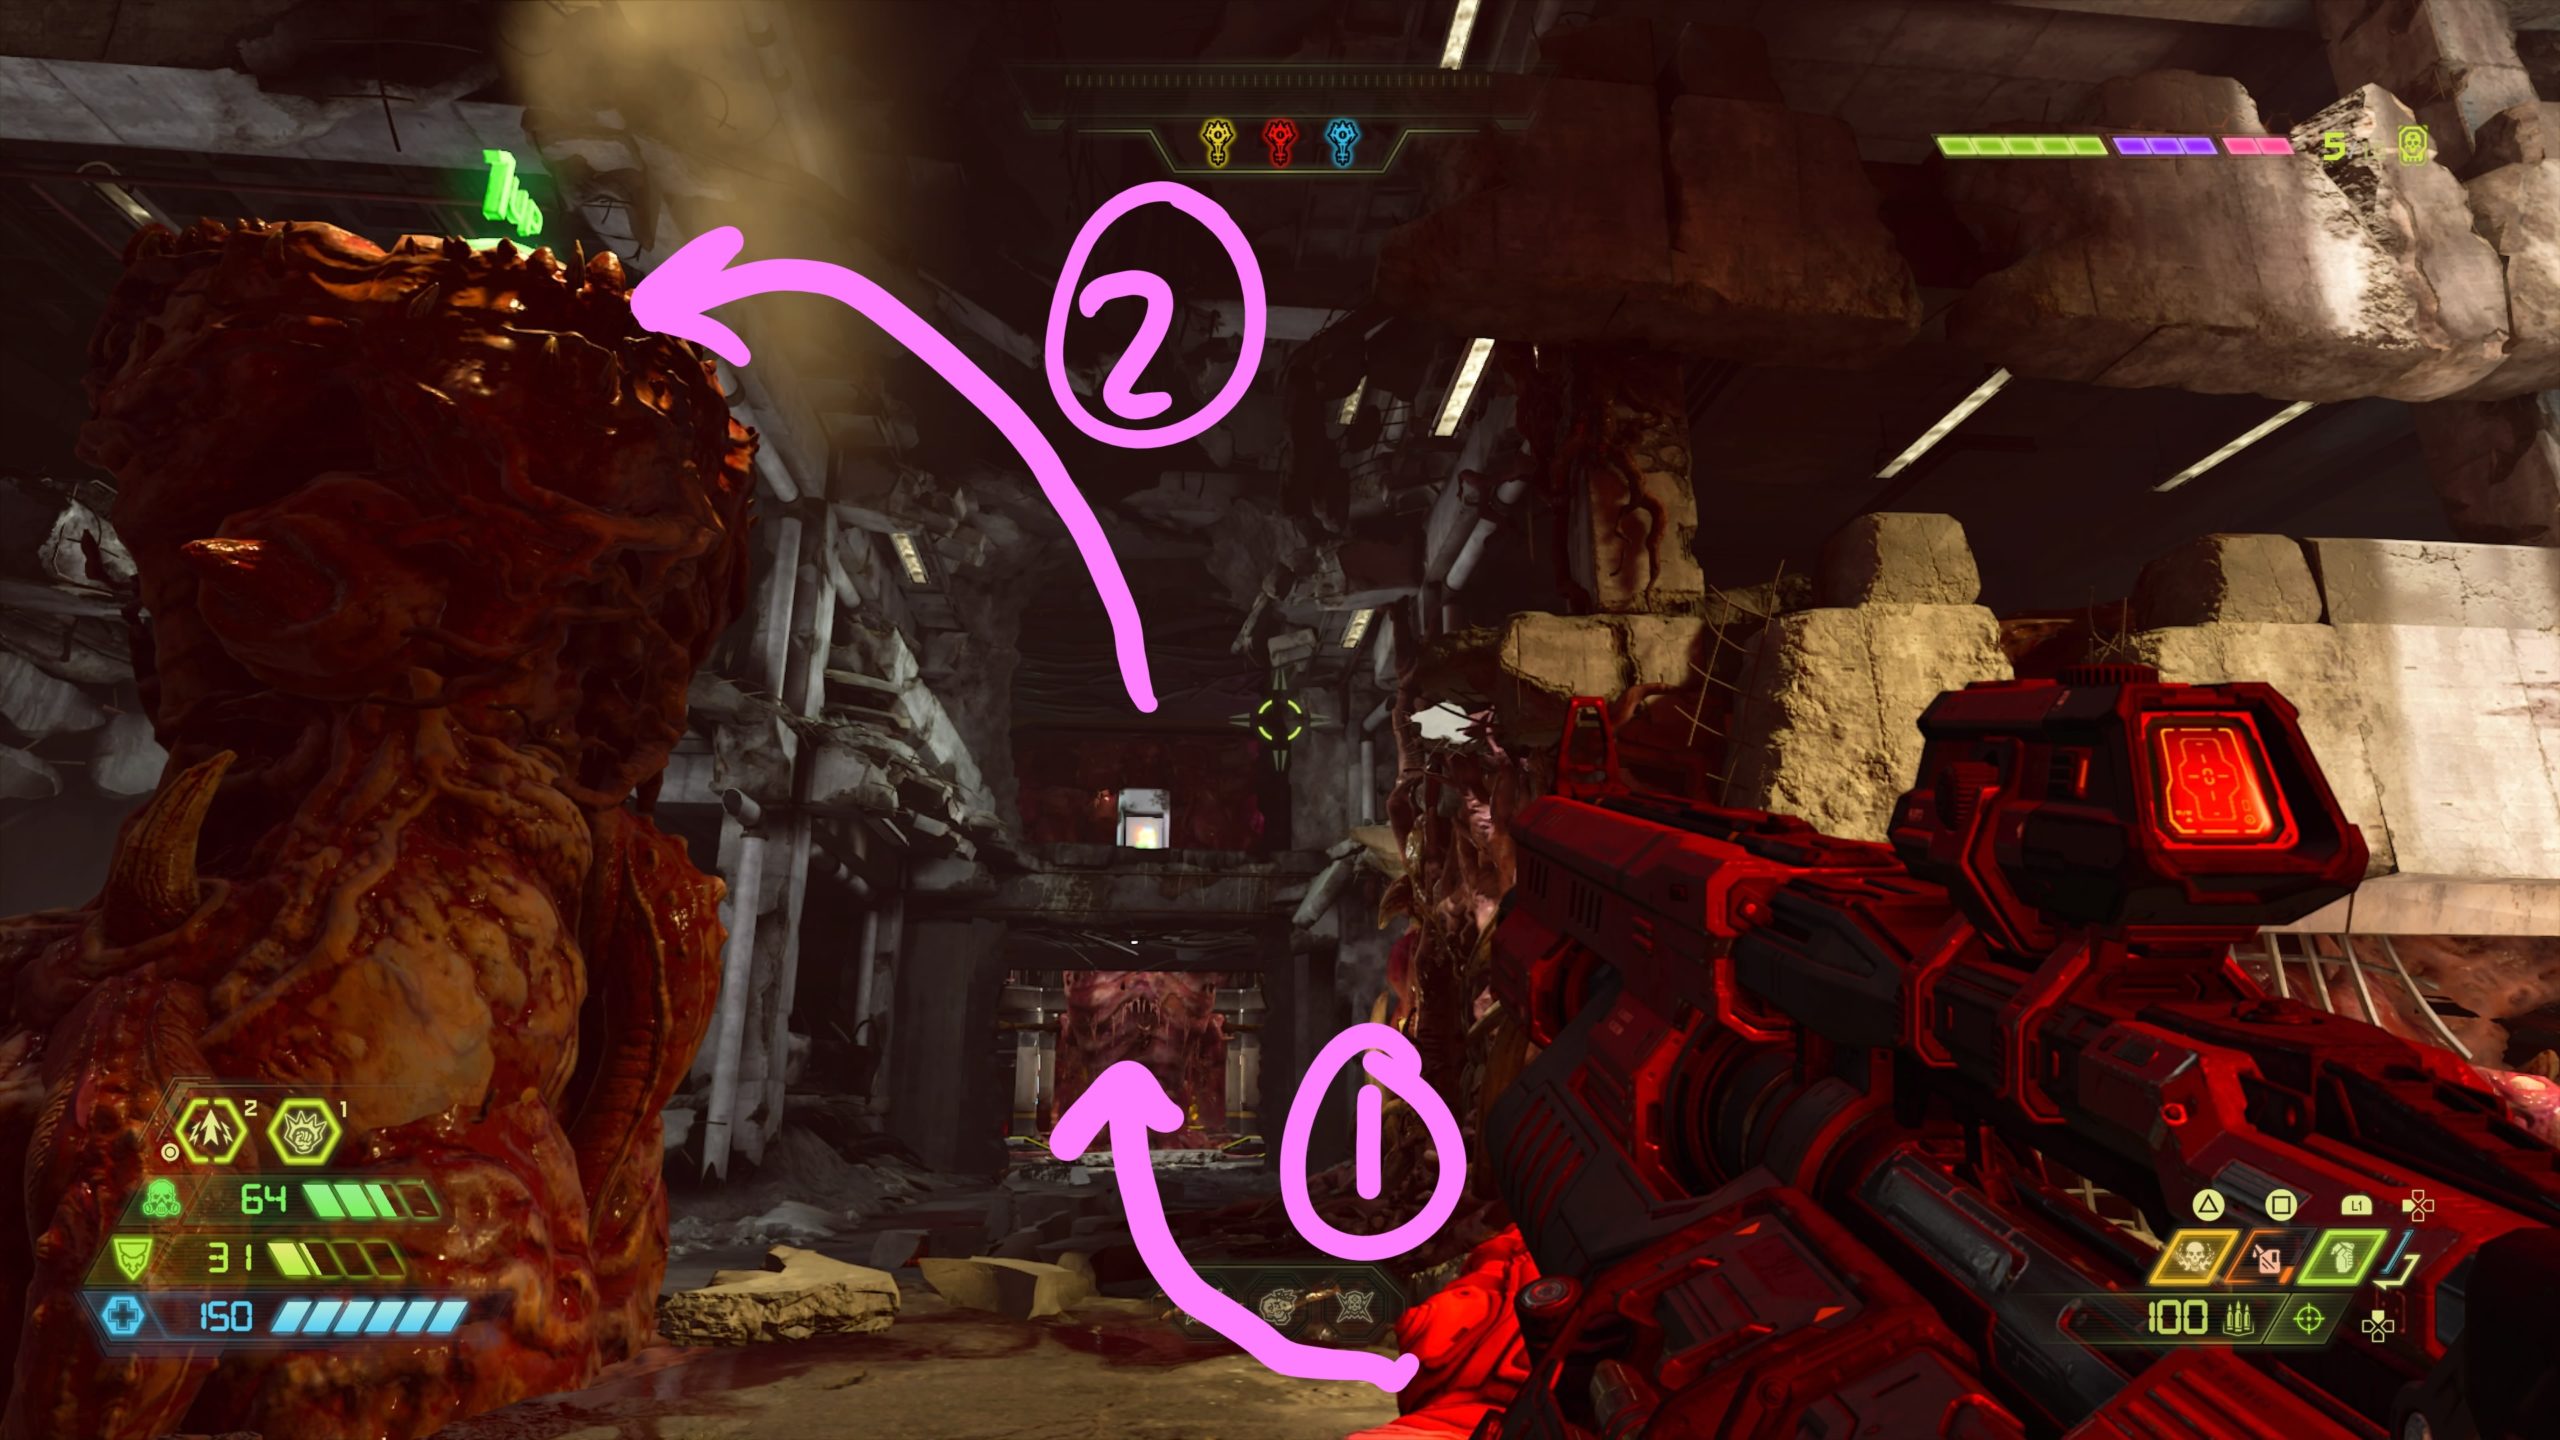
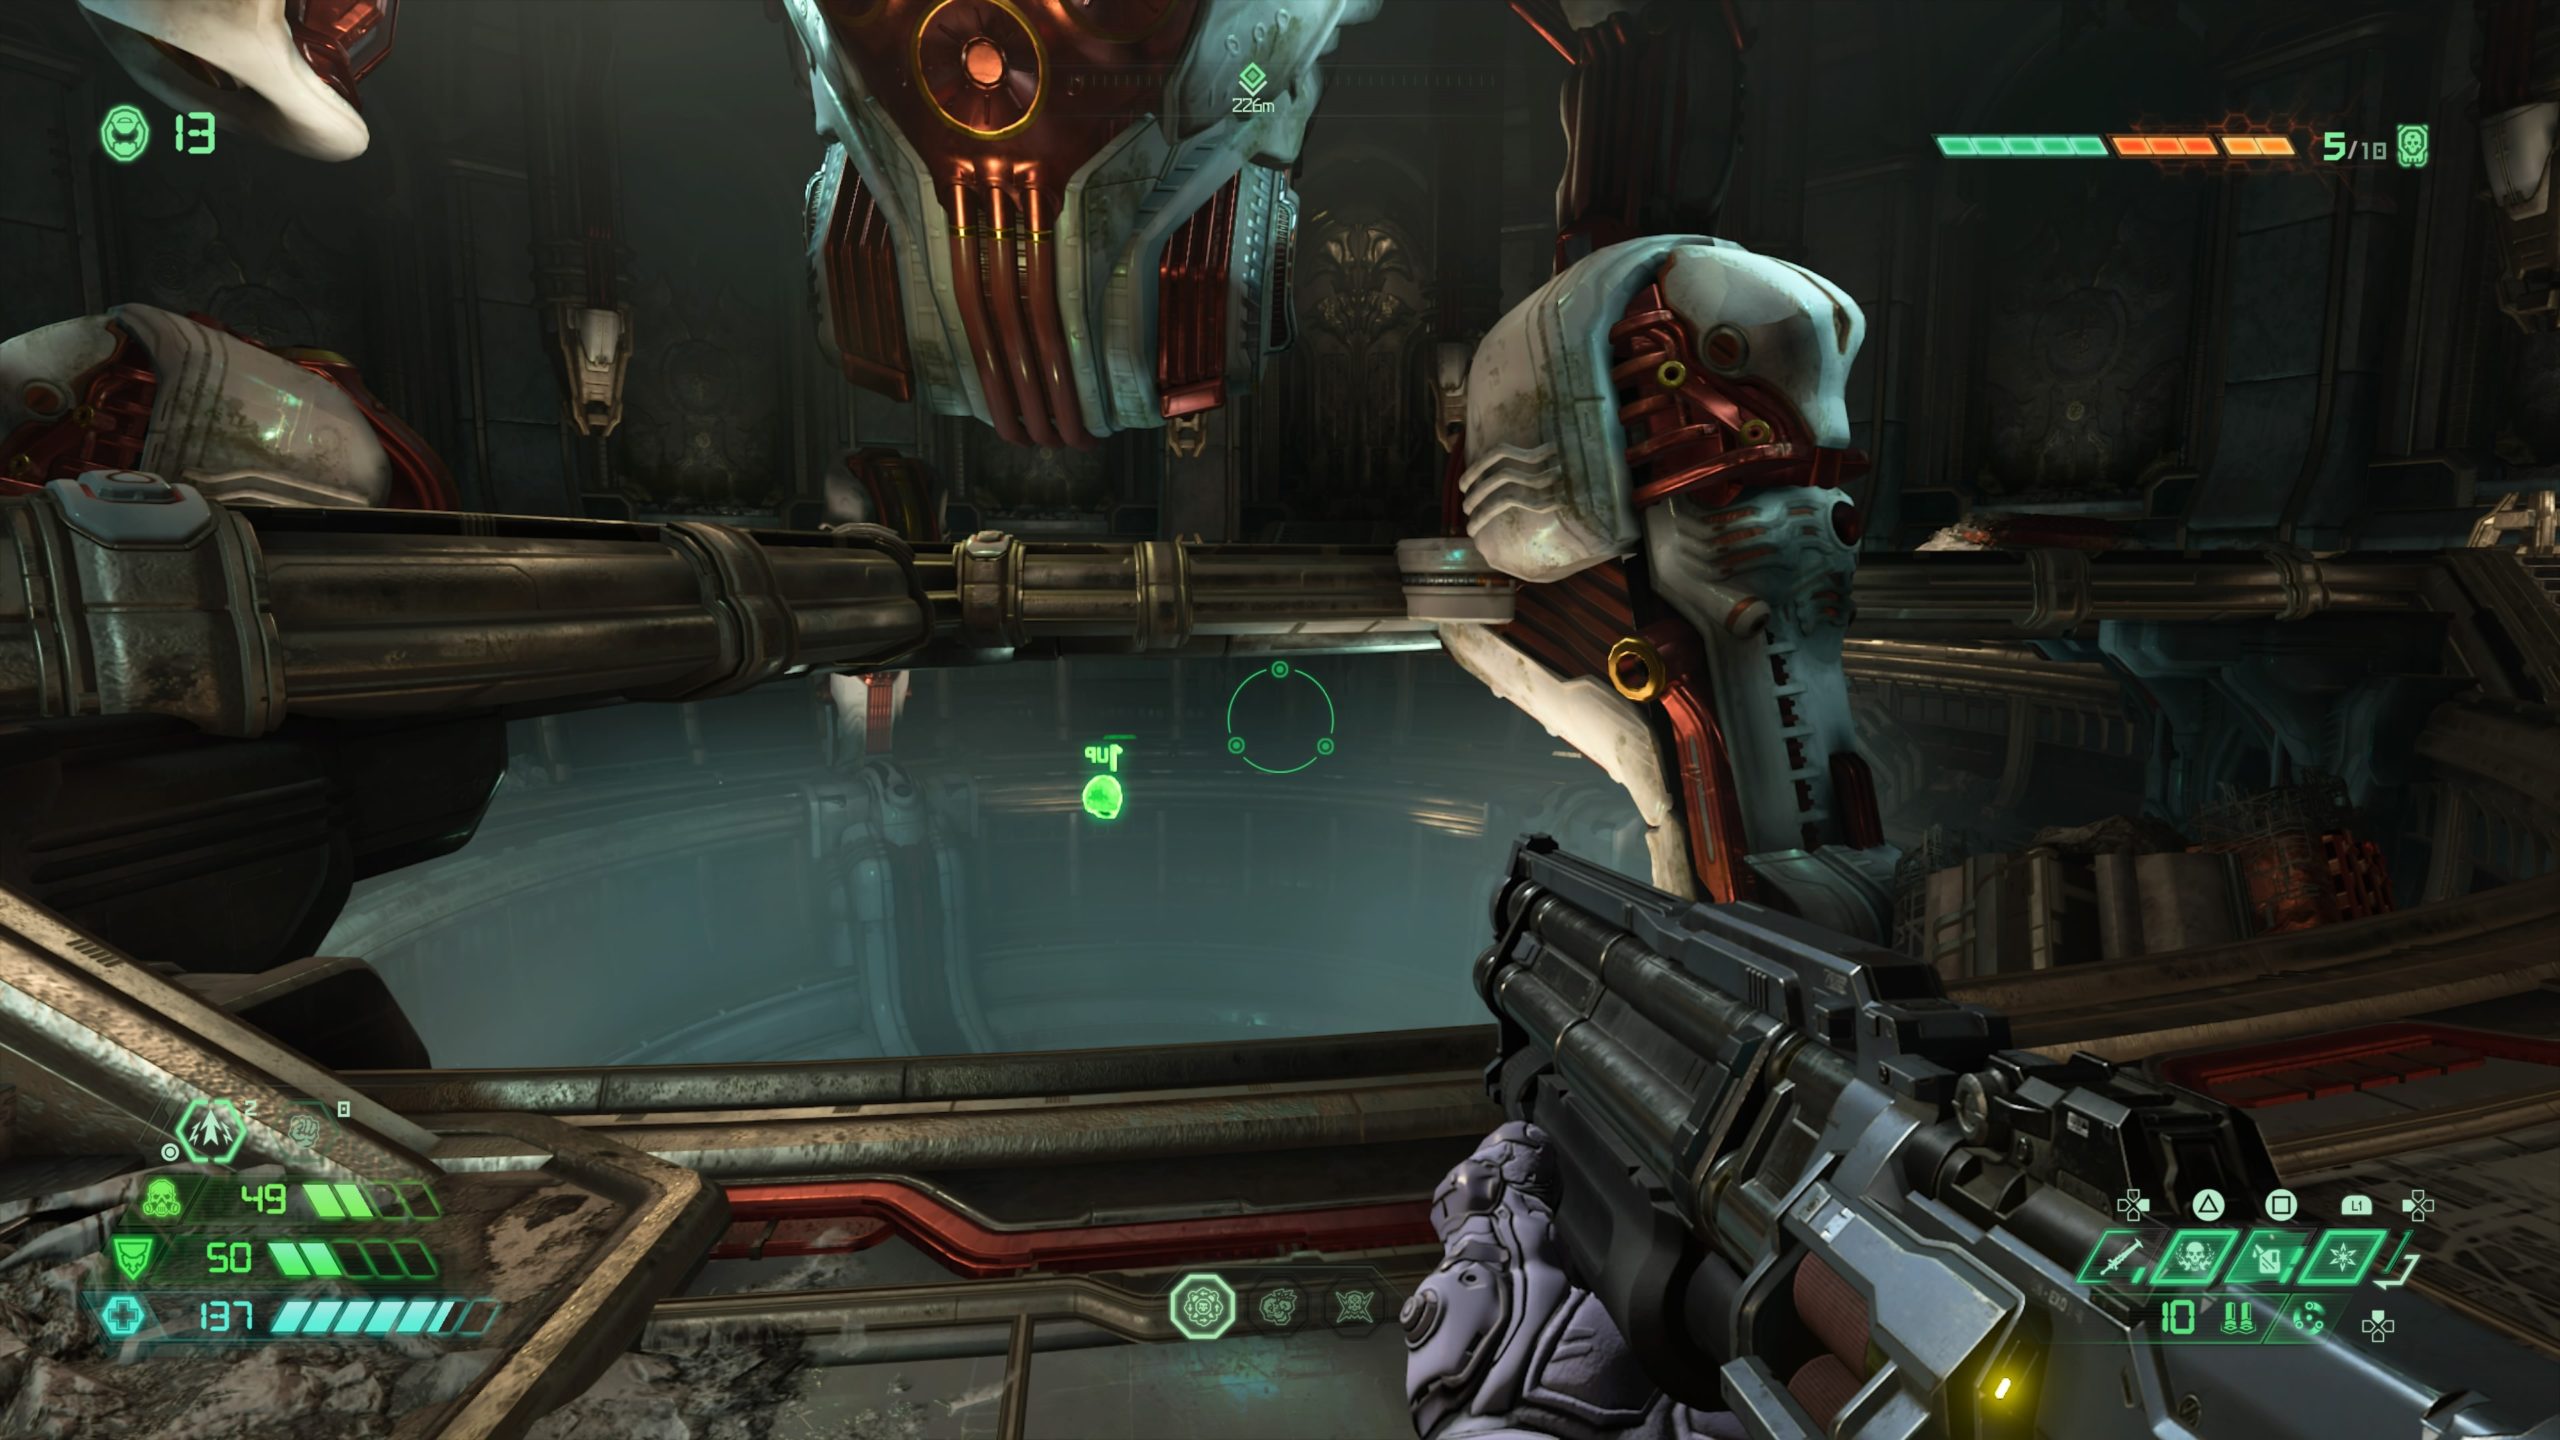
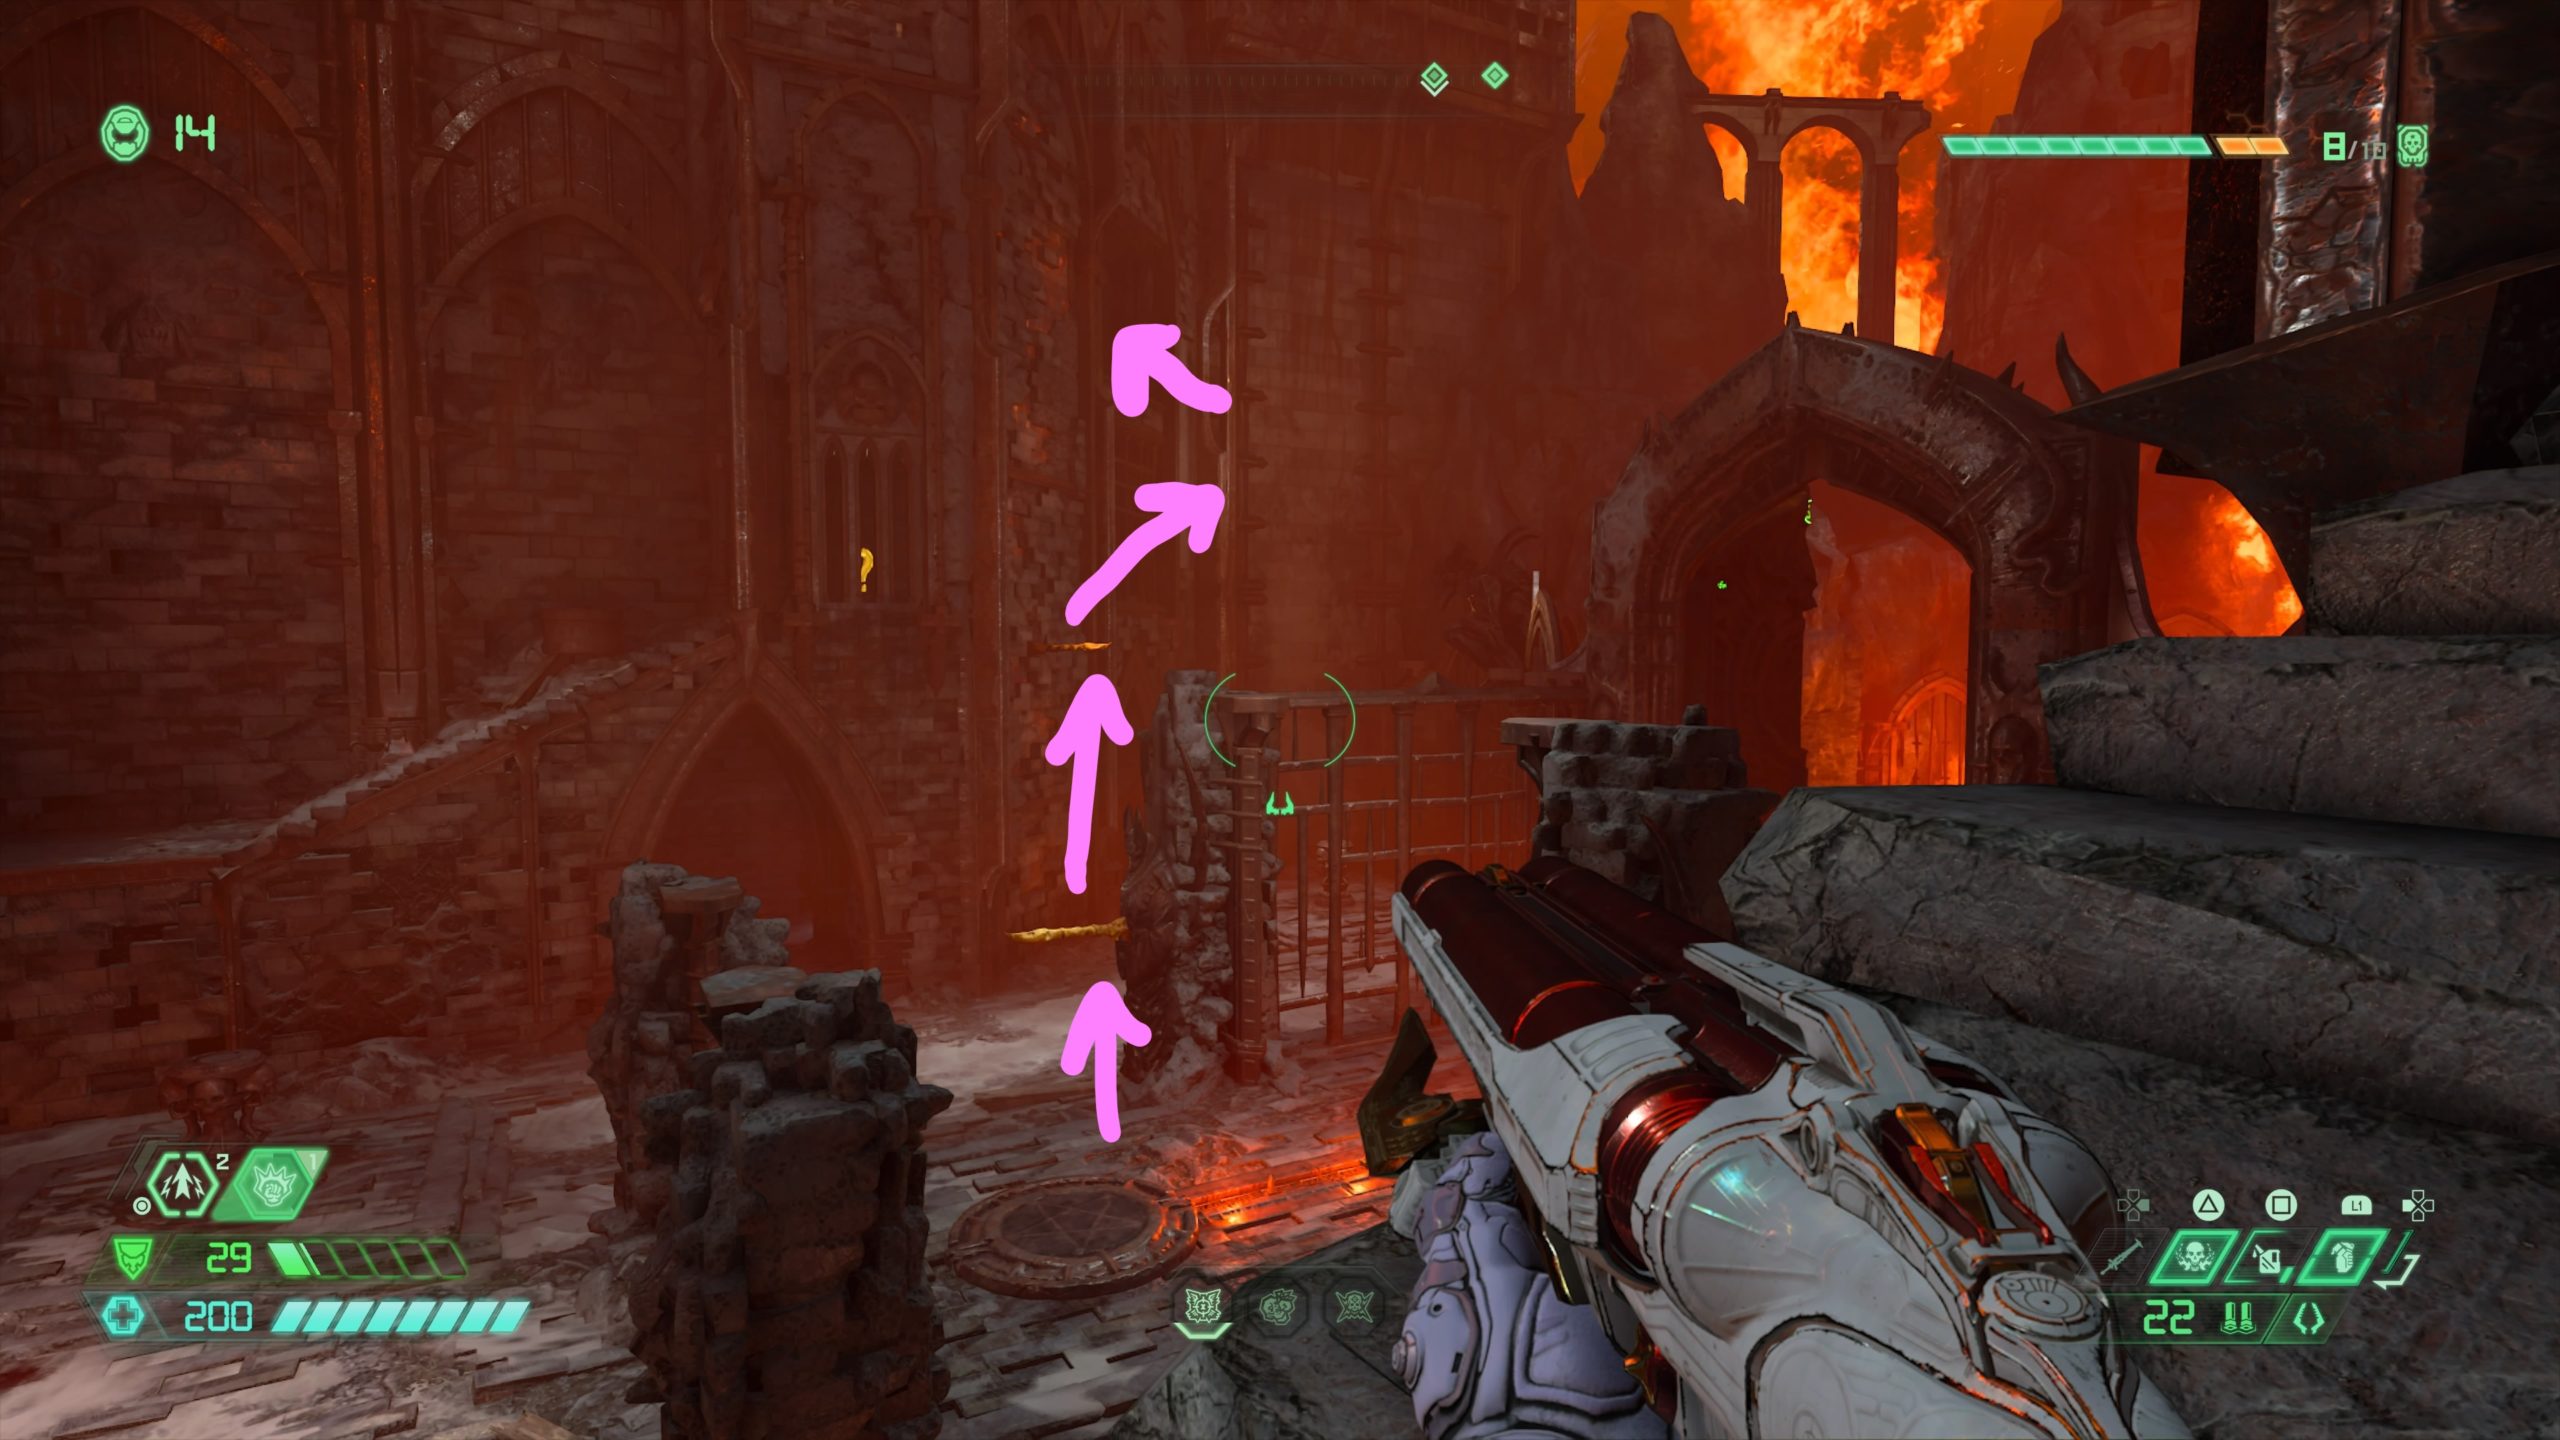
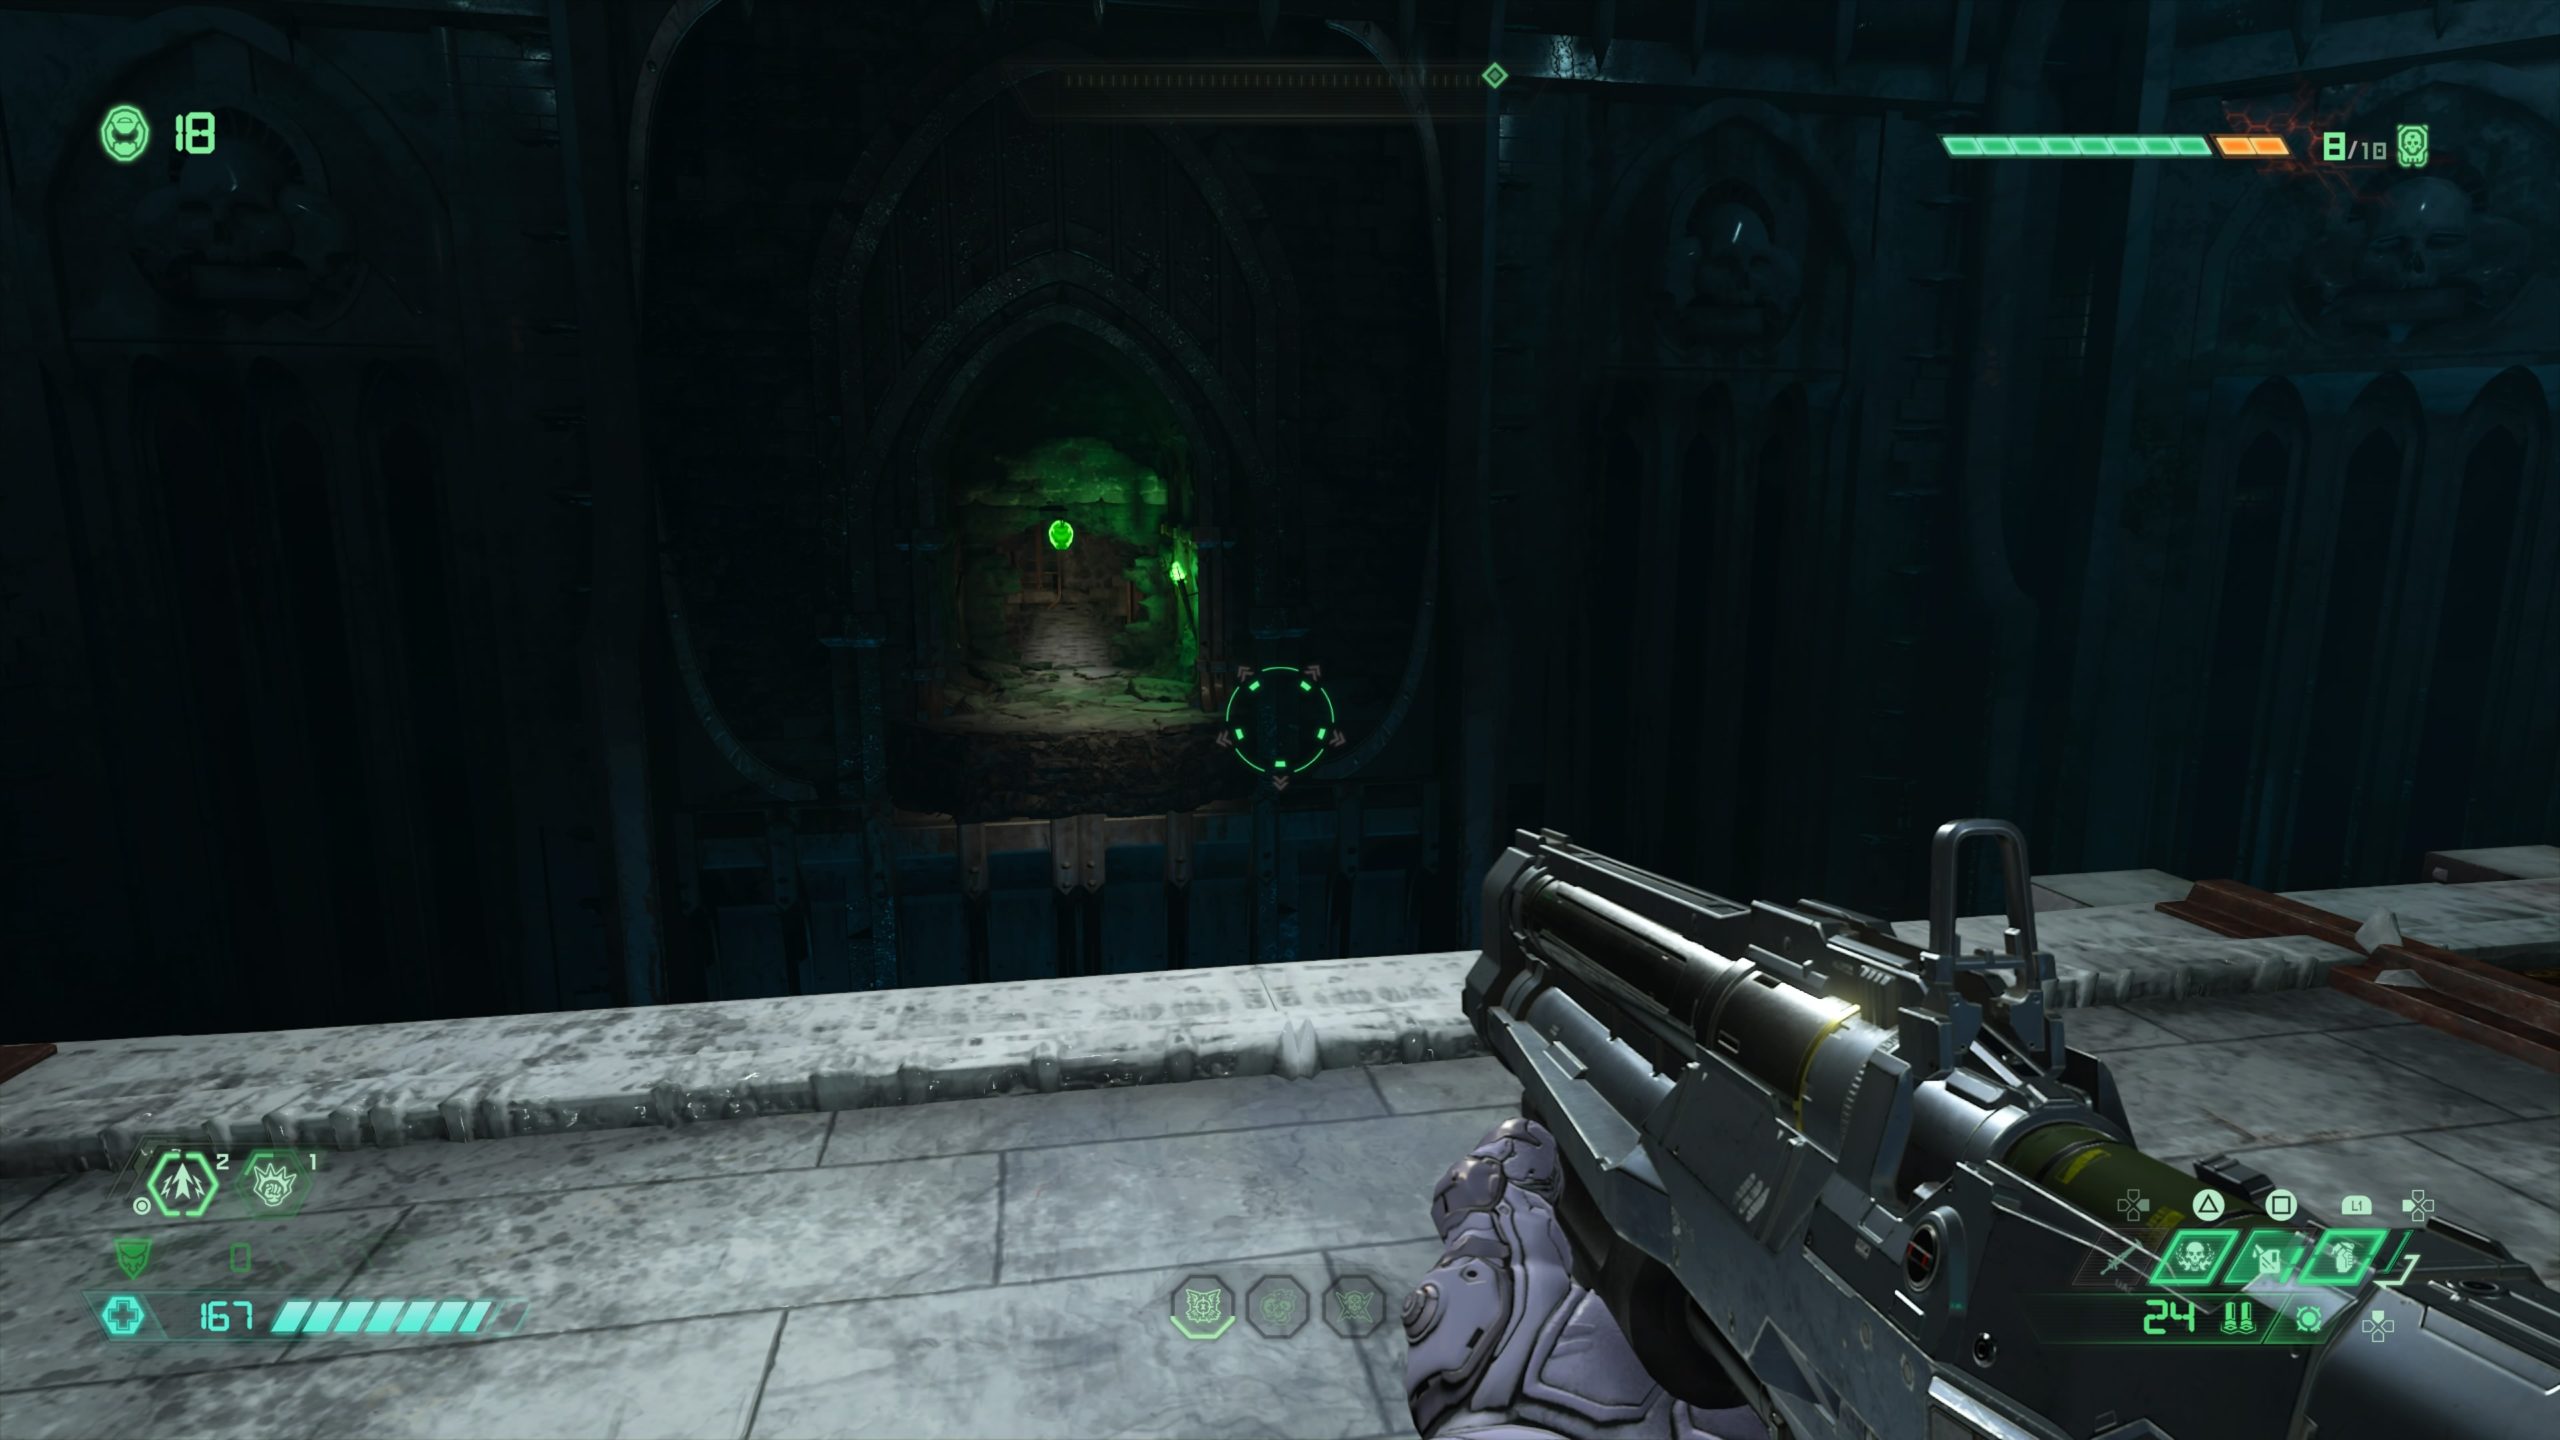
After you cross the yellow bridge, you’ll come to a hallway of death (where the game introduces the Mancubus). After clearing out the enemies, you’ll be able to proceed forward to a ledge with a sentinel holding a Praetor Suit Point. At the end of the ledge you’ll see a green diamond (see image above). Shooting the diamond will temporarily open the way forward. You will have to jump under the green diamond and dash to the climbable wall before the gate closes.
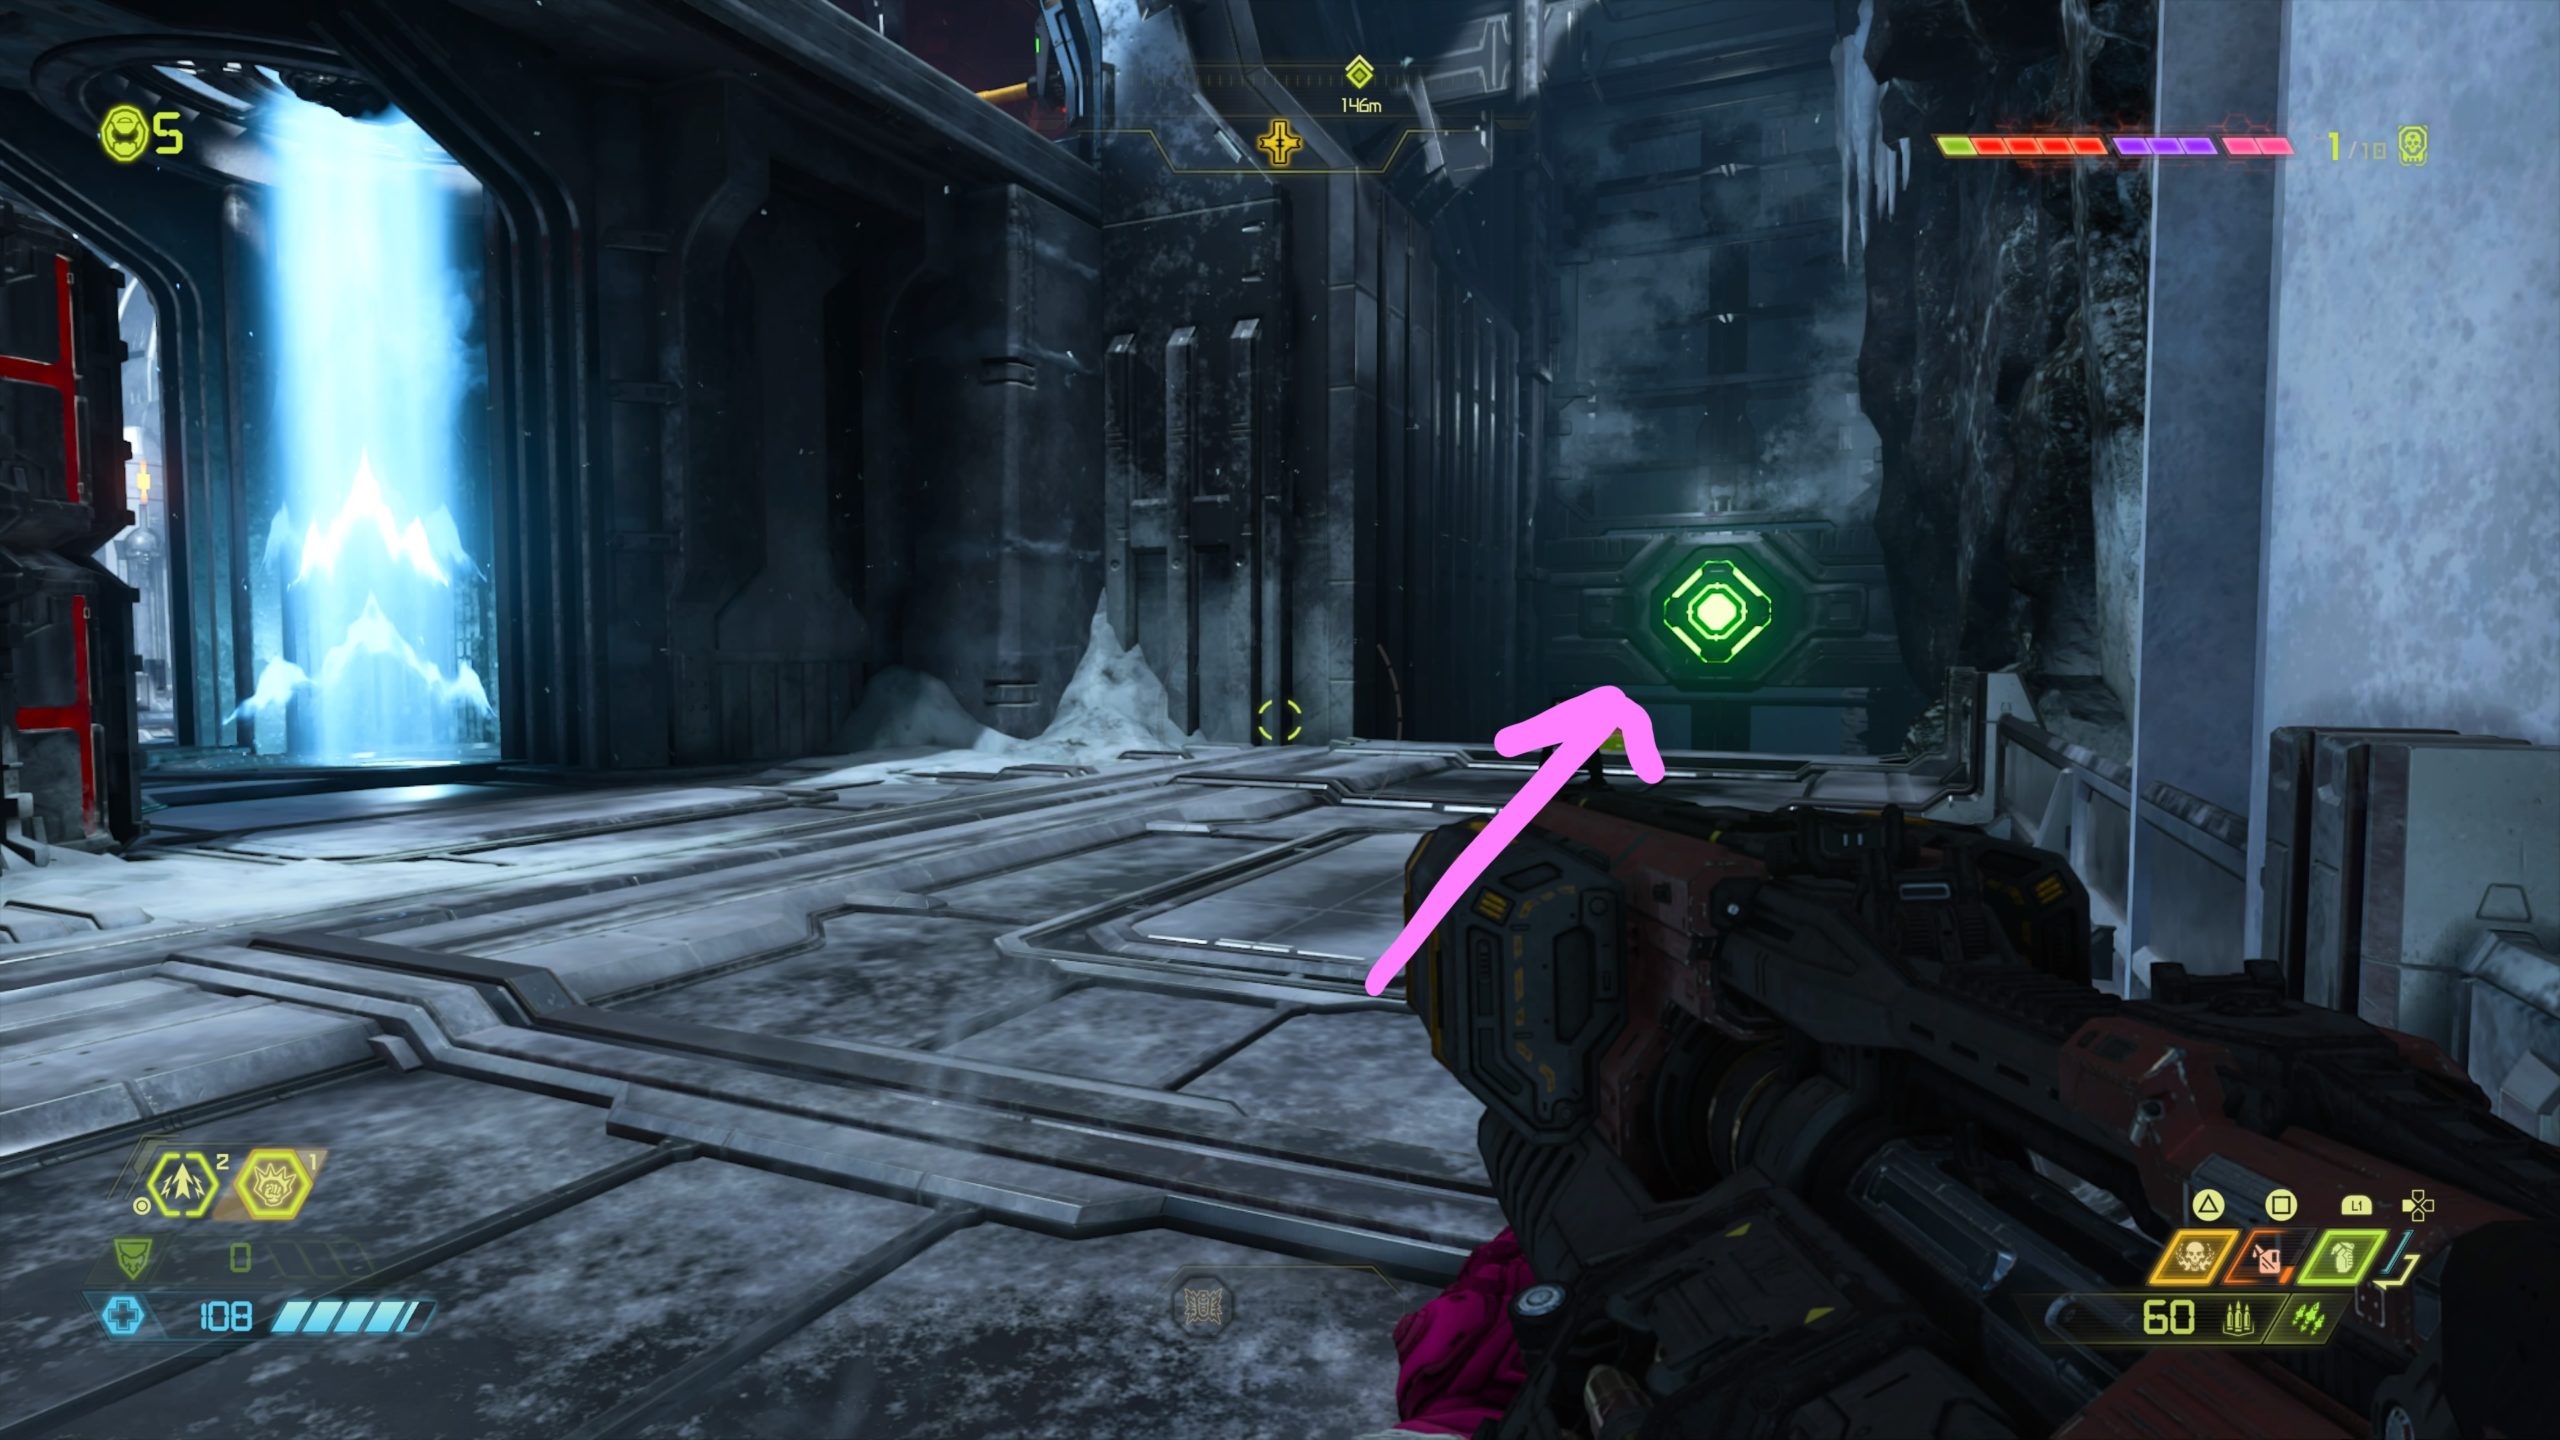
Climb up this wall to arrive on a loading platform then take a left, passing a blue air flow, to find another green diamond on the other side (see image above). Shoot the diamond to temporarily open the gate then jump under the diamond and dash to reach a climbable wall.
Climb up to the top of the wall then jump to the hanging platform containing the extra life.
Cultist Base (Travel Point: Station of Inquisition)

From the previous extra life, enter the hallway and head through the door requiring the Cultist Key to arrive on a metal platform. Immediately jump off the right side of the platform then head to the ledge overlooking the water. You’ll see another small ledge that you can drop down to. From this ledge, jump towards the gold spin bar and dash into a cave on the left. Melee the goofy fish to reveal the extra life.
Cultist Base (Travel Point: Basilica of Adjuration)

After you defeat a group of enemies, a long gate will drop from a tall tower allowing you to move on to the next area. In this tower, you will need to melee a switch then use the gold spin bars to reach a small climbable section at the end of the room. Once you reach this surface, look back the way you came and jump to the extra life floating in the air.
Cultist Base (Travel Point: Promenade of Culling)

In the room with spiky walls that crush you, jump through the climbable walls. You will pass the extra life located in the center structure. Once you reach the climbable wall just past the extra life, climb up to the top then turn around and jump to the extra life.
Mission 4: Doom Hunter Base
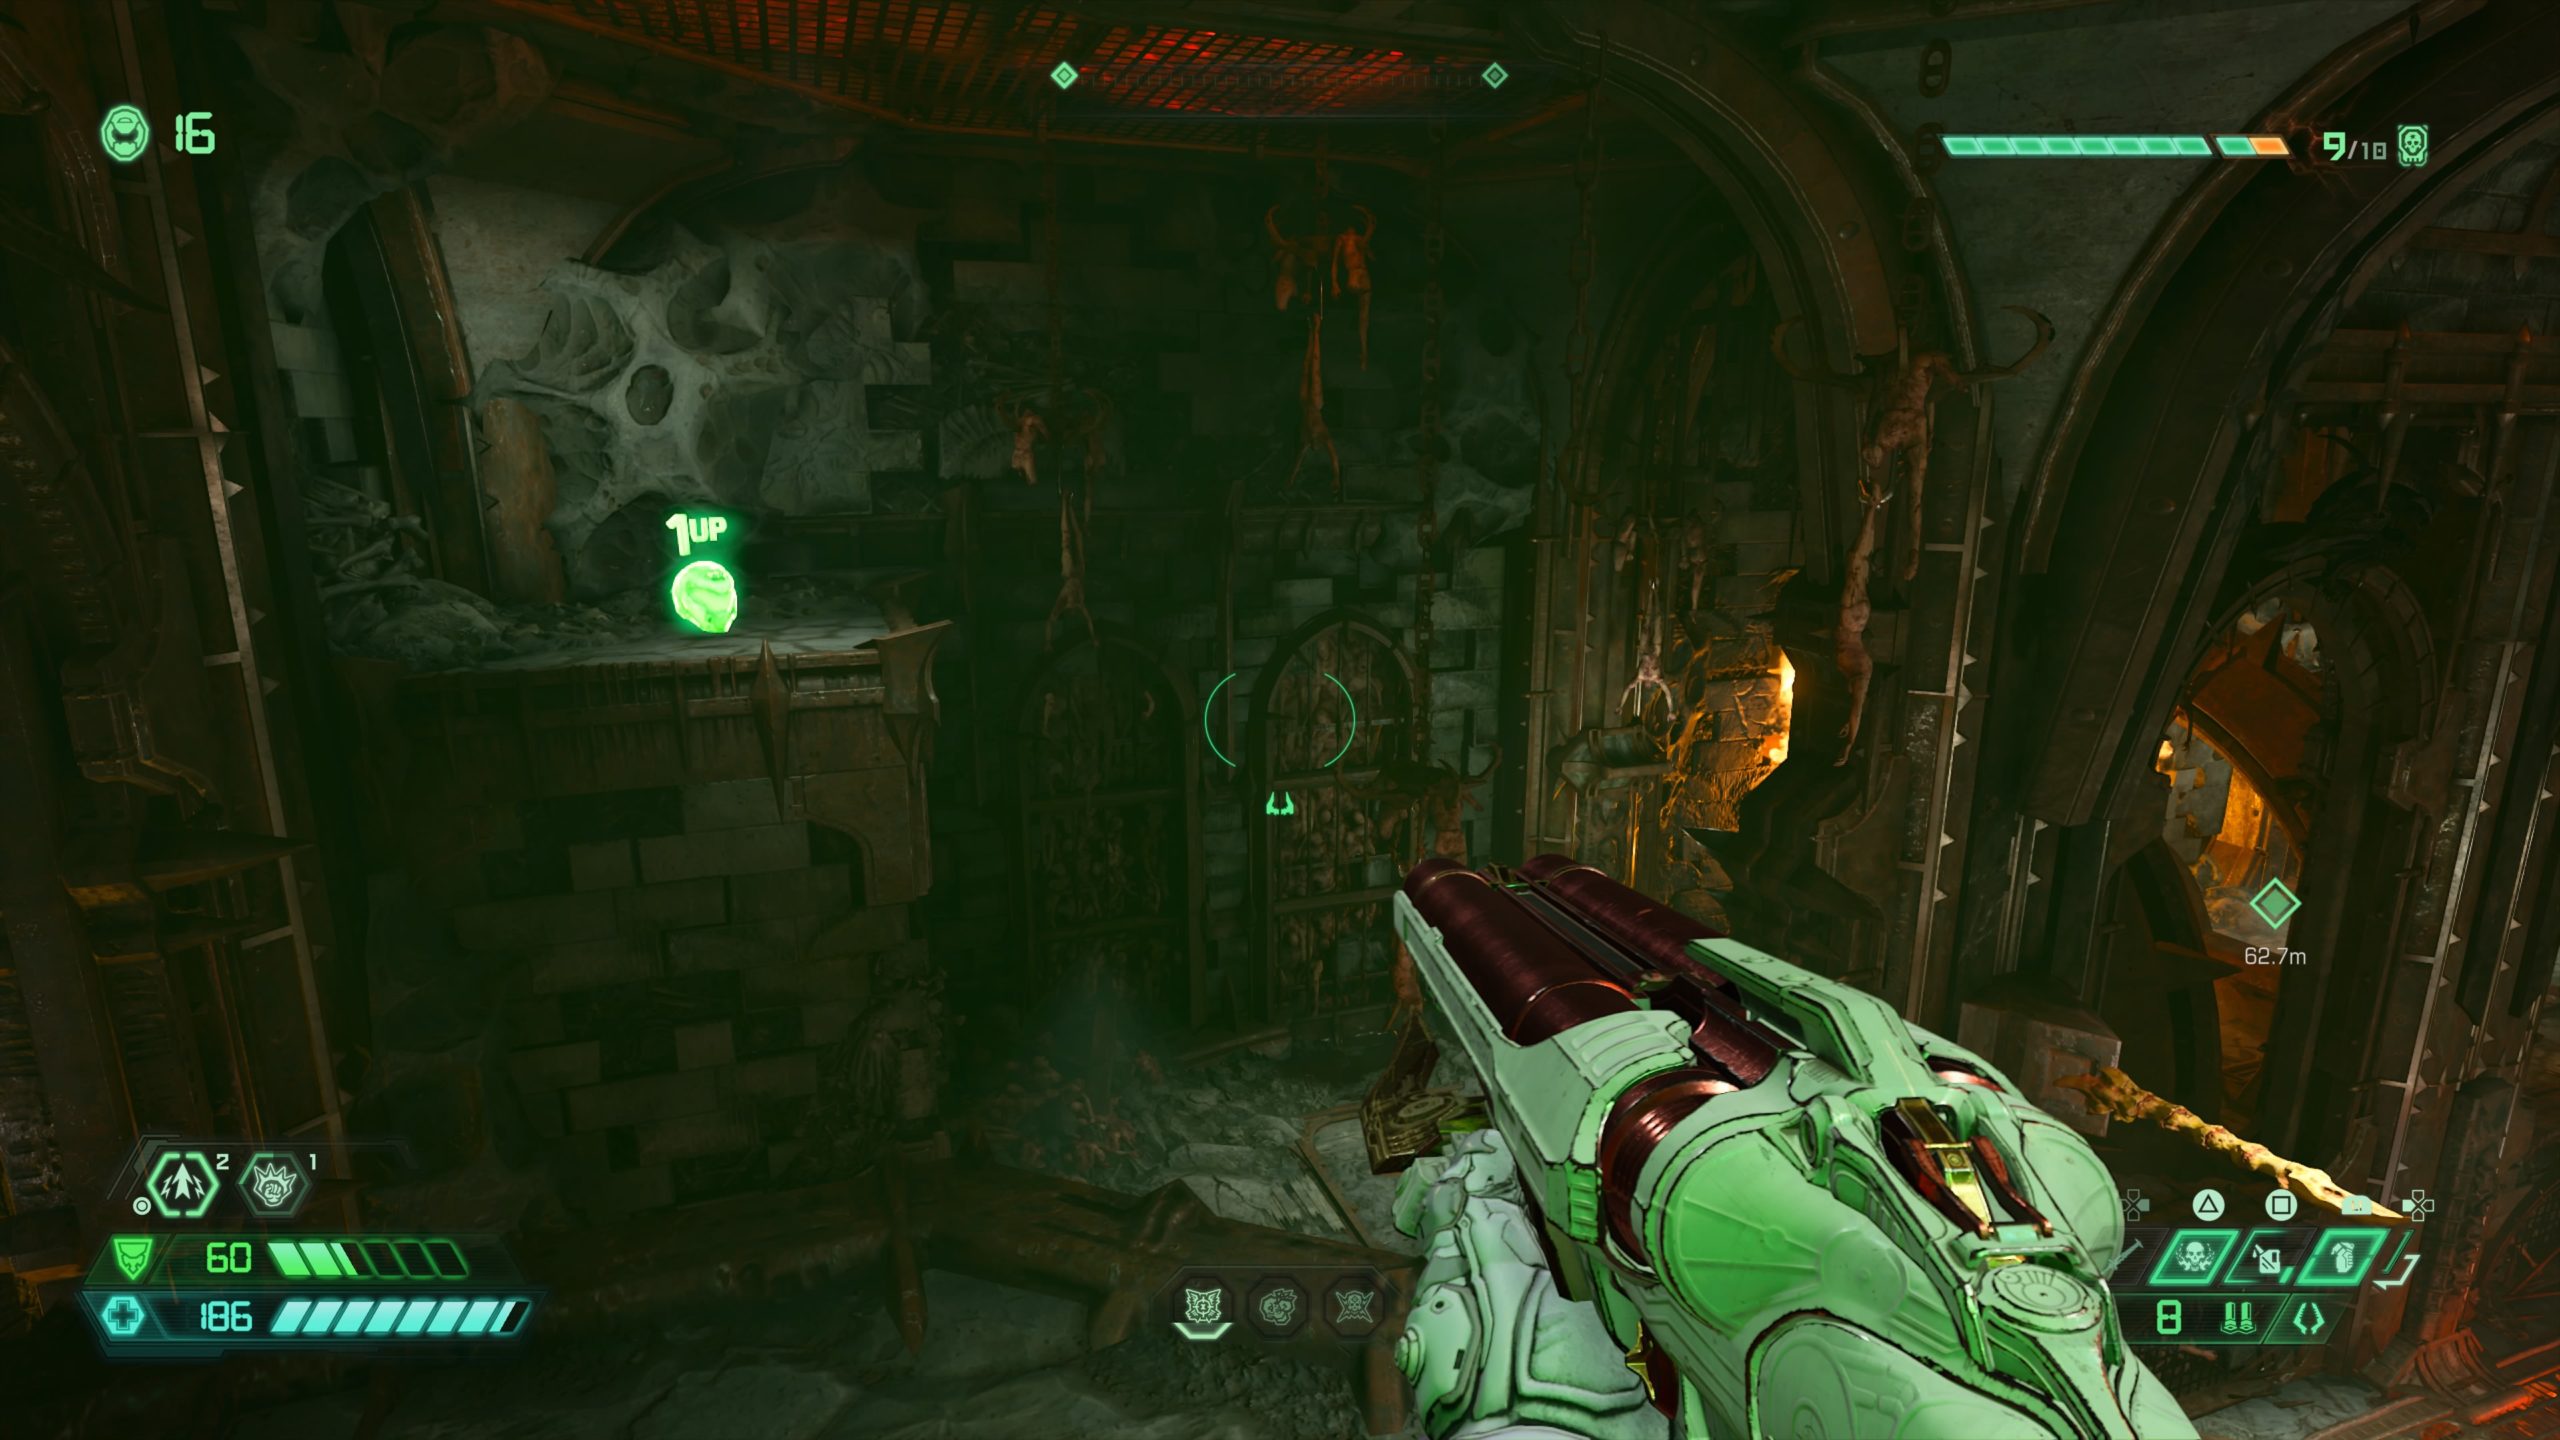
Doom Hunter Base (Travel Point: Station of Redemption)

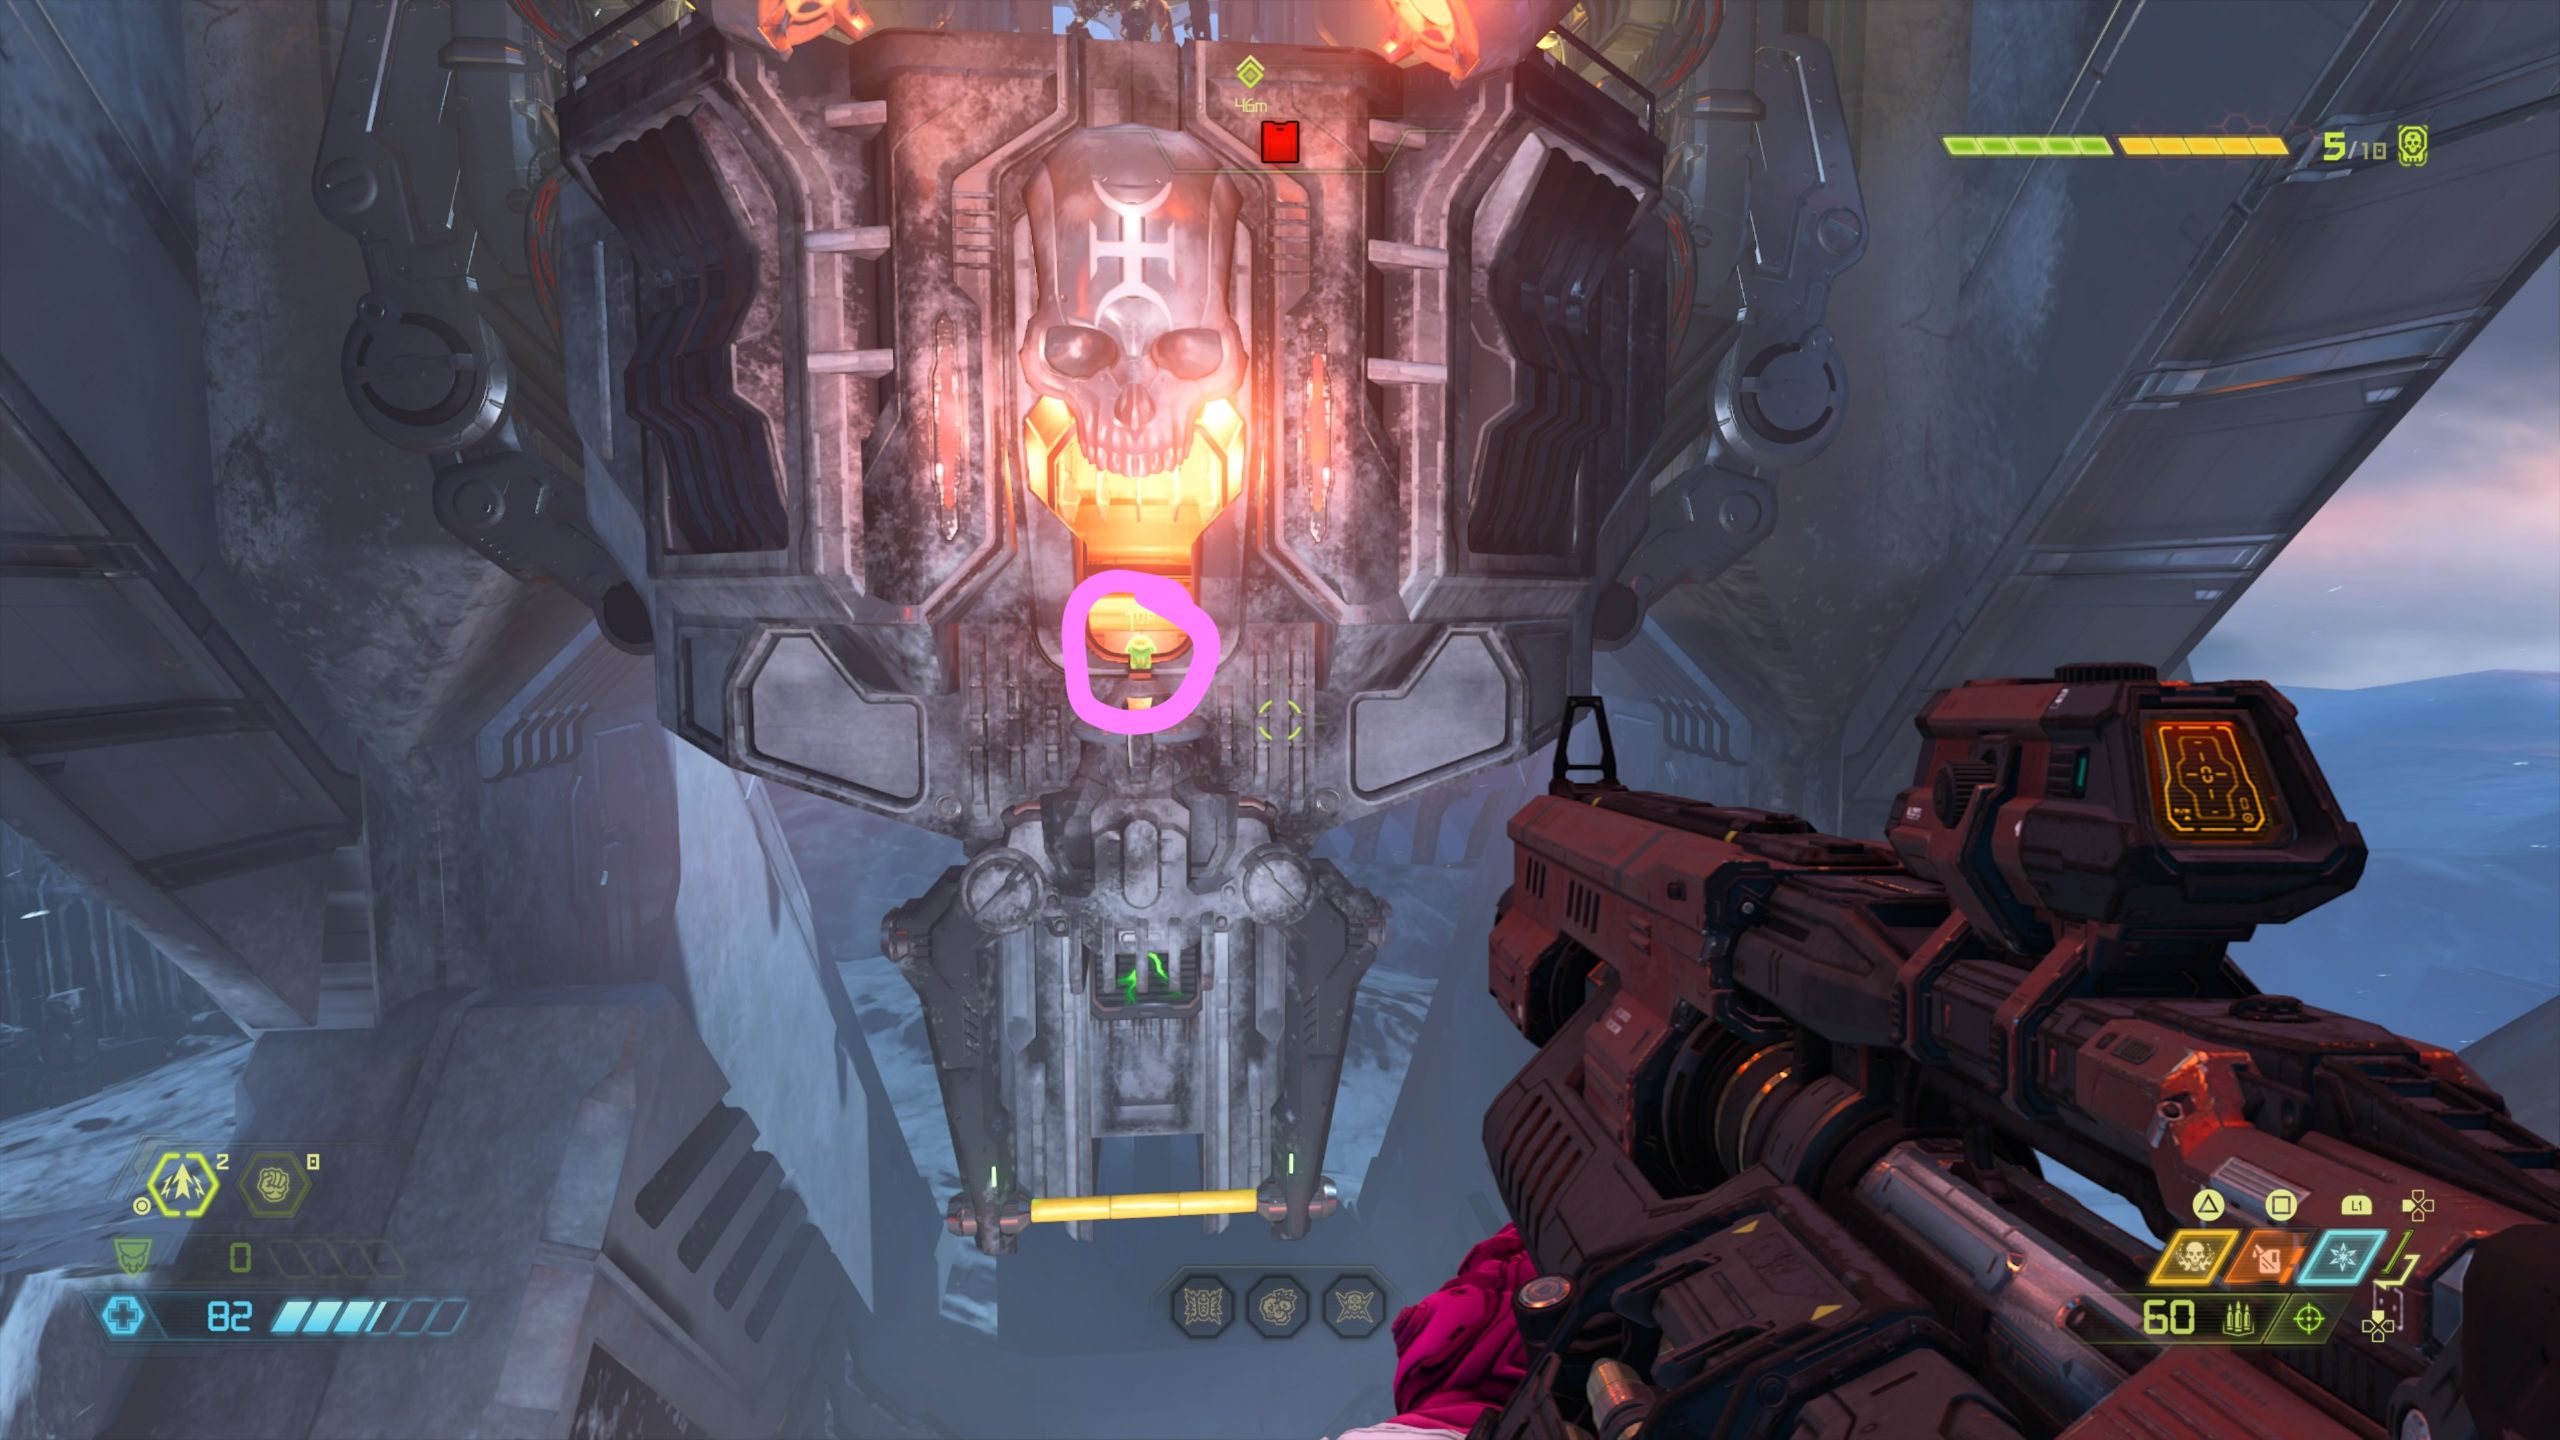
From the starting area, head to the platform on the other side of the red barrier then jump towards the metal skull that shoots fire. Once on that platform, head to the other side and climb up the wall to reach another climbable wall on the other side of the room. At the top of the wall, take a left facing the entrance where you came from to spot a gold spin bar. Use the gold spin bar to reach the climbable wall on a bridge. At the top of the bridge, turn around to face the spin bar. The extra life can be found on a small platform above the spin bar. Double jump and dash to reach it.
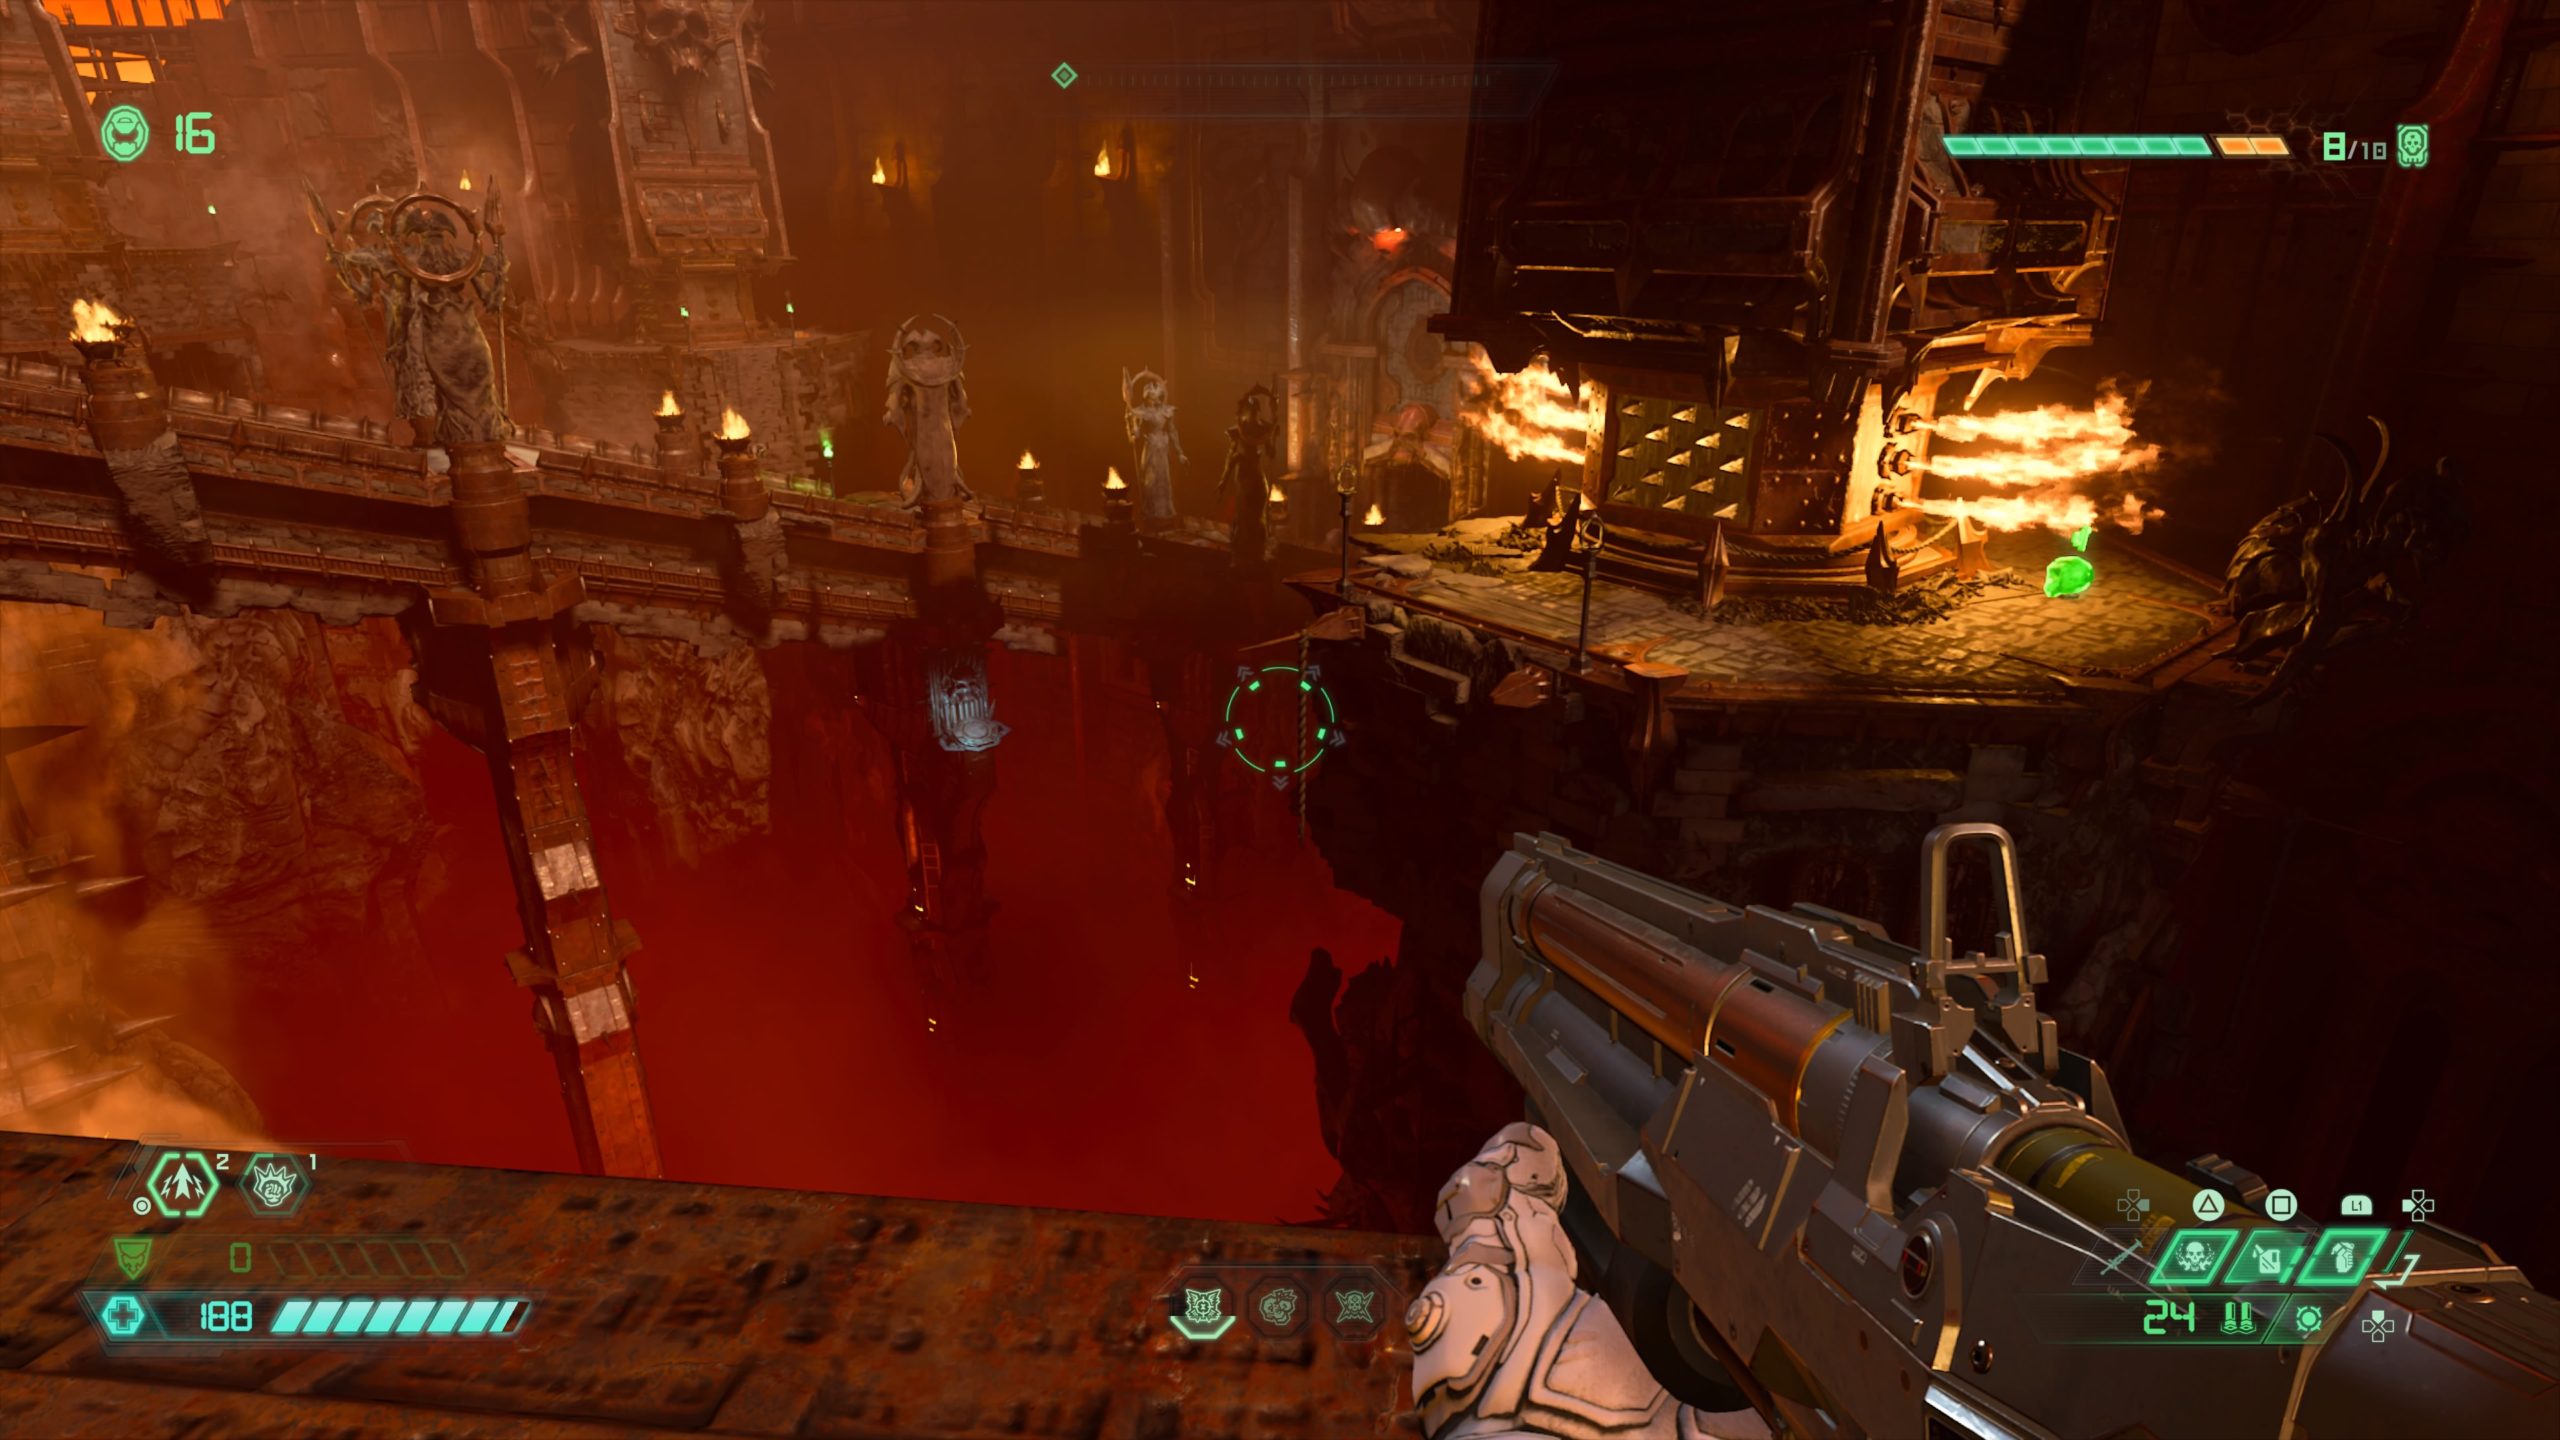
Doom Hunter Base (Travel Point: Skies of Stigmata)
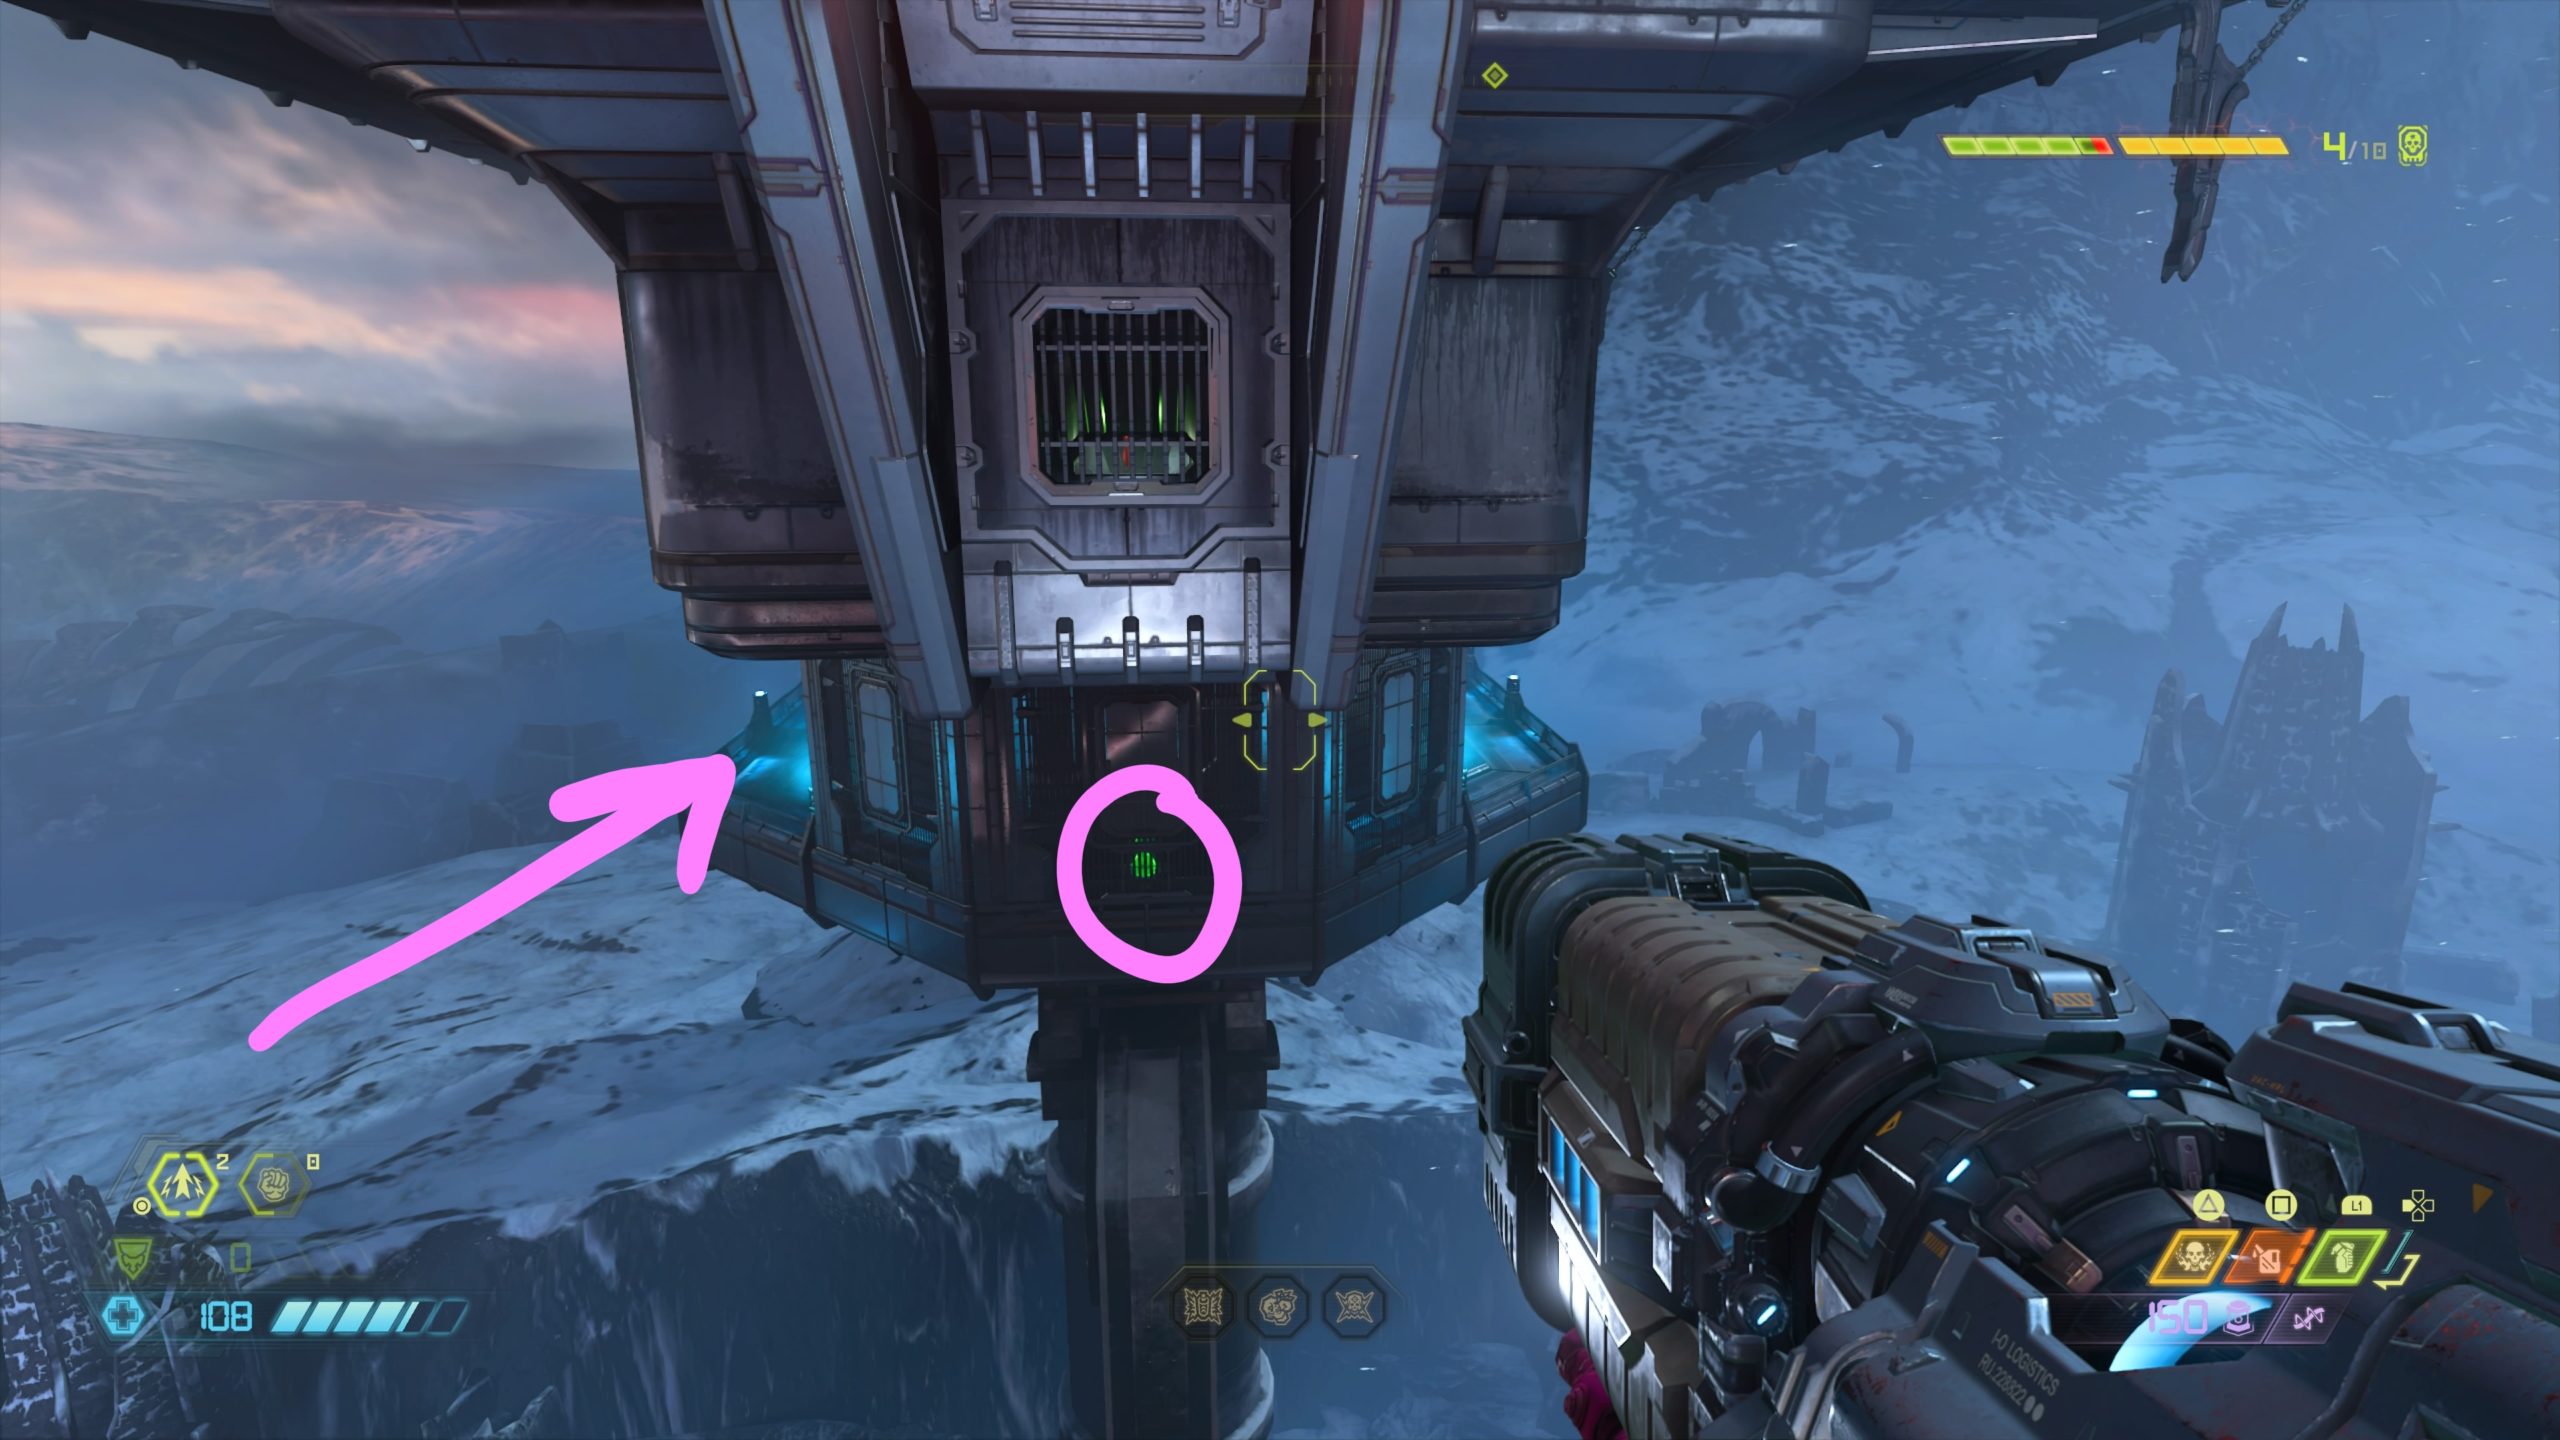
This extra life is located on the free standing structure opposite of the red access door. To reach it, face the structure then take the platform on the left. Look for the hanging climbable wall then jump to it and use the gold spin bar to reach the structure. The extra life is located on the lower level.
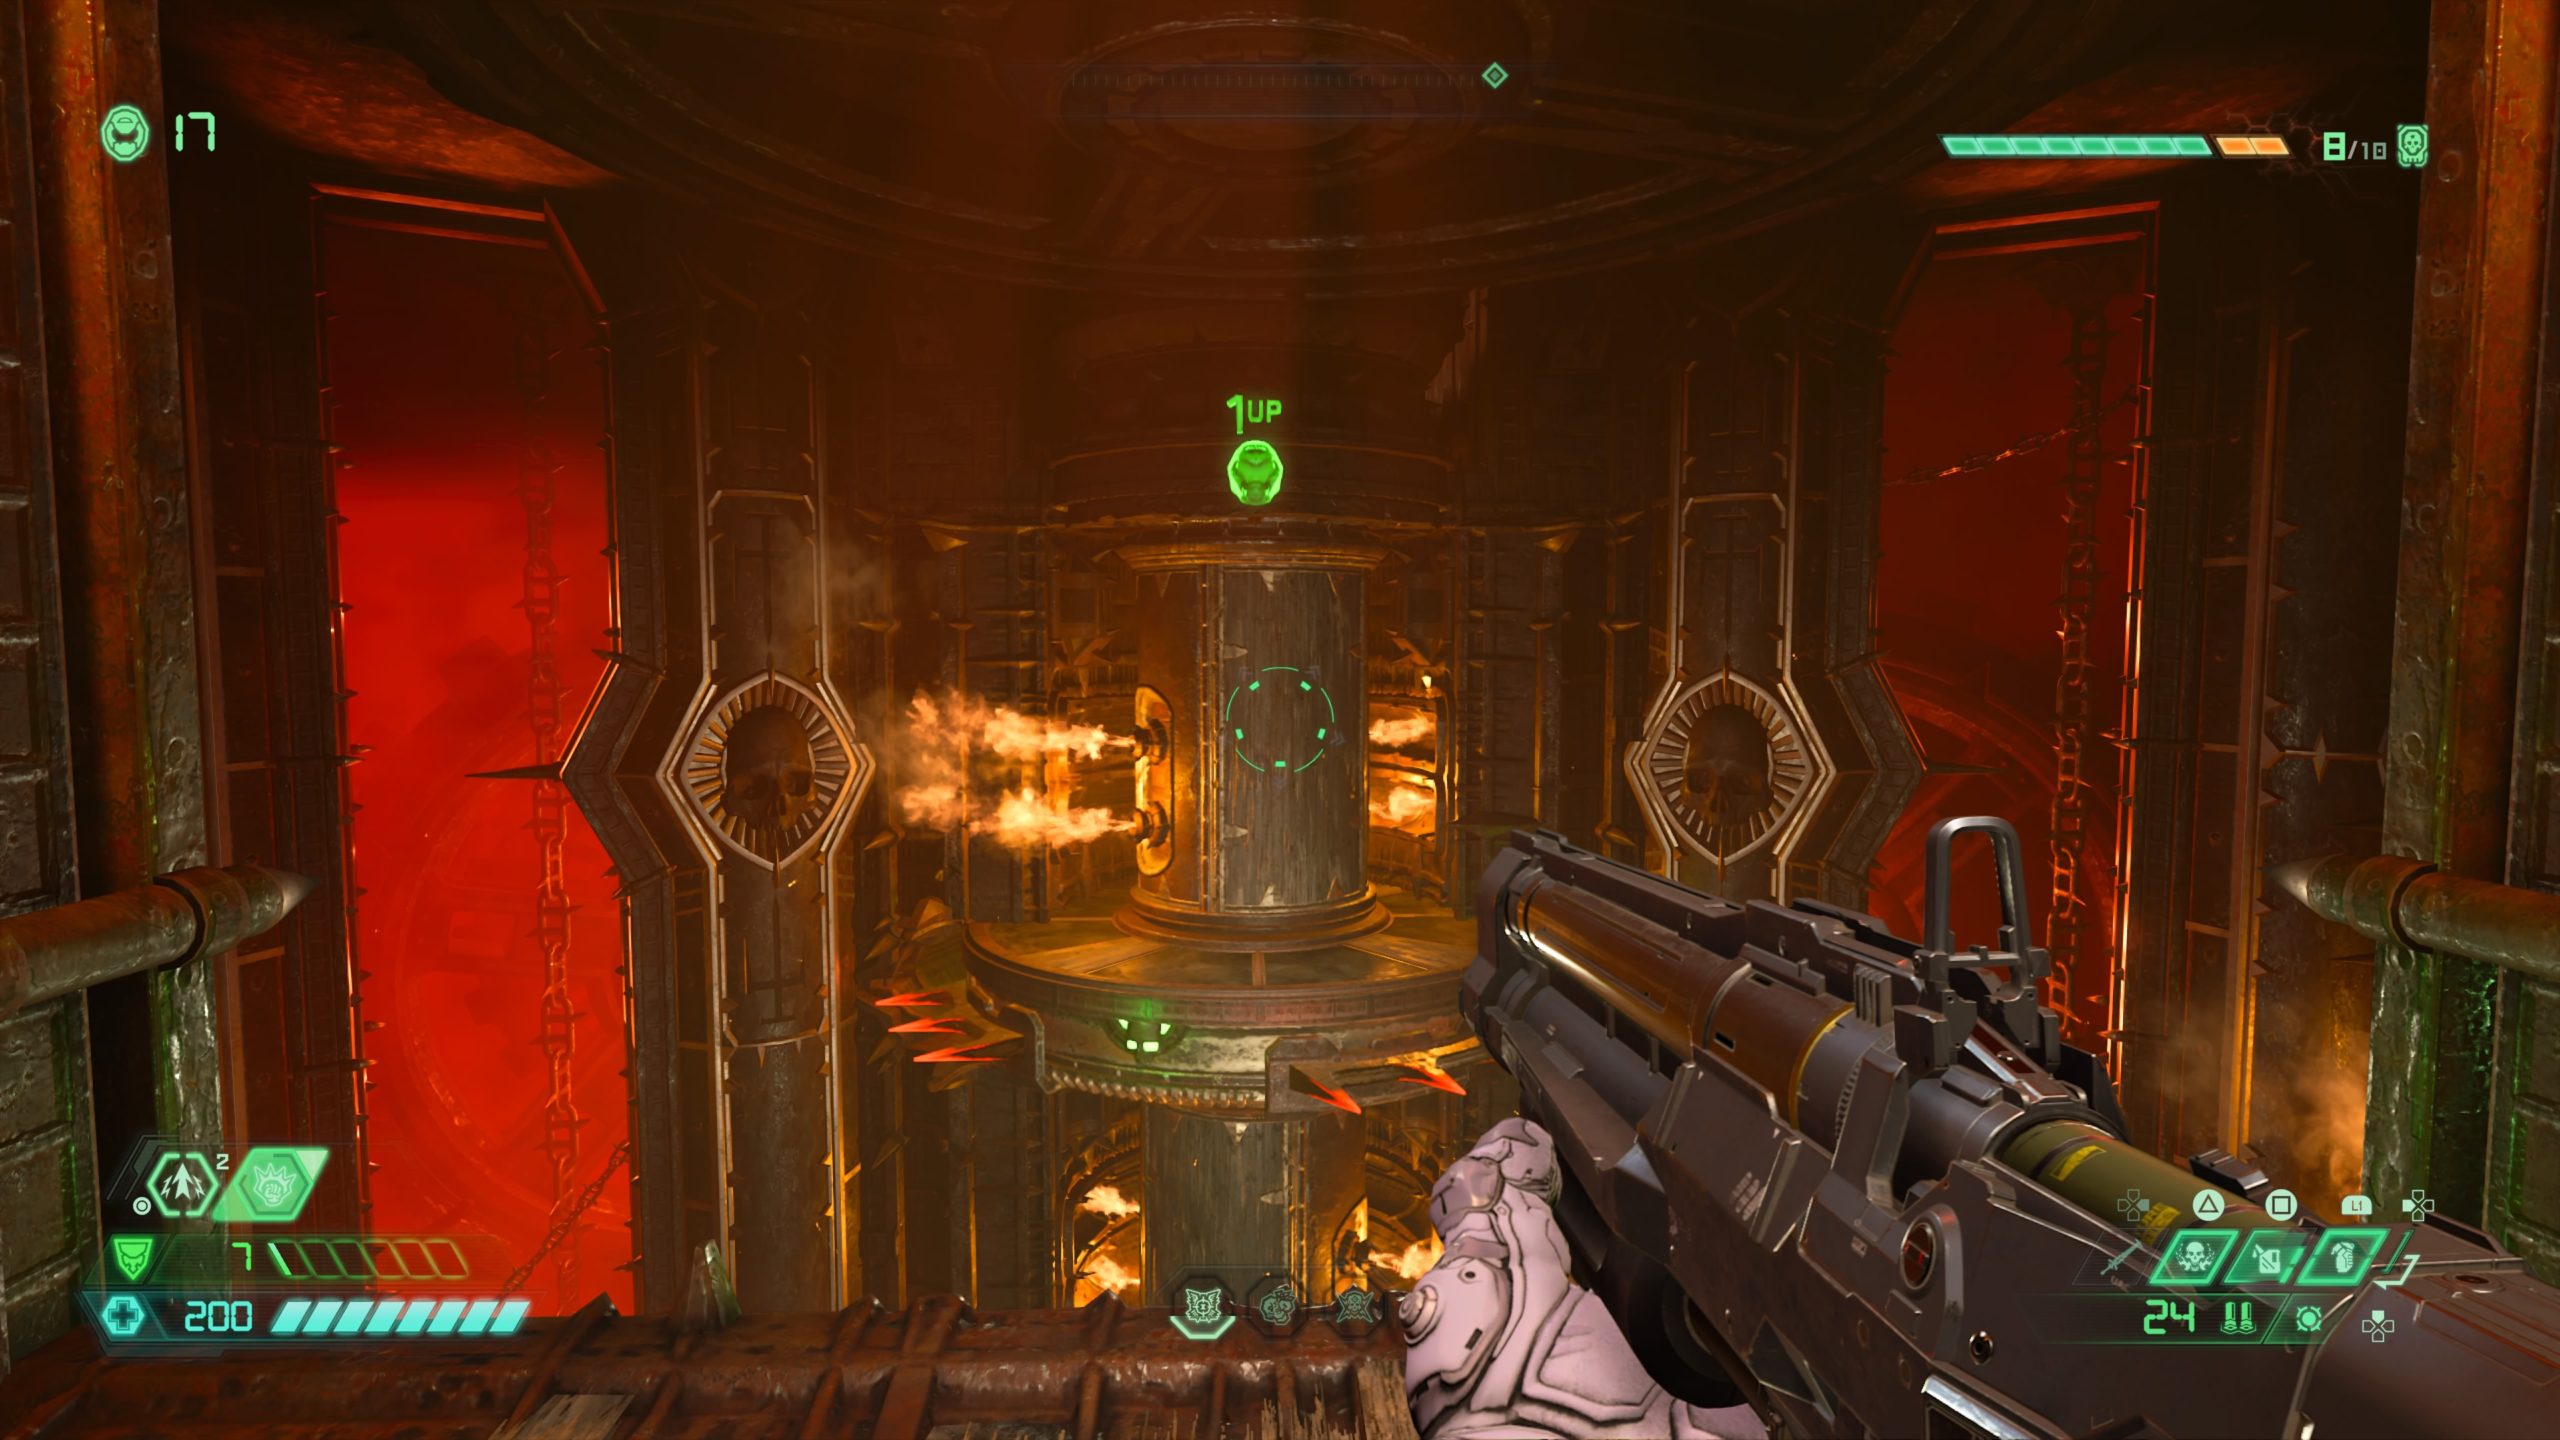
Doom Hunter Base (Travel Point: Skies of Stigmata)
During the story mission, you will pass through a small room with a giant spinning fire column. Hug the wall to avoid fire damage and the extra life will be located on the other side of the column.
Mission 5: Super Gore Nest
Upper Area (Travel Point: Mixom Square)
From the fast travel point, head straight forward to find the extra life on top of a gunk covered pillar. To reach it, just before the column turn right and proceed to the room at the end with a gunk covered pillar. Use the gold spin bar on the pillar to reach the second level. Look for a crack in the wall then melee the wall to reveal the extra life. Use double jump and dash to reach the extra life.
Upper Area (Travel Point: Vermilion Canal)
From the fast travel point, head to one of the entrances next to the lift pad under the mouth of the giant creature across the way. Once inside, head to the central room with the UAC Spokesperson hologram. The extra life will be floating in this room. Use the gold spin bar attached to the column in the center of the room to reach it.
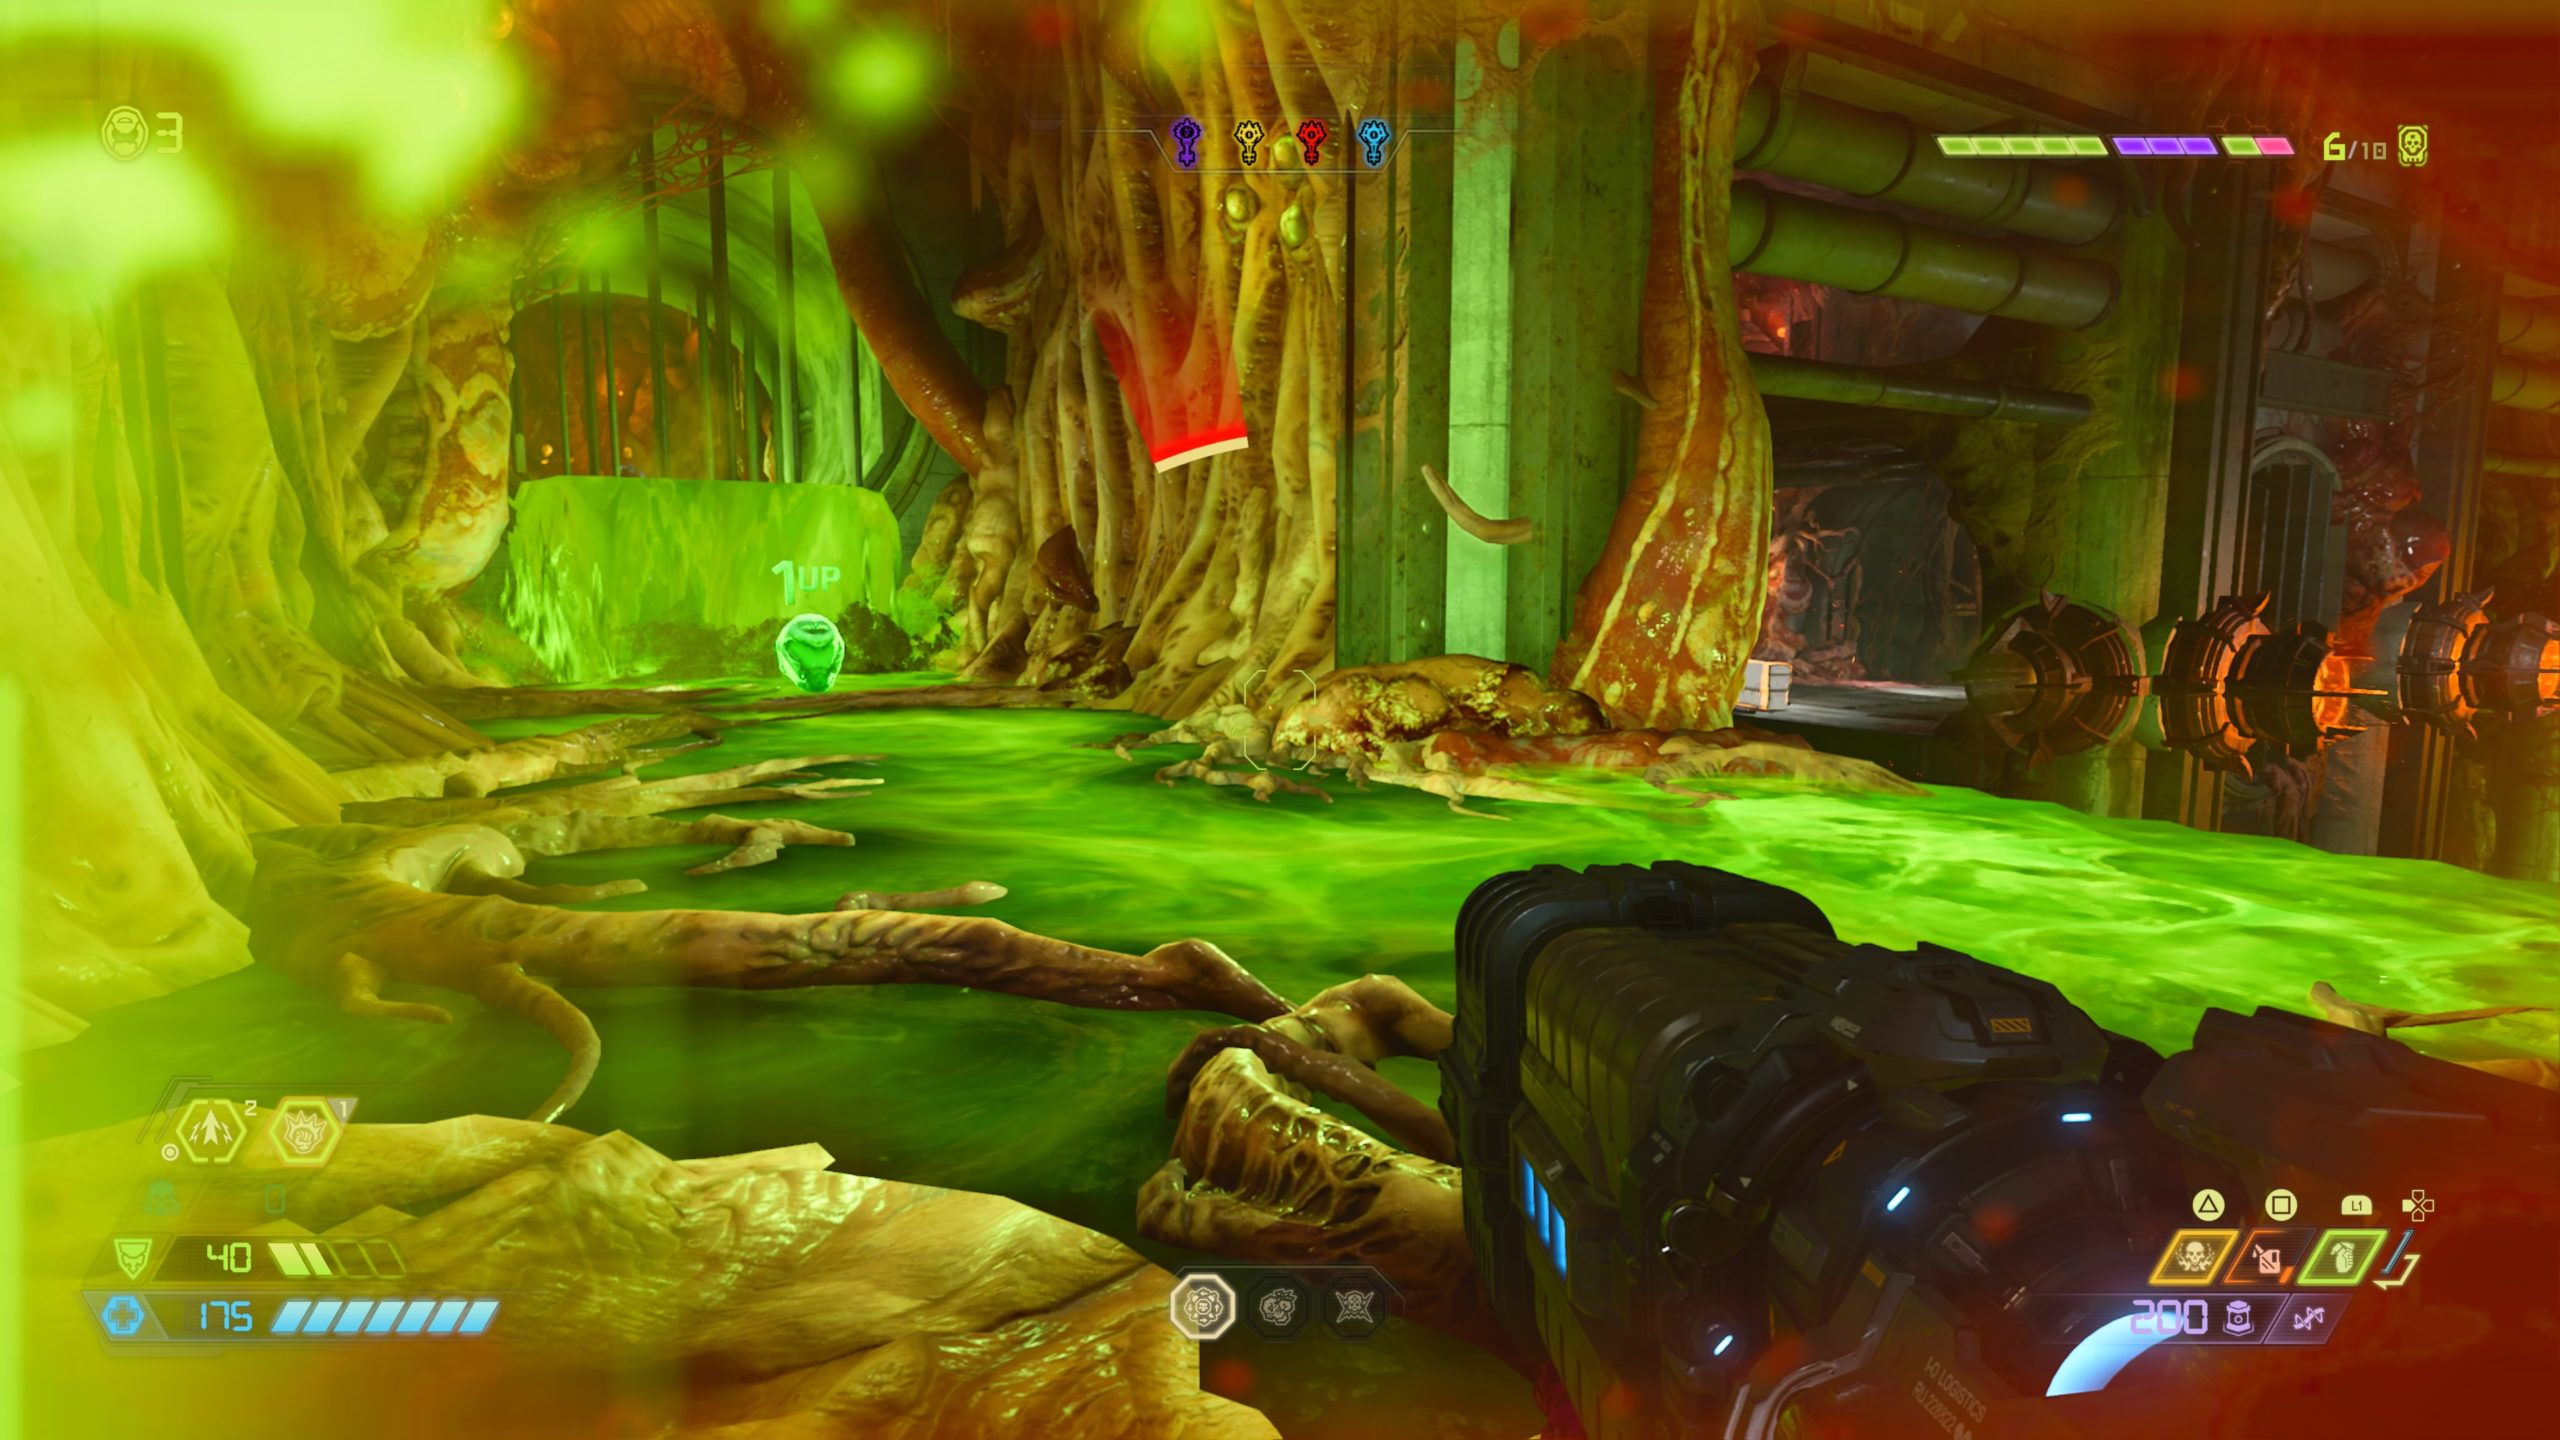
Upper Area (Travel Point: Industrial Zone)
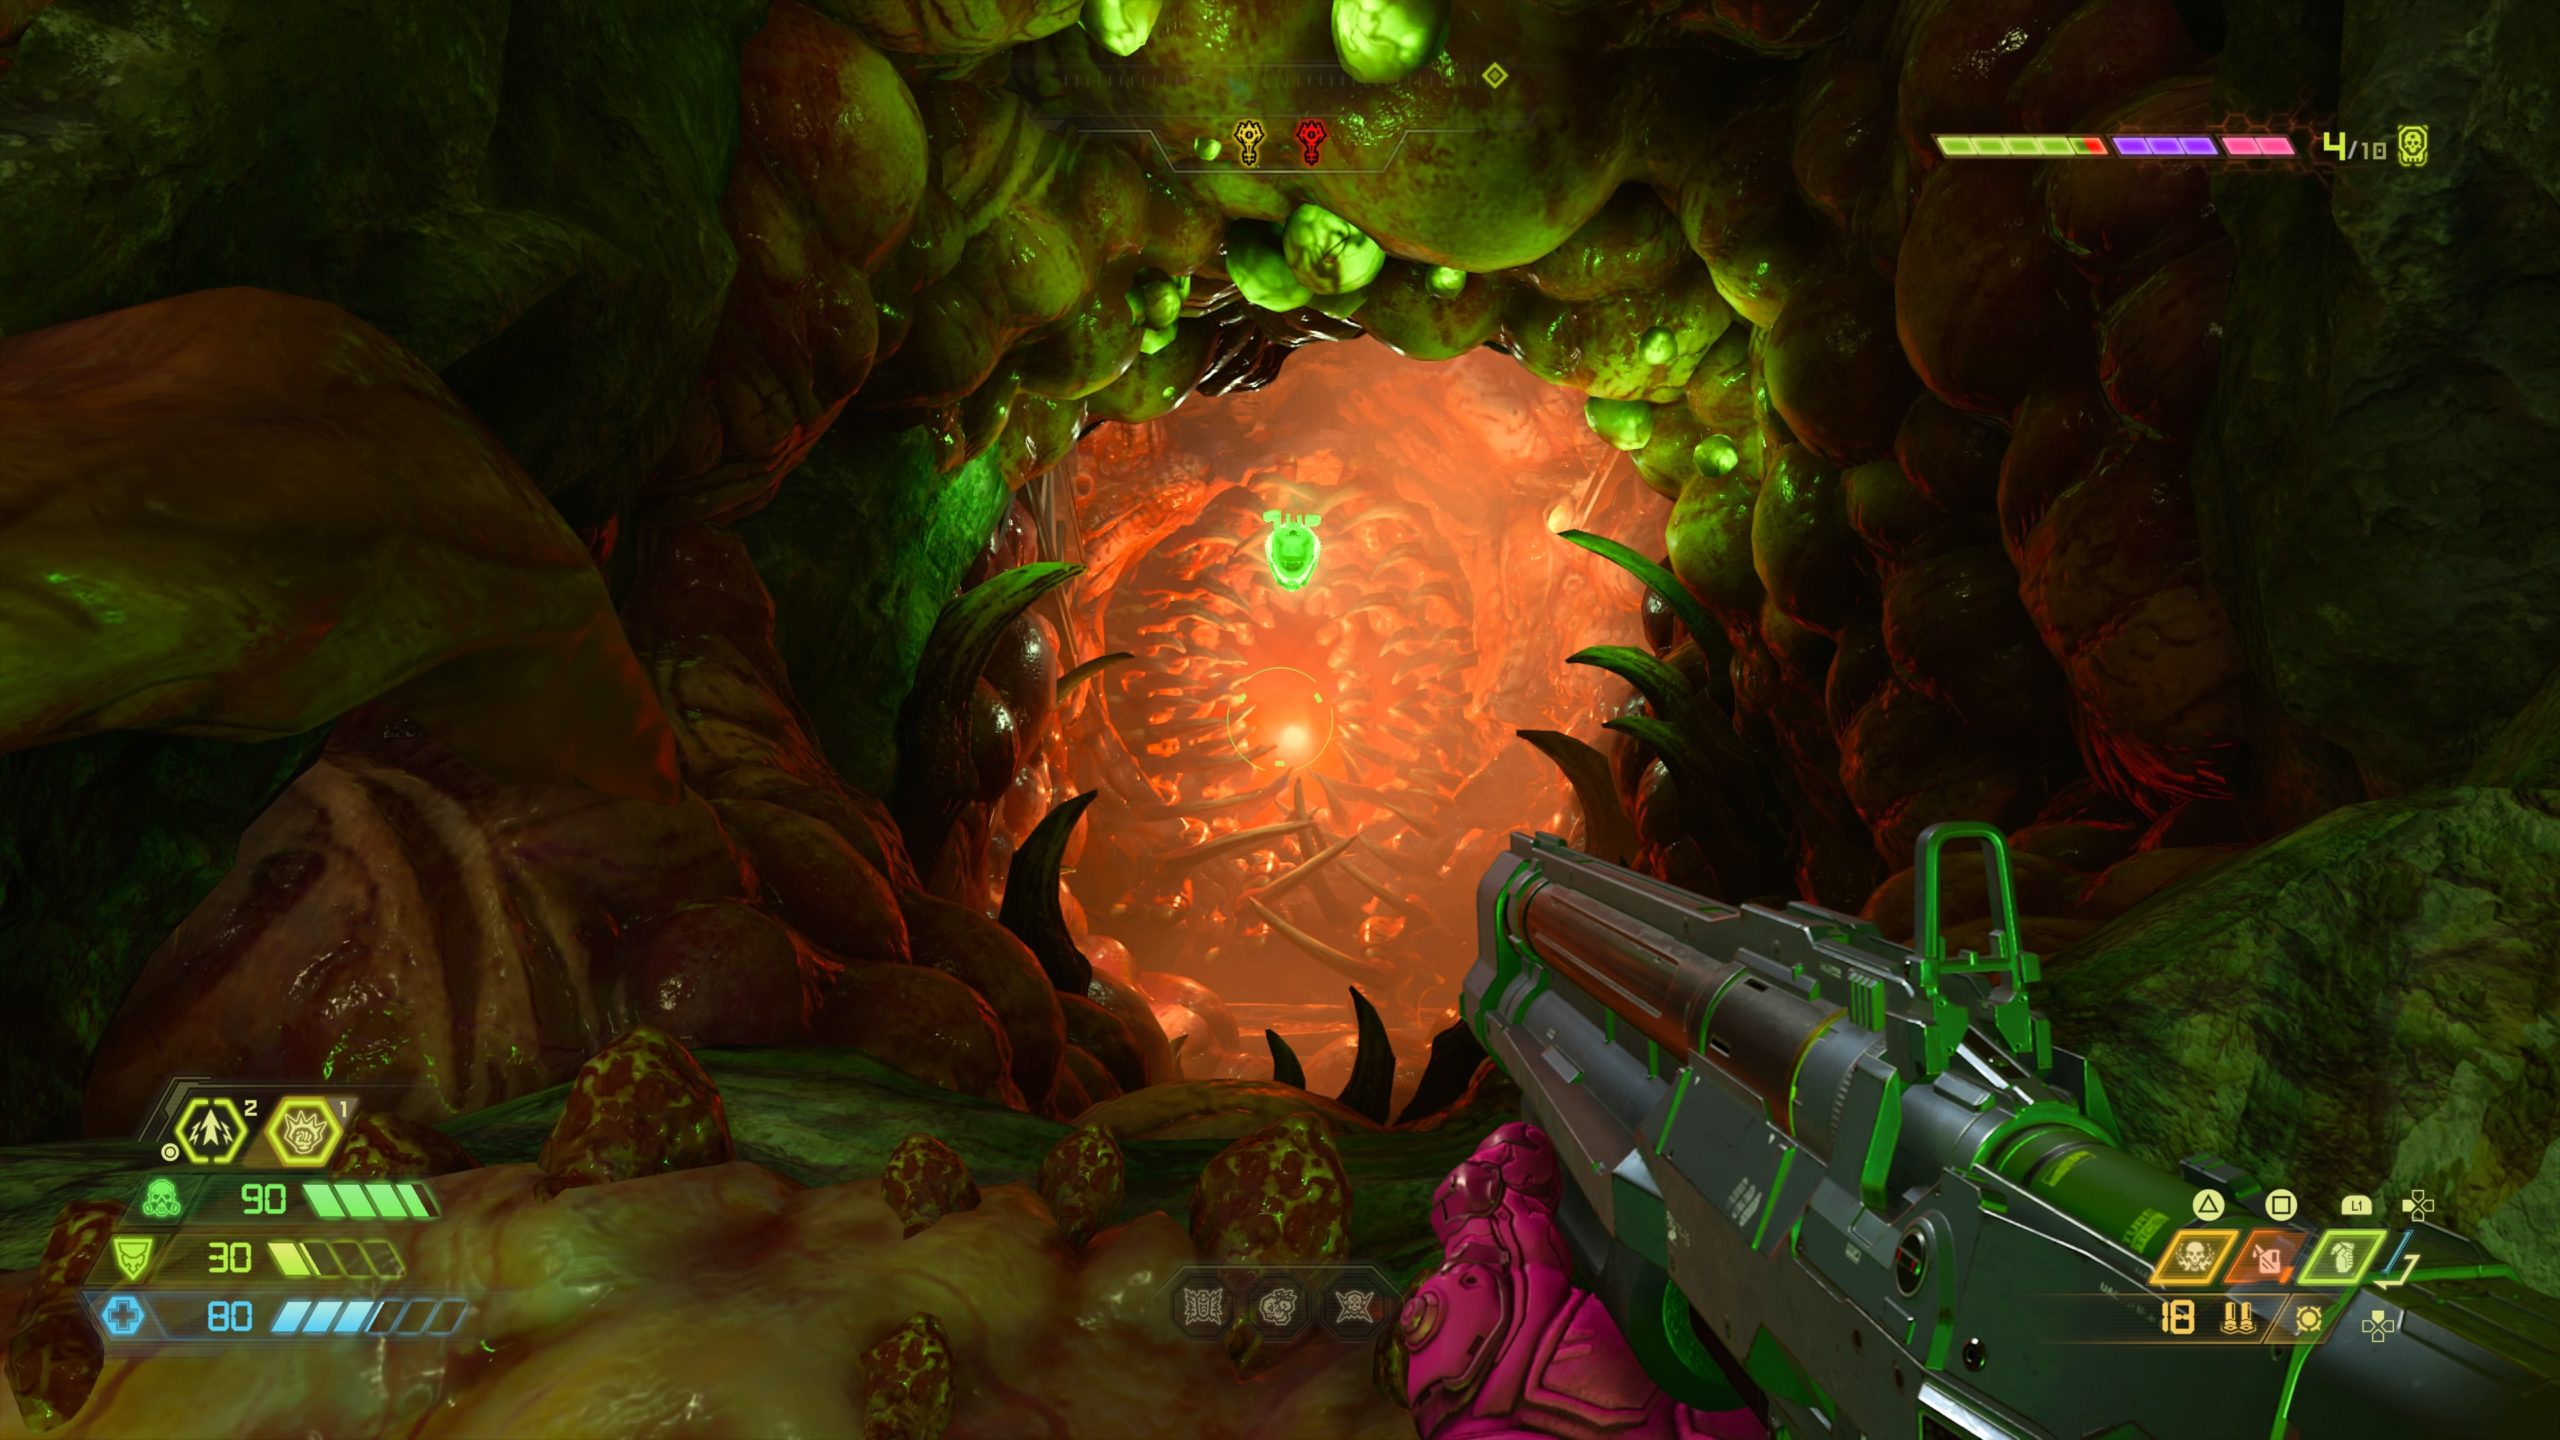
From the fast travel point, work your way through the lava area, jumping on top of the debris, towards the spinning fire chains. Follow the cliff around, dodging the fire chains, to come to a green colored, gunk covered cave. Drop into the hole at the end to find the extra life. Be ready to dash as soon as you get it.
Lower Area (Travel Point: Toxin Refinery)
From the fast travel point, head forward, jumping over the moat of toxic liquid, then head through a teeth covered doorway. This will bring you to a room filled with toxic waterfalls and fire cannon balls. Look to the right to spot a climbable wall. Use this wall to reach a platform the next level down. Jump to the top of the toxic waterfall near the climbable wall you just used and follow the path around to locate the extra life.
Mission 6: Arc Complex
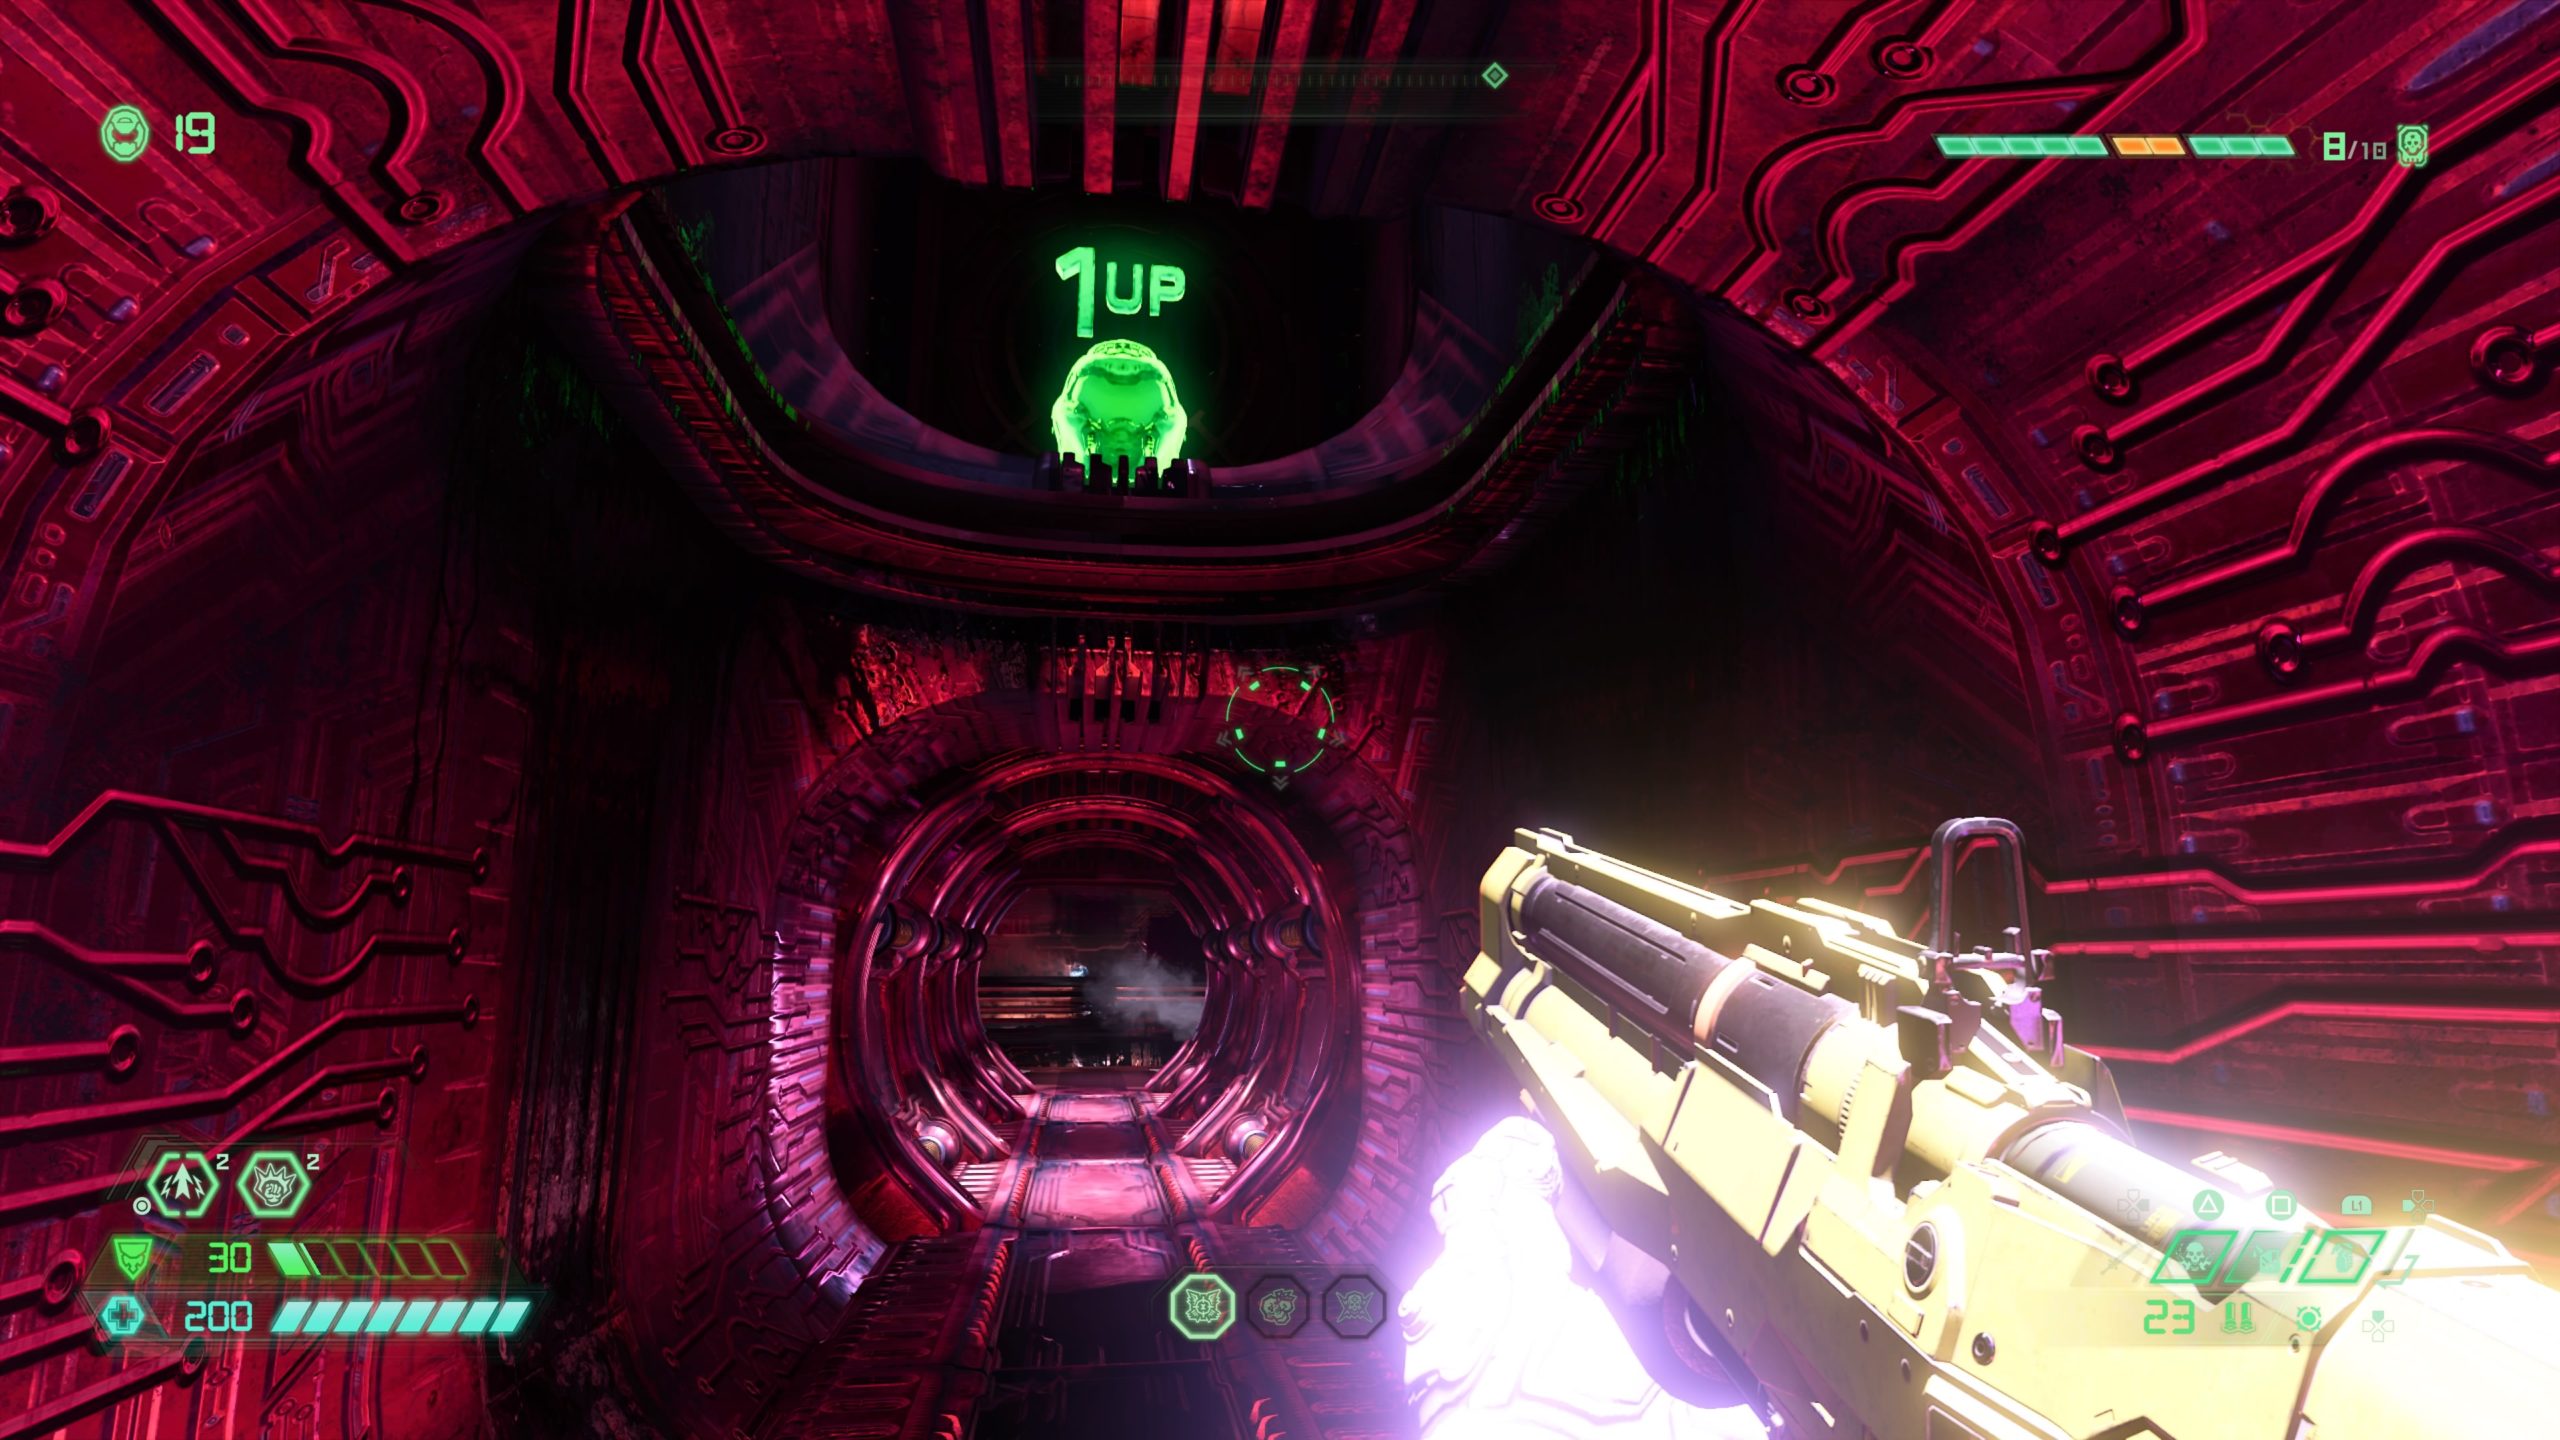
The Waste Tunnels
From the fast travel point, head down the purple gunk filled tunnel and drop down into the room below. Climb on the platform a short distance away and use the gold spin bar and dashes to reach the platform in the corner of the room. Jump to the tunnel across from the platform and follow it to the end. Dodge the electric spikes along the way to eventually end up at an elevator. Take it up then exit the elevator to find yourself in another hallway. Follow it right dodging more electric spikes ending up at a door. Pass through the door and take a left heading through another door. Jump up to the platform above the ledge to find the extra life.
Atrium Offices

From the fast travel point, jump out the window to the building across the way. Once in the other building, follow the path right using some debris to jump to the second level. Go past the golden plane and head out the broken window to the left of the room, using a series of gold spin bars and climbable walls to reach the middle level of the building. The extra life will be in this room next to a log console.
Moring Aeronautics
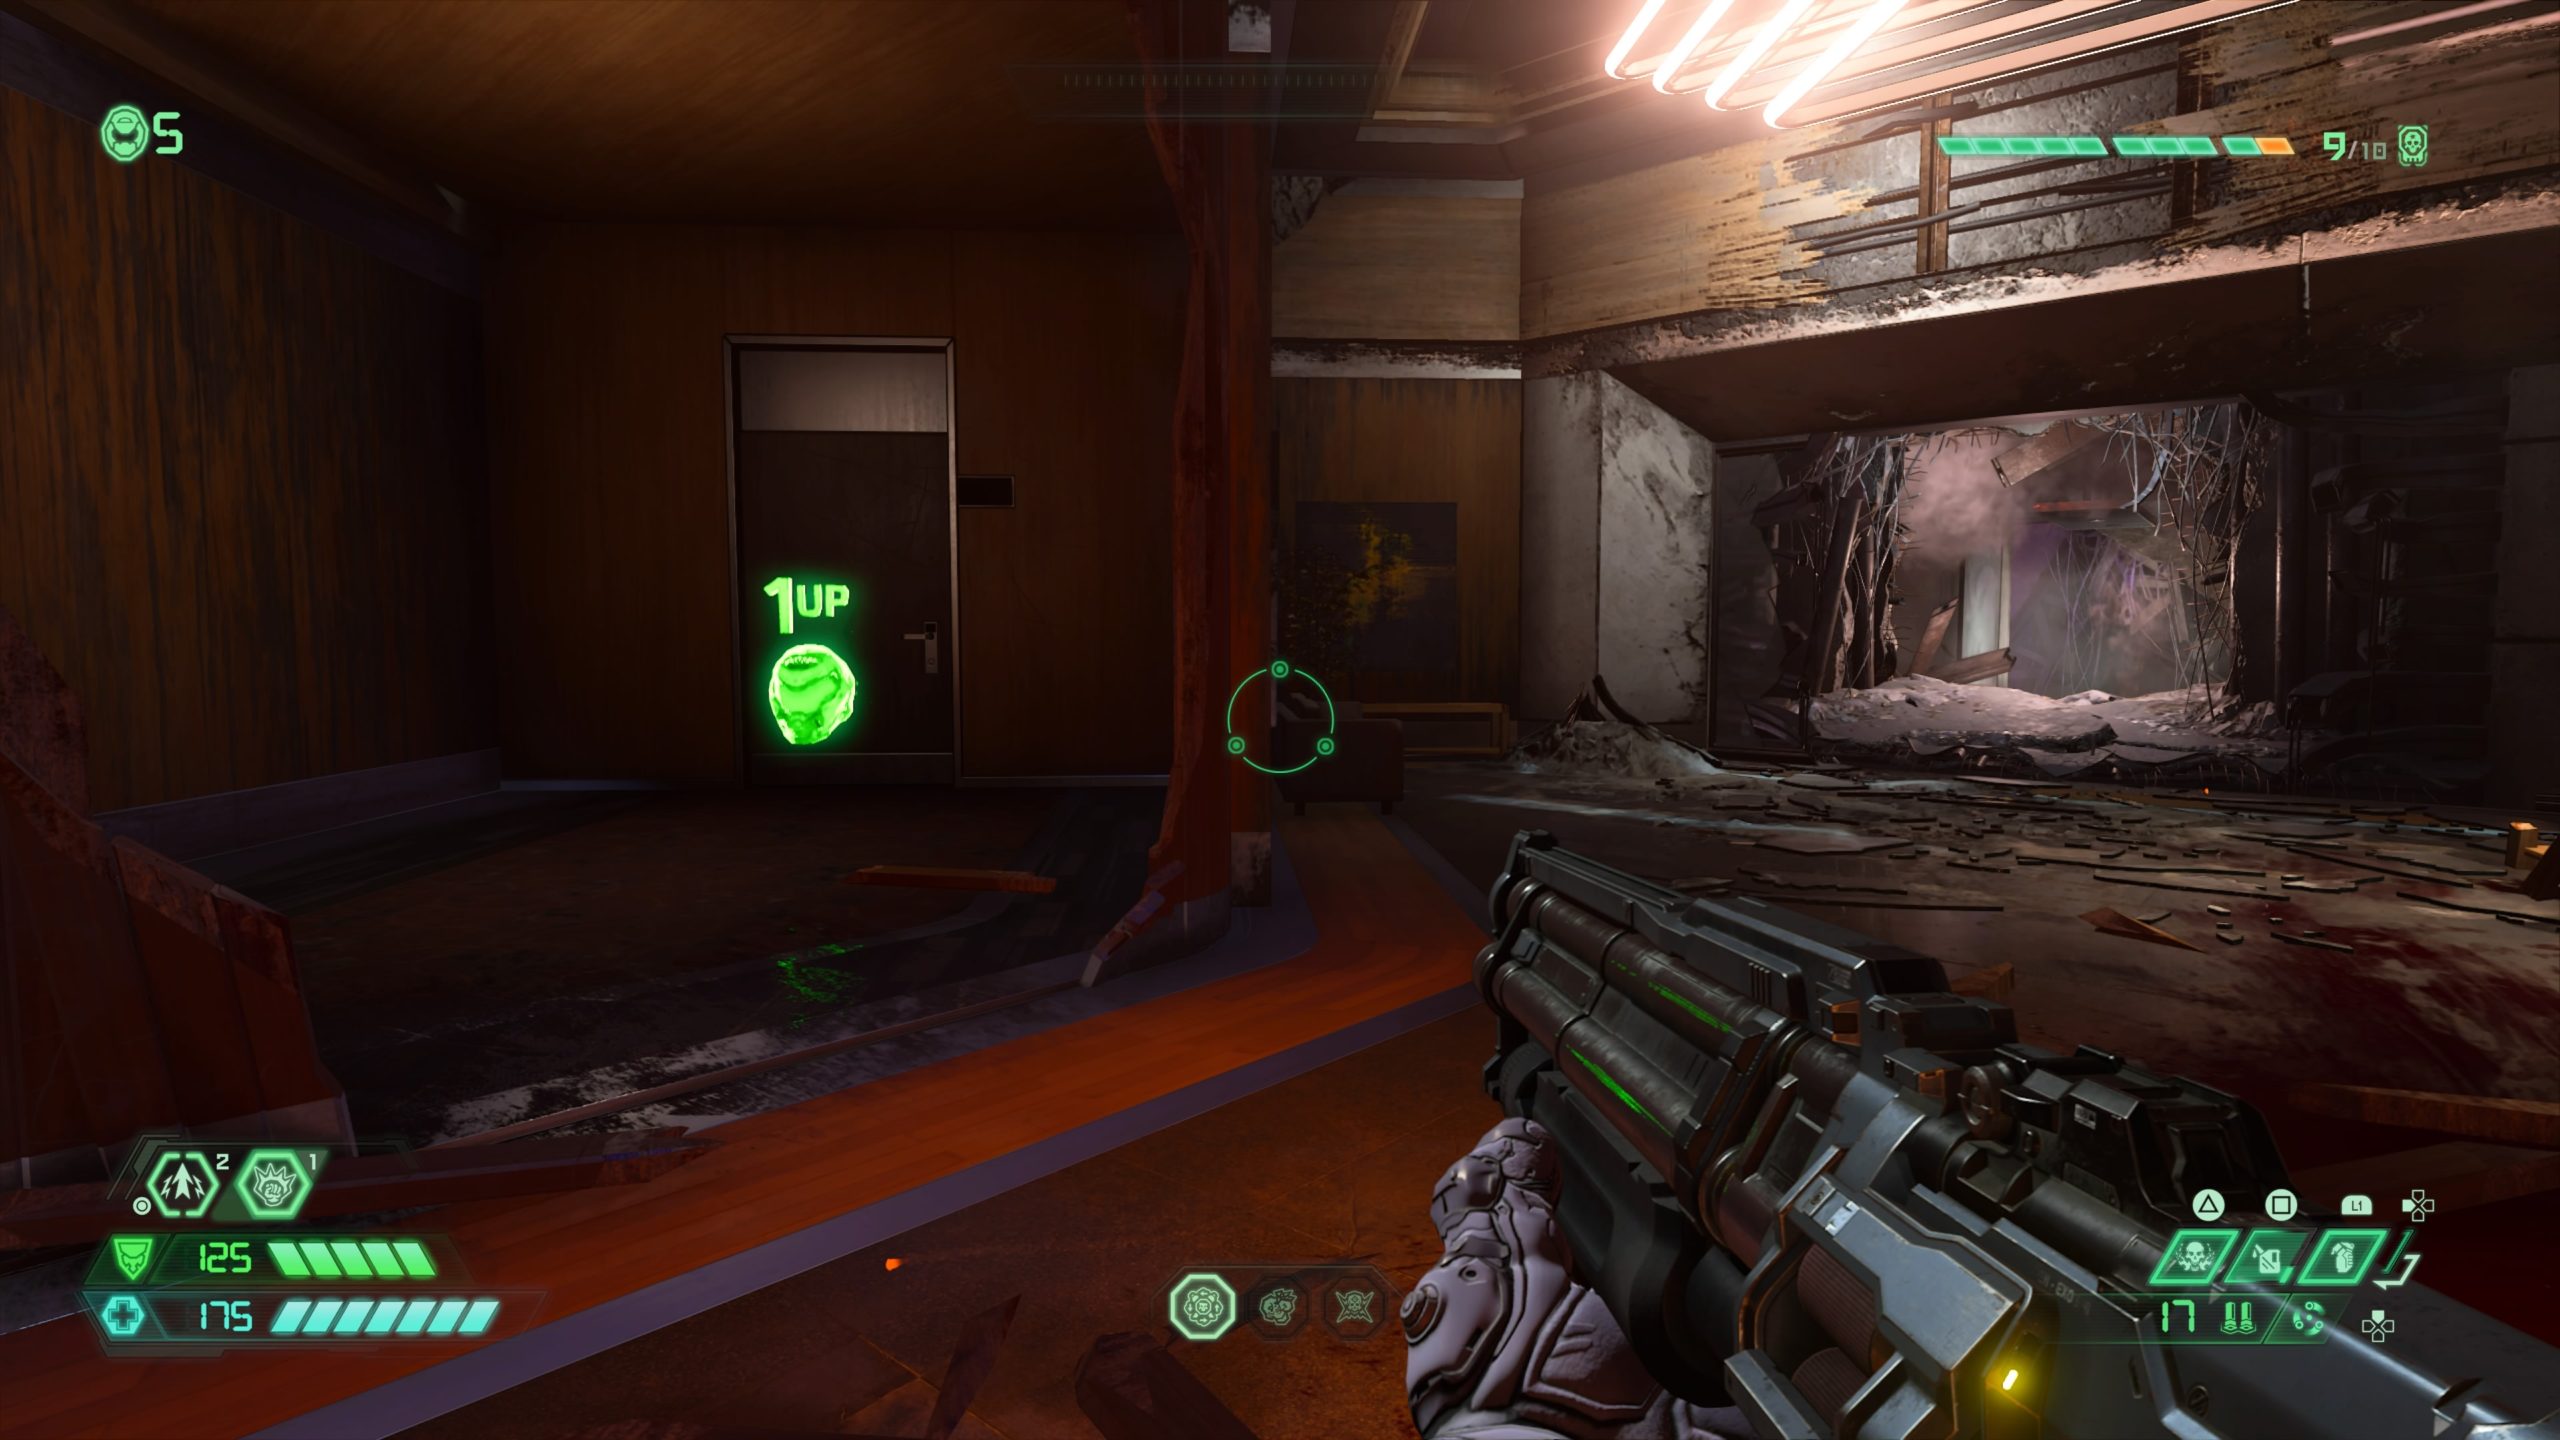
From the fast travel point, take a right into the interior section of the building and head up four flights of stairs on the right. At the top of the last set of stairs, turn right and head to the end of the hallway. Jump through the hole in the wall to the adjacent building. Take the first right to find the extra life.
Mission 7: Mars Core
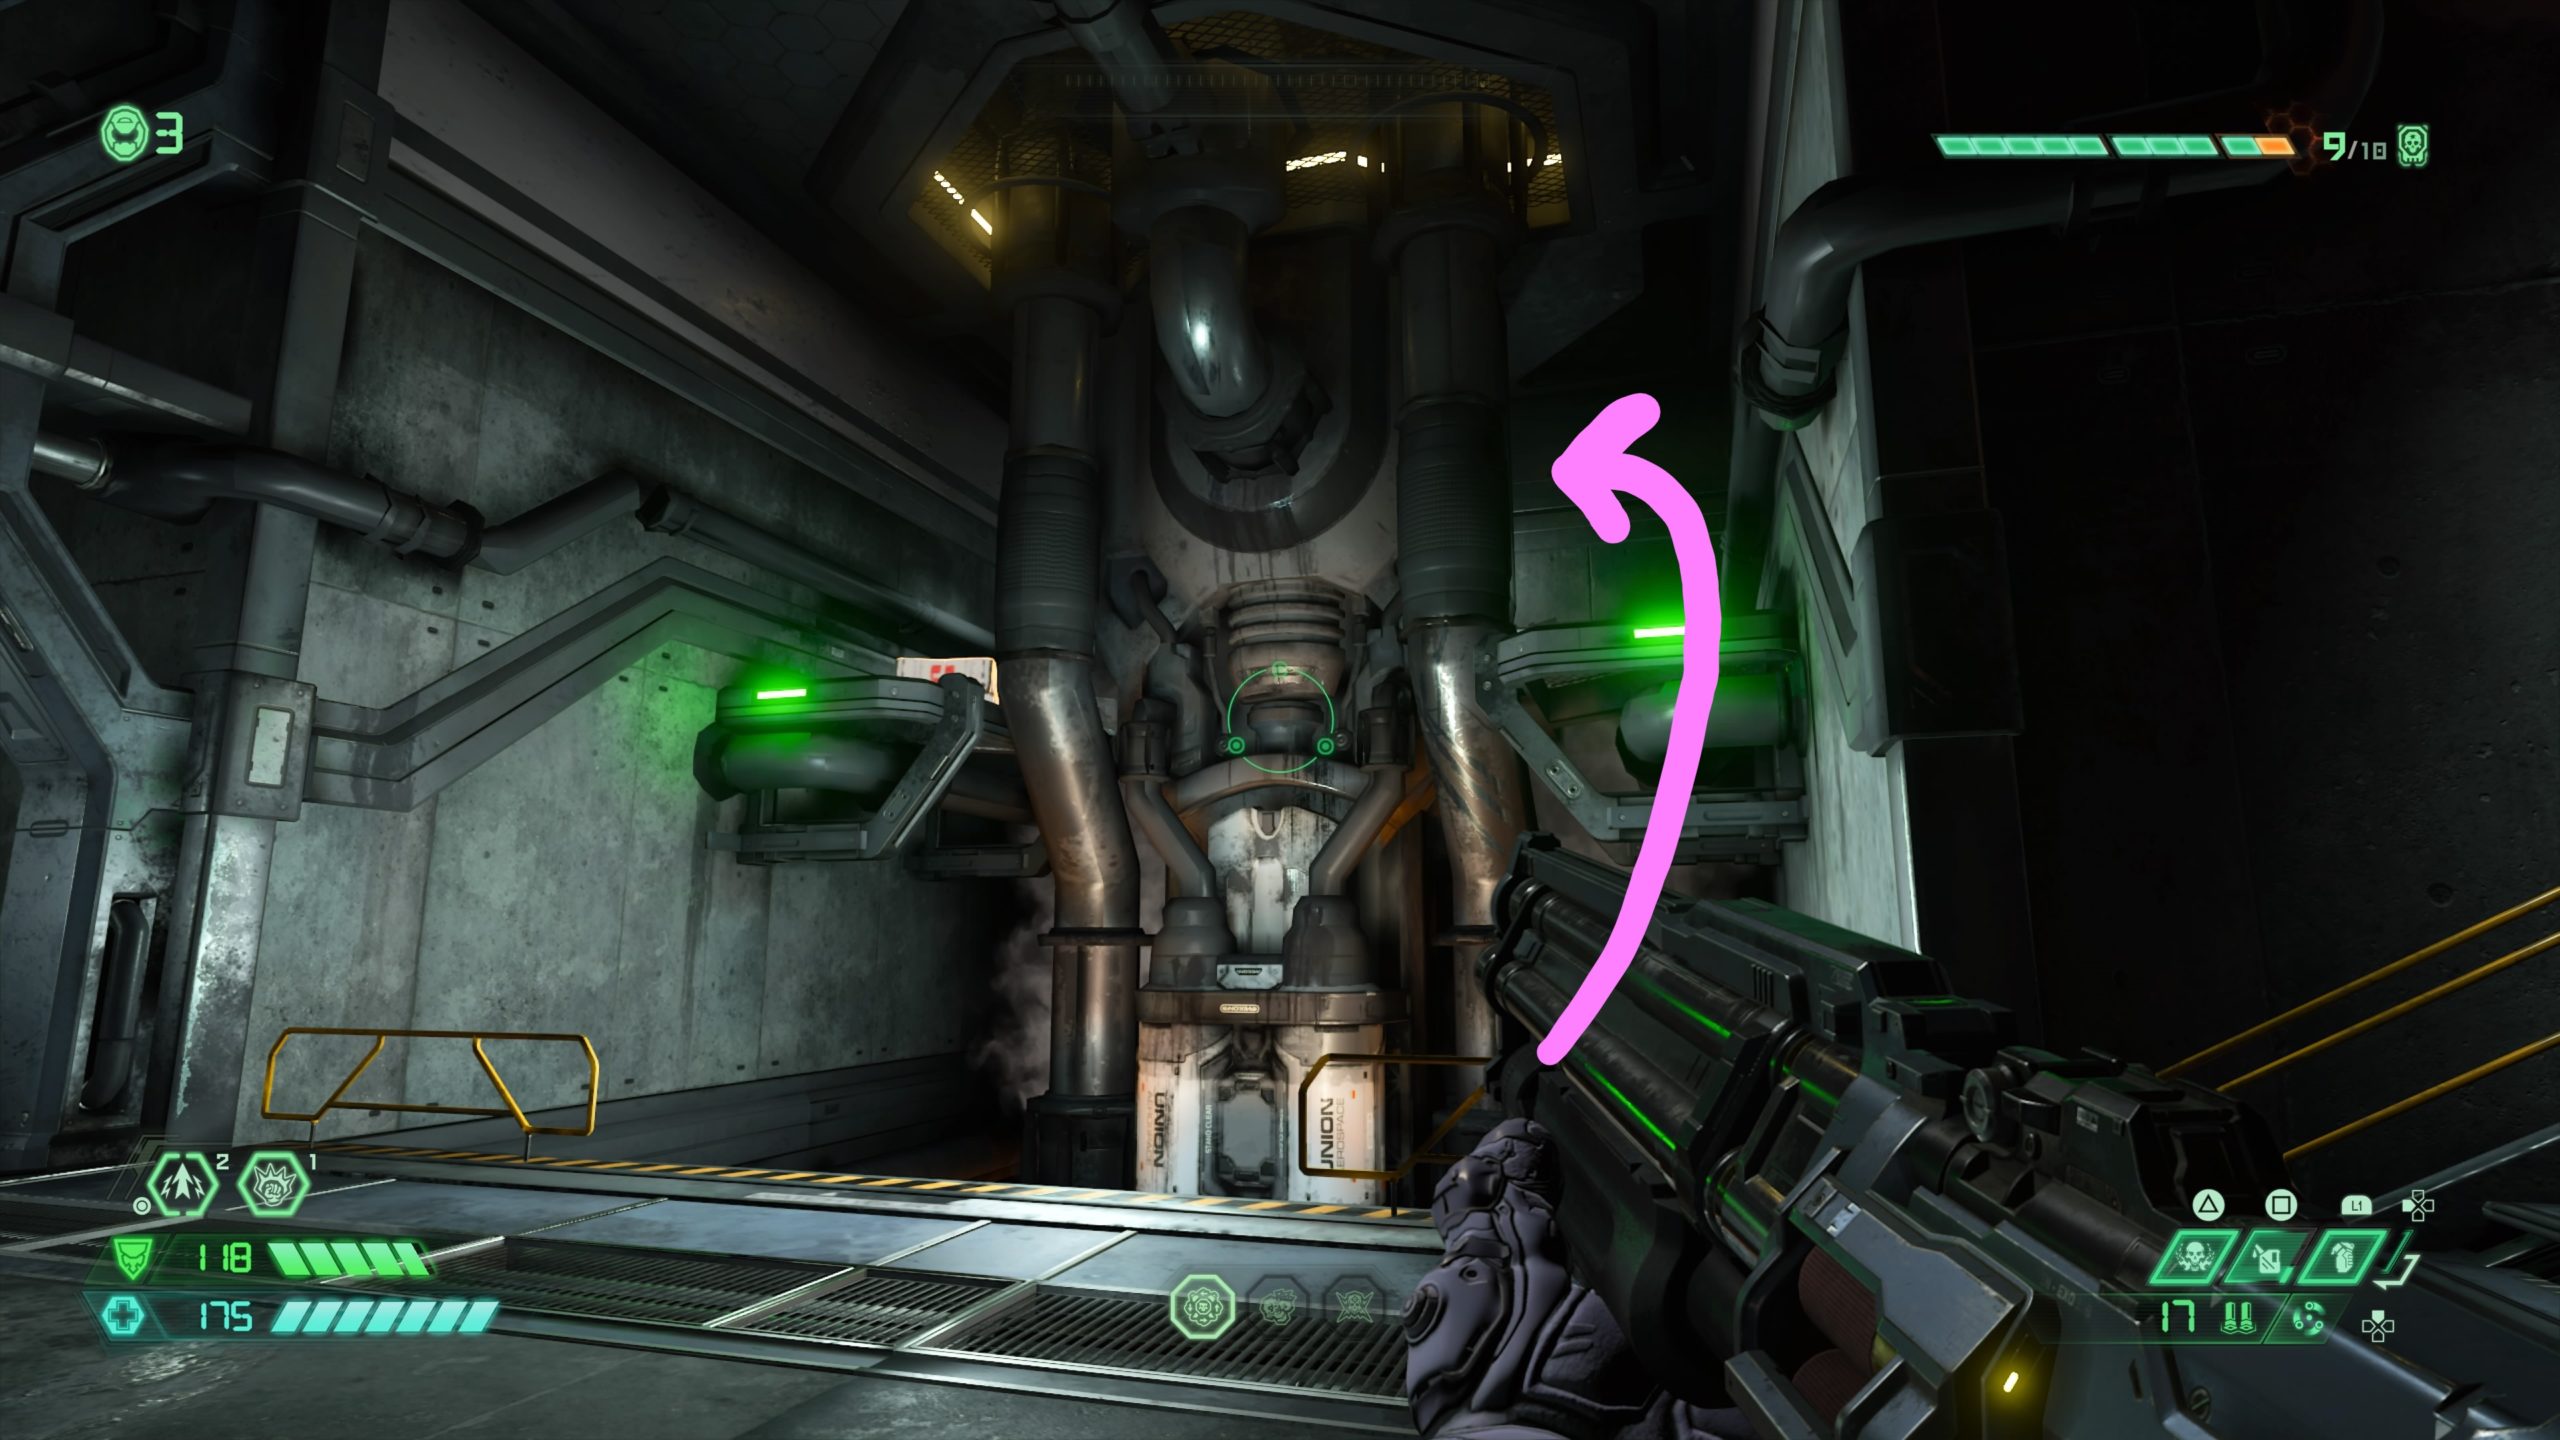
Phobos – BFG-10000 Gun Deck

From the fast travel point, jump on top of the nearby cylinder platform on the left and use it to reach a metal platform overlooking the extra life. Use your double jump and dash to reach it.
UAC – UAC Outpost LD
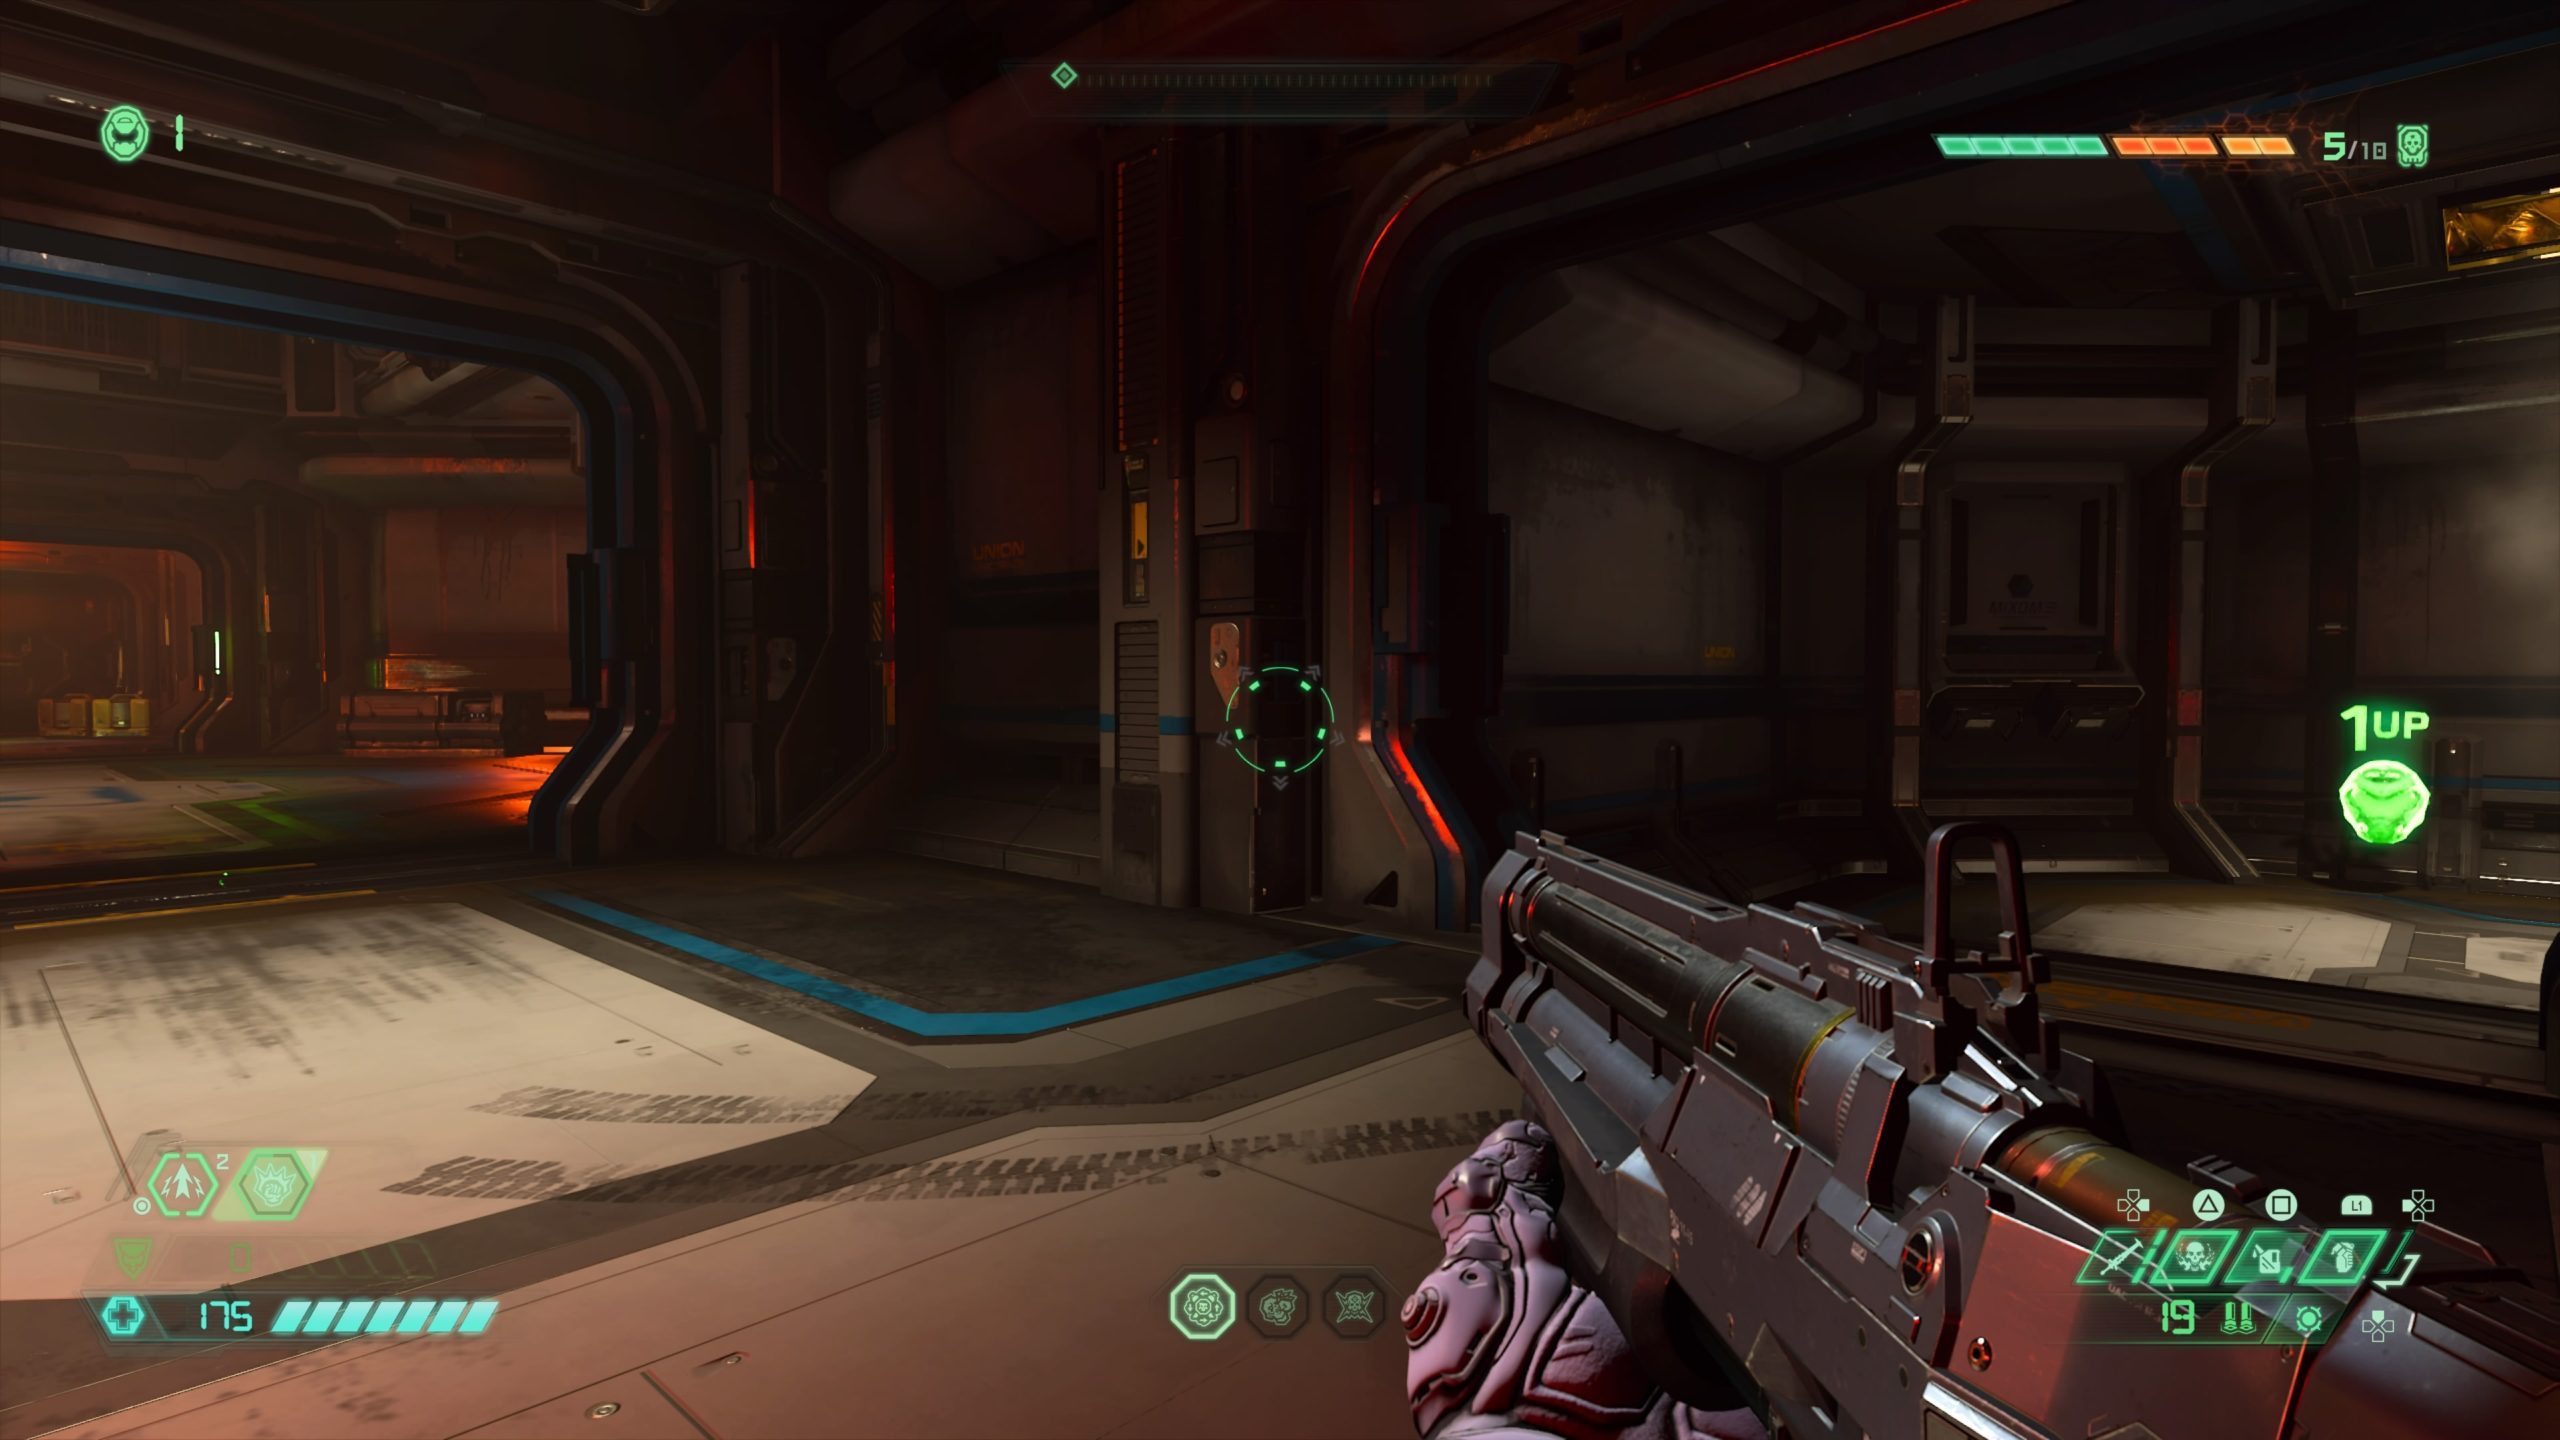
From the fast travel point, turn around and head through the door to enter a hallway. Follow the hallway all the way to the end to find the extra life.
Meteor – Alpha Labs
From the fast travel point, head straight up the stairs and take a left through the doorway followed by a right to enter a room with a lift pad in the middle of it. Head through the first doorway on the left side followed by another left. Climb up the metal crate there to reach the vent shaft. Climb to the top to reach a platform overlooking the lift pad. Jump/dash to the lift pad then aim for the gold spin bar. You will need to dash through the crack in the wall above the spin bar to reach the extra life.
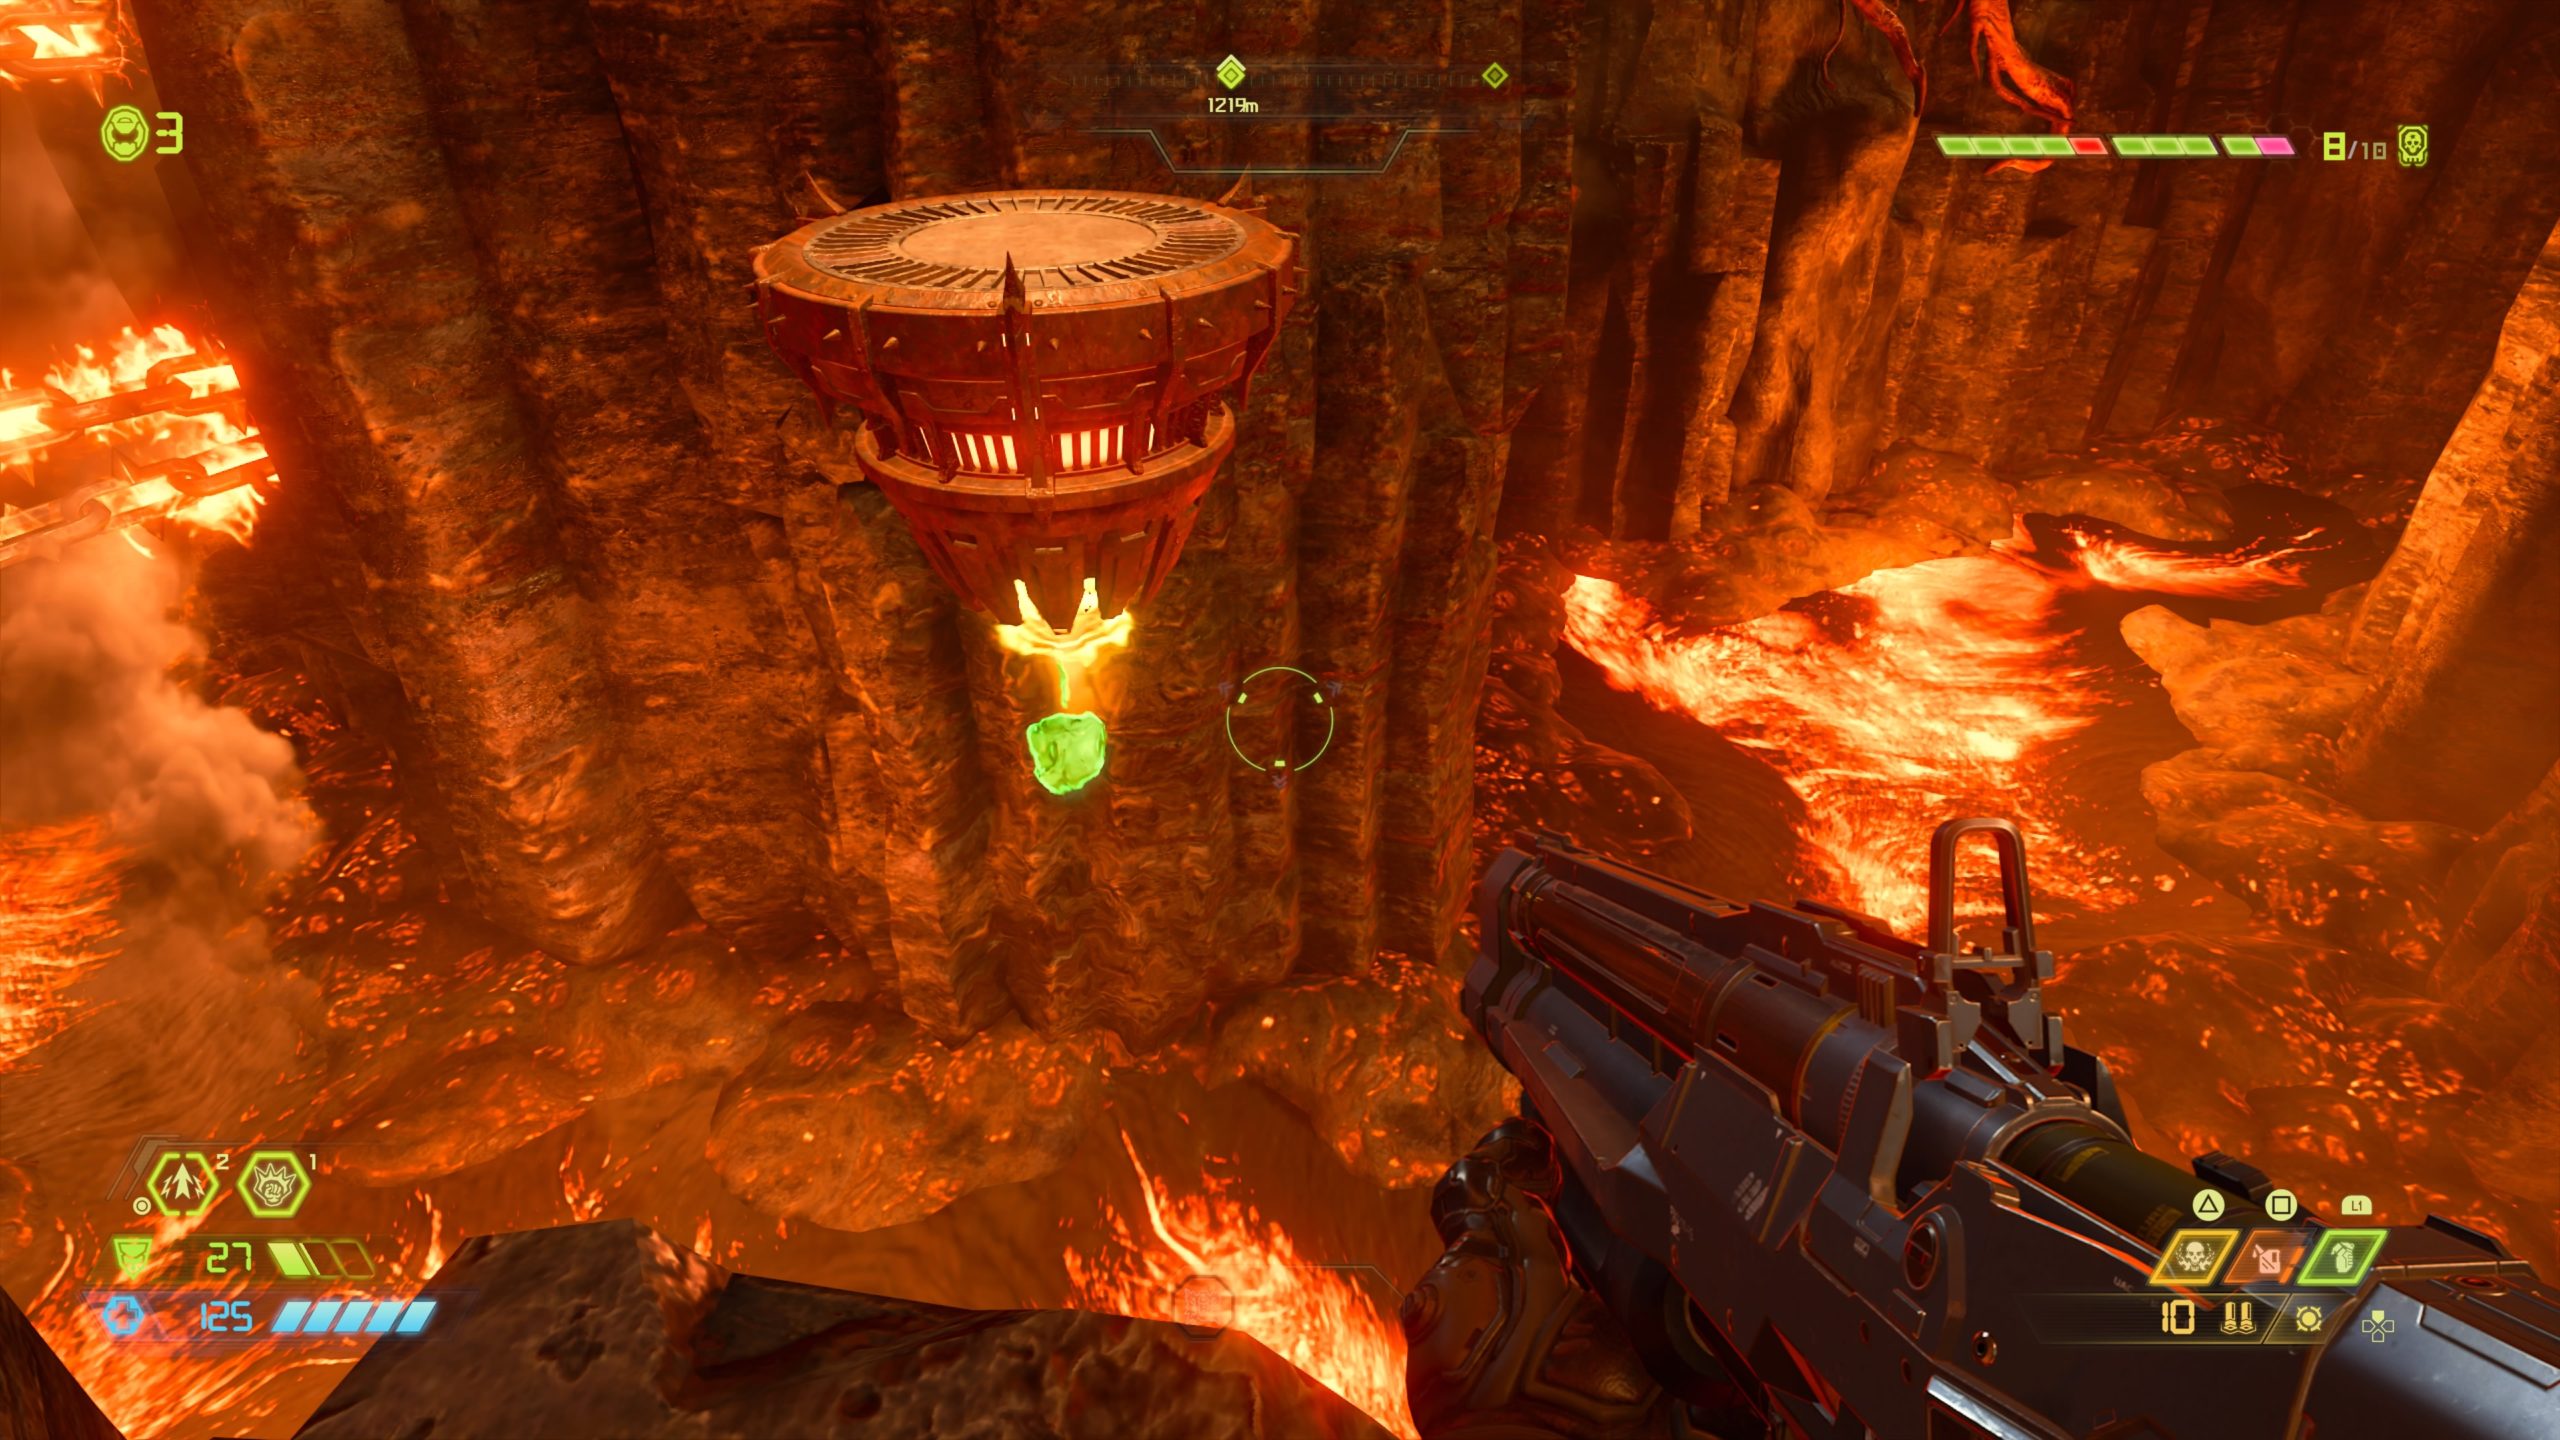
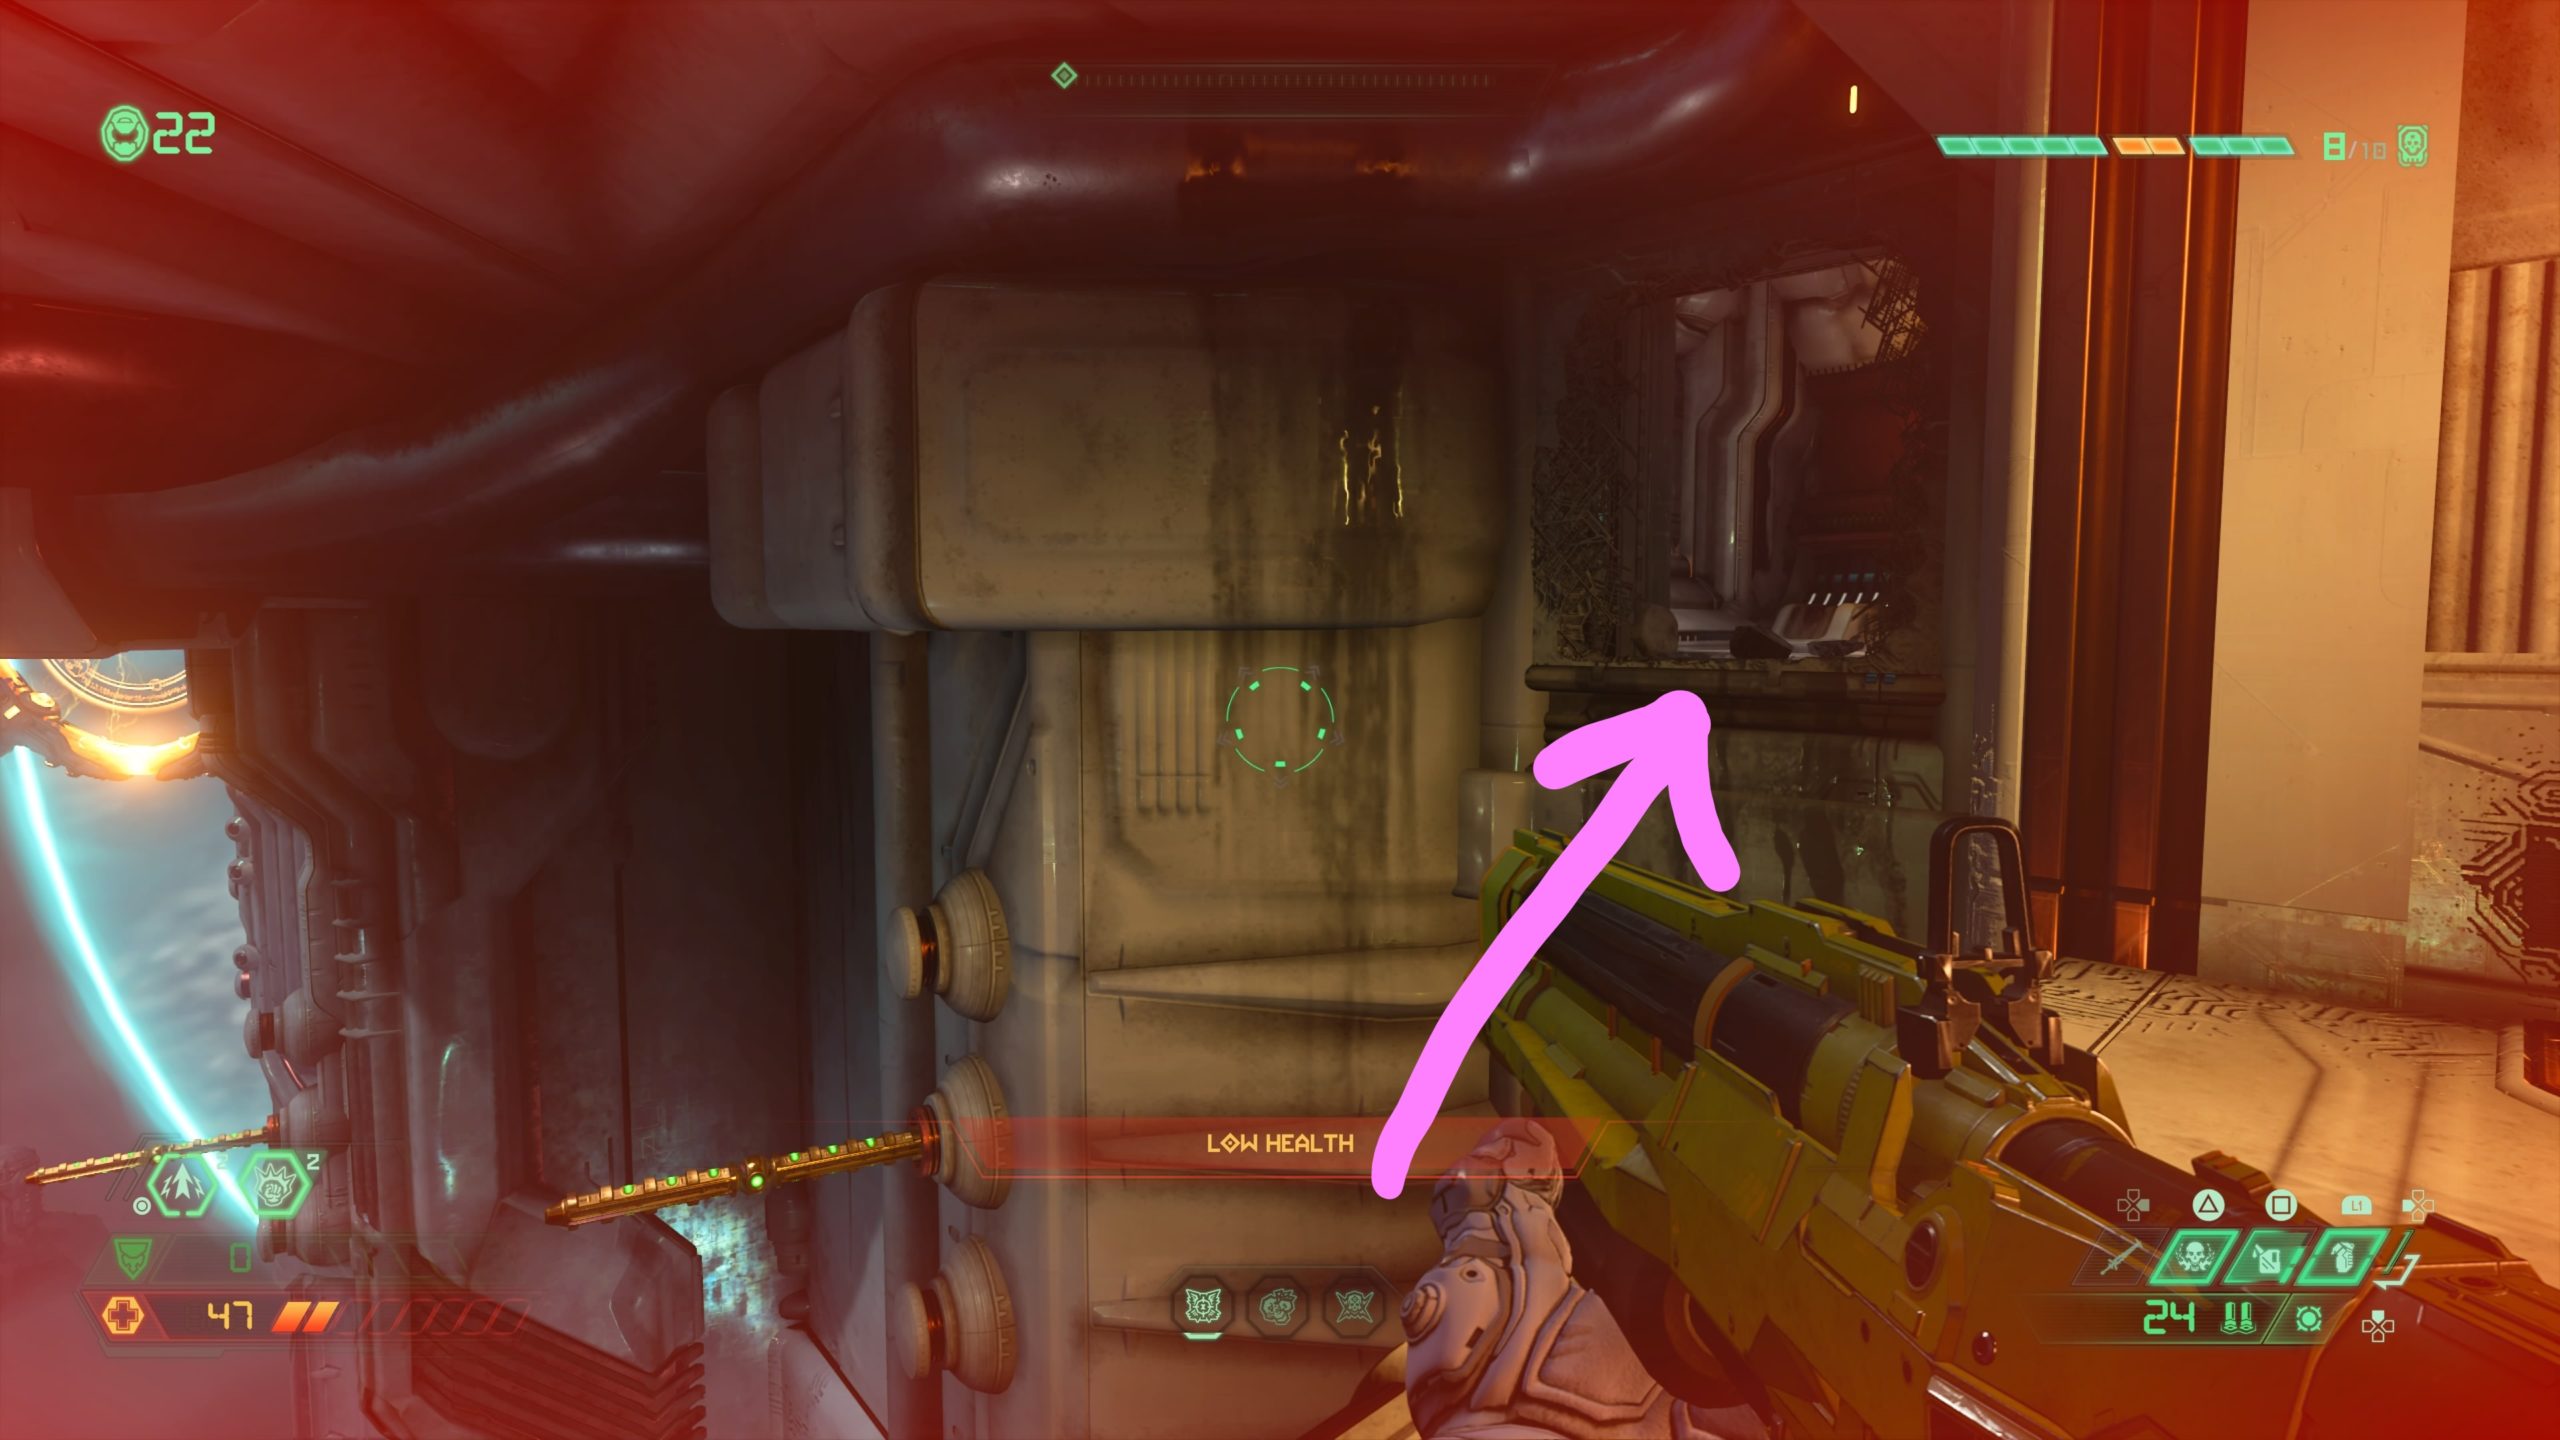
Meteor – UAC Transmission Tower

From the fast travel point, follow the path left around the structure to reach a lift pad. Use the lift pad to reach the upper level of the structure then head up the small set of steps. Take a right and and head to the ledge to spot a climbable wall on a floating rock. Jump/dash then climb up two more climbable walls. You should now be overlooking the structure in the image above. Use the explosive barrel to reach a floating rock to the left. From there you can reach the extra life on the top of the structure.
Meteor – UAC Transmission Tower 2

From the fast travel point, head past the three columns of climbable walls to reach a giant rock with four red circles of electricity (and BFG ammo). Facing the Union Aerospace facility (giant building past the rock), drop off the right side of the rock to a ledge below. Follow the ledge around to come to a series of climbable walls that lead to the extra life.
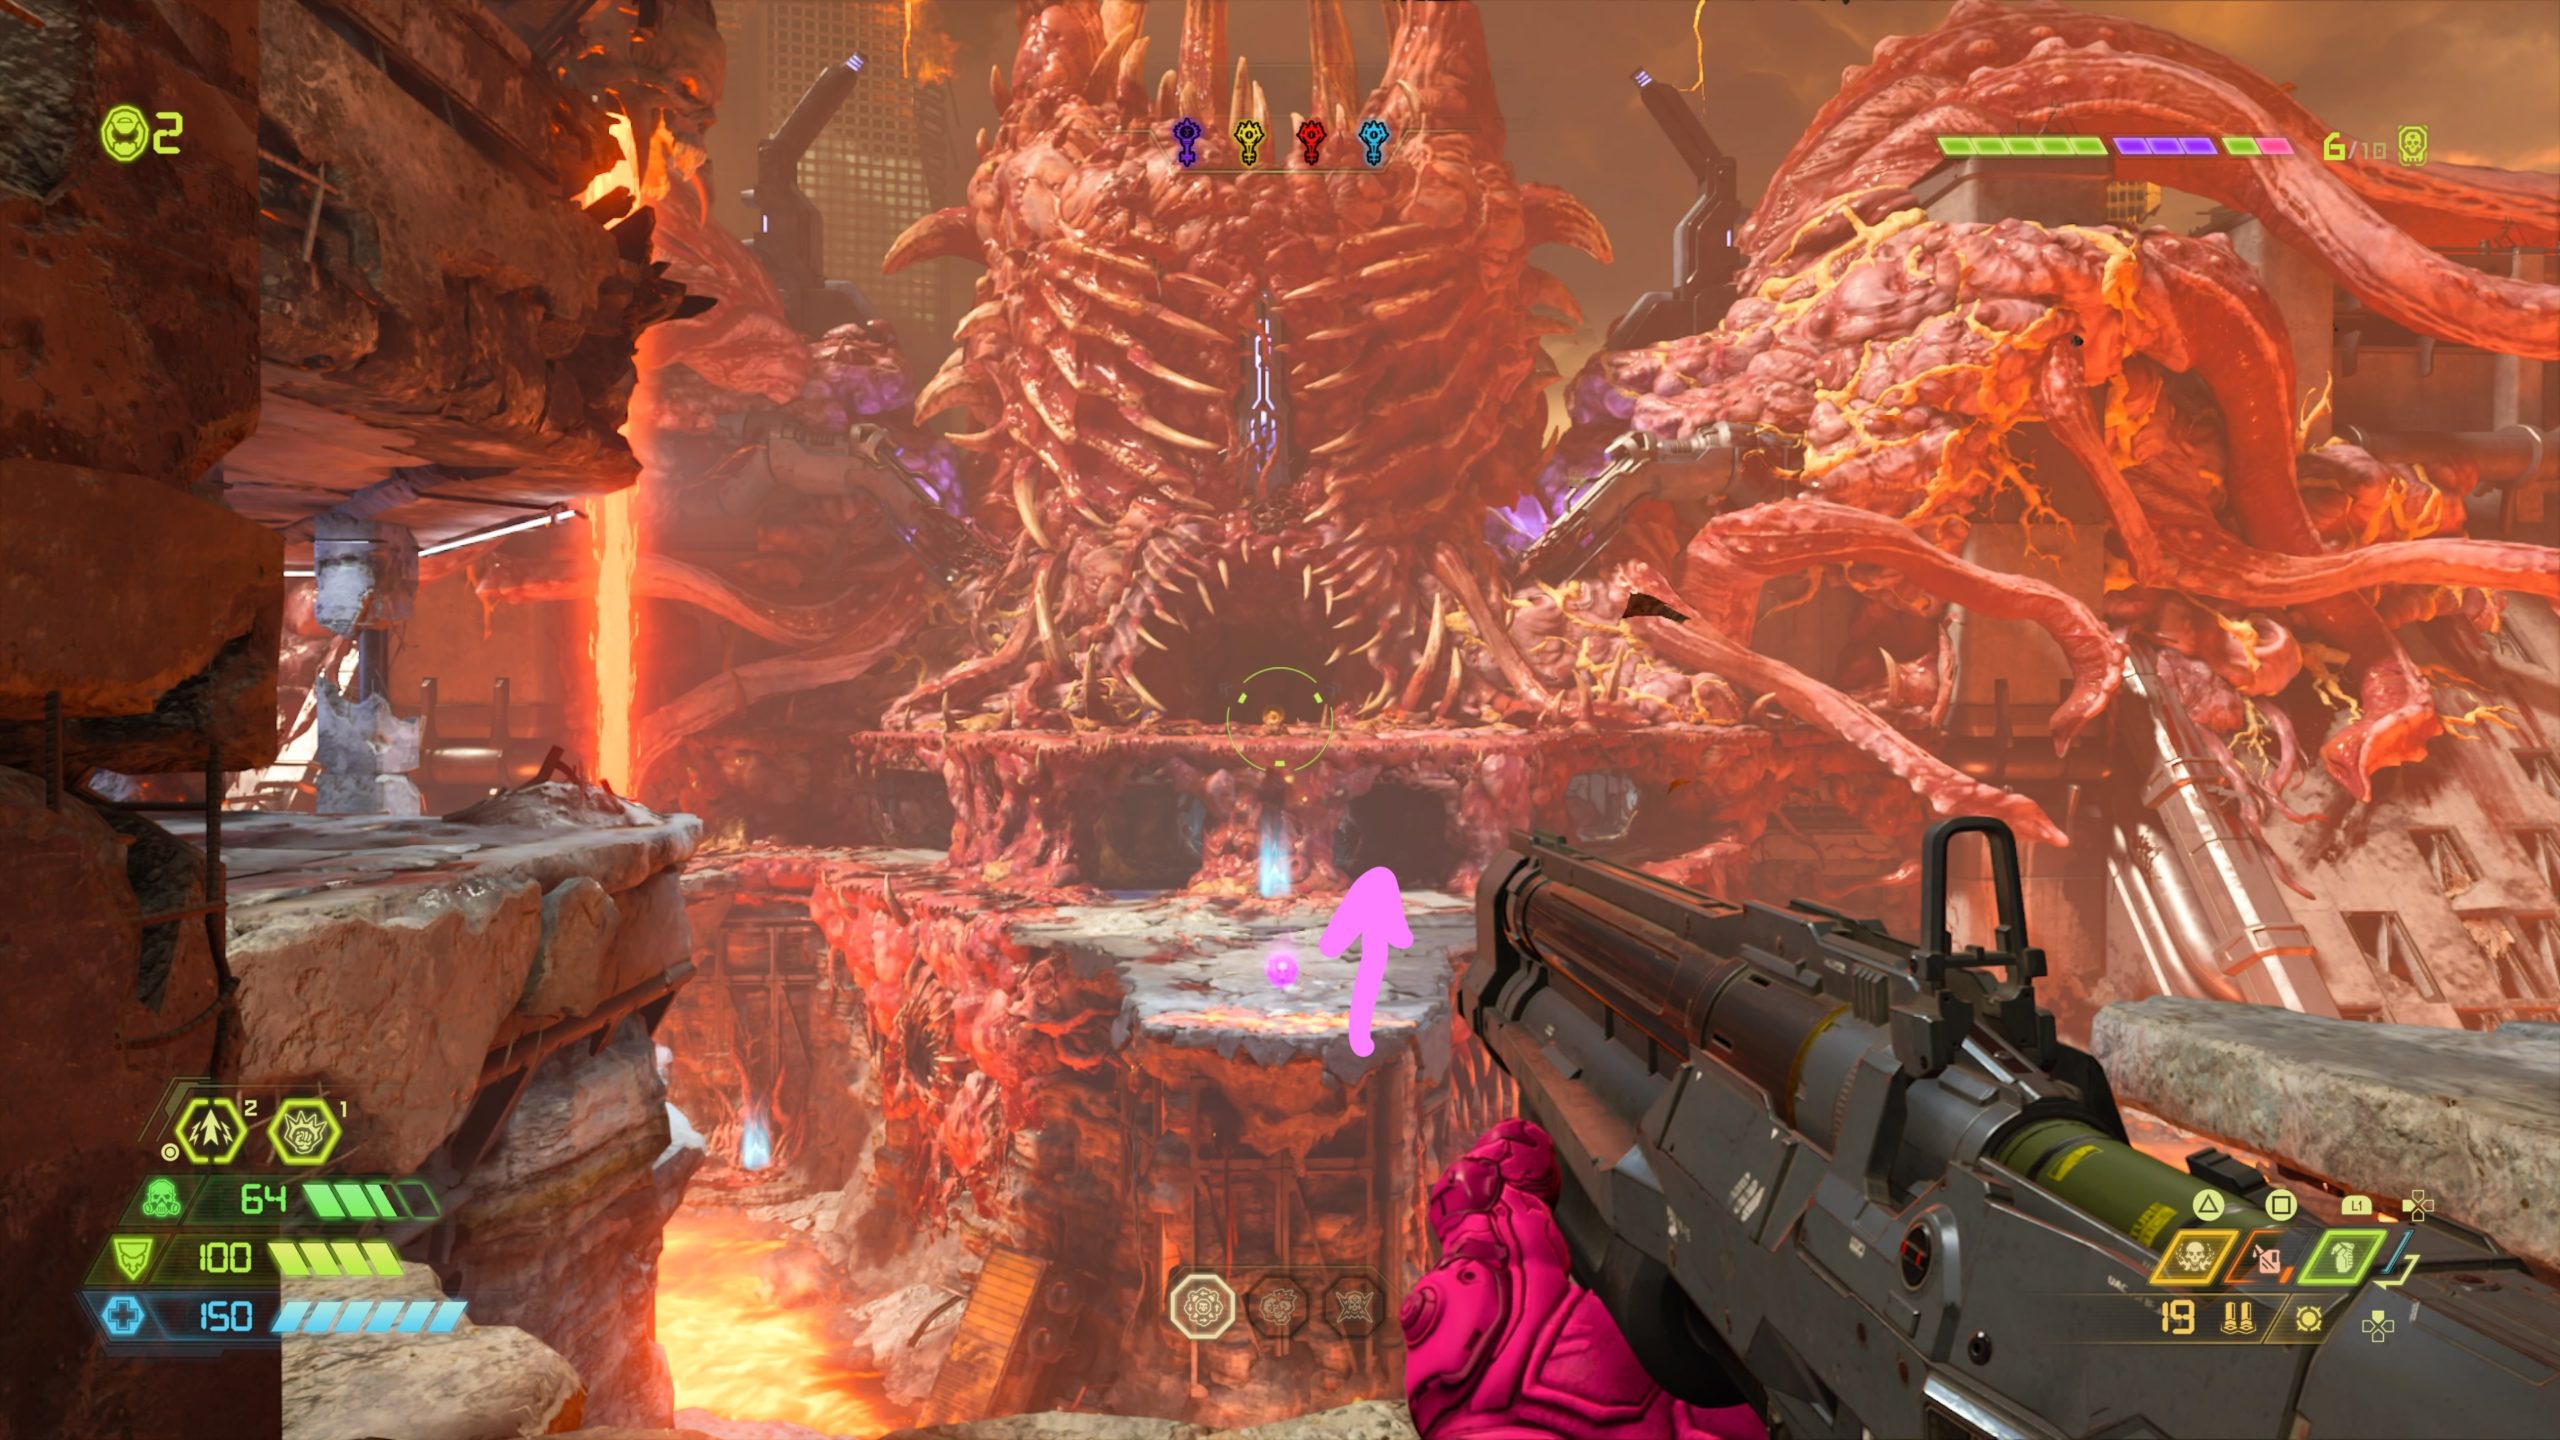
Hell – Temple of Sin
From the fast travel point, work your way forward until you reach the big open area with the giant portal in the back. The extra life will be floating in the middle of this room. Use the moving spin bar to reach it.
Mission 8: Sentinel Prime
Training Hall

From the fast travel point, turn around and head to the end of the hallway. Take a right and activate the skull switch at the bottom of the stairs. Look to the right to see a newly opened doorway with a red banner behind it across the other side of the room. Jump towards the red banner to find the extra life on the right.
Training Hall

From the fast travel point, take the stairs up to the top. Once there take a right and follow the walkway to the end. Across from you will be another walkway containing the Sentinel holding the point. Jump over there then take a right at the Sentinel to find the extra life at the end of the walkway.
Mission 9: Taras Nabad
Slayer Creation Chamber
From the fast travel point, head straight forward to arrive in a room with a giant machine in the middle. The extra life can be located under the platform the machine is resting on. Jump down to the lower platform and use double jump/dash to collect the life.
Fallen Titan

From the fast travel point, climb up the titan to reach a courtyard with a gold spin bar in the center. Take the stairs up and enter through the doorway. Take a left to reach the second level of the building then follow the walkway around to find the extra life.
Skyline
From the fast travel point, drop down to the bridge below then jump across the gap to the other side. Follow the hallway until you come to a hole in the floor. Jump down and aim for the spin bar. Use the bar to reach the extra life.
Mission 10: Nekravol – Part I
Pain’s Basin
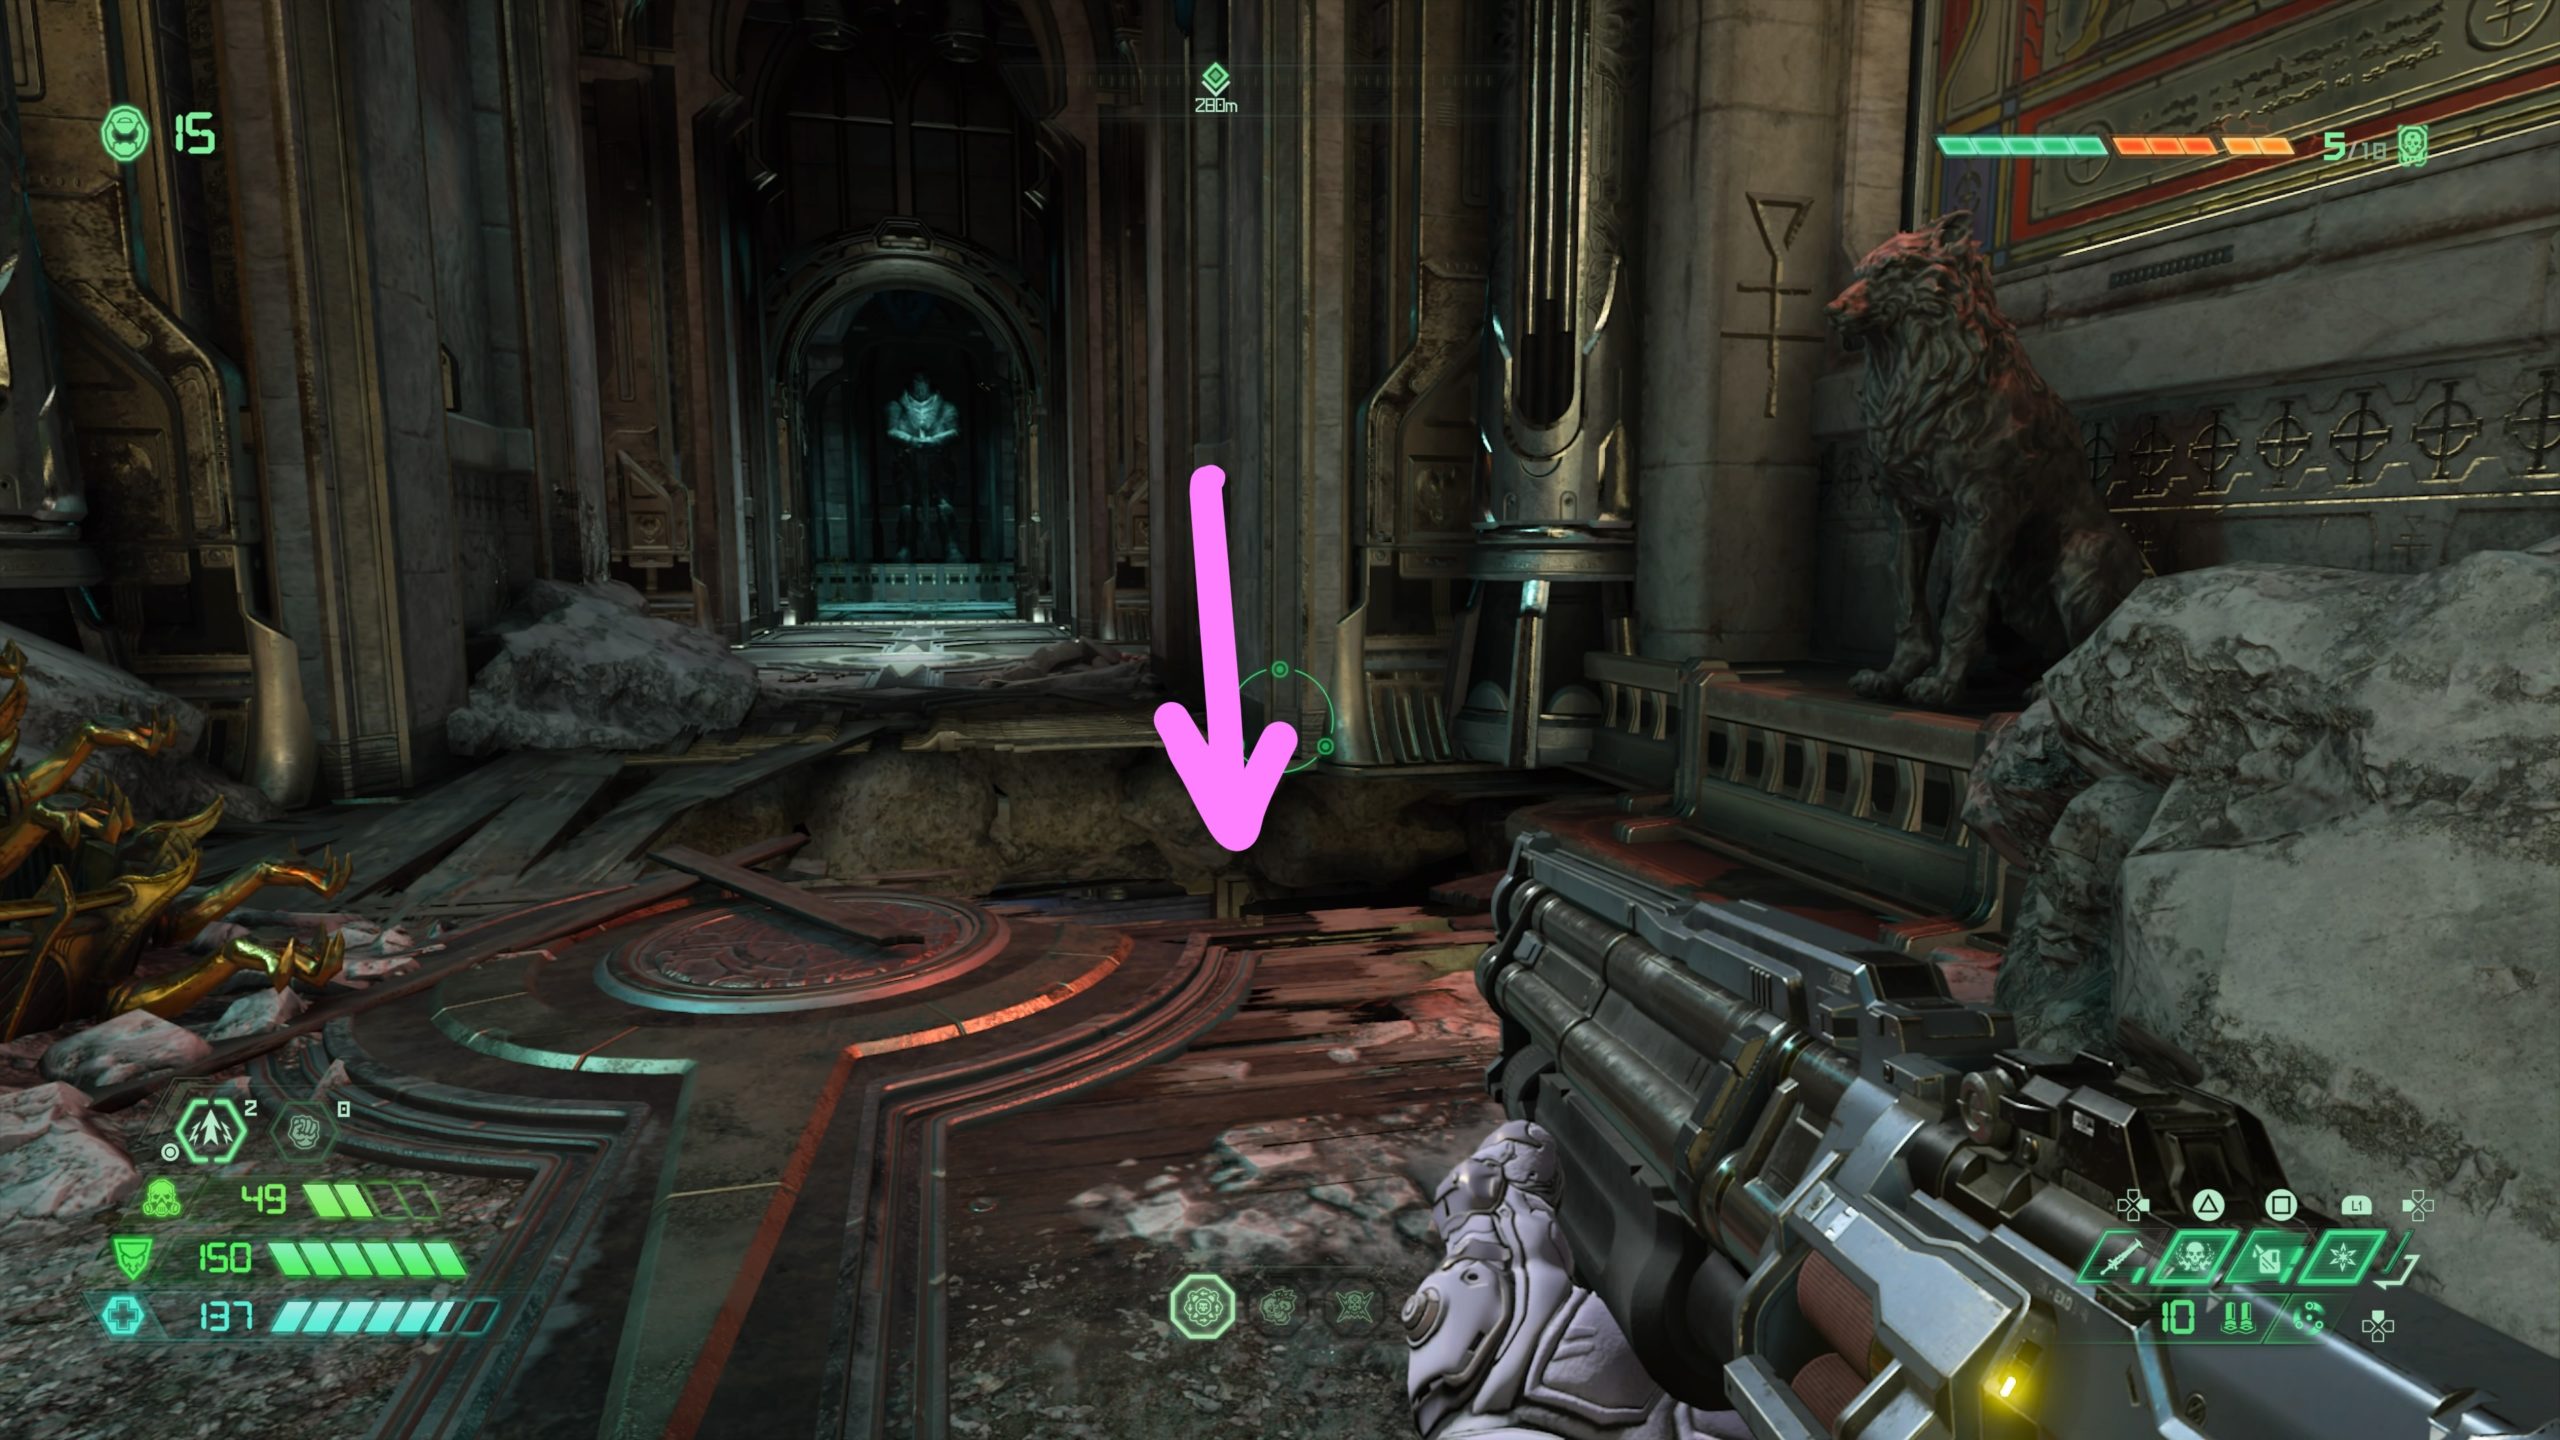
From the Pain’s Basin fast travel point, follow the broken walkway through the lava pit then climb the stairs at the end. Once at the top take a left and follow the walkway around past the stairs to the other side. You’ll need to climb up a couple of rock ledges and use a spin bar to reach a climbable wall. Use the climbable wall to reach the inside of the structure. Head down the nearby stairs and take a left passing some columns to reach a gap at the end of the hallway. Jump across the gap then head forward to the end of the slab to reach another gap in the floor and drop down the nearby hole. Head through the nearby doorway to reach a courtyard. To reach the collectible behind the bars on the other side of the courtyard, you will need to use the spin bar on the left section of the main gate to reach another spin bar on the adjacent wall. Use that bar to reach a climbable wall on the same side as the spin bar. Climb up to the top then jump into a small room to reach the extra life.
Passage of the Damned

From the fast travel point, take a left down two flights of stairs to find the extra life.
Halls of Torment

From the fast travel point, head to the other side of the room and turn around. Use the first gold spin bar to reach the higher gold spin bar. Use that spin bar to reach the ledge above the fast travel point with a green skull. Facing the skull, jump to the ledge on the right containing the extra life.
Mission 11: Nekravol – Part II
Corpse Conveyor
From the fast travel point, head down the bridge and about halfway across look to the left underneath the bridge to find a blue lift pad. Jump off the bridge and use dash to reach the lift pad to shoot towards a platform with a spinning cylinder shooting fire. The extra life is located on this platform.
Demon Foundry
From the fast travel point, head forward onto the central platform and use it to reach a climbable wall under a green flame. Follow the hallway to arrive in a room with spinning platforms. Work your way through this room to reach the top level. Turn around to find the extra life floating in the air across the way. Jump and dash to reach it.
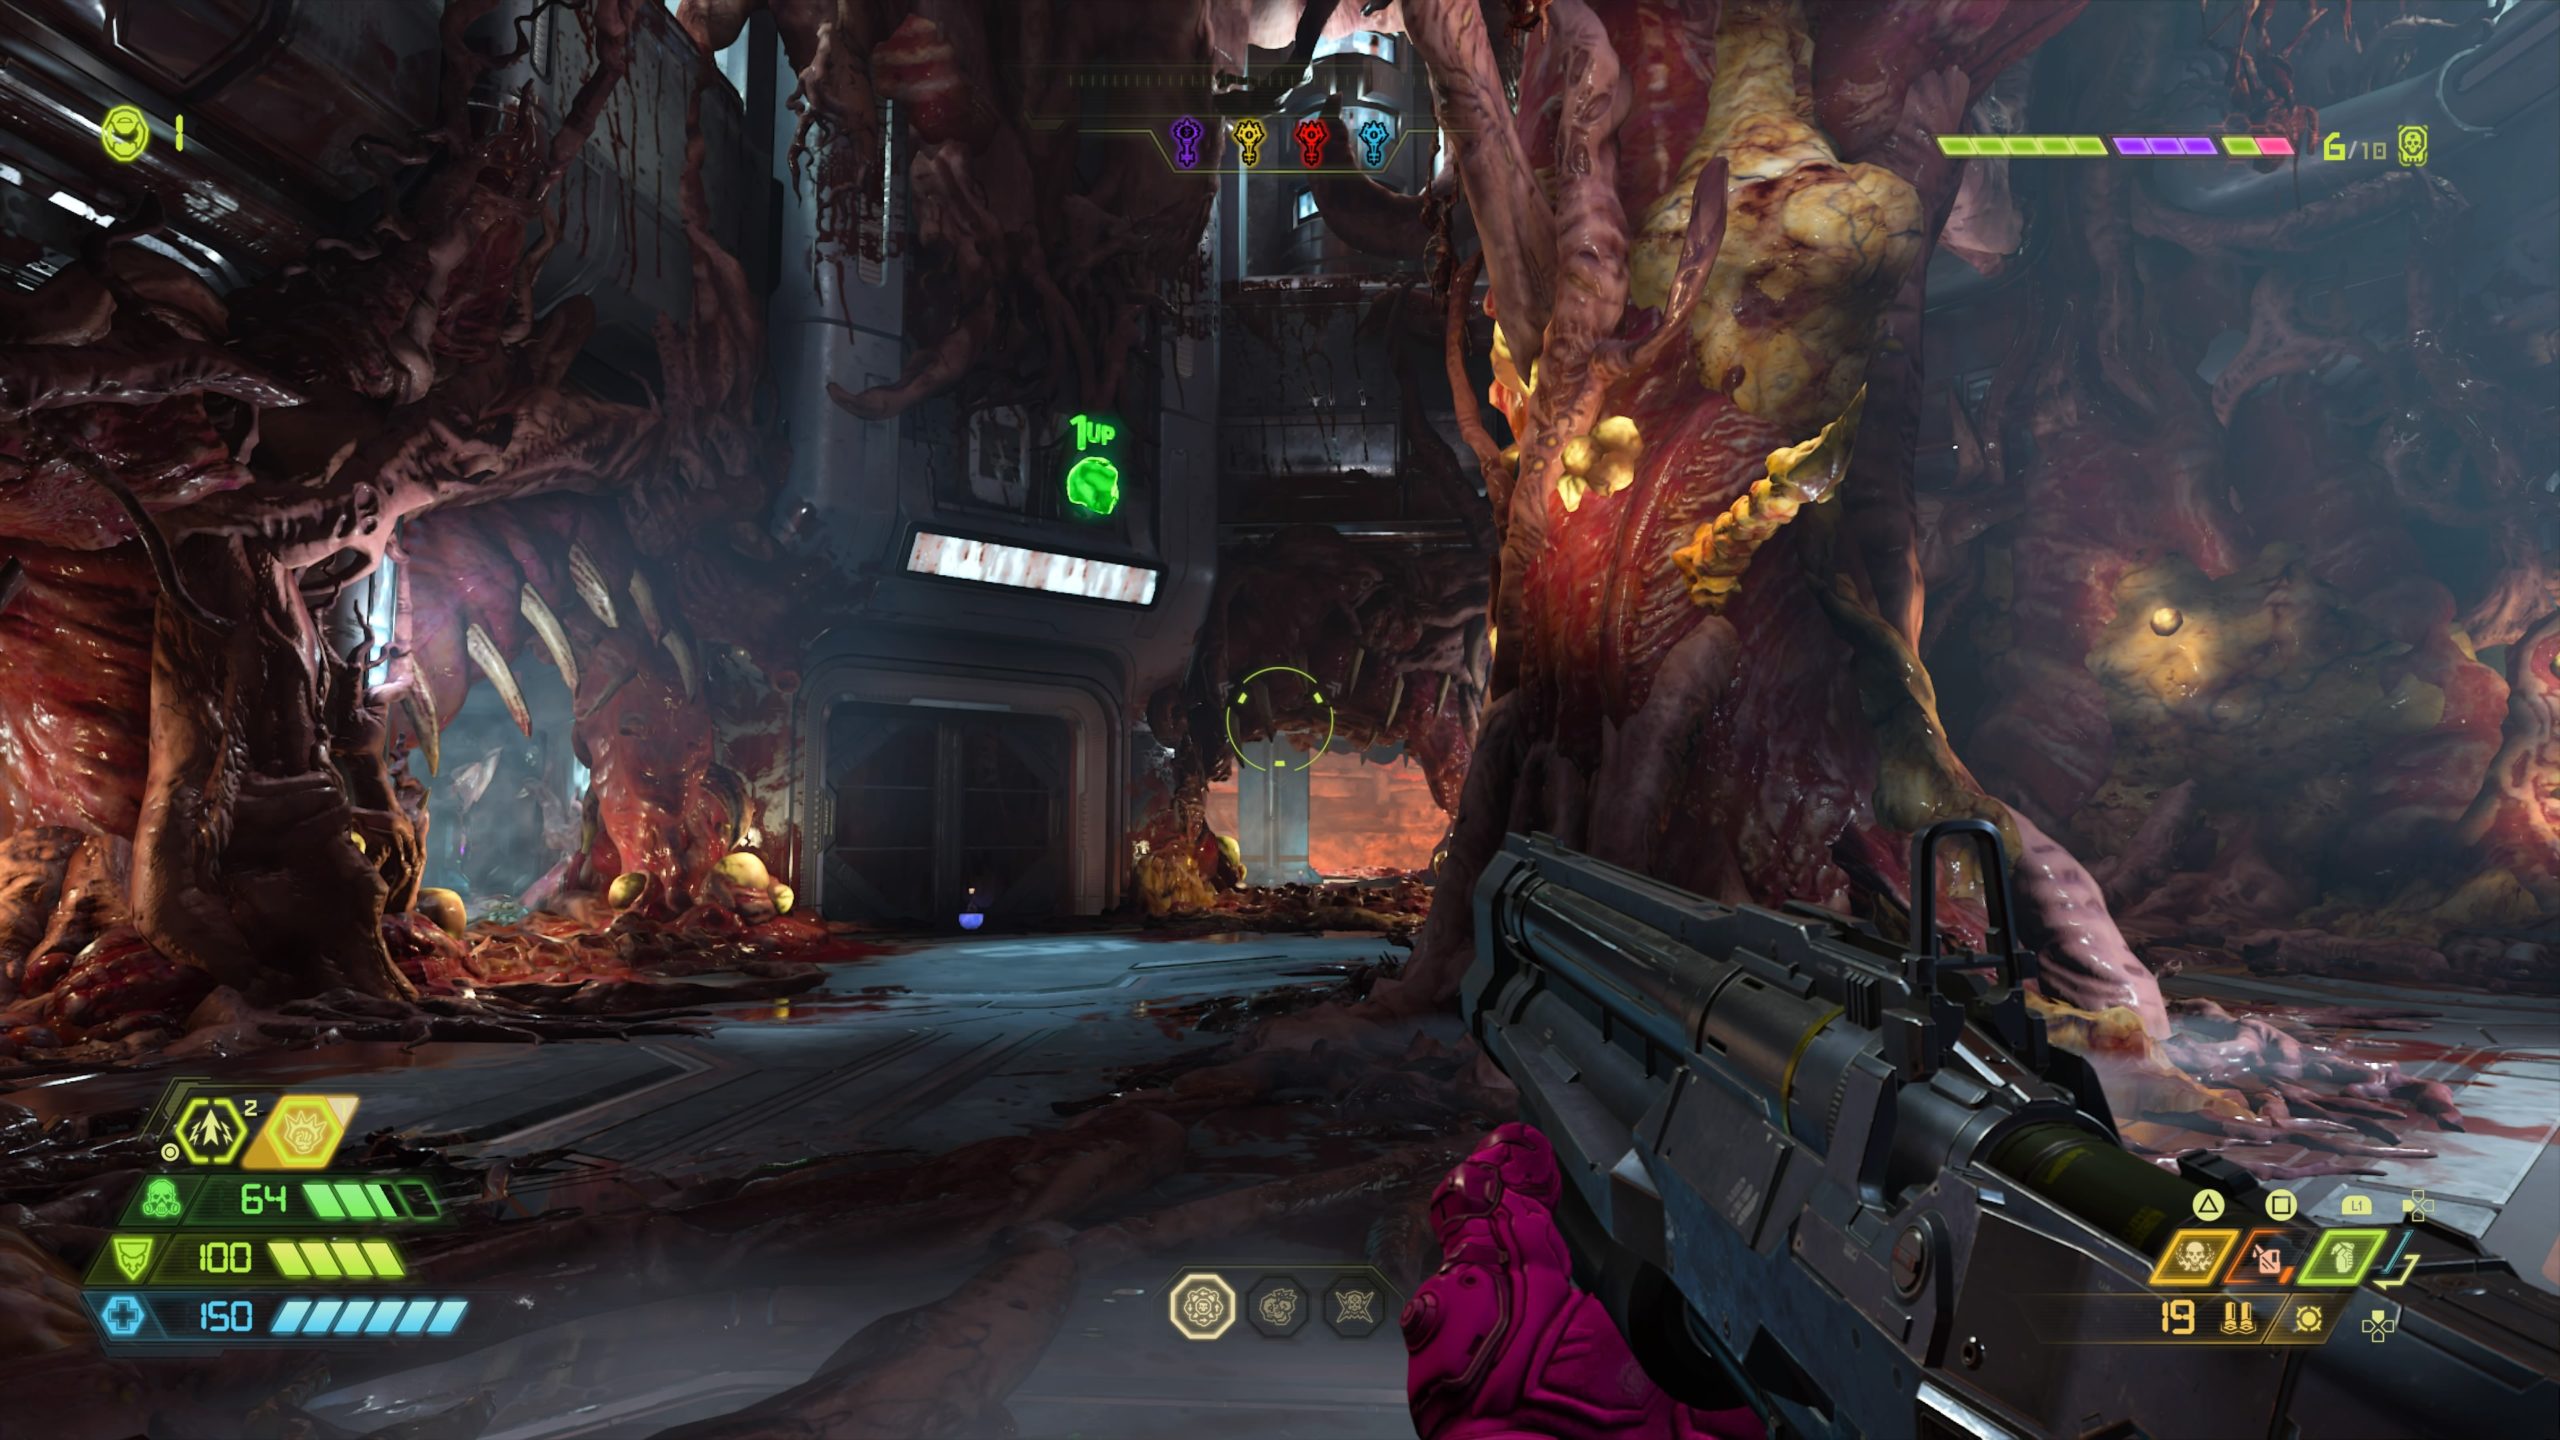
Soul Converter
From the fast travel point, turn around to find the extra life across the way in a small nook. Jump and dash to reach it.
Mission 12: Urdak
Guardians of Sanctuary
From the fast travel point, turn around and head through the hallway and look up in the hallway to find a hole in the ceiling that contains the extra life.
Dimensional Lacerator
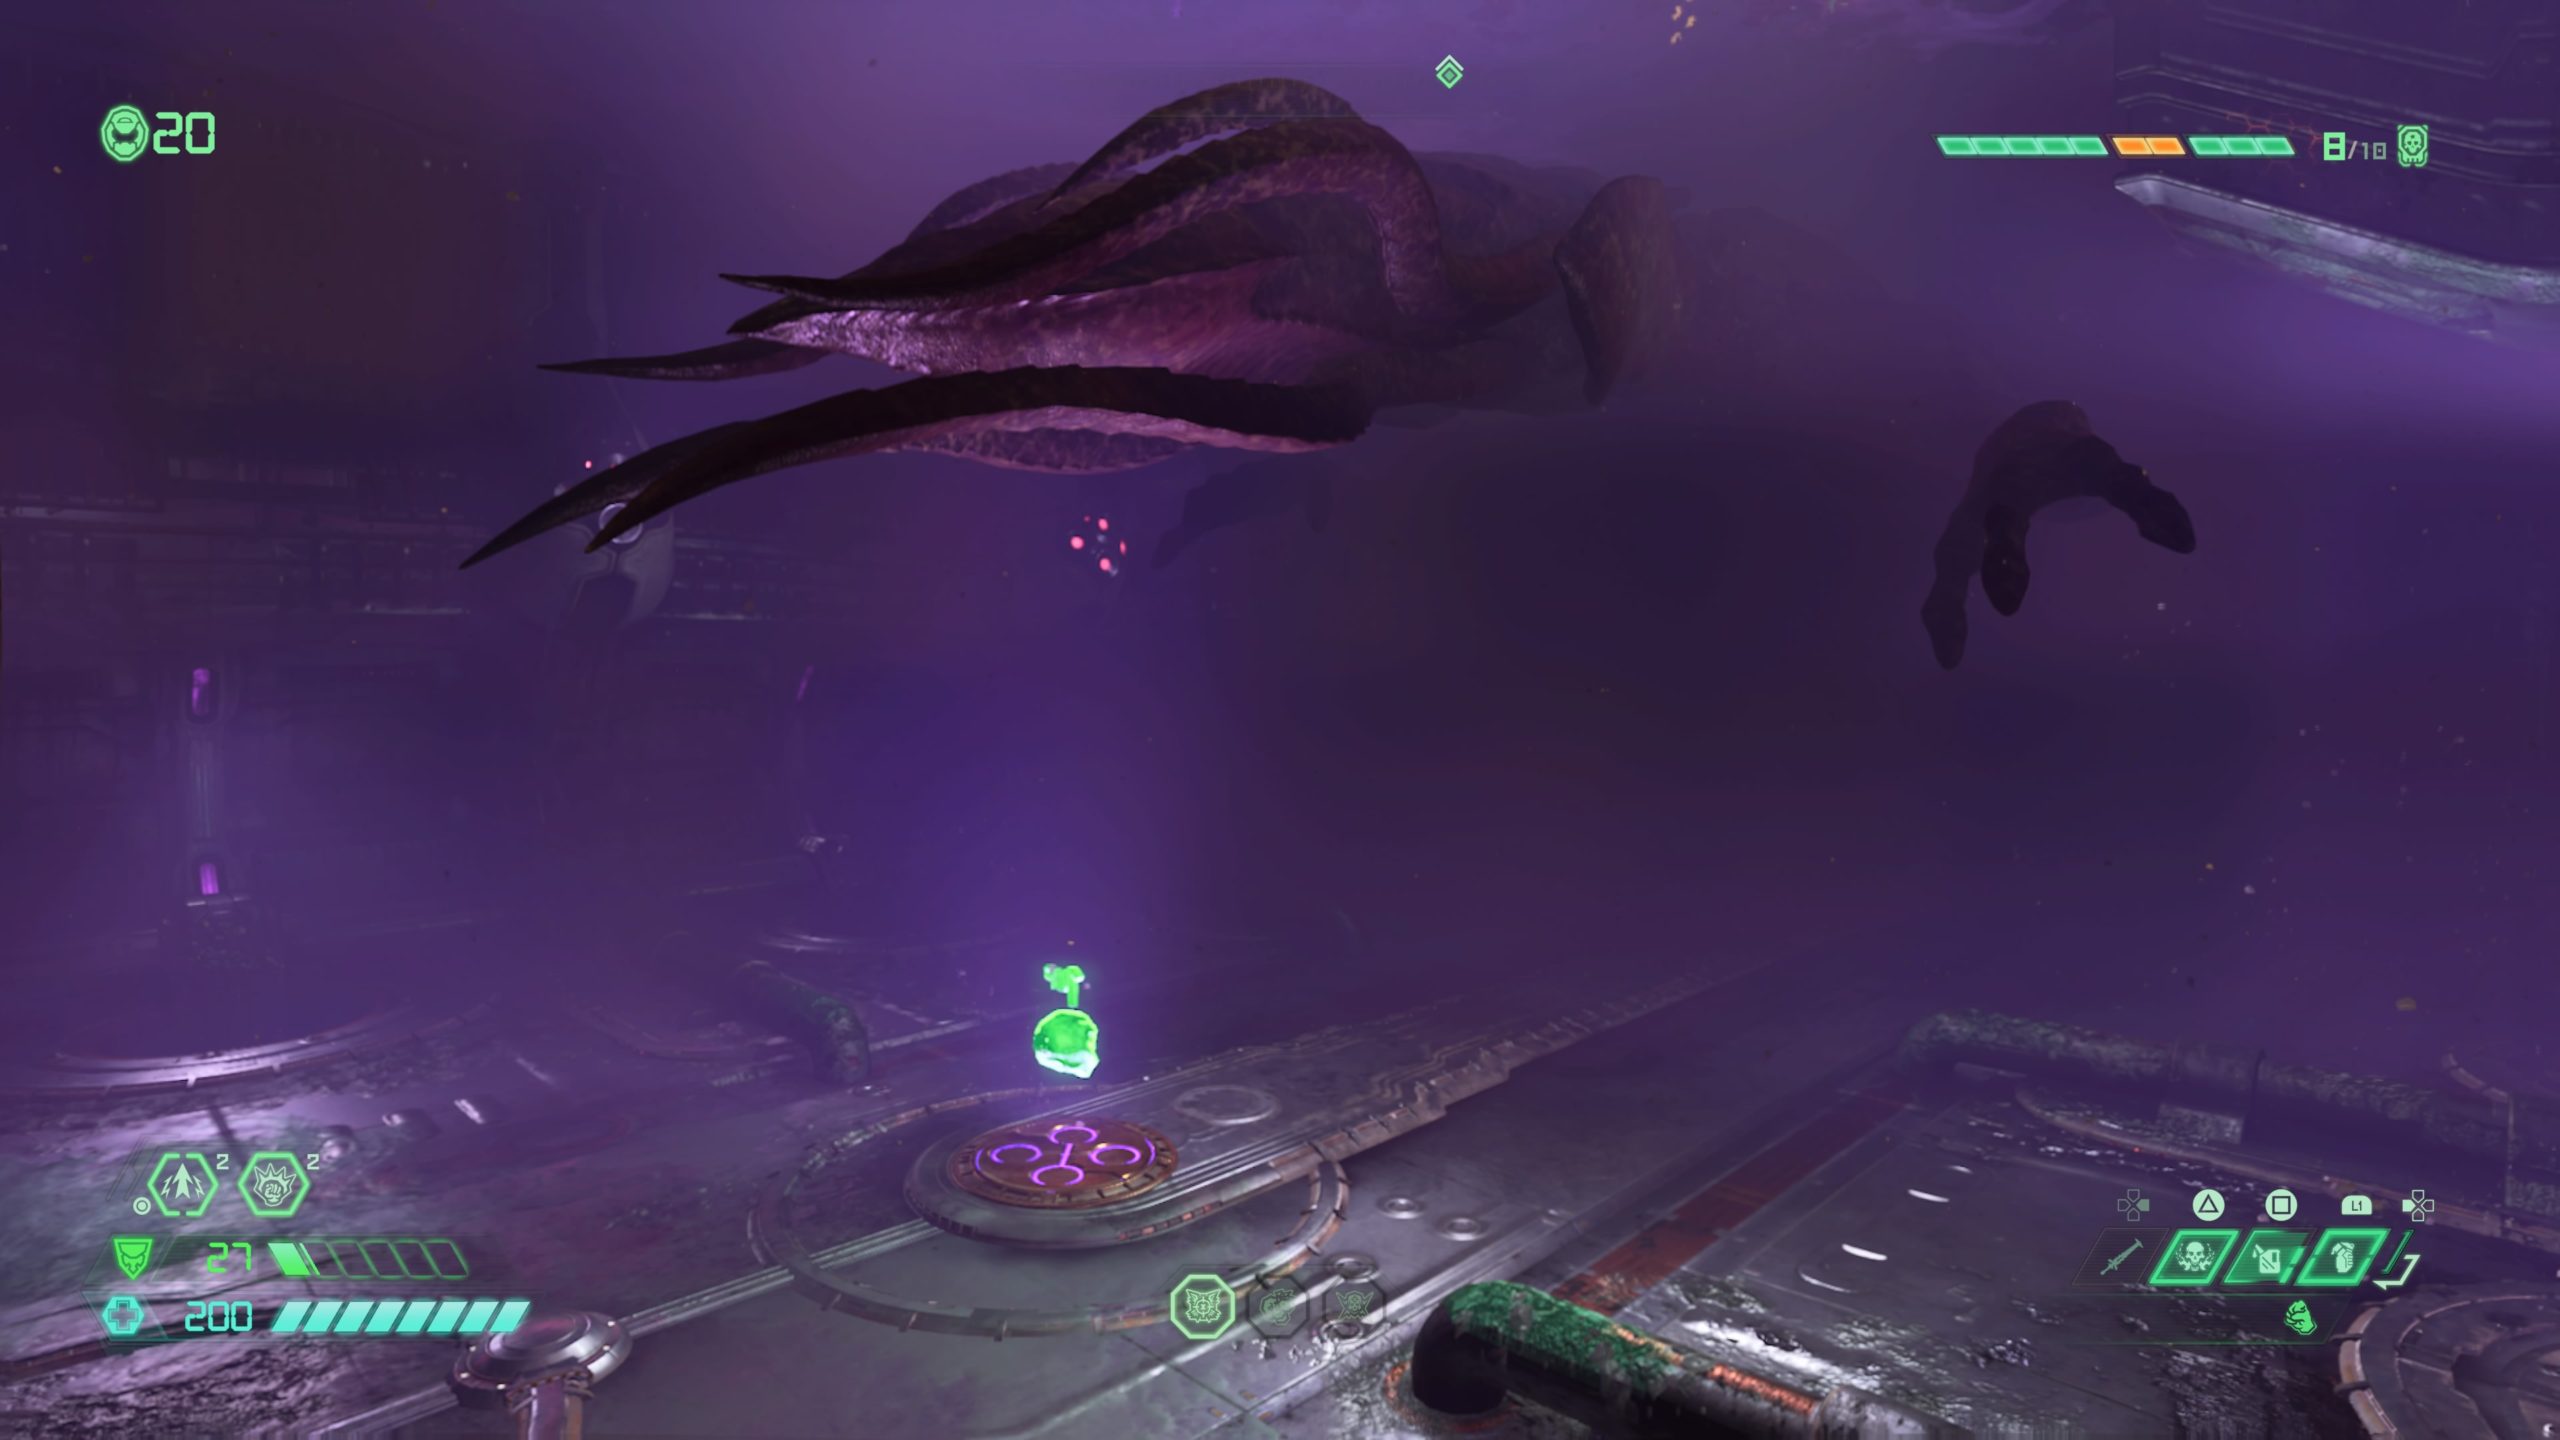
From the fast travel point, turn around and head through the doorway. Work your way through the hallway until you get to the giant room filled with water. The extra life will be in the water under the floating giant Maykr.
Xanthous Harmonizer
From the fast travel point, turn around and head through the door on the left side of the building. This will bring you to a ledge overlooking the giant beam. Look immediately to the right side on the outside of the building just before the first gold spin bar to find a cracked wall. Dash through the wall to find the hidden area containing the extra life.
Mission 13: Final Sin
Starstruct Industries
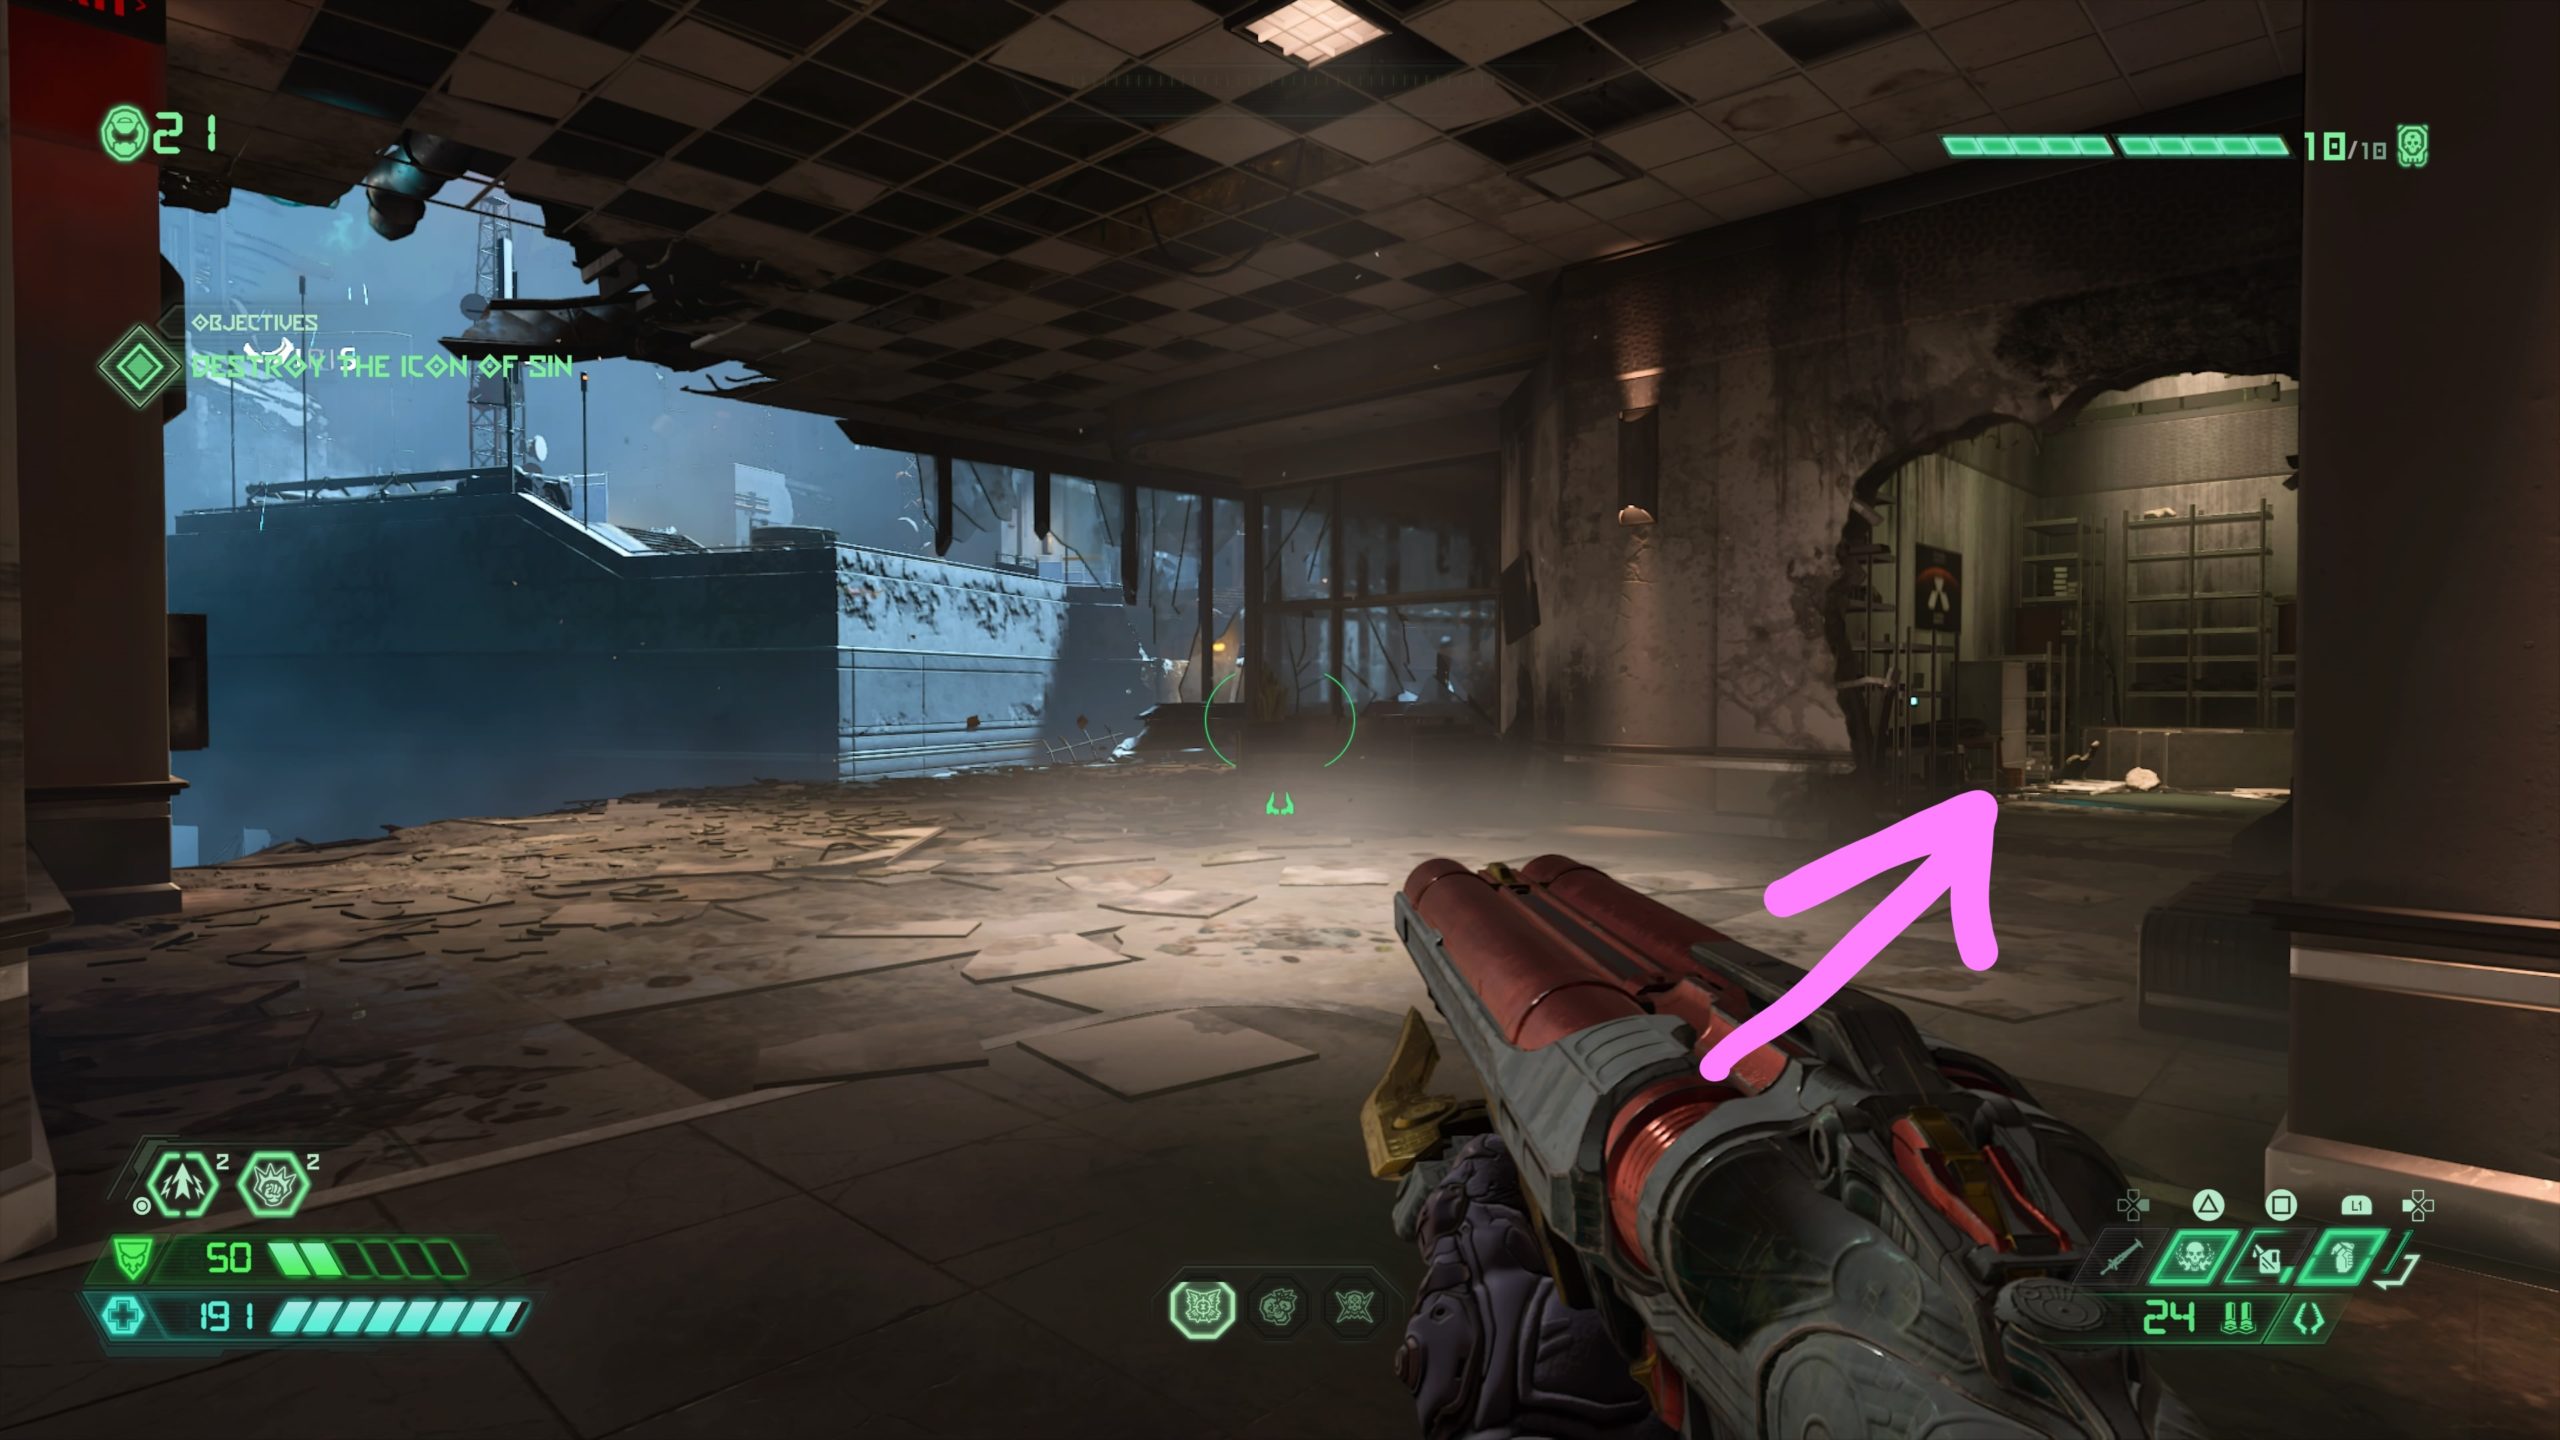
From the fast travel point, follow the hallway until you reach a room that is missing a wall. In this room, there will be a cracked wall. Melee the wall to enter a storage room then climb up on the shelving to duct in the ceiling above. Follow the duct to the end to locate the extra life.
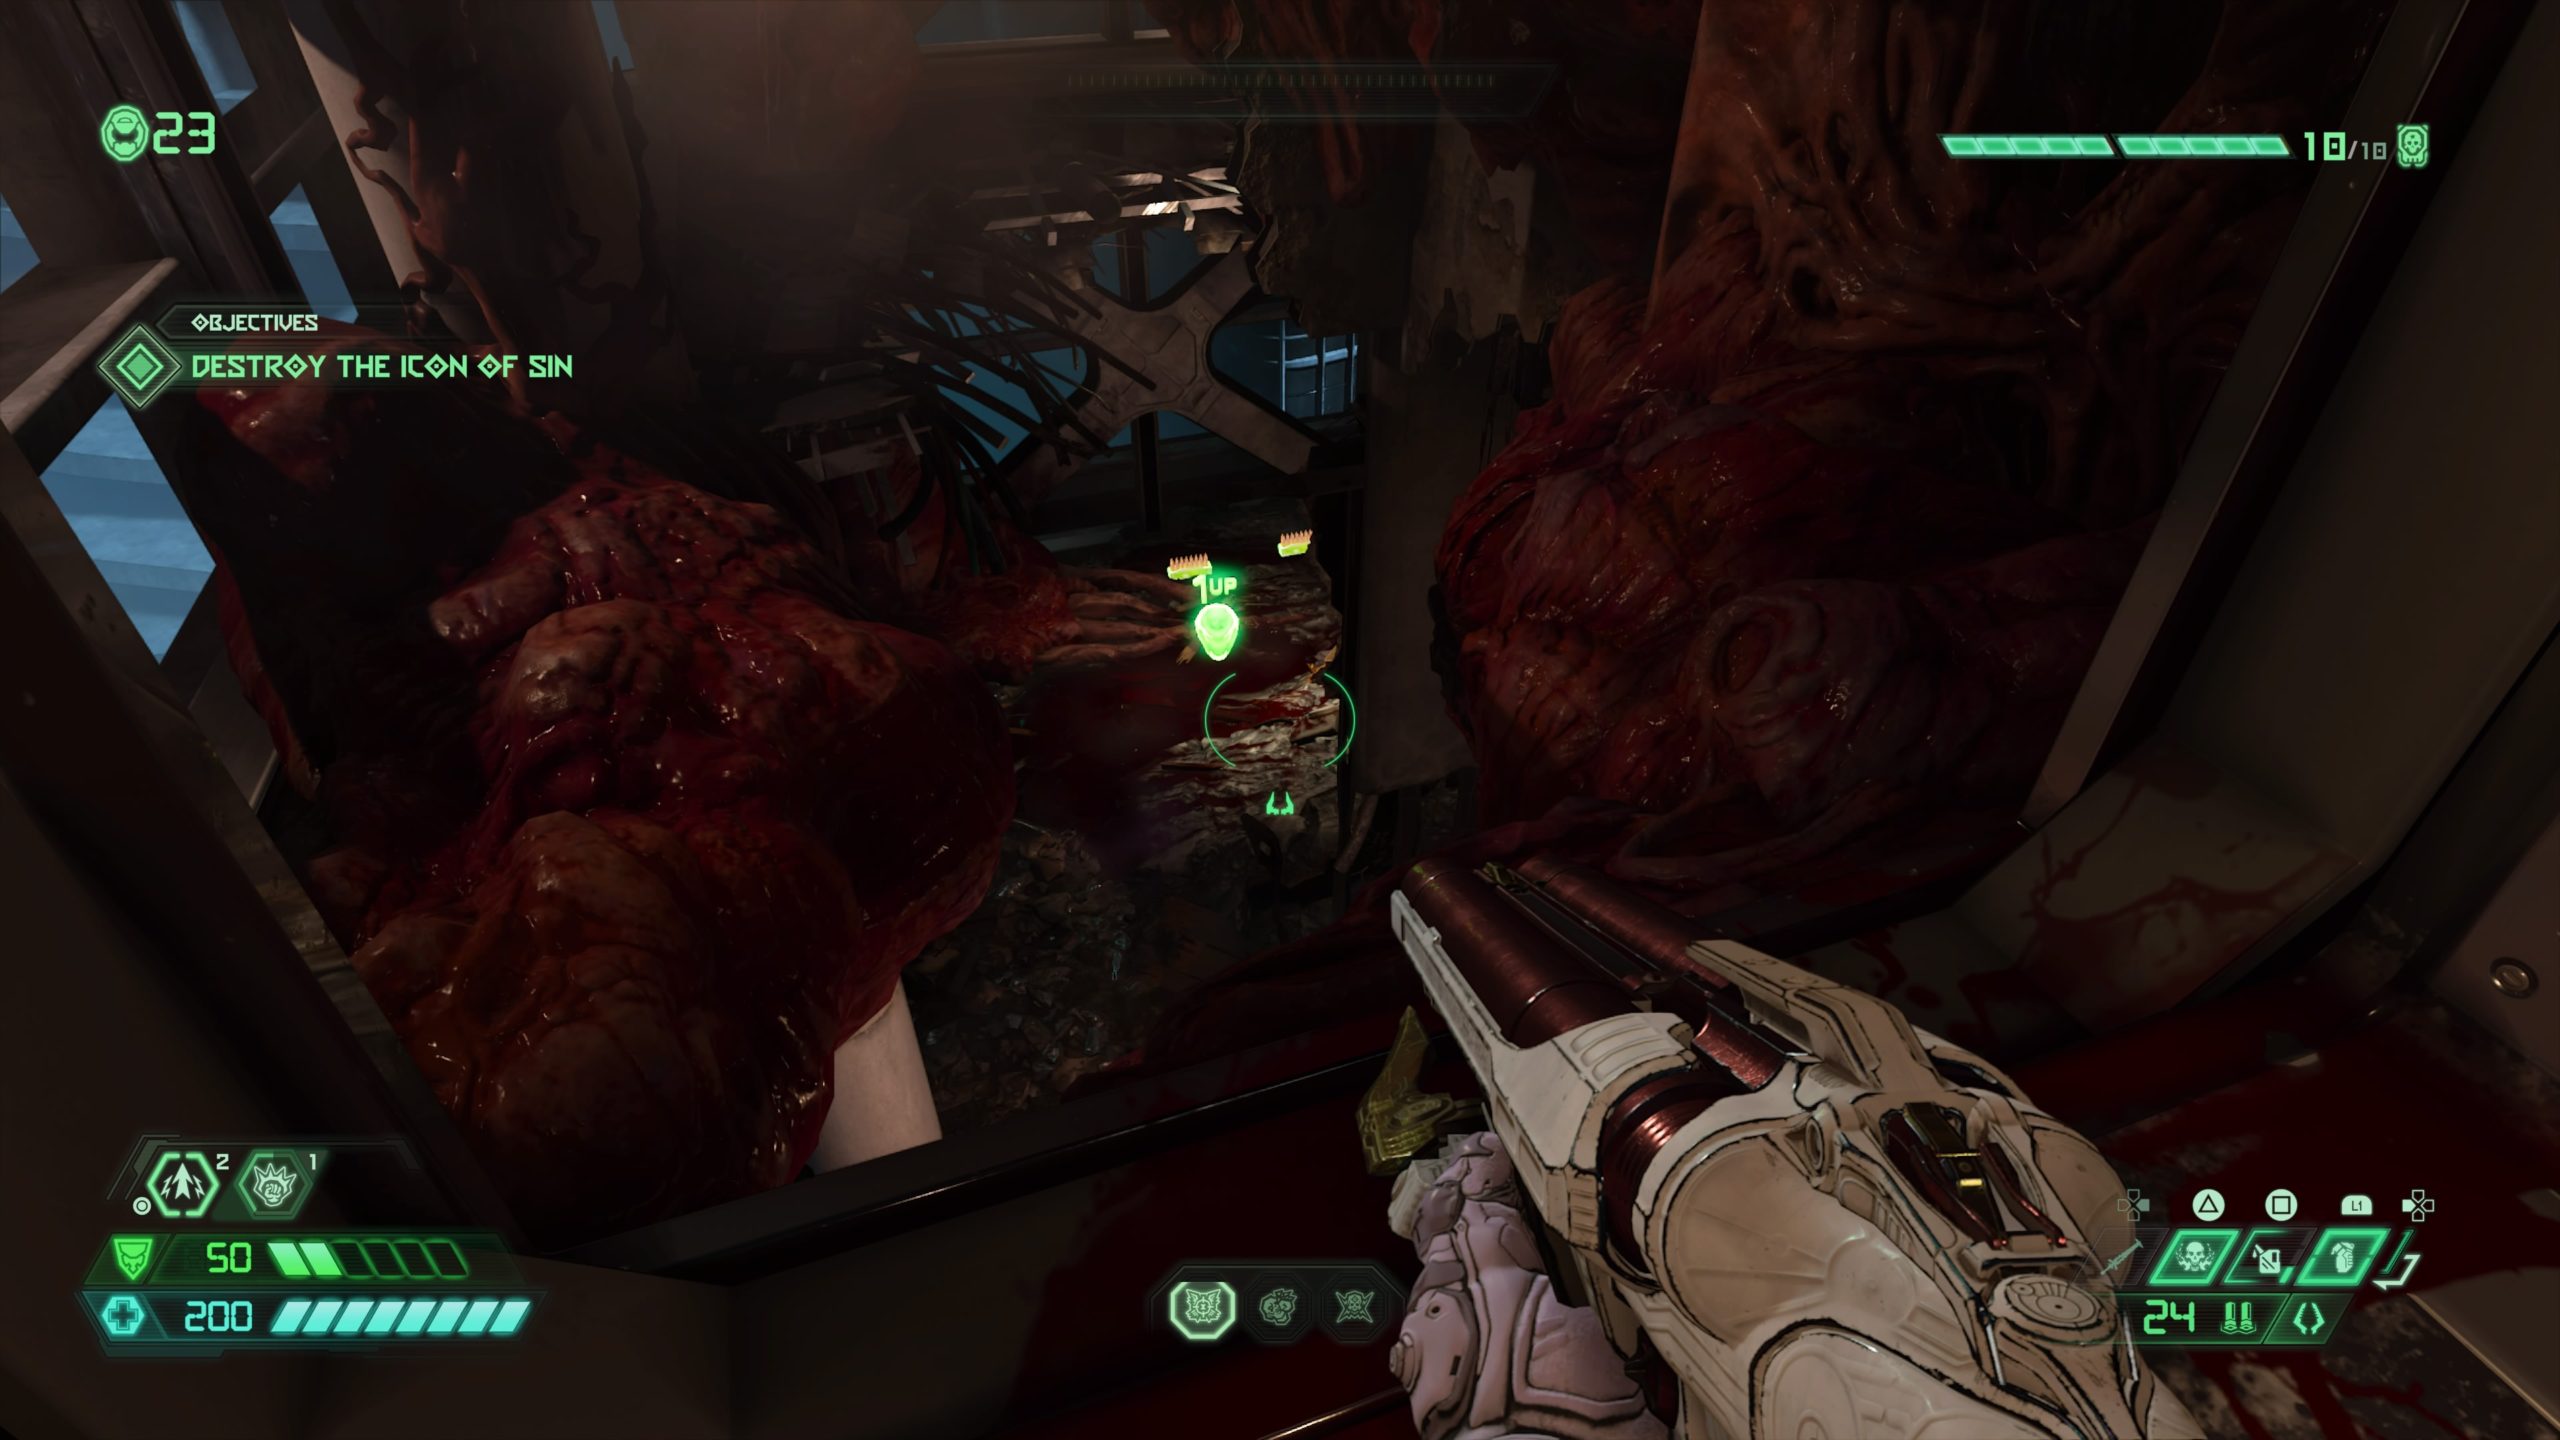
Starstruct Industries
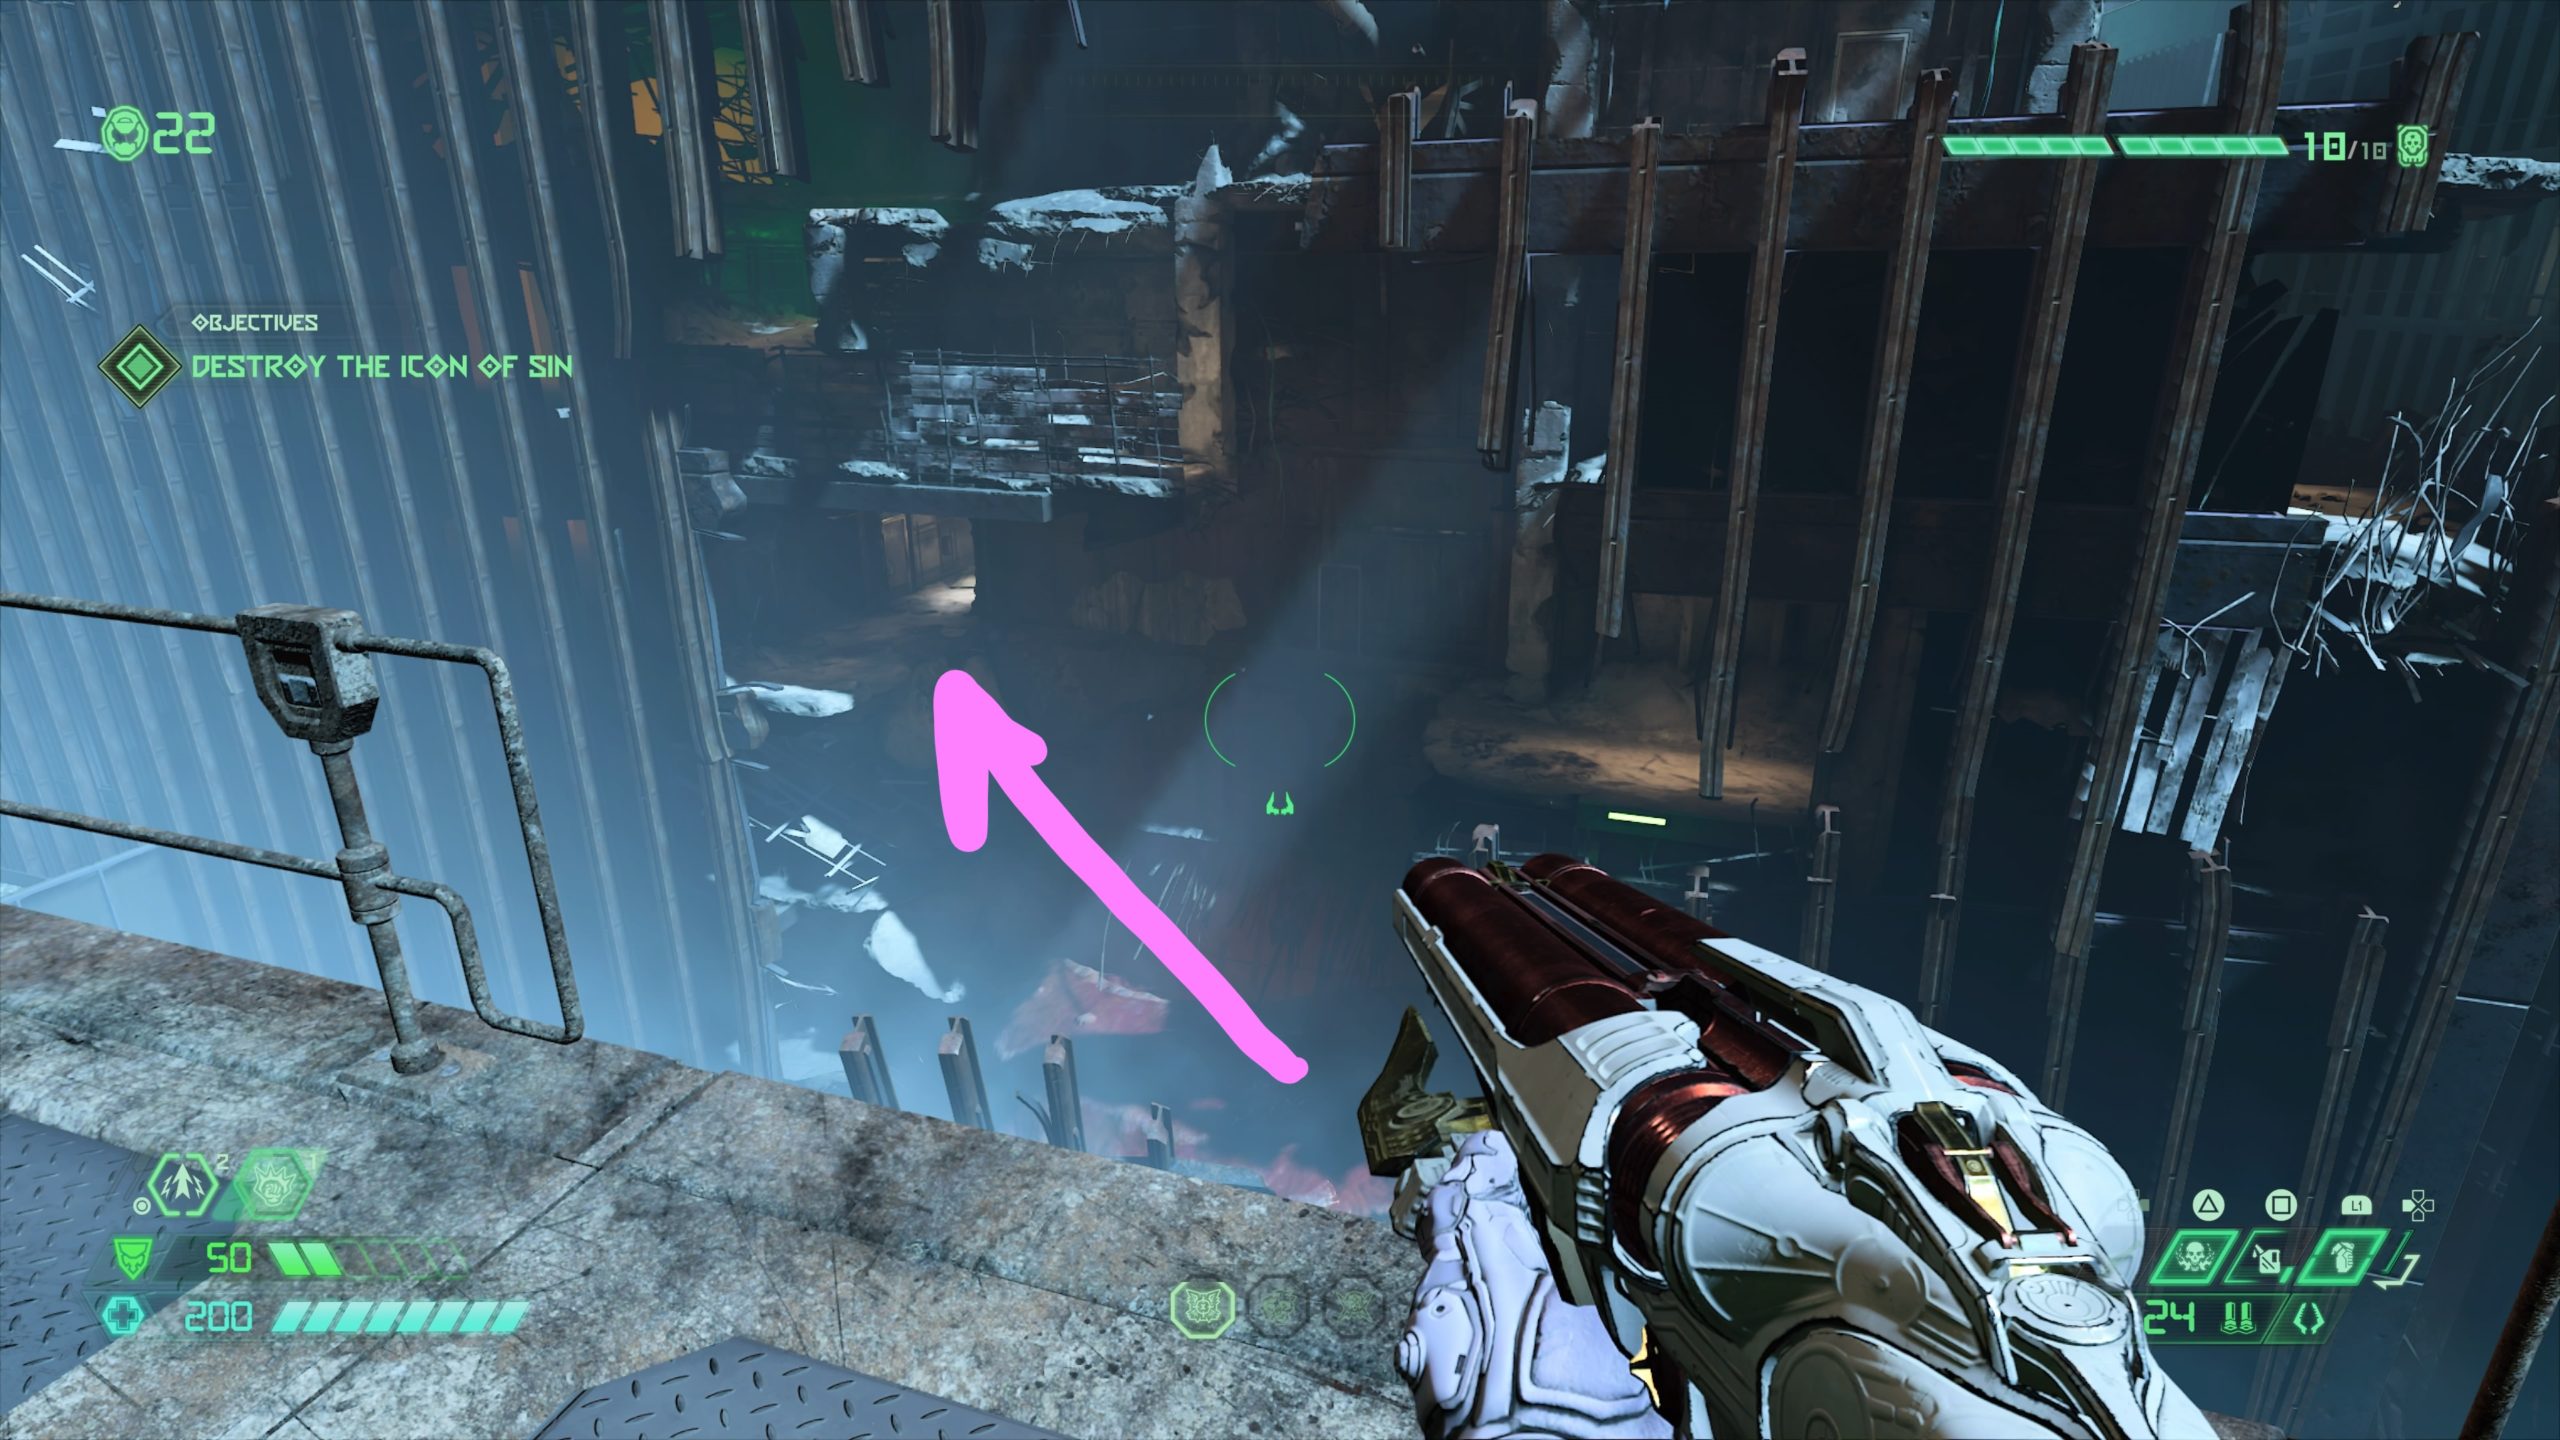
From the previous extra life, jump out the hole in the room to a climbable wall on the adjacent building. Head to the walkway behind the satellite tower then head through the section of missing wall and take the stairs up. Follow the walkway around and jump to the destroyed adjacent building on the bottom left side. There will be a cracked wall. Melee the wall then head inside to find a climbable wall. Use the wall to reach a duct containing the extra life.
Viris West
From the fast travel point, turn around and head through the building until you reach the elevator lobby. Drop down the right elevator shaft to reach the lower level. Head to the elevator next to it and shoot the target through the cracked elevator doors. Climb back up the elevator shaft then head to the next elevator to see an accessible duct. Jump into the duct to reach the room containing the extra life.
Oriiion, Inc.

From the fast travel point, jump across to the adjacent building then use the lift pad in the middle room to reach the third floor via a climbable wall. Climb the stairs and swing right then head to the end of the room. At the end of the room, turn left to find a cracked wall near a column. Melee the wall and drop down to collect the extra life.