While exploring the Island of Waford in One Piece Odyssey, you’re bound to find loads of treasures along the way. One such category of treasure is the Locked Chest which contains resources vital to your survival on the island provided you have a chest key to open them with. Below is a guide on where you can find the locked chests in Alabasta. Opening all of them rewards you with the Treasure Hunter trophy/achievement. Please note that you will have to complete the Grand Line Quiz questline in order to receive the key needed to open the chests. You can find details on those quests here.
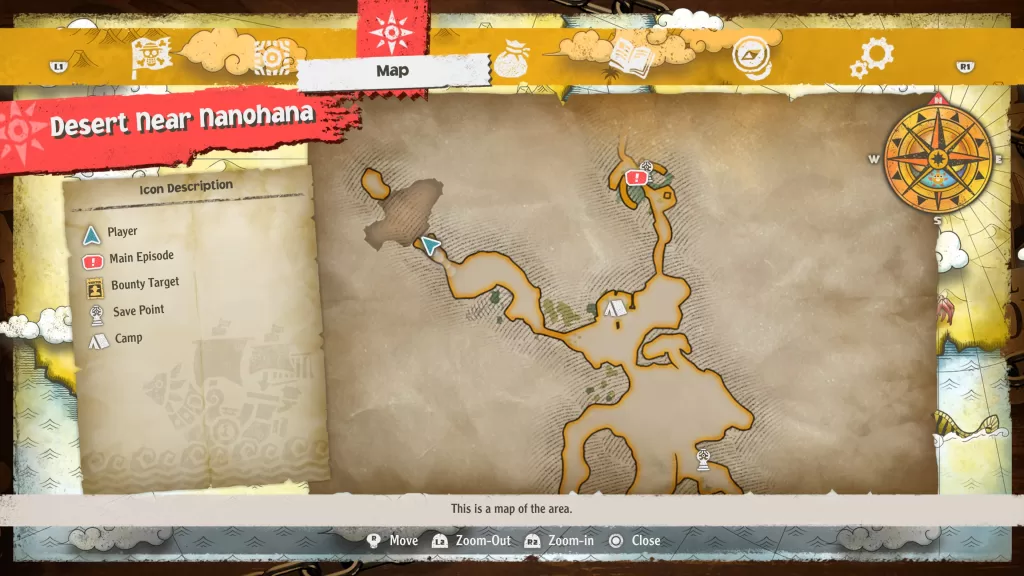
Desert Near Nanohana
Desolate Valley
This chest can be found in the northwestern part of the region. You’ll need to have Frankie as a party member so he can build a bridge to reach the chest.
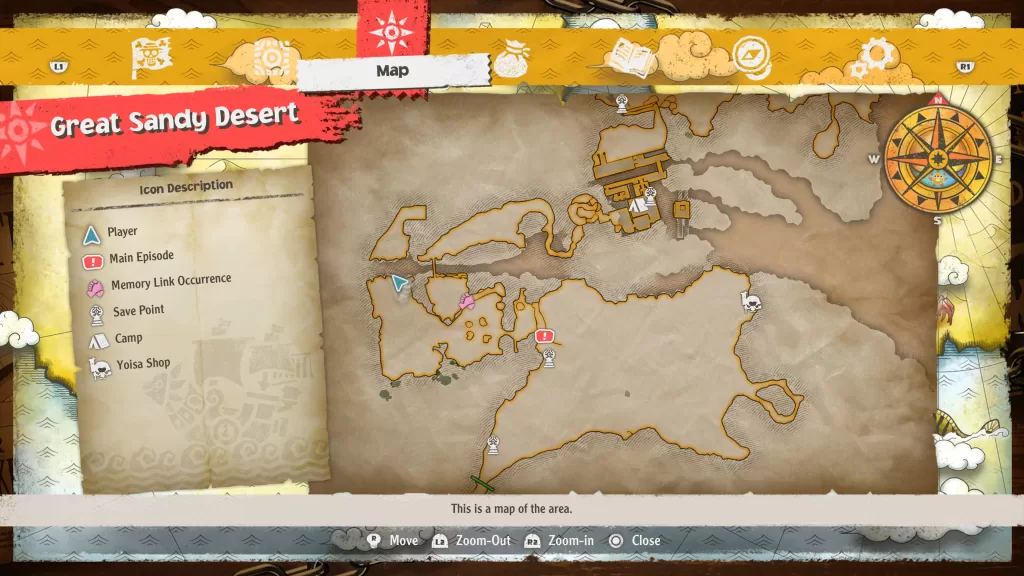
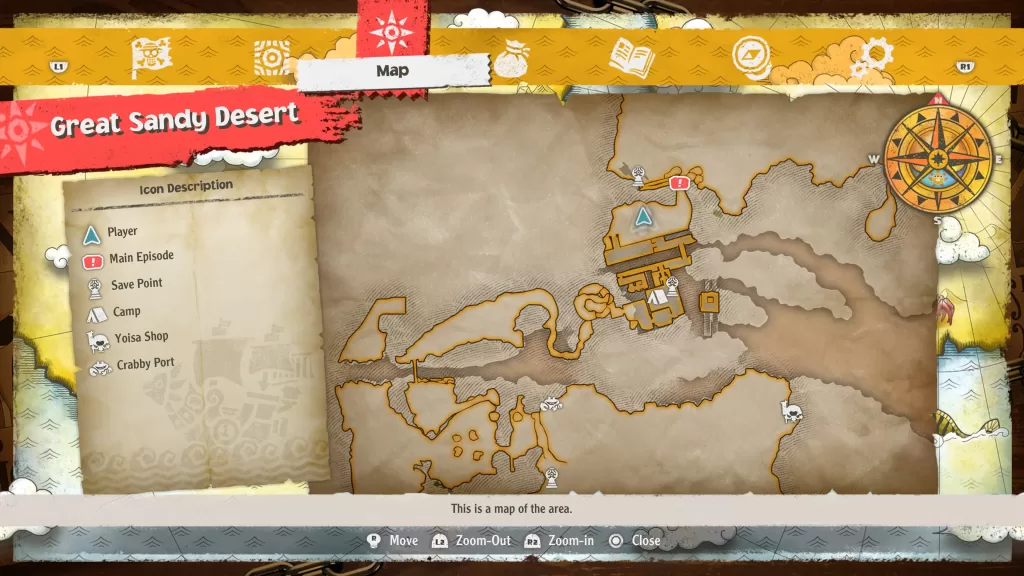
Great Sandy Desert
Cross Bone Bridge Canyon
This chest can be found in the western part of the region. You’ll need to have Frankie as a party member so he can build a bridge to reach the chest.
Sandy Ruins
This chest is guarded by a giant dragon-lizard on the north side of the ruins. You’ll need to defeat the beast to access the chest.
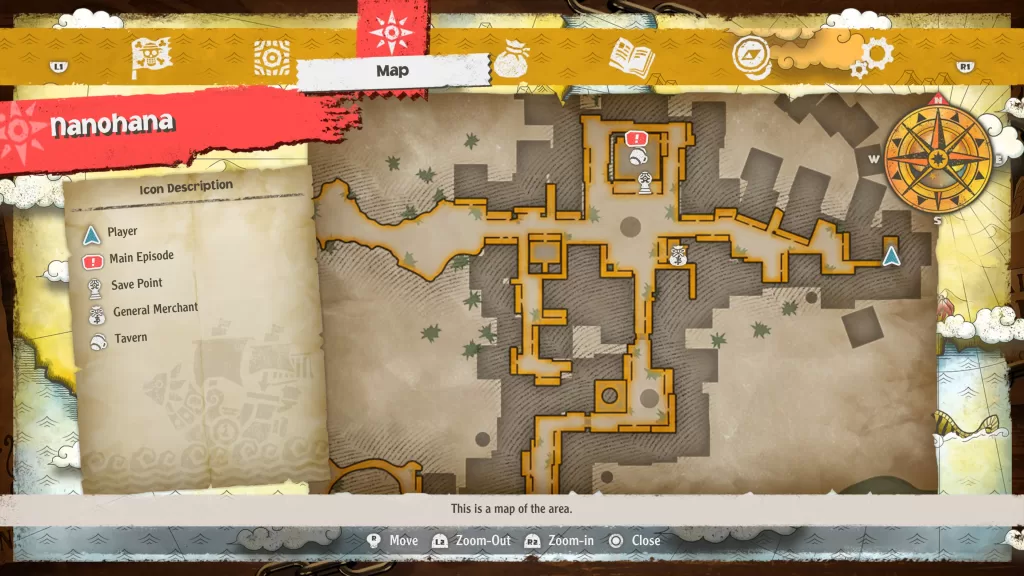
Nanohana
Eastern Highway
This chest can be found at the far eastern end of the highway in an alley up some stairs. You’ll need to use Chopper to reach it.
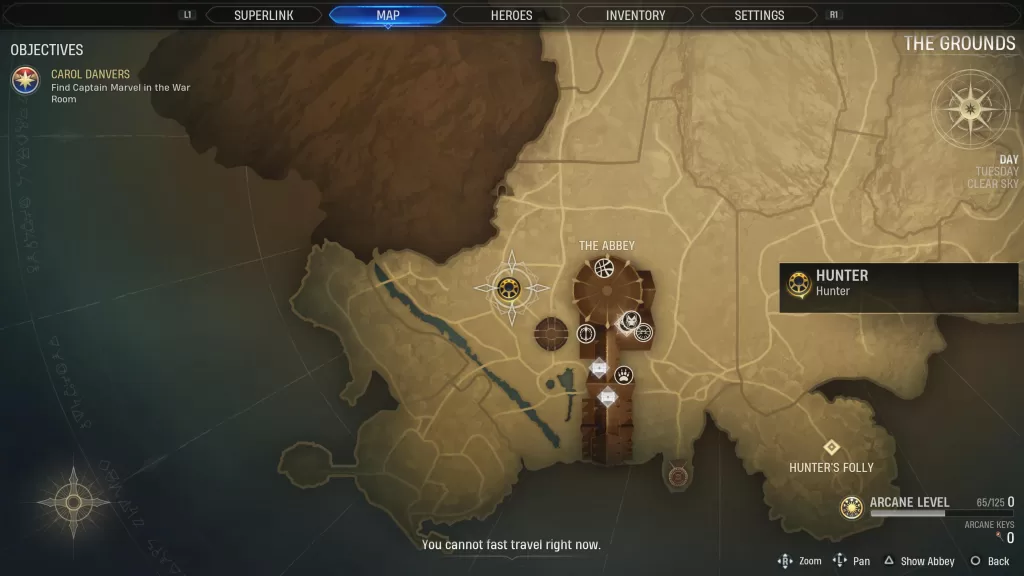
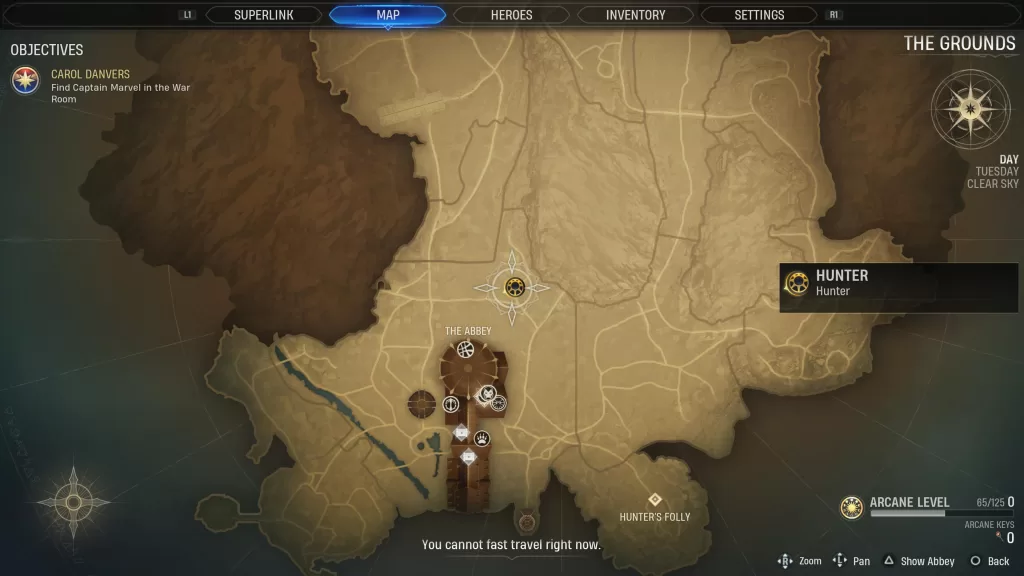
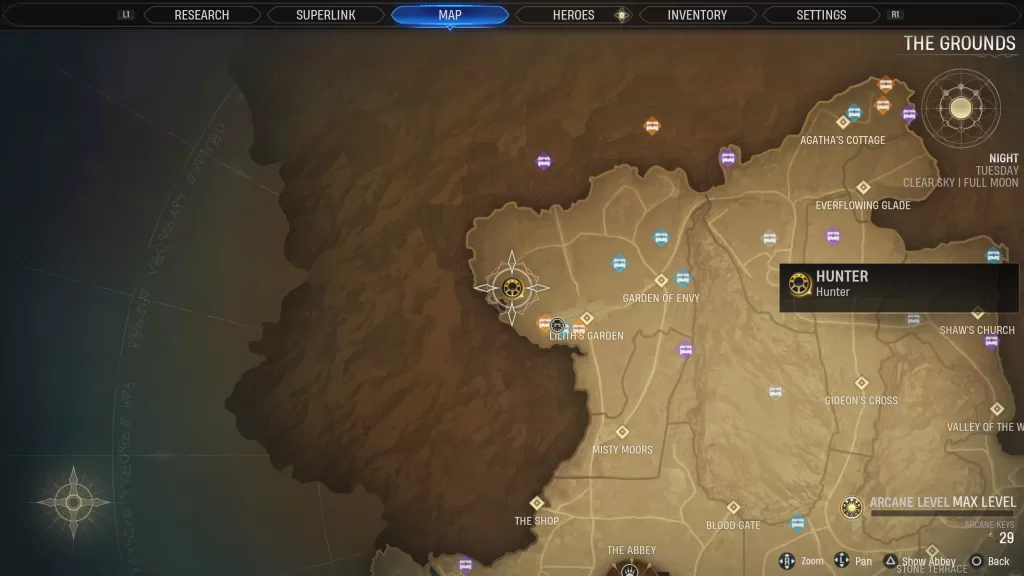
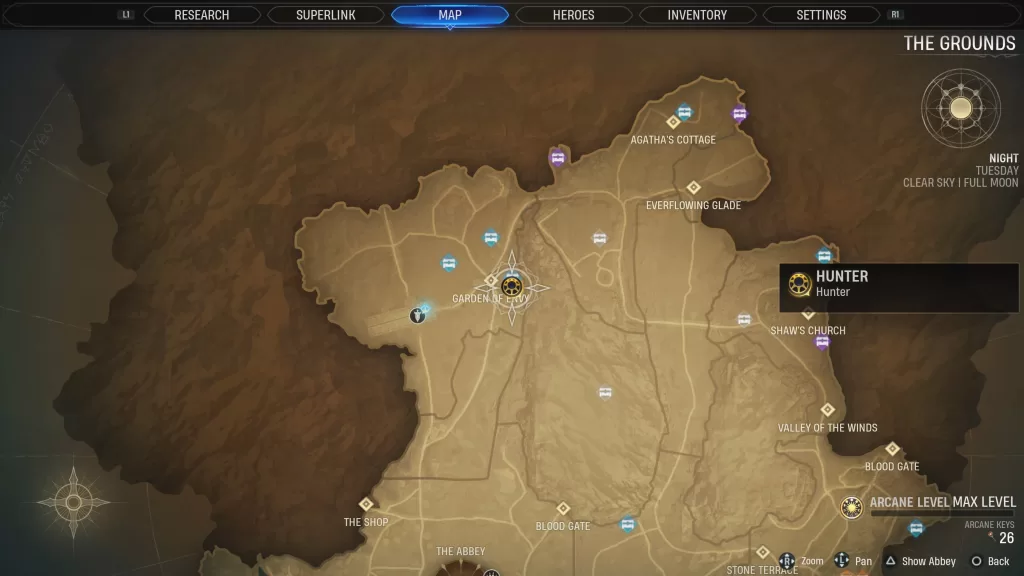
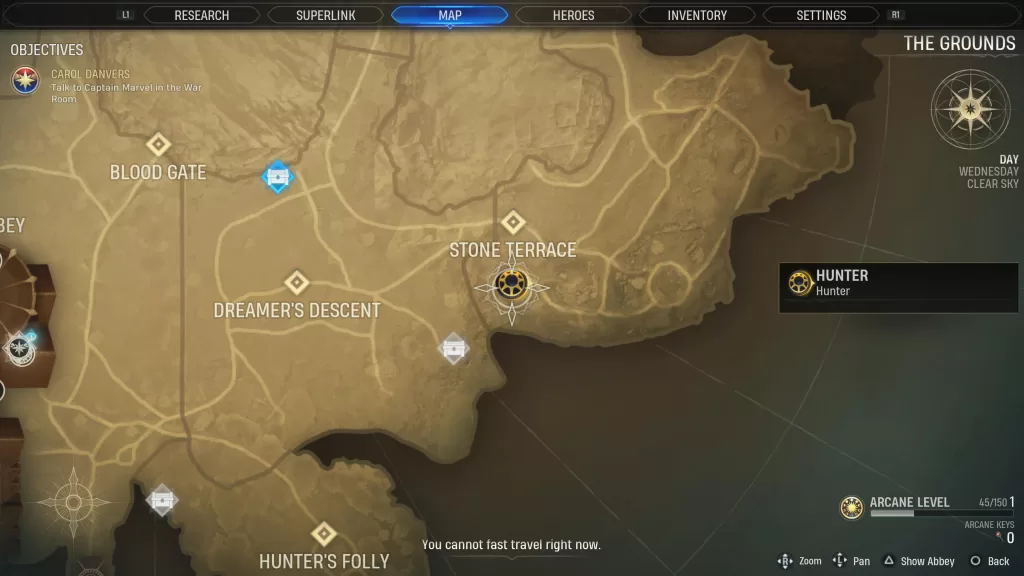
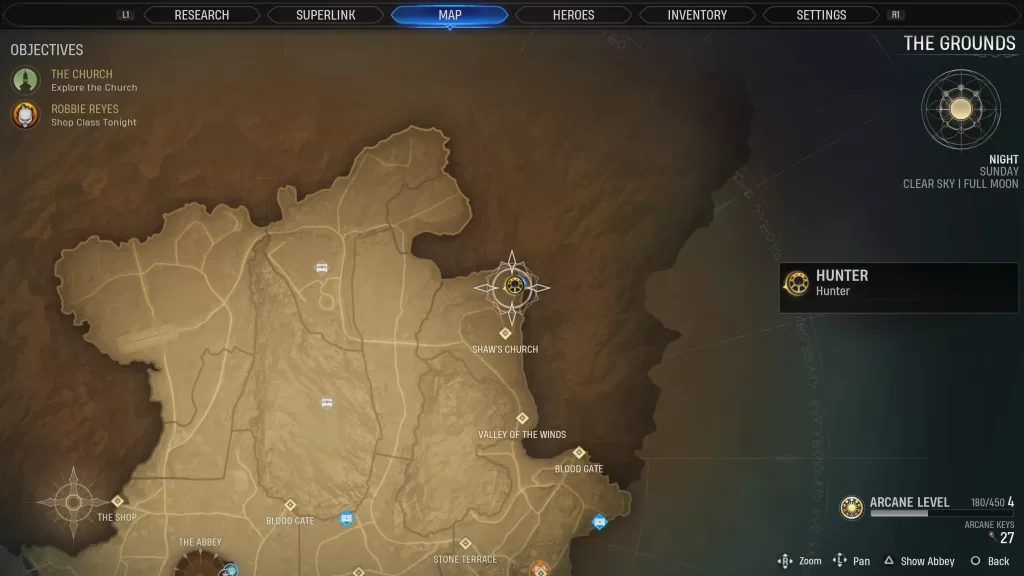
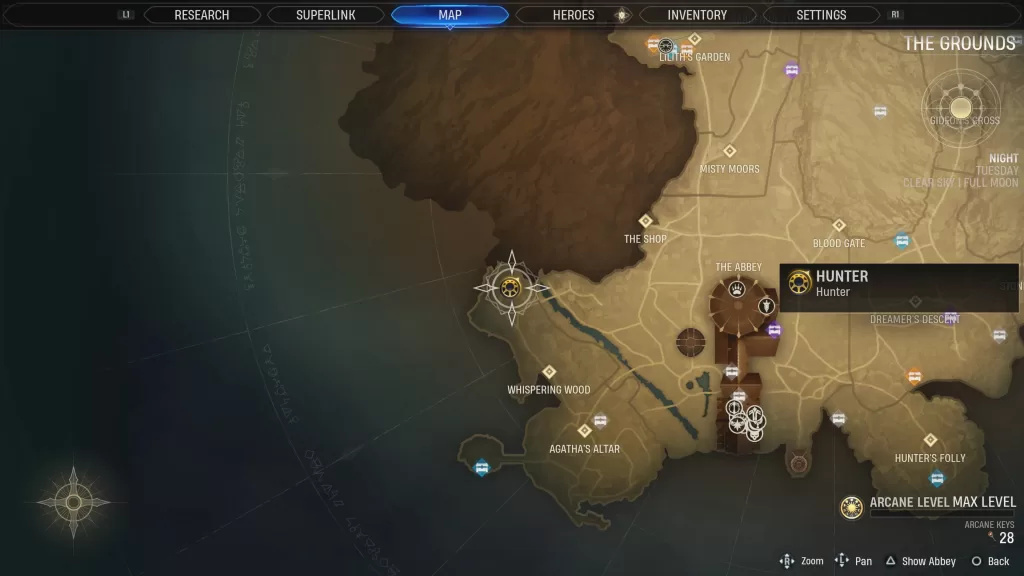
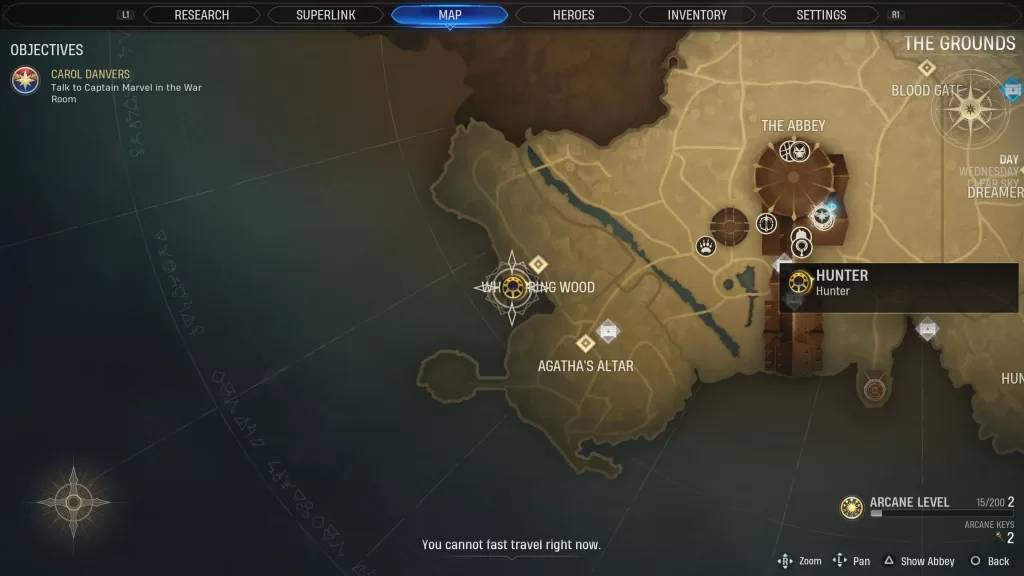
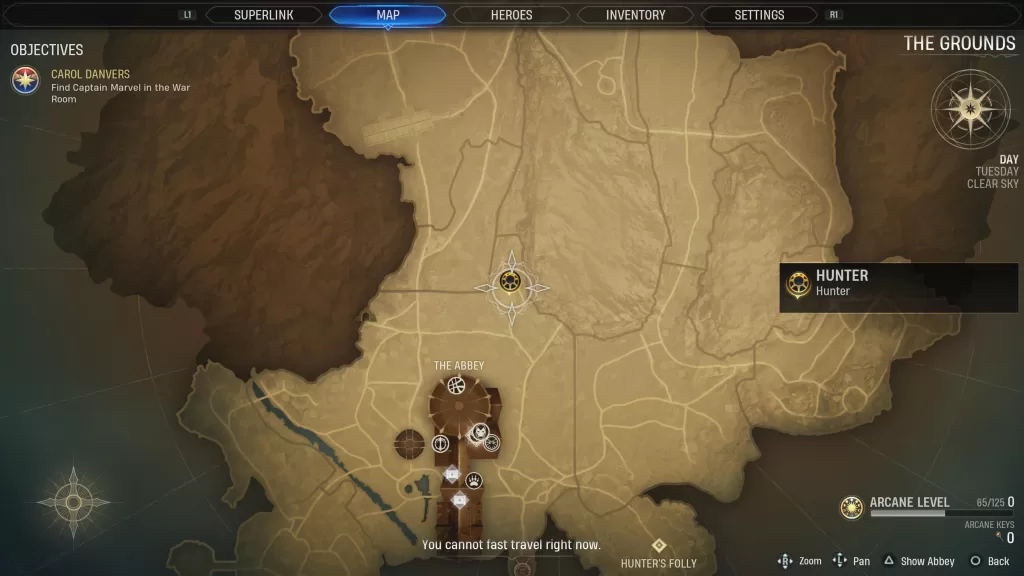
In Marvel’s Midnight Suns, masterworks can be placed in frames around The Abbey. You can find these masterworks throughout the game at the below locations!
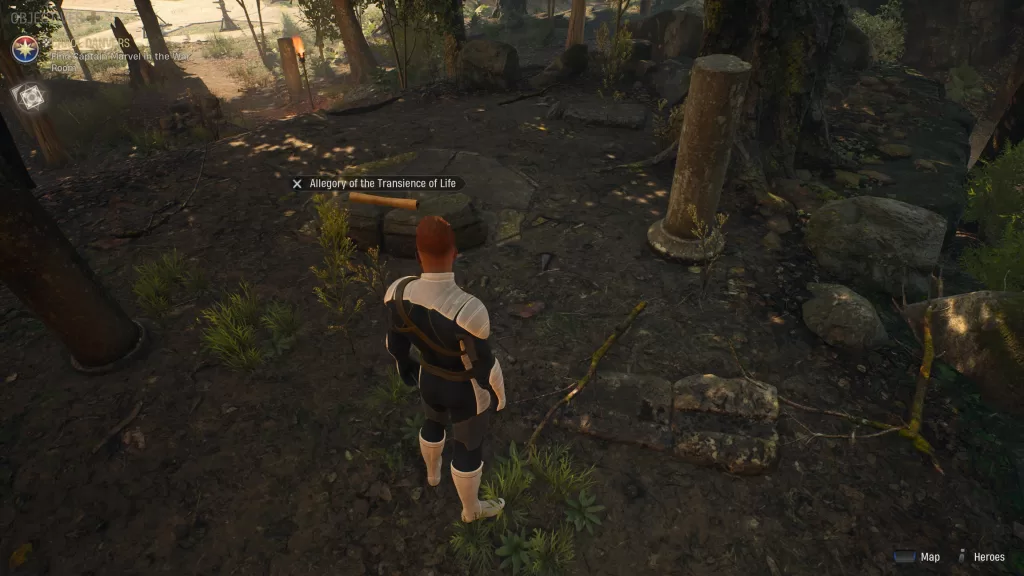
Allegory of the Transience of Life
This masterwork can be found west of The Abbey just past the training ground.
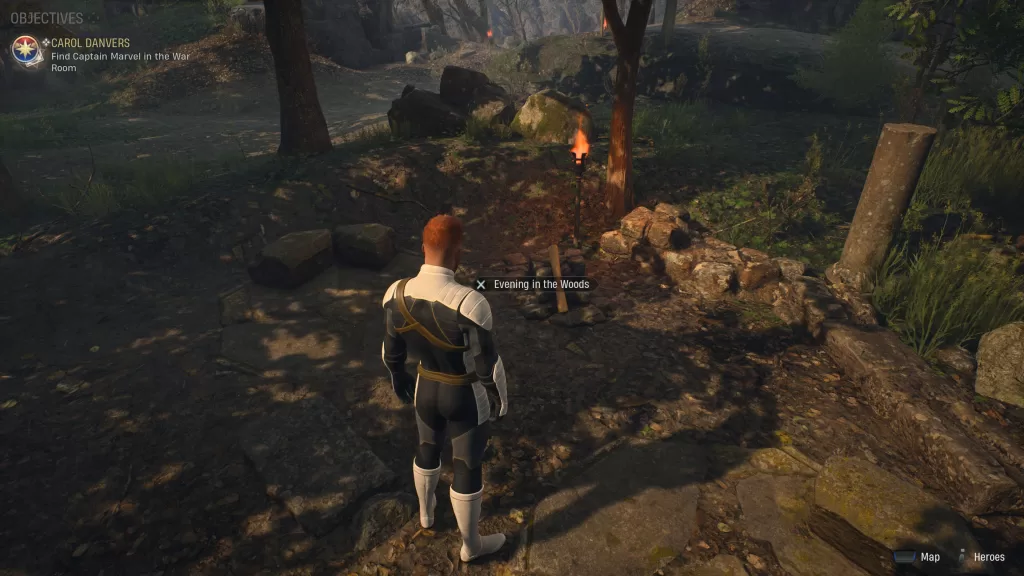
Evening in the Woods
This masterwork can be found near a pond northeast of The Abbey.
Girl with Cherries
This masterwork can be found behind a breakable wall just south of the Everflowing part of the Everflowing Glade text on the map.
Heart’s Ease
This masterwork can be found under the bridge on a rock west of the Abbey in the creek.
Moonlight on Mount Lafayette, New Hampshire
This masterwork can be found leaning against a broken wall south of Agatha’s Altar.
Moonlight, Wood Island Light
This masterwork can be found in the central part of Gideon’s Cross on the eastern side of the main path.
Schloss Milkel in Moonlight
This masterwork can be found near the cross paths in northern Gideon’s Cross.
Still Life with a Skull and a Writing Quill
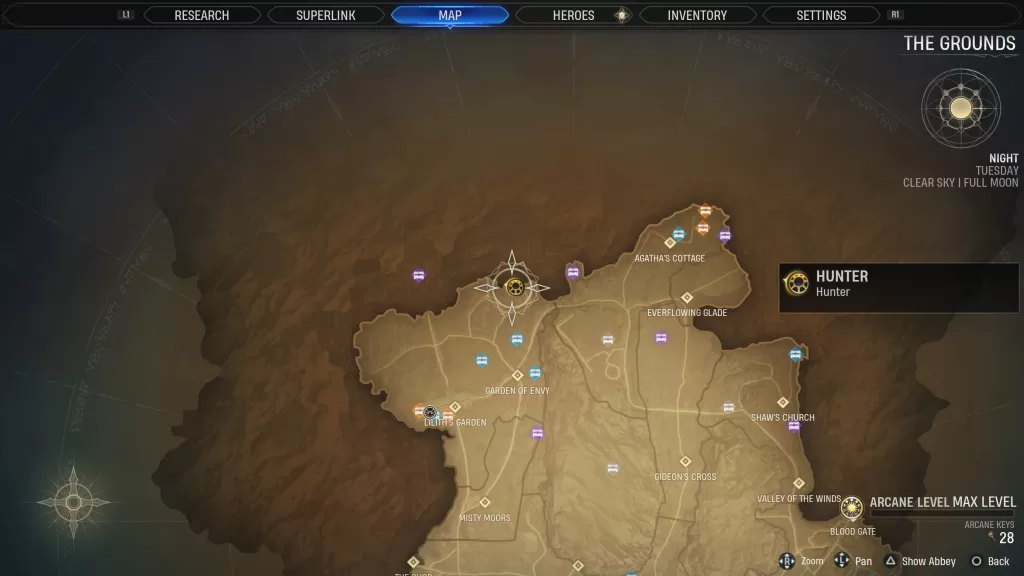
This masterwork can be found northwest of Lilith’s Garden.
The Damsel and Orlando
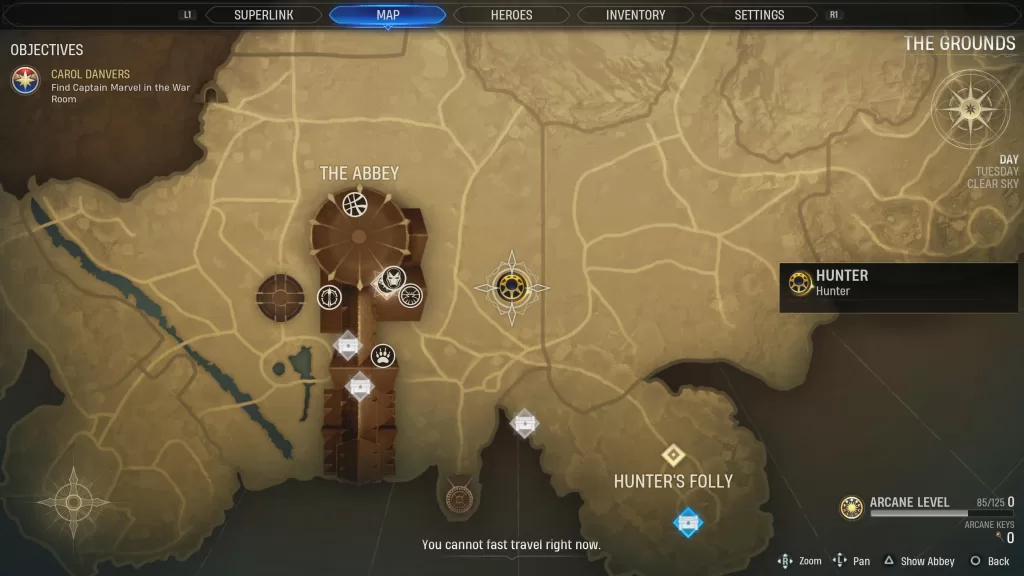
This masterwork can be found on a rock pile in the northwestern part of the Hunter’s Folly Region near a chest.
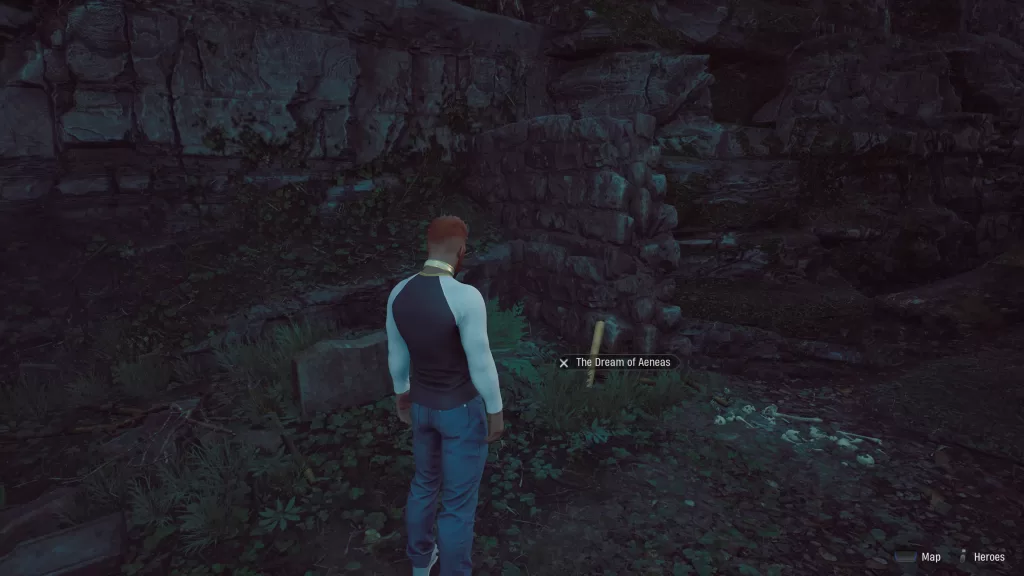
The Dream of Aeneas
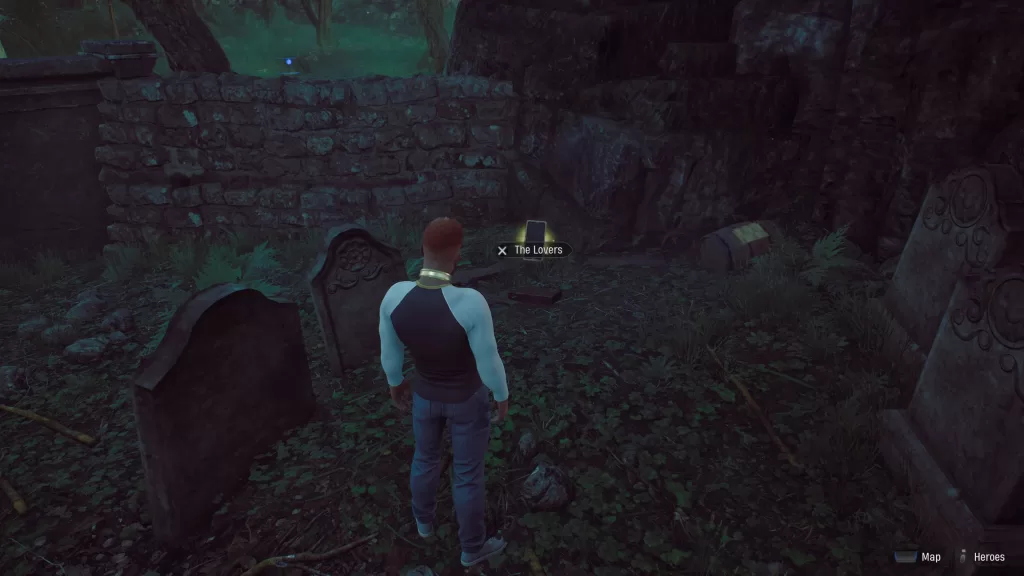
This masterwork can be found in a small cemetery just north of the Envy part of the Garden of Envy text on the map. You’ll need to use the Open Word of Power on the gate to reach it.
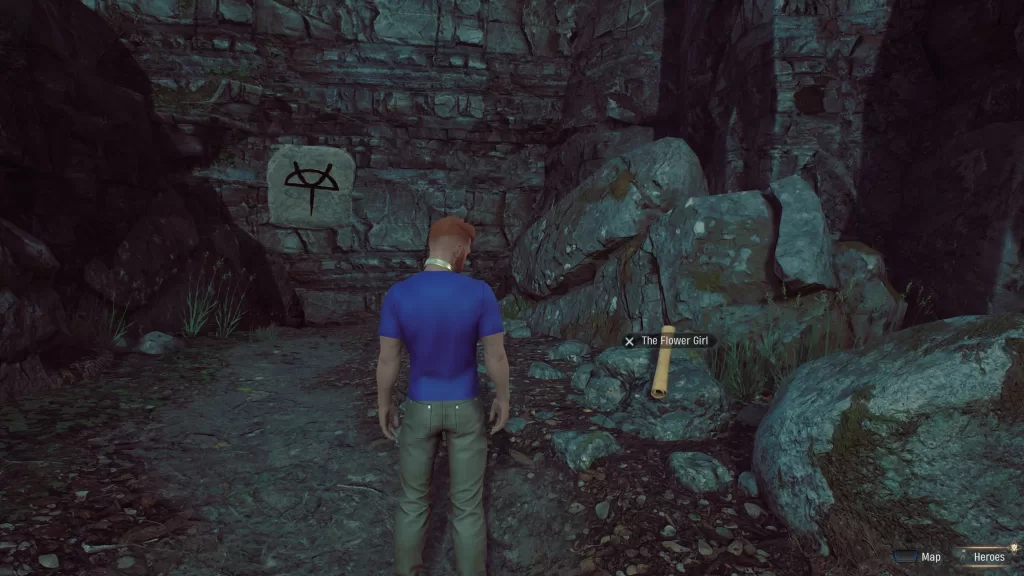
The Flower Girl
This masterwork can be found in the northern part of the Garden of Envy. You’ll need to use the Break Word of Power to clear the rubble blocking the path in order to reach it.
The Glorification of the Royal Hungarian Saints
This masterwork can be found by a wheel barrel next to a building in the northern part of the Valley of the Winds.
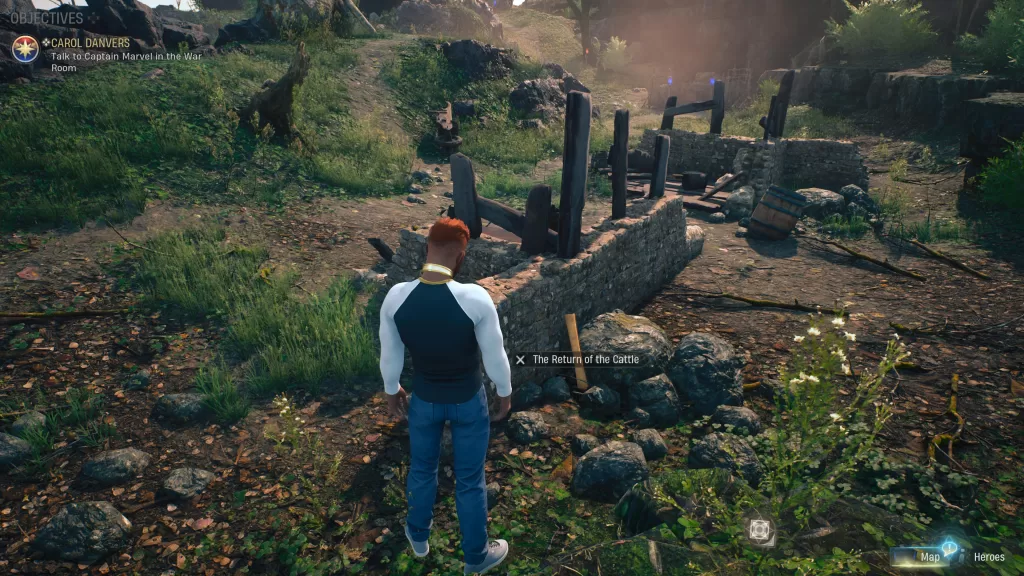
The Return of the Cattle
This masterwork can be found just under the “Te” of Stone Terrace on the map in the remains of a building.
The Weeders
This masterwork can be found on a table down the northeastern path from Shaw’s Church.
Two Men Contemplating the Moon
This masterwork can be found in the northern part of the Whispering Wood.
Vanitas Still Life
This masterwork can be found in a bucket across the northern bridge in the Whispering Wood.
For more guides on Marvel’s Midnight Suns, click here!
In Marvel’s Midnight Suns, there are 12 Faded Journal Pages that make up the Caretaker’s Journal, which is a collectible that can be found throughout the world. Below are the locations of these pages in Marvel’s Midnight Suns! After you obtain all 12 of the Faded Journal Pages, you’ll receive the Black Grimoire recipe book which allows you to convert Gloss to Credits and Credits to Gloss.
Faded Journal Page
Location
July 13, 1689
The day after recruiting Spiderman, a ladder will be available in the Chapel allowing you to reach the attic. Climb up the ladder to find the journal on the table in the back.
July 13, 1689
War Room – On Caretaker’s desk across from the Mirror Table
November 23, 1689
War Room – On a wooden table near the Mirror Table
April 13, 1693
Caretaker’s Room – Bedside table
April 17, 1694
Caretaker’s Room – On desk
November 4, 1694
Caretaker’s Room – In front of fireplace
November 14, 1694
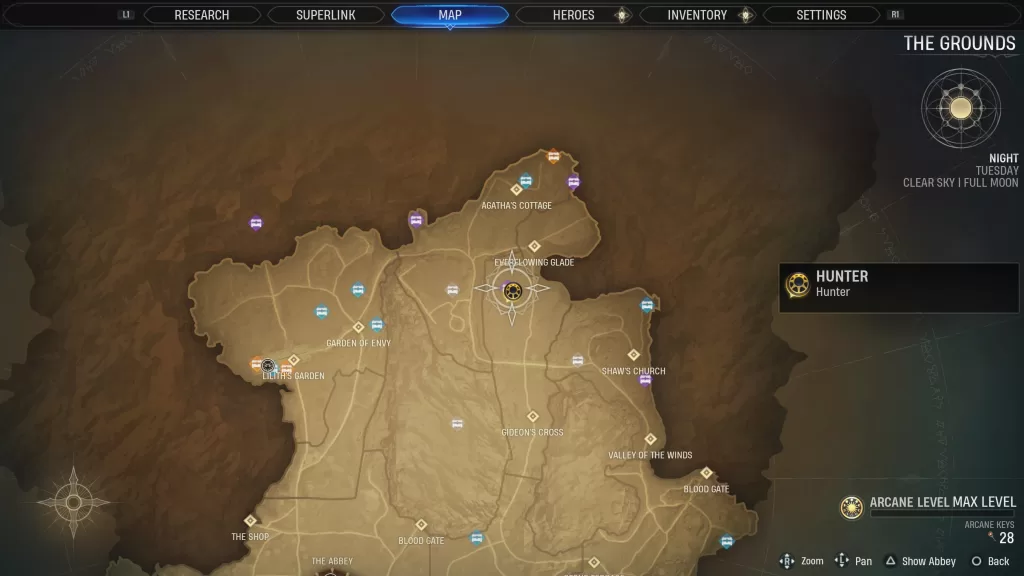
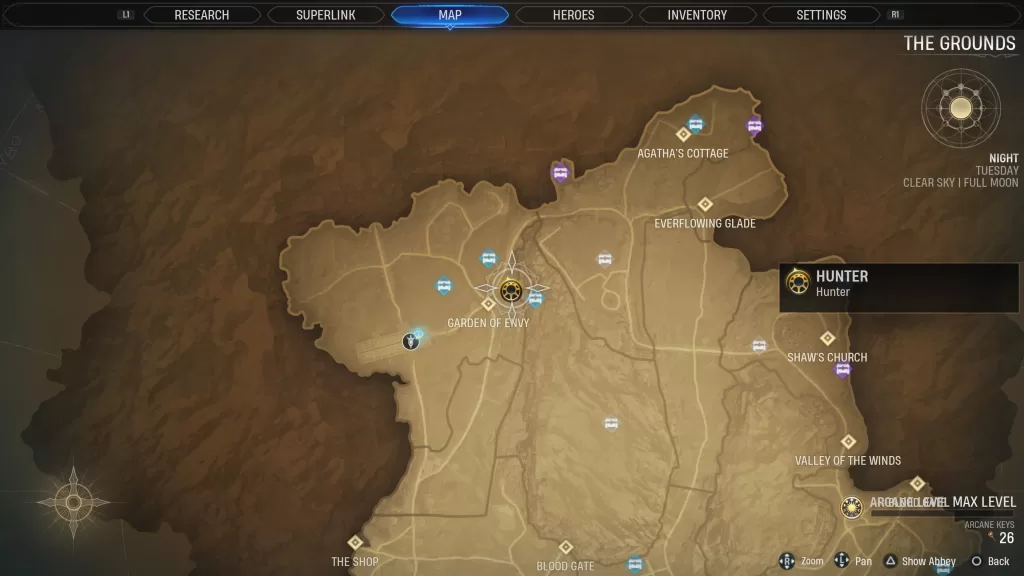
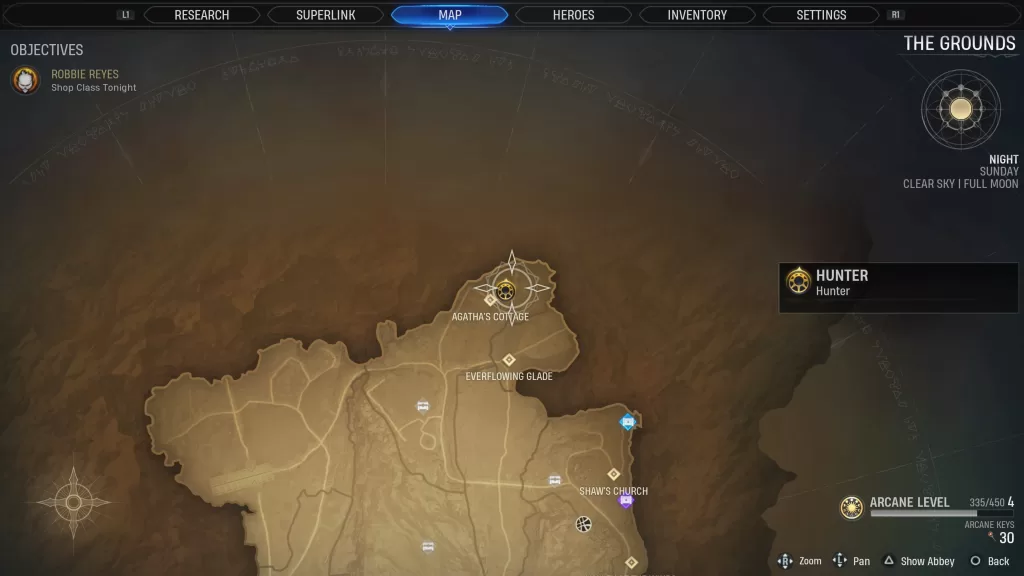
In Agatha’s Cottage *See below for map!*
November 20, 1694
In Agatha’s Cottage *See below for map!*
January 2, 1695
Agatha’s Cottage – On a table under the overhang attached to the cottage *See below for map!*
April 4, 1701
Agatha’s Cottage – On a table in the courtyard in front of the cottage *See below for map!*
February 14, 1708
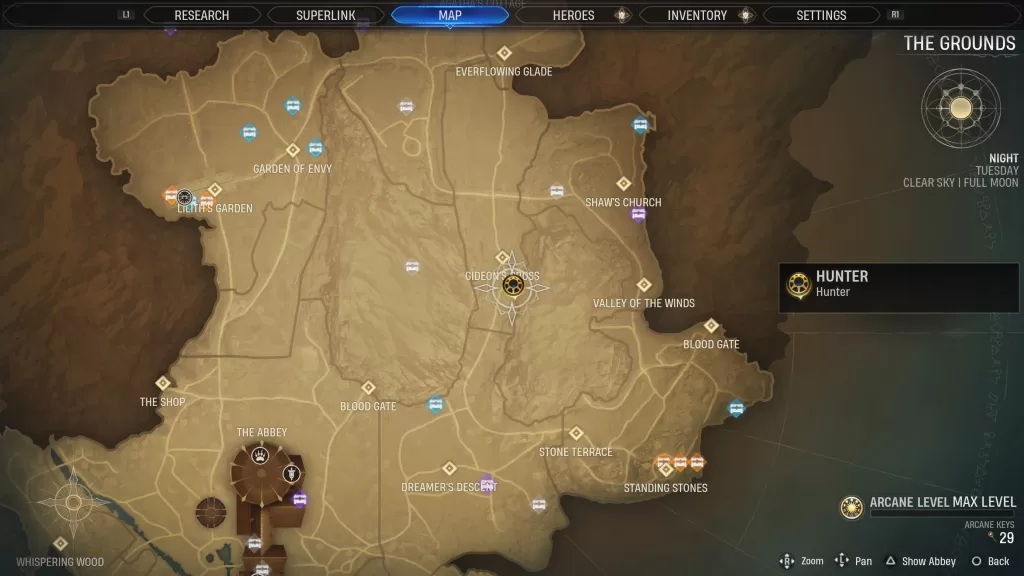
Lilith’s Garden – Next to Lilith’s statue
June 3, 1710
Accessible during the story on Night 3 – On a desk in the back of the Library
August 15, 1710
Chapel – On a bookshelf
Agatha’s Cottage Location
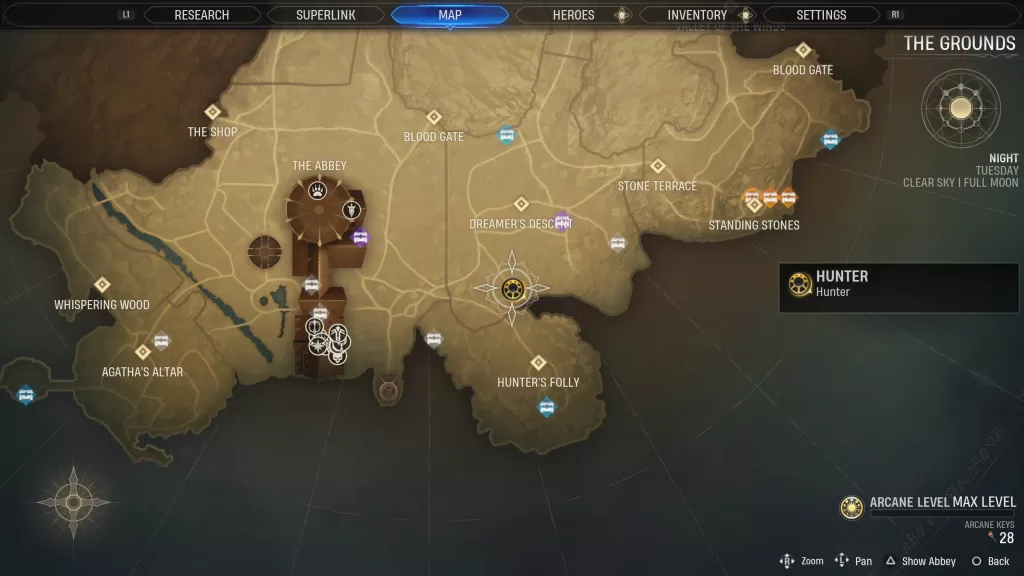
Lilith’s Garden
For more guides on Marvel’s Midnight Suns, click here!
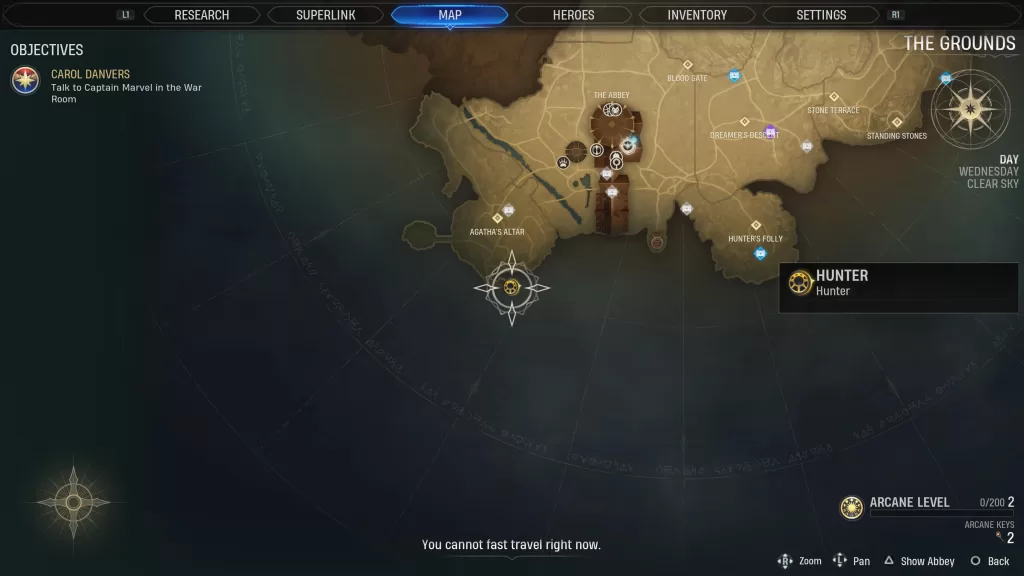
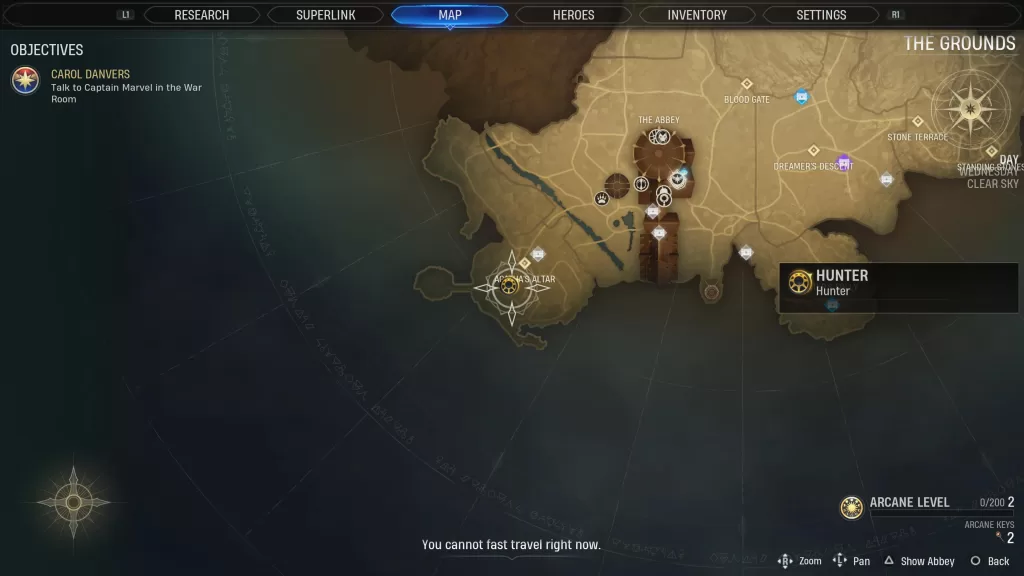
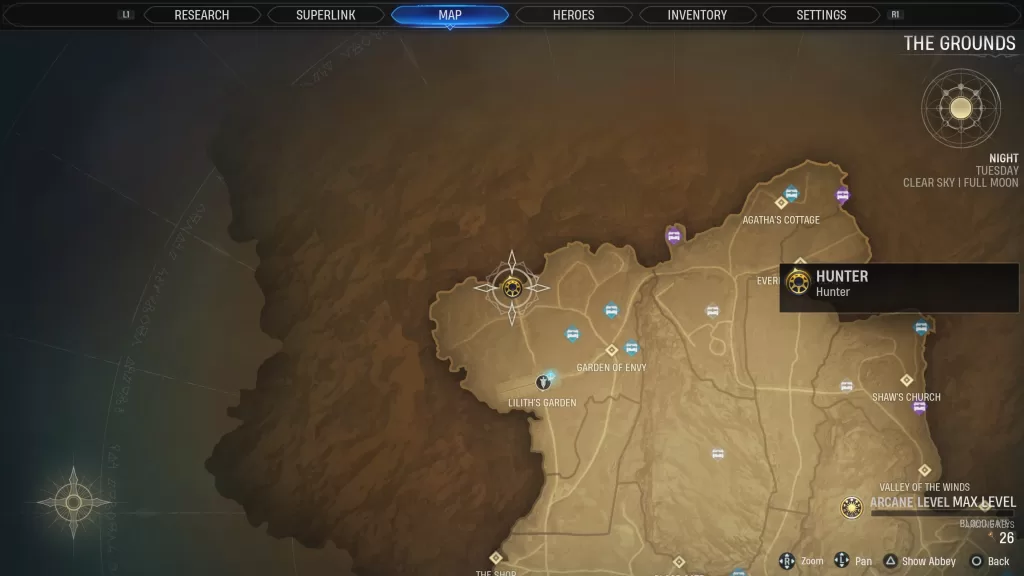
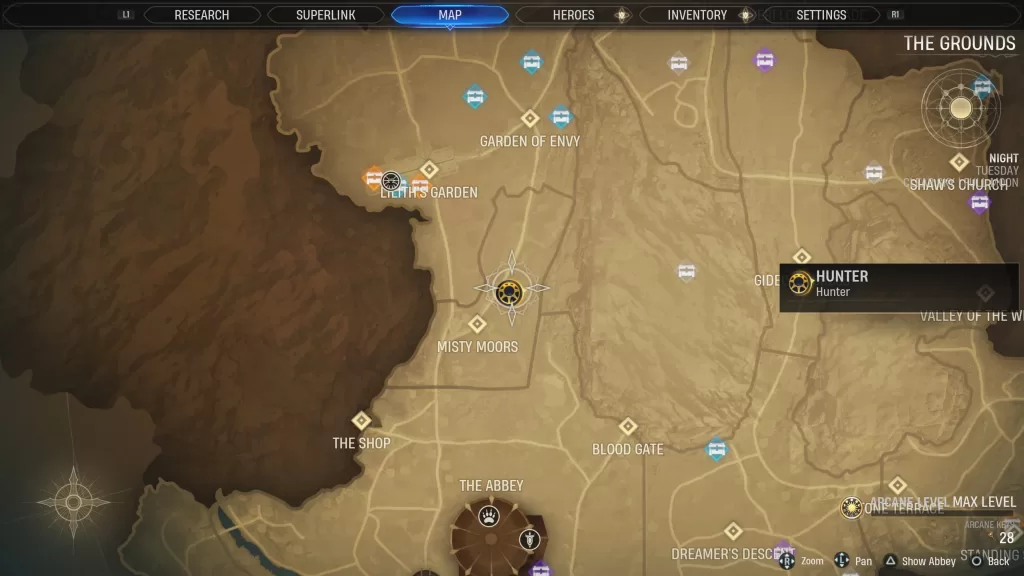
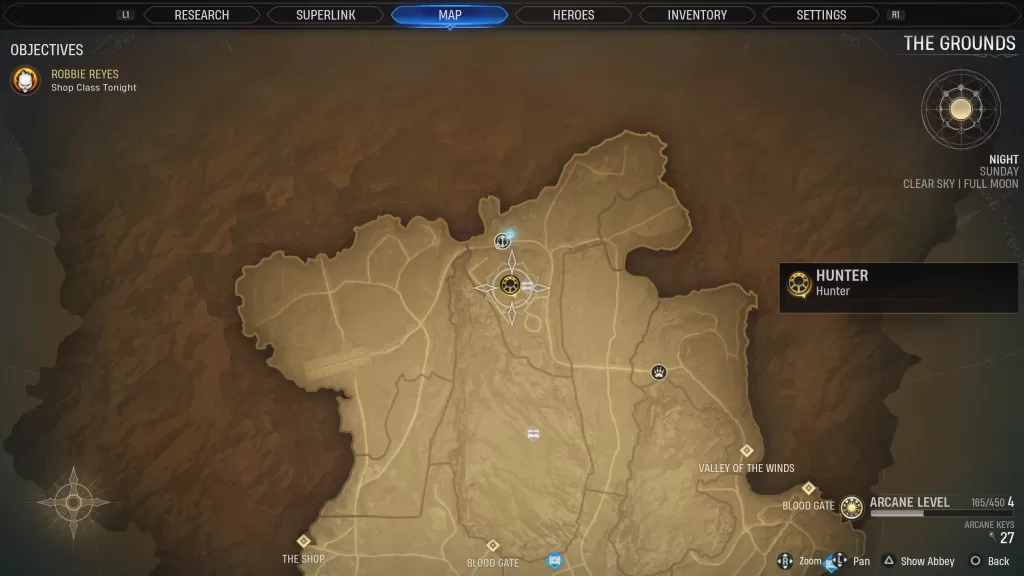
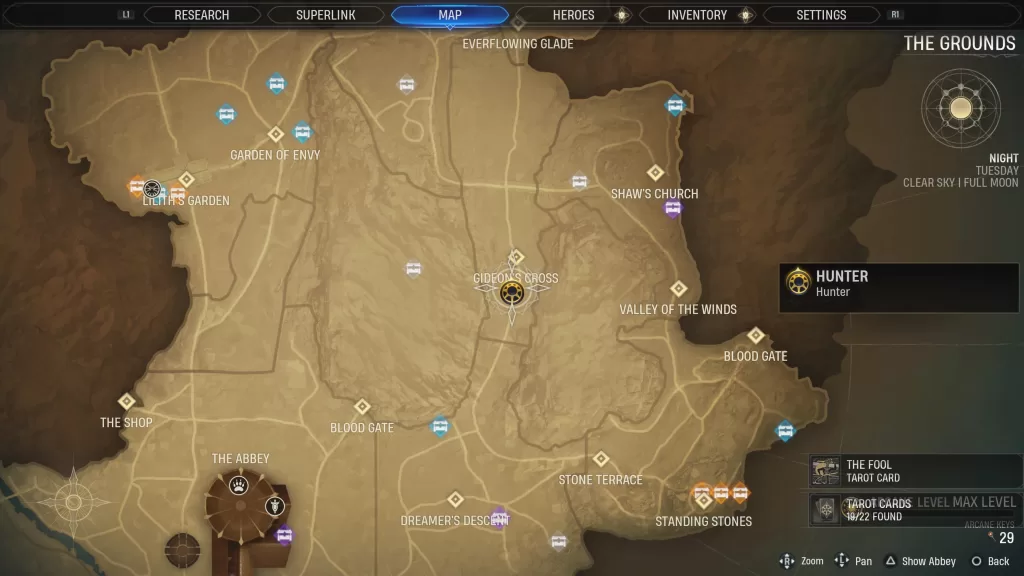
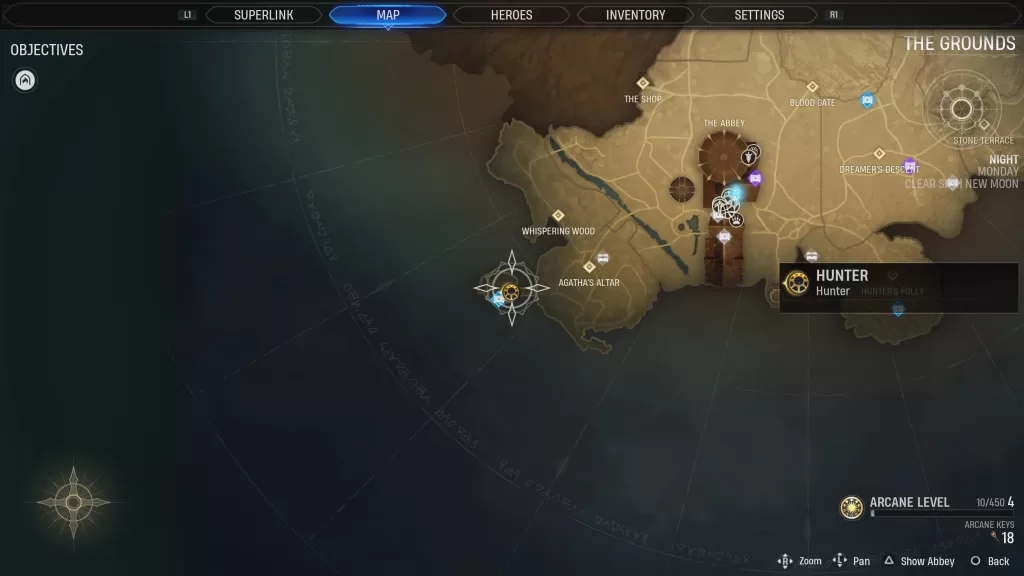
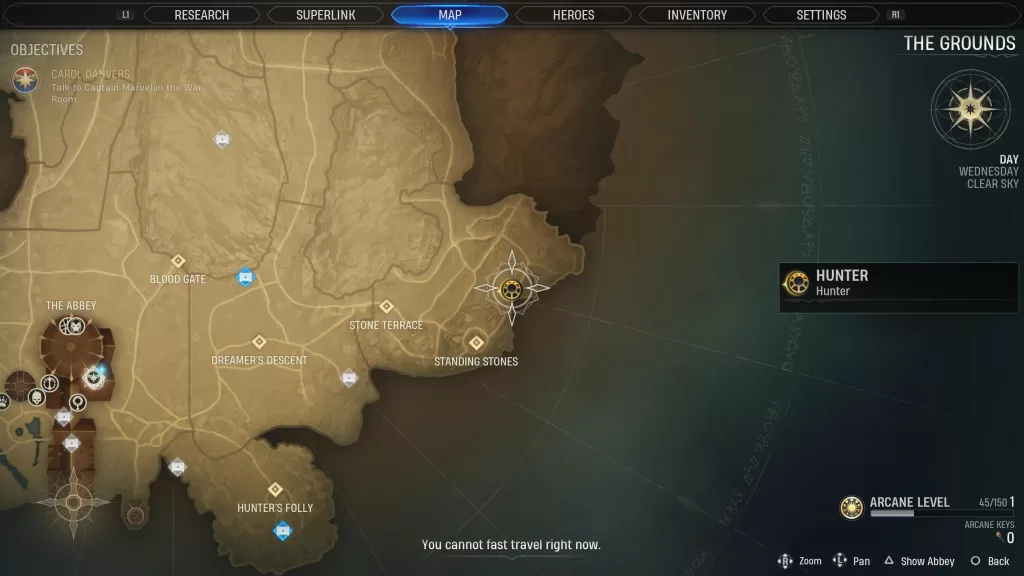
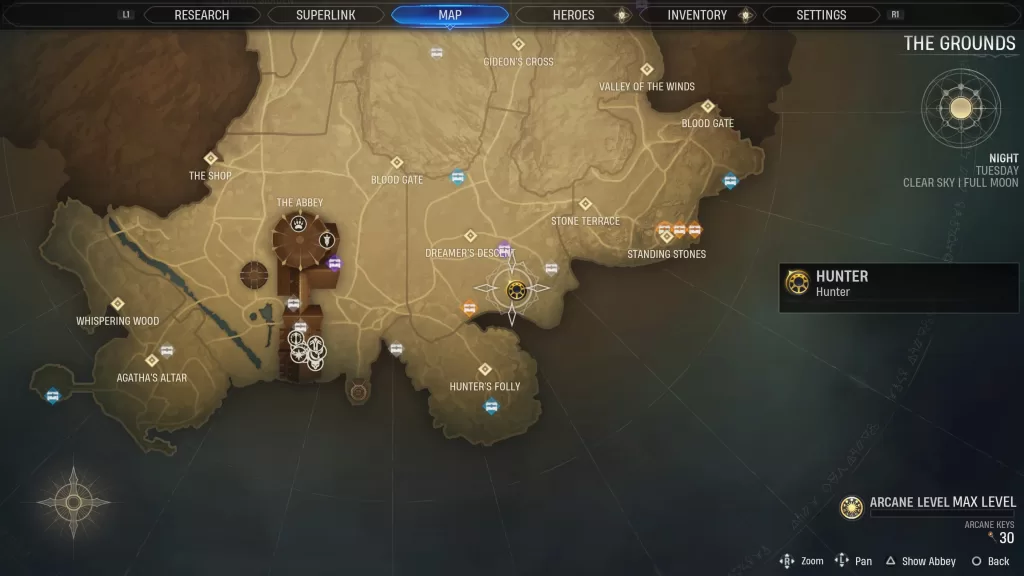
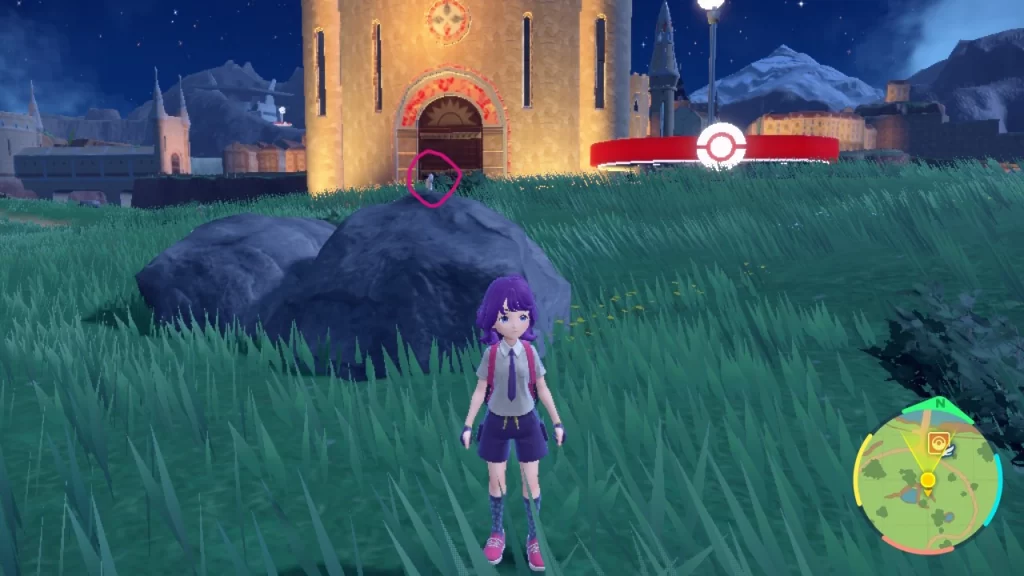
In Marvel’s Midnight Suns, there are 22 tarot cards that can be found throughout the world. These tarot cards are a part of the Collection! Below are the locations of these tarot cards in Marvel’s Midnight Suns!
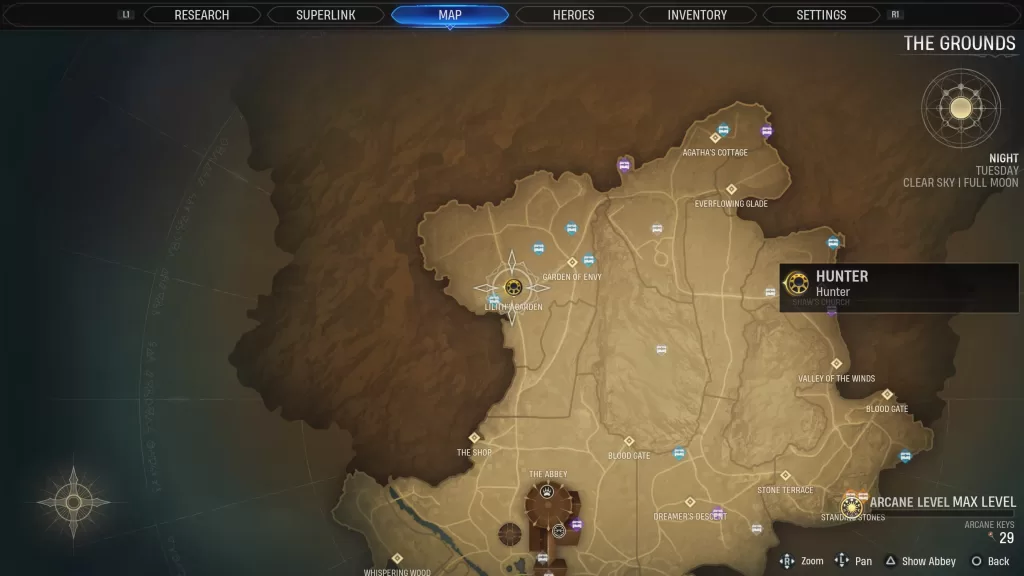
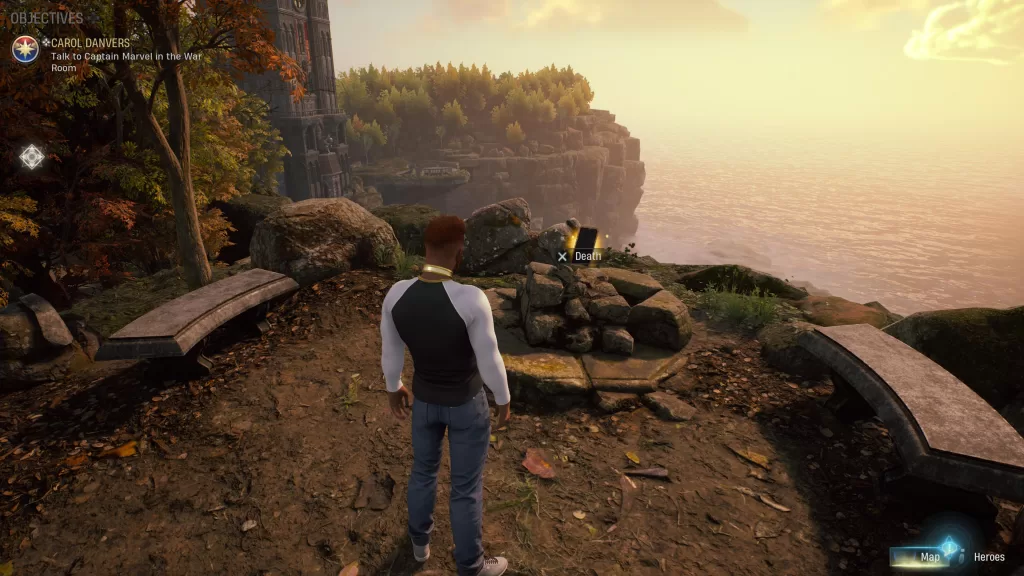
Death
This tarot card can be found on the very southern tip of Agatha’s Altar along the edge of the map.
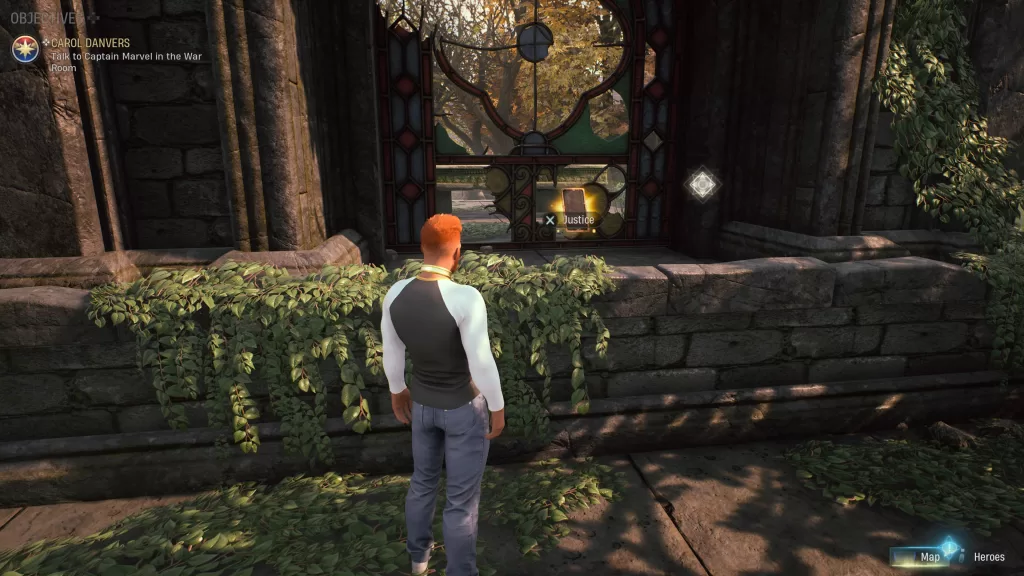
Justice
This tarot card can be found on the backside of Agatha’s Altar.
Strength
This tarot card can be found in the Chapel on the floor next to the bookshelf.
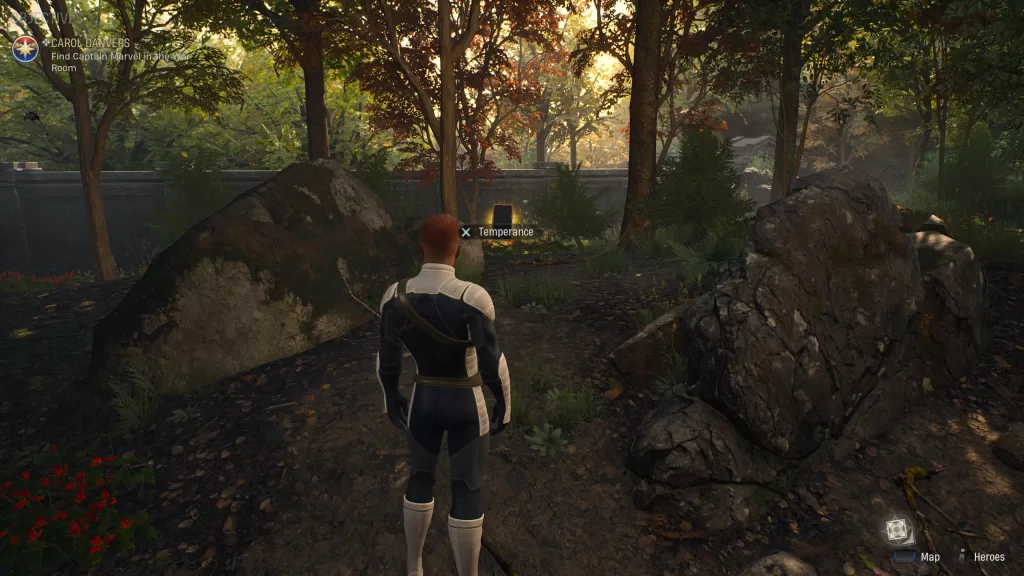
Temperance
Head outside from the War Room and take a left then head straight into the woods. You’ll come to some large rocks on your left. This tarot card will be in the middle of these rocks.
The Chariot
This tarot card can be found to the far north of Lilith’s Garden. Use the Reveal Word of Power on the bridge to reach it!
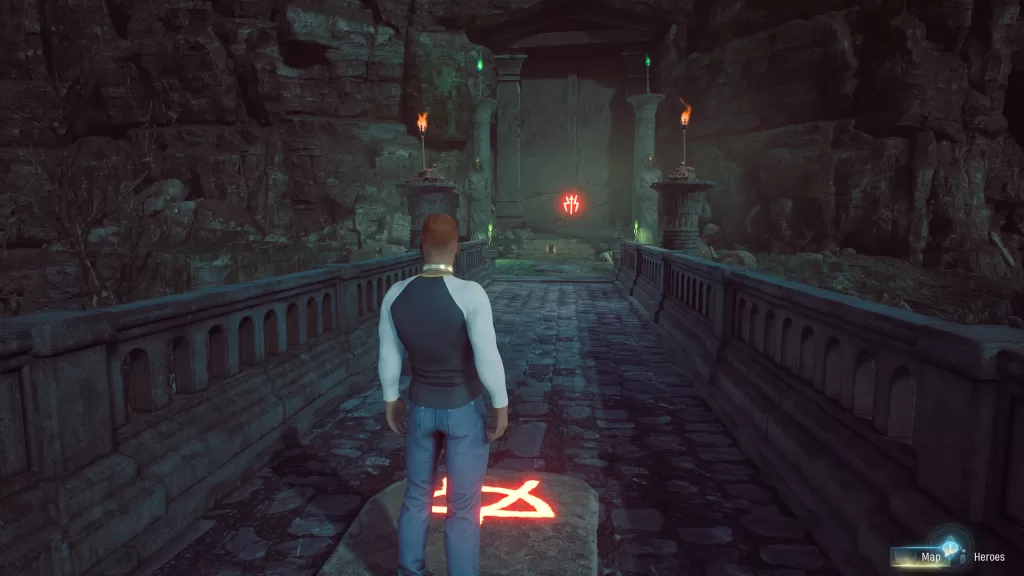
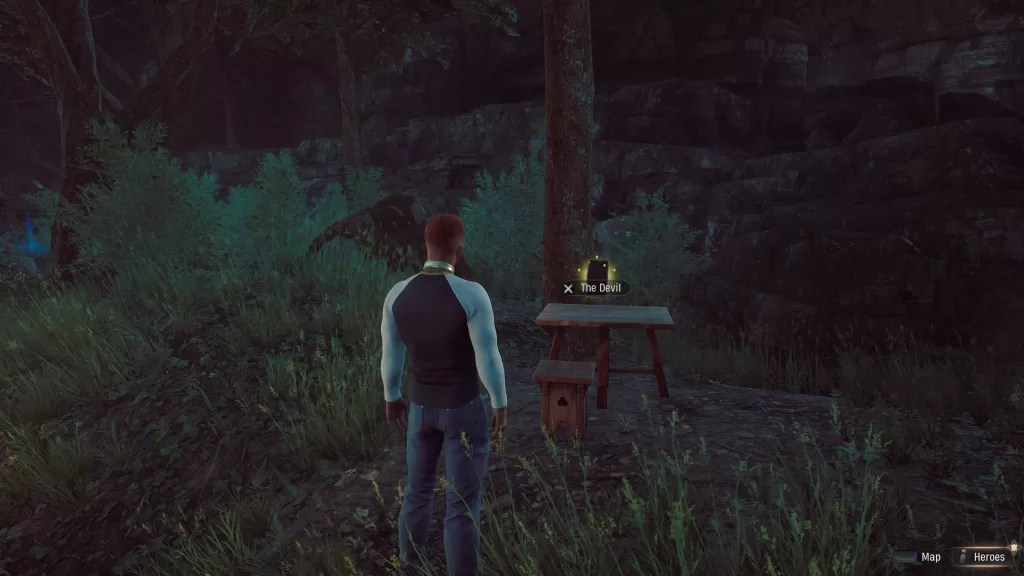
The Devil
This tarot card can be found along the main path in the Misty Moors.
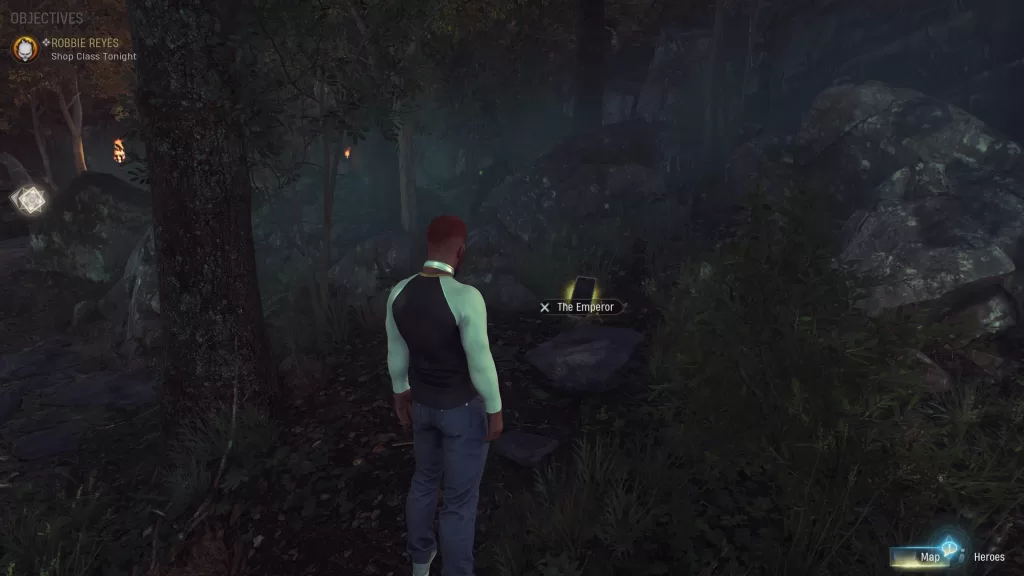
The Emperor
This tarot card can be found just below the “Glade” in the Everflowing Glade text on the map.
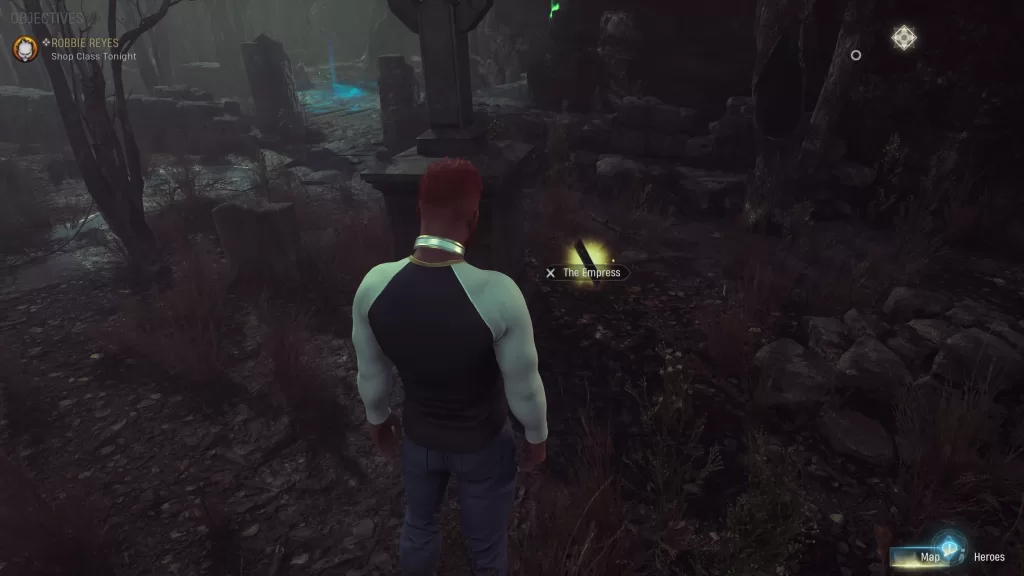
The Empress
This tarot card can be found in the cemetery northwest of Shaw’s Church.
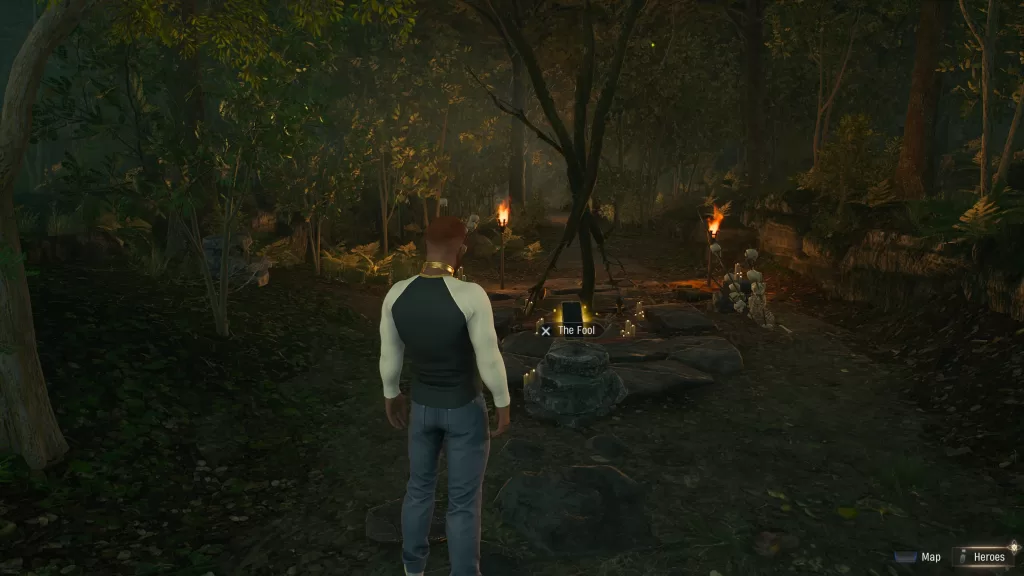
The Fool
This tarot card can be found in the central part of Gideon’s Cross along the main path.
The Hanged Man
This tarot card can be found across a bridge west of Agatha’s Altar and is only reachable after obtaining the “Reveal” Word of Power.
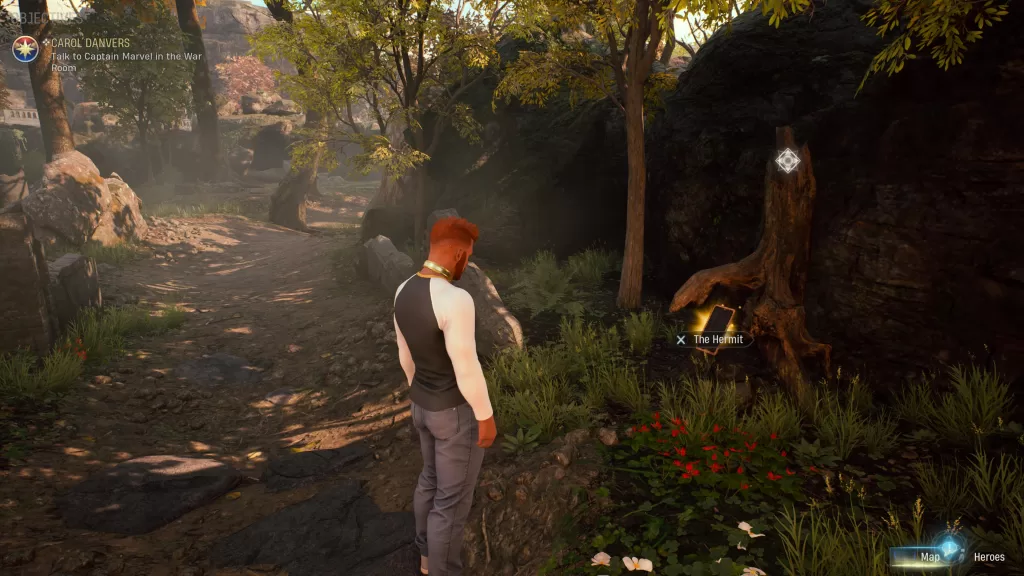
The Hermit
This tarot card can be found along the path in the “Whispering” text on the map of Whispering Wood.
The Hierophant
This tarot card can be found in the area behind Shaw’s Church, which is accessible during the Hiram Shaw’s Church Mystery.
The High Priestess
This tarot card can be found along the path northeast of Standing Stones along the edge of the map.
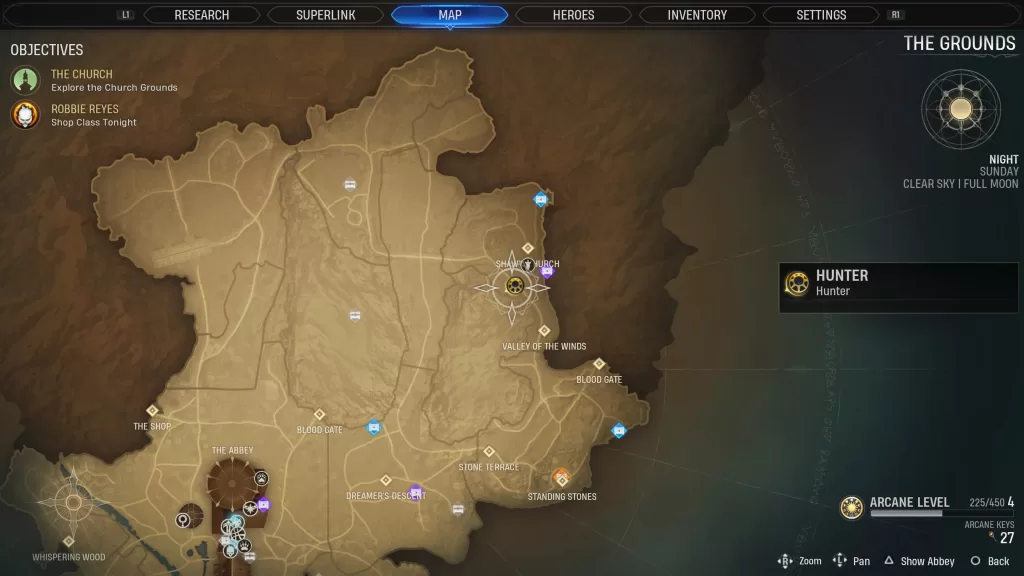
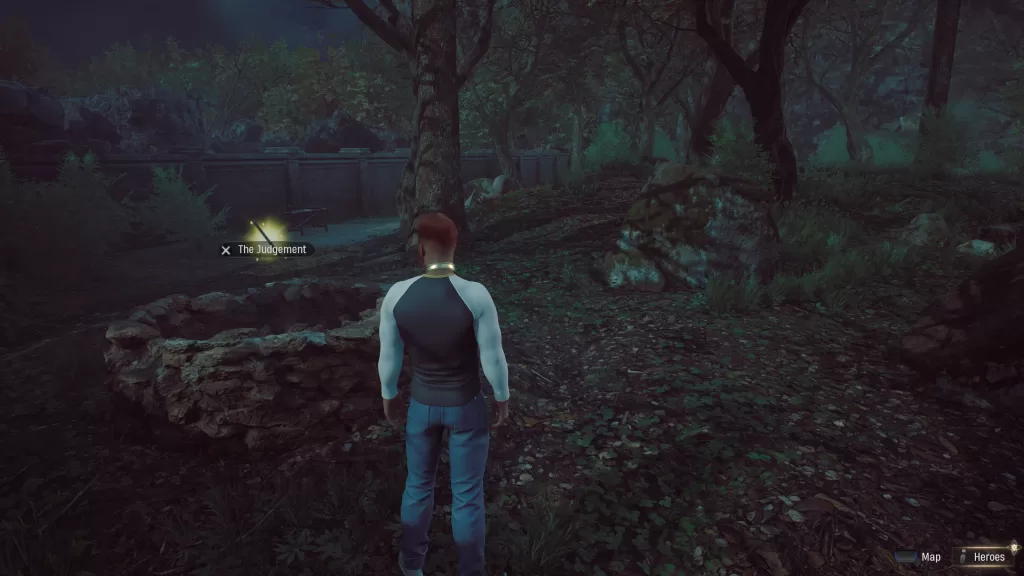
The Judgement
This tarot card can be found above a well in the southeastern part of Misty Moors.
The Lovers
This tarot card can be found in a small cemetery just north of the Envy part of the Garden of Envy text on the map. You’ll need to use the Open Word of Power on the gate to reach it.
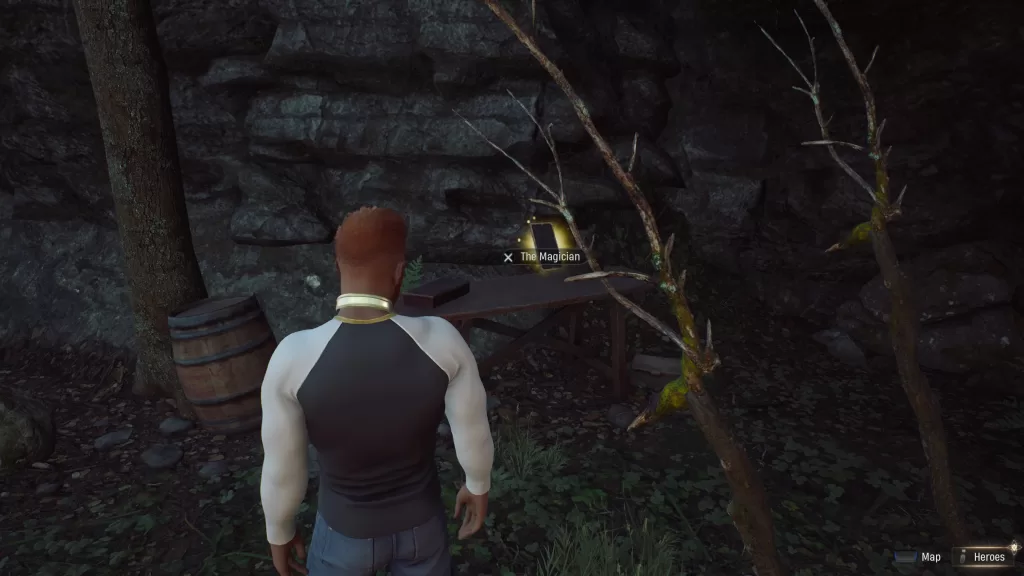
The Magician
This tarot card can be found behind the breakable wall in the southern part of the Dreamer’s Descent.
The Moon
This tarot card can be found in the Forge on the ground near the bookshelves.
The Star
This tarot card can be found in the Forge on the counter near the glove hologram by the Iron Man suit.
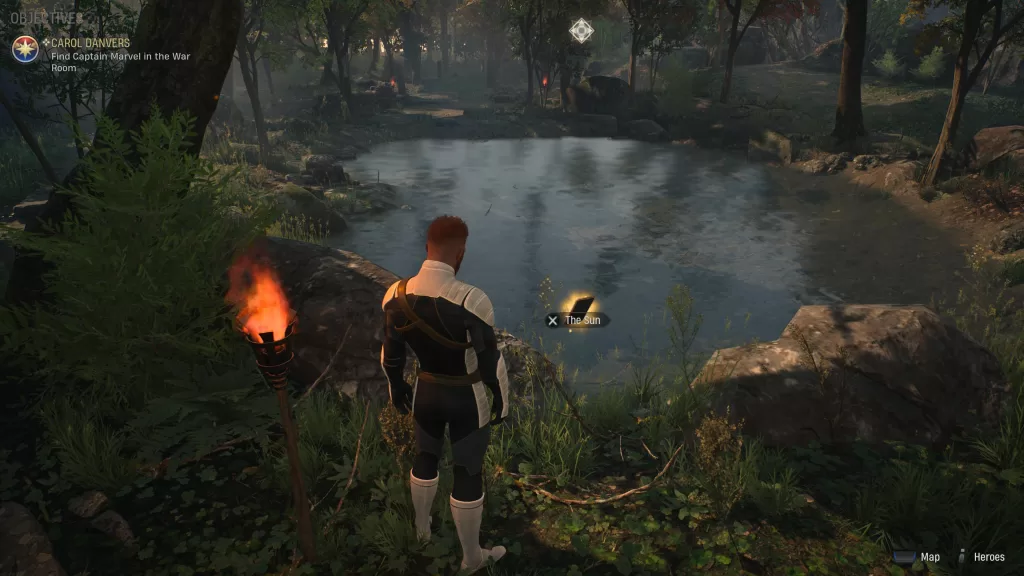
The Sun
This tarot card can be found northeast of The Abbey near a pond.
The Tower
This tarot card can be found in the southeastern part of Dreamer’s Descent. You’ll need to use the Break Word of Power on some rubble blocking a path to clear the way allowing you to reach it.
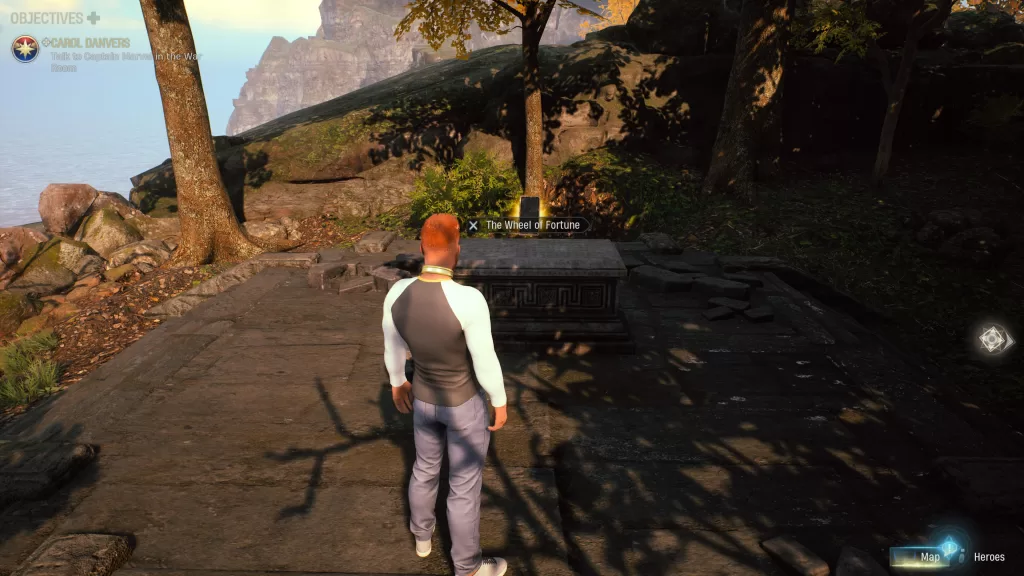
The Wheel of Fortune
This tarot card can be found on a small altar directly west of Agatha’s Altar.
The World
This tarot card can be found at Agatha’s Cottage.
For more guides on Marvel’s Midnight Suns, click here!
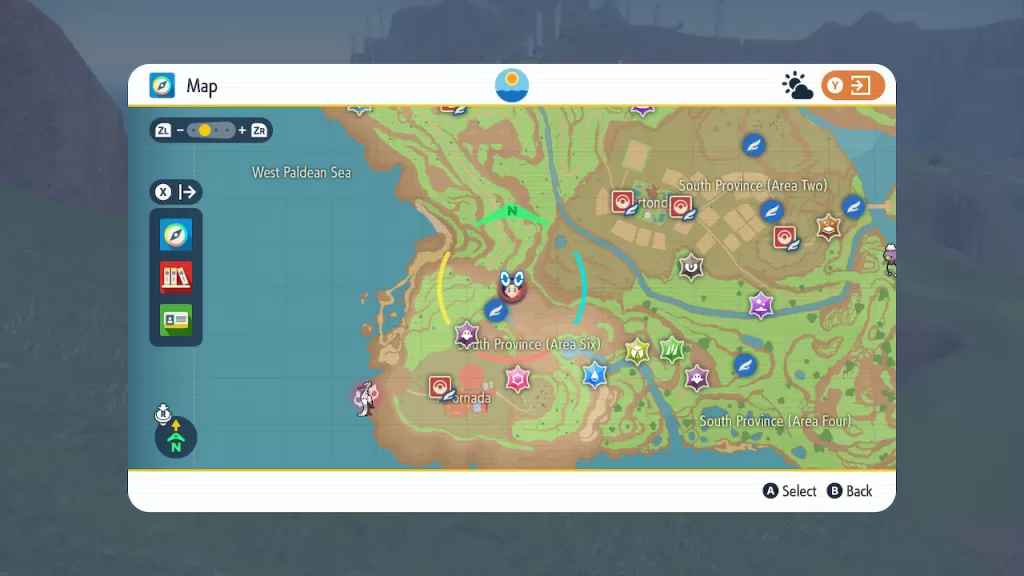
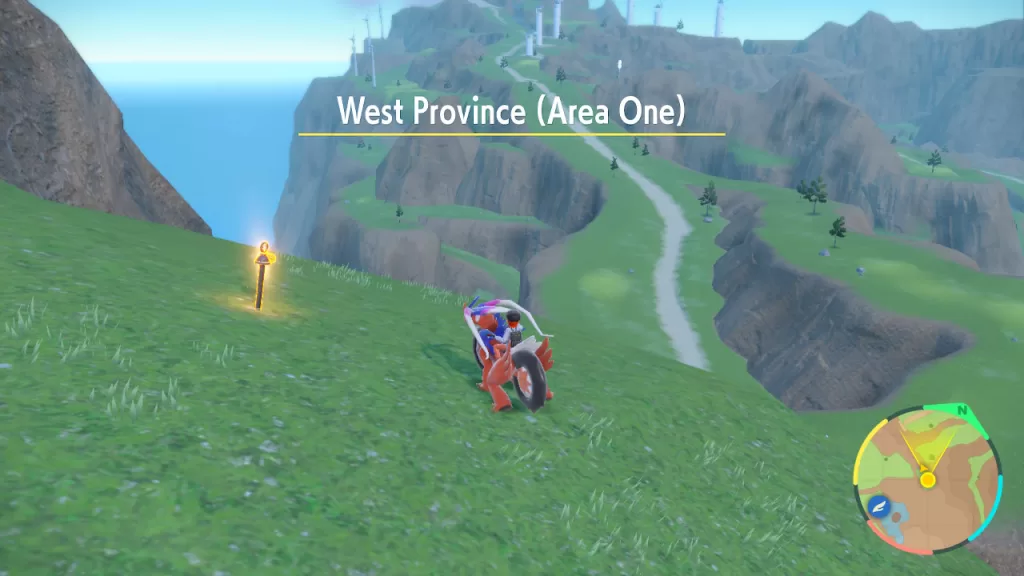
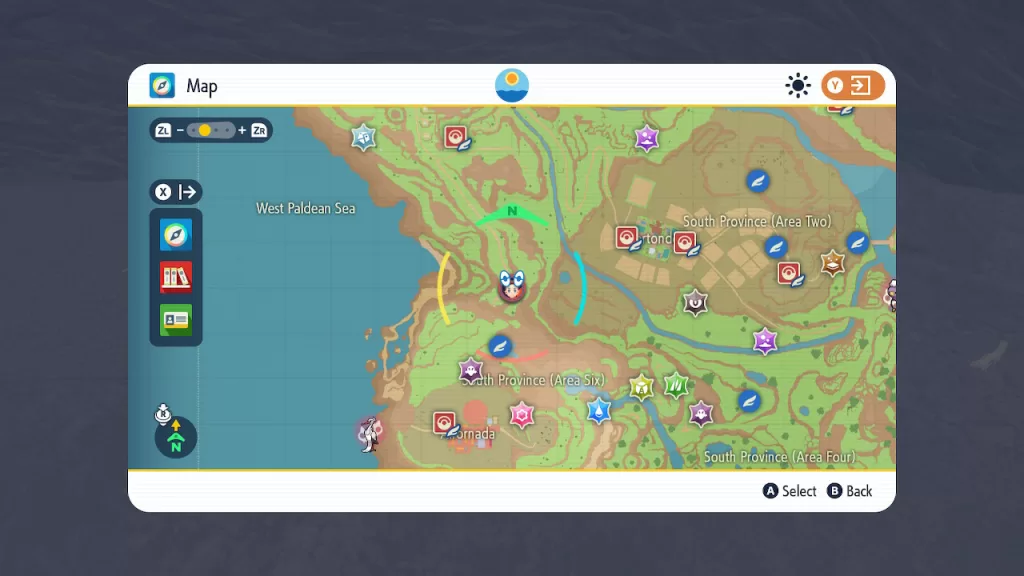
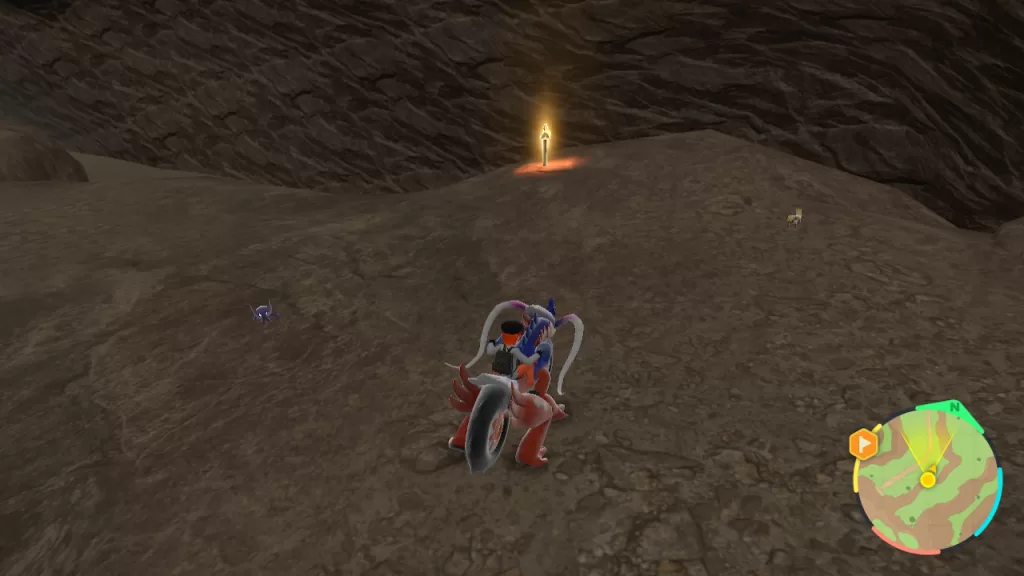
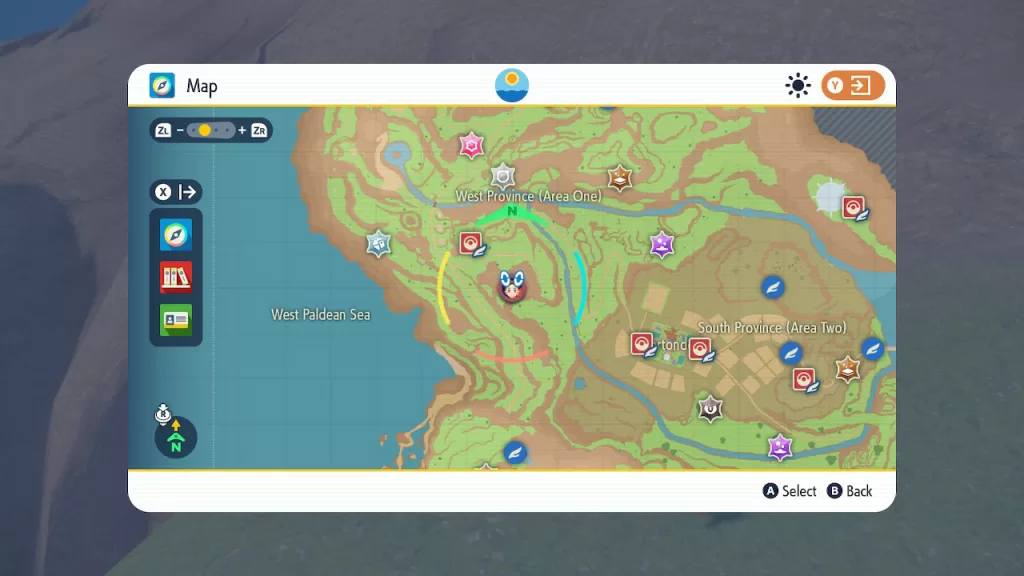
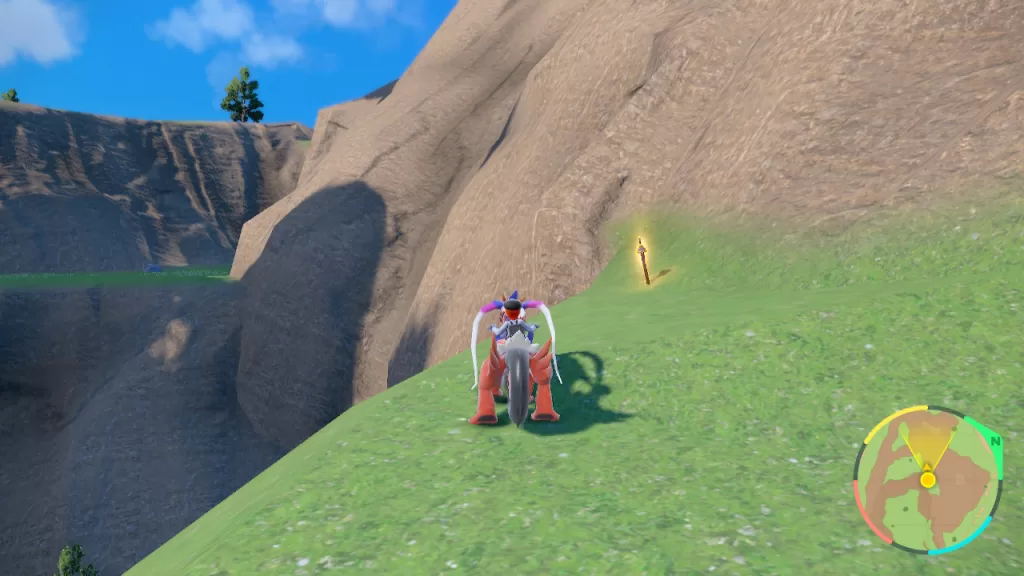
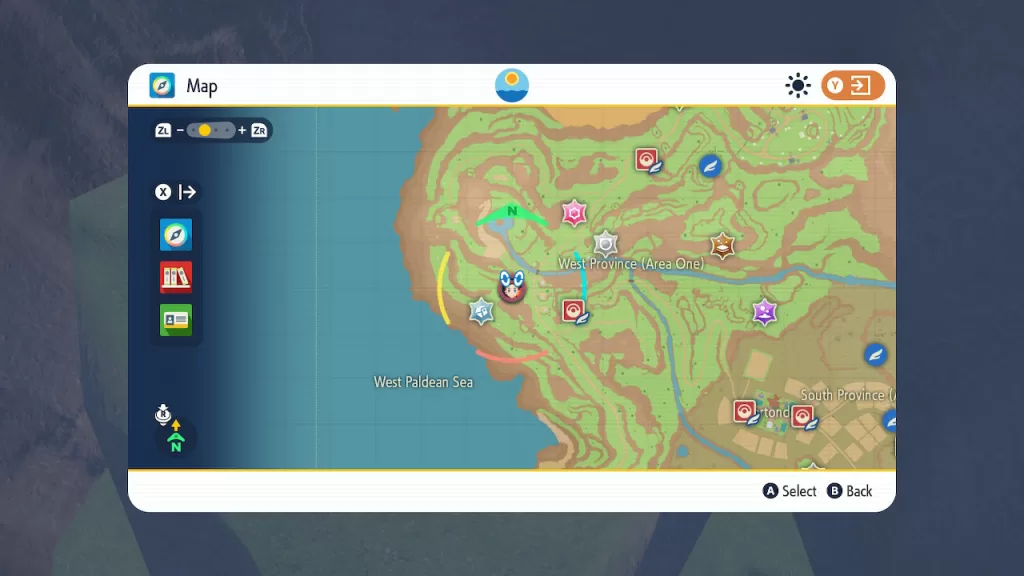
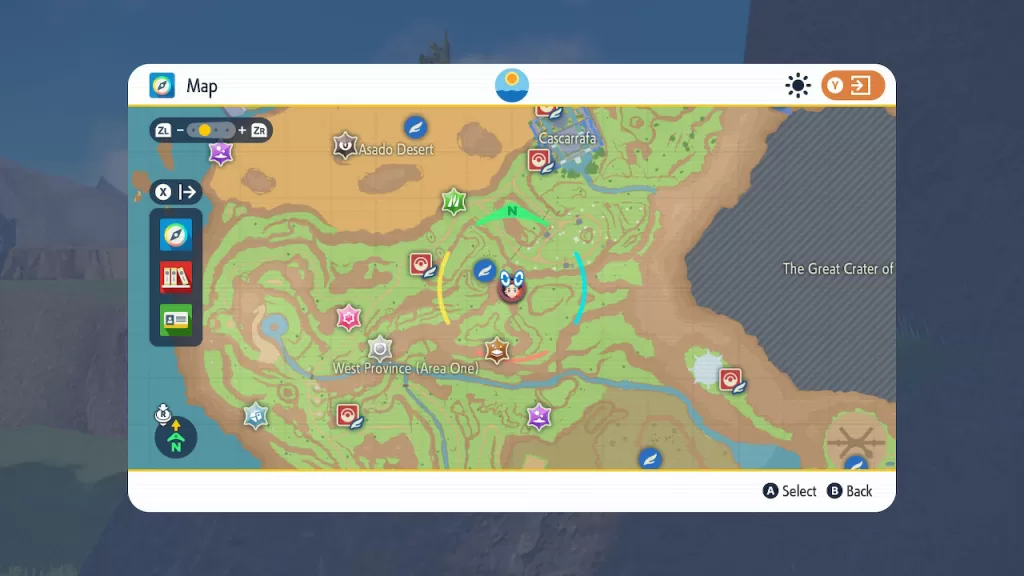
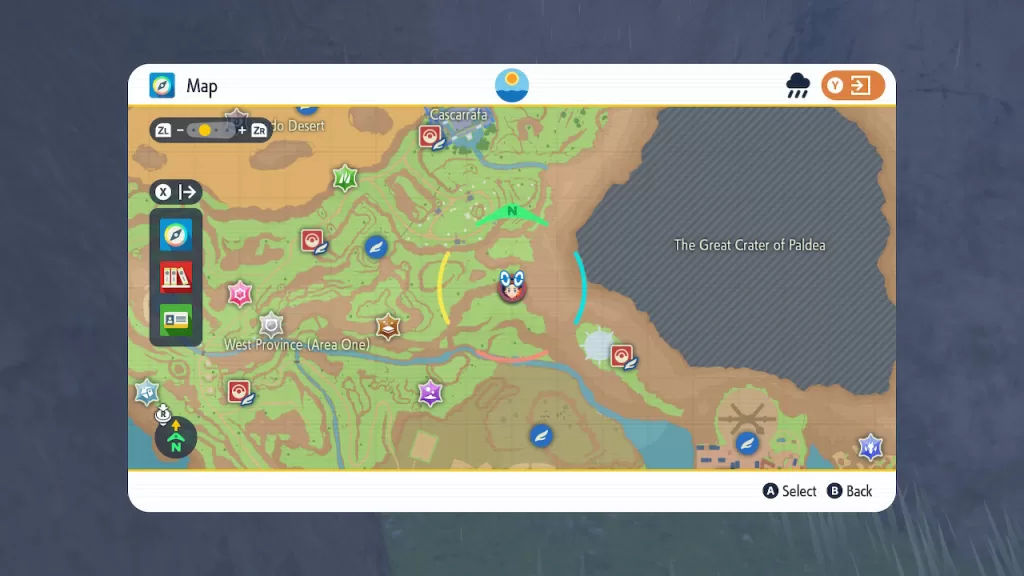
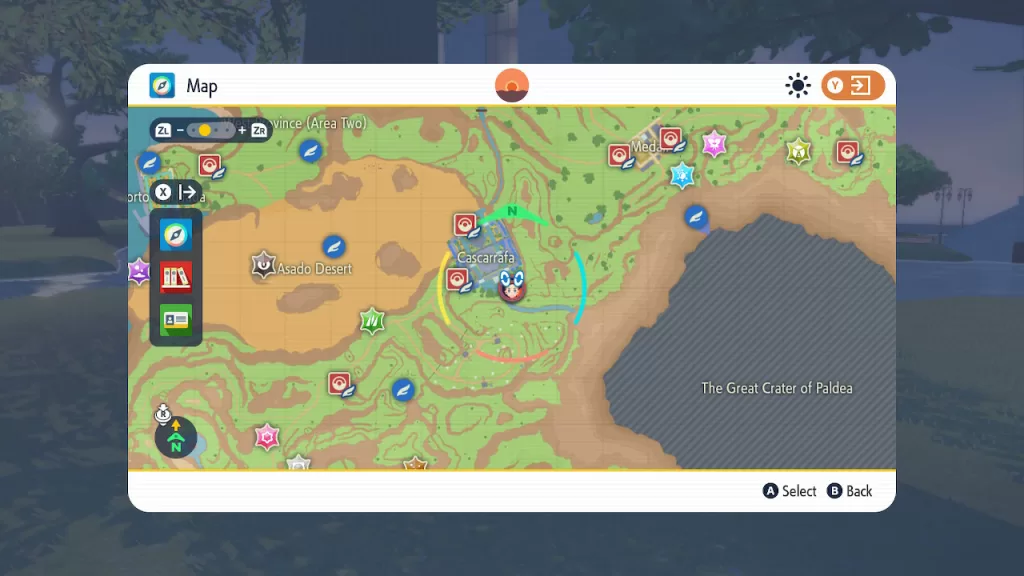
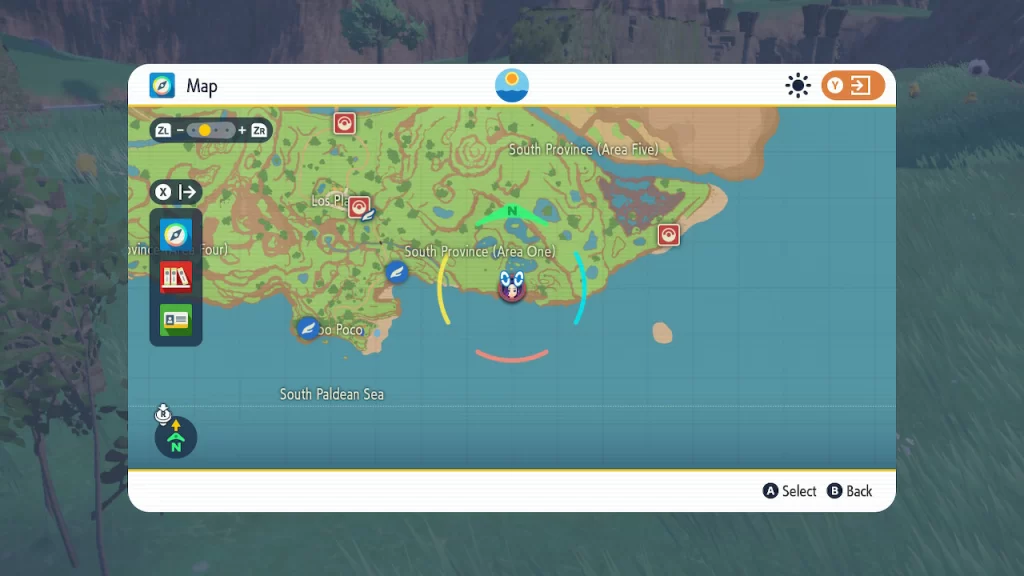
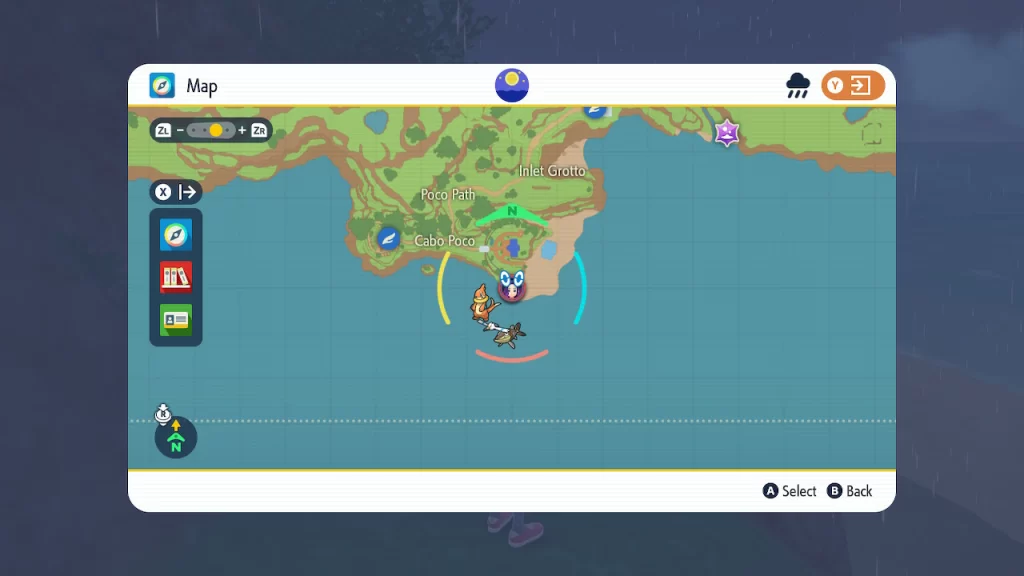
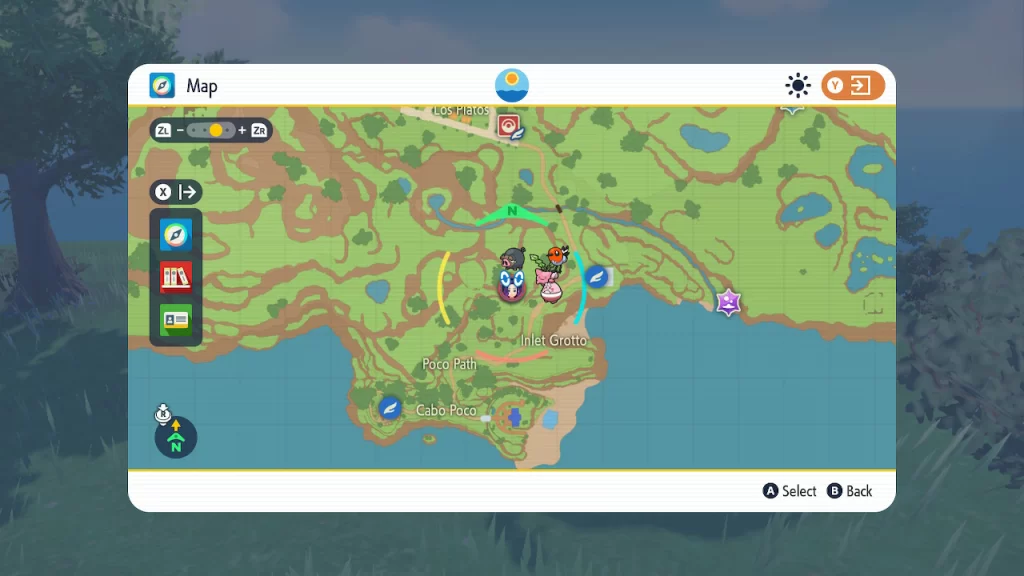
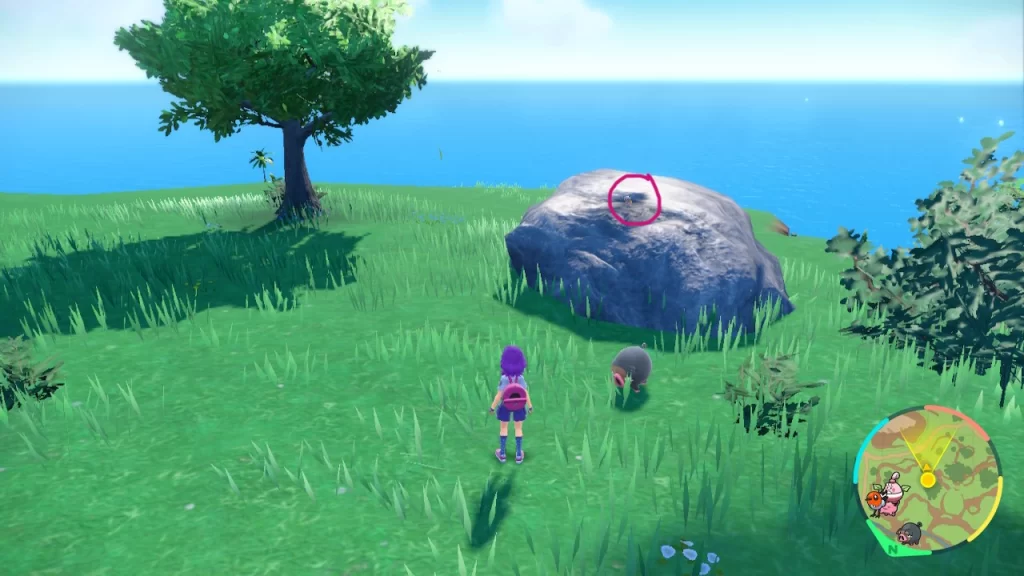
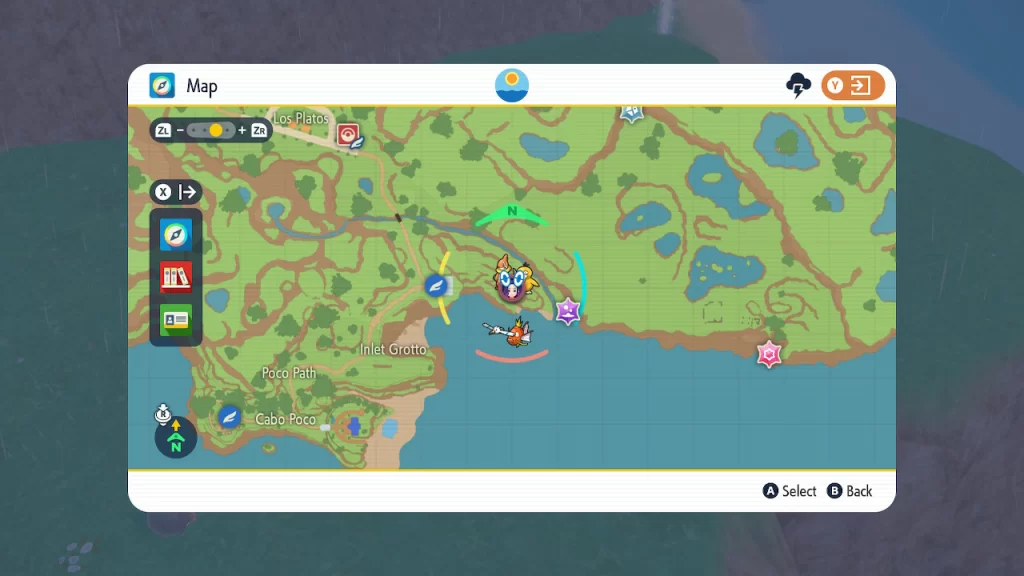
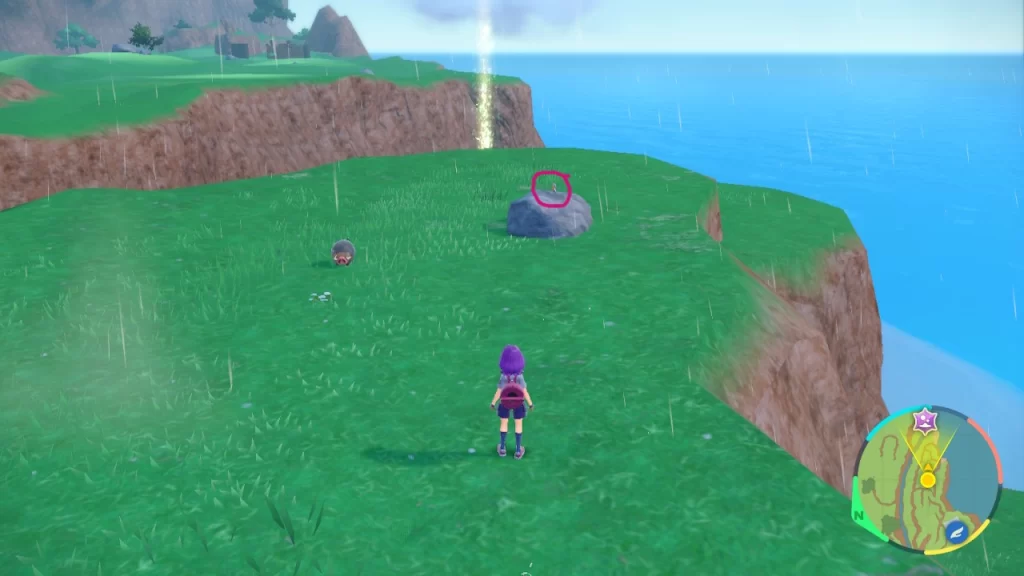
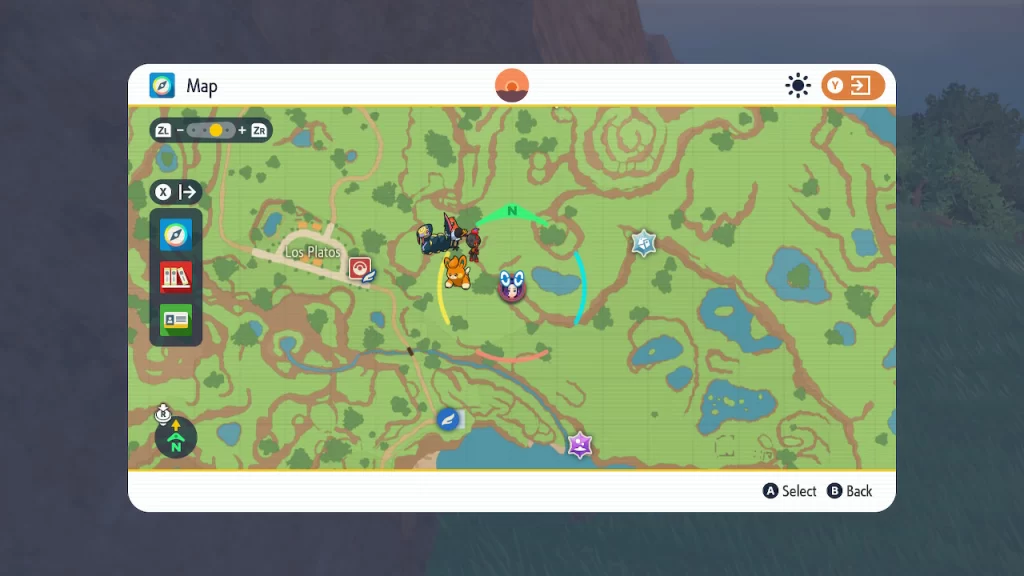
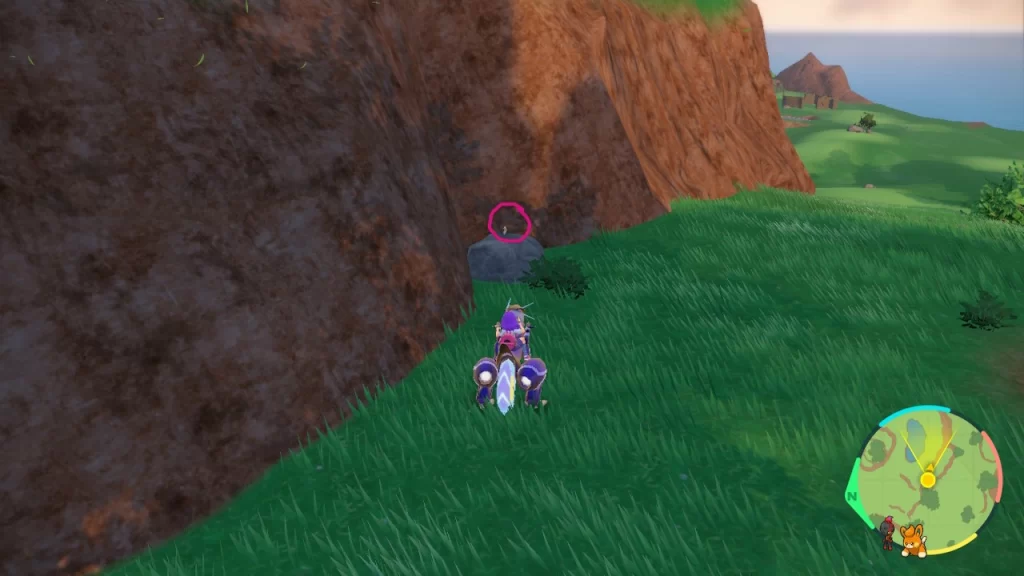
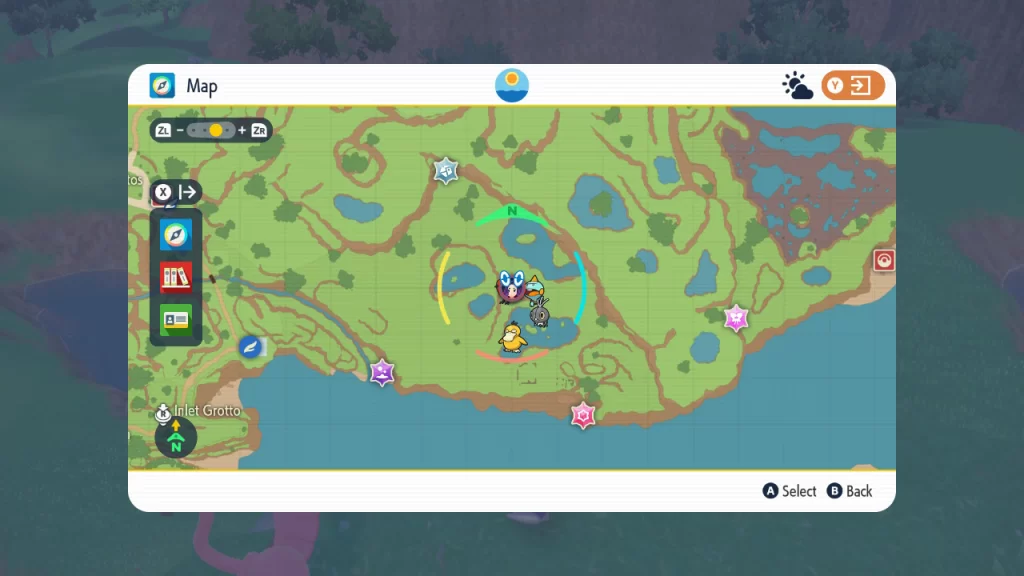
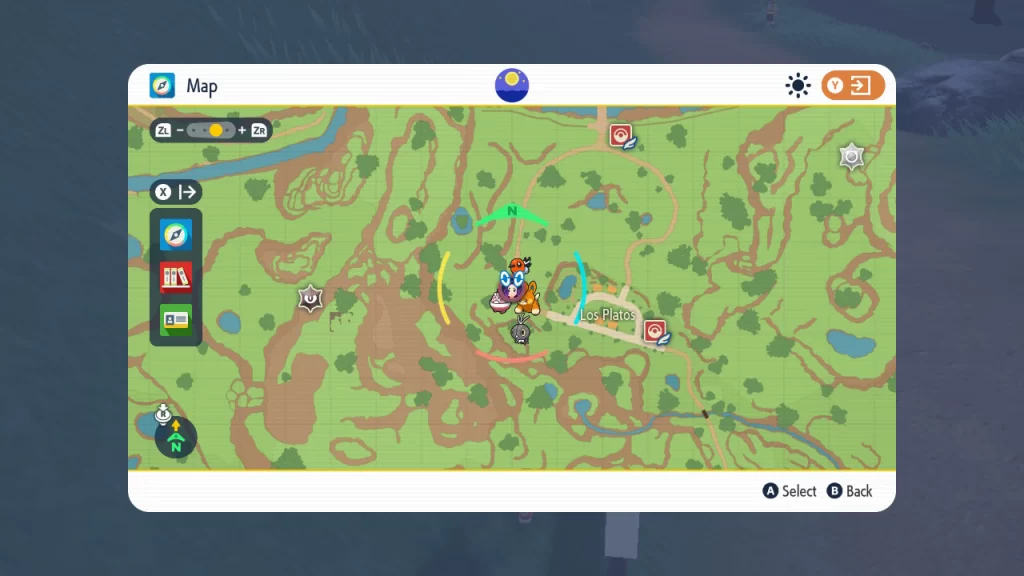
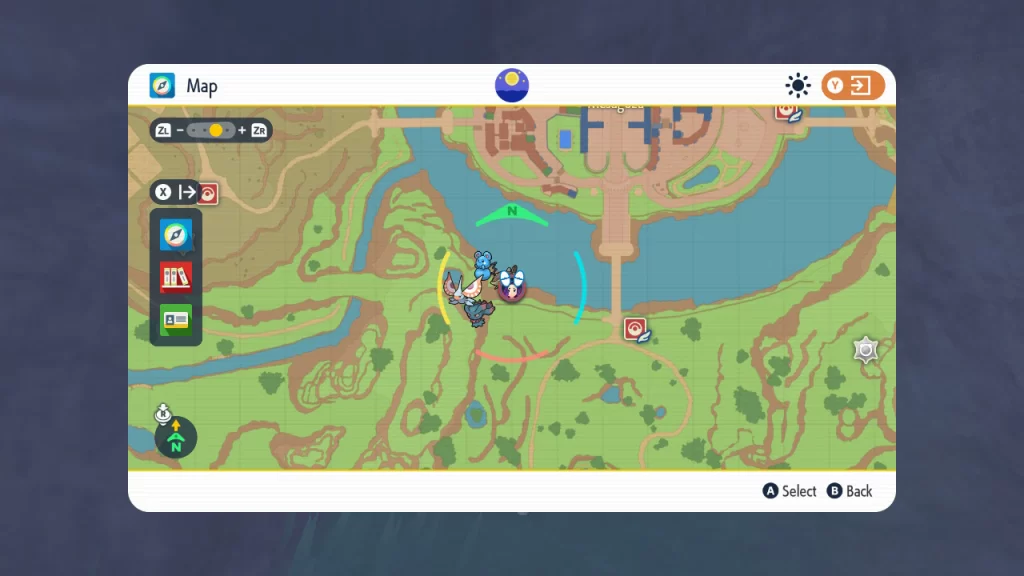
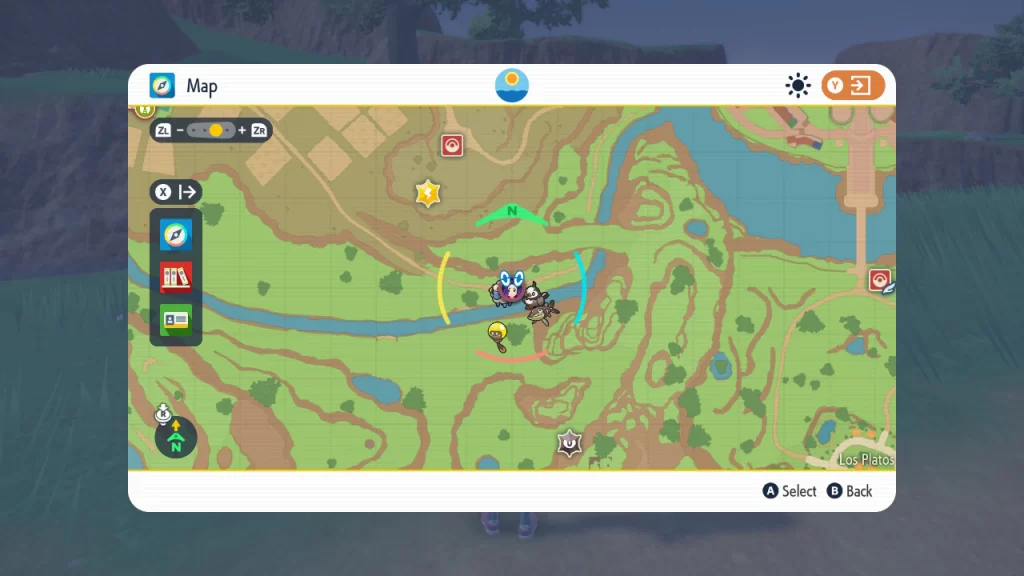
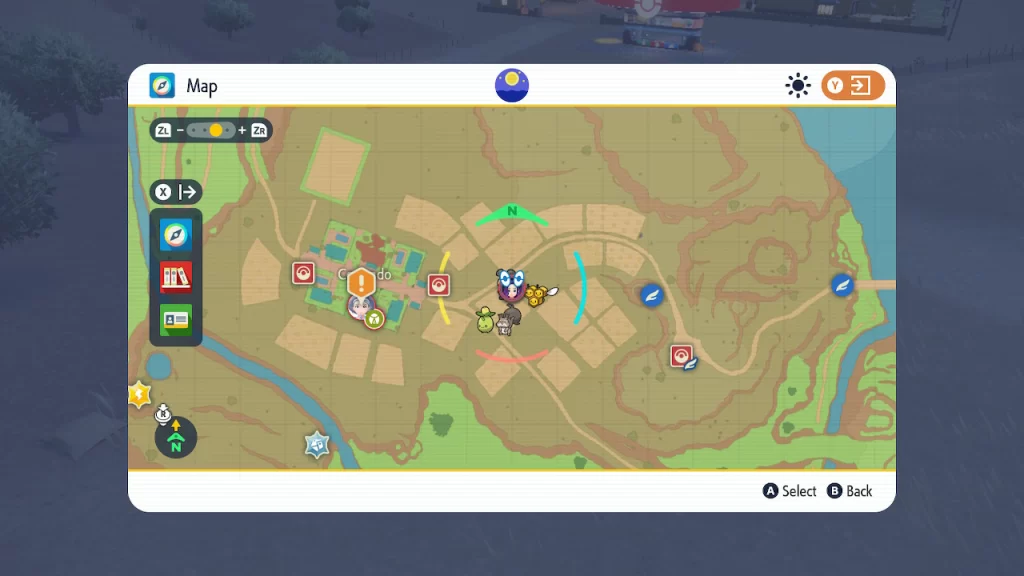
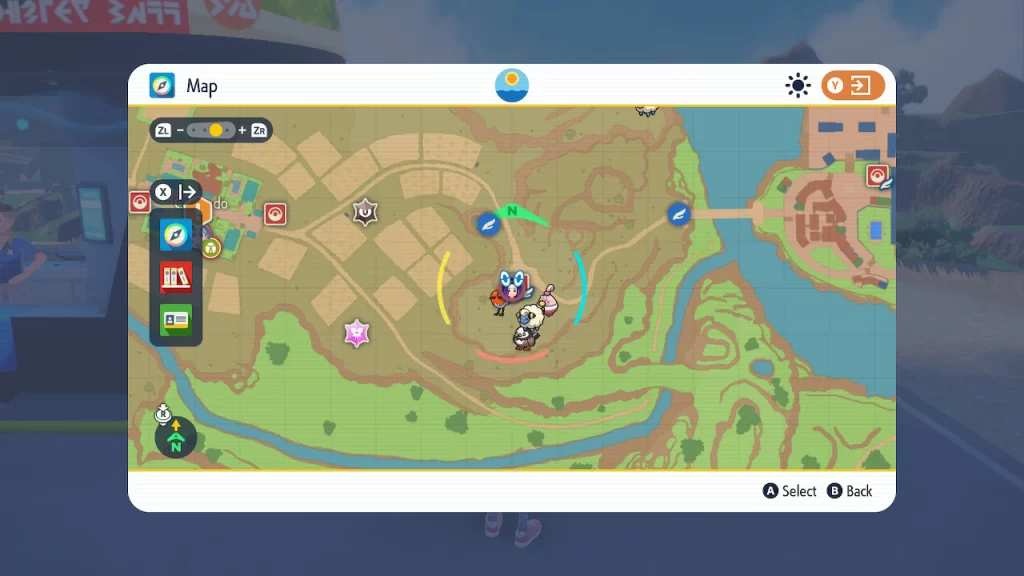
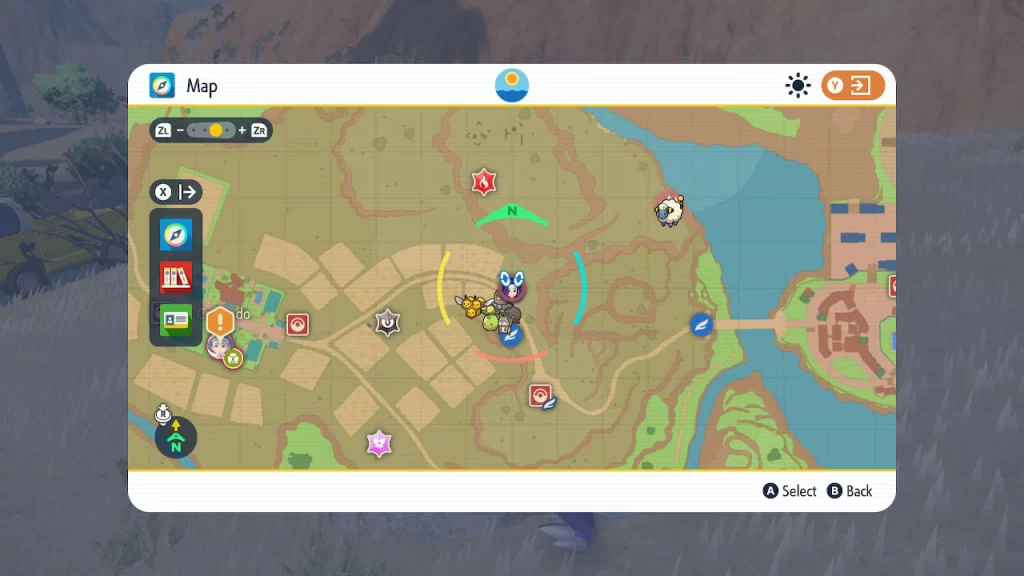
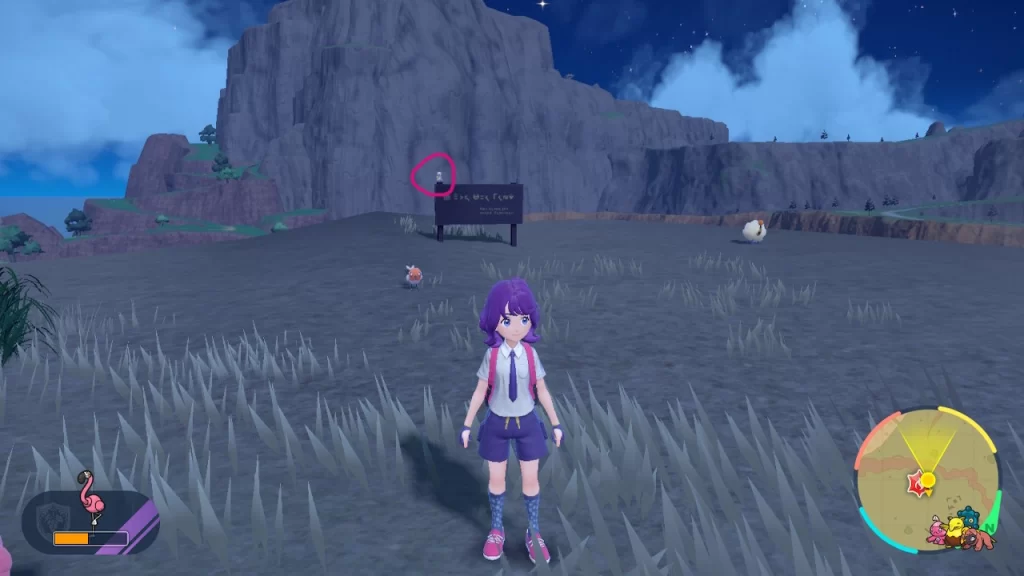
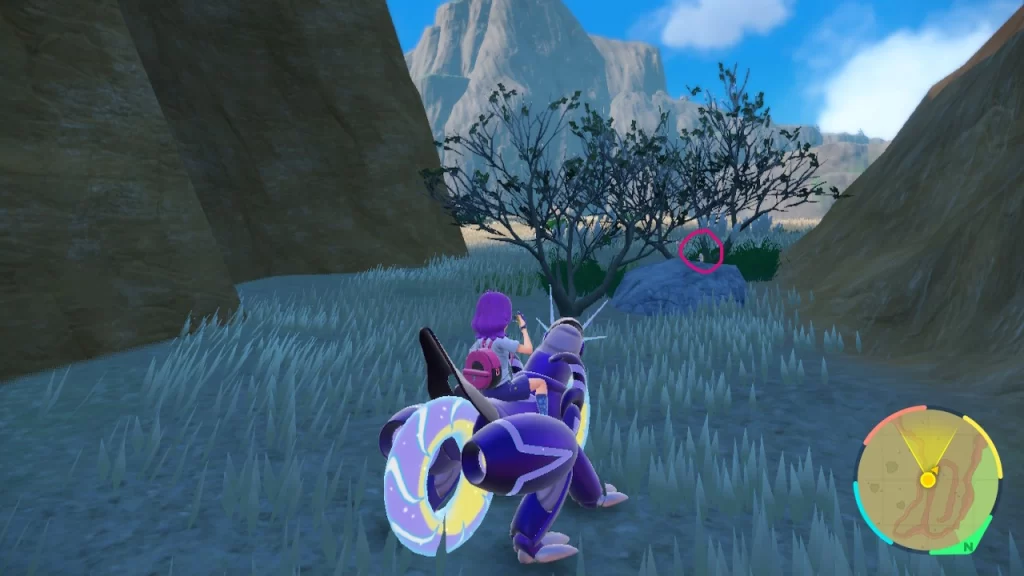
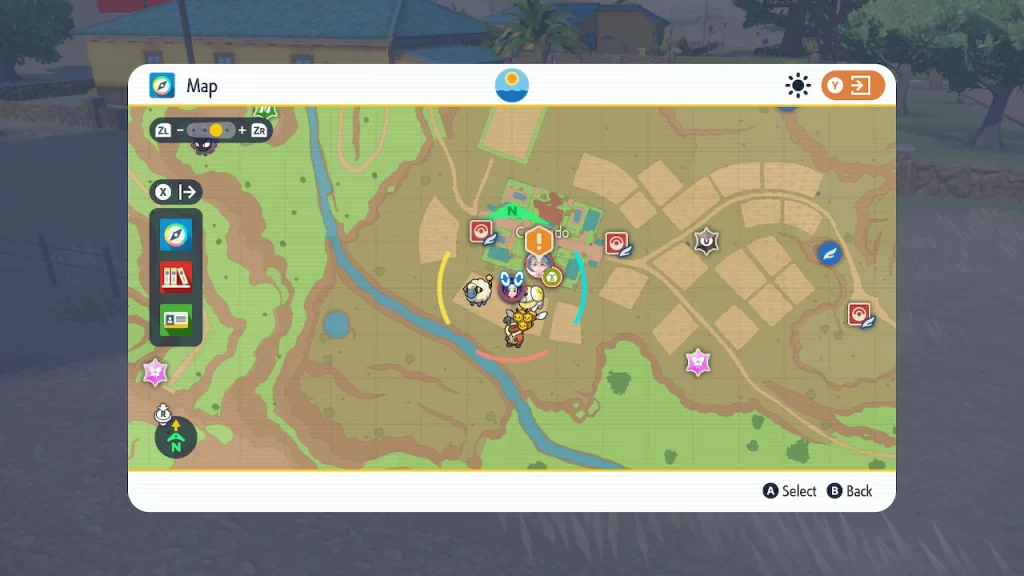
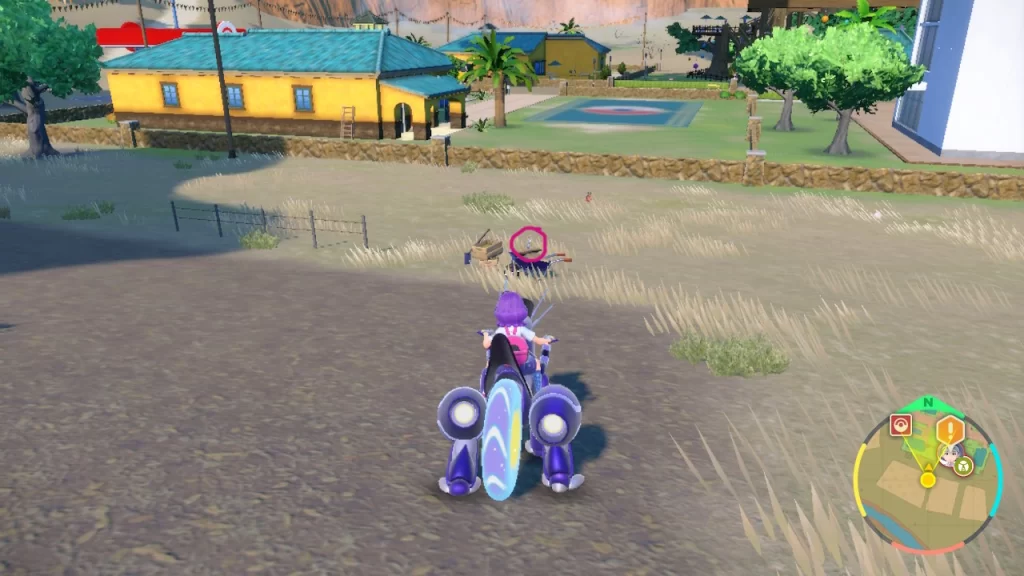
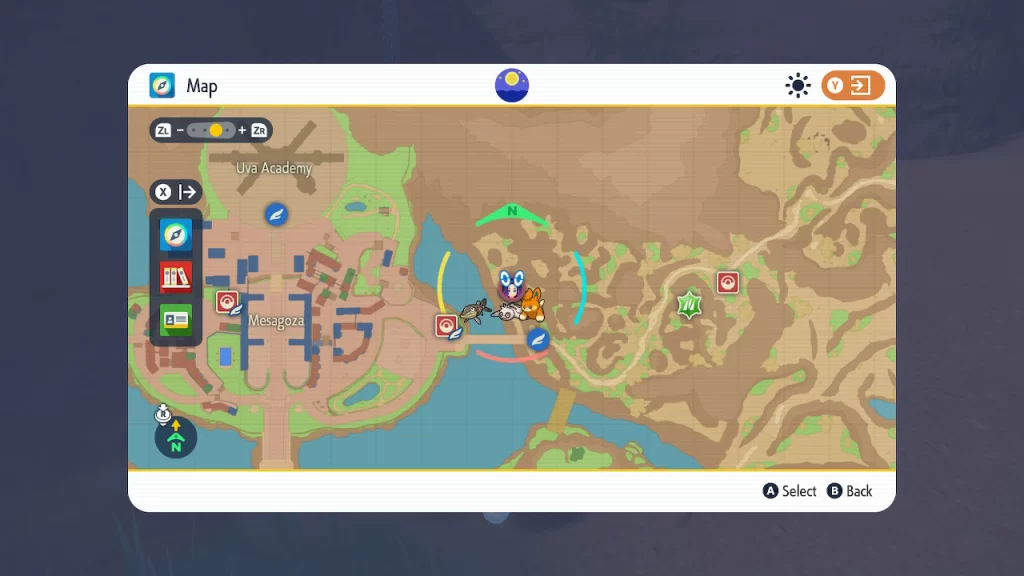
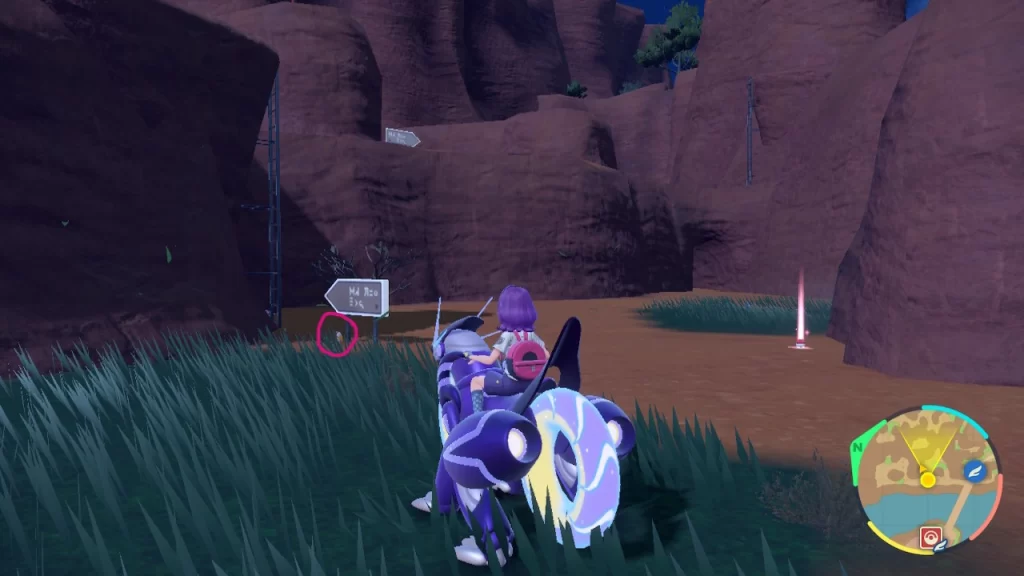
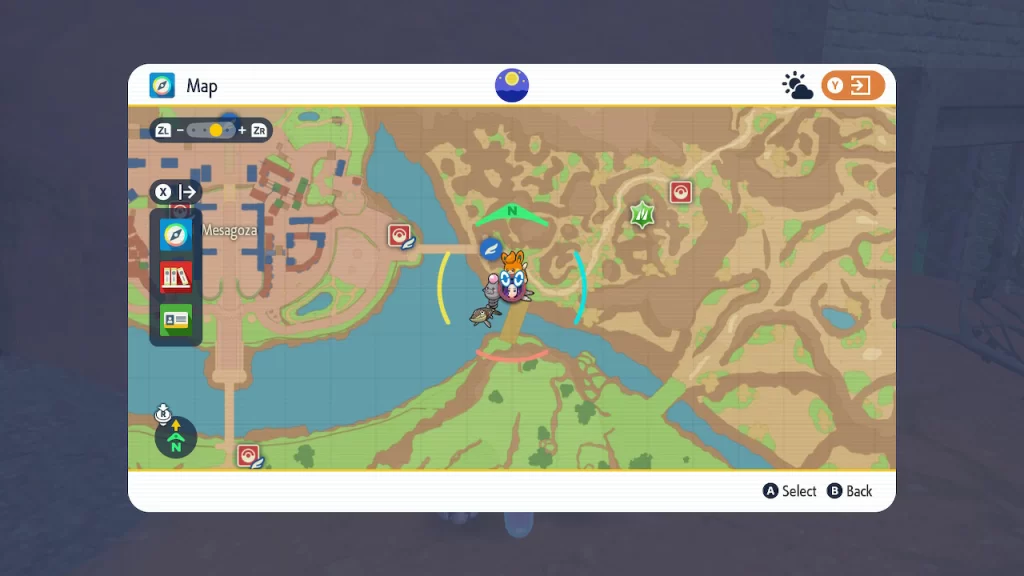
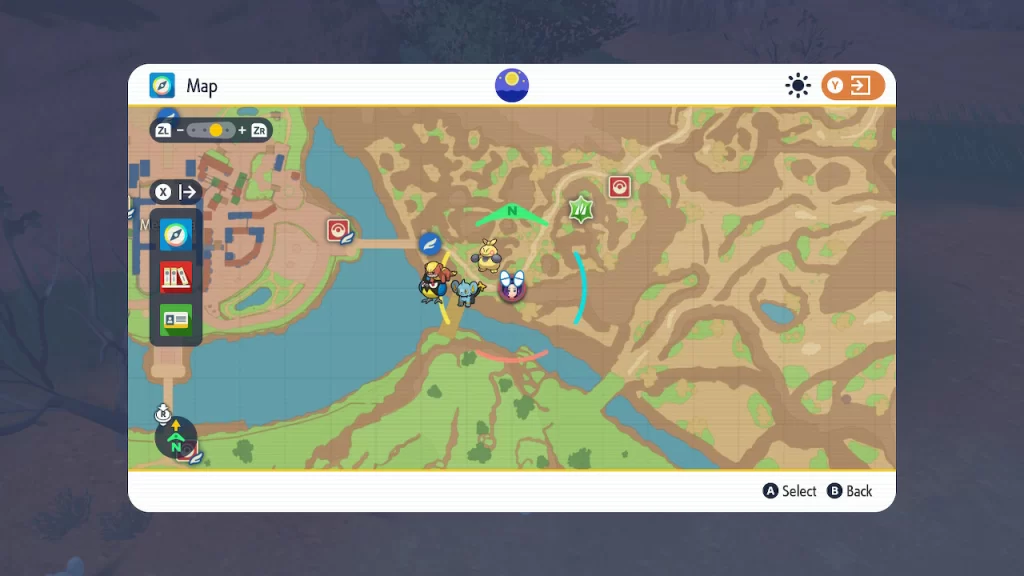
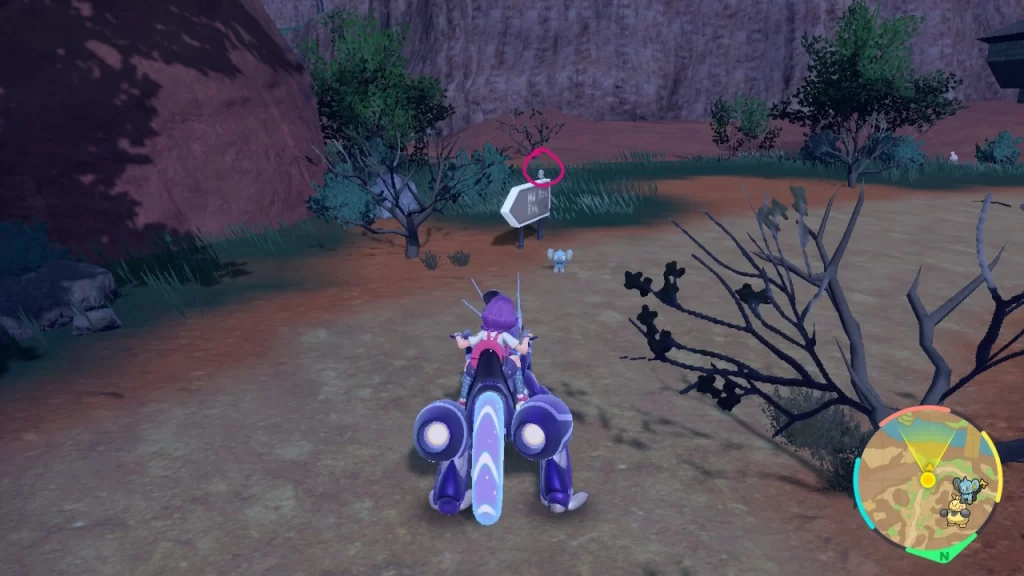
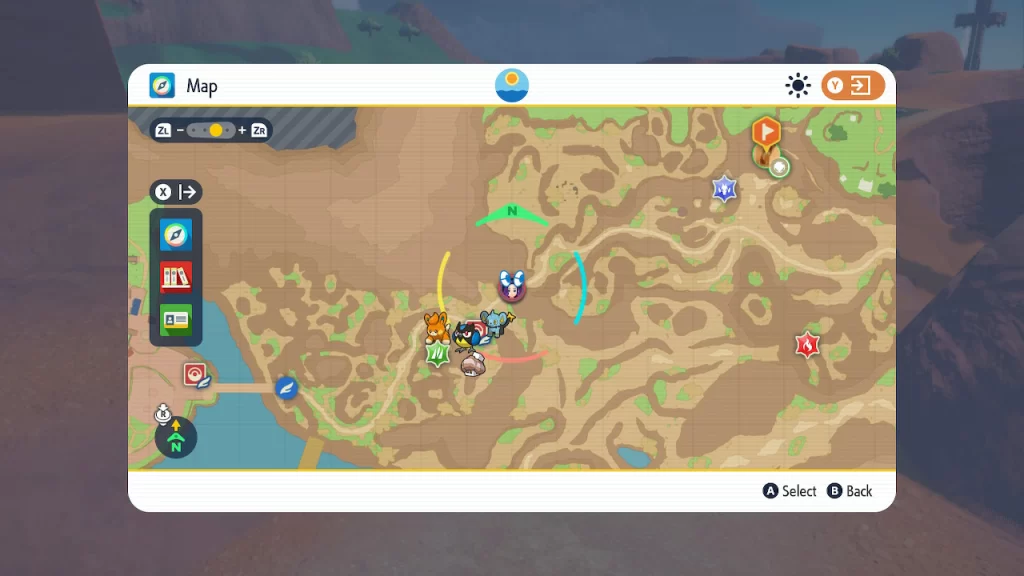
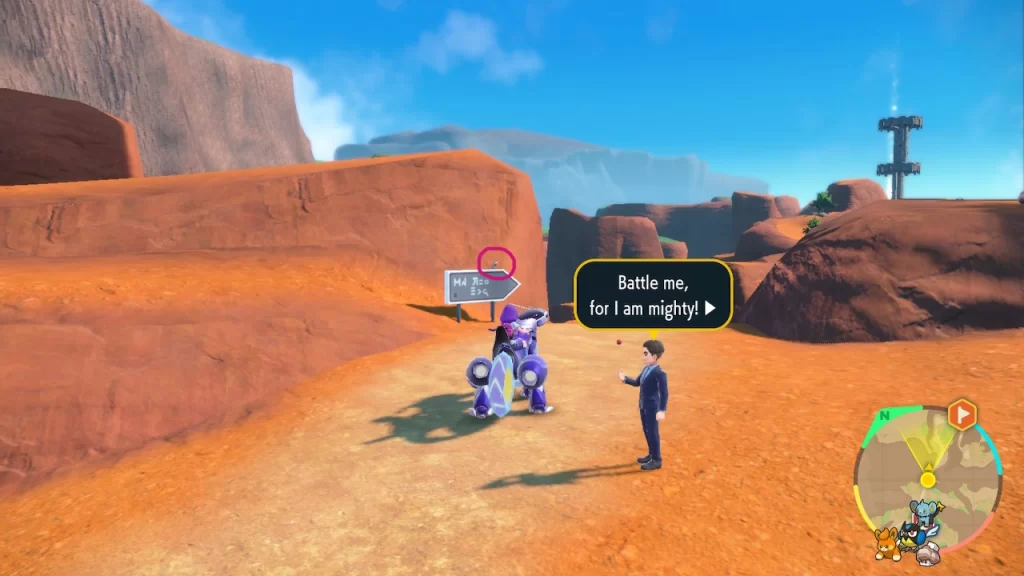
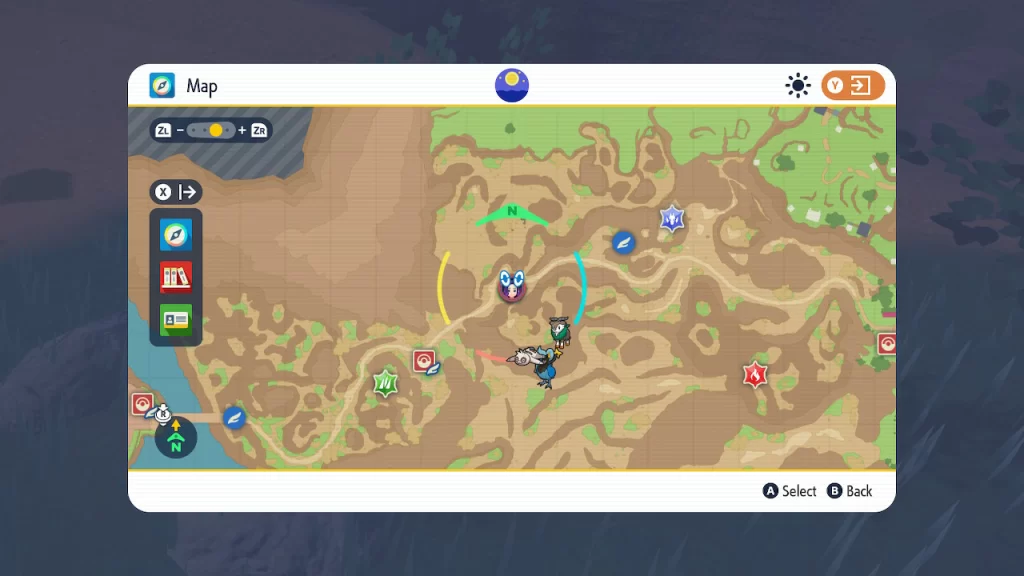
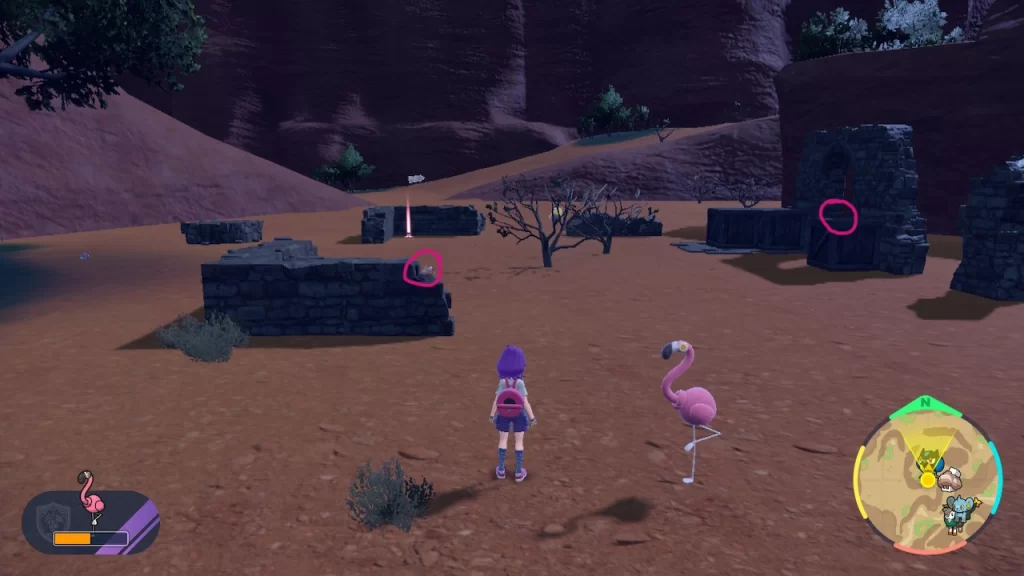
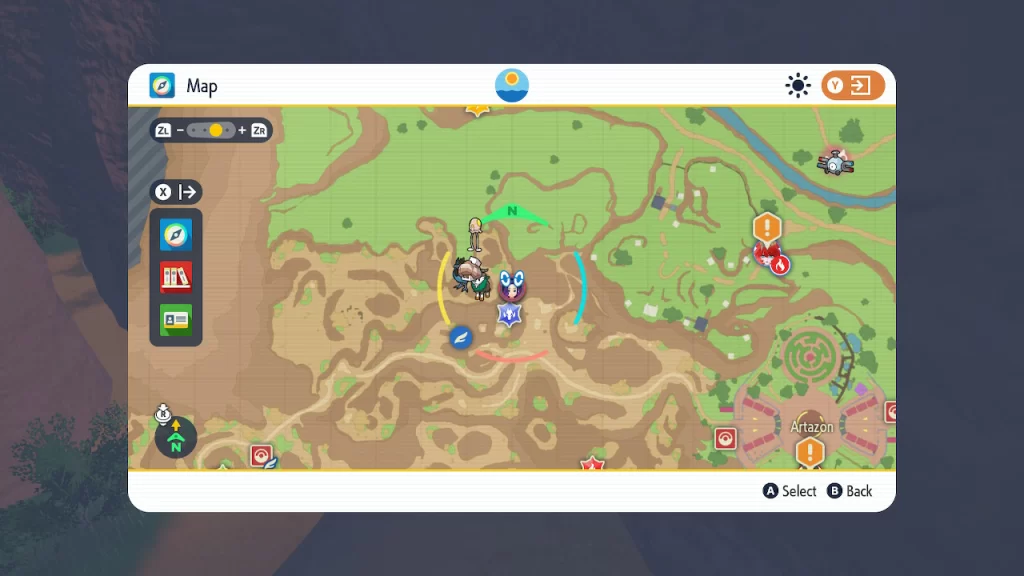
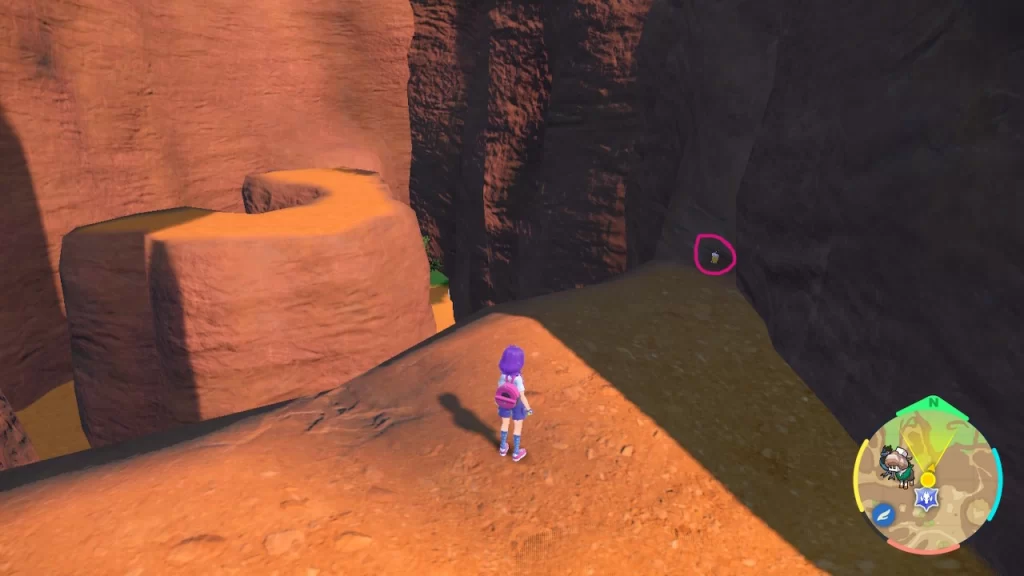
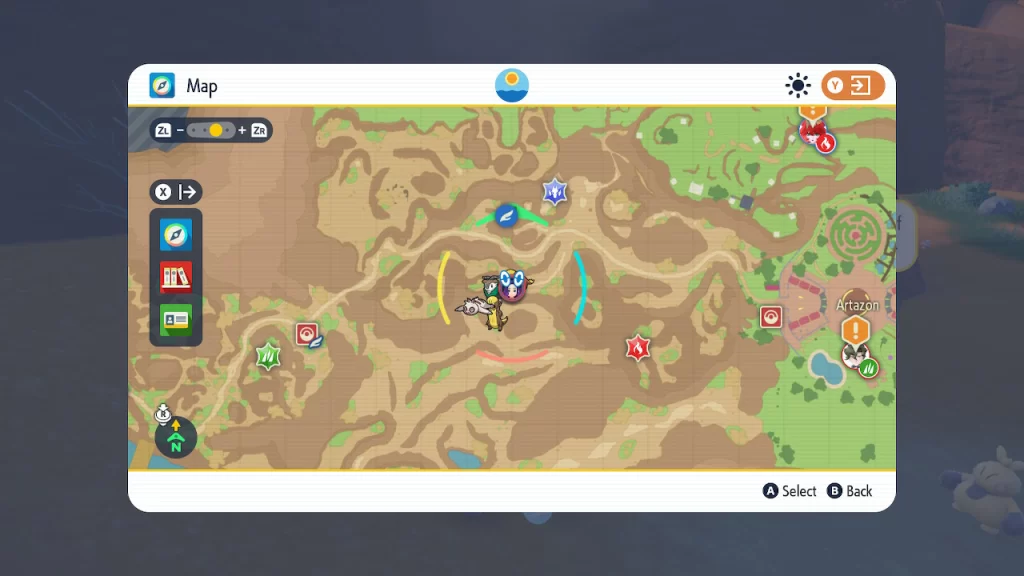
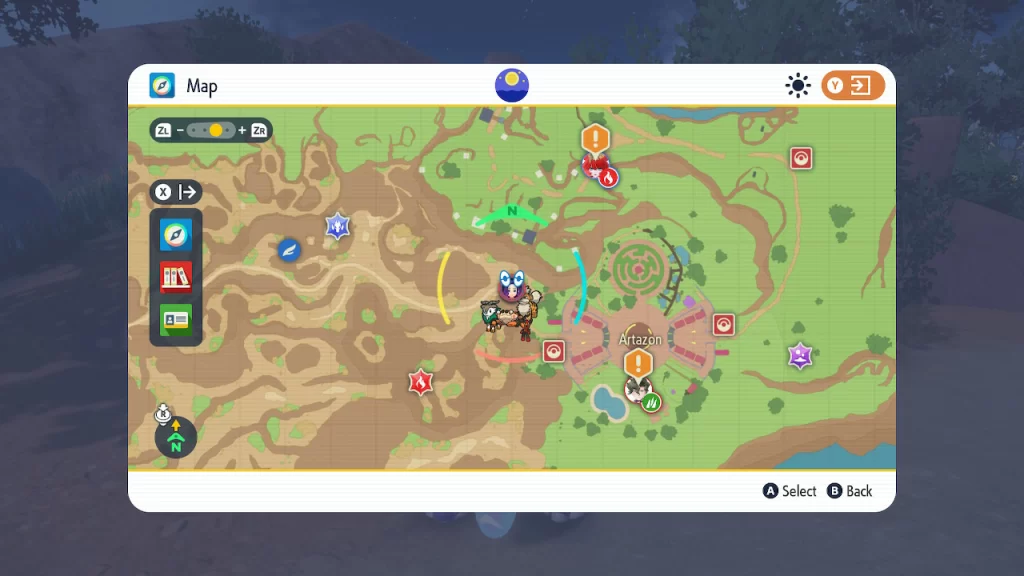
As you explore Pokemon Scarlet and Violet, you’ll see stakes sticking up from the ground. These stakes can be used to open sealed shrines throughout the Paldea Region. In order to reach these stakes, you’ll need to have unlocked all the abilities for your mount. For a guide on how to unlock these abilities, click here! To open the yellow shrine located on the far western side of Western Province (Area 1), you’ll need to find 8 yellow stakes throughout Pokemon Scarlet and Violet.
This yellow shrine is home to the Level 60 Dark / Ice type Pokemon known as Chien-Pao.
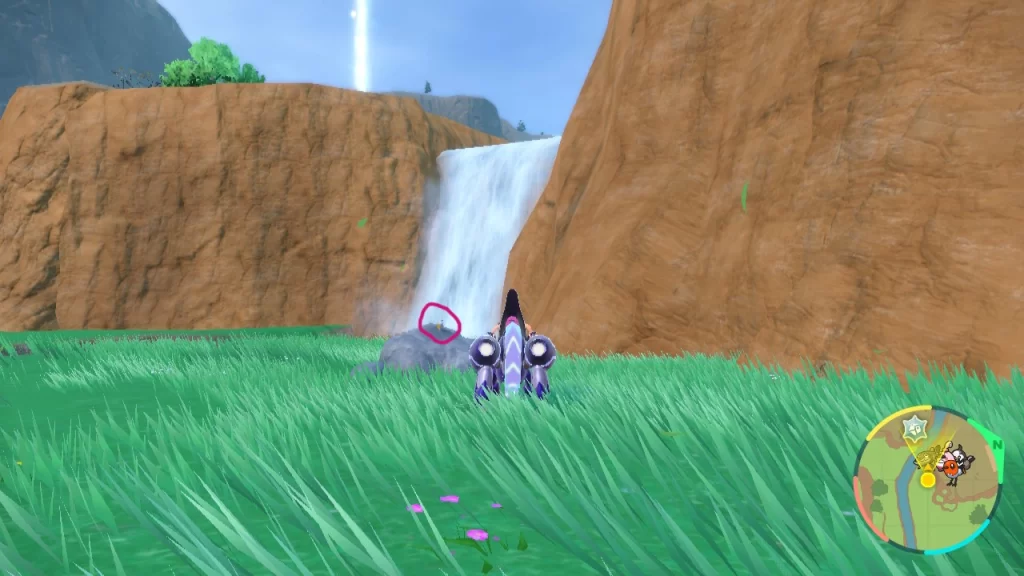
Stake 1
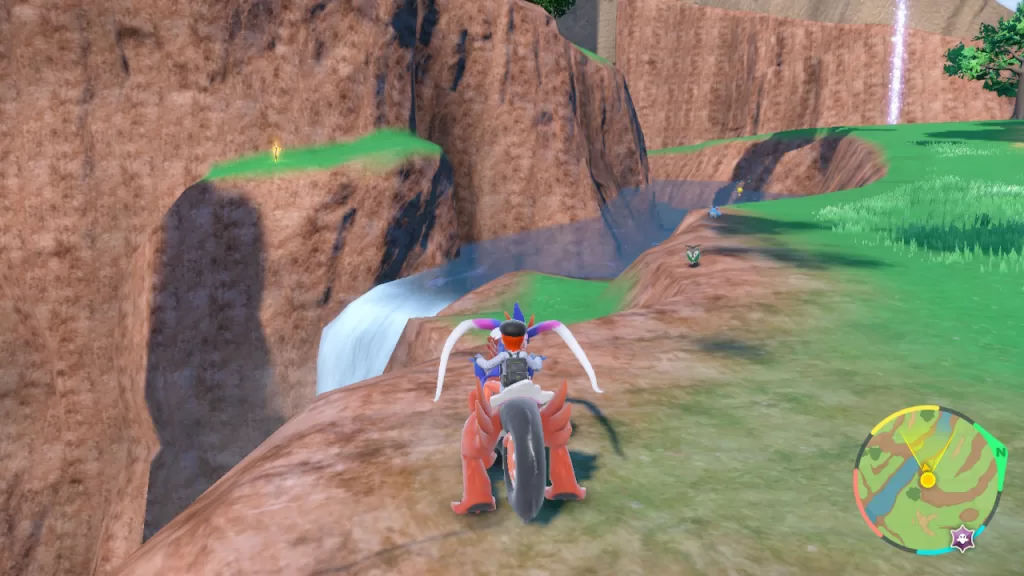
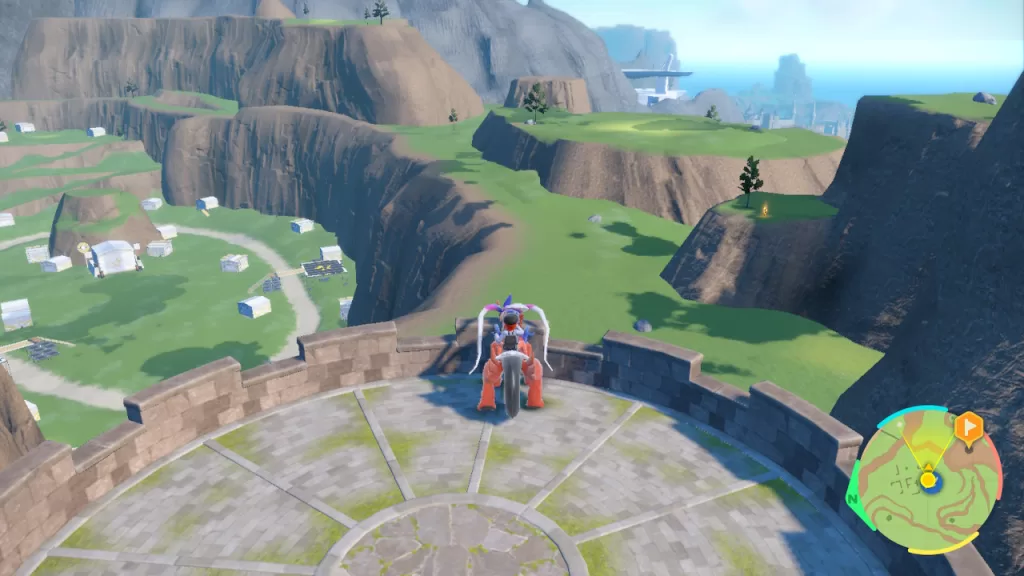
This stake can be found at the top of the central waterfall east of Alfornado.
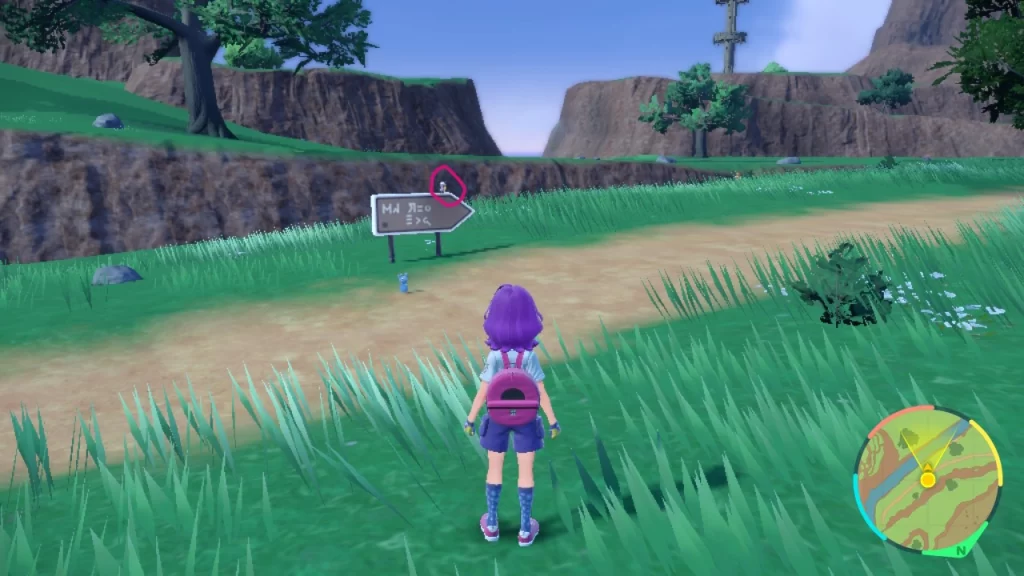
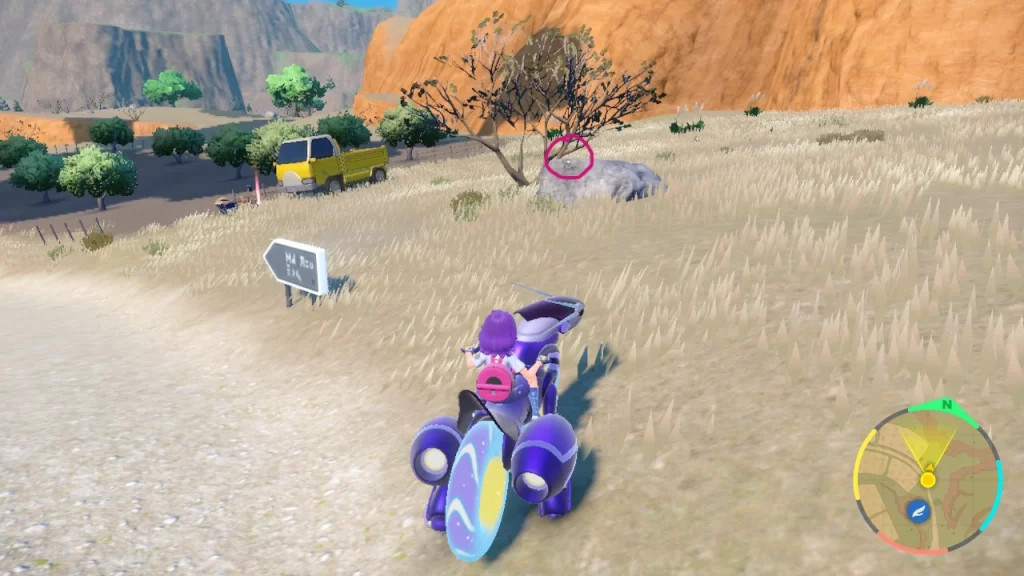
Stake 2
This stake can be found on a grassy ledge northeast of the Leaking Tower of Paldea, which is north of Alfornado.
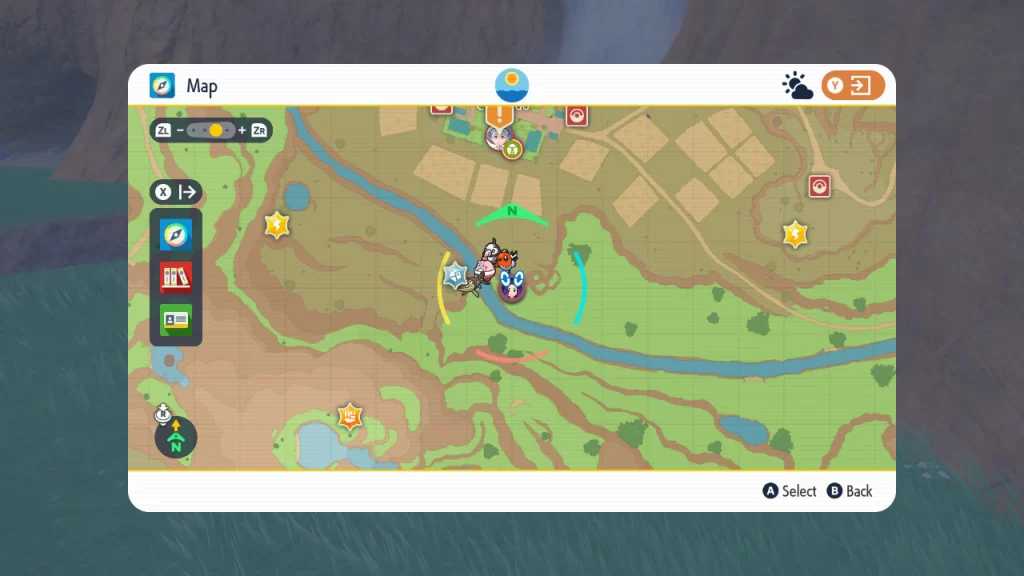
Stake 3
From Cortondo, head southwest across the river to enter South Province (Area 4). Keep heading southwest to reach a cave. Head through the cave to find the stake.
Stake 4
This stake can be found southwest of the West Province (Area 1) – Central Pokemon Center on a grassy ledge.
Stake 5
This stake can be found northwest of the West Province (Area 1) – Central Pokemon Center. There will be a cave on the west side of the mountain that you’ll need to enter to reach the secluded area where the stake rests.
Stake 6
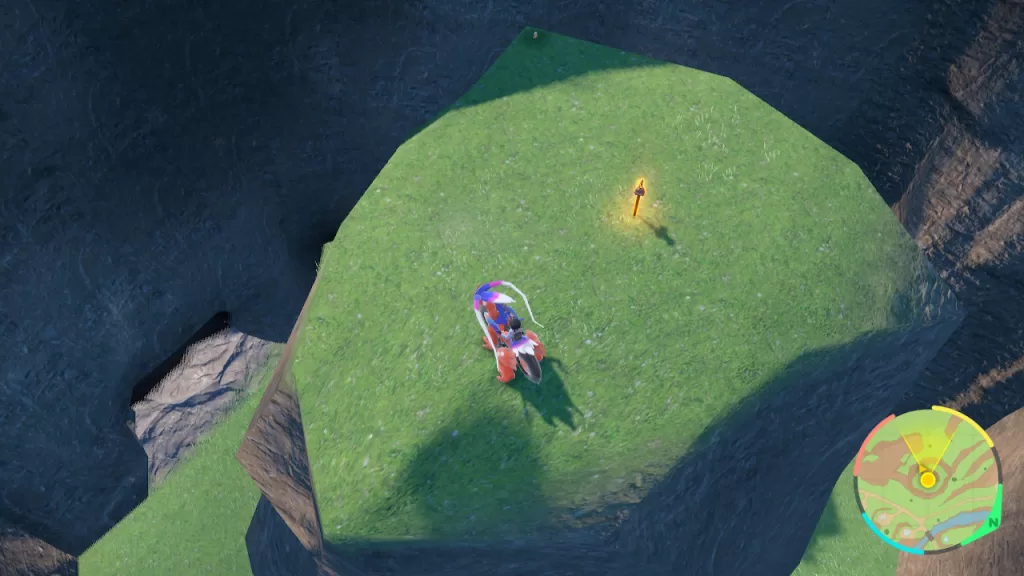
This stake can be found on a ledge just southeast of the West Province (Area 1) Watchtower overlooking the Team Star Camp.
Stake 7
This stake can be found in the eastern part of West Province (Area 1) in a little nook along the mountainside.
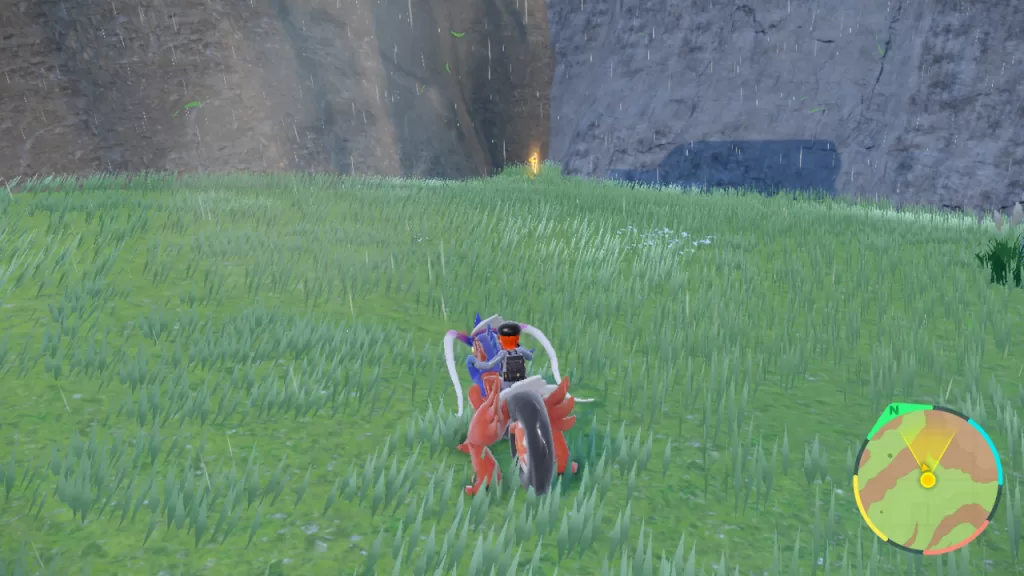
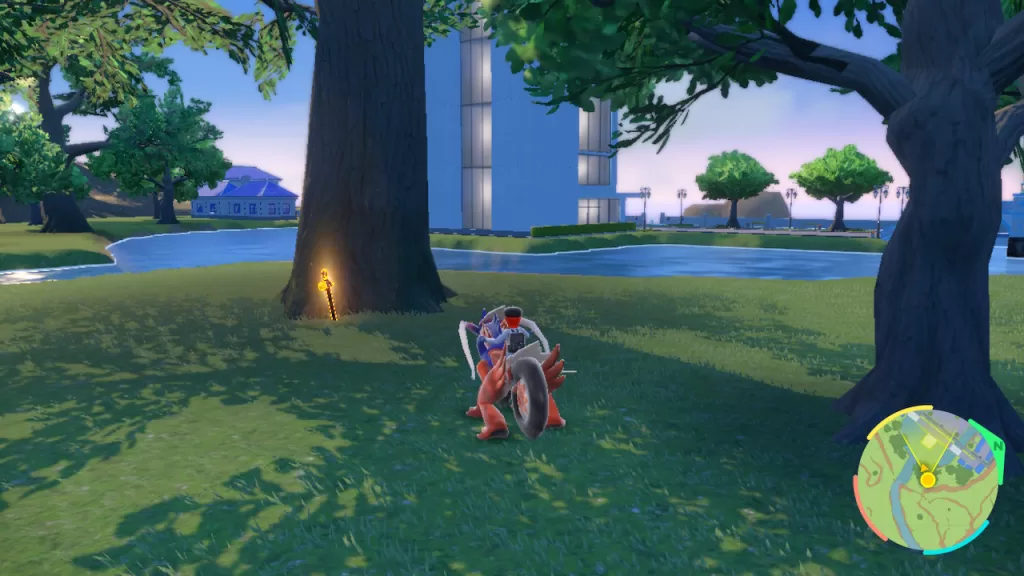
Stake 8
This stake can be found behind the gym in Cascarrafa next to a big tree.
Looking for more stakes to open the other shrines? Click here for more guides on these stake locations!
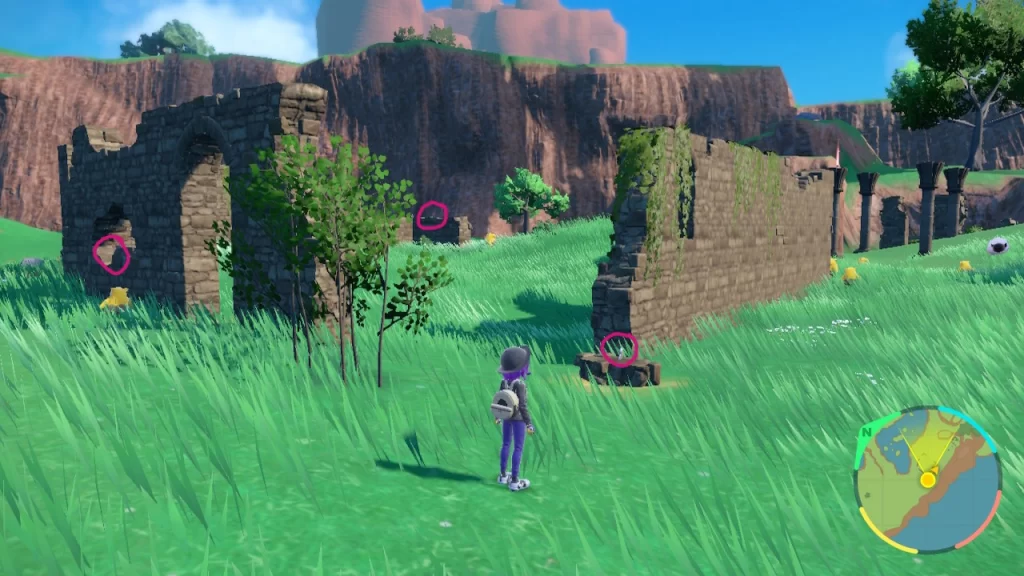
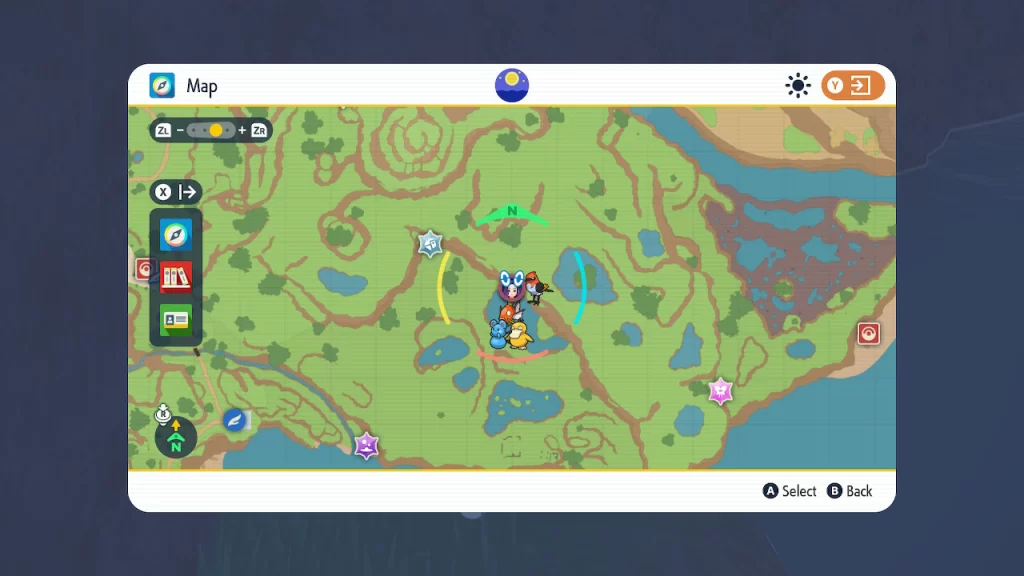
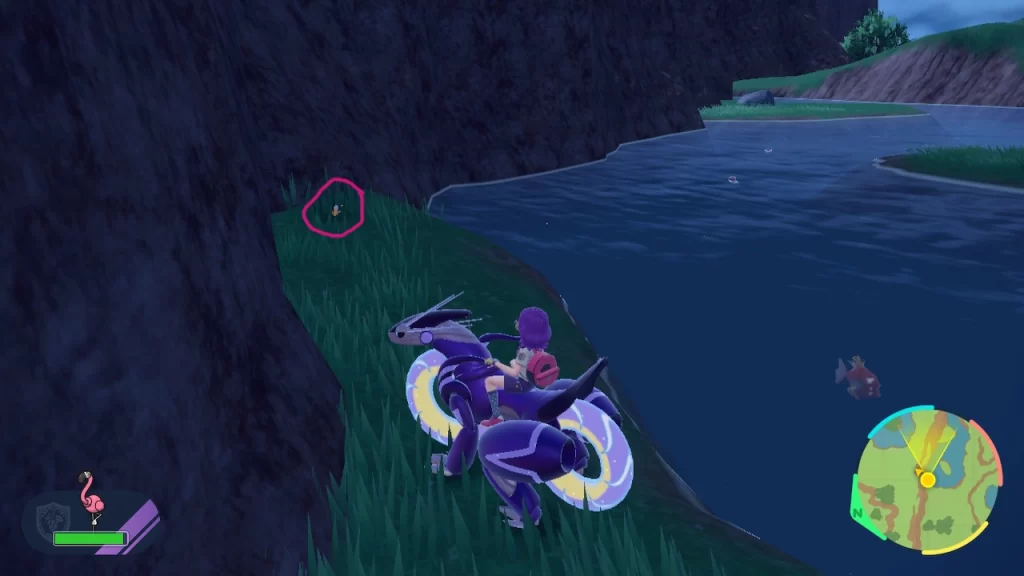
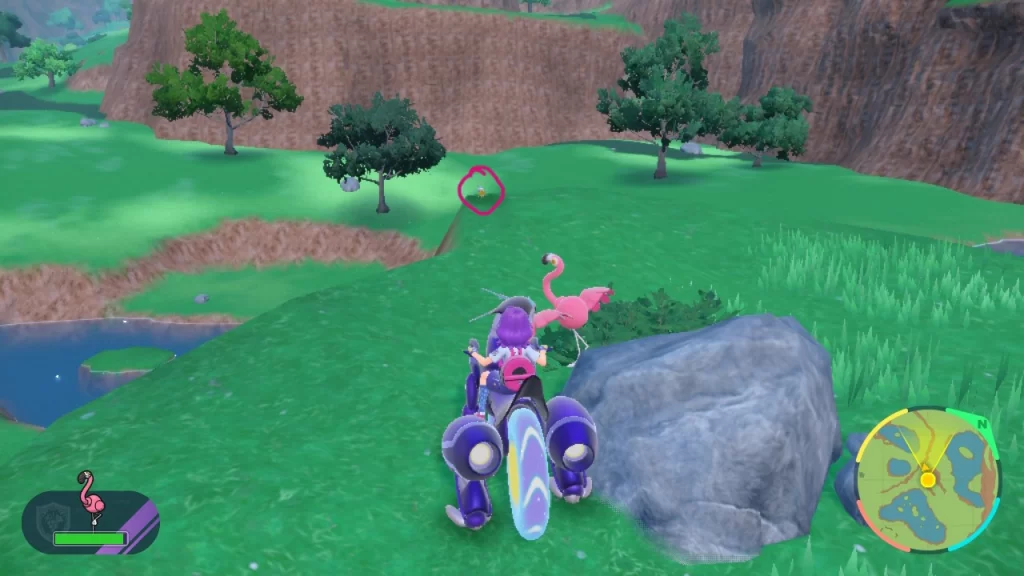
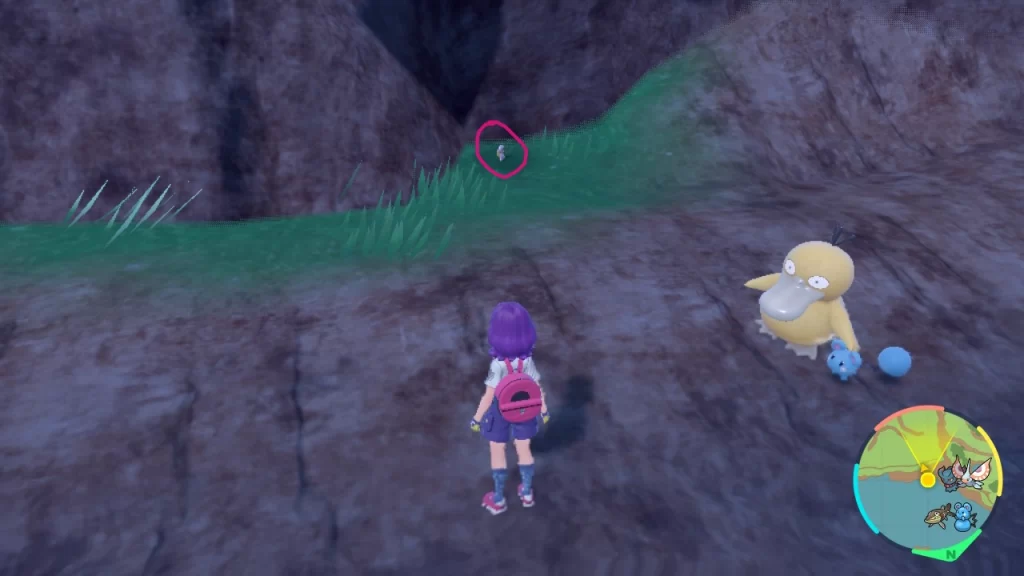
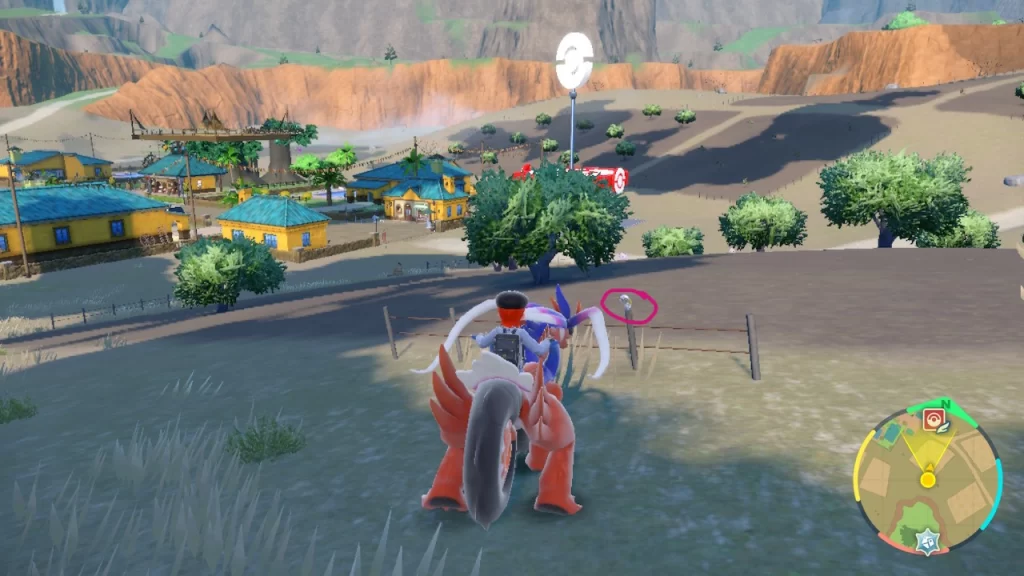
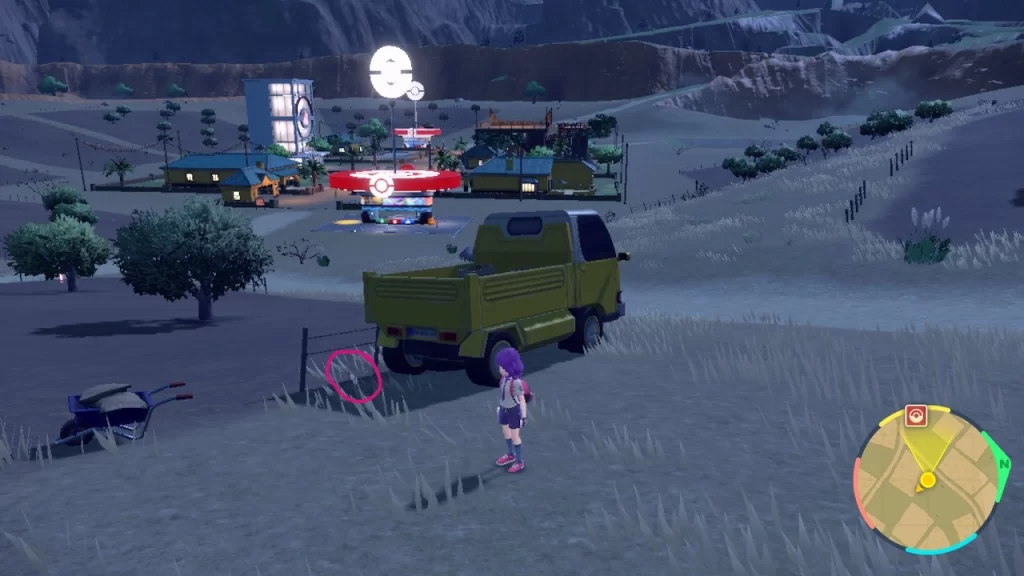
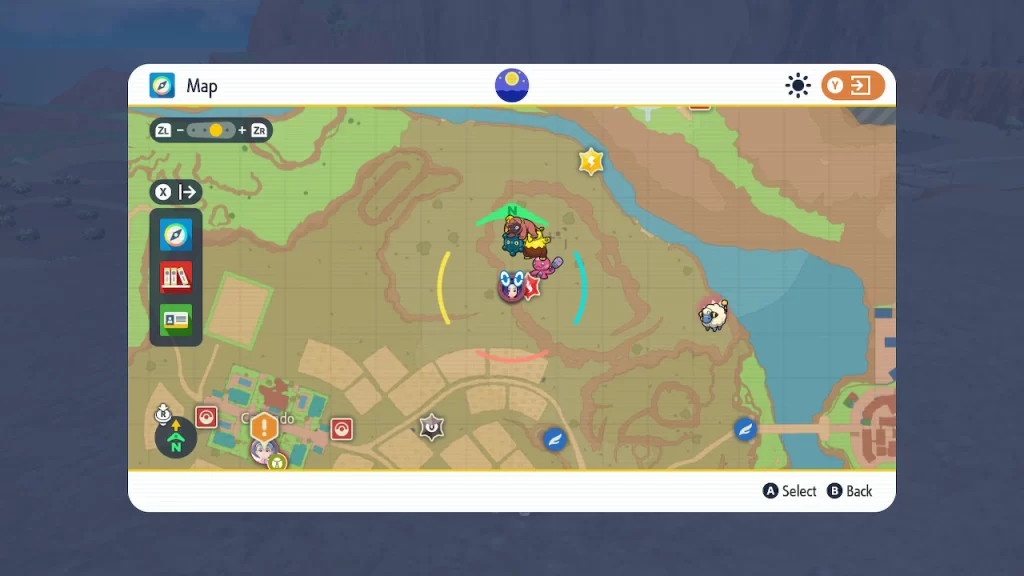
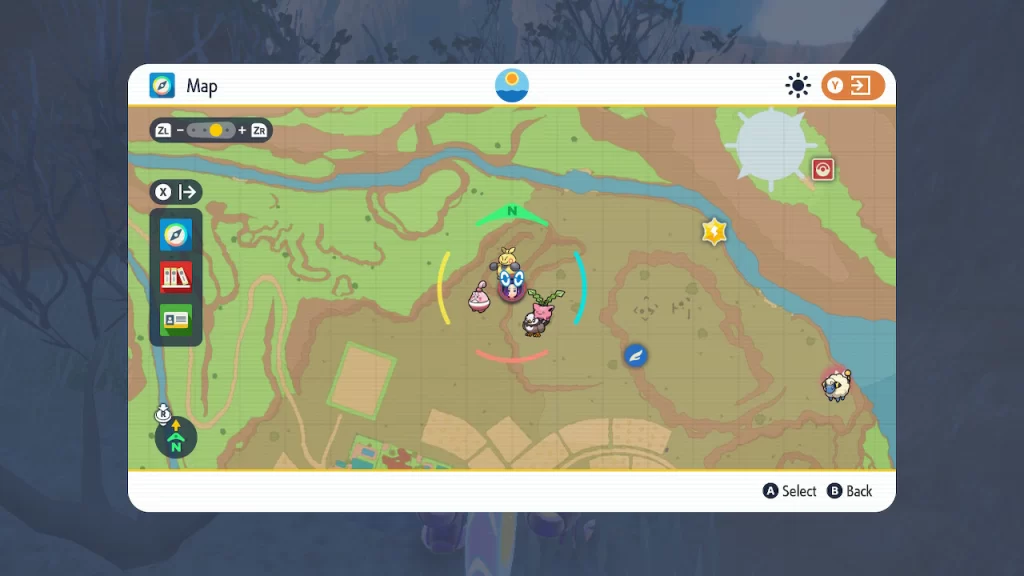
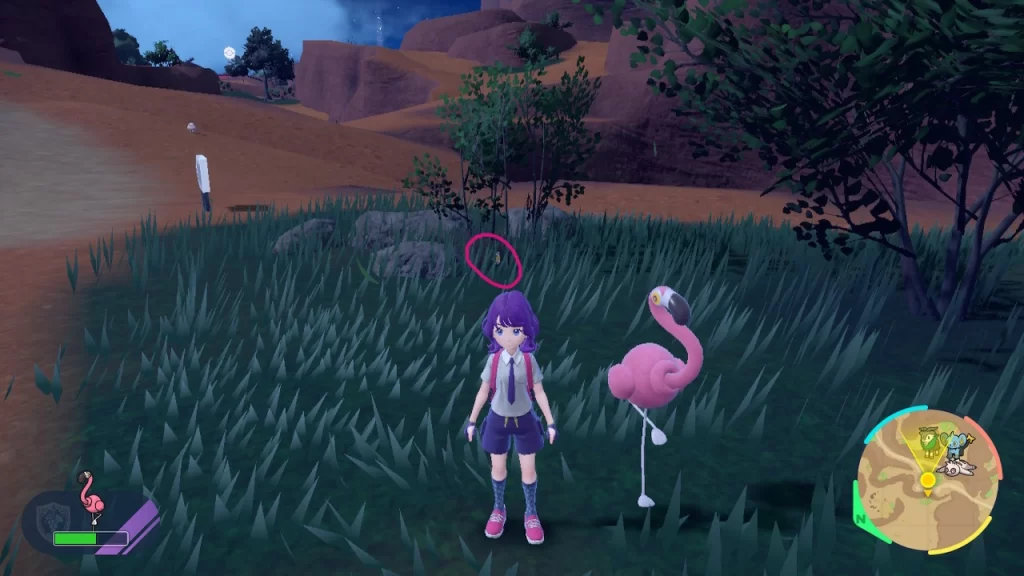
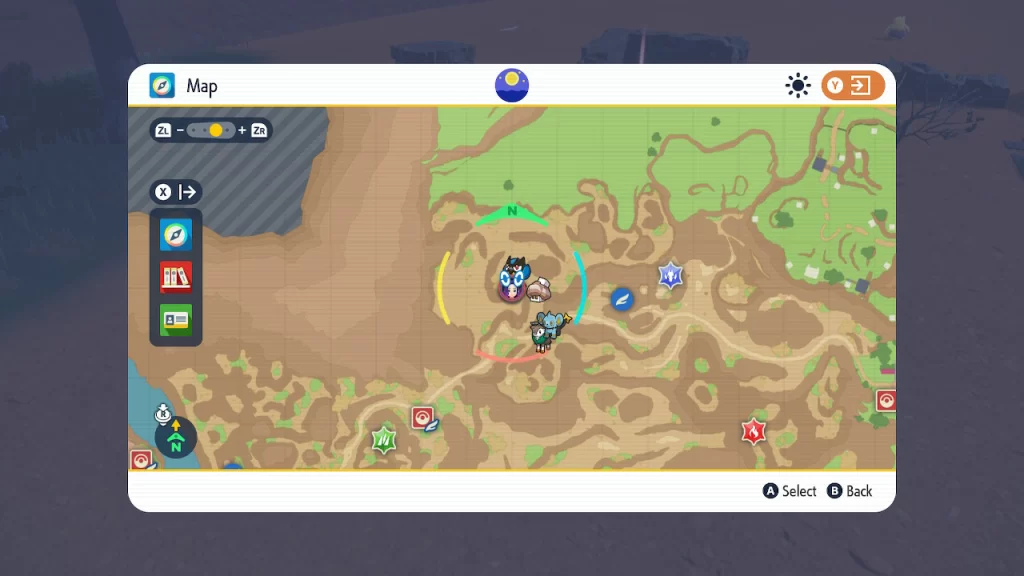
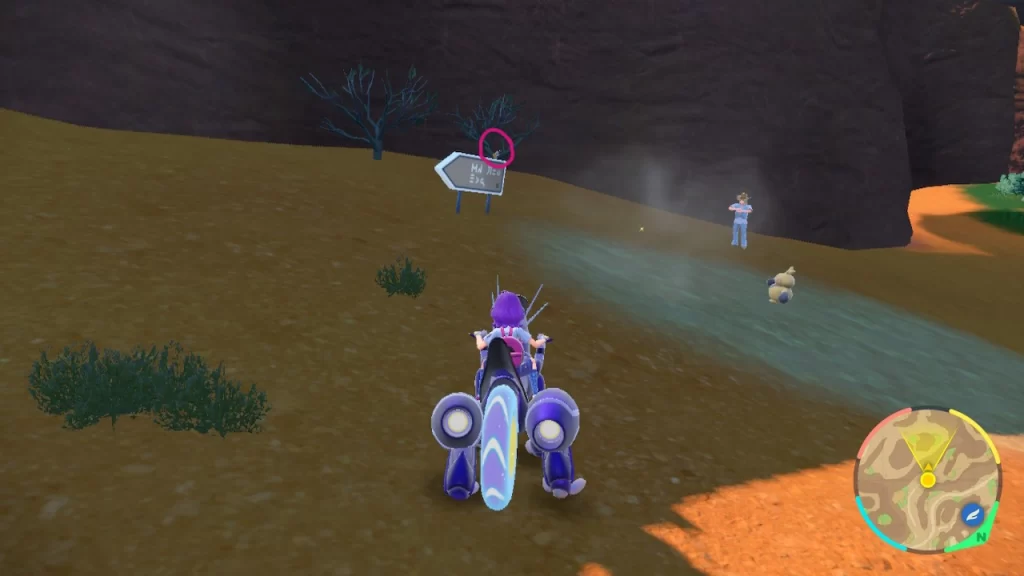
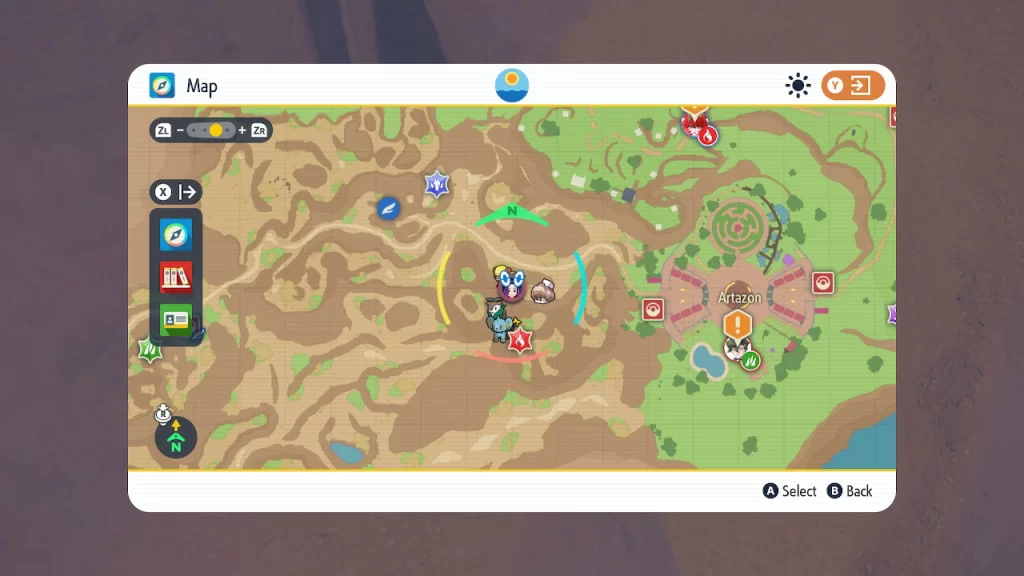
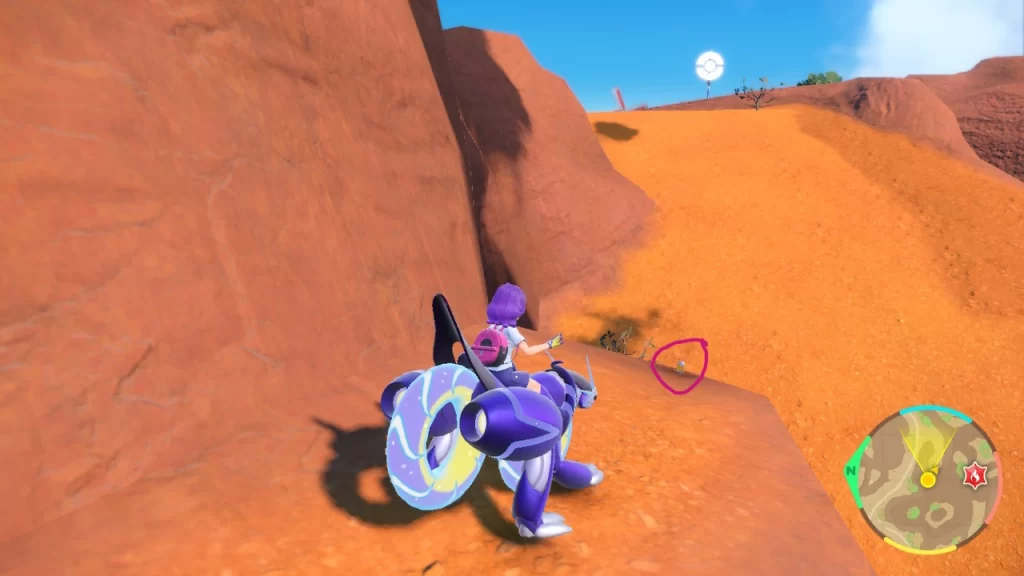
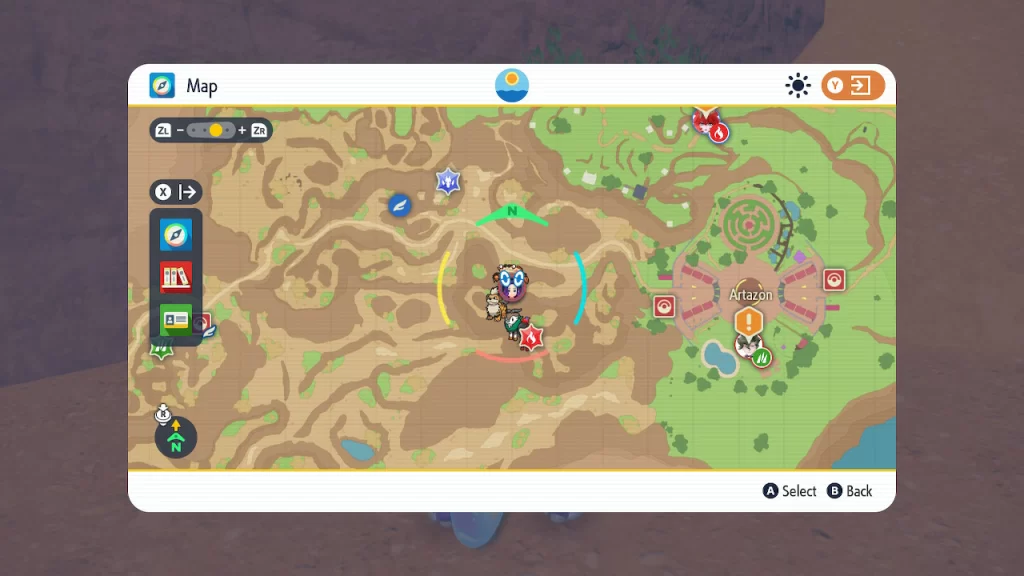
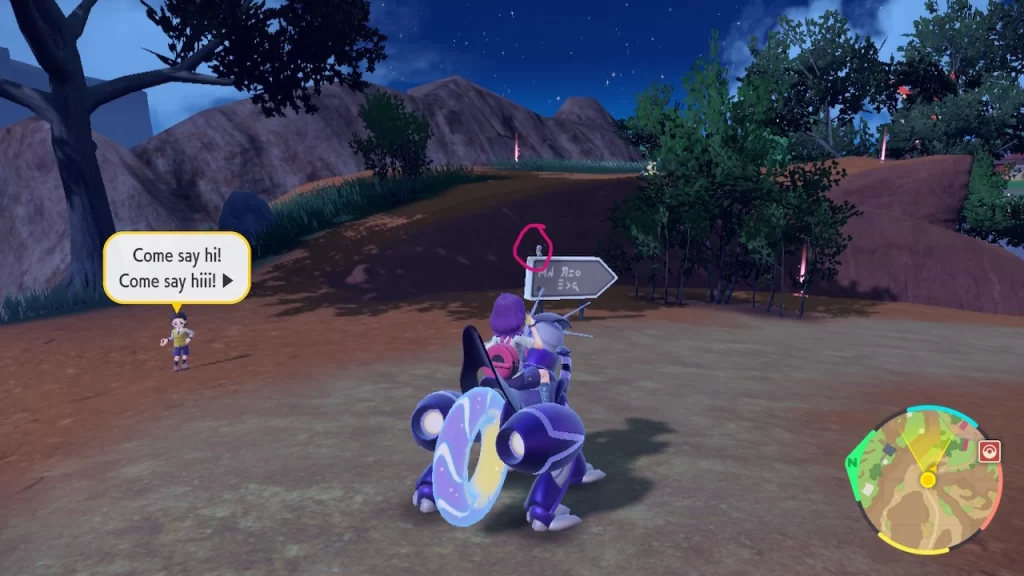
While adventuring around the Paldea region in Pokemon Scarlet and Violet, you’ll come across Gimmighoul Coins scattered around the world. 999 of these coins are required to evolve the Pokemon Gimmighoul into Gholdengo. Below is a guide on where you can find Gimmighoul Coins. They tend to respawn and award varying amounts of coins each time so be sure to check back frequently.
Misc.
Capture/defeat Gimmighoul to receive a lot of coins! We found them at the top of the watchtowers.
Medali – Speak with the man wearing a uniform in the courtyard southwest of the gym to receive some Gimmighoul Coins!
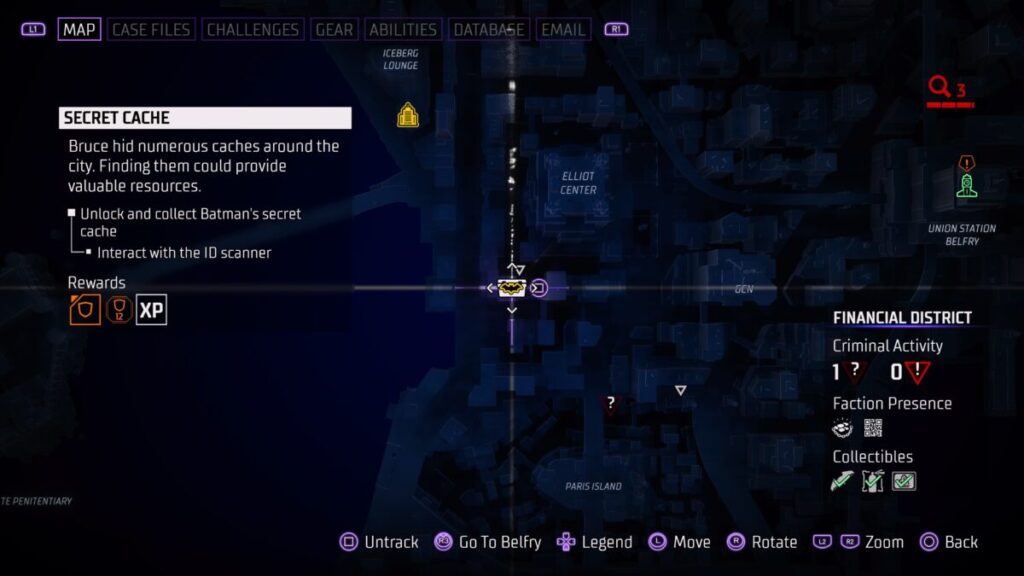
This is a guide for the side activity Secret Cache in Gotham Knights. It becomes available at the start of Case 02: The Rabbit Hole and rewards you with Bruce’s audio recordings. After you collect all of Bruce Wayne’s hidden audio recordings, you’ll receive the Gotham City Confidential trophy!
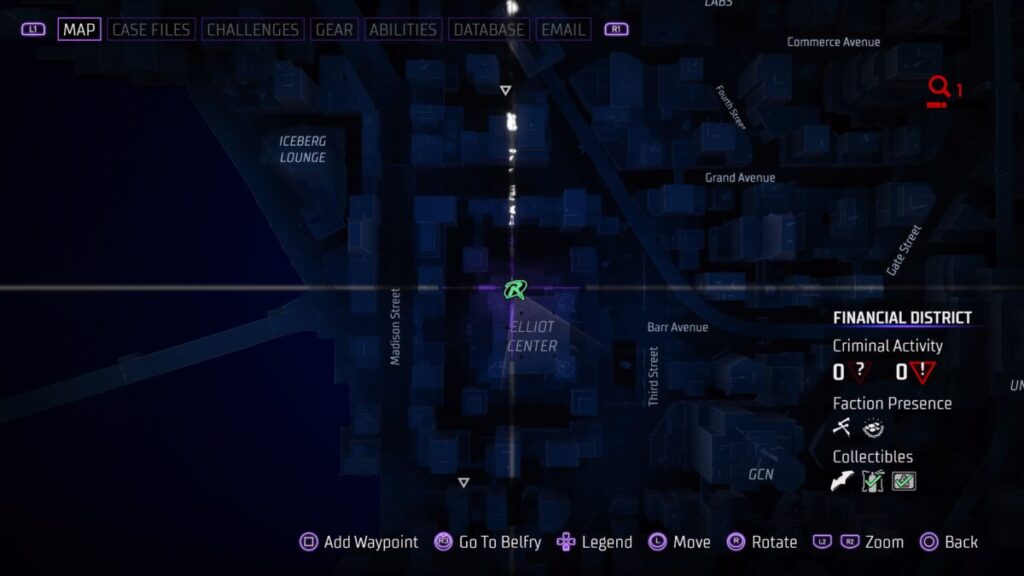
Reach the Secret Cache
Leave the Belfry (if you’re there) and head to the eastern part of the Financial District southwest of the Elliot Center. You’ll find a building there with the stash icon on top of it. Examine the ID scanner on the roof to make 3 beams appear nearby. Run through them all quickly as you’ll be timed. This will authenticate you and upload the location of the cache. Grapple to the nearby ledge and investigate it to loot the cache to receive one of Bruce’s Audio Logs.
Return to the Belfry
Before you’ll get any more of these activities, you’ll need to return to the Belfry.
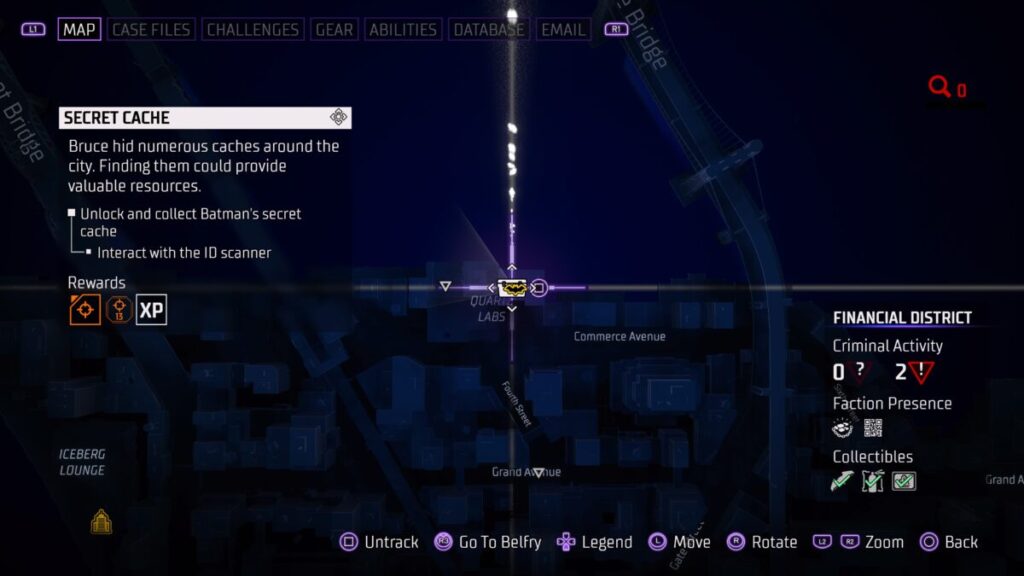
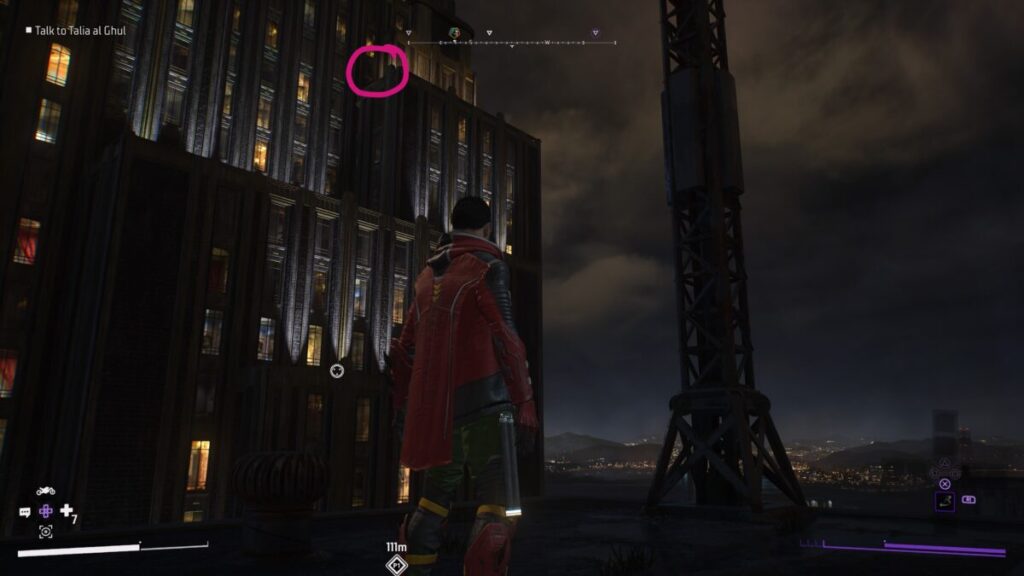
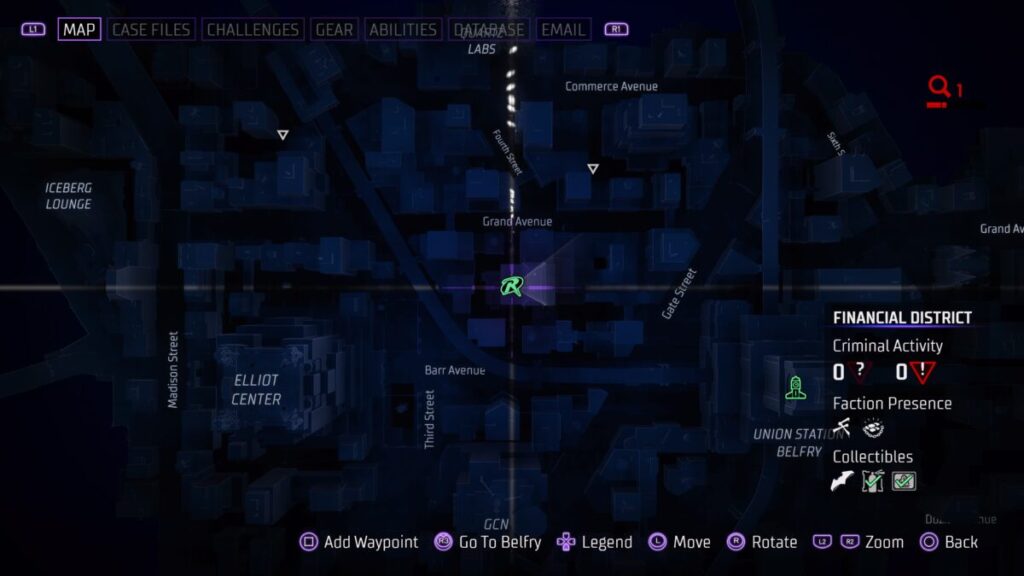
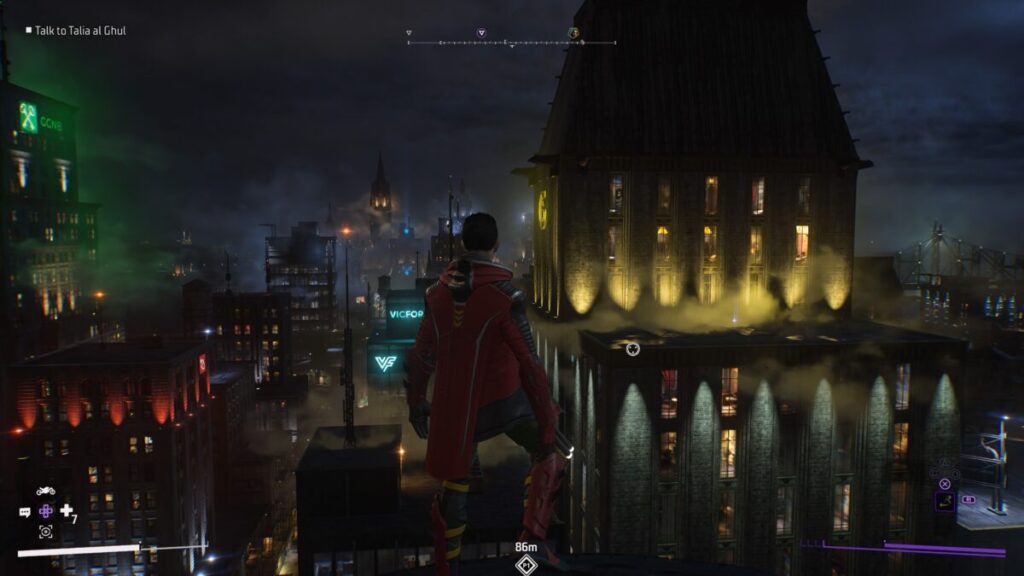
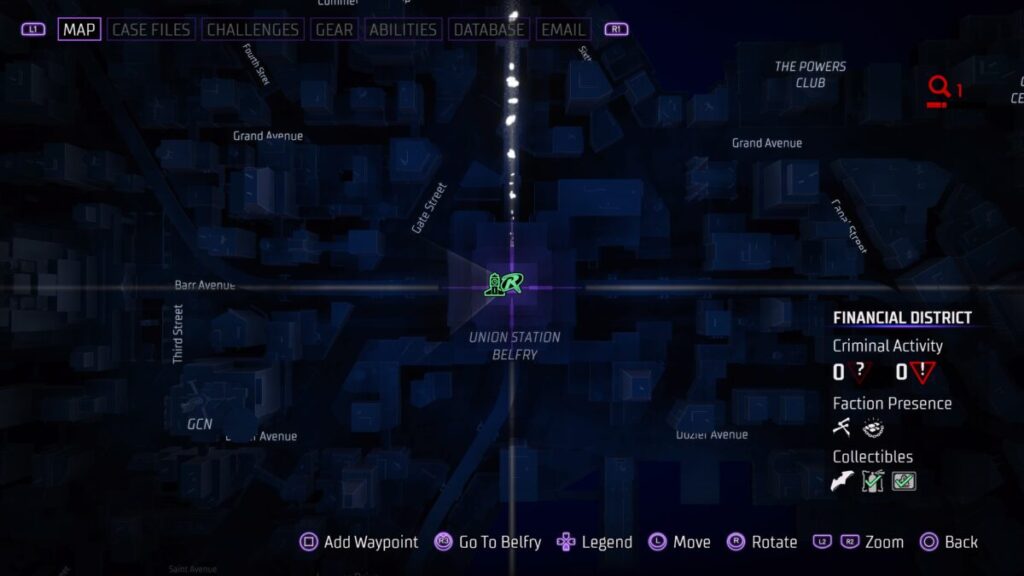
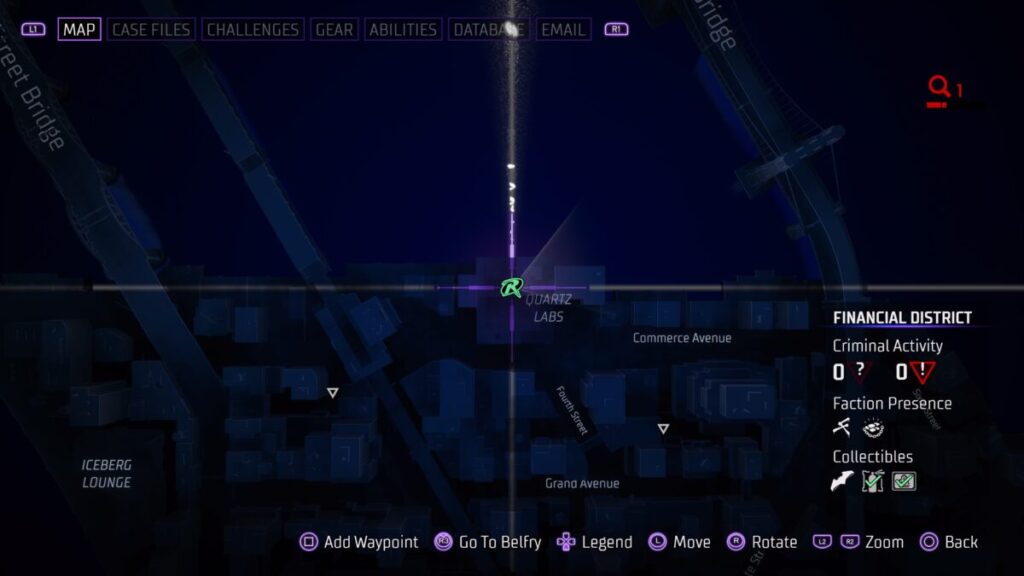
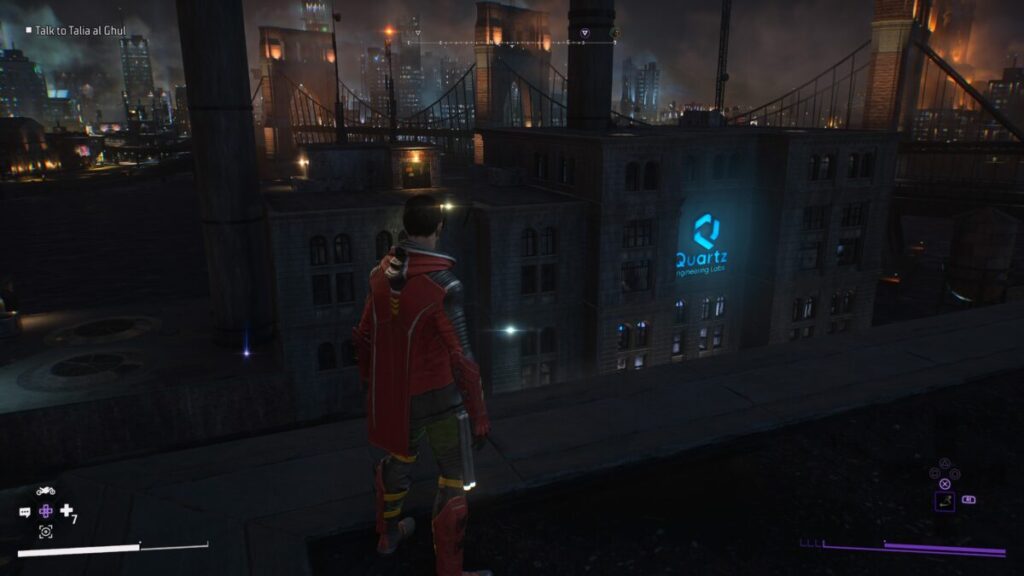
Reach the Secret Cache
Travel to the roof of Quartz Labs in the north central part of the Financial District and interact with the ID scanner there. After you activate the scanner, run through a set of beacons before time runs out. After making it through the last beacon, grapple to the nearby ledge and examine the cache to receive one of Bruce’s Audio Logs.
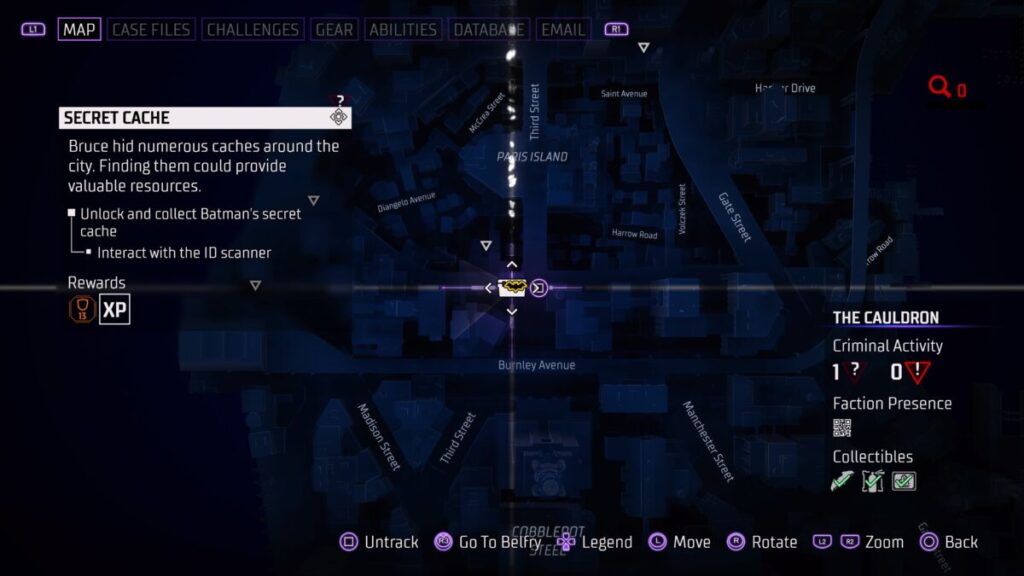
Reach the Secret Cache
Head to the roof of a building south of Paris Island in The Cauldron and interact with the ID scanner there. After you activate the scanner, run through a set of beacons before time runs out. After making it through the last beacon, grapple to the nearby ledge and examine the cache to receive one of Bruce’s Audio Logs.
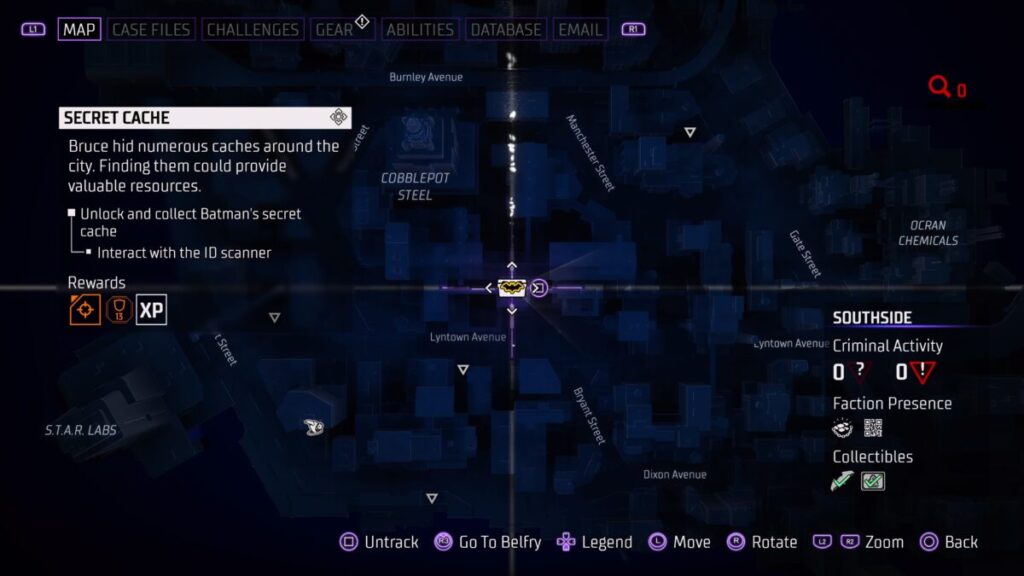
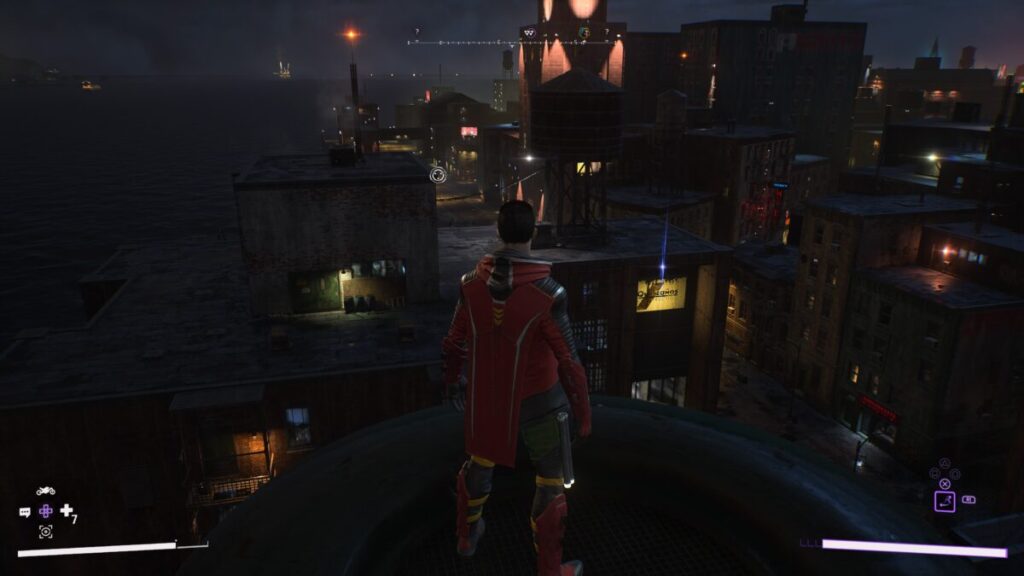
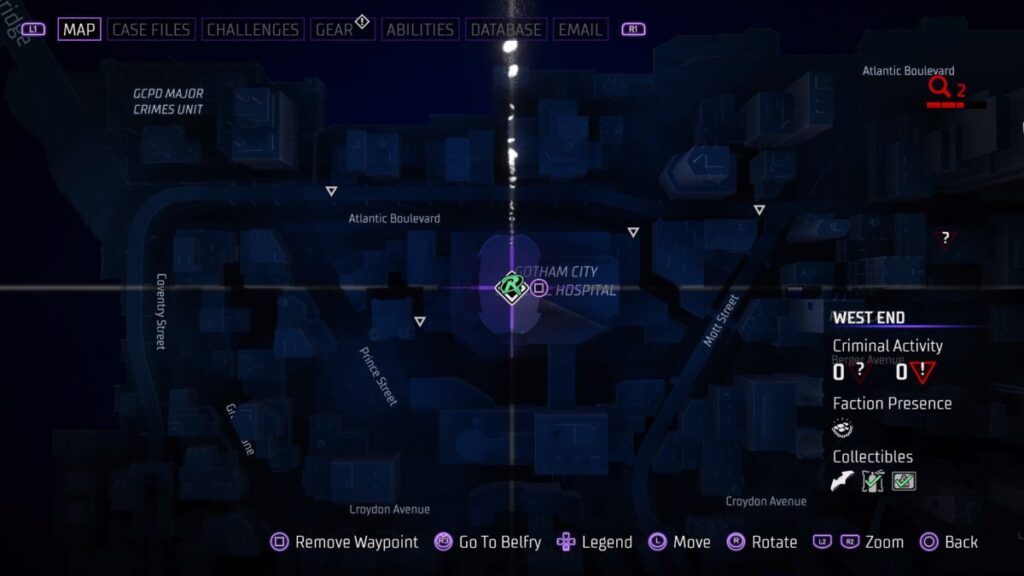
Reach the Secret Cache
Travel to the rooftop of a building in the image above of Southside, southeast of Cobblepot Steel. After you activate the scanner, run through a set of beacons before time runs out. After making it through the last beacon, grapple to the nearby ledge and examine the cache to receive one of Bruce’s Audio Logs.
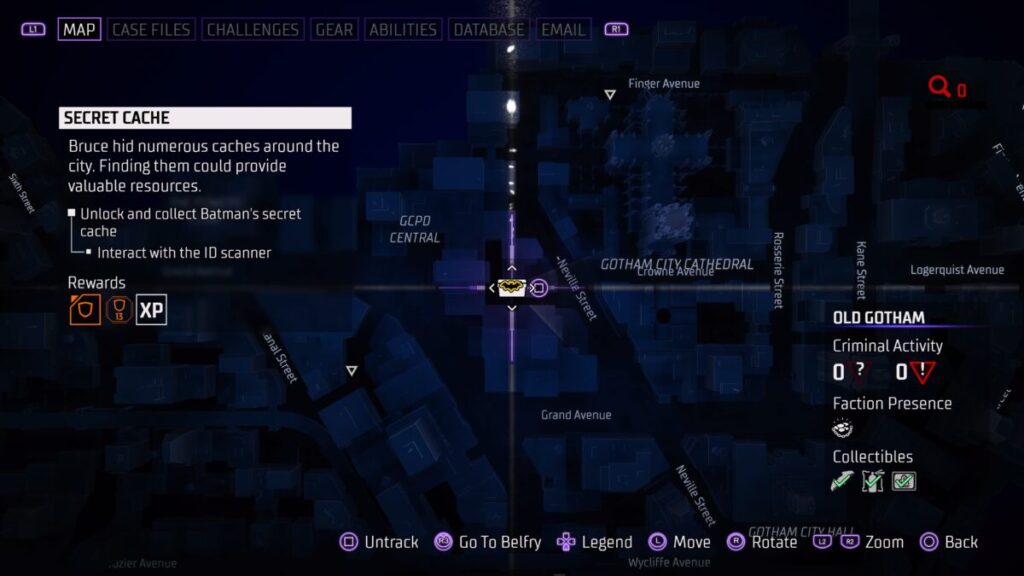
Reach the Secret Cache
Head to the rooftop of the GCPD building in Old Gotham. After you activate the scanner, run through a set of beacons before time runs out. After making it through the last beacon, grapple to the nearby ledge on the Gotham City Cathedral and examine the cache to receive one of Bruce’s Audio Logs.
Return to the Belfry
Before you’ll get any more of these activities, you’ll need to return to the Belfry.
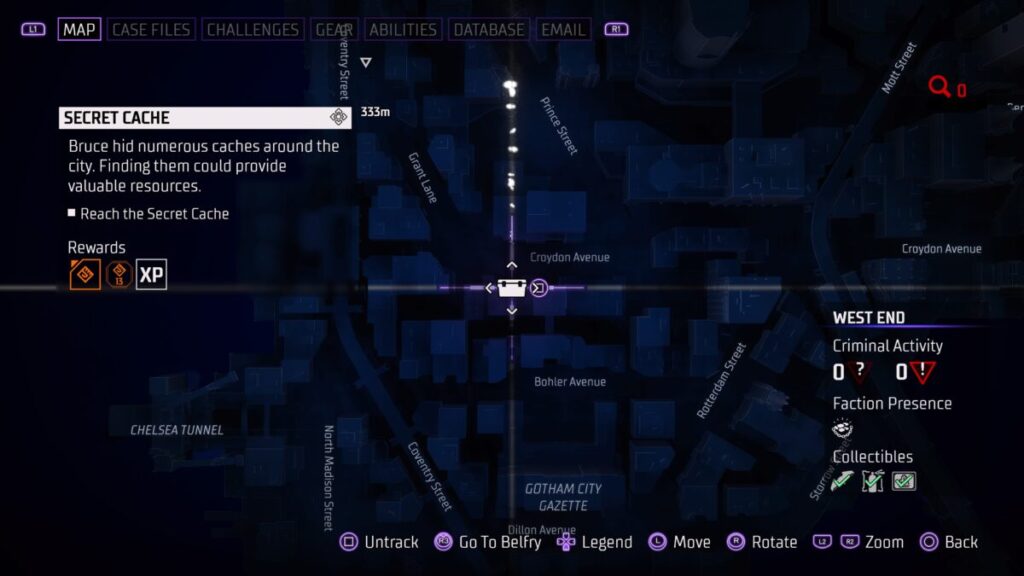
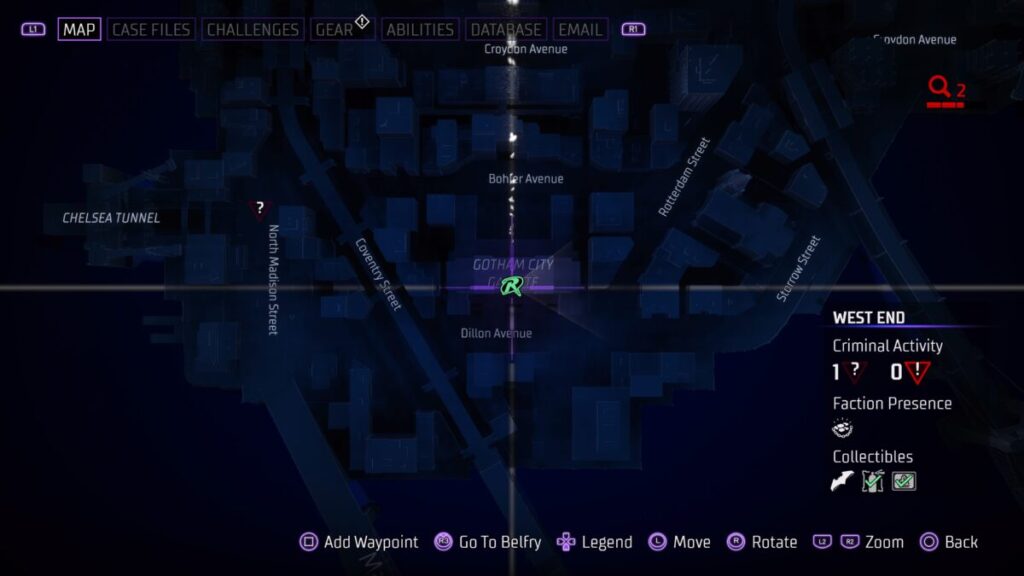
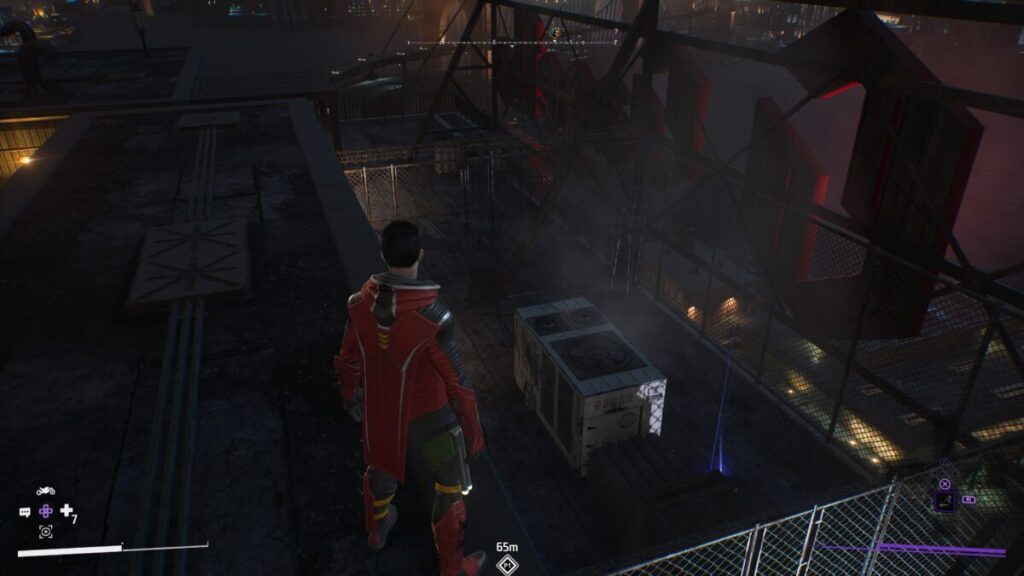
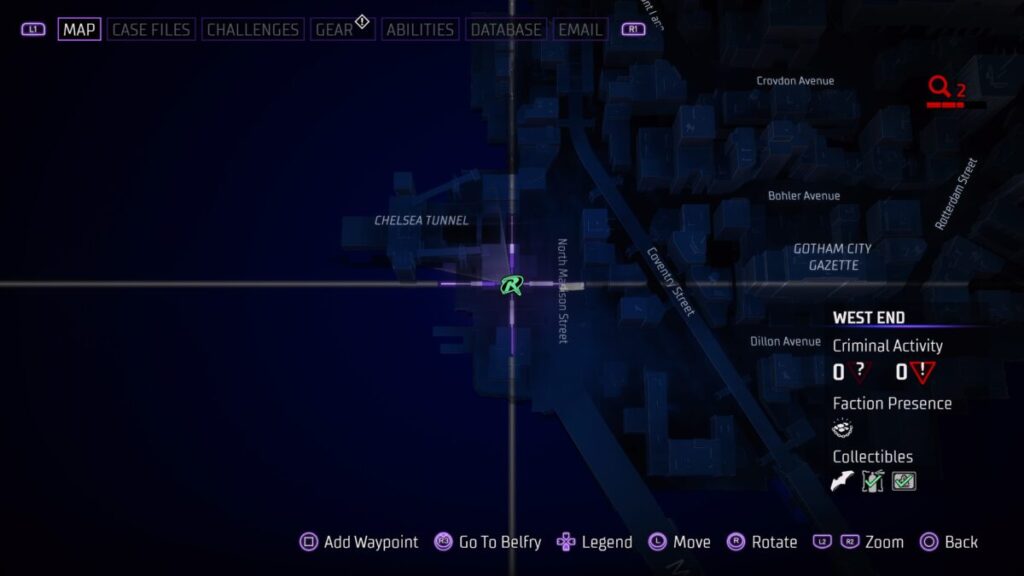
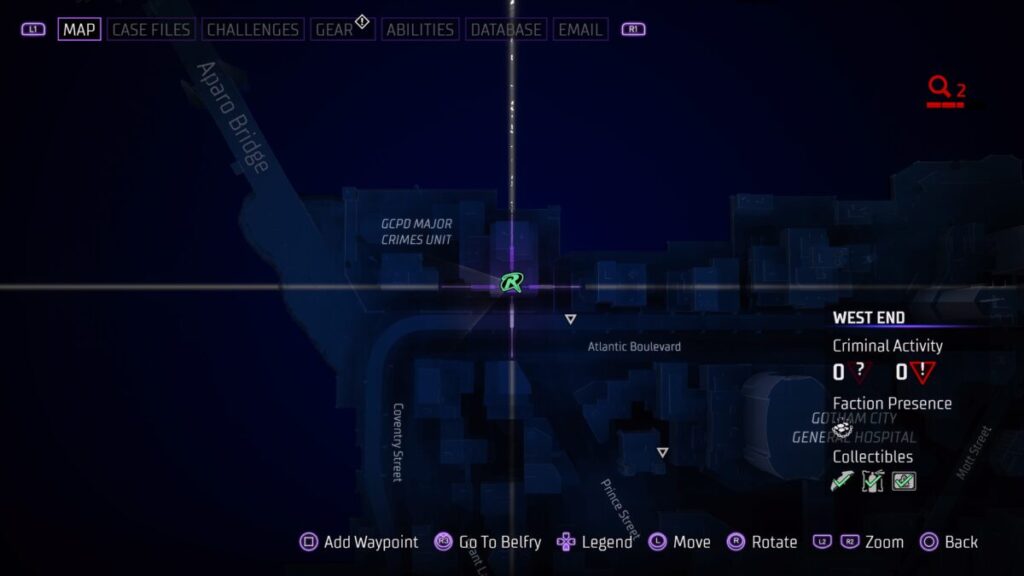
Reach the Secret Cache
Travel to the roof in West End between Croydon Avenue and Bohler Avenue. After you activate the scanner, run through a set of beacons before time runs out. After making it through the last beacon, grapple to the nearby ledge and examine the cache to receive one of Bruce’s Audio Logs.
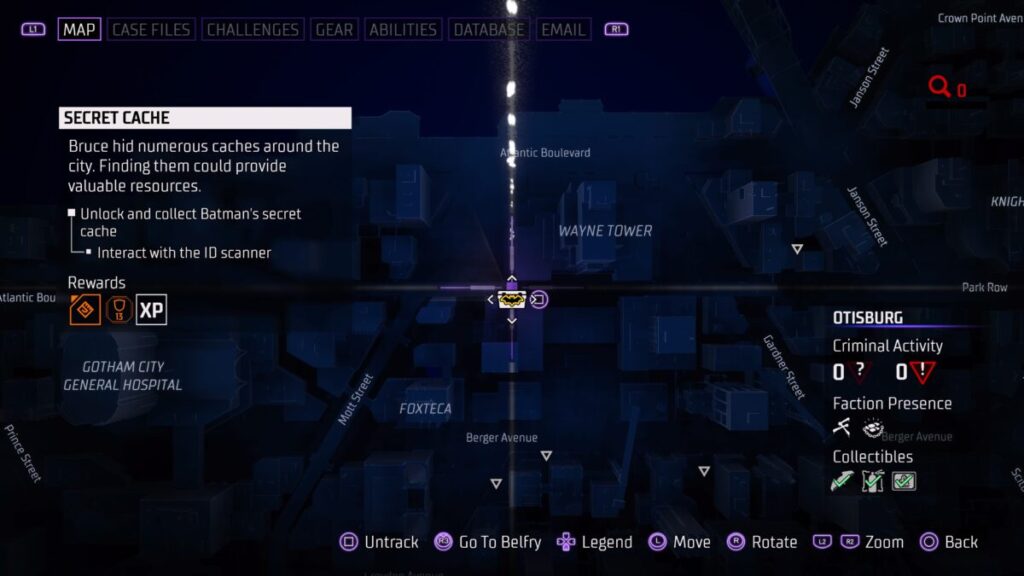
Reach the Secret Cache
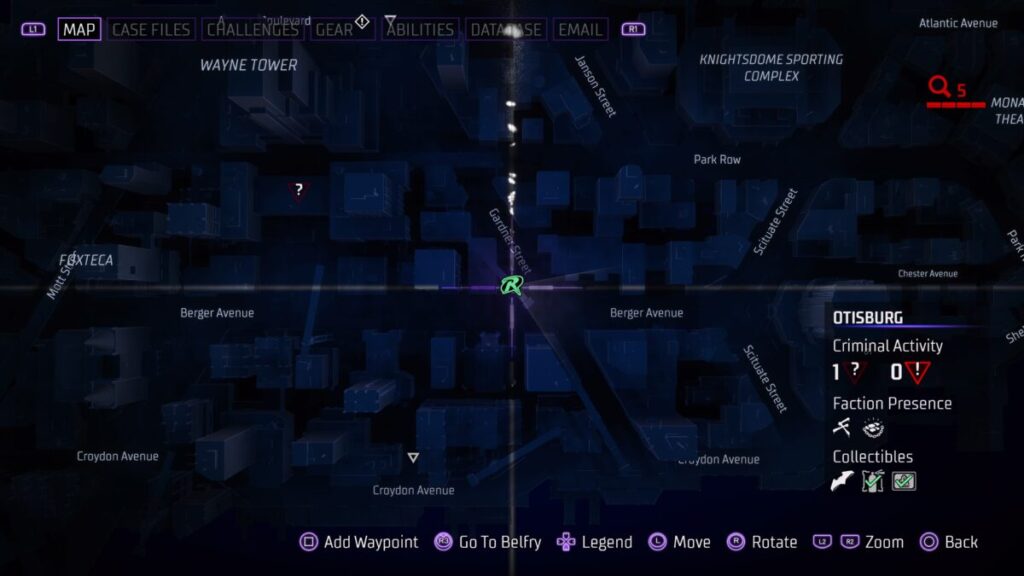
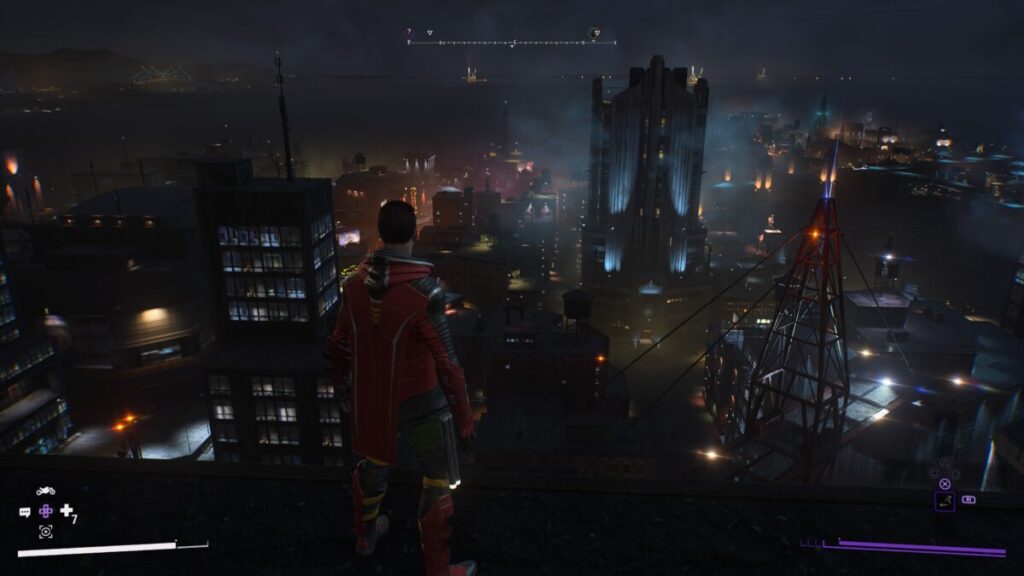
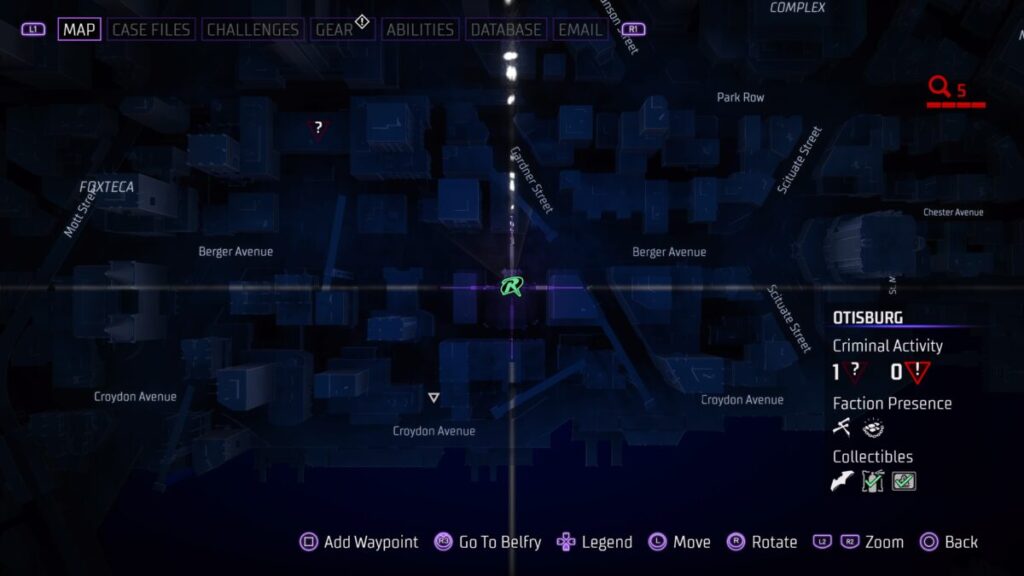
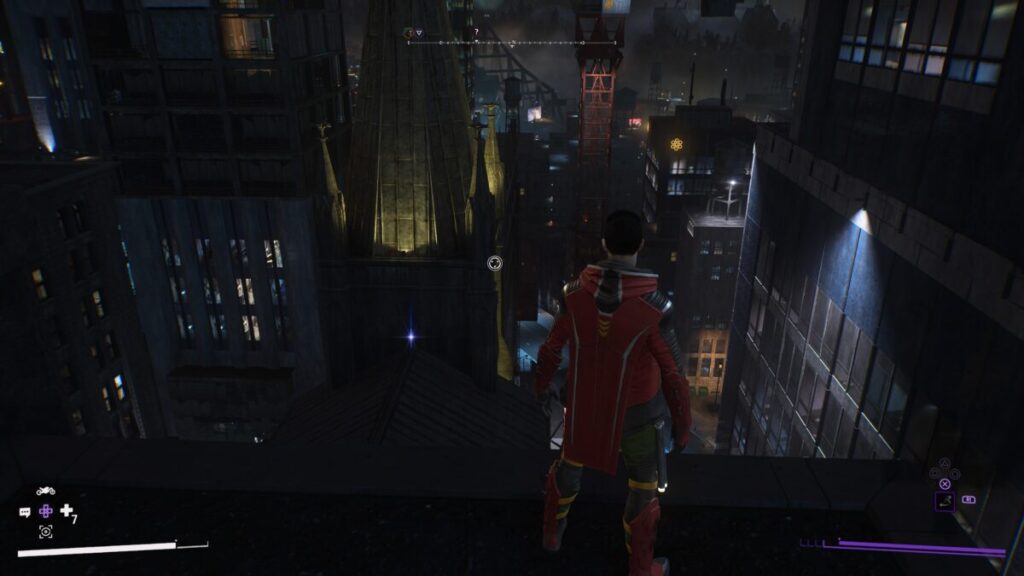
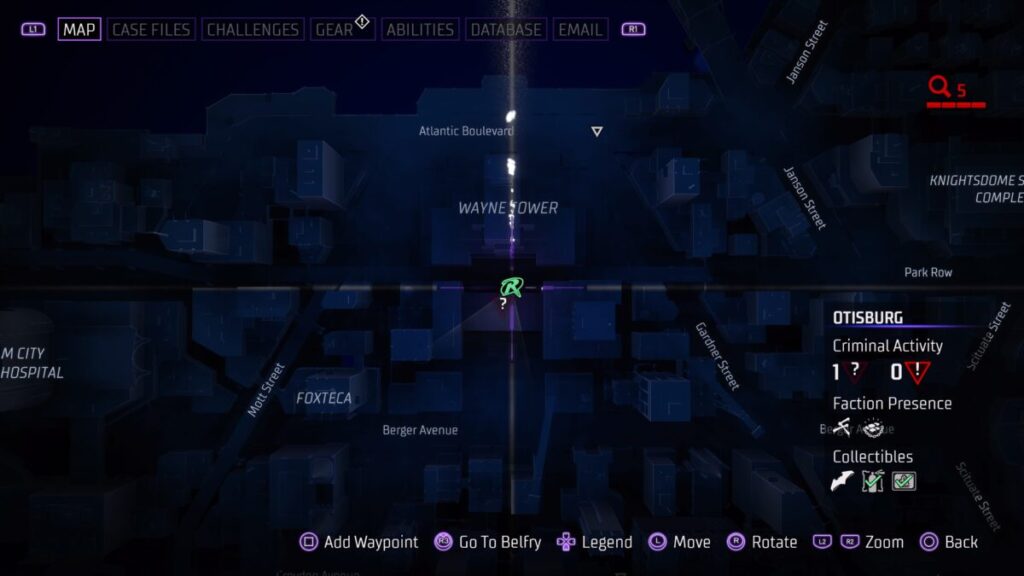
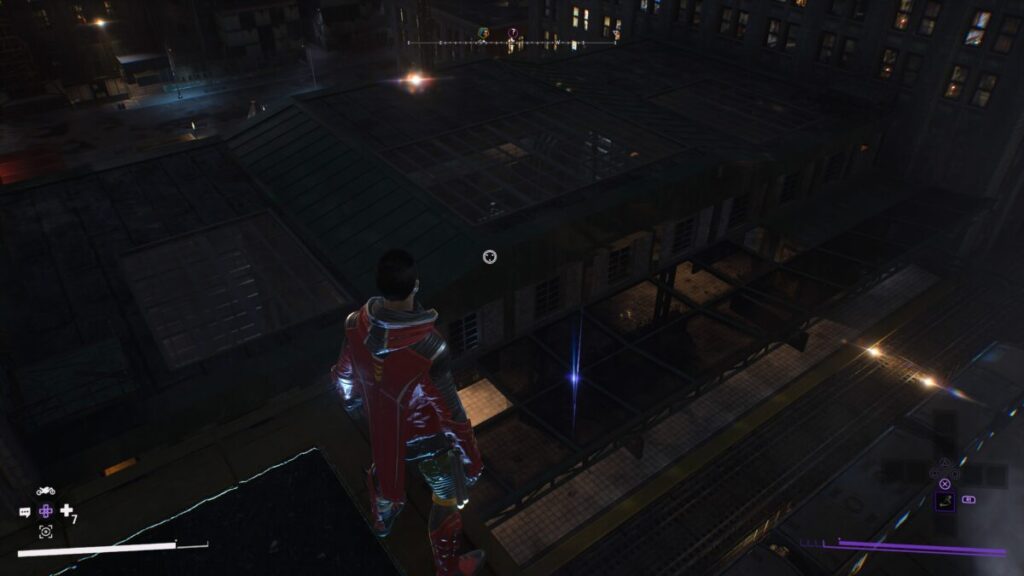
Head to Otisburg to the building southwest of Wayne Tower. After you activate the scanner, run through a set of beacons before time runs out. After making it through the last beacon, grapple to the nearby ledge and examine the cache to receive one of Bruce’s Audio Logs.
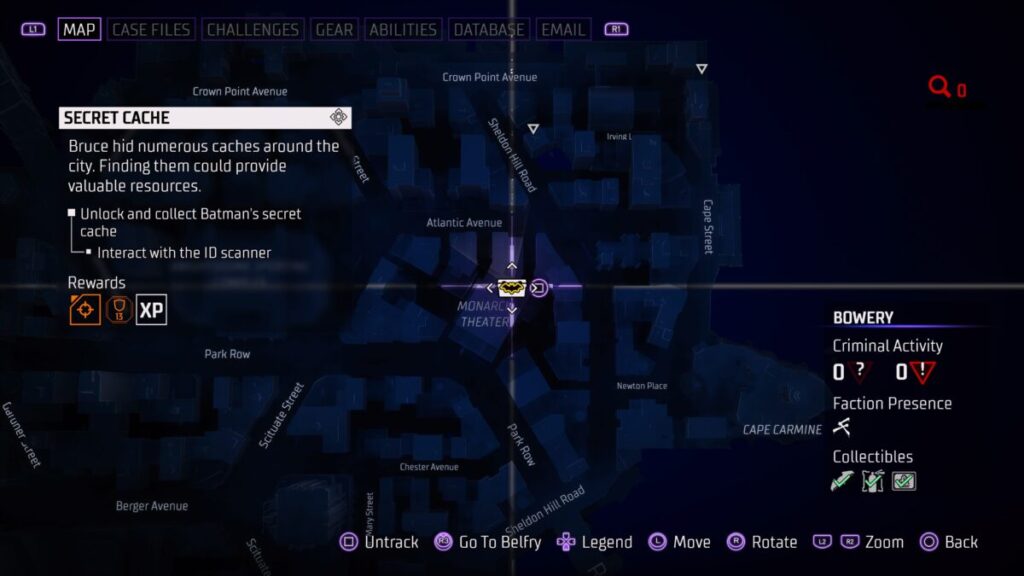
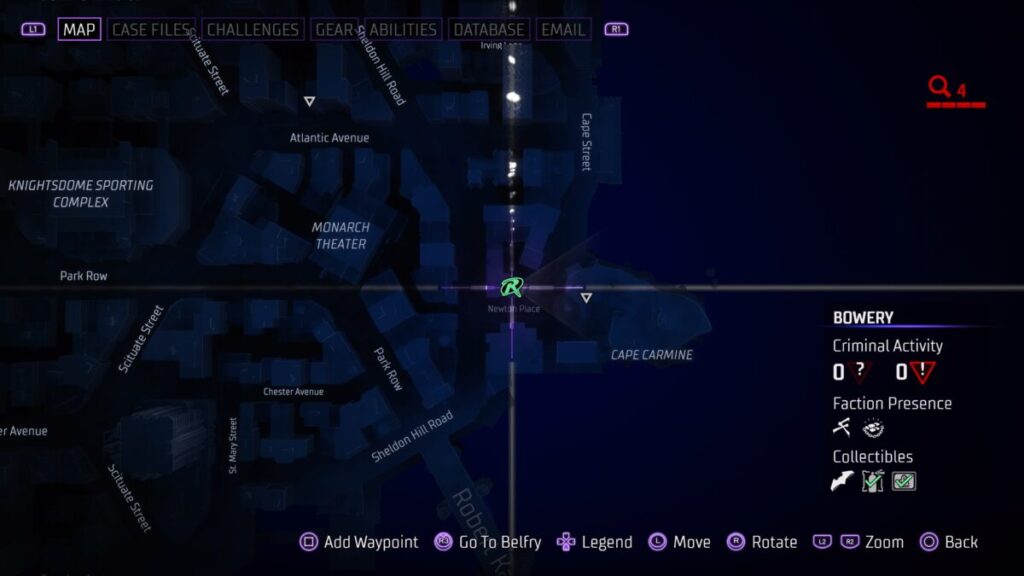
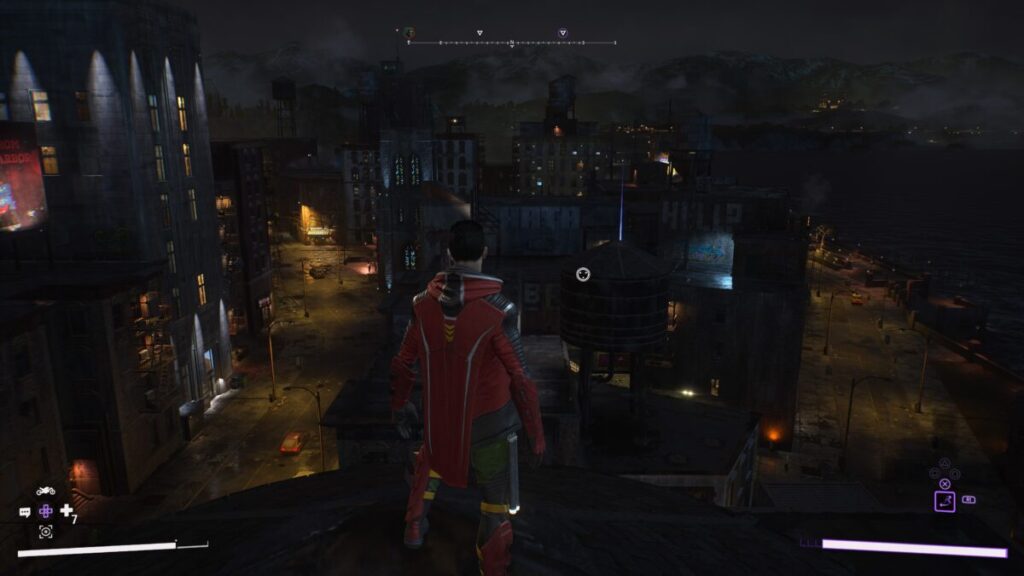
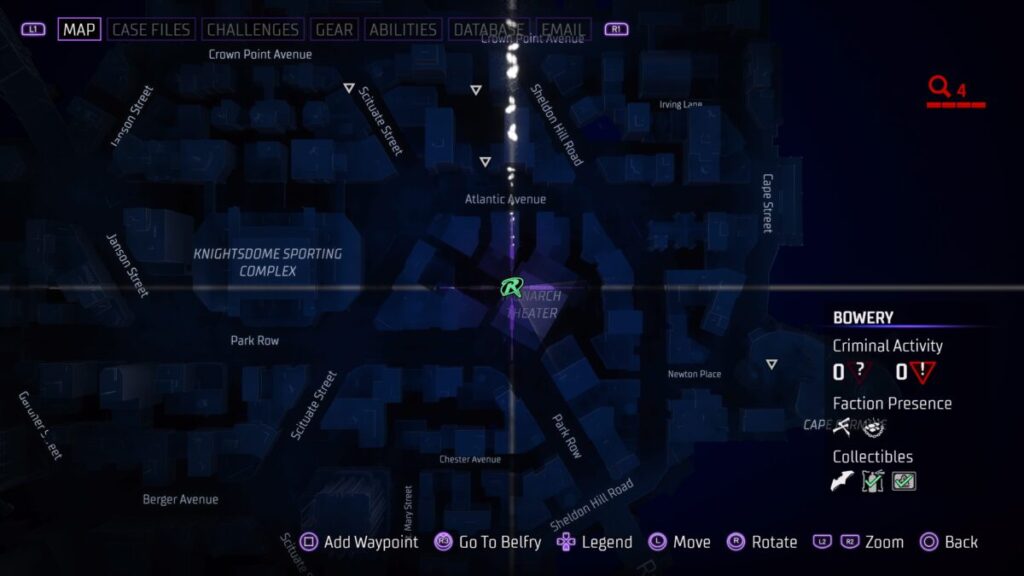
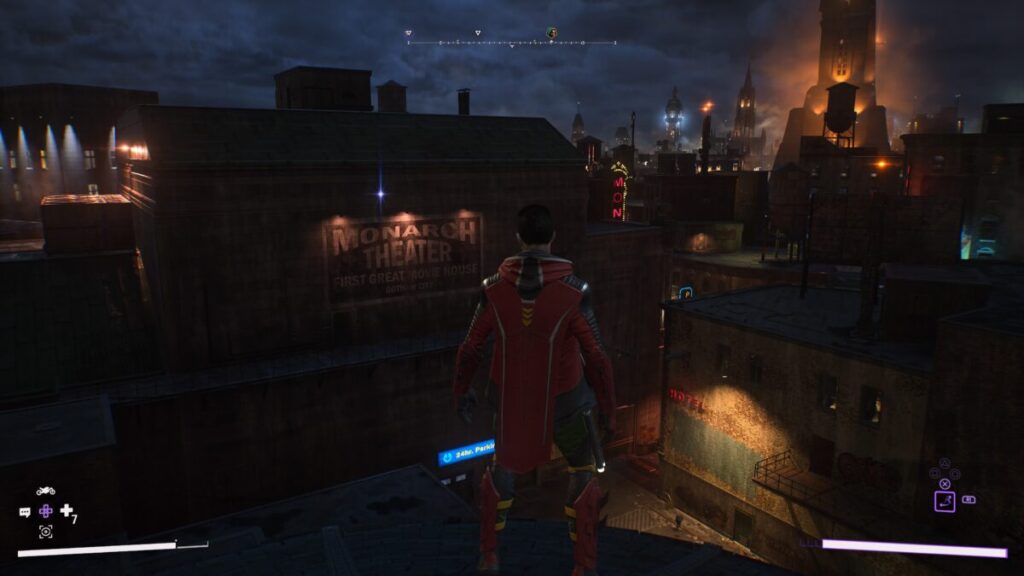
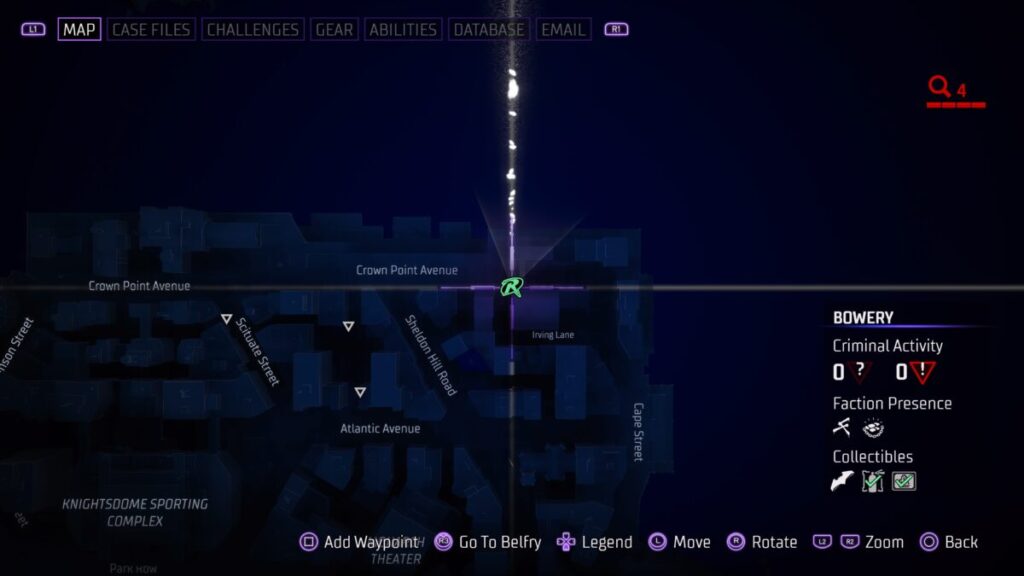
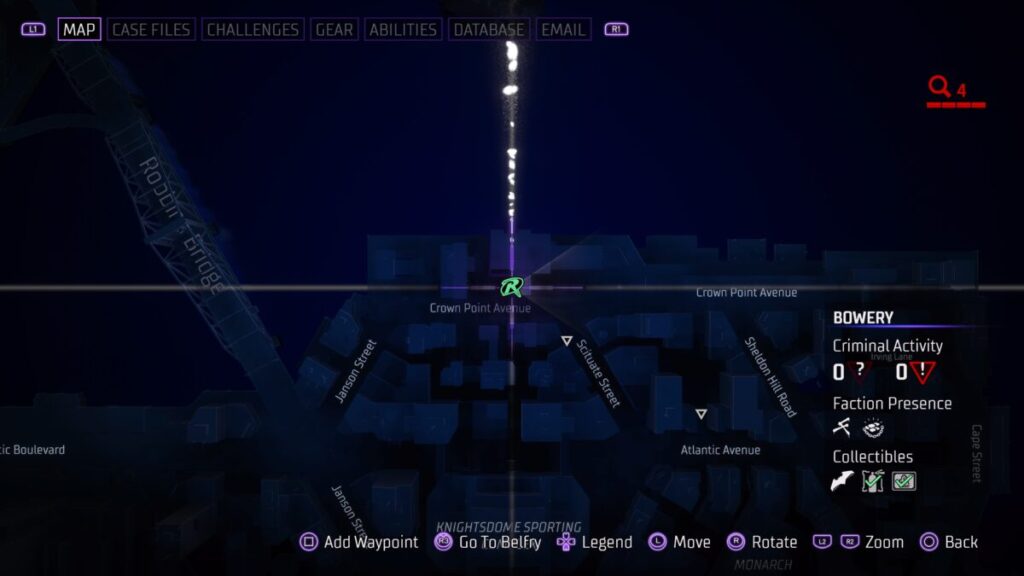
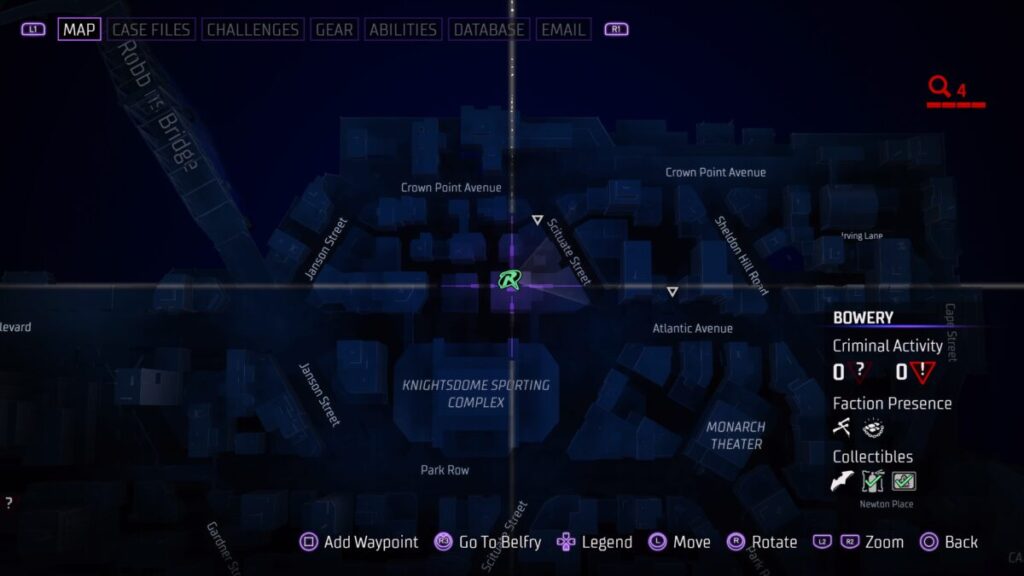
Reach the Secret Cache
Travel to the roof of Monarch Theater in the Bowery. After you activate the scanner, run through a set of beacons before time runs out. After making it through the last beacon, grapple to the nearby ledge and examine the cache to receive one of Bruce’s Audio Logs.
Reach the Secret Cache
Head to Tricorner Island then make your way to the building east of Quarterdeck Road. After you activate the scanner, run through a set of beacons before time runs out. After making it through the last beacon, grapple to the nearby ledge and examine the cache to receive one of Bruce’s Audio Logs.
Return to the Belfry
Before you’ll get any more of these activities, you’ll need to return to the Belfry.
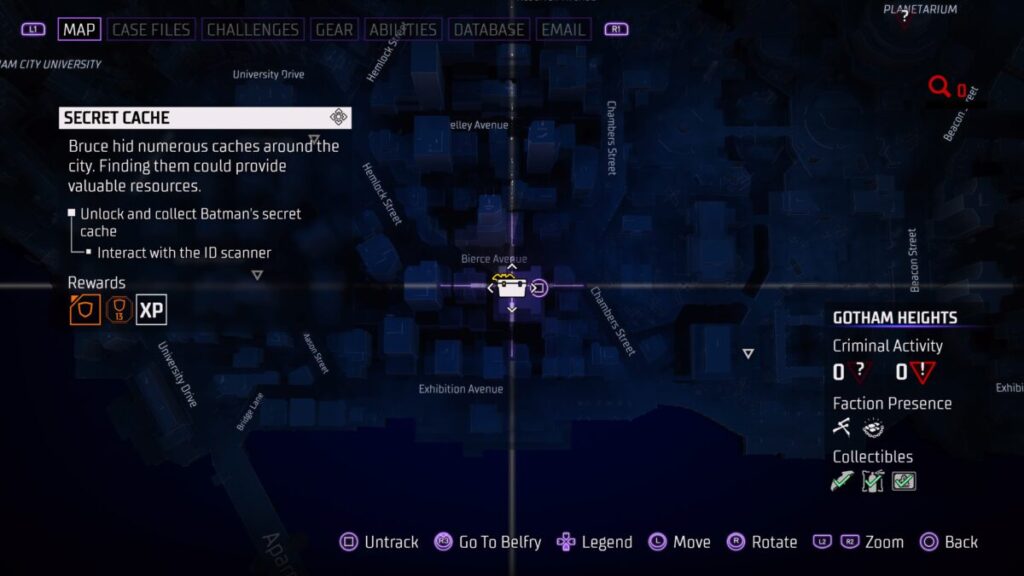
Reach the Secret Cache
Travel to the building just south of Bierce Avenue in Gotham Heights. After you activate the scanner, run through a set of beacons before time runs out. After making it through the last beacon, grapple to the nearby ledge and examine the cache to receive one of Bruce’s Audio Logs.
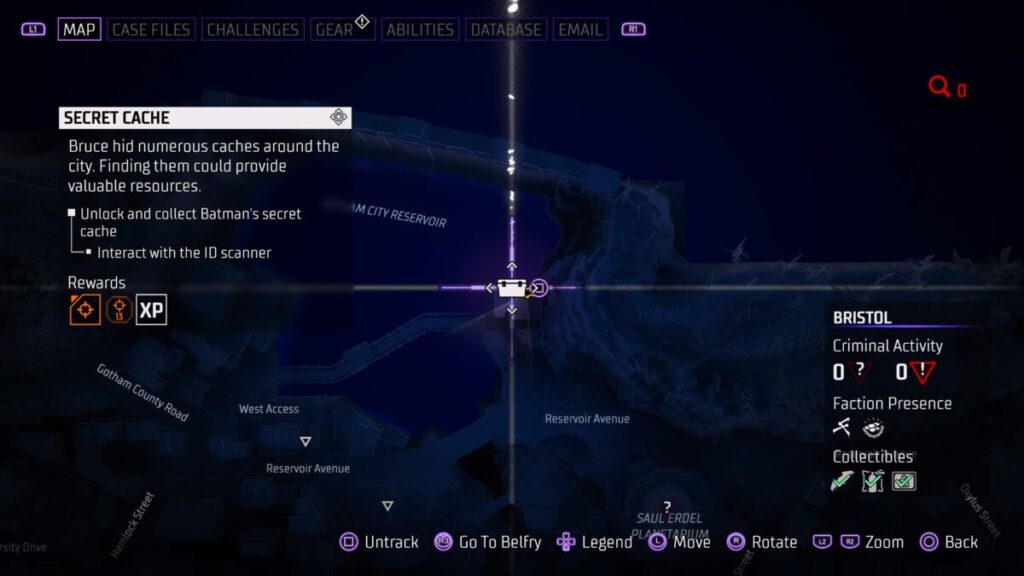
Reach the Secret Cache
Head to the building near the corner of Mercey Avenue and Oxylus Street in Bristol. After you activate the scanner, run through a set of beacons before time runs out. After making it through the last beacon, grapple to the nearby ledge and examine the cache to receive one of Bruce’s Audio Logs.
Reach the Secret Cache
Travel to the Gotham City Reservoir to find the next scanner. After you activate the scanner, run through a set of beacons before time runs out. After making it through the last beacon, grapple to the nearby ledge and examine the cache to receive one of Bruce’s Audio Logs.
For more guides on Gotham Knights check our main guide page here!
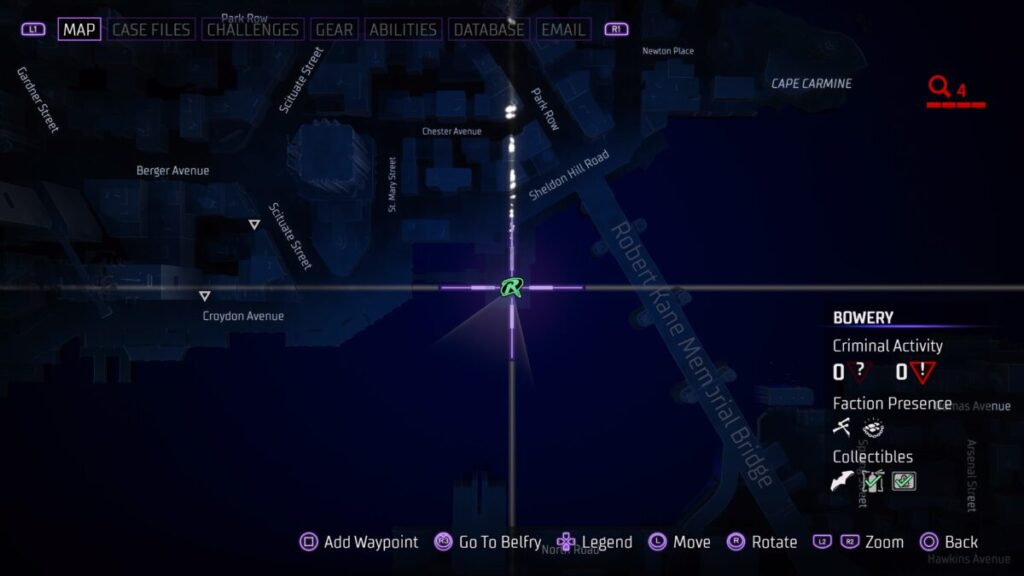
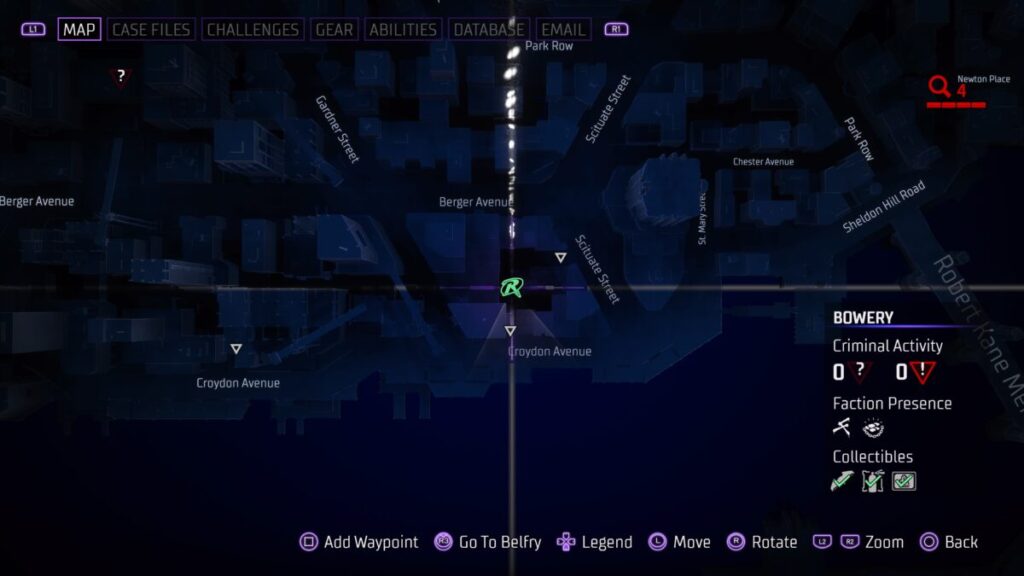
Below are the locations of the 12 Batarangs that can be found around New Gotham in Gotham Knights. New Gotham consists of two areas: Bowery and Otisburg. You’ll need to collect all of the Batarangs for the Batarang Collector trophy. For guides on the locations of the Batarangs in other areas, please click here!
Bowery Batarangs
Batarang 1
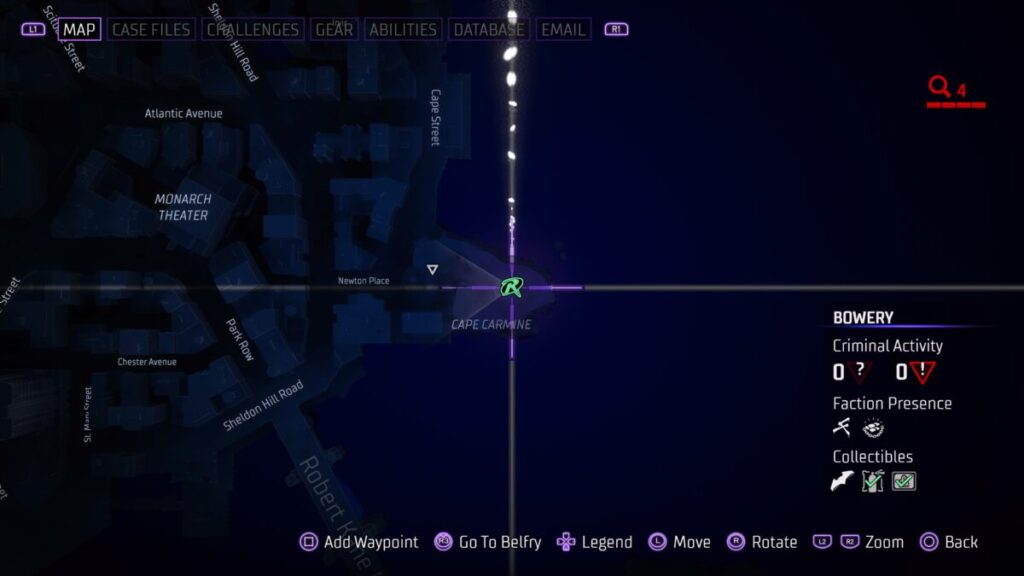
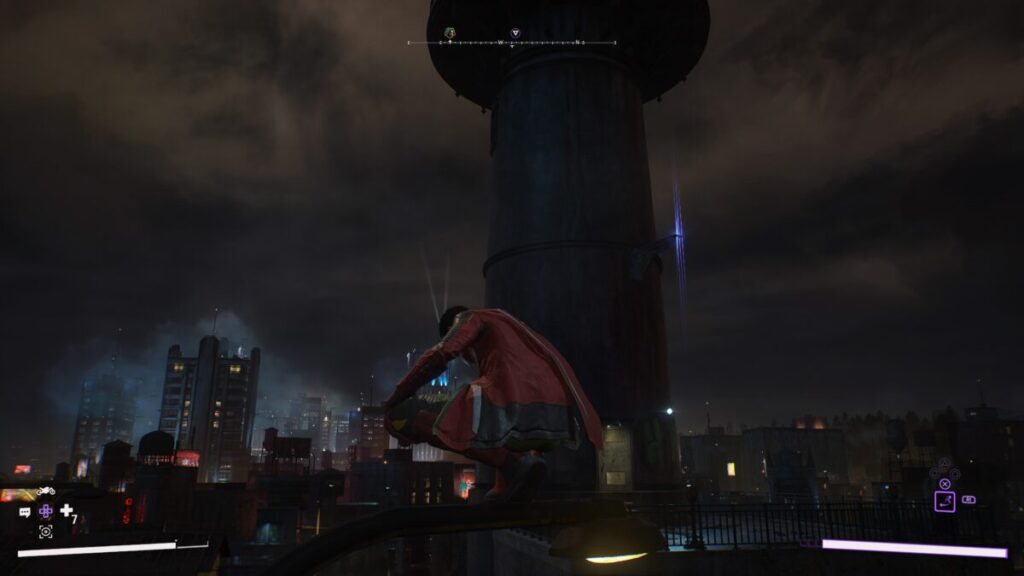
This Batarang can be found on the water tower atop a building just south of Newton Place.
Batarang 2
This Batarang can be found at Cape Carmine about halfway up the lighthouse.
Batarang 3
This Batarang can be found on the western side of the Monarch Theater.
Batarang 4
This Batarang can be found on the roof of a building just north of Irving Lane.
Batarang 5
This Batarang can be found on the side of a building on the western side of Crown Point Avenue.
Batarang 6
This Batarang can be found on a water tower atop a building just north of the Knightsdome Sporting Complex.
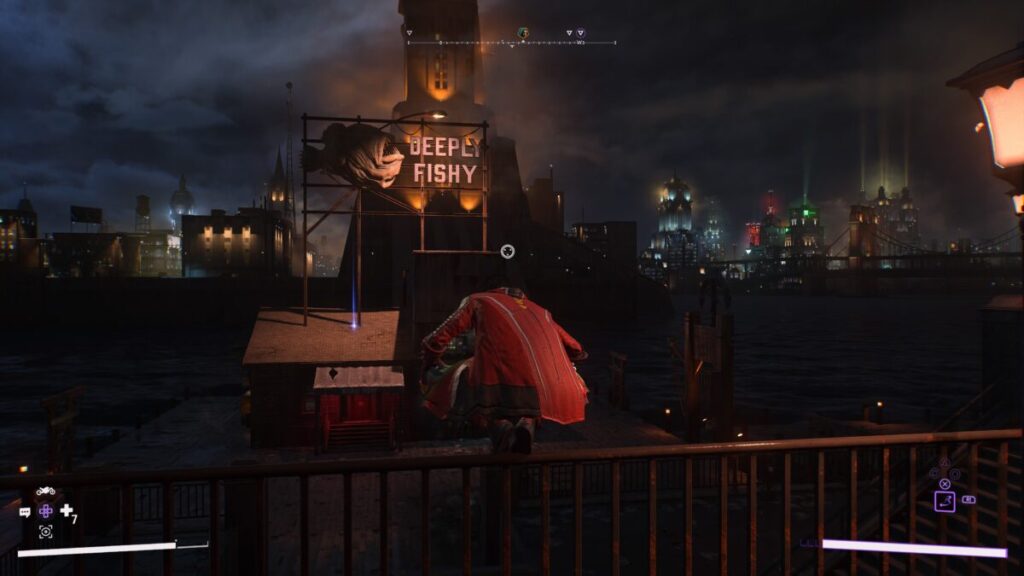
Batarang 7
This Batarang can be found on the Deeply Fishy building along the water just west of the Robert Kane Memorial Bridge.
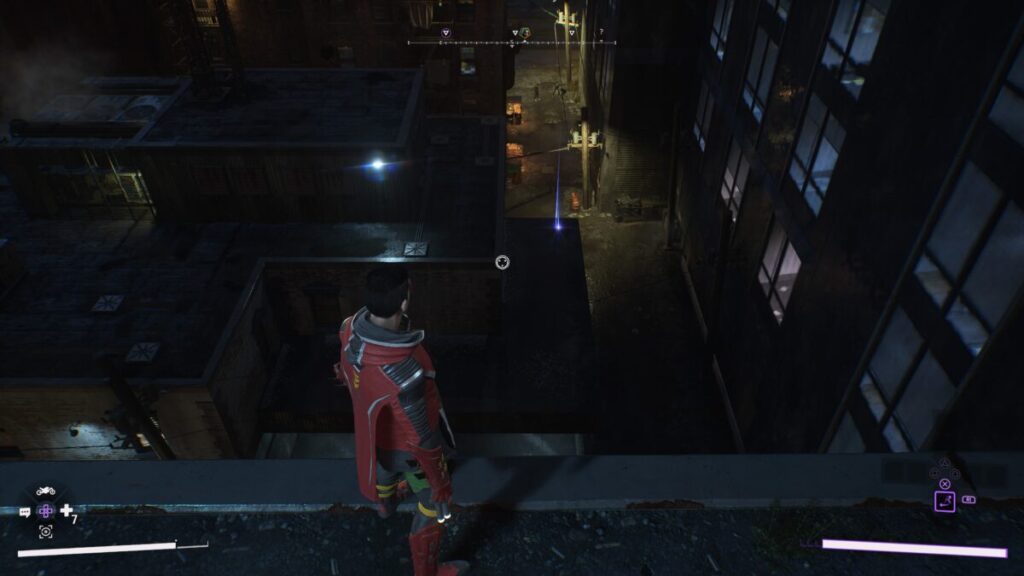
Batarang 8
This Batarang can be found in the alleyway between Berger Avenue and Croydon Avenue.
Otisburg Batarangs
Batarang 9
This Batarang can be found atop a crane at the intersection of Gardner Street and Berger Avenue.
Batarang 10
This Batarang can be found on the roof of a church behind the steeple on the south side of Berger Avenue.
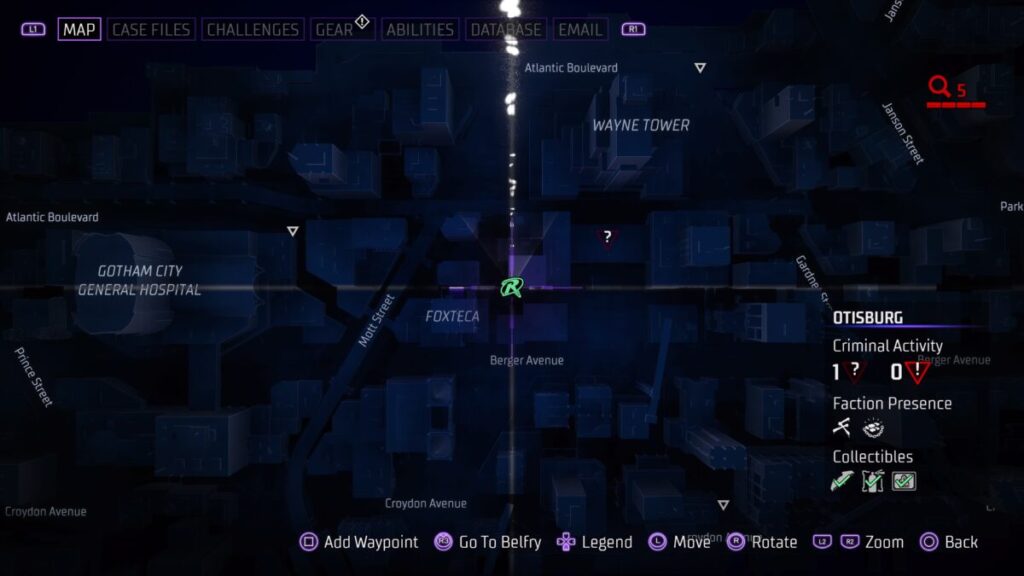
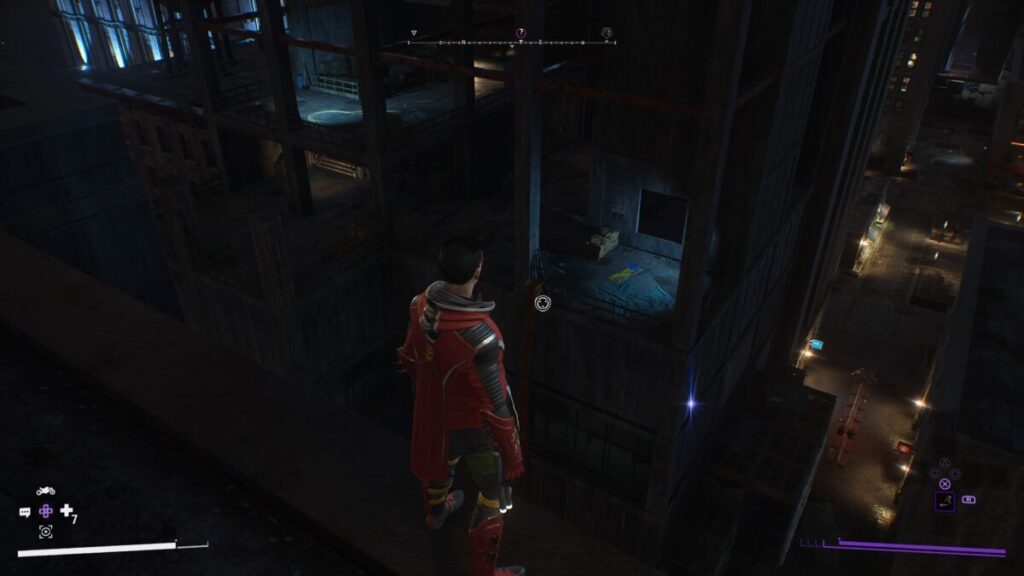
Batarang 11
This Batarang can be found directly south of Wayne Tower on the overhang above the railroad tracks.
Batarang 12
This Batarang can be found on the side of a building northeast of Foxteca.
Below are the locations of the 12 Batarangs that can be found around Downtown Gotham in Gotham Knights. Downtown Gotham consists of two areas: Financial District and West End. You’ll need to collect all of the Batarangs for the Batarang Collector trophy. For guides on the locations of the Batarangs in other areas, please click here!
Financial District Batarangs
Batarang 1
This Batarang can be found near the top of the Elliot Center building on the north side.
Batarang 2
This Batarang can be found on the western roof of the yellow lit building just south of Grand Avenue.
Batarang 3
This Batarang can be found on the antenna located atop the Belfry.
Batarang 4
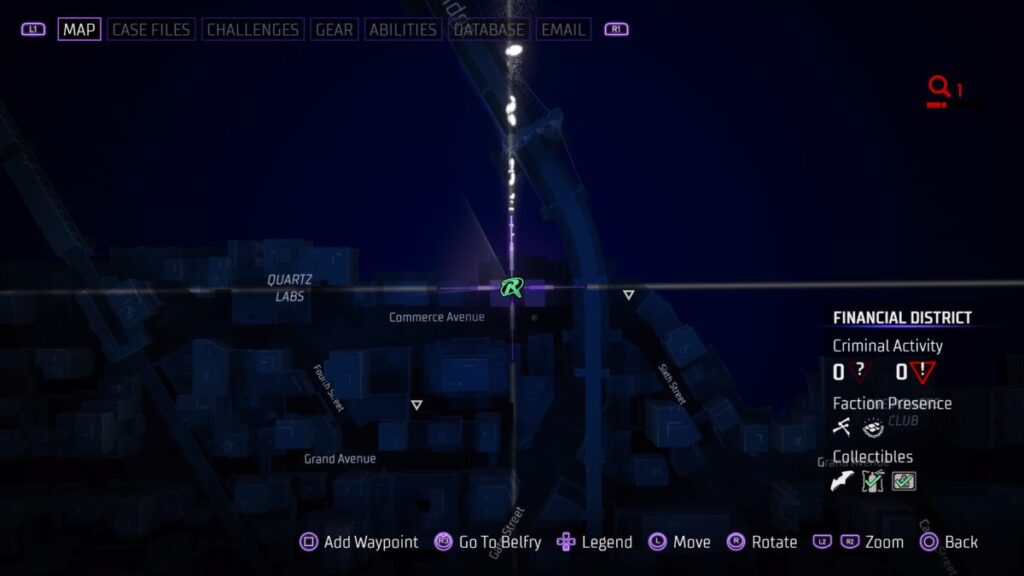
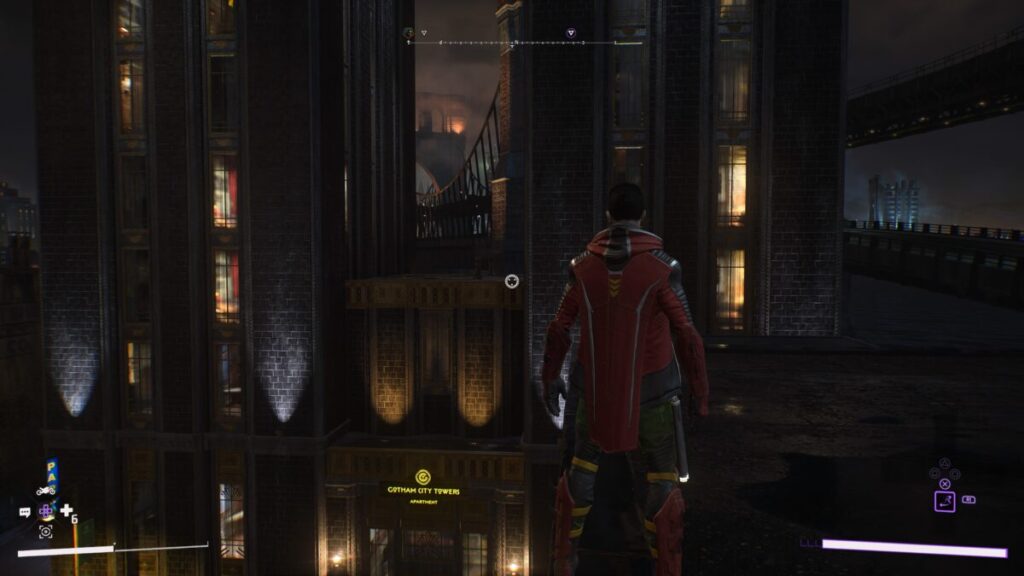
This Batarang can be found on the roof between the two towers of the Gotham City Towers Apartment on Commerce Avenue.
Batarang 5
This Batarang can be found on the roof of Quartz Labs at the base of two chimney stacks.
Batarang 6
This Batarang can be found atop the clocktower on the Gotham City Ferry Co. building.
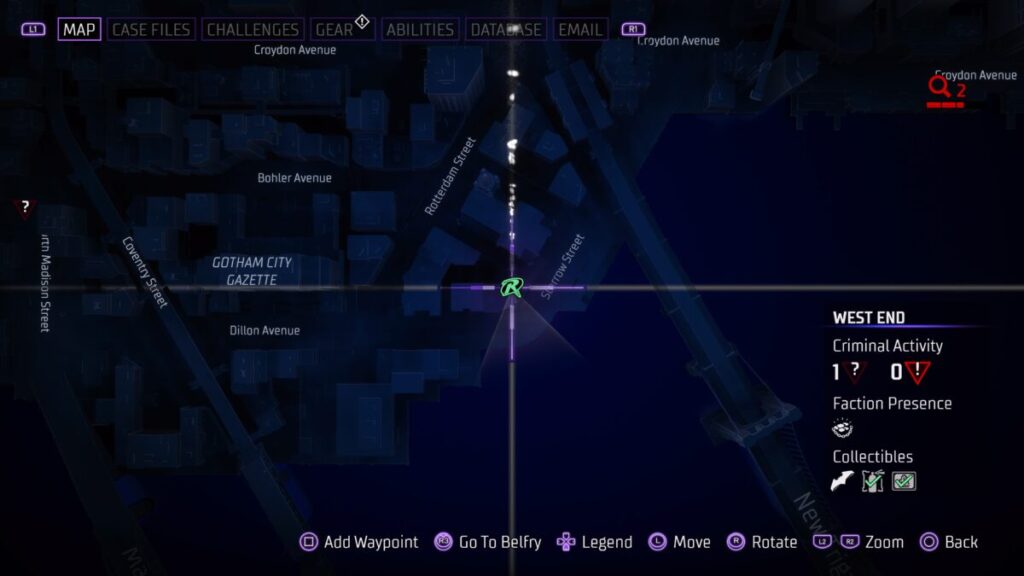
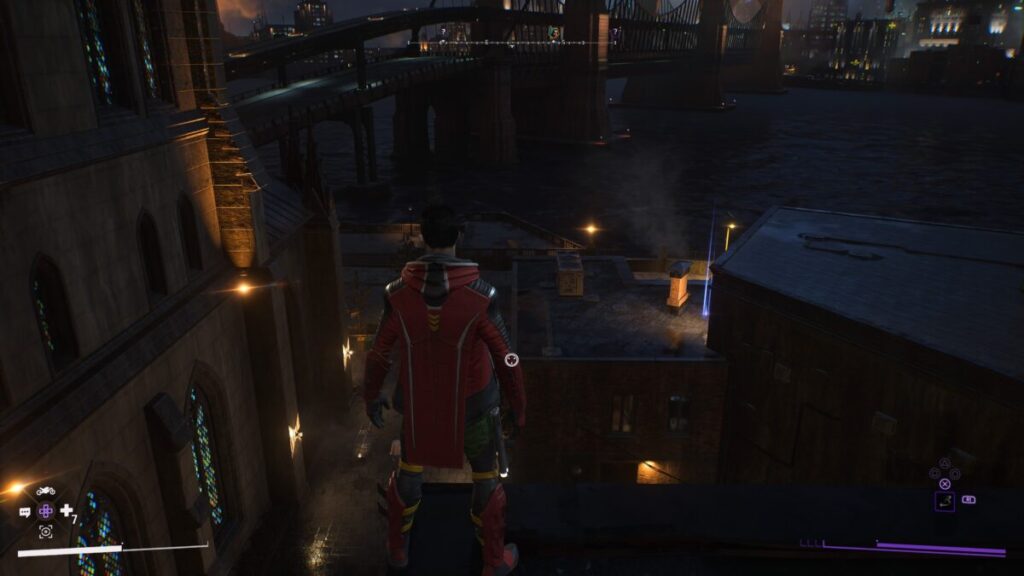
West End Batarangs
Batarang 7
This Batarang can be found on the roof of the Gotham Gazette.
Batarang 8
This Batarang can be found on the building just west of Storrow Street.
Batarang 9
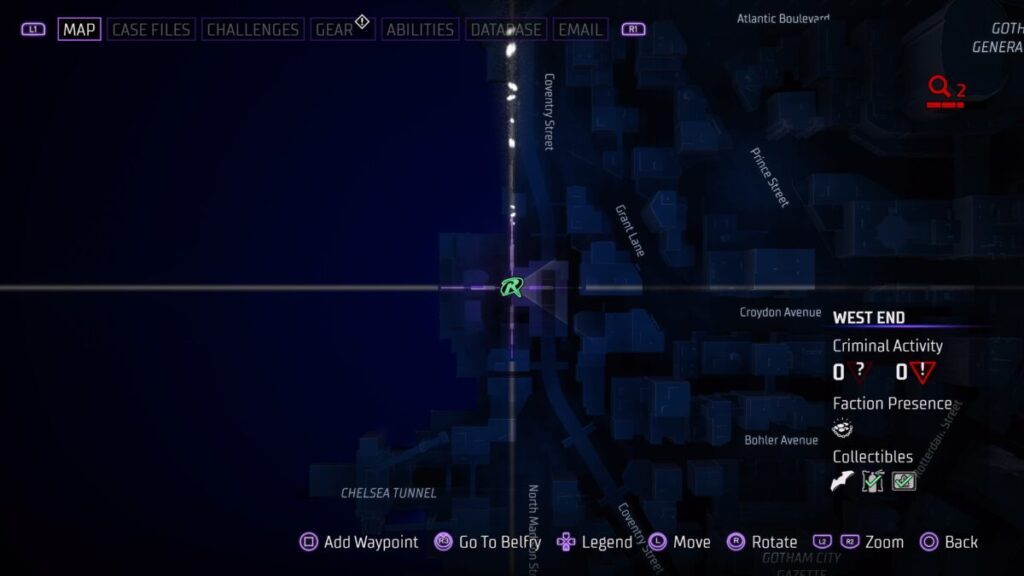
This Batarang can be found just southeast of the Chelsea Tunnel under a billboard atop a building.
Batarang 10
This Batarang can be found on stuck in a wooden board on top of a broken window along the west side of the train station.
Batarang 11
This Batarang can be found on the roof in the gated area on the southeastern side of the GCPD Major Crimes Unit.
Batarang 12
This Batarang can be found on the roof of Gotham City General Hospital.
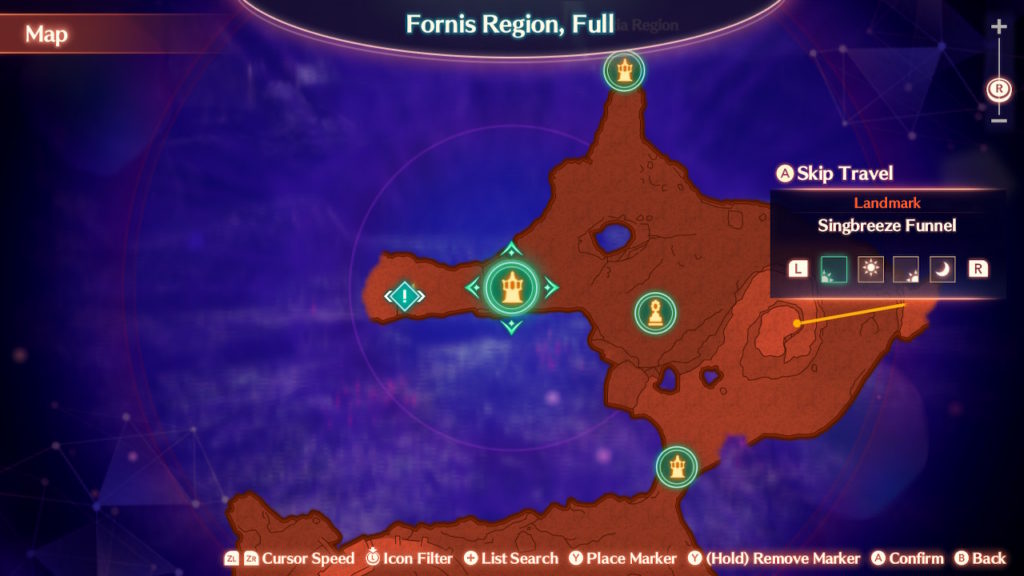
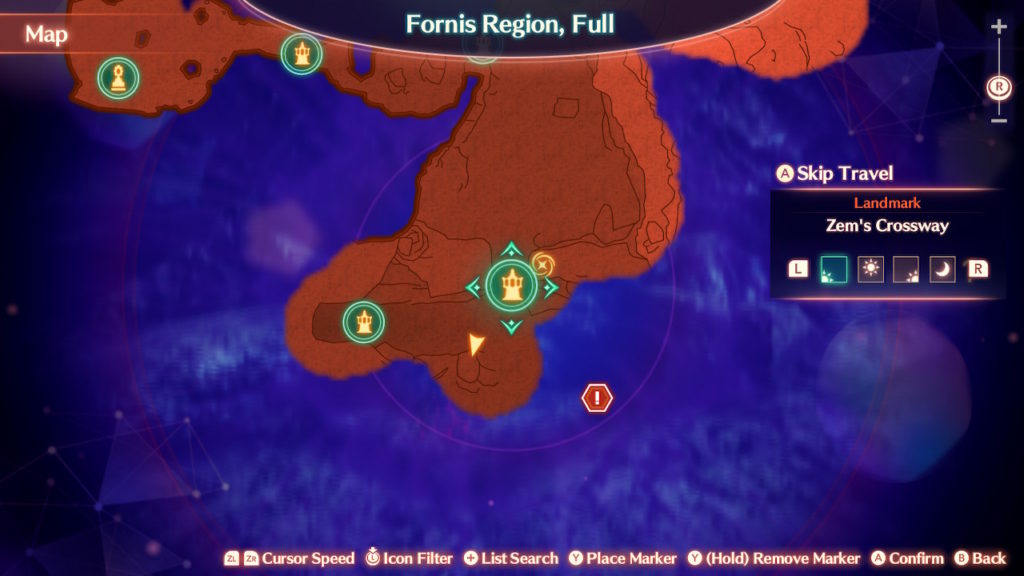
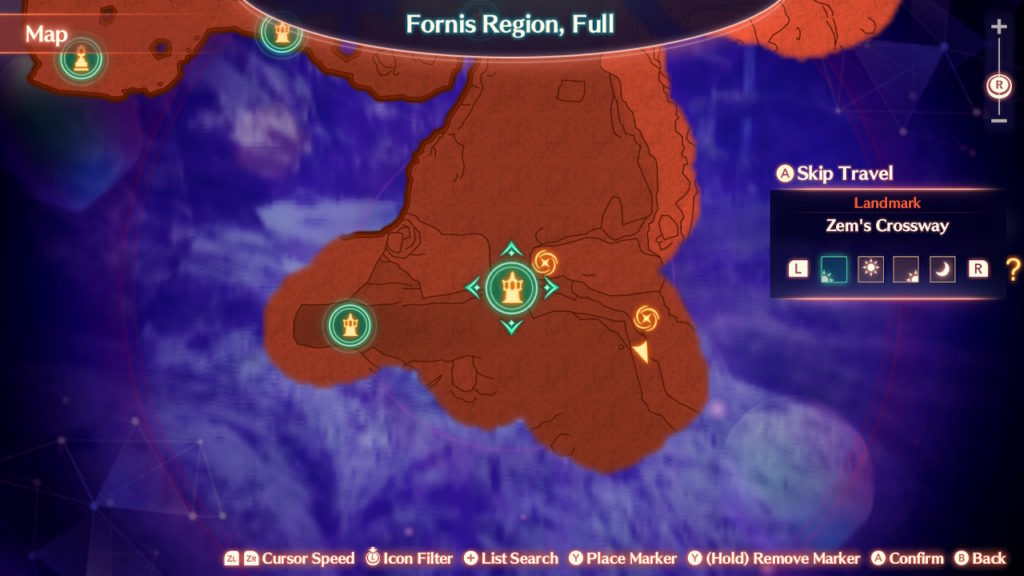
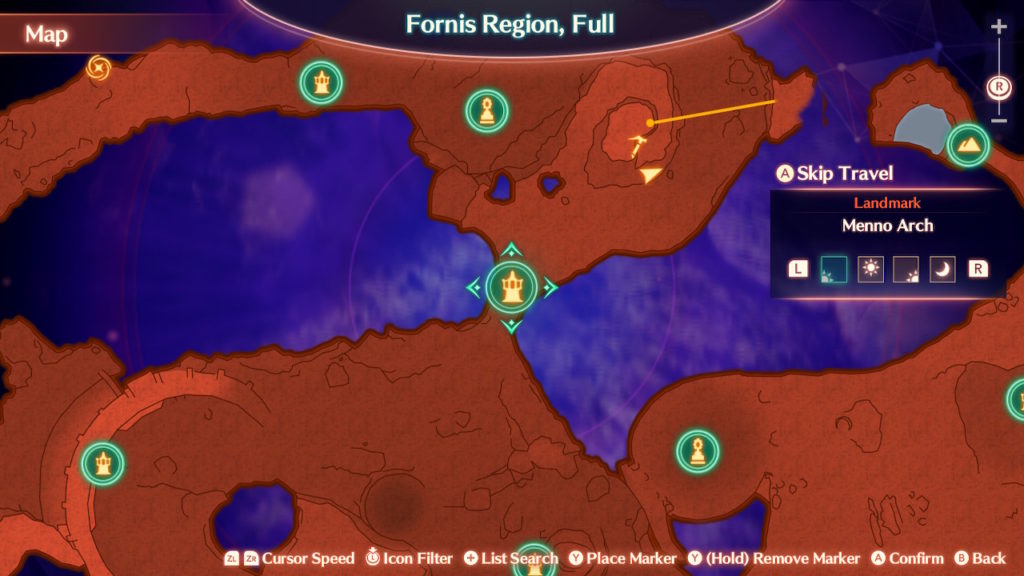
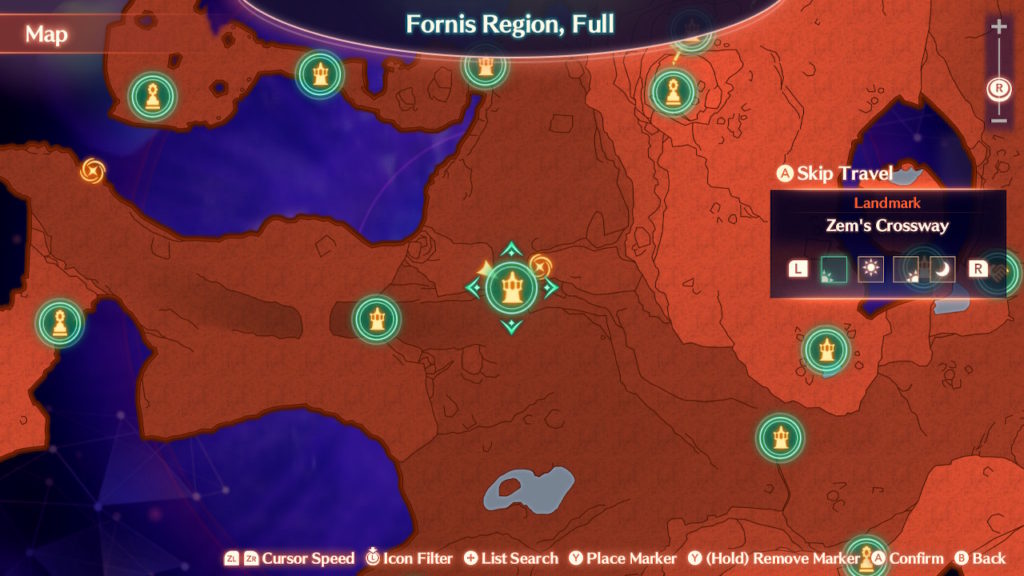
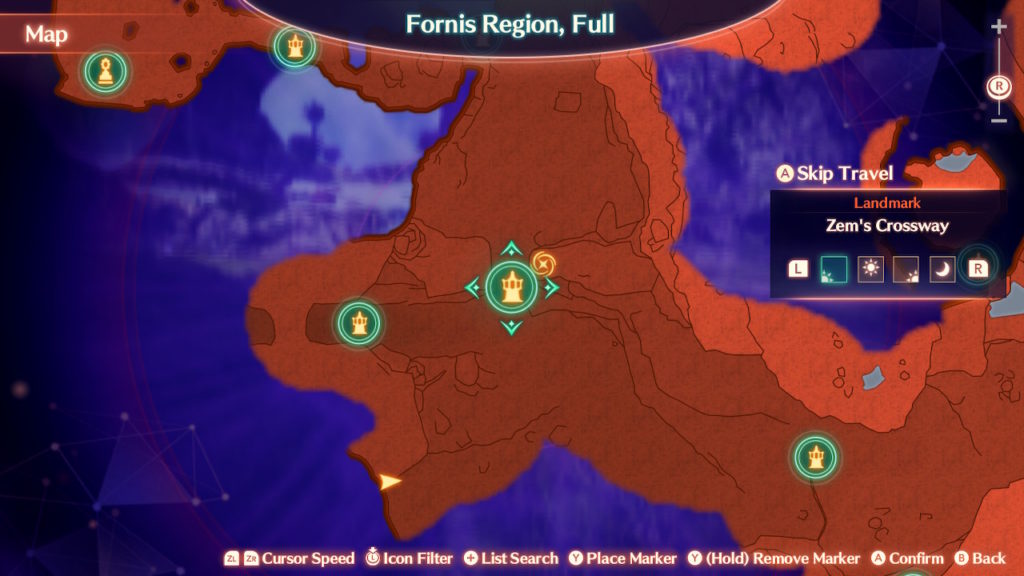
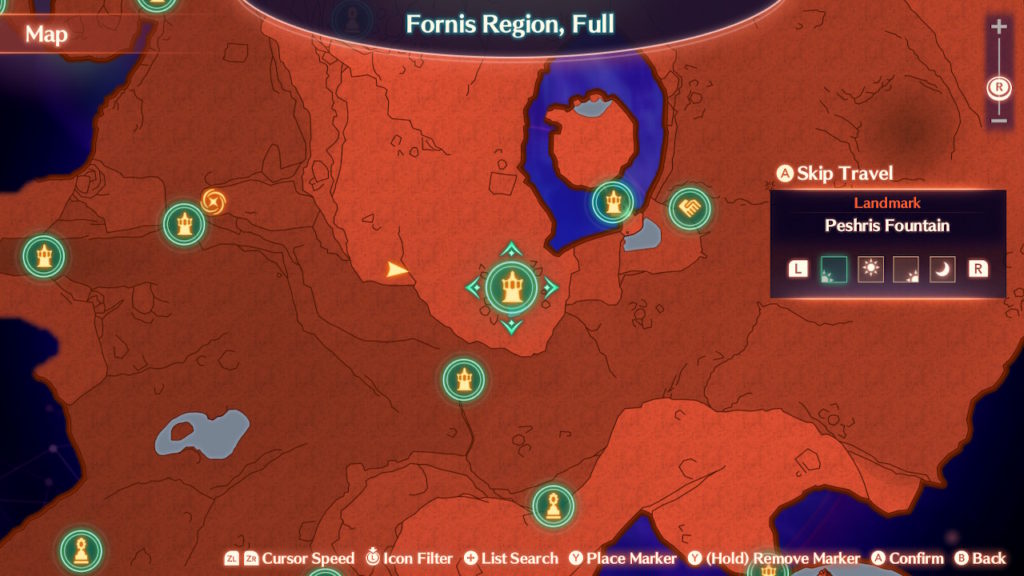
Southeast of Zem’s Crossway landmark along the cliff
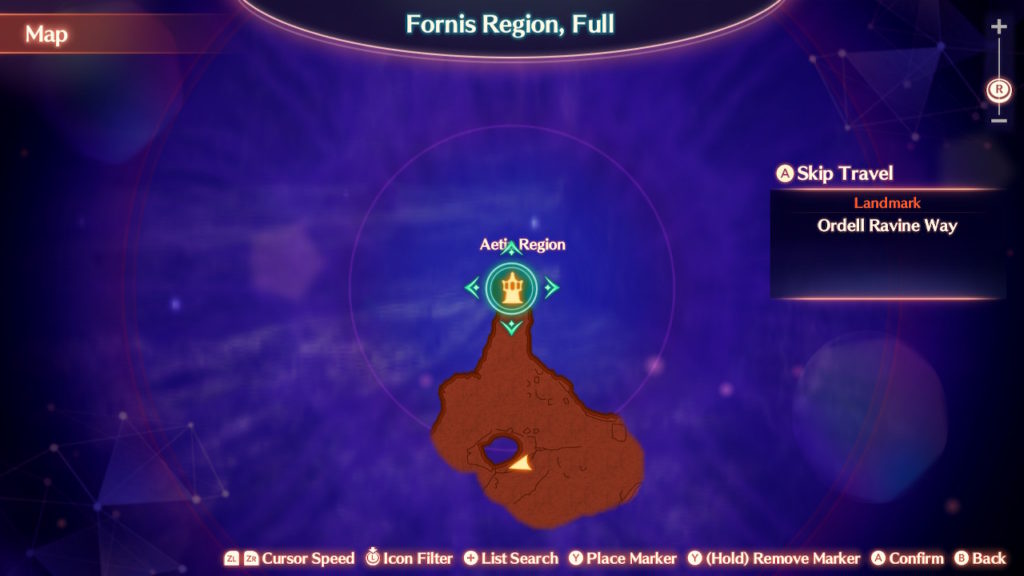
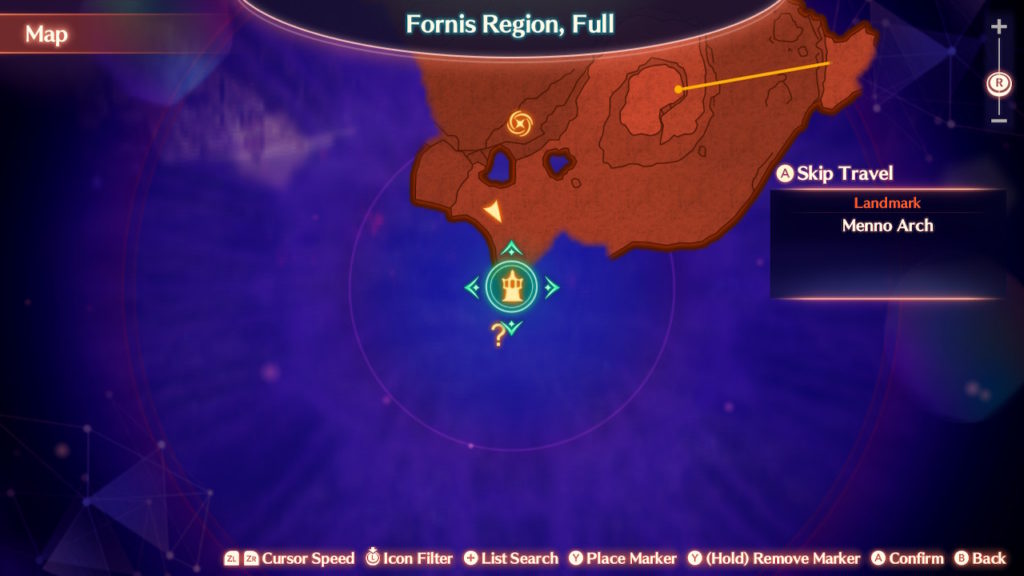
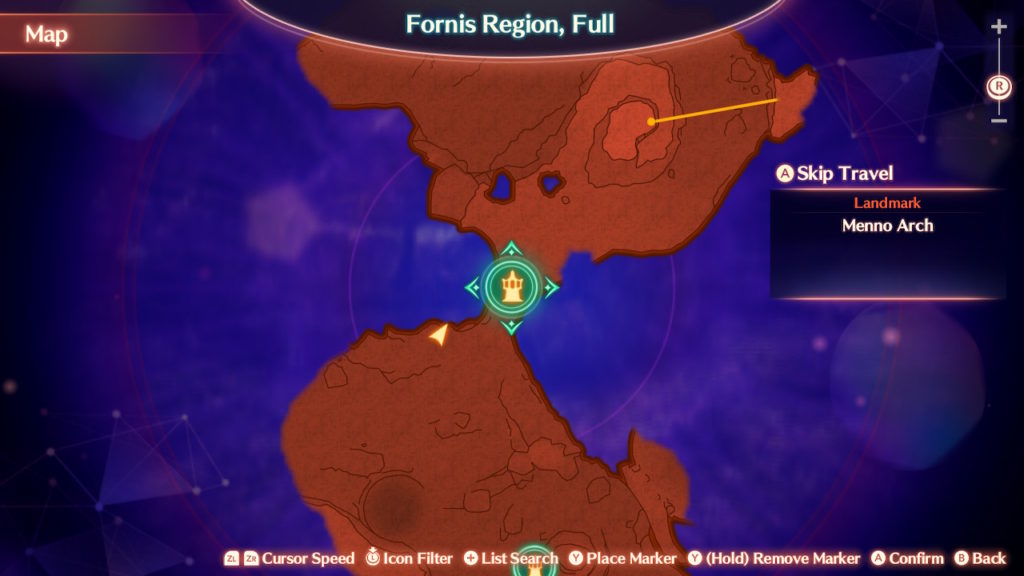
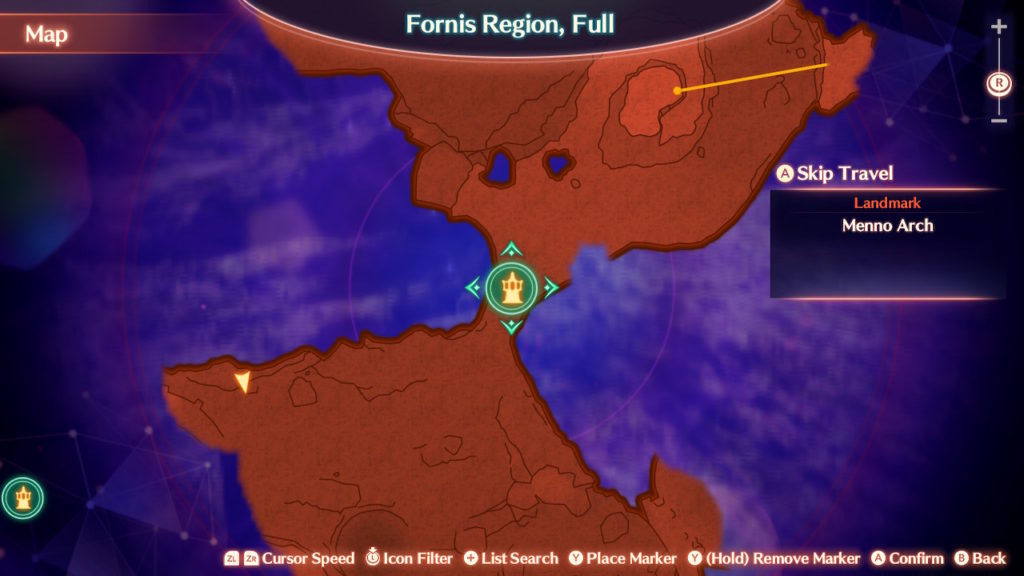
Northeast of Menno Arch
Nih’l Valley – At Zem’s Crossway
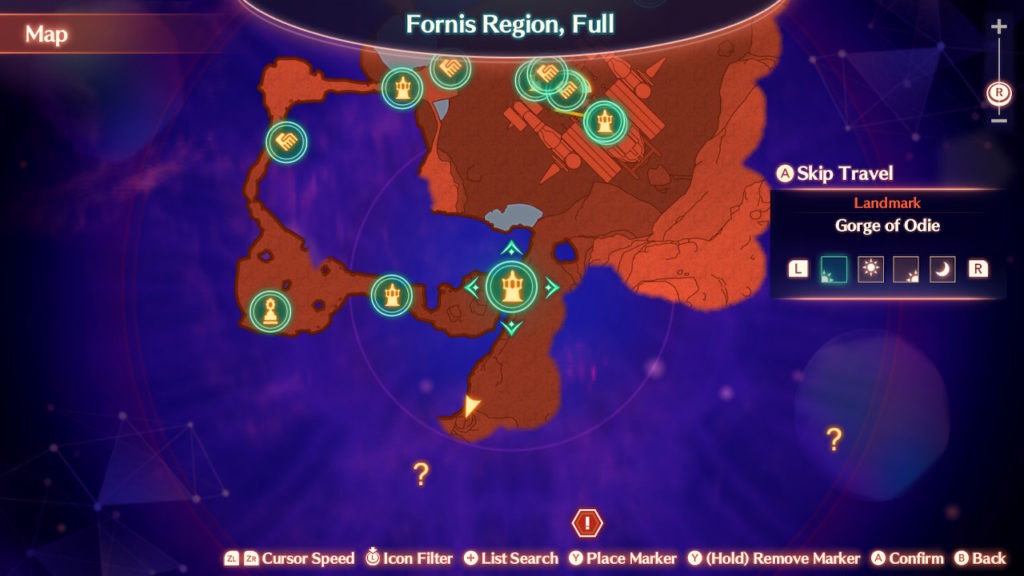
Ribbi Flats
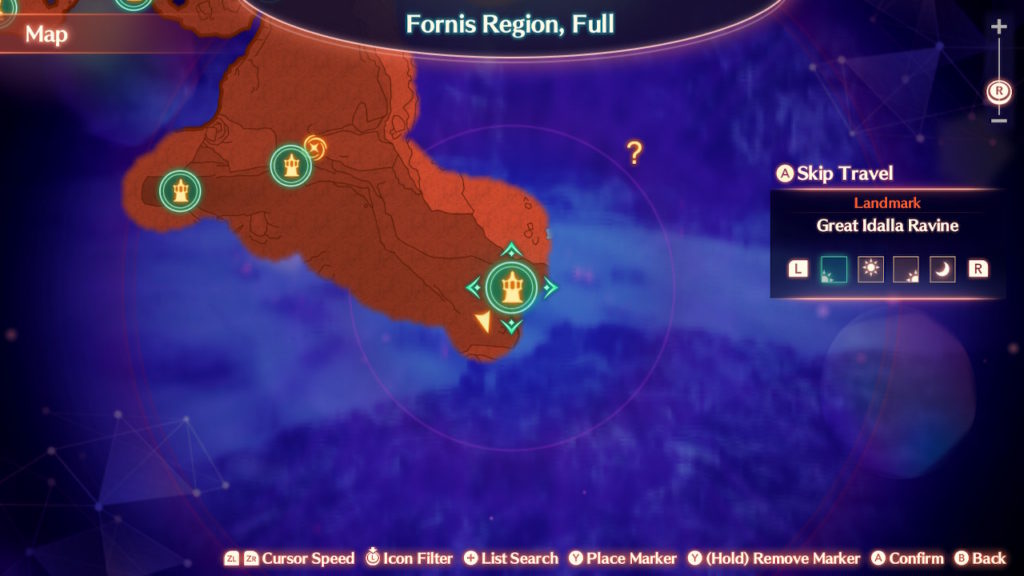
Sparres Barr – South of Great Idalla Ravine
Sparres Barr – Southwest of Zem’s Crossway
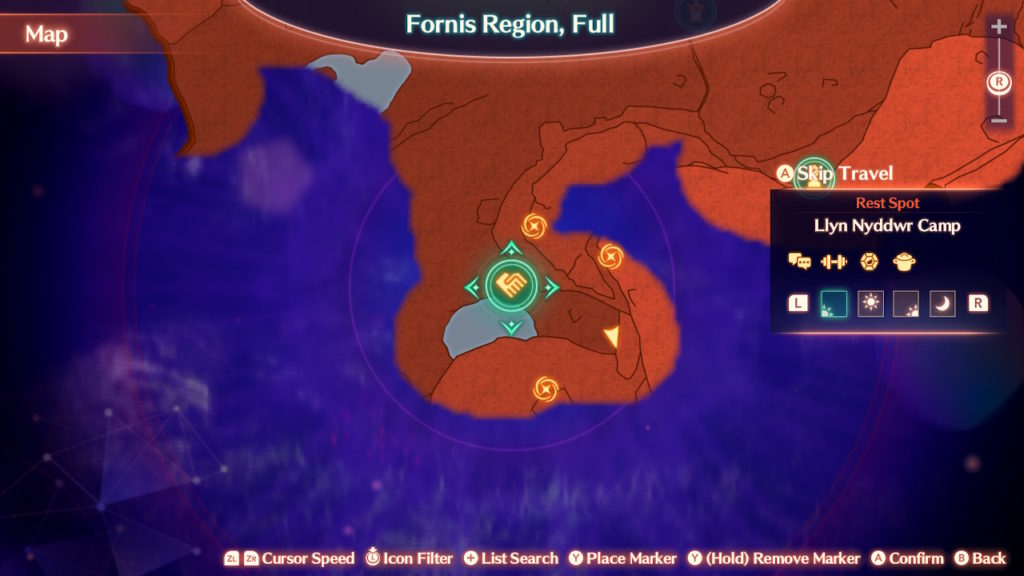
Just southeast of Llyn Nyddwr Camp
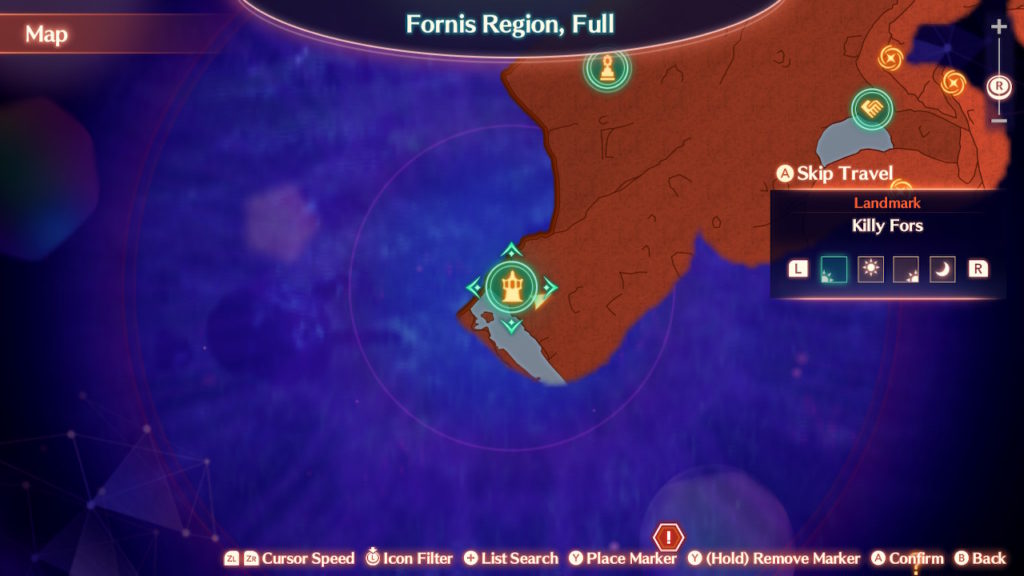
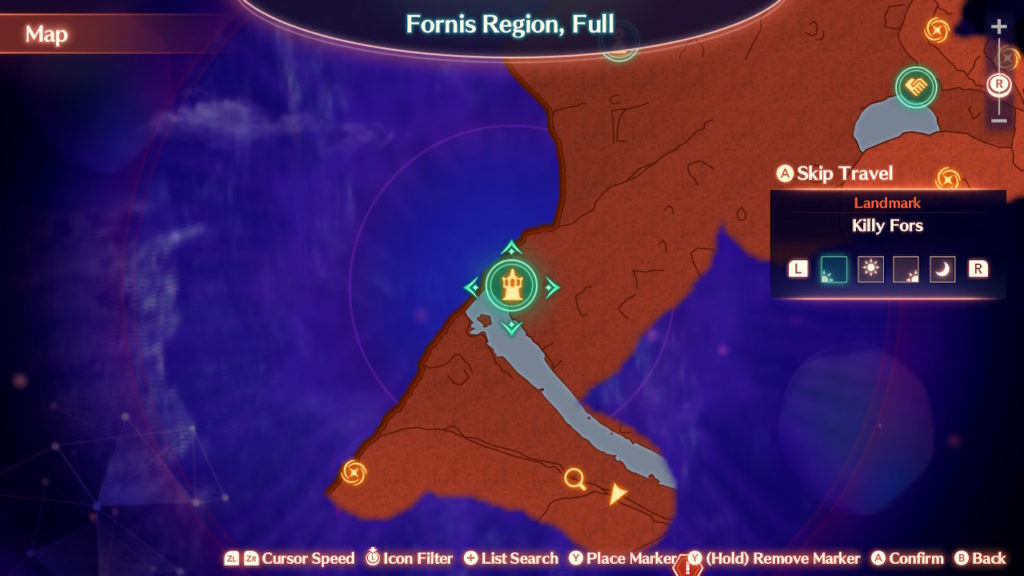
Killy Fors – Right at the Killy Fors landmark
Tonic Waters – Southeast of Killy Fors
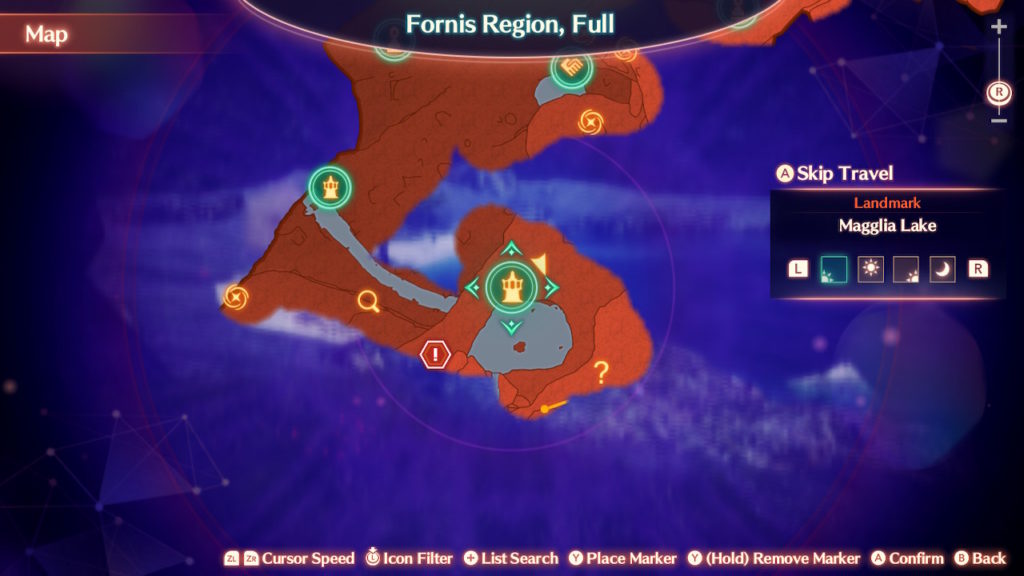
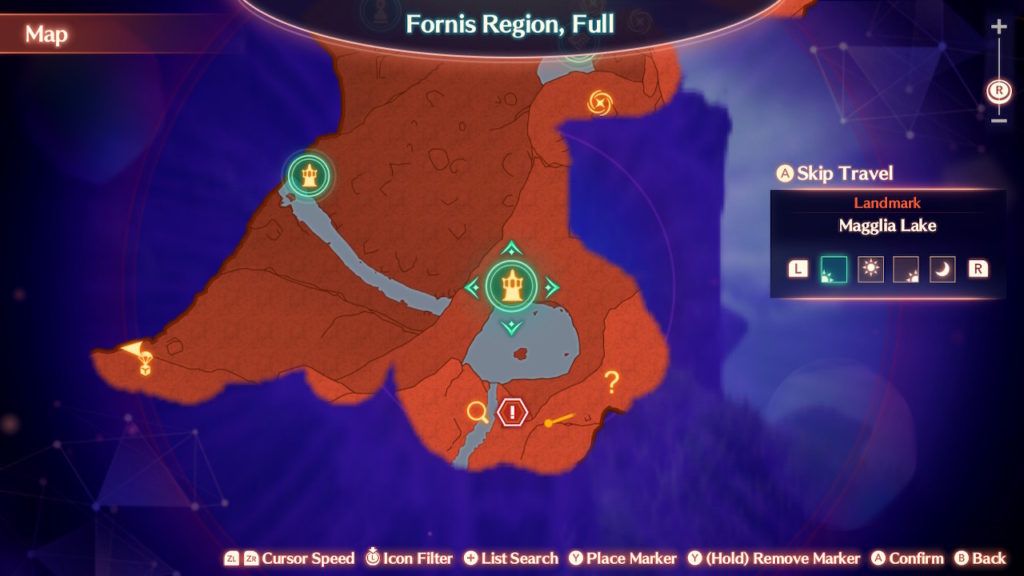
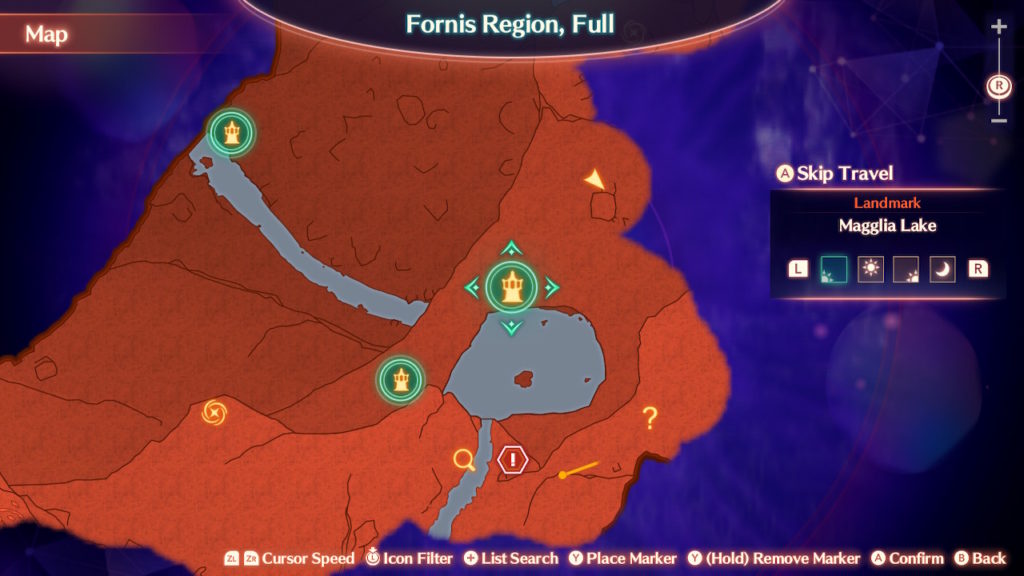
Magglia Lake – Just northeast of the Magglia Lake landmark
Laprel Knoll – West of Magglia Lake
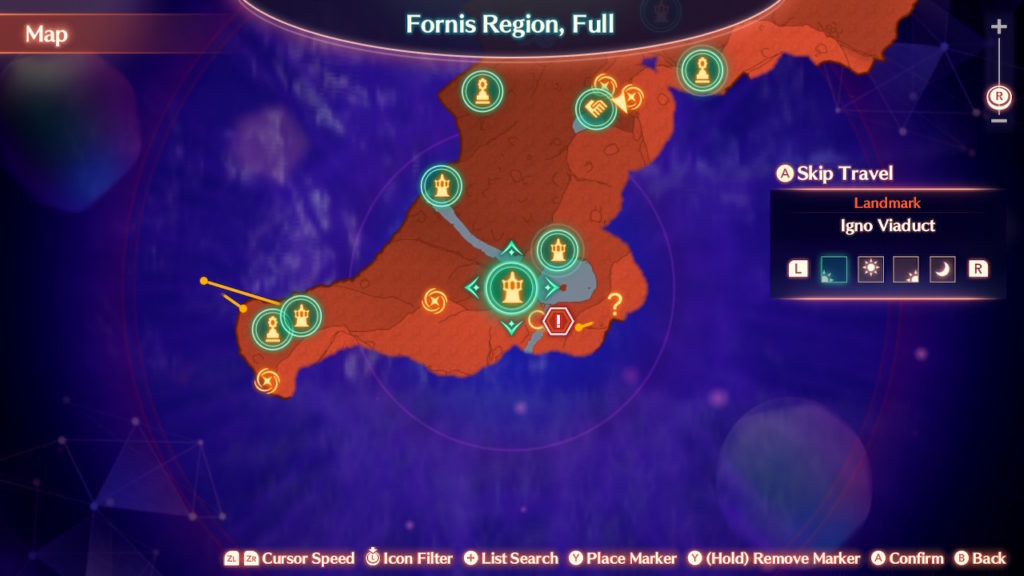
Caitlin Drum – Northeast of Igno Viaduct
Sage’s Balcony – Accessible via cave in Caitlin Drum which is northeast of Igno Viaduct
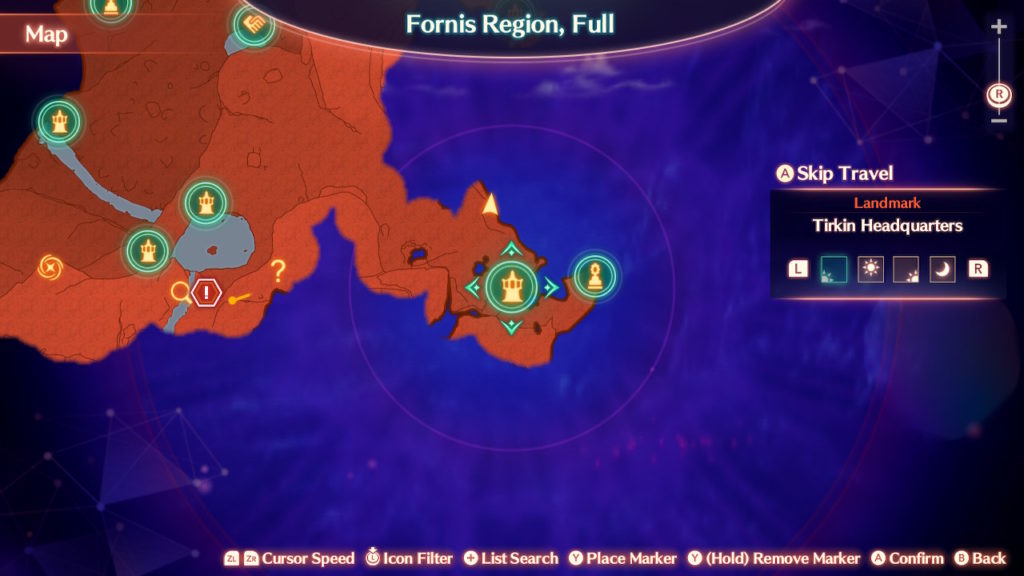
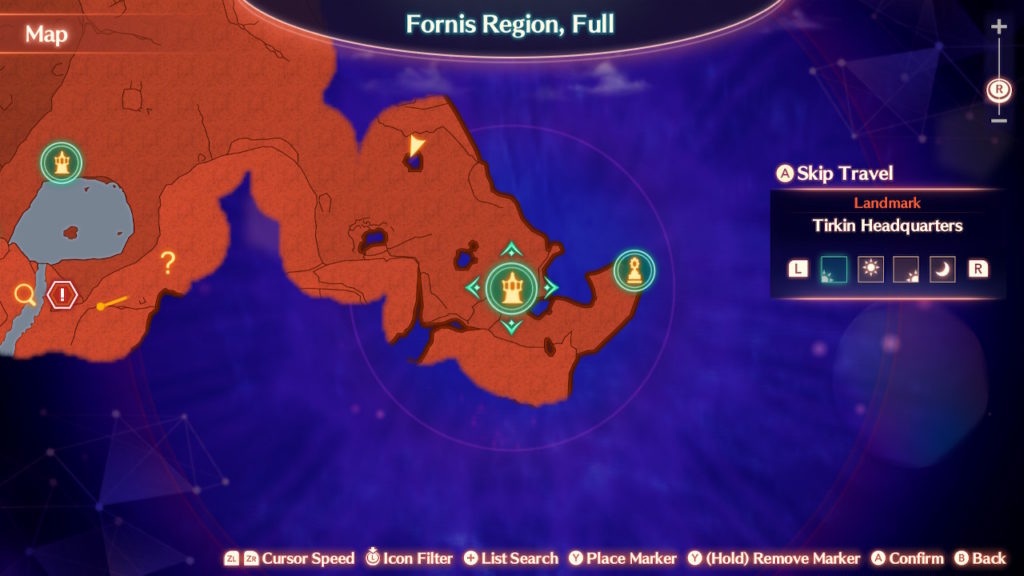
Terra Wastelands – North of Tirkin Headquarters
Terra Wastelands – Next to the above husk
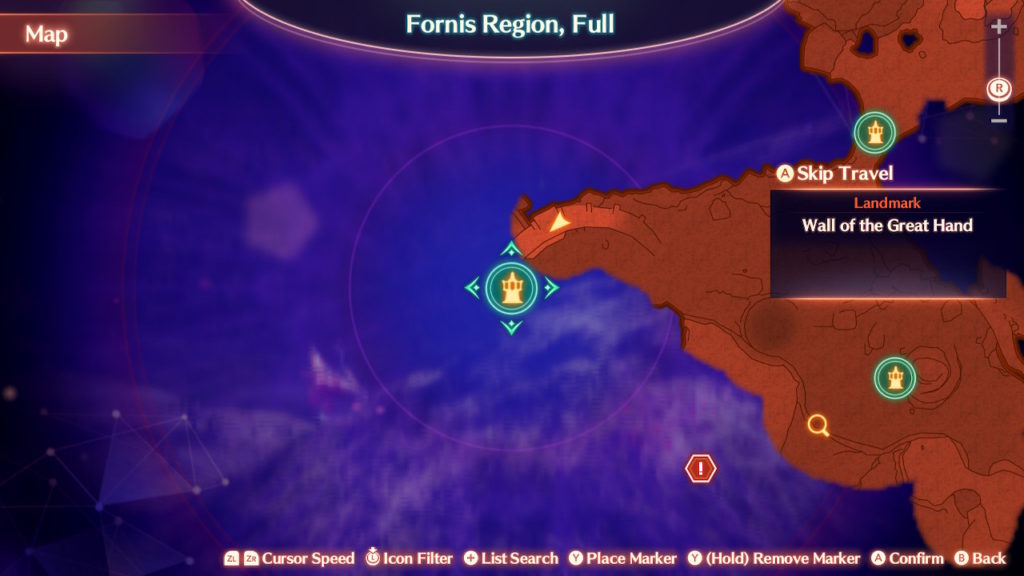
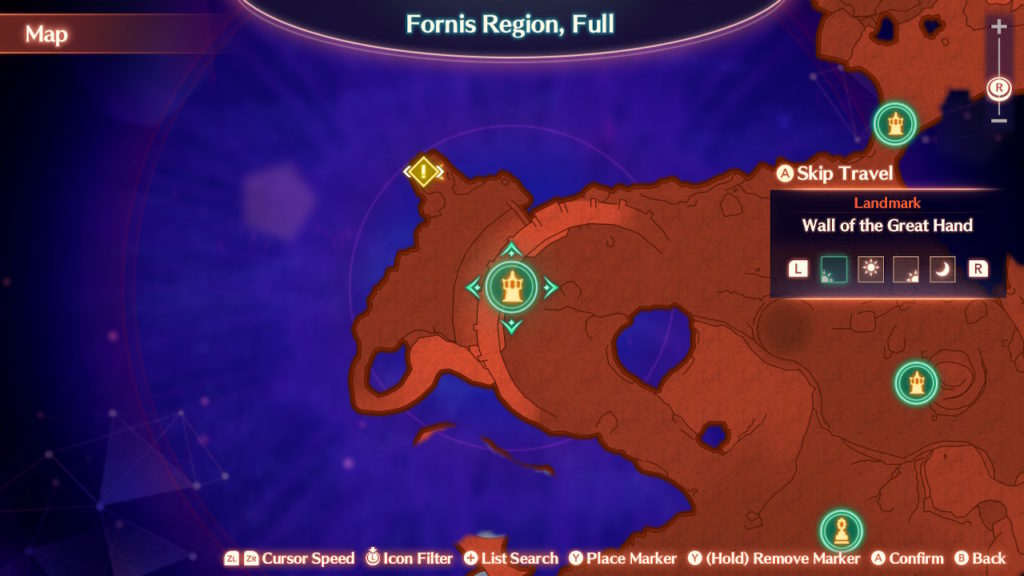
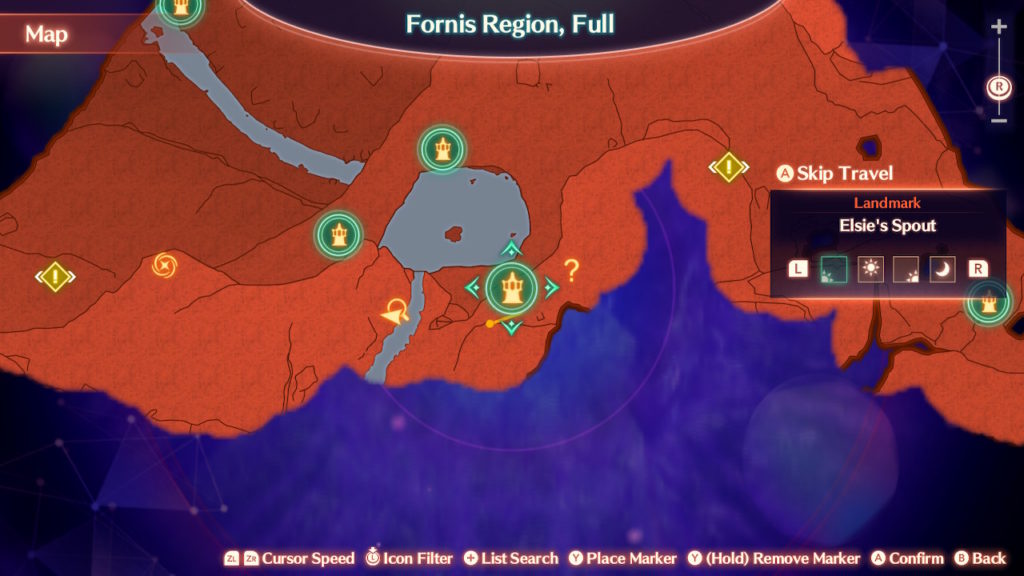
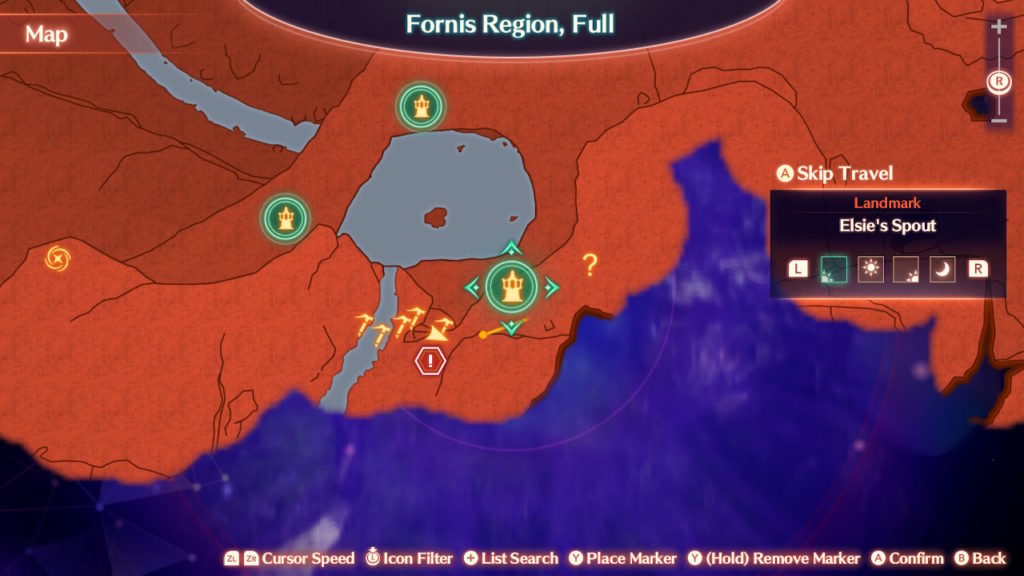
Elsie’s Spout – West of Elsie’s Spout
Precipice of Judgment – On side of cliff southwest of Elsie’s Spout
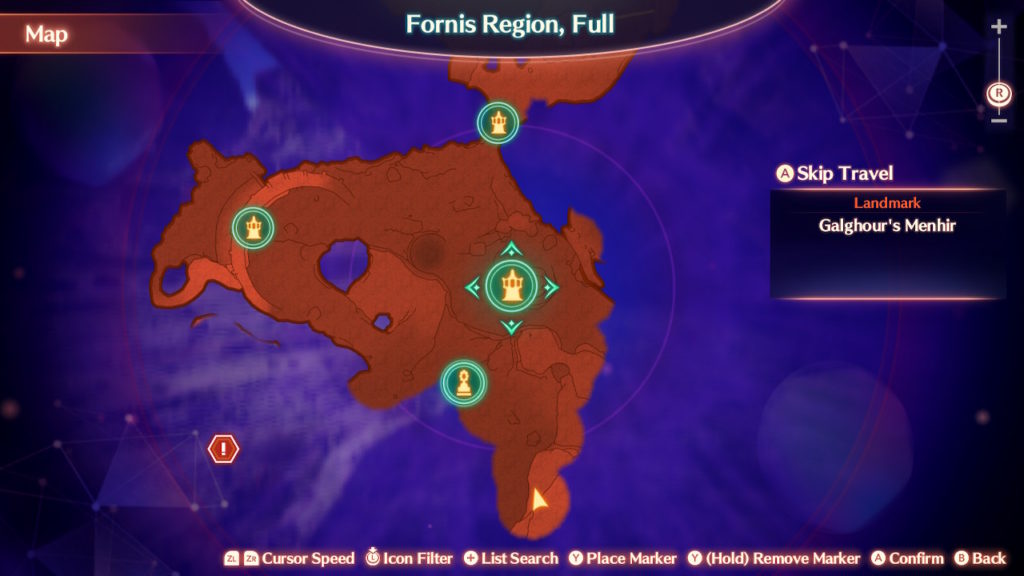
Dannagh Desert
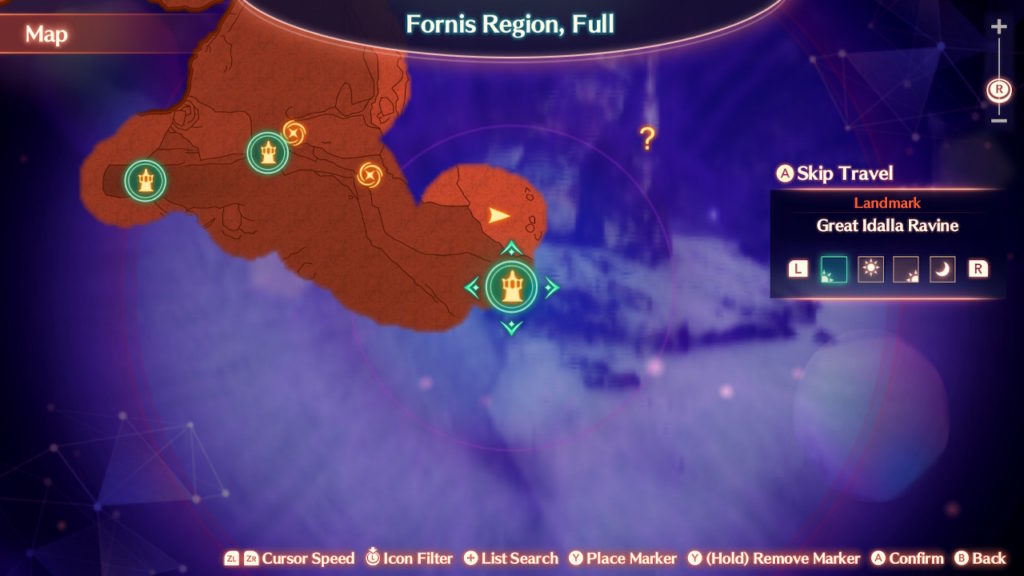
North of Great Idalla Ravine
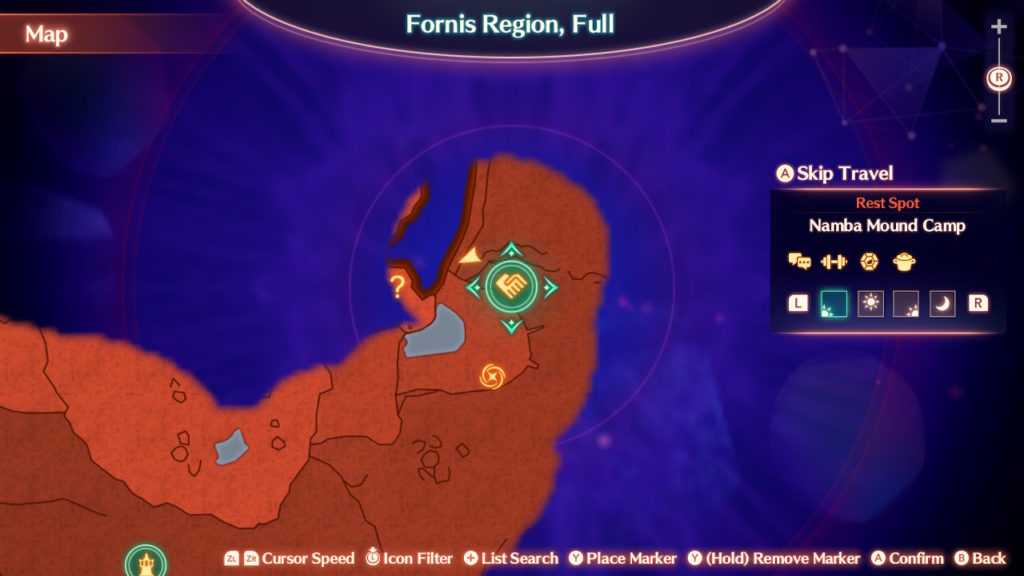
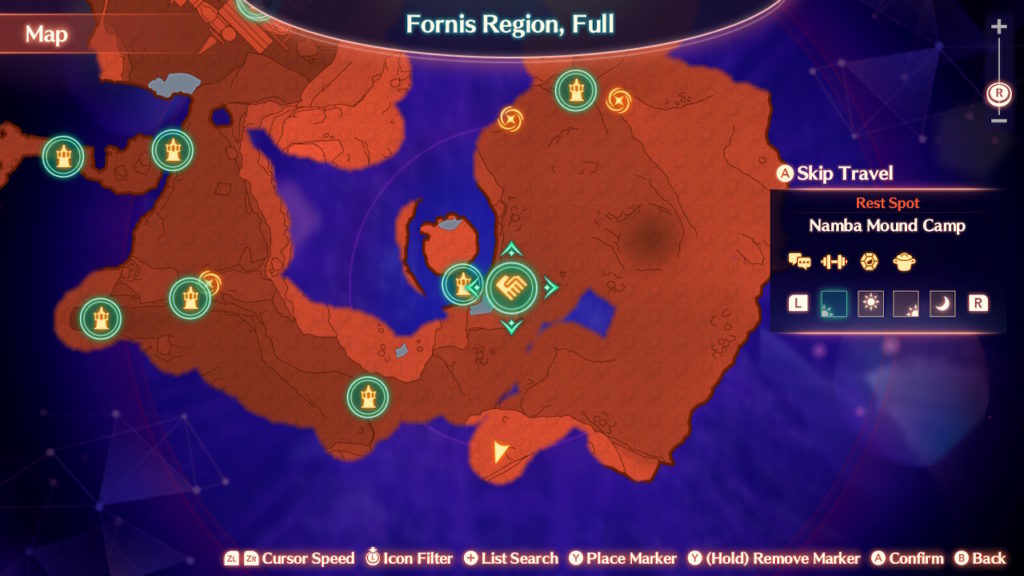
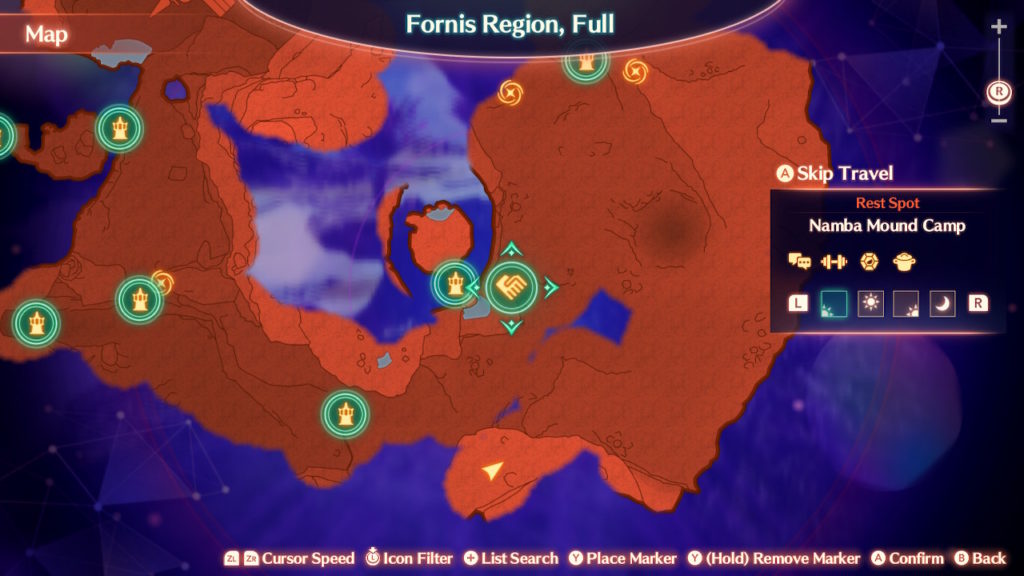
Next to Namba Mound Camp
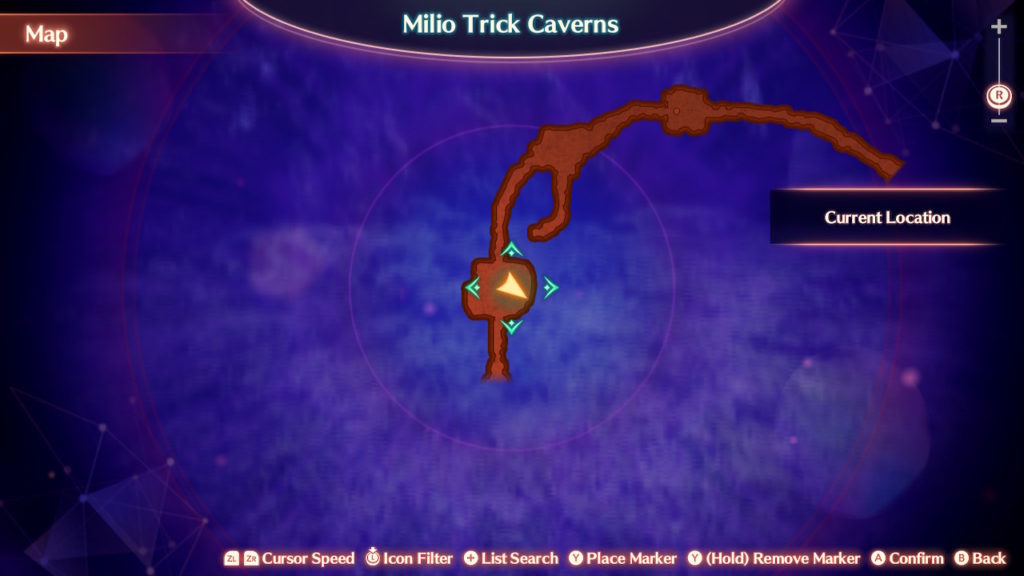
Guarded by 2 elite Pawn Arachno in Milio Trick Caverns
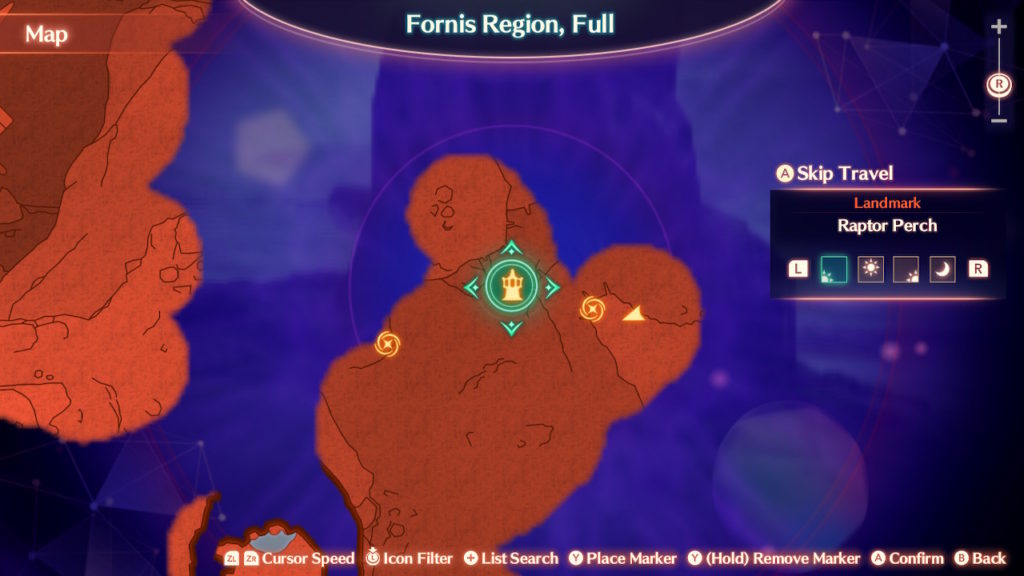
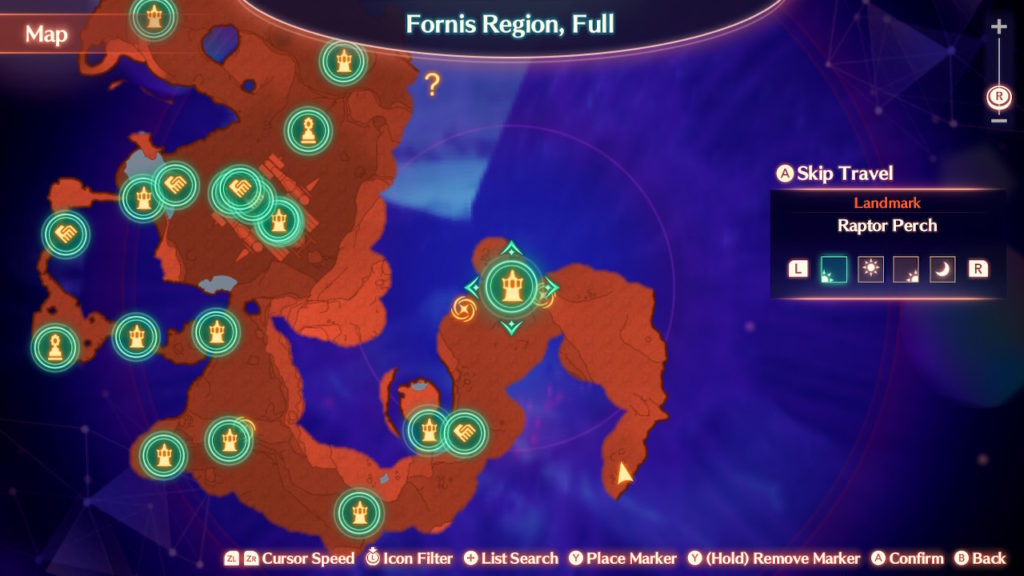
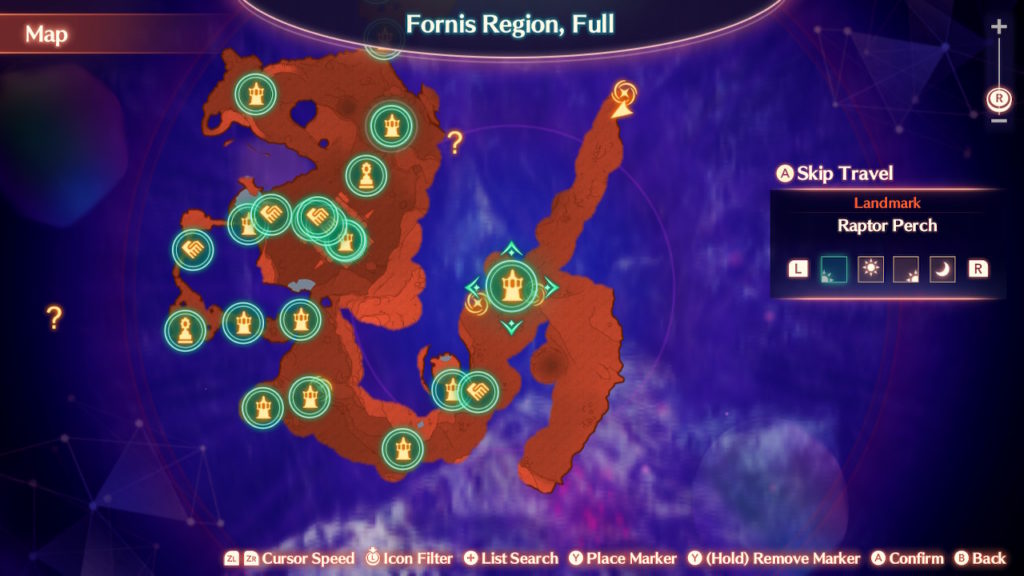
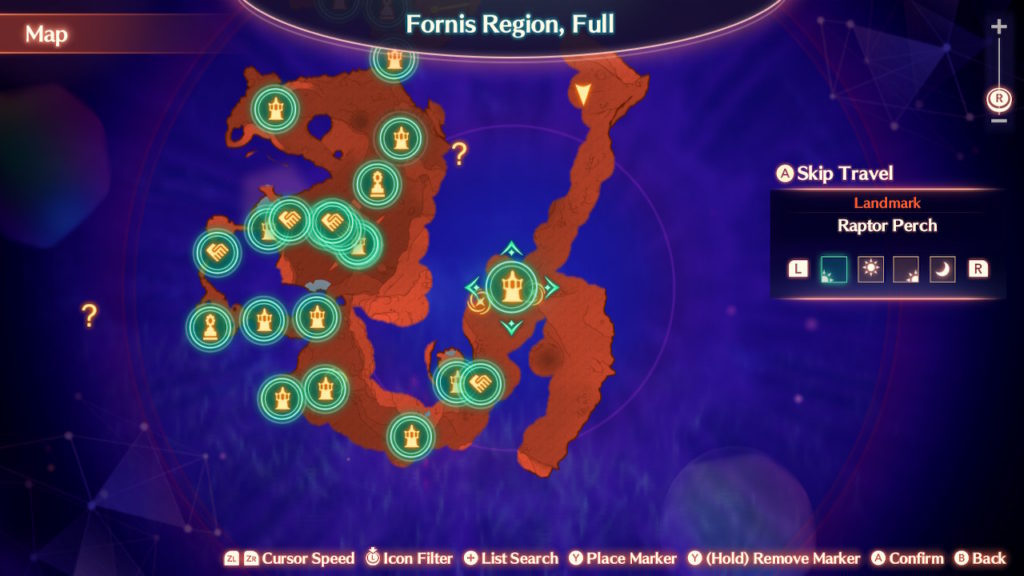
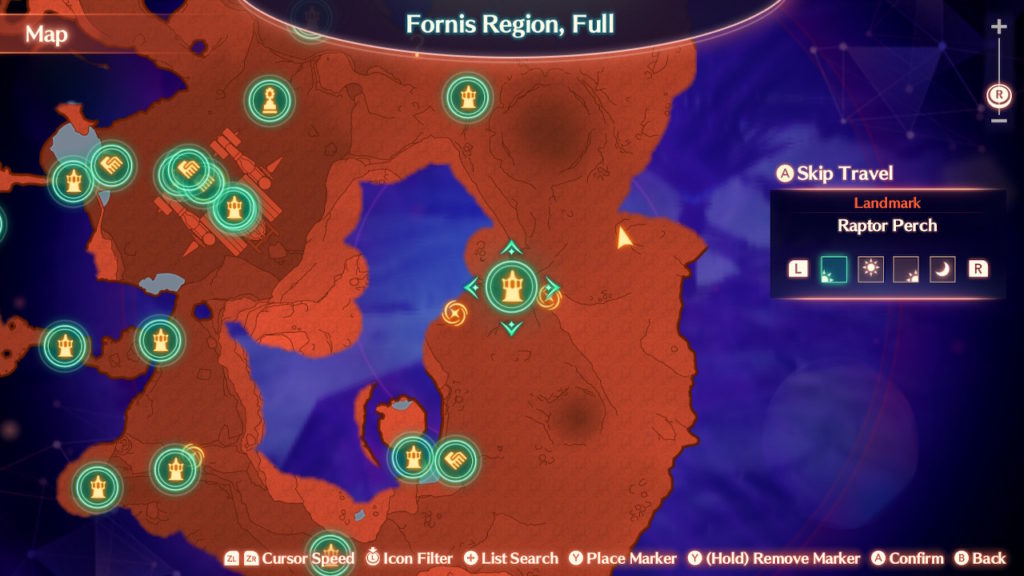
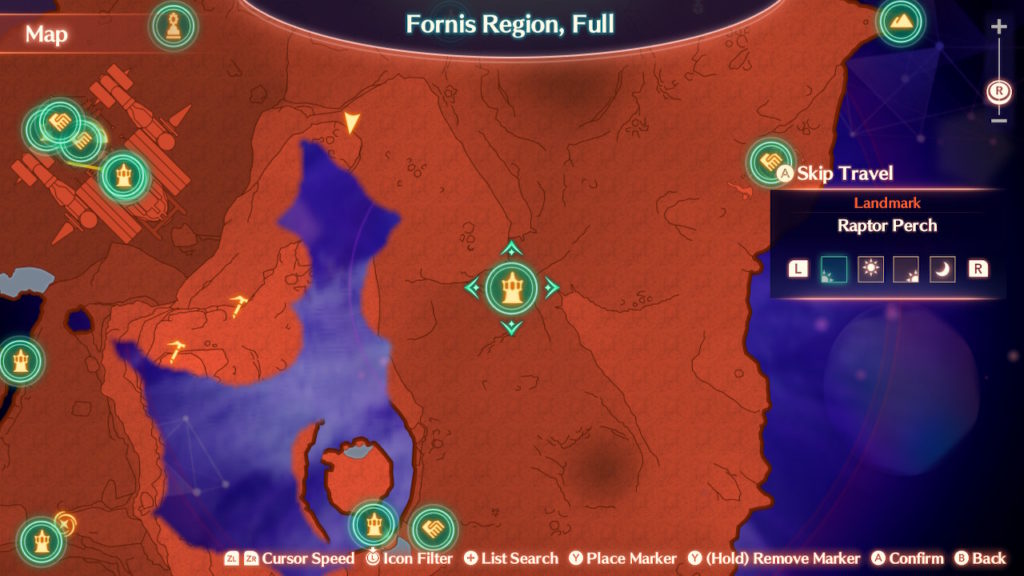
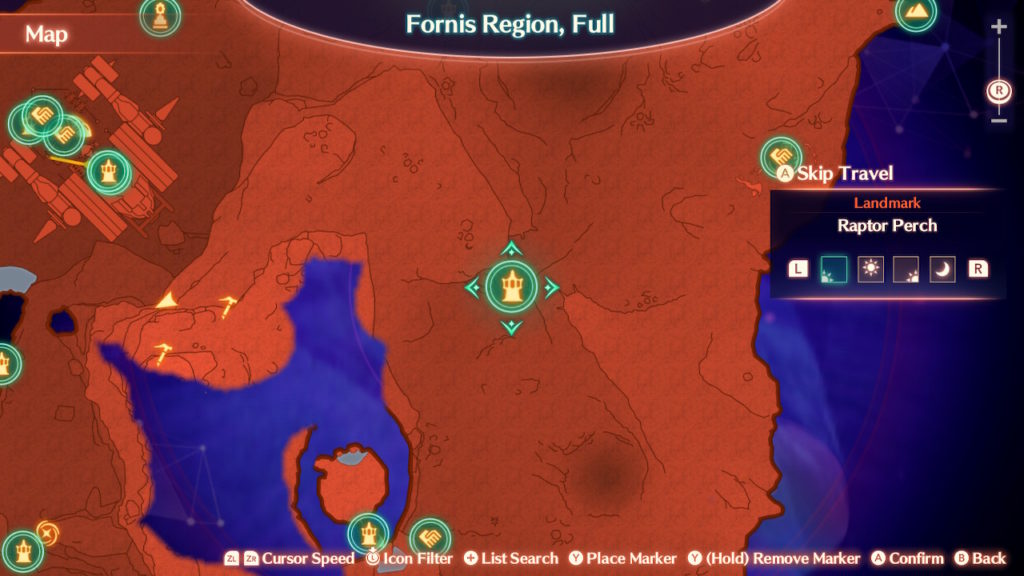
East of Raptor Perch
Southeast of Raptor Perch
Southeast of Raptor Perch along the map’s edge
North of Raptor Perch
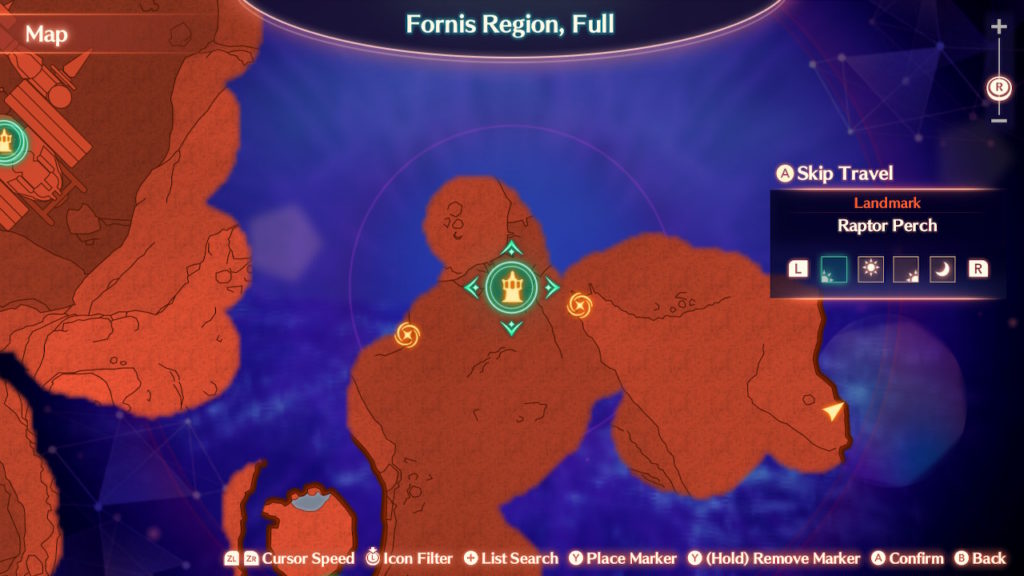
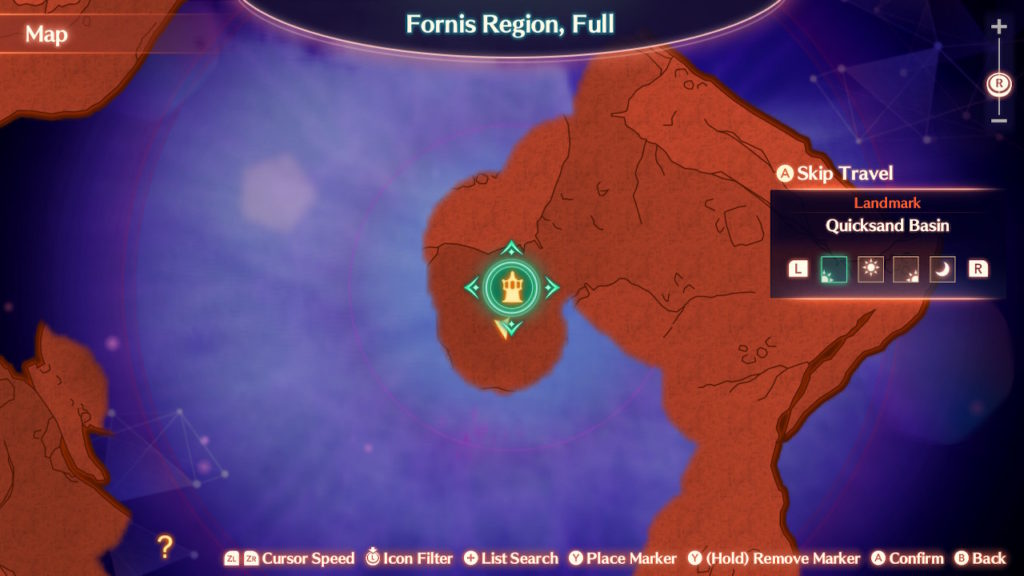
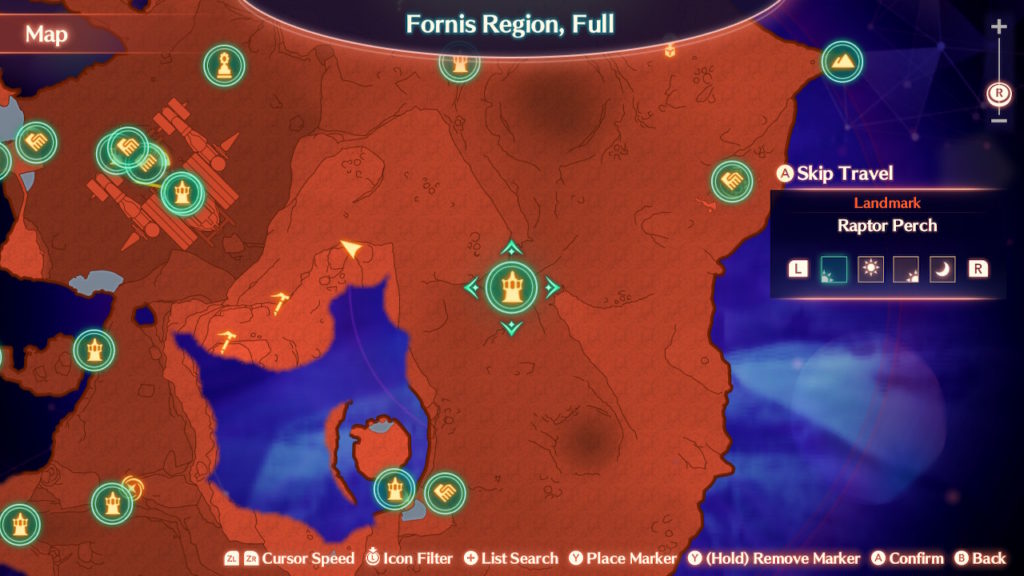
Apex Wing – North of Raptor Perch near Quicksand Basin
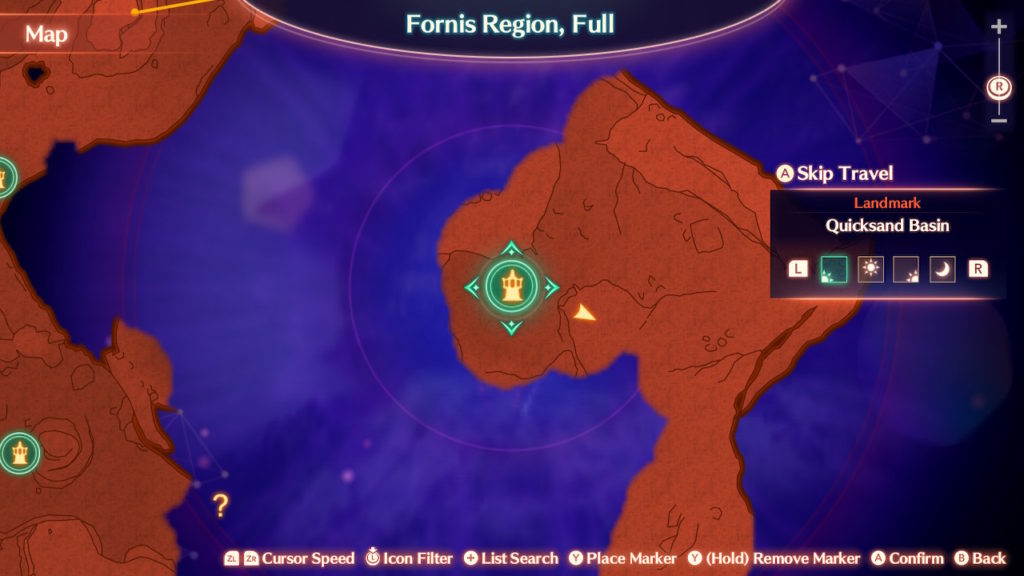
Quicksand Basin
Quicksand Basin
Slightly southeast of Quicksand Basin
Fetos Sandgarden – West of Quicksand Basin
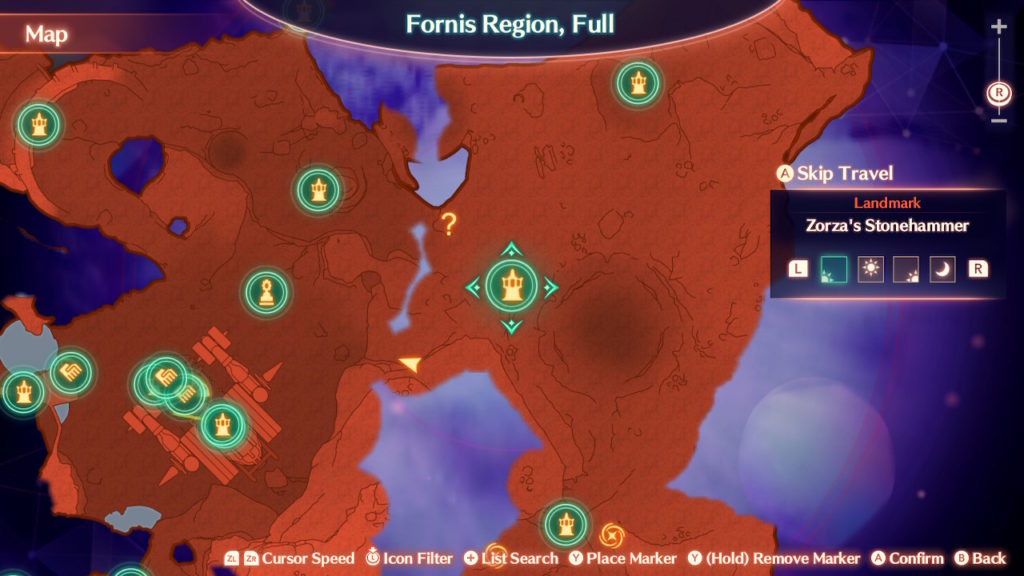
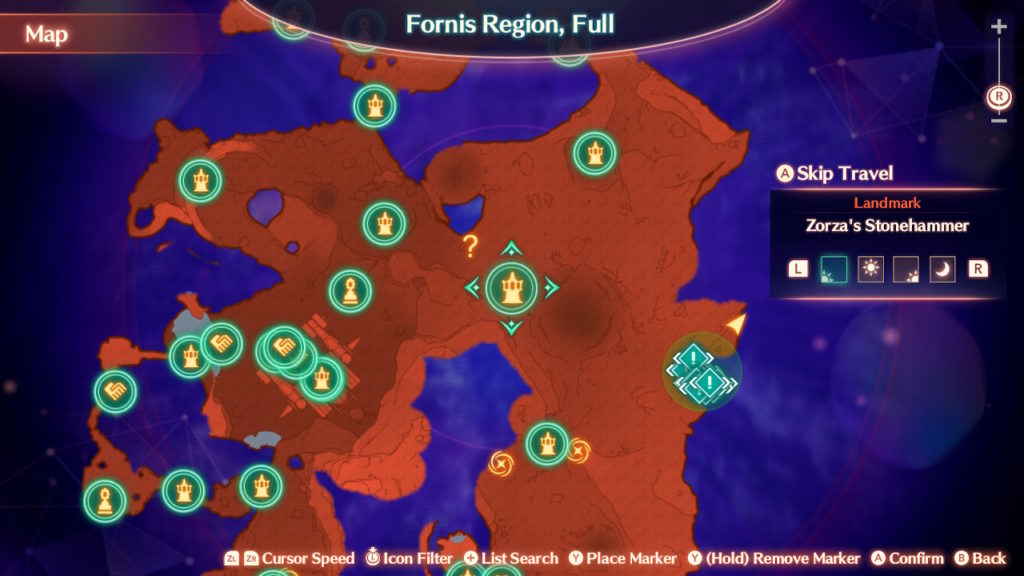
Fetos Sandgarden – Southwest of Zorza’s Stonehammer
Great Adalla Ravine – South of Namba Mound Camp
Great Adalla Ravine – South of Namba Mound Camp, directly under the above husk
Namba Mound – Southeast of Namba Mound Camp under a cliff overhang
Slightly northeast of Raptor Perch on a hill overlooking a quicksand pit
Apex Wing – East of Zorza’s Stonehammer guarded by a Level 68 enemy along the map’s edge
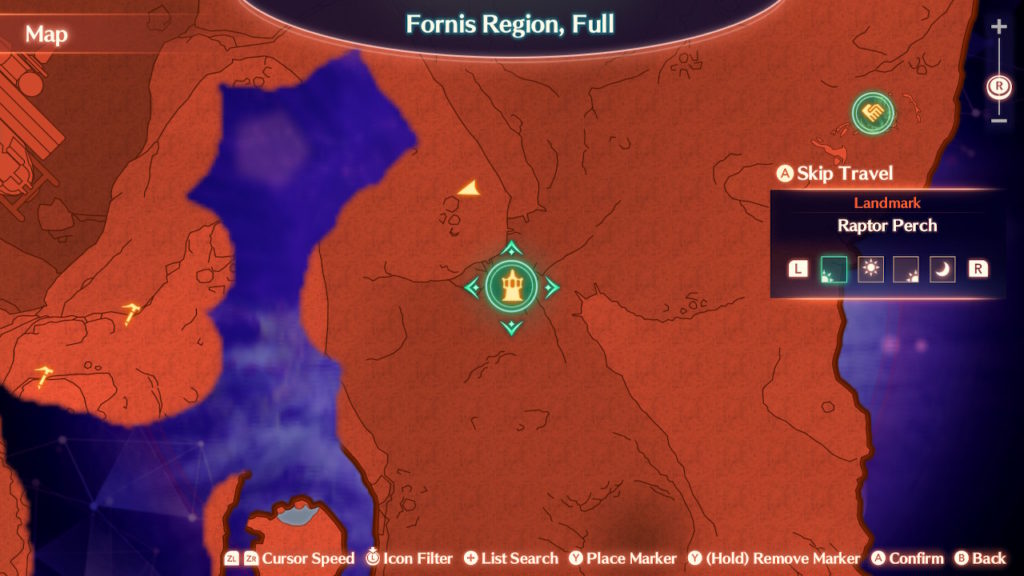
Limoux Hill – Northwest of Raptor Perch landmark (will need to have unlocked Scree Walking to reach this area)
Limoux Hill – Northwest of Raptor Perch landmark (will need to have unlocked Scree Walking to reach this area)
Limoux Hill – West of Raptor Perch landmark
Klondos Table – West of Raptor Perch landmark
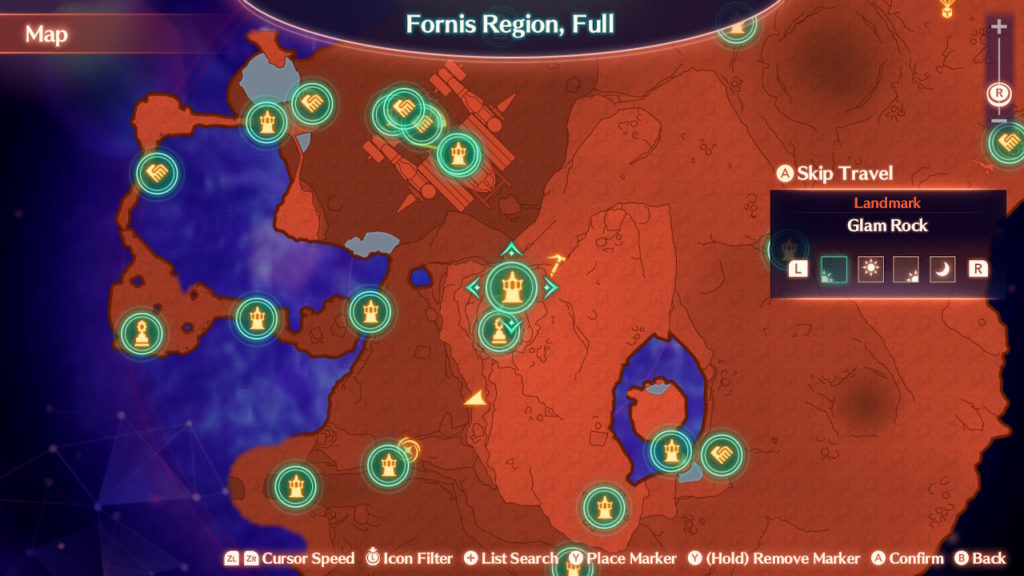
Nih’l Valley – South of Glam Rock landmark on side of cliff
Sem’s Crossway – From the above husk, just keep heading along the cliff’s ledge to find this one!
Rae-Bel Tableland
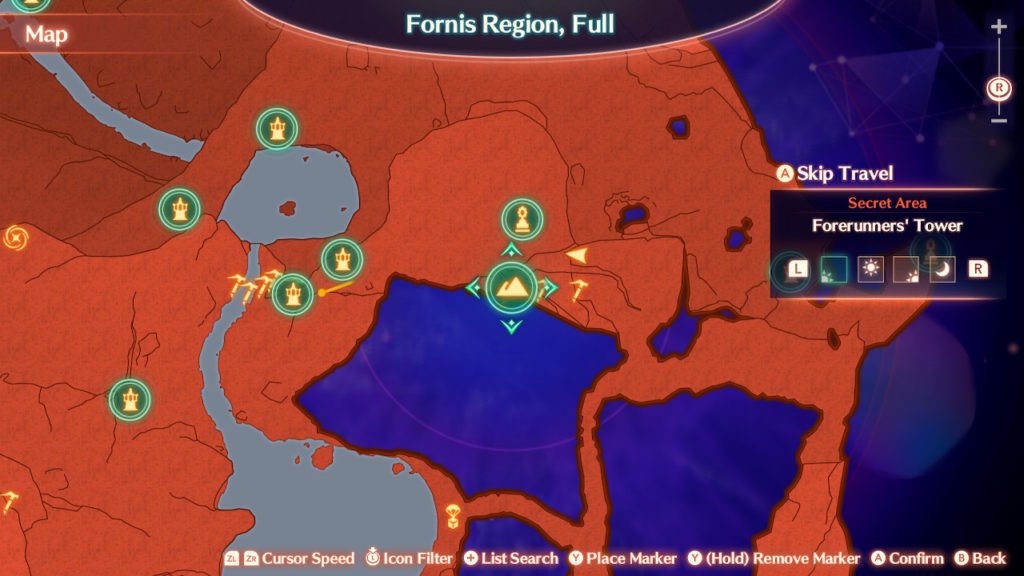
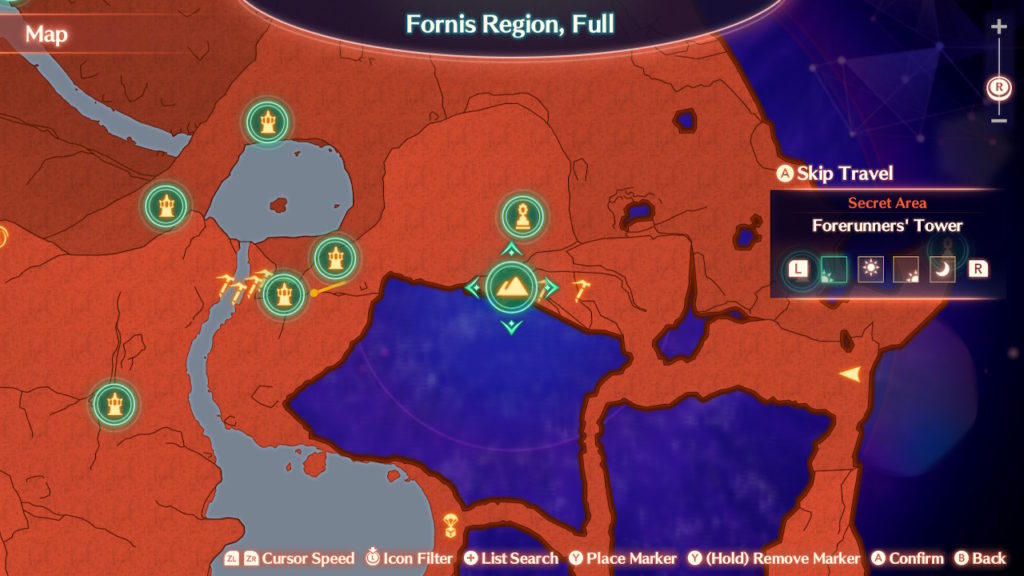
Isnie Ledge – Northeast of Forerunners’ Tower landmark
Isnie Ledge – In area with all Tirkin east of Forerunners’ Tower landmark
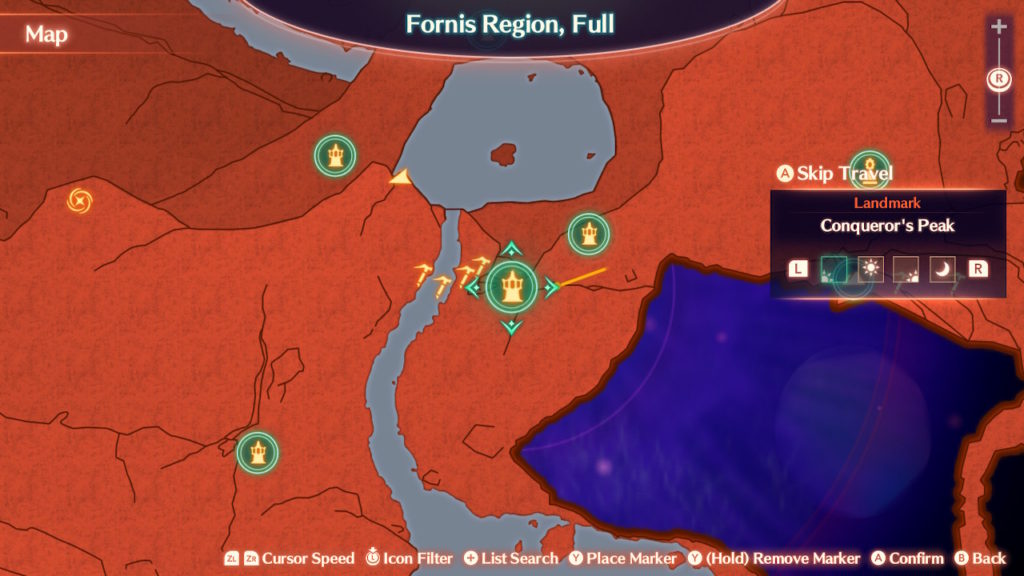
Just southeast of Conqueror’s Peak landmark
Dumas’ Jaw – Northwest of Conqueror’s Peak landmark at the top of the waterfall
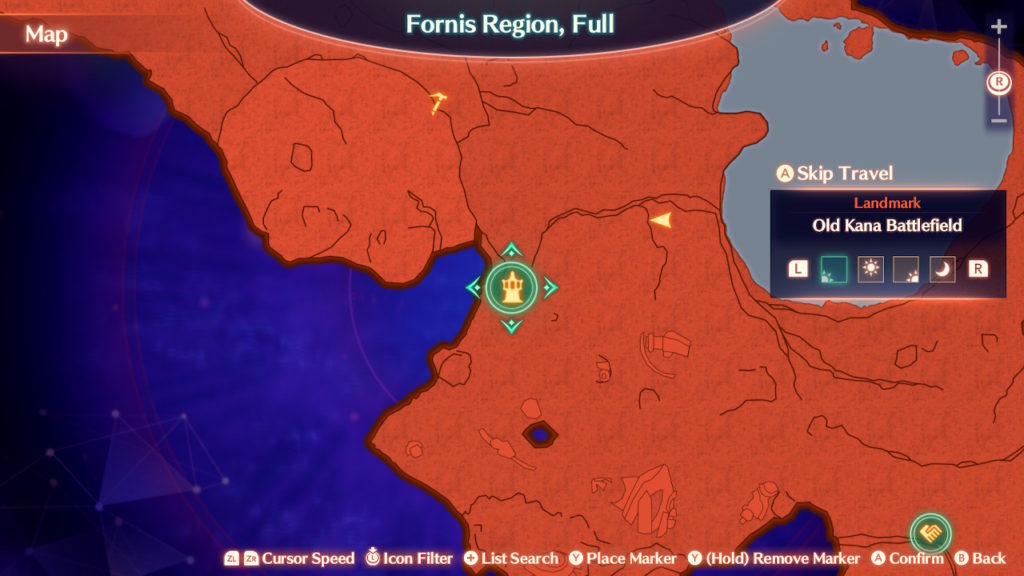
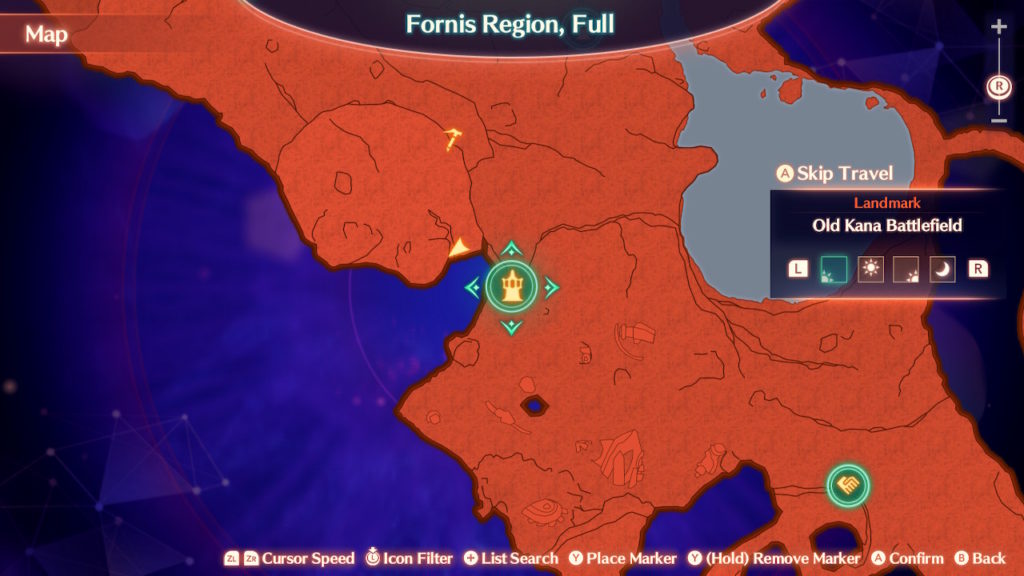
Old Kana Battlefield – Northeast of Old Kana Battlefield landmark
Pinasa Highland – Northwest of Old Kana Battlefield
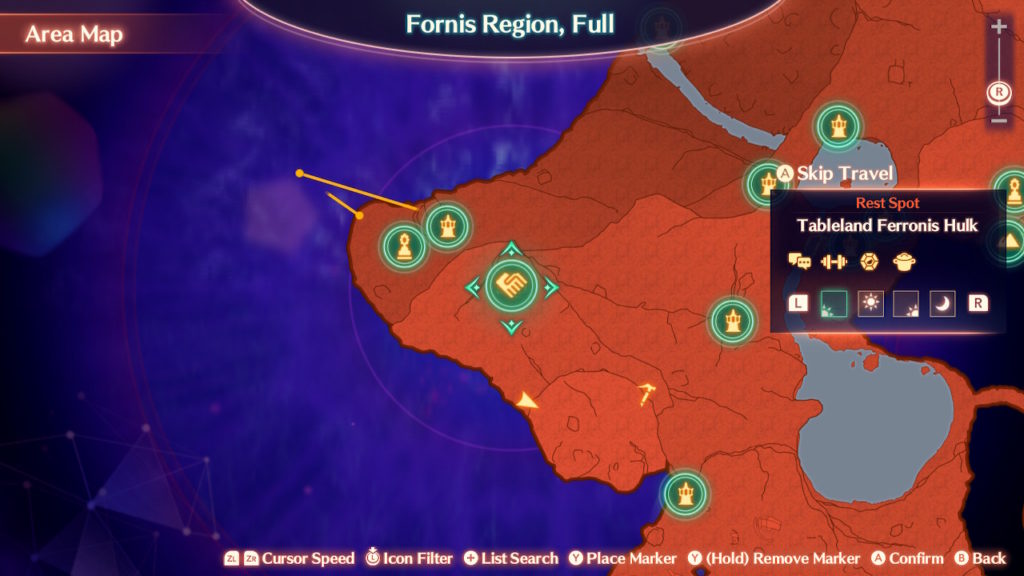
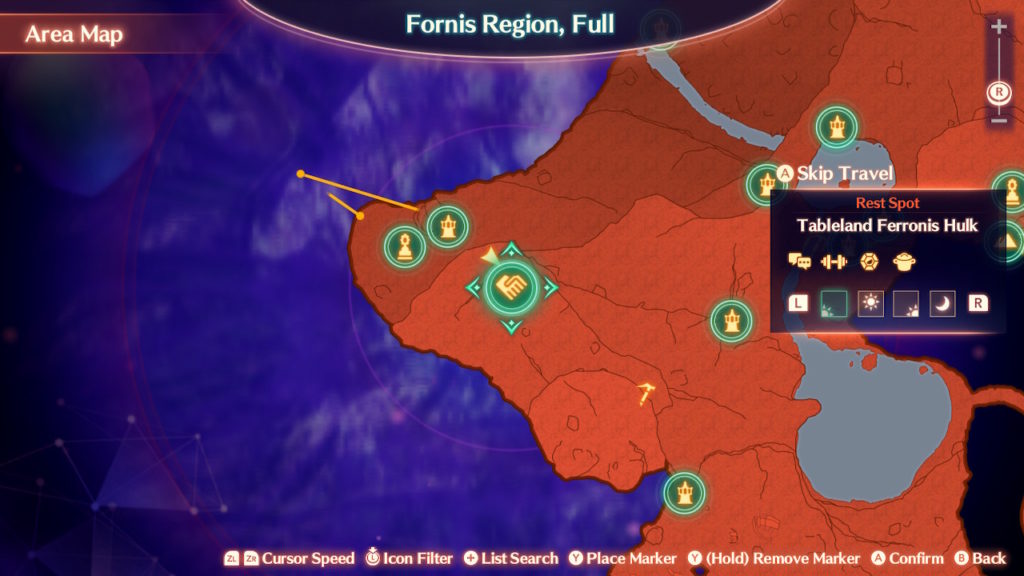
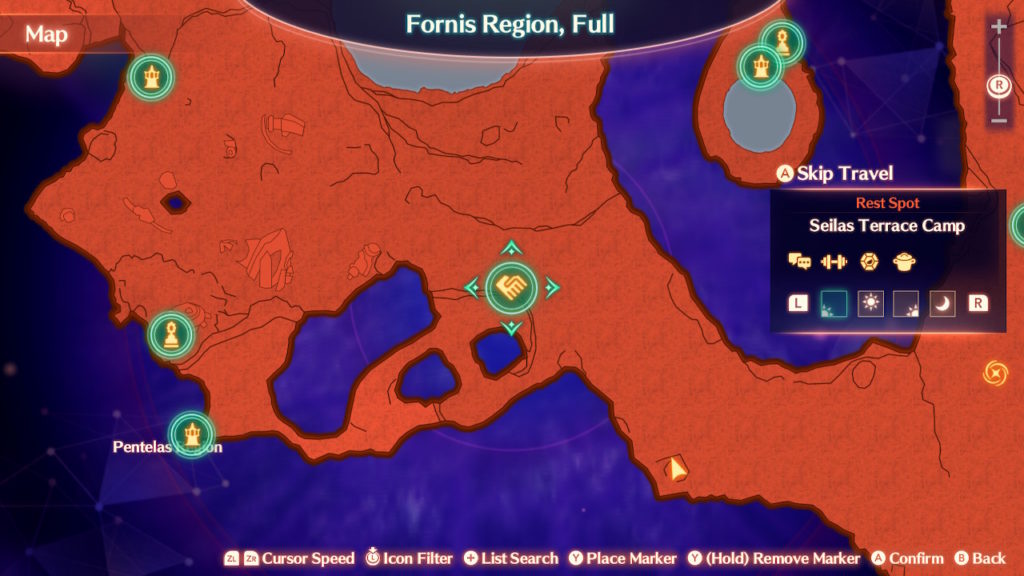
Rutez Barr – South of Tableland Ferronis Hulk rest spot
Rutez Barr – Northwest of Tableland Ferronis Hulk rest spot
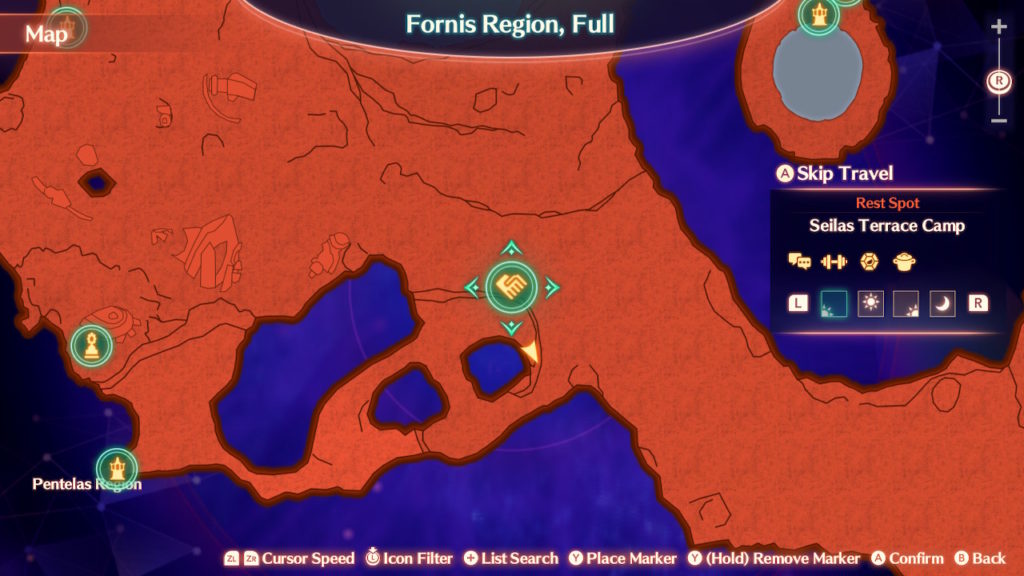
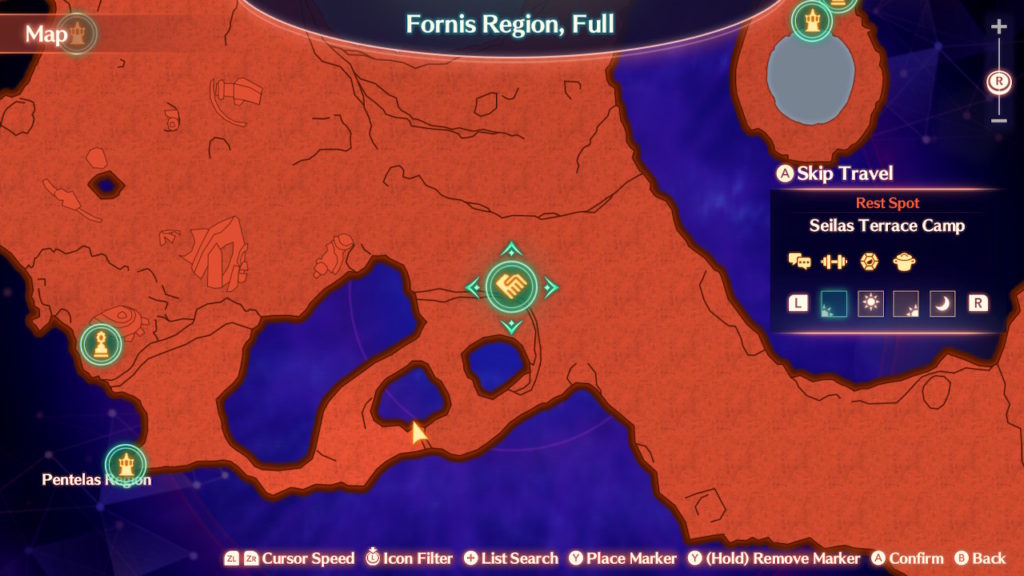
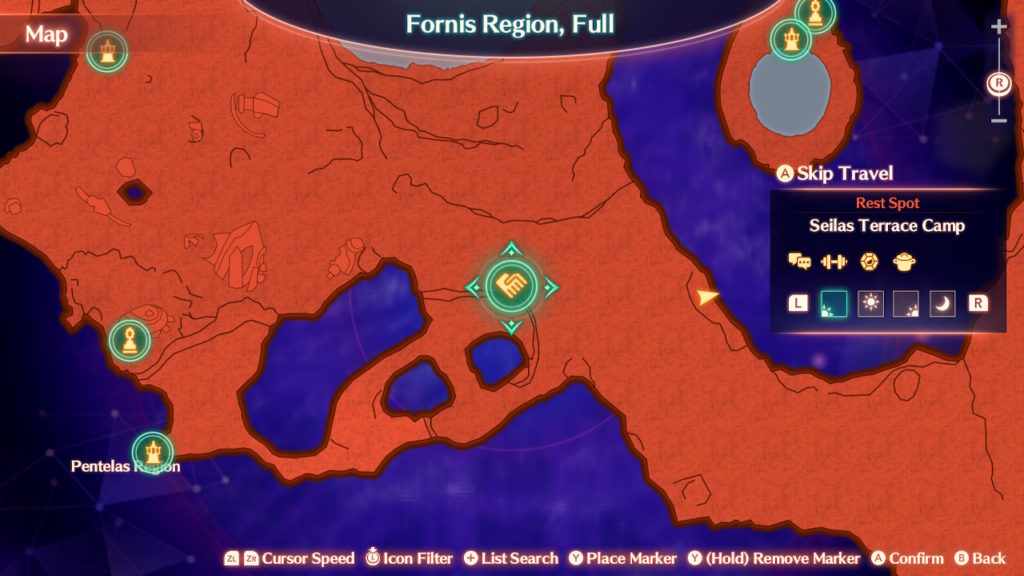
Bittley Slope – Just south of Seilas Terrace Camp rest spot
Bittley Slope – Southwest of Seilas Terrace Camp rest spot
Seilas Terrace – East of Seilas Terrace Camp rest spot
Tilpa Scree – Southeast of Seilas Terrace Camp rest spot
Tilpa Scree – Further southeast of Seilas Terrace Camp rest spot
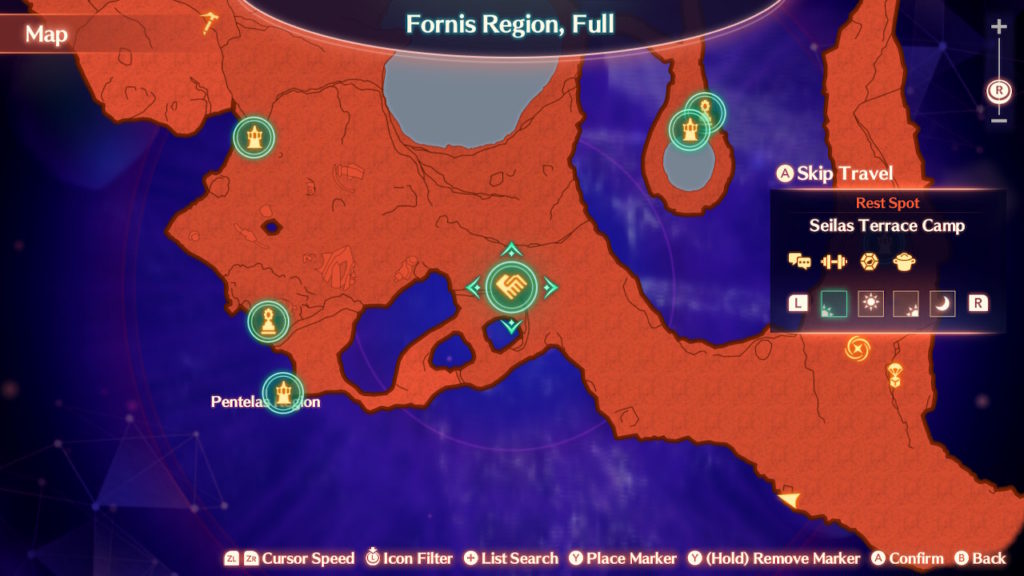
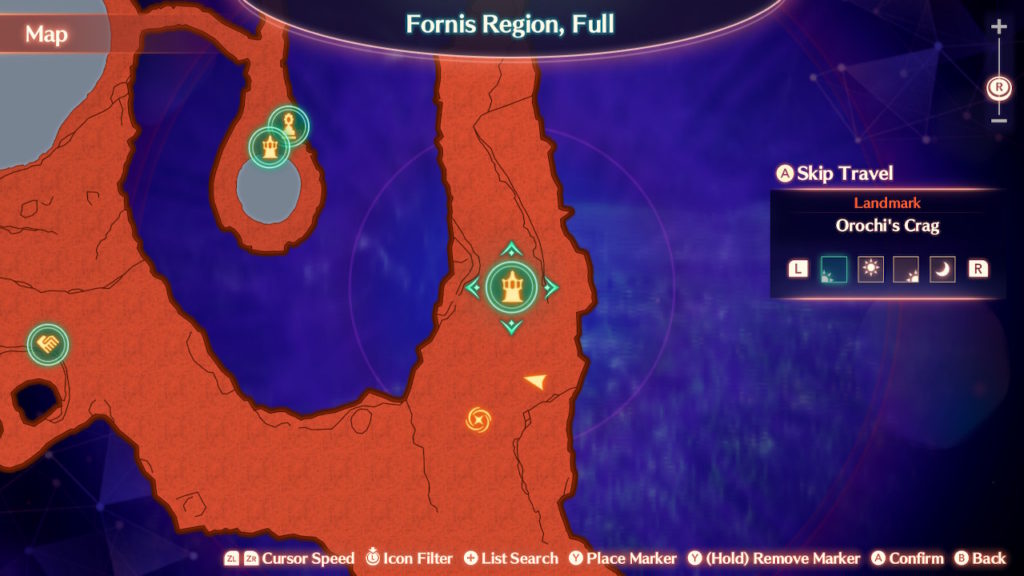
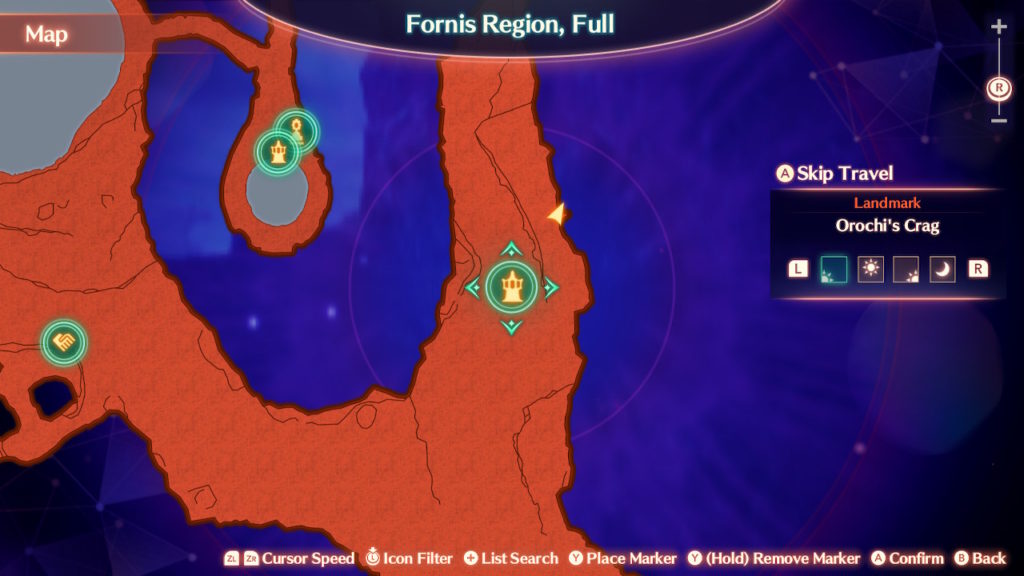
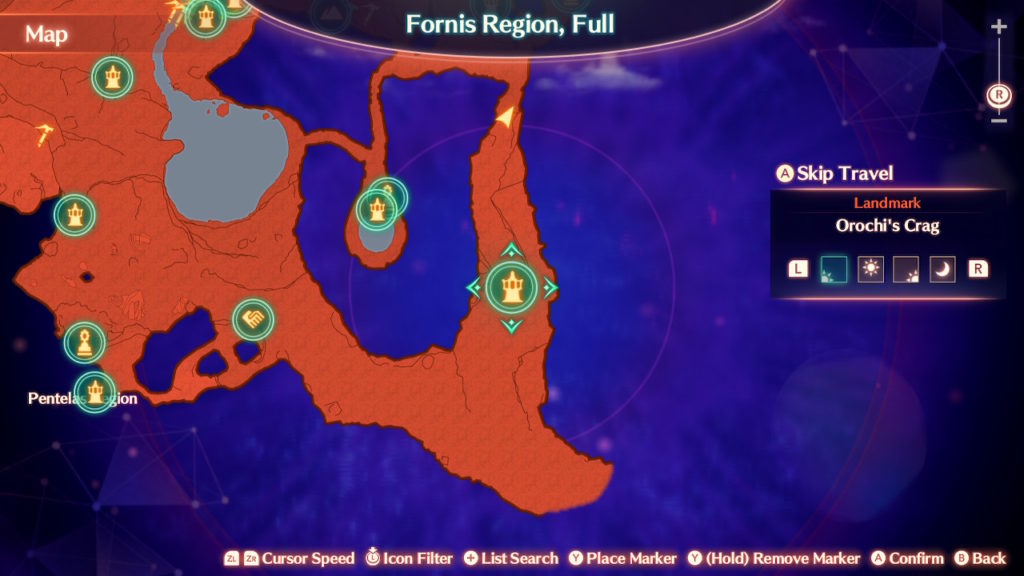
Elsayer Caps – South of Orochi’s Crag landmark
Valley of Anguish – Northeast of Orochi’s Crag landmark
Valley of Anguish – North of Orochi’s Crag landmark
Elaice Highway
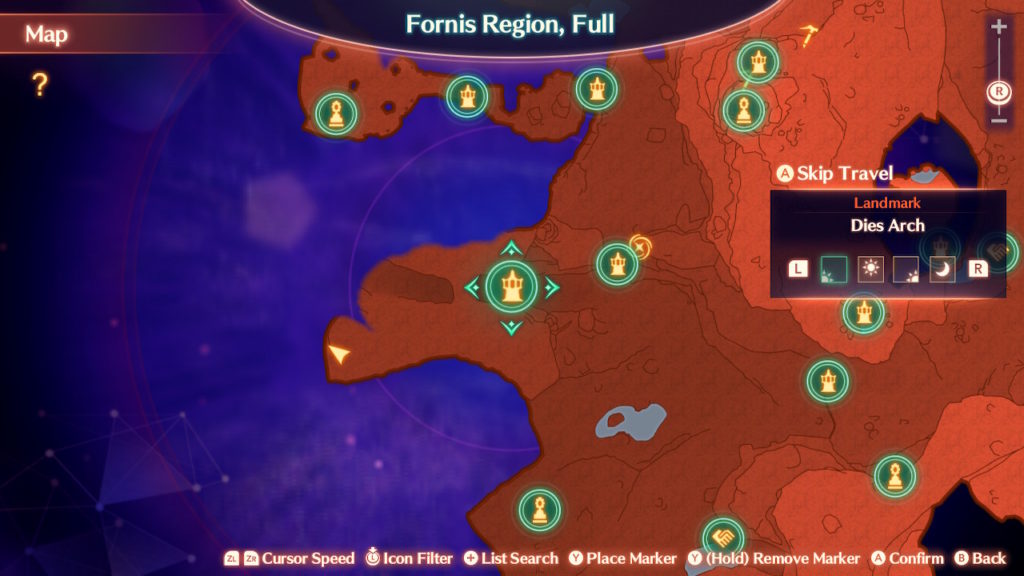
Tepnos Heights – West of Dies Arch landmark
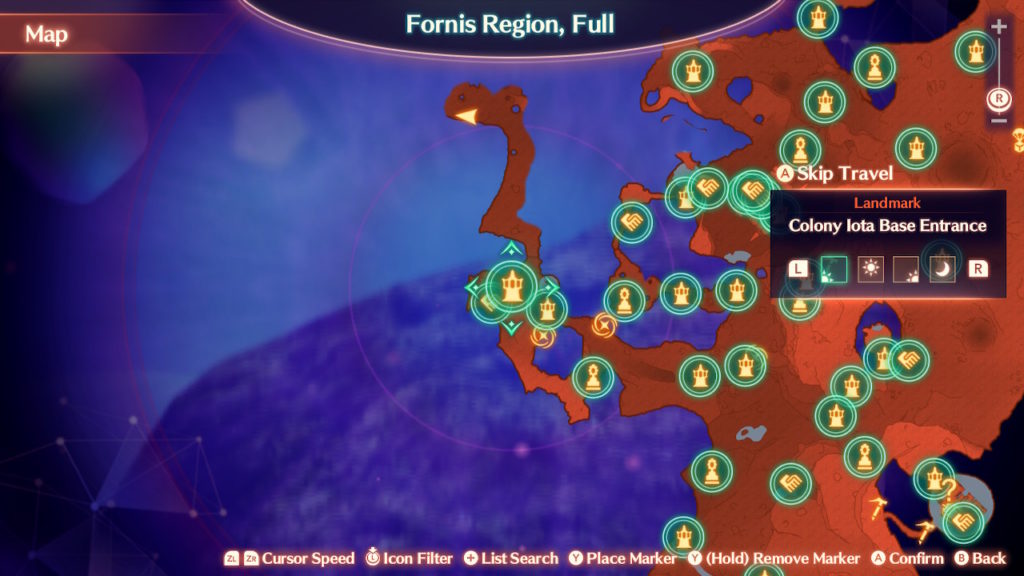
Great Liente Shelf – North of Colony Iota Base Entrance landmark
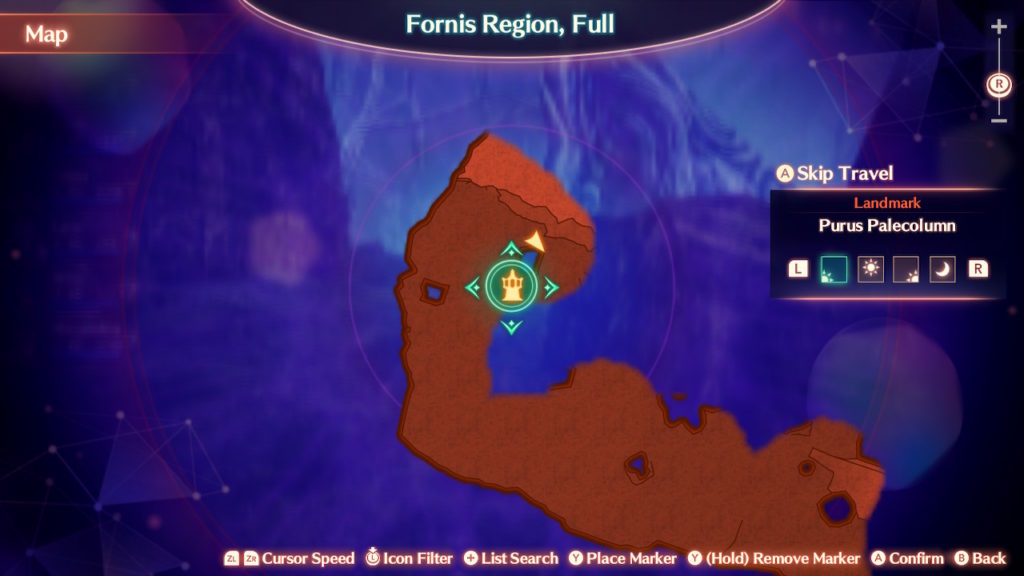
Purus Palecolumn – At the Purus Palecolumn landmark
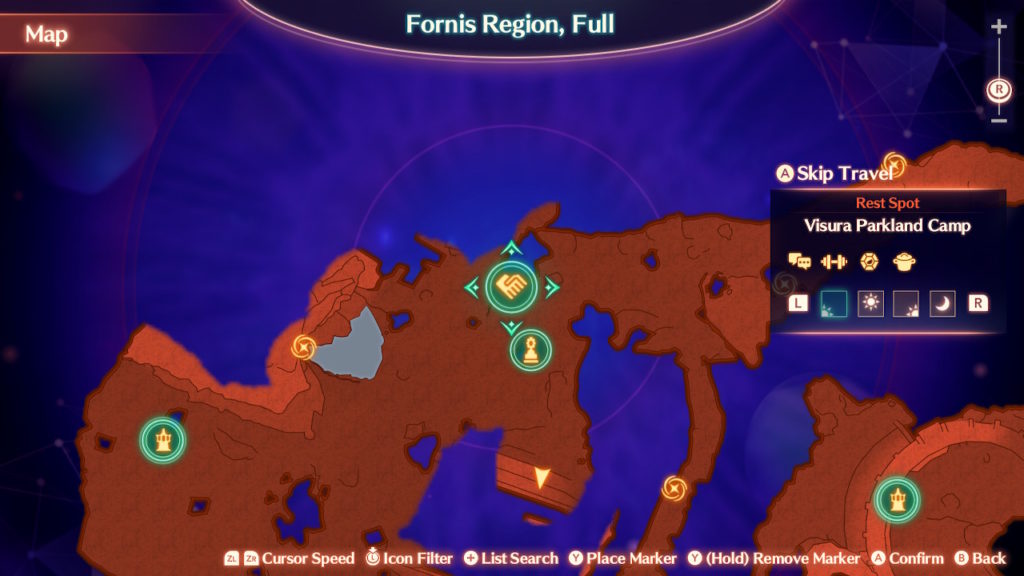
Hictern’s Cleft – East of Visura Parkland Camp rest spot
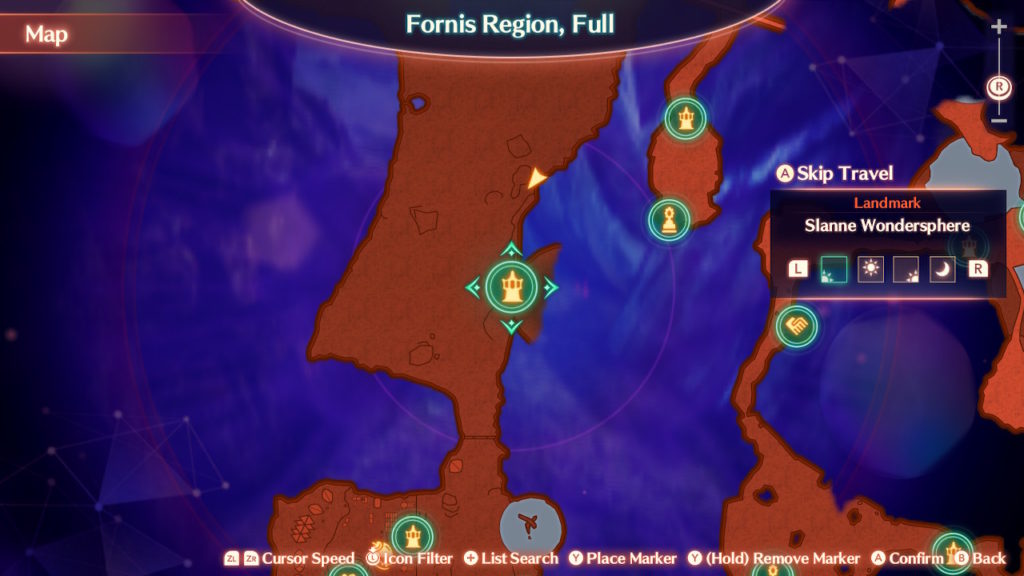
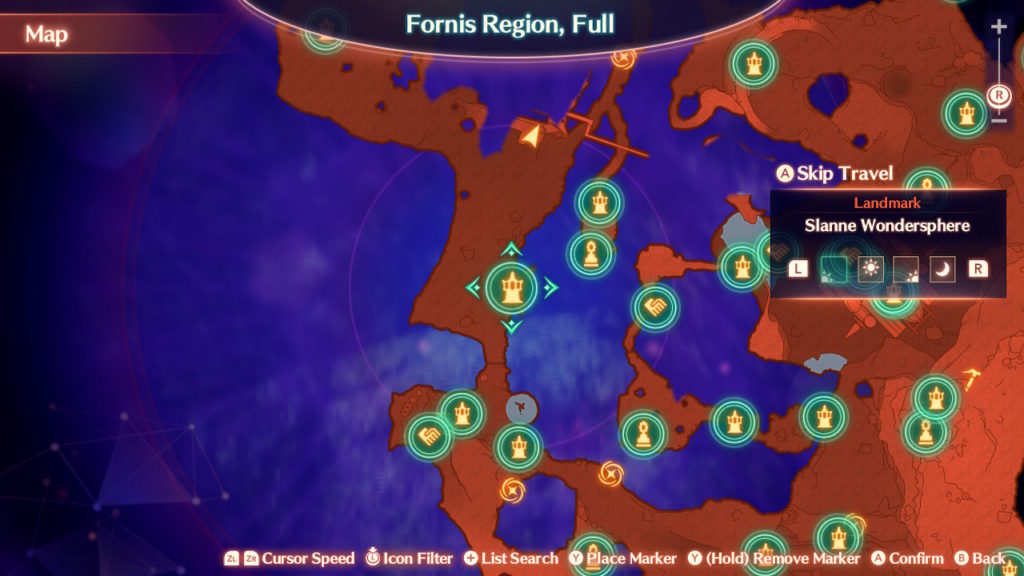
Mehnert Interdigit – North of Slanne Wondersphere landmark
Zain’s Talon – North of Slanne Wondersphere landmark
Visura Parkland – South of Visura Parkland Camp landmark
Zain’s Talon – South of Visura Parkland Camp landmark
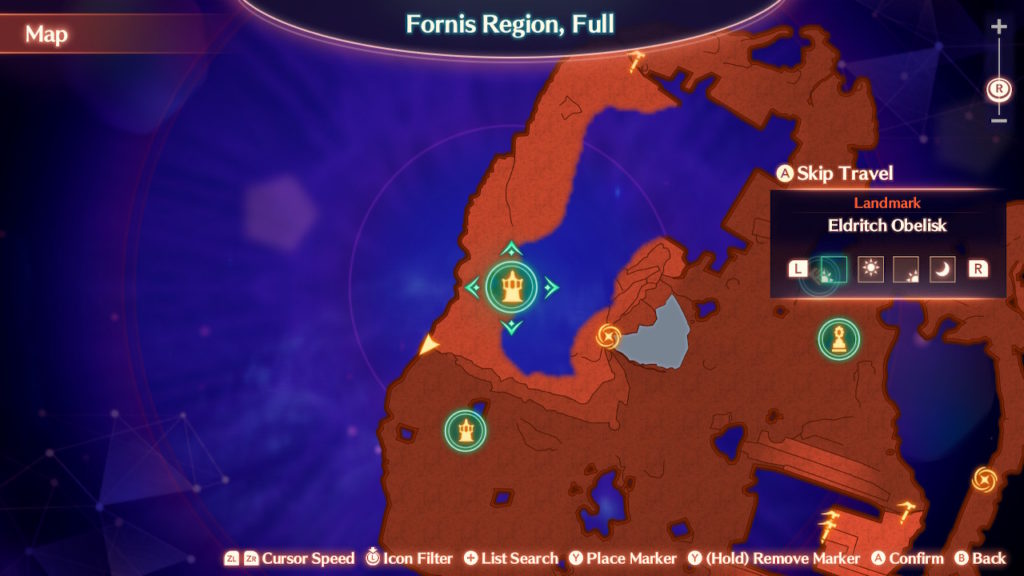
Yunnaie’s Rise – South of Eldritch Obelisk landmark
Yunnae’s Rise – Southeast of Eldritch Obelisk landmark
Search
This site uses cookies. By continuing to use this website, you are giving consent to cookies being used. For more information on cookies, view our Privacy Policy.OkPrivacy Policy