Below are the side quests that can be found throughout Ys IX: Monstrum Nox! In order to obtain the Good Samaritan trophy, you’ll need to complete all the quests. Please note that some are time sensitive!
Chapter 2
Little Girl’s Plea
Obtained: Speak with Sue in Shantytown during Chapter 2
Objective: Find 3 butterflies
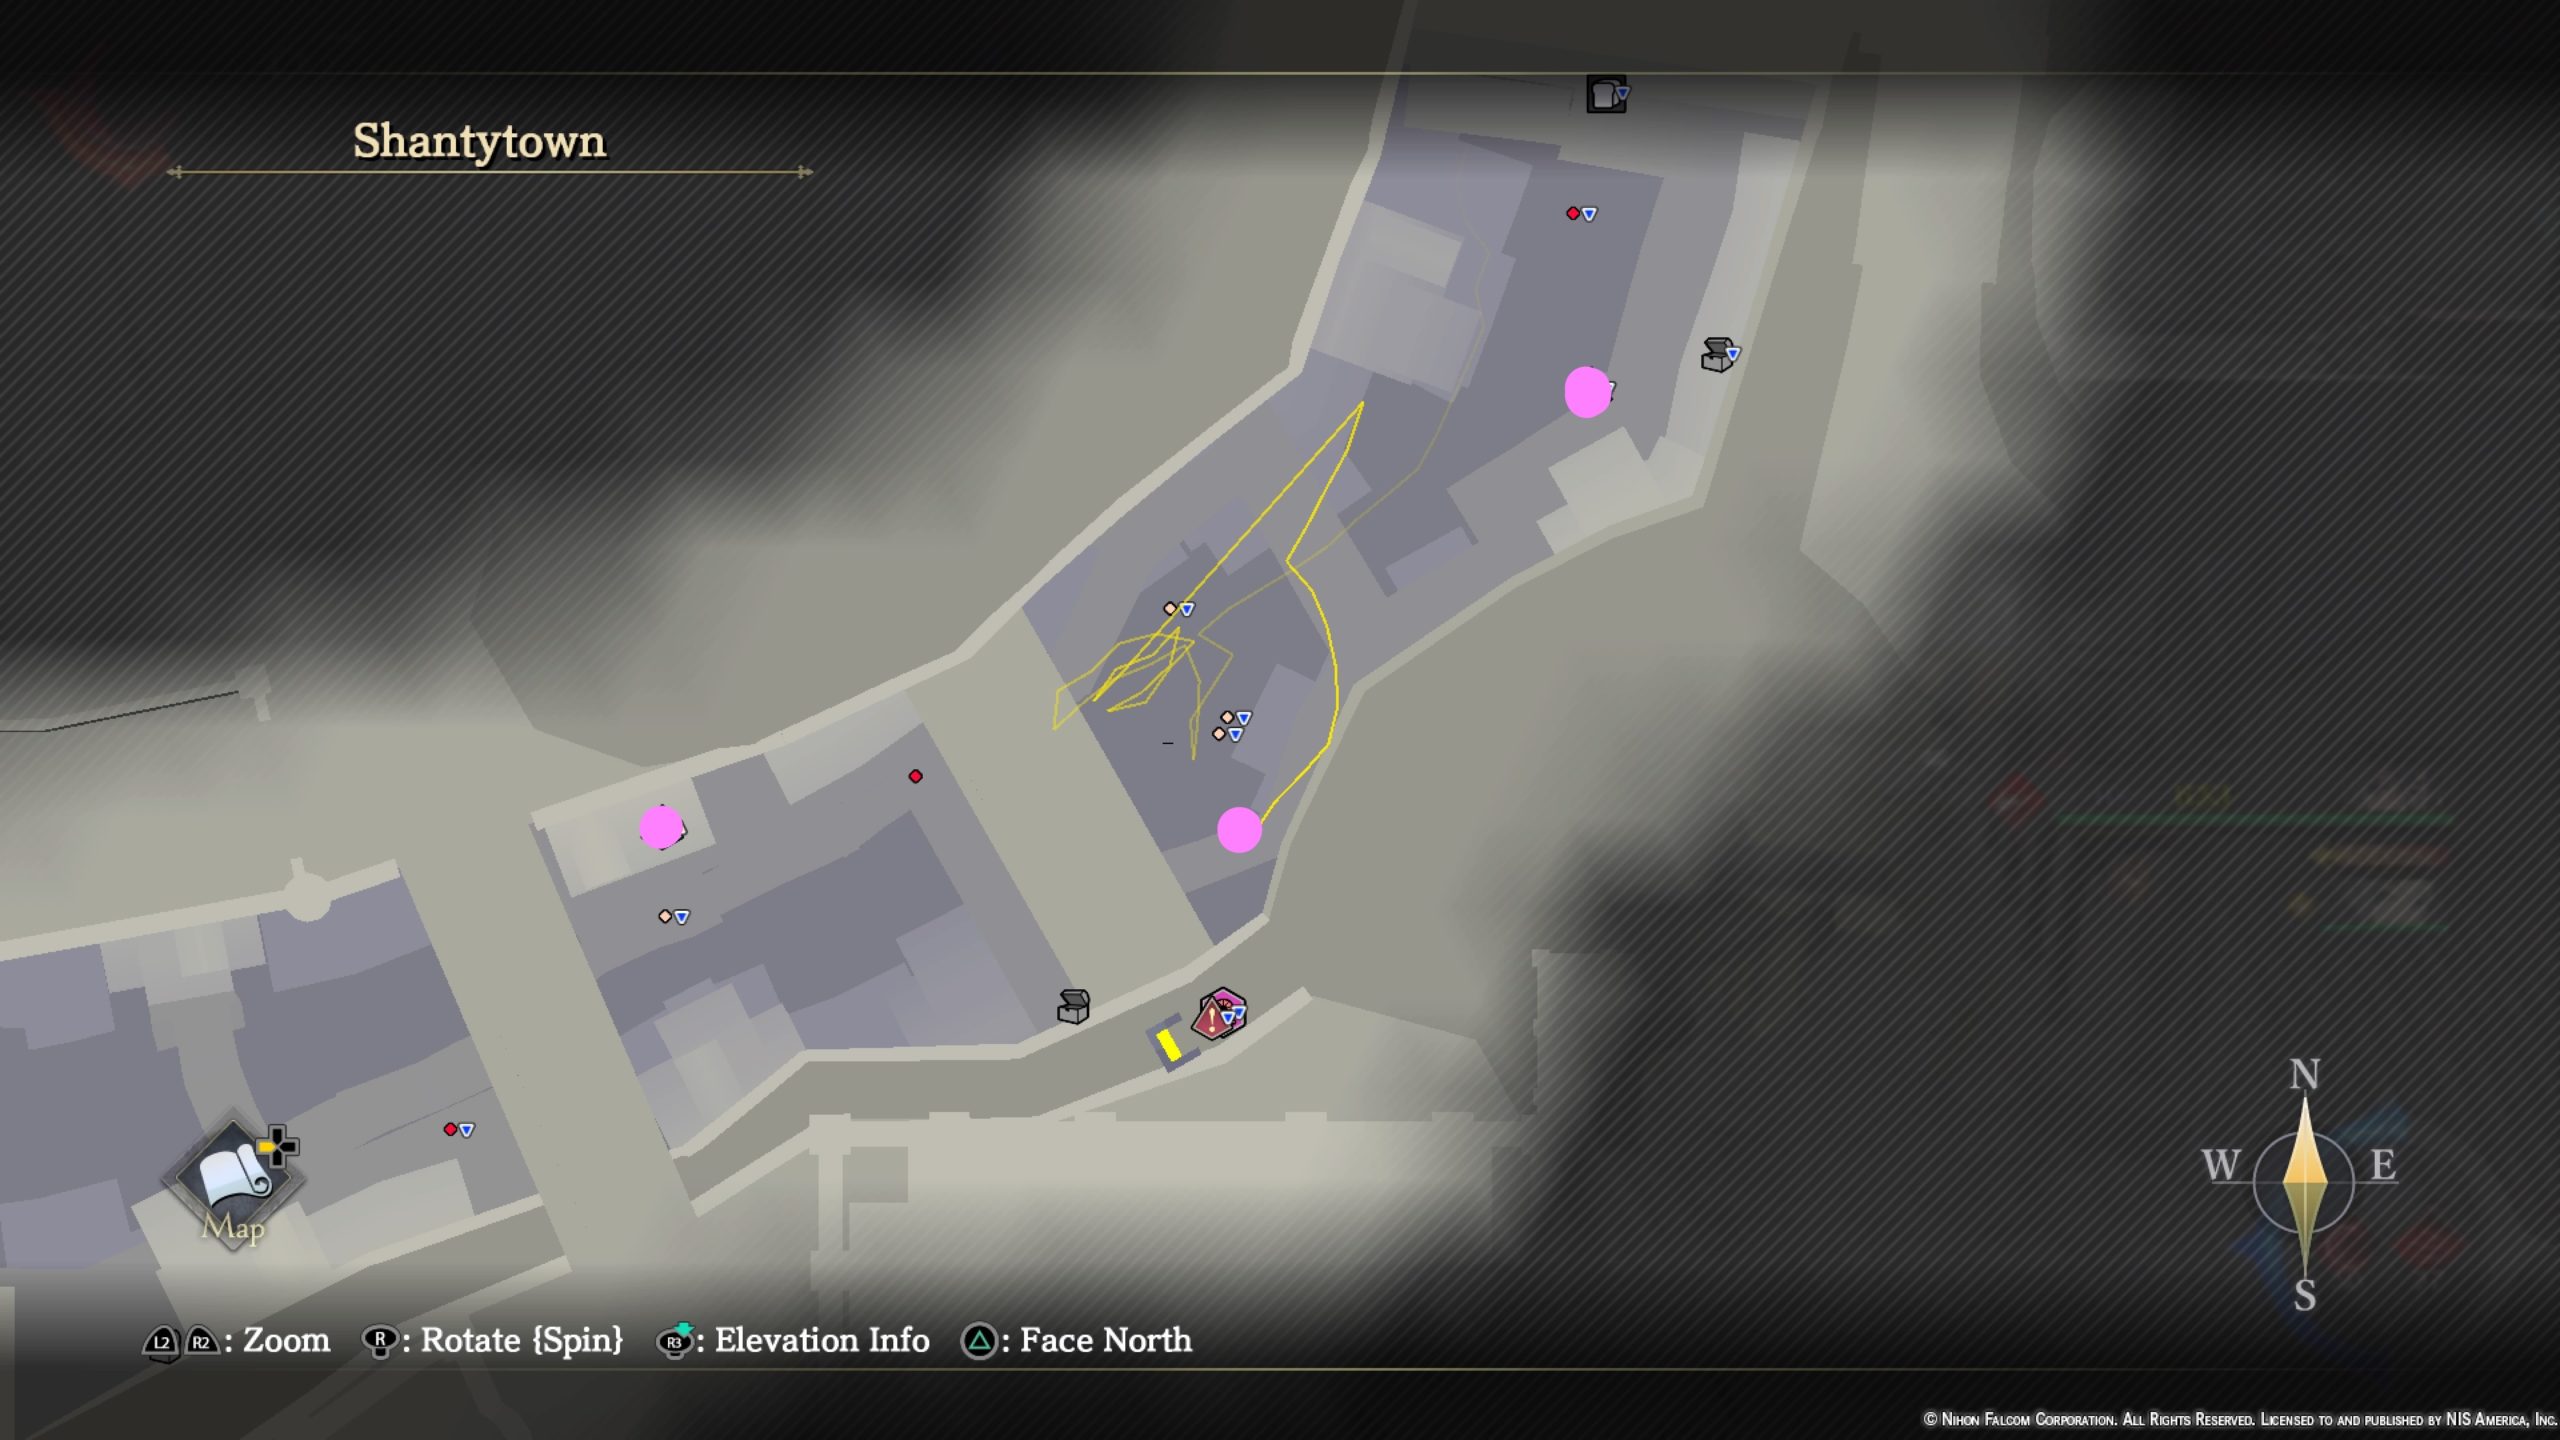
The butterflies can be found on the second level of the town where the green triangles are (pink dots in the map above). One will be on the roof of a building. The second is along the makeshift walkway, and the last is on a balcony across from Nirvana. Once you’ve collected all the butterflies, return to Sue to complete the quest.
Reward: Empty Bottle
Chapter 3
Illness Inquiry
Obtained: Bulletin Board at Dandelion during Chapter 3
Objective: Find out cause of illness
Speak with Jake and Kaia in the Agricultural District to accept the quest. Next, examine the nearby well twice to enter it. Follow the path a short way to find a horde of monsters. Defeat them all then exit the well to trigger a cutscene, which will complete the quest.
Reward: Flour x10 and Tomatoes x10
Maid in Amiss
Obtained: Speak with the Girl in a Maid Dress during Chapter 3 when you visit the Hieroglyph Knights HQ as part of the story
Objective: Help her find a sack
Exit the holding room and head through the door across the hallway. Defeat the 3 knights inside to trigger a brief cutscene. Inspect the shiny object next to one of the knights to find a key. Exit the room then head left to find a locked door on the right of the hallway. Use the key to open the door. Inspect the burlap sack resting on some barrels then return to the girl for a cutscene. Afterwards, defeat the monsters that spawn behind you to continue with the cutscene and complete the quest.
Reward: Leather Bracelet
Missing Family Report
Obtained: Bulletin Board at Dandelion during Chapter 3
Objective: Meet Geoffrey at fountain plaza in the Central District
Head to Fountain Plaza in the Central District and speak with Geoffrey. Agree to accept his request then speak with the Girl to the west of the Pendleton Company. Next, speak with the Woman standing next to a wagon up the road from the Girl. Afterwards, head behind the cathedral to speak with the Young Man. When you speak with all 3 people, a cutscene will trigger. Travel behind the cathedral to find a miasma vortex at their apartment. Interact with the vortex to discover a Grimwald Nox. Work your way through the area defeating enemies as you head north. When you approach the objective, a short cutscene will trigger. Afterwards, defeat the waves of enemies to save the family and trigger another cutscene which will complete the quest.
Reward: 1000 Gold
Sowing Seeds of Joy
Obtained: Speak with Hannah in Shantytown during Chapter 3
Objective: Deliver flowers to Cabato and Ivan in Shantytown and Largus in the Central District
Speak with Cabato at Nirvana in Shantytown. Ivan can be found near the center of Shantytown sitting on the side of the street. Speak with him then make your way to the Central District. Largus can be found under the bridge to the Main Square, which is reachable by entering the building to the left of Edouard’s Bookstore. Talk to him then return to Hannah in Shantytown and speak with her to complete the quest.
Reward: Marl Flower x10
Pickpocket Pursuit
Obtained: Speak with the Market Manager in the Main Square during Chapter 3
Objective: Search for the suspicious character
Head to a corner stall near an alley to trigger a cutscene. Afterwards, chase the Suspicious Man until you run into him. This will “catch” him causing a cutscene which completes the quest.
Reward: 2000 Gold
Chapter 4
Bathhouse Debauchery
Obtained: Bulletin Board during Chapter 4
Objective: Search bulletin board near the public baths
Head to the bulletin board in the Main Square across from the bathhouse to locate Old Man Guindeau. Speak with him then inspect all the windows on the roof above the reception area. Afterwards, check all the chimneys then return to Old Man Guindeau and speak with him to complete the quest.
Reward: Blinding Bangle
Chapterhouse Repairs
Obtained: Speak with Knight Huon in the Artisan Lane in Chapter 4
Objective: Check out the damages around the commandery
Head to Hieroglyph Commandery then make your way up to the roof of the main building and inspect the wooden lift. Next, travel north near the waterfront passing a maid playing with a cat to interact with a cut banner on the ground. Afterwards, head to the southern side of the area to inspect a broken column. After inspecting all 3 items, you’ll automatically return to Knight Huon to complete the quest.
Reward: Strength Elixir
One in a Bouillon
Obtained: Speak with Chante and Roscoff in the Central District near the Le Bistro Blanc during Chapter 4
Objective: Gather intel on ingredients
Head to the Agricultural District and speak with Susie. Next, travel to the Main Square – Marketplace and speak with Philippe on the dock. Afterwards, head to the Pendleton Company in the Central District and speak with Carla. After the conversation, return to Chante and Roscoff to complete the quest.
Reward: Bouillabaisse Recipe
Prison Rescue
Obtained: Bulletin Board during Chapter 4
Objective: Visit Parks in basement of Dandelion
Speak with Parks in the basement of Dandelion and agree to help the young girl escape. Next, head to the Central District and speak with Maxim. He’ll want you to get the latest tabloid and 500 Gold. Speak with Marie near the bulletin board at the Main Gates to receive the tabloid then return to Maxim once you have the 500 Gold. After the cutscene, follow the path through the hallway and down the stairs to reach the North Wing – Roof. Once on the roof, pull the lever behind the door to raise the wooden plank allowing you to continue down the stairs. After enter the large room, examine the barrel with scrolls sticking out of it on the right side of the room to obtain the Prison Floor Plan. Head through the double doors to the left and Adol will notice a sound. Enter the storage room on the right and interact with the pot in the back of the room to trigger a cutscene. Xavier will lead you through the West Dumping Ground. Avoid the traps and defeat the enemies as you proceed through the area. Eventually you’ll arrive in an archive room. Inspect the bookshelf near the two tables to find a book on the prison. This will trigger a cutscene. Adol and party will receive a map of the prison. Take it to Parks in the basement of the Dandelion then speak with him when you’re ready to begin the rescue mission. Once inside the prison, work your way to the Head Office to trigger a cutscene. During the cutscene, convince Iris to return with you to the bar. After this cutscene ends, the quest will complete.
Reward: 2500 Gold
Wanted: Maretudos
Obtained: Bulletin Board during Chapter 4
Objective: Subdue Maretudos in Cloaca Maxima
Travel to Cloaca Maxima – Depths then defeat the 3 Maretudos (large frog-like monsters) in the room ahead. When you defeat the enemies, exit the dungeon and travel to the Central District. Speak with Aprilis in the giant tower west of the Pendleton Company to complete the quest.
Reward: Fool’s Gloves
Chapter 5
All That Glitters
Obtained: Speak with Saradhi at Dandelion during Chapter 5
Objective: Find Saradhi
When you gain control, make your way through the Decrepit Underpass until a cutscene triggers with Saradhi. Defeat the 4 bugs that spawn to continue with the cutscene and complete the quest.
Reward: Golden Gloves
Hazardous Harvest
Obtained: Bulletin Board at Dandelion during Chapter 5
Objective: Meet Baldwin at Trading Bureau
Travel to the Trading Bureau at the Main Square and speak with Baldwin on the second floor. Afterwards, make your way to the southern part of Estatte Road to find Mount El Dore – Cave. Walk inside the cave to trigger a cutscene, and proceed through the cave until you reach the end. You’ll then be on Mount El Dore where a quick cutscene will trigger. Defeat the Hornville that spawn to continue with the cutscene and complete the quest.
Reward: 3500 Gold
Owner, Where Art Thou?
Obtained: Bulletin Board at Dandelion during Chapter 5
Objective: Meet Family on a Pilgrimage at the inn by the west gate of Artisan Lane
Speak with the family near the Relief Tile in Artisan Lane then head to Rijndael Antiques to speak with Roderio. Next, travel to Main Square and speak with the Receptionist behind the ticket counter at the amphitheater. Use Doll’s gift to follow the footprints into the Central District. You’ll find the girl on the east side past Andelph’s Armory. Speak with her to complete the quest.
Reward: Chamomile x10
Prison Liberation
Obtained: Bulletin Board at Dandelion during Chapter 5
Objective: Rescue prisoner
Speak with Parks in the basement of the Dandelion when you’re ready to begin the quest then make your way to the Central District to speak with Maxim. He’ll need you to get 1000 Gold and Dry-Aged Meat. For the Dry-Aged Meat, you can exchange for it at Arche’s Warehouse in the basement of the Dandelion for 4 Smoked Meat. You can purchase the Smoked Meat for 800 a piece from Durfee’s Butchery in Main Square or from Silhouette’s Errand Runs. Once you’ve obtained the items, return to Maxim to hand them over. You’ll then be given control of Prison Adol. Work your way through the prison until you reach a library. Examine the bookshelves to find a book on the prison transport, which will trigger a cutscene. Afterwards, you’ll regain control of your party. Head north through Estatte Road in pursuit of the wagon. When you get close enough, a cutscene will trigger followed by a fight. Defeat the group of knights to continue with the cutscene and complete the quest.
Reward: 5000 Gold
Scam on the Lam
Obtained: Speak with the Coliseum Staff in the Entertainment District during Chapter 5
Objective: Find the con artist gambler
From the Coliseum Staff, head north and take a right down the first alley to locate the Suspicious Man speaking with a Middle-Aged Person. After the cutscene, chase the Suspicious Man and catch him. As soon as you get close enough, a cutscene will trigger and the quest will complete.
Reward: 4000 Gold
Wanted: Tarantiels
Obtained: Bulletin Board at Dandelion during Chapter 5
Objective: Defeat Tarantiel Eggs
Travel to Dry Moat Ruins – Depths to defeat the cluster of eggs in the cage. Afterwards, head to Ruined Belfry in Central District to speak with Aprilis to complete the quest.
Reward: Berserker’s Mask
Chapter 6
A Legend of Heroes
Obtained: Bulletin Board at the Dandelion during Chapter 6
Objective: Speak with Tetra
Travel to the Main Square and speak with Tetra underneath the bridge. She will want you to find old graffiti around the area from the Holy Swordsman. First, head to the Agricultural District then search the graffiti on the outer wall in the eastern part of the area. Second, travel to the outer wall behind Rijndael Antiques in Artisan Lane to find more graffiti on an upper ledge. Lastly, head to the western part of Hieroglyph Commandery to find the graffiti on the outer wall behind a long building. When you have read all 3 graffiti, return to Tetra in Main Square to complete the quest.
Reward: Brilliant Ice
Calling All Strongmen!
Obtained: Bulletin Board at the Dandelion during Chapter 6
Objective: Enter to be a strongman
Travel to the Coliseum in the Entertainment District to speak with Felix and Promoter DeSalle which will trigger a cutscene. Afterwards, defeat the waves of enemies that spawn in the arena to complete the quest.
Reward: 3500 Gold
Masking for Trouble
Obtained: Speak with Michele in the Noble District during Chapter 6
Objective: Be Michele’s date
Speak with Michele to trigger a cutscene. When you gain control, mingle with the guests that have “!” above their heads. When you’ve spoken to all the necessary guests, a cutscene will trigger and the quest will complete.
Reward: Mayura Stone
Tobacco To Go
Obtained: Bulletin Board at the Dandelion during Chapter 6
Objective: Deliver a premium Gllian cigar
Speak with Parks in the basement of the Dandelion then travel to Central District to have a chat with Maxim. Afterwards, talk to Nora at Nora’s Gift Shop in the Main Square to receive the Premium Gllian Cigar. With this task accomplished, return to Maxim and relinquish 1500 Gold. You’ll then play as Prison Adol. Make your way through the South Dumping Ground to trigger a cutscene at the end. You’ll then get control of the Monstrums. After reaching the West Wing – Roof and interacting with the large wooden door, search for the North Wing Key on the ground to the left of the door near a wooden hatch. Use the key to open the door which will trigger a cutscene with Margot and complete the quest.
Reward: 6000 Gold
Wanted: Dragia Haman
Obtained: Bulletin Board at the Dandelion during Chapter 6
Objective: Hunt Dragia Haman in Estatte Road
Travel to the western area of Estatte Road to find the gigantic Dragia Haman. Defeat it in battle then report back to Aprilis at Ruined Belfry in Central District to complete the quest.
Reward: Asura Cloak
Chapter 7
Aprilis’s Trial
Obtained: Bulletin Board at the Dandelion during Chapter 7
Objective: Undertake trial
Head to the Ruined Belfry in Central District and speak with Aprilis to start the trial. Afterwards, defeat the waves of enemies to complete the quest.
Reward: Fenrir Claw
Art-isan is Suffering
Obtained: Bulletin Board at the Dandelion during Chapter 7
Objective: Help Berling
Speak with Berling in Artisan Lane down the road from the Relief Tile then travel to the southwest Relief Tile in Milianne Plains. Once at the Relief Tile, head north to find Potts near a tree and speak with him. He’ll want you to try out his porotype shield. Defeat 15 mushroom enemies with the shield equipped. A message will pop up on the bottom of the screen when you defeat all the monsters. Once it does, return to Potts to complete the quest.
Reward: Feather Shield
Gamberg Family Errand
Obtained: Speak with Yufa’s family in the Agricultural District during Chapter 7
Objective: Go shopping!
Speak with Yufa’s family to trigger a cutscene. When you gain control, head to the Trading Bureau and speak with Renee behind the counter to receive the chocolate. Next, travel to Hale’s General Store to speak with Hale. He’ll give you wrapping paper. Lastly, head to Paulette at Paulette’s Produce and speak with her to receive the orange. Once you’ve obtained all the items, the quest will complete after a cutscene.
Reward: Apple x20, Flour x20, Mushroom x20, Red Meat x20, White Meat x20
Iris of the Storm
Obtained: Speak with Iris in the basement of the Dandelion during Chapter 7
Objective: Find Iris
Travel to the objective in the Noble District to trigger a brief cutscene then enter the large building via a hatch in the roof. Another cutscene will trigger and the quest will complete.
Reward: Empusa’s Gloves
Tree Stumped
Obtained: Speak with Vallin who is northeast of the Keening Highland – Start Relief Tile during Chapter 7
Objective: Find the legendary tree in Keening Highlands
Head east to find the large tree and examine it to trigger a cutscene and complete the quest.
Reward: Tempest Elixir
Warehouse Stakeout
Obtained: Bulletin Board at the Dandelion during Chapter 7
Objective: Find the robber
Head to the objective in the Noble District and speak with Count Edgell and Butler Clint. Afterwards, climb up the building diagonally from the warehouse to find a spot overlooking the entrance. Next, head southwest of the warehouse to find a secluded area housing a chest. Lastly, head to the guarded door east of the warehouse and run up to the balcony on top for another vantage point. With all points discovered, a cutscene will trigger. When you regain control, chase the thief until you catch him to complete the quest.
Reward: 8000 Gold
Chapter 8
A Fool and Her Treasure…
Obtained: Bulletin Board at the Dandelion during Chapter 8
Objective: Find the treasure
Travel to the Prison Outskirts to find Saradhi near the Prison Entrance Gate. Speak with her then walk into the Path to Hidden Treasure. Make your way to the end of this area and defeat the group of enemies at the end. Afterwards, a cutscene will trigger and the quest will complete.
Reward: Gorgon Gloves & Genius Green
Inscription Inspection
Obtained: Speak with Tetra in the Forbidden Altar Ruins in the Woodlands of Woe during Chapter 8
Objective: Find the stone fragments
The stone fragments can be found at the following locations:
- Stone Fragment 1 – From Stone Fragment 3, follow the creek around until you come to a ledge that you can jump up onto on the right. Doing so puts you in a small clearing with a tree in the center. The fragment can be found on the ground behind the tree.
- Stone Fragment 2 – From the Woodlands of Woe Relief Tile, head into the woodlands and jump into the water past the large tree. The Stone Fragment 2 can be found next to a large rock.
- Stone Fragment 3 – This fragment can be found in the center of the map next to a treasure chest in a creek in front of some dead trees.
Once you obtain all the fragments, return to Tetra in the Forbidden Altar Ruins to complete the quest.
Reward: Strike Crown
Peril of the Bells
Obtained: Bulletin Board at the Dandelion during Chapter 8
Objective: Meet with Dogi
Speak with Dogi in the basement of Dandelion. Next, speak with Alex at the Balduq Visitor’s Kiosk in Main Square. Afterwards, travel to Perry’s Pub in the Central District to speak with Perry. Lastly, head to Main Square and speak with Old Man Guindeau. Once you’ve spoken with everyone, you’ll be teleported back to the Dandelion for a cutscene. When you gain control, head to Cloaca Maxima and work your way through the dungeon until a cutscene triggers. At its conclusion, defeat the horde of enemies that spawn to complete the quest.
Reward: Full Potion
Prison Infiltration
Obtained: Bulletin Board at the Dandelion during Chapter 8
Objective: Speak with Maxim
Head to the Central District and speak with Maxim. When you’re ready to infiltrate the prison, speak with him again. Once inside, work your way through the prison following the objectives. Afterwards, a long cutscene will trigger and the quest will complete.
Reward: 10000 Gold
Wanted: Drolls
Obtained: Bulletin Board at the Dandelion during Chapter 8
Objective: Defeat the group of Drolls
Travel to the Beast Enclosure in Groaning Grotto and defeat the group of Drolls. Afterwards, return to Dogi to complete the quest.
Reward: Blood Fang
Chapter 9 (Final Chapter)
Belger’s Request
Obtained: Bulletin Board at the Dandelion during Chapter 9
Objective: Defeat the monster on Estatte Road
Travel to Estatte Road to trigger a brief cutscene then defeat the enemies that spawn. Afterwards, follow the road north to come across a group of enemies off to the right. Defeat them to trigger a cutscene during which more enemies will spawn. Defeat them for yet another cutscene then return to town where Adol will participate in a solo fight with Credo. Emerge victorious to complete the quest.
Reward: 15000 Gold
Final Dispossession
Obtained: Bulletin Board at the Dandelion during Chapter 9
Objective: Dispose of Master Chatelard’s legacy
Speak with Chante at the Dandelion then travel to the Alchemy Wing – Depths. Backtrack a short way towards the objective to inspect the tubes housing the bodies. This will trigger a long cutscene after which the quest will complete.
Reward: Warlord Elixir
His Father’s Son
Obtained: Bulletin Board at the Dandelion during Chapter 9
Objective: Find missing husband
Travel to Jules’ house in the Noble District then head to Balduq Cathedral in the Central District. After the cutscene, make your way to the Milianne Plains – Ruined Altar Relief Tile to find Smirnov on the east side of the ruins. Speak with him to complete the quest.
Reward: Defense Elixir
Life by the Sword
Obtained: Bulletin Board at the Dandelion during Chapter 9
Objective: Help Xavier
Travel to the Ancient Battlefield to meet Xavier then head forward a short way towards the objective to trigger a brief cutscene. Afterwards, head to the landmark to trigger another cutscene. Defeat the Lemures that spawn then drop down behind the building into the water to find the sword. This will complete the quest.
Reward: Holy Sword’s Hilt
The Errant Knights
Obtained: Bulletin Board at the Dandelion during Chapter 9
Objective: Meet Lucien
Head to the entrance of the Groaning Grotto to meet Lucien and agree to help him. Afterwards, head forward a short way to defeat a small group of knights. Press forward through the grotto towards the objective to reach another set of knights. Defeat them then continue following the path once more to reach Gilbert. After the cutscene, defeat Gilbert and the knights to complete the quest.
Reward: Slash Crown
Wanted: Bualadh-Orgh
Obtained: Bulletin Board at the Dandelion during Chapter 9
Objective: Defeat Bualadh-Orgh in the Keening Highlands
Head to northern Keening Highlands to find the giant Bualadh-Orgh roaming around. Defeat it in battle then return to the Dandelion to report back to Aprilis and complete the quest.
Reward: Crystal Shield
Wreath Restoration
Obtained: Bulletin Board at the Dandelion during Chapter 9
Objective: Gather materials
First, speak with Giselle at Giselle’s Tailoring in the Main Square to obtain ribbon. Second, travel to Ciel Canyon Trail just outside of the Alchemy Wing to find a patch of flowers. Afterwards, return to Rijndael Antiquest to speak with the group inside and complete the quest.
Reward: Pierce Crown