Welcome to NGB and our Stellar Blade guide on the Find the Cat request! Here we’ll cover how you can start the request, what you’ll need to do in order to complete it and the rewards you’ll receive at the end.
How to Start the Find the Cat Request
You can start this request after reaching Xion. Travel to the Bulletin Board and interact with it then accept the request.
How to Complete the Find the Cat Request
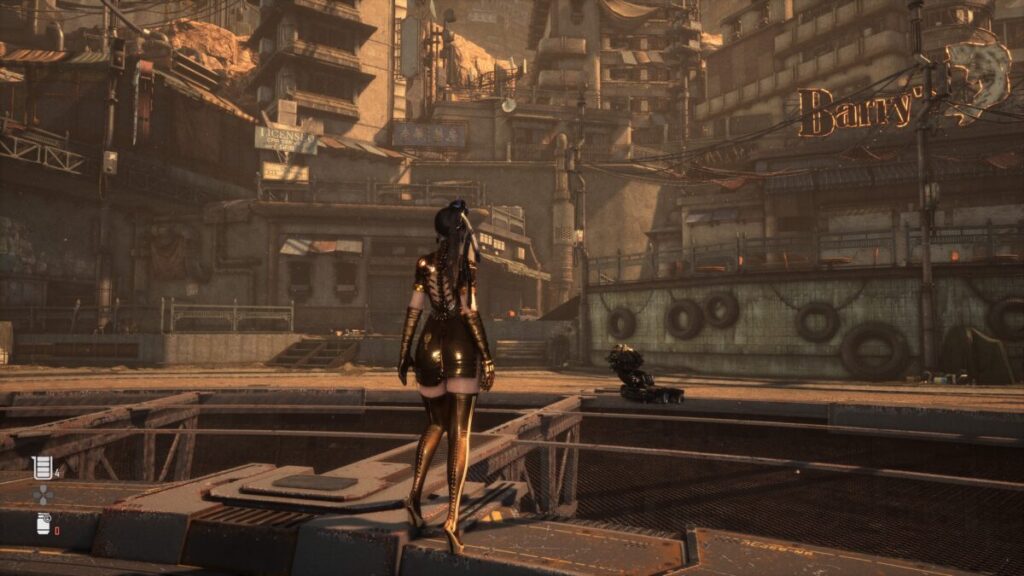
To complete this request, you’ll need to find a cat as black as the night that wasn’t looking so well, last seen near Barry’s shop. Barry’s shop can be found in the northern part of the city. Travel there then head up the small set of steps on the left side next to a pair of benches.
Take a left (instead of right towards the next set of stairs leading to Barry’s) to spot the cat lying on the ground next to some trash bags. Interact with the cat to complete the objective. Return to the Bulletin Board to complete the request and receive your rewards.
Find the Cat Request Rewards
Once you have completed the request, you’ll be rewarded with the items listed below!
1,000 gold
Stellar Blade Guides and Walkthroughs
For more guides and walkthroughs on Stellar Blade, click here!
Welcome to NGB and our Stellar Blade guide on the Simple Puzzle request! Here we’ll cover how you can start the request, what you’ll need to do in order to complete it and the rewards you’ll receive at the end.
How to Start the Simple Puzzle Request
You can start this request after reaching Xion. Travel to the Bulletin Board and interact with it then accept the request.
How to Complete the Simple Puzzle Request
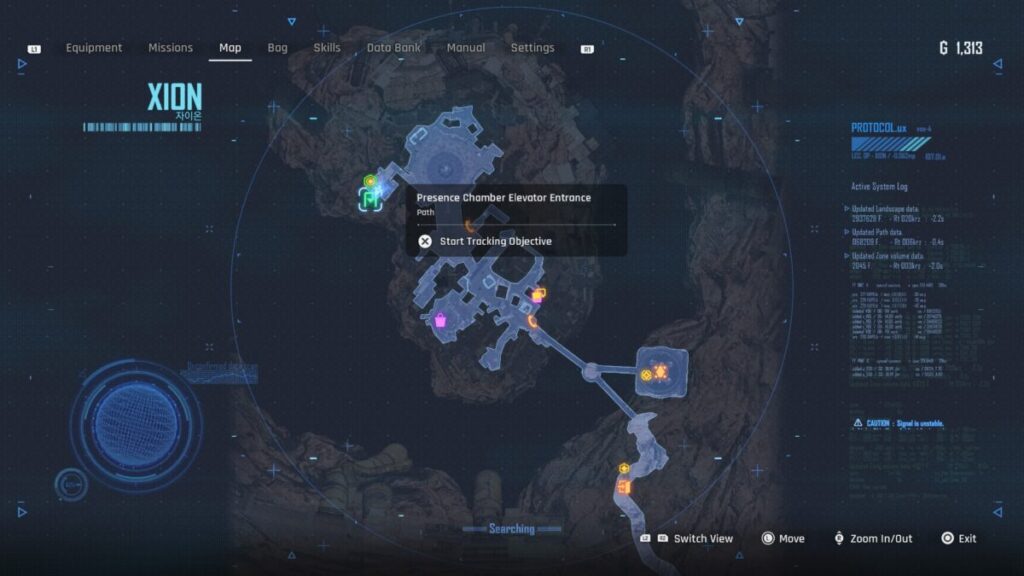
To complete this request, you’ll need to solve the puzzle presented by the requester and enter the correct number sequence into the input device on the elevator leading to the Presence Chamber. If you look at the request you’ll get the following puzzle:
4@7@8 = 285684
9@3@5 = 271542
6@2@7 = 121426
5@6@7 = ?
To solve it, you’ll need to multiply the 1st and 2nd numbers (5 * 6 = 30) then the 2nd and 3rd numbers (6 * 7 = 42) and add the results together (30+42 = 72). This will give you the number to input into the device: 304272.
Take the number and head to the area just outside the Presence Chamber Elevator to find the device attached to the side of one of the columns (back right one with your back to the stairs facing the elevator). Interact with it and input the code. If it’s correct, the quest objective will be completed. You’ll then need to return to the Bulletin Board to turn in the request and collect your reward.
Simple Puzzle Request Rewards
Once you have completed the request, you’ll be rewarded with the items listed below!
1,000 gold
Vitcoin x2
Stellar Blade Guides and Walkthroughs
For more guides and walkthroughs on Stellar Blade, click here!
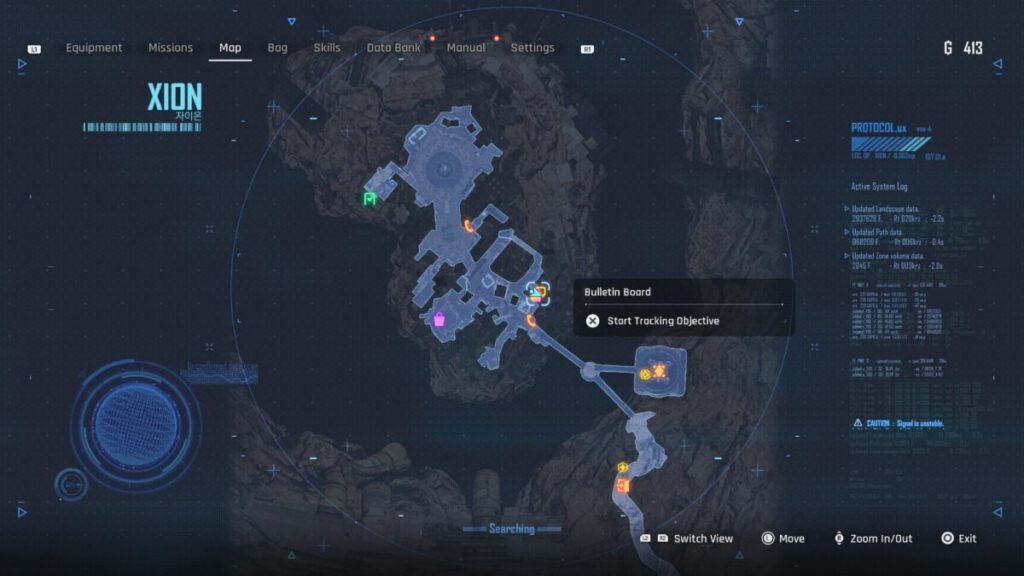
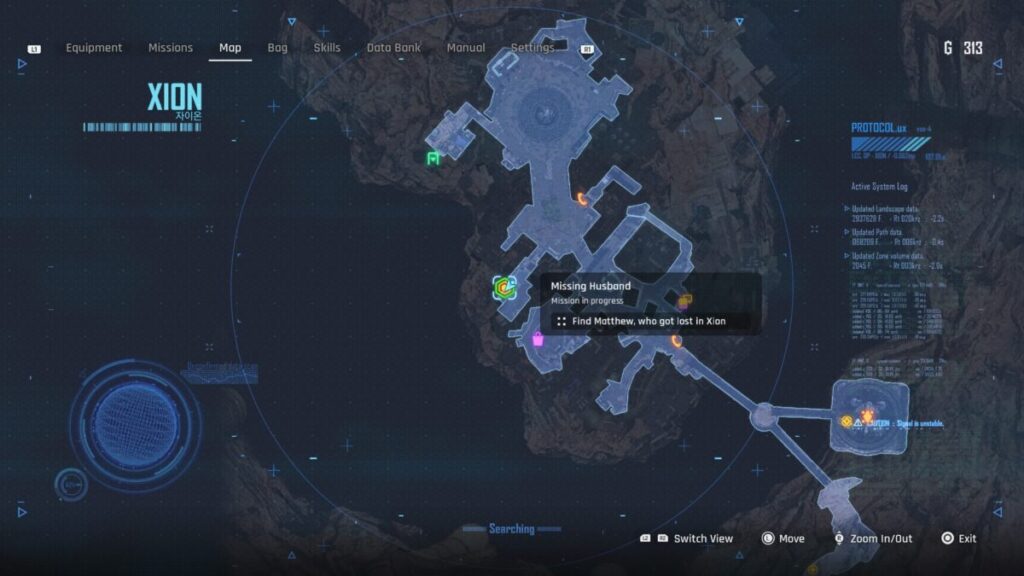
Welcome to NGB and our Stellar Blade guide on the Missing Husband request! Here we’ll cover how you can start the request, what you’ll need to do in order to complete it and the rewards you’ll receive at the end.
How to Start the Missing Husband Request
You can start this request after reaching Xion. Travel to the Bulletin Board and interact with it then accept the request.
How to Complete the Missing Husband Request
For this request, you’ll need to track down the missing Matthew who mysteriously quit his job and disappeared. To do this, head for the alleyway that leads to The Last Gulp bar. Make your way past (not heading into) the bar to find a man on the ground under a hanging pufferfish. Investigate the body to read Matthew’s Memory with some interesting content that will satisfy the objective. Return to the Bulletin Board to complete the request and receive your rewards.
Request Rewards
Once you have completed the request, you’ll be rewarded with the items listed below!
1,000 gold
Stellar Blade Guides and Walkthroughs
For more guides and walkthroughs on Stellar Blade, click here!
Welcome to NGB and our Stellar Blade guide on the Sleeping Beauty request! Here we’ll cover how you can start the request, what you’ll need to do in order to complete it and the rewards you’ll receive at the end.
How to Start the Sleeping Beauty Request
You can start this request after reaching Xion. Travel to the Bulletin Board and interact with it then accept the request.
How to Complete the Sleeping Beauty Request
The Sleeping Beauty request tasks EVE with checking on a lady in the Cradle for her husband who isn’t can’t get too close to the Cradle for…reasons. To get started on the request, head to the northwestern part of the Xion to the Presence Chamber Elevator and take it down to the Cradle.
Once you are there, enter the Presence Chamber and run past the Orcal to the Hyper Drive room. Approach the hyper drive and climb down the ladder on the right side of the platform it rests on. Interact with the terminal there to locate the requestor’s wife and read the comment she left for him. Head back to the Bulletin Board to report what you found and complete the request to receive your rewards.
Sleeping Beauty Request Rewards
Once you have completed the request, you’ll be rewarded with the items listed below!
1,400 gold
Stellar Blade Guides and Walkthroughs
For more guides and walkthroughs on Stellar Blade, click here!
Welcome to NGB and our complete list of Nano Suits in Stellar Blade! Here we’ll cover all of the Nano Suits you can find in Stellar Blade along with how to obtain them and what they look like on EVE to help you prioritize your wardrobe for kicking some Naytiba Ass!
This guide is a work in progress and will be updated regularly as we progress through the game!
List of Nano Suits
The table below lists all of the Nano Suits you’ll come across in Stellar Blade along with a brief description of how you can obtain them. If you click on the name of each suit, you’ll be taken to an image of the suit along with any additional details that you’ll need to know to get your own!
You can purchase this suit from Roxanne for 8 Vitcoins in Xion next to the Bulletin Board once you level her affinity to Level 3.
Keyhole Suit
You can purchase this suit from Roxanne for 8 Vitcoins in Xion next to the Bulletin Board once you level her affinity to Level 3.
Moutan Peony
You can purchase this suit from Roxanne for 10 Vitcoins in Xion next to the Bulletin Board once you level her affinity to Level 3.
Orca Exploration Suit
You can purchase this suit from Roxanne for 6 Vitcoins in Xion next to the Bulletin Board once you level her affinity to Level 2.
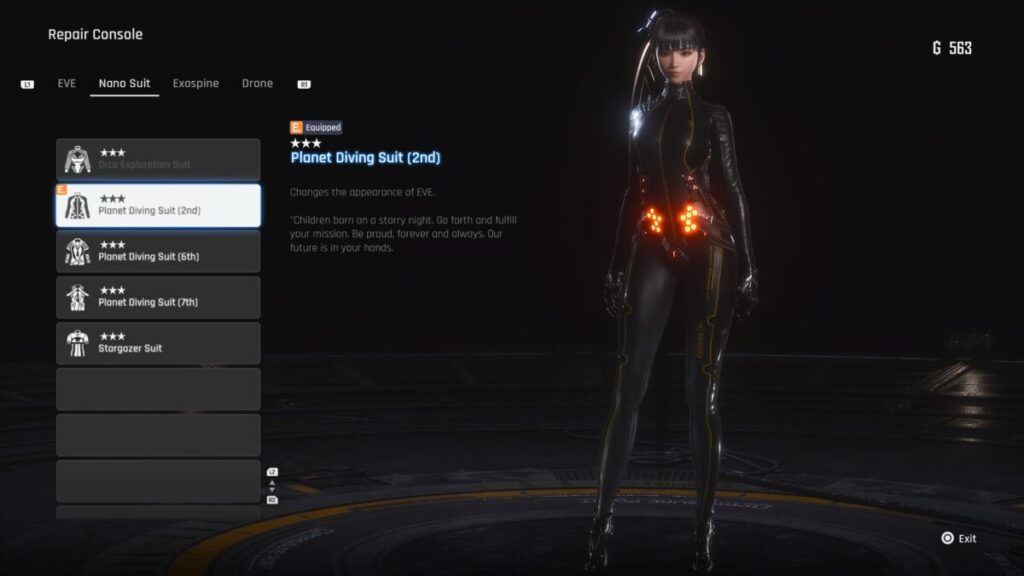
Planet Diving Suit (2nd)
You can purchase this suit from Roxanne for 3 Vitcoins in Xion next to the Bulletin Board once you level her affinity to Level 2.
Planet Diving Suit (6th)
You’ll be able to collect this nano suit at Adam’s Safehouse as soon as you reach Xion if you pre-ordered Stellar Blade.
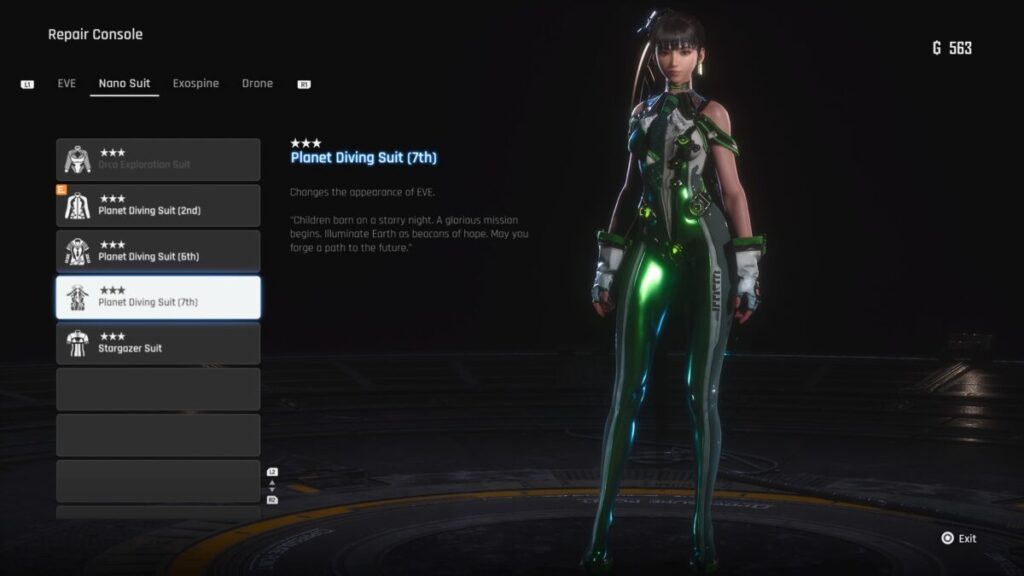
Planet Diving Suit (7th)
This is the Nano Suit you start with at the beginning of the game.
Racer’s High
This Nano Suit can be looted from a chest in the Wasteland and is located between the Solar Tower and the Hidden Path Supply Camp near the Xion map transition.
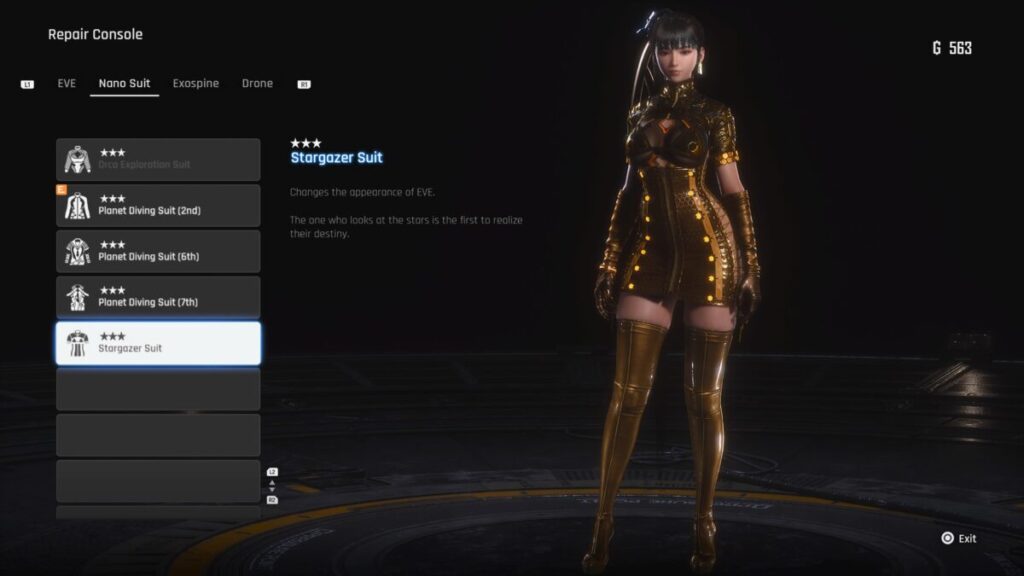
Stargazer Suit
You’ll be able to collect this Nano Suit at Adam’s Safehouse as soon as you reach Xion if you purchased the Deluxe Edition of Stellar Blade.
Stellar Blade Guides and Walkthroughs
For more guides and walkthroughs on Stellar Blade, click here!
Welcome to NGB and our Eiyuden Chronicle: Hundred Heroes walkthrough for the Catch the Criminals main quest. Here you’ll find everything you’ll need to easily breeze through this quest.
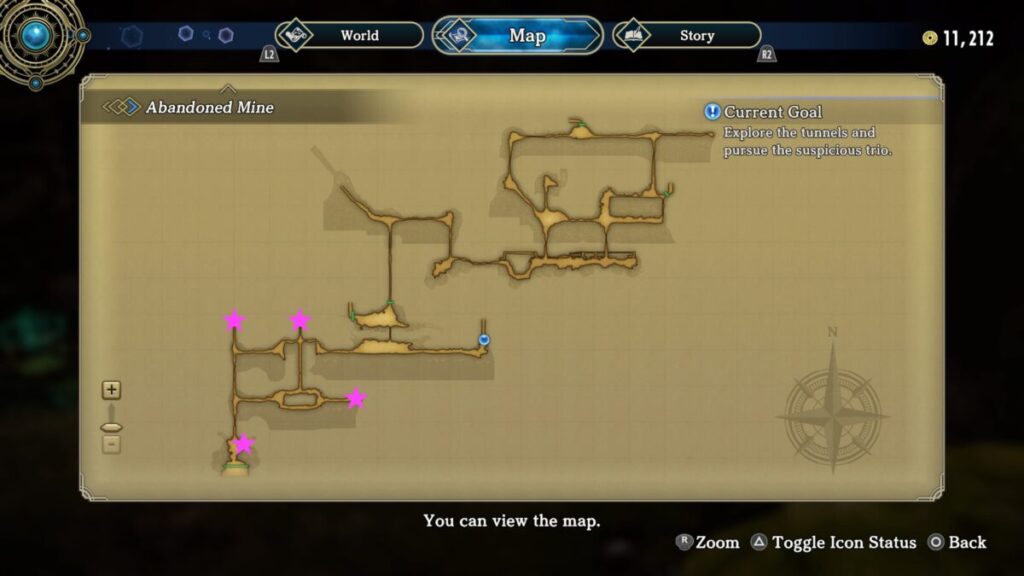
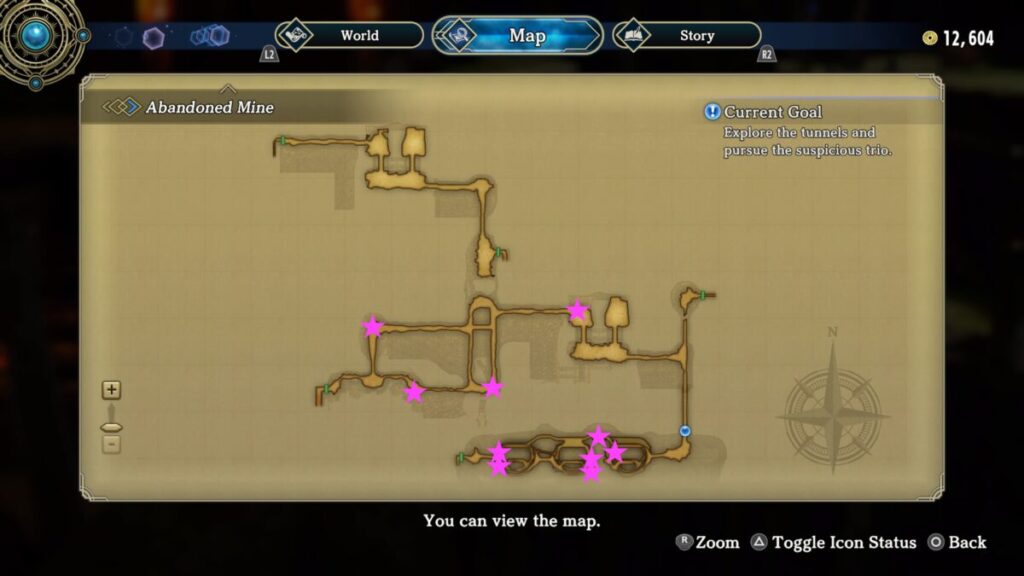
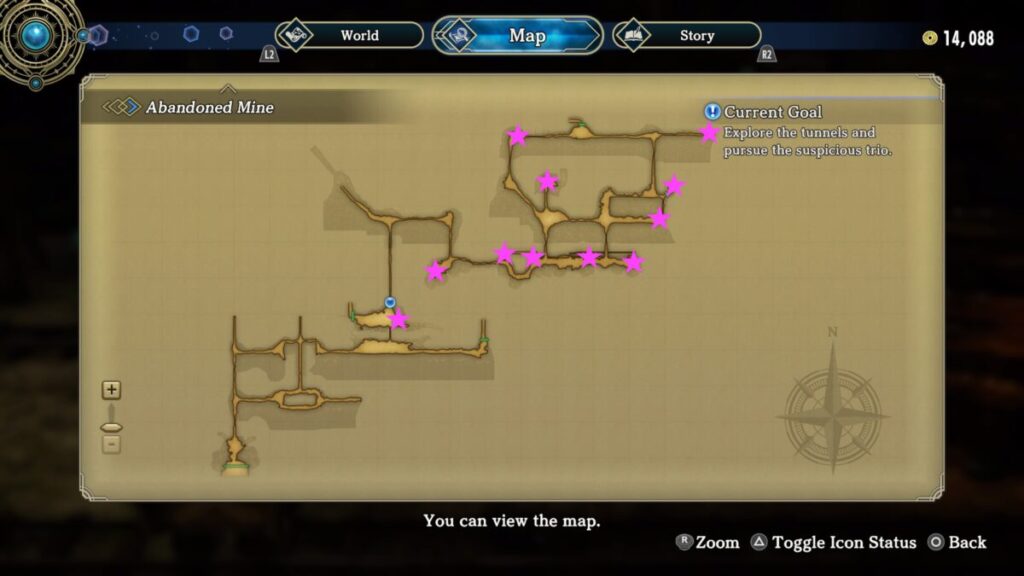
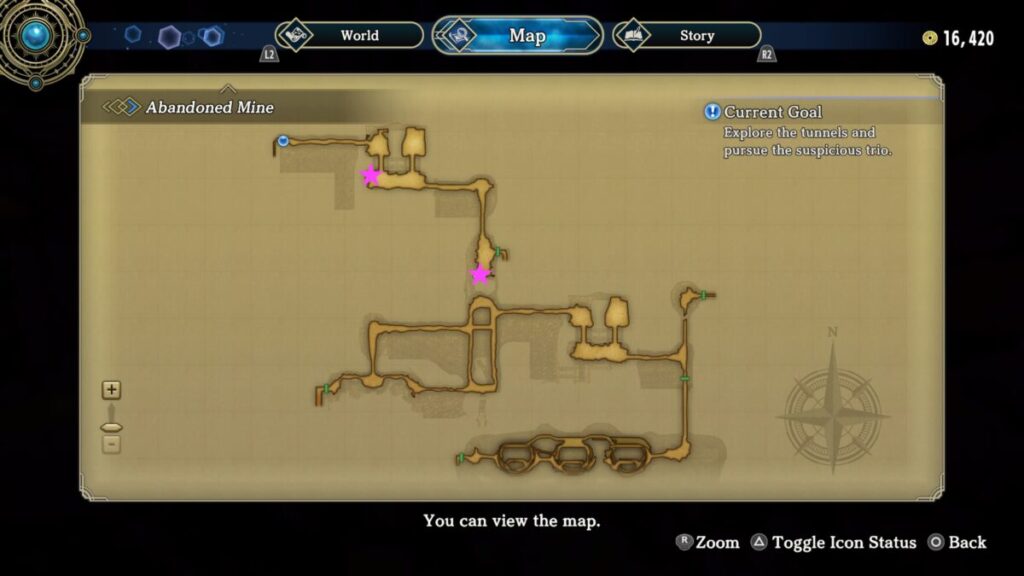
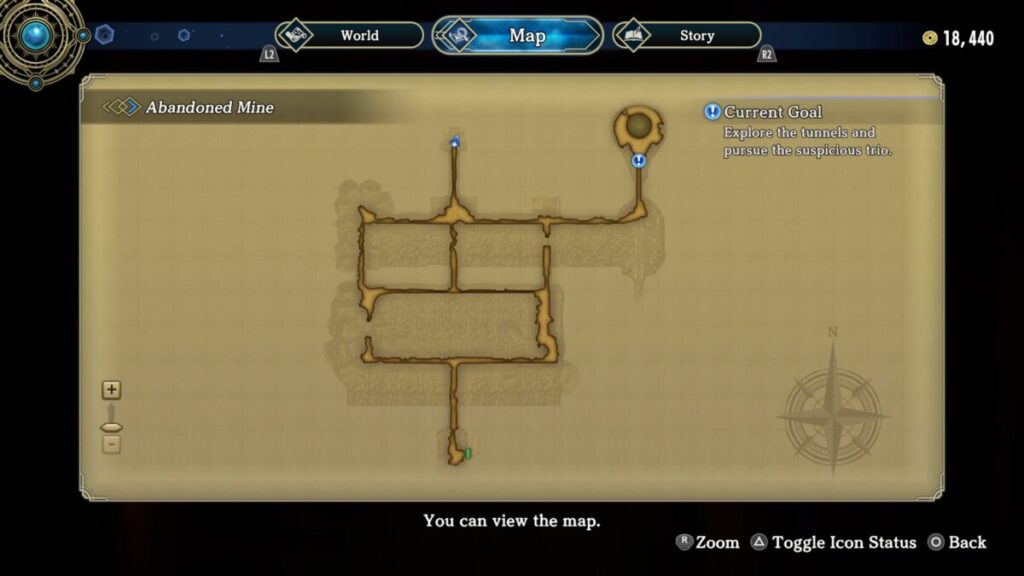
Now that you’ve received your second mission from Ymir, make your way to the southern exit of Eltisweiss to trigger a quick cutscene. Next, exit town then head west to Altverden. Once in Altverden, head to the building in the northwestern corner and speak with the Chief inside. After the cutscene, exit town and head west to the Abandoned Mine.
Abandoned Mine Collectibles
Enemies
Aether Slime
Angry Bat
Carcasseater
Death Tracker
Land Octopus
Rabbit Lancer
Rabbit Mage
Titan Slug
Collectible Materials
Stone
Iron Ore
Chests
900 Baqua
900 Baqua
Topaz Ring
Rune of Earth
Heavy Helm
Antivenom Herb x6
900 Baqua
Rune of Feint Thrust
Rune of Power
900 Baqua
Healing Herb x6
Revival Medicine x2
900 Baqua
Rune of Resistance
Healing Herb x6
900 Baqua
Anti-Poison Beads
Antivenom Herb x6
Growth Badge
Magic Drop x2
Fluffy Shield
Rune of Water
Revival Medicine x2
Rune of Defense
Rune of Skill
Quality Healing Herb x6
900 Baqua
Rune of Speed
Magic Drop x2
Dash Boots
Rune of Fire
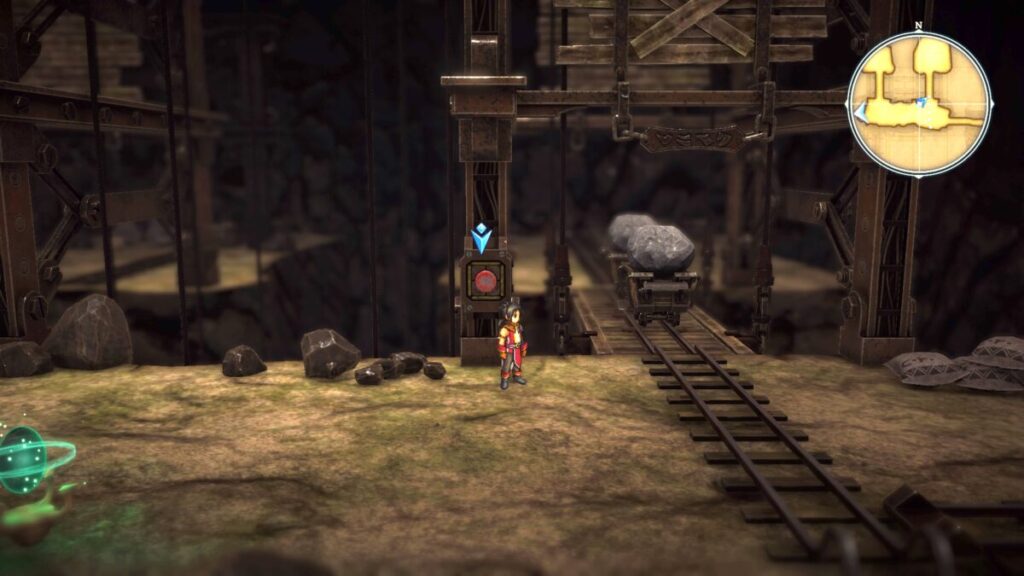
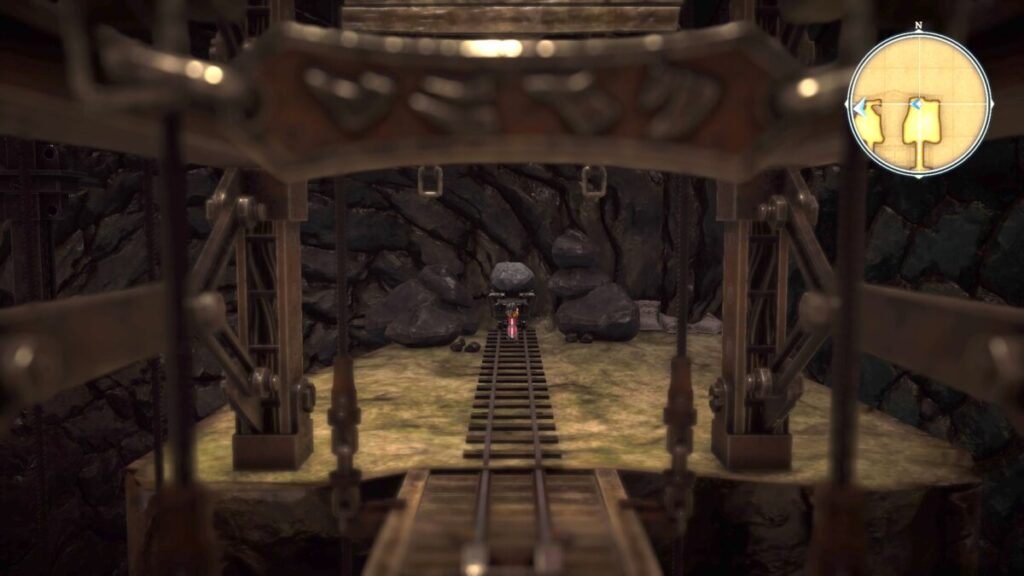
When you reach the elevator next to a save point, you’ll find that the platform is stuck. To solve this puzzle, put both mine carts on and push the red button to send it down. This will cause the one to the left to pop up!
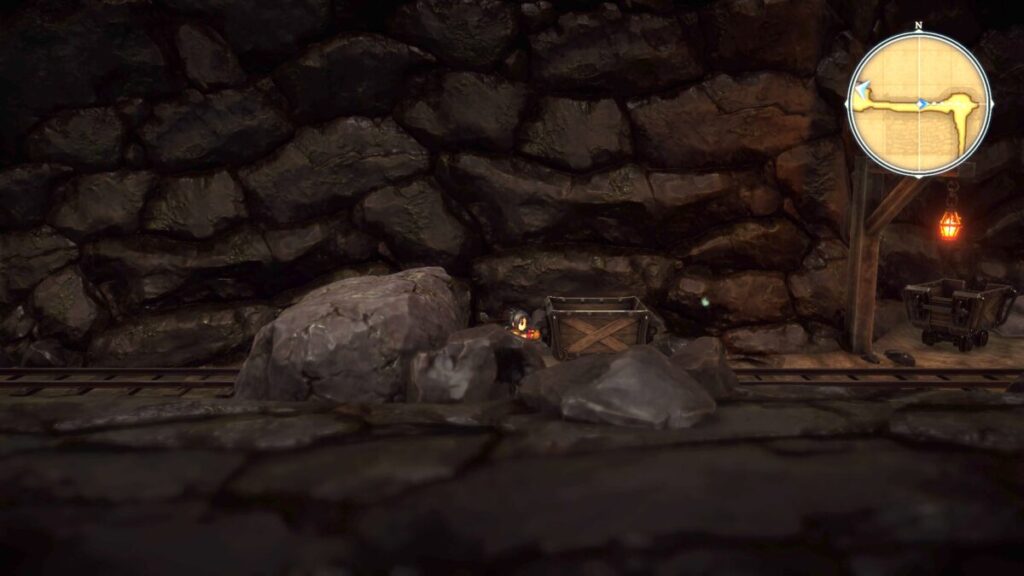
Eventually, you’re going to reach an area where there is a rock on the tracks and an empty mine cart nearby. Lian will tell you that the wall to the right appears weak. Grab the empty mine cart and drag it all the way back to the giant rock on the tracks. Keep going full speed to the right and bump into the wall, causing a rock to fall into your mine cart.
Now that your cart is heavy enough, switch sides and slam it into the rock blocking the tracks so you can proceed forward. In the next area, you’ll come across another elevator. Just like before, you’ll need to place both carts on the elevator then press the red button, however, you must first slam the empty cart into the back wall to fill it with a rock!
When you finally reach the exit, you’ll find yourself in the Castle Ruins. After the cutscene, a battle will trigger against Yuthus, Kogen and Zabi. Afterwards, the truth will be revealed. During the dialog options, we chose “…” instead of “So be it.”! When the cutscene ends, you’ll trigger the A Day in the Life of the Watch trophy!
Eiyuden Chronicle Hundred Heroes Guides and Walkthroughs
Click here for more guides and walkthroughs on Eiyuden Chronicle Hundred Heroes!
Welcome to NGB and our Eiyuden Chronicle: Hundred Heroes walkthrough for The Watch Captain’s First Job main quest. Here you’ll find everything you’ll need to easily breeze through this quest.
After speaking with Ymir, he’ll task you with recruiting new members for the Watch! Once you’re ready to begin your search for new party members, exit the den!
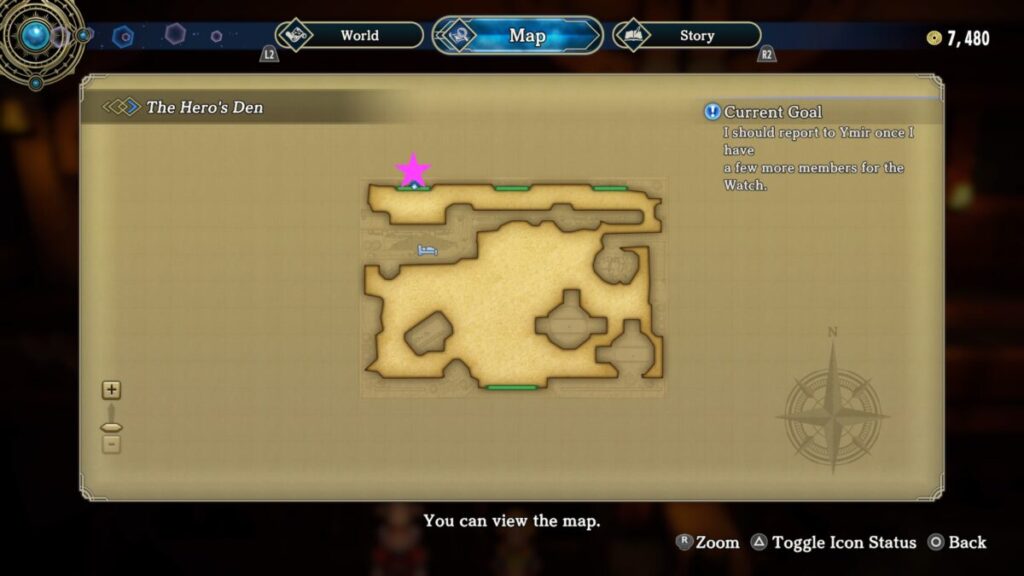
The Hero’s Den Collectibles
Chests
Faded Book, Chapter 19
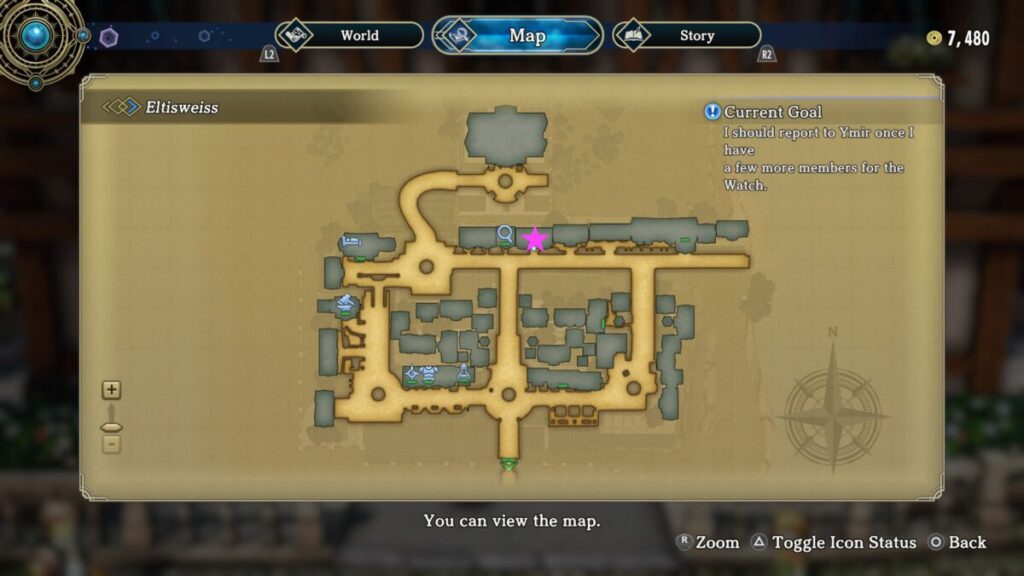
Eltisweiss Collectibles
Animals – I Love Animals Trophy
Izumi (cat) – Directly east of Hero’s Den near fountain
Momo (dog) – On south side of the above described fountain
Ell (dog) – In front of northeastern house
Morris (cat) – On stack of crates by southeastern fountain
Wata-chan (dog) – Southwestern corner of city
Artemis (cat) – Southwestern corner of city
Collectible Items
Faded Book, Chapter 3 – Speak with girl in the house on the east side of the Appraiser’s Shop
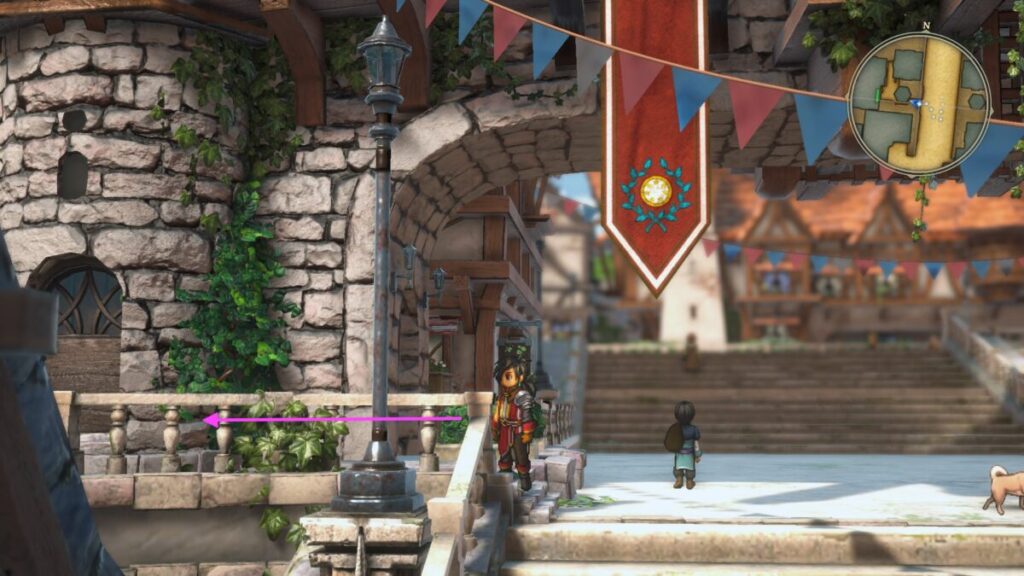
Iugo
The first person to recruit to the Watch is Iugo, who can be found in a tavern on the eastern side of Eltisweiss.
Mellore
Afterwards, head up the central stairs in the city to encounter Mellore!
She’ll then run off to Redthroat Ridge. Before going after her, swing back up to Hero’s Den to find a lady named Sabine inside by the piano. Speak with her then exit Eltisweiss via the southern exit to trigger another cutscene with Mellore.
Grum County Collectibles
Enemies
Lizard
Carcasseater
Shell Egg
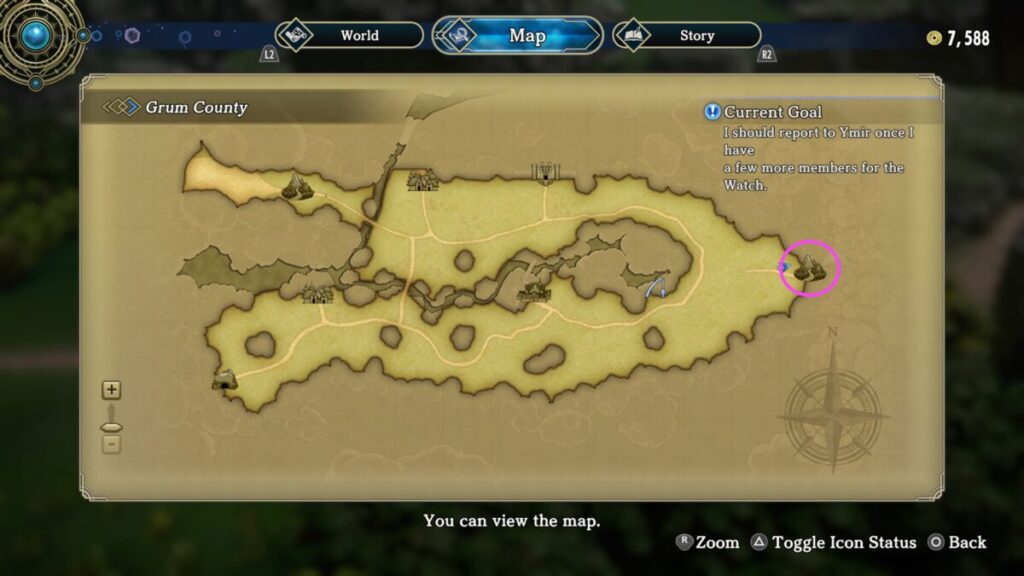
Once in Grum County, make your way east to Redthroat Ridge where you’ll find Mellore and agree to help her take down her magical monster.
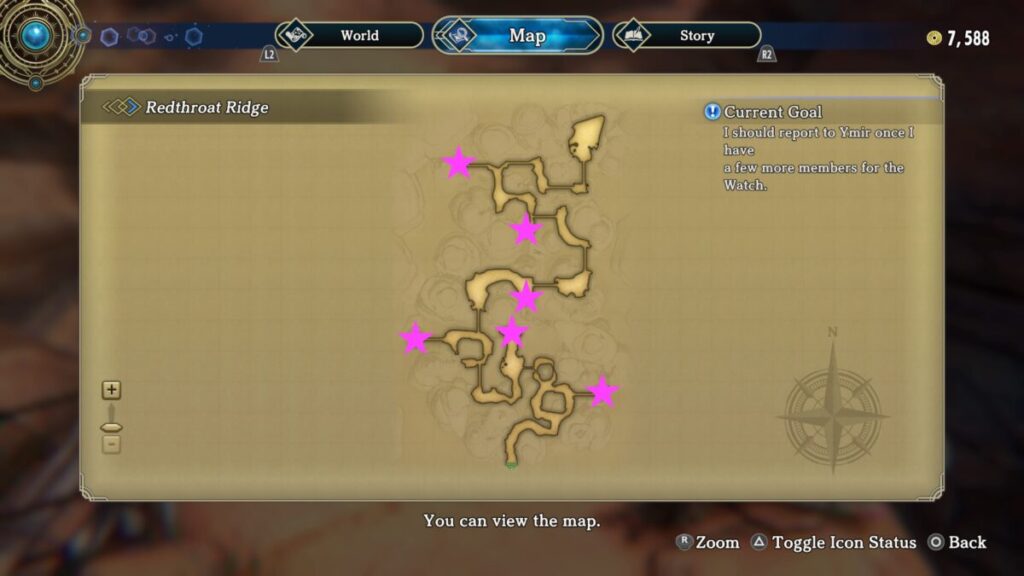
Redthroat Ridge Collectibles
Enemies
Hraesvelgr
Lizard
Shell Egg
Wild Boar
Nerthus (boss)
Collectible Materials
Iron Ore
Stone
Chests
Thick Robe
Magic Drop x2
Tricorne Hat
Healing Herb x6
600 Baqua
Rune of Magic
Make your way through Redthroat Ridge to find the monster named Nerthus in the northernmost part of the area.
Take it down then Mellore will join your party!
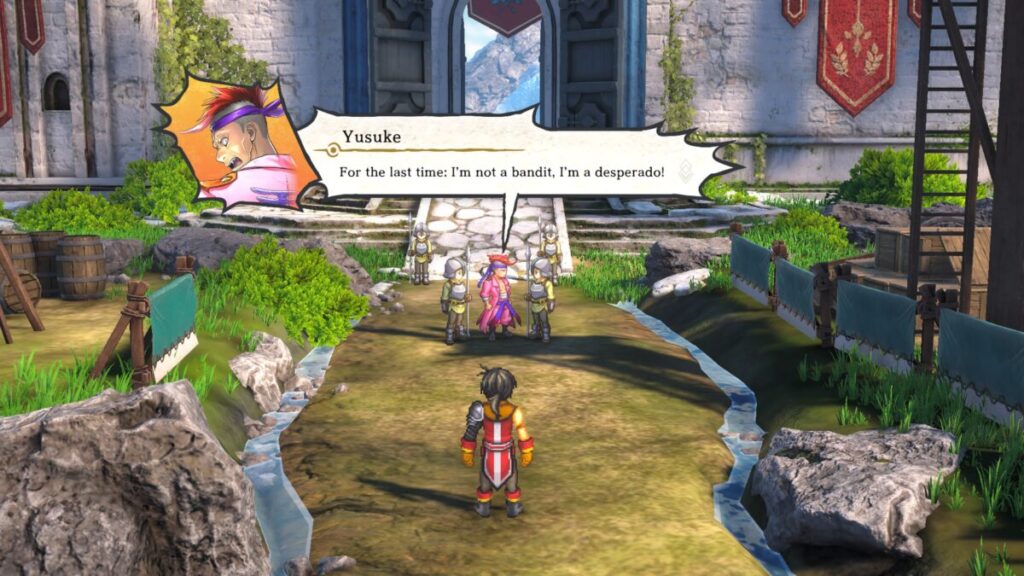
Yusuke
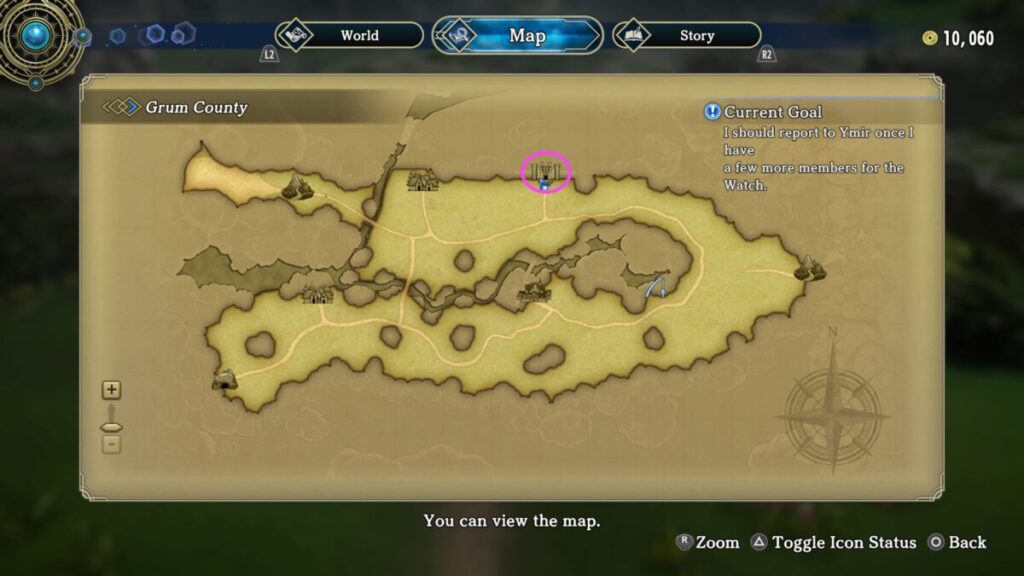
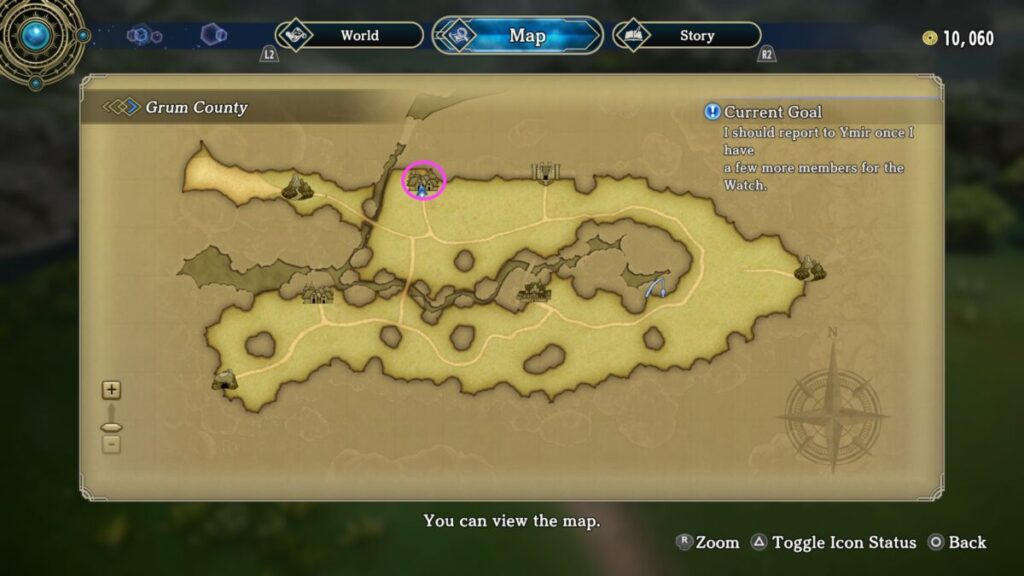
Return to Grum County then head to Fort Xialuke in the north.
Once inside, head forward down the linear path and interact with the man wearing a pink tench coat to trigger a cutscene after which you’ll be able to recruit Yusuke!
Yume and her Friend
Afterwards, head on over to Werne Village.
Werne Village Collectibles
Collectible Items
Faded Book Chapter 4 – Speak with the girl in the southeastern house which is situated between two shops
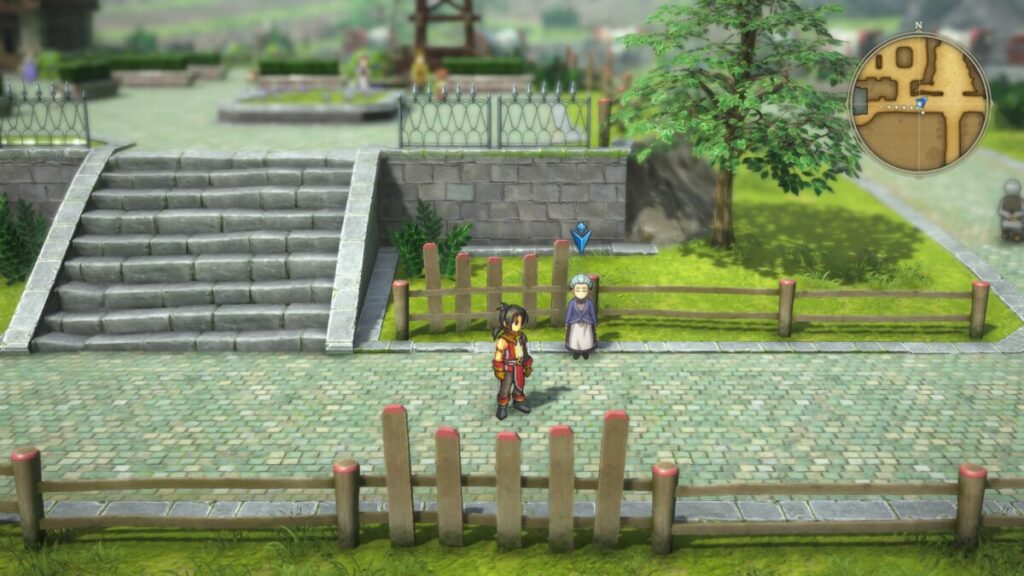
In Werne Village, speak with the Old Lady on the southern side of town to learn about her granddaughter, Yume.
Afterwards, exit town and head to Redthroat Ridge. Proceed forward a short way to find Yume and a monster. Interact with them and Yume and her “Friend” will join your ranks!
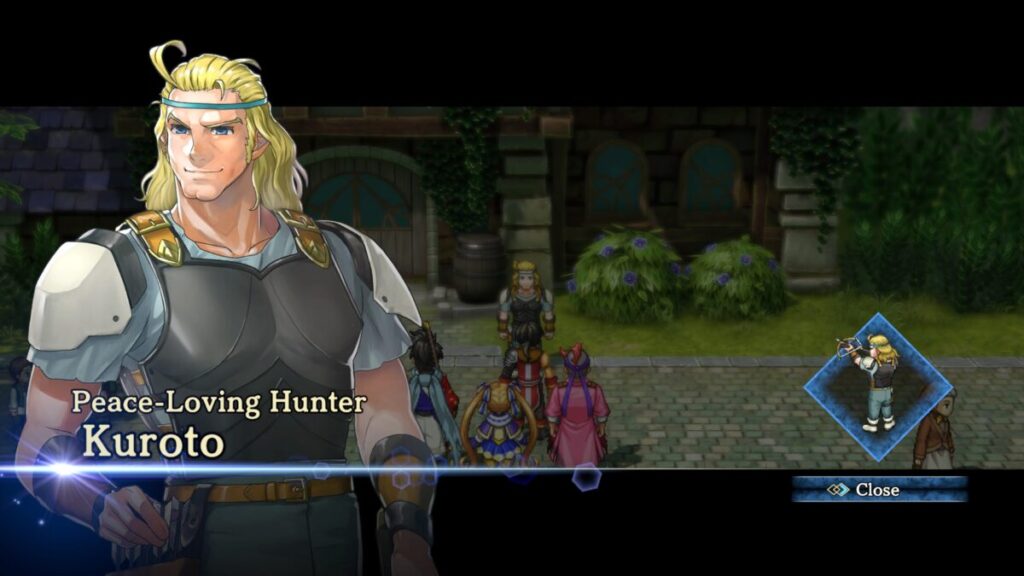
Kuroto
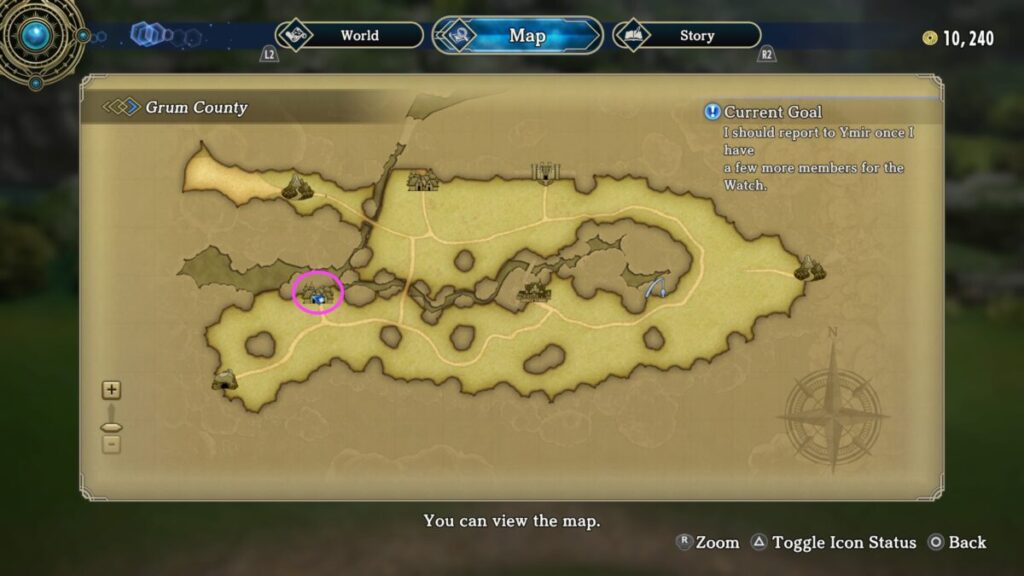
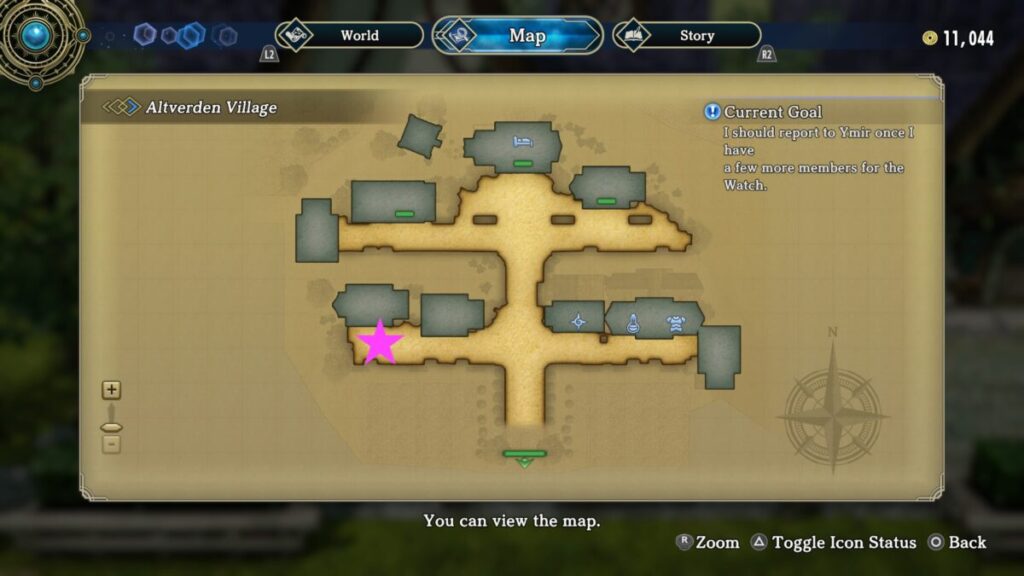
Next up, make your way to Altverden Village!
Once in the village, head to the southwestern corner where you’ll find Kuroto.
He’ll want you to find and hunt 3 Wild Boar. Speak with him again as you’ve most likely have fought some already. If you’ve somehow missed them, you can find them at Redthroat Ridge. After you speak with him again, he’ll join your party.
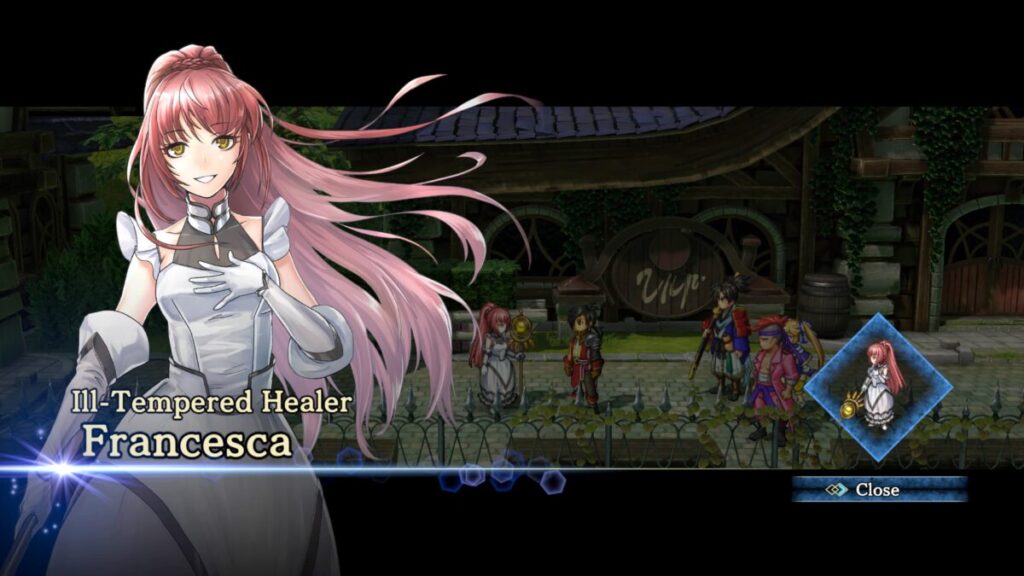
Francesca
Before leaving this town, make your way to the northeastern corner of the map to encounter Francesca.
After the cutscene, you’ll be able to recruit her.
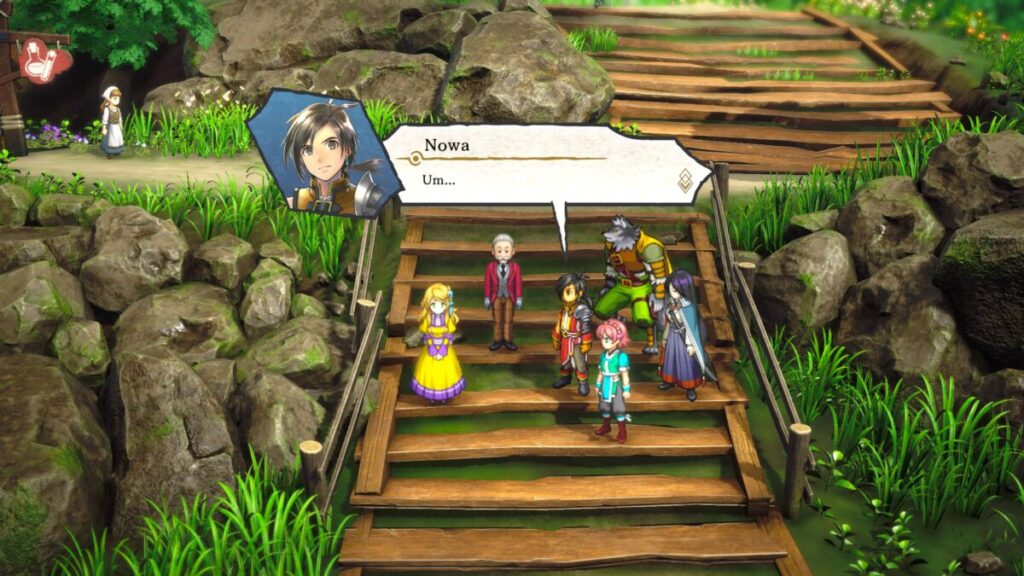
Return to Ymir
Now that you have everyone, return to the Hero’s Den in Eltisweiss where you’ll encounter Sabine yet again. After her ominous warning, approach Ymir to trigger a cutscene! Afterwards, The Watch Captain’s First Job will then conclude!
Eiyuden Chronicle Hundred Heroes Guides and Walkthroughs
For the next walkthrough on the Catch the Criminals main quest, click here! For other Eiyuden Chronicle: Hundred Heroes guides and walkthroughs, click here!
Welcome to NGB and our Eiyuden Chronicle: Hundred Heroes walkthrough for the First Mission main quest. Here you’ll find everything you’ll need to easily breeze through this quest.
At the start of Eiyuden Chronicle: Hundred Heroes, Garr, Lian and Mio will join your party! Make your way up to the northeastern side of Arenside to reach the manor. Along the way, a cutscene with Perrielle will trigger.
Afterwards, continue heading up the stairs towards the manor. Once inside, head up the stairs and speak with the duo at the top to be introduced to Hildi and Seign.
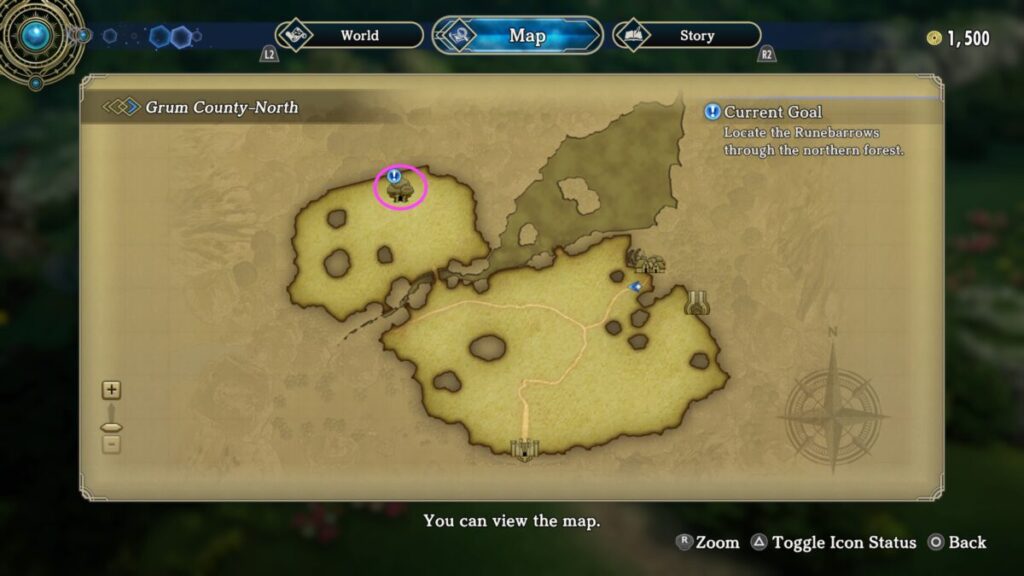
Locate the Runebarrows through the northern forest
Now the town’s amenities will open up for you to explore! If you’d like to check them out, head down the stairs and make your way over to the Inn/General Store. Speak with the guy at the counter to stay at the inn for 300 baqua or save your game. Speak with the girl on the right side of the counter if you wish to purchase some items for your upcoming adventure!
Arenside Collectibles
Animals – I Love Animals Trophy
Komugi (cat) – Just east of the Inn / General Store
Ganmo (mouse) – In front of the stables
Melon (raccoon) – Southeastern side of town in Imperial Soldier’s encampment
Once you’re ready to continue with the story, exit Arenside via the southern exit to find yourself in Grum County-North. Once in Grum County-North, make your way to the northwestern side of the area where you’ll find the Northern Forest.
Grum County-North Collectibles
Enemies
Rabbit Knight
Plantvine
Northern Forest Collectibles
Enemies
Huge Mite
Plantvine
Rabbit Knight
Rabbit Wizard
Forest Eater (boss)
Collectible Materials
Lumber
Chests
Healing Herb x6
Ruby Ring
400 Baqua
Revival Medicine x2
Tricorne Hat
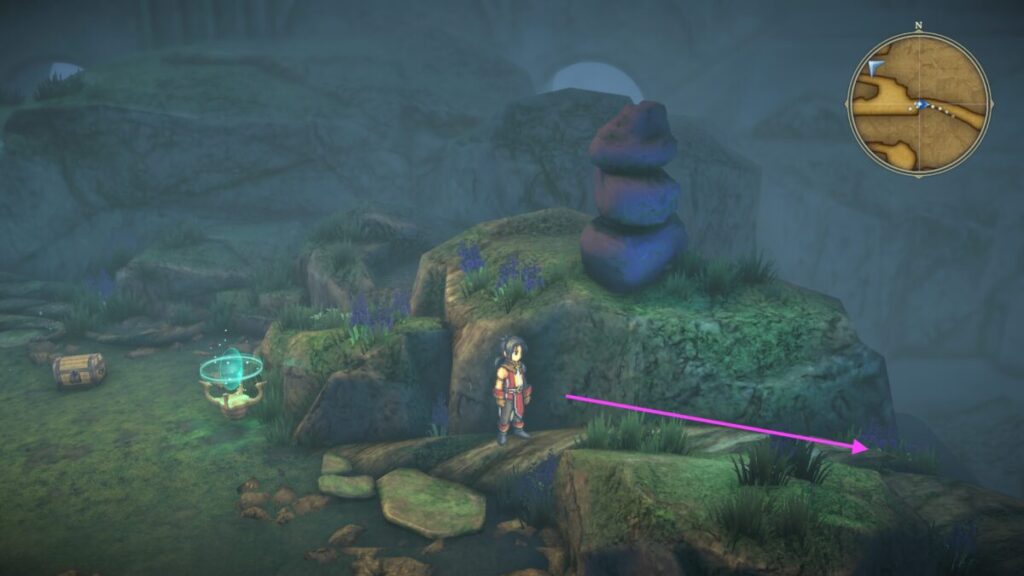
As you make your way through the Northern Forest, you’ll come across a weird looking device.
Interact with it to trigger some dialog then continue forward up the vine. When you reach the misty area of Northern Forest 2, you’ll need to keep heading up a long vine. On this vine, a scene will trigger where you’ll be teleported back to the shrine you previously found. Re-enter the misty area and head down the small path to the east of the save point.
At the end of this path, a cutscene will trigger during which Mio will spot that something’s amiss. Take out the Forest Eater that drops from above. After the fight, interact with the shrine like device and all the mist will clear! Return up the vine that had previously teleported you to find that it will no longer do such a thing. Continue to the top to find the door to the Runebarrows!
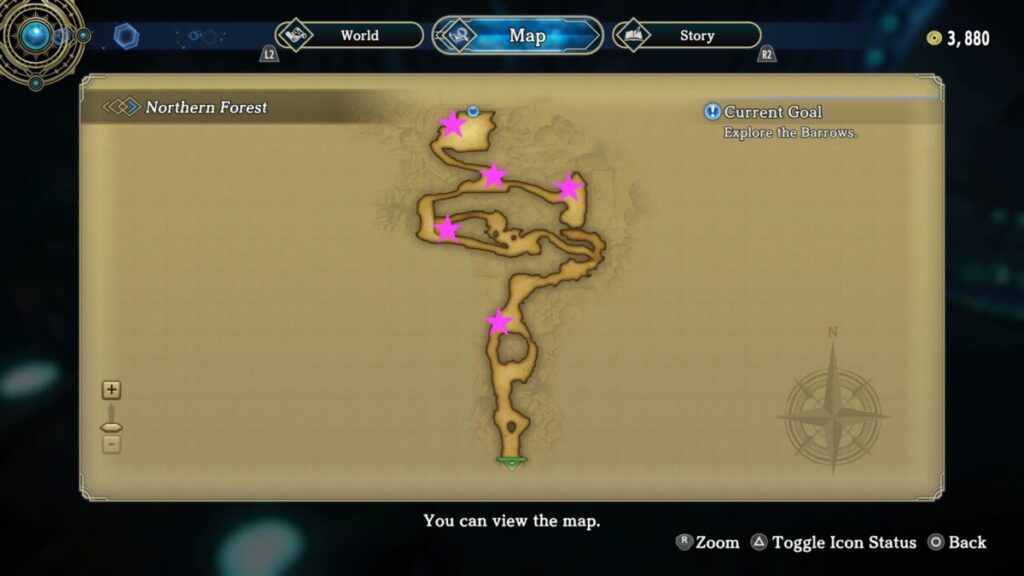
Explore the barrows
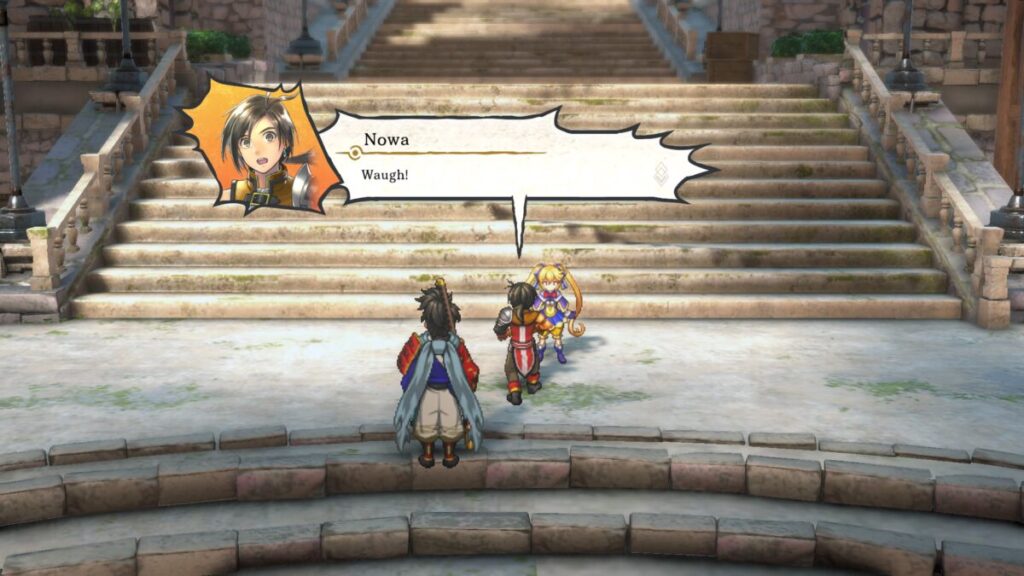
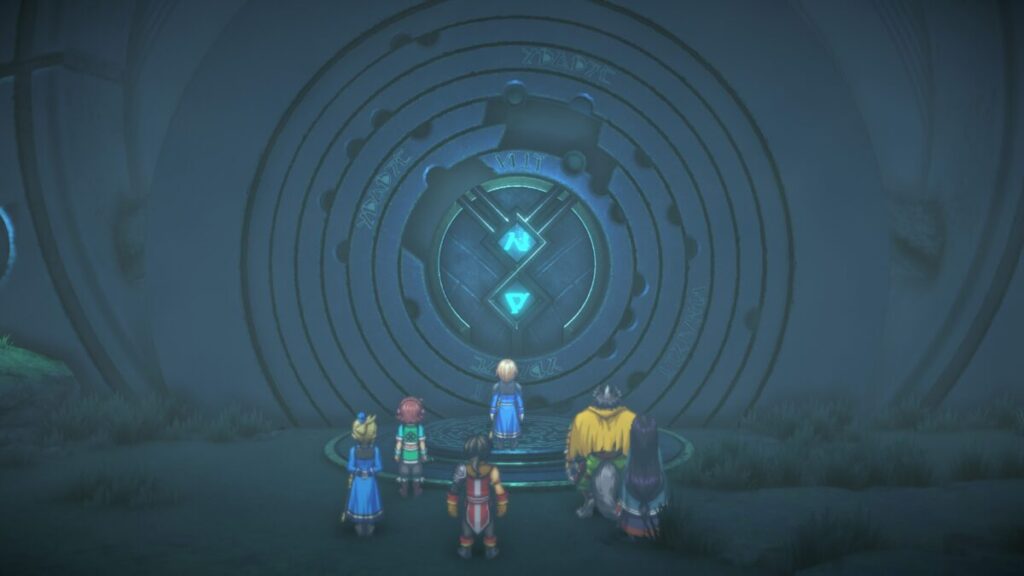
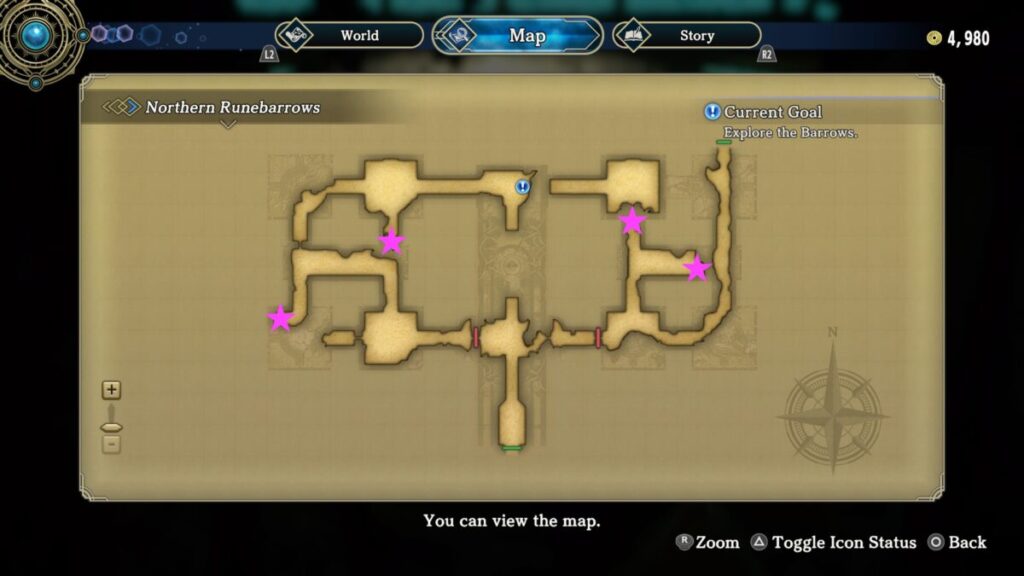
With the door now open, head inside the North Runebarrows. Stand on the left circular platform before the sealed door to trigger a cutscene during which Nowa will open it! After stepping inside, the door will seal shut behind you.
North Runebarrows Collectibles
Enemies
Golem Cleaner
Golem Pulverizer
Huge Mite
Spy Orb
Wandering Golem
Chests
400 Baqua
400 Baqua
Healing Herb x6
Bronze Mail
Revival Medicine
400 Baqua
Proceed through this area until you reach a device that will allow a new door to be opened. Interact with it again to get the sequence needed to open said door! Next, head west to reach this new door! Step on the 3 platforms in the following order: circle, triangle, square! Afterwards, head through the newly opened door and continue through the area until you reach some rubble where a cutscene will trigger.
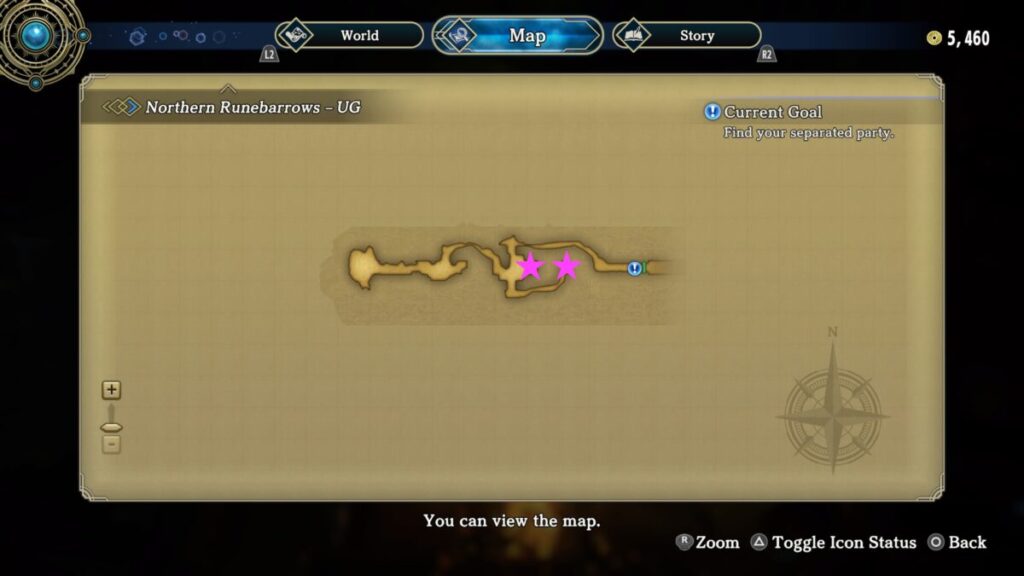
Find your separated party
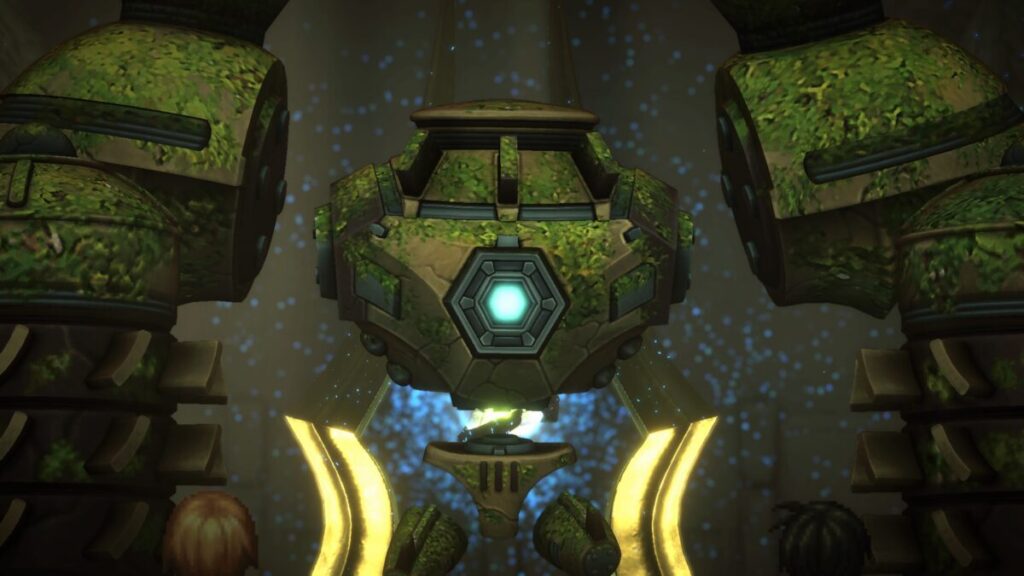
When you gain control continue through the barrow with just Nowa and Seign. As you make your way through the area, you’ll get a tutorial for Hero Combos. Continue through the area until you reach another platform to step on. This will of course allow another door to be opened. Before leaving, interact with it once more to get the sequence. Afterwards, head to the southwestern door and interact with the platforms in the following order: square, circle, triangle. Head through the newly opened door to reach the entrance where a cutscene will trigger. Afterwards, you’ll have a boss fight against the Golem Pulverizer!
Thankfully after you deal some damage, the rest of your party will show up! Take it out to trigger a cutscene!
Afterwards
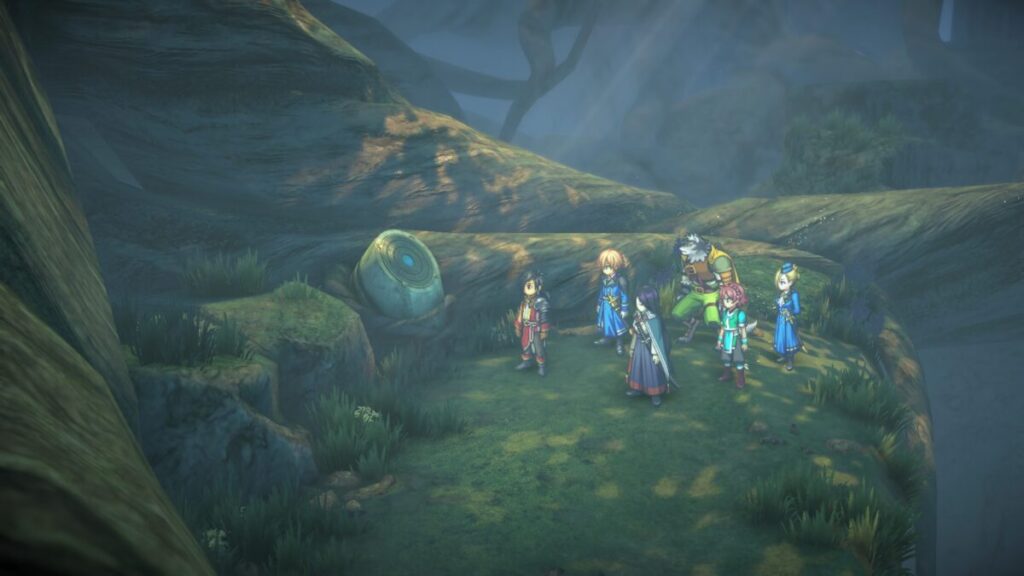
When the cutscene concludes, you’ll find yourself in the Hero’s Den. Speak with Garr and agree to be acting team captain! Afterwards, the party will then speak to Ymir!
Eiyuden Chronicle Hundred Heroes Guides and Walkthroughs
For the next walkthrough on The Watch Captain’s First Job main quest, click here! For other Eiyuden Chronicle: Hundred Heroes guides and walkthroughs, click here!
Welcome to NGB and our Dead Island 2 SoLA DLC guide on where to find the Gin & Lemon Key. In Dead Island 2, these keys can be found as a collectible around the world or dropped from zombies. Upon acquiring a key, you gain access to a specific lockbox, door or chest filled with valuable loot waiting for you to claim it as your own. Don’t miss out on these opportunities to enhance your gameplay experience and gear up for the challenges ahead!
Gin & Lemon Key Location
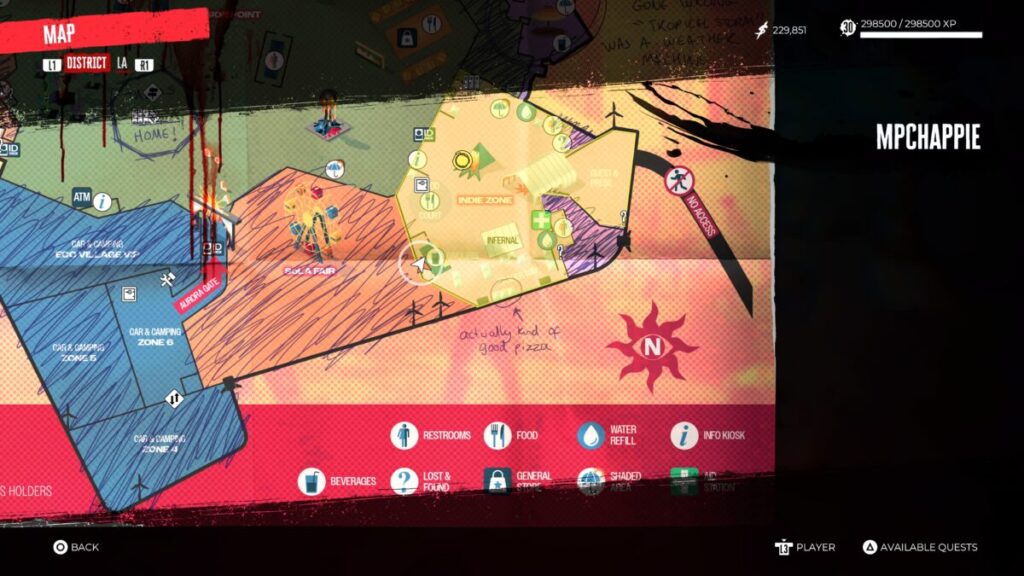
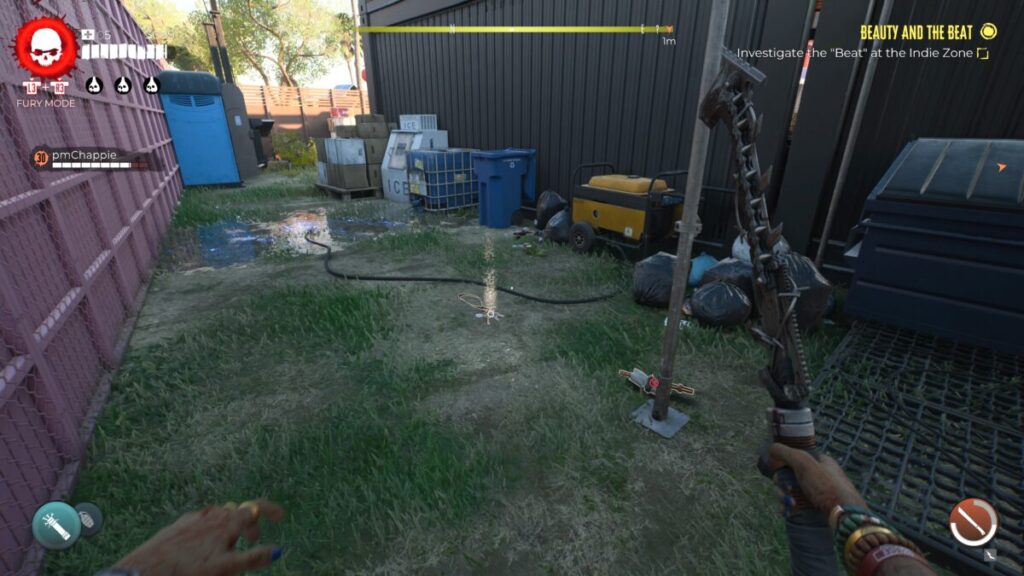
To find the Gin & Lemon Key in Dead Island 2’s SoLA DLC, travel to the southwestern side of the Indie Zone.
Once there, you’ll find this key on the ground next to a generator.
Dead Island 2 SoLA DLC Guides and Walkthroughs
For more Dead Island 2 SoLA DLC guides and walkthroughs, click here!
Welcome to NGB and our Dead Island 2 SoLA DLC guide on where to find the Stage Manager’s Keys, which is used to open the Production Toolbox. In Dead Island 2, these keys can be found as a collectible around the world or dropped from zombies. Upon acquiring a key, you gain access to a specific lockbox, door or chest filled with valuable loot waiting for you to claim it as your own. Don’t miss out on these opportunities to enhance your gameplay experience and gear up for the challenges ahead!
Stage Manager’s Keys Location
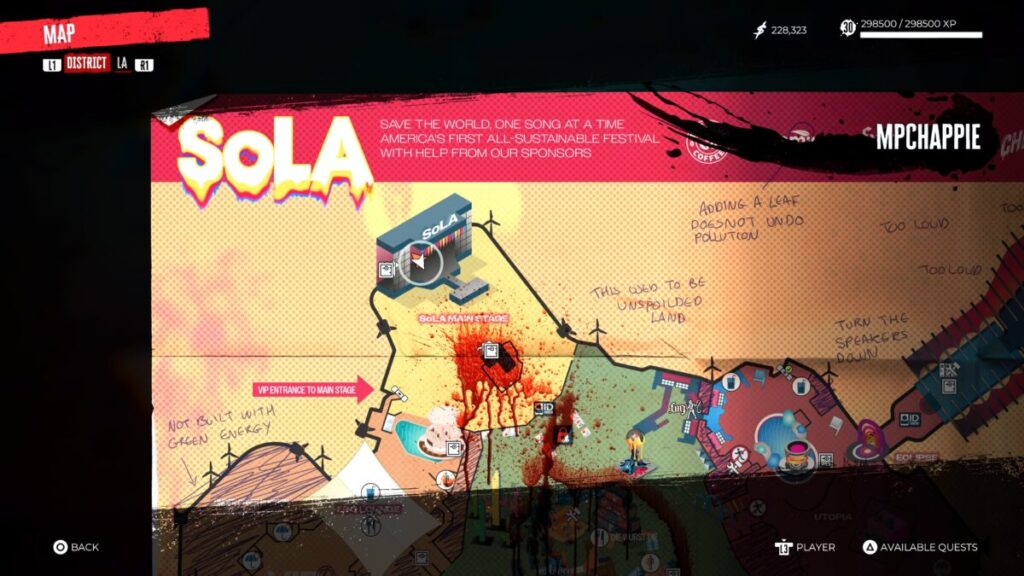
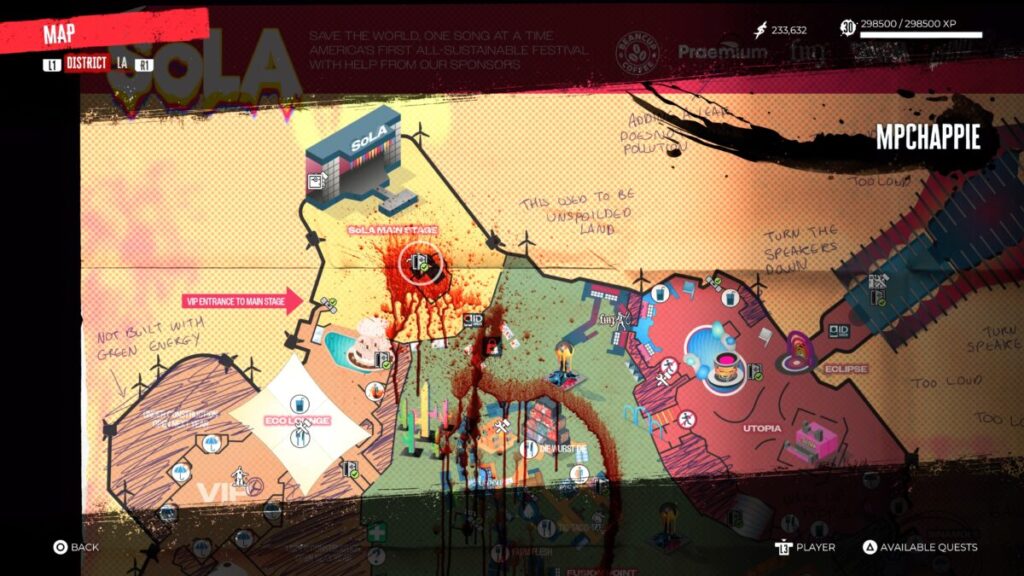
To find the Stage Manager’s Keys in Dead Island 2’s SoLA DLC, travel to the SoLA Main Stage.
Once there, you’ll find DJ Ry (who doesn’t drop anything) and the Stage Manager. Take them out then be sure to loot the Stage Manager’s Keys from where they fell.
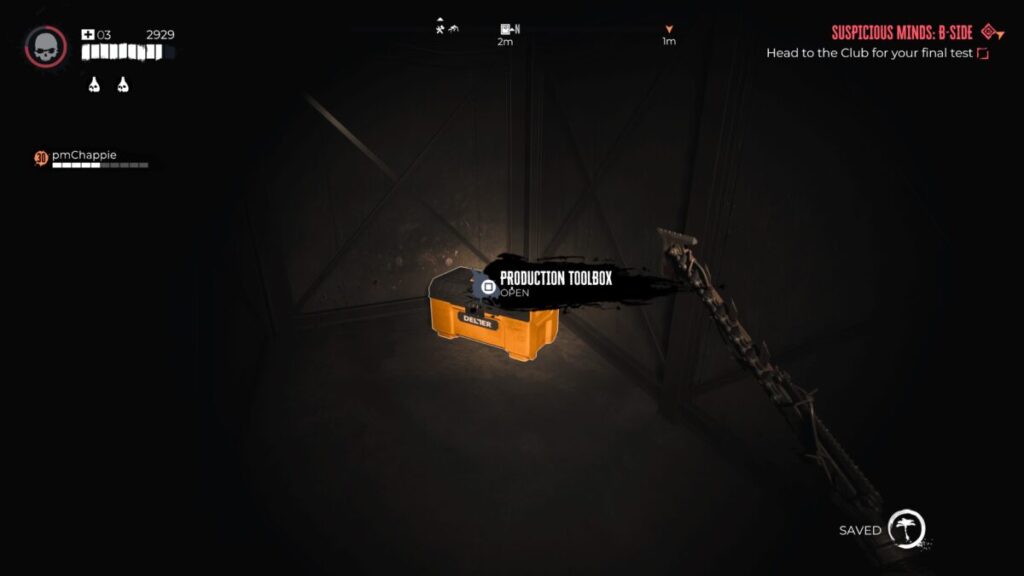
Production Toolbox Location
After finding the Stage Manager’s Keys, you’ll then need to locate the Production Toolbox to collect your loot! To find the Production Toolbox, travel to SoLA Main Stage.
Once there, head underneath the stage set up in the middle of the area to find the Production Toolbox.
Once you’ve located the toolbox, open it using the key to receive your goodies!
Dead Island 2 SoLA DLC Guides and Walkthroughs
For more Dead Island 2 SoLA DLC guides and walkthroughs, click here!
Search
This site uses cookies. By continuing to use this website, you are giving consent to cookies being used. For more information on cookies, view our Privacy Policy.OkPrivacy Policy