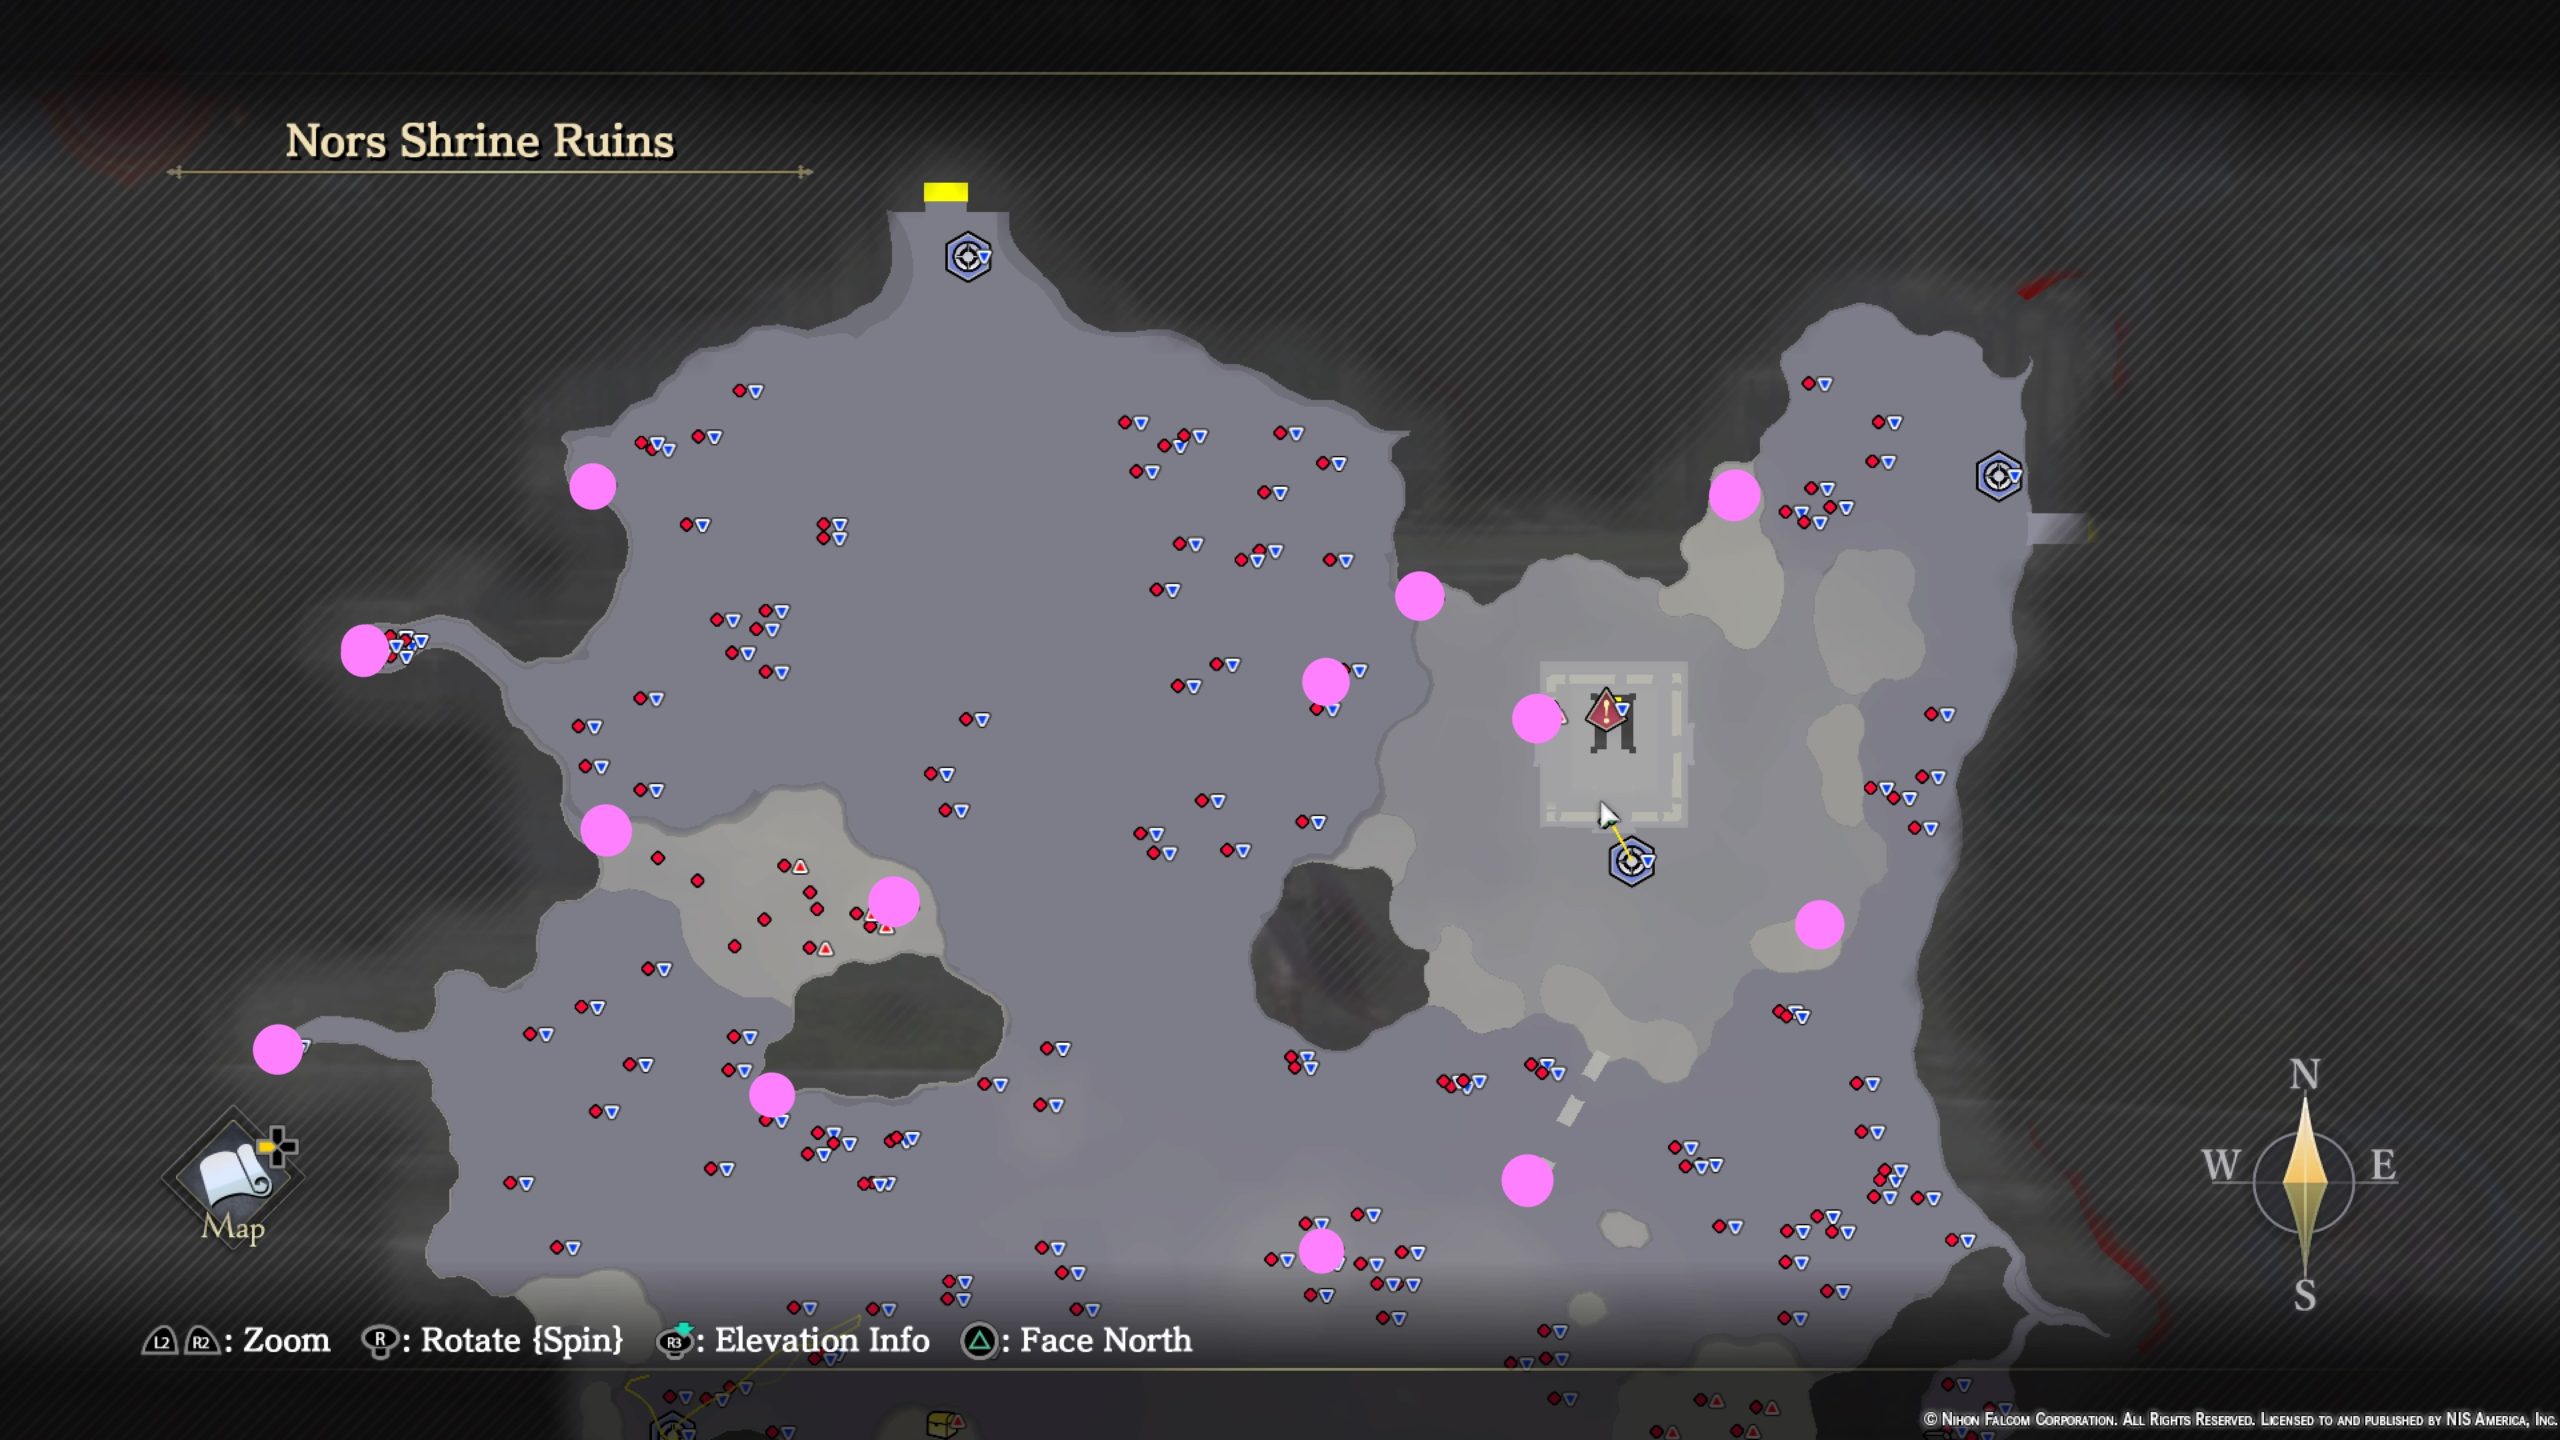
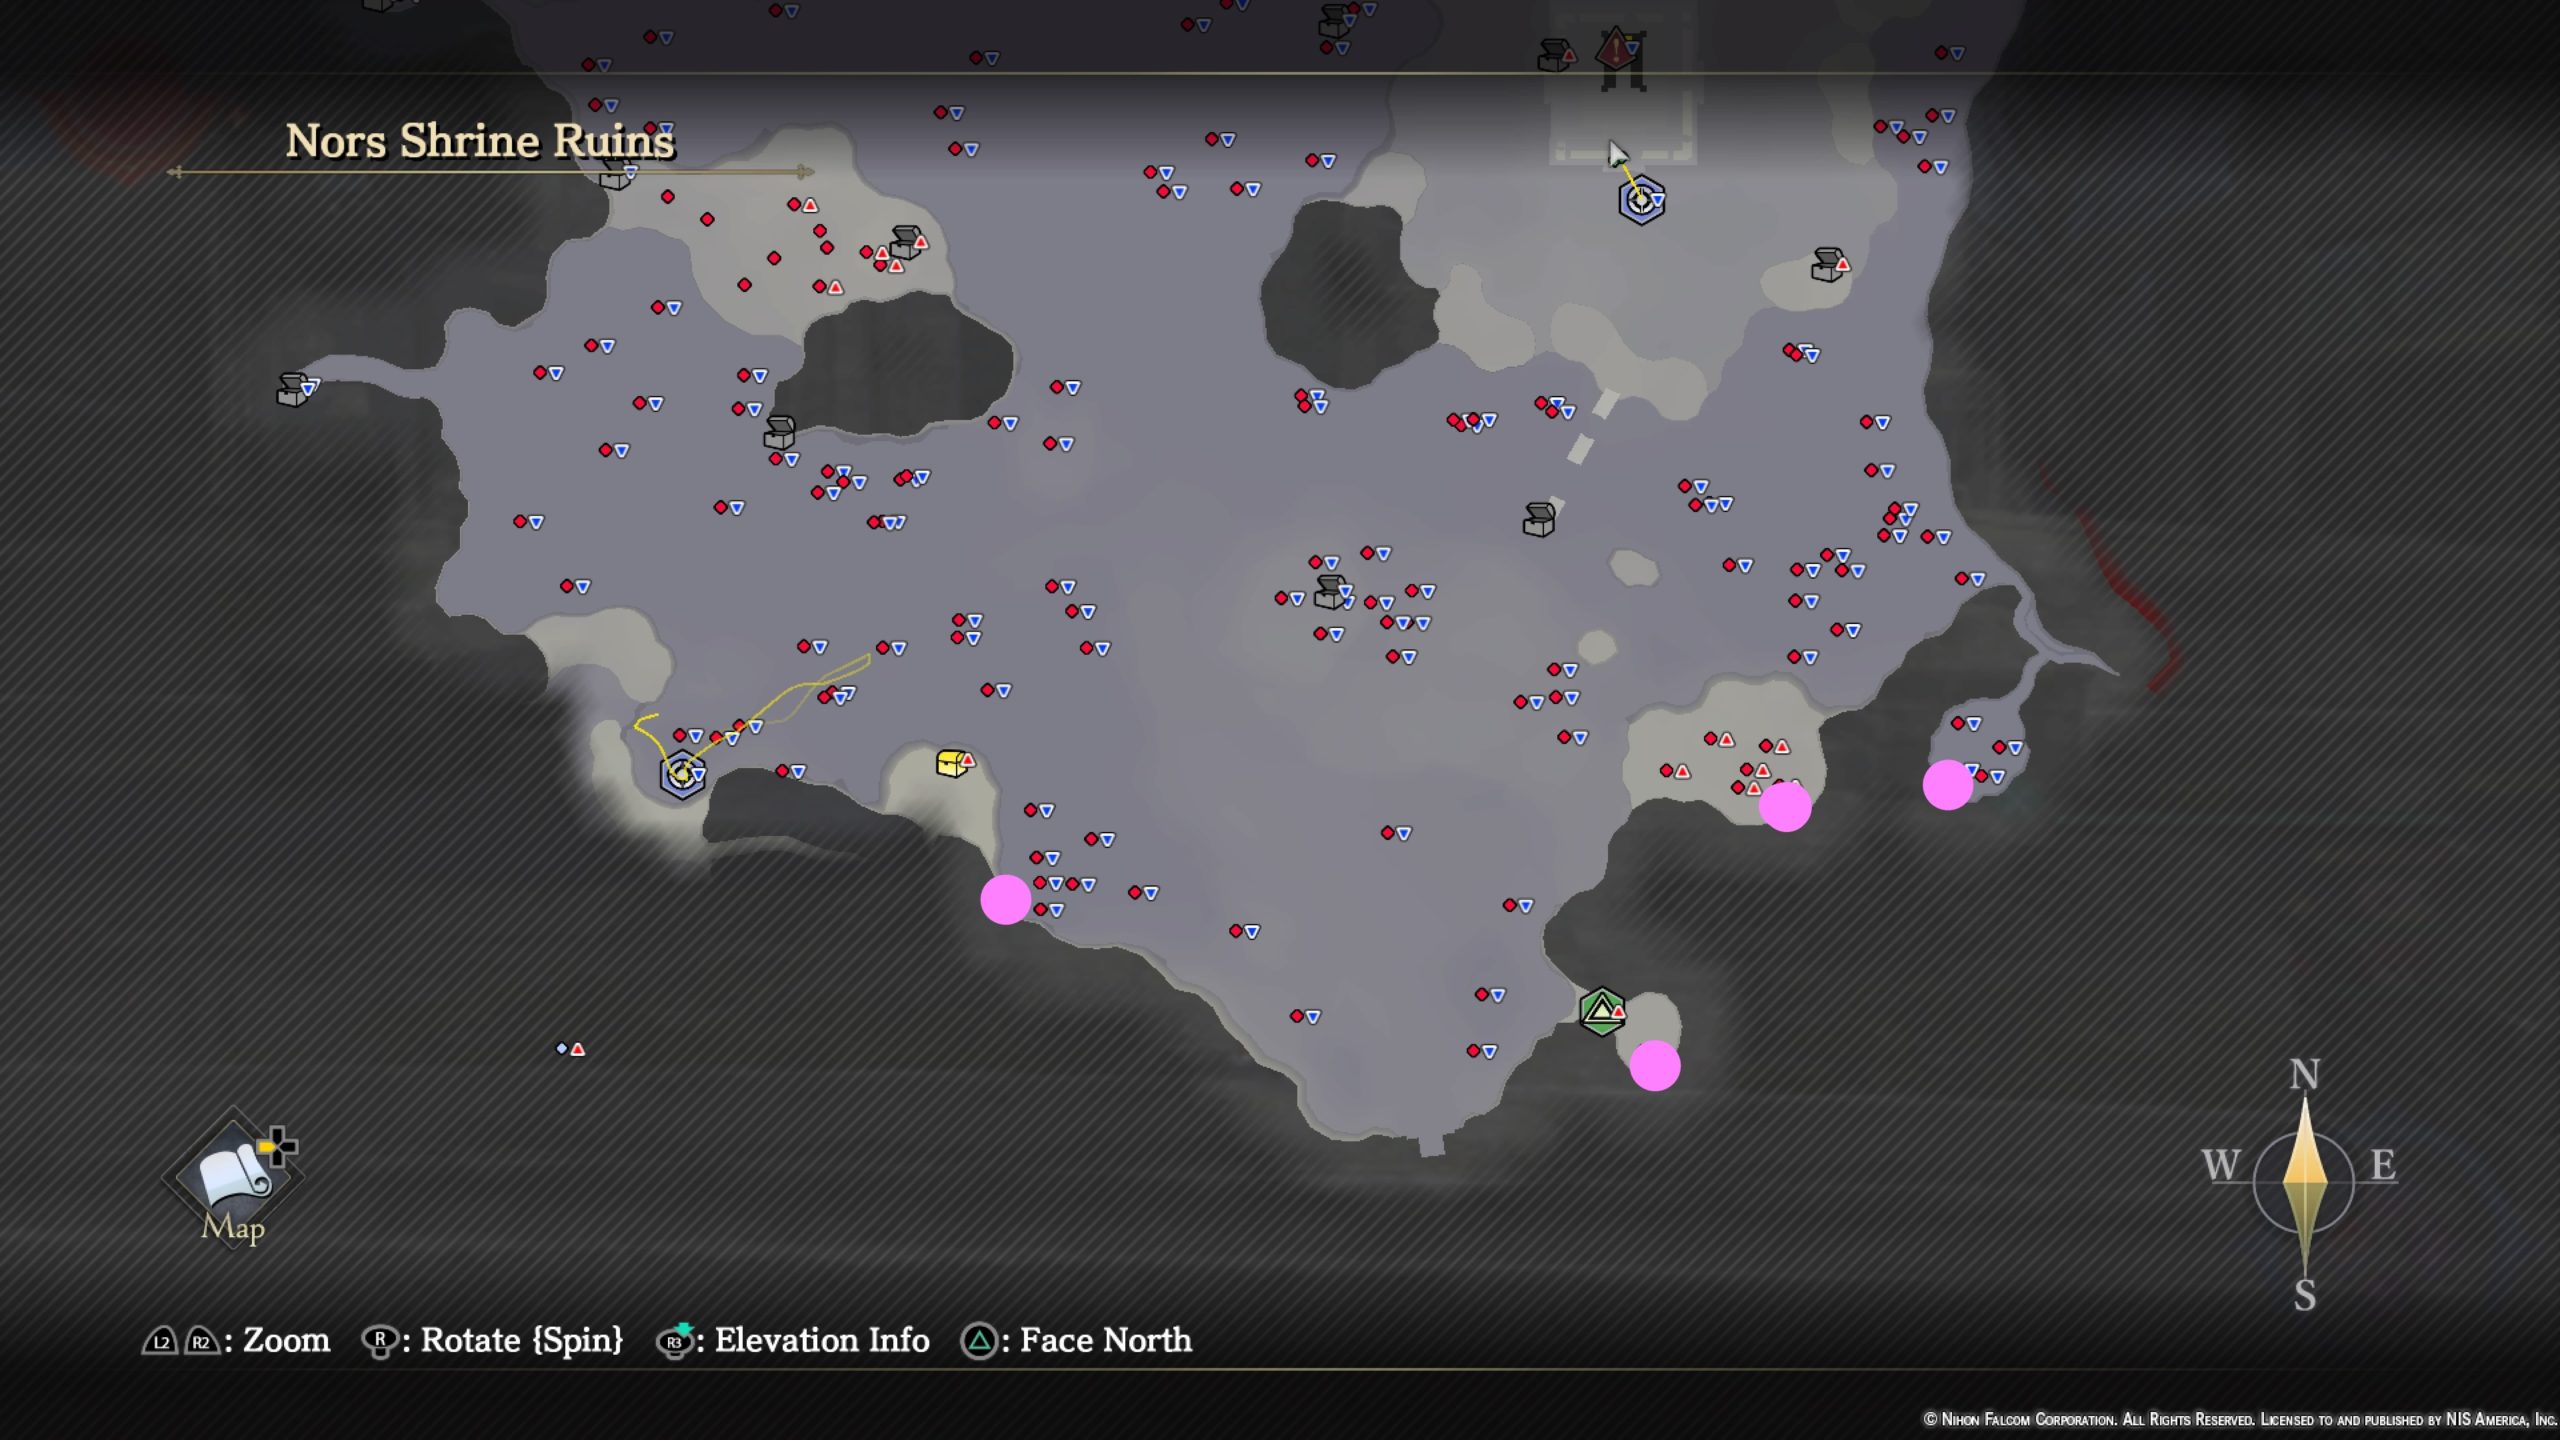
Below are the treasure chest locations in Ys IX: Monstrum Nox for the Seeker of Fortune trophy!
Agricultural District

- Glossy Leaf x2
- Flour x5
- Potato x5
- Strength Elixir
- Reachable after obtaining the White Cat
Balduq Cemetery
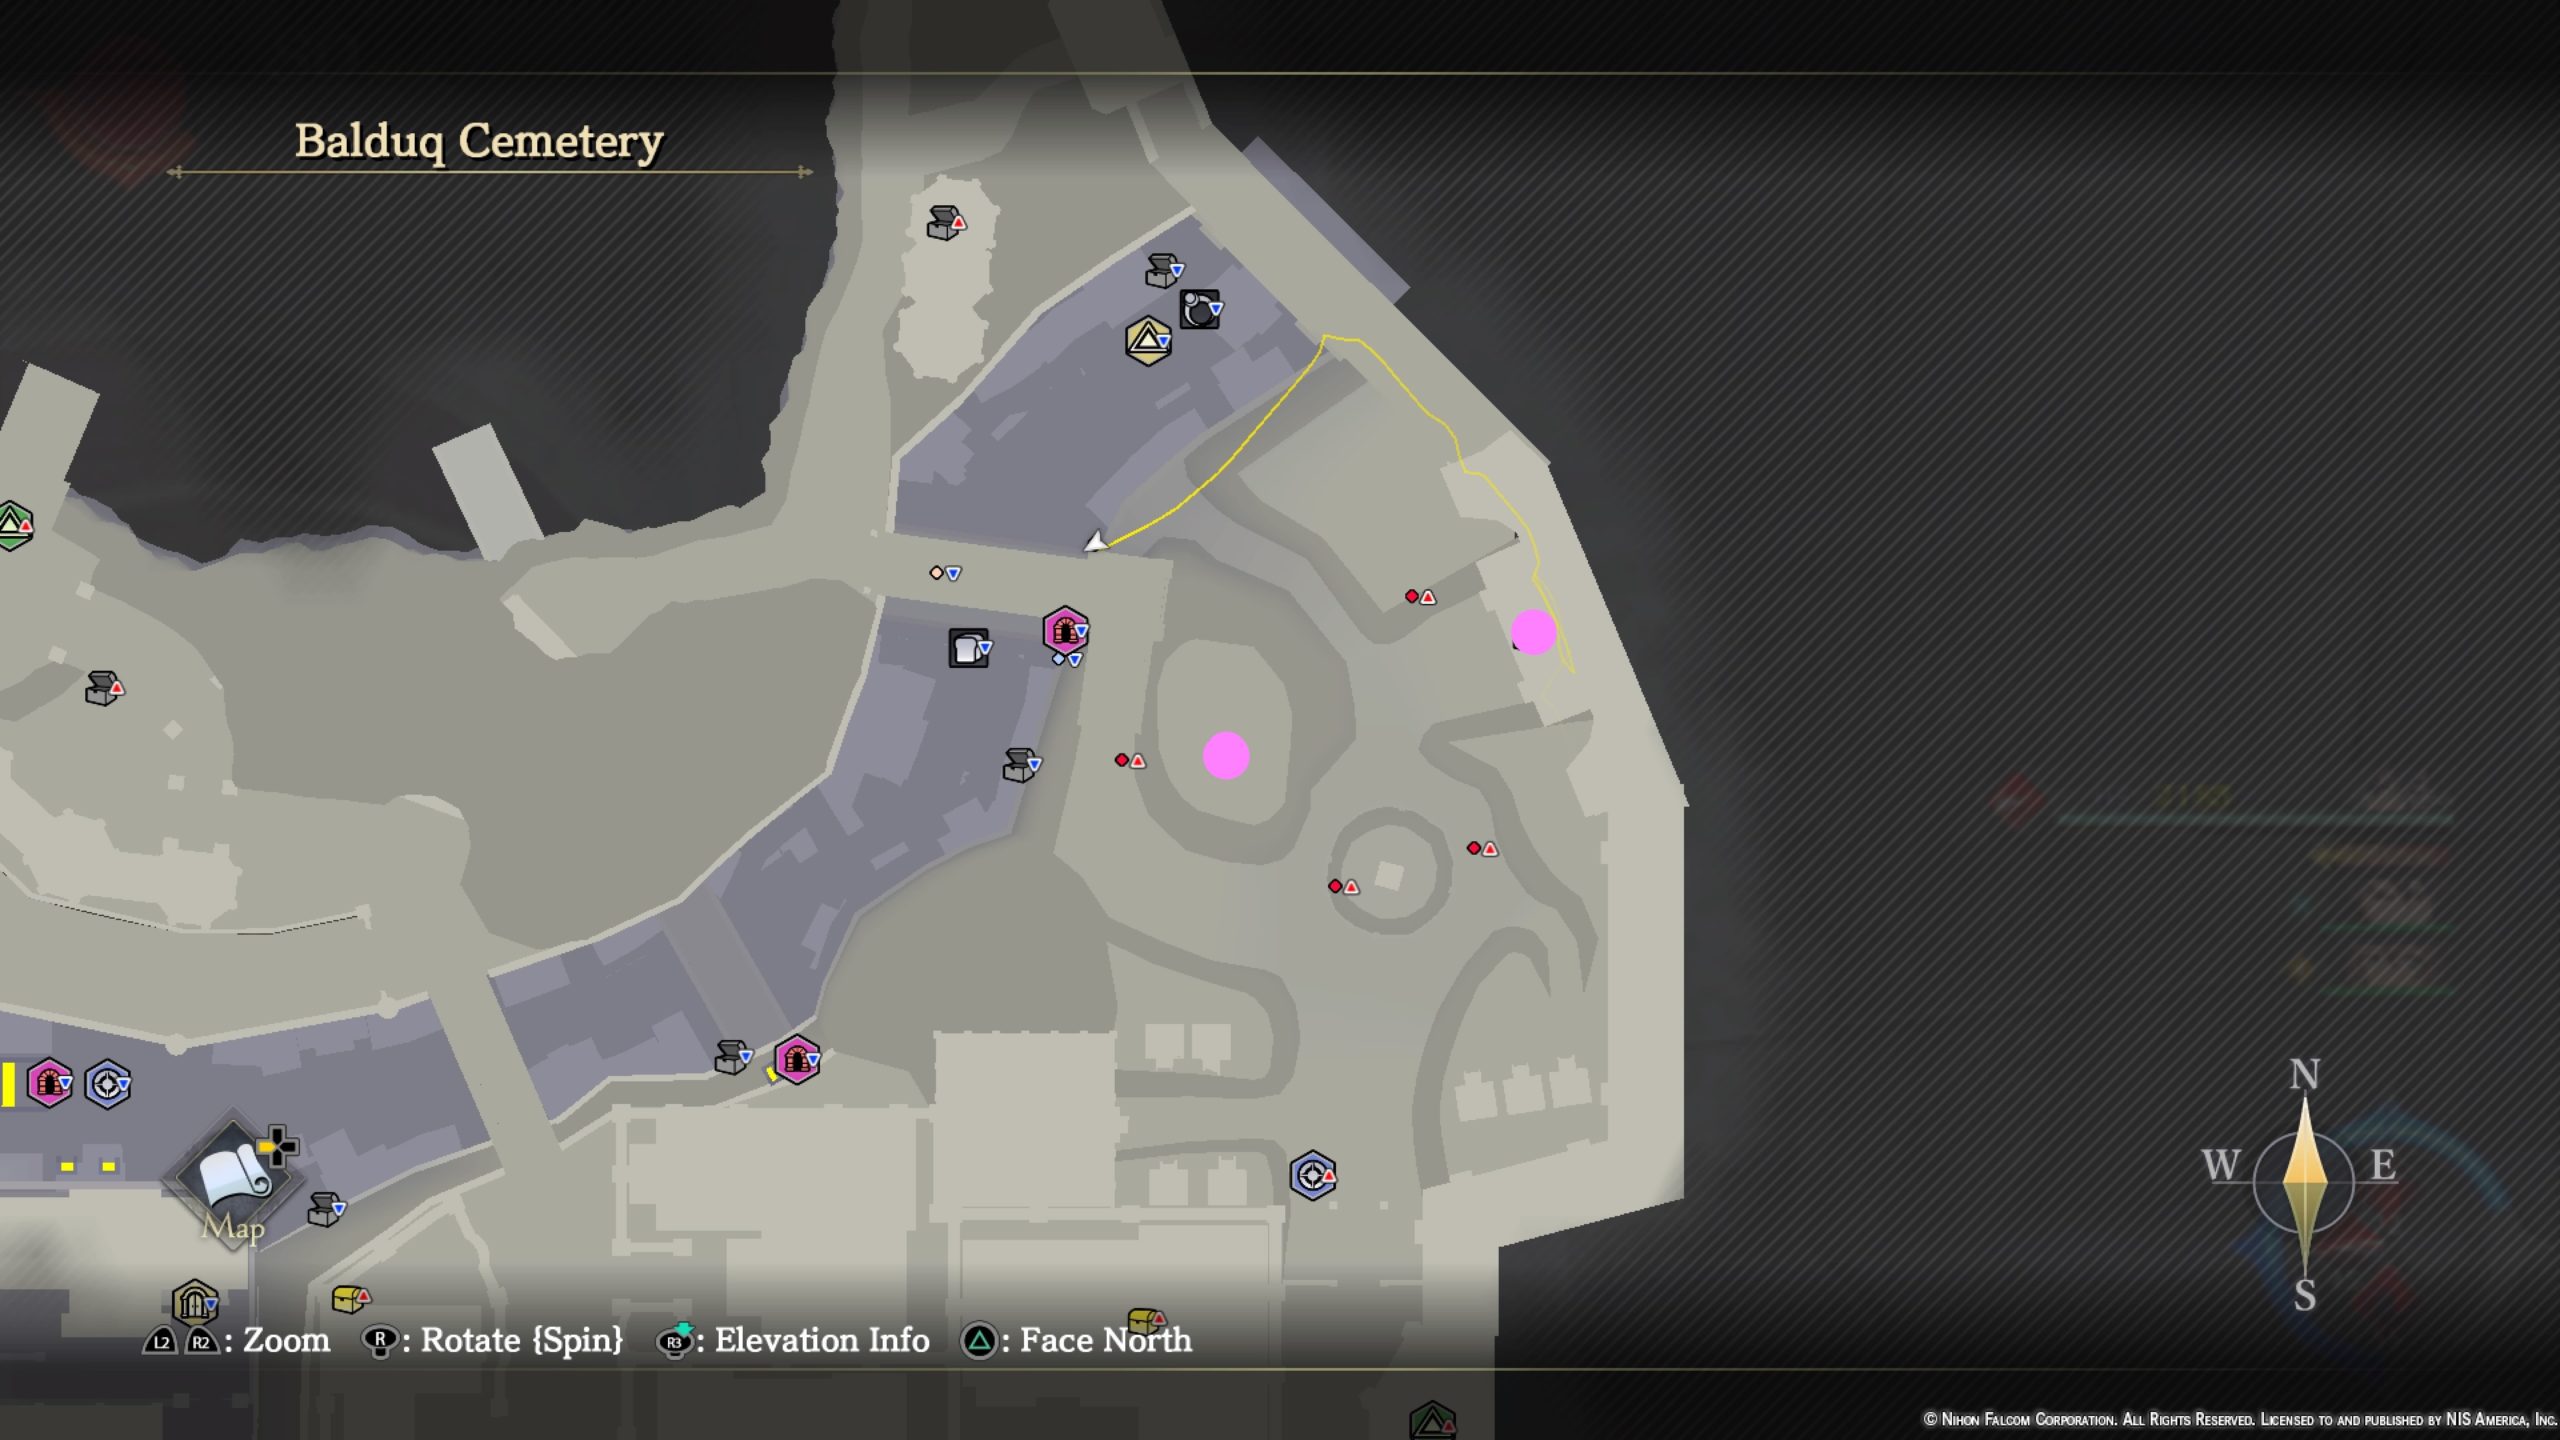
- Dry-aged Meat x2
- Tonic x2
Balduq Fortress – Abyss

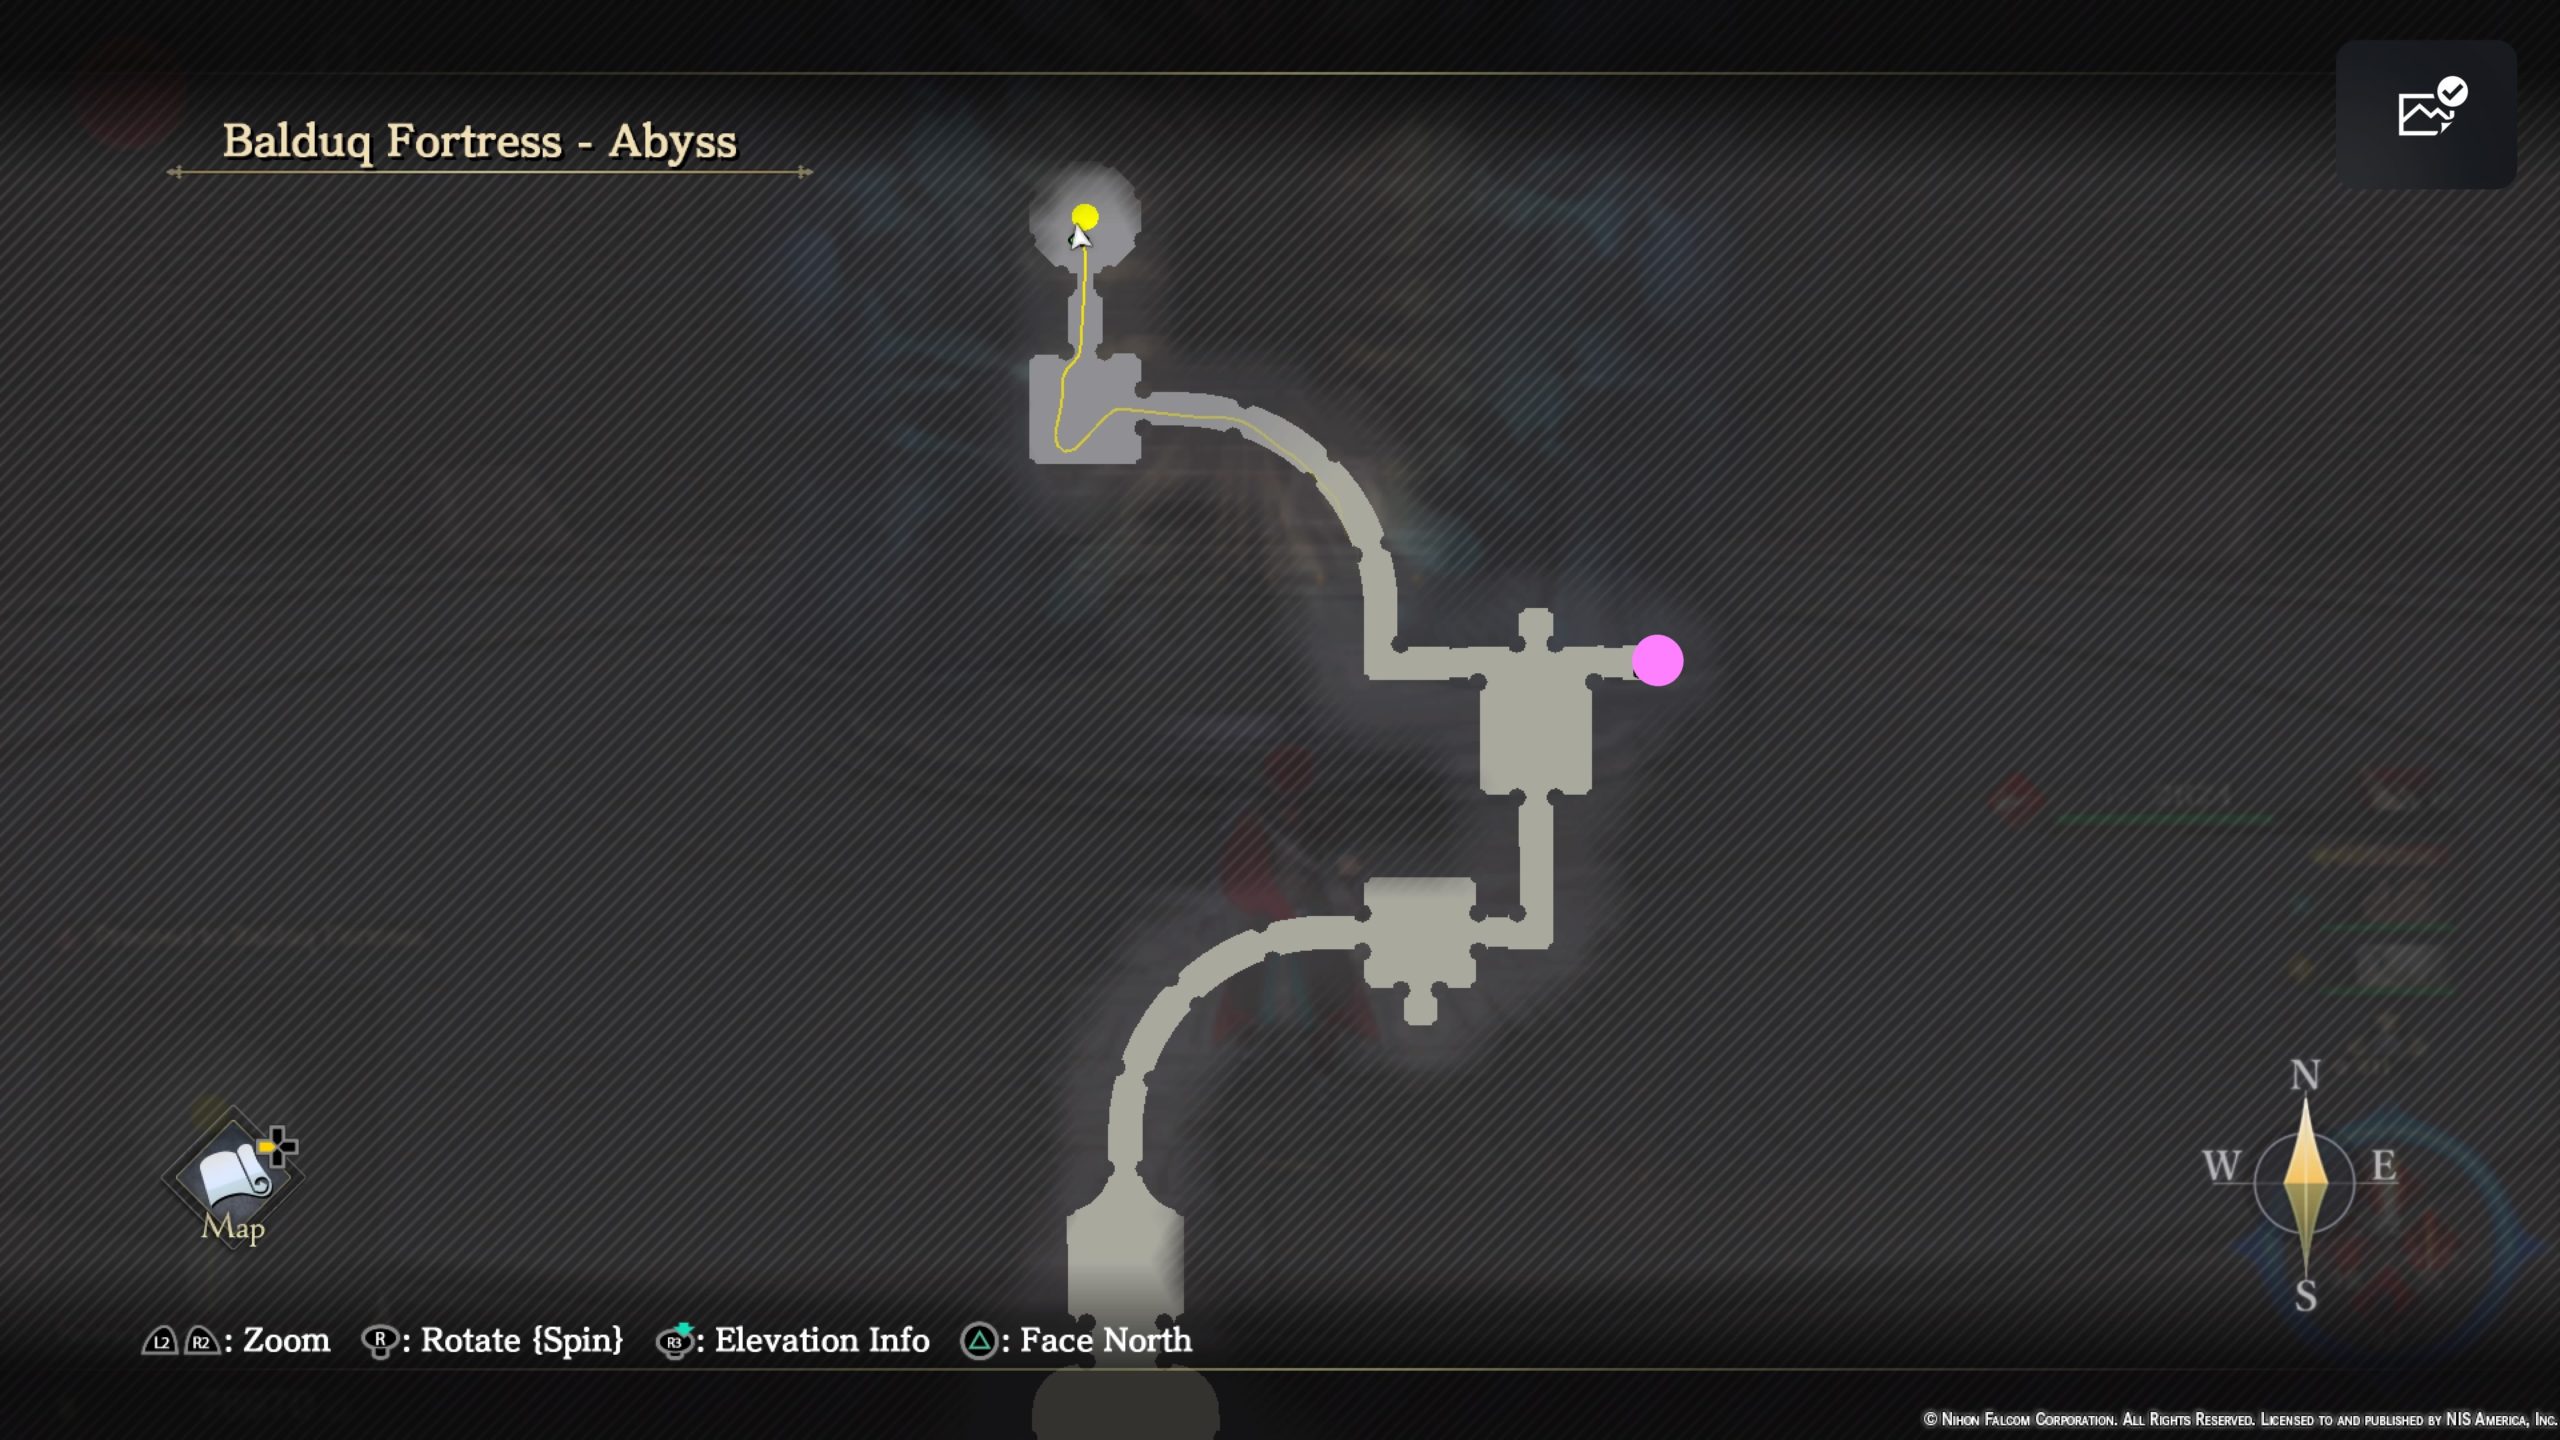
- Sacred Branch x4
- Verdant Leaf x4
- Sol Spar x4
- Polar Night Drop x4
- Sovereign’s Shawl
- Night Lord’s Belt
- Imperator’s Bandana
Balduq Fortress – Nexus
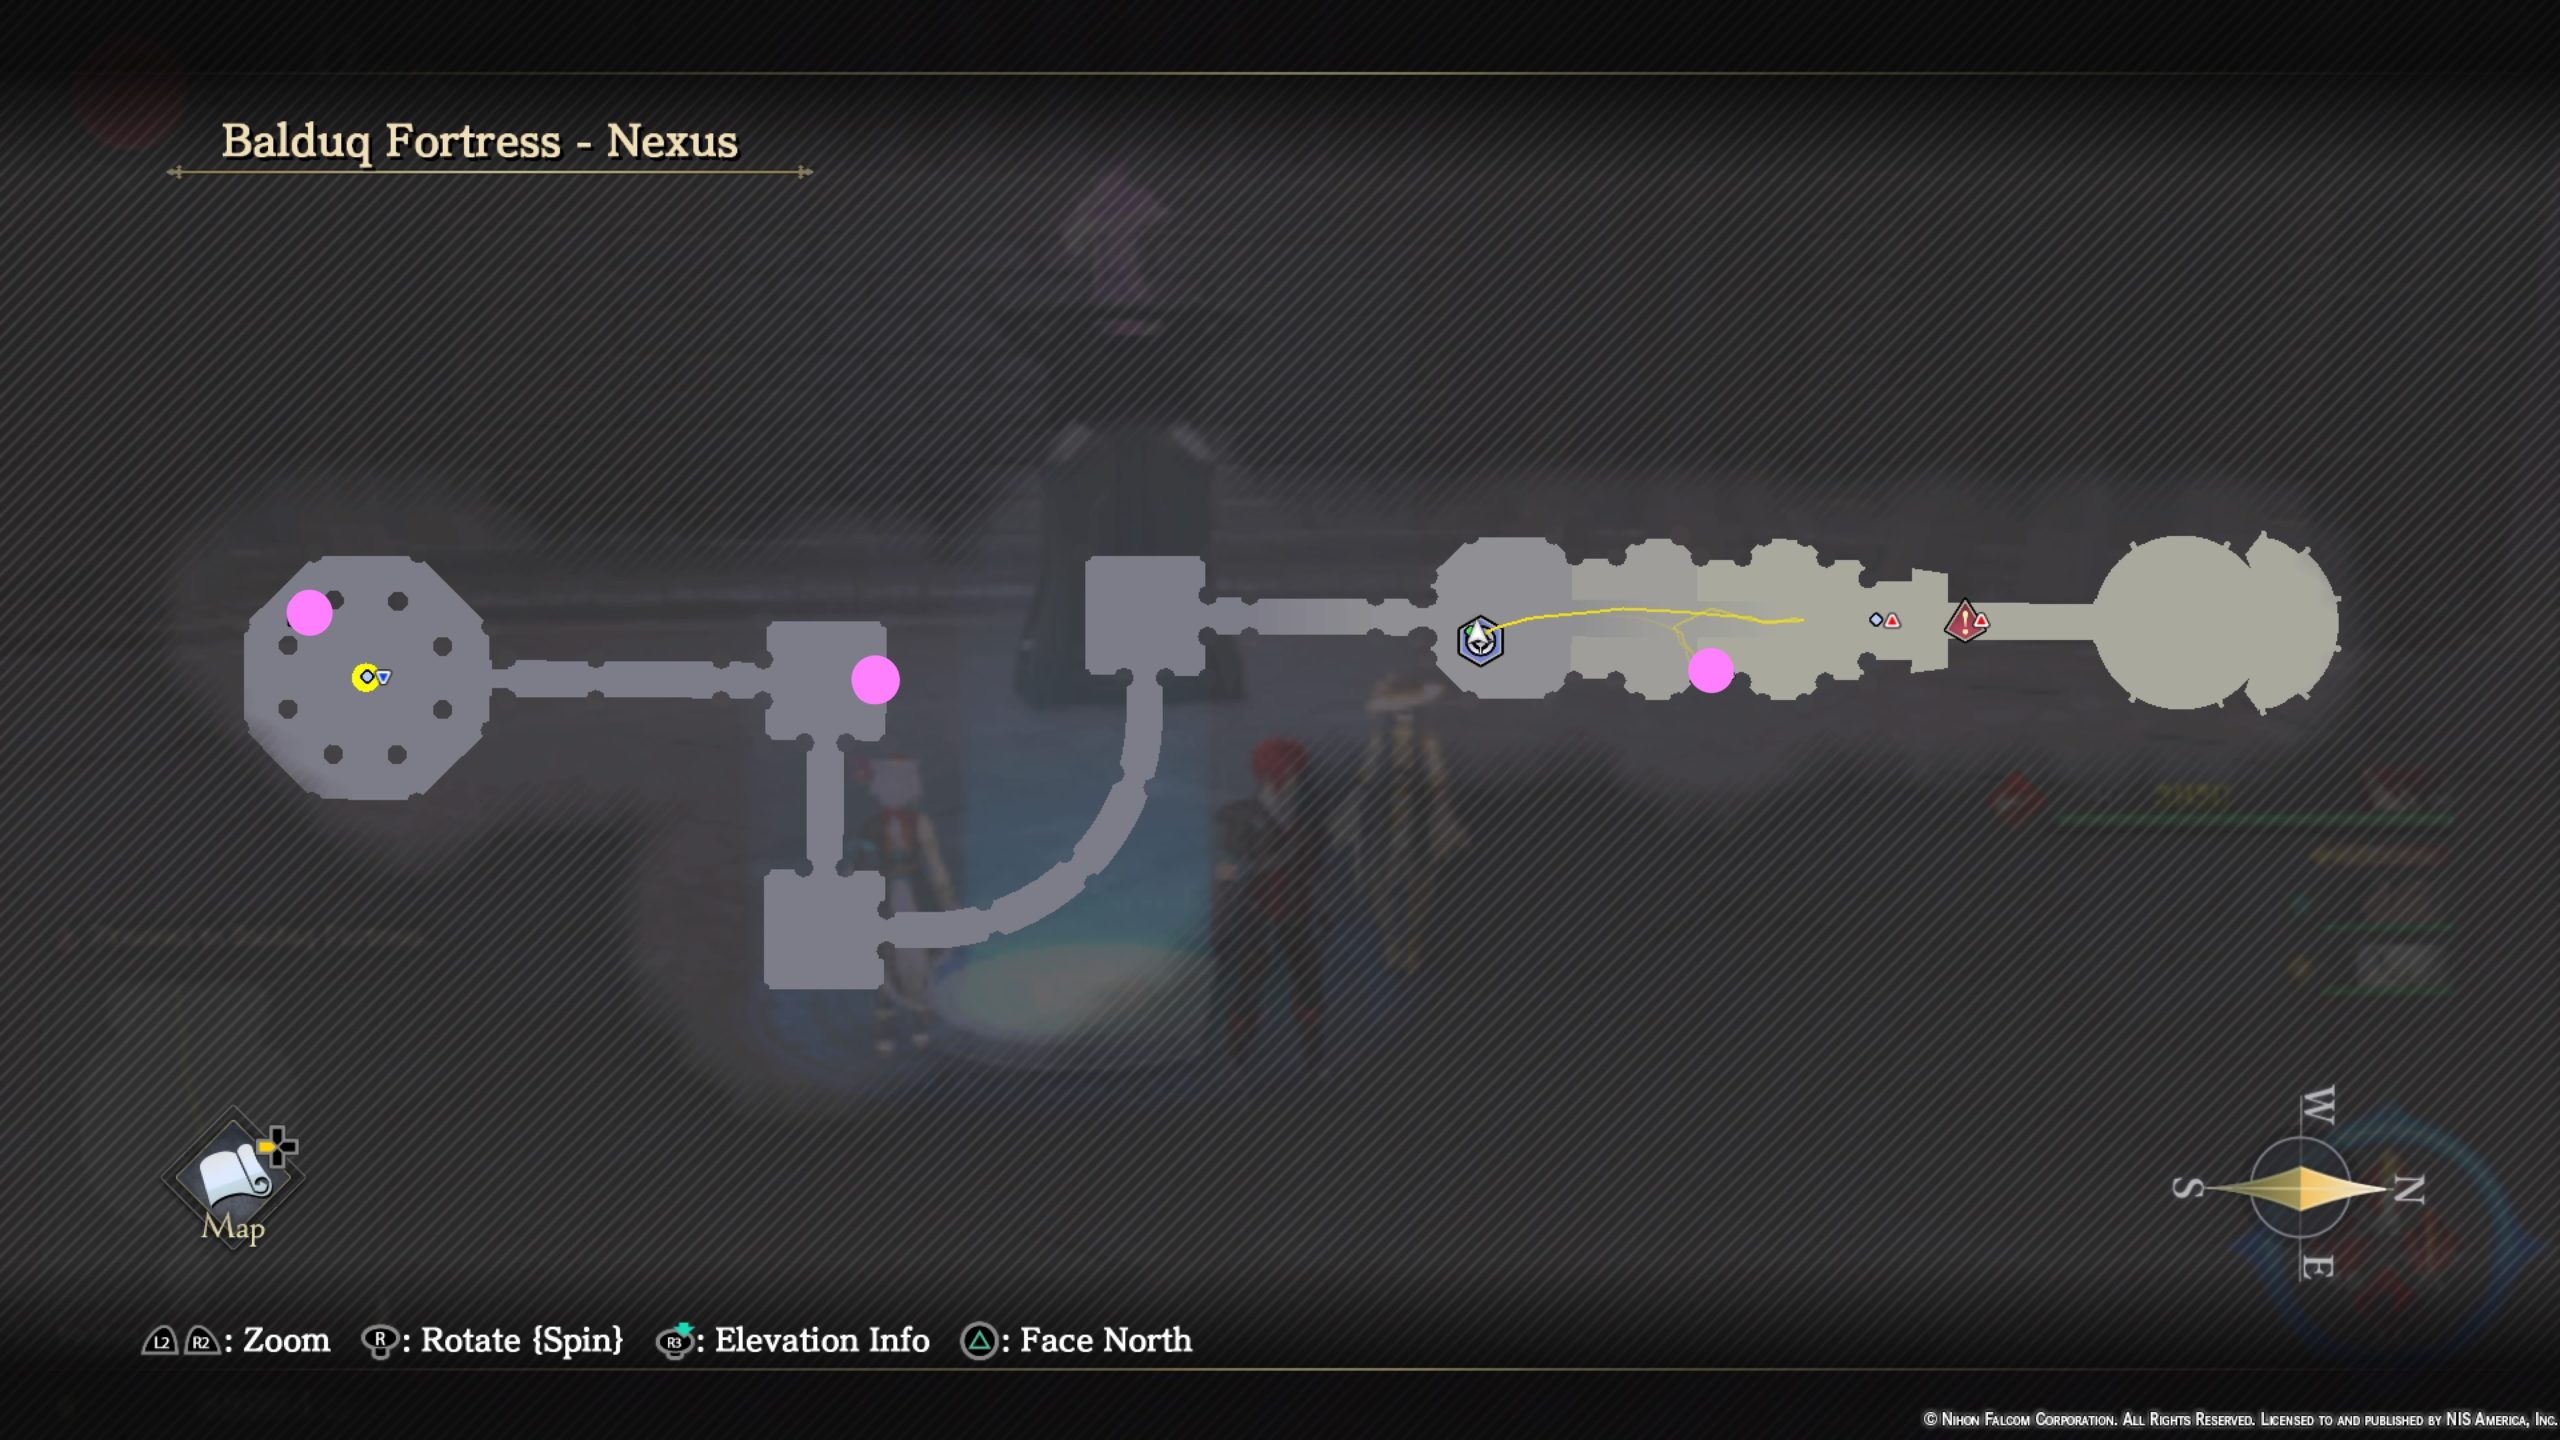
- Life Elixir
- Strength Elixir
- Defense Elixir
Balduq Fortress of Yore
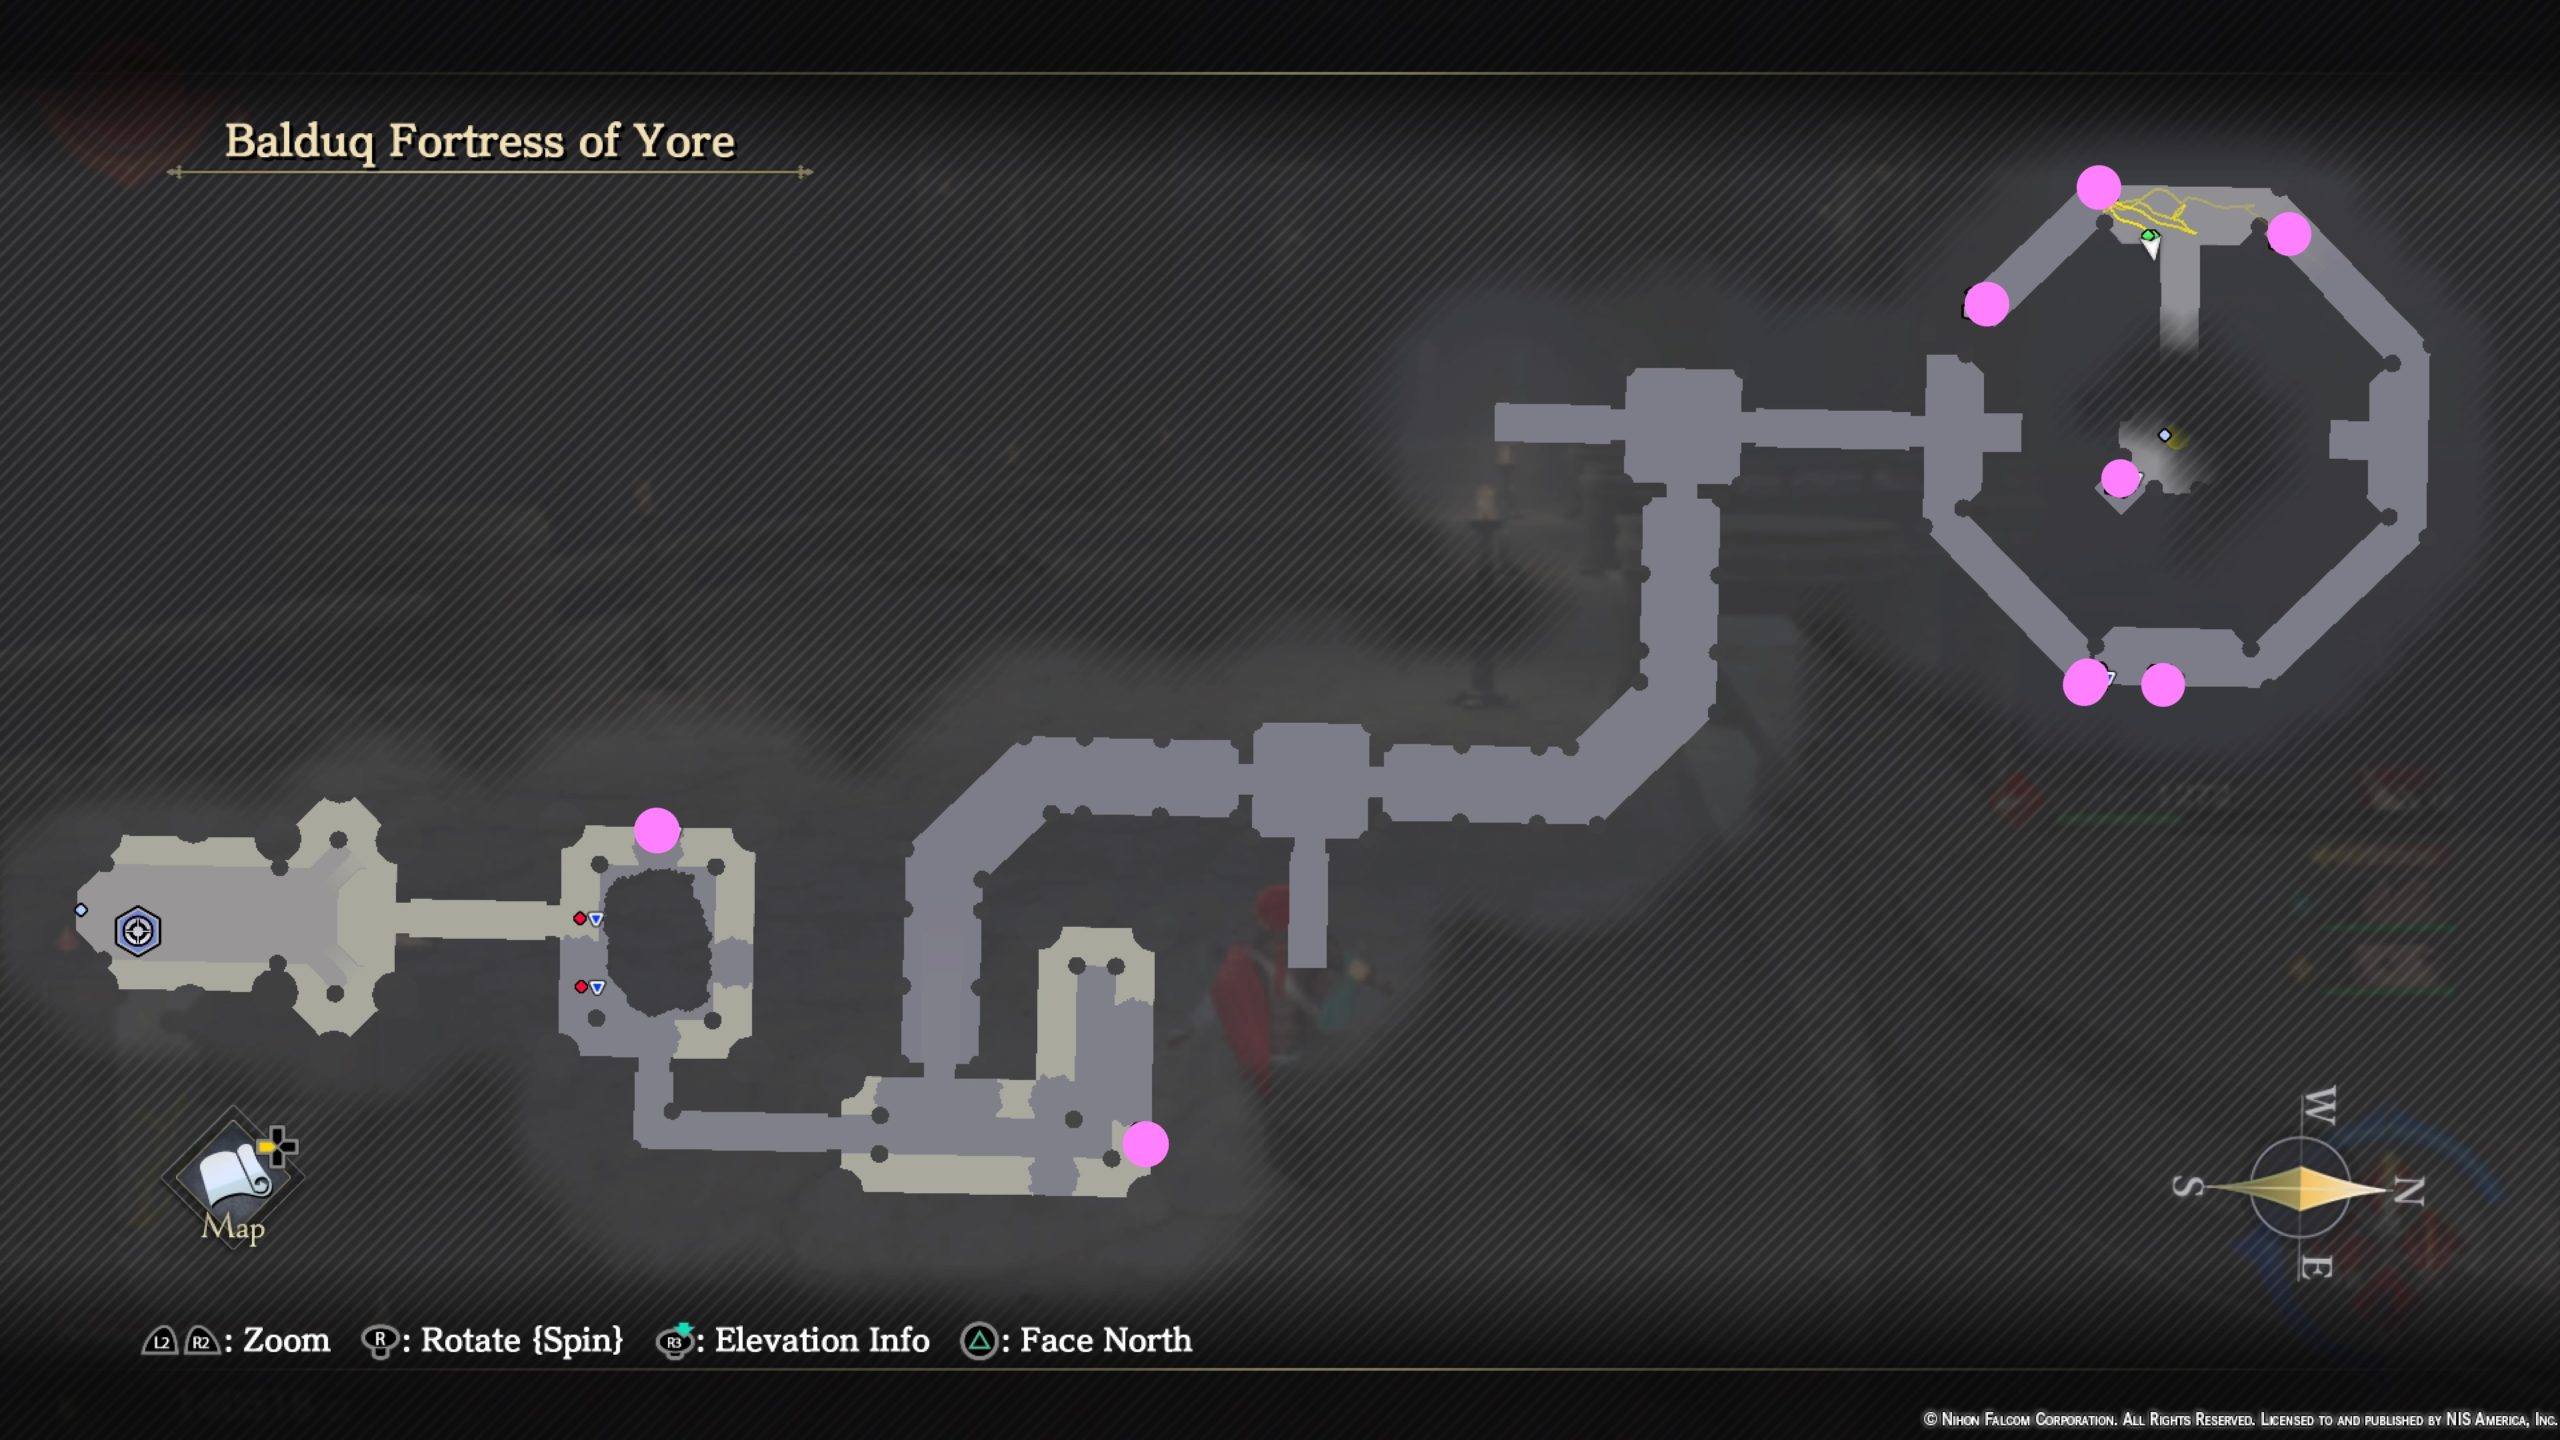
- 8000 Gold
- War King’s Cape
- Tempest Elixir
- Panacea x2
- ??? Gold (Accidently opened it during combat… sorry!)
- Dry-aged Meat x2
- Grand Elixir
- Hermit’s Remedy x2
Balduq Prison – Depths (Part 1)

- Short Sword (story related)
- Raisins x3
Balduq Prison – Depths (Part 2)
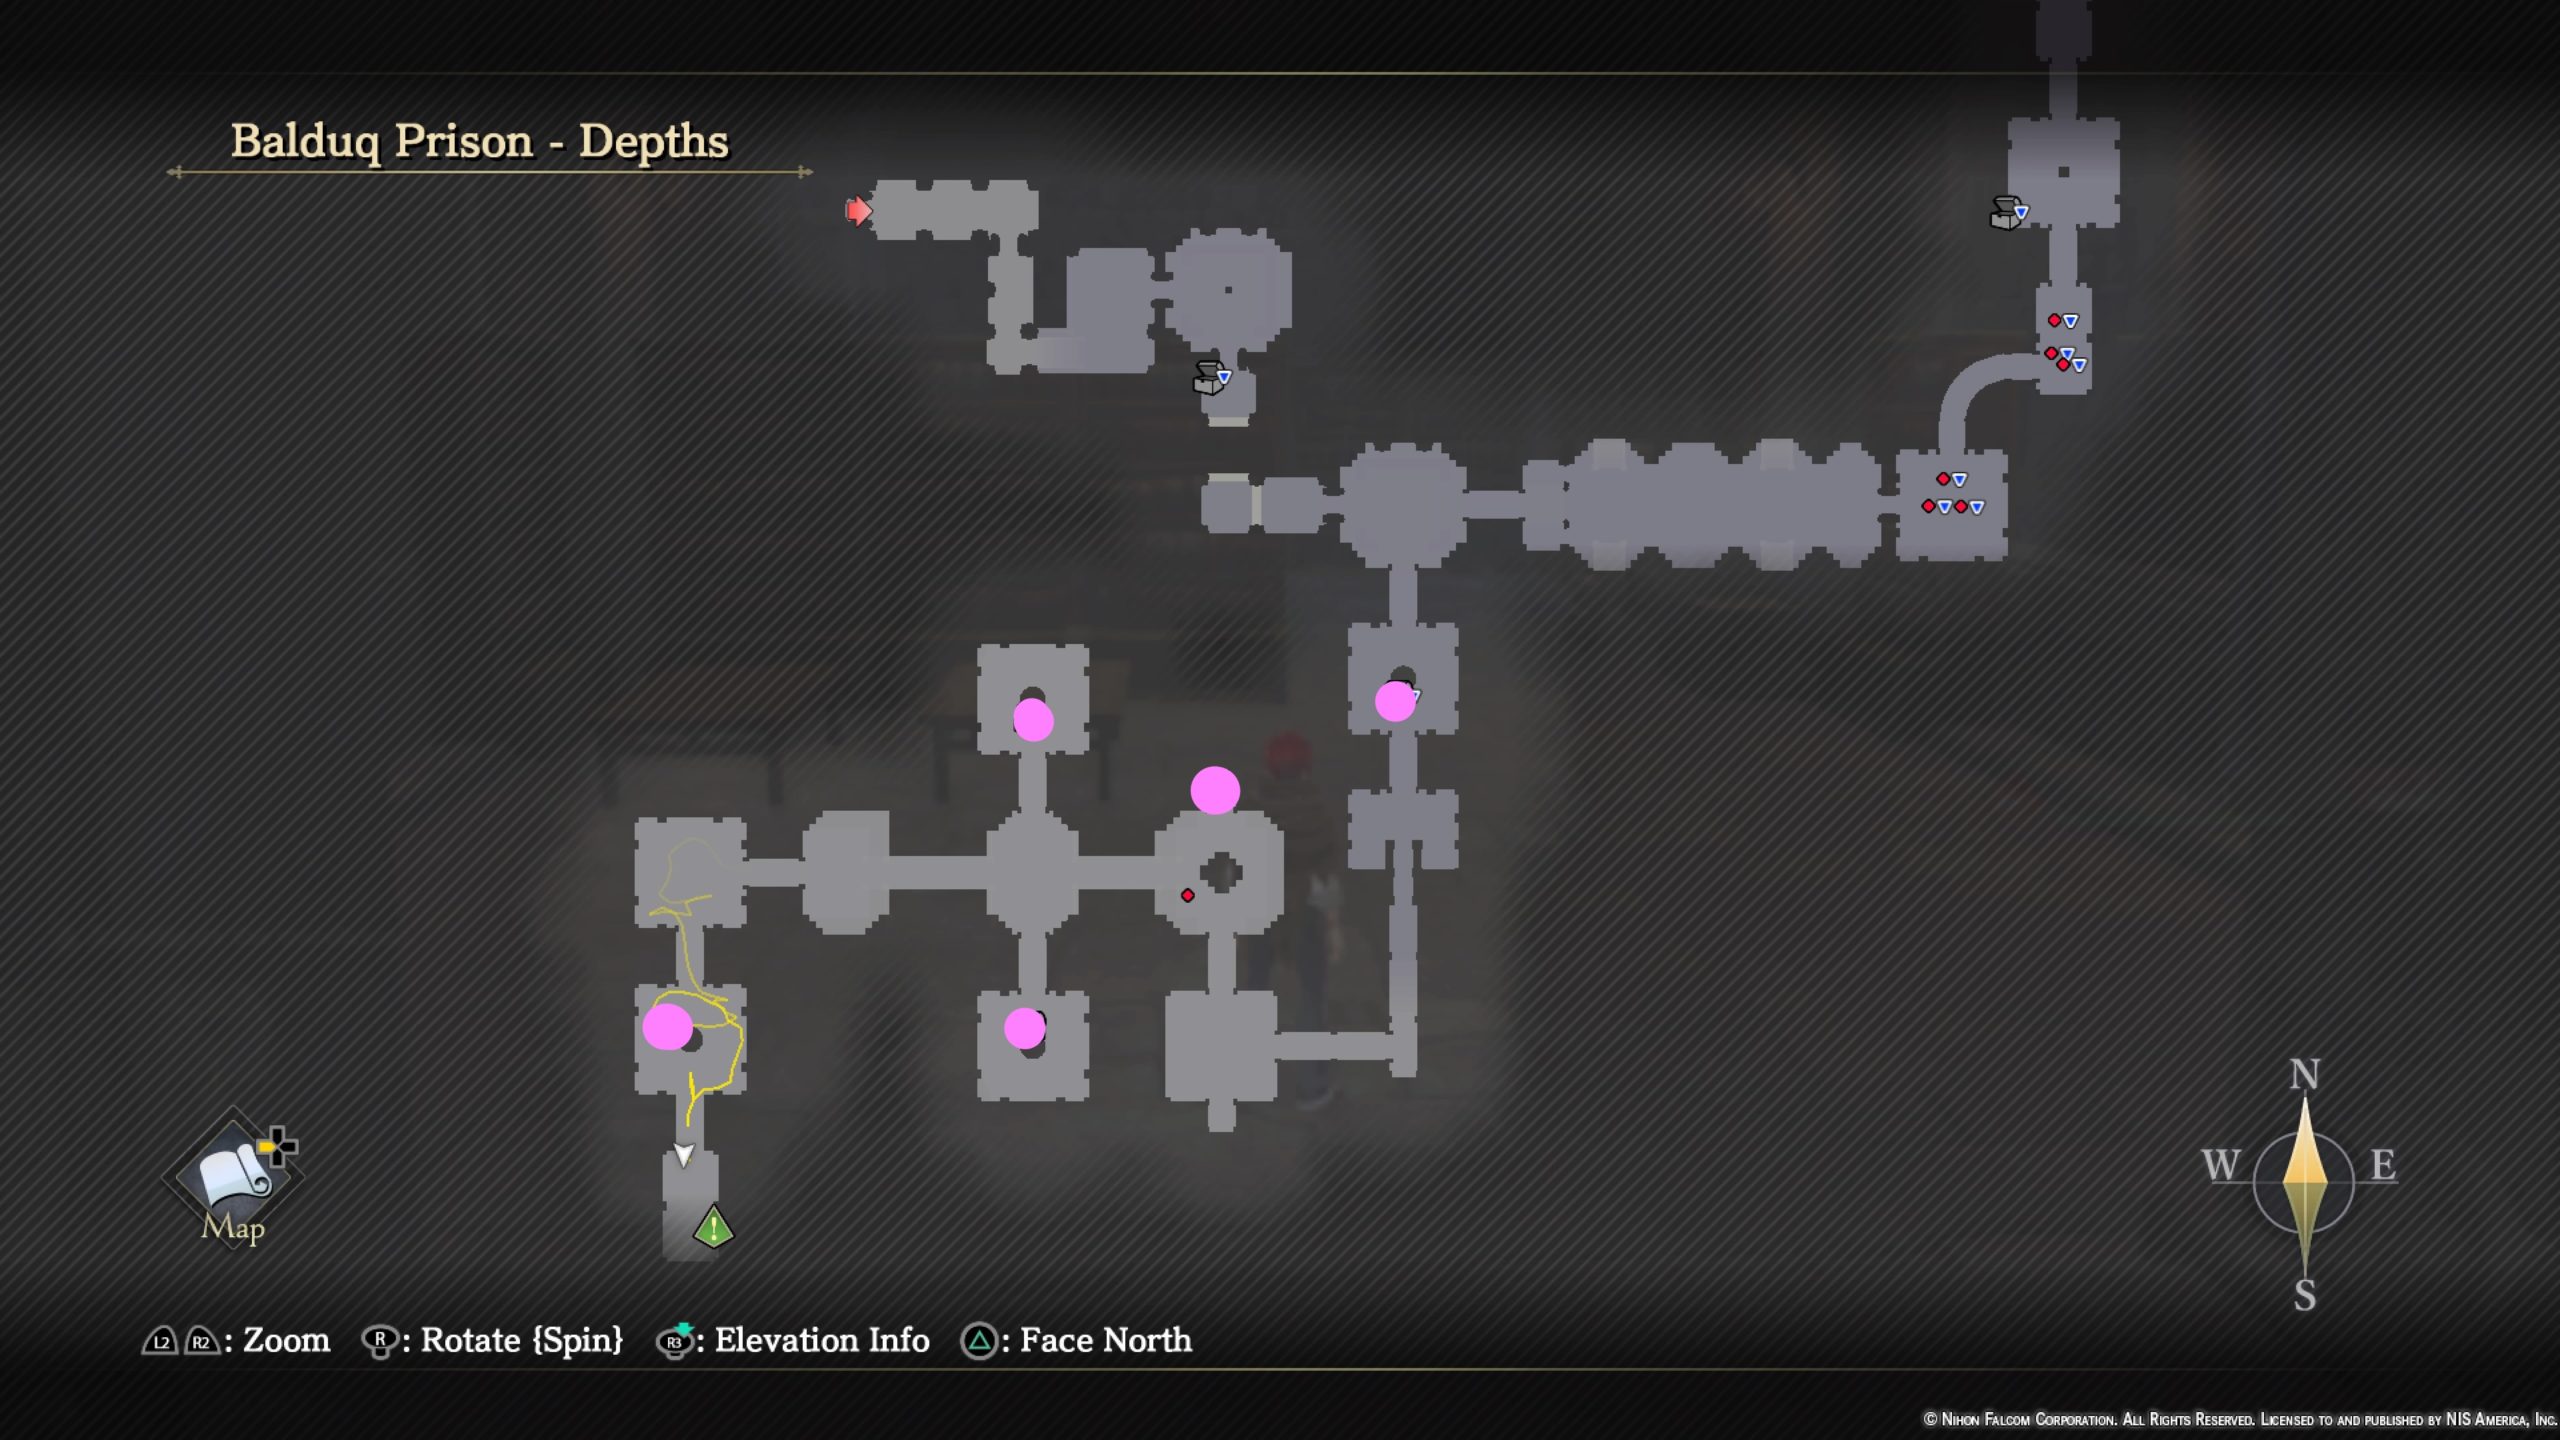
- Red Cheese
- Raisins x3
- 2500 Gold
- White Nut x3
- 2500 Gold
Blocked Path (hidden area)
*To access this hidden area in the southern part of Main Square, you’ll need to activate Raging Bull’s gift to smash a wall.

- Crimson Spar x2
- Apis Charm
- Spirit Lumber x2
- Thrust Grimoire
- Smoked Meat
Central District
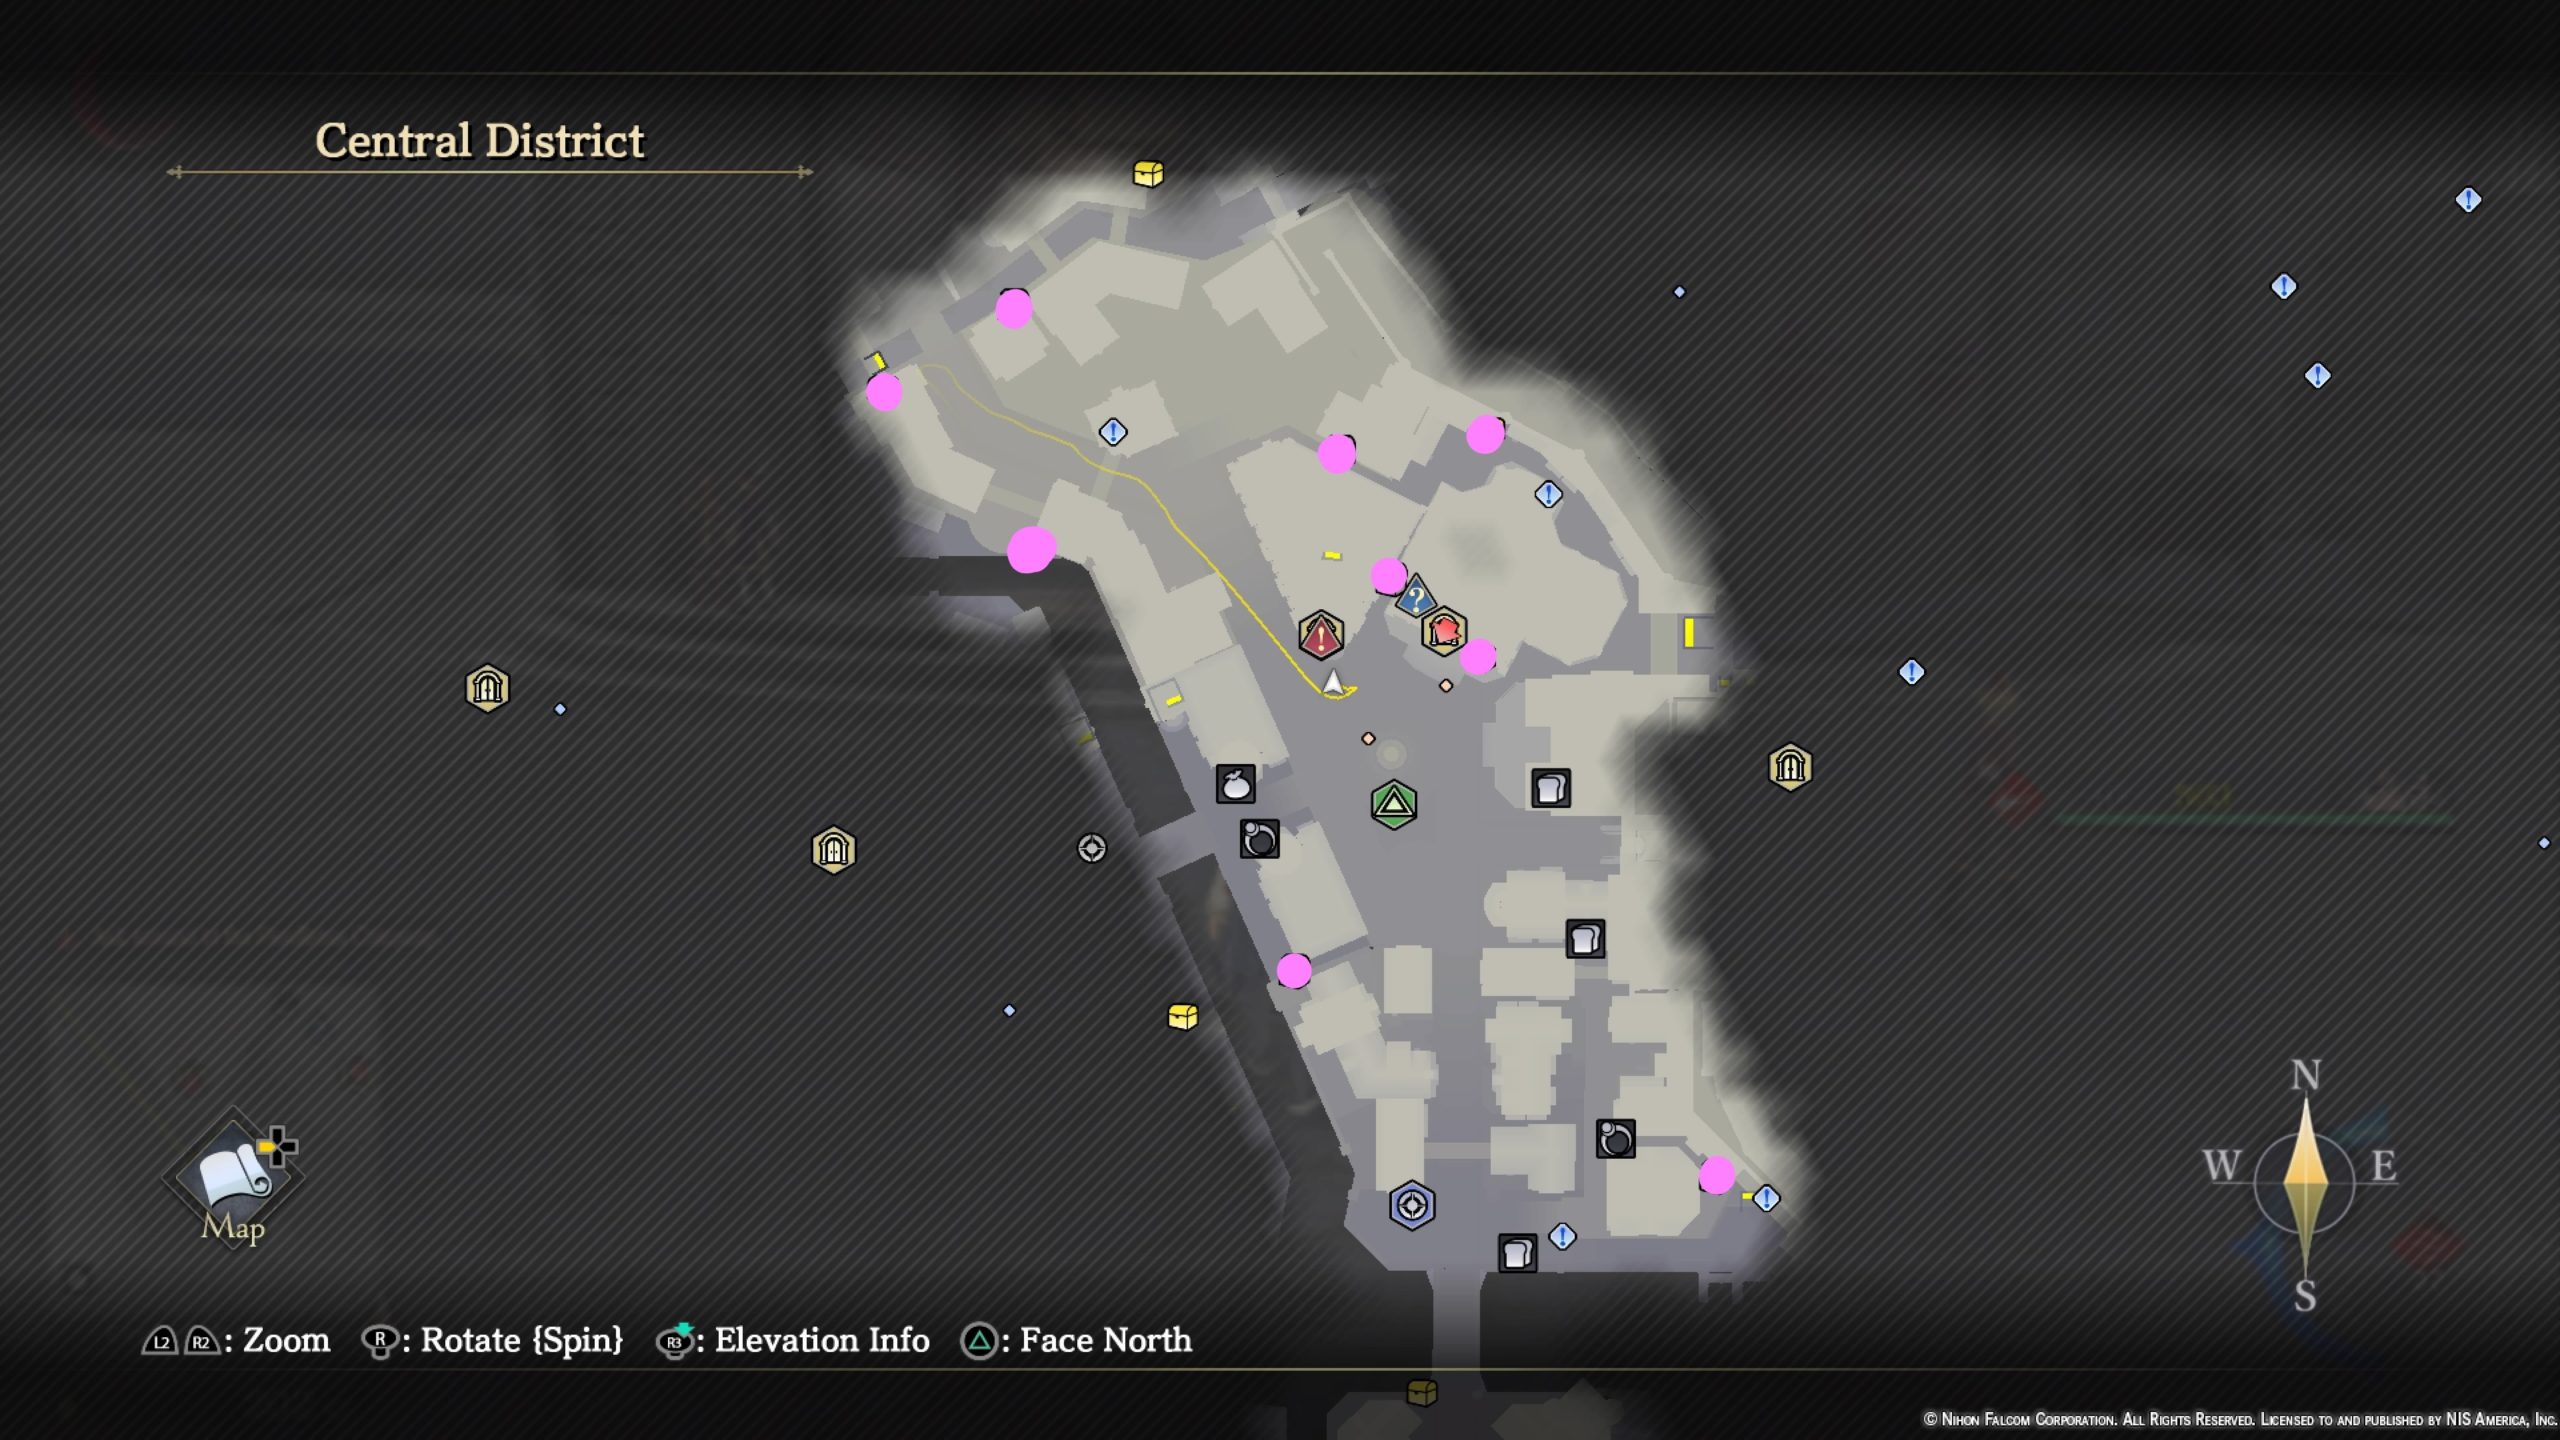
- Expellant x2
- This chest can be found in the alley with Maxim’s Black Market.
- Black Fig x2
- To find this chest, head into the building to the left of Edouard’s Bookstore. Make your way down the stairs to reach the waterway. The chest will be at the end of the path.
- Apple x5
- This chest is located on some barrels between the Cathedral and Pendleton.
- Potato x5
- This chest can be found up the stairs behind the Pendleton between a house and the ledge.
- White Nut x2
- This chest can be found behind a house.
- Sweet Remedy
- This chest is located on a wooden platform behind Pendleton. Head up the stairs to the left of the Pendleton then use Crimson Line to shoot up to the top of the house on the right. You’ll then be able to jump across the rooftops to reach it.
- Warlord Elixir
- This chest is located on the upper balcony of the cathedral. You can reach it by jumping on the roof of the Le Bistro Blanc then double jumping onto the balcony.
- Life Elixir
- This chest is located on a roof in the northwestern corner of the area near the Artisan Lane.
- 1000 Gold
- This chest is available after unsealing northern Main Square. Head to the area with the tree shading a park bench and jump over the fence to land on a ledge below containing the chest.
Ciel Canyon Trail
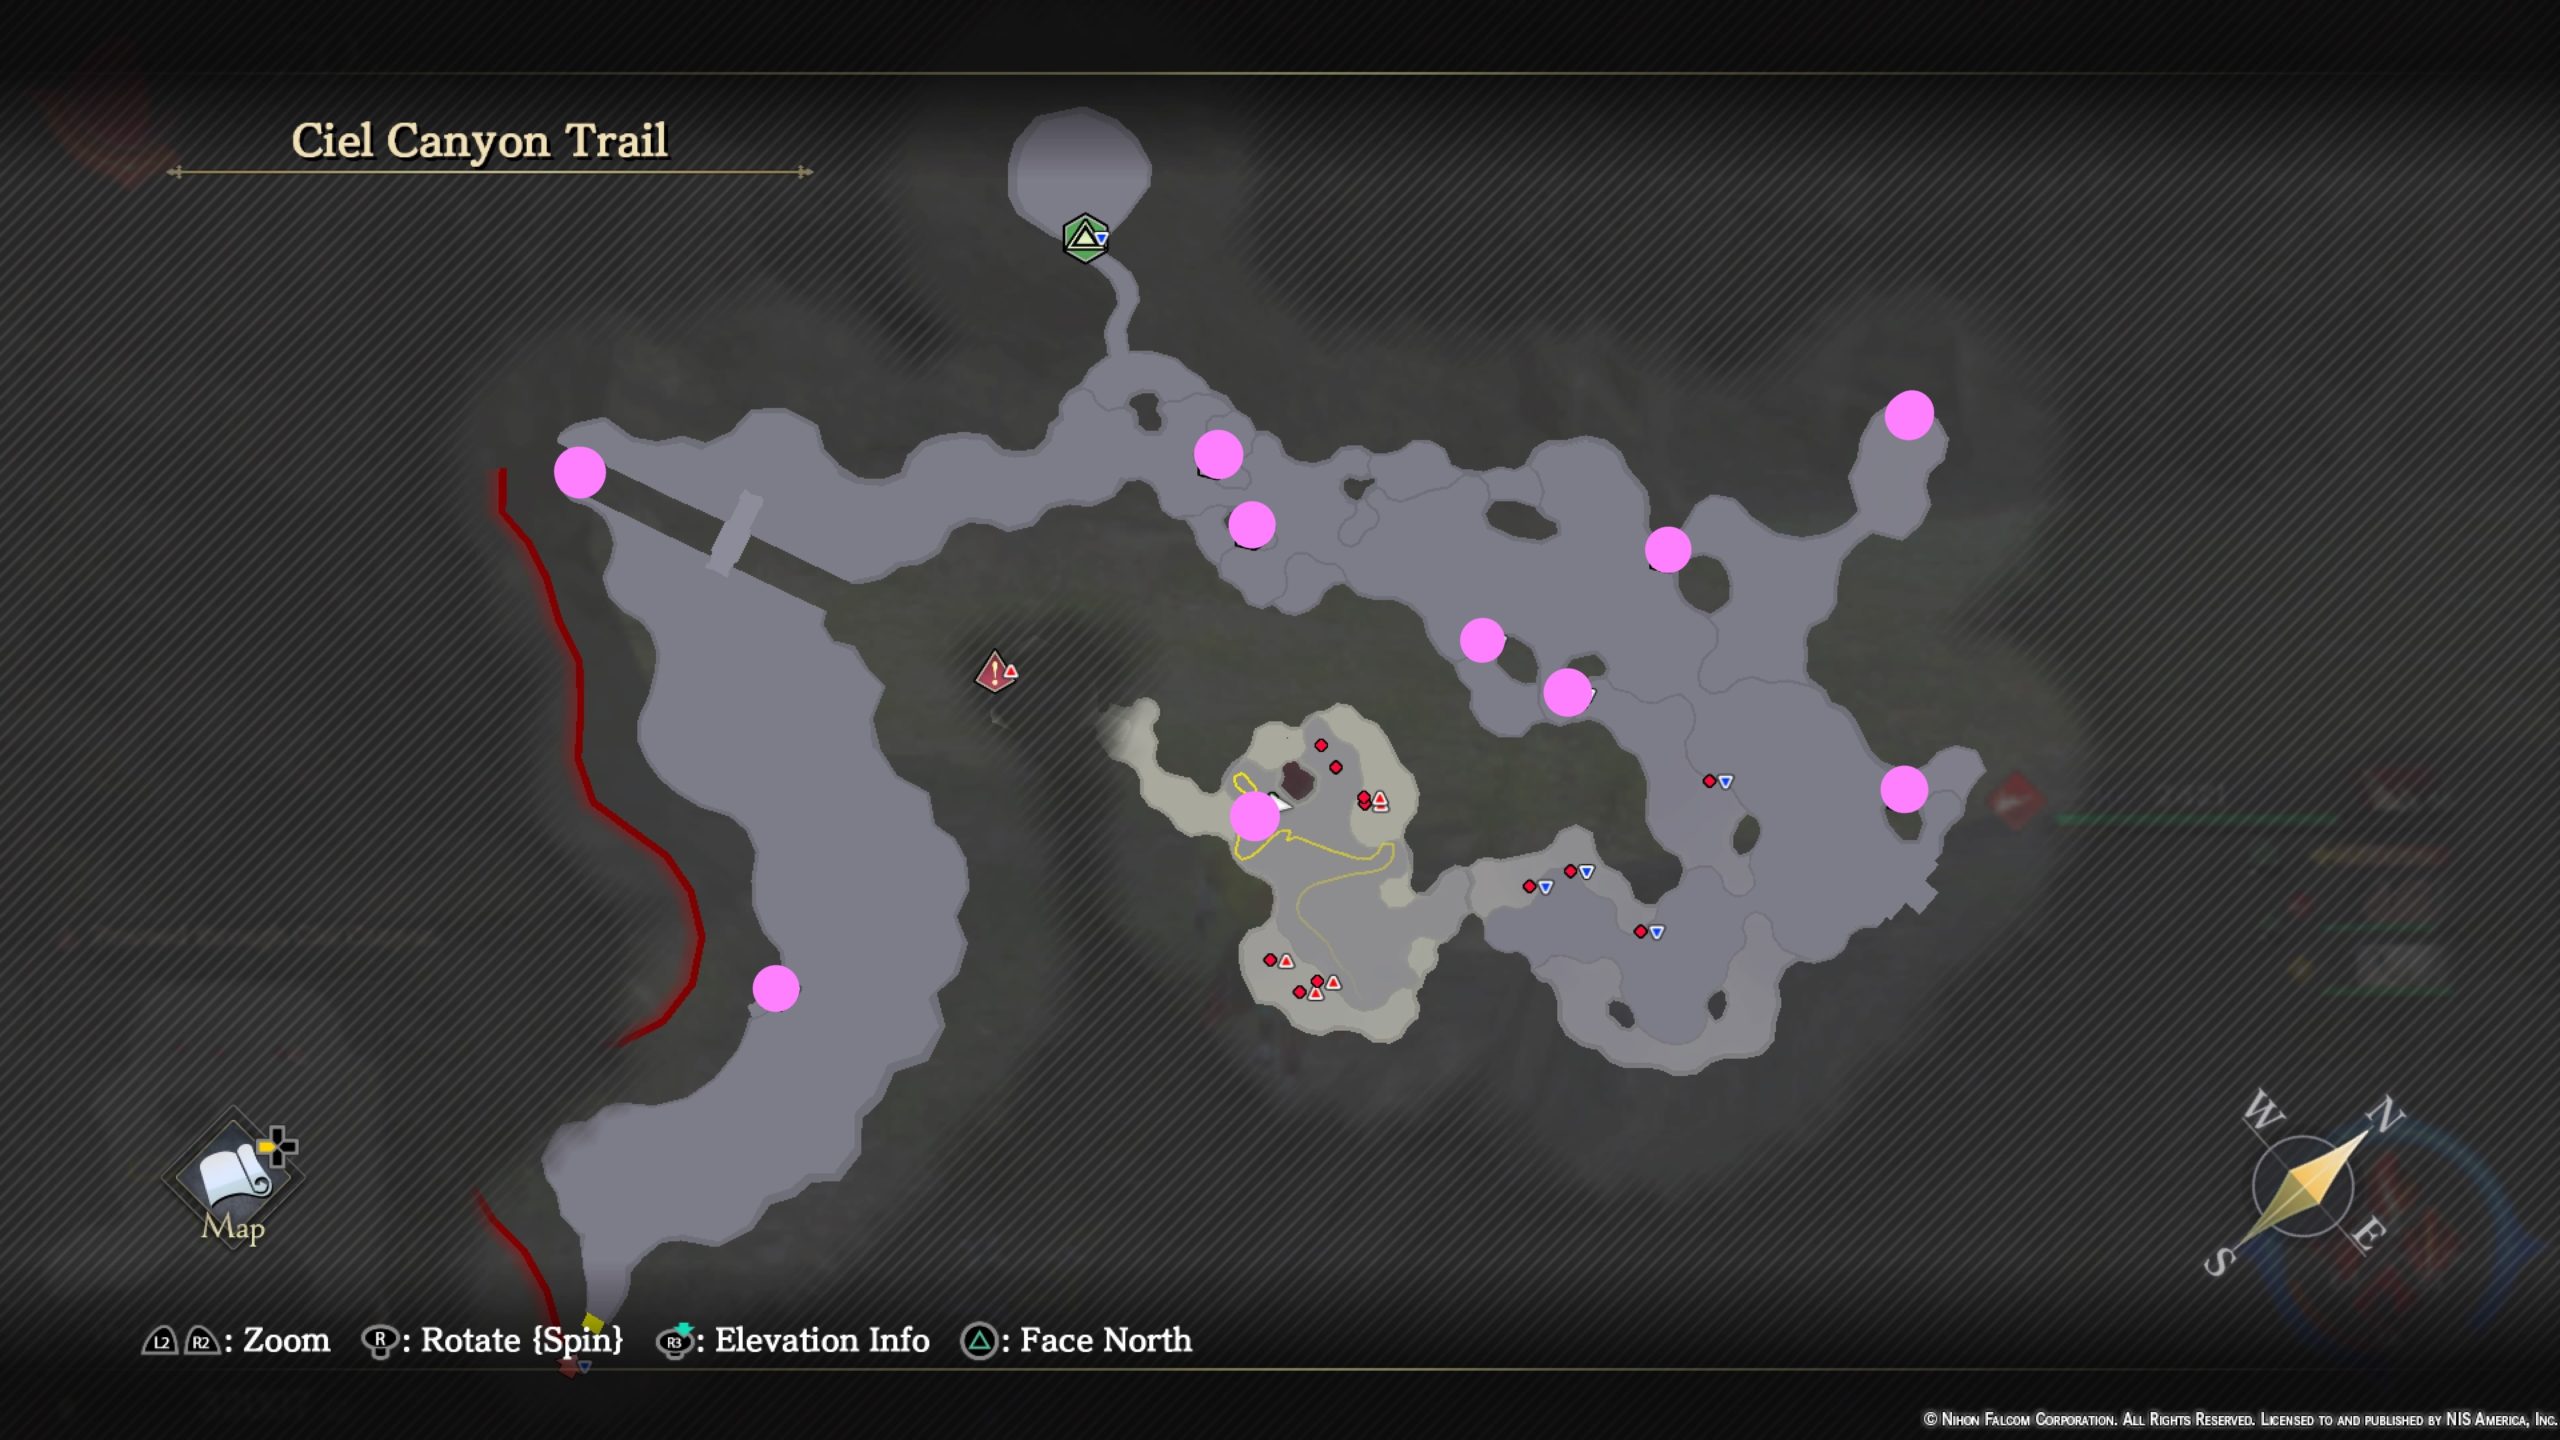
- 5400 Gold
- Quiche Recipe
- Panacea x2
- Bloodshot Tear x2
- Dry-aged Meat x2
- Hermit’s Remedy
- 3600 Gold
- Seal Rubric
- Ruby Cape
- Sol Spar x2
Cloaca Maxima

- Star Grimoire
- 300 Gold
- Black Fig x2
- White Nut x2
- Shield Earring
- Sweet Remedy x3
- 600 Gold
- Blade Ring
- Razor Claw x2
- Rise Potion
- 300 Gold
- Marl Flower x2
- Copper Ore x4
- Panacea
- Black Fig x2
- Warrior Seal
Concealed Path
*You’ll need to use Doll’s gift to reveal some of the below chests. Some chests are hidden behind walls that are openable via pressing stones and others are concealed behind vines.
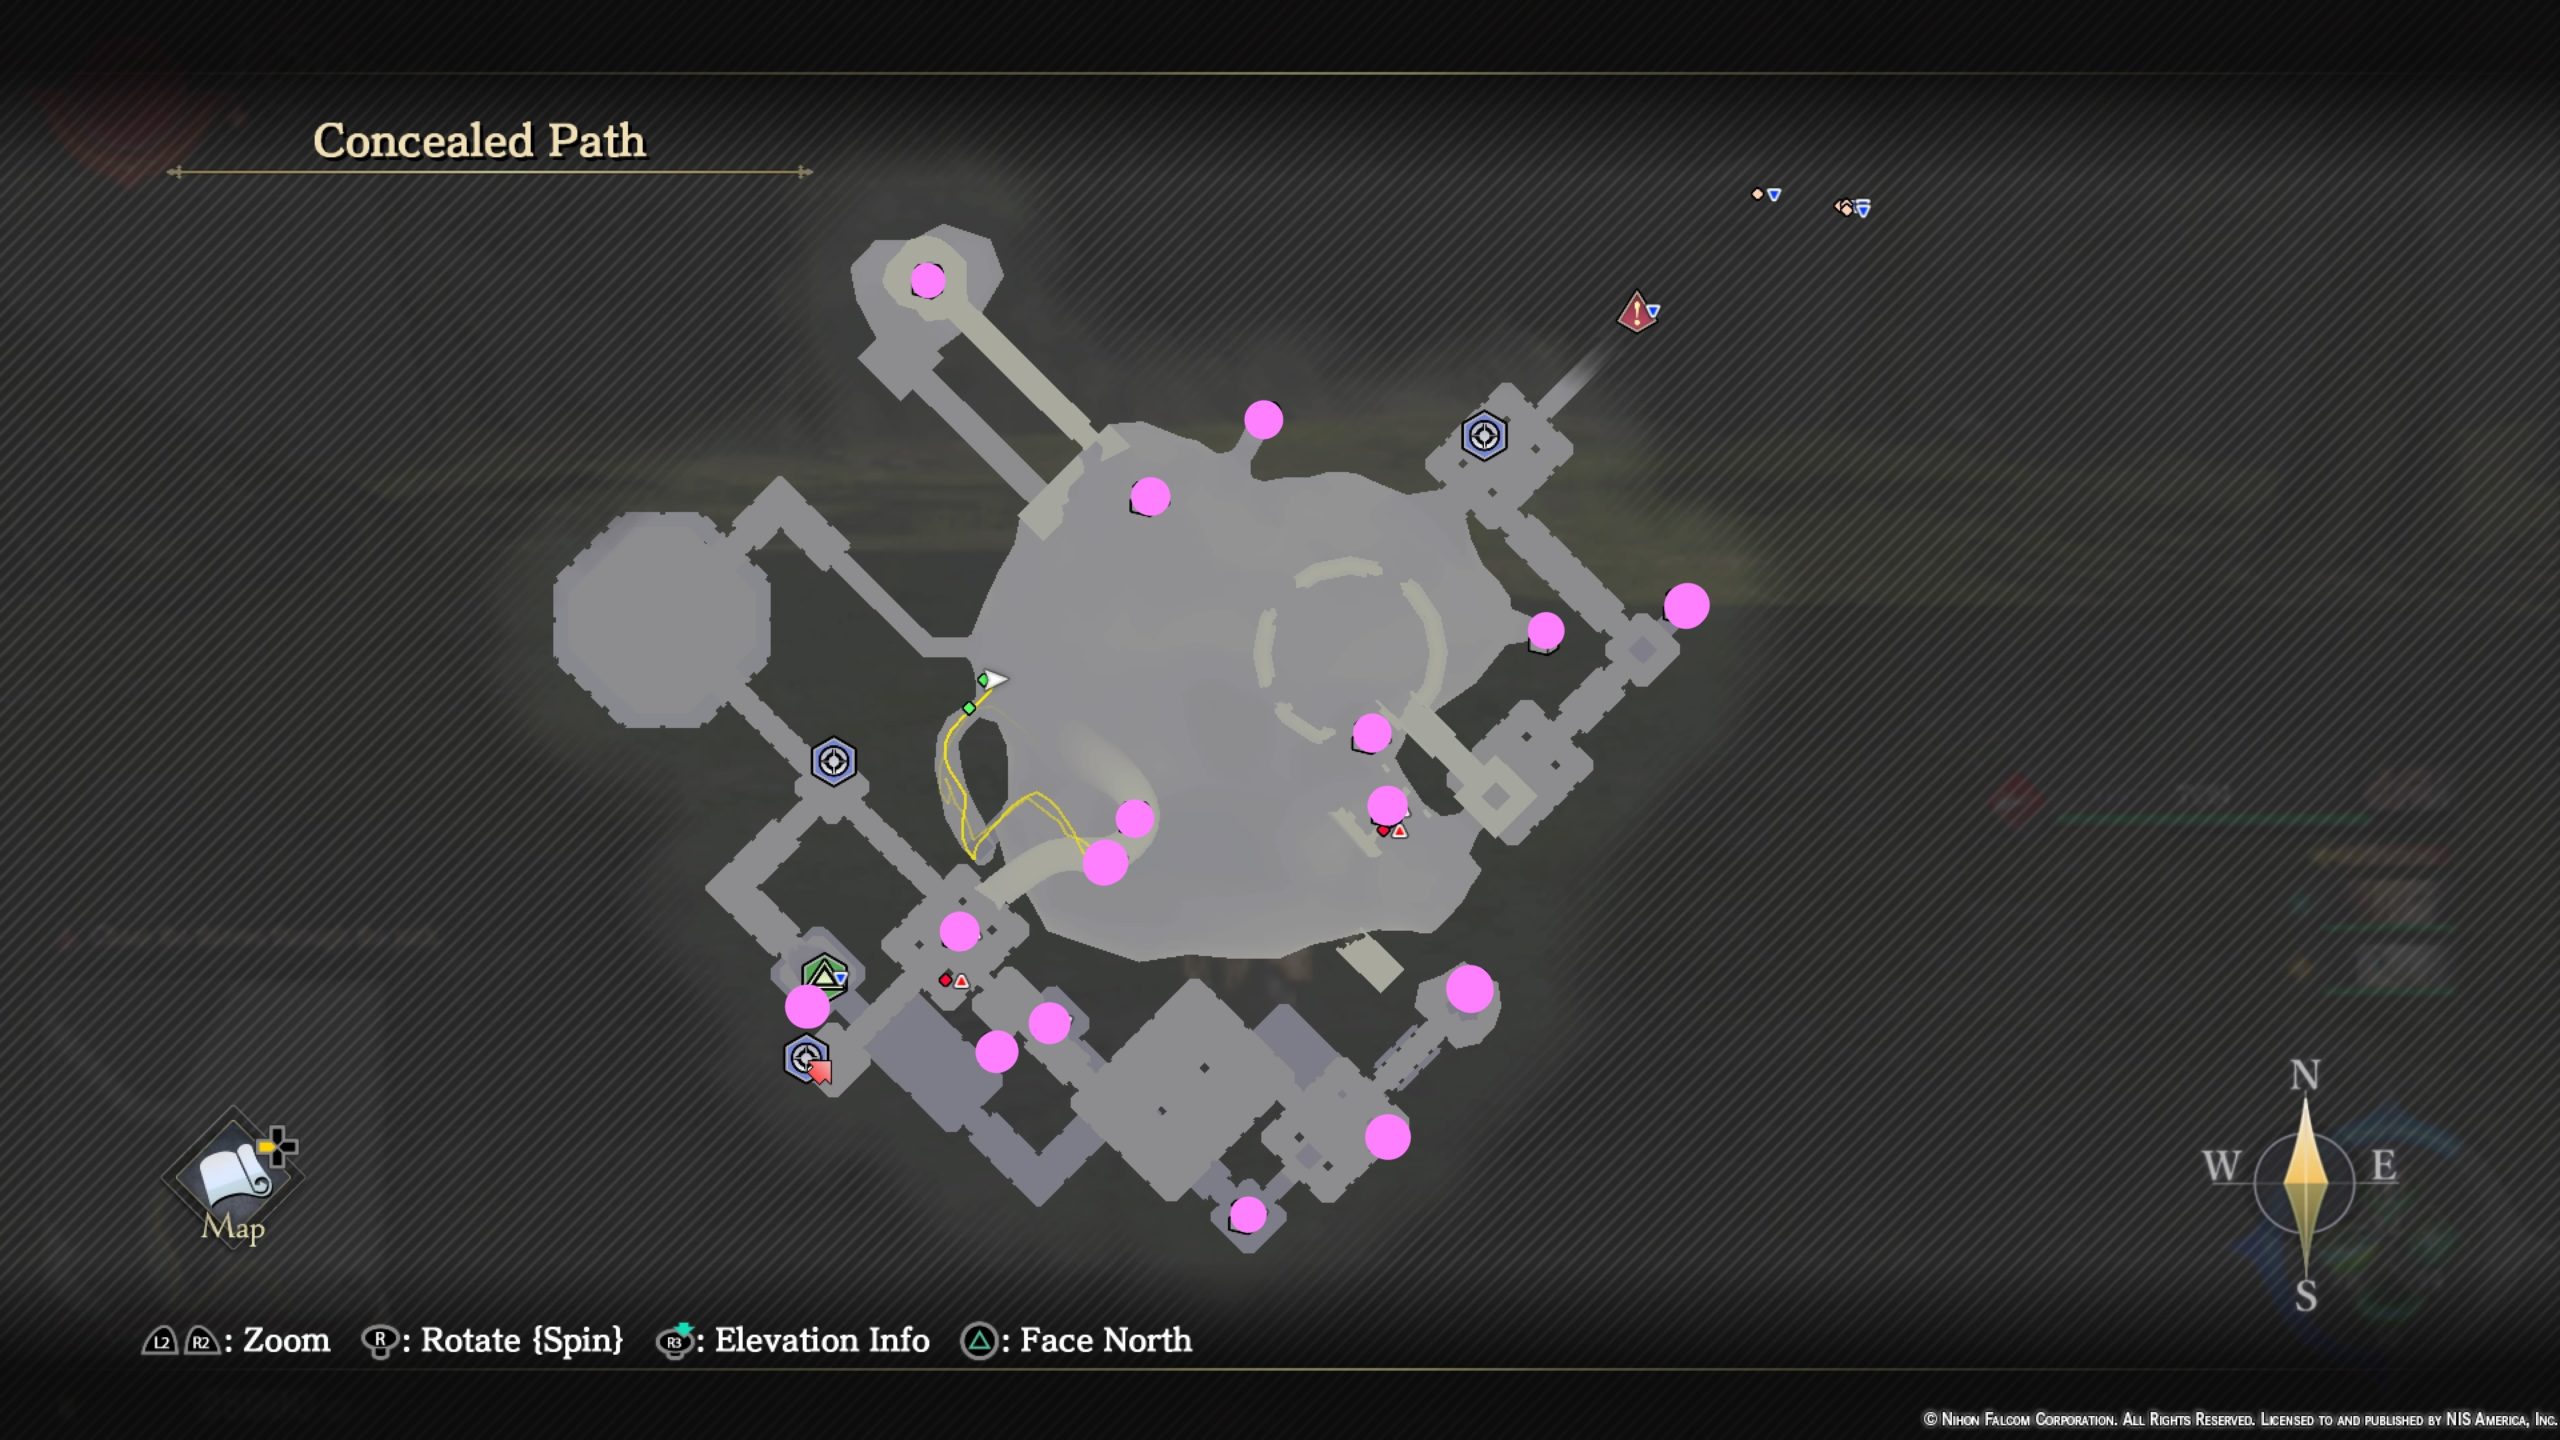
- Vortex Grimoire
- Tarantiel Thread x2
- Panacea x2
- Iron Ore x6
- 800 Gold
- Nors Bleu x2
- Rakshasa Bangle
- Smoked Meat
- Dark Drop x6
- Tempest Elixir
- Chamomile
- 1600 Gold
- Shadow Shoes
- Sparkling Leaf x3
- Blue Bandana
- Blinding Bangle
Concealed Stockroom (hidden area)
*To access this hidden area, travel to the upper level of Shantytown just above the Nirvana shop. On the east side under an archway, activate Doll’s gift to see the unseen revealing a brick you can interact with which causes a secret door to open.

- Grimnut x2
- Black Fig x2
- Nors Bleu x2
- Dry-aged Meat x2
Cultural Heritage Site
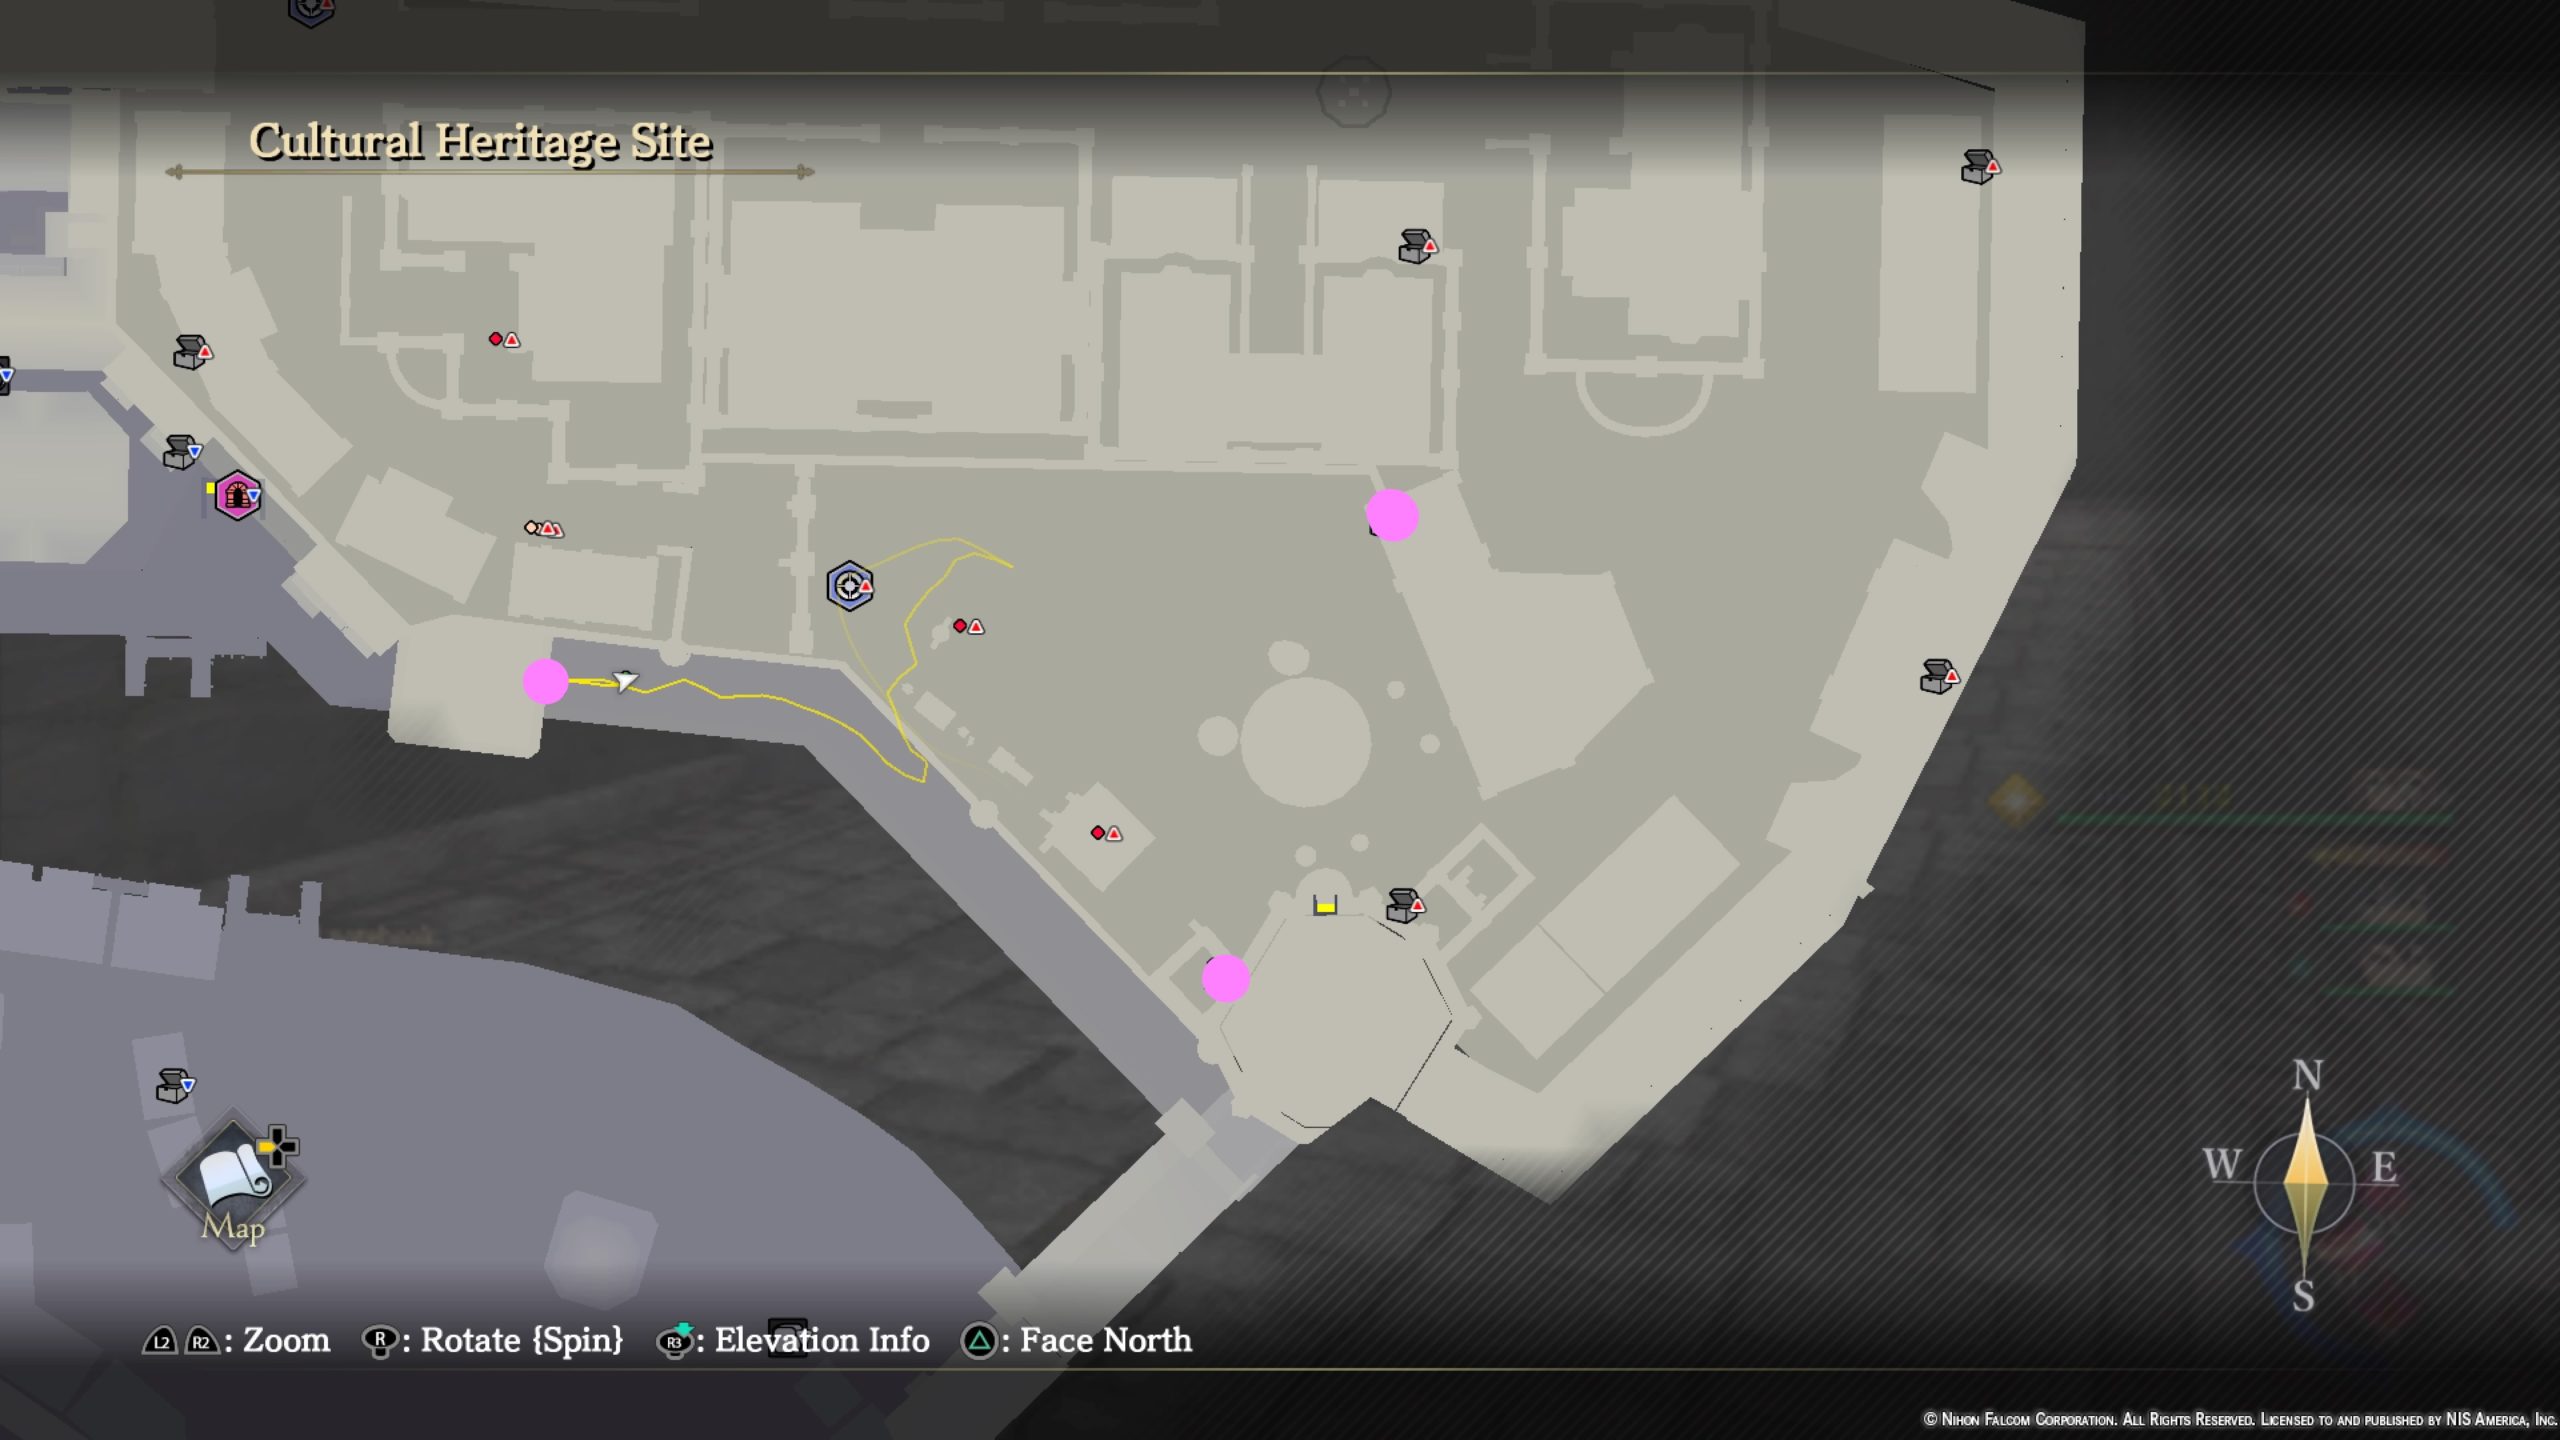
- 3000 Gold
- Panacea x2
- Tonic x2
Decrepit Underpass
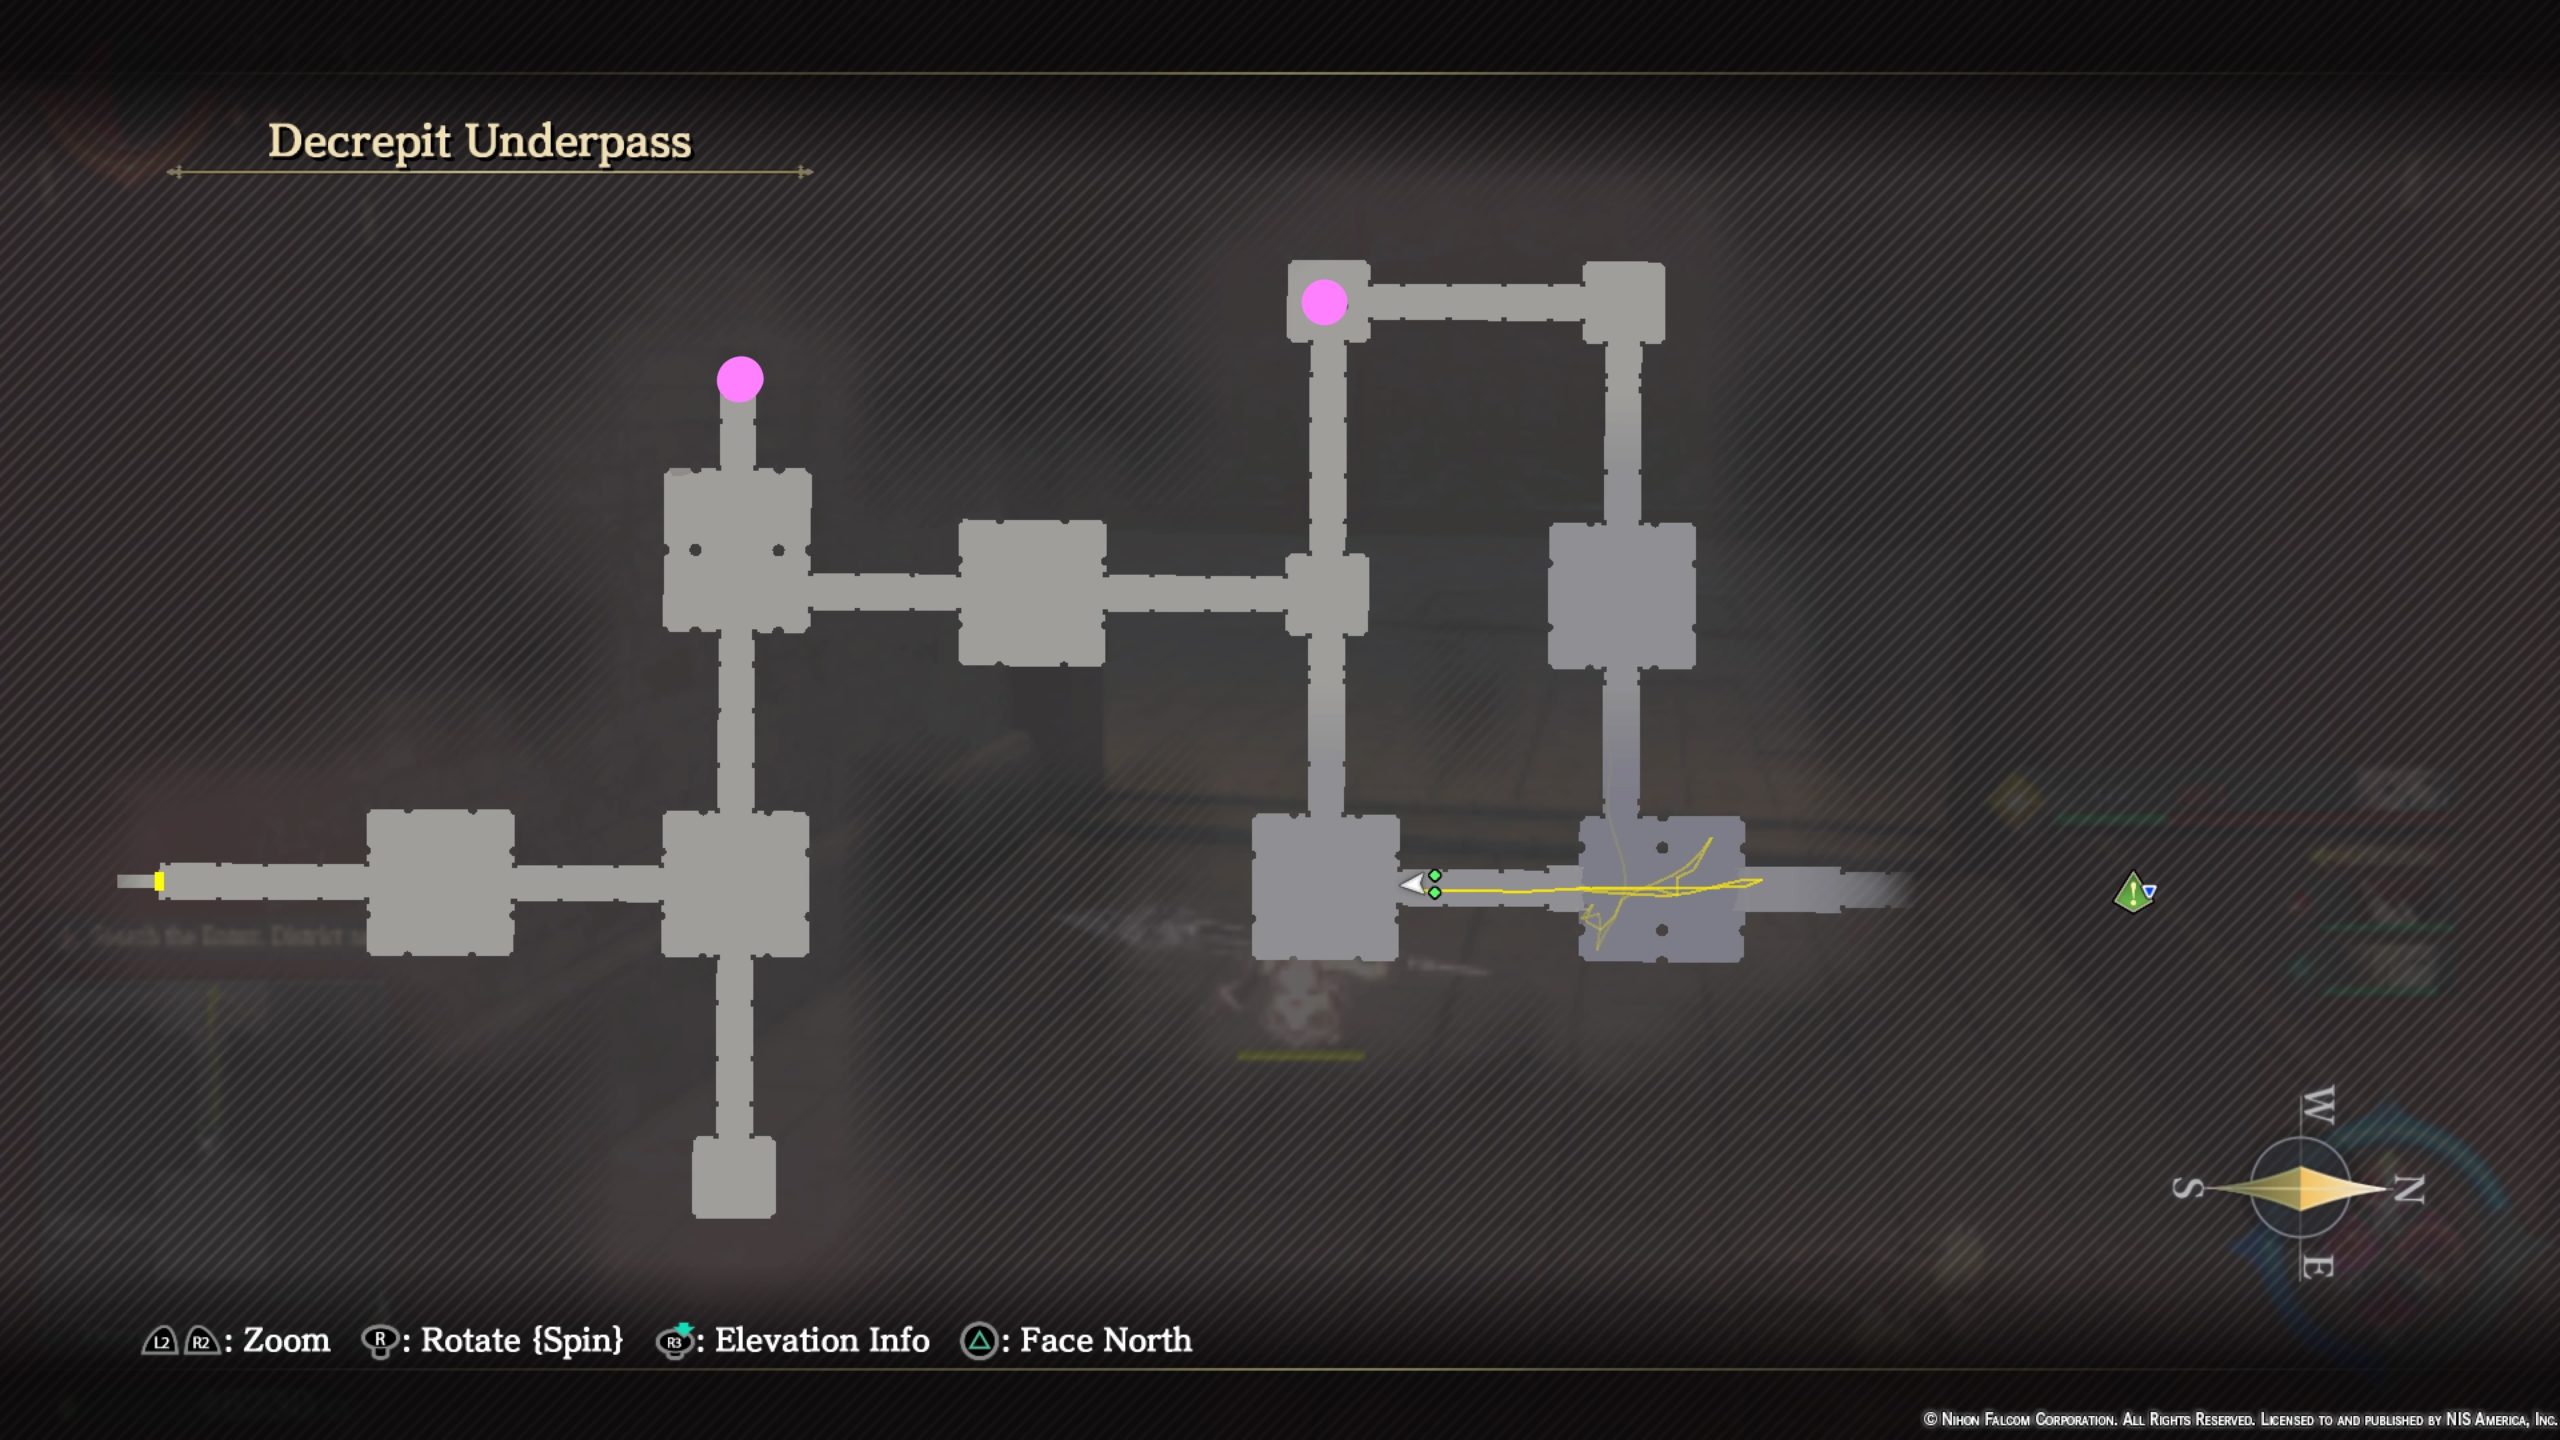
- Crimson Spar
- Life Elixir
Dry Moat Ruins
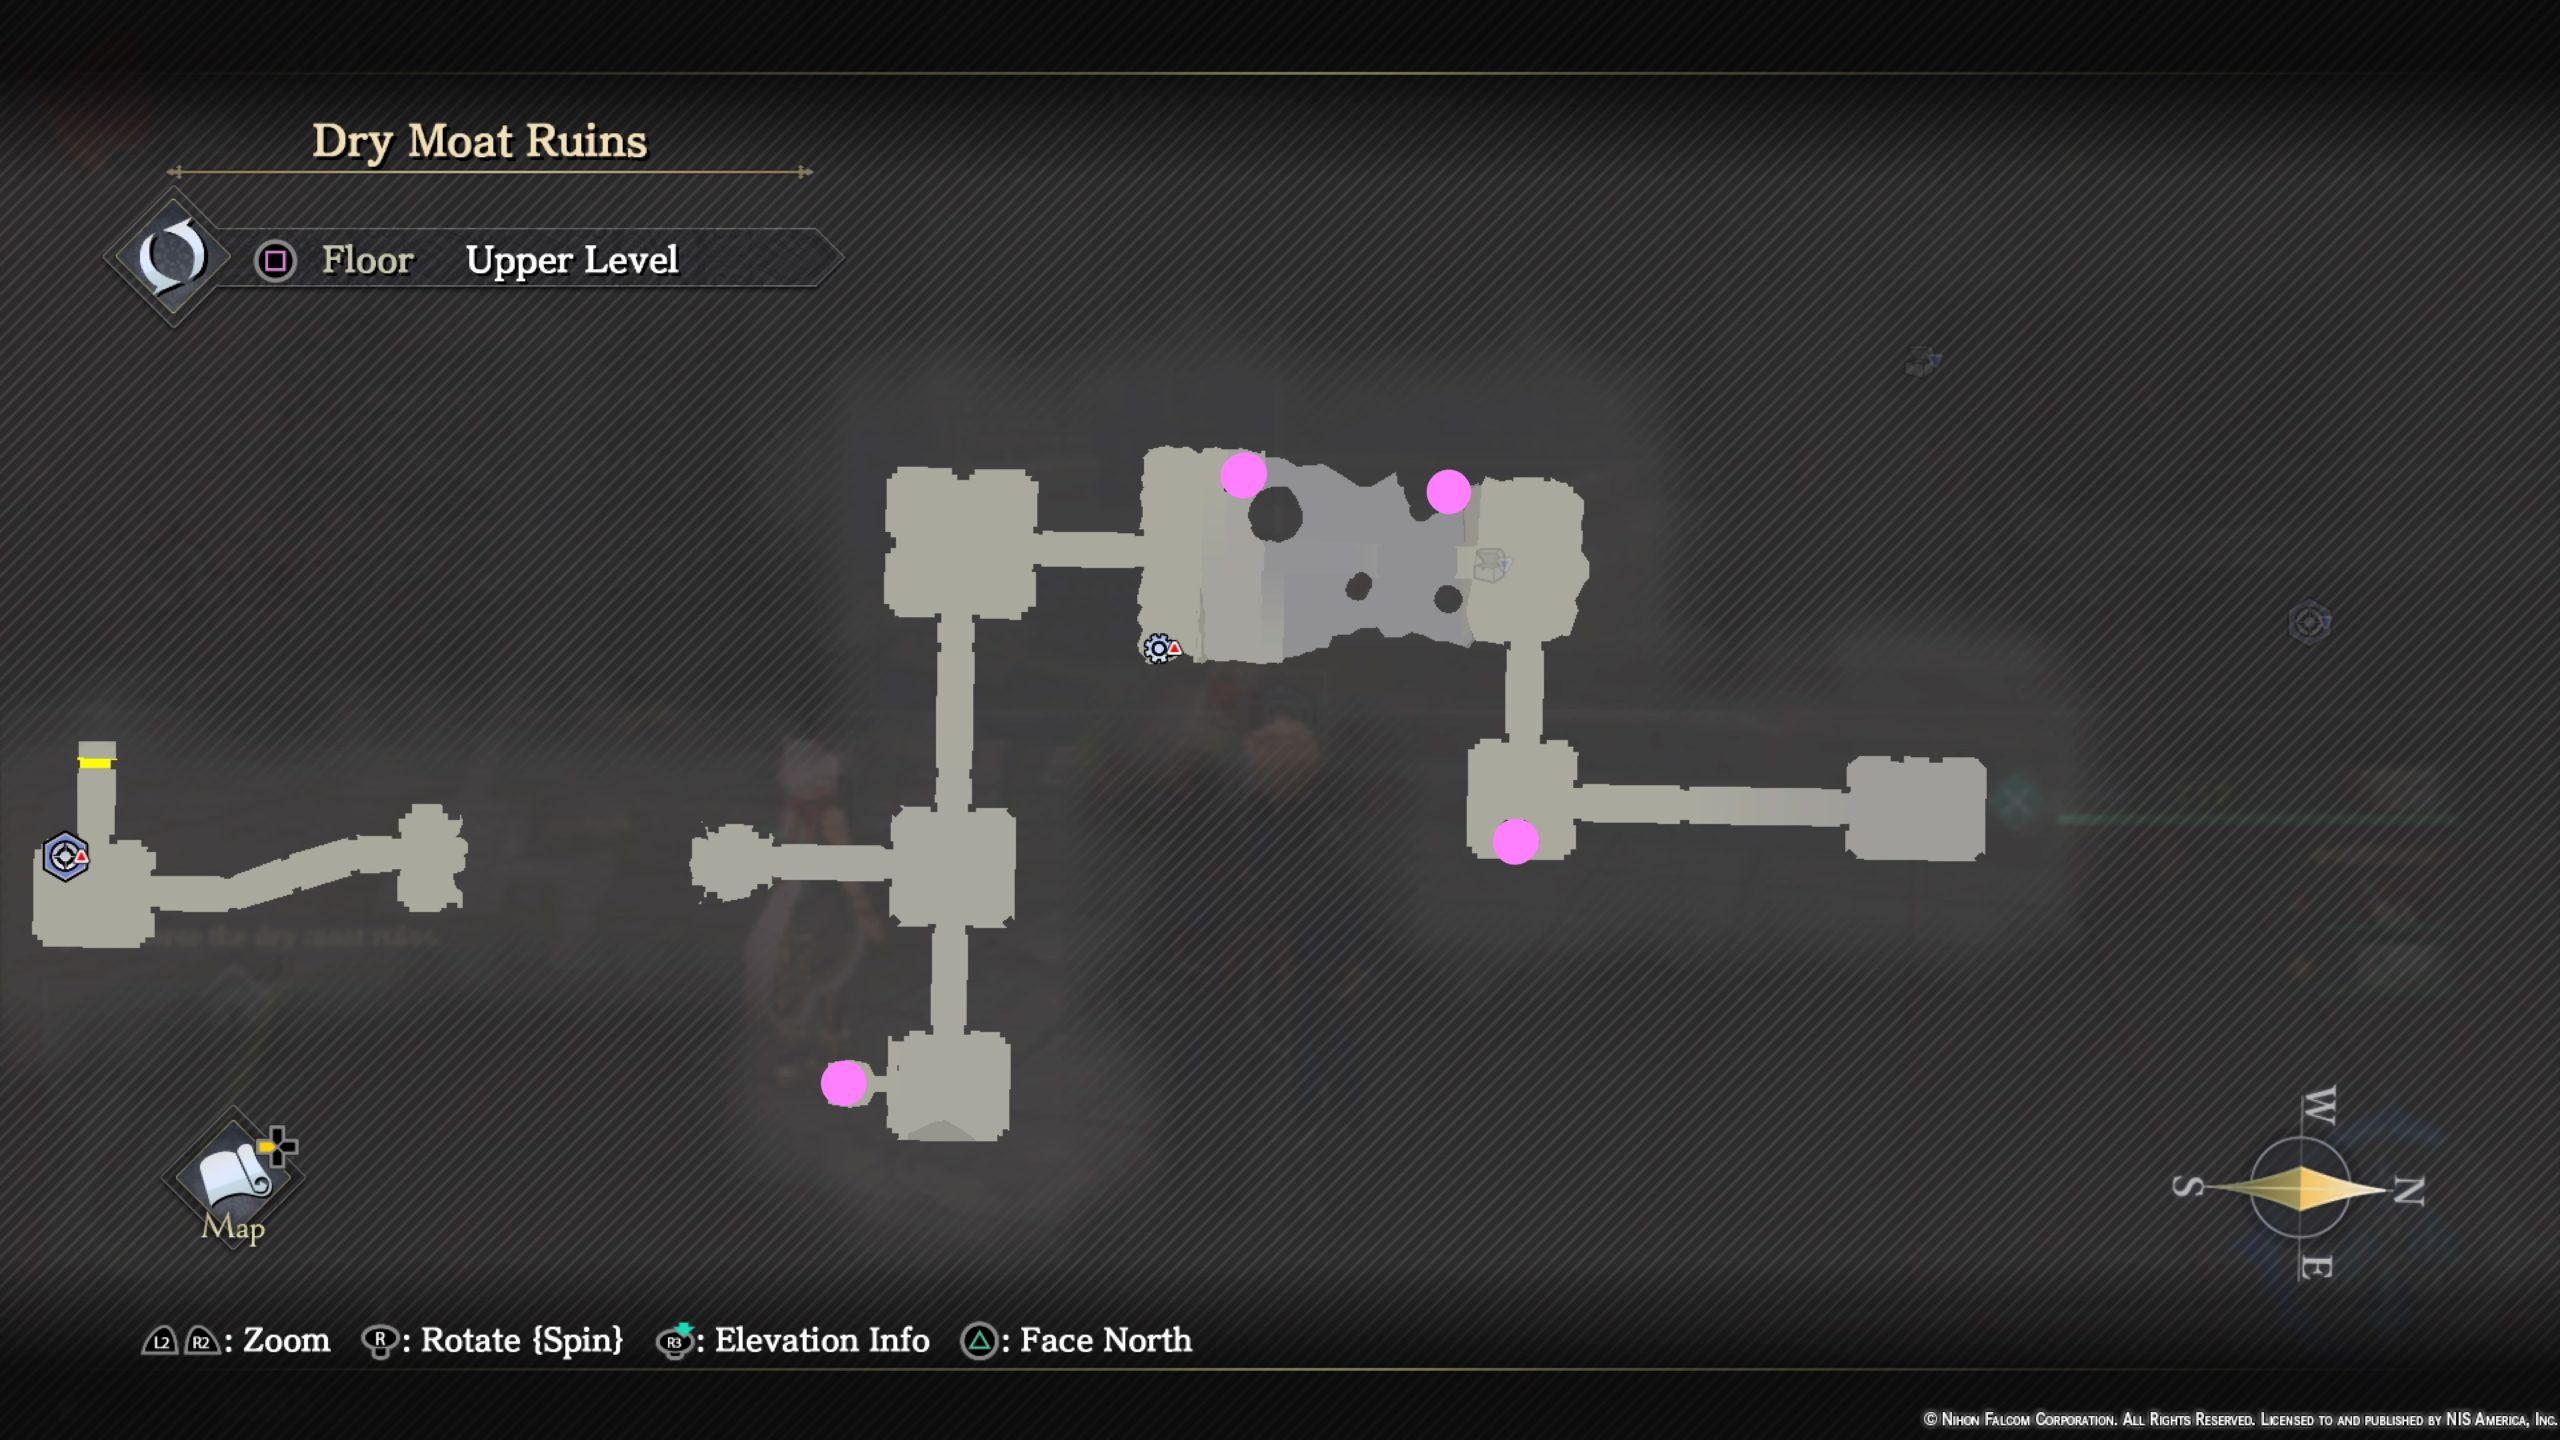

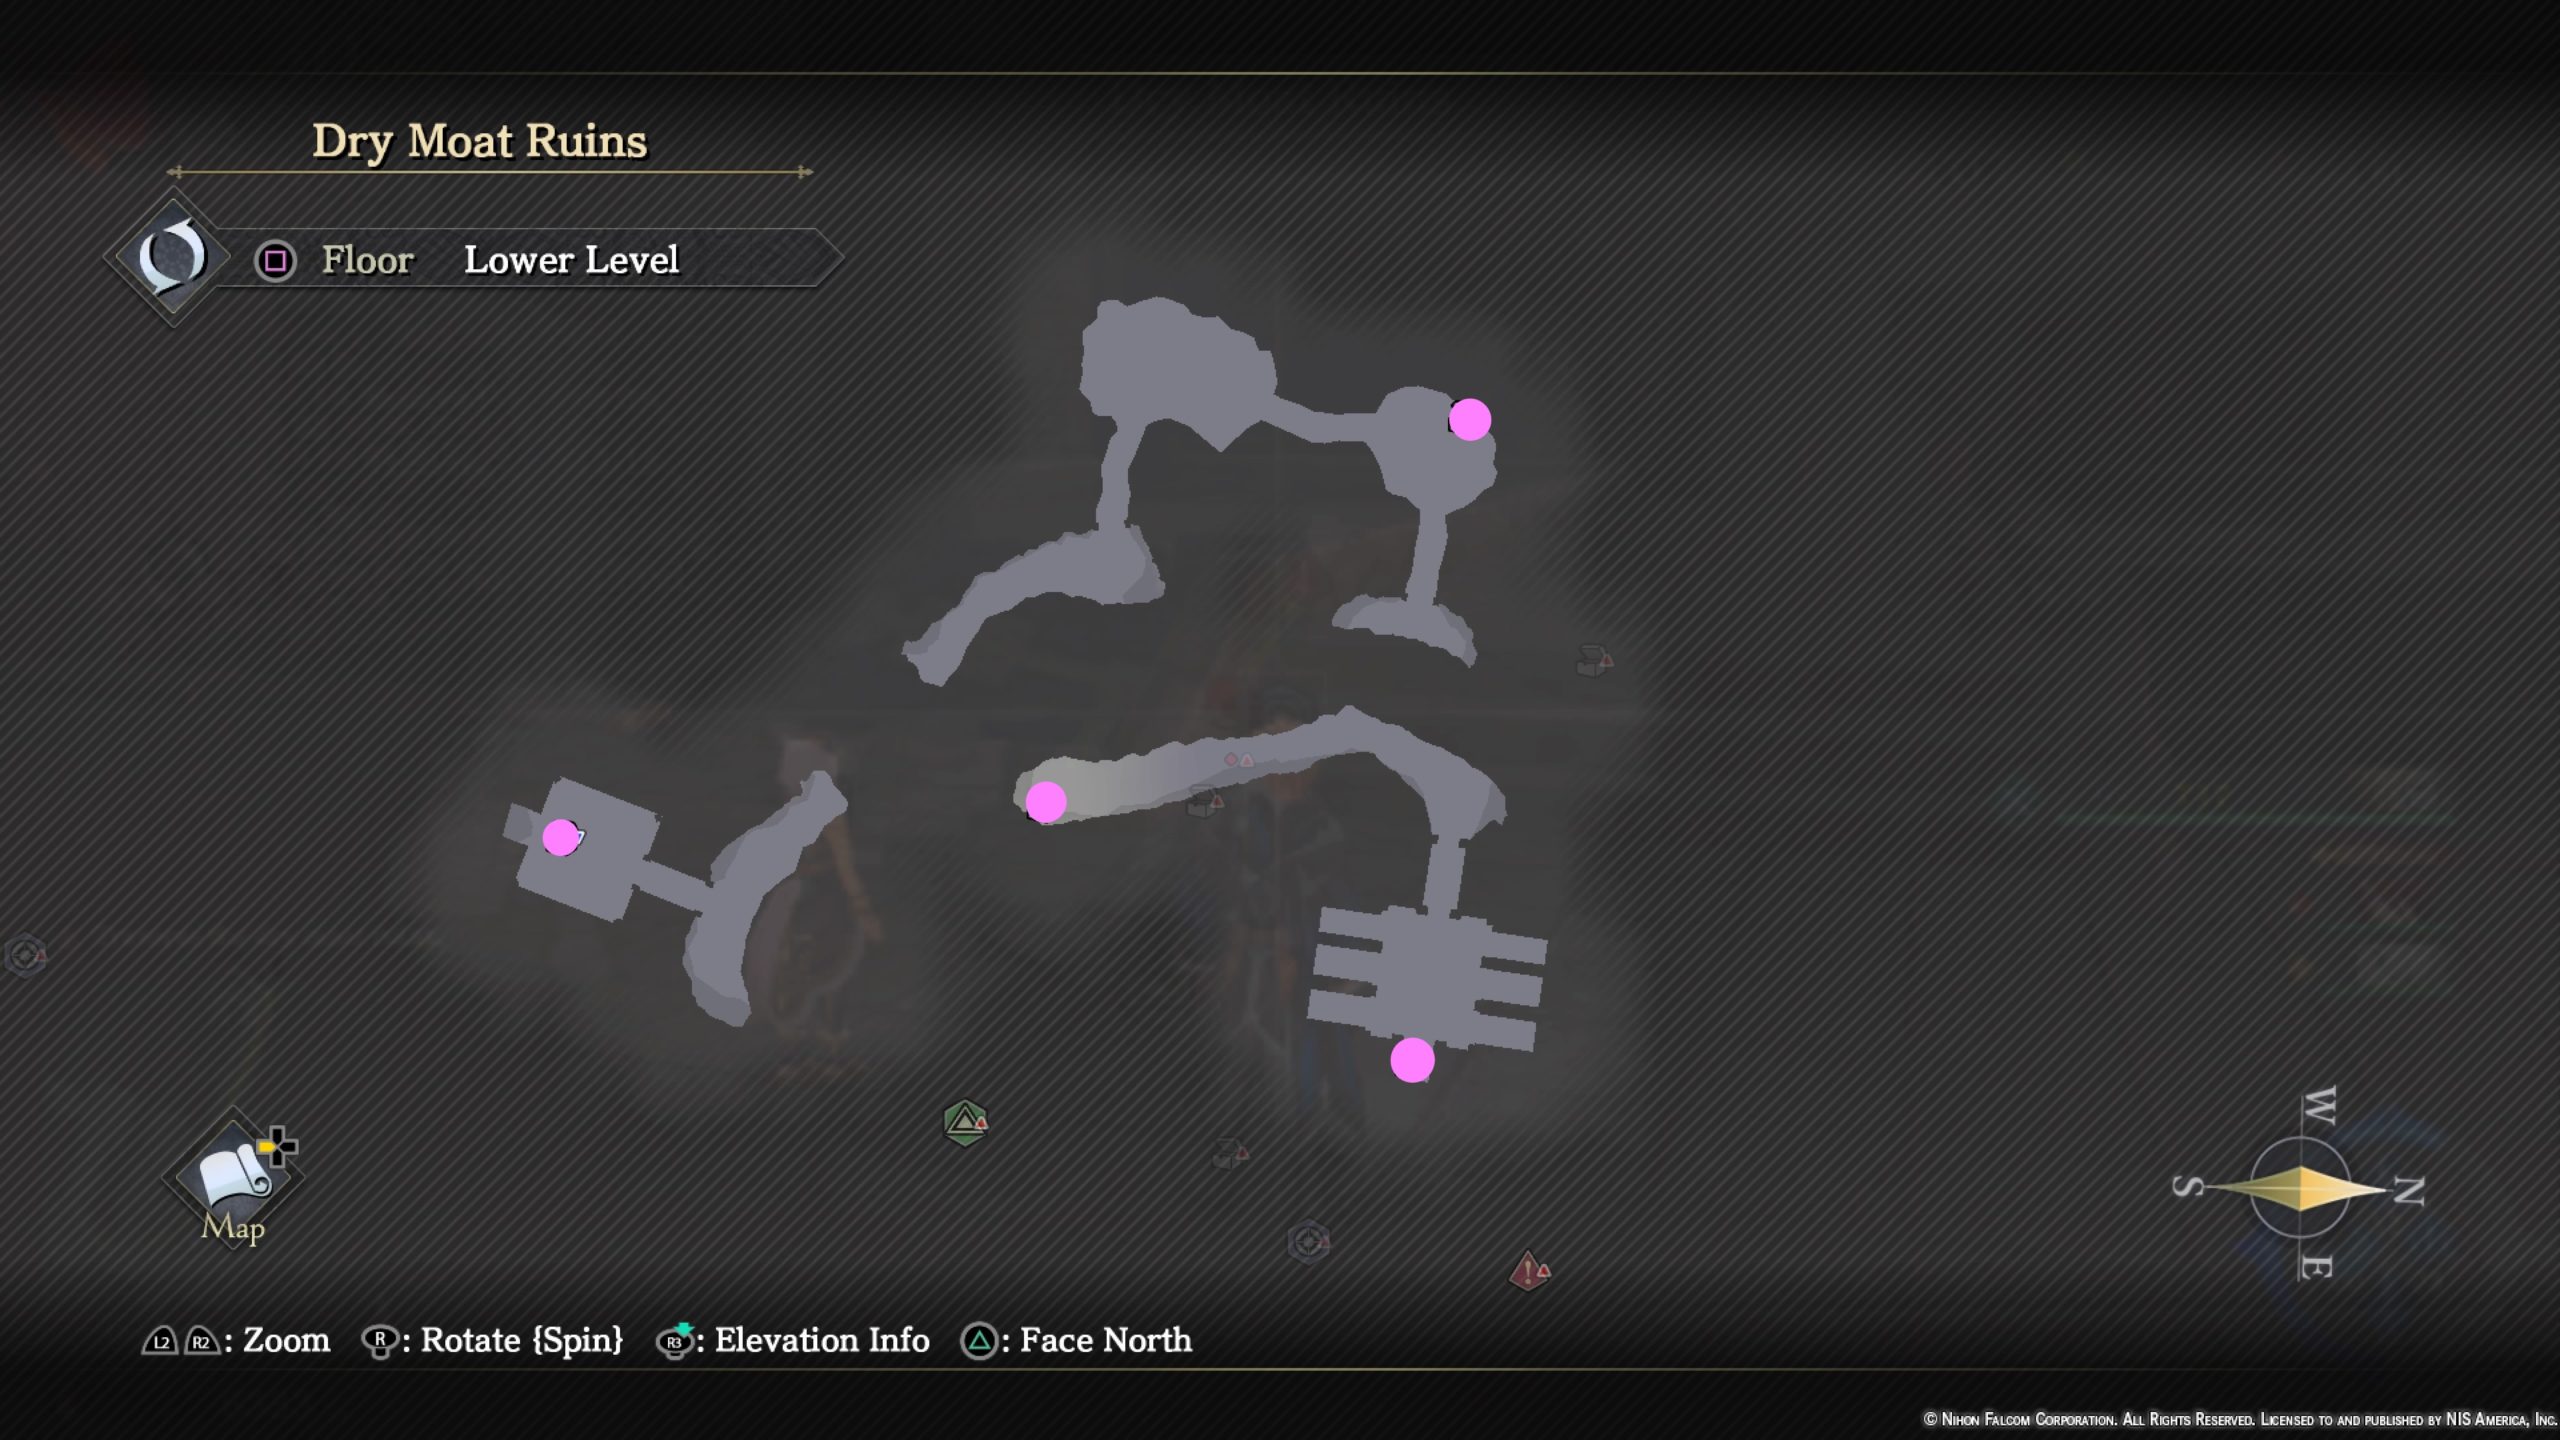
- Grimnut x2
- Wood Shield
- Sedative x3
- Red Cape
- Rebel Grimoire
- 1000 Gold
- Nors Bleu
- 500 Gold
- Hornville Wing x2
- Red Cheese x2
- Spirit Elixir
- Life Elixir
- Boost Potion
Emain Macha

- Strength Elixir
- Smoked Meat x2
- Polar Night Drop x2
- Flaring Spaulder
- Wicked Grimoire
- Panacea x2
- Bitter Remedy x6
- Blade Ring III
- Tonic x4
- Eagle Eye Orb
- Onyx Belt
- 3000 Gold
- 2500 Gold
- Hermit’s Remedy
- Warrior Seal III
- 2000 Gold
- Full Potion
- Nors Bleu x2
- Mystic Lazulite x2
Entertainment District
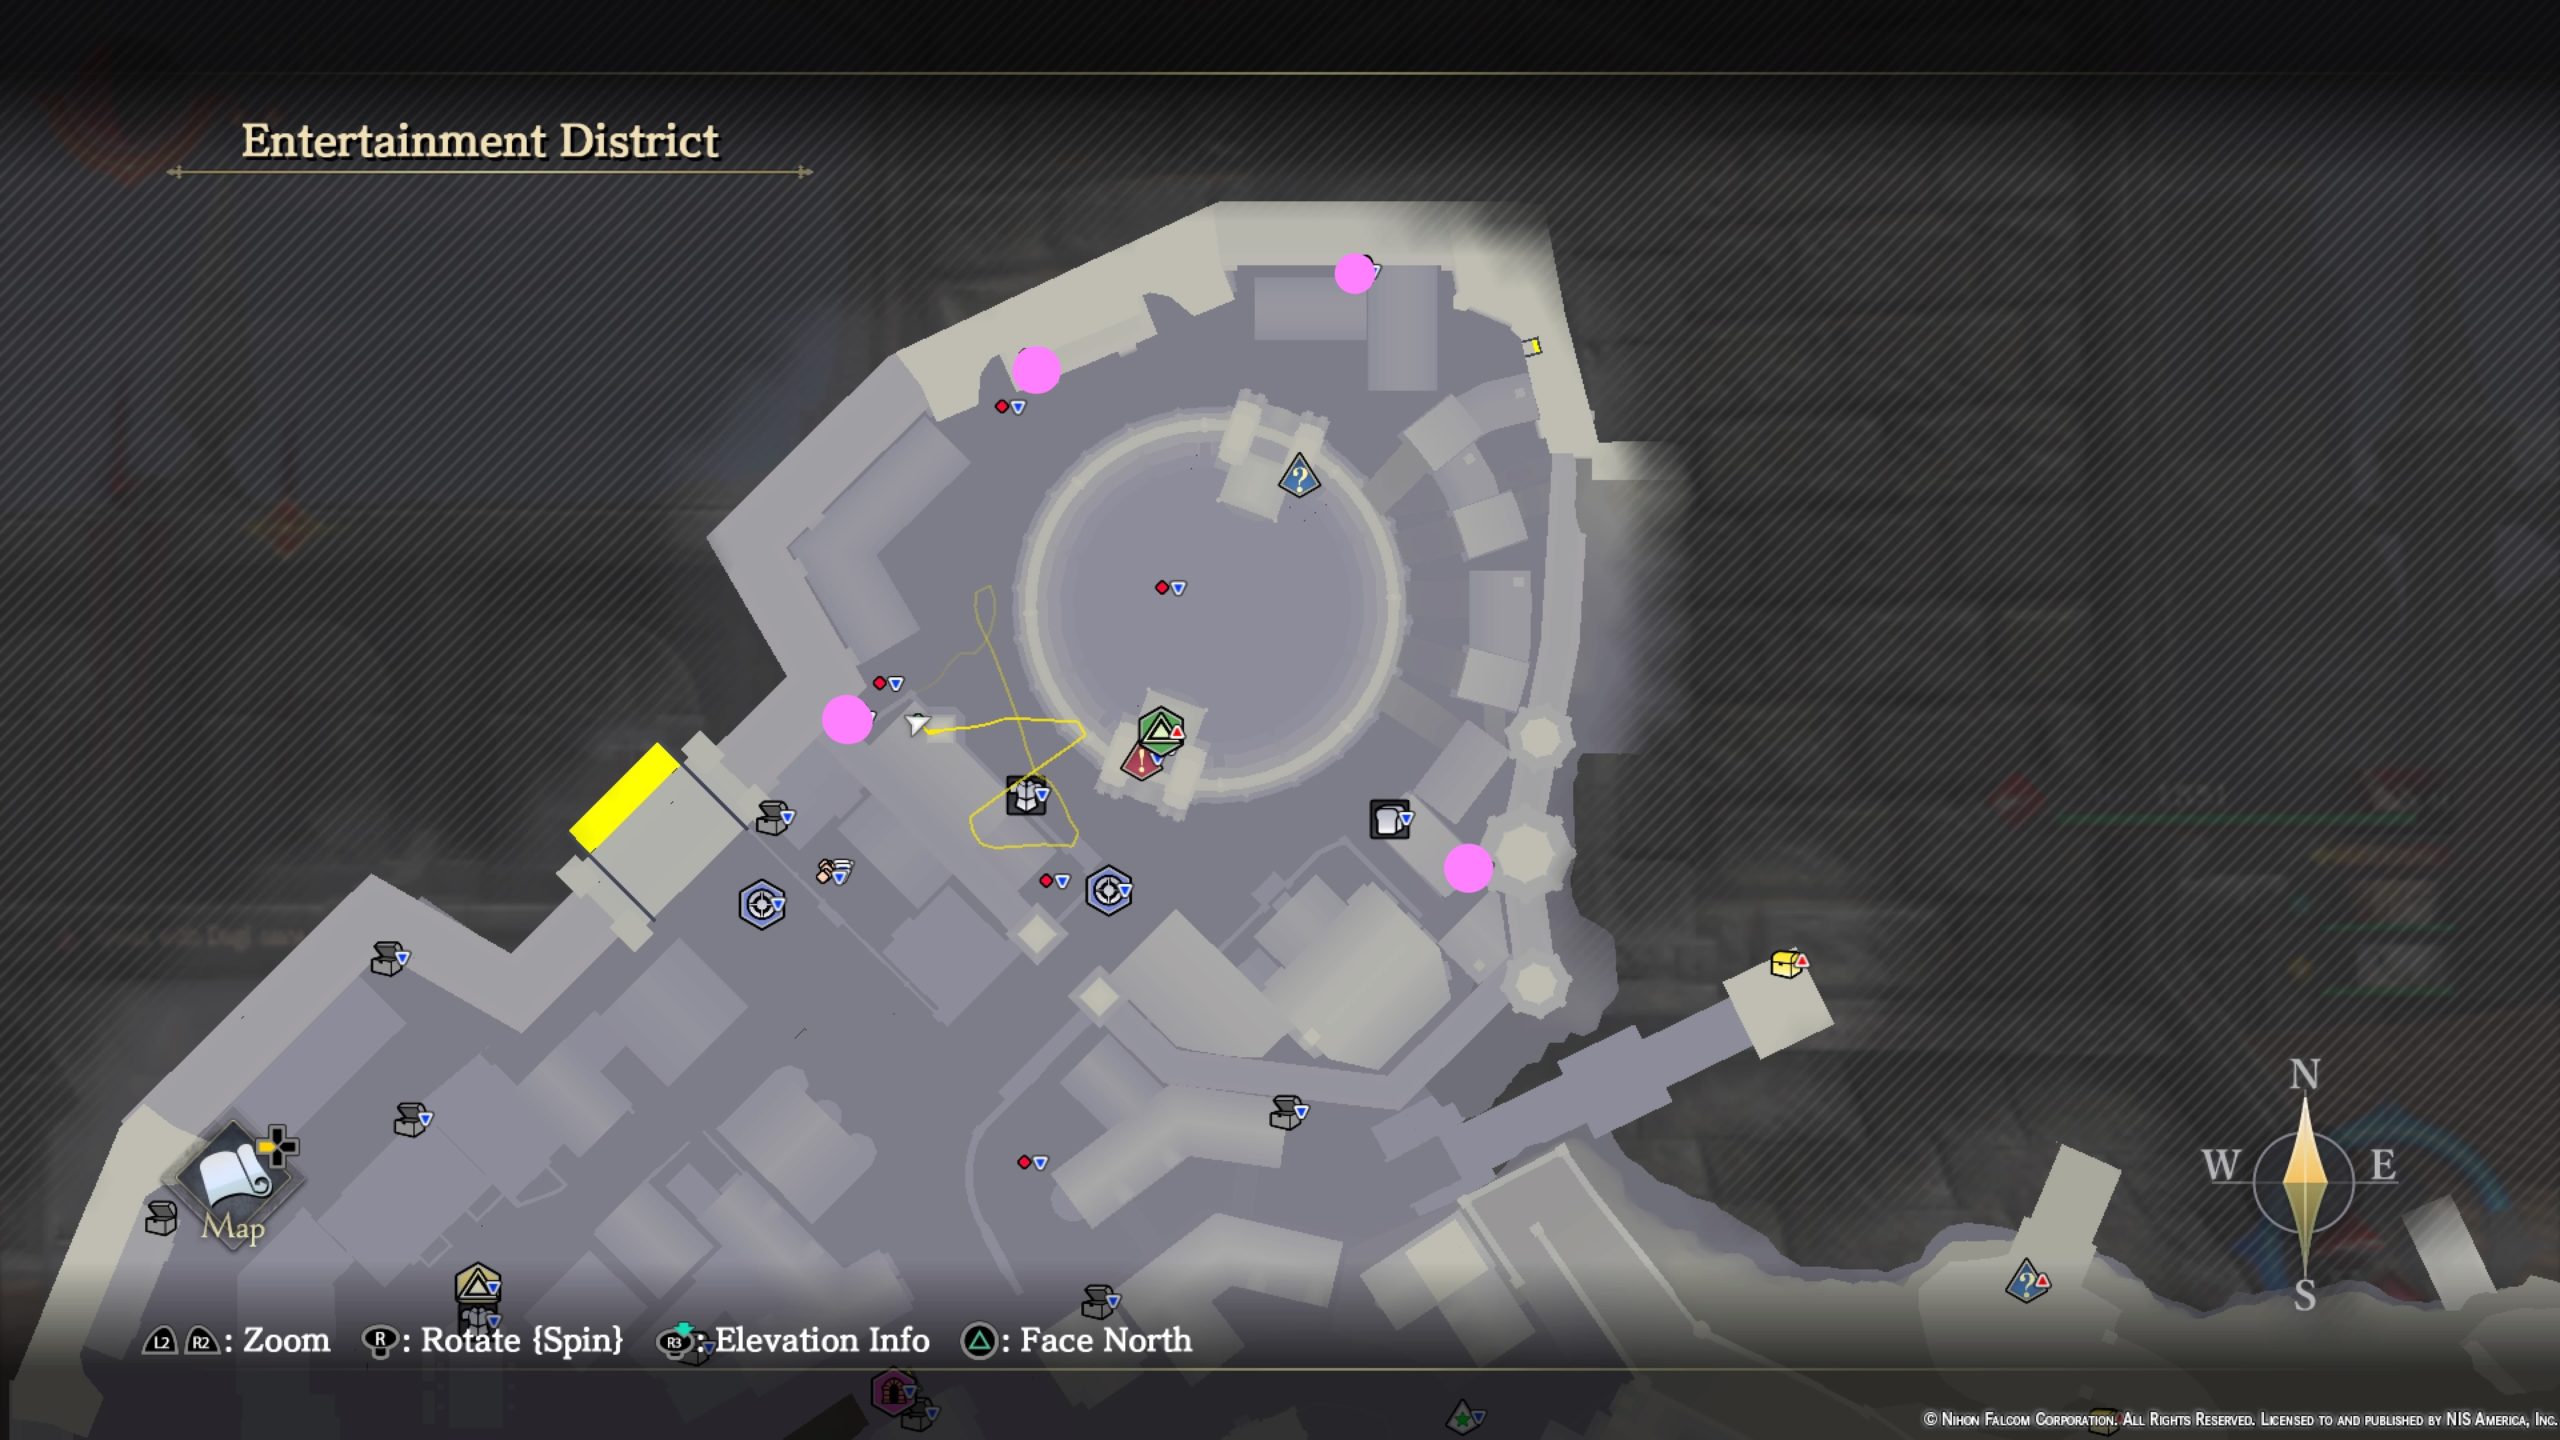
- Cheese x5
- Red Cheese x2
- 2000 Gold
- Emollient x2
Estatte Road
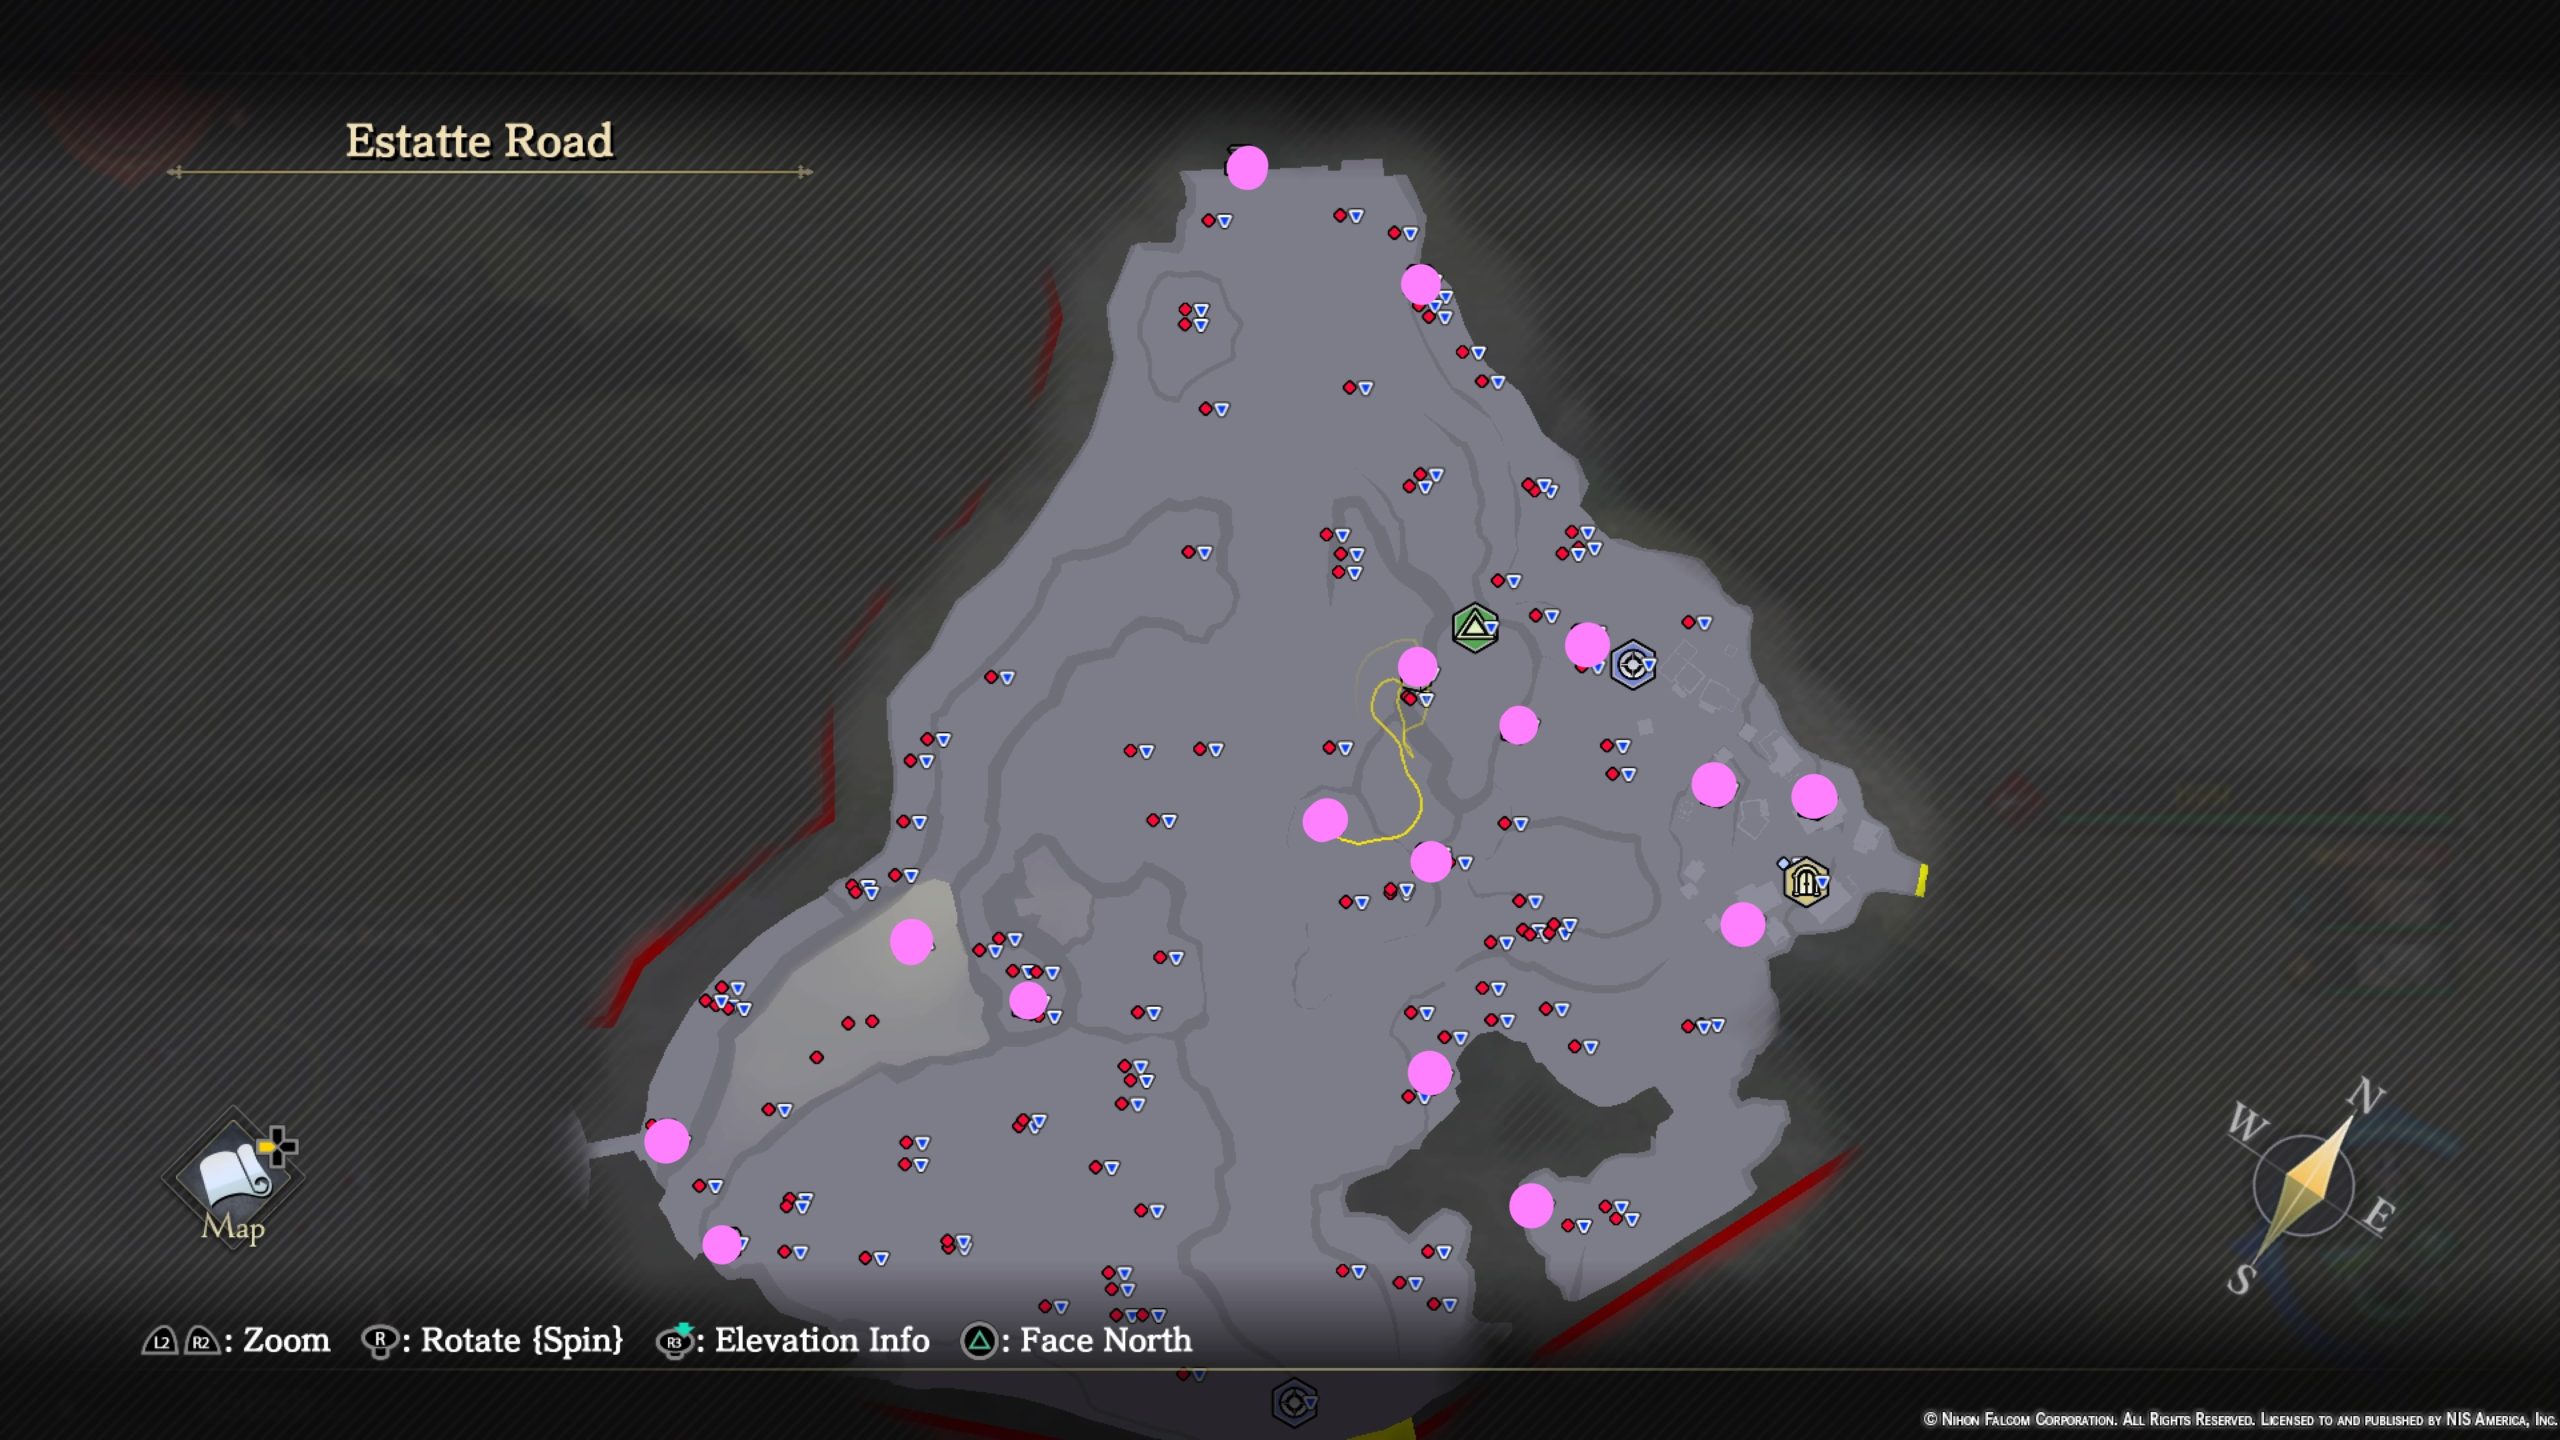
- Heal Potion
- White Meat x5
- Aromatic Lumber x5
- Eagle Feather
- Bitter Remedy
- Black Belt
- Ultradense Bone x2
- Defense Elixir
- 800 Gold
- Grimnut x2
- Iron Ore x5
- Red Meat x5
- Red Cheese x3
- Antidote x3
- 800 Gold
- Panacea
Fool’s Jail
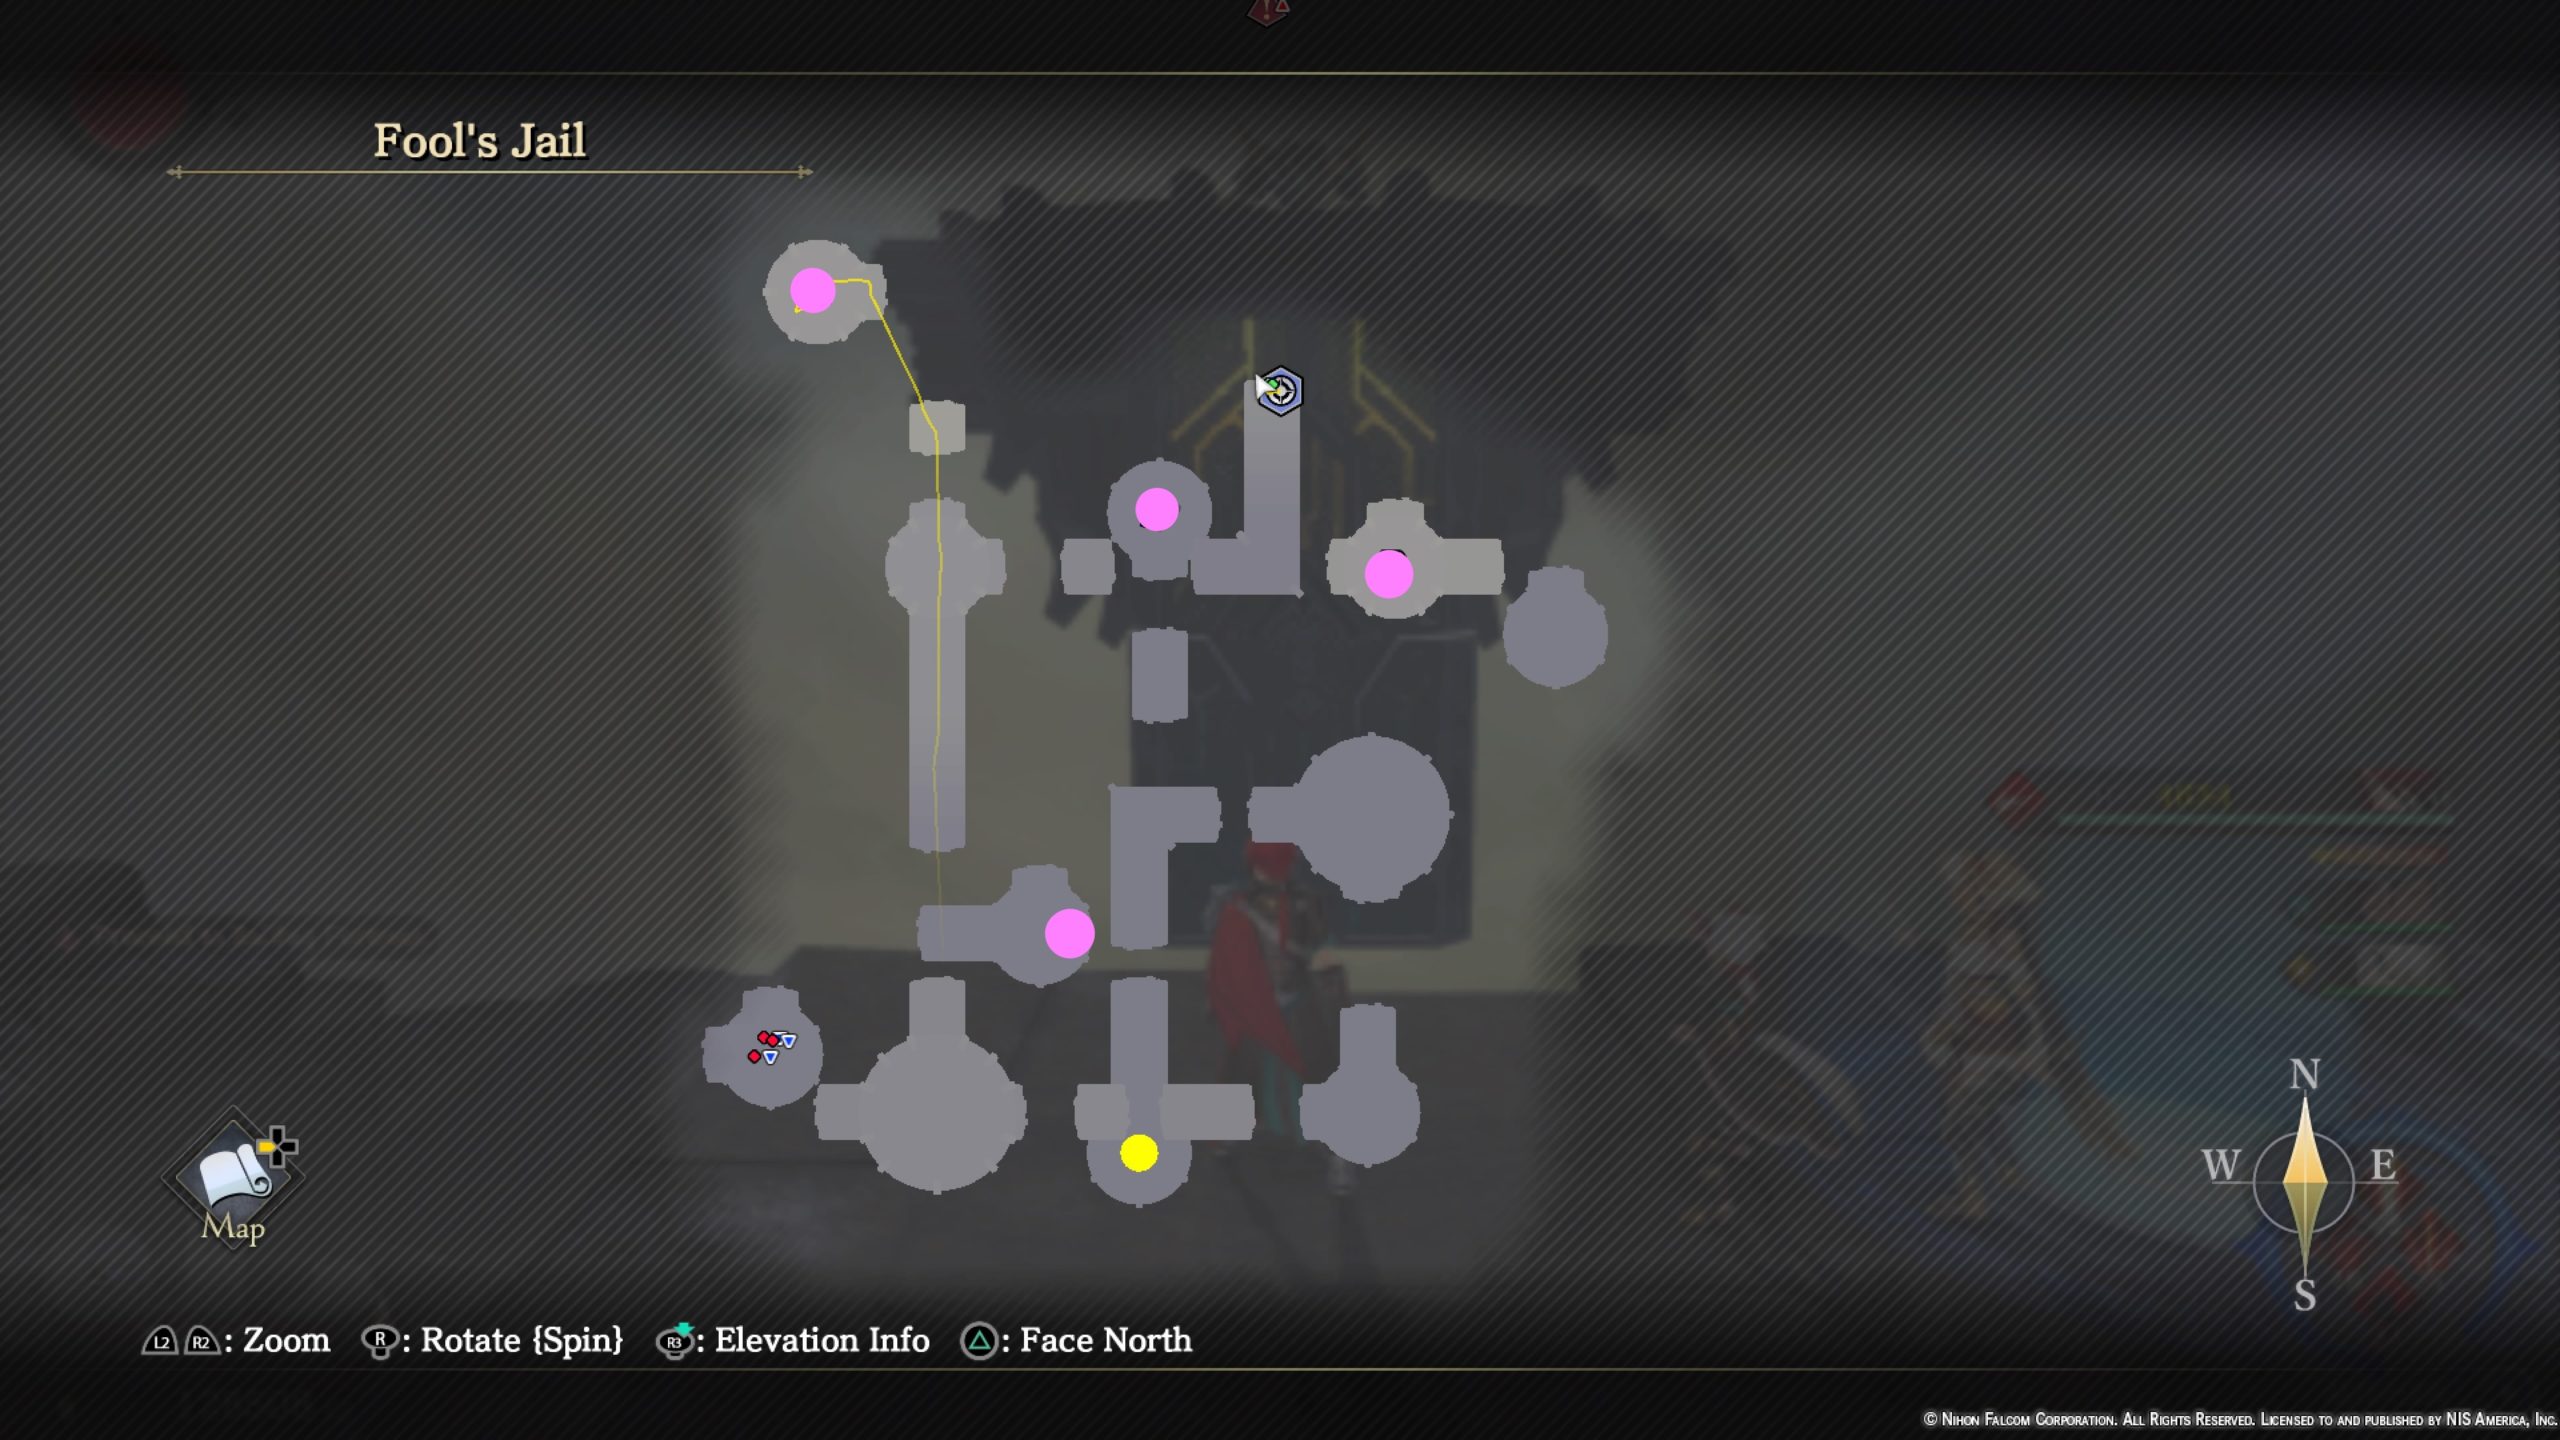
- Mythical Blueprints
- 12000 Gold
- Tellurian Talisman
- Otherworldly Core
Forgotten Armory (hidden area)
*From the Memorial Tree in Artisan Lane, head north just to the right of the road to find 3 sewer grates. Use Renegade’s gift to enter the middle grate.


- Arachne Gloves
Groaning Grotto

- Boost Potion
- To reach this chest, follow the path from the entrance until you reach a broken section of tunnel on your left revealing a cavern. You’ll need to fly over to a flat wall on the other side then run up it to reach a ledge where you can smash a wall revealing the hidden chest.
- Panacea x2
- Soul Lumber x4
- Formian Cuticle x2
- Yellow Shawl
- 1400 Gold
- Sturdy Grimoire
- Crimson Spar x4
- Tiger Claw
- 2000 Gold
- Life Elixir
- Dry-aged Meat x2
Heretic’s Jail
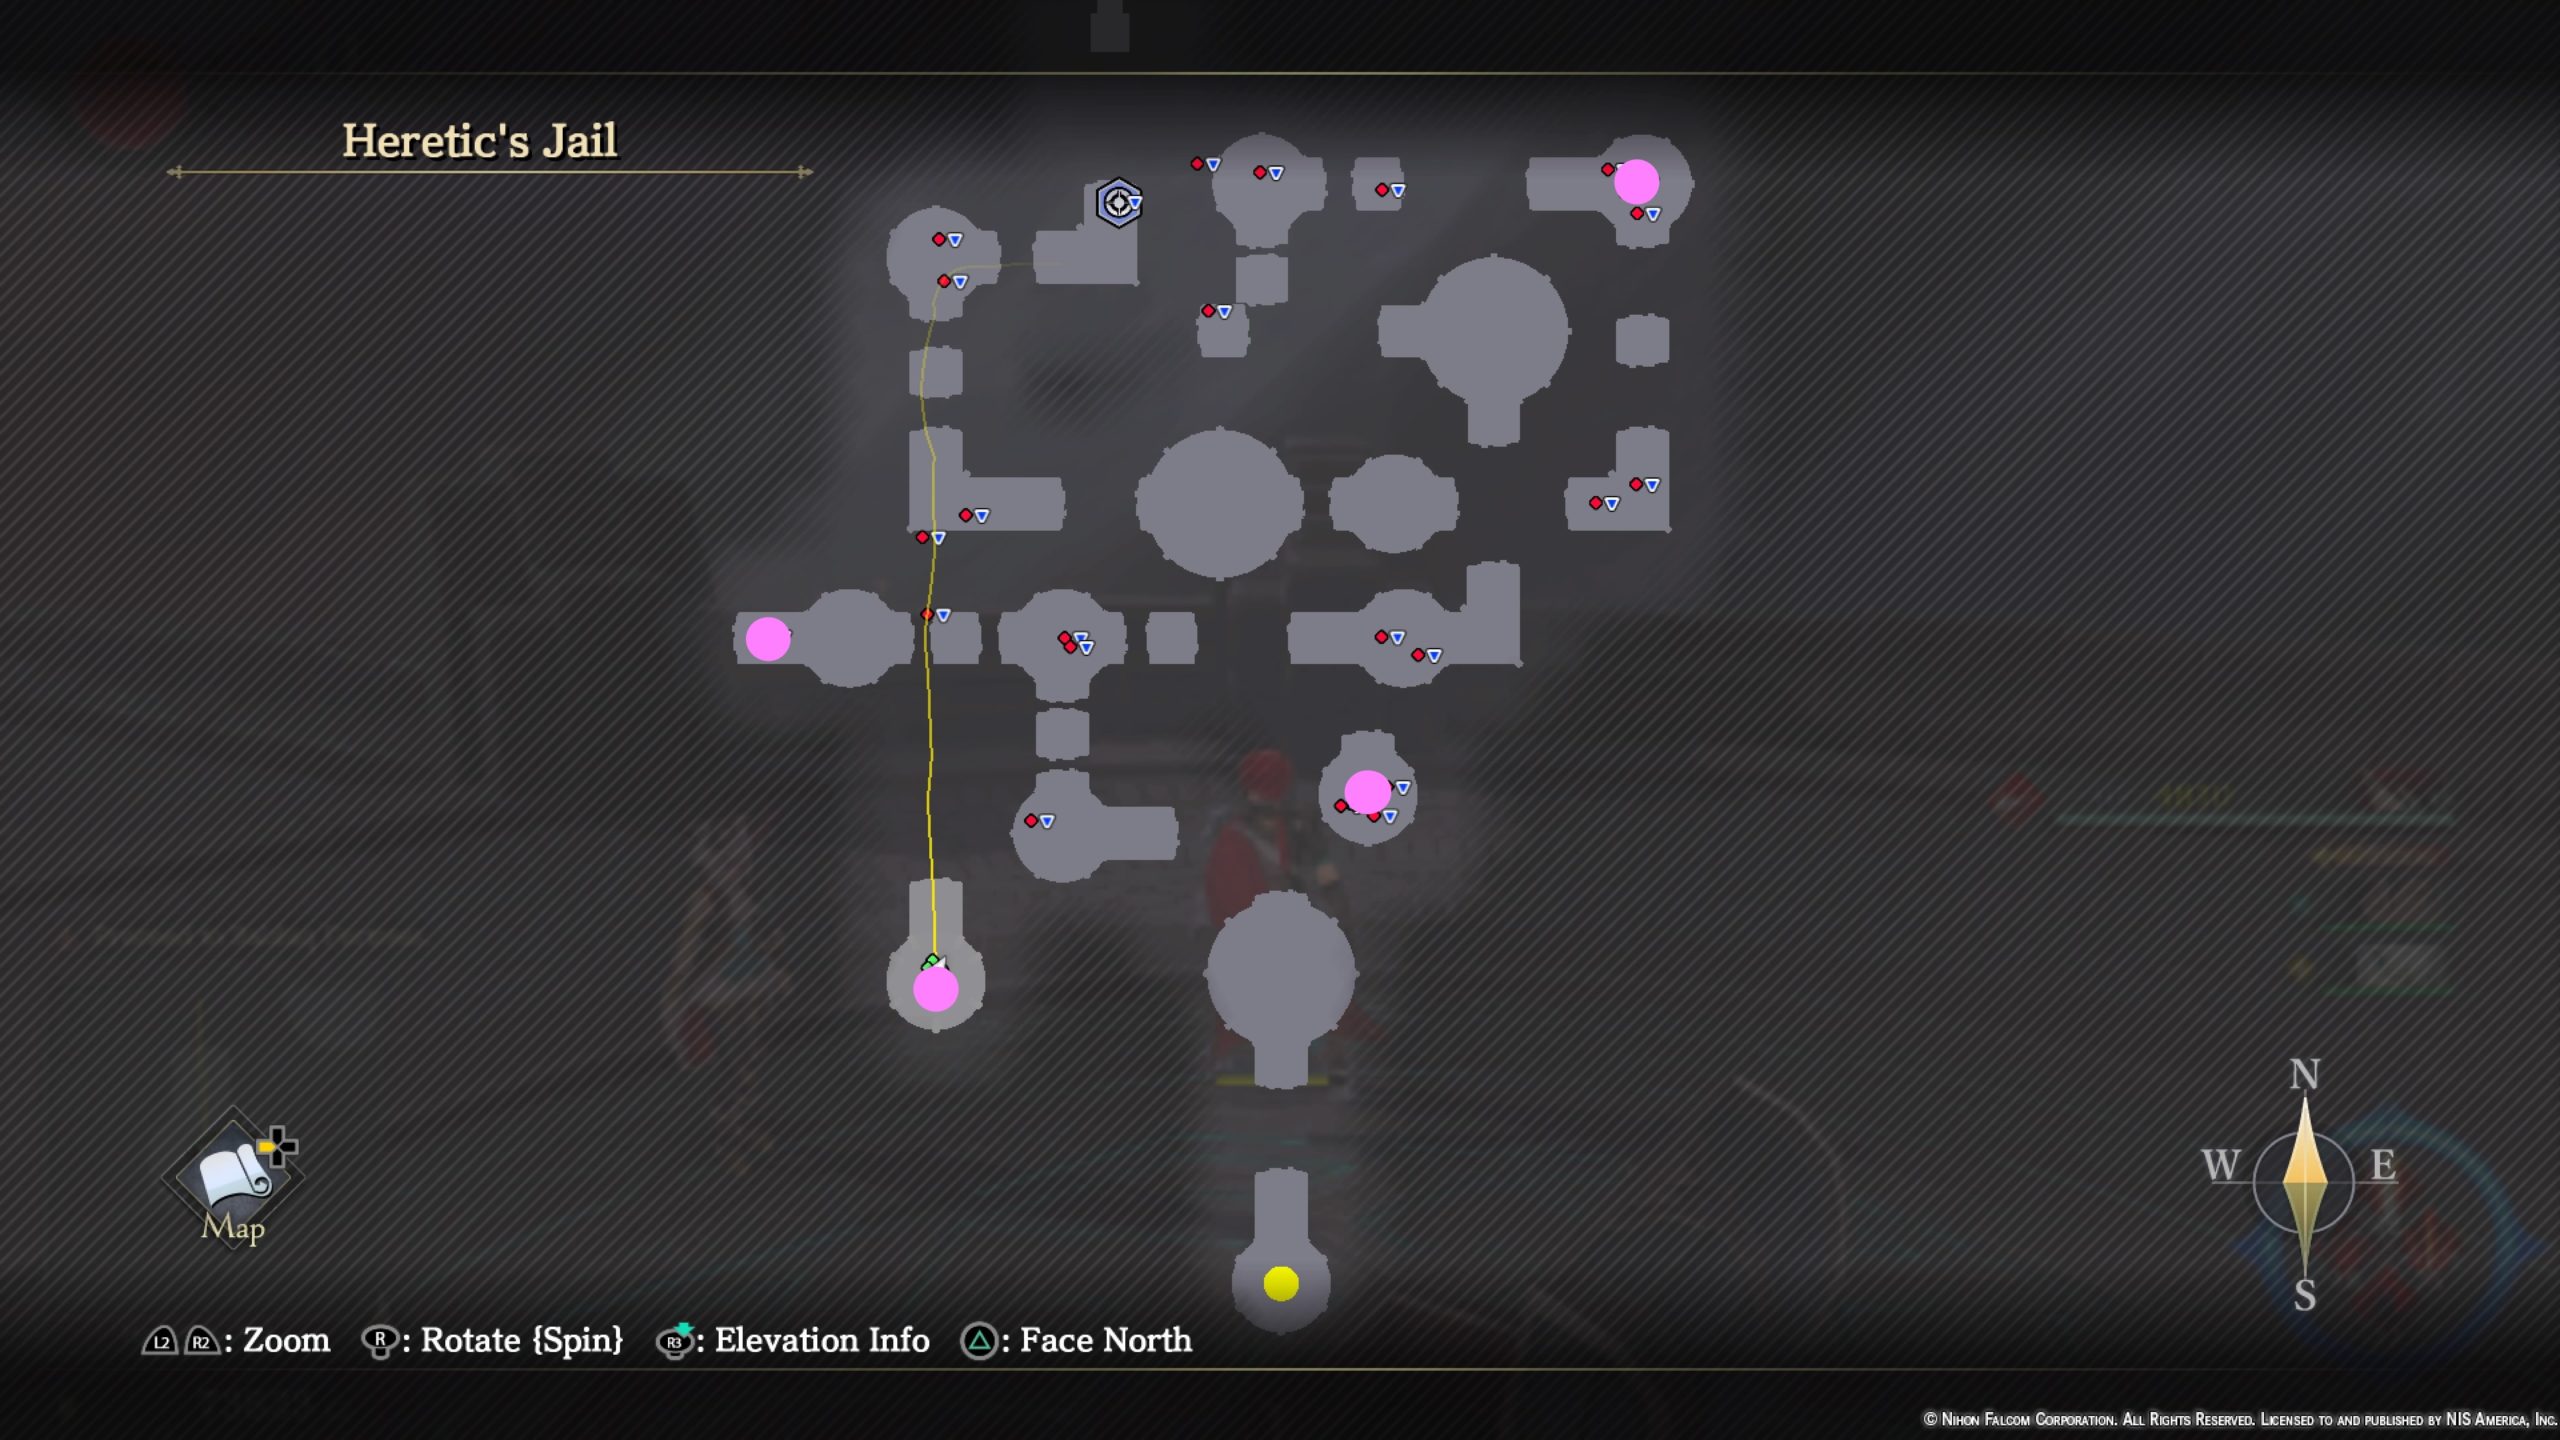
- 15000 Gold
- Nocturne Oil
- Otherworldly Core
- Crimson Fang x2
Hidden Research Wing

- Leather Necklace IV
- 4800 Gold
- Panacea x2
- Sapphire Bandana
- Warlord Elixir
- Hermit’s Remedy x2
- Dry-aged Meat x2
- Strength Elixir
- 7200 Gold
- Grand Elixir
- Blade Ring IV
- 6000 Gold
- Adichivo Shell
- Blood Fang
- Nocturne Oil
Hieroglyph Commandery
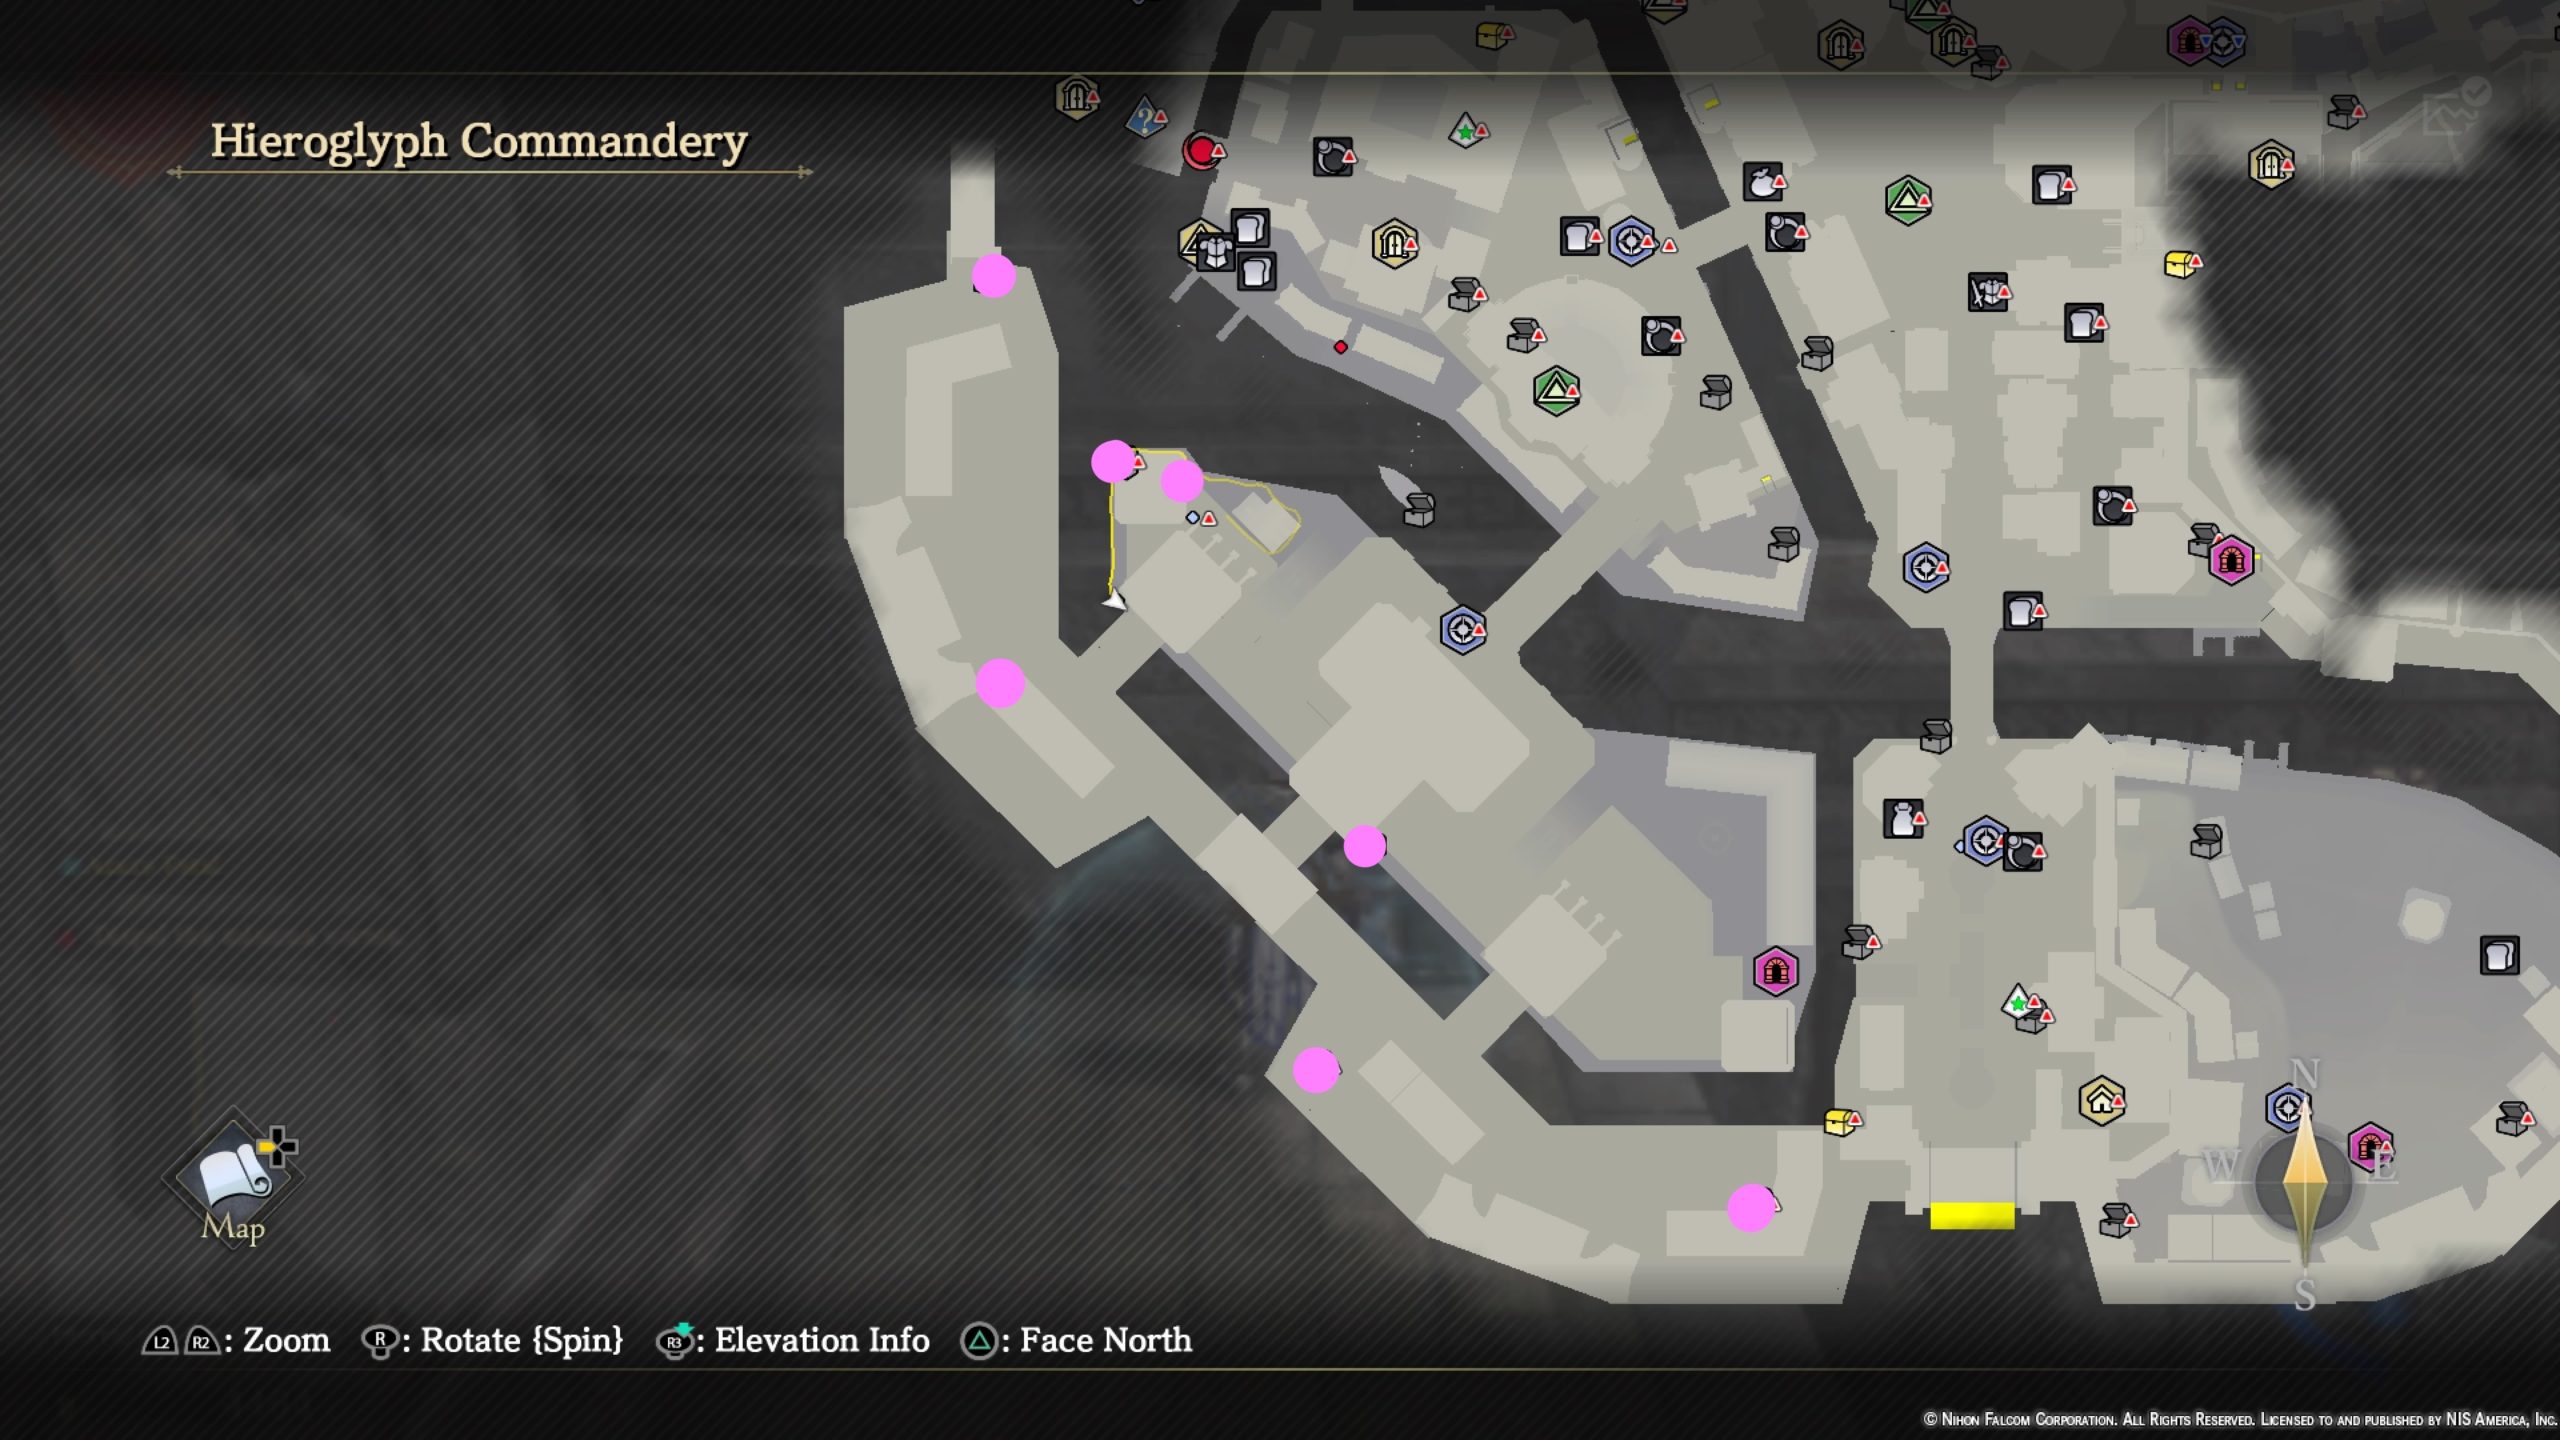
- Grimnut x2
- Tomato x5
- Red Meat x5
- Sedative x2
- 1000 Gold
- Nors Bleu x2
- 3000 Gold
- Requires Renegade to be in party
Jillian Mines (Part 1)
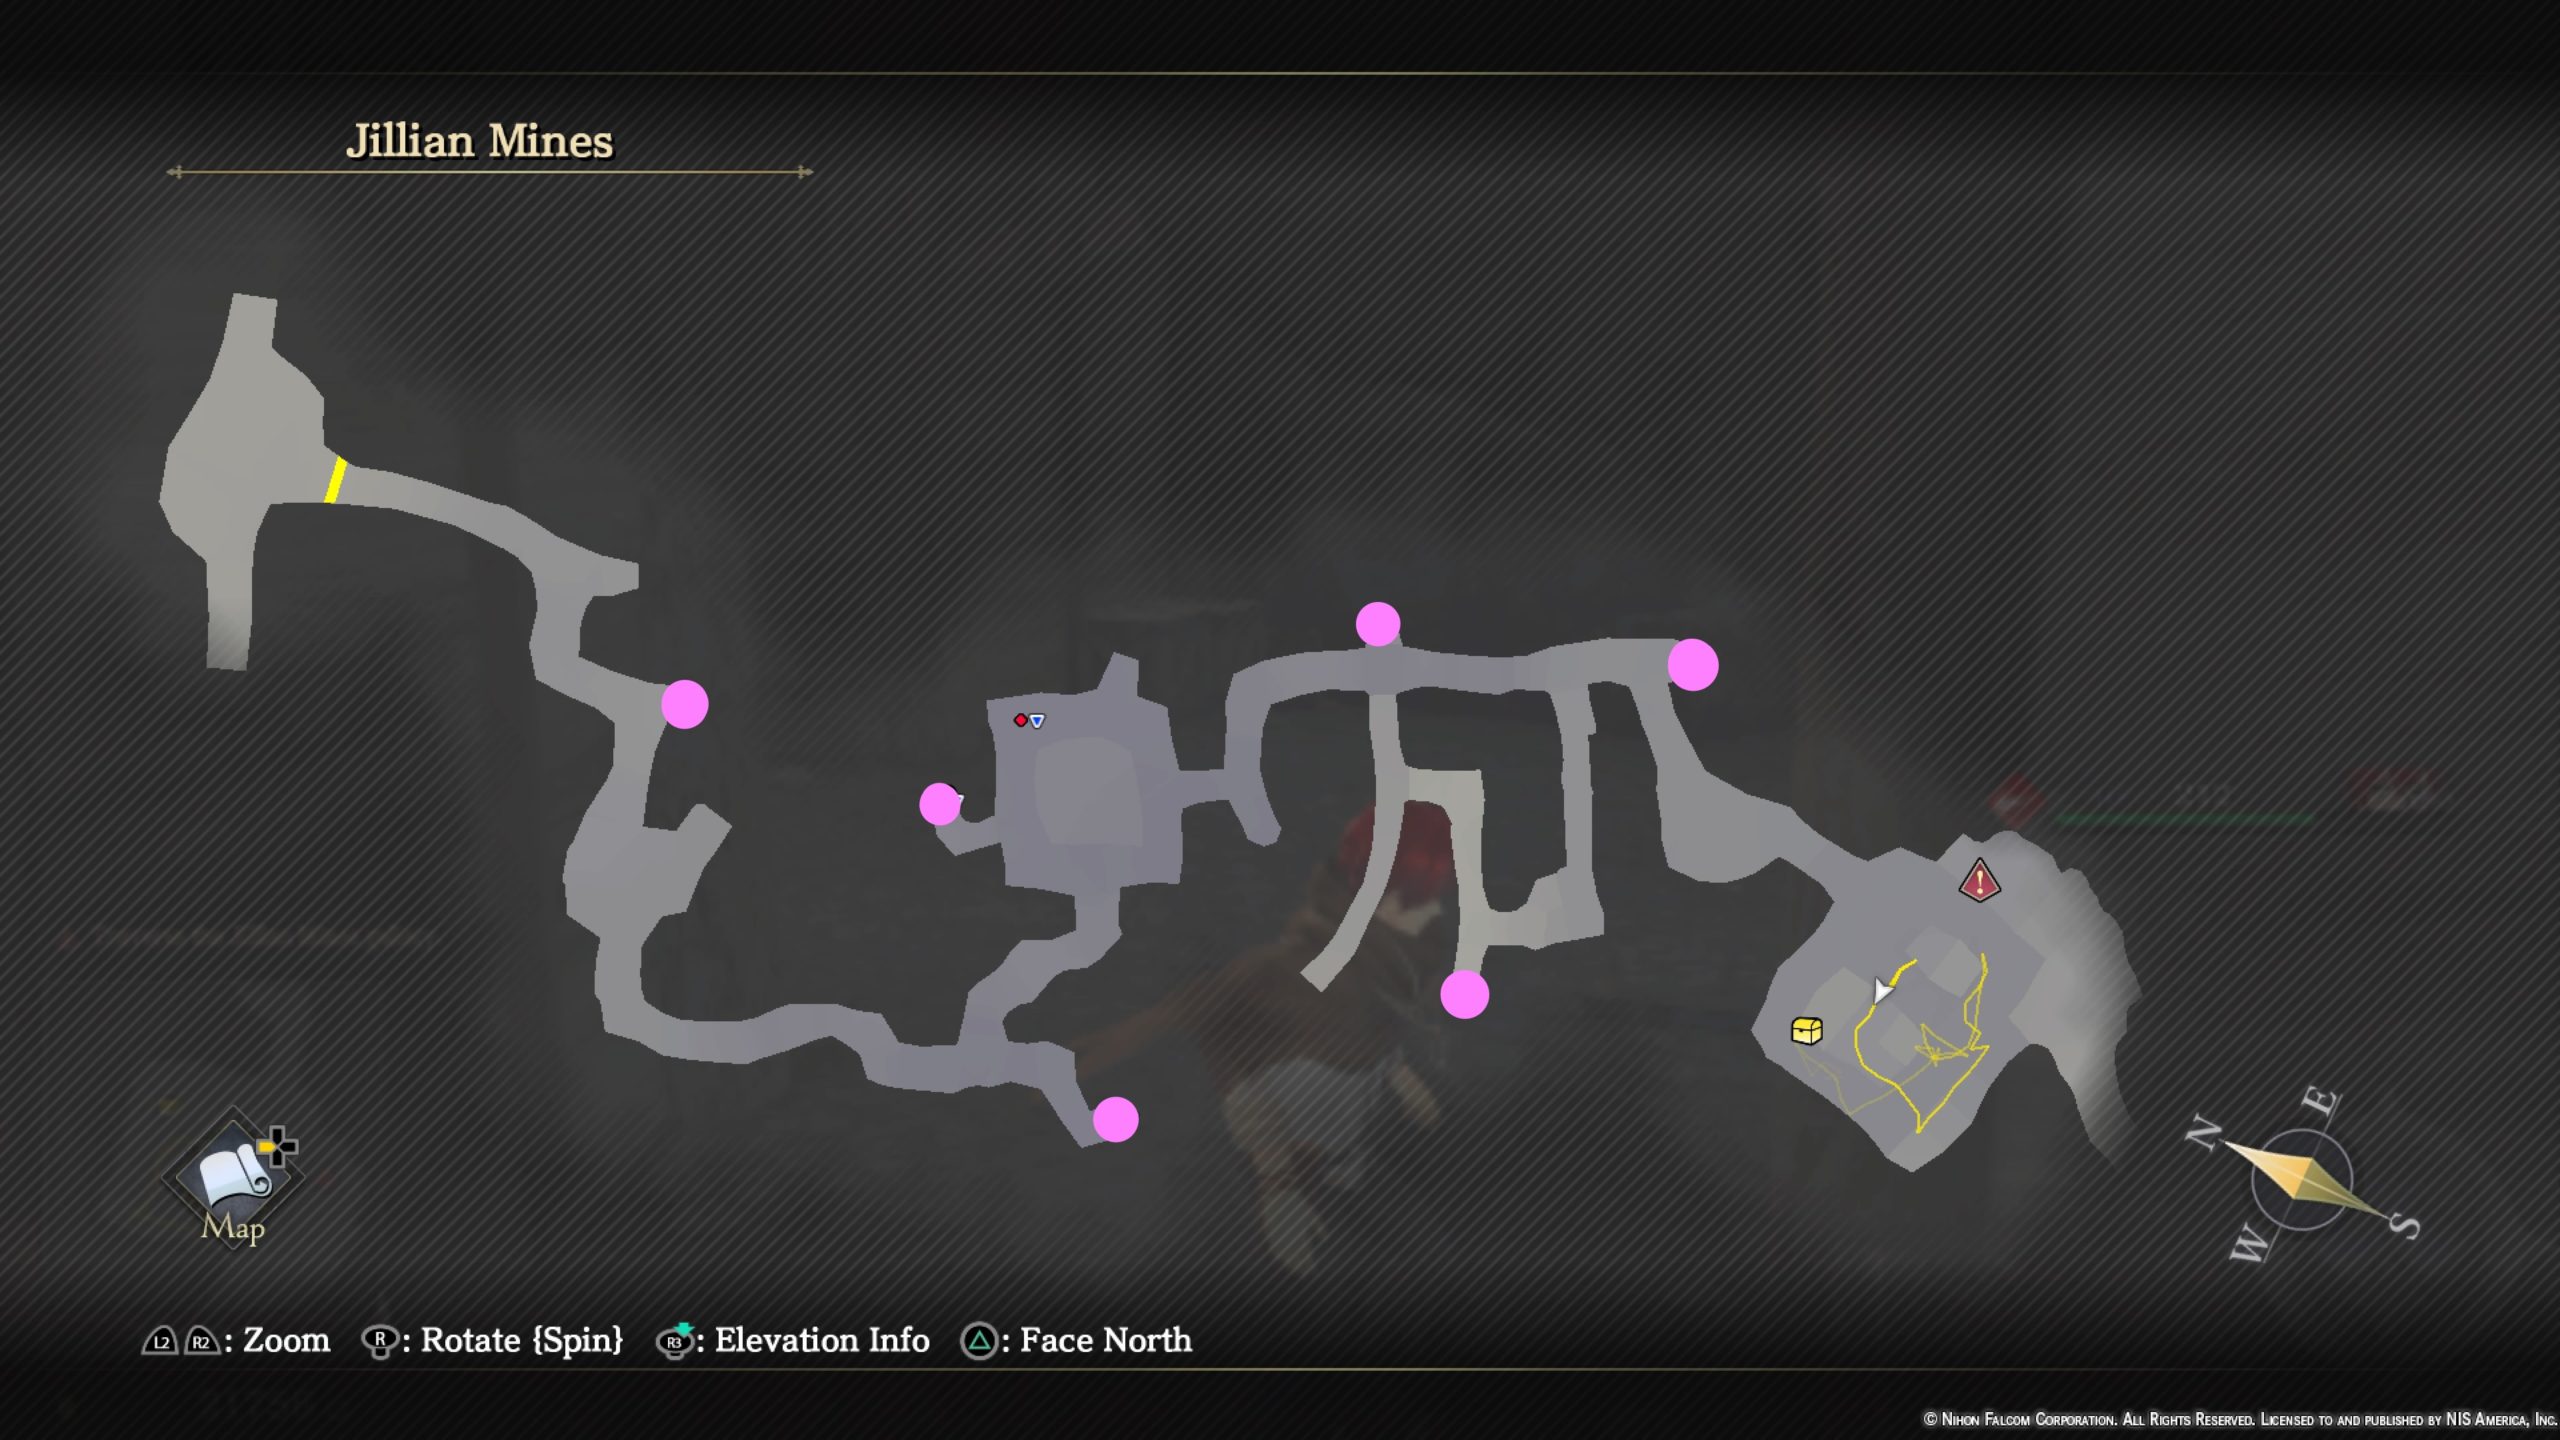
- White Nut
- 800 Gold
- Red Cheese
- 1200 Gold
- 1600 Gold
- Raisins x2
Jillian Mines (Part 2)
*You’ll return here during Chapter 7.
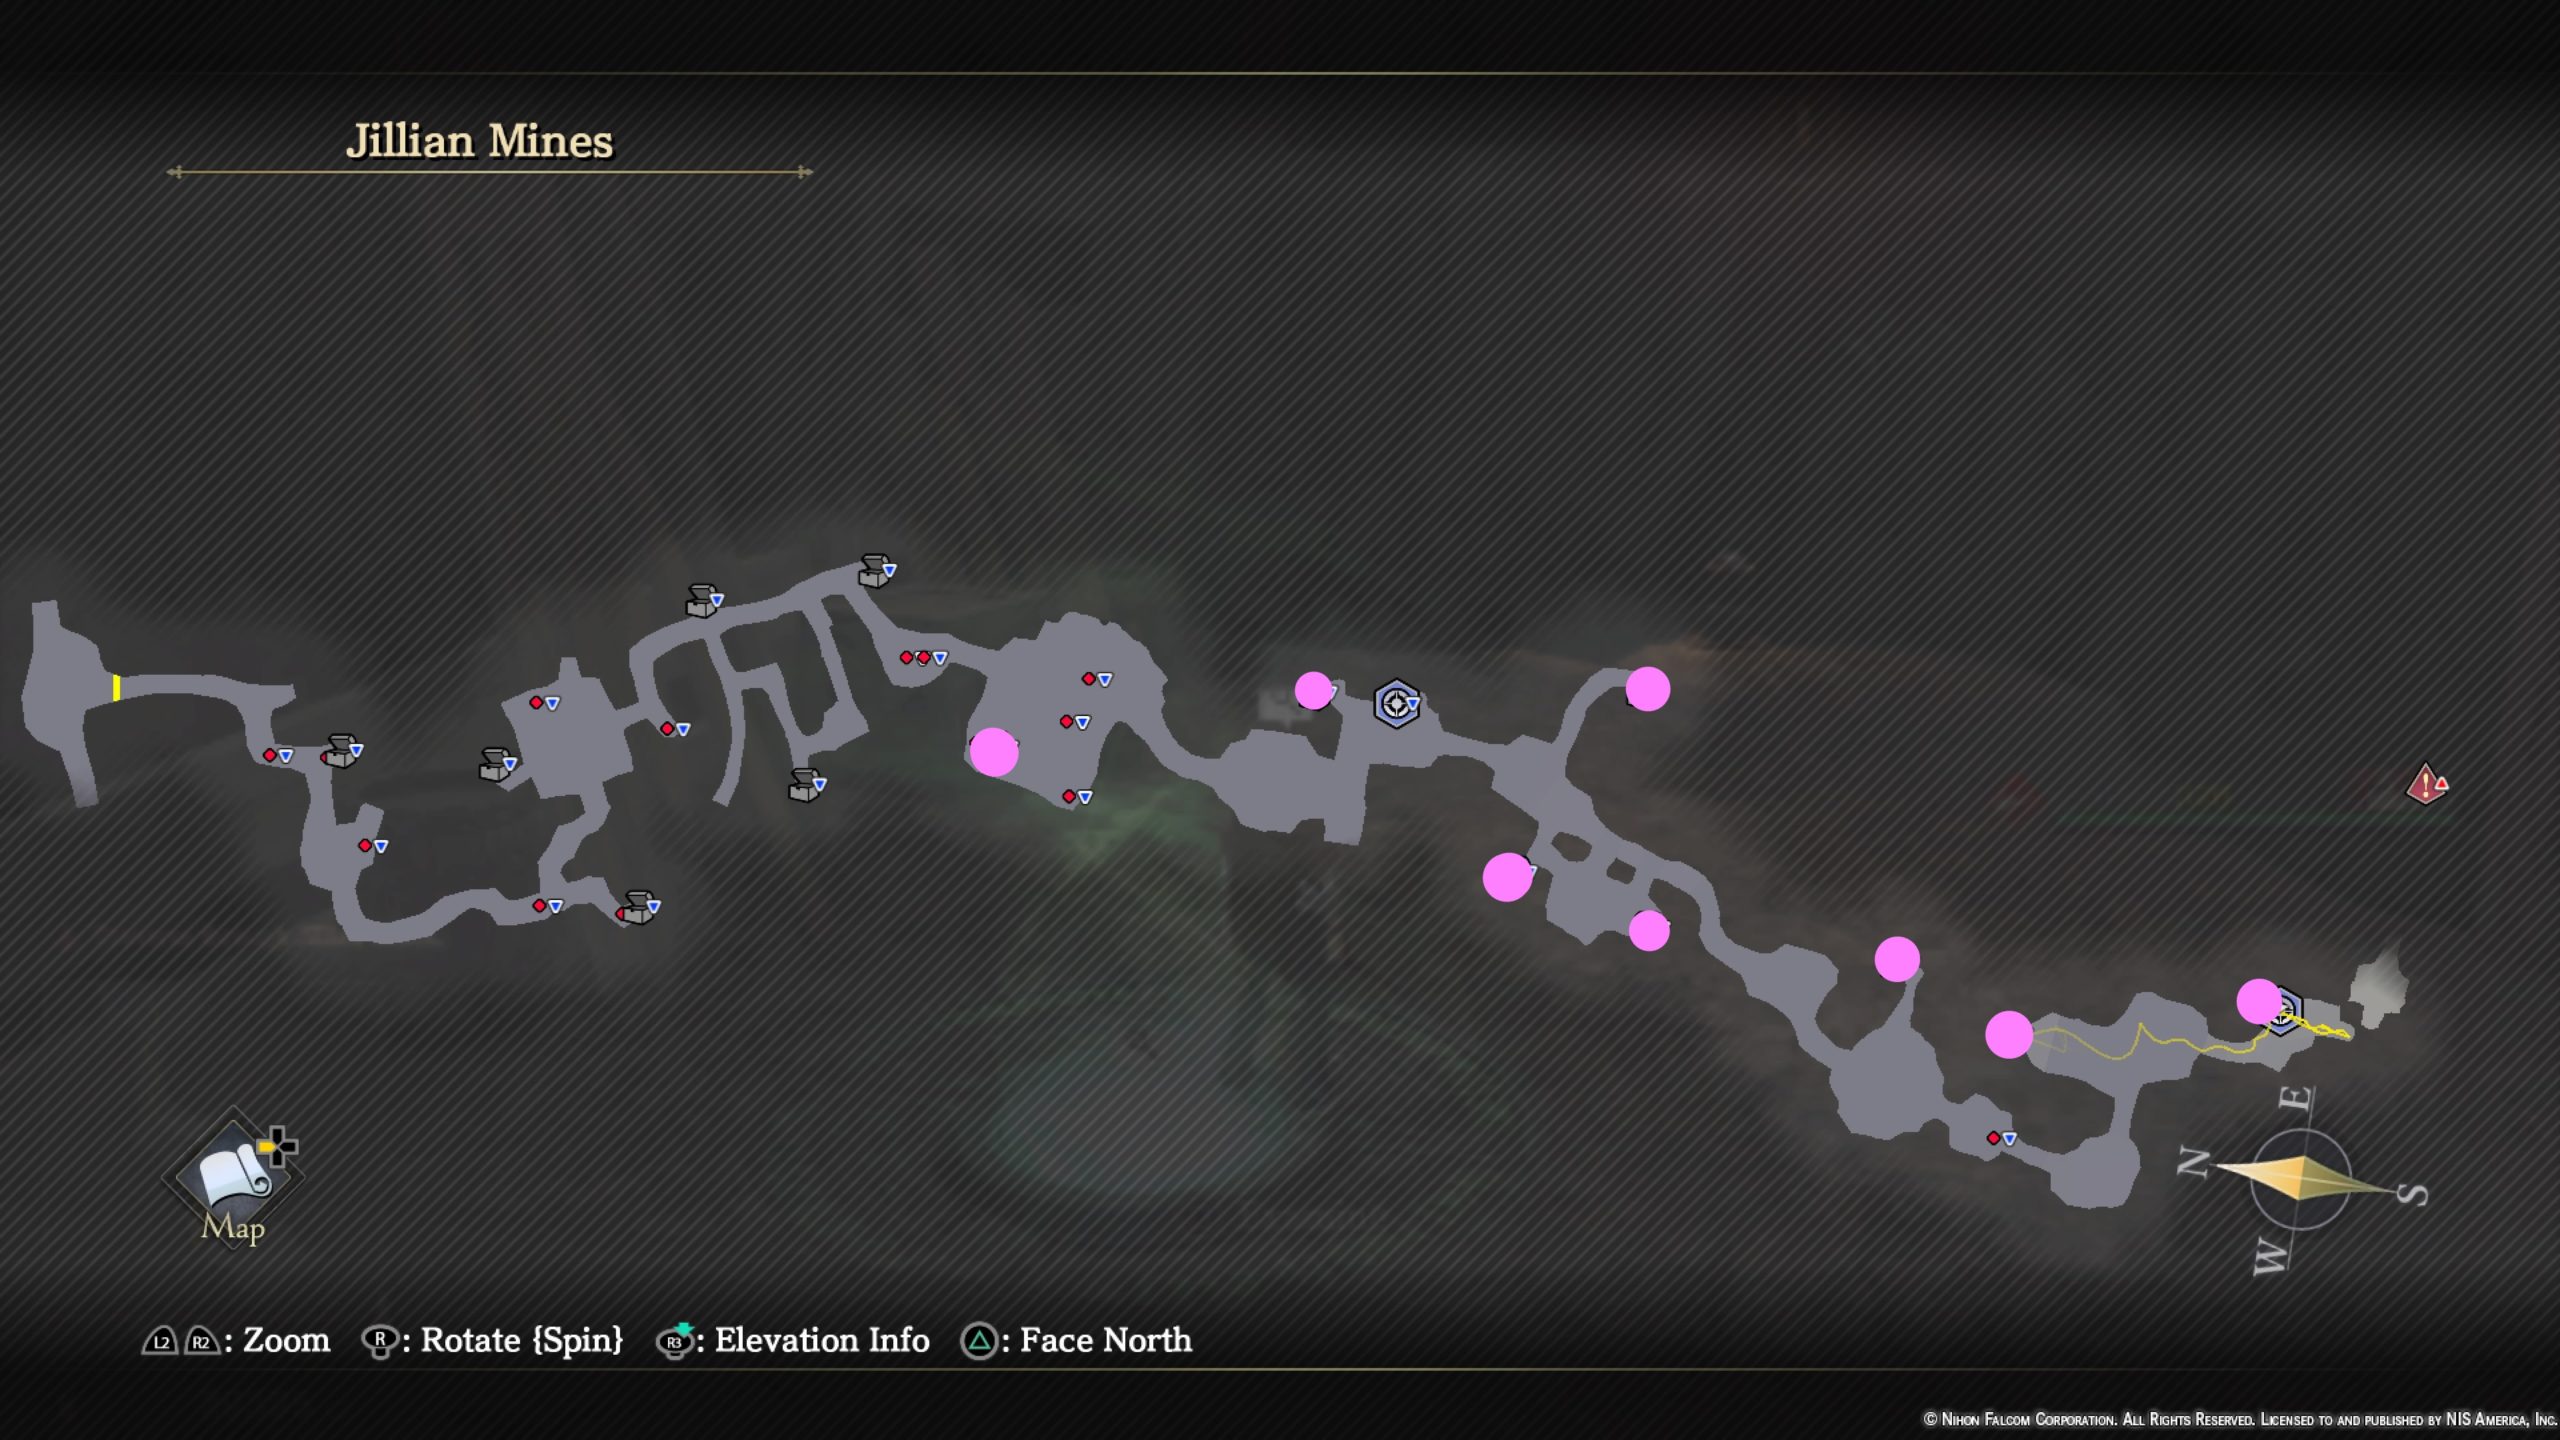
- 2400 Gold
- White Nut
- Raisins x2
- 2000 Gold
- Smoke Meat
- 2800 Gold
- Red Cheese
- 400 Gold
Keening Highlands / Ancient Battlefield
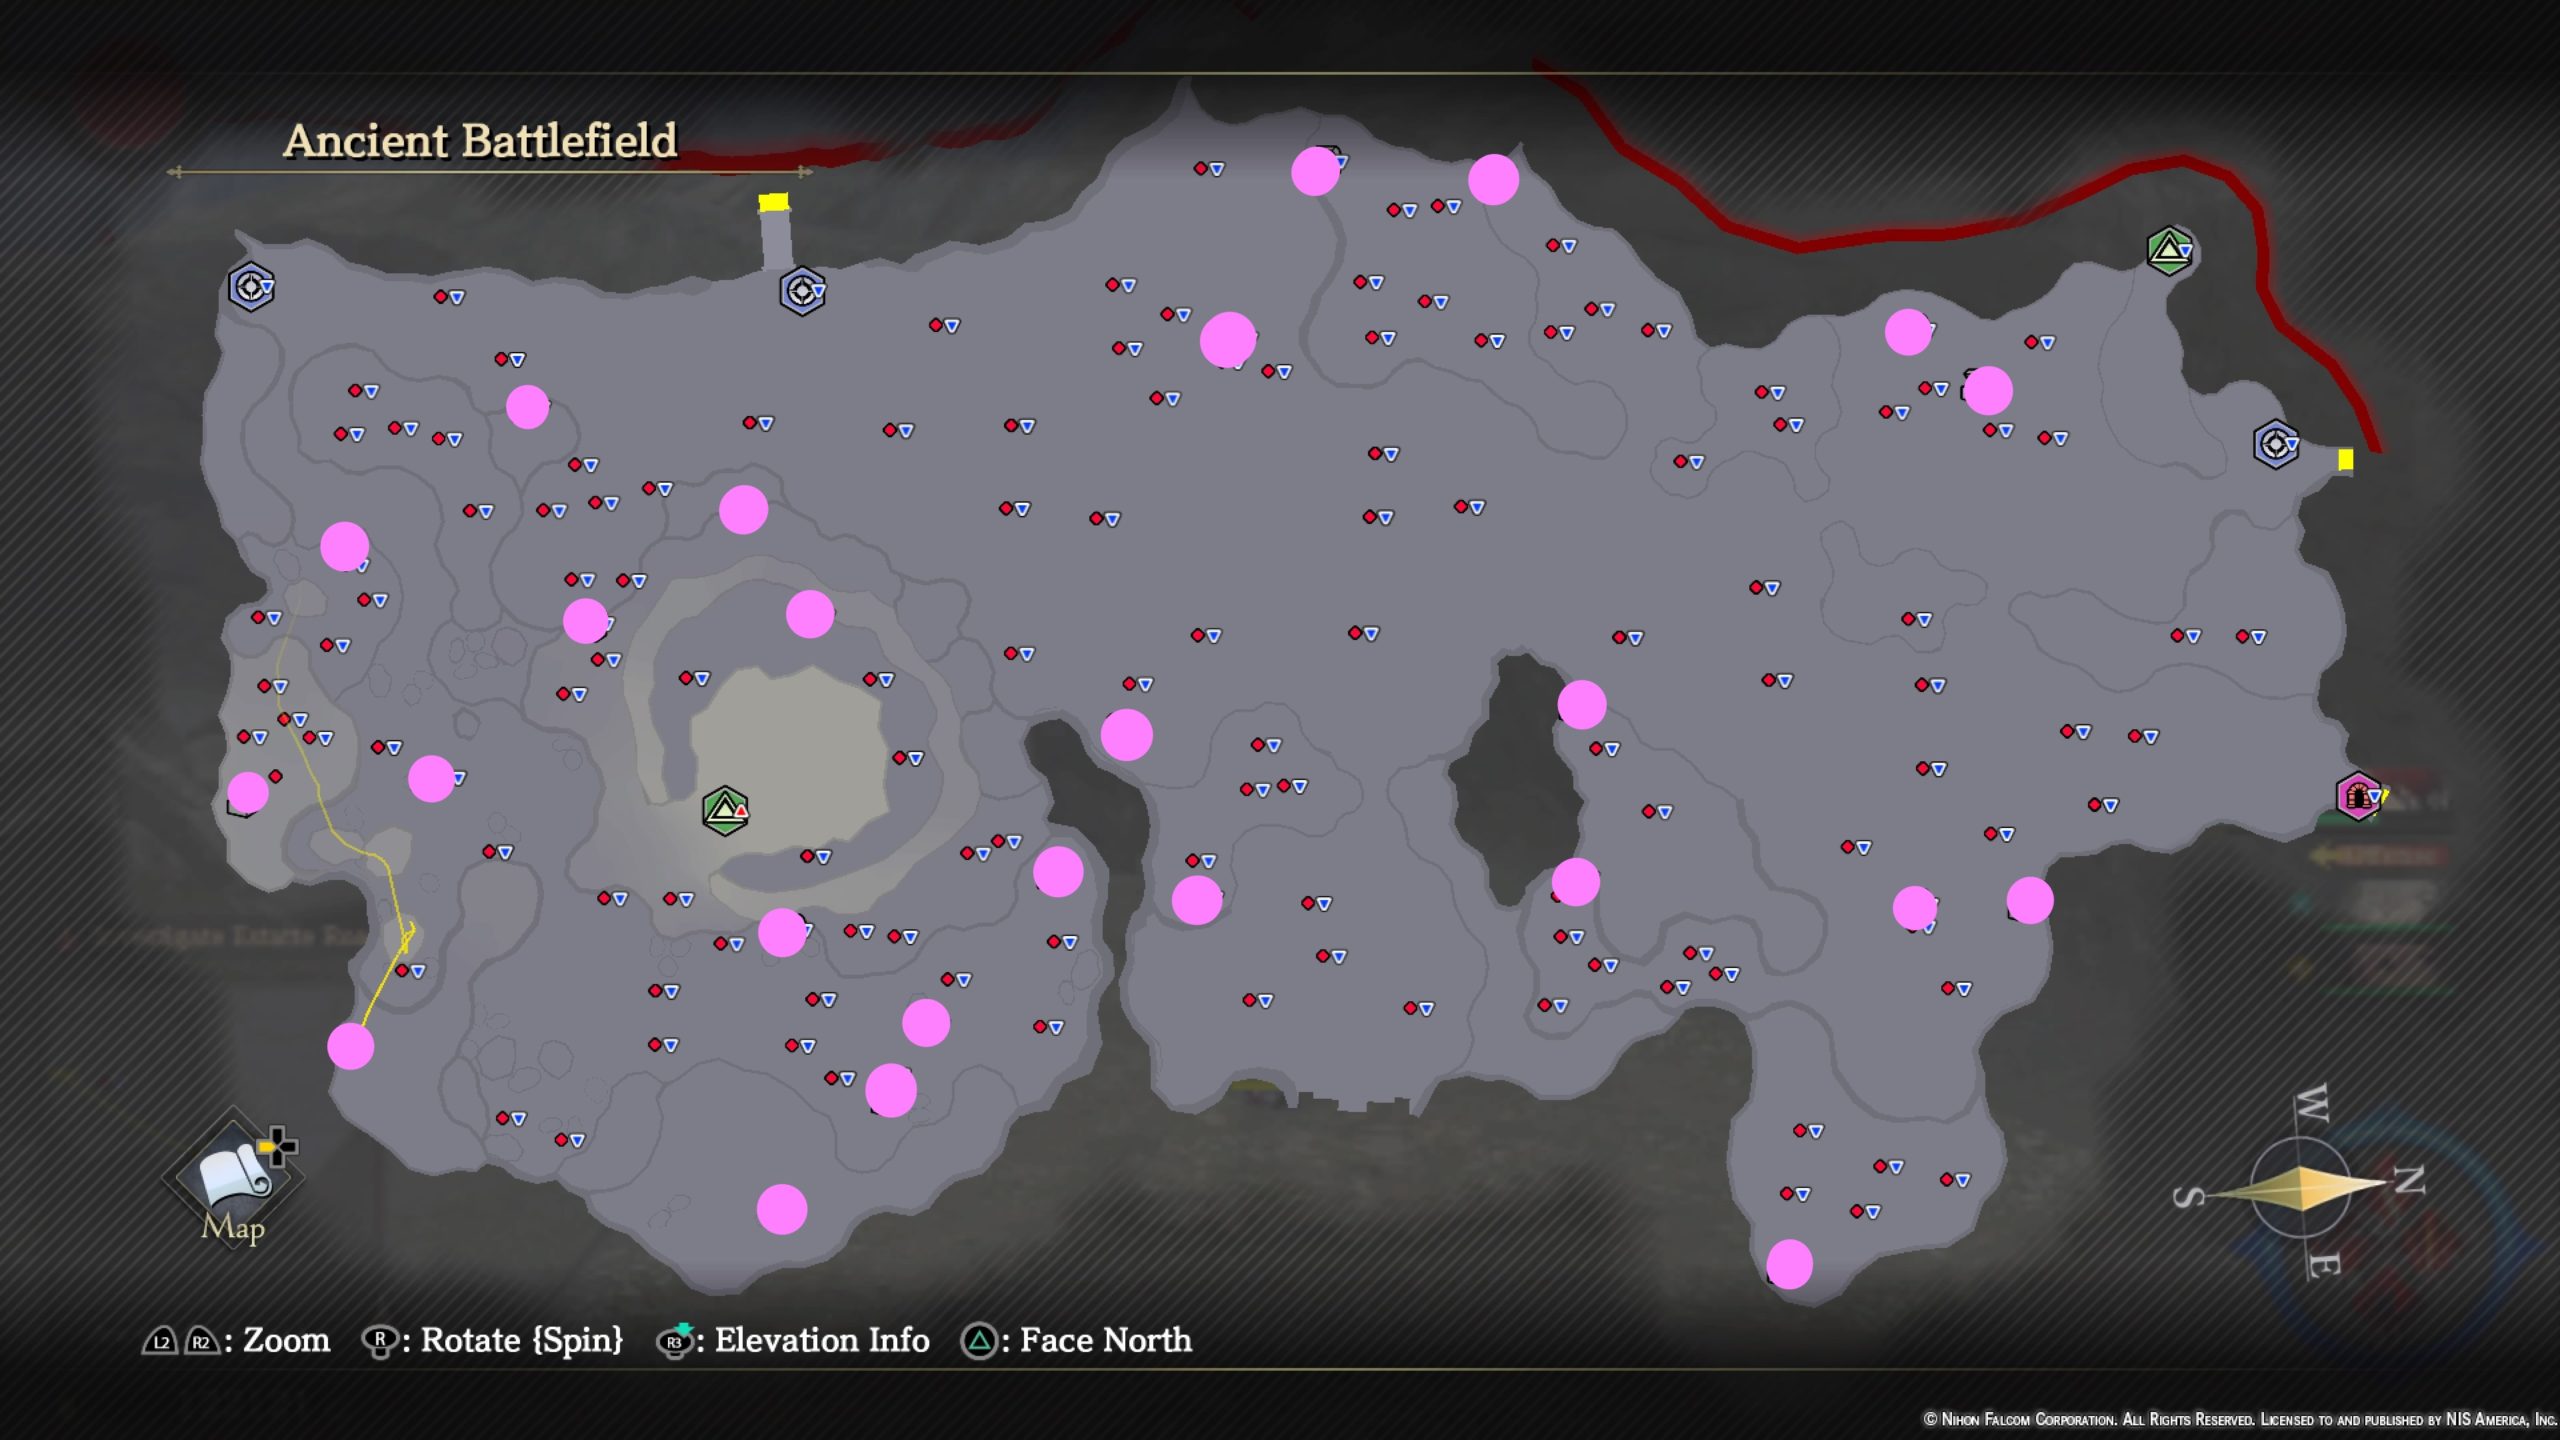
- 2400 Gold
- Nightfrost Beauty x2
- Drill Fang x2
- Amber Shawl
- Barghest Stone
- Life Elixir
- Panacea x2
- Bloodshot Tear x2
- 3600 Gold
- 3000 Gold
- Smoked Meat x4
- Full Potion
- Hermit’s Remedy
- Shield Earring IV
- Panacea x2
- 6000 Gold
- Life Elixir
- Sol Spar x2
- Defense Elixir
- Master Bangle
- 8000 Gold
- Hermit’s Remedy x2
- 7000 Gold
- Warrior Seal IV
- Strength Formula
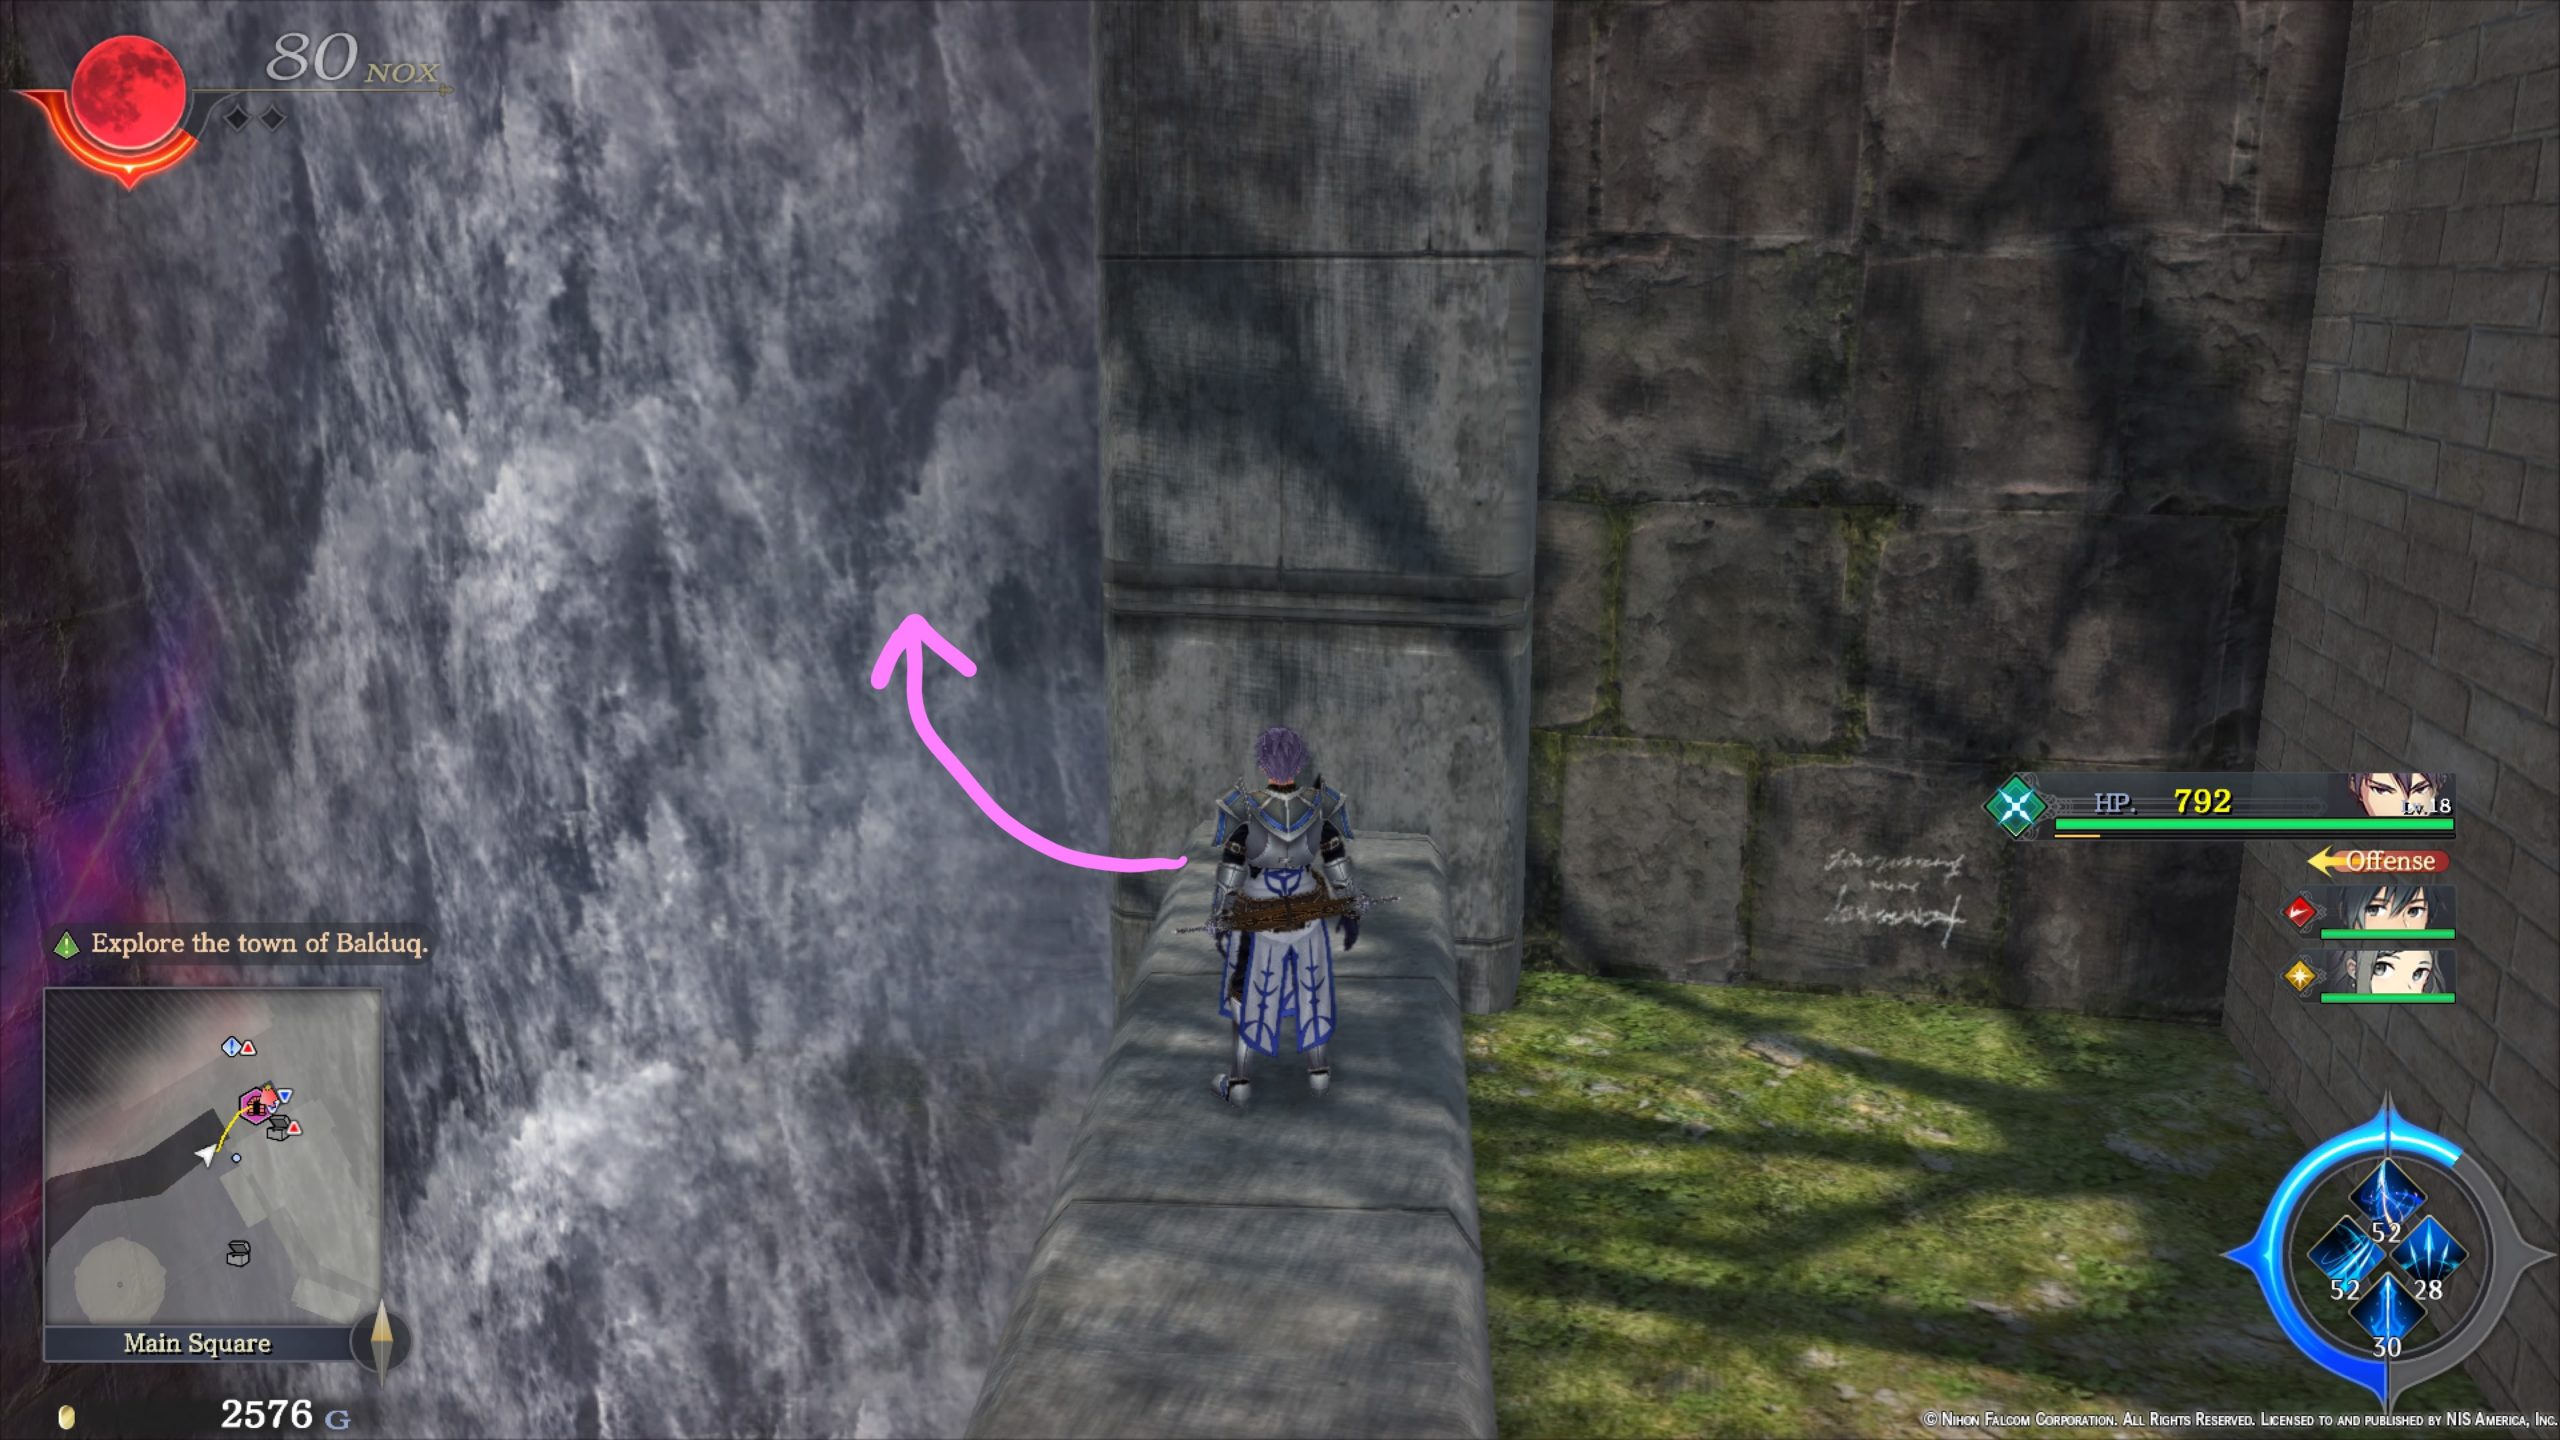
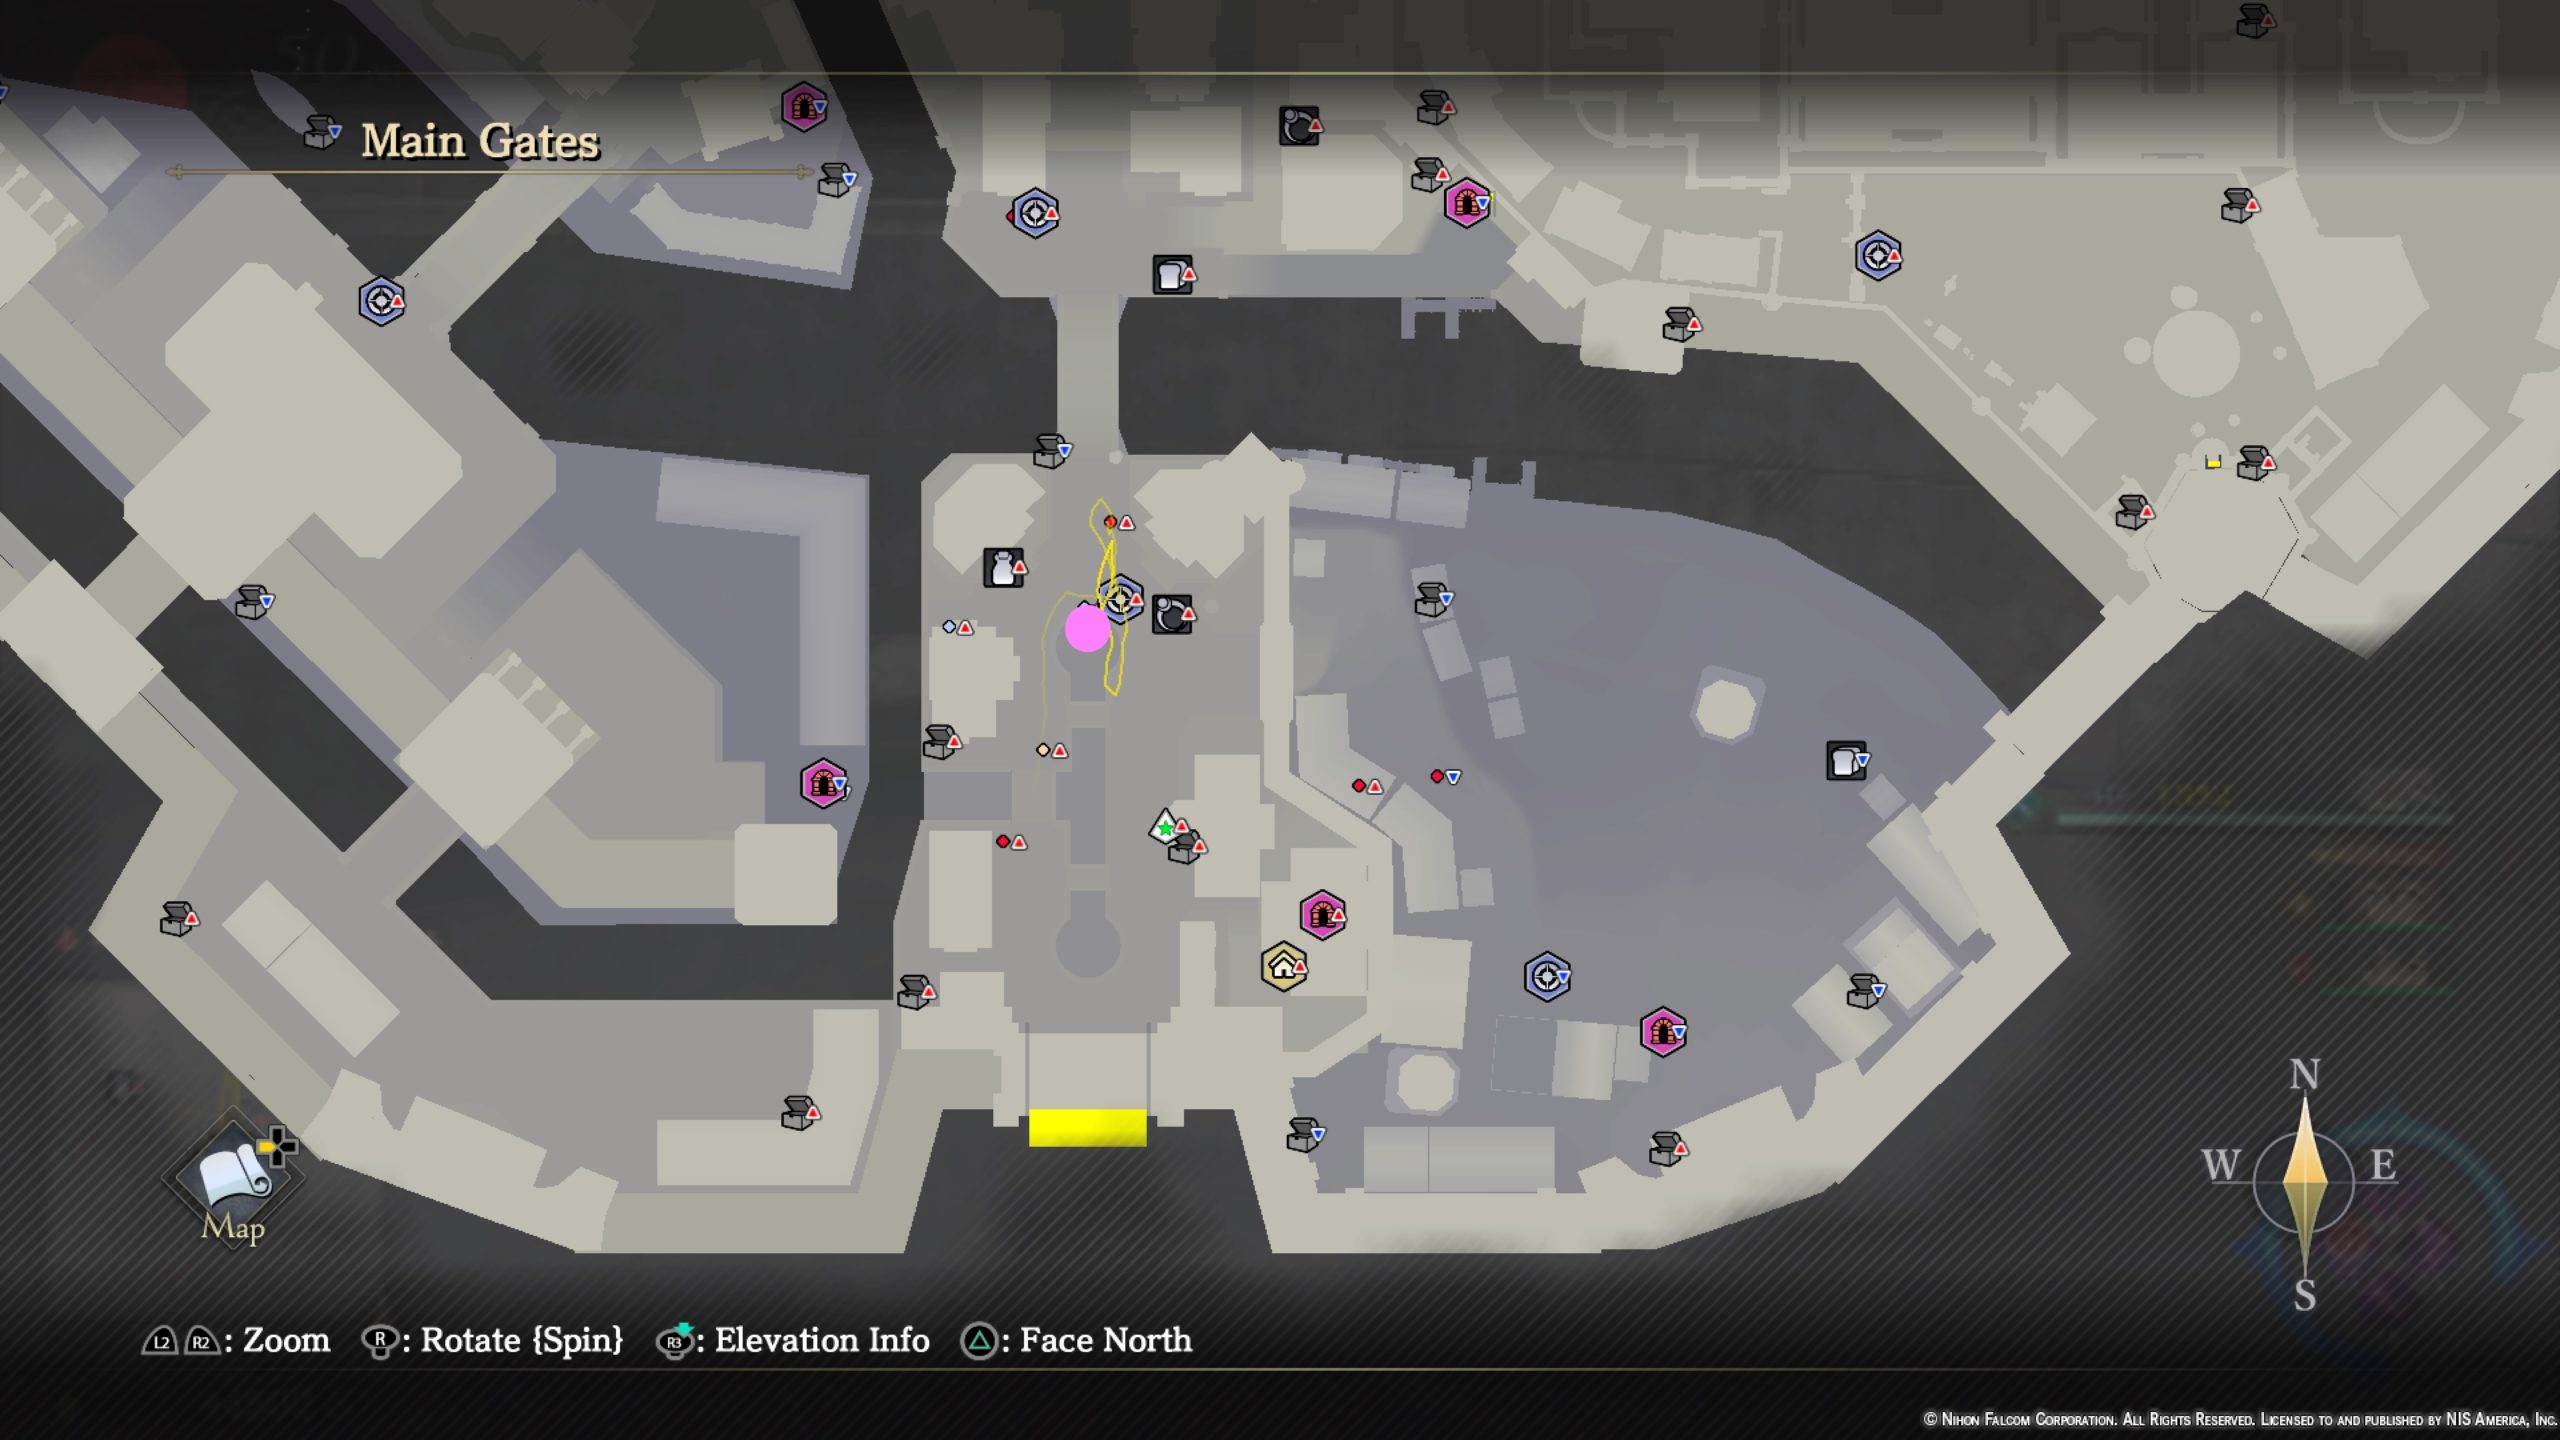
Main Gates
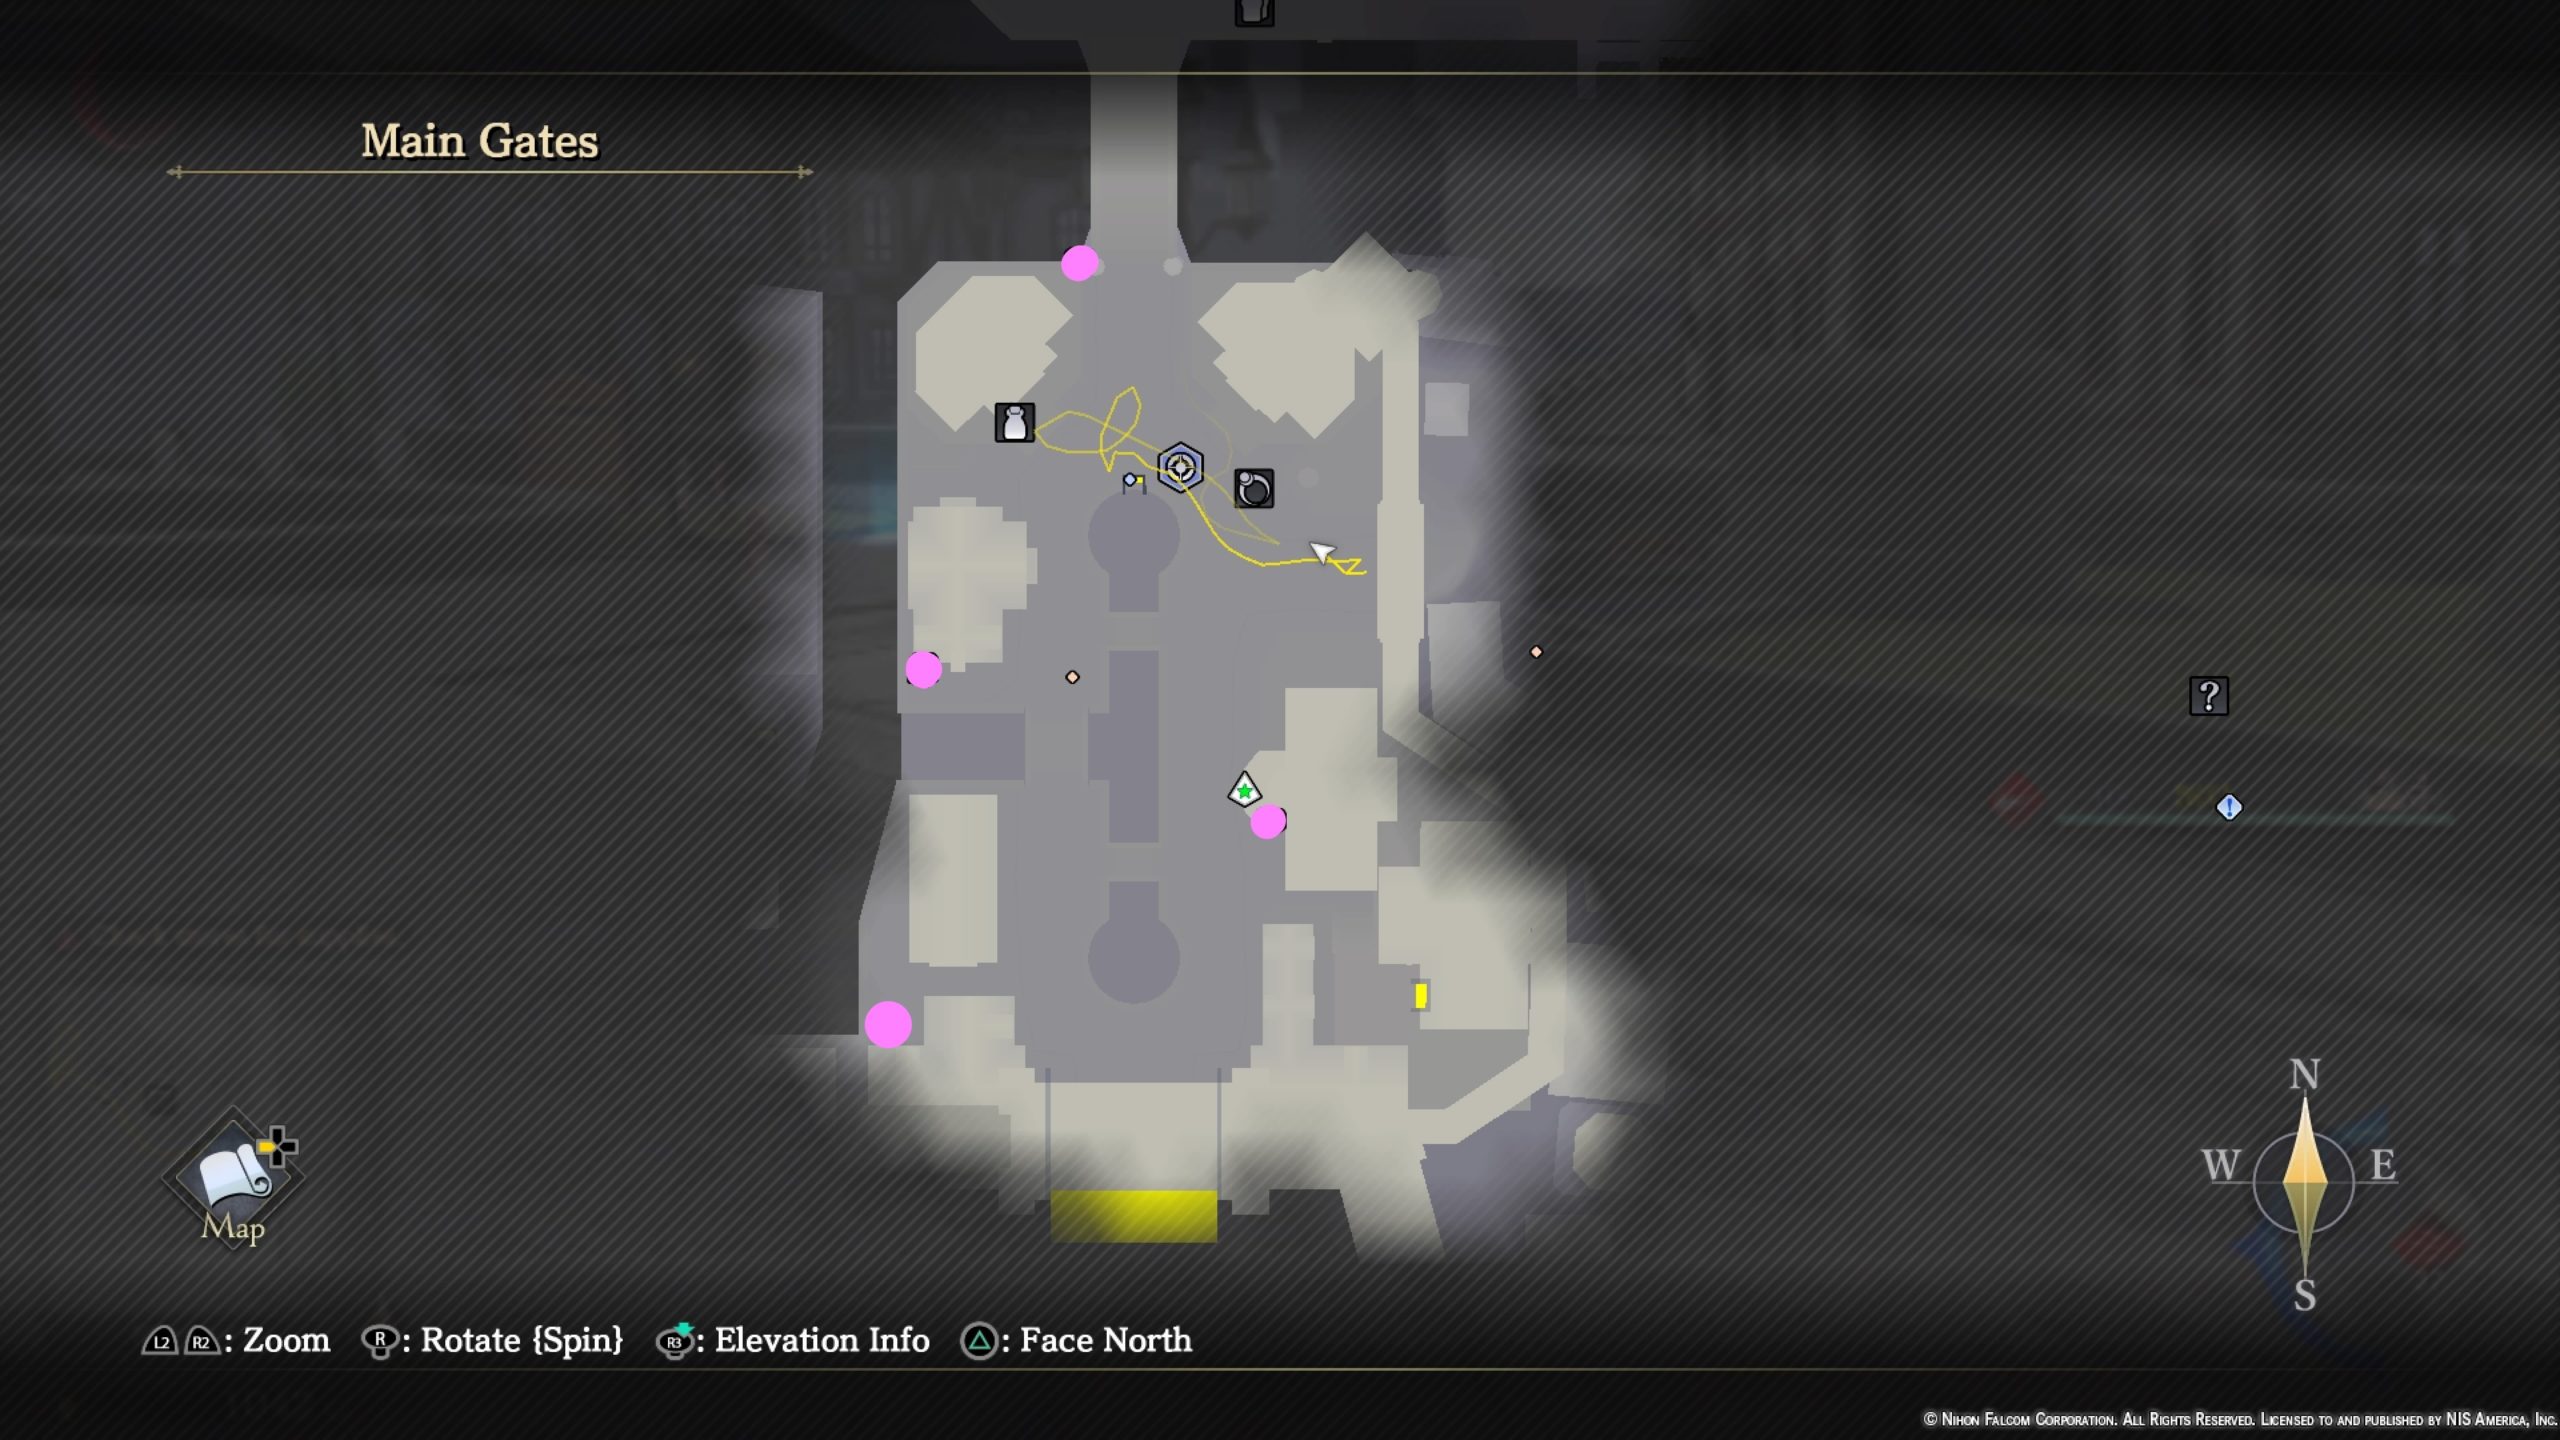
- Flour x5
- Raisins x2
- Requires Crimson Line – On roof of Balduq Visitor’s Kiosk
- 1000 Gold
- Requires Crimson Line – At base of bridge near the waterline on the side of Eric’s Clinic. You’ll need to jump down to the ledge it’s resting on then use the Crimson Line to jump back up.
- Defense Elixir
- Requires Renegade to join party
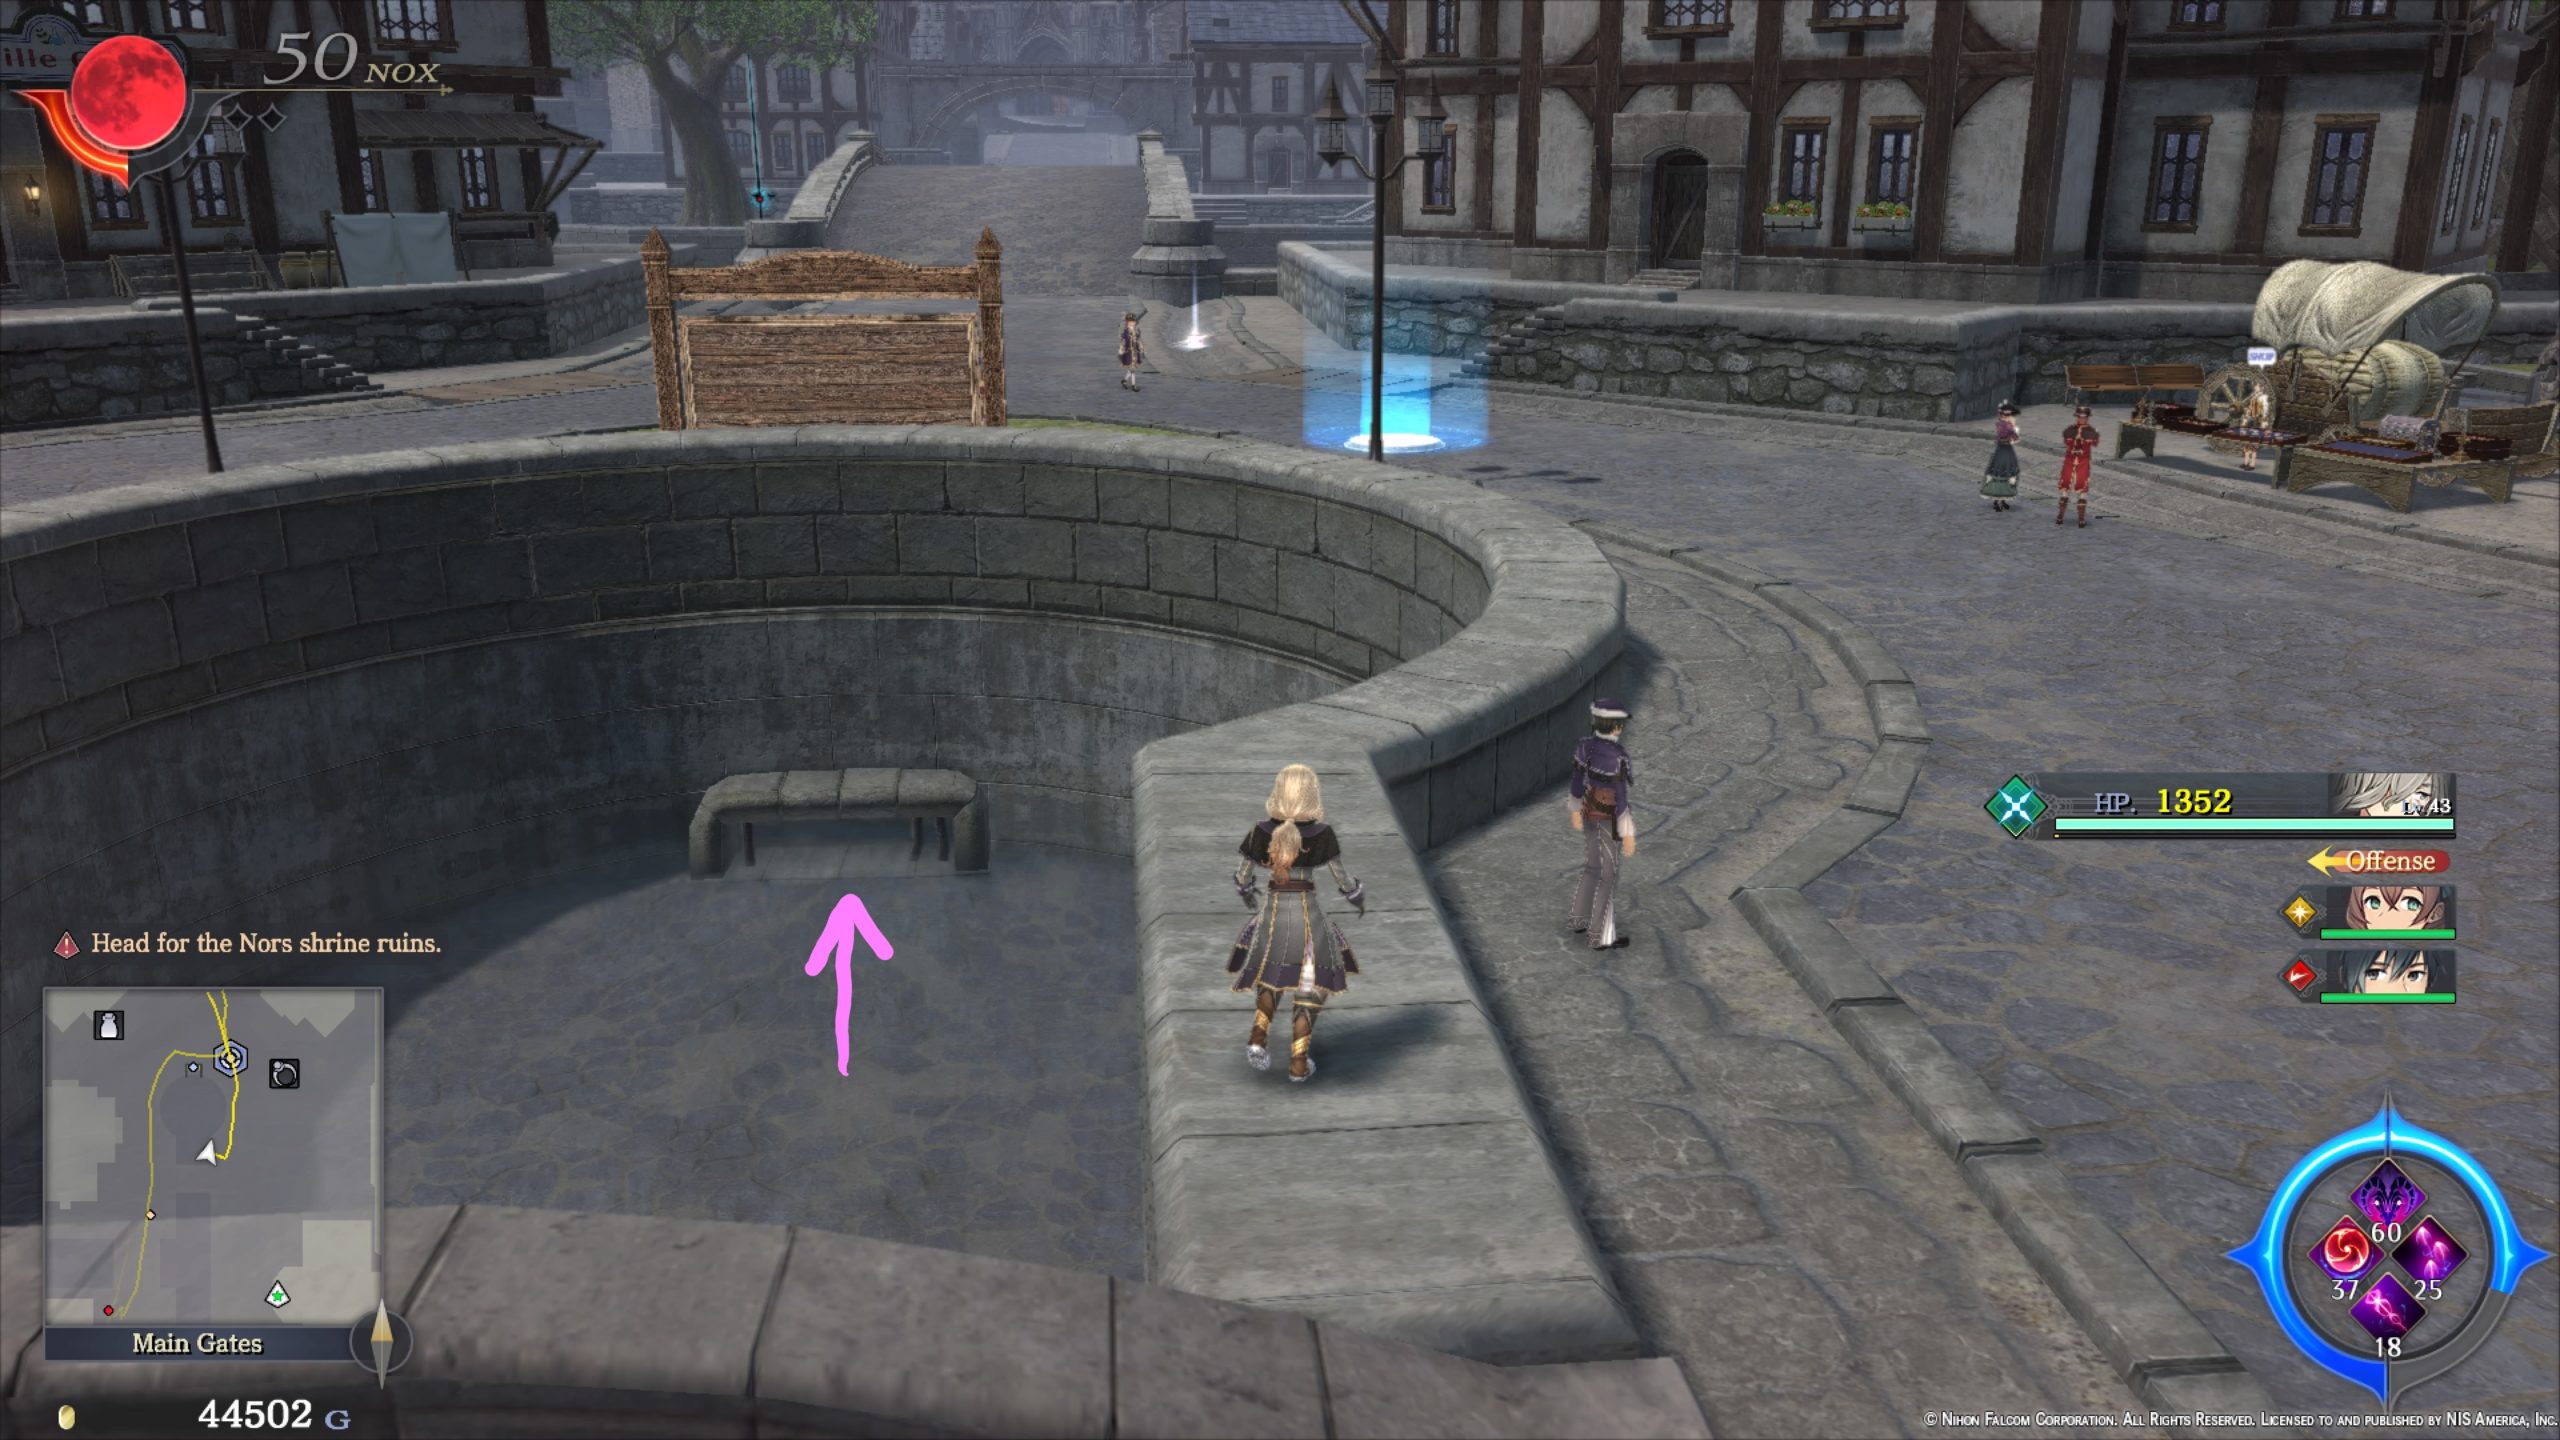
Main Square
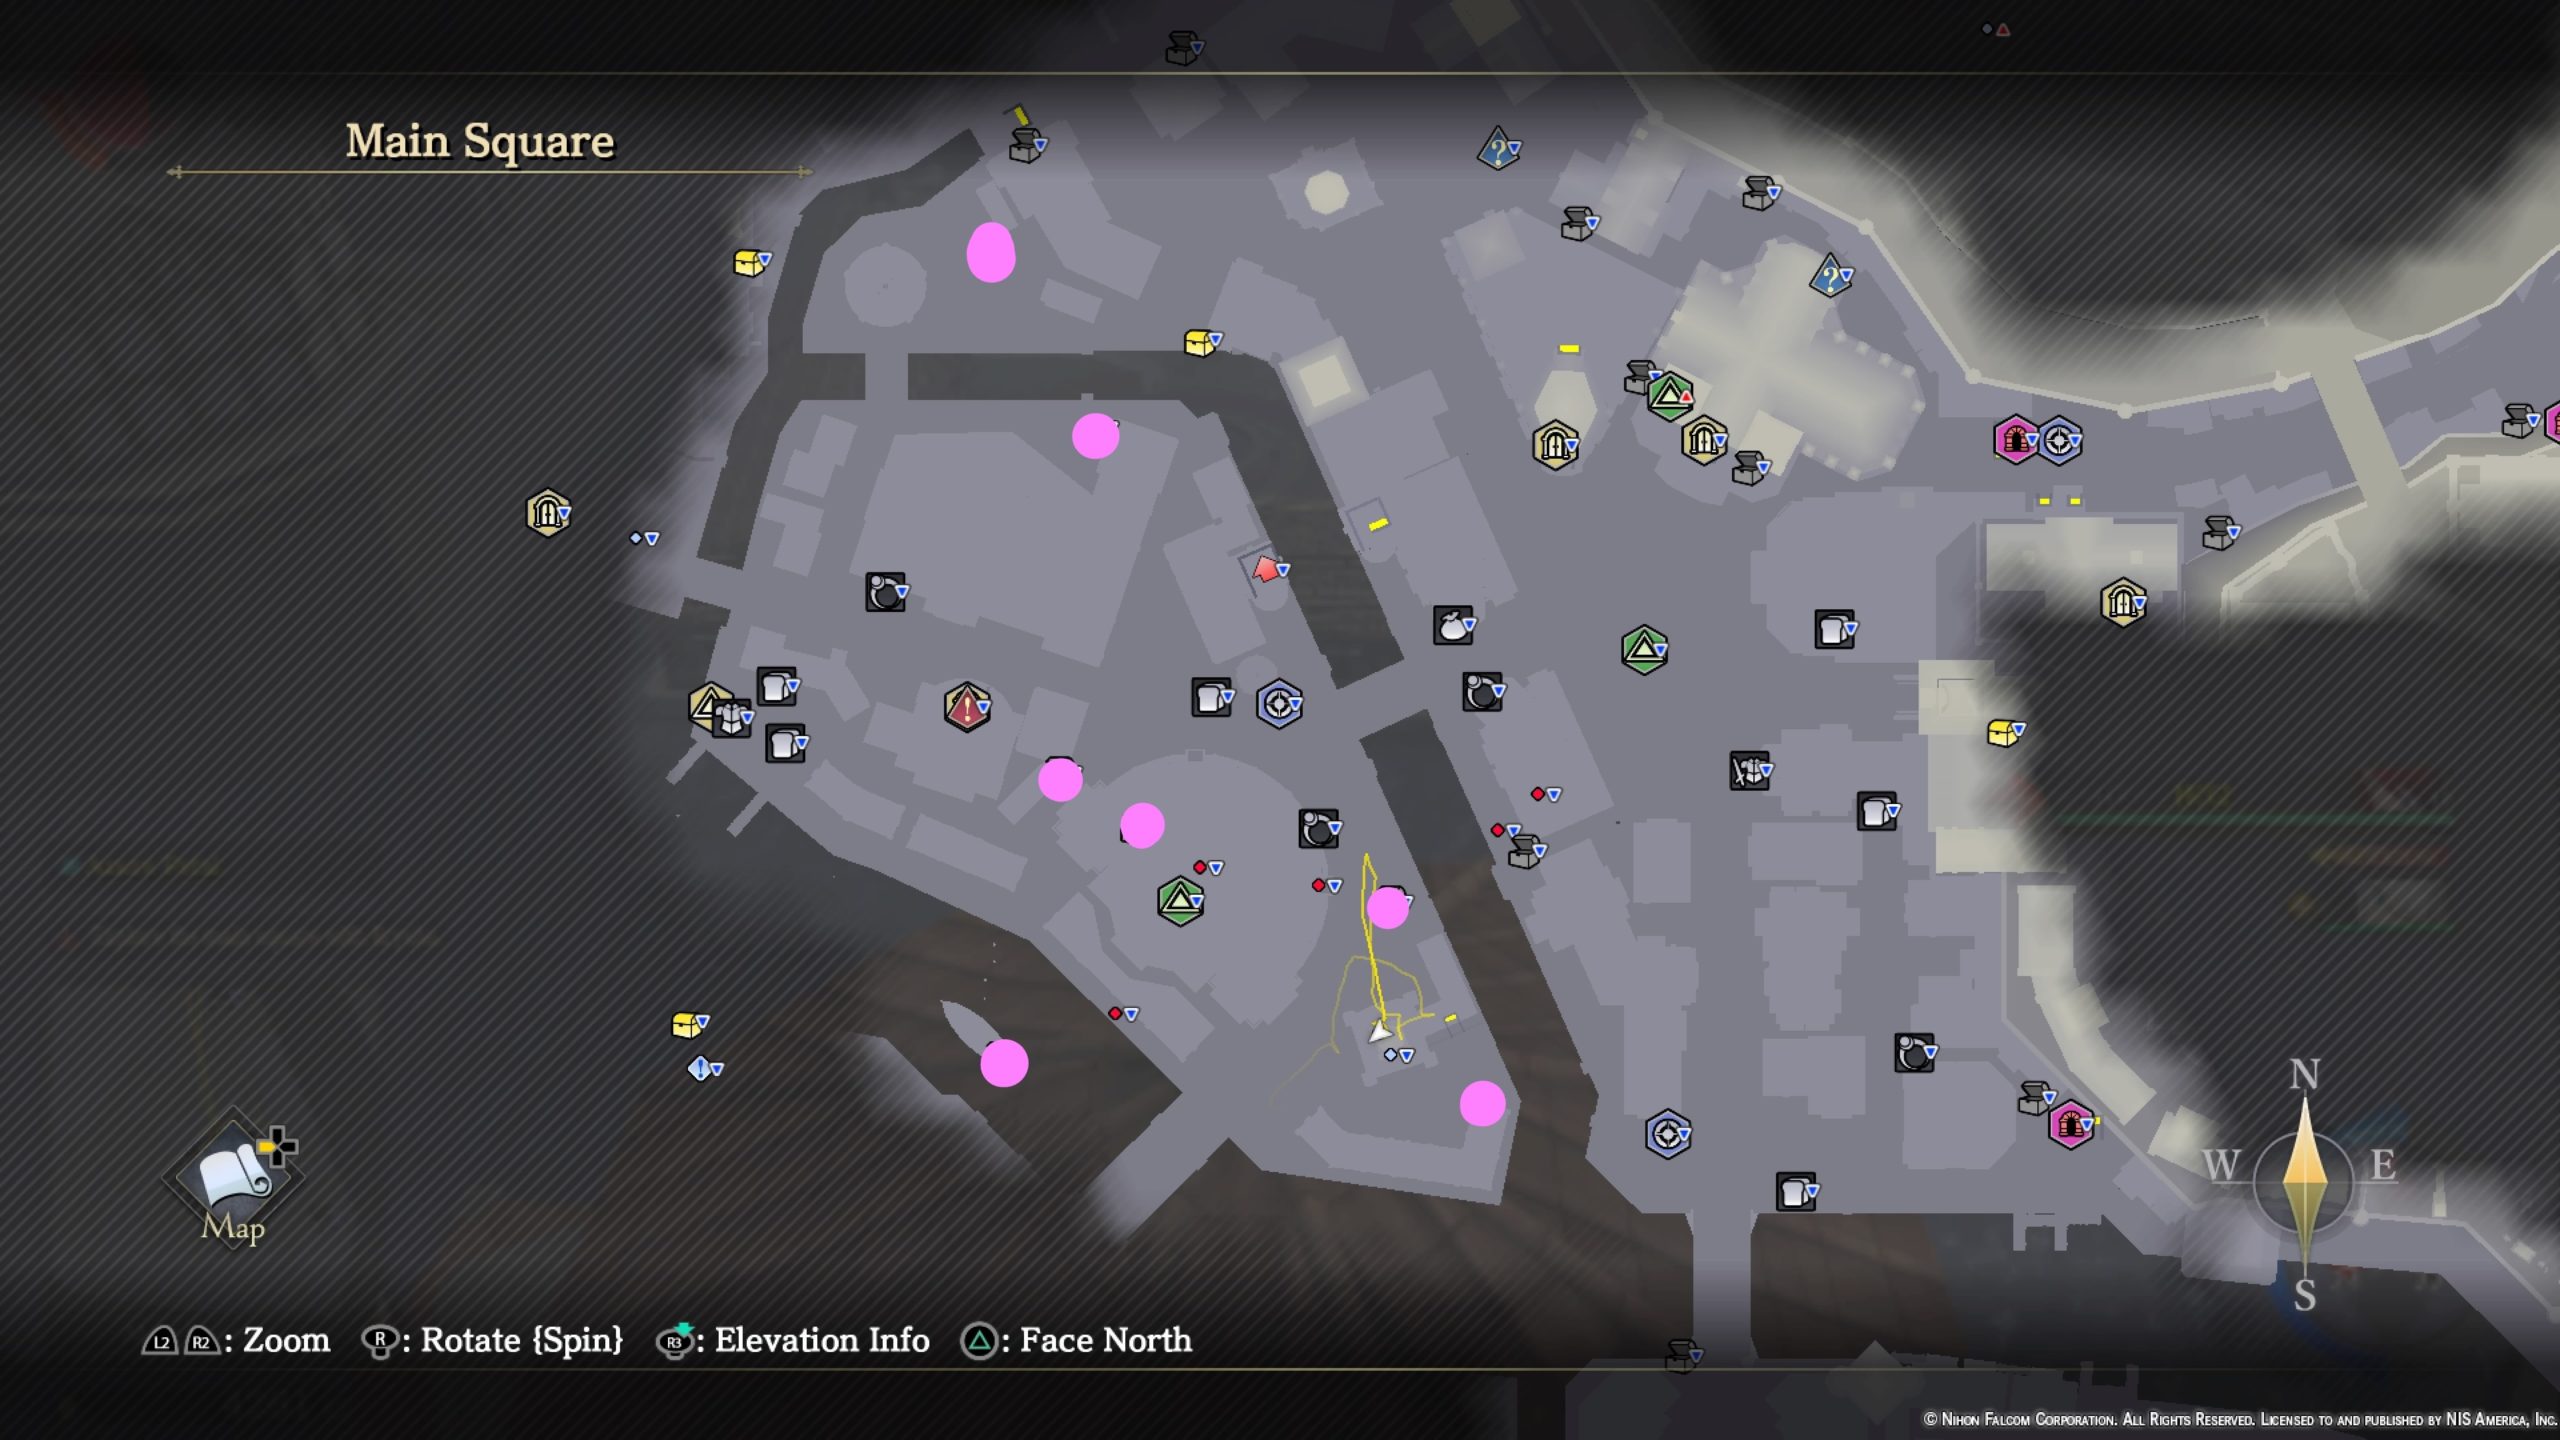
- White Asparagus x5
- Shield Earring II
- Sedative x2
- White Nut x2
- White Meat x5
- Grimnut x2
- 3000 Gold
Marionette’s Jail
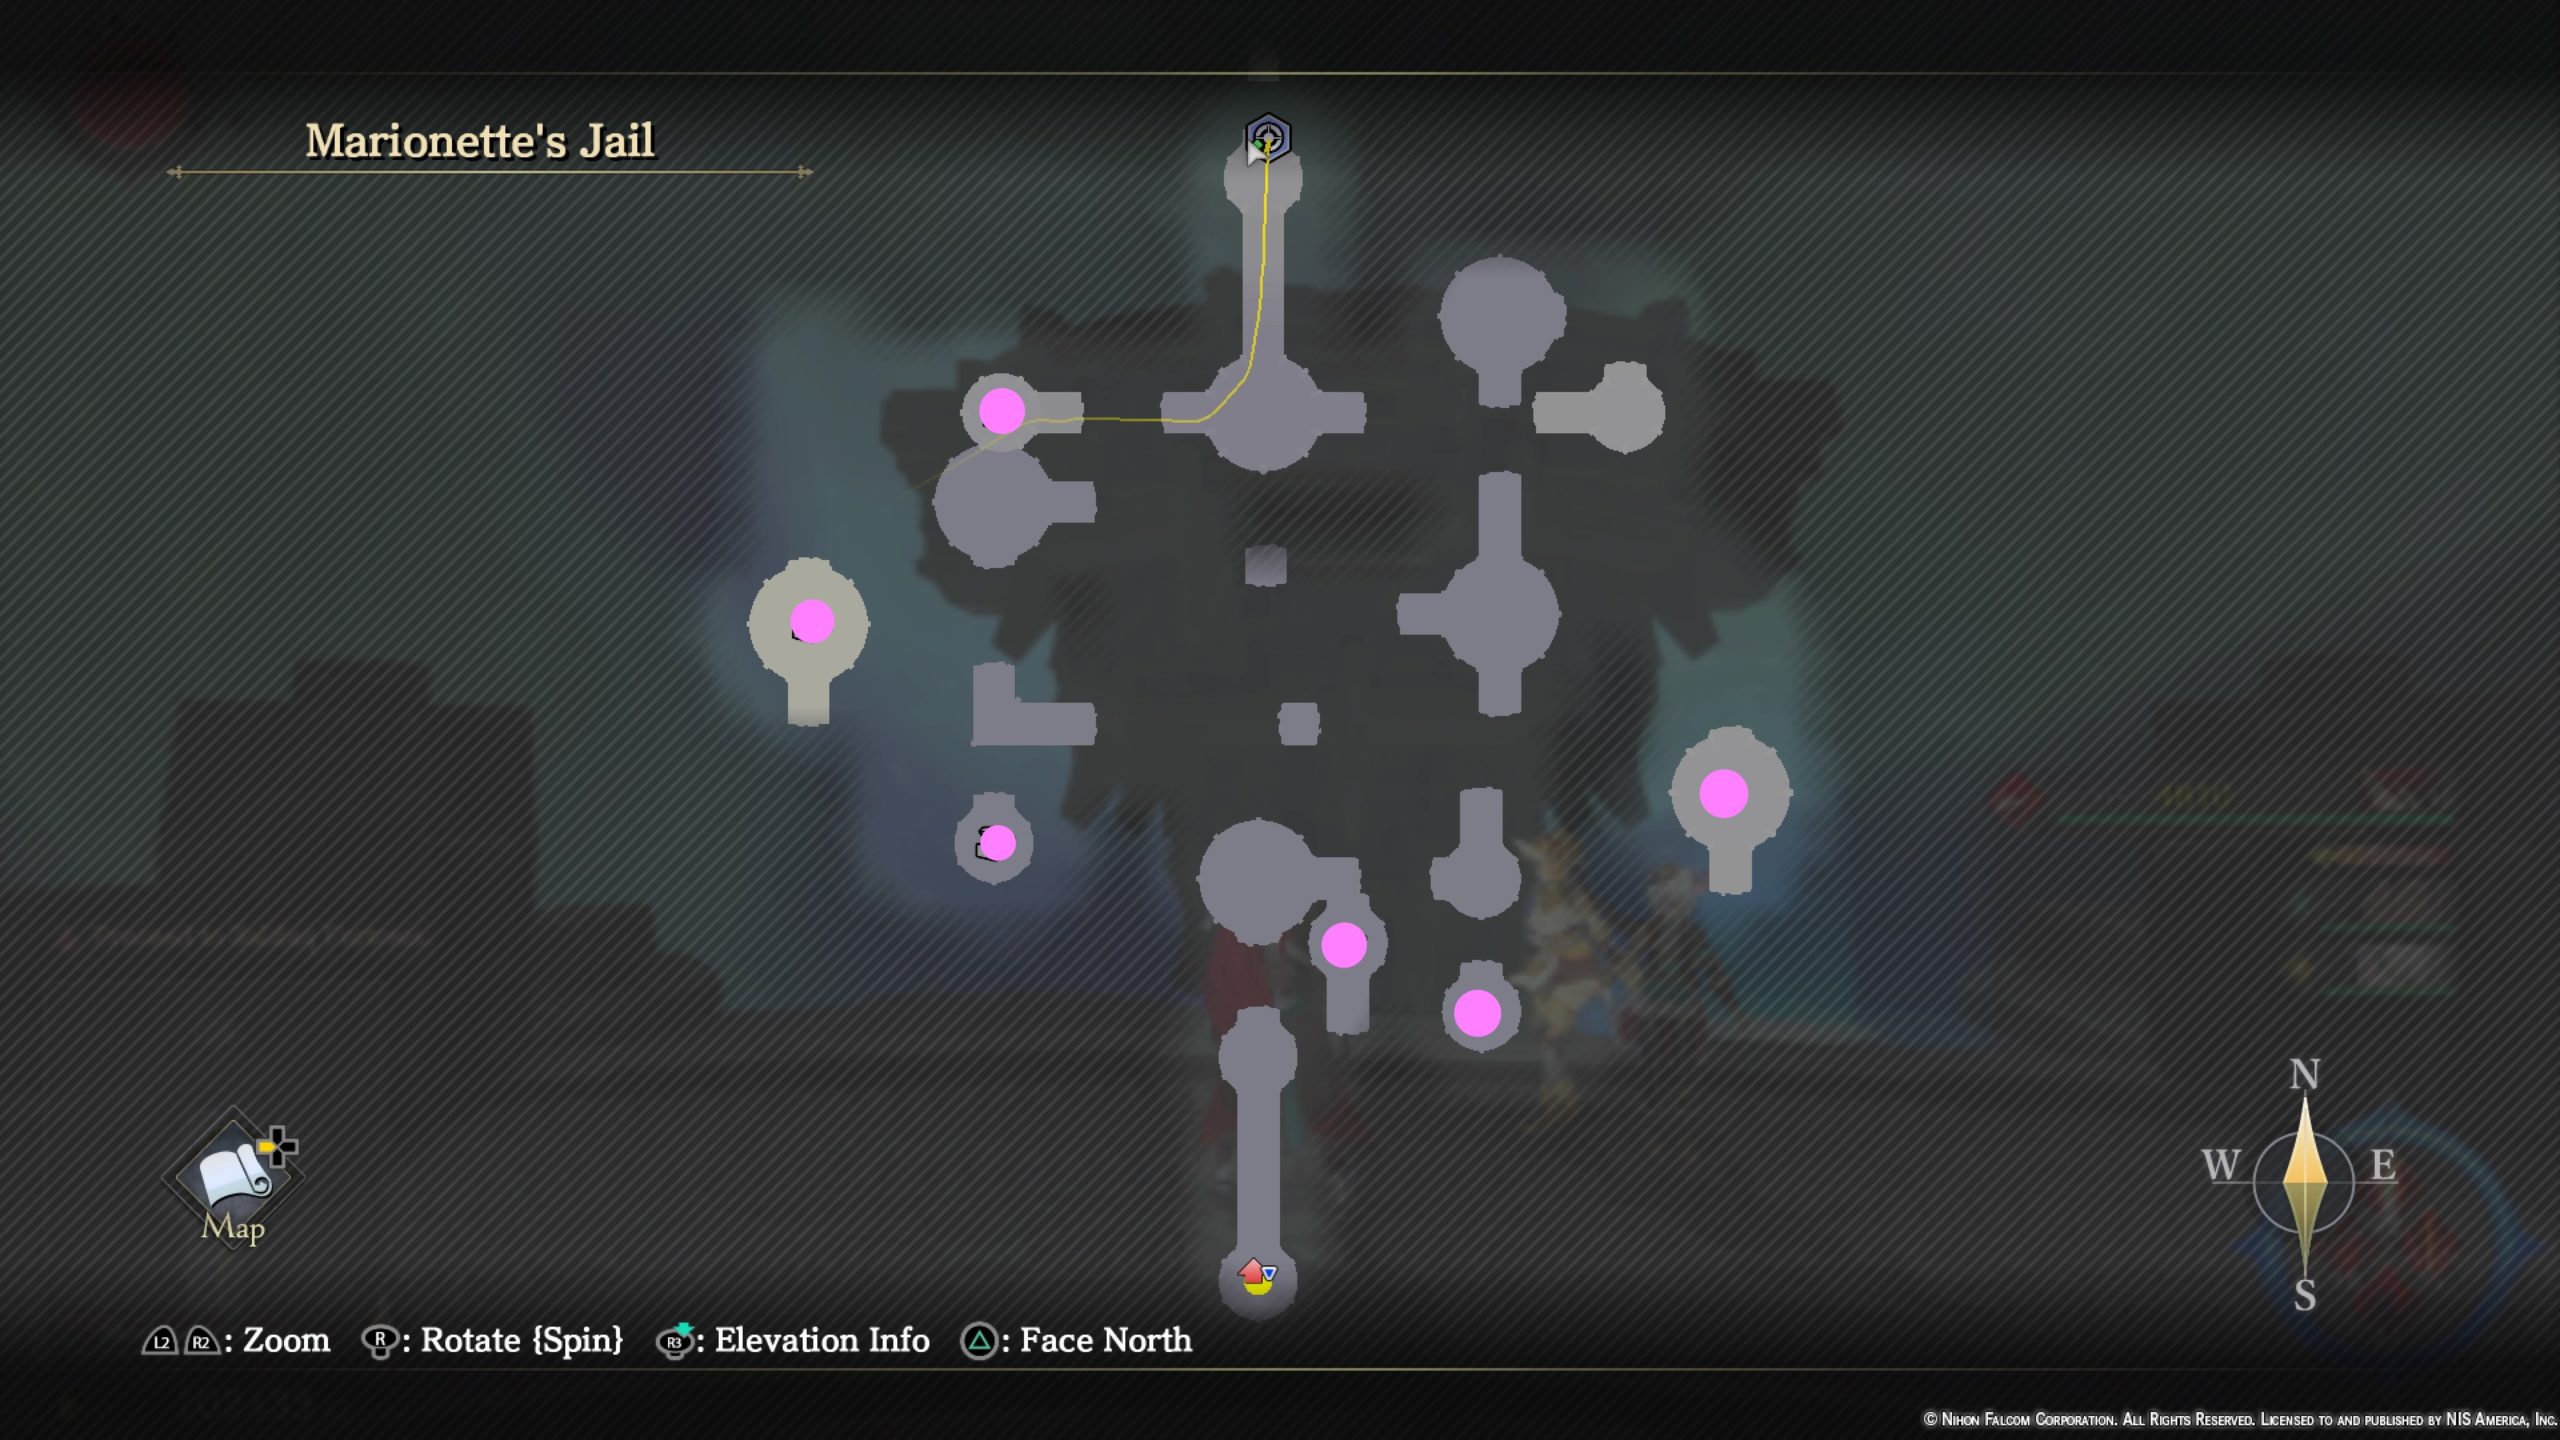
- Relic Bone x4
- Adichivo Shell
- Otherworldly Core
- 18000 Gold
- Nocturne Oil
- Fairy Necklace x2
Milianne Plains (Part 1)
- Red Cheese x4
- Bitter Remedy x4
- Violet Gloves
- Grimnut x2
- Panacea x2
- Gublin Tribe Shield x2
- Polar Night Drop x2
- Verdant Leaf x2
- Dry-aged Meat x2
- Boots Rubric
- 2400 Gold
- Tonic x4
- Leather Necklace III
- Snowbell x2
- Tempest Elixir
- Galette Recipe
- 1600 Gold
Milianne Plains (Part 2)
*Unlocks during Chapter 7.
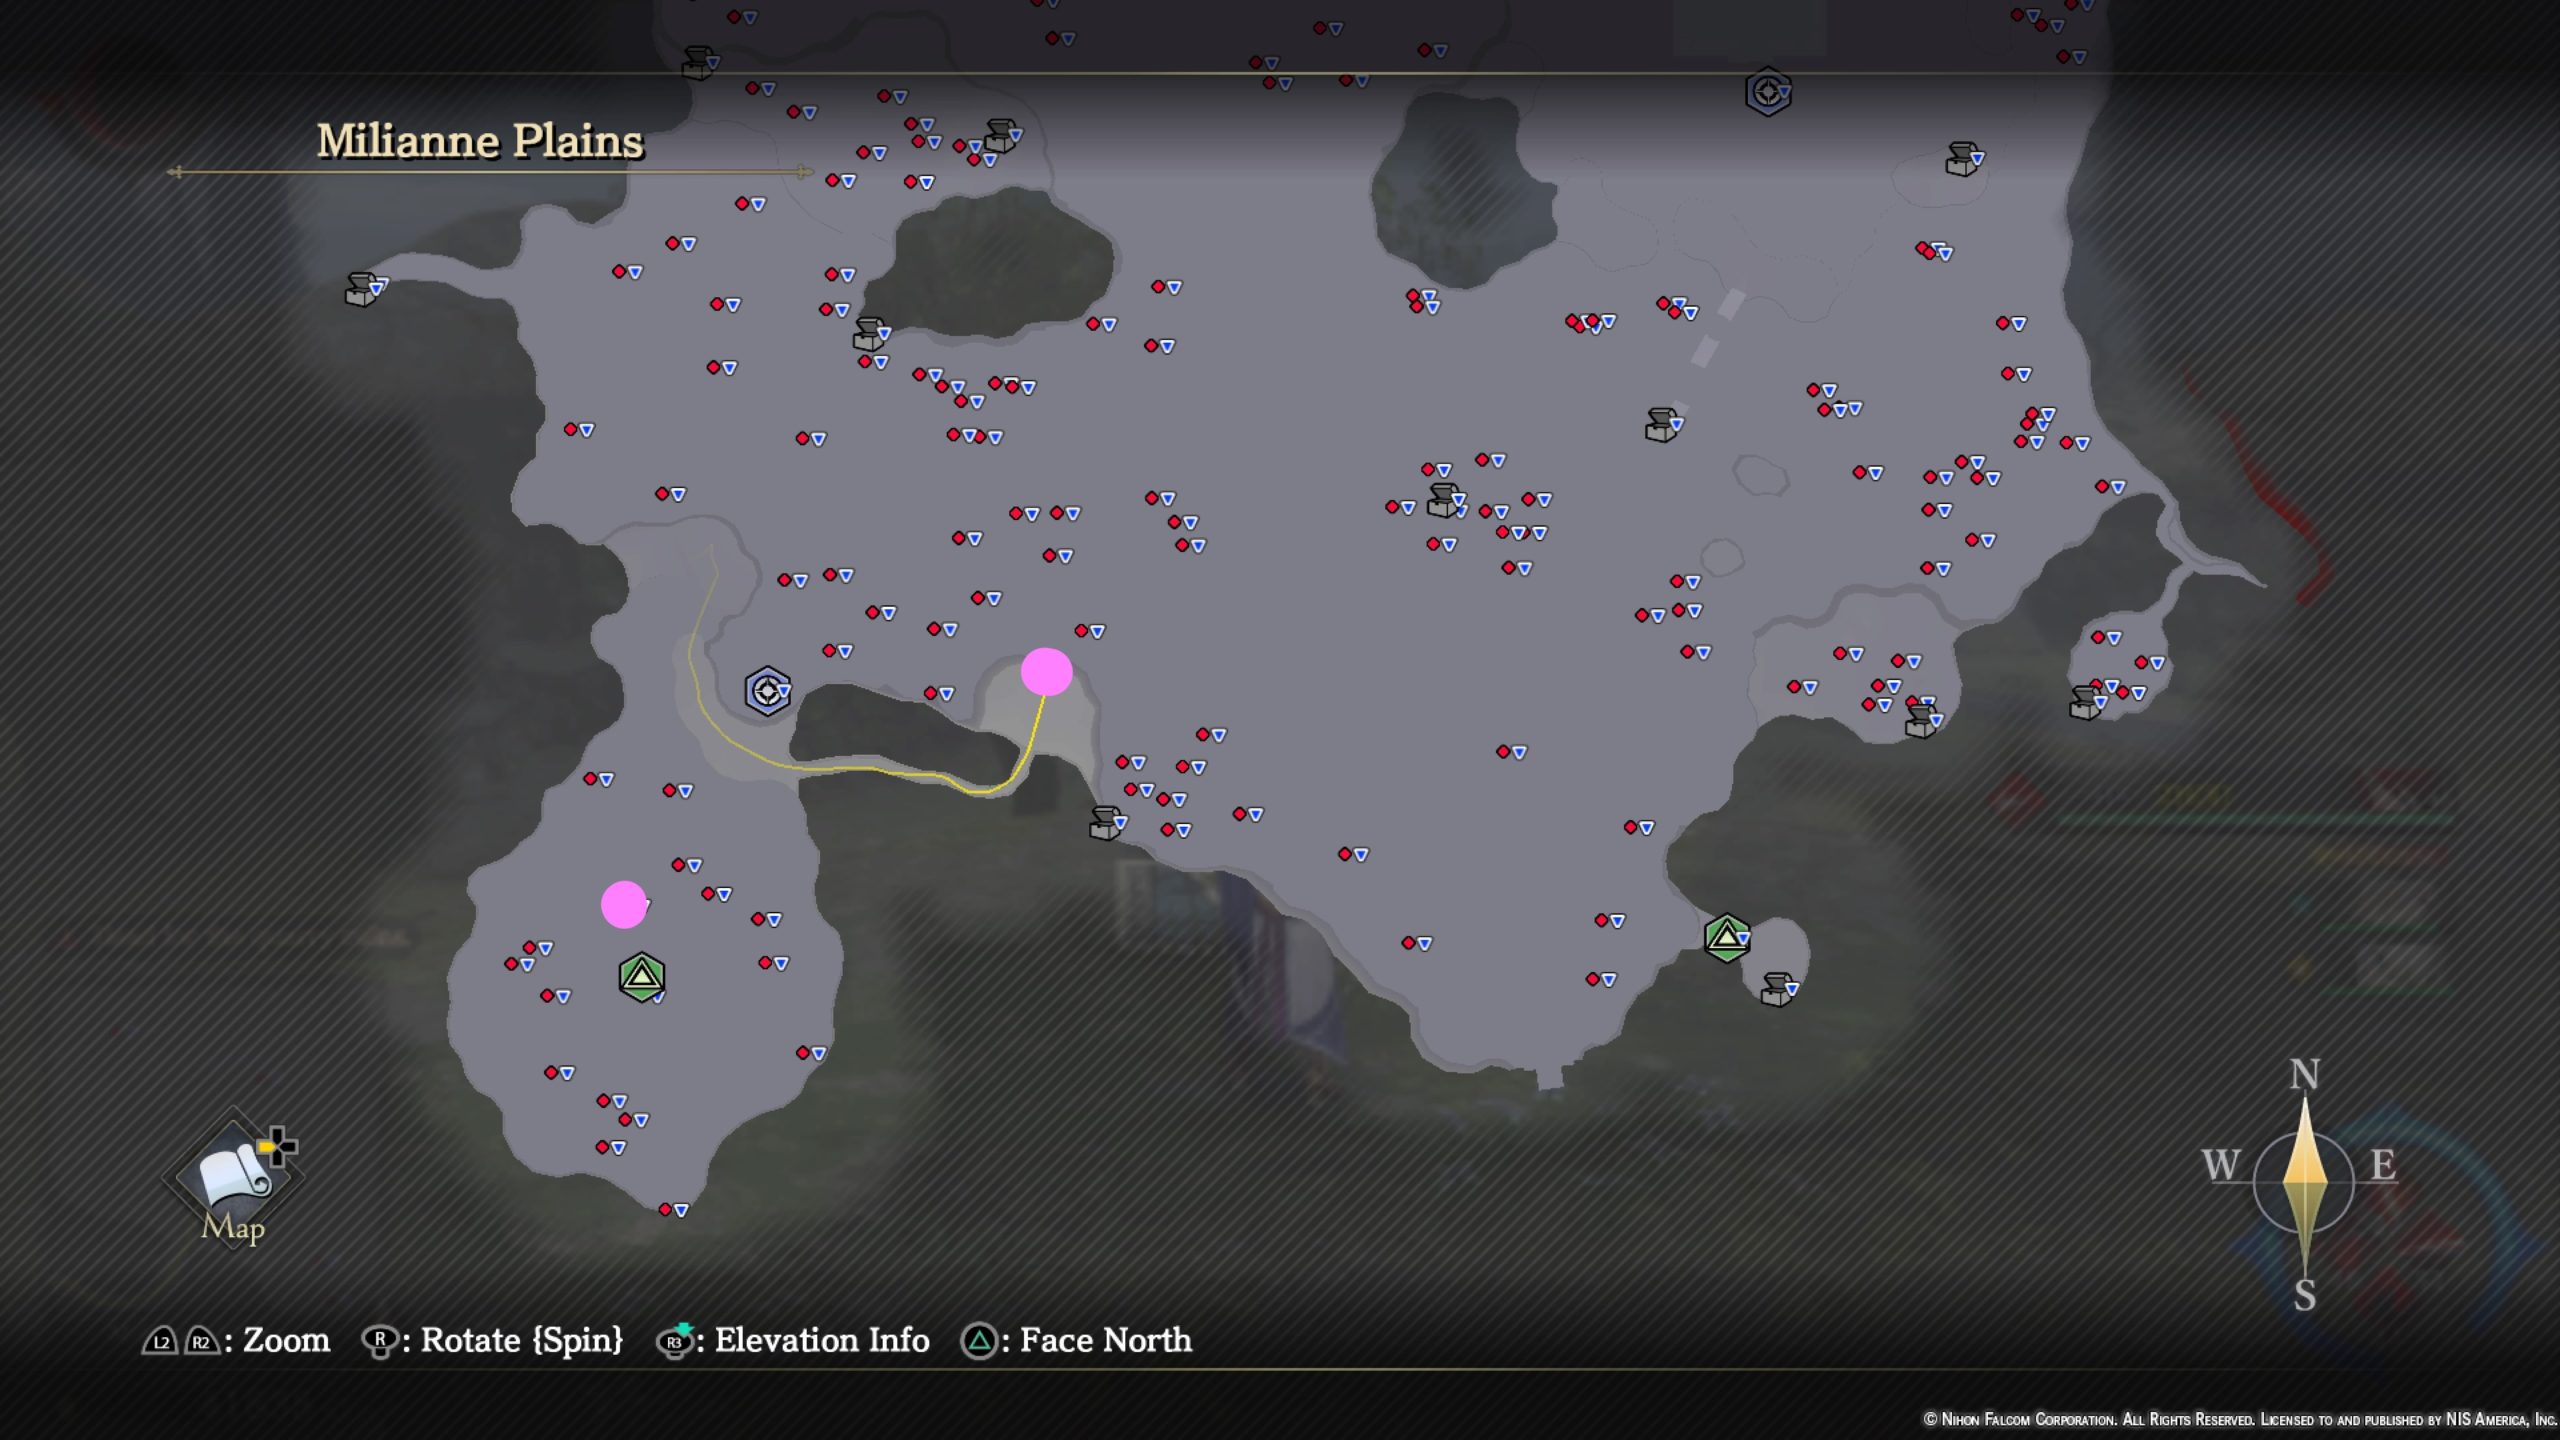
- Apocrypha: Judgment
- Defense Elixir
Mount El Dore
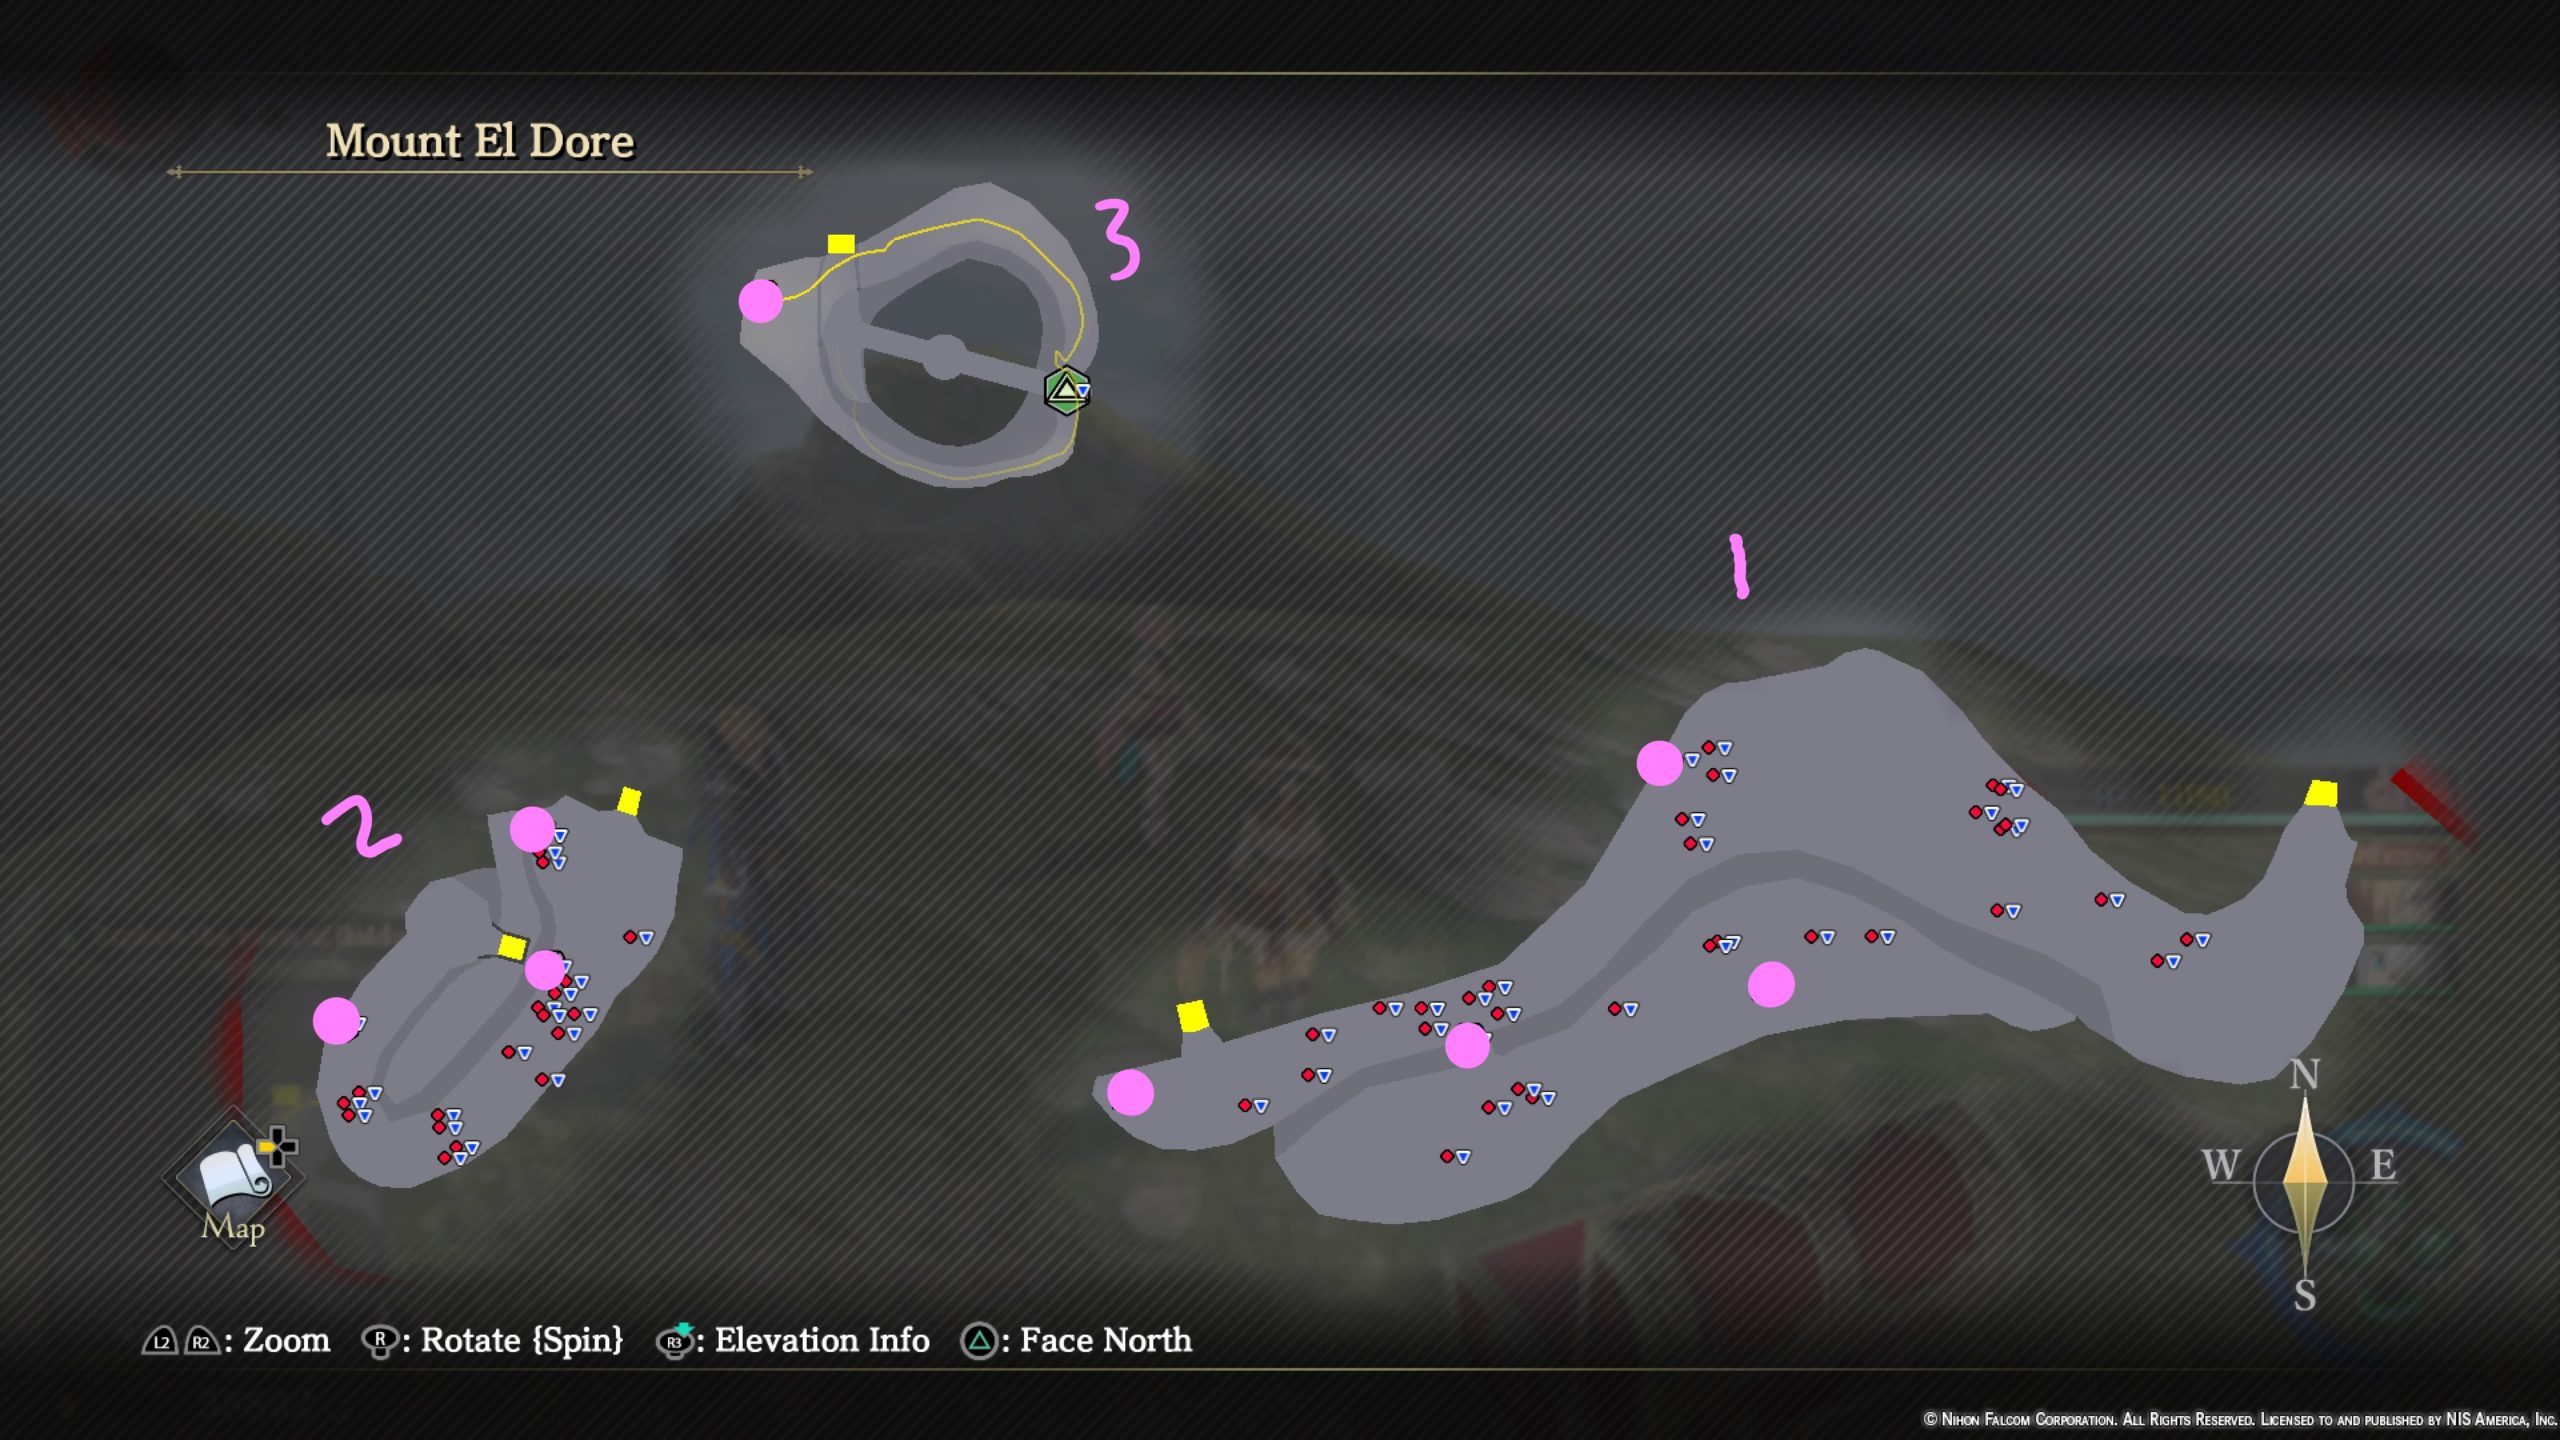
- White Asparagus x10
- Crimson Spar x3
- Bitter Remedy x2
- Blinding Bangle
- Expellant x3
- Midnight Sun Drop x2
- 1200 Gold
- Apocrypha: Karma
Mount El Dore – Cave

- 1200 Gold

- Black Fig x4
- Beast Hide x2
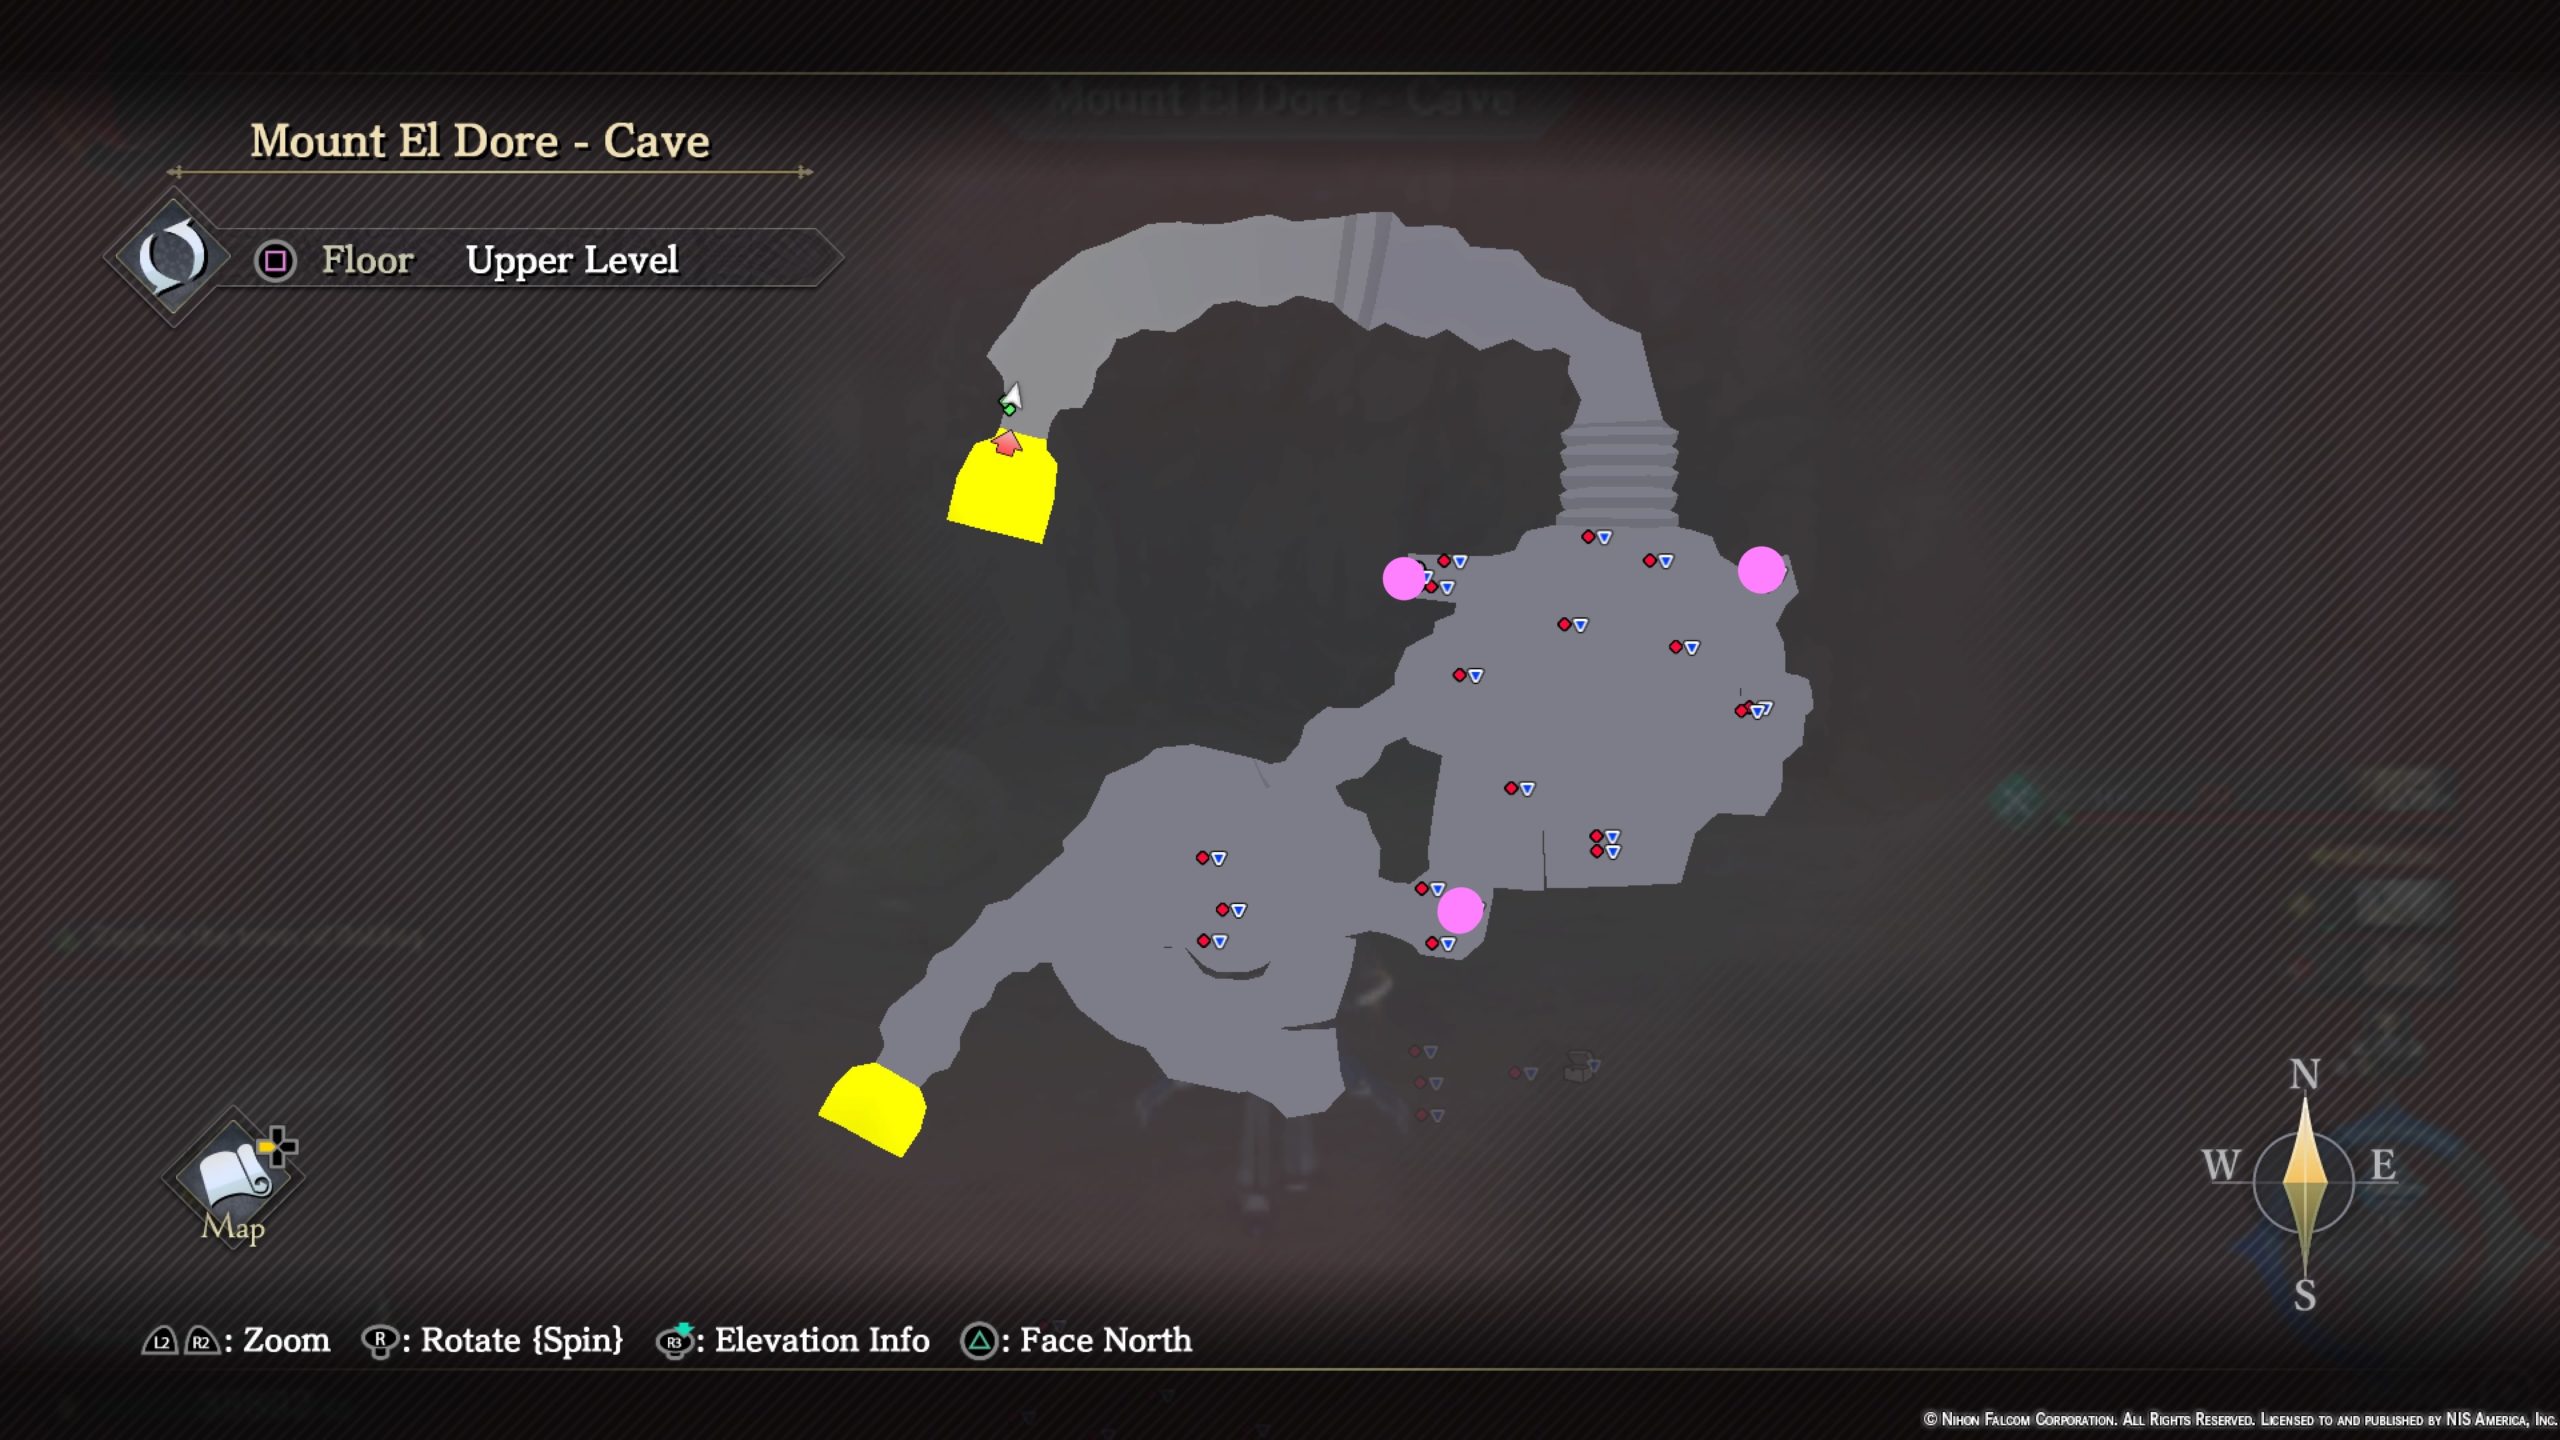
- Gaudy Gloves
- Luminescent Fluid x2
- Emollient x2
Noble District

- Antidote x2
- Smoked Meat x2
- Emollient x2
- Strength Elixir
- Warlord Elixir
- Cheese x5
- Mushroom x5
- Dry-aged Meat x2
Path to Hidden Treasure

- Light Shell x2
- Armored Shell x2
- Sturdy Shell x2
Prison Outskirts

- Strength Elixir
- 2000 Gold
- Mushroom x5
- Defense Elixir x2
- Bitter Remedy
Quarry Ruins
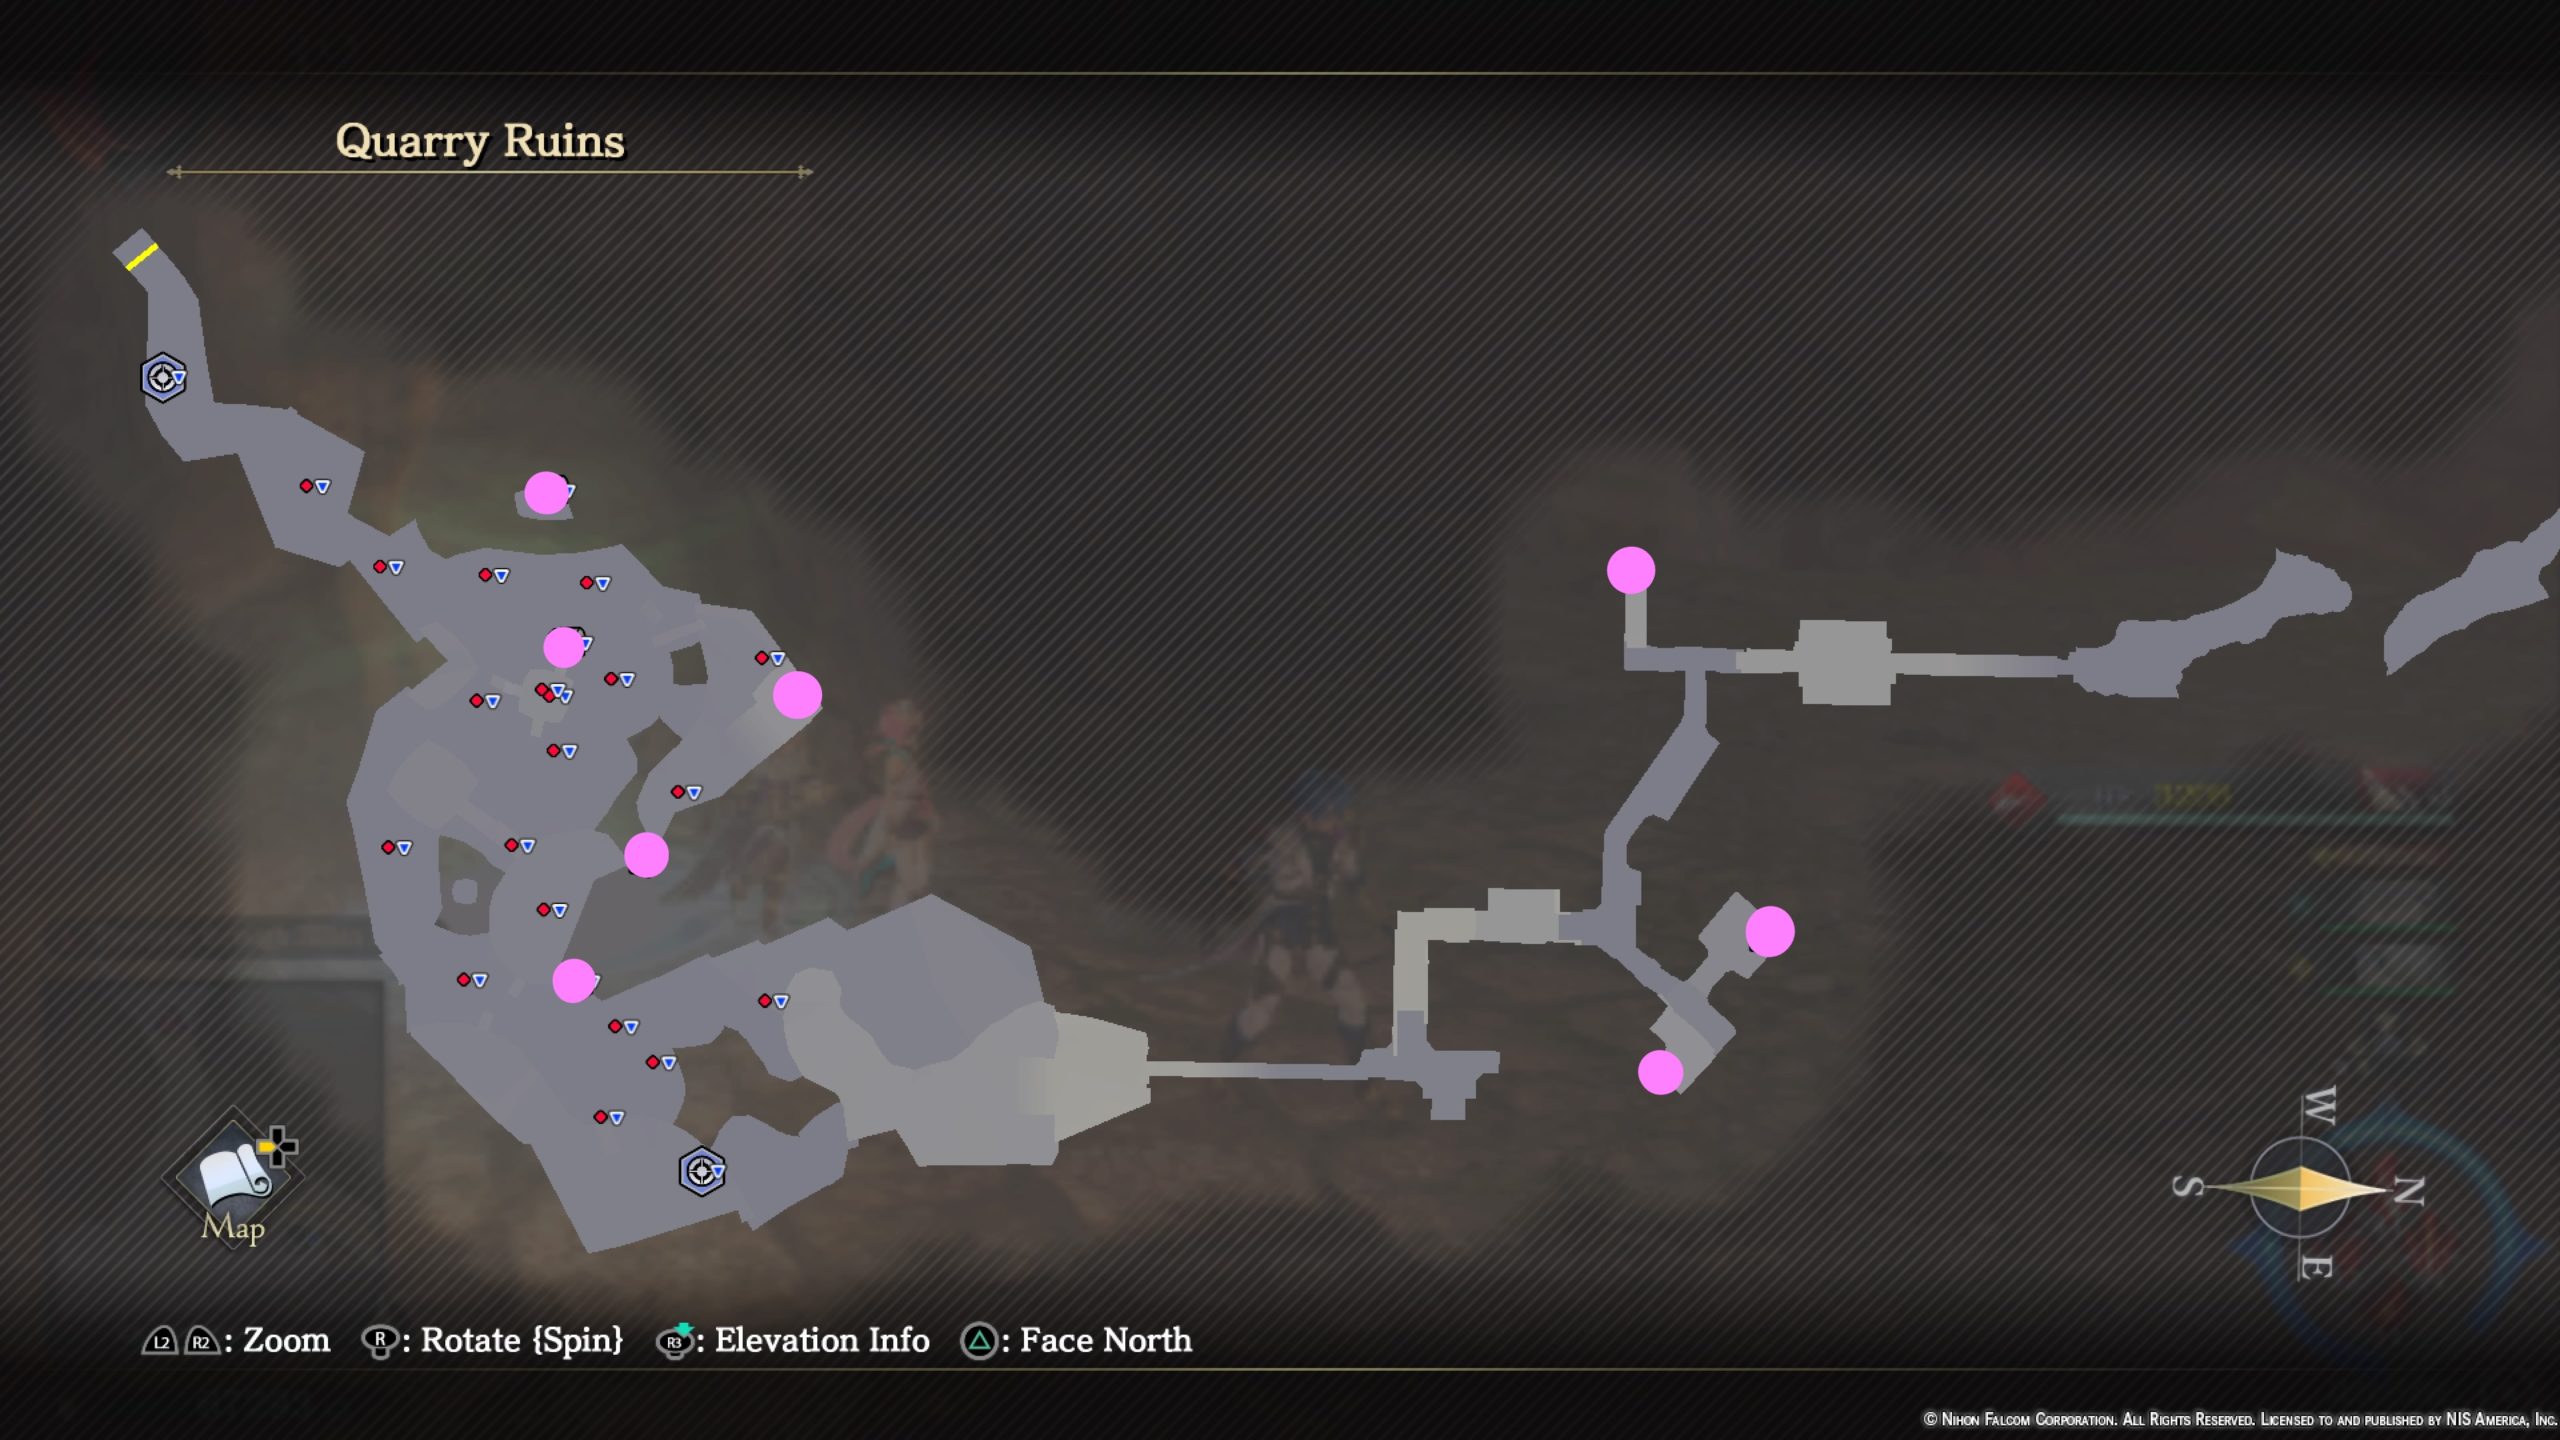
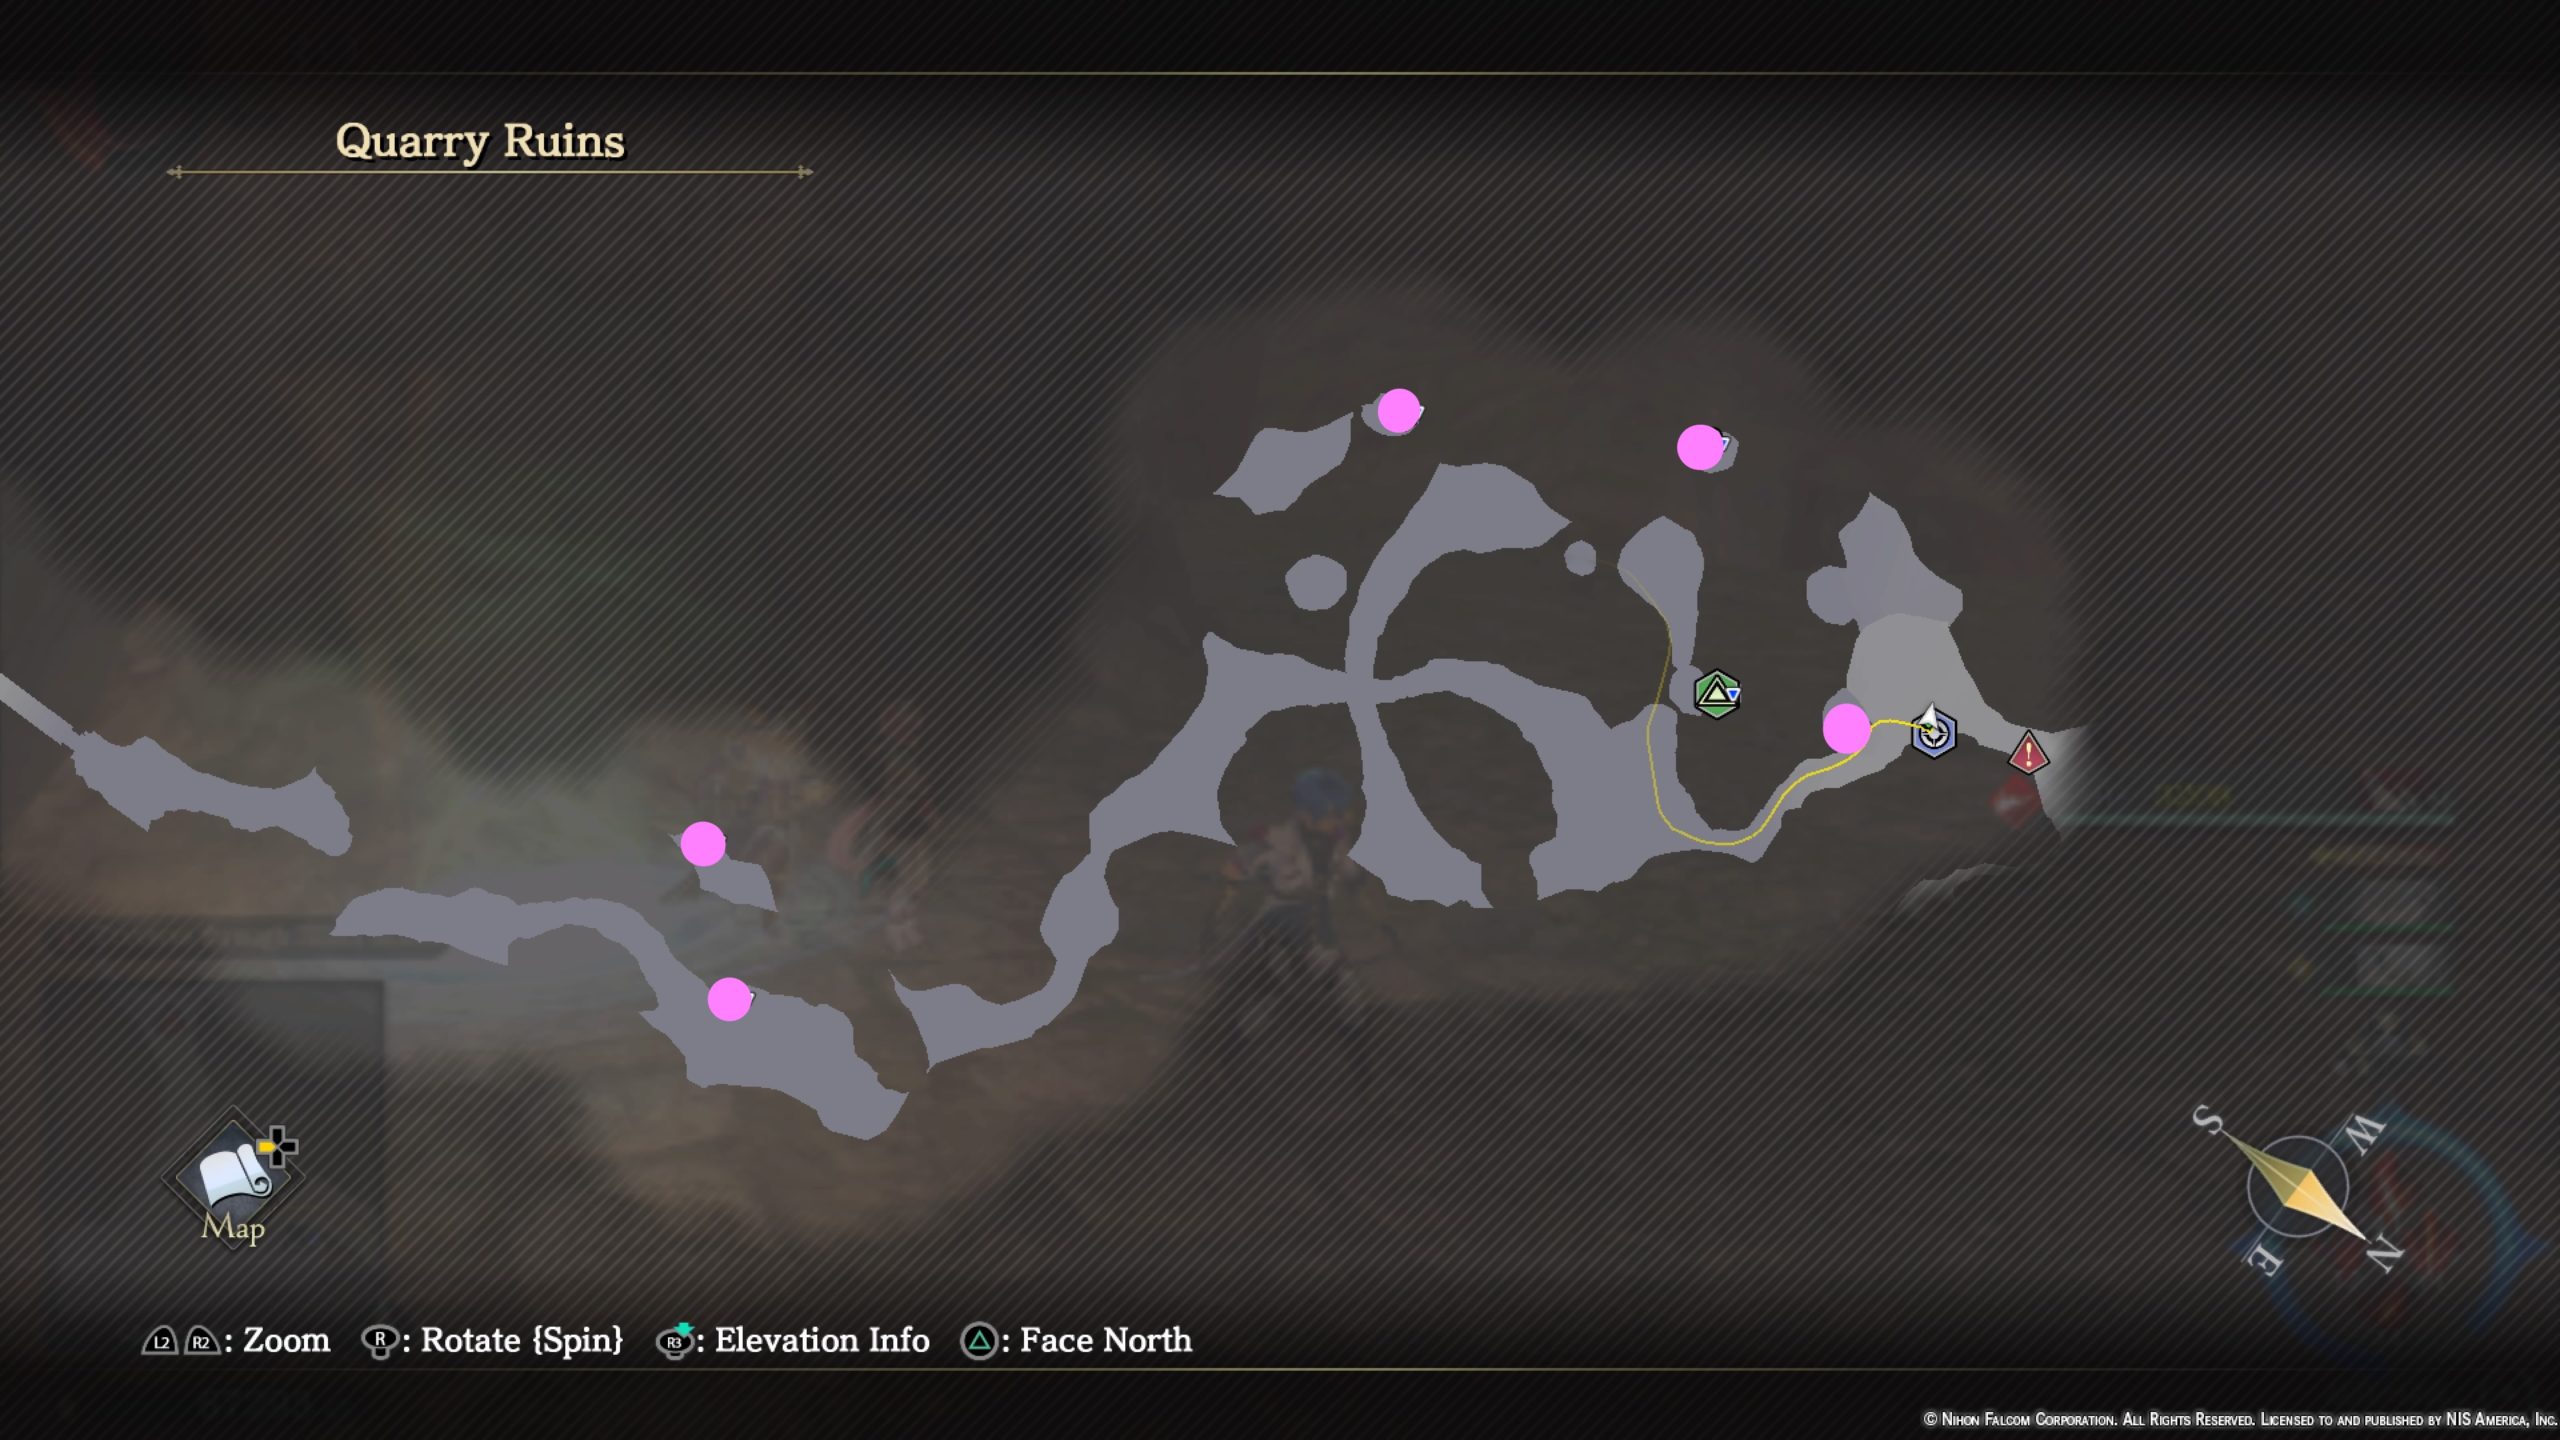
- Dry-Aged Meat x2
- 3200 Gold
- Shield Earring III
- Panacea x2
- Calamity Grimoire
- 4000 Gold
- Mandragora Root
- Iron Shield
- Diglem Core x2
- Boost Potion
- Suzhen Stone
- 4800 Gold
- Strength Elixir
Secret Medicine Stash (hidden area)
*To access this hidden area, travel to Central District. From Andelph’s Armory head west towards a metal fence. Jump over the fence to end up in an alleyway. Activate Doll’s gift to find a brick you can interact with to cause a secret door to open.

- Sweet Remedy x2
- Panacea x2
- Hermit’s Remedy x2
- Bitter Remedy x2
Shantytown
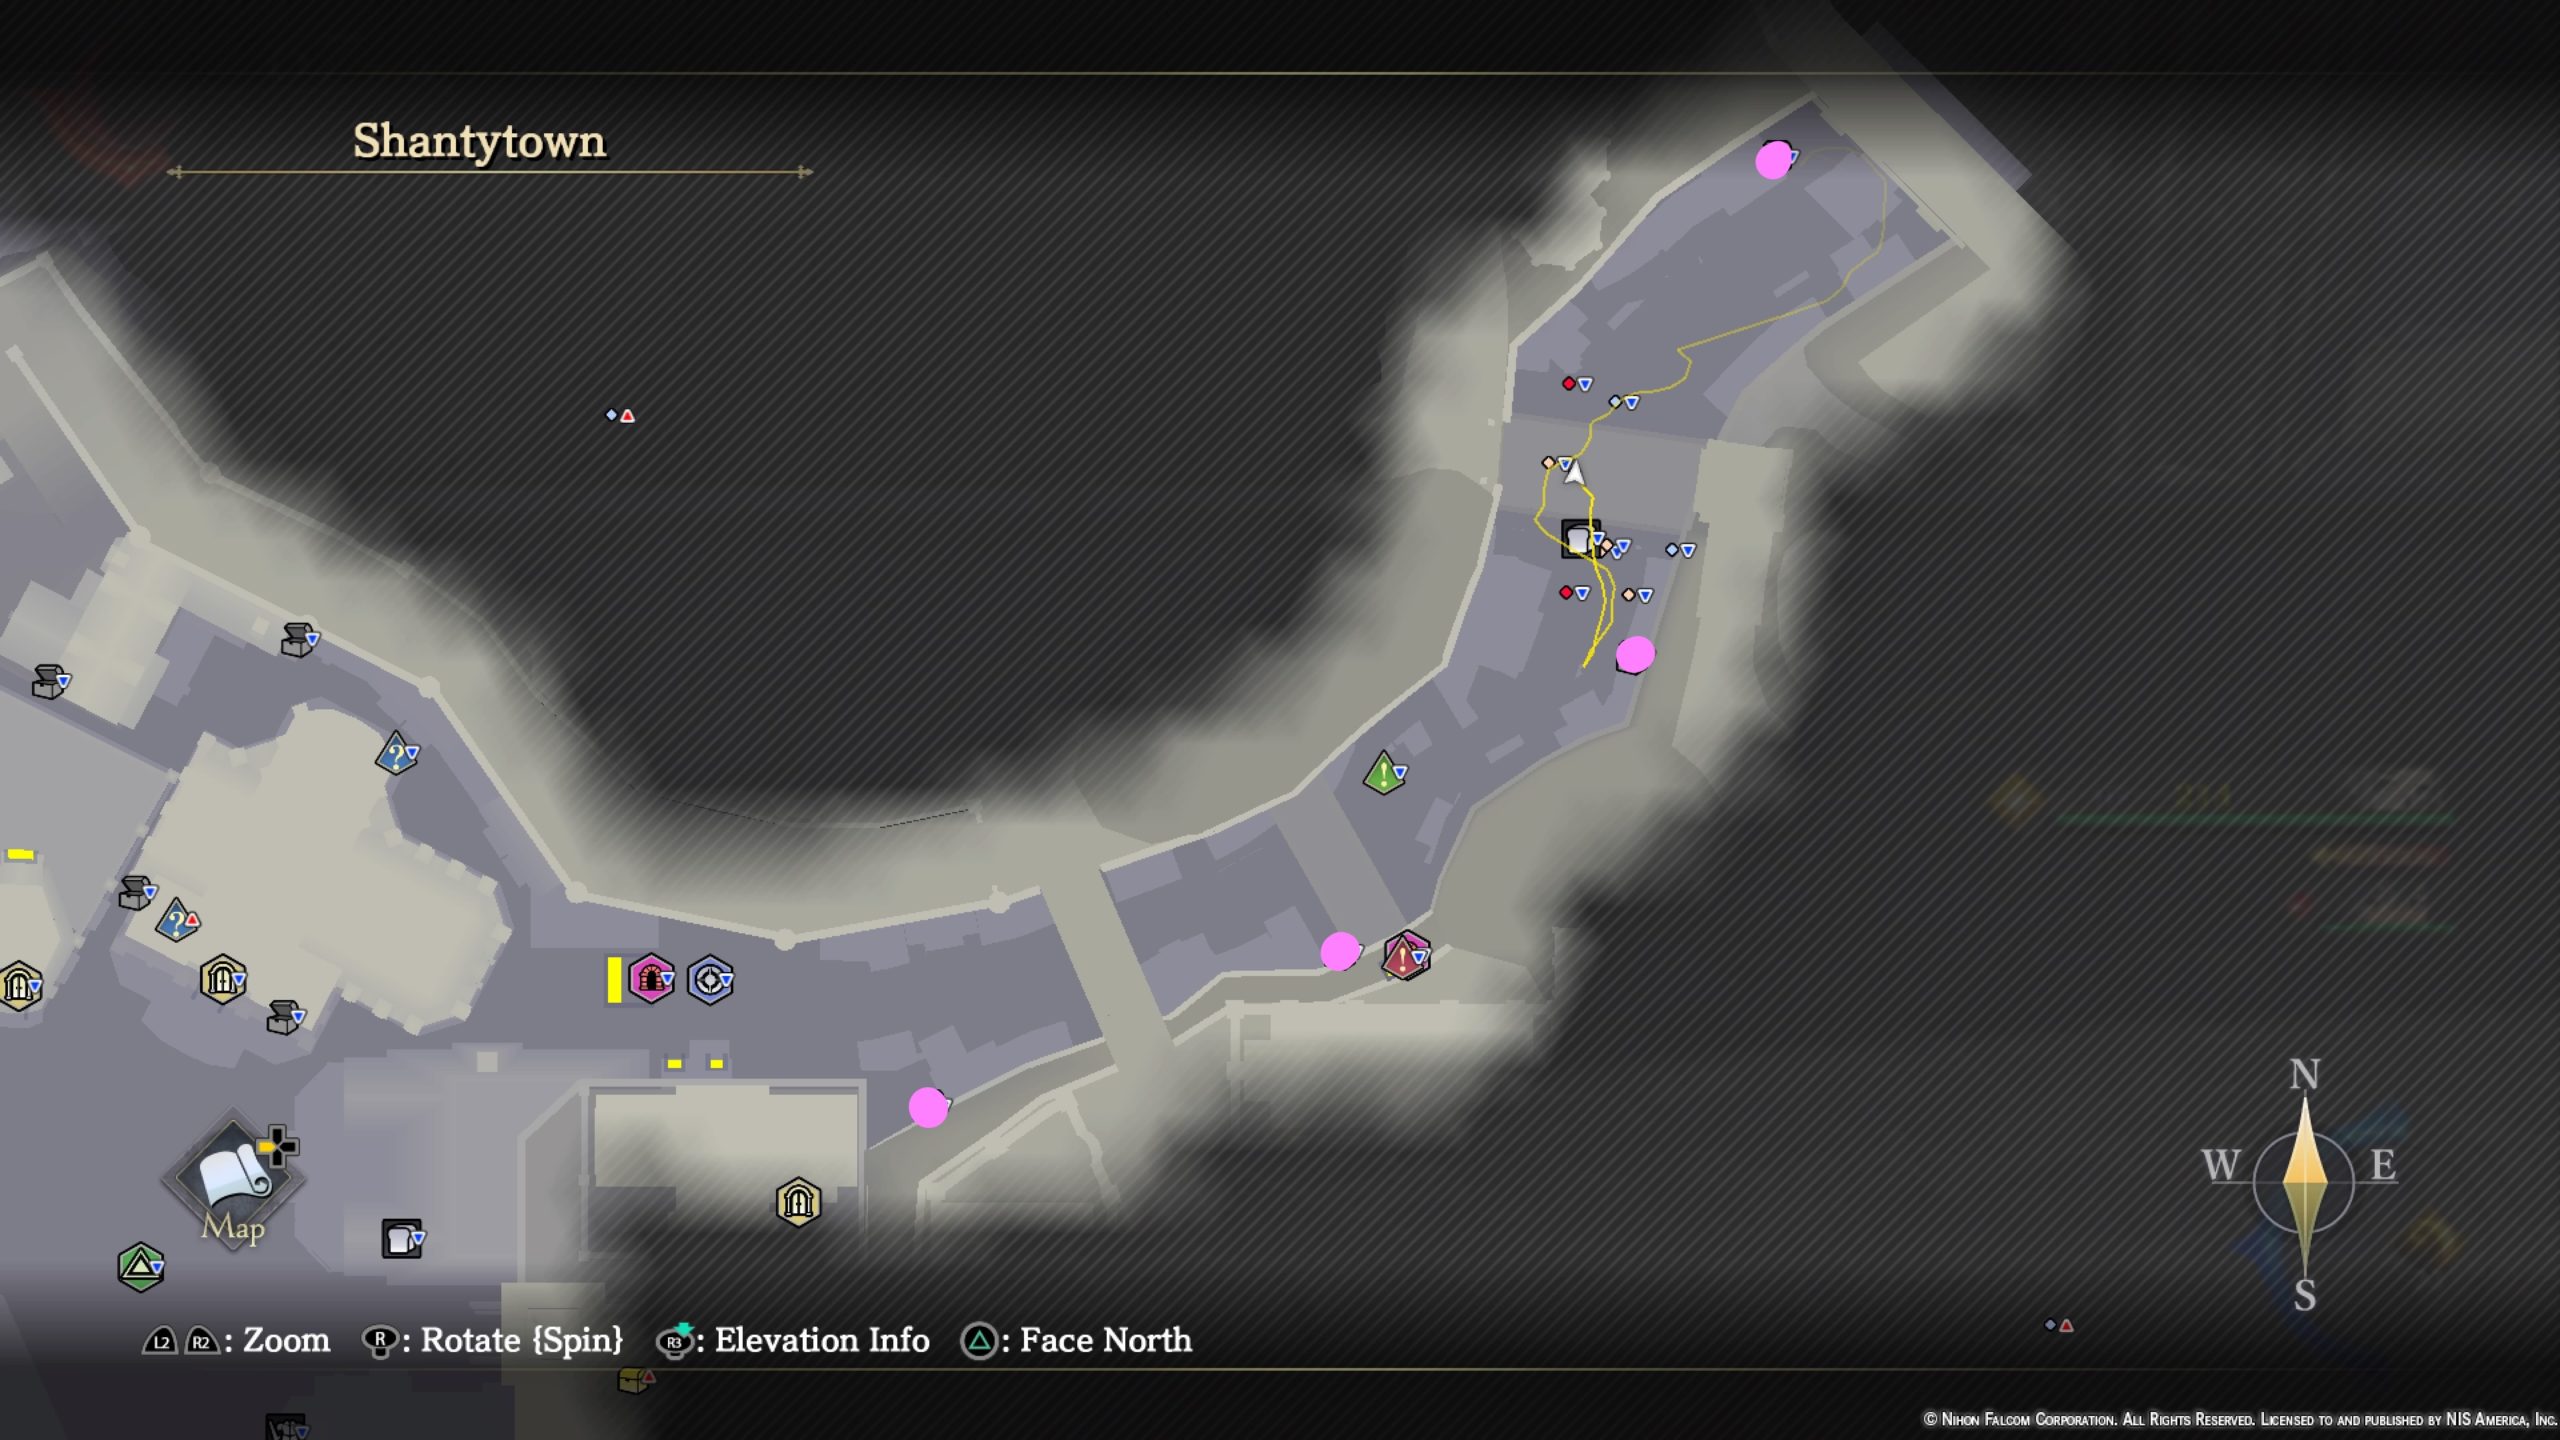
- Marl Flower x2
- Diagonally from Nirvana on a ledge
- Defense Elixir
- Accessible after White Cat joins party
- Apple x5
- Accessible after White Cat joins party
- Expellant x2
- Accessible after White Cat joins party
South Dumping Ground

- 6000 Gold
- Raisins x3
- Red Cheese
- 2000 Gold
- White Nut x3
- 2000 Gold
Tranquil Underpass
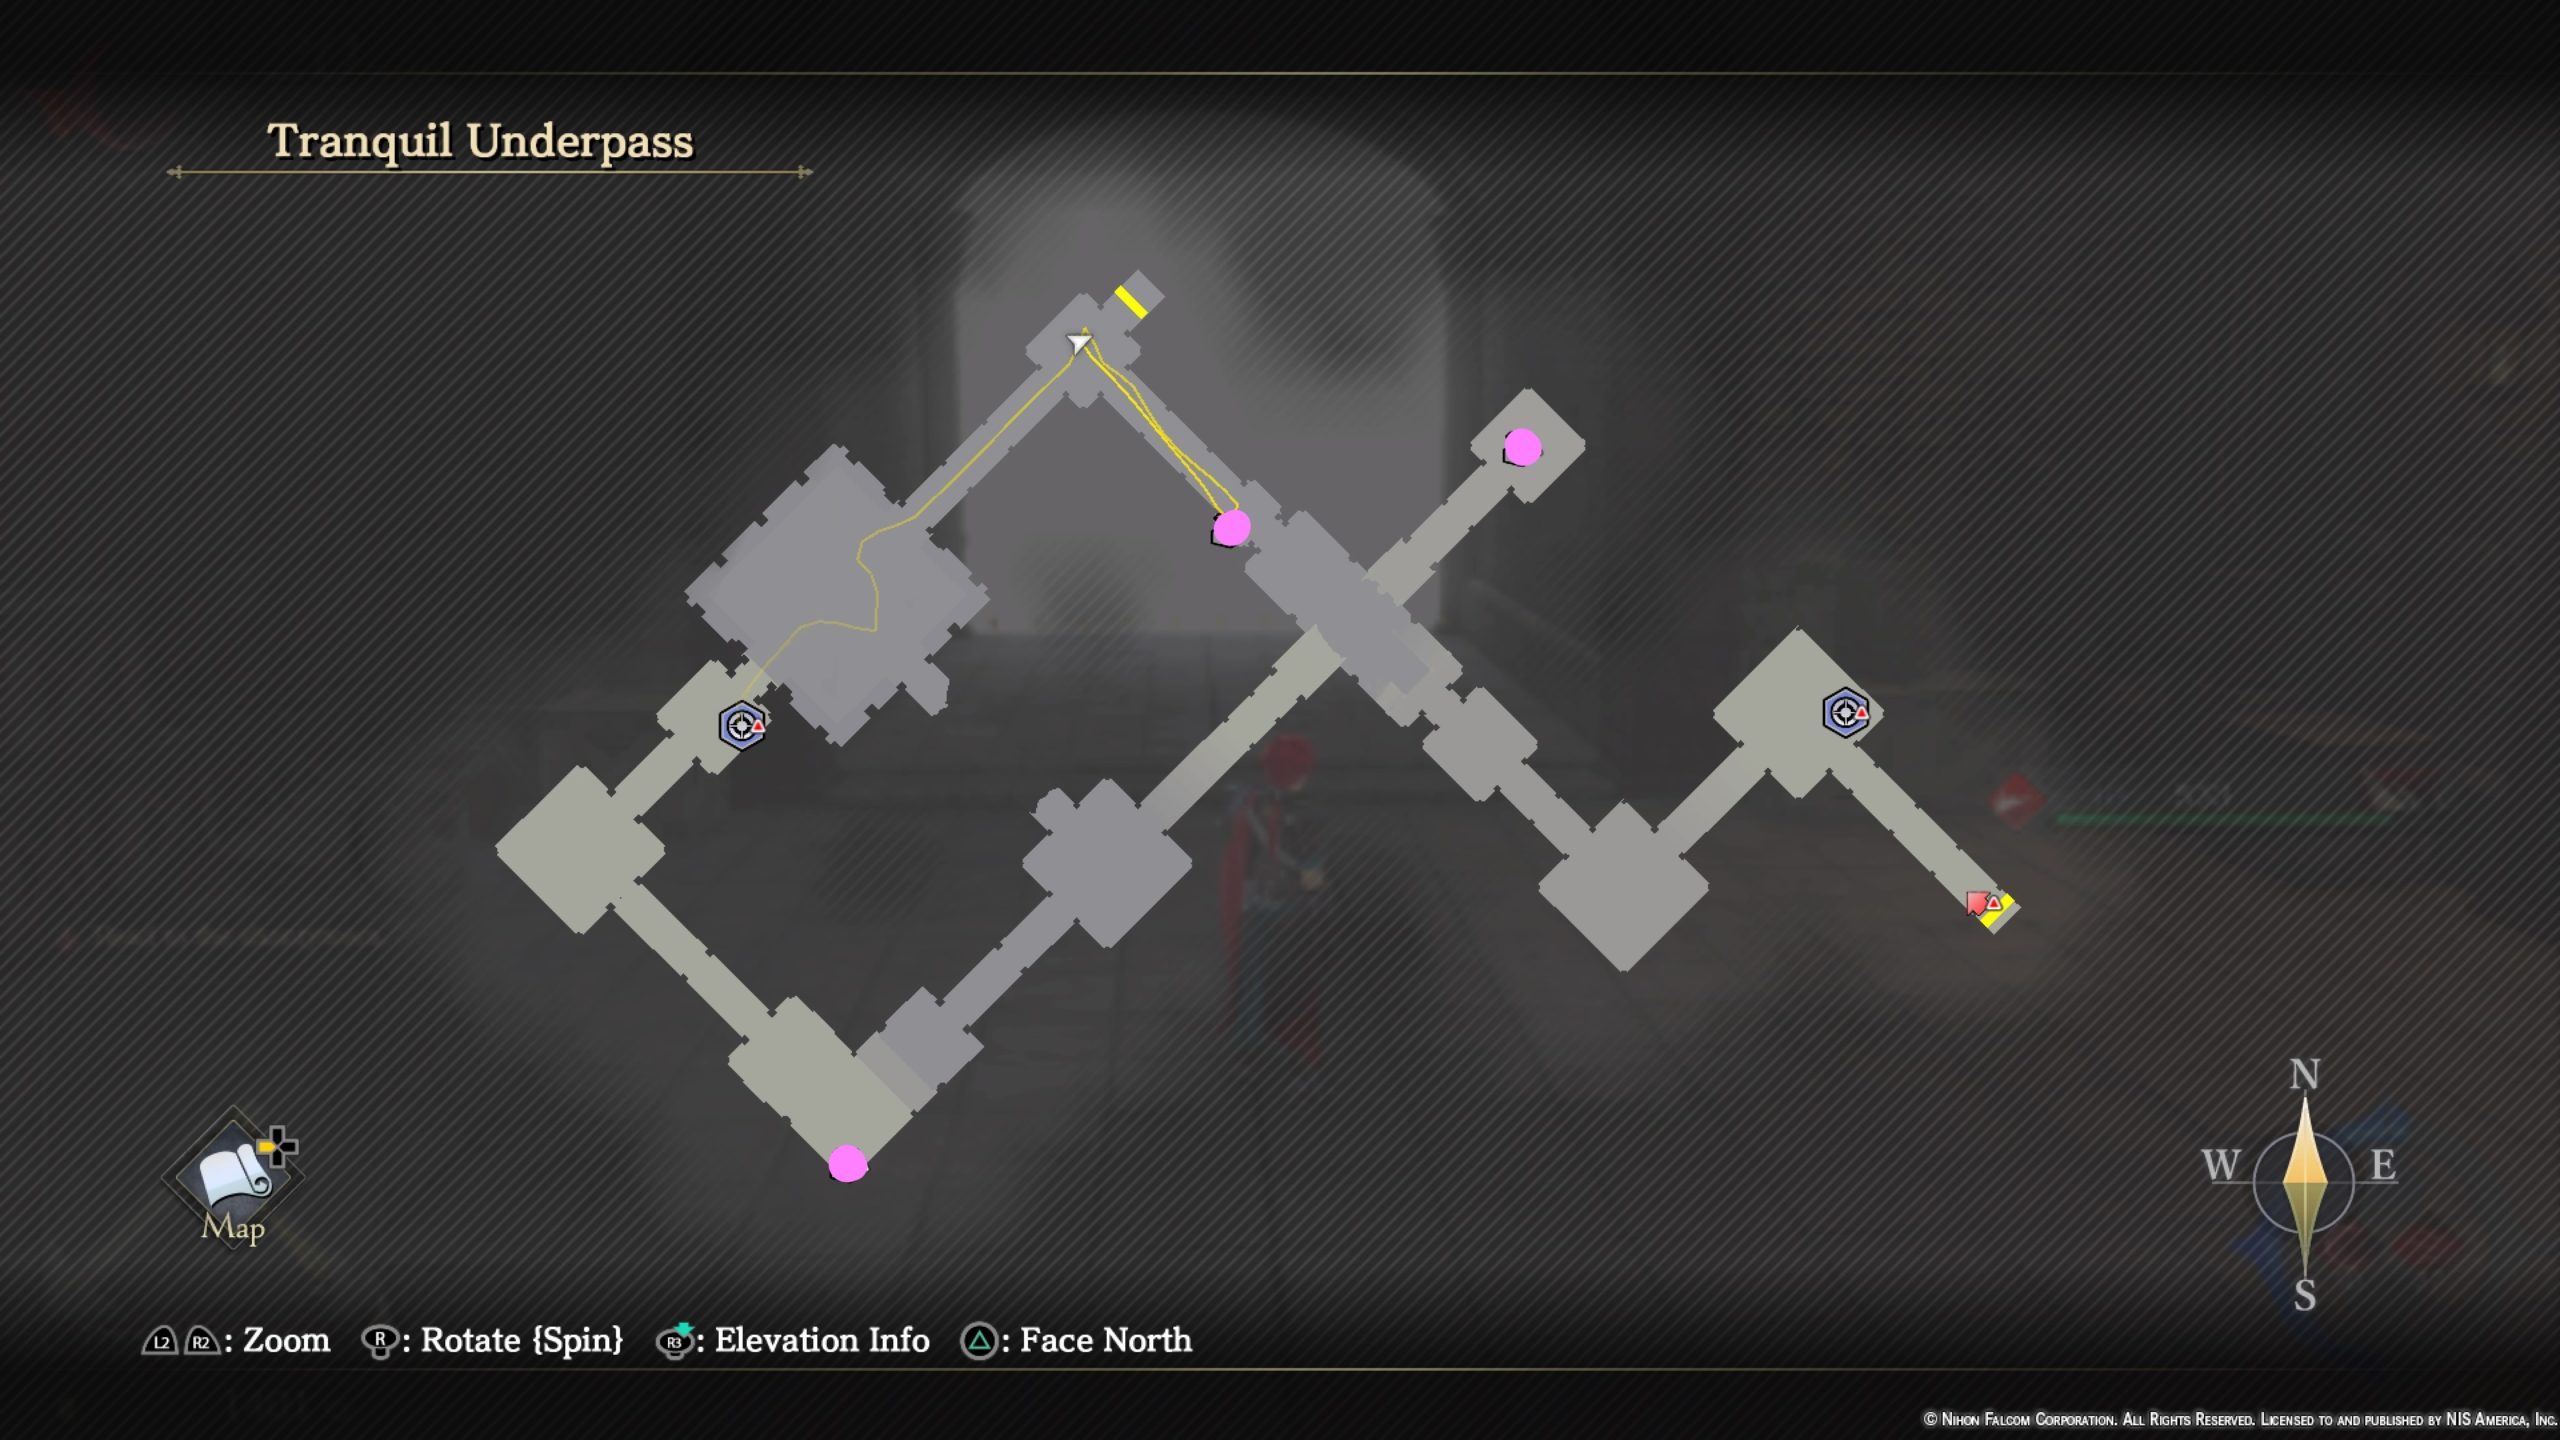
- Copper Ore x4
- Leather Necklace
- Raisins x2
Vacant Ritual Room (hidden area)
*Travel to the Cultural Heritage Site and use Renegade’s gift to enter underneath the gated doorway in the southern part of the area just past the statue.

- Bash Grimoire
Waterfall Storeroom (hidden area)
*To reach this area, head to northern Main Square near the circular gazebo. Make your way to the graffiti on the wall near the waterfall. Jump on the ledge to the left of the graffiti then jump into the waterfall to locate a hidden path leading to the Waterfall Storeroom.
- Strength Elixir
Waterway Vault (hidden area)
*In order to access this area, you’ll need to head to the Main Gates and jump into the water behind the bulletin board near the Relief Tile. Next, you’ll need to use Renegade’s gift to go into the sewer grate.
- Life Elixir
West Dumping Ground (Part 1)

- Raisins x3
- 3000 Gold
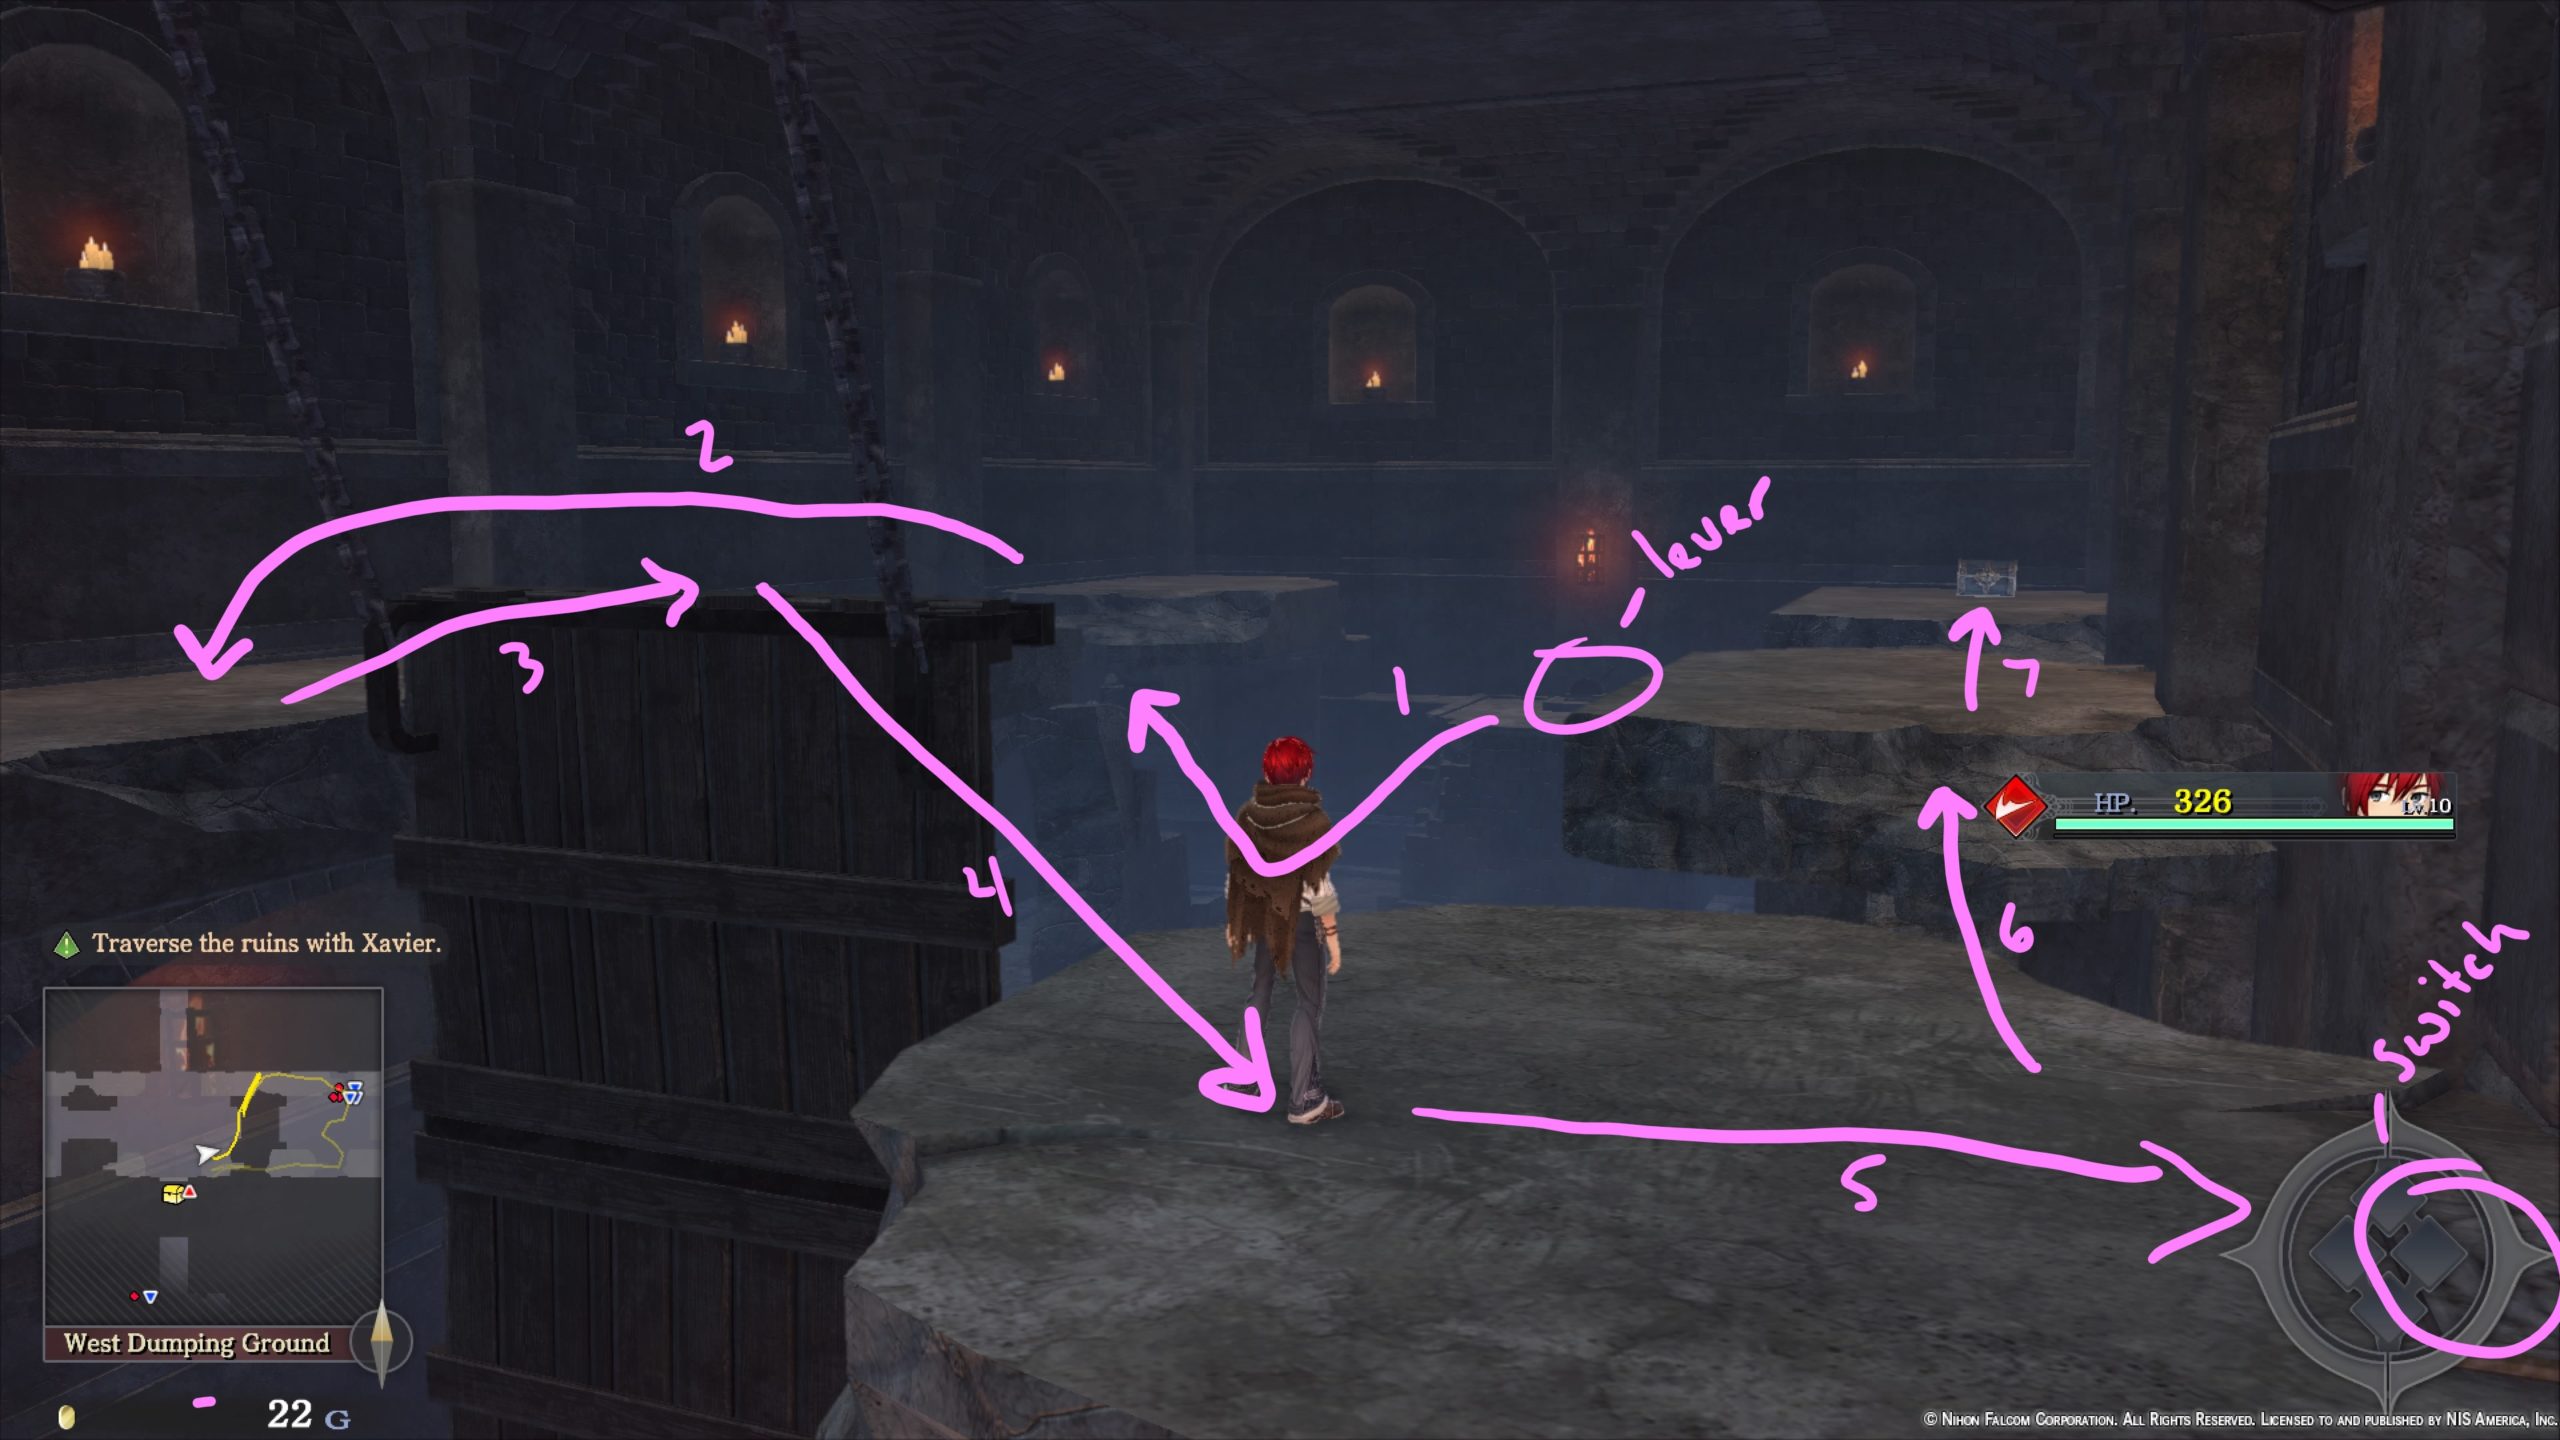
-
- To reach this chest on the left side of the room, flip the lever raising the drawbridge that you just walked across then jump down and head back up the crumbled wall. At the top, make your way to the raised drawbridge then do a sprint jump to reach the top of the drawbridge. Once you make it, jump to the other side of the room to find a switch. Stand on the switch then jump your way to the chest.
- White Nut x3
West Dumping Ground (Part 2)
*You’ll return to this area in Chapter 5 as part of the story!

- Tempest Elixir
Woodlands of Woe

- Relic Bone
- 3600 Gold
- Iron Bangle
- Panacea x2
- Hermit’s Remedy
- 5400 Gold
- Dry-aged Meat x2
- Dark Grimoire
- Defense Elixir