Octopath Traveler 2 Logo
Guides

Octopath Traveler II – Crestlands Region Guide

by NightlyGamingBinge in

In Octopath Traveler II, you’ll come to the Crestlands region as part of your journey. This guide will cover the chests, townspeople, enemies and side stories you’ll come across in the Crestlands.

Path Actions

The below list has links to each Path Action guide and the rewards you can get from using each one.

Enemies

NameVulnerable
Antagonistic AntSword / Axe / Staff / Light
Crimson AmmoniteSword / Light
Cultured CaitAxe
Dark Curator Mk.IISpear / Bow / Light
Dark PorcupineSword / Bow / Staff / Lightning
Dark SentinelSword / Spear / Axe / Staff / Light
Dark Spiny ShrewSpear / Axe / Dark
Dread FalconSpear / Dagger / Bow / Ice /Light
Ettin OphidianSword / Axe / Wind / Light
Giant FalconSword / Spear / Bow / Fire / Light
Highland GoatSword / Spear / Light
Horned FlySpear / Bow / Ice / Wind
Lightning Elemental Wind / Dark
Mountain AnteaterDagger / Axe / Dark
Mountain Ape ISword / Staff / Ice / Light
Mountain Ape IISword / Spear / Ice / Light
Mountain Ape IIIDagger / Staff / Lightning / Wind
Mountain Ape IVSword/ Bow / Fire / Lightning
Mountain Ape VSpear / Dagger / Lightning / Wind
Mountain Apeking ISword / Dagger / Ice
Mountain Apeking IIDagger / Staff / Lightning
Mountain Apeking IIISword / Lightning / Wind
Mountain Apeking VIDagger / Staff / Lightning
Mountain GoatDagger / Bow / Light
Puppet BonesStaff / Fire / Light
RockadilloStaff
Shadow WispFire / Lightning / Wind / Light
Shaggy AurochsSpear / Dagger / Axe / Fire
Thunder GuardianSword / Dagger / Bow / Wind
Vagrant Ratkin VISpear / Axe / Staff / Dark
Vagrant Ratking IStaff / Light
Vagrant Ratking IISpear / Staff / Lightning / Light
Vagrant Ratking IIISword / Dagger / Dark
Wild WeaselSword / Axe / Ice / Dark
Wind ElementalLightning / Light
Winged SerpentSpear / Bow / Wind

Abandoned Church

Chests

LootLocation
Healing Grape BunchFirst floor near the entrance on the eastern side
Black DaggerOn the first floor behind the podium near the entrance
Inspiriting Plum BasketOn the first floor after coming down the first set of stairs
Olive of Life (M)Just east of savepoint

Abandoned Traverse

Chests

LootLocation
Bottle of Poison DustNear the entrance of the area from Montwise off the main path on the western side
Energizing PomegranateFrom the entrance go across the bridge then head north
Guardian AmuletFrom the entrance go across the bridge then head south. Take the western path a short ways down.
Ice Soulstone (M)From the above chest continue along the path to find this in the nook just before the stairs

Borderfall

Chests

LootLocation
Inspiriting Plum (M) x1Along the path leading from Eastern Flamechurch Pass to the savepoint
Shadow BowFrom the savepoint head west. When you reach the top of the stairs follow the path right.
Thunder Soulstone (M)Head east from the savepoint and across a bridge
Empowering LycheeHead east from the savepoint and across a bridge. You’ll then climb down a ladder. Use the dock to sail west.

Eastern Flamechurch Pass

Chests

LootLocation
Fur ArmorEnd of the path directly north of the savepoint
Energizing Pomegranate x1Follow the path south of savepoint and take first path east
Fire Soulstone x1Head east of the savepoint to find it near the end on a cliffside
Slumber Sage x1Head northeast of the savepoint to find it on a side path to the right

Flamechurch

Chests

ItemLocation
400 leavesIn house northwest of the general store
Healing Grape x1In the room above the Inn behind the Solider (will need to Ambush/Provoke)
Guard’s Shield x1In the room above the Inn behind the Solider (will need to Ambush/Provoke)

Flamechurch: Cathedral

Chests

LootLocation
Shadow SoulstoneIn house on southwestern side of area closest to the savepoint

Flamechruch Pilgrims’ Way

Chests

LootLocation
Inspiriting PlumFound along the path heading west from the savepoint
Healing GrapeDown the steps to the right before the tunnel entrance
Tough NutIn the tunnel, follow the western path to the end
Stimulating RingIn the tunnel, follow the eastern path then use the dock to sail across the water

Forsaken Graveyard

Chests

LootLocation
Vivifying StoneSoutheastern corner of area
Dark SlasherDown the stairs south of the savepoint on western side of area
Fire Soulstone (L)On western side of area up a ladder in a ruined building

Merry HilLS

Chests

LootLocation
Herb of ClamorNorthern part of town near map transition
Empowering Lychee (L)In northwestern house

Merry Hills: Shrine Entrance

Chests

LootLocation
Empowering NecklaceNortheastern side of area
2700 leavesWestern side of area

Montwise

Chests

LootLocation
Feather MantleWestern side of town reachable via the northwestern exit in the library
Engagement BowIn the house west of the tavern. You’ll need to defeat the Former Champion in order to access it!

Montwise: Libary

Chests

LootLocation
Lapis RodOn top of the bookshelf on eastern side

Northern Montwise Pass

Chests

LootLocation
Unerring NecklaceDown the long ladder just northwest of the savepoint
Shadow Soulstone (M)East of the savepoint
Large Silver OreDown the long ladder south of the savepoint
Slumber SageFrom the savepoint, head west then go down the western set of stairs
Gold DustOn eastern side of area in a chest behind a ladder. To reach it, head east of the ladder then take the northern path and follow it west.
Large Silver OreSouthwestern corner of area
Healing Grape (M)Far southeastern part of the area near map transition to Western Montwise Pass

Western Merry Hills Pass

Chests

LootLocations
Healing Grape (M)Down the stairs from the starting area
Sun ShieldAcross the first bridge head north then follow the path
Herb of AwakeningOff the main path near the savepoint
Herb of SerenityJust north of the savepoint near the stalls

Western Montwise Pass

Chests

LootLocation
800 leavesFrom the steps leading to Montwise, it will be up the ladder to the west past the wooden sign
Energizing Pomegranate (M)From the steps leading to Montwise, head south across a bridge and down a flight of stairs. It will be in a small nook to the west.
Gelid HelmFollow the path north from the savepoint then when it curves to the right take a left into a hidden cave
Star Ocean The Divine Force Walkthrough
Guides

Star Ocean: The Divine Force – Castle Vey’l

by NightlyGamingBinge in

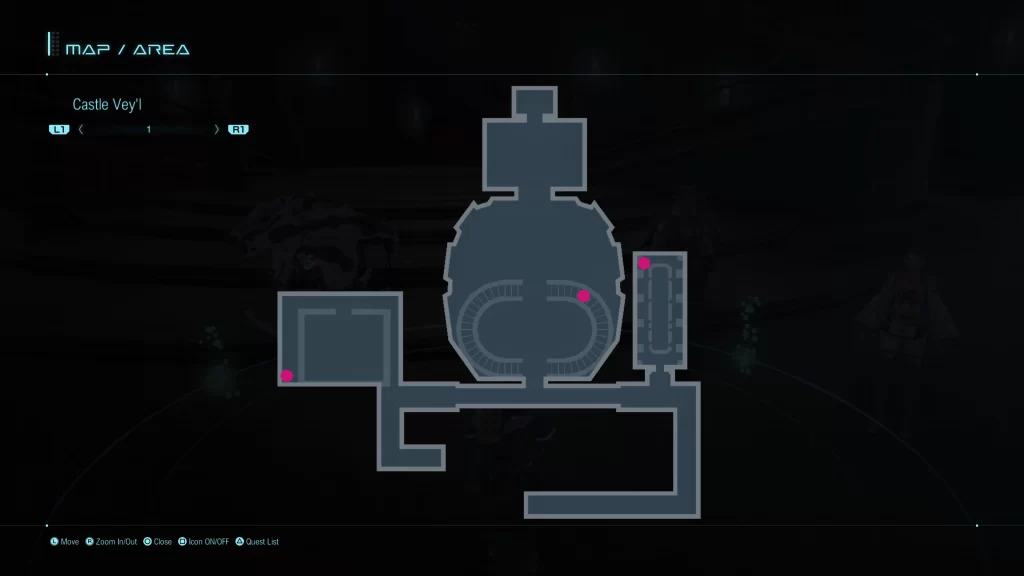
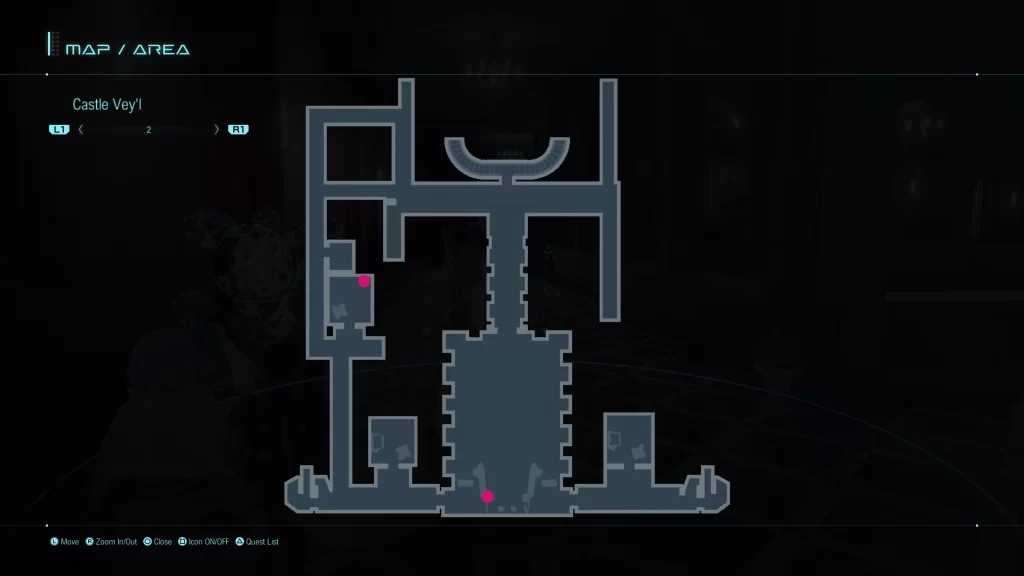
Below is a guide on the collectibles found in the Castle Vey’l of Star Ocean: The Divine Force. These collectibles could consist of mini-bunnies, treasure chests, gatherable materials and enemies!

Treasure Chests

  • Draconite Brooch
  • Miki
  • Symbol of Horror
  • Rainbow Diamond
  • Demi-lance Armor

Click here for the next walkthrough on Hybrid Research Vessel Terranus in Star Ocean: The Divine Force.

Star Ocean The Divine Force Walkthrough
Guides

Star Ocean: The Divine Force – Royal Capital Acendros City

by NightlyGamingBinge in

Below is a guide on the collectibles found in the Royal Capital Acendros City of Star Ocean: The Divine Force. These collectibles could consist of mini-bunnies, treasure chests, gatherable materials and enemies!

Side Stories

  • Similar Tastes – Approach Elena and Albaird in the town down the street south of the tavern
  • Long Live the Kingdom – Speak with Albaird during The Kennys’ Descendant main quest
  • Time Alone, Together – Speak with Elena during The Kennys’ Descendant main quest
  • Full Body Check – Approach Nina and Elena during The Kennys’ Descendant main quest
  • Jolly Midas – Speak with Midas during The Kennys’ Descendant main quest
  • An Aucerian Holiday – Approach the southern side of the city during The Kennys’ Descendant main quest to trigger an event with Midas and Malkya
  • Book Club – Approach Elena and Nina during The Kennys’ Descendant main quest
  • A Troubled Future – Speak with Elena during The Kennys’ Descendant main quest
  • Home to Royalty – Speak with Laeticia in the Royal Capital Acendros Palace Gardens during The Kennys’ Descendant main quest
  • Friendly Rivalry – Speak with Laeticia in the Royal Capital Acendros Palace Gardens during the Scorpium Principles main quest
  • A Bride Dressed the Part – Speak with Laeticia during the Scorpium Principles main quest
  • A Lady’s Love Advice – Approach Chloe and Malkya during the Scorpium Principles main quest

Mini-Bunnies

  • Snowy White Mini-Bunny **This bunny is available after returning from the citadel as part of the story!**

Treasure Chests

  • Mavelle – On roof
  • SP Seed – On roof
  • Naval Corps’ Armor – In building
  • Panah Bulat – In building
  • Sigrvandill – In building

Gatherable Materials

  • Ancient Coin
  • Aquaberry Potion
  • Speed Potion
  • Poison Bomb
  • Wind Spirit Talisman

Es’owa Opponents

  • Dangerously Alluring Woman (Lv 8 Master) – In tavern
  • Urban Man (Lv 6 Master) – Alley behind the southern item shop
  • Informed Boy (Expert) – Down main street on the southern side
  • Hardworking Man (Lv 2 Master) – Near entrance to inn
  • Sickly Woman (Apprentice) – Eastern side of town, directly east of the inn
  • Ambitious Girl (Lv 3 Master) – Eastern side of town next to a large crystal
  • Sheltered, Naïve Girl (Expert) – Northwest of the northern item shop

Click here for the next guide on the Aucerius Plains in Star Ocean: The Divine Force!

Star Ocean The Divine Force Walkthrough
Guides

Star Ocean: The Divine Force – Castle Aucerius

by NightlyGamingBinge in

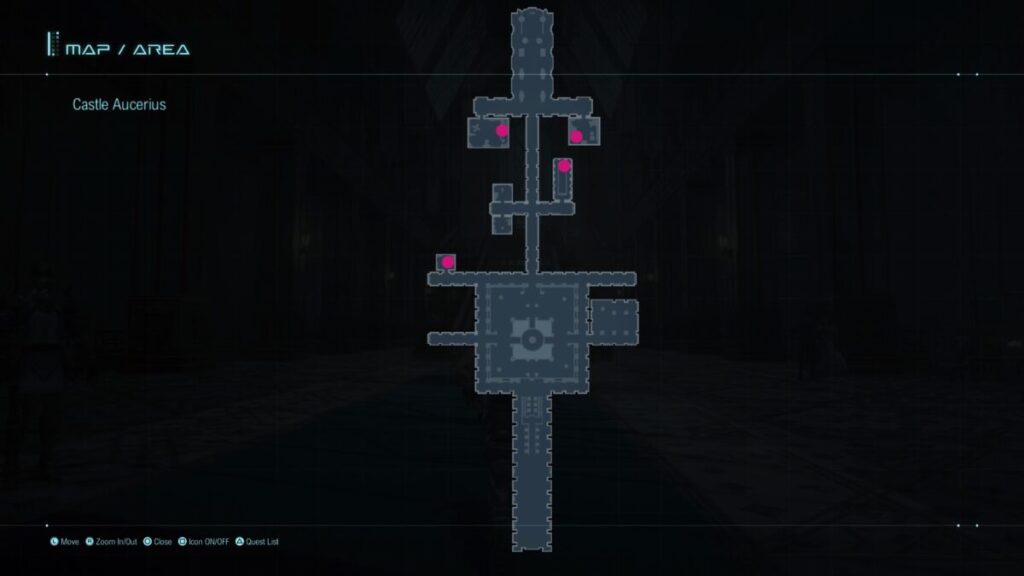
Below is a guide on the collectibles found in Castle Aucerius of Star Ocean: The Divine Force. These collectibles could consist of mini-bunnies, treasure chests, gatherable materials and enemies!

Treasure Chests

  • Victory Prize
  • The Ultimate Gag Collection
  • SP Seed
  • Victor

Gatherable Materials

  • Velvet
  • Mechanical Gears

Side Stories

Children No Longer – Speak with Laeticia during the Scorpium Principles main quest

Click here for the next guide on the collectibles at Royal Capital Acendros City in Star Ocean: The Divine Force.

Star Ocean The Divine Force Walkthrough
Guides

Star Ocean: The Divine Force – Cottorinth Mountain Pass

by NightlyGamingBinge in

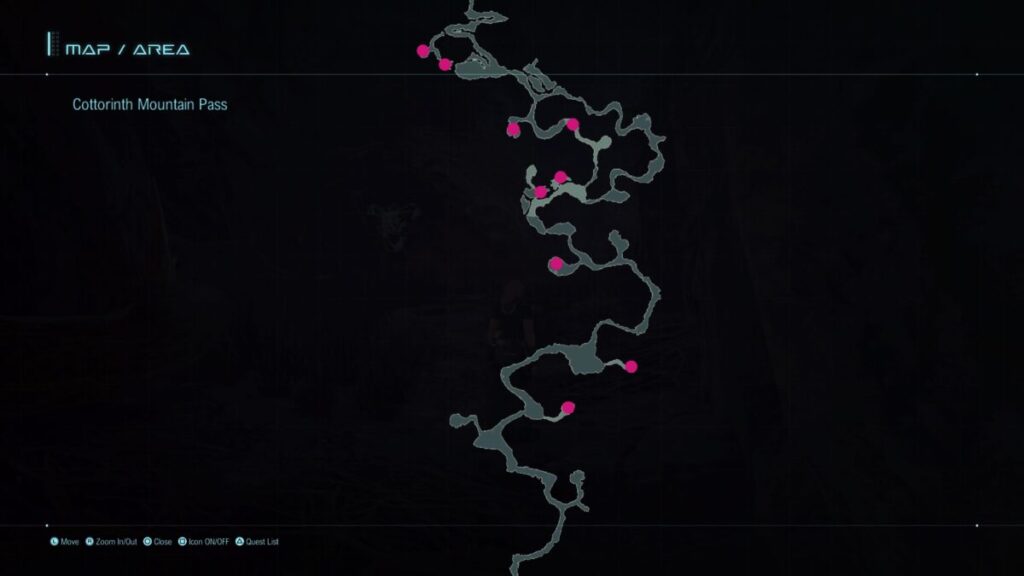
Below is a guide on the collectibles found in the Cottorinth Mountain Pass of Star Ocean: The Divine Force. These collectibles could consist of mini-bunnies, treasure chests, gatherable materials and enemies!

Treasure Chests

  • Blueberry Potion x2
  • Healing Device
  • Mechanical Gears
  • Twin Naeglings
  • Garnet Pendant
  • Healing Device
  • Heat Bomb x2
  • Prayerful Device
  • Semiomancer’s Surcoat

Gatherable Materials

  • Fresh Sage
  • Gold
  • Lodestone
  • Mechanical Gears
  • Scruffy Rag
  • Shoddy Paper
  • Silver
  • Star Ruby
  • Wool

Enemies

  • Blightcap
  • Cottorinth Wasp
  • Enigma Worm
  • Harpyia
  • Rhino Mantis

Click here for the next walkthrough on Cottorinth Summit Approach of Star Ocean: The Divine Force!

Star Ocean The Divine Force Walkthrough
Guides

Star Ocean: The Divine Force – Seaport of Cotto

by NightlyGamingBinge in

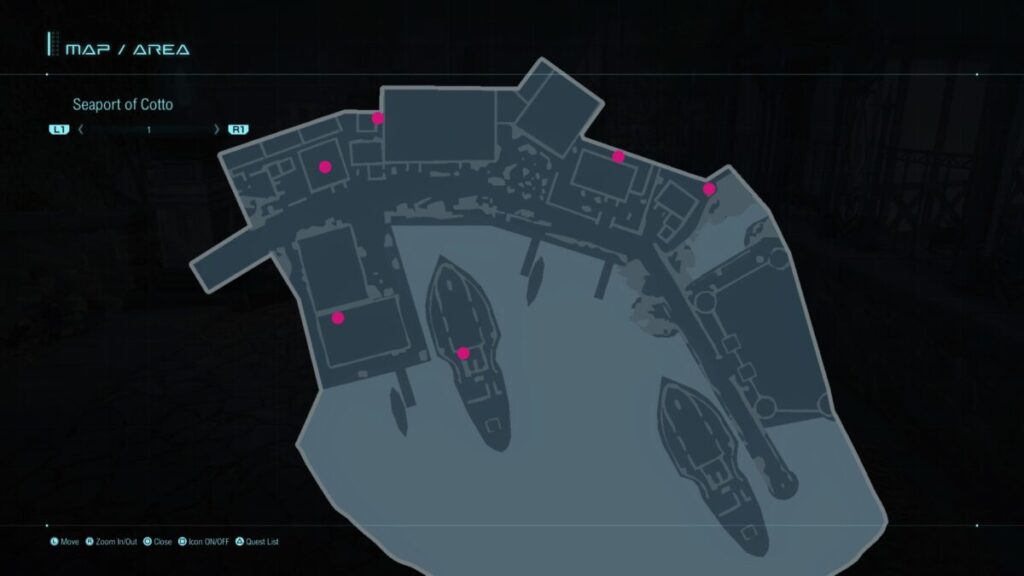
Below is a guide on the collectibles found in the Seaport of Cotto of Star Ocean: The Divine Force. These collectibles could consist of mini-bunnies, treasure chests, gatherable materials and enemies!

Treasure Chests

  • Berserker
  • Amber Pendant
  • Mixed Berries
  • Mechanical Gears
  • Shrimp and Mayo Umaibo
  • Tynave – In a building on the northwestern side of town

Gatherable Materials

  • Animal Hide
  • Lodestone
  • Panacea Leaf
  • Secret Spice
  • Silver

Es’owa Opponents

  • Squire Seeking a Challenge (Lv 5 Master) – In tavern
  • Hobbyist (Lv 6 Master) – In inn
  • Man with a Dignified Air (Lv 4 Master) – Southwestern corner of the area
  • Confident, Athletic Woman (Lv 4 Master) – In front of inn
  • Mysterious Fortune-Teller (Expert) – On street in front of tavern
  • Respectful Boy (Beginner) – On patio in front of tavern

Side Stories

  • Answer Me This, Elena! – Speak with Nina during the Scheming upon Mt. Cottorinth main quest
  • Sharp Minded? – Speak with Elena during the Scheming upon Mt. Cottorinth main quest
  • Steady Improvement – Speak with Laeticia during the Scheming upon Mt. Cottorinth main quest
  • Tired Nicknames – Speak with Albaird during the Scheming upon Mt. Cottorinth main quest
  • Albaird, A.K.A… – Speak with Albaird during the Scheming upon Mt. Cottorinth main quest
  • Divine Miracle – Speak with Midas during the Scheming upon Mt. Cottorinth main quest
  • Doubtful Eyes – Speak with Elena during the Scheming upon Mt. Cottorinth main quest
  • Just That Age – Speak with Nina during the Scheming upon Mt. Cottorinth main quest
  • Caretaker? – Speak with Elena during the Scheming upon Mt. Cottorinth main quest
  • Time Not Wasted – Speak with Marielle during the Scorpium Principles main quest

Click here for the next guide on the collectibles at Cottorinth Mountain Pass in Star Ocean: The Divine Force!

Star Ocean The Divine Force Walkthrough
Guides

Star Ocean: The Divine Force – Cottorinth Region

by NightlyGamingBinge in

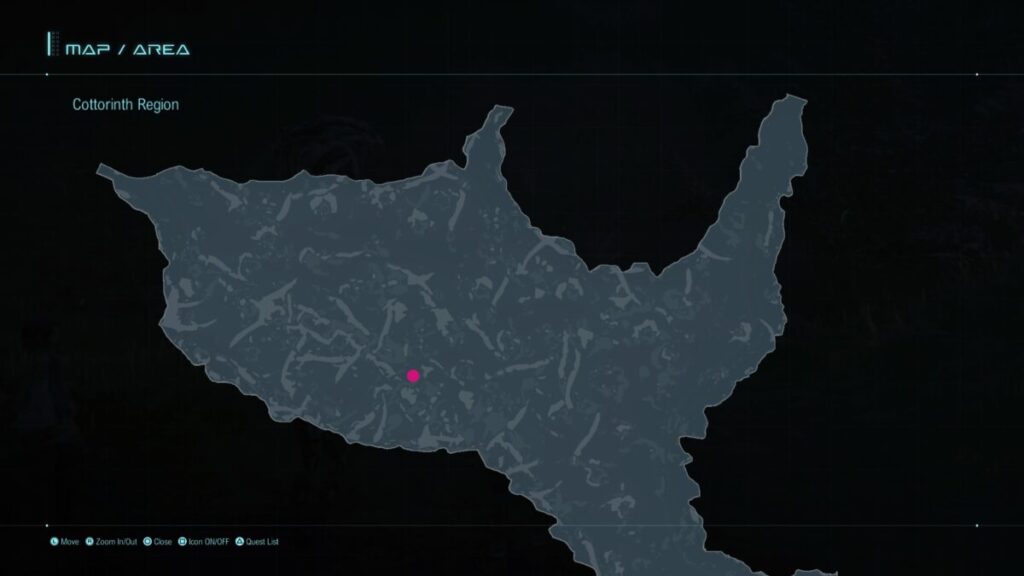
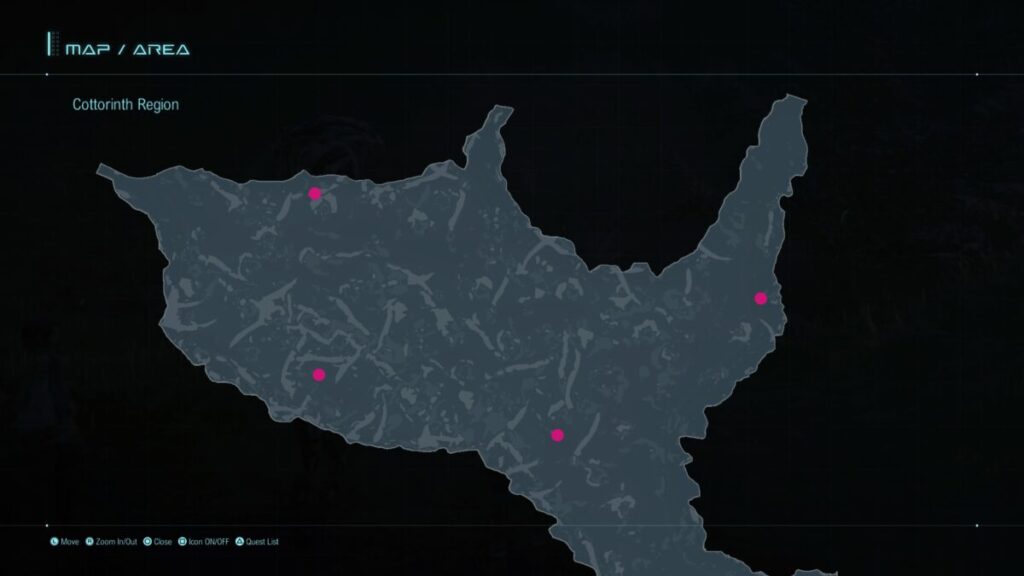
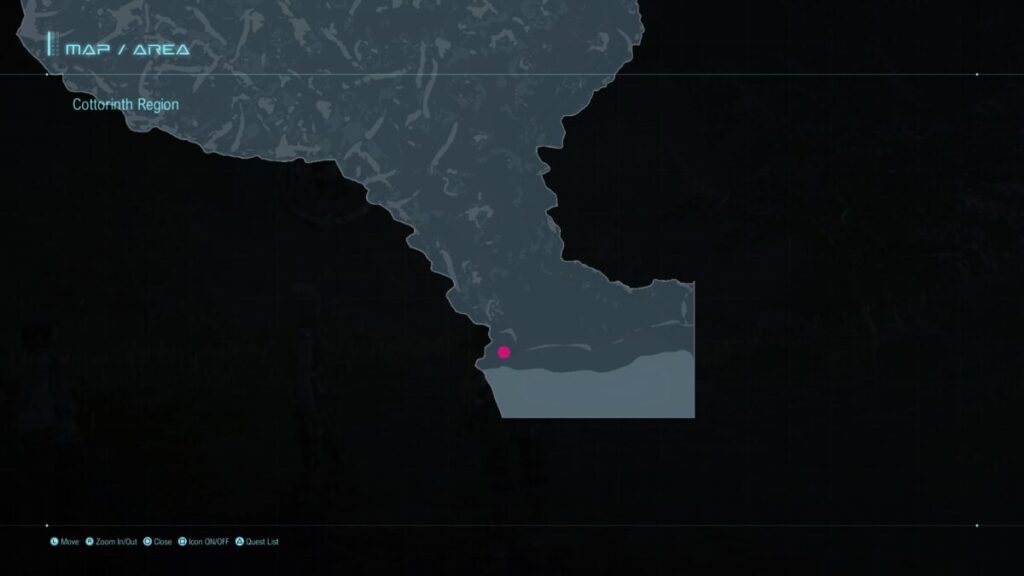
Below is a guide on the collectibles found in the Cottorinth Region of Star Ocean: The Divine Force. These collectibles could consist of mini-bunnies, treasure chests, gatherable materials and enemies!

Mini-Bunnies

  • Soft Yellow Mini-Bunny

Treasure Chests

  • Wind Spirit Talisman
  • 1000 Fol
  • Blissful Song
  • Fortitude Potion
  • Chebelim Cane

Gatherable Materials

  • Ancient Coin
  • Animal Hide
  • Aromatic Cloth
  • Game Meat
  • Gold
  • Panacea Leaf
  • Roly-Poly Bean
  • Silver

Enemies

  • Albero di Anima
  • Crater Peryton
  • Grendelian Soul
  • Hell Conductor
  • Rhino Mantis
  • Witch’s Minion

Click here for the next guide on the collectibles at Seaport of Cotto in Star Ocean: The Divine Force.

Star Ocean: The Divine Force – Hallowed Mount Galca-Lemthas

by NightlyGamingBinge in

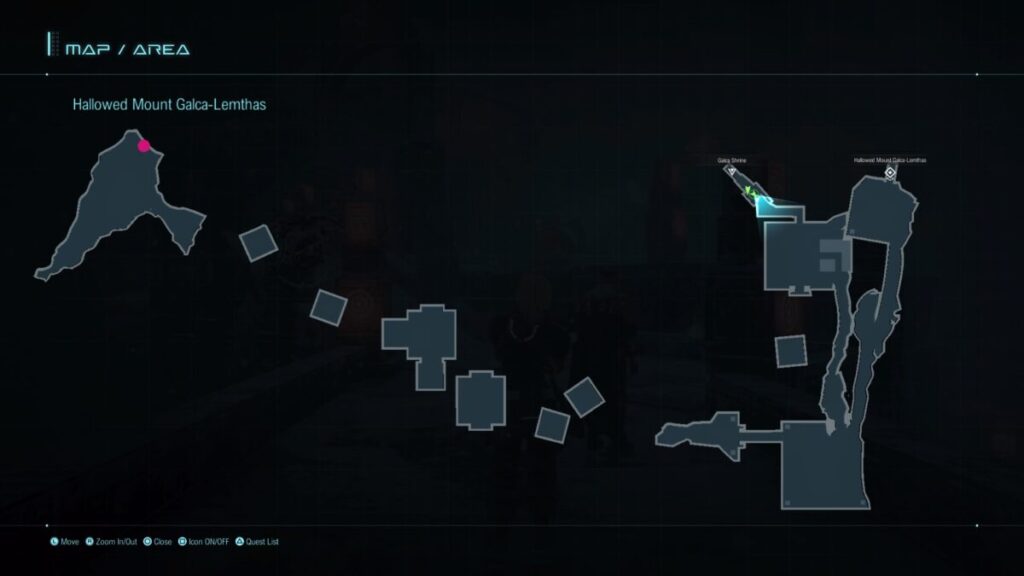
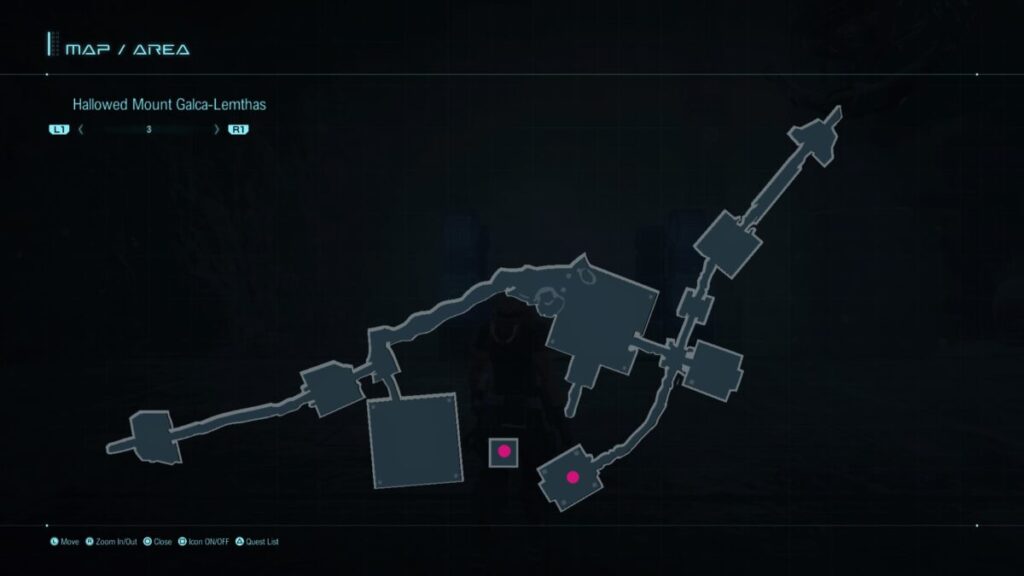
Below is a guide on the collectibles found in the Hallowed Mount Galca – Lemthas of Star Ocean: The Divine Force. These collectibles could consist of mini-bunnies, treasure chests, gatherable materials and enemies!

Mini-Bunnies

  • Simply Pink Mini-Bunny

Treasure Chests

  • 400 Fol
  • Water Charm – Above the entrance to the tunnel
  • Sapphire Pendant
  • Flameberge
  • Earth Incantation

Gatherable Materials

  • Blueberries
  • Game Meat
  • Lodestone
  • Roly-Poly Bean
  • Silk
  • Silver
  • Wool

Enemies

  • Ancient Chimera
  • Broken Eye
  • Flying Ice
  • Frozen Corpse
  • Soul Reaper

Click here for the next walkthrough for the collectibles at Cottorinth Region in Star Ocean: The Divine Force!

Star Ocean The Divine Force Walkthrough
Guides

Star Ocean: The Divine Force – Den’mohr Delve

by NightlyGamingBinge in

Below is a guide on the collectibles found in the Den’mohr Delve of Star Ocean: The Divine Force. These collectibles could consist of mini-bunnies, treasure chests, gatherable materials and enemies!

Treasure Chests

  • Strength Potion x3
  • Morale Potion x2
  • Blueberry Potion
  • Fresh Sage x2

Reachable via Larcasse Weald

  • Aquaberries x2
  • Blueberries x3
  • Fresh Sage x1

Enemies

  • Sheltered Toad
  • Corpse Bat
  • Stone Man

Click here for the next guide on the collectibles at Hallowed Mount Galca – Lemthas in Star Ocean: The Divine Force!

Star Ocean The Divine Force Walkthrough
Guides

Star Ocean: The Divine Force – Village of Eda

by NightlyGamingBinge in

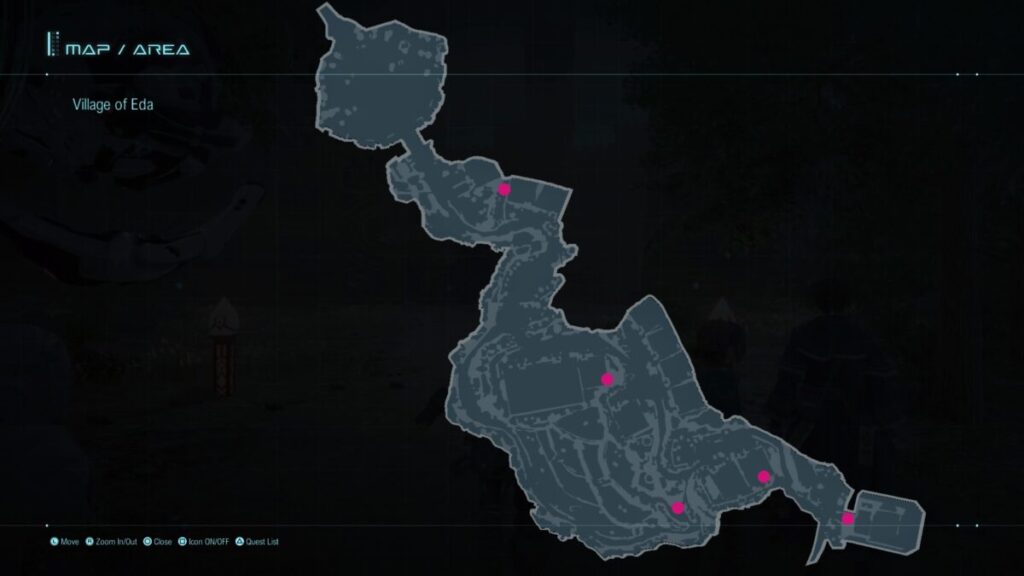
Below is a guide on the collectibles found in the Village of Eda of Star Ocean: The Divine Force. These collectibles consist of mini-bunnies, treasure chests and gatherable materials!

Mini-Bunnies

  • Snowy White Mini-Bunny – This mini-bunny can be found in the central part of town on a hillside.

Treasure Chests

  • 150 Fol – Northwestern side of map
  • Wind Incantation – On the left side of the item shop behind some barrels and crates
  • Genius Potion – Under a wooden structure near the field on the southern side of the area
  • Morale Potion – Eastern side of the area behind a house
  • Artisan Pliers – Inside Midas’ house

Gatherable Materials

  • Panacea Leaf
  • Silk
  • Scruffy Rag
  • Wool

Es’owa Opponents

  • Intensely Curious Girl (Lv 3 Master) – west of the Inn
  • Man Yearning for Color (Beginner) – northwest of the Inn
  • Mindful Sister (Apprentice) – north of the Inn
  • Competitive Man (Apprentice) – near the entrance to town next to a wind turbine
  • Sore Loser (Lv 2 Master) – in the Inn
  • Man Craving a Challenge (Lv 8 Master) – in item shop

Side Stories

  • Mountain Retreat – Speak with Raymond
  • A Troubled Young Knight – Speak with Albaird
  • Do Not Touch! – Speak with Midas inside his house
  • Peak Curiosity – Speak with Nina during The Rot – A Creepy Terror main quest

Click here for the next guide on the collectibles found at the Galca Shrine in Star Ocean: The Divine Force!