Guides

Borderlands 3 – Rise and Grind Walkthrough

by Chappie in

Welcome to NGB and our Borderlands 3 walkthrough on the Rise and Grind side mission. Here you’ll find everything you’ll need to breeze through this mission!

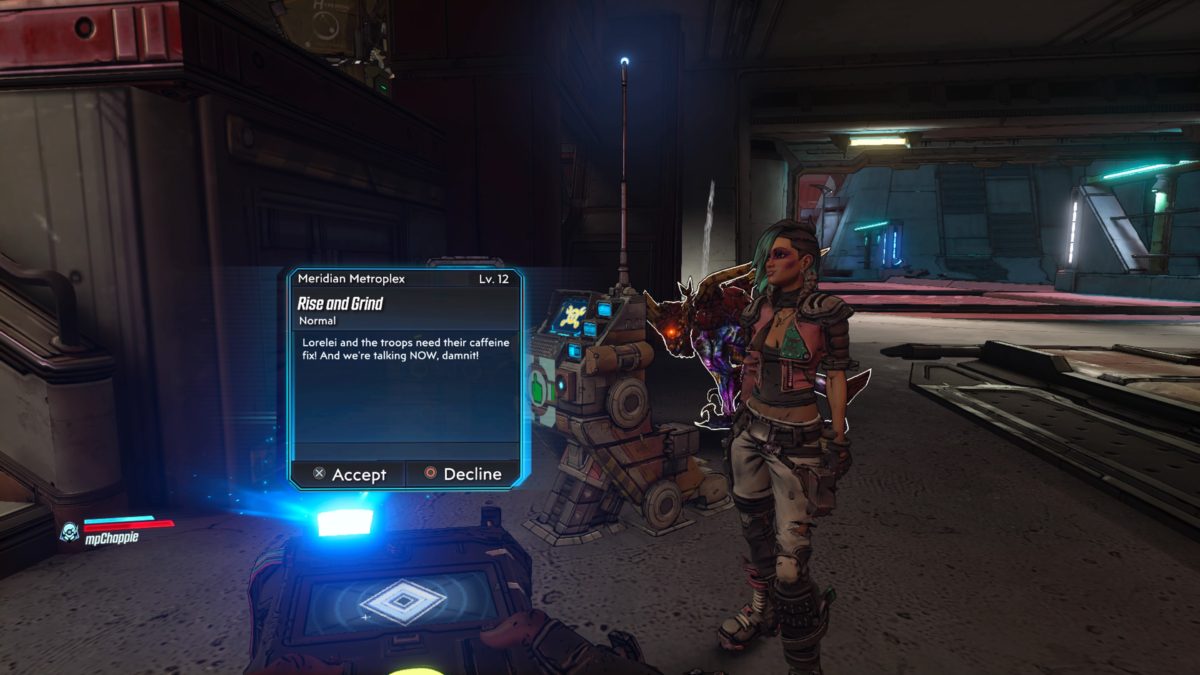
How to Begin Rise and Grind

To begin the Rise and Grind side mission in Borderlands 3, you’ll need to speak with Lorelei near the Meridian Metroplex fast travel station in Promethea after taking back the Atlas base.

Rise and Grind Objectives

Go to Rise and Grind

Follow the objective to Rise and Grind located in the eastern region of Meridian Metroplex.

Request Service

Press the button at the counter of Rise and Grind to summon the Barista Bot.

Talk to Barista Bot

Talk to the bot to order some coffee.

Kill Core Daddy

Head northwest from the coffee shop towards the objective to find Core Daddy and take him out.

Pick Up Power Core

Collect the Power Core that Core Daddy drops.

Insert Power Core

Return to Rise and Grind and insert the power core into the circuit box behind the counter.

Reboot Rise and Grind

Ring the bell again to reboot Rise and Grind.

Order Coffee

Talk to the Barista Bot to order some coffee.

Find Maliwan Commander

Head a short way north to reach the Halcyon Suborbital Spaceport and start taking out Maliwan soldiers until the commander shows up.

Kill Coffee Runner

After defeating enough soldiers, the Coffee Runner shows up. Take him out.

Take To-Go Cup

Pick up the cup.

Return to Rise and Grind

Head back to Rise and Grind.

Defend Rise and Grind

Soon after arriving at Rise and Grind, the Maliwan soldiers attack. Defeat them to update the objective.

Place To-Go Cup

Put the to-go cup on the counter near Barista Bot.

Take To-Go Cup

Grab the to-go cup from the counter.

Bring Coffee to Lorelei

Return to Lorelei and hand over the coffee.

Help Atlas Defend

Fight off the Maliwan soldiers with the Altas troops.

Talk to Lorelei

Talk to Lorelei to complete the Rise and Grind mission.

Borderlands 3 Guides and Walkthroughs

Check out our Borderlands 3 Guides and Walkthroughs for more help!

Guides

Borderlands 3 – Maliwannabees Walkthrough

by Chappie in

Welcome to NGB and our Borderlands 3 walkthrough on the Maliwannabees side mission. Here you’ll find everything you’ll need to breeze through this mission!

How to Begin Maliwannabees

To begin the Maliwannabees side mission in Borderlands 3, you’ll need to speak with Ziff in the civilian camp just before the Meridian Metroplex map transition at Meridian Outskirts in Promethea.

Maliwannabees Objectives

Go to Murder Scene

Leave the civilian camp and take the road east until you come to a broken bridge. Head under it to locate the murder scene.

Go to Supply Vehicle

Head south past the stack of storage containers, and you will eventually arrive at a flaming vehicle near a Catch-A-Ride.

Choose to Kill Rax or Max

Follow the objective west past Fort Pissoff to arrive at a bandit-made bridge. Take the elevator up to the top and head to the middle of the bridge to locate the pair. Kill one of them to update the objective (it doesn’t matter which one).

Kill Remaining Trooper (Optional)

After a little bit of time, Ziff will ask you to take out the other trooper to make sure her family is avenged. Defeat the remaining trooper.

Return to Ziff

Head back to Ziff and talk to her to complete the Maliwannabees mission.

Borderlands 3 Guides and Walkthroughs

Check out our Borderlands 3 Guides and Walkthroughs for more help!

Guides

Borderlands 3 – Healers and Dealers Walkthrough

by Chappie in

Welcome to NGB and our Borderlands 3 walkthrough on the Healers and Dealers side mission. Here you’ll find everything you’ll need to breeze through this mission!

How to Begin Healers and Dealers

To begin the Healers and Dealers side mission in Borderlands 3, you’ll need to interact with the help message near the digital tire symbol on the wall near the Meridian Outskirts fast travel station in Fort Pissoff on Promethea.

Healers and Dealers Objectives

Meet Ace Baron

Exit Fort Pissoff and take a left (west) heading under a bridge to arrive at Mt. Schuler Recovery Center. Enter and talk to Ace Baron.

Collect Meds / Blood Packs

Exit the Recovery Center and head east back towards the way you came. You will pass Fort Pissoff (Meridian Outskirts fast travel station) and another Catch-A-Ride arriving at a bridge. Use a ladder near one of the legs to climb up to a storage unit. Talk to Hardin then return to your vehicle and keep following the road northeast until you reach a big open area with some shipping containers stacked on top of each other. Head to the right of the containers to locate a garage containing a medical convoy.

Threaten Hardin

Threaten Harding to receive some medical supplies.

Pay Hardin (Optional)

Pay Hardin $1000 to receive some medical supplies.

Destroy Medical Convoy

Destroy the medical convoy and pick up the supplies. We had all 45 medicines, but only 2 blood packs. This causes the objective to update.

Deliver Medical Supplies

Return to the Recovery Center and place the supplies on the table.

Pick Up Empty Blood Pack

Grab the blood pack from Ace Baron.

Follow Ace

Follow Ace to a chair.

Attach Empty Blood Pack

Attach the blood pack to Ace’s arm.

Pick Up Blood Pack

Pick the blood pack off of the ground.

Hand Over Blood Packs

Give Ace the blood packs to complete the Healers and Dealers mission.

Borderlands 3 Guides and Walkthroughs

Check out our Borderlands 3 Guides and Walkthroughs for more help!

Guides

Borderlands 3 – Bad Reception Walkthrough

by Chappie in

Welcome to NGB and our Borderlands 3 walkthrough on the Bad Reception side mission. Here you’ll find everything you’ll need to breeze through this mission!

How to Begin Bad Reception

To begin the Bad Reception side mission in Borderlands 3, you’ll need to speak with Claptrap at The Droughts in Pandora after completing the “From the Ground Up” main mission.

Bad Reception Objectives

Search Old Laundry

Follow the objective past the Sun Smasher’s camp and over the broken bridge to arrive at a trap door next to a giant rib cage.

Open Trap Door

To open the trap door, head up to the rock ledge behind the door and jump off of it, pressing the crouch button (circle button) to slam down into it. Enter the bunker and collect the hanger in the back of the room.

Search Satellite Tower

Follow the objective to the western section of the Droughts to arrive at Varkid Valley. Make your way to the tower on the western side of the valley and clear out the enemies stationed there. Once they are dealt with, climb up the tower and shoot the satellite at the top to break free the antenna to collect it.

Search Sid’s Stop

Follow the objective past the Sun Smasher’s camp, over the broken bridge and through the Children of the Vault roadblock to reach Sid’s Stop.

Speak to Sid

Talk to Sid.

Destroy Sid’s Satellite Dish

Destroy all three satellite dishes. The first one is located on the roof of Sid’s shack. The second one is located under the giant windmill west of the shack. The final one is located south of the windmill above the Children of the Vault roadblock (follow the power line from the windmill to spot it).

Speak to Sid

Speak to Sid again then defeat him and take his tinfoil hat.

Search Spark’s Cave

Follow the objective north past the Sun Smasher’s camp to reach a broken bridge. Take the path to the left of the bridge leading into a ravine to locate Spark’s Cave. Enter the cave and shoot the target on the top of the power generator in the back to turn it off. This will allow you to pass through the water and retrieve a spork from a dead bandit.

Search Old Shack

Follow the objective to the northern section of the Droughts to locate the Old Shack. As you try to enter it, a turret and Badass Tink will start attacking you. As you approach the door it will close the door. Back off and wait for it to open again, then run and slide in before it closes again. Defeat them and head to the back room to find the umbrella on the toilet.

Give Items to Claptrap

Head back to Claptrap and hand over the antennas to complete the mission.

Borderlands 3 Guides and Walkthroughs

Check out our Borderlands 3 Guides and Walkthroughs for more help!

Guides

Borderlands 3 – Dump on Dumptruck Walkthrough

by Chappie in

Welcome to NGB and our Borderlands 3 walkthrough on the Dump on Dumptruck side mission. Here you’ll find everything you’ll need to breeze through this mission!

How to Begin Dump on Dumptruck

To begin the Dump on Dumptruck side mission in Borderlands 3, you’ll need to interact with the bounty on the wall at Ellie’s garage after acquiring a vehicle at The Droughts in Pandora.

Dump on Dumptruck Objectives

Kill the Holy Dumptruck

Follow the objective past the Sun Smasher’s camp and over the broken bridge to arrive at a structure many bandits called Bloodbucket’s Chapel. Work your way to the top, defeating enemies as you go to find Dumptruck and defeat him.

Shoot ’em in the Ass (Optional)

While fighting Dumptruck, he will turn his ass to face you and shake it. When he does this, shoot him in the ass.

Open Trap Door

To open the trap door, shoot the pipe near the broken cable to make a puddle. Then shoot the target on the overhanging section of the building to turn on the power. This will electrify the water causing the trap door to open.

Find Red Chest

Jump down the hole to find the chest and complete the Dump on Dumptruck mission.

Borderlands 3 Guides and Walkthroughs

Check out our Borderlands 3 Guides and Walkthroughs for more help!

Guides

Borderlands 3 – Powerful Connections Walkthrough

by Chappie in

Welcome to NGB and our Borderlands 3 walkthrough on the Powerful Connections side mission. Here you’ll find everything you’ll need to breeze through this mission!

How to Begin Powerful Connections

To begin the Powerful Connections side mission in Borderlands 3, you’ll need to interact with Marcus’ vending machine near the Crimson Raider base in The Droughts at Pandora after the Children of the Vault main mission.

Powerful Connections Objectives

Identify the Problem

Follow the cable running out of the machine to come to a broken circuit box near a Catch-A-Ride.

Collect Skag Spine

Follow the objective to a nearby skag den and defeat skags until a shock skag appears. Kill the shock skag to collect its spine.

Collect Human Spine (Optional)

Head to the objective to reach the Sun Smasher camp and take out the bandits until one drops a spine.

Use Human Spine (Optional)

Head back to the circuit box and install the human spine if you retrieved one.

Use Skag Spine

Install the shock skag spine into the circuit box.

Go to Secret Stash

Head back to the recently fixed vending machine and enter the bunker behind it to complete the Powerful Connections mission.

Borderlands 3 Guides and Walkthroughs

Check out our Borderlands 3 Guides and Walkthroughs for more help!

Guides

Borderlands 3 – Under Taker Walkthrough

by Chappie in

Welcome to NGB and our Borderlands 3 walkthrough on the Under Taker side mission. Here you’ll find everything you’ll need to breeze through this mission!

How to Begin Under Taker

To begin the Under Taker side mission in Borderlands 3, you’ll need to interact with the bounty on the back of Sid’s Stop at The Droughts in Pandora.

Under Taker Objectives

Find Under Taker

Follow the objective to the northern region of the Droughts near the map transition to Ascension Bluff to find the Under Taker near one of the buildings with a broken pipe spewing water from the side.

Kill Under Taker

Take out the Under Taker to complete the Under Taker mission.

Borderlands 3 Guides and Walkthroughs

Check out our Borderlands 3 Guides and Walkthroughs for more help!

Guides

Borderlands 3 – Golden Calves Walkthrough

by Chappie in

Welcome to NGB and our Borderlands 3 walkthrough on the Golden Calves side mission. Here you’ll find everything you’ll need to breeze through this mission!

How to Begin Golden Calves

To begin the Golden Calves side mission in Borderlands 3, you’ll need to interact with the COV Statue at the Crimson Command in The Droughts after acquiring a vehicle.

Golden Calves Objectives

Find Poster with Front View

Head to Ascension Bluff and make your way to the northeastern part of the area. There you will find a bandit settlement filled with enemies.  This poster will be located across a metal bridge on a tower under a long metal pipe.

Find Poster with Profile View

This poster will be on the first level of a tower with a windmill on the top.

Find Poster with Intimate View

This poster is located on a board across from the windmill on a rock ledge.

Go to 3D Printing Plan

Follow the objective to the far east of Ascension Bluff to locate the 3D printer.

Use Scanner

Place the posters on the scanner to create some Vaughn statues.

Admire Your Work

Give the statues a good once over.

Smash COV Statues

Head back through the bandit settlement smashing three of the COV Statues.

Replace with Vaughn Statues

Replace the COV Statues with statues of Vaughn.

Talk to Vaughn

Head back Vaughn in The Droughts and talk with him to complete the mission.

Borderlands 3 Guides and Walkthroughs

Check out our Borderlands 3 Guides and Walkthroughs for more help!

Guides

Borderlands 3 – Skag Dog Days Walkthrough

by Chappie in

Welcome to NGB and our Borderlands 3 walkthrough on the Skag Dog Days side mission. Here you’ll find everything you’ll need to breeze through this mission!

How to Begin Skag Dog Days

To begin the Skag Dog Days side mission in Borderlands 3, you’ll need to interact with the bounty on the board near the Droughts – Highway fast travel station at The Droughs in Pandora.

Skag Dog Days Objectives

Find the Big Succ

Follow the objective to the northwestern region of the Droughts to arrive at the Dahl 3rd Brigade Memorial Dam. Enter the dam and make your way to the building in the back. Locate the dumpster behind the building and retrieve the Big Succ from the care package inside.

Find Cacti

Exit the dam and head to the northern area of the Droughts, west of the Ascension Bluff map transition. Head up into the mountains to locate the cacti.

Pick Up Cactus Fruit

Shoot the cacti to make them drop the Cactus Fruit. You may need to equip the Big Succ for this to happen.

Collect Succulent Skag Meat

Defeat the Succulent Skags and collect the meat they drop.

Kill Succulent Alpha Skag

Follow the objective a short distance to reach the den of the Succulent Alpha Skag. Head into the den and defeat him.

Collect Succulent Skag Meat

Once defeated, the Succulent Alpha Skag will drop the Succulent Alpha Meat.  Pick it up.

Kill Mincemeat

Follow the objective just north of the Droughts – Highway fast travel station to locate Mincemeat and take him out.

Kill Trufflemunch and Buttmunch

These two skags accompany Mincemeat. Kill them along with their master.

Collect Meat

Collect the meat dropped by Trufflemunch and Buttmunch.

Drop Ingredients Off

Head to the drop-off location east of the Droughts – Highway fast travel station to turn in the ingredients and complete the Skag Dog Days mission.

Borderlands 3 Guides and Walkthroughs

Check out our Borderlands 3 Guides and Walkthroughs for more help!

Guides

Borderlands 3 – Head Case Walkthrough

by Chappie in

Welcome to NGB and our Borderlands 3 walkthrough on the Head Case side mission. Here you’ll find everything you’ll need to breeze through this mission!

How to Begin Head Case

To begin the Head Case side mission in Borderlands 3, you’ll need to inspect the head in a jar towards the end of the Holy Broadcast Center at Ascension Bluff in Pandora.

Head Case Objectives

Pick up Head

After starting the Borderlands 3 Head Case side mission, pick up the jar containing a head.

Plug in Head

Exit the Holy Broadcast Center and make your way back to the entrance of the Path of Sacrifice to find a building. Enter the building and place the head on the console.

Enter Simulation

Activate the switch on the terminal to enter the simulation.

Collect Memory Fragments

Head back down the Path of Sacrifice towards the Holy Broadcast Center, collecting the fragments as you go.

  • In a box on the passenger side of the first car you come across
  • In a box on a couch next to three cars stacked on top of each other with Holy written on them
  • Enter the Holy Broadcast Center and take a left to enter a room with the fragments in a box on a table
  • Located in a box on a wooden table past all of the big speakers

Find Vic

Vic is located in the area just before the room you fought Mouthpiece in.

Kill Interrogator 

Kill Vic’s interrogator.

Exit Simulation

Head back to the beginning of the Path of Sacrifice and use the console to exit the simulation.

Talk to Vic

Talk to Vic to complete the mission.

Borderlands 3 Guides and Walkthroughs

Check out our Borderlands 3 Guides and Walkthroughs for more help!