Guides

Borderlands 3 – Ratch’d Up Walkthrough

by Chappie in

Welcome to NGB and our Borderlands 3 walkthrough on the Ratch’d Up side mission. Here you’ll find everything you’ll need to breeze through this mission!

Ratch’d Up Walkthrough

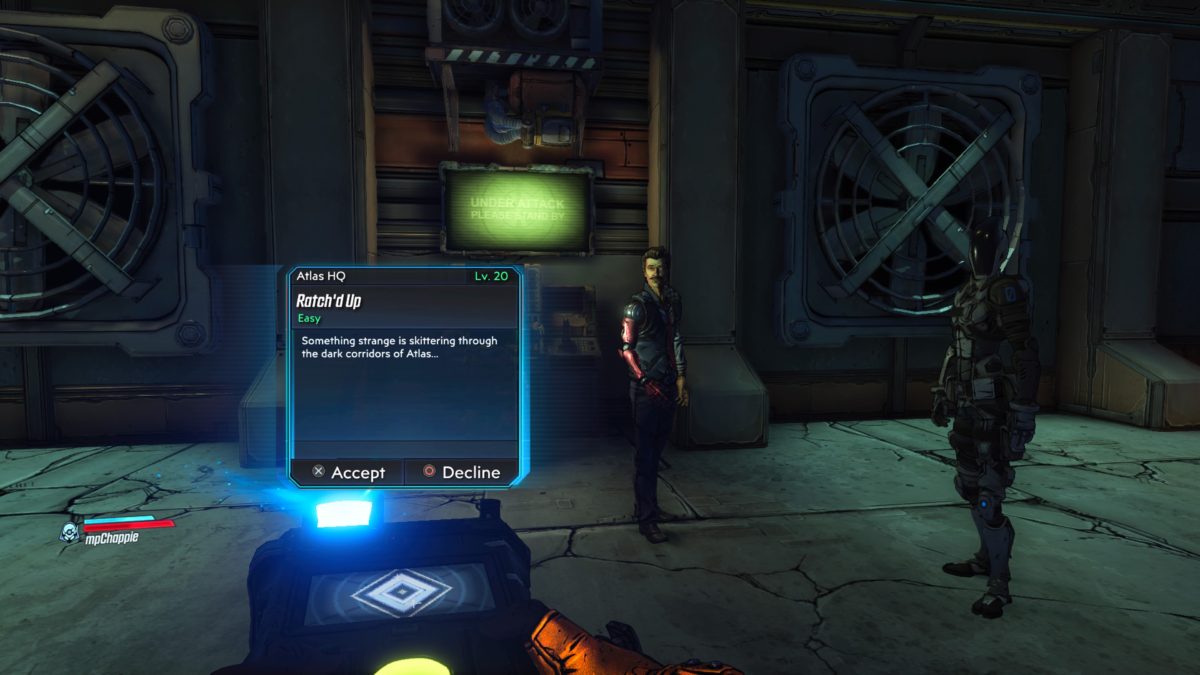
How to Start Ratch’d Up

To begin the Ratch’d Up side mission in Borderlands 3, you’ll need to talk to Rhys in Atlas HQ on Promethea after completing the Atlas, at Last main mission.

Ratch’d Up Objectives

Find Terry

Head to the second level of Lobby of Self-Actualization and enter Terry’s Office.

Search for Clues

Press the green button behind the XXX jug next to the stereo on the table.

Search Secret Area

Enter the super secret area via the secret entrance.

Investigate Voice

Head deeper into the lab until you hear a voice. Walk over to the locked red door.

Open Glenn’s Cell

Work your way further into the lab until you come to a room filled with Ratch. Eliminate the Ratch then head up to the second level of the room and press the button to free Glenn.

Eliminate Ratch Threat

Exterminate the Ratch.

Talk to Glenn

Exit the room and talk to Glenn.

Follow Glenn

Follow Glenn back into the room with the Ratch.

Pick Up Terry’s Brain

Collect Terry’s brain off the ground.

Lower Cage

Pull the lever next to the large cage containing Gary.

Kill Gary

Drop into Gary’s Pit and kill him before he eats you.

Place Terry’s Brain

Put Terry’s brain into the transfer tank in the room connected to Gary’s Pit.

Resurrect Terry

Press the button to bring Terry back as a Ratch.

Talk to Terry

Talk to Ratch Terry.

Talk to Glenn

Head back to Glenn and talk with him to complete the Ratch’d Up mission.

More Borderlands 3 Guides and Walkthroughs

Check out our Borderlands 3 Guides and Walkthroughs for more help!

Guides

Borderlands 3 – Opposition Research Walkthrough

by Chappie in

Welcome to NGB and our Borderlands 3 walkthrough on the Opposition Research side mission. Here you’ll find everything you’ll need to breeze through this mission!

Opposition Research Walkthrough

How to Start Opposition Research

To begin the Opposition Research side mission in Borderlands 3, you’ll need to talk to Gonner Maleggies who is in a ventilation shaft in Sector 1 to the left of the giant circular door in the image below at Skywell-27 on Promethea.

Borderlands 3 Opposition Research

Opposition Research Objectives

Get Katagawa Intel

Collect all 3 tapes from the spies.

Locate Spy

Head through the circular door mentioned above and make your way to the room with the giant elevator that leads down to the mine laser. Head to the second level and enter the doorway behind the elevator.  Take the stairs down a level, turn right and head to the end of the hall to locate the spy.

Search Body

Inspect the body.

Follow Blood

Follow the blood trail into the 2nd stall from the left in a bathroom.

Search Toilet

Interact with the toilet to locate the intel.

Take Tape

Pick up the poop covered echo log.

Locate Spy

Keep making your way through the Maliwan facility, passing the laser thruster and entering Sector 4 (Tritanium Refinery). You know your in the right spot when you see the giant chute in the middle of the area. Head into the building west of the chute and take the stairs inside to the second level. Head through the doorway and take a left, heading through another doorway into a room. Go to the second room across from where you are to locate the spy.

Search Body

Inspect the body.

Open Locker

In the same room as the body, search the lockers on the right side of the room.

Kill Interrogator

Defeat the Interrogator in the hallway just outside the room.

Take Key

Grab the key the Interrogator drops when you defeat him.

Get Tape

Head back to the locker and use the key to unlock it.  Once it’s open, pick up the echo log.

Locate Spy

Jump down the long chute in Sector 4. This will place you in Fuel Processing. Exit through the door to enter a room containing a cylinder with a blue sphere in the middle of it. Take a right and follow the path forward to arrive in the area before the boss leading to the server room. Enter the server room and head to the east side of the room to locate the spy.

Take Tape

Grab the tape from the spy

Open Door to Data Center

Follow the path in the room the spy was in to head to the Data Center. Press the button under the Data Center sign to open it.

Use Central Computer

Head into the Data Center and use the central computer.

Enter Password

Interact with the computer to enter the password two times.

Kill Maliwan

Fight off the Maliwan soldiers.

Kill COV

Take out the COV bandits that attack.

Turn on Loudspeaker

Press the button on the terminal to turn on the loudspeaker.

Clear Room

Fight the Maliwan soldiers and COV bandits.

Upload Data to Atlas

Press the button on the console near the central computer to upload the intel and complete the Opposition Research mission.

More Borderlands 3 Guides and Walkthroughs

Check out our Borderlands 3 Guides and Walkthroughs for more help!

Borderlands 3
Guides

Borderlands 3 – Locations of All the Athenas Echo Logs

by Chappie in

Welcome to NGB and our Borderlands 3 guide on the Athenas Echo Logs. Here you’ll find all the locations of these logs!

Quick Links

Athenas Echo Log Locations

Traunt’s Taunts

Athenas Echo Log

This log is laying on a chair near the plaza in Windward Plaza. You can find it in the northwestern section of the plaza. See the map below for the exact location.

Athenas Echo Log location on map

Dis-Order

Athenas Echo Log

This log is on a picnic table in front of Storm Bewin located at the north-central area on the map. See the map below for the exact location.

Athenas Echo Log map location

Sneaking

Athenas Echo Log

This log is located on a crate on the second level of the building in the picture above. This area is just before the location where the Captain Traunt fight takes place. See map below for the exact location.

Athenas Echo Log map location

More Borderlands 3 Guides and Walkthroughs

Check out our Borderlands 3 Guides and Walkthroughs for more help!

Borderlands 3
Guides

Borderlands 3 – Athenas Crimson Radio Crew Challenge

by Chappie in

Welcome to NGB and our Borderlands 3 guide on the Athenas Crimson Radio Crew Challenge. Here you’ll find all the locations needed to complete this challenge!

Quick Links

Athenas Crimson Radio Crew Challenge Locations

Athenas Broadcast Tower

Athenas Crimson Radio Crew Challenge

This broadcast tower is located on the top of the building in the image above near the entrance of the Anchorhold. See the below map for the exact location. You can reach the top of the building by climbing up the shed with a speaker on top of it to the right of the building. From there, jump across to the concrete platforms with the two crates and climb up to the top of them. Next, jump onto the cornerstone with the yellow paint. Then jump onto the roof and make your way to the crate in the middle of the roof. Climb up the crate and jump onto the railing. From the railing, jump to the section of the building sticking out of the wall with a hole in it. Climb up to a higher rooftop and then head up two metal containers stacked on top of each other to reach yet another rooftop. From here, jump across to the concrete platform connected to the tower with the satellite on the top. Climb up two ladders to reach the terminal at the top of the broadcast tower. Sabotage it to complete this challenge.

Athenas Crimson Radio Crew Challenge location on map

More Borderlands 3 Guides and Walkthroughs

Check out our Borderlands 3 Guides and Walkthroughs for more help!

Borderlands 3
Guides

Borderlands 3 – Athenas Typhon Logs ^ Dead Drop Crew Challenges

by Chappie in

Welcome to NGB and our Borderlands 3 guide on the Athenas Typhon Logs and Dead Drop Crew Challenges. Here you’ll find all the locations needed to complete this challenge!

Quick Links

Athenas Typhon Logs and Dead Drop Crew Challenges Locations

Stormhaven Square

Athenas Typhon Log Stormhaven Square

This log is located on a concrete platform connected to the tall clay-colored building with a spinning satellite dish on the top of it near where you first meet Maya. See the map below for the exact location. To reach it, stand in front of the giant bell facing west. Climb up the building on the right using the dumpster to access its roof. Jump up to the highest part of the roof then jump across to a concrete platform connected to the clay-colored building to find the log.

Athenas Typhon Log location on map

Dido’s Remorse

Athenas Typhon Log

This log is located on a church wall in the back of the Dido’s Remorse cemetery at the northeastern section of the map. See the map below for the exact location.

Athenas Typhon Log location on map

Outside Anchorhold

Athenas Typhon Log

This log is located in the water on the left side of the shrine-like area after the Captain Traunt boss fight where you get the Vault Key Fragment. See the map below for the exact location.

Athenas Typhon Log location on map

Athenas Dead Drop Cache

Athenas Typhon Dead Drop Cache

This cache is located in the Anchorhold near the entrance to the left of the bridge when facing south. After you pass over the bridge, head through the courtyard with the fountain in the middle and through the doorway into an open area. Go down the small flight of steps and take a left (east) following the walkway around the building you just exited to come to a gated doorway with a crate near it. Climb on the crate and jump over the doorway to reach the area containing the cache.

More Borderlands 3 Guides and Walkthroughs

Check out our Borderlands 3 Guides and Walkthroughs for more help!

Guides

Borderlands 3 – Holy Spirits Walkthrough

by Chappie in

Welcome to NGB and our Borderlands 3 walkthrough on the Holy Spirits side mission. Here you’ll find everything you’ll need to breeze through this mission!

Holy Spirits Walkthrough

How to Start Holy Spirits

To begin the Holy Spirits side mission in Borderlands 3, you’ll need to talk to Brother Mendel on Athenas at Storm Brewin located in the northern central area of the map.

Holy Spirits Objectives

Follow Brother Mendel

Follow behind Brother Mendel as he leads you into the brewery.

Enter Cellar

Head into the cellar (Holy Distillery) and follow the stairs to the bottom.

Clear Ratch Gunk

At the bottom of the stairs, shoot the stopper off the barrel. Head through the doorway to enter an underground cavern. The second ratch gunk is located in a doorway leading to the last room of the cavern. The final ratch gunk is located in the final room of the cavern in the back.

Kill Ratch Broodmothers

Work your way through the tunnels killing the three broodmothers that call it home.

Harvest Intoxicated Livers (Optional)

Collect the five intoxicated livers from large dead ratches laying around the cavern.

Destroy Ratch Nest

After passing through the doorway blocked by the second ratch gunk, destroy the Ratch Nest in this room.

Take Bell Striker

Collect the bell striker that the Ratch Nest dropped.

Repair Bell

Attach the bell striker on the ropes near the bell to repair it.

Ring Bell

With the bell repaired, ring it.

Place Intoxicated Ratch Livers (Optional)

Head through the door and place the livers you collected into the barrel.

Return to Mendel

Head back to Mendel and talk with him to complete the Holy Spirits mission.

More Borderlands 3 Guides and Walkthroughs

Check out our Borderlands 3 Guides and Walkthroughs for more help!

Guides

Borderlands 3 – Invasion of Privacy Walkthrough

by Chappie in

Welcome to NGB and our Borderlands 3 walkthrough on the Invasion of Privacy side mission. Here you’ll find everything you’ll need to breeze through this mission!

Invasion of Privacy Walkthrough

How to Start Invasion of Privacy

To begin the Invasion of Privacy side mission in Borderlands 3, you’ll need to talk to Ava on Sanctuary after completing the Impending Storm main mission.

Invasion of Privacy Objectives

Go to Athenas

Head to Athenas to update the objective.

Retrieve Stuff

Follow the path forward to enter Stormhaven Square until you come to the first structure with vending machines in it. Collect Ava’s stuff from the trash pile.

Retrieve More of Ava’s Stuff

Keep following the path north to until you reach the first set of buildings leading into a small village. Collect Ava’s stuff that is lying on the ground.

Get Diary

Head through the village, dealing with the Maliwan soldiers as you go. Pass the bell to enter Windward Plaza and head up the small set of stairs. At the top, take a right and open the safe under a tree.

Find Beans

Keep following the path forward heading through another village filled with enemies. Pass another bell exiting the town to arrive in a search area. Look for a ripped page from Ava’s diary sitting on a couch and pick it up.

Seriously, Find Beans

Keep working your way down the path until you come to the part of Windward Plaza with a giant pipe running through it and part of the plaza will be submerged by water. Head through the water to reach the other side and up a flight of stairs. At the top of the stairs, take a right to find a really embarrassing page from Ava’s diary on a picnic table with a pink umbrella.

Not Kidding, Find Bean, It’s Super Important

Head to the Storm Brewin brewery located in the north-central area of the map. The next diary page is located on a table across from the bar counter.

Kill Beans

Go to the cemetery in Dido’s Remorse located east of the brewery to find Beans then take him out.

Find Hide-a-Key

Collect the key located on the east side of the cemetery next to an old run-down building along a fence.

Open Weapons Cache

Head south following the fence until you reach a lit wooden sign pointing to the Academic District. Head behind the sign and follow the rocky path to reach the cache. Open the cache.

Return to Sanctuary

Fast travel back to Sanctuary.

Go to Ava’s Room

Once at Sanctuary, head to Ava’s room near the bridge of the ship.

Return Ava’s Belongings

Place Ava’s stuff in their spots in her room.

Talk to Ava

Talk to Ava to complete the Invasion of Privacy mission.

More Borderlands 3 Guides and Walkthroughs

Check out our Borderlands 3 Guides and Walkthroughs for more help!

Borderlands 3
Guides

Borderlands 3 – Athenas Dead Claptrap Crew Challenge

by Chappie in

Welcome to NGB and our Borderlands 3 guide on the Athenas Dead Claptrap Crew Challenge. Here you’ll find all the locations needed to complete this challenge!

Athenas Dead Claptrap Crew Challenge Locations

Windward Plaza (Poetry Module)

Athenas Dead Claptrap Crew Challenge

This dead claptrap is located on a couch in front of a white building sitting on a small island. It is connected to the southern part of Windward Plaza by a bridge. See the map below for the exact location.

Athenas Dead Claptrap Crew Challenge location on map

The Anchorhold (Singing Module)

Athenas Dead Claptrap Crew Challenge

This dead claptrap is located on the second level of building in the image above laying in front of a piano. See the map below for the exact location.

Athenas Dead Claptrap Crew Challenge location on map

More Borderlands 3 Guides and Walkthroughs

Check out our Borderlands 3 Guides and Walkthroughs for more help!

Borderlands 3
Guides

Borderlands 3 – Promethea Dead Claptrap Crew Challenge

by Chappie in

Welcome to NGB and our Borderlands 3 guide on the Promethea Dead Claptrap Crew Challenge. Here you’ll find all the locations needed to complete this challenge!

Meridian Outskirts

Cave (Universal Transistor)

Promethea Dead Claptrap Crew Challenge Meridian Outskirts

This dead claptrap is located in a cave between Meridian Outskirts drop pad and the Meridian Outskirts fast travel station.

Meridian Metroplex

Stairwell (Stair-Climbing Update)

Promethea Dead Claptrap Crew Challenge Meridian Metroplex

This dead claptrap is located in a stairwell to the right of Dynasty Diner (near the center of the map).  Head below the green arrows in the image above to enter the stairwell containing the claptrap.

Lectra City

Downtown Square (8th Gen Emotive Resonator)

Promethea Dead Claptrap Crew Challenge Lectra City

This dead claptrap is located under the Welcome Home neon sign in the Underpass in south-central Lectra City. To reach it, take the big concrete stairs in Downtown Square down to the area where you fight Jenny during the Kill Killavolt side mission.  The dead claptrap is located in this room in the back corner.

Market Quarter (Eye Rotor)

Promethea Dead Claptrap Crew Challenge Lectra City

This dead claptrap is located directly south of the Lectra City fast travel station on the roof of a shack overlooking the docks.

Skywell-27

Sector 2 (Antenna)

Promethea Dead Claptrap Crew Challenge Skywell-27

This dead claptrap is located in Sector 2 of the Maliwan base. This is after passing the large elevator that leads to the laser and climbing through the vents leading back outside. Claptrap will be tied to a metal radio tower connected to a rock just past a bridge in the middle of the path. You will need to climb up the big rock across from the tower to jump over to it.

Observation Deck (Dubstep Library)

Promethea Dead Claptrap Crew Challenge Skywell 27

This claptrap is on the second level of a building in the Observation Deck. See the image below for the exact location. To reach it, you will need to jump down the long chute in Sector 4. This will place you in Fuel Processing. Exit through the door to enter a room containing a cylinder with a blue sphere in the middle of it. Take a right and follow the walkway down a couple of steps. Take another right and enter the building there. Climb up the two flights of stairs then jump through the open section of the wall to locate it.

Promethea Dead Claptrap Crew Challenge Skywell 27 Map Location

Atlas HQ

Lobby of Self-Actualization (Claptrap-VPN)

Promethea Dead Claptrap Crew Challenge Atlas HQ

This dead claptrap is located in Atlas Tower behind a bar on the second floor. Enter Atlas and head forward, past the spinning gold ball, then under the red ATLAS sign in the middle of the walkway. Follow the walkway forward until you reach a set of double doors. Instead of heading through them, take the flight of stairs up on the left or right side of the doors to reach the second level in the Lobby of Self-Actualization. The bar will be in the room on the northeastern side of the walkway.

Neon Arterial

Green Diamond Platform (Antenna Accessory)

Promethea Dead Claptrap Crew Challenge Neon Arterial

This dead claptrap is located on the train track in the middle of the Green Diamond Platform. See the map below for the exact location.

Promethea Dead Claptrap Crew Challenge Neon Arterial Map Location

More Borderlands 3 Guides and Walkthroughs

Check out our Borderlands 3 Guides and Walkthroughs for more help!

Borderlands 3
Guides

Borderlands 3 – Locations of All the Sanctuary Echo Logs

by Chappie in

Welcome to NGB and our Borderlands 3 guide on the Sanctuary Echo Logs. Here you’ll find all the locations of these logs!

Sanctuary Echo Logs

Sanctuary Echo Log Locations

One More Mission

Sanctuary Echo Logs One More Mission

This log is located on the lower floor on a table in a small room near Marcus.  From Marcus’ location, turn around and head into a hallway, taking a left through a door.  Once through the door, take the first right to find the small room containing the log.

Reborn

Sanctuary Echo Log Reborn

This log is located on a table in Moxxxi’s bar.

Get In Line

Sanctuary Echo Log Get in Line

This log is located on the top floor of the ship above the golden chest. See the map below for the exact location.

Sanctuary Echo Log Get in Line map location

Morning Tea

Sanctuary Echo Log Morning Tea

The log is located on the south side of the ship in a storage room connected to the stairway leading to the cargo bay. See the map below for the exact location.

Sanctuary Echo Log Morning Tea map location

More Borderlands 3 Guides and Walkthroughs

Check out our Borderlands 3 Guides and Walkthroughs for more help!