A new side quest in the Isle of Armor DLC for Pokemon Sword and Shield is given to you automatically when you approach the bridge to the dojo. You are tasked with tracking down 150 Digletts! Below is a guide on the locations of the 20 Digletts in the Soothing Wetlands.
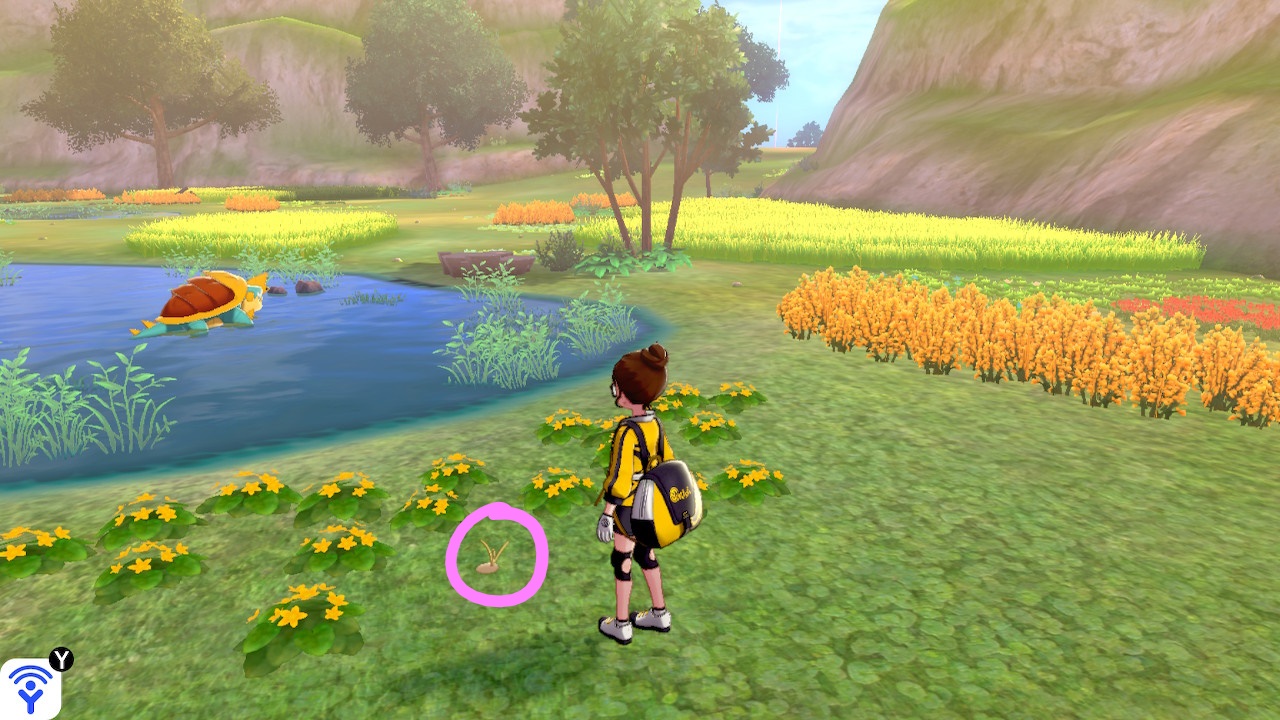
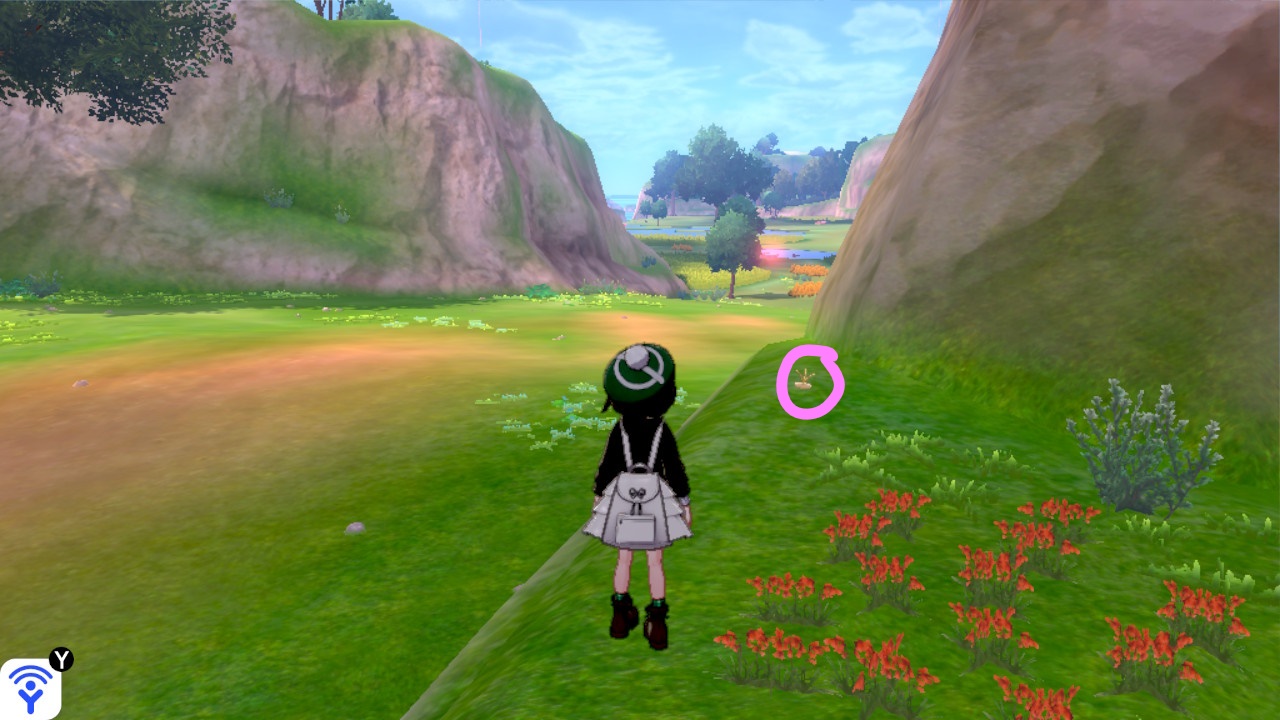
1. South side near the path to the dojo
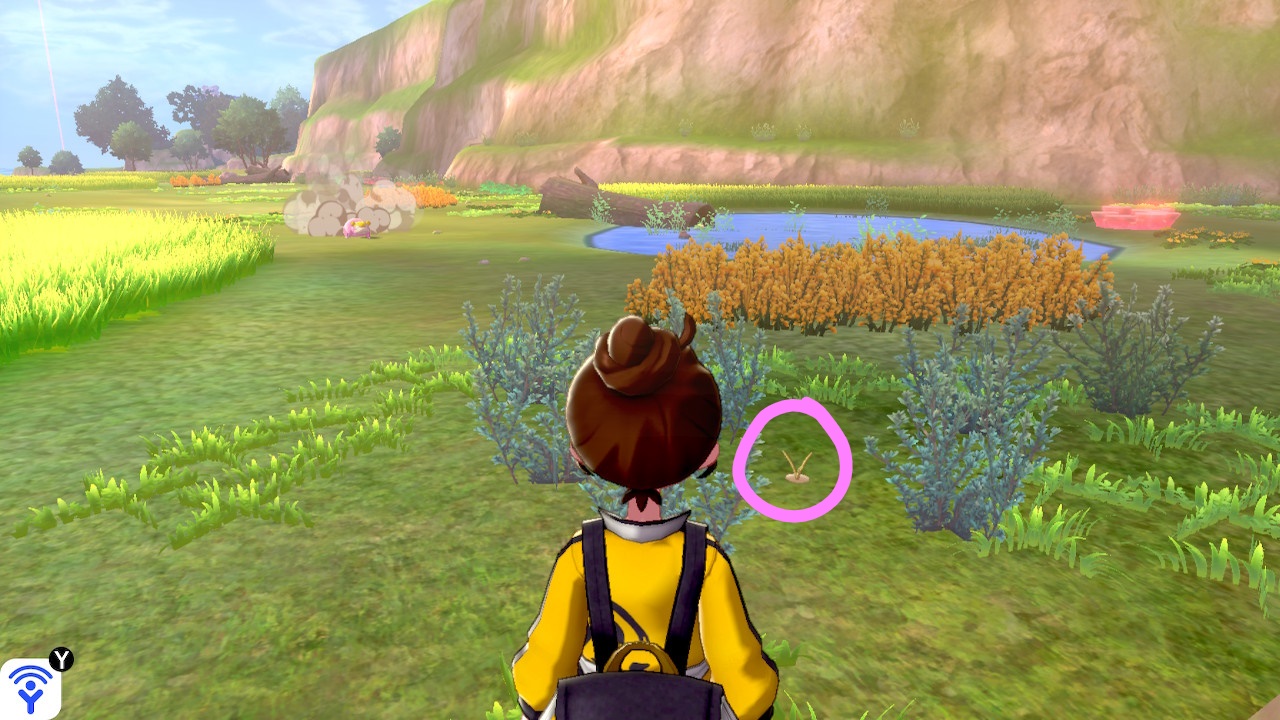
2. Southwest side between a pond and a cliff
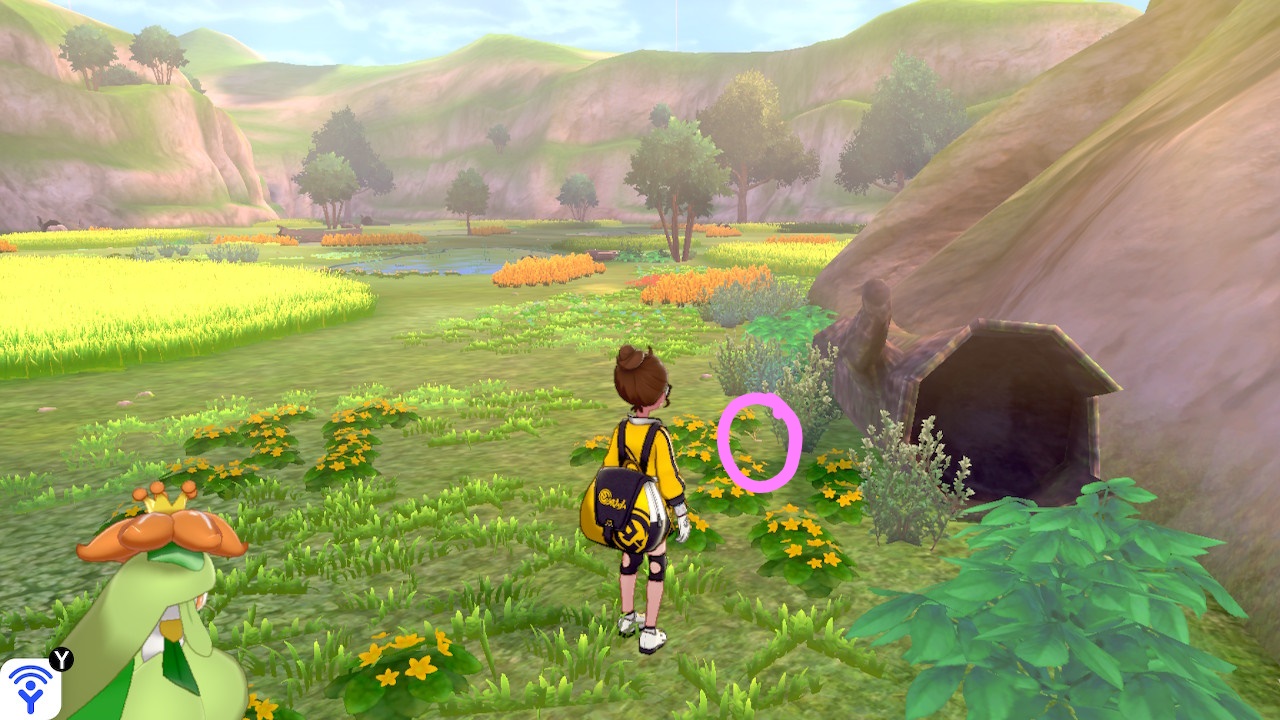
3. Southeast side along the cliff near a pond with a log partially in it near Brawler’s Cave
4. Southeast side along the cliff near some tall grass
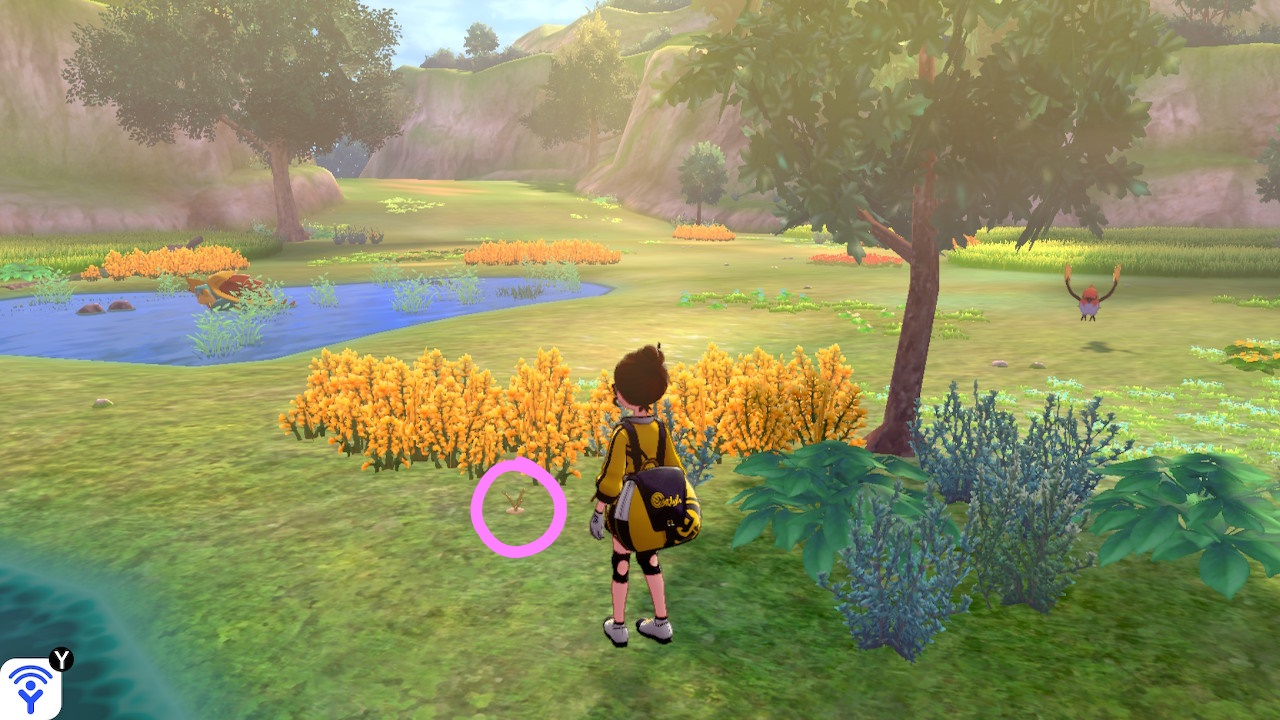
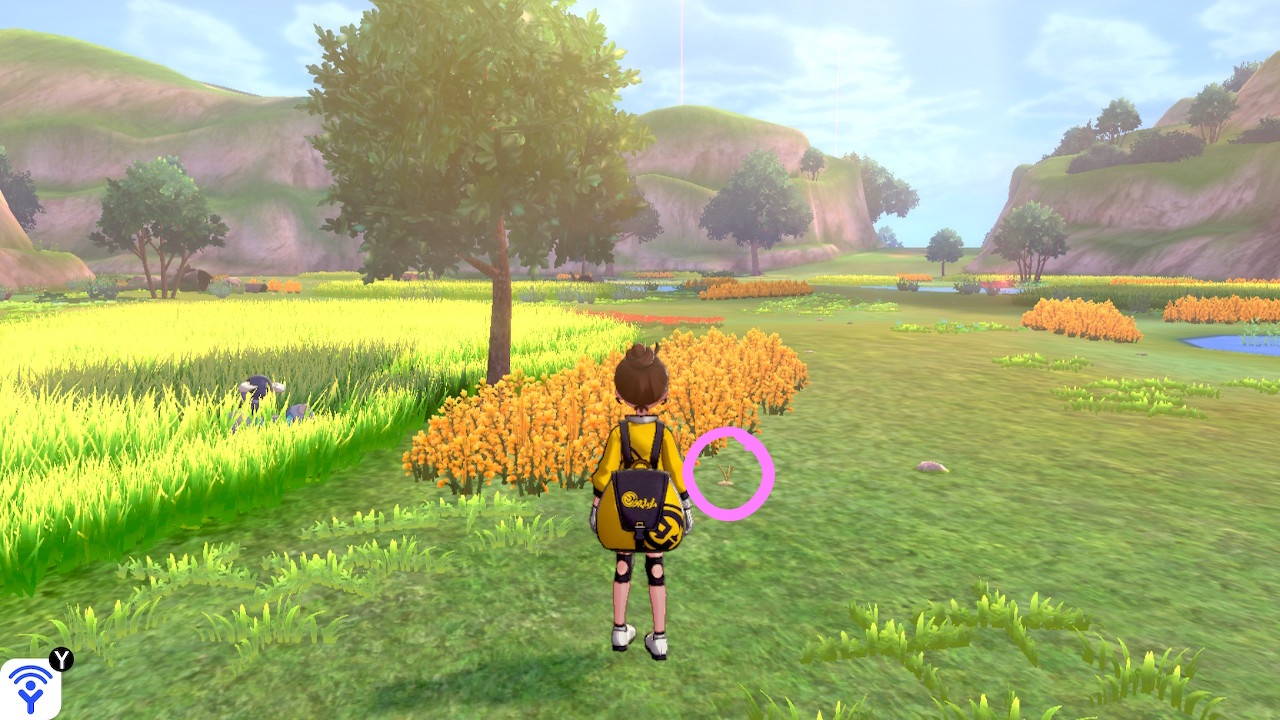
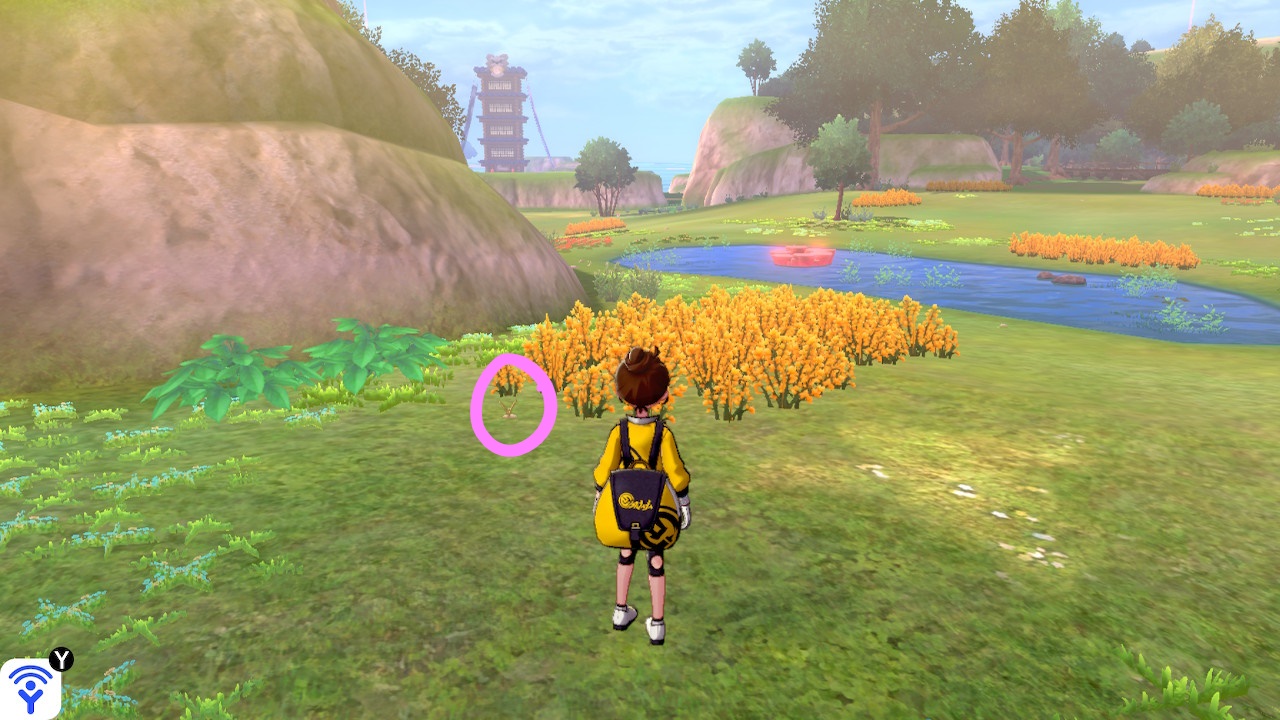
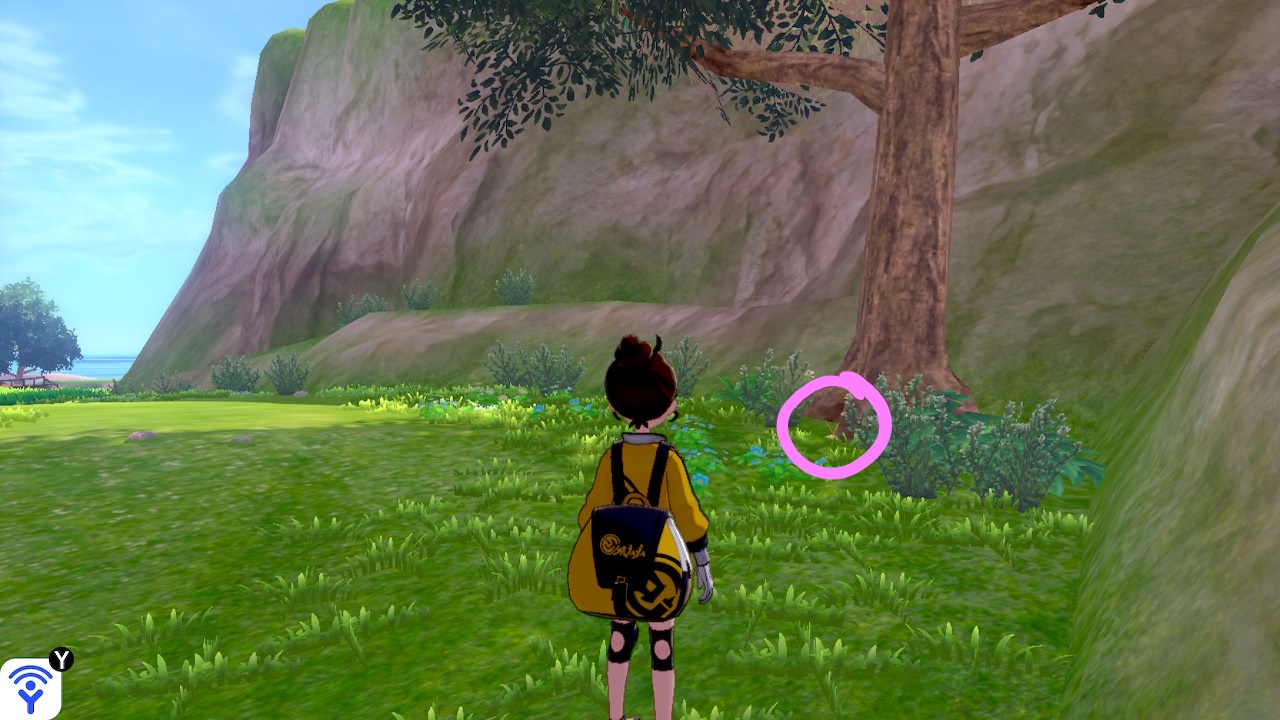
5. Southeast near some tall yellow plants with a small tree
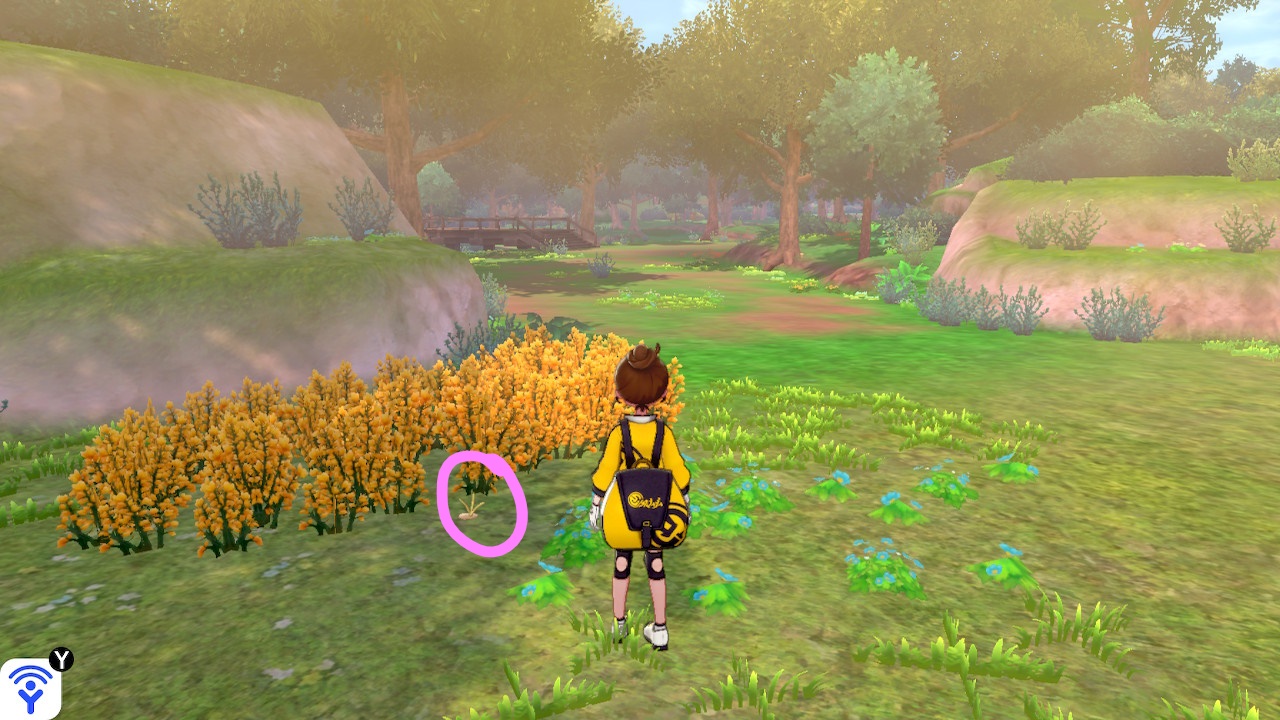
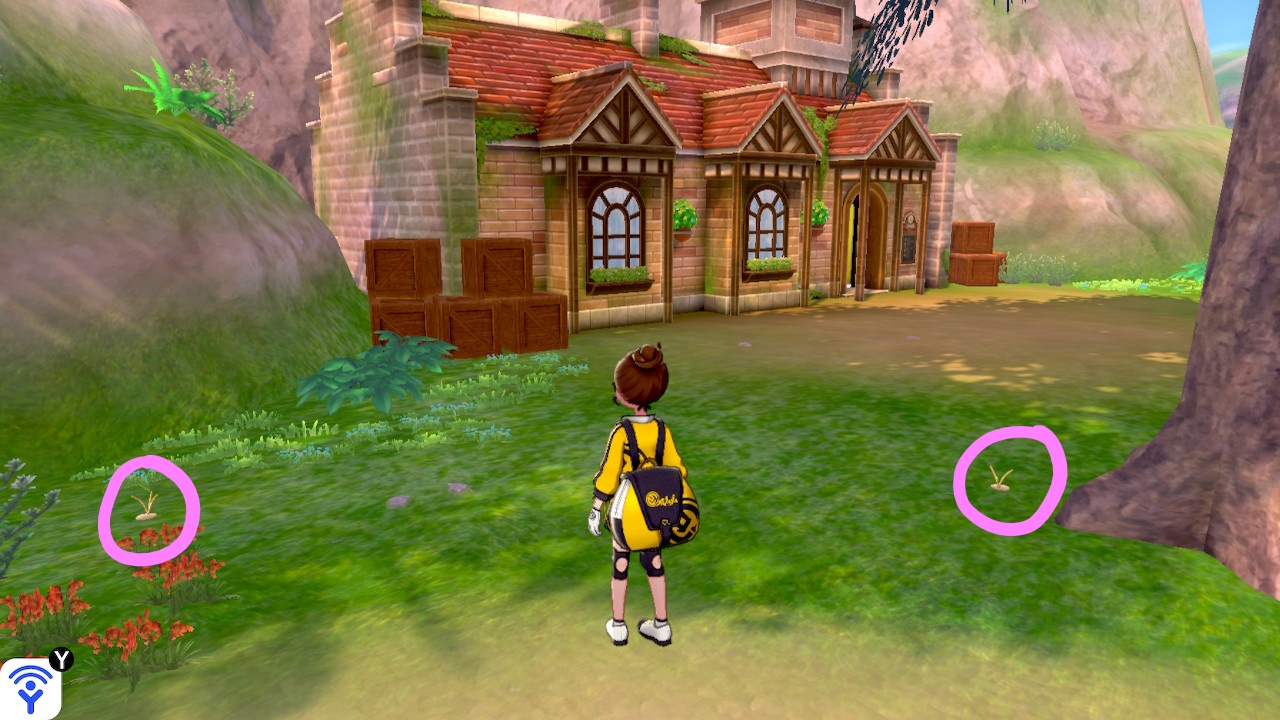
6. Central east side in the grass near some tall yellow plants
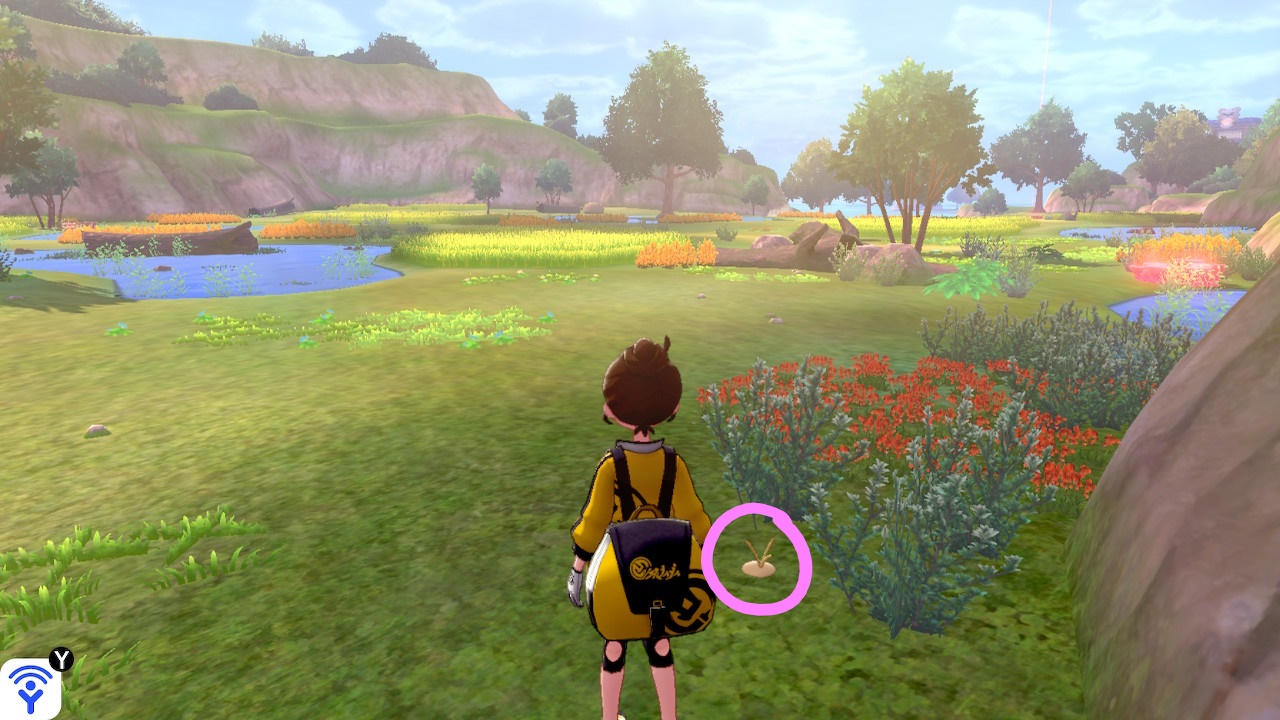
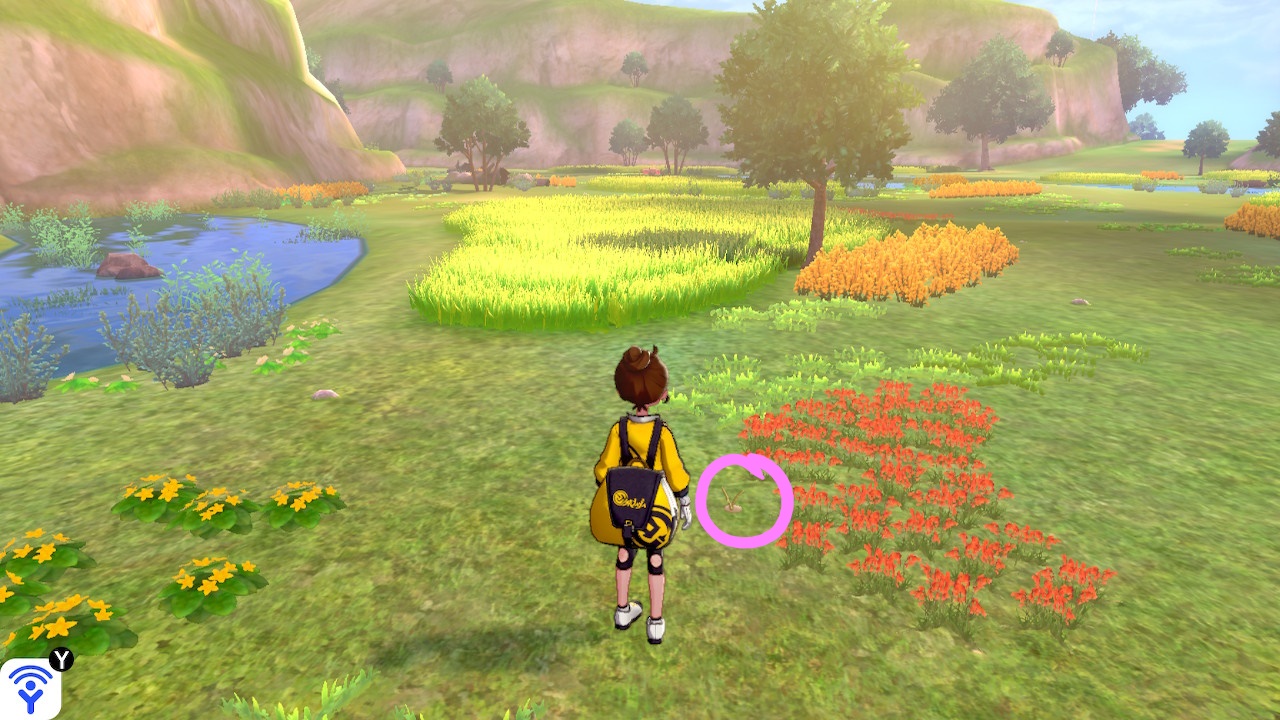
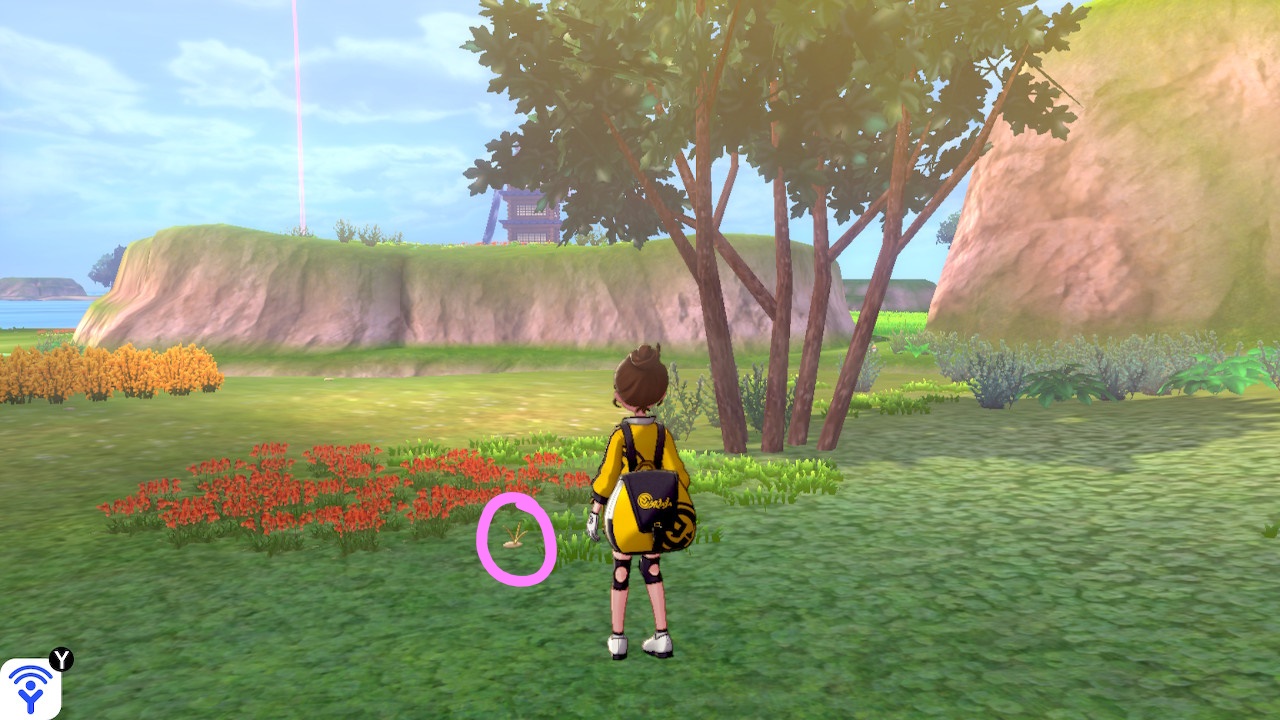
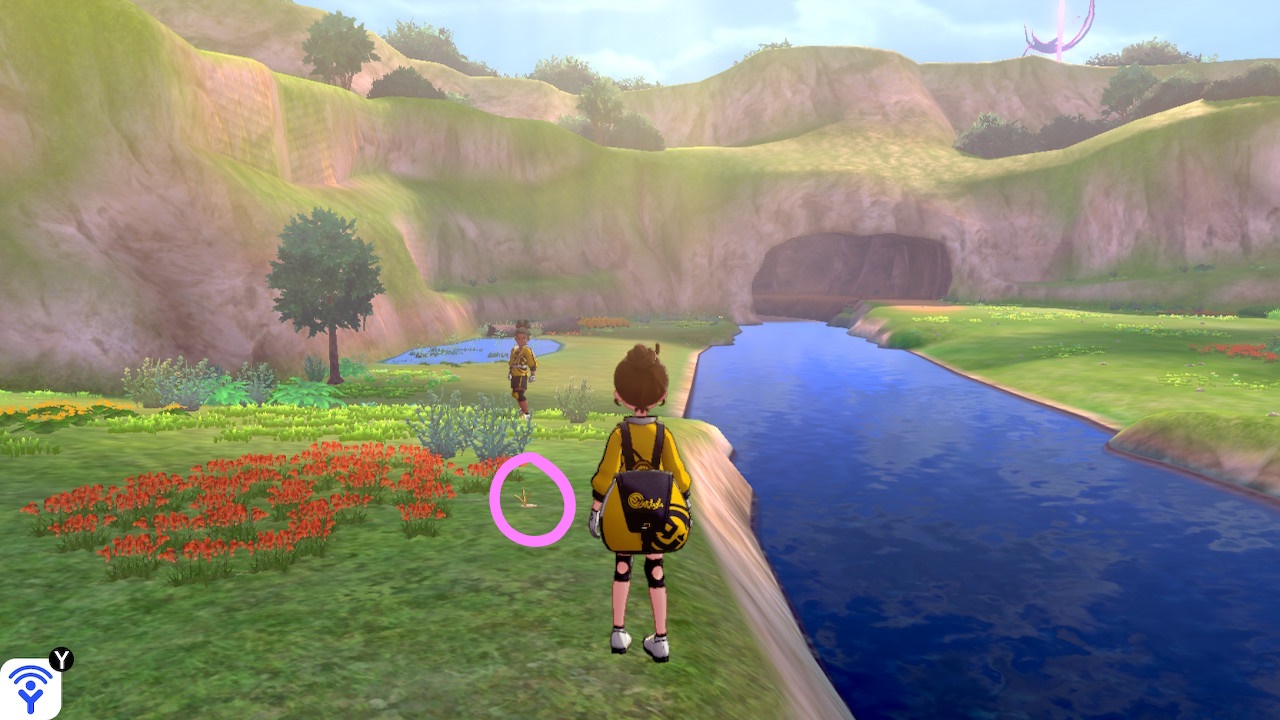
7. Central east side near a patch of red flowers next to a pond along the cliff
8. East side behind two fallen logs near the cliff
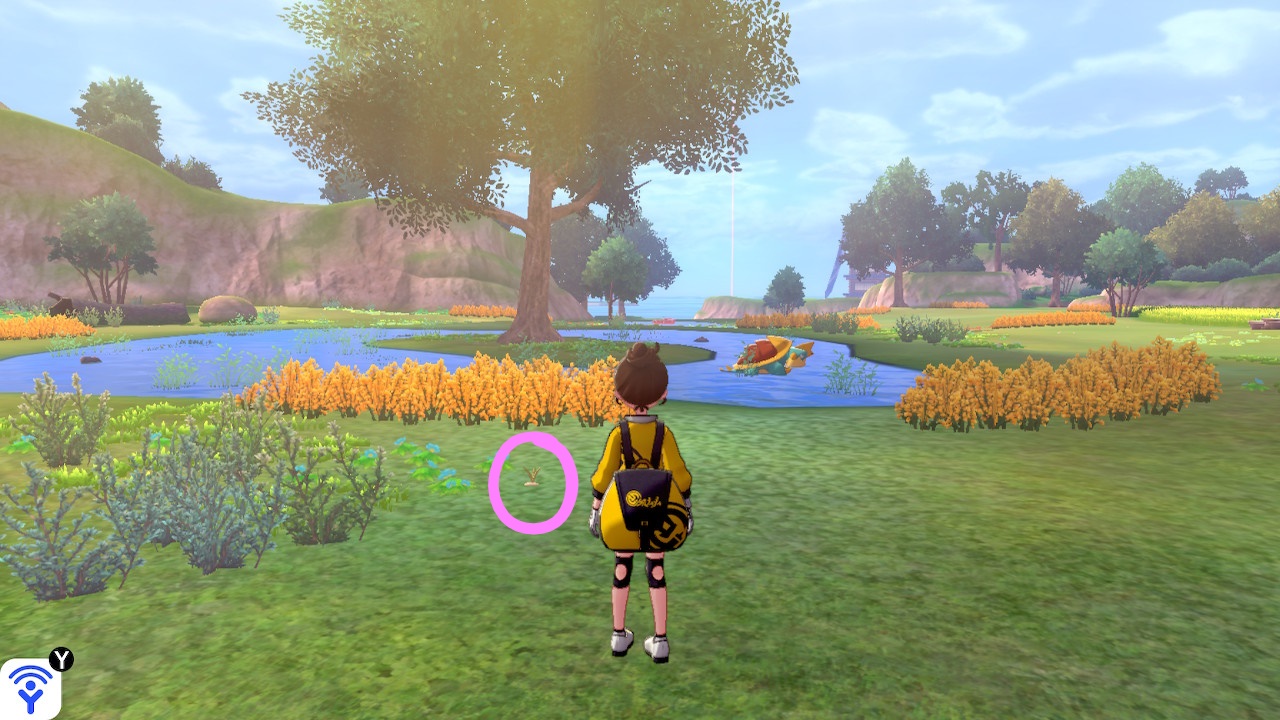
9. Central part of the map near the pond with a small island containing a tree
10. Central part of the map on the small island with a tree on it
11. Central part of the map at the base of a small tree
12. West side of the map next to a log along the cliff
13. Central west side along the cliff near some tall yellow plants
14. Central west side along the cliff near a small lake
15. North central side in the grass near the cliff
16. Northeast in the grass next to some yellow plants near the entrance to the Forest of Focus
17. Northeast in the grass near the cliff
18. Northeast side near a cluster of small trees next to the river
A new side quest in the Isle of Armor DLC for Pokemon Sword and Shield is given to you automatically when you approach the bridge to the dojo. You are tasked with tracking down 150 Digletts! Below is a guide on the locations of the 19 Digletts in the Fields of Honor.
1. Received automatically when you approach the bridge to the dojo
2. After crossing the bridge and facing the dojo, take an immediate right to find the Diglett in a small dirt patch surrounded by 2 patches of red flowers.
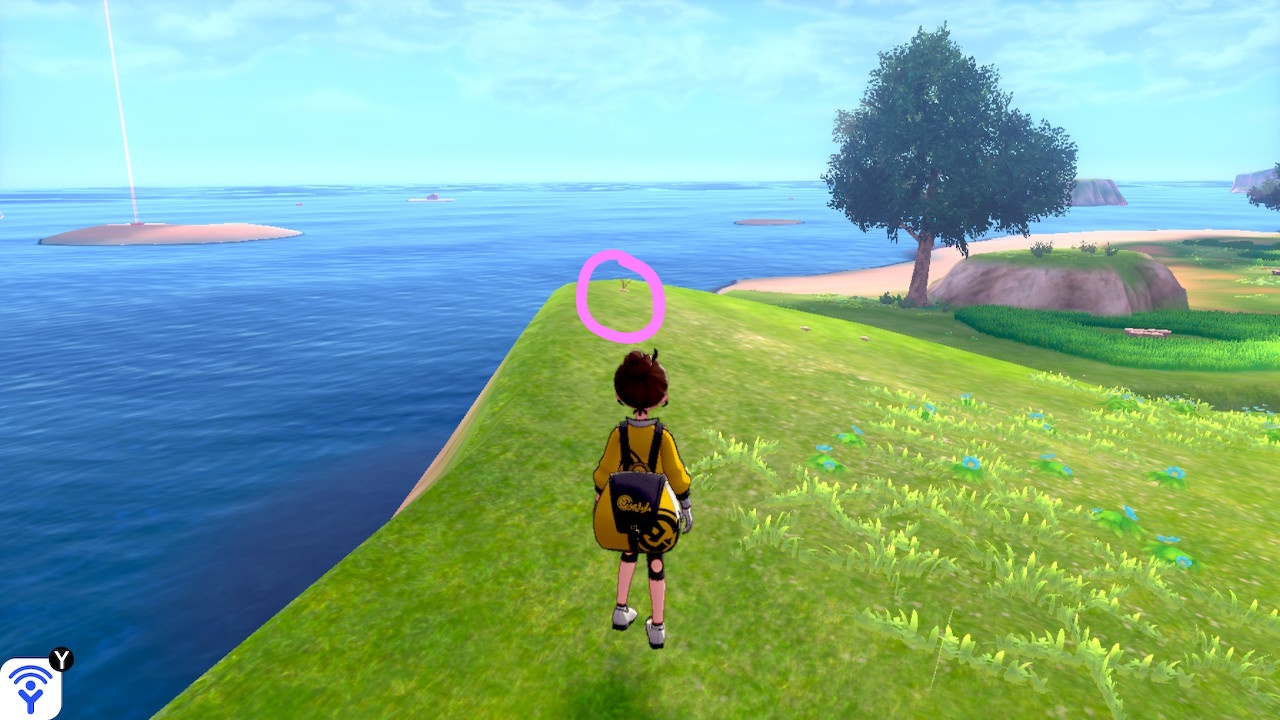
3. From the above Diglett, keep heading along the cliff to reach the tip overlooking the sea where the Digett can be found.
4. In the dirt along the main path from the bridge to the dojo
5. In the grass between the garden by the dojo and a small cliff
6. In the dirt in the corner of the unplanted garden by the dojo
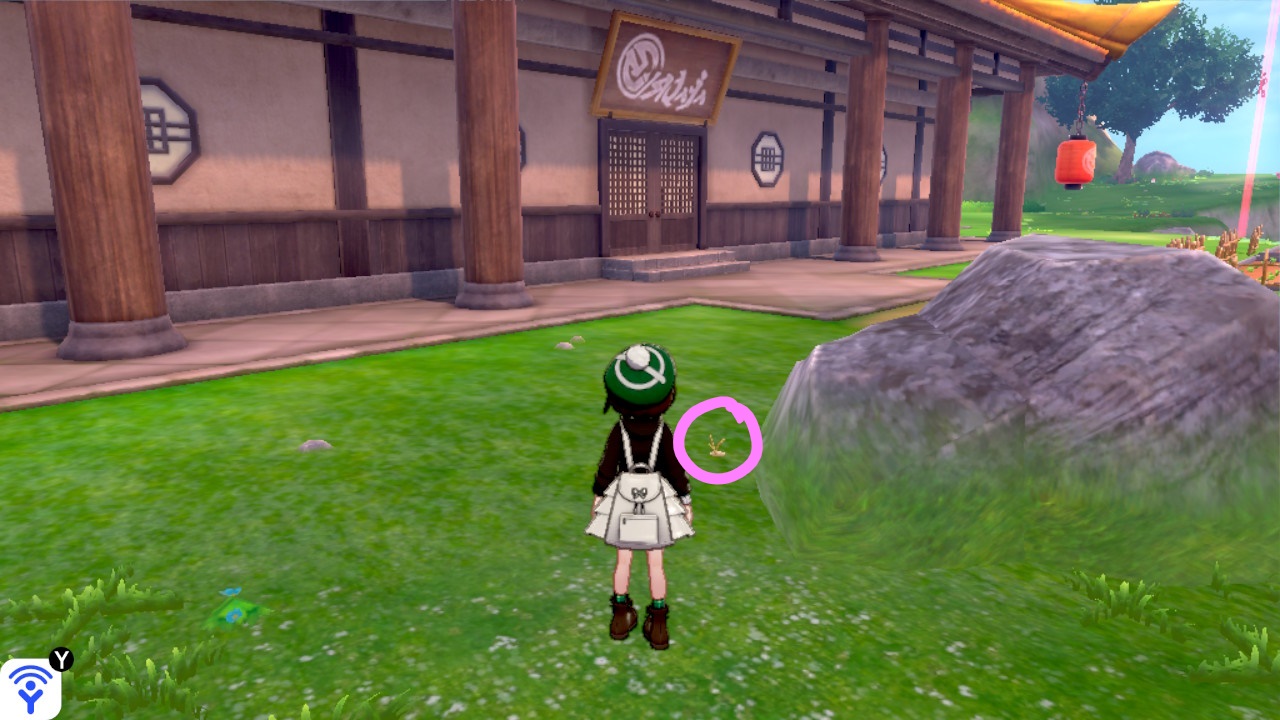
7. In the grass next to the large rock to the left of the dojo’s entrance
8. In the grass next to the cliff at the end of the path to the left of the dojo’s entrance
9. In the grass next to the tree at the end of the path to the right of the dojo’s entrance
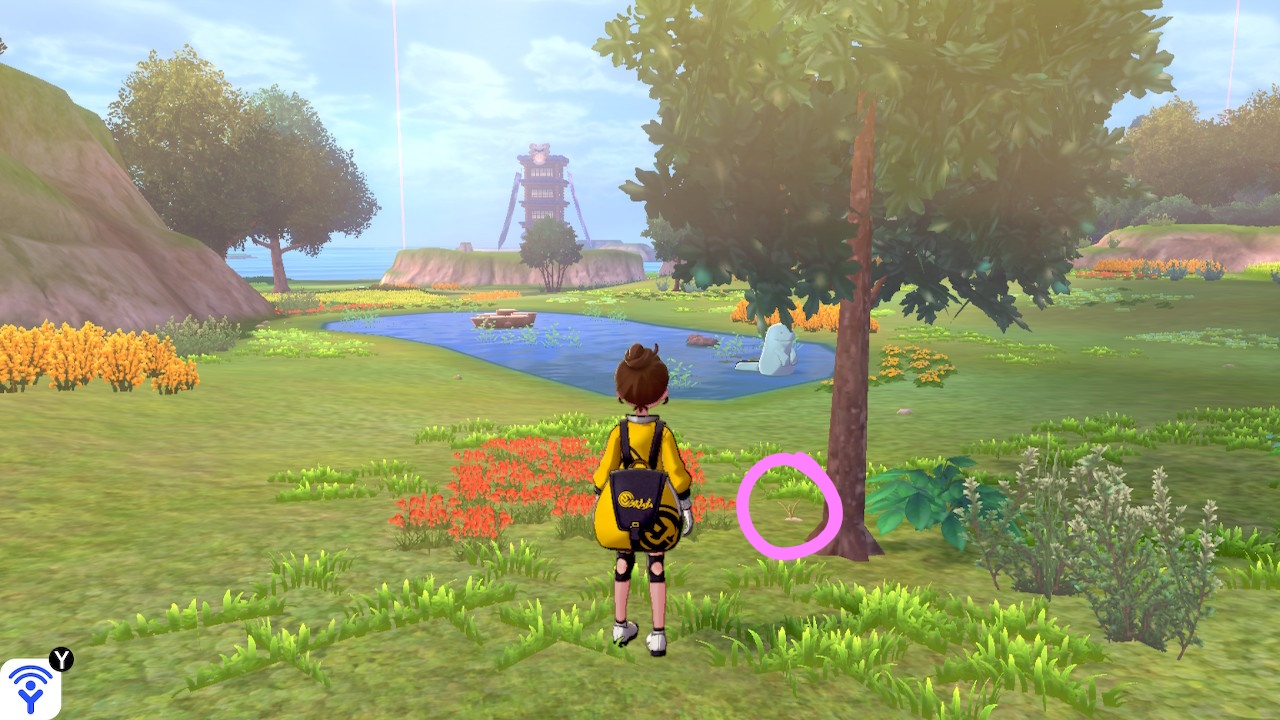
10. Underneath a tree along the cliff near the entrance to the Soothing Wetlands
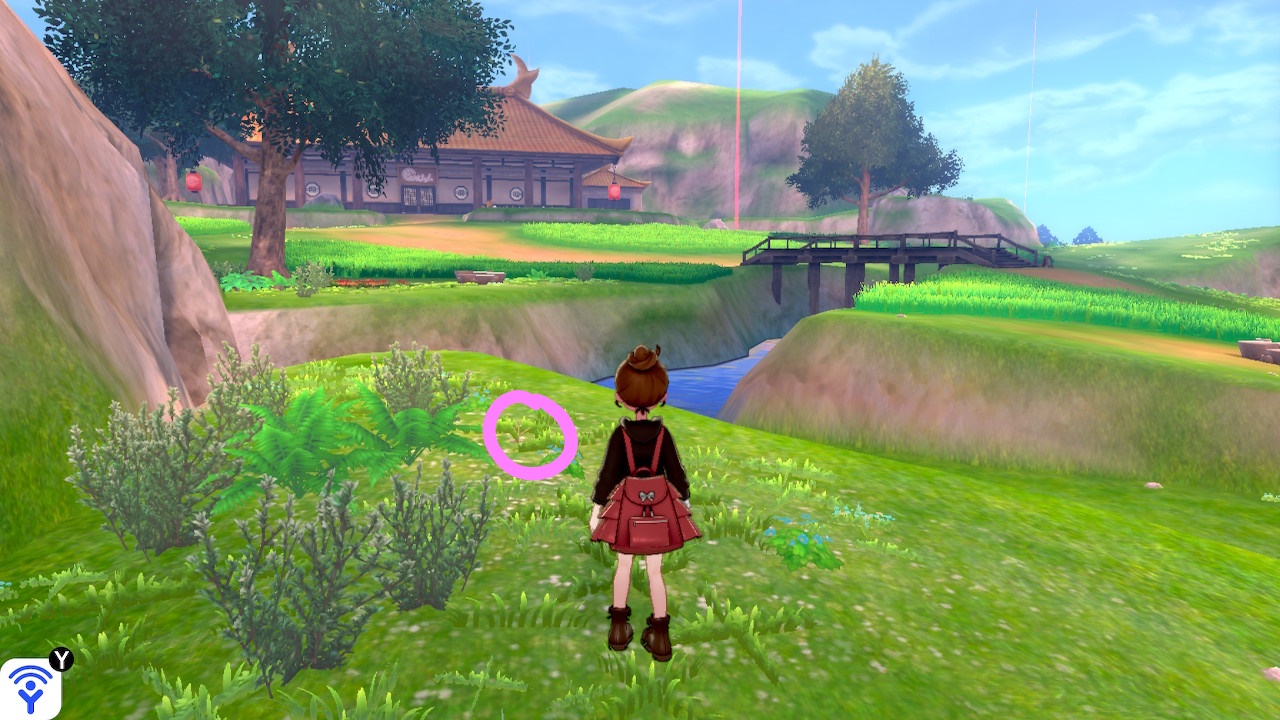
11. Southwest of the bridge on the higher level along the cliff near the path to the river
12. Southwest of the bridge behind the giant rock near the cliff
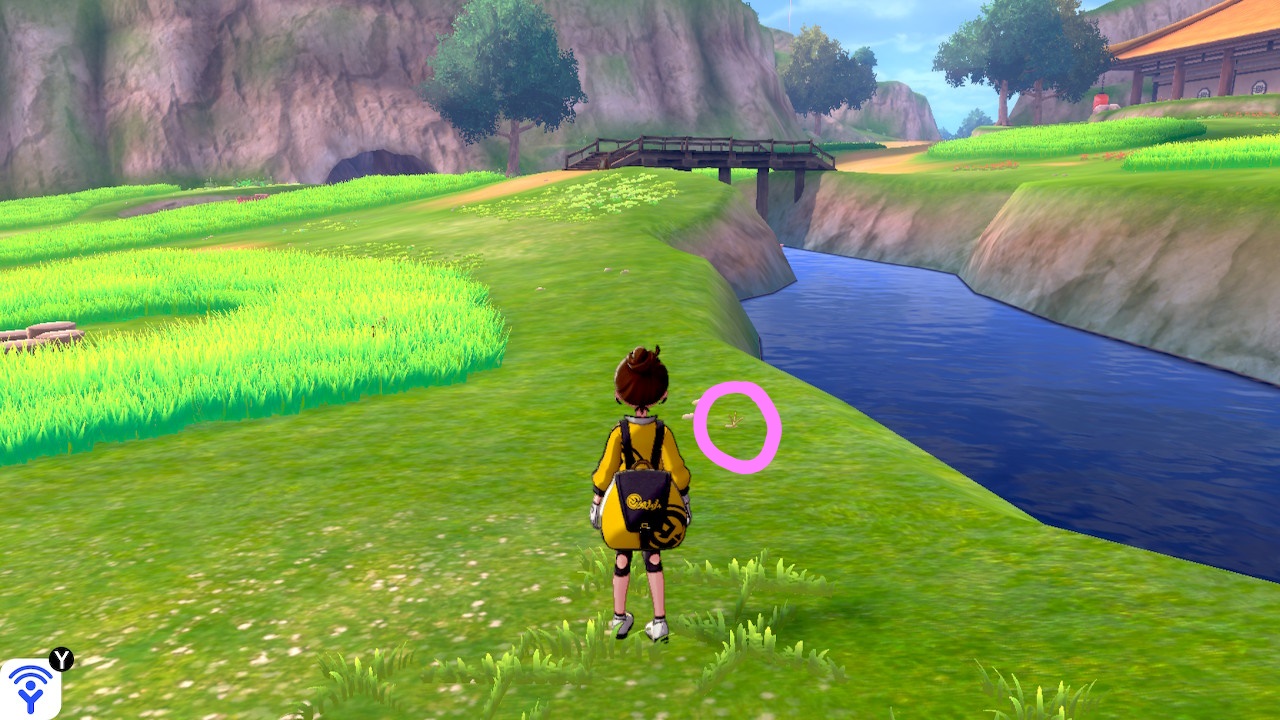
13. Southeast of the bridge along the river
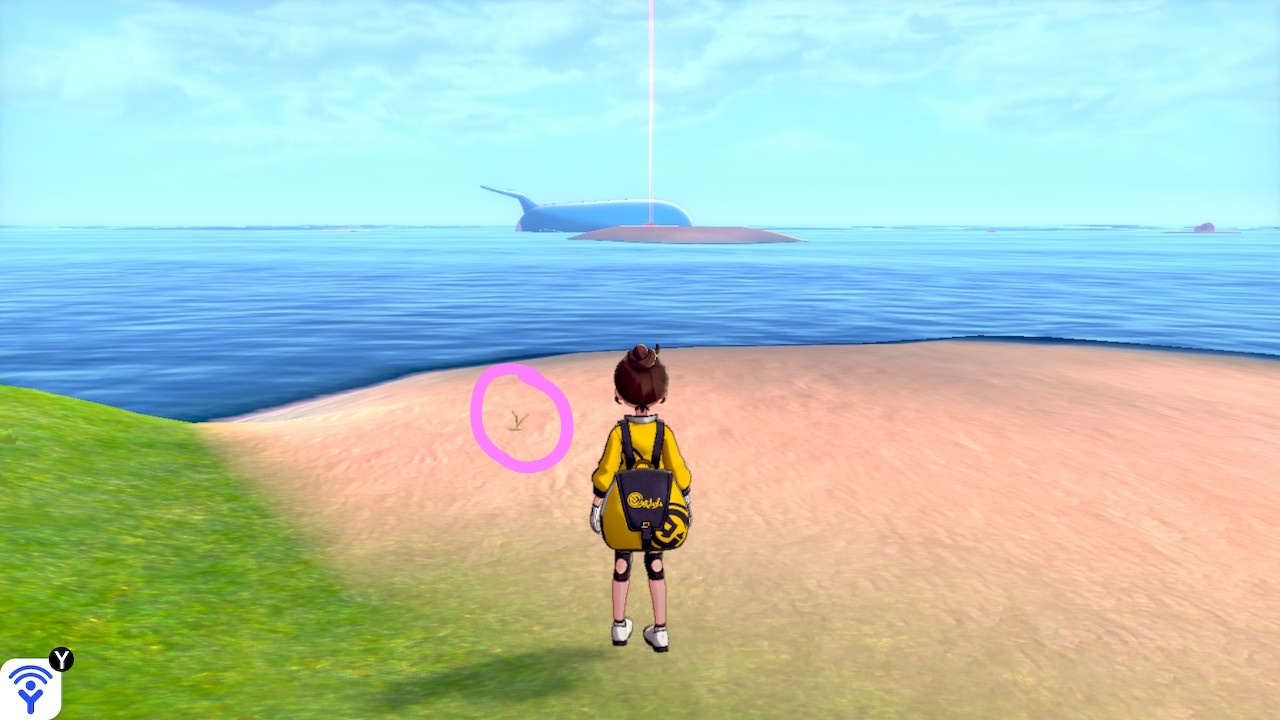
14. Southeast of the bridge on a ledge overlooking the ocean
15. On the beach in the sand near the giant rock
16. & 17. Near the station
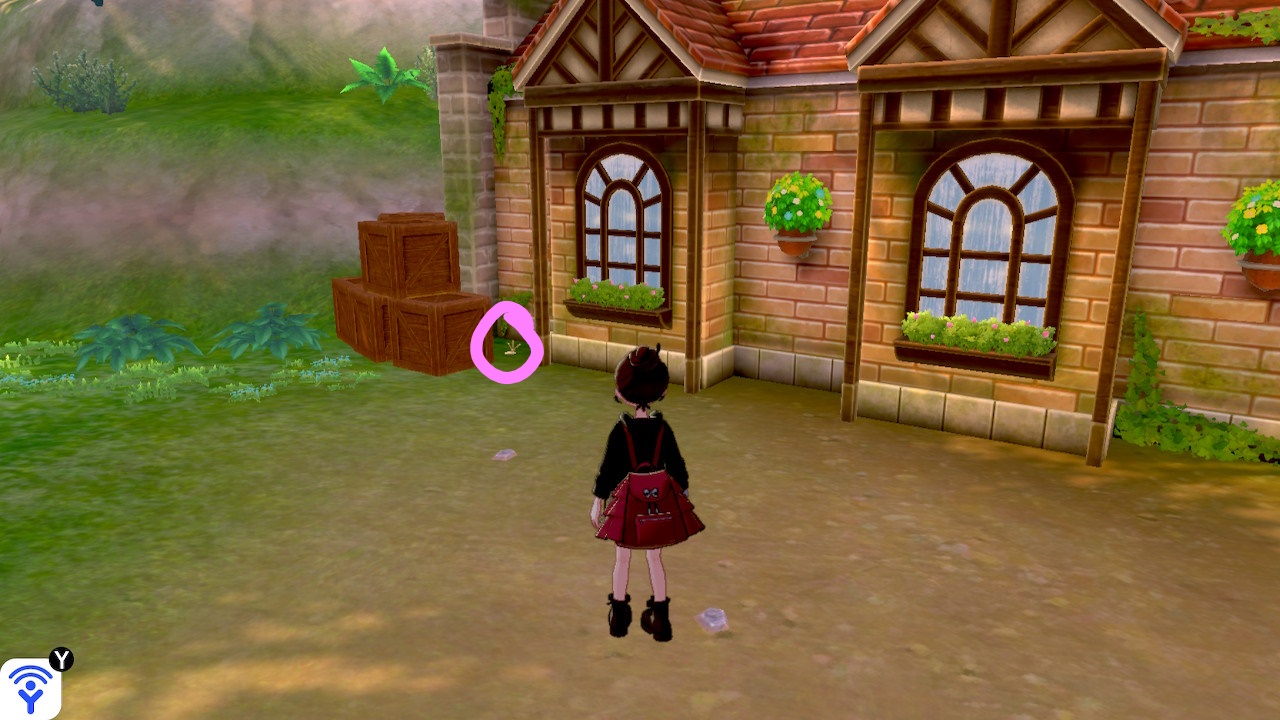
18. Behind the stacked boxes to the left of the station
19. Along the narrow path to the south of the station in a patch of red flowers
Below are the side quests that can be obtained in Agniratha!
Agniratha Beautification 1 (timed)
Obtained: Speak with a City Planning Terminal near the Central Tower landmark
Objective: Collect 4 New Part Ss from small Mechon and 5 Fairy Tale Diodes
The New Part Ss are dropped from small Mechon in Agniratha. The Fairy Tale Diodes are located on the ground around Agniratha.
Agniratha Beautification 2 (timed)
Obtained: Speak with a City Planning Terminal near the Central Tower landmark
Objective: Collect 3 New Part Ls from large Mechon and 6 Grape Springs
The New Part Ls can be dropped from large Mechons such as M97/CYCLE or Exterminator/EMBER. The Grape Springs can be found on the ground around Agniratha.
Civil Protection 1-1 (timed)
Obtained: Speak with a Civil Protection Terminal near the Central Tower landmark
Objective: Defeat 5 M67/HASTE Mechon in Agniratha
The M67/HASTE are located in the Residential District 2. Defeat them all to complete the quest.
Civil Protection 1-2 (timed)
Obtained: Speak with a Civil Protection Terminal near the Central Tower landmark
Objective: Defeat 6 M36/SACRE Mechon in Agniratha
The M36/SACRE are located on 2F in Helas Pillar. Defeat them to complete the quest.
Civil Protection 1-3 (timed)
Obtained: Speak with a Civil Protection Terminal near the Central Tower landmark
Objective: Defeat 3 Offensive/BRAVE Mechon in Agniratha
The Offensive/BRAVE are located on 2F. Defeat them to complete the quest.
Civil Protection 2-1 (timed)
Obtained: Speak with a Civil Protection Terminal near the Central Tower landmark
Objective: Defeat 6 M55/DREAD Mechon in Agniratha
The M55/DREAD are located on 1F and on 2F in Helas Pillar. Defeat them to complete the quest.
Civil Protection 2-2 (timed)
Obtained: Speak with a Civil Protection Terminal near the Central Tower landmark
Objective: Defeat 4 M67/RADAR Mechon in Agniratha
The M67/RADAR can be found in Dios Pillar and Zedonia Plaza. Defeat them to complete the quest.
Civil Protection 2-3 (timed)
Obtained: Speak with a Civil Protection Terminal near the Central Tower landmark
Objective: Defeat 4 M87/GRAND Mechon in Agniratha
The M87/GRAND are located on 2F in Helas Pillar and on Dios Pillar. Defeat them to complete the quest.
Military Status 1-1 (timed)
Obtained: Speak with a Military Status Terminal
Objective: Defeat Vagabond Allocer in the area of Helas Pillar in Agniratha
The Vagabond Allocer is a level 63 unique enemy on 1F in the northwestern corner. Defeat it to complete the quest.
Military Status 1-2 (timed)
Obtained: Speak with a Military Status Terminal
Objective: Defeat Wise Gremory in the area of Zedonia Plaza in Agniratha
The Wise Gremory is a unique enemy located between Zedonia Plaza and Telethia Bridge on the second floor. Defeating the enemy will complete the quest.
Military Status 2-1 (timed)
Obtained: Speak with a Military Status Terminal near the Central Tower landmark
Objective: Defeat Meditative Varla in the Zedonia Plaza area of Agniratha
The Meditative Varla is a level 65 unique enemy that can be found in Zedonia Plaza. Defeat it to complete the quest.
Military Status 2-2 (timed)
Obtained: Speak with a Military Status Terminal near the Central Tower landmark
Objective: Defeat Wrathful Orobas in the area of Dios Pillar of Agniratha
The Wrathful Orobas is a level 67 unique enemy near the Dios Pillar on 1F. Defeat it to complete the quest.
Telethia Investigation 1 (timed)
Obtained: Speak with a Strategic Intel Terminal near the Central Tower landmark
Objective: Investigate the small Telethia around Helas Pillar, Dios Pillar, Effigy of Meyneth and Calcos Pillar
The small Telethia around Calcos Pillar is located in the northern part of the map on 2F. The second one is located north of the 3rd Control Platform on the 3F. Another one is located south of Telethia Bridge on 2F. The last small Telethia can be found in Agniratha. Investigating all the small Telethia will complete the quest.
Telethia Investigation 2 (timed)
Obtained: Speak with a Strategic Intel Terminal near the Central Tower landmark after completing the Telethia Investigation 1 side quest
Objective: Investigate the large Telethia with three heads in the Residential District 1, Helas Pillar, Telethia Bridge and Judicial District
The first large Telethia is located in the Residential District 1 on the ground level. The second one is located on Telethia Bridge, and the third one is located in the Judicial District across from the 3rd Control Platform on the 3rd floor. The last one is located north of Helas Pillar on the 1st floor. Investigate them all to complete the quest.
Below are the side quests that can be obtained in the Central Factory!
Daring Assault (timed)
Obtained: Surprise Quest
Objective: Defeat the M96 Crisis Unit and 2 Crisis Response Units in the Mechon Factory
This quest will trigger when you head through the Mechon Factory on the 3rd floor. The M96 Crisis Unit is a level 61 enemy and the Crisis Response Units are level 60. Defeat them to complete the quest.
Eliminate the Backup! (timed)
Obtained: Surprise Quest
Objective: Defeat Beautiful Vagul in the Storage Depot
This quest will trigger when you approach the Storage Depot, which is on GF of the Central Factory. Beautiful Vagul is a level 60 unique enemy that is accompanied by 2 level 56 M57/BEASTs. There are other enemies that you can also pull as well in the Storage Depot. After defeating the unique enemy, the quest will complete.
New Weapon for Fiora (timed)
Obtained: Speak with the Junks Staff on Junks when the Junks ship lands at Central Factory
Objective: Use the Weapon Creation Machine in the Control Tower of the Central Factory
You will be able to reach this area after the story cutscene with Shulk deep in thought and Fiora tells him that he can tell her or the others anything. When you’re ready, head towards the Maintenance Wing on the ground floor. Interact with the machine in the middle of the room to complete the quest.
Below are the side quests that can be obtained in the Mechonis Field!
Best Boots
Obtained: Speak with Bozatrox at Machina Refuge after completing the To My Loved One… side quest
Objective: Collect 2 Reinforced Jets and 2 Reinforced Plungers
The Reinforced Jets are dropped from Mechon carrying swords and shields on Mechonis Field. The Reinforced Plungers are dropped from large bipedal Mechon in Mechonis Field. After collecting the items, return to Bozatrox to complete the quest.
Monster Quest (timed)
Obtained: Speak with the Garrisoned Troop at Machina Refuge
Objective:Defeat 3 M66/TRICK Mechon in Mechonis Field
The M66/TRICK Mechon can be found near the 1F Main Power Switch landmark. Defeat them to complete the quest.
Challenge Quest 1 (timed)
Obtained: Speak with the Garrisoned Troop at Machina Refuge
Objective:Defeat Revolutionary Bifrons near Power Supply Area 1 in Mechonis Field
Revolutionary Bifrons is a level 60 unique enemy, which is east of the Upper Bulkhead Bridge landmark. Defeat it to complete the quest.
Challenge Quest 2 (timed)
Obtained: Speak with the Garrisoned Troop at Machina Refuge
Objective:Defeat Infernal Crocell near Power Supply Area 2 in Mechonis Field
The Infernal Crocell is a level 58 unique enemy that is located on the 4th Floor, which is west of the Upper Bulkhead Bridge landmark. Defeat it to complete the quest.
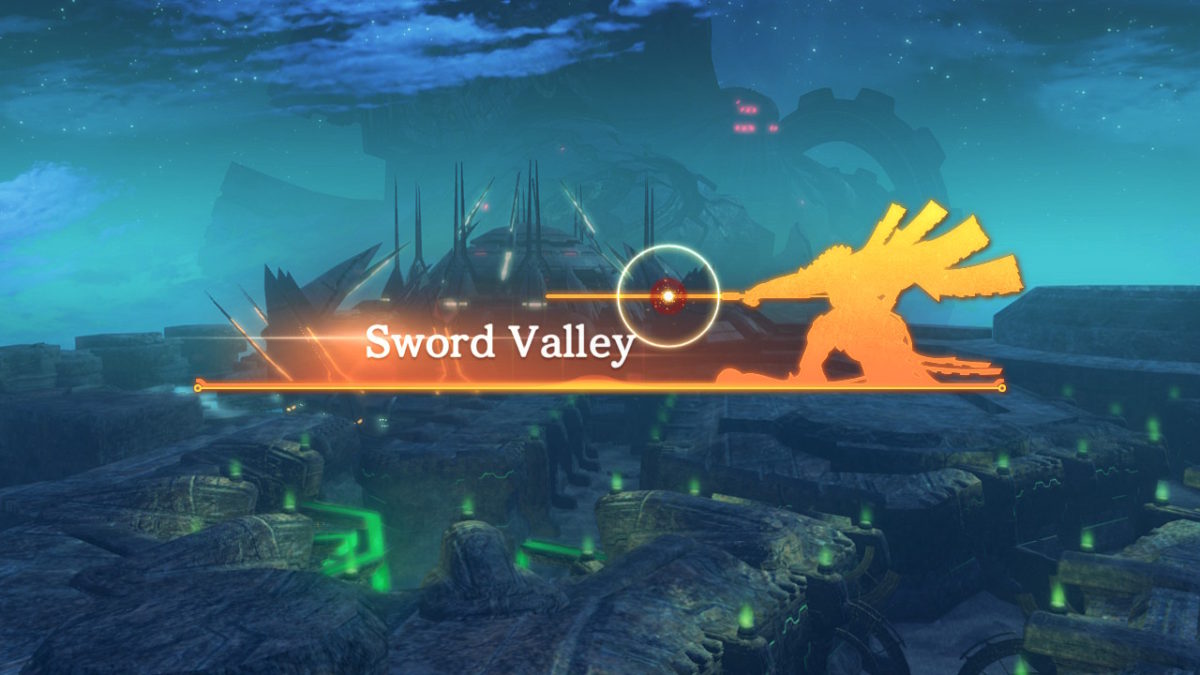
Below are the side quests that can be obtained in Sword Valley!
Secure Dolgan Outpost (timed)
Obtained: Surprise Quest
Objective: Defeat Prudent Purson at Dolgan Outpost
This quest will pop up when you approach the Dolgan Outpost landmark. Prudent Purson is a level 49 unique enemy accompanied by 2 level 45 M63X Android Units. Defeat them all to complete the quest.
Secure Enalda Control Base (timed)
Obtained: Surprise Quest
Objective: Defeat Tranquil Morax at the Enalda Control Base
This quest will pop up when you approach the Enalda Control Base landmark. Tranquil Morax is a level 50 unique enemy accompanied by 2 level 46 M63X Android Units. Defeat them all to complete the quest.
Secure the Radio Tower (timed)
Obtained: Surprise Quest
Objective: Defeat Lightning Ronove who is in the area around the Radio Tower
This quest will pop up when you approach the Radio Tower landmark (southwestern side of area). Lightning Ronove is a level 55 unique enemy accompanied by a horde of level 47 M54 Attack Units and 2 level 48 M63 Destruction Units. Defeat them all to complete the quest.
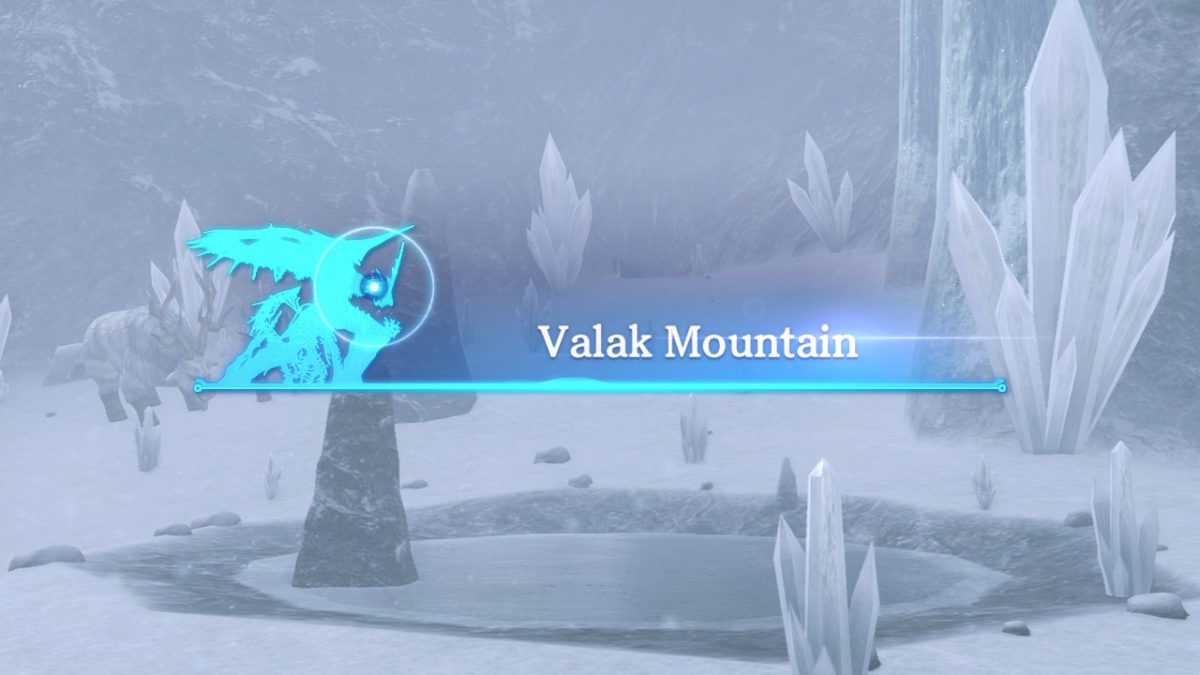
Below are the side quests that can be obtained in Valak Mountain!
Bad Timing
Obtained: Speak with the Nopon Researcher in Great Glacier after unlocking ice melting
Objective: Defeat 4 Cunning Chilkins on Valak Mountain
After accepting the quest, the Cunning Chilkins will appear directly behind you at the entrance to the tunnel where you melted the ice. Defeat them then speak with the Nopon Researcher again to complete the quest.
Chilkins and Antols
Obtained: Speak with the Nopon Researcher at Nopon Camp
Objective: Defeat 5 Poleaxe Chilkins and 5 Ent Antols on Valak Mountain
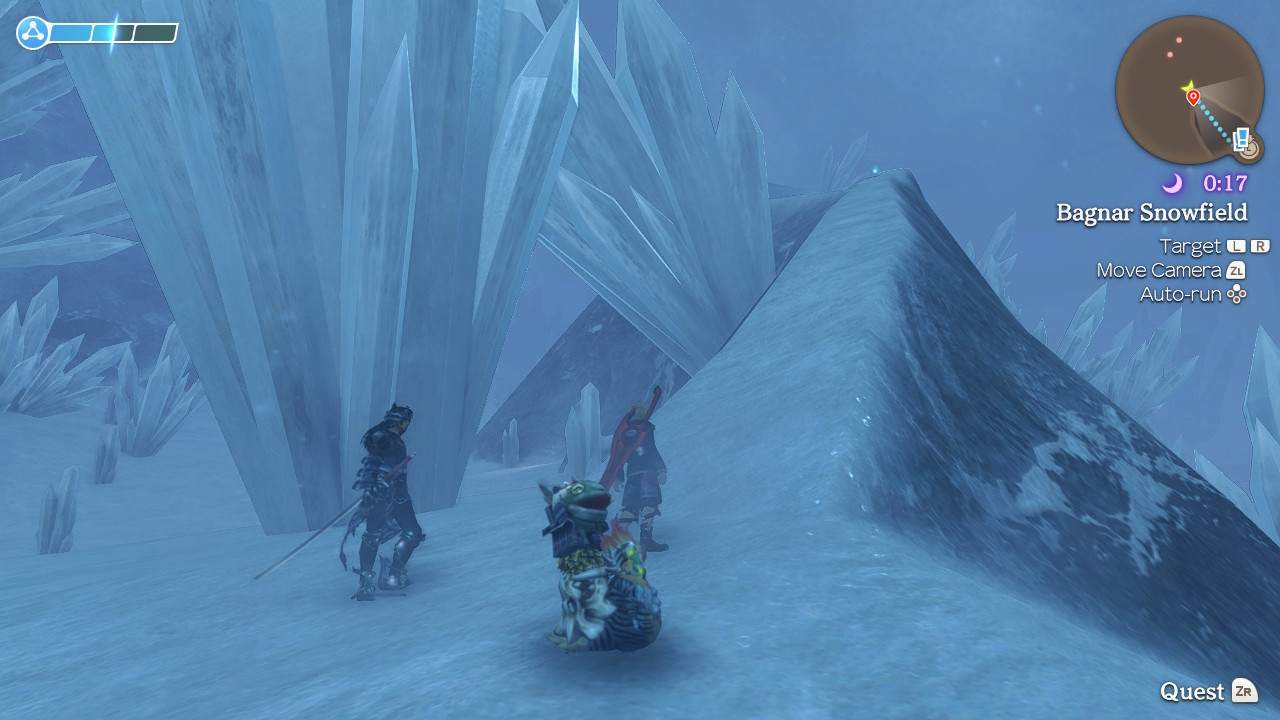
Poleaxe Chilkins and Ent Antols can easily be found wandering around Valak Mountain. The Ent Antols can be readily found in Antol Den, which is directly above the Nopon Camp. To reach the Antol Den, you will need to travel to the Bagnar Snowfield landmark then enter the tunnel straight ahead. While sliding, jump across the first gap into the tunnel. You’ll then curve around and need to jump to the area above the next tunnel. Once you defeat the enemies, return to the Nopon Researcher to complete the quest.
Chilkin Changes
Obtained: Speak with Dakuku at Nopon Camp
Objective: Investigate the Chilkin Lair in Bagnar Snowfield on Valak Mountain
Travel to Chilkin Lair on the western side of the map and investigate the spot where indicated. After you inspect the ground, a group of level 39 Ent Antols will appear. Defeat them then return to Dakuku to complete the quest.
Monster Quest 1
Obtained: Speak with the Nopon Merchant in Zokhed Pass
Objective: Defeat 2 Monta Moramoras on Valak Mountain
Monta Moramoras can be found all over Valak Mountain. There are a lot near the Mechonis Wound landmark. Defeat them to complete the quest.
Monster Quest 2
Obtained: Speak with the Nopon Merchant in Zokhed Pass
Objective: Defeat 5 Sparas Paguls on Valak Mountain
The Sparas Paguls can be found at Nagul Waterfall. Defeat them to complete the quest.
Monster Quest 3
Obtained: Speak with the Nopon Merchant in Zokhed Pass
Objective: Defeat 3 Bow Chilkins on Valak Mountain
The Bow Chilkins are located in Bagnar Snowfield. Defeat them to complete the quest.
Monster Quest 4
Obtained: Speak with the Nopon Merchant in Zokhed Pass
Objective: Defeat 1 Sesna Lexoson Valak Mountain
The Sesna Lexos can be found near the Mechonis Wound. Defeat them to complete the quest.
The Balance of Power
Obtained: Speak with Dakuku at Nopon Camp after completing the Chilkin Changes side quest
Objective: Defeat Barbaric Sitri in Antol Den and Banquet Vassago in Valak Mountain
In order to get this quest, you must speak with Dakuku with Dunban as the party leader. Barbaric Sitri is a level 47 unique enemy that can be found in Antol Den, which is directly above the Nopon Camp. To reach it, you will need to travel to the Bagnar Snowfield landmark then enter the tunnel straight ahead. While sliding, jump across the first gap into the tunnel. You’ll then curve around and need to jump to the area above the next tunnel. This area will be Antol Den. The Banquet Vassago is also located in the Antol Den in one of the Bonterra Pods. Attack the large pod and the level 48 unique enemy will pop out. Once both enemies are defeated, return to Dakuku with him with Dunban as the party leader.
The Final Giants’ Ruins
Obtained: Speak with Zain between 6:00 – 6:00 in the Sealed Tower
Objective: Collect 3 Giants’ Treasures from all around the world
Complete The Giants’ Treasures side quest.
The Giants’ Treasures
Obtained: Speak with Zain between 6:00 – 6:00 in the Sealed Tower
Objective: Collect the Truth of the Giants, Daring of the Giants and Heart of the Giants
The Truth of the Giants is located in Tephra Cave in the Trader’s Stopover south of the Heavenly Window landmark on 2F. The Daring of the Giants is located in Satorl Marsh. The Heart of the Giants is located in King Agni’s Tomb in Makna Forest.
The Freezing Nopon
Obtained: Speak with the Nopon Researcher
Objective: Collect 3 Hox Flints, 2 Antol Fire Pouchesand 1 Feris Aged Ale
To reach this Nopon, you will need to have found Valak Peak in the very north of the map. To reach Valak Peak, you will need to use the ice slide on Agul Mountain Range, which is in the eastern part of the map. The Hox Flints are dropped from Porcu Hoxes, which are located near the Lava Cave landmark. The Antol Fire Pouces are dropped from Ent Antols on Valak Mountain. The Feris Aged Ale is dropped from a Noto Feris on Valak Mountain. Once you gather all the items, return to the Nopon Researcher to complete the quest.
Valak Mountain Research
Obtained: Speak with the Nopon Researcher at Nopon Camp after completing Chilkins and Antols
Objective: Take in the scenery from Befalgar Pedestal and Kana Peak
Follow the objective to Kana Peak, which is located in the central part of the map. You will need to climb up a super narrow ledge to reach Kana Peak. The entrance to this ledge is marked in the image below!
Befalgar Pedestal is located in the far south eastern part of the lower level of Valak Mountain. Once you take in the scenery, return to the Nopon Researcher.
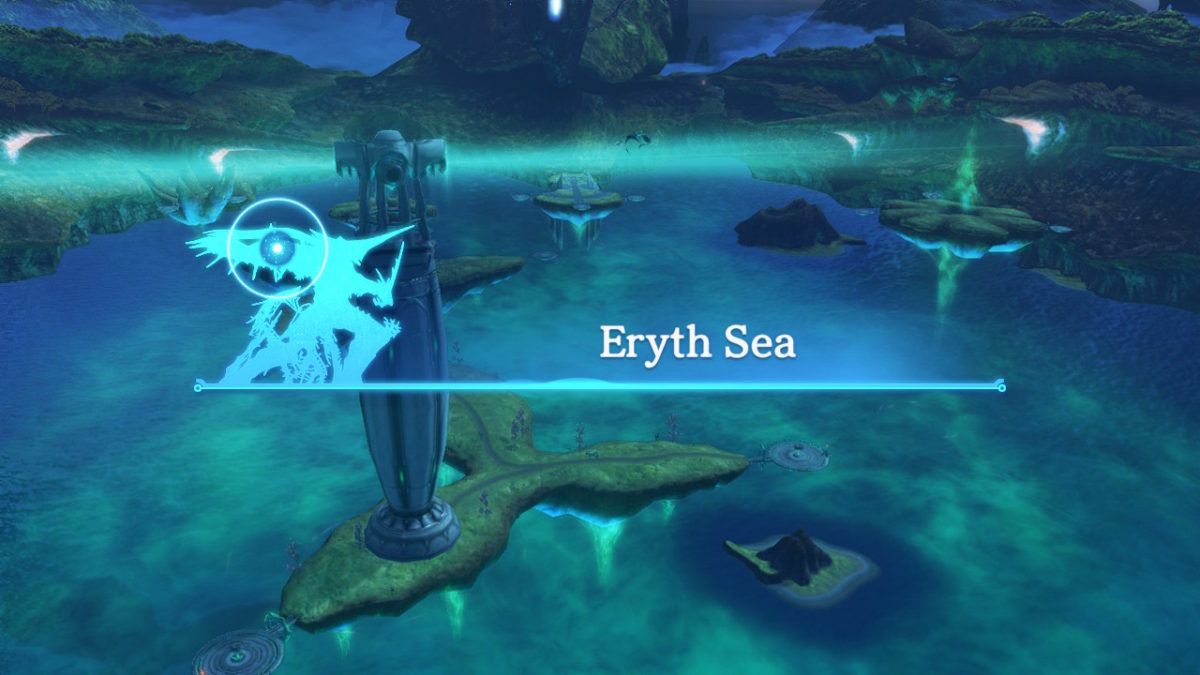
Below are the side quests that can be obtained in Eryth Sea!
Ancient High Entia Mystery
Obtained: Speak with Talia between 18:00 – 6:00 at the Ether Plant
Objective: Investigate the War God statue at La Luz Church in Valak Mountain
You will be able to enter La Luz Church after completing the side quest called The Imperial Ceremony. Head inside the church then interact with the statue. Afterwards book it back to Talia because a level 97 enemy will spawn after you interact with the statue. Once you speak with Talia as Melia, the quest will complete.
Collection Quest 1
Obtained: Speak to an Alcamoth Citizen on the second level of Syrath Lighthouse
Objective: Collect 3 Hiln Coin Purses and 5 Doomsday Poppies from Eryth Sea
Hiln Coin Purses are dropped from Eryth Hiln, which can be found on Hovering Reef 1 near Latael Shore and Anu Shore (eastern Eryth Sea). The Doomsday Poppies can be found on the ground near Latael Shore.
Collection Quest 2
Obtained: Speak to an Alcamoth Citizen on the second level of Syrath Lighthouse
Objective: Collect 3 Andos Antennae, 3 Old Dragon Spines and 3 spears of Pink Asparagus
The Andos Antennae are dropped from Azul Andos in the High Entia Tomb. The Old Dragon Spines are dropped from Racti Lexos, which are located on Hovering Reef 5 and Hovering Reef 8. To reach the one on Hovering Reef 5, you will need to drop down the hole on the floating part of Hovering Reef 5 to reach the pond below. The Pink Asparagus can be found on the ground on Hovering Reef 3 & 4.
Hode Attack
Obtained: Speak with Jarack at the Ether Plant after completing the Trouble at the Plant side quest
Objective: Defeat 2 Confusion Ekidnos at Eryth Sea
The Confusion Ekidno are located at Ether Plant. Defeat them then return to Jarack and speak with him to complete the quest.
Mend the Plant
Obtained: Speak with Jarack at the Ether Plant
Objective: Collect 3 pieces of Luxury Hode Wood from Hodes at Eryth Sea
The Luxury Hode Woods are dropped from Possessio Hode on Hode Refuge. Once you collect the items, return to Jarack and speak with him. Afterwards, use the Turbine Access Panel in the Ether Plant to fix the plant then return to Jarack.
Monster Quest 1
Obtained: Speak to the Lighthouse Keeper at Syrath Lighthouse
Objective: Defeat 5 Palti Kromars at Eryth Sea
The Palti Kromars can be found on Hovering Reefs 6 and 7.
Monster Quest 2
Obtained: Speak to the Lighthouse Keeper at Syrath Lighthouse
Objective: Defeat 5 Maleza Kromars at Eryth Sea
The Maleza Kromars can be found on Hovering Reef 7.
Monster Quest 3
Obtained: Speak to the Lighthouse Keeper at Syrath Lighthouse
Objective: Defeat Flabbergasted Jerome in the area of Hovering Reef 5 at Eryth Sea
The Flabbergasted Jerome is a level 38 unique enemy that can be found on Hovering Reef 5 in the water underneath the hovering island. You will need to drop down the hole on the floating part of Hovering Reef 5 to reach the pond below.
Punish the Hodes
Obtained: Speak with Jarack at the Ether Plant
Objective: Defeat Funeral Gozra at the Hode Refuge in Eryth Sea
Funeral Gozra is a level 42 unique enemy that can be found in Hode Refuge. After defeating him, return to Jarack and speak with him.
The Missing Boy
Obtained: Speak with Miriall between 18:00 – 6:00 at the Ether Plant
Objective: Talk to Teelan
Teelan can be found in Alcamoth in the southeastern part of Melfica Road. Speak with him then return to Miriall to complete the quest.
Trouble at the Lighthouse
Obtained: Speak with Shalen on Hovering Reef 4
Objective: Defeat 3 Decay Ekidnos near Syrath Lighthouse at Eryth Sea (only at night)
In order to receive this quest, Melia will need to be the party leader when you speak with Shalen. Shalen will then want you to defeat 3 Decay Ekidnos. Switch the game to night then defeat the 3 Decay Ekidnos around Shalen. Afterwards, speak to Shalen to complete the quest.
Trouble at the Plant
Obtained: Speak with Jarack at the Ether Plant
Objective: Teach the head of the Hodes a lesson and use the Turbine Access Panel in the Ether Plant at Eryth Sea to fix the plant
Complete the Punish the Hodes and Mend the Plant side quests then speak with Jarack to complete this quest.
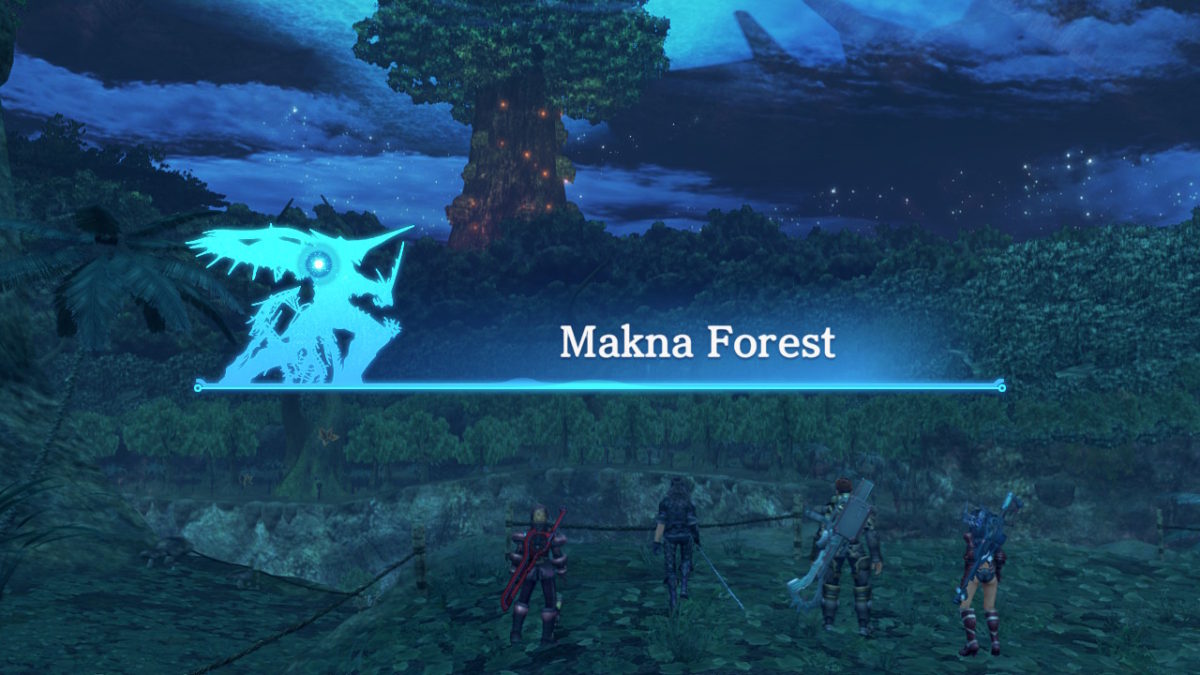
Below are the side quests that can be obtained in Makna Forest!
Bridge Repair
Obtained: Speak with the Nopon Researcher at the Pod Landing Site (after you progress far enough in story)
Objective: Collect 5 Hode Planks and 3 Rhogul Axe Crests
The Hode Planks are dropped from Hyle Hodes in Makna Forest. The Rhogul Axe Crests are dropped from Mist Rhoguls in Satorl Marsh. After you collect all the items, return to the Nopon Researcher to complete the quest.
Challenge
Obtained: Speak with a Nopon Merchant near the Agni Tablet
Objective: Defeat Shimmering Forte near the Eks Watering Hole in Makna Forest (on a hot day)
The Shimmering Forte is a level 33 unique enemy that can be found between the Eks Watering Hole and the Twisted Tree Gate landmark on a hot day.
Challenge of the Sage
Obtained: Speak with a Nopon Sage from 12:00 – 15:00 between Waypoint Beacon and Divine Sanctuary after completing the Legend of the Sage side quest
Objective: Go to the Seahorse Islet in Makna Forest and collect the Proof of Courage
Travel to Seahorse Islet (very northern part of the river) then jump in the water to retrieve the item. Return to the Nopon Sage to hand over the item.
Final Challenge of the Sage
Obtained: Speak with a Nopon Sage from 12:00 – 15:00 between Waypoint Beacon and Divine Sanctuary
Objective: Go to Great Makna Falls in Makna Forest and defeat Unreliable Rezno (only during day)
Unreliable Rezno can be found during the day in the middle of the Great Makna Falls. It is a level 96 unique enemy.
Legend of the Sage
Obtained: Speak with a Nopon Sage from 12:00 – 15:00 between Waypoint Beacon and Divine Sanctuary
Objective: Talk to Pipiki in Frontier Village
Speak with Pipiki in Central Plaza of Frontier Village then return to the Nopon Sage. You will then need to speak to Pachipa who is on the Archaeology Centre and then return once again to the Nopon Sage.
Monster Quest 1
Obtained: Speak with the Nopon Merchant
Objective: Defeat 5 Jungle Quadwings in Makna Forest
The Jungle Quadwings are located west of the Agni Tablet.
Monster Quest 2
Obtained: Speak with the Nopon Merchant
Objective: Defeat 2 Makna Feris in Makna Forest
The Makna Feris is located past Bridge One near Waypoint Beacon.
Monster Quest 3
Obtained: Speak with the Nopon Merchant
Objective: Defeat 2 Makna Ansels in Makna Forest
The Makna Ansels are located along the path north of the Waypoint Beacon.
Monster Quest 4
Obtained: Speak with the Nopon Merchant
Objective: Defeat 3 Makna Eks in Makna Forest
The Makna Eks are located in the Eks Watering Hole in the central northern part of the map.
Search
This site uses cookies. By continuing to use this website, you are giving consent to cookies being used. For more information on cookies, view our Privacy Policy.OkPrivacy Policy