Leon – “Crude Drawing of an Angel Statue” (Character Collectible)
Obtained automatically at the end of the objective Track Leon
Chase Down Leon
Chase Leon down the road until a cutscene triggers.
Track Leon
Follow the path under the fallen tree and squeeze between the rocks to come to a clearing. Use your survival vision to find a point of interest near the clearing’s center. Take the right path and keep moving forward until another cutscene triggers. After the cutscene, walk across the bridge and jump over the blood covered fence, then head down a little ways to trigger yet another cutscene.
Return To Bikes
Head back up the path and jump over the fence, backtracking to the camp.
Find Material To Craft Bandage
Sterilizer – Located to the right of the road closed sign
Rag – Located passed the sterilizer between the green tent and the campfire
Craft Bandage
Craft the bandage using the Survival Wheel.
Use Bandage
Use the bandage via the Survival Wheel.
Return To Bikes
Follow Boozer back up the path to reach the bikes.
Bastard Son – Automatically acquired on 5/29 as part of the story
Fish
Bareahard Central Plaza
Anor Carp
Swordtail
North Kreuzen Highway
Rockeater
Kasagin
Master Quartz
Davos’ Factory
Scepter
Can buy for 2,000 mira
Wing
Can buy for 4,000 mira
Monsters and Treasure Chests
North Kreuzen Highway
Monsters
Egg Snake
Man Trap
Green Raccoon
Treasure Chests
150 of each Sepith
Reviving Balm
Recuria
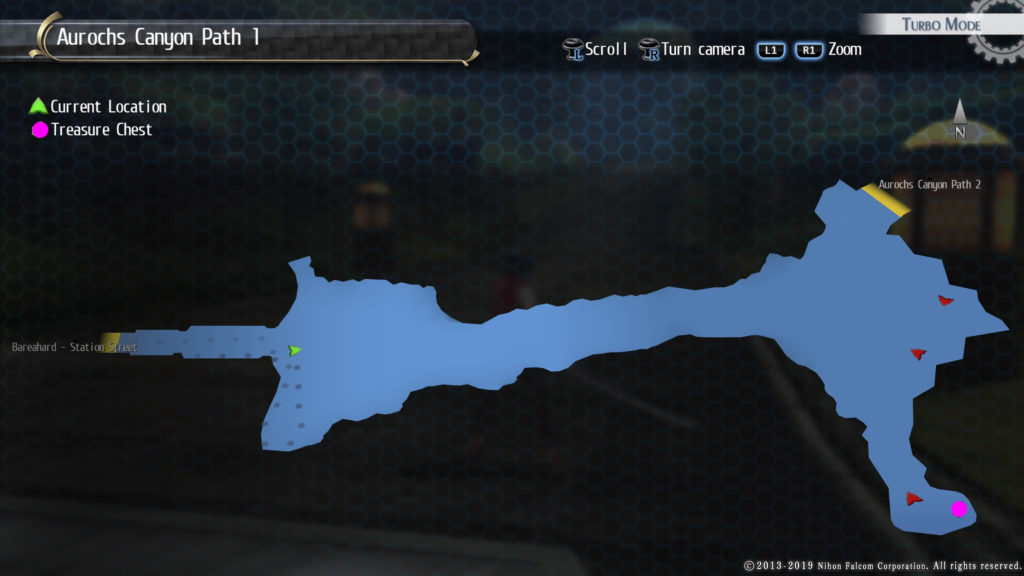
Aurochs Canyon Path 1
Monsters
Stealth Turtle
Anteater
Treasure Chests
Curia Balm
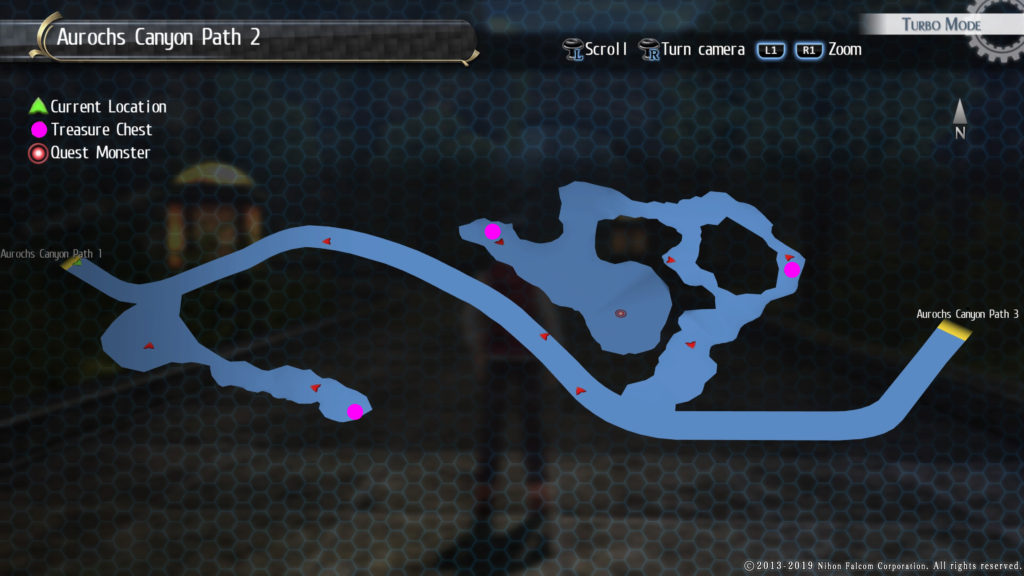
Aurochs Canyon Path 2
Monsters
War Mantis
Zwordar
Stealth Turtle
Anteater
Attack Dog
Hornteater
Treasure Chests
150 of each Sepith
Breeze (Monster Chest)
Blind
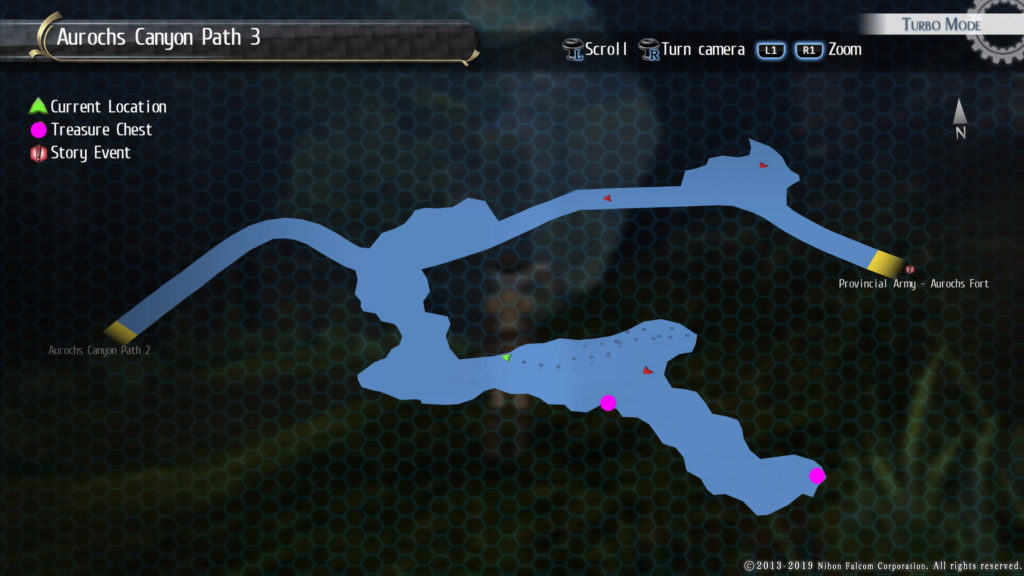
Aurochs Canyon Path 3
Monsters
War Mantis
Attack Dog
Zwordar
Stealth Turtle
Treasure Chests
Groundbait
Mind 2
Recipes
Savory Herb Tea
Talk to Lorna at Bareahard Residence 2 in the Noble District of Bareahard
Quests
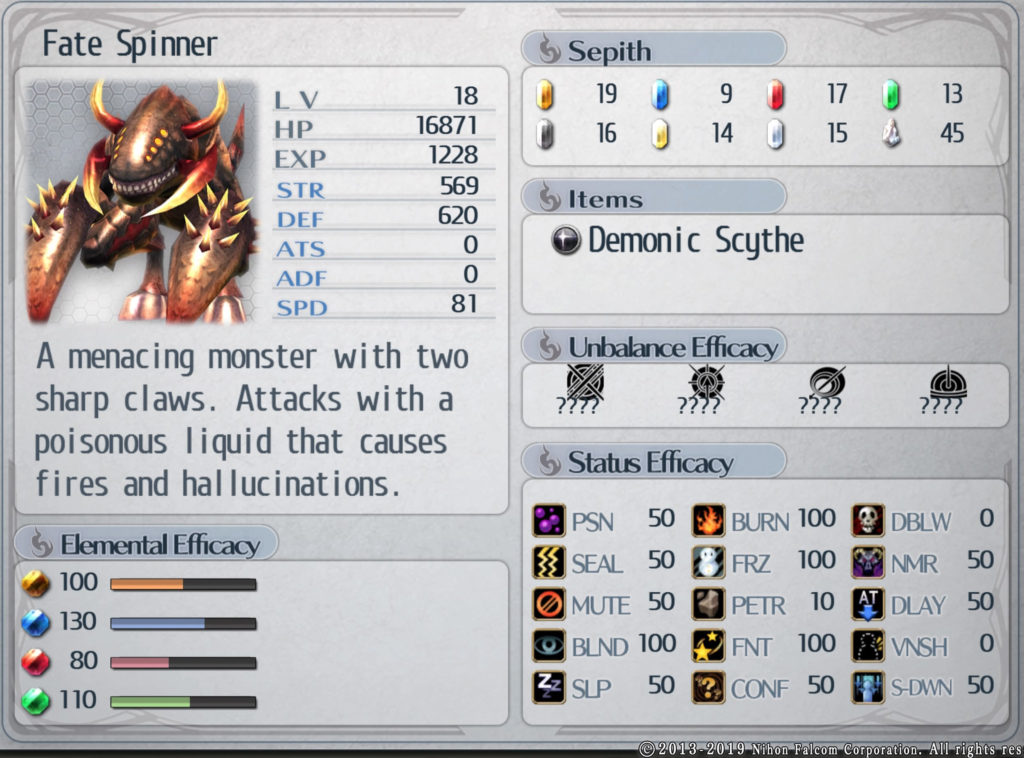
Aurochs Canyon Monster
Objective: Defeat the Fate Spinner along the Aurochs Canyon Path
Head to the quest marker in the center of Aurochs Canyon Path 2
Defeat the Fate Spinner
Report to the soldiers at Aurochs Fort
Reward: Spark Arrow
*Hard Mode Stats
Fate Spinner Attacks
Wondrous Vomit
AOE attack that can confuse anyone hit by it
Pincer Attack
Attacks the target using its pincers
Pounce
Jumps up in the air and lands on the target
Weakness
Weak to water and wind arts
S-Craft with Fie then swapped in Emma to heal
Breath on Jusis and Rean
Have to use Machias and Jusis in party
I started this fight off with Rean, Fie, Machias and Jusis as the game forces you to use Machias and Jusis. The first move I made was using Fie’s S-Craft to deal some massive damage to the Fate Spinner, then I swapped her out for Emma. My strategy for this fight was to use Rean to tank the boss while Jusis and Machias provided support leaving Emma to focus on healing and casting arts as needed. The two main attacks you need to look out for are Wondrous Vomit and Pounce. Make sure to use water and earth arts as the Fate Spinner is weak to both. I also put Breath on both Rean and Jusis for extra AOE healing if needed.
Put a Ring on It
Objective: Find a semi-precious stone for Bruc
Talk to Bruc in Turner’s Jewelers on Artisans’ Street
Head to the North Kreuzen Highway via Station Street
Follow the quest marker to the middle to the map and inspect the tree
Return to Bruc
Reward: Luck
Addicted to Bath Salts
Objective: Procure more bath salts for the Voltaire Family
Talk to Hasan next to Sorciere Restaurant
Make your way to Aurochs Canyon Path 3 and head for the quest objective on the south side of the map
Note: You will have to defeat the Fate Spinner to gain access to Path 3
Tech Institute – Talk to him before going into the Old Schoolhouse
Angelica
Biking Trips – Talk to her in the Student Council Room after completing the Old Schoolhouse
Instructor Sara
Odd Friendship – Talk to her in Micht’s Pawn Shop after investigating the Old Schoolhouse
Fish
Trista River
Kasagin
Swordtail
Trista Pond
Crayfish
Swordtail
Gray Crab
Master Quarz
Scepter
Buy from George in the Engineering Building for 2000 mira
Wing
Buy from George in the Engineering Building for 4000 mira
Monsters and Treasure Chests
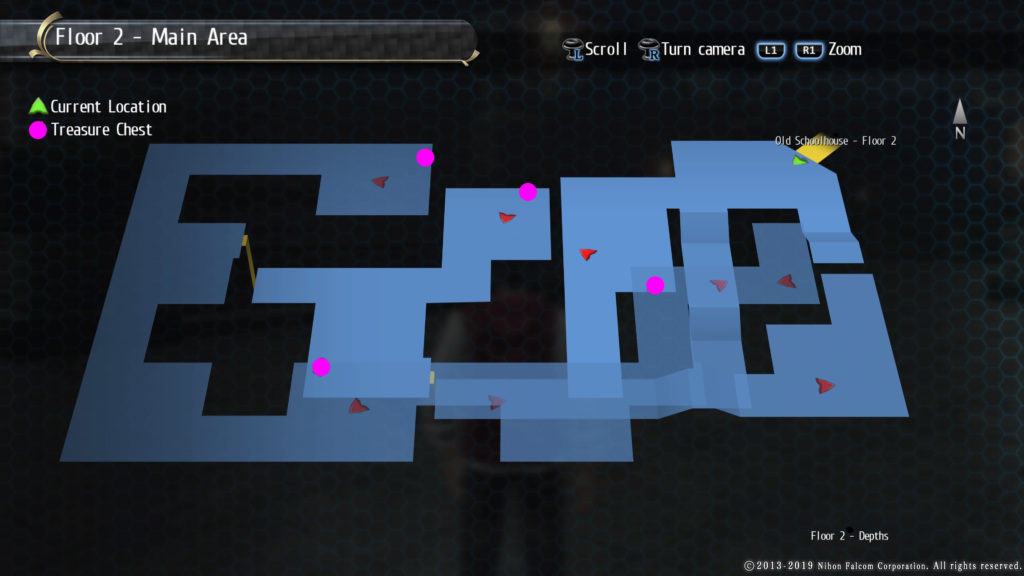
Old Schoolhouse Floor 2 – Main Area
Monsters
Pom
Lantern Spider
Claydoll
Stone Stalker
Treasure Chests
150 of each Sepith
Floral Bottle
Reaper (Monster Chest)
EP Charge II
Recipes
Tomato Sandwich
Buy Manly Munchies – Sandwiches from Keynes’ Bookstore for 500 mira
Quests
Old School House Mystery II
Objective: Continue the investigation of the Old Schoolhouse
Investigate the Old Schoolhouse and defeat the boss
Reward: Heal
* Hard Mode Stats
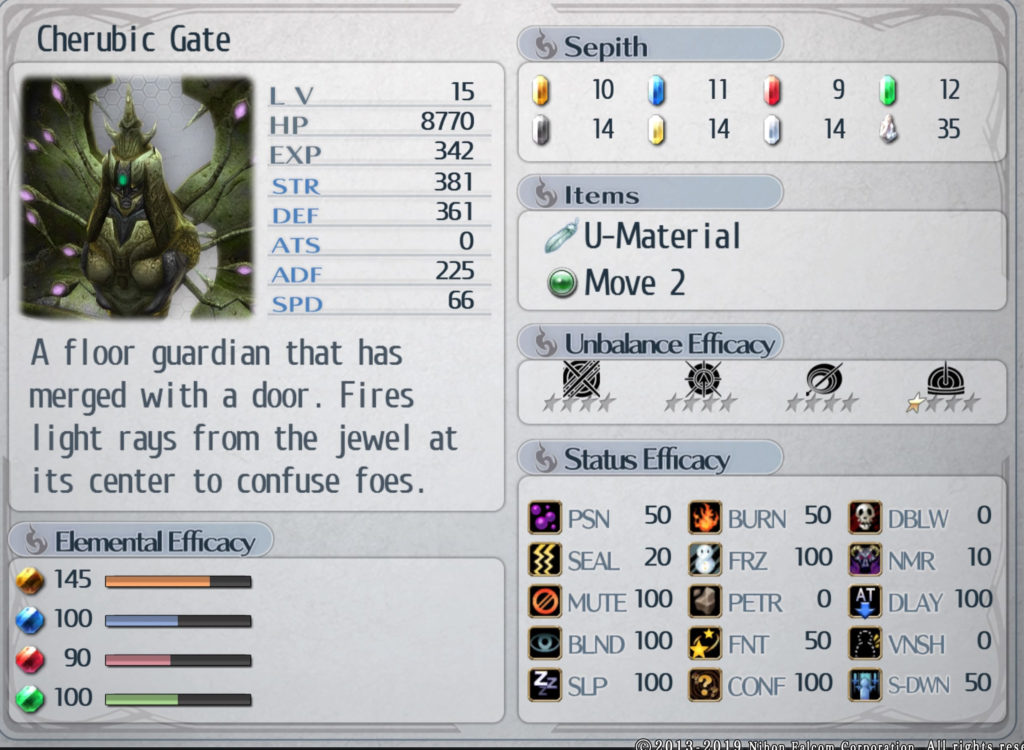
Cherubic Gate Attacks
Light Beam
Damages the targeted party member and anyone near them
Crysis Cry
Deals damage to everyone and can decrease speed
The best way I found to handle this fight was by dealing with one of the three Cherubic Gates at a time while healing through the attacks for all three. My party consisted of Rean, Larua, Gaius and Elliot. Laura, Rean and Gaius focused on the monster while Elliot healed nearby. Try to keep up Elliot’s Resounding Beat to help with the healing, and I had Breath on Elliot for AOE healing as well. One of the issues I ran into was the enemies started targeting Elliot, so I also had Tear on Gaius to assist with healing. The Cherubic Gate has two main attacks to watch for with the first being a Light Beam that targets a party member and deals splash damage. The second is called Crysis Cry, and it damages all party members in combat while decreasing speed and the possibility to inflict Confuse. Try to get the enemy’s health down to around 5,000 then use Rean and Laura’s S-Crafts to finish it off. Once defeated, move onto the next one. You can also use earth-based arts to deal extra damage to the Cherubic Gates. Take your time and use items if needed to pull off the win here.
Substitute Tutor
Objective: Tutor a kid for Klein
Head to the lower class dorms and talk to Klein
Head to Emile’s house (the house in front of the lower class dorms) and talk to Melissa
Questions:
When did the Orbal Revolution take place?
Roughly 30 years ago
Roughly 50 years ago ( Answer)
Roughly 70 years ago
Who invented orbments?
Professor C. Epstein (Answer)
Professor A. Russell
Professor G. Schmidt
What was the Reinford Factory’s specialty?
Goods, like clocks and cameras
Vehicles, like carriages and boats
Weapons, like guns and artillery (Answer)
Completes after answering the questions
Reward: 2000 mira
Book Delivery
Objective: Deliver books for Keynes
Head to Keynes’ Bookstore and talk to Keynes
Deliver the book Behind the War of the Lions to Instructor Thomas in the Academy Library
Deliver the book Modern Art: The Complete Works to Instructor Mary in the Music Room in Thors Academy Main Building 2F
Deliver the book Topical Science to Instructor Makarov on the Thors Academy Main Building Rooftop
Deliver the book Analyzing Microeconomics to Vice Principal Heinrich in the teacher’s office in Thors Academy Main Building 1F
Deliver the book The Empire’s Hottest Spots to Instructor Sara in the Class VII Dormitory in her room
Return to Keynes
Reward: Groundbait x 3
A Rose By Any Other Name
Obtained: Talk to Linde in the Art Room of Thors Academy Main Building 2F after completing Old Schoolhouse Mystery II
Objective: Pick up some flowers from Jane’s flower shop
Obtained from Robin in the West Highway Farmhouse on West Celdic Highway 2
Fish
East Celdic Highway 1 (Behind the most southern windmill in the river)
Kasagin
Swordtail
Carp (NG+/Nightmare, Beginner Rod)
Anor Carp (NG+/Nightmare, Beginner Rod)
West Celdic Highway 2 (near the entrance to the Lunaria Nature Park
Crayfish
Swordtail
Gluttonous Bass (NG+/Nightmare, Beginner Rod)
Monsters & Treasure Chests
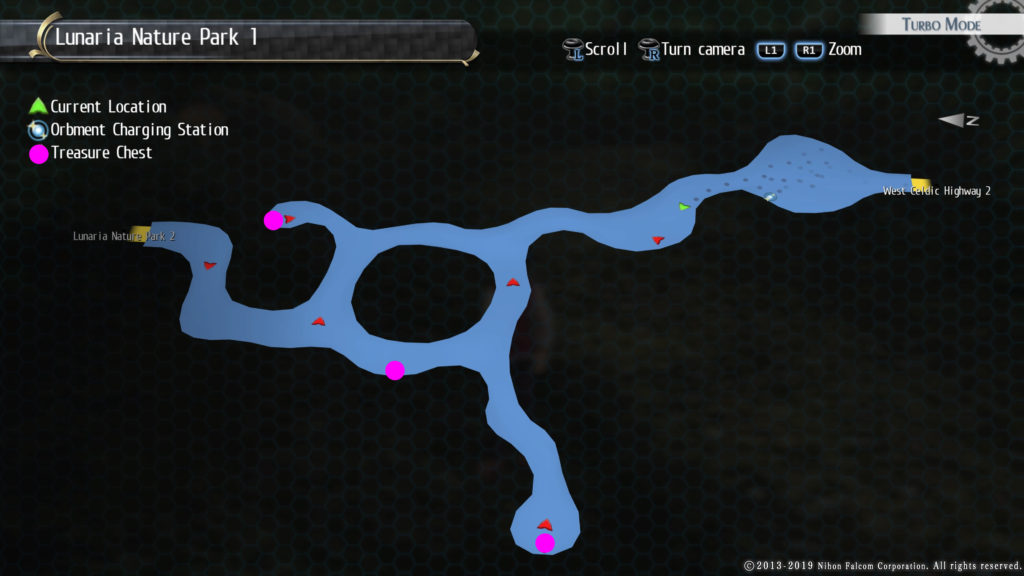
Lunaria Nature Park 1
Monsters
Jelly Shroom
Blade Horn
Gordi Chief
Treasure Chests
100 of each Sepith
Curia Balm
Citrus Bottle
Lunaria Nature Park 2
Monsters
Jelly Shroom
Blade Pincher
Sasa Panda
Gordi Chief
Treasure Chests
Teara Balm
Air Strike
Celestial Balm
Coral Ring
Lunaria Nature Park 3
Monsters
Sasa Panda
Blade Horn
Blade Pincher
Gordi Chief
Jelly Shroom
Treasure Chests
Heat Wave (Monster Chest)
Teara Balm
Golden Sphere
Quests
West Celdic Highway Monster
Objective: Defeat the monster on West Celdic Highway
Talk to Otto in the Marker Manager’s House
Head to West Celdic Highway 1
The monster is on the west side of the area near a bridge
Defeat the monster
Return to the Market Manager to complete the quest
Reward: U-Material x 5, Breath
*Hard Mode Stats
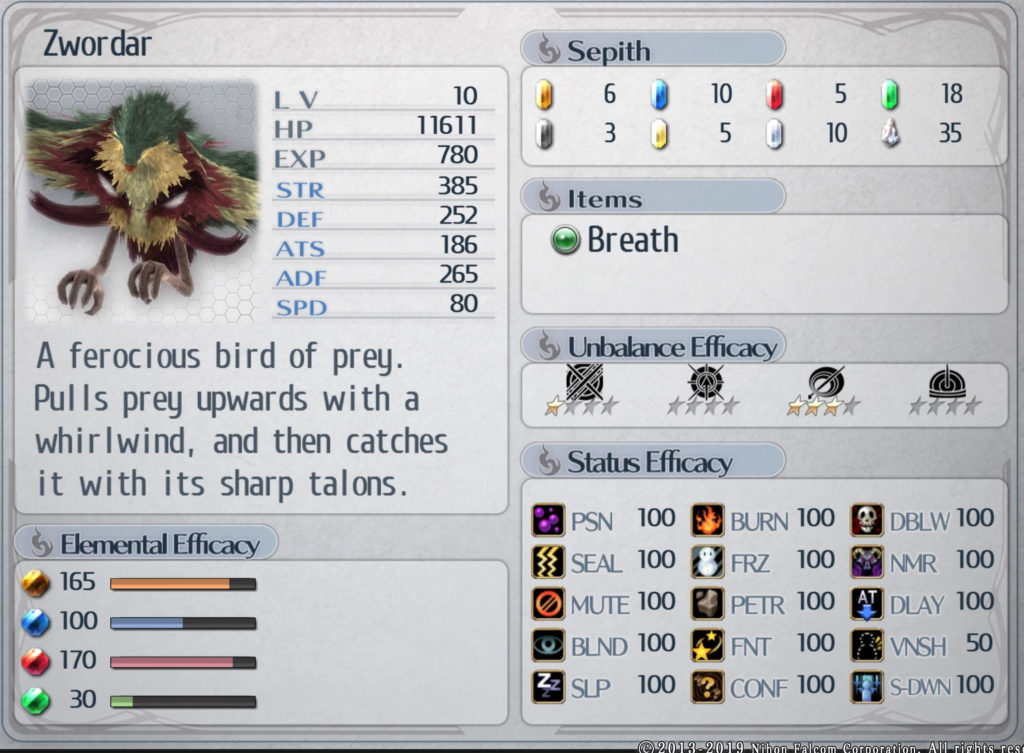
Zwordar Attacks
Slash Attack
Targets 1 party member
Aerial
AOE wind attack
Zwordar Tornado
Shoots a tornado that damages all in its path and can inflict blind status
For this fight, I had Laura and Rean attack the Zwordar on both sides while Alisa supported from a distance and Elliot used arts and healed. Start off by using Elliot’s Resounding Beat craft and buff the party as needed. Watch out for the Zwordar Tornado attack that hits all party members in its path and can inflict blind. You can use any fire or earth arts to deal extra damage to the beast as it is weak to both. When the Zwordar’s health drops down to 4,000 or so, hit it with Laura’s S-Craft to finish it off.
Lost Wallet
Objective: Find the owner of the lost wallet
Head to the Grand Market and talk with Merchant Lizzie (first on the right)
Contains a train ticket to Heimdallr
Enter the train station and talk with the Station Employee
Head to the Weathercock Inn and talk to Owner Margot
Head to the Grand Market and talk to Tableau sitting at a table in the back to the left of the musician
Head to the Celdic Church and talk with Annabelle who is standing on the right behind the pews
Reward: Pikkard Plush
Questions / Answers
Which group’s actions don’t seem to make sense here?
The Market Manager and his Wife
The Merchants in the Market
The Provincial Army (Answer – 1 AP)
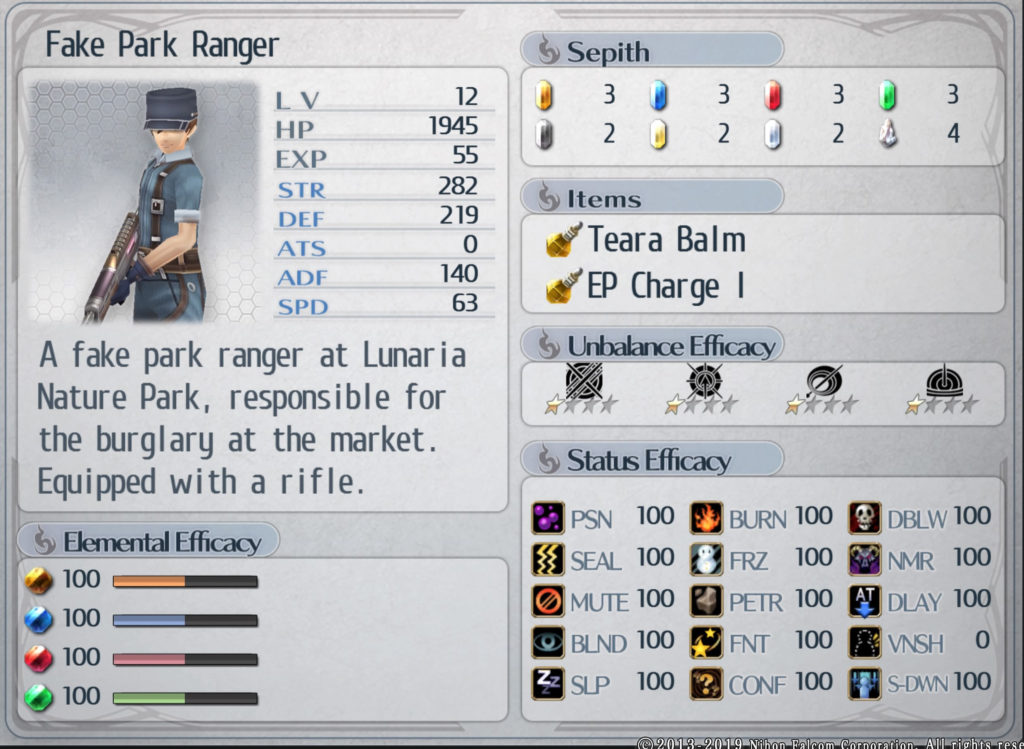
Lunaria Nature Park – Fake Park Ranger Boss Fight
*Hard Mode Stats
Fake Park Ranger Attacks
Gun Shot
Targets a party member and shoots them
Charged Shot
A charged shot that targets a single party member
This fight is pretty straight forward, take down the four Fake Park Rangers one at a time while healing any damage you take with Eillot. Try not to use any S-Crafts as the real boss fight of the chapter takes place after this fight.
Lunaria Nature Park – Grunoja Boss Fight
*Hard Mode Stats
Grunoja Attacks
Roar
Buffs Str and Def
Swipe
A standard attack that targets a character and can damage anyone near them
Deadly Cry
A loud cry that targets all party members with a chance to inflict seal
Fists of Fury
Multiple punch/slam attack that deals massive damage to the target
Make sure you go into this fight with both Rean and Laura at 200 CP, because when it starts you will be fighting Grunoja along with two Gordi Chiefs. Focus on taking out the Gordi Chiefs by weakening them with some fire arts and finishing them off with an S-Craft from Rean and Laura. This will allow you to give your full attention to the boss. Also, make sure to keep up Elliot’s Resounding Beat craft on the party for the health regen and increased defense to make healing a bit easier. Don’t be afraid to use Rean’s Impassion art on himself and Laura to help regenerate CP. I used Laura to keep Grunoja’s attention while Rean dealt additional damage from the side. Alisa and Elliot were at a distance to support as needed. Watch out for Grunoja’s Deadly Cry and Fists of Fury Attacks. Deadly Cry hits everyone and can seal attacks and crafts while Fists of Fury deals massive damage to its target. If you find yourself in a tight spot, Alisa’s Blessed Arrow can heal the rest of the party. Just keep managing the party’s health and you should be just fine.
A sweeping attack that can hit multiple party members and cause the burn status
Tail Spin
Spins in a circle hitting any party members in range with its tail
Ground Slam
Slams its front legs down onto a party member
Soul Blur
An arts attack that targets 1 party member for a good chunk of damage.
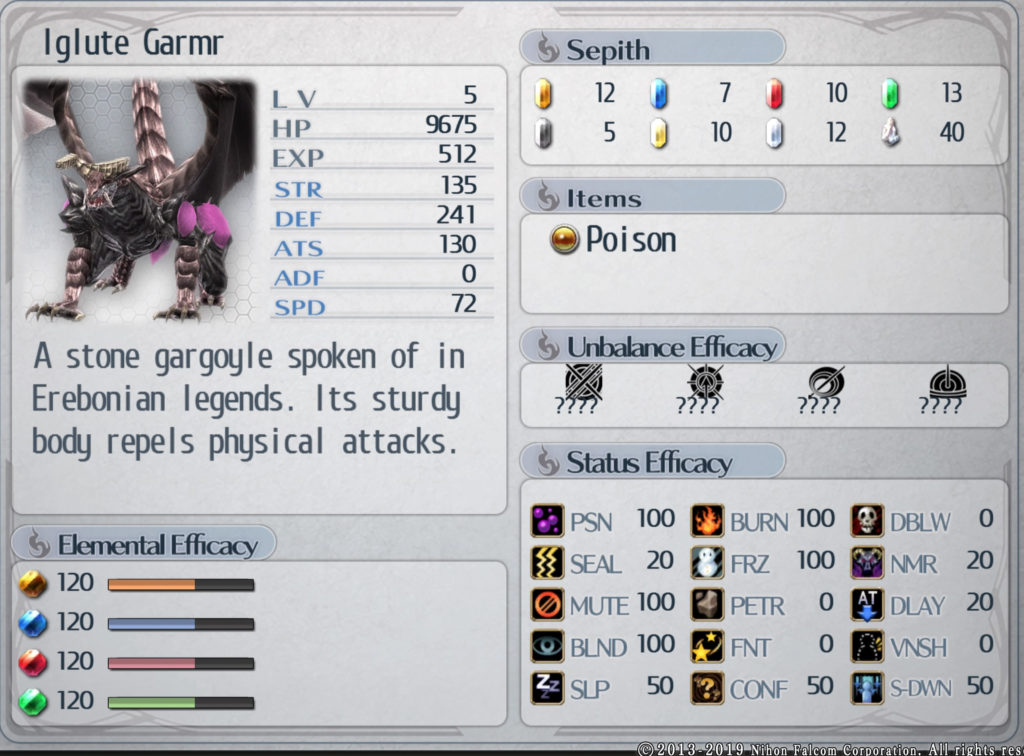
Form 2 Attacks
Aerial
An arts attack the summons a tornado that damages any party members in the area
Squall
It flaps its wings launched a party member back with a gust of wind and damages anyone in the wind’s path
Swipe
A basic swipe attack that targets 1 party member
*Form 2 Hard Mode Stats
For this fight, I used a party of Rean, Elliot, Gaius and Machias. I placed Rean on the left side of the boss, Gaius on the right, Machias just close enough to be in range with his shotgun and let Elliot hang out where he started. The general strategy was to keep the boss occupied with Rean and Gaius while Machias attacked using his arts and ranged attack from a distance and Elliot could heal or deal additional damage with his arts. For Iglute Garmr’s first form, just keep chipping away at his health and keep an eye out for him to start casting. When that happens, use Rean’s Autumn Leaf Cutter craft to interrupt it. When the boss gets down to around 50% health, it will change forms, healing itself for a good chunk of HP. In this form, the boss is more resistant to arts and deals more physical damage. I would recommend using Elliot’s Resounding Beat craft on Rean and Gaius to give them HP regen and increased defense to combat this. With some good planning and patience, this boss should be a piece of cake.
This site uses cookies. By continuing to use this website, you are giving consent to cookies being used. For more information on cookies, view our Privacy Policy.OkPrivacy Policy