Like a Dragon Gaiden Logo
Guides

Like a Dragon Gaiden Calm My Nerves and Find My Car Request

by NightlyGamingBinge in

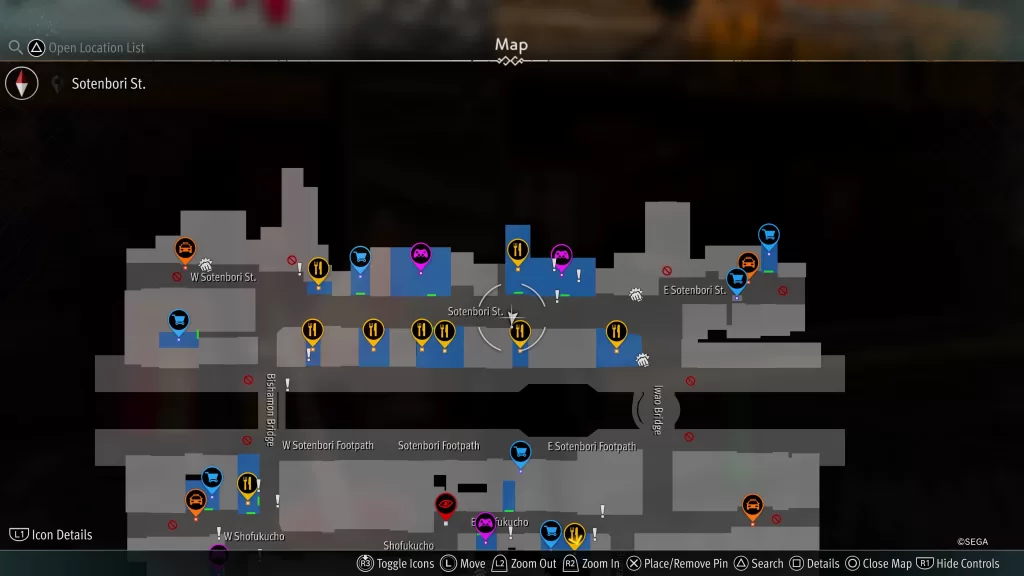
Welcome to our Like a Dragon Gaiden Calm My Nerves and Find my Car Request guide! The Calm My Nerves and Find My Car is an Akame Network Stroll n’ Patrol request that you can obtain by speaking with the man on Sotenbori St. in front of Osaka King.

Calm My Nerves and Find My Car Location

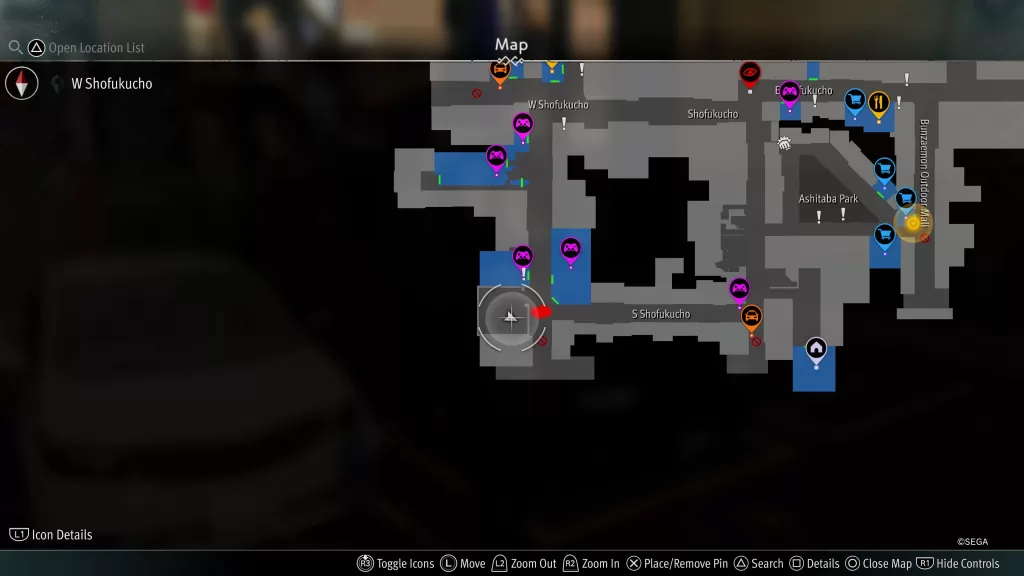
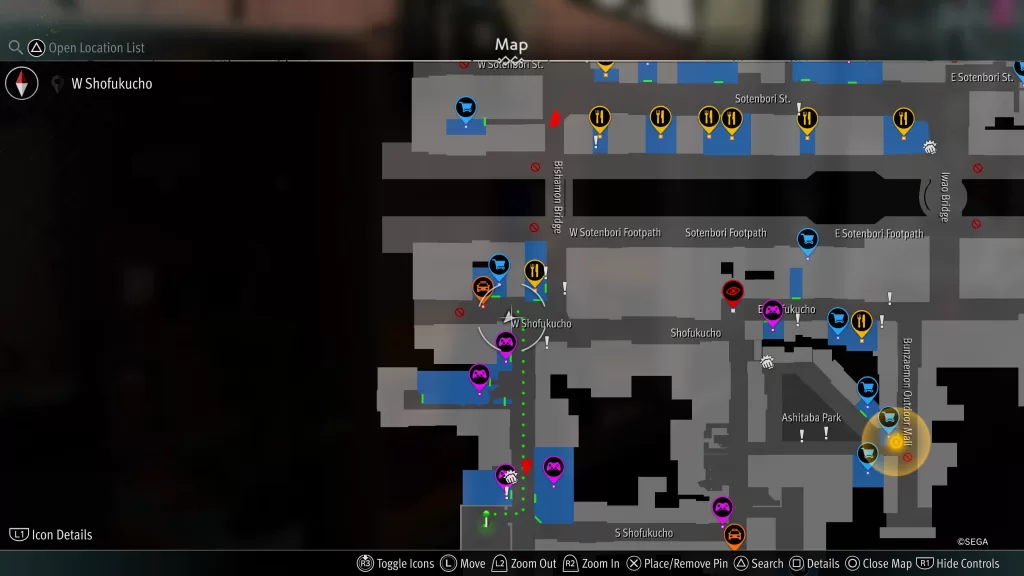
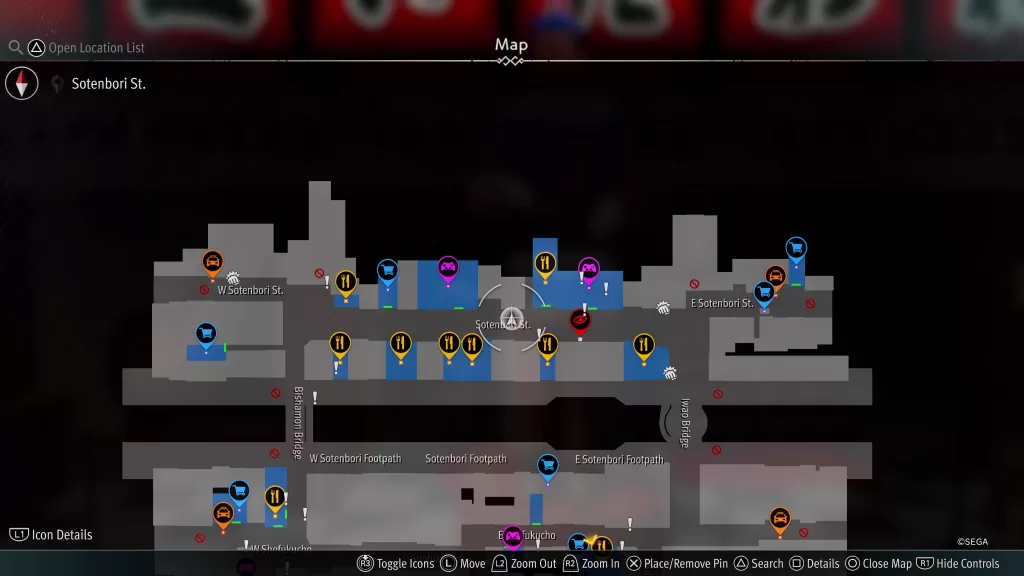
For this request, you’ll need to travel to the parking lot in southwestern Sotenbori.

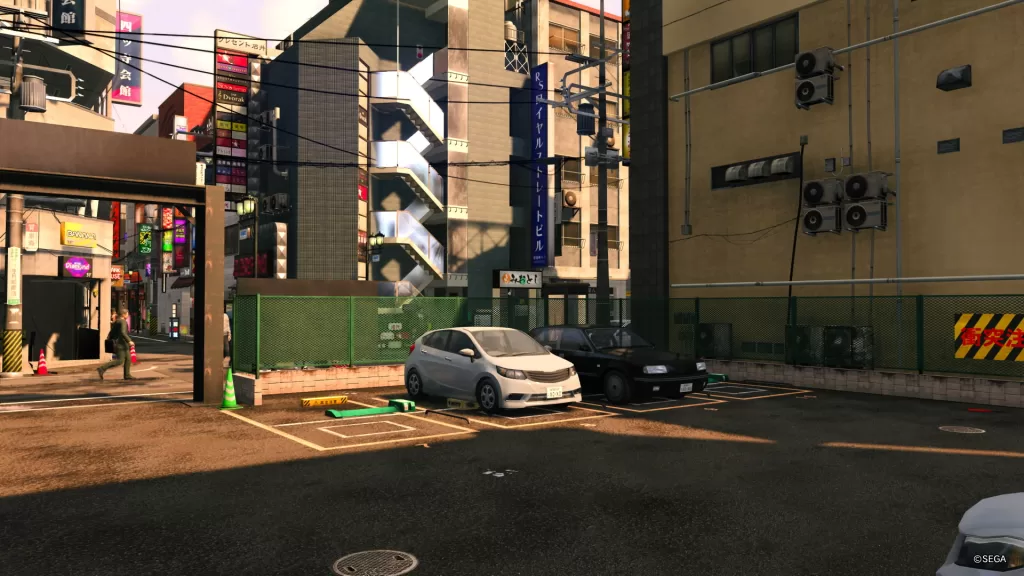
Calm My Nerves and Find My Car Black Car Location

There you’ll spot a black car in the parking lot next to a white one. Take a picture using the in game camera. Make sure the prompt to take a picture is available otherwise it won’t count!

Once you have the photo, return to the man on Sotenbori St. to complete the Calm My Nerves and Find My Car request! For more Like a Dragon Gaiden guides and walkthroughs, click here!

Like a Dragon Gaiden Logo
Guides

Like a Dragon Gaiden Stroll n Patrol Requests

by NightlyGamingBinge in

Welcome to our Like a Dragon Gaiden Stroll n Patrol Akame Network Requests guide!

For the Stroll n Patrol requests, you’ll spot them as fists or ! on the map. If the symbol is a fist, you’ll need to beat up the bad guys accosting the request giver! If it’s an !, it will be a request to either bring the requester an item, help them get something down from high up, take a picture, etc.

If you’re looking for a specific item for a request, check out our guide here on where to purchase items! Alternatively, check out our table below for requests involving taking a picture. After selecting the request, you’ll be able to see where the photo op can be found!

Picture Taking RequestsPhotos
Calm My Nerves and Find My Car!Black Car
Find the Cute CafeWhite Table and Chairs
Find the Flying TakoyakiFlying Takoyaki
Find the Terrifying Beings3 Terrifying Beings
How ‘Bout Them KappasKappa
Never Forget Four ShrineClub Four Shrine Sign
Osaka’s Famous ClownMechanical Clown Kuidaore Taro
Photograph the Boat GuyWild Looking Guy on Boat
Show Me Kids Playing Pocket CircuitKids Playing Pocket Circuit

Another type of Stroll n’ Patrol request you can come across are the quizzes! To ace these quizzes, check out our guide here on the Challenge to the Informant requests!

For more Like a Dragon Gaiden guides and walkthroughs, click here!

Like a Dragon Gaiden Logo
Guides

Like a Dragon Gaiden Osaka’s Famous Clown Request

by NightlyGamingBinge in

Welcome to our Like a Dragon Gaiden Osaka’s Famous Clown Request guide! The Osaka’s Famous Clown is an Akame Network Stroll n’ Patrol request that you can obtain by speaking with the man on W Shofukucho just south of Poppo (Shofukucho).

Osaka's Famous Clown Location

For the Osaka’s Famous Clown request, you’ll need to travel to Sotenbori St. just east of Yokobori Golf Center.

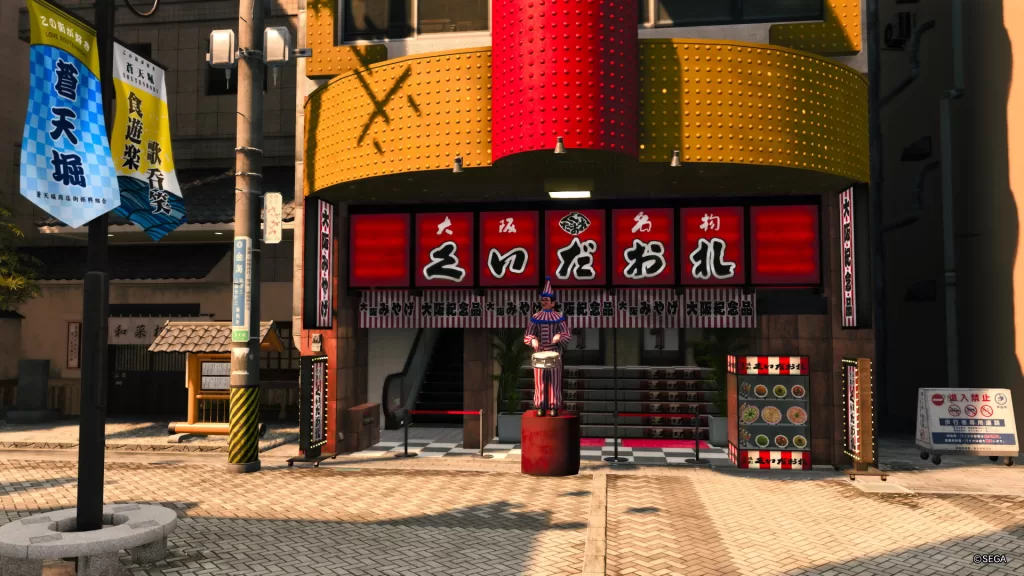
Location of the Mechanical Clown Kuidaore Taro

There you’ll find the mechanical clown Kuidaore Taro. Take a picture of this clown by using your in game phone camera (press up on the d pad). Once on the photo screen, you’ll need to press the X prompt for “Take photo” when you see those words on the screen for it to count.

Mechanical Clown Kuidaore Taro

After taking the photo correctly, return to the man to complete the Osaka’s Famous Clown request! For more Like a Dragon Gaiden guides and walkthroughs, click here!

Like a Dragon Gaiden Logo
Guides

Like A Dragon Gaiden Never Forget Four Shrine

by NightlyGamingBinge in

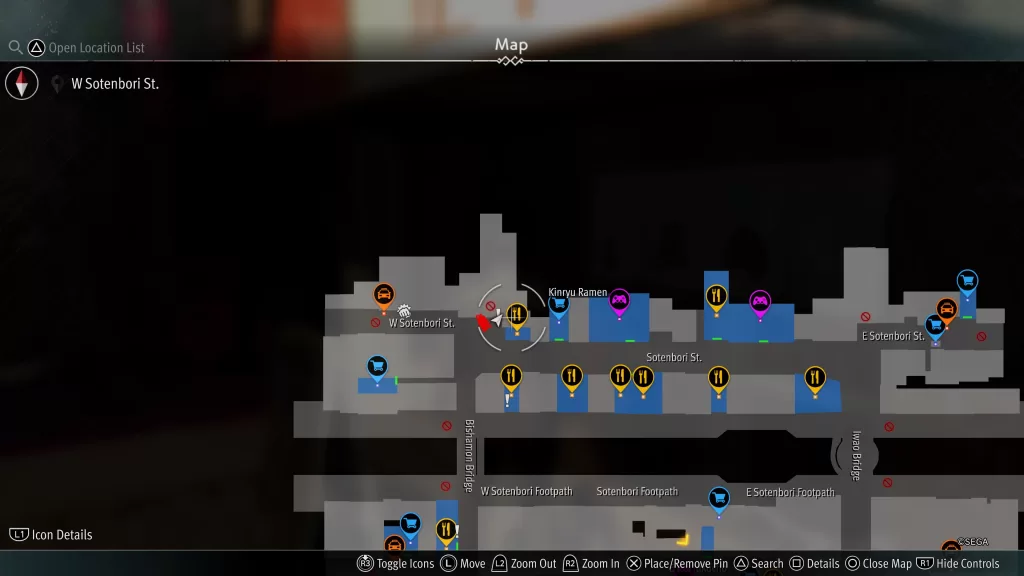
Welcome to our Like a Dragon Gaiden Never Forget Four Shrine guide! The Never Forget Four Shrine is an Akame Network Stroll n’ Patrol request that you can obtain by speaking with the Cheerful Woman in northwestern Sotenbori on W Sotenbori St. She is standing on the west side of Kinryu Ramen.

Never Forget Four Shrine Stroll n Patrol request location

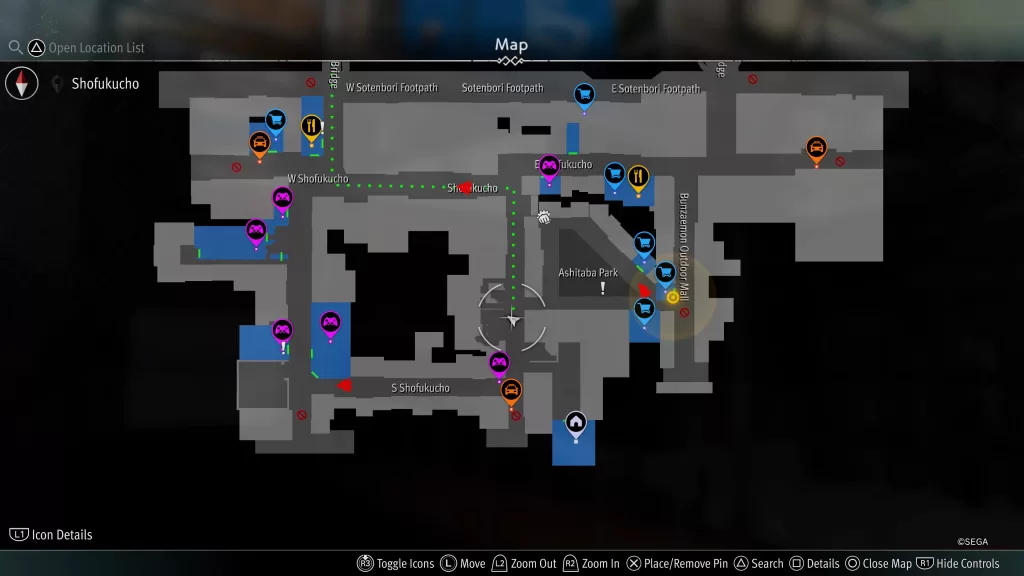
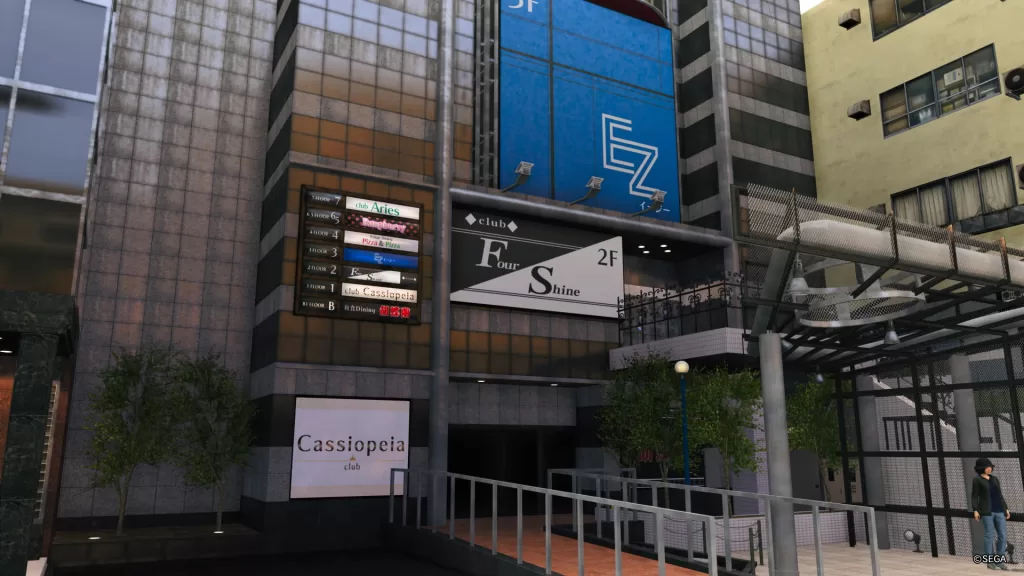
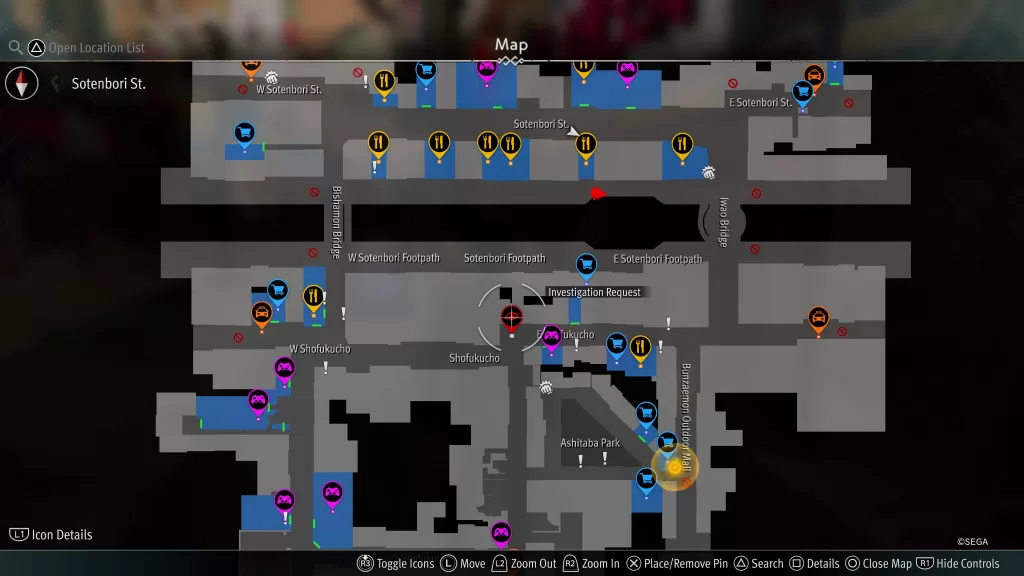
For this Stroll n’ Patrol Akame Network request, you’ll need to snap a picture of the Club Four Shrine sign. Club Four Shrine can be found slightly southwest of Ashitaba Park.

Location of Club Four Shrine in Like a Dragon Gaidon

Once there, take a picture of the Four Shrine sign on the side of the building by using your in game phone camera (press up on the d pad). Once on the photo screen, you’ll need to press the X prompt to “Take photo” when you see those words on the screen for it to count.

Club Four Shrine Sign

After taking the photo correctly, return to the woman on W Sotenbori St. to complete the Never Forget Four Shrine request.

For more Like a Dragon Gaiden guides and walkthroughs, click here!

Tales of Arise
Guides

The Keeper of Wallets Subquest Guide: Beyond the Dawn

by NightlyGamingBinge in

Welcome to our Tales of Arise Beyond the Dawn guide covering the Keeper of Wallets subquest. Here, you’ll learn how to start the Keeper of Wallets subquest, what you’ll need to do to complete it, and what rewards you’ll earn. This quest is also a reconstruction quest that will have an effect on the region’s city and add more items to the general store. Happy Questing!

How to Start The Keeper of Wallets Subquest

The Keeper of Wallets Subquest Map Location

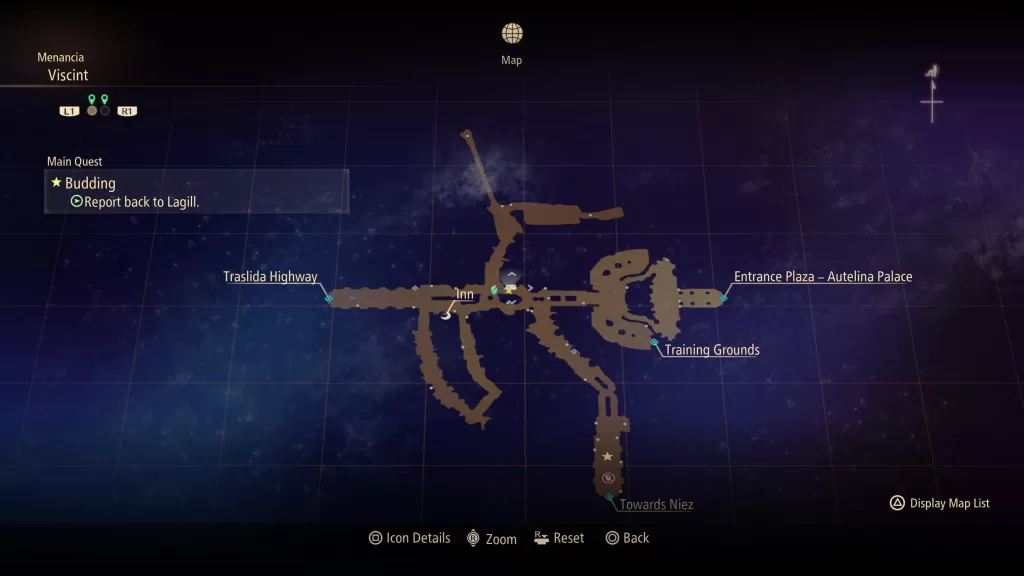
To start The Keeper of Wallets subquest, you must reach the Budding main quest and then progress to the Report back to Lagill objective. Once you’ve done that, travel to Viscint in Menancia and head a little east of the Inn to find a shopkeeper. Speak with him to begin the subquest.

The Keeper of Wallets Objectives

  • Speak with the shopkeeper
  • Invigorate the caravan soldiers
  • Talk to the caravan solider
  • Report the training results to the shopkeeper

Speak with the Shopkeeper

Talk to the shopkeeper to learn that the prices of goods are rising due to frequent zeugle attacks on the supply caravans transporting the goods. This will fire Kisara up and set her attention to some soldiers who are in desperate need of some emergency instruction.

Invigorate the Caravan soldiers

Make your way over to the Training Grounds near the palace in Viscint then speak with the Service Corps soldiers standing near the back desk. This will lead to a fight where you’ll need to beat them up using just Kisara and Dohalim. You’ll face a level 74 Armored Swordsman, Armored Marksman and Heavy Spearman. As you defeat enemies, more will spawn occurring for several waves. Also, make sure to keep an eye out for when they start casting. The arte will create a black hole on the ground that will suck you while dealing a bit of damage.

Talk to the Caravan Solider

After winning the fight, Kisara will address the soldier automatically via cutscene.

Report the Training Results to the Shopkeeper

Return to the shopkeeper to give him the good news about the soldiers thus completing the subquest.

The Keeper of Wallets Rewards

  • 2800 Gald
  • 660 SP

For more guides on Tales of Arise and the Beyond the Dawn DLC check out our guides and walkthrough page here!

Like a Dragon Gaiden Logo
Guides

Like a Dragon Gaiden Investigation Request – Akame Network

by NightlyGamingBinge in

Welcome to our guide on Like a Dragon Gaiden Investigation Request, an Akame Network Request.

Starting the Akame Network Job Request

To begin the Like a Dragon Gaiden Investigation Request, speak with Akame in her hideout after completing the Emergency Request! and ranking up.

Investigate the Namioka Family

After accepting the mission, you’ll need to investigate the Namioka Family in South Shofukucho. Make your way near the southernmost taxi to trigger a cutscene during which you’ll meet an old acquaintance! Due to the interruption, you’ll lose sight of your target. Akame will then direct you to a theater just south of W Sotenbori St. Make your way to the northwestern corner of Sotenbori to find the theater.

Once you arrive at the location, you’ll spot a man on the ground and a cutscene will trigger during which you’ll meet the Black Market Weapons Dealer. Afterwards, a tutorial battle will ensue introducing you to the mechanics of the drone.

Now that you have a new fighting buddy, head on over to Club SEGA on Sotenbori St. to trigger another cutscene. Afterwards, make your way to the Girls Club Fly High, the Sexy Pub Prison on East Shofukucho, which is diagonally from Club Heavenly.

Gaiden Investigation Request Location

Once you arrive another cutscene will trigger. After Etsuko shows up to save the day, you’ll make another called to Akame to explain.

Gaiden Investigation Request Rewards

After the call with Akame, the Investigation Request will complete! As a reward, you’ll receive 3,000 points and 300,000 yen!

For more Like a Dragon Gaiden guides and walkthroughs, click here!

Tales of Arise
Guides

Complete Guide for Material Locations in Beyond the Dawn

by NightlyGamingBinge in

Welcome to our Tales of Arise Beyond the Dawn Materials guide. Here, you’ll find a list of the materials that can be found in the Beyond the Dawn DLC along with where they can be found!

This guide is a work in progress! More ingredients and materials will be added as we progress in the game!

Where to Find Ingredients

IngredientArea
Adan PepperAdan Lake (Mahag Saar)
AppleAdan Lake (Mahag Saar)
Nevira Snowplains (Cyslodia)
Shinefall Woods (Ganath Haros)
Traslida Highway (Menancia)
CarpIglia Wastes (Calaglia)
EggsTraslida Highway (Menancia)
LemonAdan Lake (Mahag Saar)
Shinefall Woods (Ganath Haros)
Traslida Highway (Menancia)
LettuceAdan Lake (Mahag Saar)
Aqfotle Hills (Mahag Saar)
Nevira Snowplains (Cyslodia)
Rudhir Forest (Cyslodia)
Shinefall Woods (Ganath Haros)
MackerelAdan Lake (Mahag Saar)
Traslida Highway (Menancia)
MushroomIglia Wastes (Calaglia)
PepperAqfotle Hills (Mahag Saar)
Shinefall Woods (Ganath Haros)
PotatoAqfotle Hills (Mahag Saar)
Iglia Wastes (Calaglia)
Traslida Highway (Menancia)
RiceAdan Lake (Mahag Saar), Aqfotle Hills (Mahag Saar)
Shinefall Woods (Ganath Haros)
SalmonAdan Lake (Mahag Saar)
Nevira Snowplains (Cyslodia)
Rudhir Forest (Cyslodia)
Traslida Highway (Menancia)
StrawberryAqfotle Hills (Mahag Saar)
Nevira Snowplains (Cyslodia)
Pharia Ranch (Menancia)
TomatoRudhir Forest (Cyslodia)
Shinefall Woods (Ganath Haros)
Traslida Highway (Menancia)
WheatAqfotle Hills (Mahag Saar)
Iglia Wastes (Calaglia)
Nevira Snowplains (Cyslodia)
Traslida Highway (Menancia)

Where to Find Crafting Materials In Mahag Saar

MaterialObtained
Beast ManeMahag Saar: Adan Lake (Alpha Withered Wolf)
Beast TailMenancia: Traslida Highway (Boomy)
Bizarre MegacoreCalaglia: Iglia Wastes (Golem)
Mahag Saar: Adan Lake (Tempestuous Mass)
Mahag Saar: Aqfotle Hills (Tempestuous Mass)
Mausoleum: Helgal-Ryugola 238 (Omnious Earthen Mass)
Blistering FangMausoleum: Helgal-Ryugola 67 (Berserker Boar)
Chameleon HideMausoleum: Helgal-Ryugola 67 (Chrome Gazer)
Clam TentacleMausoleum: Helgal-Ryugola 238 (Bandit Shellshocker)
Clay FragmentMenancia: Traslida Highway (Granilem)
Copper ChunkCalaglia: Iglia Wastes (Blast Bee, Golem, Rampage Wolf, Rokmadillo)
Cyslodia: Nevira Snowplains (Berserker Deceptive Effigy)
Cyslodia: Rudhir Forest (Ice Wolf, Alpha Ice Wolf, Manhunt Hawk, Berserker)
Ganath Haros: Shinefall Woods (Assault Bee, Wild Boar, Wild Boomy)
Mahag Saar: Adan Lake (Vandal Dragon)
Dark ManeCalaglia: Iglia Wastes (Rampage Wolf)
Ganath Haros: Shinefall Woods (Cursed Assassin Wolf)
Demihuman MuscleMahag Saar: Aqfotle Hills (Rioter Claw)
Demihuman TalonCyslodia: Nevira Snowplains (Berserker)
Cyslodia: Rudhir Forest (Berserker)
Dragon BloodCyslodia: Rudhir Forest (Manhunt Hawk)
Dragon Flame SacMahag Saar: Adan Lake (Vandal Dragon)
Earth SeedMenancia: Traslida Highway (Forest Roper)
Earth StoneMausoleum: Helgal-Ryugola 238 (Omnious Earthen Mass)
Granite FangMausoleum: Helgal-Ryugola 238 (Destructive Boar)
Menancia: Traslida Highway (Boar)
Hard BoneMausoleum: Helgal-Ryugola 238 (Sweeper Ape)
Hard Spherical ShellCalaglia: Iglia Wastes (Rokmadillo)
Mahag Saar: Aqfotle Hills (Crystalmadillo)
Icicle FangGanath Haros: Shinefall Woods (Wild Boar)
Incendiary ScaleCalaglia: Iglia Wastes (Blast Bee)
Indomitable GargantuboneCalaglia: Iglia Wastes (Rampage Wolf)
Mahag Saar: Adan Lake (Alpha Withered Wolf)
Mahag Saar: Aqfotle Hills (Crystamadillo)
Mausoleum: Helgal-Ryugola 67 (Gangster Shellshocker, Murder Ape, Rending Mantis)
Mausoleum: Helgal-Ryugola 238 (Bandit Shellshocker, Destructive Boar)
Menancia: Traslida Highway (Granilem)
Iron ChunkMahag Saar: Adan Lake (dropped from most enemies)
Menancia: Traslida Highway (dropped from most enemies)
Keen GigafantCalaglia: Iglia Wastes (Rampage Wolf, Blast Bee)
Cyslodia: Nevira Snowplains (Berserker)
Cyslodia: Rudhir Forest (Ice Wolf, Alpha Ice Wolf, Manhunt Hawk, Berserker)
Ganath Haros: Shinefall Woods (Assault Bee, Wild Boar, Wild Boomy)
Large Demihuman TalonMenancia: Traslida Highway (Forest Roper)
Majestic FeatherCyslodia: Rudhir Forest (Manhunt Hawk)
Ganath Haros: Shinefall Woods (Reptilian Hawk)
Mantid ClawMausoleum: Helgal-Ryugola 67 (Rending Mantis)
Megafauna BoneCyslodia: Nevira Snowplains (Deceptive Effigy)
Mahag Saar: Aqfotle Hills (Rioter Claw)
Mausoleum: Helgal-Ryugola 238 (Sweeper Ape)
Mucus SacMausoleum: Helgal-Ryugola 67 (Gangster Shellshocker)
Mystical LumniacoreCalaglia: Iglia Wastes (Golem)
Mahag Saar: Adan Lake (Tempestuous Mass)
Mahag Saar: Aqfotle Hills (Tempestuous Mass)
Mausoleum: Helgal-Ryugola 67 (Chrome Gazer, Violent Earthen Mass)
Mausoleum: Helgal-Ryugola 238 (Omnious Earthen Mass)
Menancia: Traslida Highway (Forest Roper)
Cyslodia: Nevira Snowplains (Roper)
Cyslodia: Rudhir Forest (Roper)
Paralysis StingerGanath Haros: Shinefall Woods (Assault Bee)
Penumbra StoneMausoleum: Helgal-Ryugola 67 (Violent Earthen Mass)
Punisher’s VambraceMausoleum: Helgal-Ryugola 67 (Murder Ape)
Raging Storm BeakMahag Saar: Adan Lake (Archer Hawk)
Rending TitanfangGanath Haros: Shinefall Woods (Cursed Assassin Wolf, Reptilian Hawk)
Mahag Saar: Adan Lake (Vandal Dragon)
Mausoleum: Helgal-Ryugola 67 (Berserker Boar)
Mausoleum: Helgal-Ryugola 238 (Destructive Boar)
Menancia: Traslida Highway (Boar, Boomy)
Sharp FangMahag Saar: Adan Lake (Archer Hawk, Withered Wolf)
Mahag Saar: Aqfotle Hills (Rioter Claw)
Menancia: Traslida Highway (Boar, Boomy)
Silver ChunkCalaglia: Iglia Wastes (Rampage Wolf)
Cyslodia: Rudhir Forest (Ice Wolf, Alpha Ice Wolf, Manhunt Hawk)
Ganath Haros: Shinefall Woods (Cursed Assassin Wolf, Reptilian Hawk)
Mausoleum: Helgal-Ryugola 67 (Berserker Boar, Chrome Gazer, Gangster Shellshocker, Murder Ape, Rending Mantis, Violent Earthen Mass)
Mausoleum: Helgal-Ryugola 238 (Bandit Shellshocker, Destructive Boar, Sweeper Ape)
Spirit TailGanath Haros: Shinefall Woods (Wild Boomy)
Statue FragmentCyslodia: Nevira Snowplains (Deceptive Effigy)
Sticky TentacleCyslodia: Nevira Snowplains (Roper)
Cyslodia: Rudhir Forest (Roper)
Stone FragmentCalaglia: Iglia Wastes (Golem)
Strange CoreMenancia: Traslida Highway (Granilem)
Sturdy MegaboneCalaglia: Iglia Wastes (Rokmadillo)
Cyslodia: Nevira Snowplains (Deceptive Effigy)
Cyslodia: Rudhir Forest (Ice Wolf, Alpha Ice Wolf)
Mahag Saar: Adan Lake (Withered Wolf)
Mahag Saar: Aqfotle Hills (Crystamadillo)
Mausoleum: Helgal-Ryugola 238 (Bandit Shellshocker, Omnious Earthen Mass)
Tempest StoneMahag Saar: Adan Lake (Tempestuous Mass)
Mahag Saar: Aqfotle Hills (Tempestuous Mass)
Titanium VambraceMausoleum: Helgal-Ryugola 238 (Sweeper Ape)
Wind-Swept ManeMahag Saar: Adan Lake (Withered Wolf, Apha Withered Wolf)

For more guides on Tales of Arise and the Beyond the Dawn DLC check out our guides and walkthrough page here!

Tales of Arise
Guides

Beauty Clearing the Land Subquest Guide: Beyond the Dawn

by NightlyGamingBinge in

Welcome to our Tales of Arise Beyond the Dawn guide covering the Beauty Clearing the Land subquest. Here, you’ll learn how to start the Beauty Clearing the Land subquest, what you’ll need to do to complete it, and what rewards you’ll earn. This quest is also a reconstruction quest that will have an effect on the region’s city and add more items to the general store. Happy Questing!

How to Start The Beauty Clearing the Land Subquest

Beauty Clearing the Land Subquest Map Location

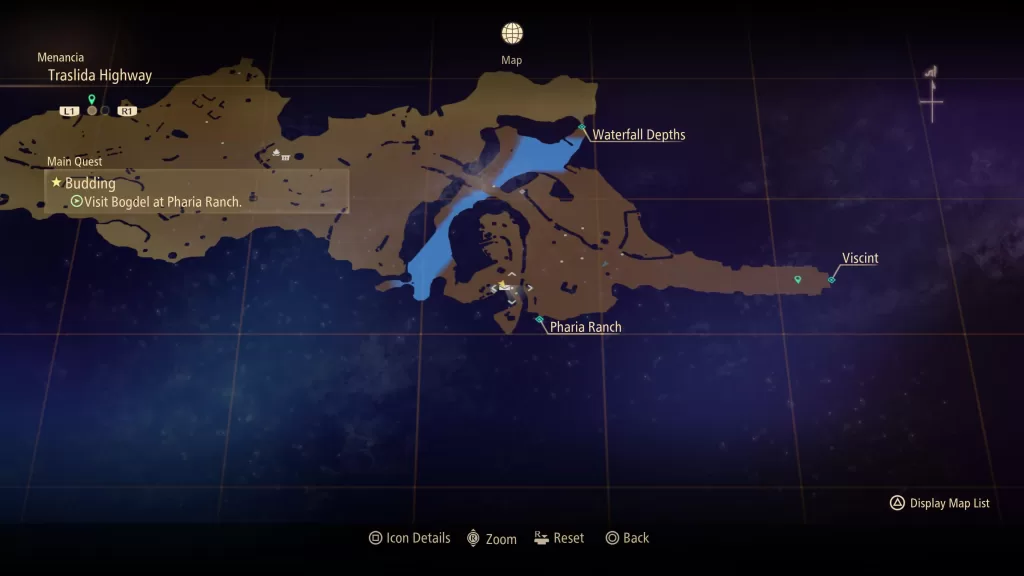
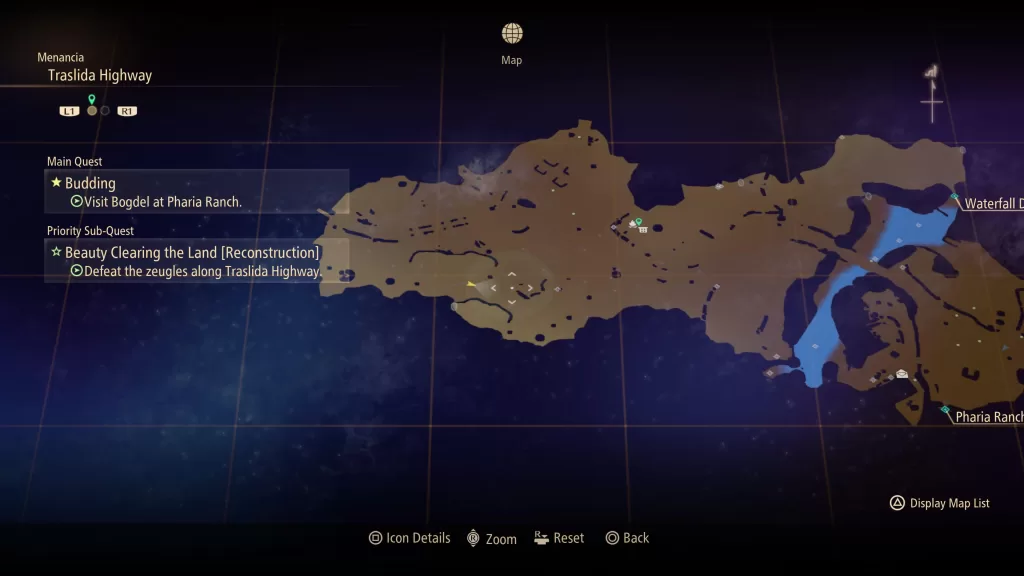
To start the Beauty Clearing the Land subquest, you must first begin the Budding main quest and then progress to the Visit Bogdel at Pharia Ranch objective. Once you’ve done that, travel to the Traslida Highway in Menancia then head for the small village near the Pharia Ranch entrance. Speak with the elderly female farmer there and agree to help her.

Beauty Clearing the Land Objectives

  • Speak to the elderly female farmer
  • Defeat the zeugles along the Traslida Highway
  • Report back to the elderly female farmer

Speak to the Elderly Female Farmer

Talk to the Elderly Female Farmer to learn about the zegules that infest the highway (and talk about Kisara’s brawny physique). Agree to help her then set out to put those muscles to work.

Defeat the Zeugles Along Traslida Highway

Beauty Clearing the Land Zeugles Map Location

Head west across the bridge then when you reach the campfire, change direction going southwest to arrive at the quest area. Approach the zeugles to start a battle with a level 70 Boar, level 68 Boomy and level 69 Forest Roper. As you defeat enemies, more will show up and this will continue for a couple of waves.

Report Back to the Elderly Female Farmer

After you have dealt with all of the zegules, return to the elderly farmer and give her the good news to complete the subquest.

Beauty Clearing the Land Rewards

  • Impact Ring x1
  • 2300 Gald
  • 420 SP

For more guides on Tales of Arise and the Beyond the Dawn DLC check out our guides and walkthrough page here!

Like a Dragon Gaiden Logo
Guides

Like a Dragon Gaiden Akame Network Requests

by NightlyGamingBinge in

Welcome to our Like a Dragon Gaiden Akame Network Requests guide. Here you’ll find a list of the Like a Dragon Gaiden Akame Network Requests along with their rewards. For additional information on how to complete each request, click the link under the job request column in the table. Happy Questing!

Like a Dragon Gaiden Akame Network Requests

Job RequestsUnlocksRewards
Emergency Request!Automatically1,000 pts. & 100,000 yen
Film Assistant NeededAutomatically3,000 pts. & 300,000 yen
Investigation RequestAutomatically3,000 pts. & 300,000 yen
Vanquish the Red PeacocksAutomatically3,000 pts. & 300,000 yen
A Simple Heavy-Lifting JobAfter reaching Silver Rank in Coliseum 8,000 pts. & 500,000 yen
Ghost of SotenboriAfter reaching Silver Rank in Coliseum 8,000 pts. & 500,000 yen
Seeking AdviceAfter reaching Silver Rank in Coliseum 8,000 pts. & 500,000 yen
Recruit Homeless YamanakaAfter reaching Silver Rank in Coliseum 4,000 pts.
The Strongest Convenience Store ClerkAfter reaching Silver Rank in Coliseum 4,000 pts.
The Cat-Lovin’ RapperAfter completing the Recruit Homeless Yamanaka request4,000 pts.
Save the Pro WrestlerAfter completing The Strongest Convenience Store Clerk request4,000 pts.
Liberate the Hammer ManAfter reaching Silver Rank in Coliseum 4,000 pts.
The Struggling HostAfter completing the Liberate the Hammer Man request4,000 pts.
Final Showdown: Red PeacocksAfter reaching Silver Rank in Coliseum 3,000 pts. & 300,000 yen
Vanquish the White KnightsAfter completing the Final Showdown: Red Peacocks request8,000 pts. & 500,000 yen
Final Showdown: White KnightsAfter completing the Vanquish the White Knights request8,000 pts. & 500,000 yen
The Golden SamuraiAfter reaching Silver Rank in Coliseum 8,000 pts. & 500,000 yen
End the DestructionAfter reaching Gold Rank in Coliseum15,000 pts. & 1,000,000 yen
Gotta Catch ’em Balls!After reaching Gold Rank in Coliseum15,000 pts. & 1,000,000 yen
Vanquish the Black SwallowtailsAfter reaching Gold Rank in Coliseum15,000 pts. & 1,000,000 yen
Final Showdown: Black SwallowtailsAfter completing the Vanquish the Black Swallowtails request15,000 points & 1,000,000 yen
The Golden ScourgeAfter reaching Gold Rank in Coliseum15,000 pts. & 1,000,000 yen
Golden Gauntlet ThrowdownAfter reaching Platinum Rank in Coliseum30,000 pts. & 2,000,000 yen

For more Like a Dragon Gaiden guides and walkthroughs, click here!

Like a Dragon Gaiden Logo
Guides

Need Help With the Like a Dragon Gaiden Emergency Request?

by NightlyGamingBinge in

Welcome to our Like a Dragon Gaiden Emergency Request guide. During Chapter 2 of Like a Dragon Gaiden, the main story will introduce you to the Akame Network Requests by giving you this quest. As you earn more support for Akame by doing Stroll n’ Patrols around Sotenbori, you’ll unlock more Akame Network Requests!

Starting the Akame Network Job Request

You’ll automatically obtain the Emergency Request Akame Network Job Request during the main story and will need to complete it as a main story objective.

Club Heavenly Mini Game

Once you’ve begun the quest, make your way over to Club Heavenly on E Shofukucho and speak with the Bouncer inside where you’ll need to fork over 10,000 yen to gain access. Do so then select a hostess. During your visit, certain answers will net you a higher affinity than others! For a guides on which answers are the best ones to maximize your affinity, click here!

Gaiden Emergency Request Rewards

Once you’ve finished the mini game, return to Akame to give her the low down on the cabaret club. As a reward, you’ll receive the Nutriment of the Conquering Emperor x5 and the request will then complete. You’ll receive 1,000 pts. & 100,000 yen.

For more Like a Dragon Gaiden guides and walkthroughs, click here!