Evil West Logo
Guides

All Collectibles in The Questionable Cargo – Evil West Guide

by NightlyGamingBinge in

Welcome to our guide on where to find all the collectibles in 01 The Questionable Cargo of Evil West. In this chapter you’ll find 9 money stashes and 2 lore collectibles.

Questionable Cargo Collectibles

Bucks

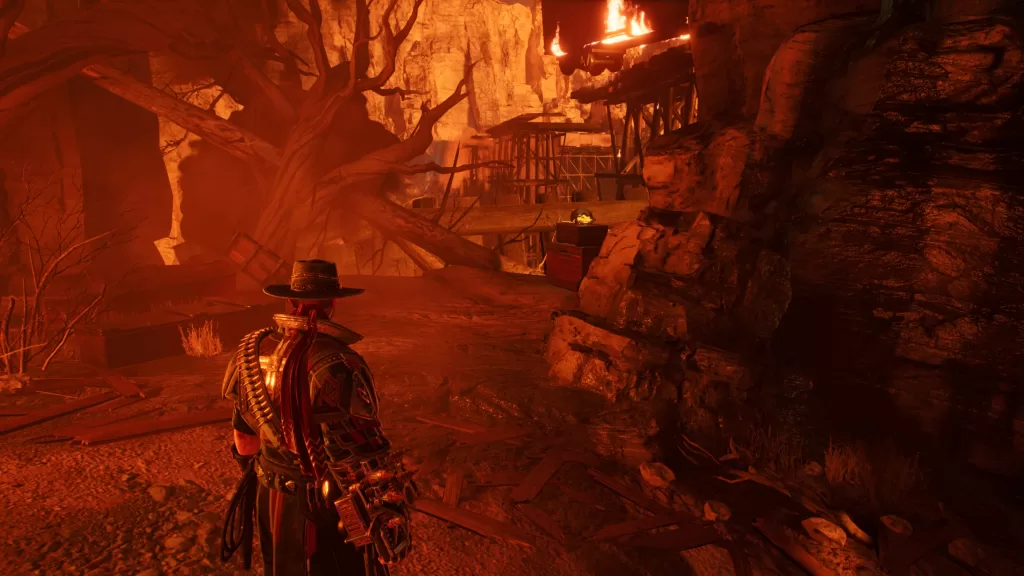
While on the way to the train, you’ll jump down using a grappling point on a tree branch. Once your feet touch the ground, turn around to find the cash!

Bucks

Once you reach the train, you’ll need to fight some monsters. After finding the first group of enemies, take a left and jump over some fallen debris to find a chest.

Questionable Cargo Evil West Chest Location

Bucks

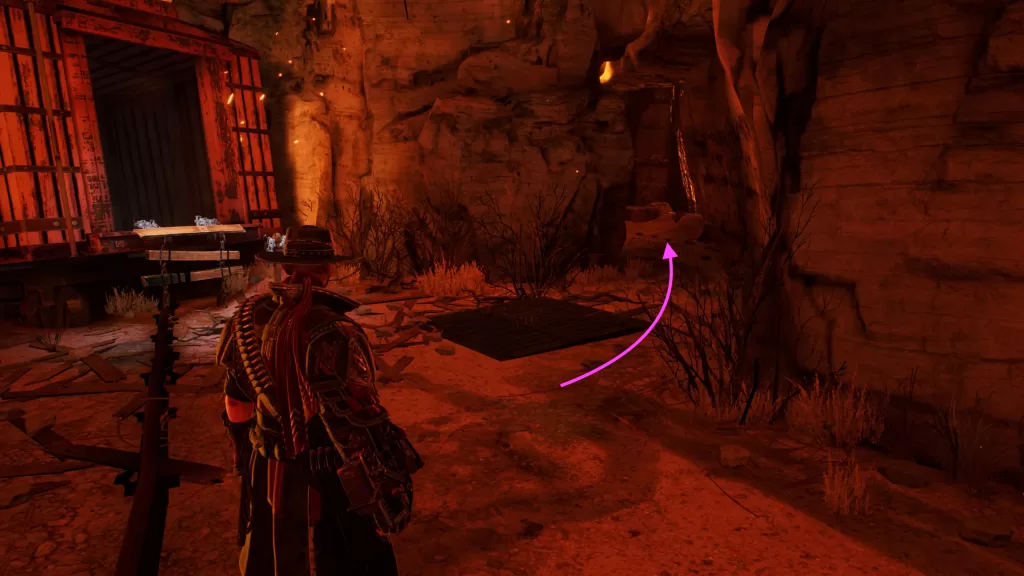
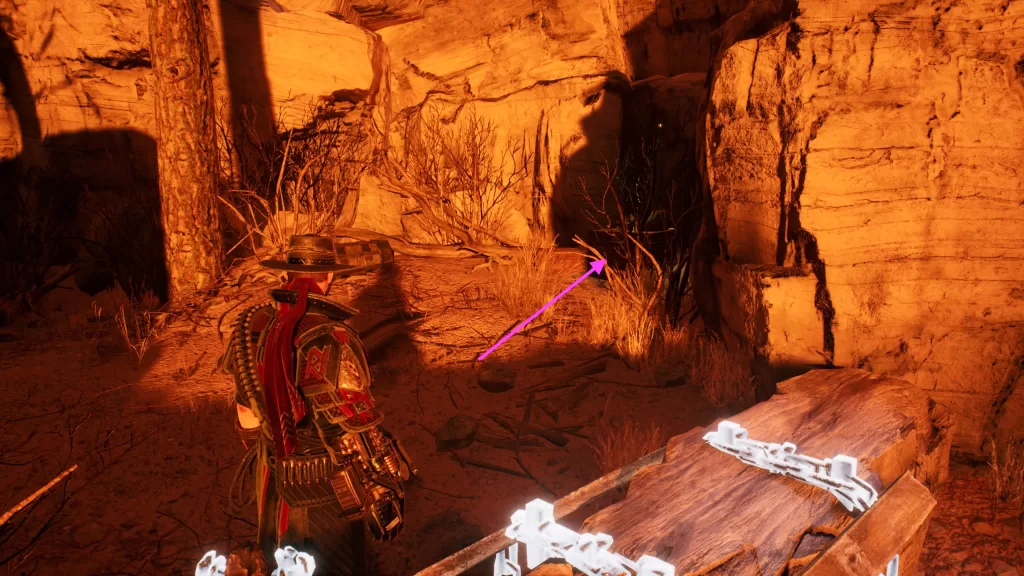
Just before entering the train car, take a right into a small cave. You’ll find the cash on the ground next to a corpse.

Questionable Cargo Evil West Collectibles Cash Location

Collectible – Fragment of Inventory

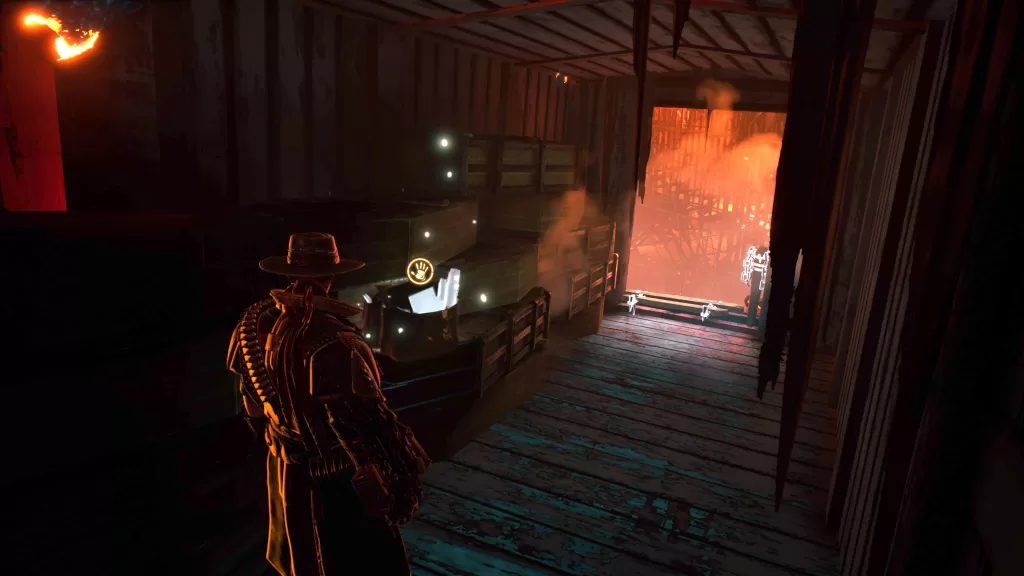
In the train car, loot the glowing papers on the left.

Questionable Cargo Collectibles Evil West Collectible

Bucks

You’ll find the next stash after jumping out of the train car. The Bucks Pickups tutorial will trigger and you’ll find the cash against the rock wall.

Questionable Cargo Evil West Collectibles Cash Location

Bucks

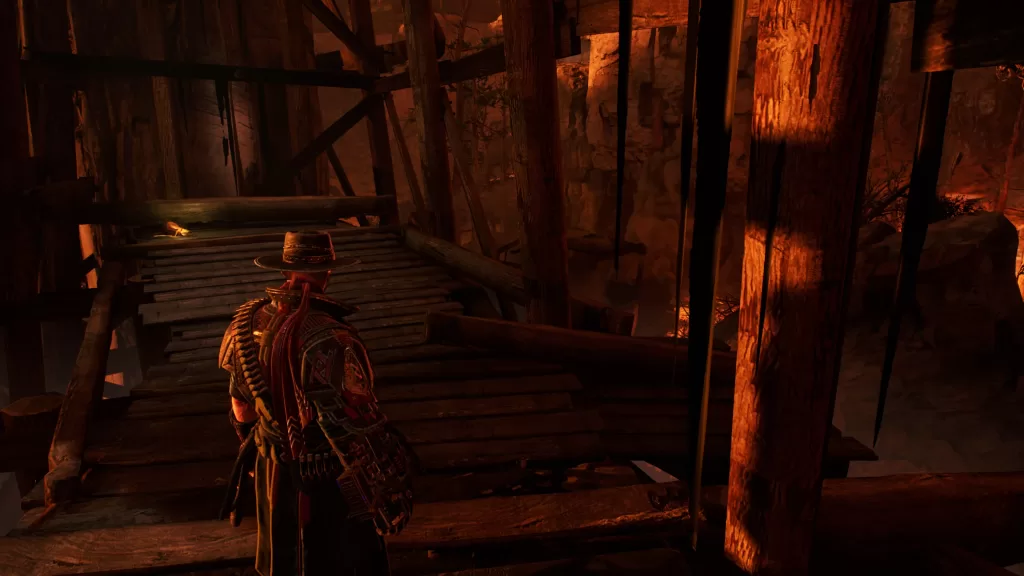
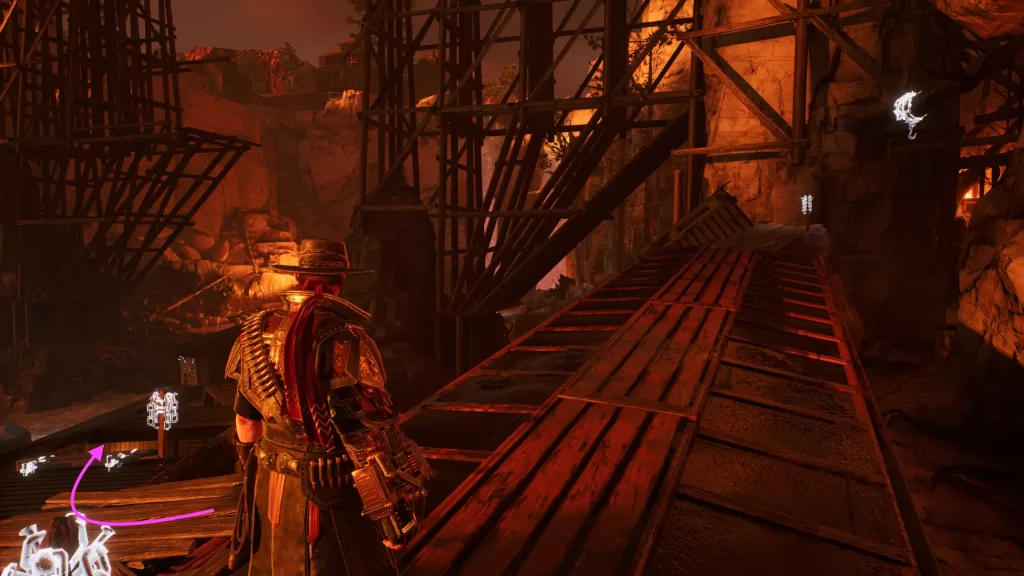
After jumping on the wooden bridge, take a right to find the cash.

Questionable Cargo Evil West Collectibles Cash Location

Bucks

After the big guy busts out of the wall, take him out then continue forward by jumping over the debris. Just on the other side, take a right to find the cash.

Questionable Cargo Evil West Collectibles Cash Location

Bucks

When Edgar shows up, you’ll take down a bunch of enemies. Afterwards, you’ll climb up a red train car. At the top of the train car, head left, crossing some wooden boards then drop down into it to find the cash.

Questionable Cargo Evil West Collectibles Cash Location

Collectible – Chester Morgan’s Letter

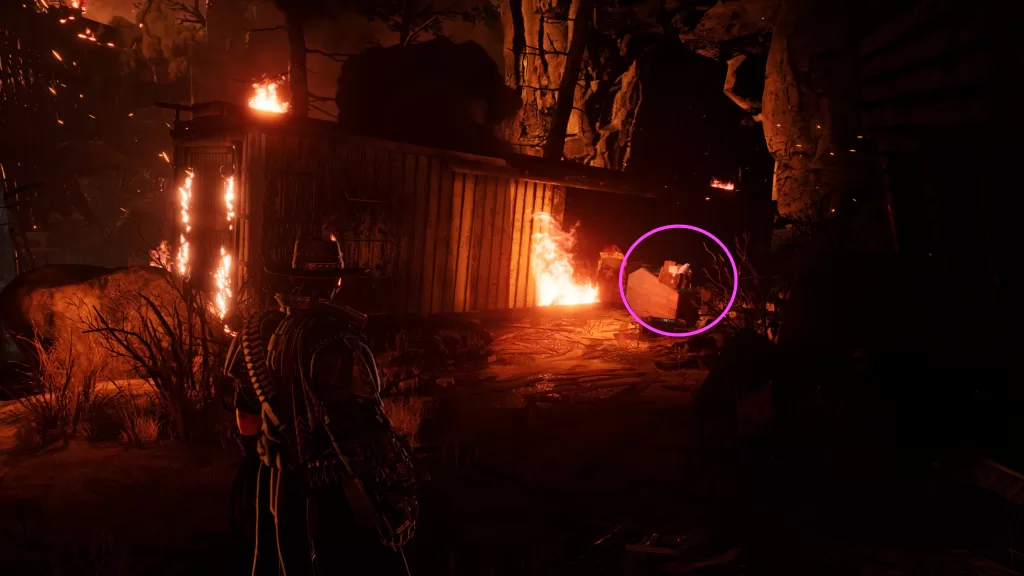
This lore can be found in front of the flaming train car.

Questionable Cargo Collectibles Evil West Collectibles Cash Location

Bucks

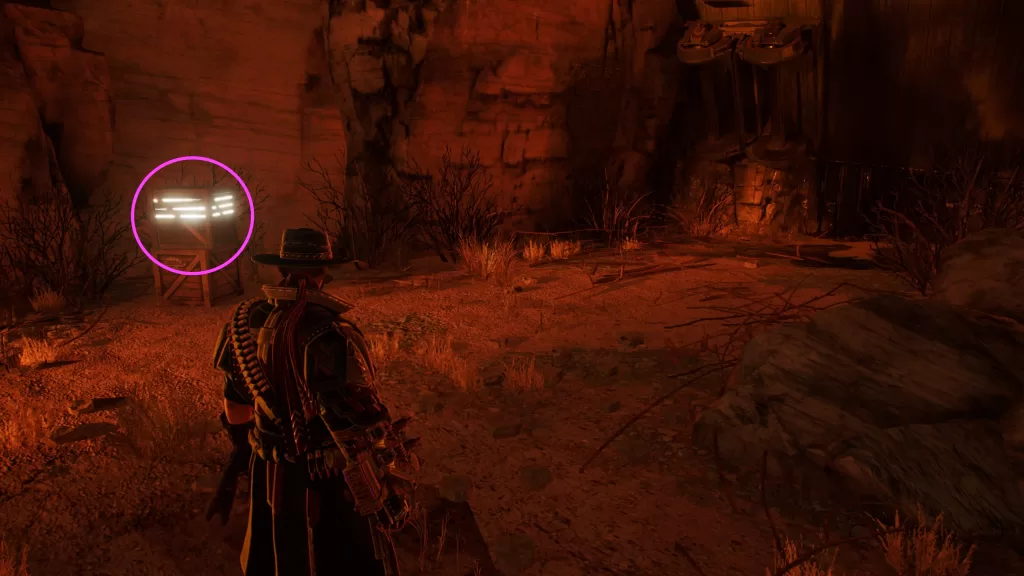
You’ll find this money in a box that you’ll need to punch along the main path just before reaching the tail end of the train.

Questionable Cargo Collectibles Evil West Collectibles Cash Location

Bucks

After crouching under the train car, take a right to find the cash.

Questionable Cargo Collectibles Evil West Collectibles Cash Location

For more Evil West guides and walkthroughs, click here!

Avatar Frontiers of Pandora Logo
Guides

A Match Made in Pandora – Avatar: Frontiers of Pandora Guide

by NightlyGamingBinge in

Welcome to NGB and our guide for A Match Made in Pandora exploration quest in Avatar: Frontiers of Pandora. Here’ll we cover how to start the quest and what all you’ll need to do in order to complete it.

How to Start A Match Made in Pandora

This quest will automatically begin after you complete a story mission (either A Distant Storm or Rising Pressure).

A Match Made in Pandora Objectives

Talk to Anqa at the Resistance Hideout

Speak with Anqa in the Living Quarters of the Resistance Hideout.

Scout Evergreen Station

Exit the Resistance Hideout via the eastern exit then head south to Evergreen Station.

A Match Made in Pandora Evergreen Station Avatar

Fix the power

Pull the switch on the northeastern side of the building. Afterwards, use your SID to follow the wires and fix the flow at the intersections. At the computer, you’ll need to hack it to turn on the power.

A Match Made in Pandora Fixing the Power

Tell Anqa about Evergreen Station

Return to Anqa in the Living Quarters at the Resistance Hideout.

Ask Priya what kinds of things she likes

Speak with Priya in the Command Center.

Ask Alexander about recordings

Speak with Alexander in the Med Bay.

Find the tablet

You can find the tablet on a metal shelf in the Living Quarters across from Rajinder’s shop.

A Match Made in Pandora Where to find the tablet

Bring the recordings to Evergreen Station

Return to Evergreen Station and hack the computer that you previously used to turn on the power. After you’ve hacked it, interact with the computer to upload the music.

Fix the Antenna

Interact with the electrical panel on the tower next to the computer to fix it.

Defeat the RDA

Unfortunately, the music attracted the RDA. Defeat all the forces that show up!

Thank Alexander for the recordings

Return to Alexander in the Med Bay at the Resistance Hideout.

A Match Made in Pandora Rewards

  • Spare Parts x8
  • Cupid’s Watch – Armguard Mod – Exquisite

For more Avatar: Frontiers of Pandora guides and walkthroughs, click here!

Avatar Frontiers of Pandora Logo
Guides

The Dark Theater: All Kame’tire Shadow Puppets Locations

by NightlyGamingBinge in

Welcome to NGB and our guide for where to find all Kame’tire Shadow Puppets for The Dark Theater exploration quest in Avatar: Frontiers of Pandora. Here’ll we cover how to start the quest and what all you’ll need to do in order to complete it.

How to Start The Dark Theater

In order to start this quest, you’ll need to find a Kame’tire shadow puppet.

The Dark Theater Objectives

Find the puppet’s owner in The Hollows

Travel to the Hollows in Stone Cloud Valley of the Clouded Forest and speak with Namtet in the Sotryteller’s Passage.

Collect 9 Kame’tire shadow puppets in the Clouded Forest

One-Eyed Mother

Kame'tire shadow puppets Avatar

The Abandoned

Kame'tire shadow puppets Avatar

The Baby Face

Kame'tire shadow puppets Avatar

The Blonde Adonis

Kame'tire shadow puppets Avatar

The Fellow

Kame'tire shadow puppets Avatar

The Siren

Kame'tire shadow puppets Avatar

The Sitting Elder

Kame'tire shadow puppets Avatar
Kame'tire puppets Avatar

The Sprinter

Kame'tire shadow puppets Avatar
Kame'tire puppets Avatar

The Strong

Kame'tire shadow puppets Avatar

Return the puppets to Namtet

After you’ve collected all the dolls, you’ll receive the Doll Collector trophy! Travel to the Storyteller’s Passage in the Hollows and speak with Namtet to complete the quest!

The Dark Theater Rewards

  • Clan Favor
  • Shadow Puppeteer’s Drape – Chest Guard Mod – Exquisite

For more Avatar Frontiers of Pandora guides and walkthroughs, click here!

Avatar Frontiers of Pandora Logo
Guides

All Zeswa Kite Locations for the Wind Will Carry Us in Avatar

by NightlyGamingBinge in

Welcome to NGB and our guide for the Wind Will Carry Us side quest in Avatar: Frontiers of Pandora. Here’ll we cover how to start the quest and what all you’ll need to do in order to complete it.

How to Start The Wind Will Carry Us

In order to start this quest, you’ll need to speak with Fa’zak at The Circle in the Mother of Rivers of the Upper Plains.

The Wind Will Carry Us Objectives

Collect 9 Zeswa kites in the Upper Plains

Kite of Water

Kite of Water Zeswa Kite Avatar

Fight Kite

Fight Kite Zeswa Kite Avatar

Fog Guiding Kite

Fog Guiding Kite Zeswa Kite Avatar

Warning Kite

Warning Kite Zeswa Kites Avatar

Flower Kite

Flower Kite Zeswa Kites Avatar

Spirit of the Clan Kite

Spirit of the Clan Kite Zeswa Kites Avatar

Storm Kite

Storm Kite Zeswa Kites Avatar

Transforming Kite

Transforming Kite Zeswa Kites Avatar

Spite Kite

Spite Kite Zeswa Kites Avatar

Return to Fa’zak

After you’ve found all the kites, you’ll receive the Tethered Kites trophy! Return to Fa’zak in the Maker’s Tent at The Circle. She’ll request that you follow her to a nearby location. When you arrive at the destination, speak with her. Afterwards, interact with the kite on the rock to raise it then speak with her again to complete the Wind Will Carry Us quest.

Wind Will Carry Us Rewards

  • Clan Favor
  • Drifting Sorrow Pouch

For more Avatar: Frontiers of Pandora guides and walkthroughs, click here!

Avatar Frontiers of Pandora Logo
Guides

Tracking the Past – Avatar Frontiers of Pandora Guide

by NightlyGamingBinge in

Welcome to NGB and our guide for the Tracking the Past side quest in Avatar: Frontiers of Pandora. Here’ll we cover how to start the quest and what all you’ll need to do in order to complete it.

How to Start Tracking the Past

In order to start this quest, you’ll need to speak with a Hunter at The Hollows in the Stone Cloud Valley of the Clouded Forest.

Tracking the Past Objectives

Find the Kame’tire hunter who has been defending ferals

Tracking the Past Avatar

Travel to the southern side of the Great Stone Swamp in the Stone Cloud Valley to find the remnants of a battle.

Investigate the battle site

To investigate the site, you’ll need to link the following:

  • Messy wildlife footprints
  • Bullet spray
  • Destroyed AMP suit
  • Kame’tire arrows

Track the scent of AMP oil

Use your Na’vi senses to follow the trail of oil.

Talk to the Kame’tire hunter

Climb atop the giant mushroom and speak with Sa’ney.

Find the RDA patrol hunting to the north

Tracking the Past RDA Patrols

Travel north to the eastern side of Great Stone Swamp where you’ll find a group of RDA soldiers. Take them out along with the ferals!

Join Sa’ney on the hunt

Travel west of Horseshoe Mountain Station in the Stone Cloud Valley to meet up with Sa’ney and speak with her to complete the quest.

Tracking the Past Rewards

  • Sa’ney’s Headpiece (exquisite)

For more Avatar: Frontiers of Pandora guides and walkthroughs, click here!

Avatar Frontiers of Pandora Logo
Guides

The Black Wind – Avatar Frontiers of Pandora Guide

by NightlyGamingBinge in

Welcome to NGB and our guide for The Black Wind side quest in Avatar: Frontiers of Pandora. Here’ll we cover how to start the quest and what all you’ll need to do in order to complete it.

How to Start The Black Wind

In order to start this quest, you’ll need to complete A Shadow and a Threat side quest and Penance (if you’ve already started this quest).

The Black Wind Objectives

Talk to Ri’nela at the Resistance Hideout

Travel to the Resistance Hideout and speak with Ri’nela. She’ll give you the Black Wind Heavy Bow recipe and the Woodshaper Pouch.

Crafting Black Wind Heavy Bow (Optional)

It’s optional, but you can craft the Black Wind Heavy Bow using the recipe you just got to take down the stormglider. If you wish to do so, you’ll need any root (exquisite), any reed (superior) and any bast (fine).

Defeat the stormglider “Black Wind”

The Black Wind where to find stormglider in Avatar

Travel to the Weeping Steps in the Step’s Cradle of the Upper Plains. Make your way to the objective marker to find a nest at the top of the floating rocks. You’ll see it flying around. Quickly land on the rock then fight the stormglider. Once you’ve defeated her, the quest will complete. You’ll receive Spare Parts and Clan Favor.

For more Avatar: Frontiers of Pandora guides and walkthroughs, click here!

Avatar Frontiers of Pandora Logo
Guides

Homecoming – Avatar Frontiers of Pandora Guide

by NightlyGamingBinge in

Welcome to NGB and our guide for the Homecoming side quest in Avatar: Frontiers of Pandora. Here’ll we cover how to start the quest and what all you’ll need to do in order to complete it.

How to Start Homecoming

In order to start this quest, you’ll need to speak with Zamhil at The Hollows in the Clouded Forest.

Homecoming Objectives

Search for wayward members of the Kame’tire

Find and help Keylu

In the Cut of the Clouded Forest, travel just northwest of the Hydro-Oil Extractor Bravo RDA Outpost, crossing the Shrewd River. Once there, speak with Keylu next to a Sailfin Goliath. You’ll then need to complete The Gentle Giant quest.

Meet Hastu and Uwol in The Hollows

Approach Uwol and Hastu at The Commons in The Hollows to trigger a scene.

Find and talk to Reyzu

Travel to the Crooked Seat Na’vi camp in the southeastern corner of Cradling Pines of Clouded Forest and speak with Reyzu. You’ll then need to complete the Flavor of the Past side quest.

Find and talk to Taka’ri

You’ll find Taka’ri at Boulder’s Gap Na’vi Camp in the Cradling Pines of Clouded Forest. Speak with her then complete the Stories Old and New quest.

Go back to Zamhil

Once you’ve finished the above, return to Zamhil at The Hollow and speak with her to complete the Homecoming quest.

For more Avatar: Frontiers of Pandora guides and walkthroughs, click here!

Avatar Frontiers of Pandora Logo
Guides

The Gentle Giant – Avatar: Frontiers of Pandora Guide

by NightlyGamingBinge in

Welcome to NGB and our guide for The Gentle Giant side quest in Avatar: Frontiers of Pandora. Here’ll we cover how to start the quest and what all you’ll need to do in order to complete it.

How to Start The Gentle Giant

In order to start this quest, you’ll need to speak with a Gatherer at the Sheltering Log Station in The Cut of the Clouded Forest.

The Gentle Giant Objectives

Find the apothecary Keylu

The Gentle Giant Location of Keylu

In the Cut of the Clouded Forest, travel just northwest of the Hydro-Oil Extractor Bravo RDA Outpost, crossing the Shrewd River. Once there, speak with Keylu next to a Sailfin Goliath.

Gather ingredients

To help her friend, Keylu needs a Clouded Lily Bast (fine) and Banquet Mushroom (fine).

Clouded Lily Bast

Clouded Lily Bast Avatar

Clouded Lily Bast is commonly found in water throughout the Clouded Forest. Rarer clouded lilies are found in water in the Shallow Bog biome of the Clouded Forest and are best picked dry. We found ours in the water next to the Healing Lodge Na’vi Camp in the Stone Cloud Valley.

Banquet Mushroom

Banquet Mushroom Avatar

Banquet Mushrooms are commonly found near the top of braided crimson trees, which are found in the Scarlet Thicket biome of the Clouded Forest. Rarer banquet mushrooms are often found near blood urchins, which are also found in the Scarlet Thicket biome of the Clouded Forest, and are best picked at night. We found ours next to the Den of Solitude Na’vi Camp in the Crimson Great Wood.

Bring ingredients back to Keylu

With the ingredients in hand, return to Keylu and speak with her. She’ll then want you to liberate the Hydro-Oil Extractor Bravo RDA Outpost just across the Shrewd River. Do so if you have not already!

Return to Keylu

Just wait a day or two then speak with Keylu again. If you don’t wish to wait long, just head to a camp and pass time at a fire.

Greet the sailfin goliath

Approach the creature’s head then use the prompt to make the bond. Afterwards, The Gentle Giant quest will complete.

The Gentle Giant Rewards

  • Keylu’s Ankle Guards

For more Avatar: Frontiers of Pandora guides and walkthroughs, click here!

Avatar Frontiers of Pandora Logo
Guides

Stories Old and New – Avatar Frontiers of Pandora

by NightlyGamingBinge in

Welcome to NGB and our guide for the Stories Old and New side quest in Avatar: Frontiers of Pandora. Here’ll we cover how to start the quest and what all you’ll need to do in order to complete it.

How to Start the Stories Old and New

In order to start this quest, you’ll need to speak with a Gatherer at the Stone Bridge Station in the Cascading Stones of the Clouded Forest.

Stories Old and New Objectives

Talk to the storyteller Taka’ri

stories old and new avatar location

Speak with Taka’ri at Boulder’s Gap Na’vi Camp in the Cradling Pines of the Clouded Forest.

Listen to Taka’ri’s story

When you’re ready, speak with Taka’ri to listen to the story.

Find Manwe by following Taka’ri’s story

Travel just north of the “Great” in Great Stone Swamp on the map in the Stone Cloud Valley of Clouded Forest to the floating mountains.

Stories Old and New Finding Manwe

Next to a large red tree you’ll find some seeds on a leaf. Inspect them!

Stories Old and New Finding Manwe

Next, you’ll need to travel to the top of the Crying Giant in the Cascading Stones of Clouded Forest to search for signs of Manwe on top of the weeping colossus.

Stories Old and New Finding Manwe

Once there, interact with the fire to find more seeds.

Stories Old and New Finding Manwe

Afterwards, travel to the west side of “River” in Nomad’s River on the map, which is east of the Gas Extraction Plant Bravo, in the Cascading Stones.

Stories Old and New Finding Manwe

When you arrive you’ll need to investigate the area by linking the following clues:

  • Dead RDA Soldier
  • Kame’tire arrows
  • Footprints
  • Musky bag (atop a rock across the fallen log)
Stories Old and New Clues

Track the scent of musky seeds to find Manwe

Use your Na’vi senses to follow the trail into a cave where you’ll find Manwe.

Speak with Manwe

Speak with him! If you haven’t already, you’ll need to clear out the enemies then speak with him again.

Report back to Taka’ri

Return to Taka’ri and speak with her. Afterwards, the Stories of Old and New will complete!

For more Avatar: Frontiers of Pandora guides and walkthrough, click here!

Avatar Frontiers of Pandora Logo
Guides

Flavor of the Past – Avatar Frontiers of Pandora Guide

by NightlyGamingBinge in

Welcome to NGB and our guide for the Flavor of the Past side quest in Avatar: Frontiers of Pandora. Here’ll we cover how to start the quest and what all you’ll need to do in order to complete it.

How to Start Flavor of the Past

In order to start this quest, you’ll need to speak with a Gatherer at Blue Stone Haven in the Cradling Pines of the Clouded Forest.

Flavor of the Past Objectives

Talk to Reyzu

Travel to the Crooked Seat camp in the southeastern corner of Cradling Pines of Clouded Forest and speak with Reyzu.

Deliver gifts of friendship to the Aranahe and Zeswa

For this objective, you’ll first need to make Okul’s Kxan’epe using Sage Mushroom (Superior) and Stagfly Ant Nectar (Superior).

Sage Mushroom

Where to find sage mushrooms in Avatar

Sage Mushrooms are commonly found in caves throughout Pandora and are best picked at night.

Stagfly Ant Nectar

where to find Stagfly ant nectar in Avatar

The Stagfly Ant Nectar can be obtained from Stagfly Ant Hives. The Stagfly Ant Hives are commonly found in the Cluster Pines biome of the Clouded Forest. Rarer ant hives are found east of the Crying Giant in the Clouded Forest and the nectar is best picked during the day. When you harvest it, pull it northwest.

Deliver Dishes

Once you’ve gathered the necessary ingredients and crafted 2 Okul’s Kxan’epe, you’ll need to deliver them to Kin in the Cheesemaker’s Tent in The Circle and Relun at the Hearth in Hometree. In return, Kin will give you Kin’s Zangke, and Relun will give you Relun’s Fruity Tea.

Bring gifts to Setral

Speak with Setral at the Crooked Seat to complete the Flavor of the Past quest.

For more Avatar: Frontiers of Pandora guides and walkthroughs, click here!