Below is a walkthrough for the Lost Wedding Ring support request in The Legend of Heroes: Trails from Zero. To obtain this quest, speak with Vice Commissioner Pierre in the conference room of the CPD in the Administrative District after completing the Geofront – B Sector.
Client: Vice Commissioner Pierre
Salary: 1000 mira
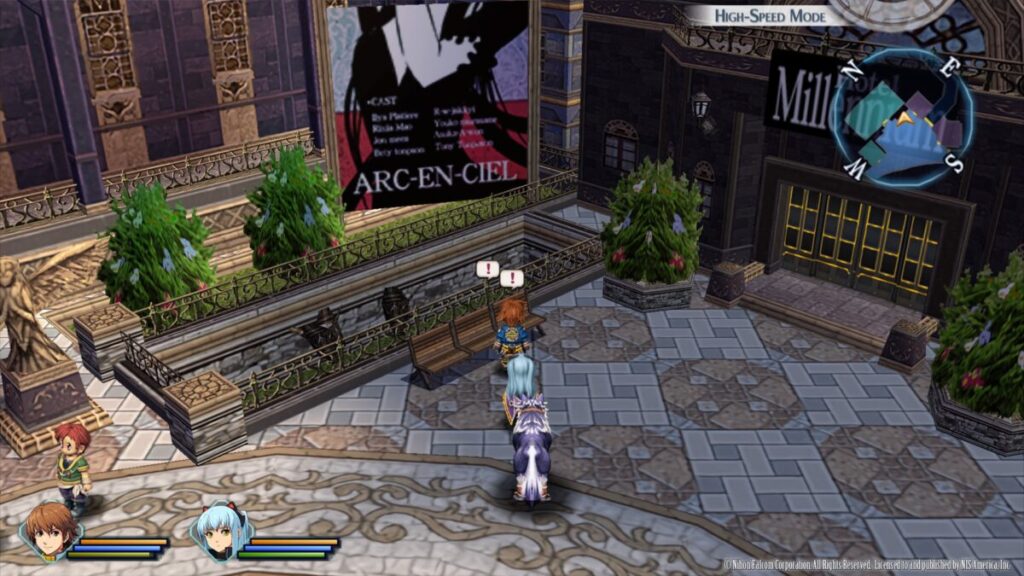
First up, head to the SSS and interact with Zeit who is sleeping by the couch near the terminal. Speak with him again and select to “ask for help”. You’ll then be teleported to the Entertainment District. When you gain control, head up the stairs to the northeast and interact with the small fence panel.
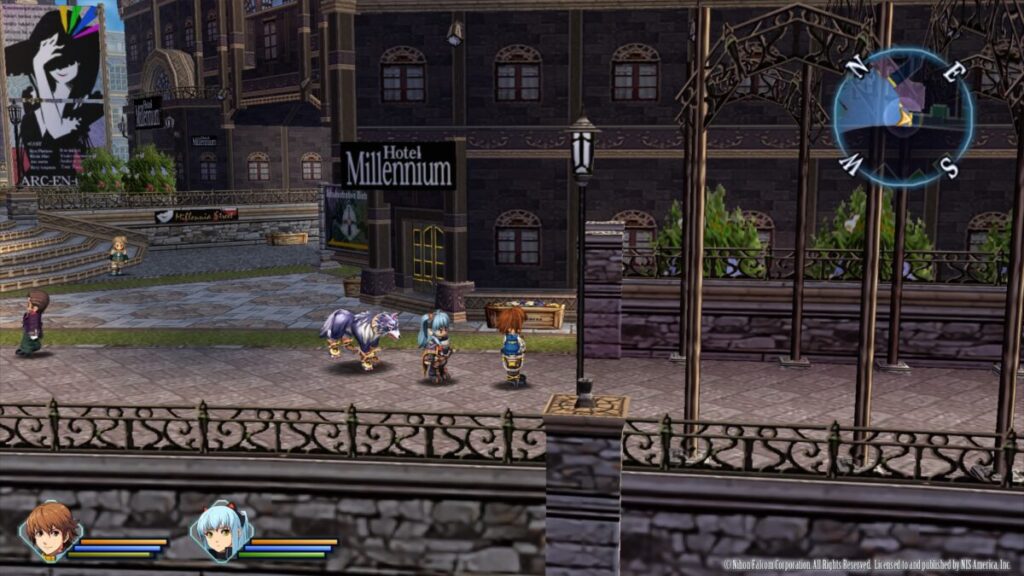
Next, interact with the bench in front of the Hotel Millennium.
Then head inside the Hotel Millennium and work your way up and down the stairs until you reach the exit to the hotel on the other side. When you exit from this side, a cutscene will trigger. Afterwards, exit via the map transition to the Back Alley.
Head inside Imelda then enter Garante to the west. Speak with Eric behind the bar then speak with Sandra who is sleeping on the counter. She’ll give you Carnelia Wedding Ring and the quest will complete! Make sure to head over to the terminal in the SSS to report this quest!
This is a guide on all Mobile Suits that can be acquired in SD Gundam Battle Alliance and how to unlock them. They are listed based on how they appear in the MS Settings screen in the game sorted by which series the suits are from. This list does not include DLC Mobile Suits. Those can be found here. Please note that this guide is a work in progress and will be updated as we progress the game.
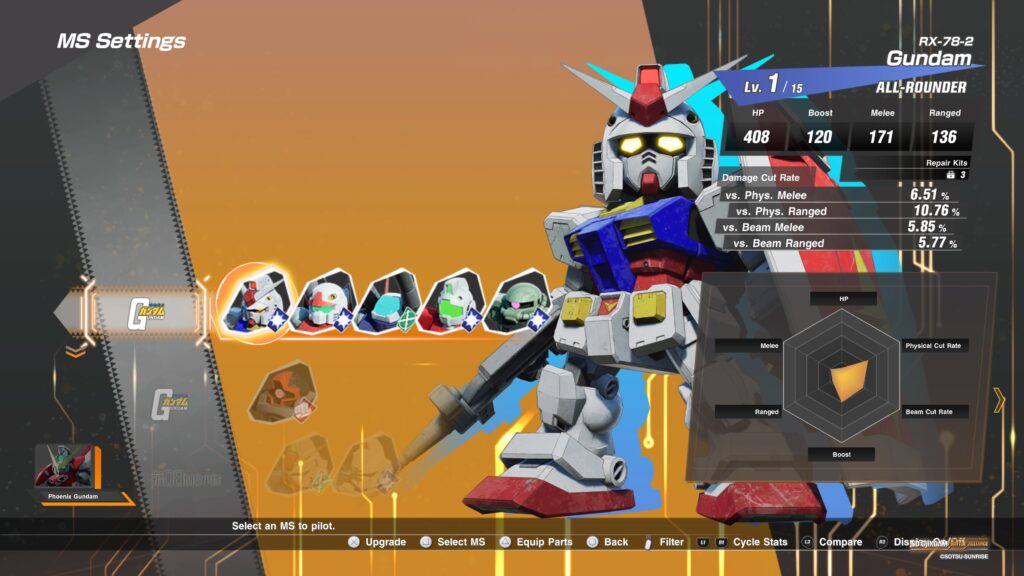
Mobile Suit Gundam
Gundam
In order to unlock this Mobile Suit, you’ll need to obtain the following blueprint(s) from the mission(s) listed.
Gundam Blueprint I
Directory 1A – Ramba Ral’s Attack
Gundam Blueprint II
Directory 2D – Trails to the Land
Gundam Blueprint III
Directory 3C – Big Zam’s Last Stand
Guncannon
In order to unlock this Mobile Suit, you’ll need to obtain the following blueprints from the mission(s) listed.
Guncannon Blueprint I
Directory 1B – A Future Reward
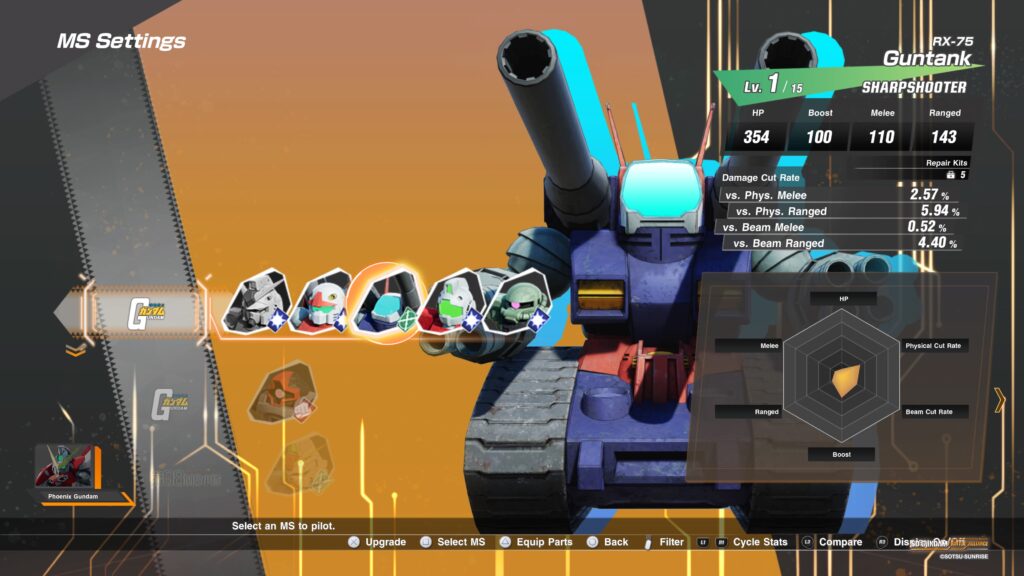
Guntank
In order to unlock this Mobile Suit, you’ll need to obtain the following blueprint(s) from the mission(s) listed.
Guntank Blueprint I
Directory 1B – A Future Reward
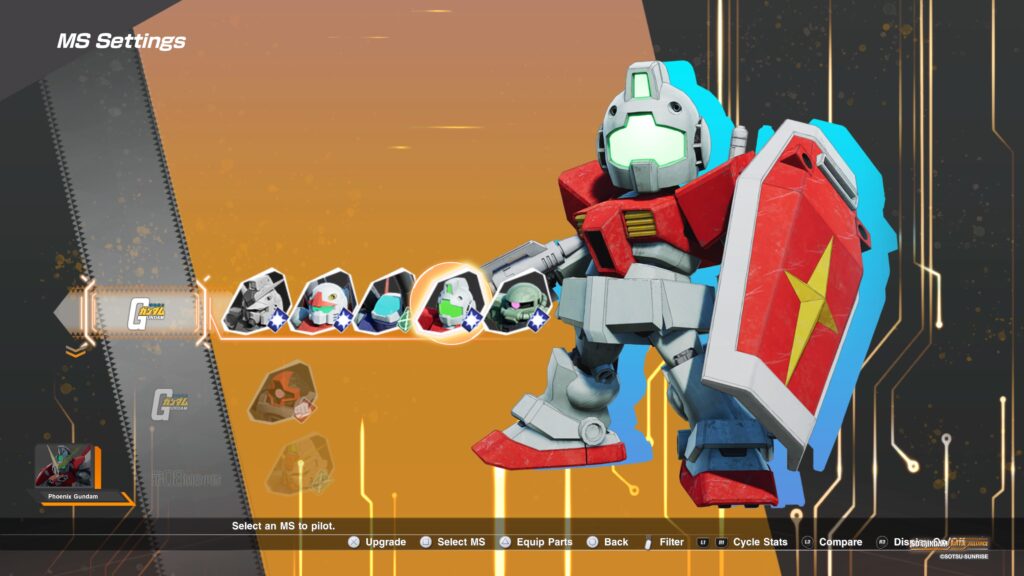
GM
You will start with this Mobile Suit when beginning the game.
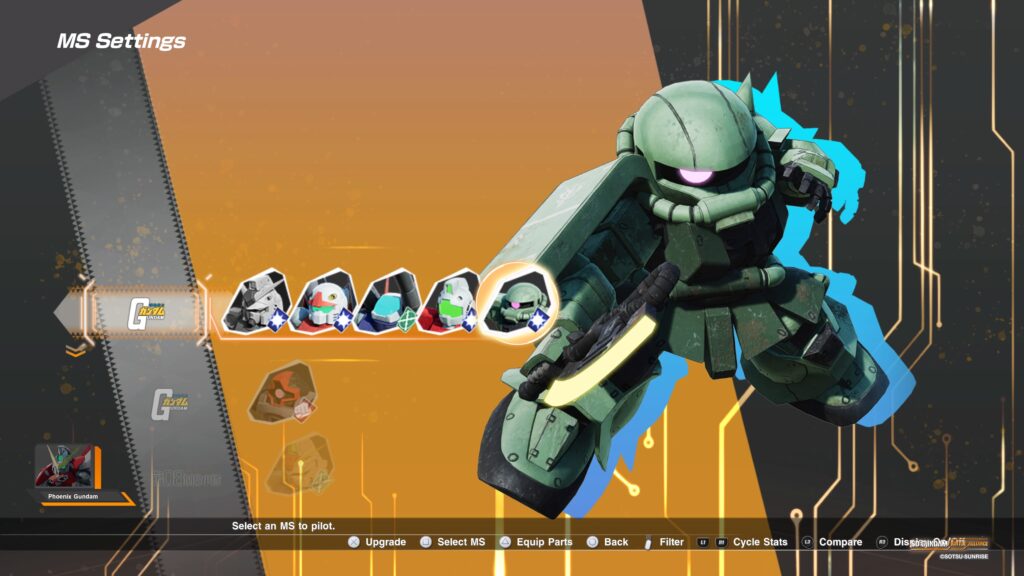
Zaku II Type F
This Mobile Suit is unlocked automatically after completing the first mission.
Dom
In order to unlock this Mobile Suit, you’ll need to obtain the following blueprint(s) from the mission(s) listed.
Dom Blueprint I
Directory 1A – Ramba Ral’s Attack
Z’Gok (Char)
In order to unlock this Mobile Suit, you’ll need to obtain the following blueprint(s) from the mission(s) listed.
Z’Gok (Char) Blueprint I
Directory 4A – The Final Light
Z’Gok (Char) Blueprint II
Directory 2A – The Descending Sword (Chaos)
Gelgoog (Char)
In order to unlock this Mobile Suit, you’ll need to obtain the following blueprint(s) from the mission(s) listed.
Gelgoog (Char) Blueprint I
Directory 4B – Encounters in Space
Gelgoog (Char) Blueprint II
Coming Soon…
08th MS Team
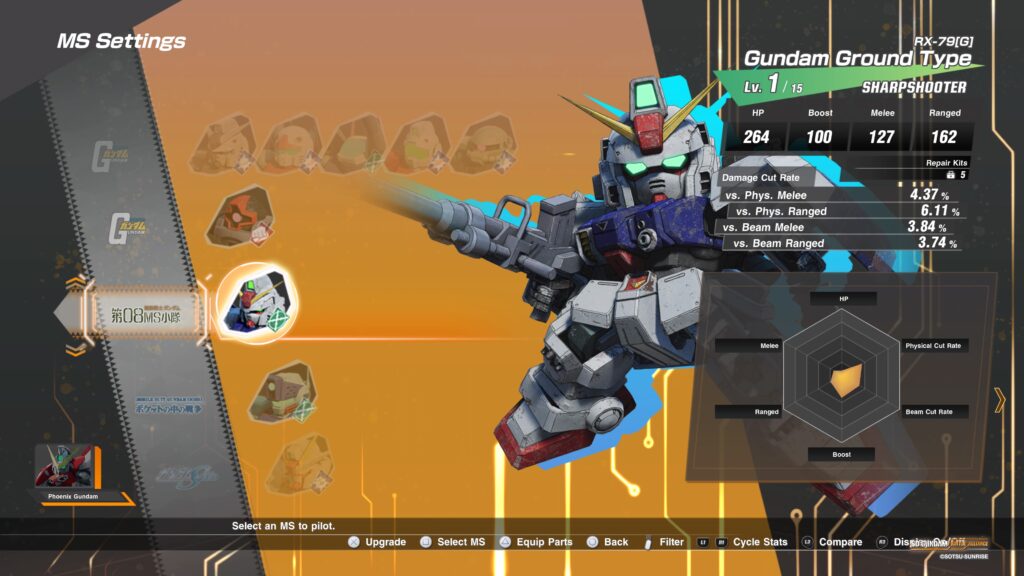
Gundam Ground Type
In order to unlock this Mobile Suit, you’ll need to obtain the following blueprint(s) from the mission(s) listed.
Gundam Ground Type Blueprint I
Directory 2A – Seen and Unseen
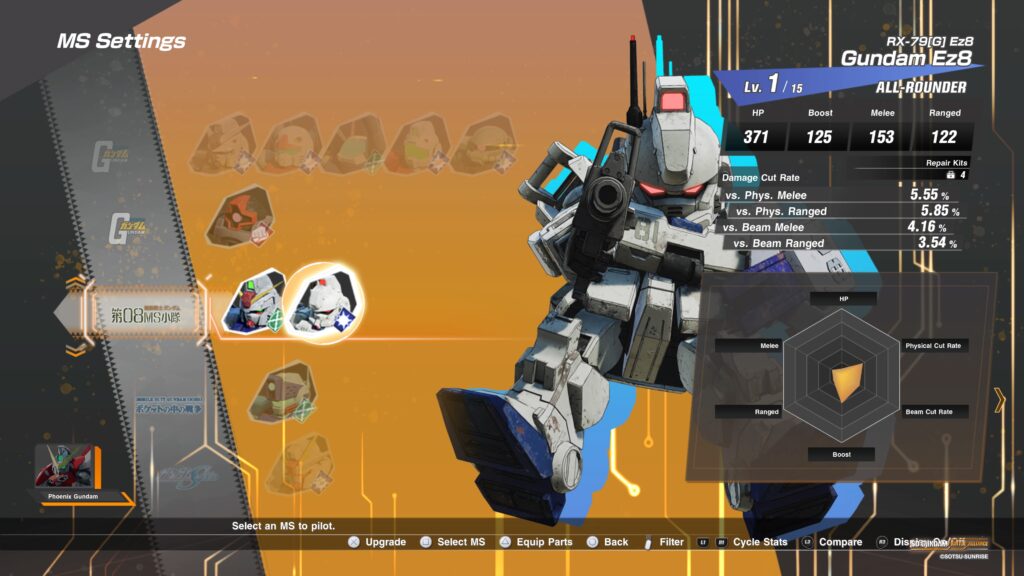
Gundam EZ8
In order to unlock this Mobile Suit, you’ll need to obtain the following blueprint(s) from the mission(s) listed.
Gundam EZ8 Blueprint I
Directory 2B – The Shuddering Mountain, Part II
Directory 1C – Zero VS Epyon (Chaos)
Gouf Custom
In order to unlock this Mobile Suit, you’ll need to obtain the following blueprint(s) from the mission(s) listed.
Gouf Custom Blueprint I
Directory 1C – Zero VS Epyon (Chaos)
Mobile Suit Gundam 0080
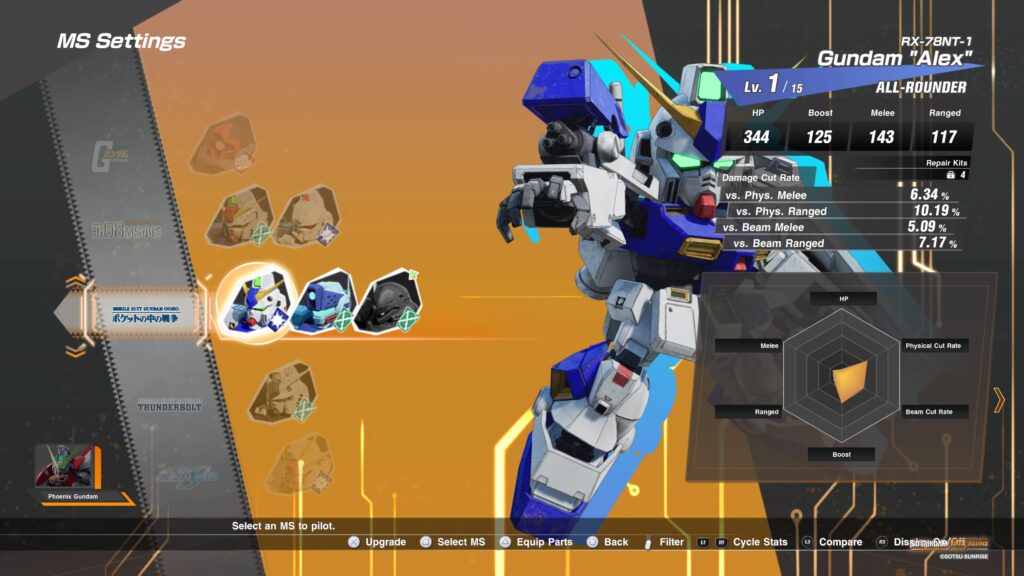
Gundam Alex
In order to unlock this Mobile Suit, you’ll need to obtain the following blueprint(s) from the mission(s) listed.
Gundam Alex Blueprint I
Directory 3B – Over the River and Through the Woods
Directory 1B – Tekkadan (Chaos)
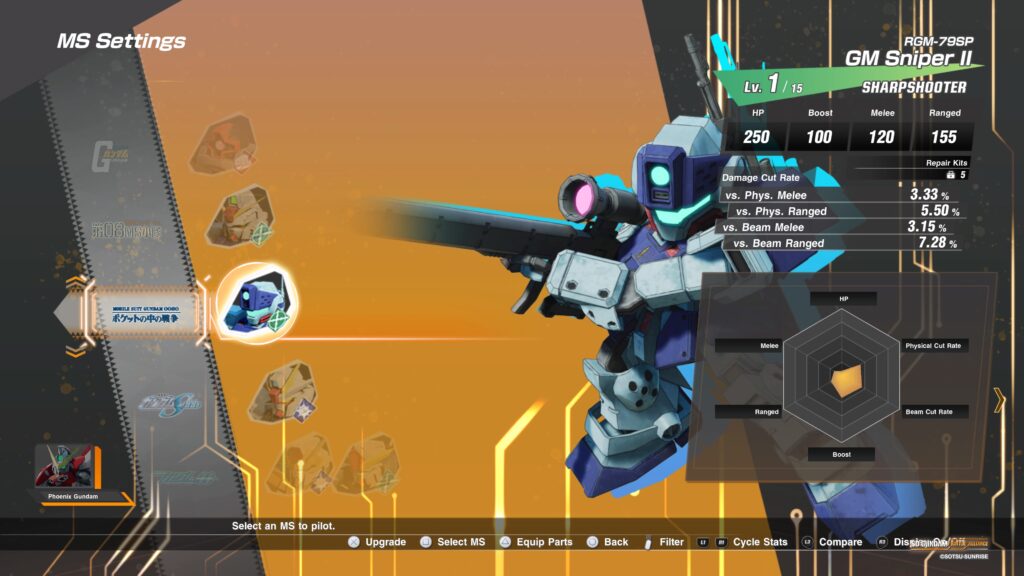
GM Sniper II
In order to unlock this Mobile Suit, you’ll need to obtain the following blueprint(s) from the mission(s) listed.
GM Sniper II Blueprint I
Directory 1D – In the Name of G
Directory 3A – Battle for Chryse
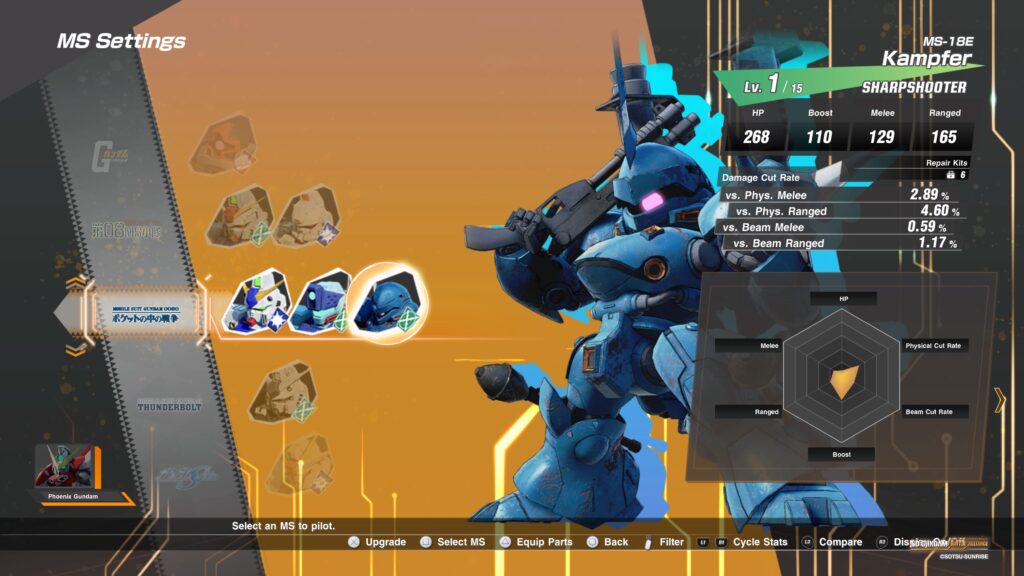
Kampfer
In order to unlock this Mobile Suit, you’ll need to obtain the following blueprint(s) from the mission(s) listed.
Kampfer Blueprint I
Directory 3B – Over the River and Through the Woods
Directory 1B – Tekkadan (Chaos)
Mobile Suit Gundam Thunderbolt
Full Armor Gundam
In order to unlock this Mobile Suit, you’ll need to obtain the following blueprint(s) from the mission(s) listed.
Full Armor Gundam Blueprint I
Directory 3C – Battle for Solomon
Full Armor Gundam Blueprint II
Coming Soon…
Psycho Zaku
In order to unlock this Mobile Suit, you’ll need to obtain the following blueprint(s) from the mission(s) listed.
Psycho Zaku Blueprint I
Coming Soon…
Psycho Zaku Blueprint II
Coming Soon…
Mobile Suit Gundam 008: Stardust Memory
Gundam GP03S Stamen
In order to unlock this Mobile Suit, you’ll need to obtain the following blueprint(s) from the mission(s) listed.
Gundam GP03S Stamen Blueprint I
Directory 4B – Encounters in Space
Gundam GP03S Stamen Blueprint II
Coming Soon…
Mobile Suit Zeta Gundam
Zeta Gundam
In order to unlock this Mobile Suit, you’ll need to obtain the following blueprint(s) from the mission(s) listed.
Zeta Gundam Blueprint I
Directory 4B – Space Fortress: A Baoa Qu
You’ll need to follow the west route after defeating the first group of enemies. Two objectives will show up on the map.
Directory 4C – Forever Four
Zeta Gundam Blueprint II
Directory 4C – Forever Four
Hyaku Shiki
In order to unlock this Mobile Suit, you’ll need to obtain the following blueprint(s) from the mission(s) listed.
Hyaku Shiki Blueprint I
Directory 4C – Storm over Kilimanjaro
Qubeley
In order to unlock this Mobile Suit, you’ll need to obtain the following blueprint(s) from the mission(s) listed.
Qubeley Blueprint I
Coming soon…
Qubeley Blueprint II
Coming soon…
The-O
In order to unlock this Mobile Suit, you’ll need to obtain the following blueprint(s) from the mission(s) listed.
The-O Blueprint I
Coming soon…
The-O Blueprint II
Coming Soon…
Mobile Suit Gundam ZZ
ZZ Gundam
In order to unlock this Mobile Suit, you’ll need to obtain the following blueprint(s) from the mission(s) listed.
ZZ Gundam Blueprint I
Coming soon…
ZZ Gundam Blueprint II
Coming soon…
Mobile Suit Gundam: Char’s Counterattack
Nu Gundam
In order to unlock this Mobile Suit, you’ll need to obtain the following blueprint(s) from the mission(s) listed.
Nu Gundam Blueprint I
Coming soon…
Nu Gundam Blueprint II
Coming soon…
Nu Gundam Blueprint III
Coming soon…
Sazabi
In order to unlock this Mobile Suit, you’ll need to obtain the following blueprint(s) from the mission(s) listed.
Sazabi Blueprint I
Coming soon…
Sazabi Blueprint II
Coming soon…
Sazabi Blueprint III
Directory 2A – The Descending Sword (Chaos)
Mobile Suit Gundam Unicorn
Unicorn Gundam
In order to unlock this Mobile Suit, you’ll need to obtain the following blueprint(s) from the mission(s) listed.
Unicorn Gundam Blueprint I
Coming soon…
Unicorn Gundam Blueprint II
Coming soon…
Full Armor Unicorn Gundam
In order to unlock this Mobile Suit, you’ll need to obtain the following blueprint(s) from the mission(s) listed.
Full Armor Unicorn Gundam Blueprint I
Coming soon…
Full Armor Unicorn Gundam Blueprint II
Coming soon…
Full Armor Unicorn Gundam Blueprint III
Coming soon…
Banshee
In order to unlock this Mobile Suit, you’ll need to obtain the following blueprint(s) from the mission(s) listed.
Banshee Blueprint I
Coming soon…
Banshee Blueprint II
Coming soon…
Banshee Norn
In order to unlock this Mobile Suit, you’ll need to obtain the following blueprint(s) from the mission(s) listed.
Banshee Norn Blueprint I
Coming soon…
Banshee Norn Blueprint II
Coming soon…
Banshee Norn Blueprint III
Coming soon…
Kshatriya
In order to unlock this Mobile Suit, you’ll need to obtain the following blueprint(s) from the mission(s) listed.
Kshatriya Blueprint I
Coming soon…
Kshatriya Blueprint II
Coming soon…
Kshatriya Blueprint III
Coming soon…
Sinanju
In order to unlock this Mobile Suit, you’ll need to obtain the following blueprint(s) from the mission(s) listed.
Sinanju Blueprint I
Coming soon…
Sinanju Blueprint II
Coming soon…
Sinanju Blueprint III
Coming soon…
Gundam F91
Gundam F91
In order to unlock this Mobile Suit, you’ll need to obtain the following blueprint(s) from the mission(s) listed.
Gundam F91 Blueprint I
Directory 4D – Winds to the Heavens
Directory 3B – Over the River and Through the Woods (Chaos)
Gundam F91 Blueprint II
Directory 3B – Over the River and Through the Woods (Chaos)
Mobile Suit Crossbone Gundam
Crossbone Gundam X1
In order to unlock this Mobile Suit, you’ll need to obtain the following blueprint(s) from the mission(s) listed.
Crossbone Gundam X1 Blueprint I
Coming soon…
Crossbone Gundam X1 Blueprint II
Coming soon…
Crossbone Gundam X2
In order to unlock this Mobile Suit, you’ll need to obtain the following blueprint(s) from the mission(s) listed.
Crossbone Gundam X2 Blueprint I
Coming soon…
Crossbone Gundam X2 Blueprint II
Coming soon…
Turn A Gundam
Turn A Gundam
In order to unlock this Mobile Suit, you’ll need to obtain the following blueprint(s) from the mission(s) listed.
Turn A Gundam Blueprint I
Coming soon…
Turn A Gundam Blueprint II
Coming soon…
Turn X
In order to unlock this Mobile Suit, you’ll need to obtain the following blueprint(s) from the mission(s) listed.
Turn X Blueprint I
Coming soon…
Turn X Blueprint II
Coming soon…
Mobile Fighter G Gundam
Burning Gundam
In order to unlock this Mobile Suit, you’ll need to obtain the following blueprint(s) from the mission(s) listed.
Burning Gundam Blueprint I
Coming soon…
Burning Gundam Blueprint II
Coming soon…
Master Gundam
In order to unlock this Mobile Suit, you’ll need to obtain the following blueprint(s) from the mission(s) listed.
Master Gundam Blueprint I
Coming soon…
Master Gundam Blueprint II
Coming soon…
Mobile Suit Gundam Wing
Gundam Epyon
In order to unlock this Mobile Suit, you’ll need to obtain the following blueprint(s) from the mission(s) listed.
Gundam Epyon Blueprint I
Coming soon…
Gundam Epyon Blueprint II
Coming soon…
After War Gundam X
Gundam Double X
In order to unlock this Mobile Suit, you’ll need to obtain the following blueprint(s) from the mission(s) listed.
Gundam Double X Blueprint I
Coming soon…
Gundam Double X Blueprint II
Coming soon…
Gundam Seed
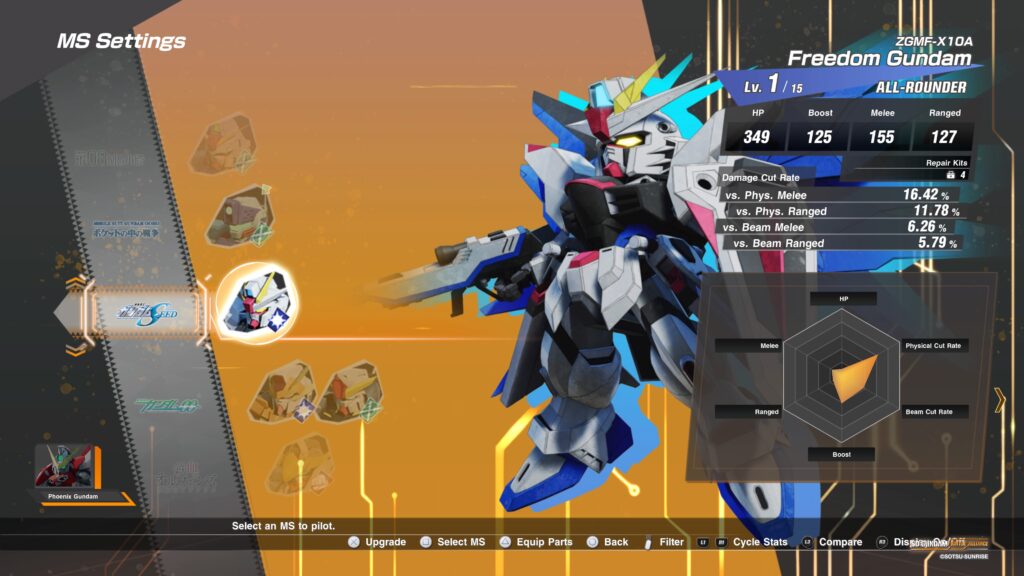
Freedom Gundam
In order to unlock this Mobile Suit, you’ll need to obtain the following blueprint(s) from the mission(s) listed.
Freedom Gundam Blueprint I
Directory 2C – Victory Song of the Resistance
Freedom Gundam Blueprint II
Directory 2A – The Descending Sword
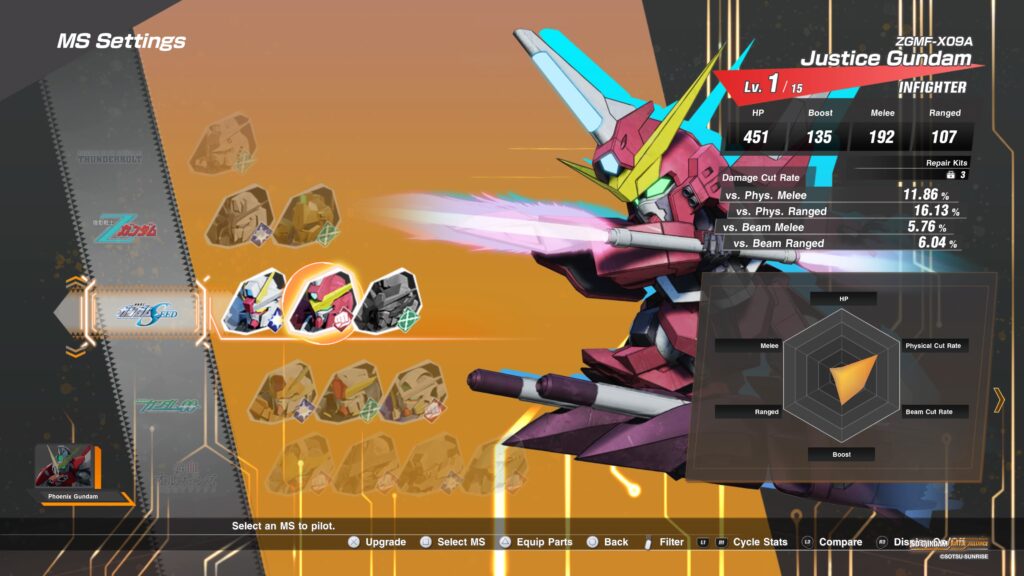
Justice Gundam
In order to unlock this Mobile Suit, you’ll need to obtain the following blueprint(s) from the mission(s) listed.
Justice Gundam Blueprint I
Directory 4A – To a Future that Never Ends
Providence Gundam
In order to unlock this Mobile Suit, you’ll need to obtain the following blueprint(s) from the mission(s) listed.
Providence Gundam Blueprint I
Directory 4B – Space Fortress: A Baoa Qu
Providence Gundam Blueprint II
Directory 4A – To a Future that Never Ends
Gundam Seed Astray
Gundam Astray Gold Frame Amatsu Mina
In order to unlock this Mobile Suit, you’ll need to obtain the following blueprint(s) from the mission(s) listed.
Gundam Astray Gold Frame Amatsu Mina Blueprint I
Coming soon…
Gundam Astray Gold Frame Amatsu Mina Blueprint II
Coming soon…
Mobile Suit Gundam 00
00 Raiser
In order to unlock this Mobile Suit, you’ll need to obtain the following blueprint(s) from the mission(s) listed.
00 Raiser Blueprint I
Directory 2B – The Shuddering Mountain, Part II (Chaos)
00 Raiser Blueprint II
Coming Soon…
Cherudim Gundam
In order to unlock this Mobile Suit, you’ll need to obtain the following blueprint(s) from the mission(s) listed.
Cherudim Gundam Blueprint I
Directory 2B – The Shuddering Mountain, Part II (Chaos)
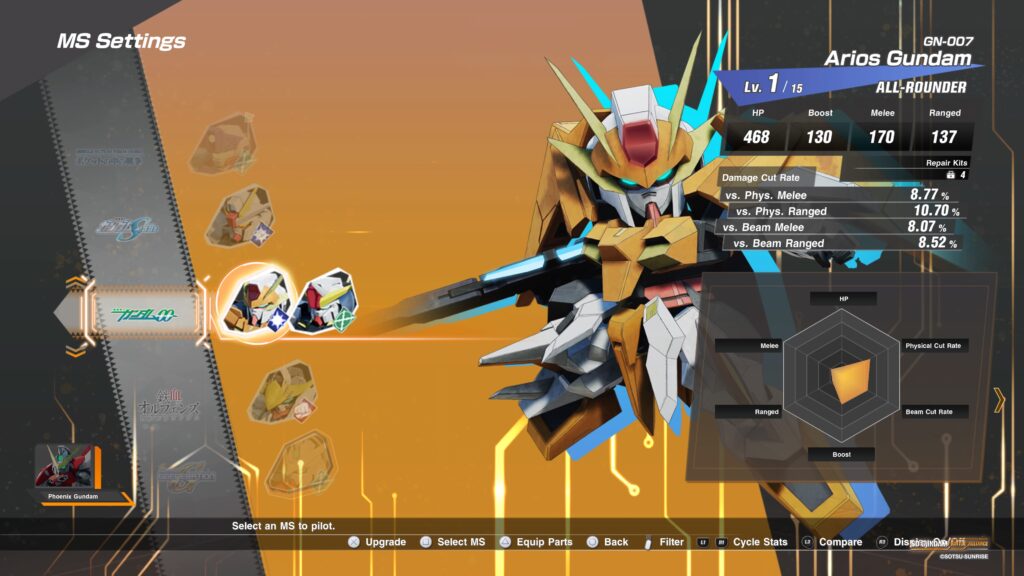
Arios Gundam
In order to unlock this Mobile Suit, you’ll need to obtain the following blueprint(s) from the mission(s) listed.
Arios Gundam Blueprint I
Directory 2A – Seen and Unseen
Directory 2C – I Can Hear a Song
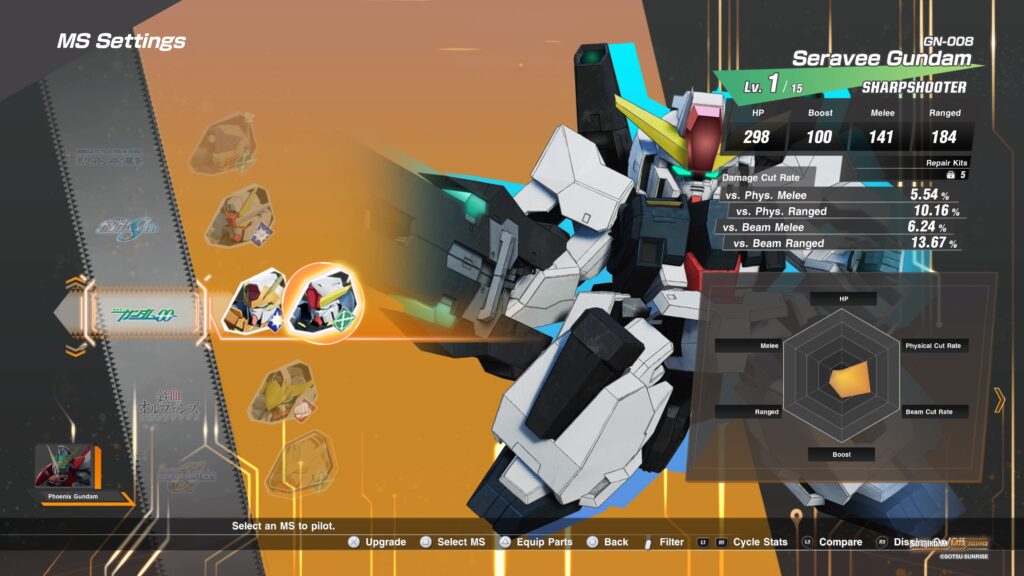
Seravee Gundam
In order to unlock this Mobile Suit, you’ll need to obtain the following blueprint(s) from the mission(s) listed.
Seravee Gundam Blueprint I
Directory 2B – The Shuddering Mountain, Part I
Directory 2C – I Can Hear a Song
Gundam Exia Repair II
In order to unlock this Mobile Suit, you’ll need to obtain the following blueprint(s) from the mission(s) listed.
Gundam Exia Repair II Blueprint I
Directory 2C – I Can Hear a Song
Gundam Exia Repair II Blueprint II
Directory 2D – Trails to the Land
Mobile Suit Gunda Iron-Blooded Orphans
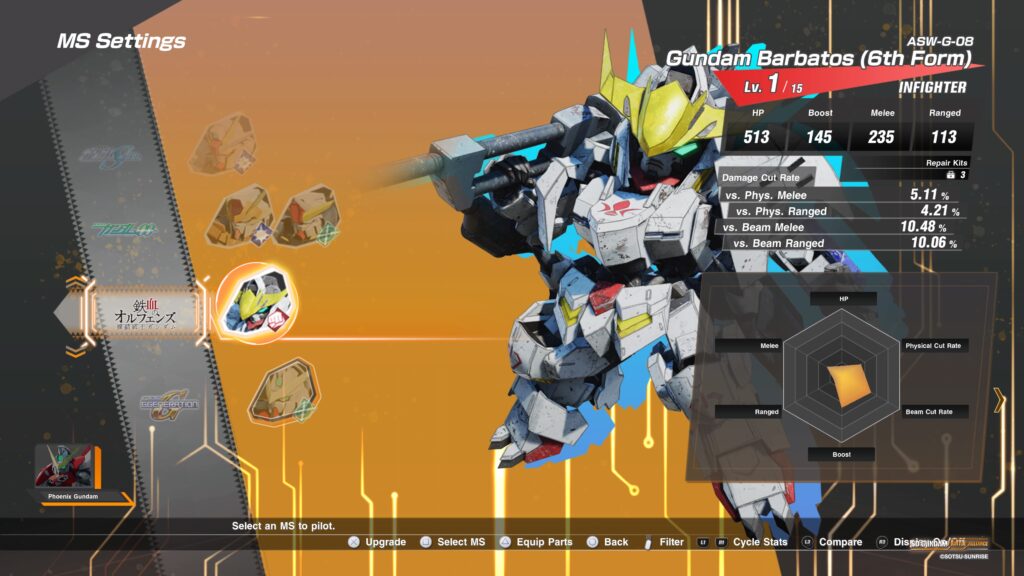
Gundam Barbatos (6th Form)
In order to unlock this Mobile Suit, you’ll need to obtain the following blueprint(s) from the mission(s) listed.
Gundam Barbatos (6th Form) Blueprint I
Directory 1B – Tekkadan
Gundam BarbATOS Lupus
In order to unlock this Mobile Suit, you’ll need to obtain the following blueprint(s) from the mission(s) listed.
Gundam Barbatos Lupus Blueprint I
Directory 4B – Space Fortress: A Baoa Qu
Directory 3A – Hunter of Angels
Gundam Barbatos Lupus Blueprint II
Directory 3A – Hunter of Angels
Gundam Gusion Rebake Full City
In order to unlock this Mobile Suit, you’ll need to obtain the following blueprint(s) from the mission(s) listed.
Gundam Gusion Rebake Full City Blueprint I
Directory 4C – Storm over Kilimanjaro
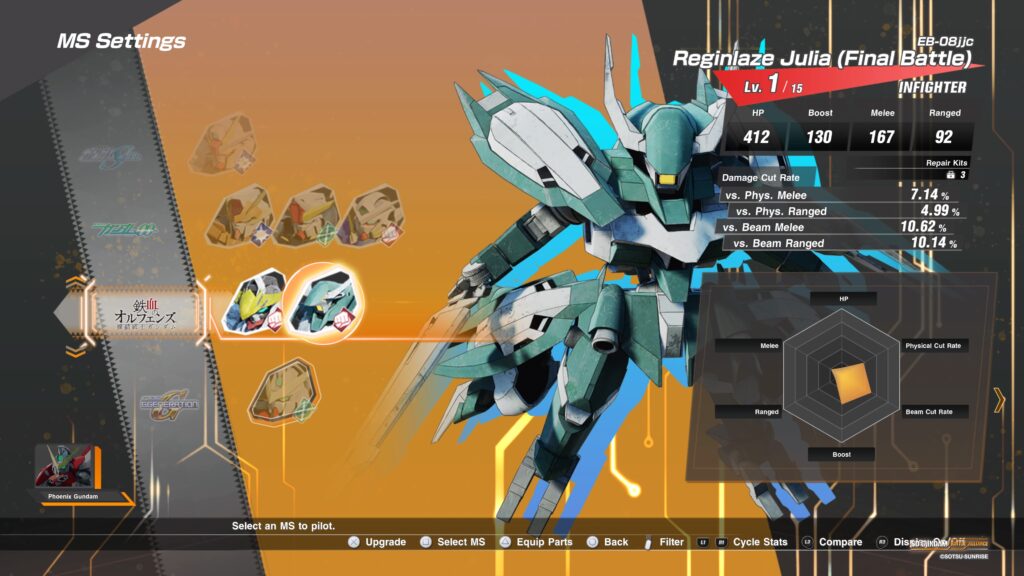
Reginlaze Julia (Final Battle)
In order to unlock this Mobile Suit, you’ll need to obtain the following blueprint(s) from the mission(s) listed.
This is a guide for The Ultimate Vessel quest in Xenoblade Chronicles 3. It is obtained automatically as you progress the story in Chapter 7.
After receiving the quest, travel to the Hall of the Serene in the Aetia Region, Upper to trigger a cutscene. When it concludes, you’ll receive the Side Story: Noah hero quest. For a guide on this hero quest, click here! After you complete the hero quest, return to Samon at the Sentridge Harbor in the Cadensia Region. After you speak with him, the quest will complete!
Below is a walkthrough for the Castle Access standard quest in Xenoblade Chronicles 3. You’ll automatically obtain this quest as part of the story.
Fast travel to the Fuller Elevator Landing landmark then travel north and speak with Samon. Afterwards, head to the objective on the south side of the City and speak with Timna. Next, fast travel to the Material Storage Warehouse landmark (southwest of the Dolgan Cliff landmark at the highest level you can reach via multiple ladders) and speak with Miyori. When speaking with her, you’ll have the following options:
Help her
Stay put
We chose to stay put as instructed. A battle will ensue following a brief cutscene. Defeat the lower level 40 Planaa Ansel. You’ll receive the ethel cylinders that you needed. Return to Samon near the Sentridge Harbor Control landmark and speak with him. After the cutscene, the quest will complete.
Below is a walkthrough for the Forgotten Supplies standard quest in Xenoblade Chronicles 3. To obtain this quest, listen in on the conversations around Colony 9. Afterwards, head to the rest spot and discuss Colony 9’s Situation.
Head to the objective in Murmur Rise, which is northeast of Kamos Guidepost. As you approach the chest, an event will trigger leading to a fight with Level 28 Troll Grebel. When you defeat them, another event will trigger. You’ll have the following options:
Discuss the matter.
Hand it over.
If you select the “Discuss the matter” option, it will lead to a fight with the Provision Team. After defeating them, interact with the supply drop then return to Camilla at Colony 9 and speak with her to complete the quest.
Below is a walkthrough for The Kind Right Hand hero quest in Xenoblade Chronicles 3. You’ll automatically obtain this quest as part of the story in Chapter 3.
Objective: Defeat the Mysterious Keeves Unit
After the cutscene concludes, defeat the Level 21 and Level 19 enemies to continue to another cutscene. You’ll then be tasked with collecting the following parts:
Levnis Endoskeleton – Just east of the Shikashaka Mesa landmark; Cutscene
Levnis Self-Charger – East of the Igno Viaduct in Caitlin Drum; Cutscene; Fight a Level 21 Equites
Levnis Auxiliary CPU – East of Elsie’s Spout along route to Tirkin HQ; Cutscene
Return to Elsie’s Spout and approach the machine to trigger another cutscene. When it concludes, follow Valdi’s Mini-Levnis to Colony 30. A cutscene will trigger followed by a fight with a Level 22 Incomplete Siege-Lev. Defeat it! After the cutscene, the quest will complete.
Below is a guide on the Tamers and Digimon you’ll face for the Silver Cup in the Offline Colosseum on Broadway 4F during Digimon Story Cyber Sleuth: Complete Edition. You can start the colosseum by interacting with the red arcade machine near Oruru. You’ll have to have won the Bronze Cup before the Silver Cup is available.
Modern Girl
Lopmon
Housewife
Patamon
Tanemon
Guy
Syakomon
Elecmon
Female Clerk
Armadillomon
ToyAgumon
Tsunomon
Stray Hacker
DemiDevimon
Impmon
Gazimon
Veteran Businessman
Gaomon
Hagurumon
Hawkmon
For winning the Silver Cup, you’ll get a Brave Point D which gives +5,000 EXP for one Digimon.
Below is a guide on the Tamers and Digimon you’ll face for the Bronze Cup in the Offline Colosseum on Broadway 4F during Digimon Story Cyber Sleuth: Complete Edition. You can start the colosseum by interacting with the red arcade machine near Oruru.
Boy
Botamon
Punimon
Girl
Tokomon
Poyomon
Businessman
Kuramon x2
Tsumemon
Office Lady
Pabumon
Nyaromon
Wanyamon
Demon Hacker
Guilmon (virus-type)
For winning the Bronze Cup, you’ll get a Brave Point E, which gives +2,500 EXP for one Digimon.
Below is a list of all the Digimon in the game and what levels they learn their skills/moves. Please note when you see SM that means that skill is a Digimon’s Special Move that is unique to them.
Training I
Digimon
LVL / Skill
Botamon
SM – Bubble Blow
Kuramon
SM – Glare Eye
Pabumon
SM – Adhesive Bubble Blow
Punimon
SM – Bubble Blow
Poyomon
SM – Super Bubble Blow
Training II
Digimon
LVL / Skill
Bukamon
SM – Air Bubbles 5 – Hydro Water I
Koromon
SM – Bubbles 5 – Wolkenapalm I
Motimon
SM – Elastic Bubbles 5 – Power Energy I
Nyaromon
SM – Fox Tail 5 – Saint Knuckle I
Pagumon
SM – Poison Bubbles S – Nightmare I
Tanemon
SM – Adhesive Bubble Blow 5 – Gaia Element I
Tokomon
SM – Bite 5 – Heavy Strike I
Tsumemon
SM – Nail Scratch S – Destruction Cannon I
Tsunomon
SM – Bubbles 5 – Comet Hammer I
Wanyamon
SM – Smile Fang 5 – Wind Claw I
Yokomon
SM – Soap Flower 5 – Crescent Leaf I
Rookie
Digimon
LVL / Skill
Agumon
SM – Pepper Breath 6 – Heavy Strike I 12 – Attack Charge
Armadillomon
SM – Diamond Shell 6 – Grand Rock I 12 – Shock
Betamon
SM – Electric Shock 6 – Ice Archery I 12 – Anti-Paralysis
Biyomon
SM – Spiral Twister 6 – Sonic Void I 12 – Mental Charge
Chuumon
SM – Cheese Bomb 6 – Heavy Strike I 12 – Escape Dash
Dorumon
SM – Metal Cannon 6 – Wolkenapalm I 12 – Critical Charge
Elecmon
SM – Thunder Cloud 6 – Heaven’s Thunder I 12 – Ripping Net
After completing the above side case, interact with the TV to enter EDEN and travel to Kowloon Lv. 1.
Kowloon Lv. 1
Head to the park in the next area of Kowloon then approach Nokia to trigger an event leading the a battle against DemiDevimon and Gazimon. After you defeat them, head deeper into Kowloon. Once in the last area of Kowloon Lv. 1, Nokia will comment on how neither Agumon and Gabumon are not there. She’ll then request we check out Kowloon Lv. 2.
Kowloon Lv. 2
Work your way to the end of Lv. 2. Once there, Nokia will mention there is again no sign of the Digimon and will request you head to Lv. 3. Return to the first area of Kowloon Lv. 2 then head over to the firewall just past the access point. Use the Wall Crack hacking skill to remove the firewall. Take the green platform to reach Lv. 3.
Kowloon Lv. 3
An event will trigger as soon as you reach the area. When it concludes, head to Area 2.
Kowloon Lv. 3 Digimon
Betamon
Patamon
Tokomon
ToyAgumon
Tsunomon
In the second area, talk to the Obstructing Hacker blocking the path forward. You’ll receive the “How to get a girlfriend” keyword. Next, head down the left path to find a chest containing HP Spray C. A chest containing SP Capsule C x3 can be found on the northeastern side of the area. On the southwestern side, you can find a chest containing ATK Boost. Return to the previous area and follow the eastern path to reach another area. Speak with the Capricious Hacker down the stairs to receive the “Friend” keyword. Continue heading along the walkway east. You’ll come across the Cheerful Hacker. If you ask him how to get a girlfriend, you’ll receive “A Smile” keyword. Near that hacker there will be a chest containing HP Capsule C x3. If you jump down to a lower platform, there will be two guys talking. Approach them to receive the “Digimon” keyword. On the ground next to them, you can find a Ninjamon Medal. Next, follow the westernmost path north. Along the northern path, you’ll find a Stray Hacker whom you can ask how to get a girlfriend. They will give you the keyword “Mixer”. If you keep heading east from him, you’ll find a chest with Memory Up. Return back to the previous area and speak with the Obstructing Hacker. Tell him all 4 keywords. When he moves, follow the path north. Work your way through the next area, grabbing the chests along the way to find the below:
Topaz
Export
Revival Capsule x2
There is an Ikkakumon Medal on the first platform you can drop down onto. When you reach the next area, an event will trigger. Once it ends, head deeper into Kowloon Lv. 3. Approach the hackers and the Digimon to trigger an event leading to a battle against BlackGatomon and Goblimon. Defeat them to begin another event. This event will be followed by another fight against Devimon (virus) and 2 Meramon (data). Defeat them then enjoy the event.
This site uses cookies. By continuing to use this website, you are giving consent to cookies being used. For more information on cookies, view our Privacy Policy.OkPrivacy Policy