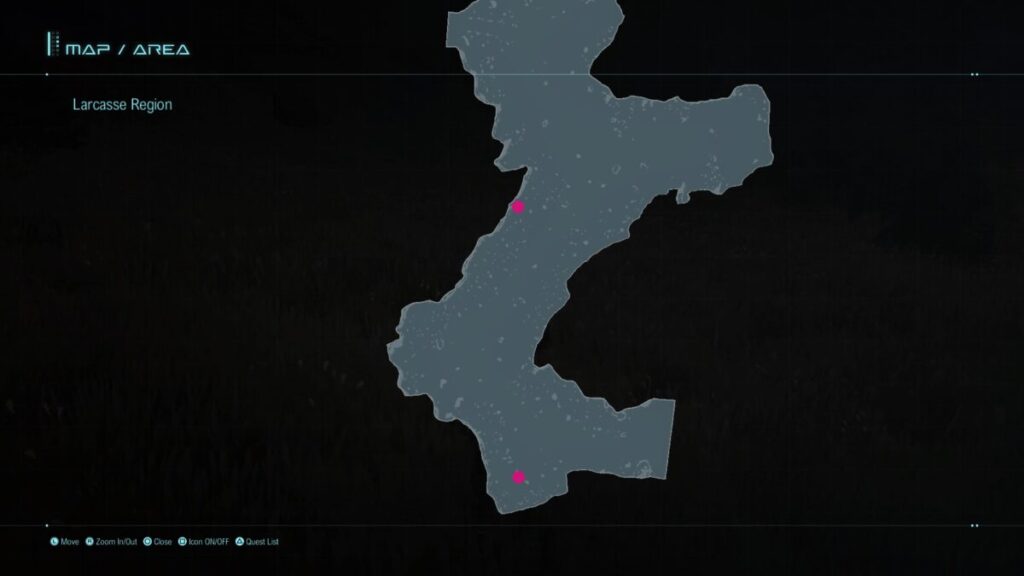
Below is a guide on the collectibles found in the Larcasse Region of Star Ocean: The Divine Force. These collectibles consist of mini-bunnies, treasure chests, gatherable materials and enemies!
Mini-Bunnies
Simply Pink Mini-Bunny – This mini-bunny can be found in the southeastern part of the area along the map’s edge.
Treasure Chests
Blueberry Potion – Northern part of area
Ring Mail – Near Mudman
Berserker – Near Larcette Village
100 Fol – Central part of the area next to a boulder
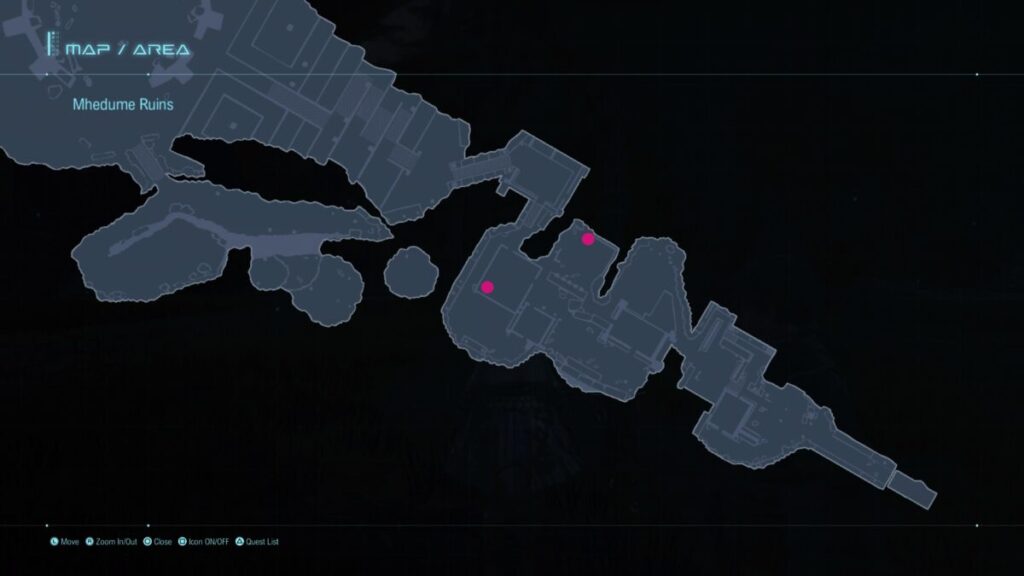
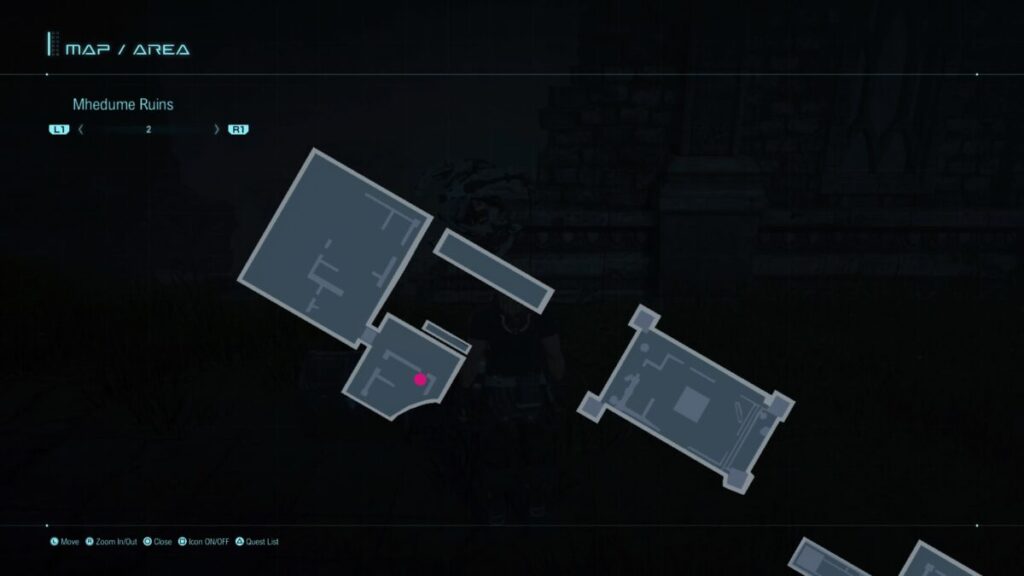
Below is a guide on the collectibles found at Mhedume Ruins in Star Ocean: The Divine Force. These collectibles consist of mini-bunnies, treasure chests, gatherable materials and enemies!
Mini-Bunnies
Snowy White Mini-Bunny
Treasure Chests
Guarding Ring – In a ruined building
Fresh Sage – In a building in the central part of the area
Silver – Northwestern side of area behind giant statue
SP Seed – Next to stairs on northwestern side of area near spot where you fought boss
Blueberry Potion – On the second level of this area on a roof
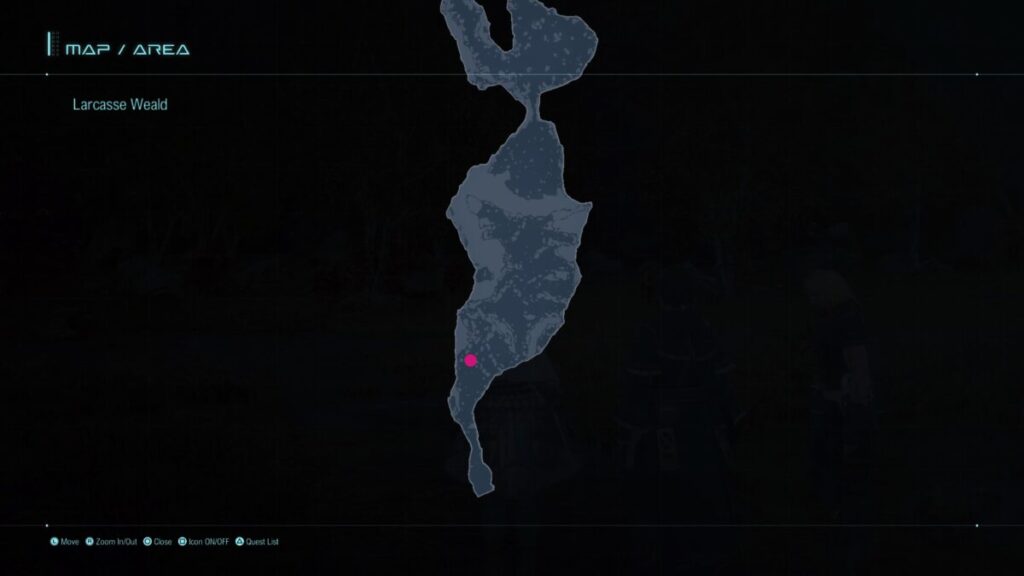
Below is a guide on the collectibles found at Larcasse Weald in Star Ocean: The Divine Force. These collectibles consist of treasure chests, mini-bunnies, materials and enemies!
Mini-Bunnies
Cool Blue Mini-Bunny – This mini-bunny can be found in the southwestern part of the map next to a tree near the map transition to the Larcasse Region.
Treasure Chests
Fresh Sage – Northeast of the northern rest spot
Silver – On the landing between the stairs north of the northern rest spot
200 Fol – On a ledge reachable via a narrow path leading south on the western side of the area just down the stairs north of the northern rest spot
Aquaberries – Northwestern corner of the area at the base of some ruins
Fresh Sage – Along the northwestern cliff
Blueberry Potion – On northwestern cliff (reachable with D.U.M.A.)
Minor Wind Blade x2 – Central western part of the area
Sapience Ring – Central western part of the area on a mountain
Aquaberries – At the base of a tree in the south central part of the area
150 Fol – Along the base of the mountain
Soldier – Little ravine in the southeastern part of the area
Below is a walkthrough for Case File 02: The Rabbit Hole in Gotham Knights! In this guide, we’ll cover how to move through the objectives during Case File 2.1 – AKA Oswald Cobblepot and 2.2 – The Powers Club. During this chapter, you’ll be investigating the infamous Penguin.
2.1 – AKA Oswald Cobblepot
Reach the Iceberg Lounge and Talk to Penguin
Travel to the Iceberg Lounge in the western part of the Financial District then head for the roof. Approach the objective by the window and interact with it to start the mission. When you load into the club, some cool items will be displayed if you are interested in them. Head into the next room to take care of the Penguin’s guards. You’ll get a bonus if you perform 3 silent takedowns. You’ll then want to cross over to the other side of the club on the 2nd level and go through the door there to trigger a cutscene. When it ends, leave the club.
Return to the Belfry
When you’re ready, return to the Belfry and speak to Alfred there. After that, listen to the recorded message on the machine near the Batcomputer.
Penguin’s Criminal Deal
The deal is taking place in an alley west of Gotham City General Hospital. You’ll need to defeat all of the enemies and retrieve 3 modchips from the cases around the area. A bonus can be rewarded if you take out two enemies at the same time.
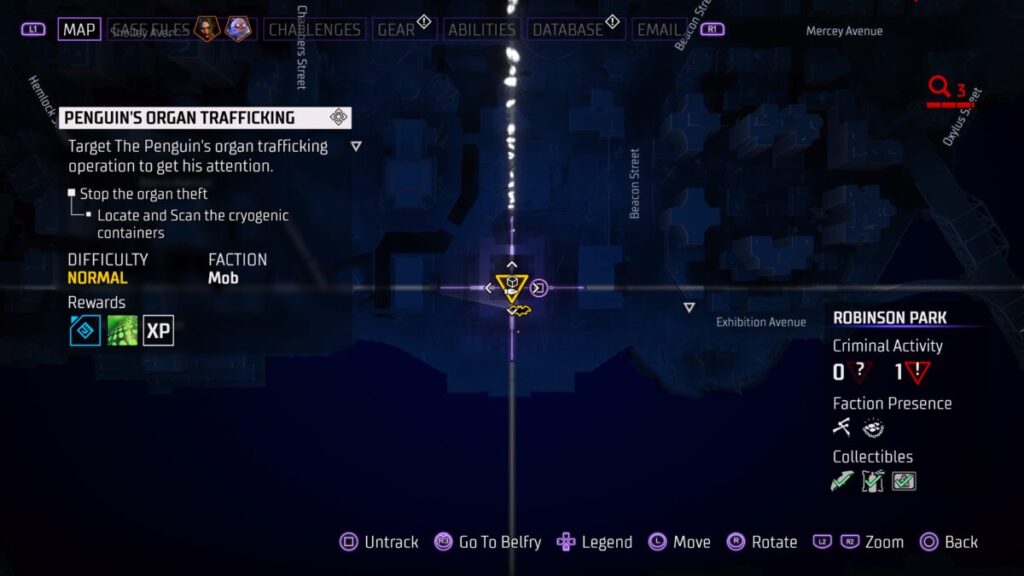
Penguin’s Organ Trafficking
The organ traffickers can be found in the southern part of Robinson Park. You’ll need to scan the cryo container which can be found in the northeastern corner of the courtyard the mob took over. You’ll then need to grab the container. Doing so will give you a 2 minute timer to deliver the “goods” to Tompkin’s mobile clinic near the Aparo Bridge in Gotham Heights.
Detective Montoya
Detective Montoya can be found in a pavilion at the Gordon Memorial in Old Gotham. Speak with her to trigger an event that leads to you unlocking additional side content.
Lucius Fox
Make your way to Foxtecha in Otisburg then head up to the roof and stand in the blue circle for a cutscene. If you speak with him again, you’ll get an activity that leads you down the path of unlocking fast travel.
Reach the Iceberg Lounge
Return to the Iceberg Lounge and deal with Penguin’s lackeys then head into his office for a cutscene. You’ll then need to destroy the bugs on the plant behind the penguin at the base of his bust and on the lamp sitting on his desk. Another cutscene will trigger after picking up the bottle of whiskey.
2.2 – The Power Club
Check on Alfred and His Evening Meeting
Travel to Tricorner Island and head to the roof of the building on the right side of Quarterdeck Road then stand in the blue circle to start a cutscene.
the Powers Club
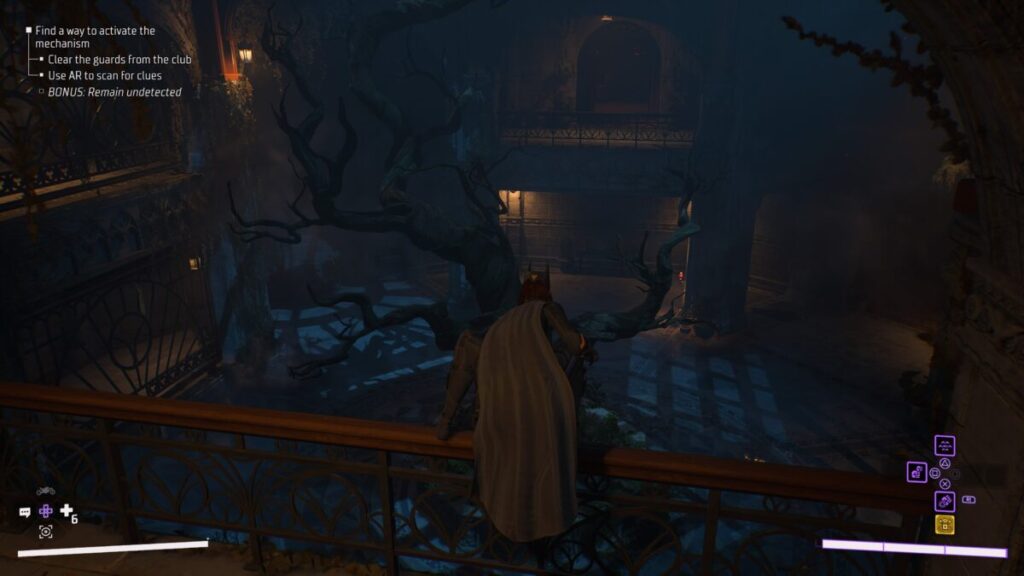
The Power Club can be found in Old Gotham west of GCPD Central. Grapple to the roof and enter through the sunroom. Deal with the guards in the circular room then examine the blood on the floor near the center with your AR. You’ll then need to scan the hidden mechanism under the floor and the lamp then follow the wires leading out from the lamp to the second floor.
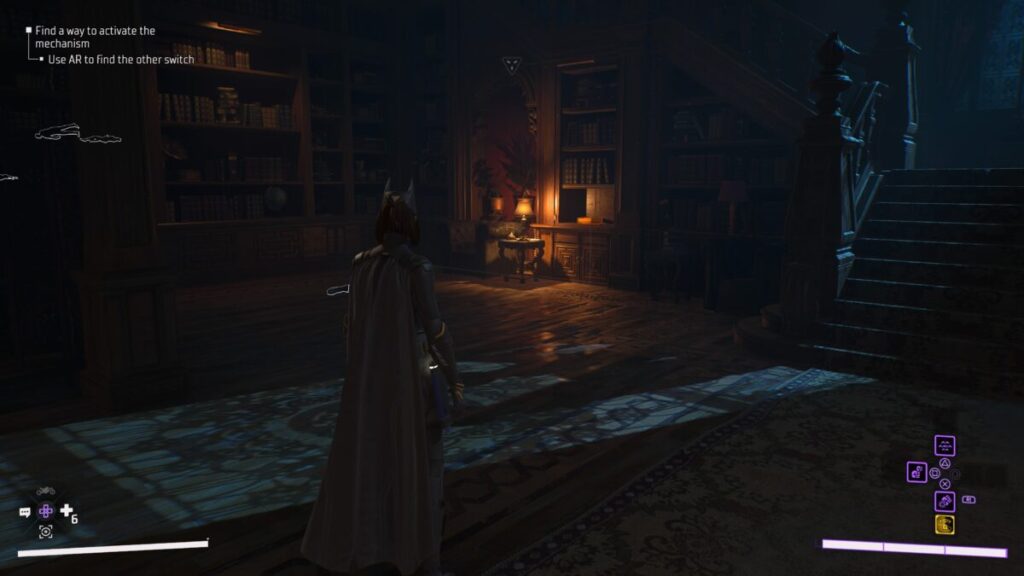
In the next area, deal with all of the guards then head for the room filled with bookshelves. Use your AR to find the book with a red glow to the left of the stairwell and scene it. Interact with it to find the first switch. Next head to the room with the fireplace Scan the bust near one of the bookshelves to find the first switch. The second is located in the room with a fireplace. You’ll need to scan the bust at the opposite side of the fireplace near a bookshelf to find the second switch. Return to the circular room and interact with the lamp from before to make the hidden staircase appear. Follow it to the basement.
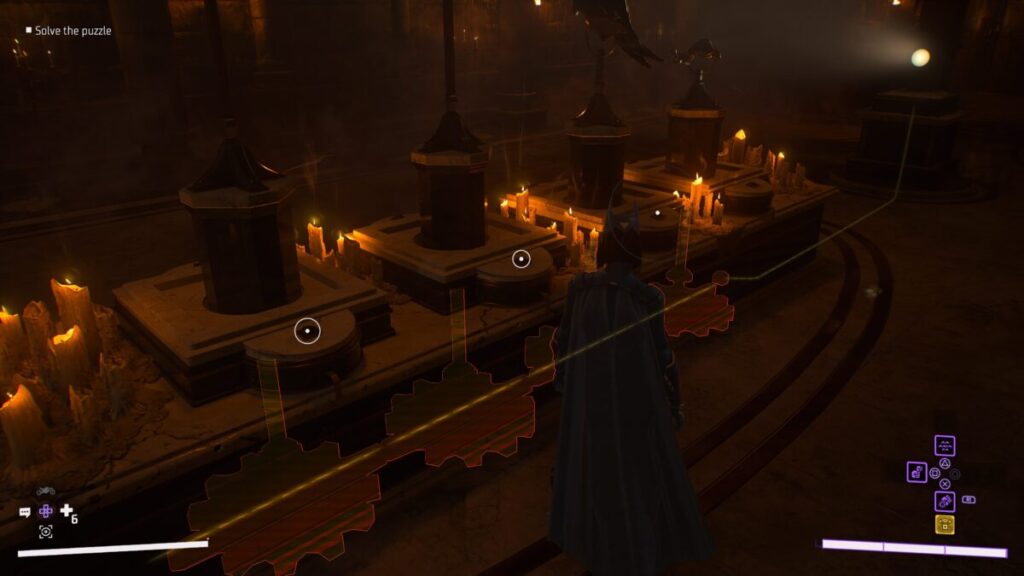
In the basement, scan the spotlight near the entrance then interact with it to turn it on. You’ll now have to solve the puzzle by rating the four objects on the pedestal to for the correct shadow. What you’ll want to do is use your AR while doing this. If the object is in the correct position, the gears in the floor with have a yellow line running through them (which is visible on the AR). From this point, the rest of the mission is pretty straightforward.
Return to the Belfry
After escaping the sewer, return to the Belfry for a cutscene.
For more guides on Gotham Knights check our main guide page here!
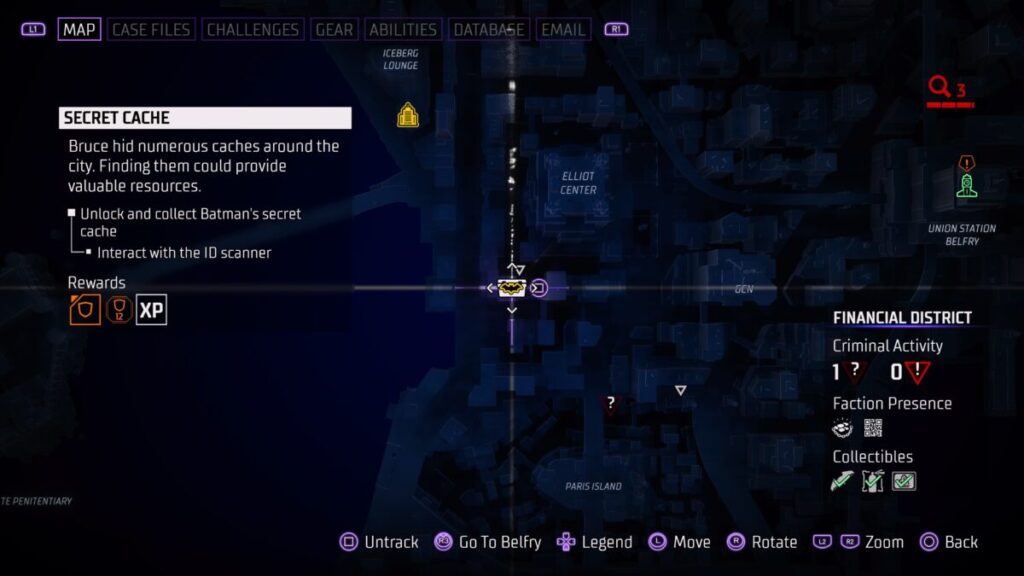
This is a guide for the side activity Secret Cache in Gotham Knights. It becomes available at the start of Case 02: The Rabbit Hole and rewards you with Bruce’s audio recordings. After you collect all of Bruce Wayne’s hidden audio recordings, you’ll receive the Gotham City Confidential trophy!
Reach the Secret Cache
Leave the Belfry (if you’re there) and head to the eastern part of the Financial District southwest of the Elliot Center. You’ll find a building there with the stash icon on top of it. Examine the ID scanner on the roof to make 3 beams appear nearby. Run through them all quickly as you’ll be timed. This will authenticate you and upload the location of the cache. Grapple to the nearby ledge and investigate it to loot the cache to receive one of Bruce’s Audio Logs.
Return to the Belfry
Before you’ll get any more of these activities, you’ll need to return to the Belfry.
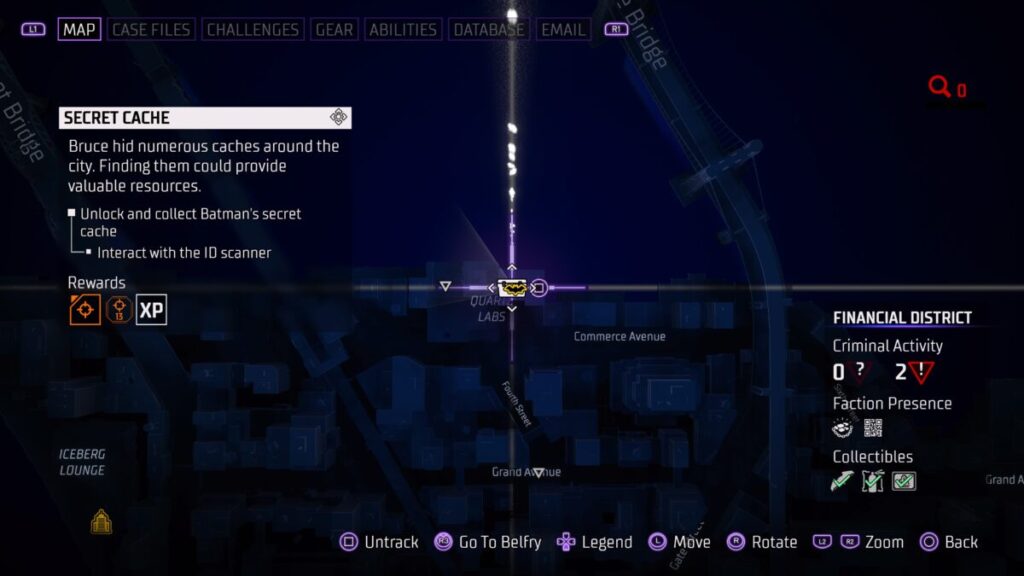
Reach the Secret Cache
Travel to the roof of Quartz Labs in the north central part of the Financial District and interact with the ID scanner there. After you activate the scanner, run through a set of beacons before time runs out. After making it through the last beacon, grapple to the nearby ledge and examine the cache to receive one of Bruce’s Audio Logs.
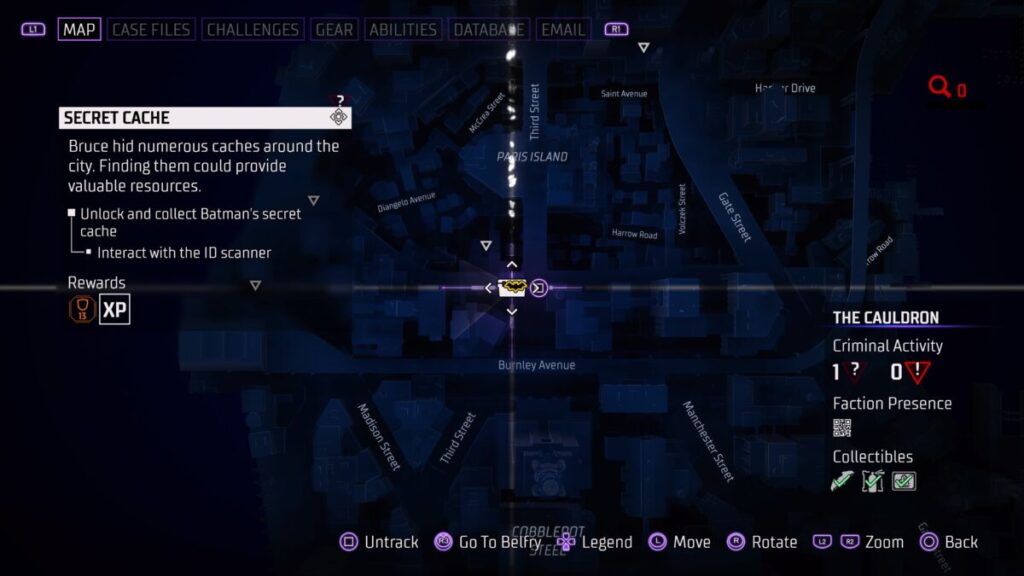
Reach the Secret Cache
Head to the roof of a building south of Paris Island in The Cauldron and interact with the ID scanner there. After you activate the scanner, run through a set of beacons before time runs out. After making it through the last beacon, grapple to the nearby ledge and examine the cache to receive one of Bruce’s Audio Logs.
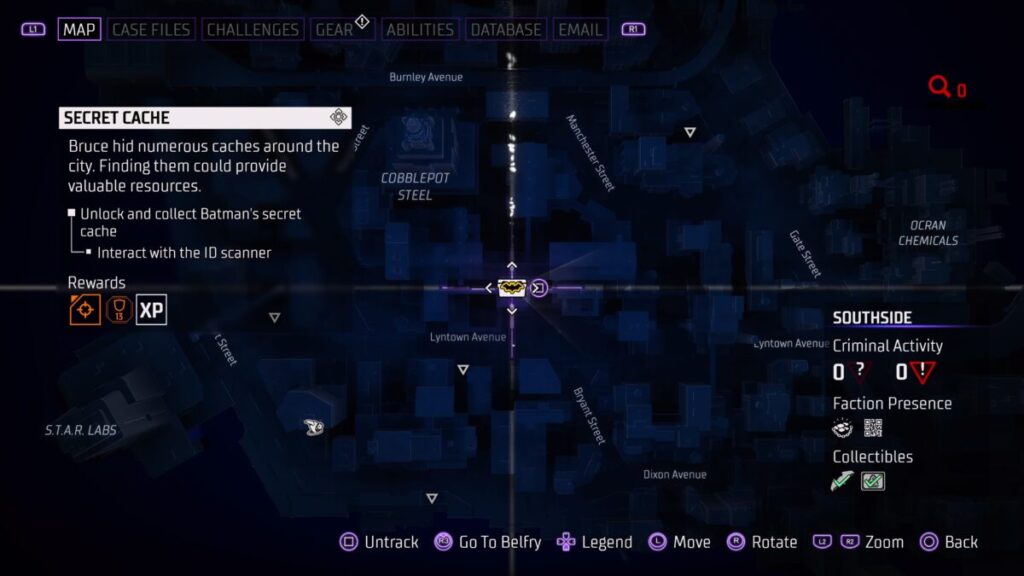
Reach the Secret Cache
Travel to the rooftop of a building in the image above of Southside, southeast of Cobblepot Steel. After you activate the scanner, run through a set of beacons before time runs out. After making it through the last beacon, grapple to the nearby ledge and examine the cache to receive one of Bruce’s Audio Logs.
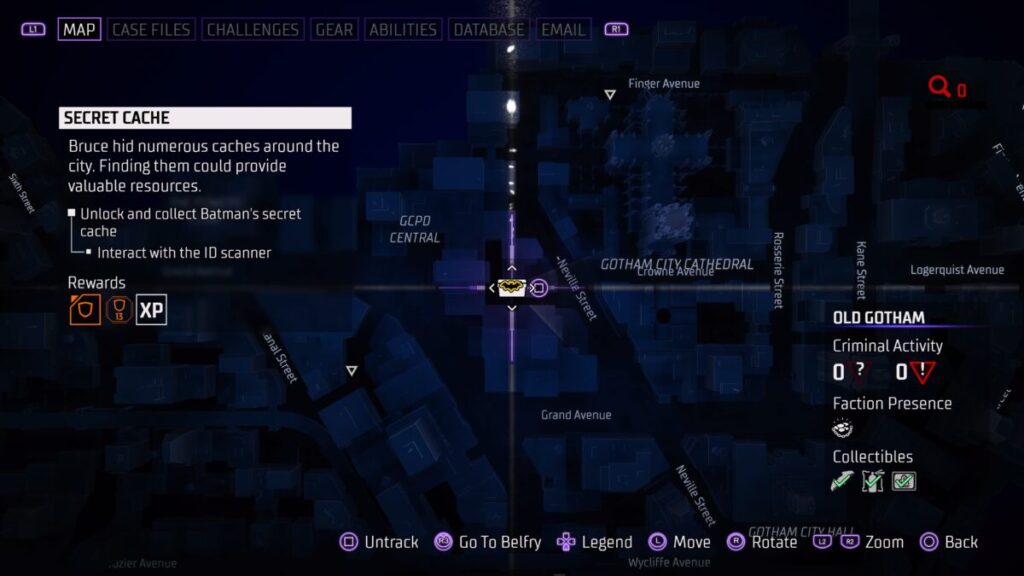
Reach the Secret Cache
Head to the rooftop of the GCPD building in Old Gotham. After you activate the scanner, run through a set of beacons before time runs out. After making it through the last beacon, grapple to the nearby ledge on the Gotham City Cathedral and examine the cache to receive one of Bruce’s Audio Logs.
Return to the Belfry
Before you’ll get any more of these activities, you’ll need to return to the Belfry.
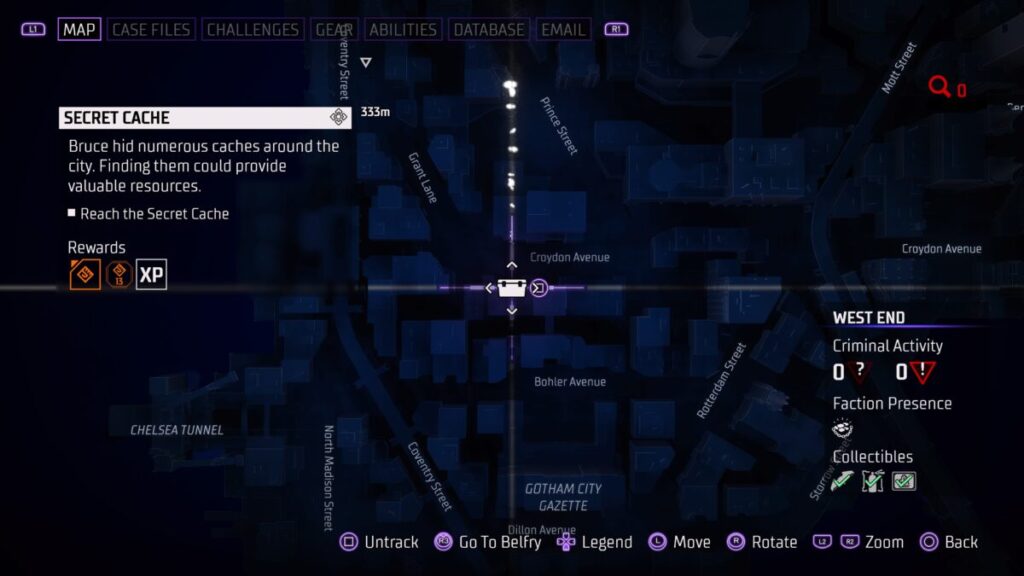
Reach the Secret Cache
Travel to the roof in West End between Croydon Avenue and Bohler Avenue. After you activate the scanner, run through a set of beacons before time runs out. After making it through the last beacon, grapple to the nearby ledge and examine the cache to receive one of Bruce’s Audio Logs.
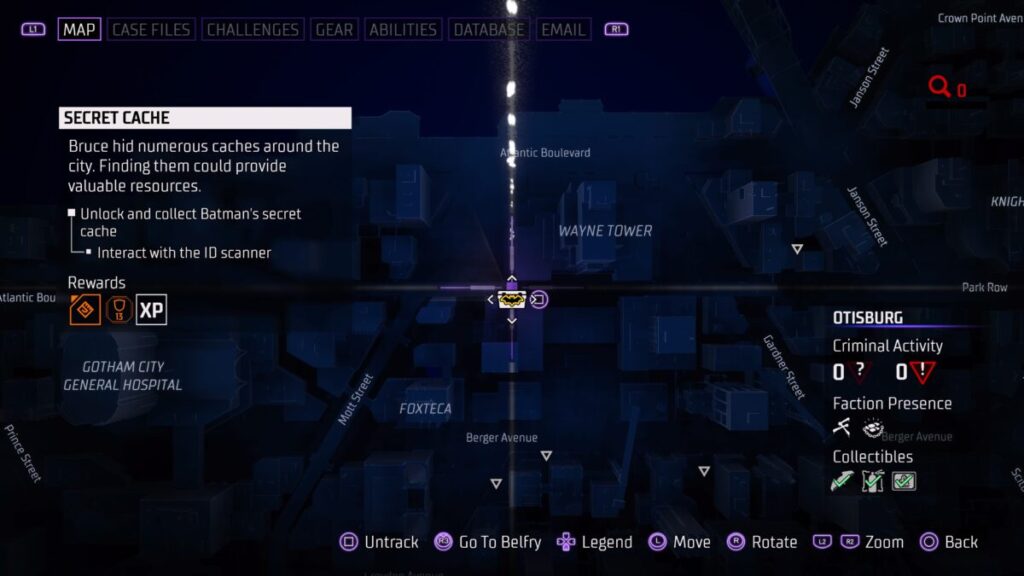
Reach the Secret Cache
Head to Otisburg to the building southwest of Wayne Tower. After you activate the scanner, run through a set of beacons before time runs out. After making it through the last beacon, grapple to the nearby ledge and examine the cache to receive one of Bruce’s Audio Logs.
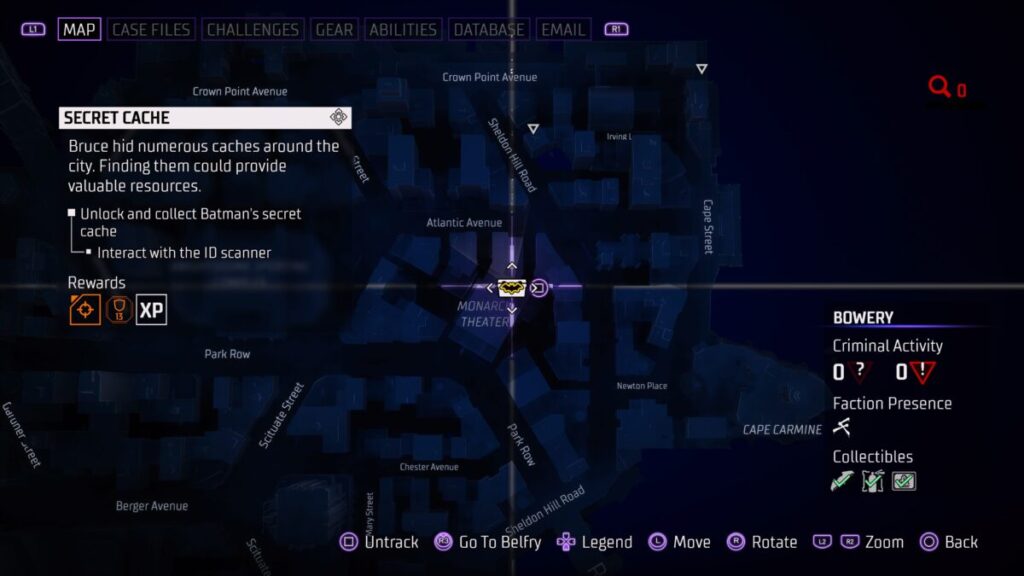
Reach the Secret Cache
Travel to the roof of Monarch Theater in the Bowery. After you activate the scanner, run through a set of beacons before time runs out. After making it through the last beacon, grapple to the nearby ledge and examine the cache to receive one of Bruce’s Audio Logs.
Reach the Secret Cache
Head to Tricorner Island then make your way to the building east of Quarterdeck Road. After you activate the scanner, run through a set of beacons before time runs out. After making it through the last beacon, grapple to the nearby ledge and examine the cache to receive one of Bruce’s Audio Logs.
Return to the Belfry
Before you’ll get any more of these activities, you’ll need to return to the Belfry.
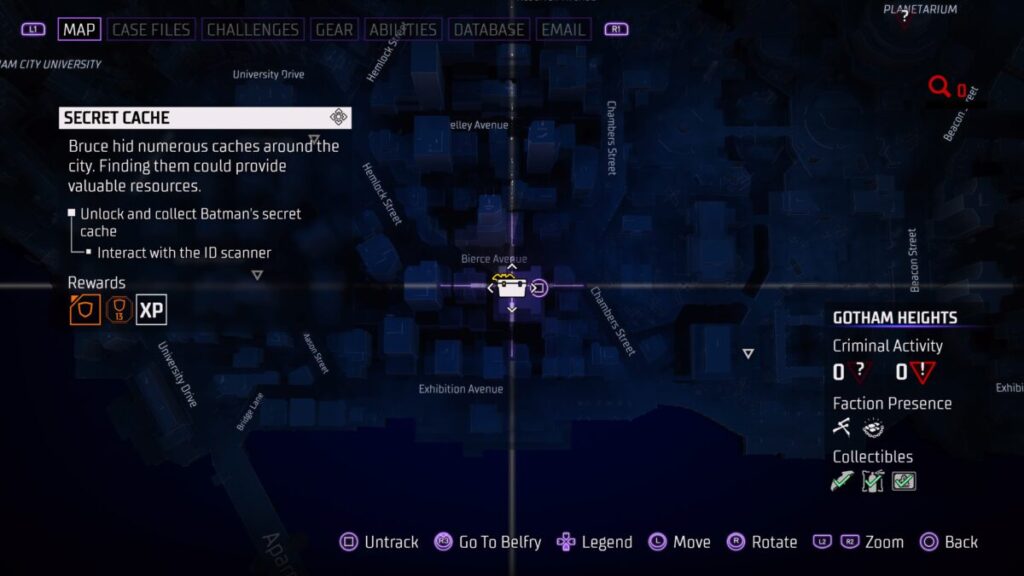
Reach the Secret Cache
Travel to the building just south of Bierce Avenue in Gotham Heights. After you activate the scanner, run through a set of beacons before time runs out. After making it through the last beacon, grapple to the nearby ledge and examine the cache to receive one of Bruce’s Audio Logs.
Reach the Secret Cache
Head to the building near the corner of Mercey Avenue and Oxylus Street in Bristol. After you activate the scanner, run through a set of beacons before time runs out. After making it through the last beacon, grapple to the nearby ledge and examine the cache to receive one of Bruce’s Audio Logs.
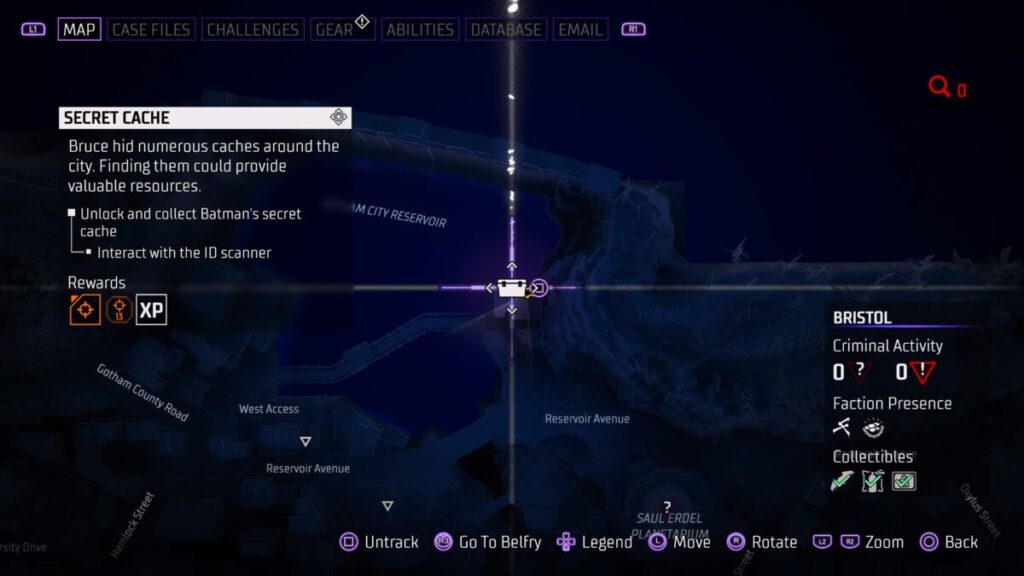
Reach the Secret Cache
Travel to the Gotham City Reservoir to find the next scanner. After you activate the scanner, run through a set of beacons before time runs out. After making it through the last beacon, grapple to the nearby ledge and examine the cache to receive one of Bruce’s Audio Logs.
For more guides on Gotham Knights check our main guide page here!
In Gotham Knights, you’ll come face to face with many villains now that Batman is gone. One of those villains is the cold hearted Mr. Freeze. Below is our walkthrough for the FR01: Mr. Freeze villain case file. This case becomes available at the start of Case 02: The Rabbit Hole.
?.? – Heist at S.T.A.R. Labs
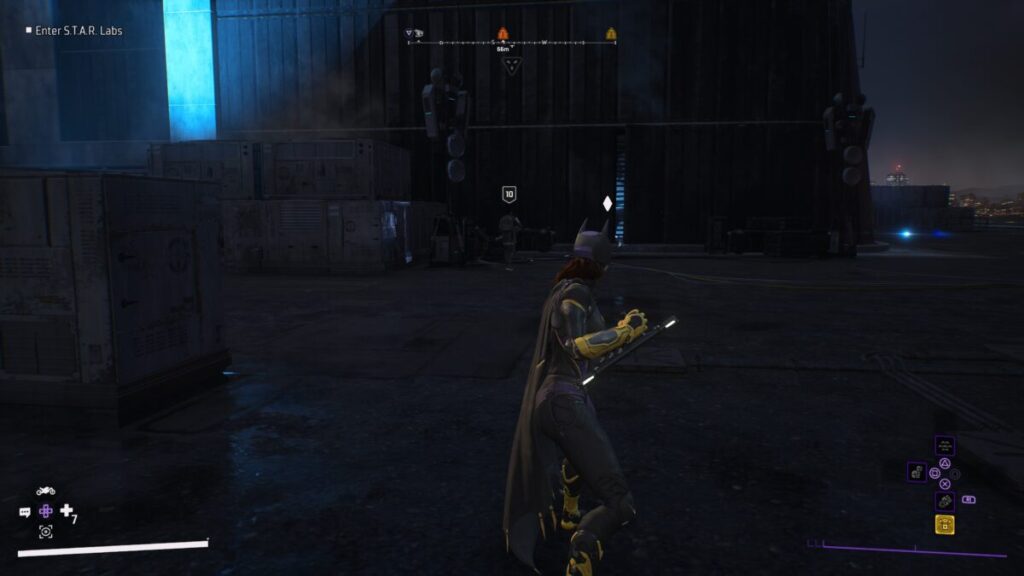
Reach S.T.A.R Labs
Leave the Belfry and head to S.T.A.R. Labs which can be found to the southwest of Southside. Once there, grapple to the roof and head inside by squeezing through the opening in the wall.
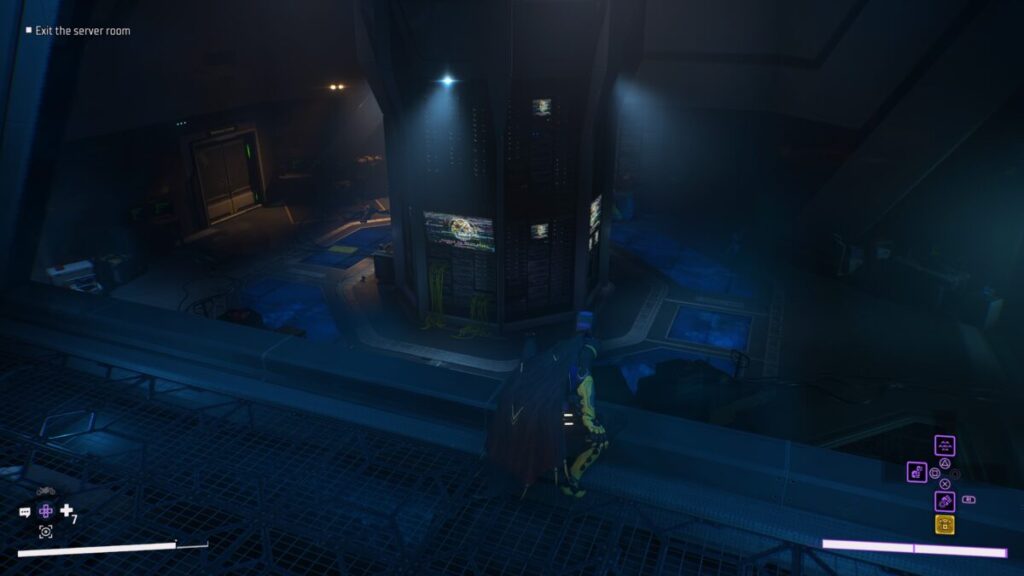
Enter the Complex / Exit the Server Room
Work your way through the fan duct using your grapple when you reach the wall of fans. Continue following the ducts until you reach the room with two regulator enemies. Take care of them then head into Server Room A at the back of the floor. Defeat the regulators here while making sure not to get caught by the cameras. You’ll earn bonus points if you defeat 3 enemies using Silent Takedowns. When they have all been dealt with, head to the console on the other side of the server room and interact with it to open the cooling vents. Jump through the cooling vents to reach another area occupied by Regulators and a turret. You can disable the turret by getting close to it or hacking if you playing the right character. After dealing with both threats make sure to read the S.T.A.R. Labs Research Notes on one of the crates then leave the server room.
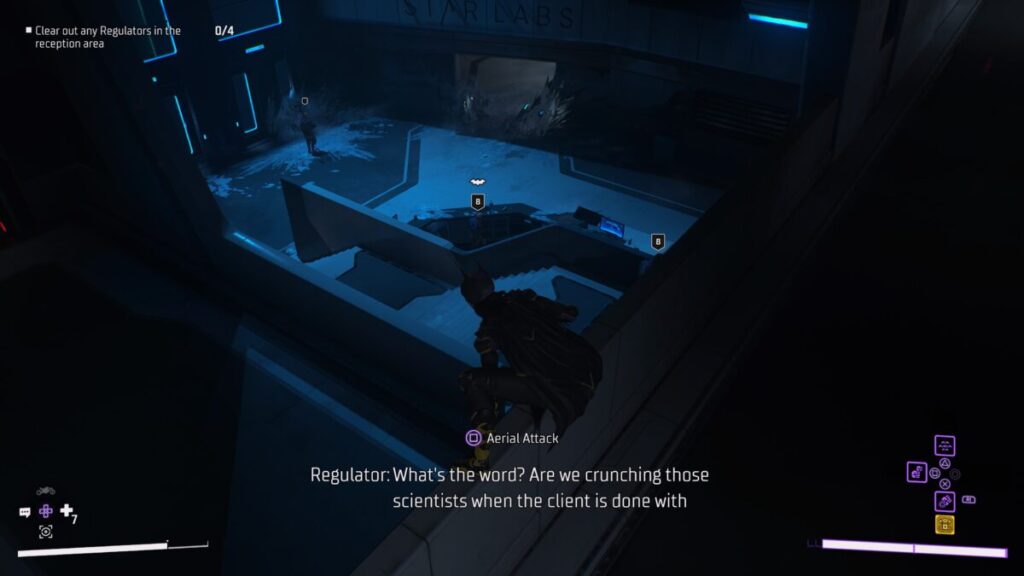
Search the Facility for the Regulators
Head into the Employee Lounge then take the stairs up and follow the hallway to the Security Hub. Defeat the Regulators guarding the room. If you remain undetected, you’ll receive a bonus reward (keep an eye on the camera in the center of the room). Check the terminal after dealing with the enemies for a quick event then head through the door behind the terminal. Grapple up to the 12th floor and take out the enemy at the top. Look for the stairwell and take it down to find a chest. Return to the 12th floor and head over a pair of gates to reach the reception area. Take care of them then follow the obvious trail of our villain by scanning their footprint with the AR.
Follow Mr. Freeze’s Footsteps / Locate Mr. Freeze
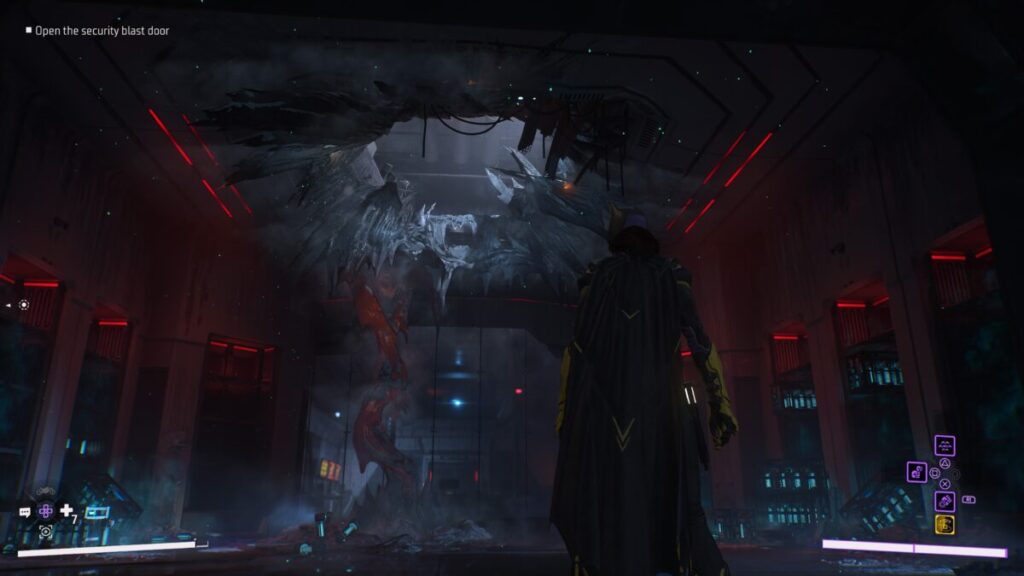
Take out the Regulators then keep following the footprints. When you get to the end of the tracks, grapple up to a vent and head through the vent shaft. When you emerge, you’ll be in a control room. Take out the two enemies then head into the Cryo Storage. Grapple up the hole in the roof of Cryo Storage. You’ll then want to follow the headway to reach the Energy Research Room. Once inside, interact with the terminal on the other side of the room to trigger a cutscene.
Free the Scientists
When you regain control of your character, you’ll be attacked by a horde of enemies. Press the button to rotate the railgun then fight off the enemies while you wait for it to get in place. You’ll then need to press another button to power up the gun. At this point, a new enemy called the shocker will show up. Defeat him and the rest of the enemies then jump up on the raised platform to fire the railgun to trigger a cutscene.
Return to the Belfry
Head back to the Belfry and interact with the projector in the center of room on the floor to trigger a cutscene.
1.2 – Cold Front
Stop Crimes
For this objective, you’ll need to stop crimes around Gotham being committed by the Regulators. Once you’ve stopped 5 of them, this case file will complete.
1.3 – Quartz Labs
Return to the Belfry
Head back to the Belfry and inspect the 1.3 – Quartz Labs subcase in the Case File menu. This will kick off a mission where the team
Reach Quartz Labs
Take out the Regulators guarding the entrance then head inside. Deal with the enemies inside then scan the switch on the upper walkway to open the vault. Scan the scientist inside, his notepad to the left of him, play the Dictaphone on the desk on the right side of the vault and the scan the blueprint on the wall to the left side of the vault. Take the stairs behind the vault switch up and follow the path there to reach the office. Use your AR to find the hidden floor compartment and grab the disruptor. You’ll then be transported back to the Belfry.
1.4 – Gotham City on Ice
Speak with Alfred in the Belfry
Talk to Alfred in the Belfry then investigate the 1.4 – Gotham City on Ice subcase in the Case File menu to kick off a cutscene leading to a mission.
Reach Elliot Center
Follow the train tracks to the Elliot Center then take out the Regulators guarding the entrance. Head inside and work your way to Mr. Freeze taking out the enemies along the way. When you reach the top, use the disrupter on the weather machine. This leads to a fight with Mr. Freeze. If you’re having trouble with him, use the weather machine as cover and attack him using range attacks. After defeating him a cutscene triggers.
1.5 – On Thin Ice
Speak with Alfred in the Belfry
When you return to the Belfry, speak with Alfred.
Interrogate Regulator
After starting the patrols of Gotham, you’ll need to locate some Regulators around town and interrogate them.
Mr. Freeze’s Regulator Operation
The Regulator you interrogated will direct you to a Criminal Stronghold in the northwestern part of The Cauldron. Make your way to the stronghold and defeat all the enemies inside. Afterwards, you’ll then be tasked with stopping two armed robberies. One can be found in Tricorner Island and the other can be found in Gotham Heights. After taking care of the robbers, return to the Belfry.
**Please note this guide is a work in progress!** For more guides on Gotham Knights check our main guide page here!
In Gotham Knights, you’ll come face to face with many villains now that Batman is gone. One of those villains is Harley Quinn. Below is our walkthrough for the HQ01: Harley Quinn villain case file. This case becomes available at the start of Case File 02: The Rabbit Hole.
1.1 – Harley Quinn Returns
Citizen Chaos – Bomb Threat
Leave the Belfry and travel to Robinson Park near the Saul Erdel Planetarium. Once there, you’ll come across a group of Freaks that have taken some people hostage. You’ll need to disarm the bombs on all three hostages to save them. You can earn bonus points for remaining undetected and defeating all of the enemies.
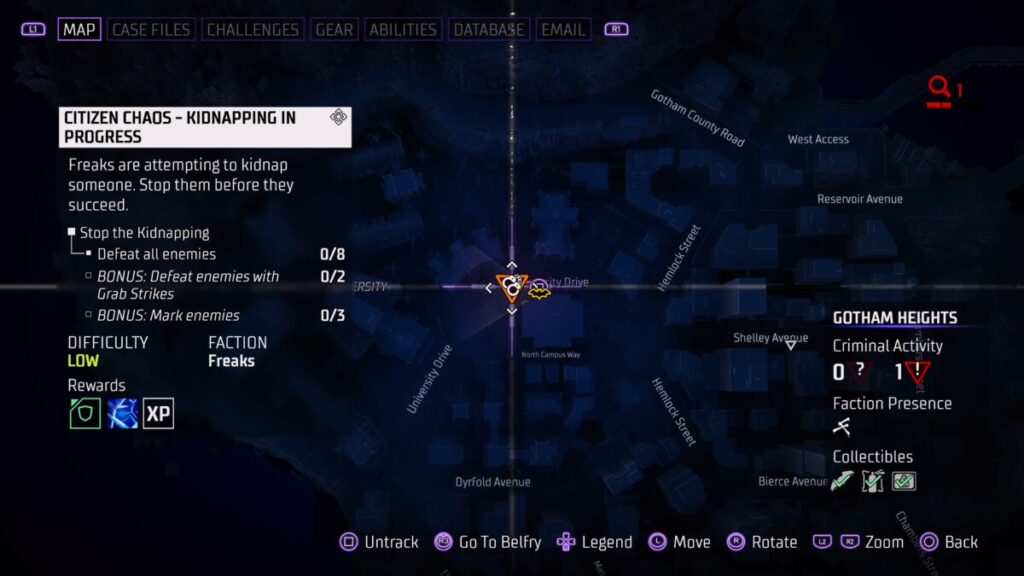
Citizen Chaos – Kidnapping in Progress
After stopping the bomb threat, head to the northwestern part of Gotham Heights to find a kidnapping in progress along University Drive. Here you’ll need to defeat all the enemies with a bonus being awarded for defeating enemies with grab strikes and marking enemies. When they have all been defeated, grab the pill bottle in the back of the ice cream truck.
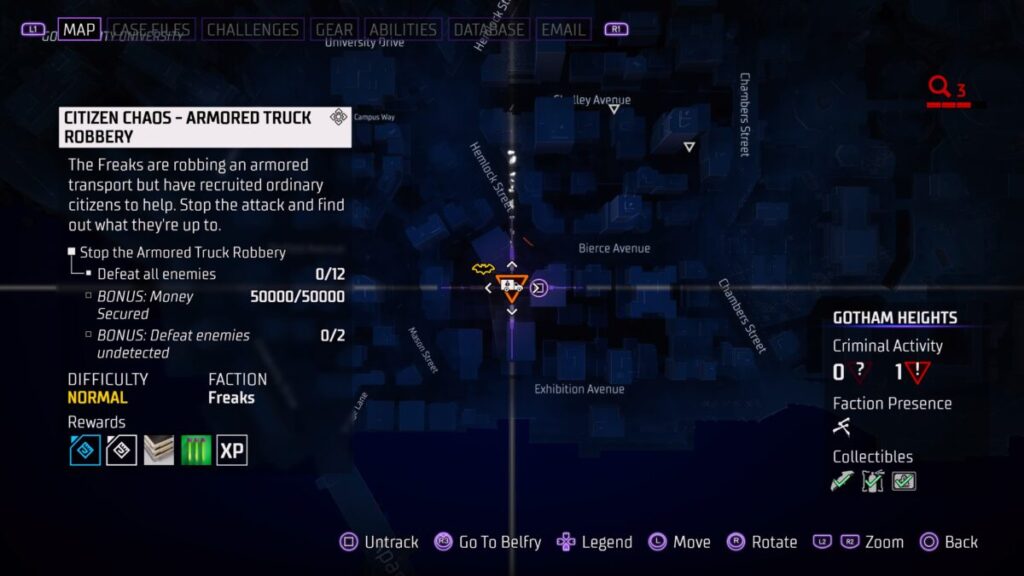
Citizen Chaos – Armored Truck Robbery
With the kidnapping thwarted, your next stop will be Gotham Heights at the corner of Hemlock Street and Bierce Avenue. Some Freaks are attempting to rob an armored car and it’s up to you to stop them. A bonus will be awarded if you can stop them from stealing all of the money and defeating two enemies undetected. After the fight, grab the business card from the back of the armored truck.
Return to the Belfry
Head back to the Belfry and speak with Alfred to trigger an event.
1.2 – Dr. Q at Monarch Theater
Investigate Harley Quinn’s Case File
Access the Batcomputer then head to the Case Files tab. Go to HQ01: Harley Quinn then select 1.2 – Dr. Q at Monarch Theater to trigger a cutscene. Please note doing this will start a mission the next time you go on patrol.
Reach the back Alley
Follow the bat signal to the Monarch Theater. When you load into the map, you’ll be put outside the Monarch Theater and locked into this mission. Head to the light projecting the bat signal then defeat the Freaks. Hop over the fence near the 24 hour parking sign and head down the stairs. Take a right through a gap in the fence to reach a back entrance. Head into the building.
Infiltrate the Monarch Theater
In the first room you start in, interact with the various items. Afterwards, follow the path around the first floor. When you get to the end of the hallway, use your grapple to reach a higher floor. You can either take the hole in the wall on the right side of the room or follow the left side of the room to a vent shaft. Both ways take you to the same place. Defeat the enemies (you’ll get a bonus if you avoid taking damage). Interact with the panel on the wall left of the stage door near the stage. After the stage moves up, deal with the group of Freaks then scan the crate in the room they come from using your AR. Afterwards, more Freaks will show up. Deal with them then head into the room they came from. Head through the door there. Before taking the stairs up, head through the vent shaft on the left to reach a chest and a scannable item. Head back through the vent then head up the stairs to progress.
Clear the Freaks from upstairs floor
Defeat the 5 enemies on the floor and you’ll receive bonus points if you remain undetected. Use your AR to find the treasure chests and interactable objects on the floor then when you’re ready, follow the rugs with your logo painted on them through a room filled with mannequins and down a flight of stairs.
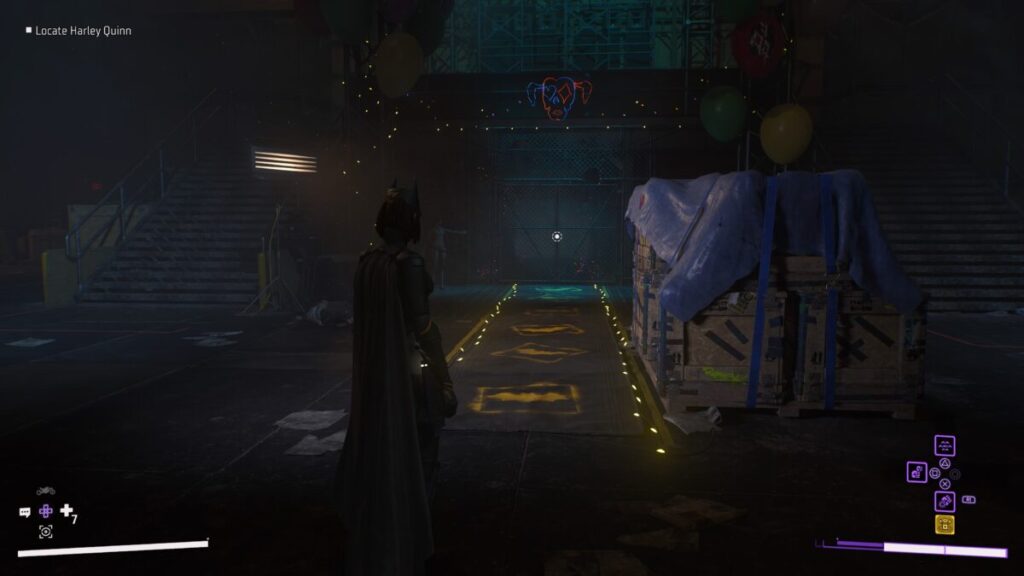
Locate Harley Quinn
You should now be backstage with 5 Freaks mucking about. Take care of them (with 3 silent takedowns for a bonus) then head through the gate in the center of the room. Follow the path to the end to trigger a cutscene leading to a boss fight with Basher. As you deal damage to his health, enemies will spawn in to help him. Watch out for the ones with spray cans as they heal Basher. When you finally take the boss down, another cutscene will trigger. When it ends, you’ll now have to face Blazer and his posse. After bringing this one down, another cutscene triggers.
Disarm the Bombs
When you regain control of your character, you’ll be in a room with 6 bombs set up. These bombs will have to be deactivated manually while fighting off waves of enemies. As the fight goes on you’ll have to diffuse more bombs during each wave. Basher and Blazer will also join in on the fun. Defeat them and the other enemies to get the final wave of bombs to diffuse. This will trigger a cutscene.
1.3 – Paging Dr. Q
Talk to Alfred
Speak with Alfred in the Belfry then begin your patrol when you’re ready.
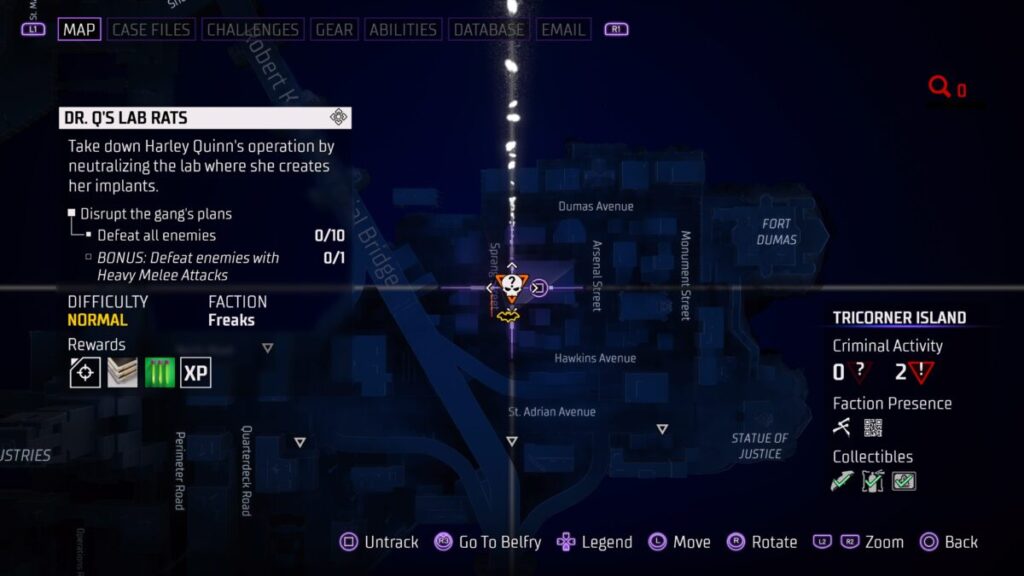
Dr. Q’s Lab Rats
Travel to Sprang Street on Tricorner Island to reach Dr. Q’s Lab Rats mission. You’ll need to defeat 10 enemies (and 1 of them with a heavy melee attack for a bonus).
Dr. Q Offline
Make your way to the Planetarium in Robinson Park to Harley’s Freaks in the middle of a deal for new equipment. You’ll need to defeat all of the enemies to prevent the deal. Taking out 2 with Grab Strikes and marking 3 enemies reward you with a bonus.
1.4 – Chaos In General
Return to the Belfry
Head back to the Belfry and speak with Alfred. Afterwards, open the Bat Computer and interact with the 1.4 Chaos in General objective under the Harley Quinn case file to start the mission to capture Harley. During the mission, you’ll have to work your way through a hospital ultimately facing Harley at the end. Defeating her will close the case.
For more guides on Gotham Knights check our main guide page here!
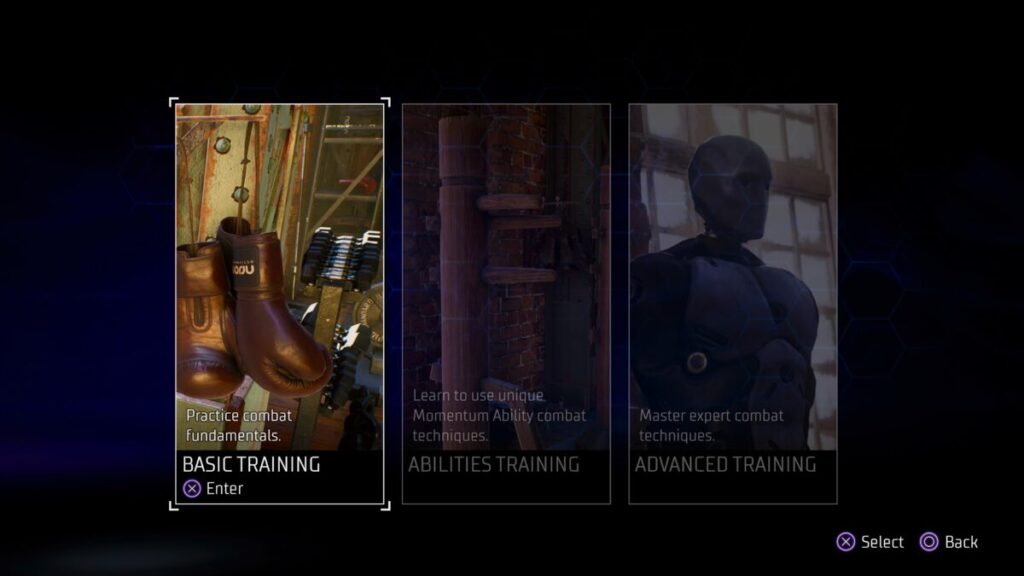
The Practice Makes Perfect trophy/achievement in Gotham Knights can be obtained by completing all of the training missions at the Training Area in the Belfry. Each of these training sessions focuses on a different aspect of combat for you to master. Only a set amount of these are available at the start of the game. You can unlock more by progressing the story. Below is a list of the training missions and which category they fit into.
Basic Training
Interrogation
Grabbing Enemies
Stealth
Combos
Guard Break
Ranged Attacks
Smoke Bombs
Abilities Training
Momentum
Momentum Abilities: Guard Break
Momentum Abilities: Piercing
Advanced Training
Perfect Evade
Timed Strikes
Attack Chains
For more guides on Gotham Knights check our main guide page here!
After starting Case 02: The Rabbit Hole in Gotham Knights, the team will receive an automated email from Batman saying that his secret identity is in danger of becoming public. He’ll then ask that the team help him plant some fake data to prevent that from happening. This guide for the side activity Secret Identity Compromised will walk you through where to plant each of the fake evidence. Doing so will reward you with the Solid Alibi trophy.
Reach the Location of the Server
Make your way to the top of the Gotham Gazette in the southern part of the West End on Dillon Avenue. Once you’re there, you’ll need to plant the fake data on the server. To reach the server, use your AR to locate the panels for each of the cameras and deactivate them as you work your way along the rooftop. The server is behind the long building on the top of the roof.
Return to the Belfry
You can head back to the Belfry whenever you’re ready. You will not get the next location until then.
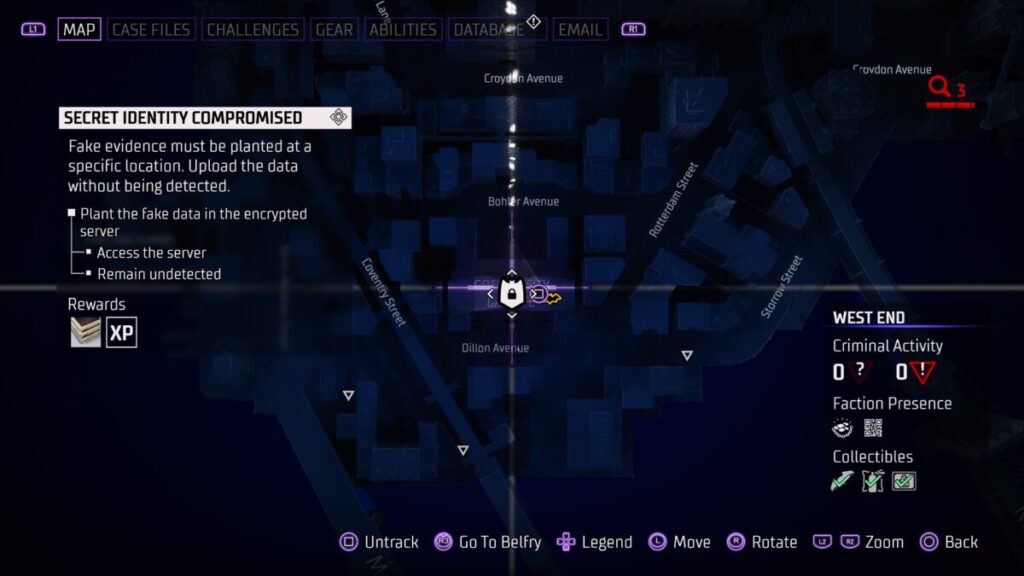
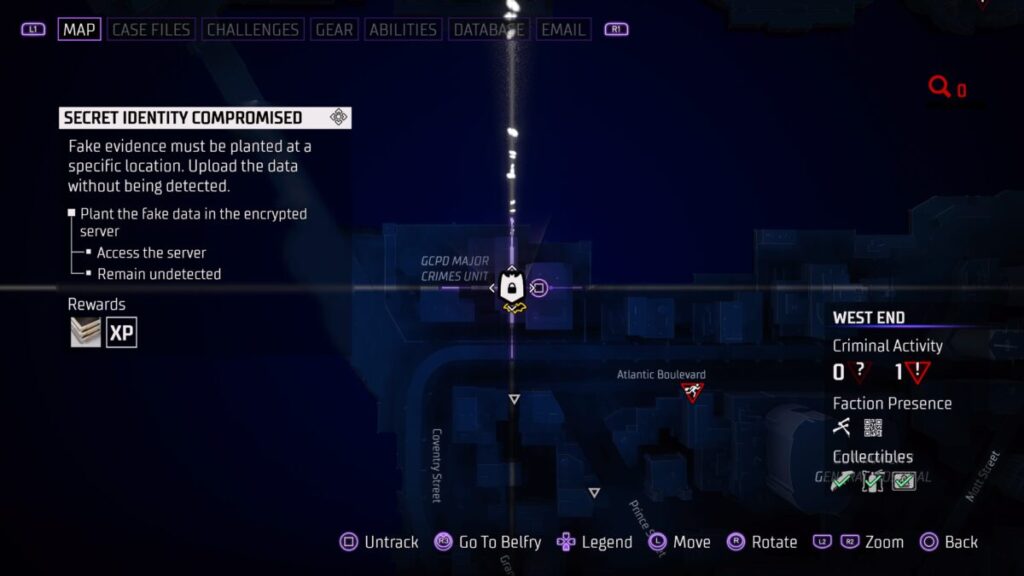
Plant the Fake Data in the Encrypted Server
You’ll need to keep an eye out for the guard patrolling the area. This server can be found on the lower roof of the GCPD Major Crimes Unit.
Return to the Belfry
You can head back to the Belfry whenever you’re ready. You will not get the next location until then.
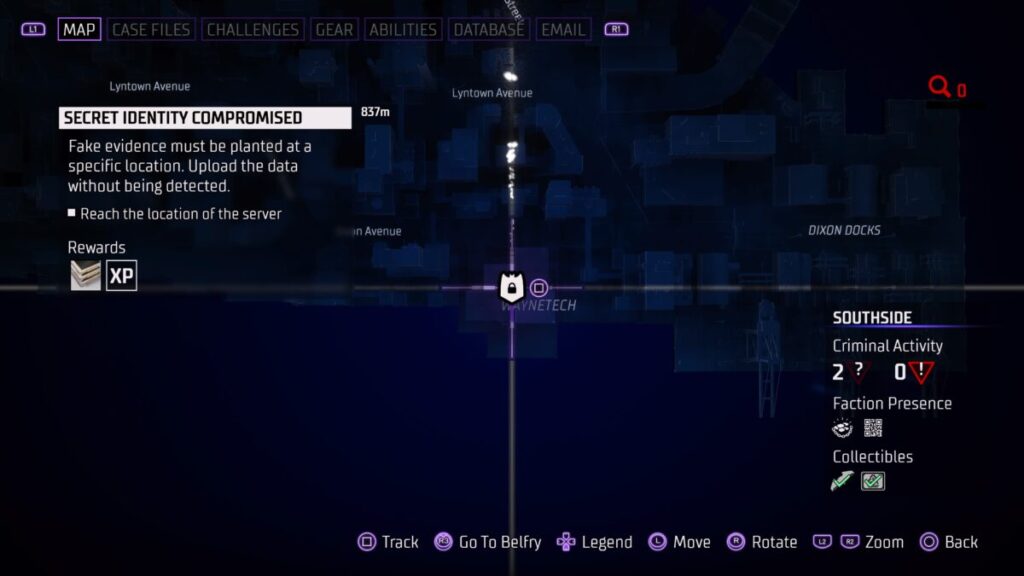
Reach the Location of the Server
Head to Waynetech in the Southside. From the front entrance head to the right side and climb up the scaffolding. From there, you’ll be able to find the entrance to a vent duct. Head inside and work your way to the server. Watch out for the security cameras surveilling the area. On the other side of the room, there will be some pressure plates that will trigger the guard if you step on them. Above there is a platform that you can grapple to. Do so to reach the laser grid panel blocking the entrance to the server room.
Return to the Belfry
You can head back to the Belfry whenever you’re ready. You will not get the next location until then.
Reach the Location of the Server
Travel to the GCPD Cental in Old Gotham then head to the northern side along the water. There you’ll come across an area guarded by security cameras and guards. The server can be found in the gated area protected by a pressure plate. To reach it, there are 3 panels you’ll need to interact with. 2 of them will deactivate cameras and the last will turn off the pressure plates allowing you to reach the server.
Return to the Belfry
You can head back to the Belfry whenever you’re ready. You will not get the next location until then.
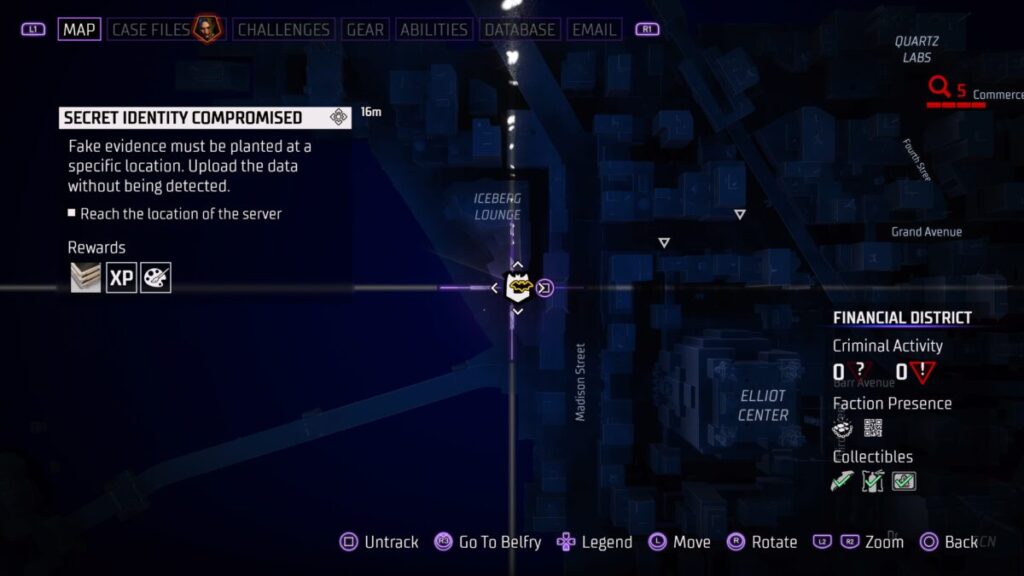
Reach the Location of the Server
The location of this server can be found just south of the Iceberg Lounge in the Financial District. Climb through the duct and follow the path to reach the room with the lasers. When they disappear, run through real quick. Hack the camera in the hallway to disable the camera then interact with the wall panel to turn off the pressure plates. You can then reach the next room. From here you’ll need to cross through another laser protected doorway and disable another set of pressure plates to reach the server. After uploading the evidence, the Solid Alibi trophy should pop.
Return to the Belfry
Return to the Belfry then head upstairs and interact with the TV to trigger a cutscene. This activity will complete when it concludes.
For more guides on Gotham Knights check our main guide page here!
A guide on where to find materials in Star Ocean: The Divine Force. These items can be purchased, gathered from the ground, looted from chests or dropped by enemies.
This site uses cookies. By continuing to use this website, you are giving consent to cookies being used. For more information on cookies, view our Privacy Policy.OkPrivacy Policy