Welcome to our collectibles walkthrough on the Finale: Hope in Reverie in The Legend of Heroes: Trails into Reverie! In this walkthrough, we’ll cover enemies you can scan, noteworthy items, character notes, shops and treasure chest locations. Please note that the game dictates who you’ll be playing as during this final act so you don’t need to worry about switching between the routes yourself!
Character Notes
Automatically at the start of the act:
- Rean 3
- Commander Baelz 2
Automatically after fighting the first group of enemies:
- Sully 1
Lloyd’s Route
Station Street
Shops
- Genten Orbal Store – Wendy shows up and you can get the typical items from her in case you need to stock up. She has nothing noteworthy!
Enemies to Scan
- Helmord
Rufus’ Route
West Street
Shops
- Oscar’s Temp Support Section – Oscar shows up and you can get the typical items from him to stock up. He has nothing noteworthy!
Enemies to Scan
- D-Bestial
Rean’s Route
East Street
Shops
- Business Owners’ Association – Roy shows up and you can buy the typical items from him to stock up. He has nothing noteworthy!
Rean / Lloyd’s Route
Enemies to Scan
- Asmodyne Menace
Rufus’ Route
Enemies to Scan
- Supreme Leader Rufus
All Routes
Enemies to Scan
- Supreme Leader Rufus
- Ilya the Dusken Dancer
Final Preparation Period
During this final preparation period, you’ll be able to go anywhere and everywhere! Take advantage of this to clean up your notebook entries, do some shopping and level up your characters! For our guide on what the shops have, click here! For our guide on the Reverie Garden / Stratums, click here!
Character Notes
Automatically at the start of the final preparation period:
- Lloyd 3
- Rixia 3
- Rufus 3
- Ilya 3
- Father Thomas 1
Administrative District
Character Notes
Speak with the group in the Administrative District plaza:
- Elliot 2
- Emma 2
- Squire Scarlet 1
Speak with the group in the Civic Center:
- Jusis 2
Speak with Millium in the Civic Center:
- Millium 2
Noteworthy Items
- Recipe: Bitter Red Soda – Purchase for 1,700 mira from Chroma’s Juice Stall
Harbor District
Character Notes
Speak with the group in the plaza:
- Laura 2
- Fie 2
Speak with the duo on the dock:
- Vivi 1
- Rex 1
Noteworthy Items
- Hard Genkotsu Ramen x4 – Speak with Koki at Ozelle’s Noodle Stand
- Recipe: Hard Genkotsu Ramen – Purchase from Ozelle’s Noodle Stand
Fishing
From the fishing point on the dock closest to the stairs:
- Cangiru
From the fishing point on the dock closest to the lighthouse:
- Sky Gill
- Kasagin
East Street
Character Notes
Speak with the duo in the Business Owners’ Association:
- Becky 1
- Hugo 1
Interact with the group in the Bracer Guild:
- Michel 1
- Sara 2
Noteworthy Items:
- Various Ingredients – Speak with Tucker at Tucker’s Vegetable Stall
- Dragon Fried Rice x5, Blazing Mapo Tofu x5 – Speak with Shanshan at Long Lao Tavern & Inn
Central Plaza
Character Notes
Speak with Chief Sergei near the entrance to the Orbal Store:
- Sergei 2
Speak with Zeit on the roof of the SSS Building:
- Zeit 2
Noteworthy Items
- Book: Crossbell Times – Emergency Special – Purchase from Southwark General Store
- Books: Moonless Morn – Chapters 15, 16, 17 – Purchase from Southwark General Store
- Power Potion II x3, Shield Potion II x3, Mind Potion II x3 – Speak with Harold in front of Vingt-Sept Cafe
- Recipe: Nature Breeze Pasta – Purchase for 2,100 mira from Vingt-Sept Cafe
West Street
Character Notes
Speak with the group near West Crossbell Road:
- Renne 2
Noteworthy Items
- Tearal Balm x5, EP Charge III x5, Celestial Balm x5 – Speak with Elsa in Tallys’ General Store
Side Quests
- Speak with Oscar in Morges Bakery to find out that he needs Native Bellberries from Ursula Road. Travel to Ursula Road – Field Ex. Camp and interact with the shiny object on the ground to acquire the Native Bellberries. Return to Oscar in Morges Bakery to hand them over. As a reward, you’ll receive Os-Ben Special x4.
West Crossbell Road
Enemies to Scan
- Cool Pom
- Rainbow Mosquito
- Scorpion King
Fishing Point
- Gold Salmon
Chests

| Location | Loot |
|---|---|
| Northeastern nook | Zeram Capsule |
| Northwestern nook | Sleep IV |
East Crossbell Highway 1
Chests

| Location | Loot |
|---|---|
| North central path | Dragon Incense |
Armorica Village
Noteworthy Items
- Tearal Balm, Fresh Egg x5, Fresh Milk x5, Mature Cheese x5 – Speak with Jake at Jake’s General Store
Ancient Battlefield – Depths
Enemies to Scan
- Heidrun – Defeat it then pick up the Black Zemurian Ore Shard from the ground!
Moon Temple – Depths
Enemies to Scan
- Unsurtr Malice – Defeat it then loot the Black Zemurian Ore Shard from the ground!
Underground Freight Line
Head to the RF Military Factory – Underground Platform to reach this area!
Enemies to Scan
- Goliath Lugh – Defeat it then loot the Black Zemurian Ore Shard from the ground!
Chests

| Loot | Location |
|---|---|
| Dead end tunnel west of the Underground Freight Line – Passage | Skanda Gem |
| Along the southwestern path | Freeze IV |
| Along the southwestern path | Dragon Incense |
| Along the southwestern path | Nohval Gem |
Knox Forest 1
Enemies to Scan
- Ginosha-Zanak – Defeat it then loot the Black Zemurian Ore Shard from the ground!
Prison – Depths
This area can be found at Crossbell Police Academy. Once there, travel to the Prison – Depths and interact with Dudley for an event.
Ursula Road 1
Enemies to scan
- Harpoon Hornet
- Spineedler
- Saccharine Tomartian
- Nauseating Tomartian
- Goldflier
- Massibrus
Fishing
- Northern Arowana
- Tiger Arowana
- Elecantus
Chests

| Location | Loot |
|---|---|
| Eastern nook near fishing point | Amberl Gem |
| Nook on western side | Carnelia Gem |
| Southern dead end | Vital Divine Water |
Ursula Road – Field Ex. Camp
Enemies to Scan
- Forest Snail
Ursula Road 2
Enemies to Scan
- Killer Shmark
Chests

| Location | Loot |
|---|---|
| Along the main path | Powerful Divine Water |
| Eastern side across Stargazer’s Tower | Esmelas Gem |
| On the southeastern beach | Fortuitous Divine Water |
| On the southeastern beach | Sapphirl Gem |
Event
- Interact with the group on the southeastern beach
Fishing
In order to catch the special fish from the southeastern fishing point on the beach, you’ll need to catch 25 other fish!
- Jeweled Cancer
- As a reward for catching this fish, the 3 fisherman will give you a Dragon Incense!
Stargazer’s Tower
Enemies to Scan
- Grunoja – Defeat it then loot the Black Zemurian Ore Shard from the ground!
- Simiamanita
- Bracken Monkey
- Cauliflamonkey
Ursula Road 3
Enemies to Scan
- Granpam Ossa
Fishing
- Marble Snakehead
- Cobrahead
- Cangiru
Chests

| Location | Loot |
|---|---|
| Eastern edge near Ursula Road 2 | Magical Divine Water |
| Northern dead end | Diabolos Gem |
| Western edge of main path | Spiritual Divine Water |
| Southwestern corner | Goldia Gem |
| Next to the southern fishing point | Manly Munchies – Assorted Hotpot |
St. Ursula Medical CollEGE
Character Notes
Speak with Linde / Doctor Seiland on the roof then select to visit Mirelle:
- Linde 1
Event
- Visit Ilya’s room
Lake Elm Wetlands 1
Enemies to scan
- Galliosaurus – Defeat it then pick up the Black Zemurian Ore Shard it drops!
Fishing
- Pearlglass
- Sky Gill
Chests
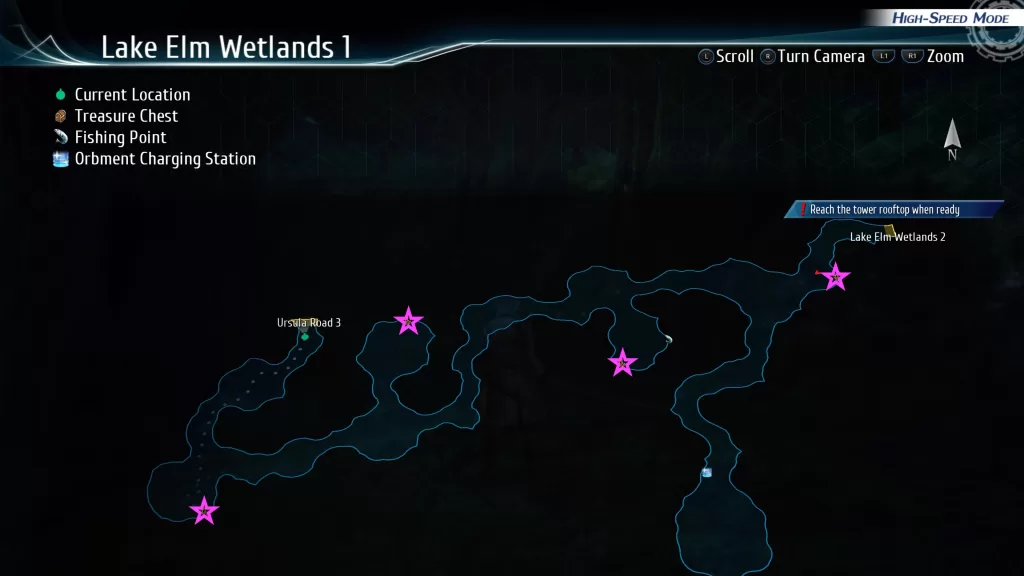
| Location | Loot |
|---|---|
| Next to the fishing point near the center of the area | Spirit Incense |
| Northwestern side of the area | Ocean Bell |
| Southwestern corner of the area | Argem Gem |
Castle of Mirrors Depths
Character Notes
Speak with the group of people:
- Squire Rosine 1
Orchis Tower
Character Notes
Speak with the group at Orchis Tower – 35F in a conference room:
- Gaius 2
Final Mission
When you’ve completed everything and are ready to finish the story, select to begin the operation! After a very lengthy cutscene, you’ll need to divide your characters into two teams: Team A and Team B. Each team will have 20 characters. Team A will have to have Lloyd, Rufus and Nadia while Team B has Rean, Swin and Lapis.
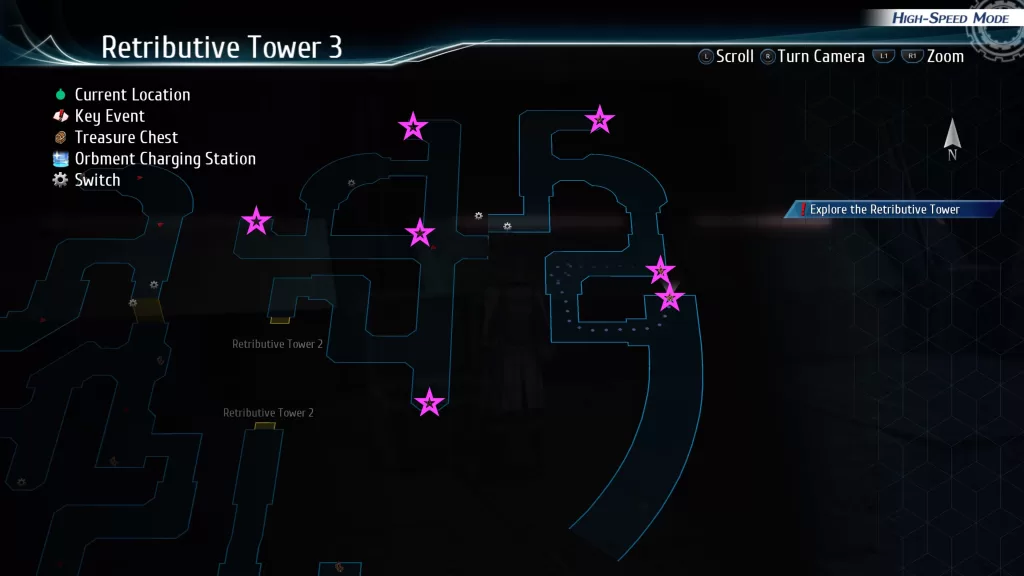
Retributive Tower
Character Notes
Automatically after dividing the characters into Team A and Team B:
- Prince Olivert 2
- Speaker MacDowell 2
Enemies to scan
- Dovon Ace
- Tri-Attacker V2
- Gun Buster Type-A
- Tri-Attacker SS
- El Cubile
- Cubile
- Zero Timelord
- Pale Apache X
- Zero Sorcerer
- Zero Warrior
- Harpy
- Ancient Dogger
- Sneak Gunner R-0
- Sneak Gunner M-0
- Sneak Gunner G-0
- Gespard Gerrod Sigma
- Gun Buster Type-B
- Gun Buster Type-C
- Gundharva
- Aurgelmir
- Torturer
- Divine Delf
- Weiss Clown
- Yyd Vanas
- Yyd Vats
- Plutus Bennu
- Angry Maggot
- Magic Knight Dynagram
- magic Knight Isra-Zamiel
- Magic Knight Sigheim
- Magic Knight Regulus-Zamiel
- Cubelion Telos
- Melphegor Nix
- Ishmelga Rean
- Ishmelga of the End
Chests
| Location | Loot |
|---|---|
| Lloyd – Tower 2 – Just north of the map transition to Retributive Tower 1 | Dazzling Amberl Gem |
| Lloyd – Tower 2 – Along the main path just north of the previous chest | Seiryuu |
| Lloyd – Tower 2 – Along the main path | Spiritual Divine Water |
| Lloyd – Tower 2 – Along the main path | Tear All Balm |
| Lloyd – Tower 2 – Behind a door on the eastern side of the map near the central Retributive Tower 3 marker on the map | Black Zemurian Ore |
| Lloyd – Tower 2 – Along the main path | Celestial Balm EX |
| Lloyd – Tower 2 – Central part of the area just off the main path | Dazzling Esmelas Gem |
| Rean – Tower 2 – Northern side of the map | Steel Bell |
| Rean – Tower 2 – Along the main path on the northwestern side of the area | Vital Divine Water |
| Rean – Tower 2 – Along the main path on the western side of the area | Umbral Gyre |
| Rean – Tower 2 – Along the main path on the western side of the area | Fortuitous Divine Water |
| Rean – Tower 2 – Southwestern corner of the area | Dazzling Sapphirl Gem |
| Rean – Tower 2 – Along the southern main path | Tearal Balm Celestial Balm EP Charge III |
| Rean – Tower 2 – Eastern side of the area near the switch to Lloyd | Dazzling Carnelia Gem |
| Lloyd – Tower 3 – Near the starting point of the floor down the eastern path | Solar Gyre |
| Lloyd – Tower 3 – Along the main path near the south-central part of the area | Zeram Capsule |
| Lloyd – Tower 3 – Along the main path near the center of the area | Power Potion Omega Shield Potion Omega Mind Potion Omega |
| Lloyd – Tower 3 – Western side of the area | Dazzling Argem Gem |
| Lloyd – Tower 3 – Northern side of the area | Dazzling Golden Gem |
| Lloyd – Tower 3 – Western side of the area | Astral Bell |
| Lloyd – Tower 3 – Western side of the area long the main path | Magical Divine Water |
| Rean – Tower 3 – Southern side of the area just after the Retributive Tower 2 map transition | Dazzling Nohval Gem |
| Rean – Tower 3 – Along the main path at a crossroad | Powerful Divine Water |
| Rean – Tower 3 – Western side of the area | Zeus Gem |
| Rean – Tower 3 – Northern side of the area | Brave Soul |
| Rean – Tower 3 – Northeastern side of the area | Mars Gem |
| Rean – Tower 3 – Along the main path | EP Charge IV |
| Rean – Tower 3 – Along the main path on the eastern side | Dragon Incense |
Lloyd – Tower 2

Rean – Tower 2

Lloyd – Tower 3

Rean – Tower 3
Character Notes
Automatically after Lloyd returns to the Retributive Tower to save Rufus:
- Lloyd 4
- Rean 4
- Crow 2
- Rufus 4
- Lapis 3
For more guides on The Legend of Heroes: Trails into Reverie, click here!