Baldo
Guides

Baldo The Guardian Owls – Rodia Library Books

by Chappie in


If you didn’t want to purchase all the books in the Rodia Library, you can still obtain their knowledge by browsing the below! There are extremely helpful tips and tricks for making progress in Baldo The Guardian Owls! Please note that some of the tips contain spoilers.


The following are the books found on the first floor of the library:


Castle Guards

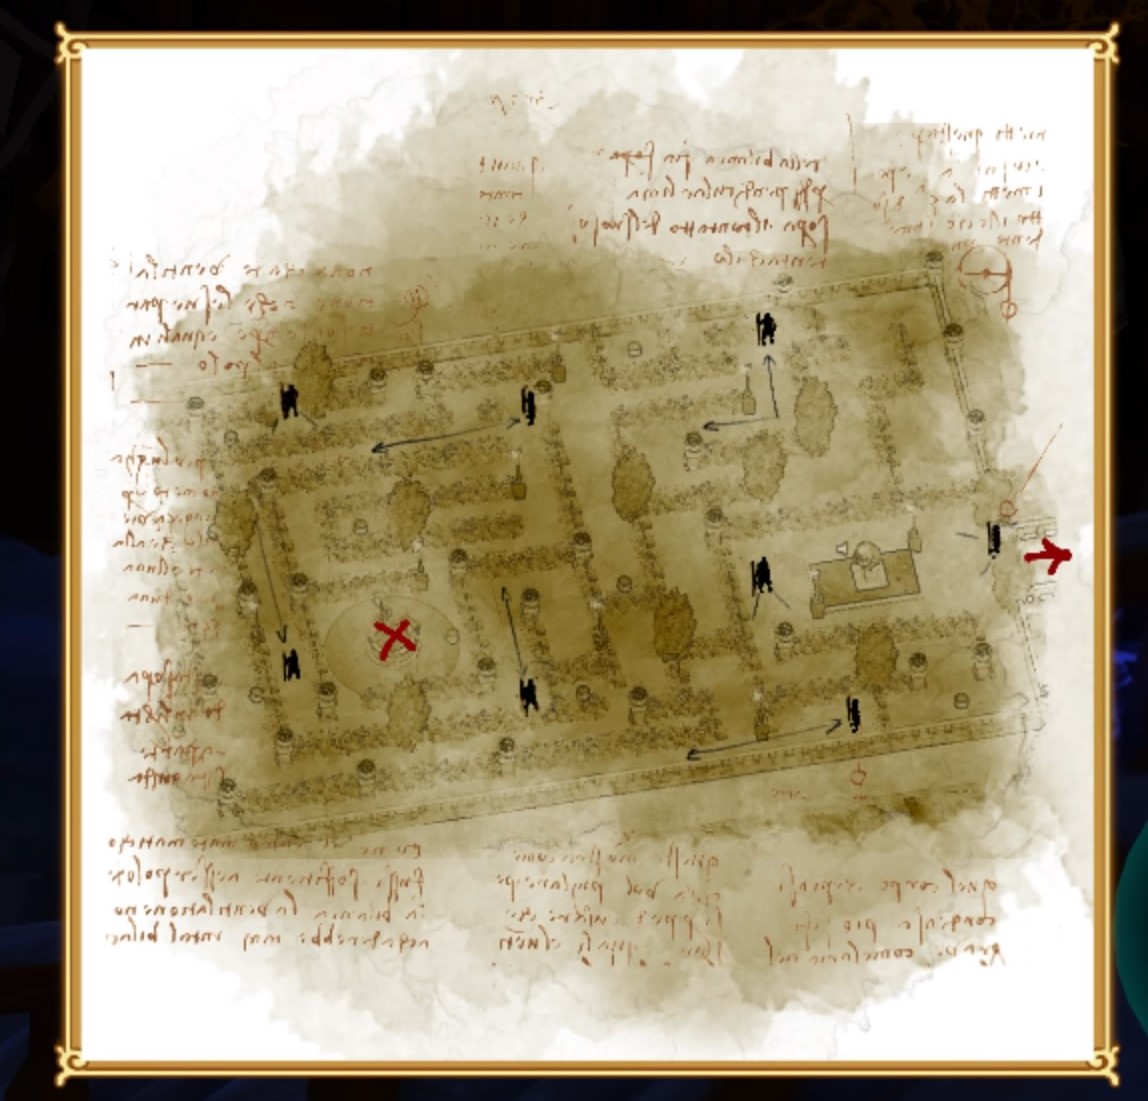
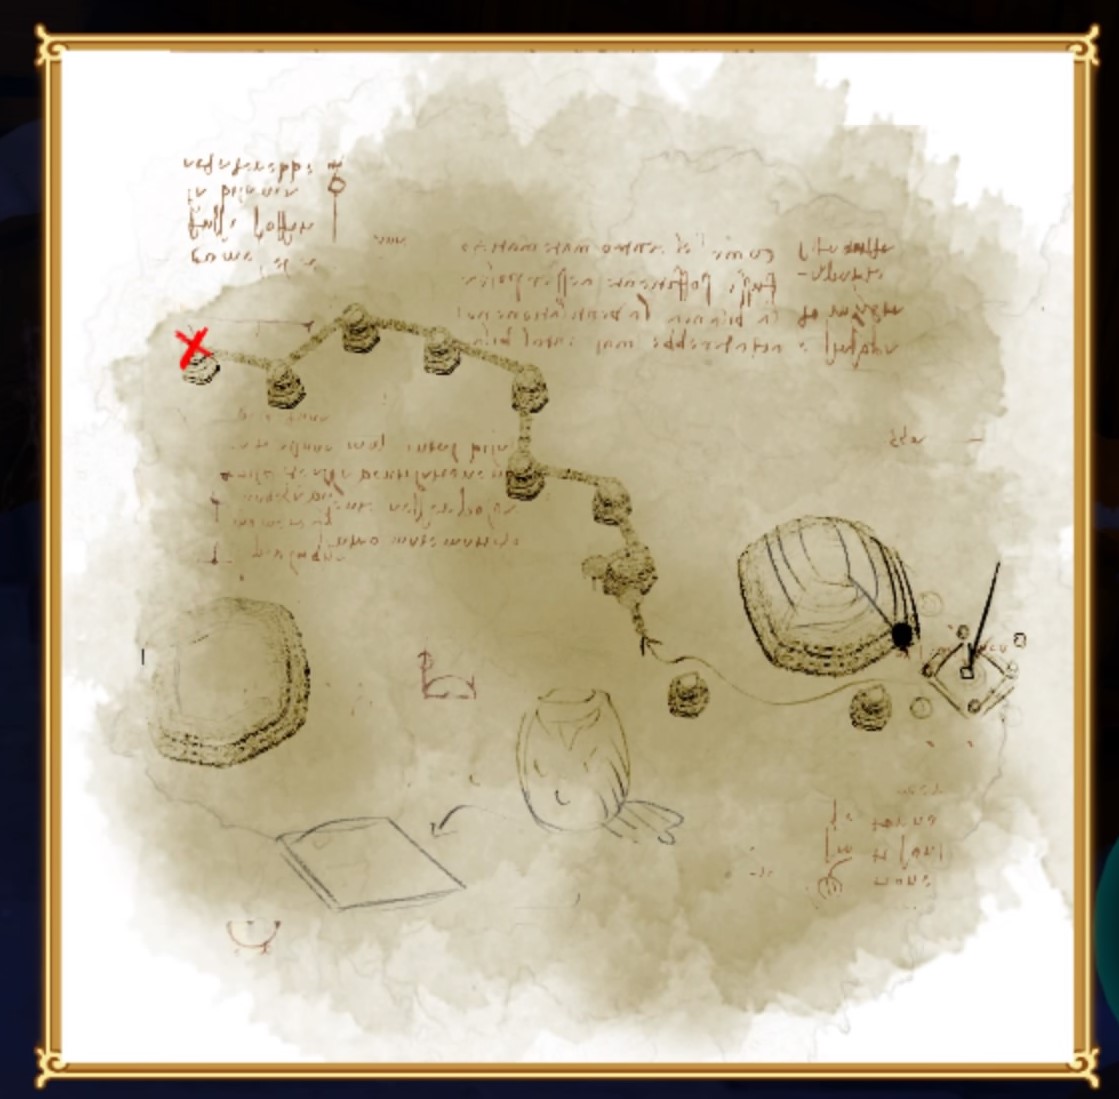
Rodia castle is protected by guards day and night. They take it in turns, so there are always guards patrolling. There are strict orders that the guards have to follow on their rounds… in the garden: these orders were set in stone by the captain of the guards. They always have to follow the same route, which is shown on this map.


Dogs and their behavior

Dogs are beloved creatures that have been people’s best friends since time immemorial. People and dogs share love and affection, but dogs can also perform helpful tasks, which they really enjoy doing. They’re perfect for… tending flocks of sheep: sheep can be quite stubborn at times. Dogs also love bones, and they sometimes get into the cemetery and try to dig up interesting things.


Flora’s Inn

Rodia has a wealth of different shops, but there’s also a famous inn run by a kindhearted woman called Rina. The inn was named in honor of… Flora, the forest spirit and mother of the bobos, who looks after all the creatures of nature. At this inn weary travelers can rest a while, letting time pass to skip between day and night. Who knows if there are other inns elsewhere in the land?


Minisio’s Shops, and where to find them

This map shows the locations of all Minisio’s Shops throughout the land.


Ranotto the Minstrel

Ranotto is one of the oddest creatures in the land. Nobody knows where he came from or when he was born. Some say he was always here in this land. He is very knowledgeable, and can… be found in many places. It’s said he used to sing with the owls, and that’s how he learned the ancient songs. He’s known for his wonderful Song of The Wind, but there’s another song he keeps secret: only a privileged few have heard him sing the Eye of the Mind Song, which allows the singer to remember what they have seen and capture an image of it. Keep the image as a reminder of anything interesting or useful. Ranotto can often be found in Naneko Town, by the waterfall.


Rodia Cemetery & Tero

Rodia is famous for its old cemetery, where the tombs of the oldest and most important… families are situated. The grave keeper is a man called Tero, who is also well known for his collection of rare and precious golden items of Rodia. He is always on the lookout for more rare items to collect. He used to be an explorer, and he amassed an impressive collection on his travels. He was also warden of the Bobo Temple in Sinaro Meadow, and Savoca Prison in Kidoge Village.


Scarecrows

Scarecrows are great. A mannequin in the shape of a human, usually dressed like an old man, placed in an open field. Everybody knows they try to… stop birds eating newly planted seeds and crops, but not everybody knows that they also keep secrets! Legend has it that you can play a mystical tune on a magical instrument to wake up a scarecrow, who might be able to reveal a long-forgotten secret.


The Lost Royal Item

Legend has it that a rare item that belonged to the Royal Family was lost long ago, when a thief tried to steal it… The thief was caught by the guards and put in jail, where he died of a rare illness he had contracted in the Gaziri Swamp. He had a note with him, revealing the location of the missing item. According to the note, the item is still in the castle, hidden in a chest in the attic. He also wrote that the key to open the attic is hidden in one of the wardrobes in the princess’s room. Nobody knows how the thief knew where the attic key was hidden.


The Lost Woods & the Forgotten Path

There is a magical place called Muccia Forest. Once upon a time, there were a variety of different ways to enter these Lost Woods, but they have been forgotten over the decades. However, there is one passage that is still open: follow the path… behind Maneko’s house, but be careful: even if you know the way, you can still get lost all too easily.


The race

Rodia is also renowned for its runners! They can run faster than anyone else in the land, training hard from childhood, but there is a way to beat them… It’s vital to be well prepared for a race, and Scatia Mushrooms on their own may not be enough to beat the best time: runners are well advised to purchase a Yellow potion, half bottle from Kidoge shops before accepting the challenge.


The Secret Passages of Rodia

Rodia Town was built hundreds of years ago, and it’s full of secrets and shortcuts that lead almost everywhere. Everybody knows that… the well outside Rodia leads to the sewers, where you can get to the center of the town, but there’s also a secret underground passage that leads to the garden of the Royal Castle. The entrance is hidden behind Odessa the herbalist’s house. It was built to allow members of the Royal family to sneak in and out of the castle without being noticed. It is said there is another passage that leads to the second garden of the Castle, allowing access to the Abandoned Royal Mansion.


The following are the books found on the second floor of the library:


Abandoned Savoca Prison

There is an abandoned prison on the lower side of Kidoge along the path to the Ridijo Canyon. Savoca Prison was an old Owl Tower that lost its mystical powers and… was used to house prisoners. It was then closed down, and locked to stop people going in and getting lost in the depths of its dungeons. Tero the grave keeper has the key.


Bobos

One of the most common legends of this land relates to the bobo. These lovely pure creatures live in the woods, mostly around… the Bobo Pit, in the depths of the land. They are creatures born of pure nature spirits, but they can be dangerous if they become corrupted by the darkness. They’re usually small and cute, but if they become corrupted they take on the form of huge monsters that are extremely sensitive to sound. They can’t be beaten when they’re standing, so they need to be knocked down by throwing something at them, and then attacked while they’re on the ground, until they revert to their primal form: a Bobo seed. Only Flora can turn them back to their original sweet selves and restore balance.


Invisibility Potions

It isn’t easy to get hold of a decent invisibility potion, and only practised hands can hope to prepare it successfully. Even then, the potion requires special ingredients to be used in the preparation. There is only one… place in the entire land where these ingredients can be found: the Gaziri Swamp up by the Ridijo Canyon. The only way to reach the swamp is going under the bridge that connects Sinaro Meadow with the Garudo Rocks.


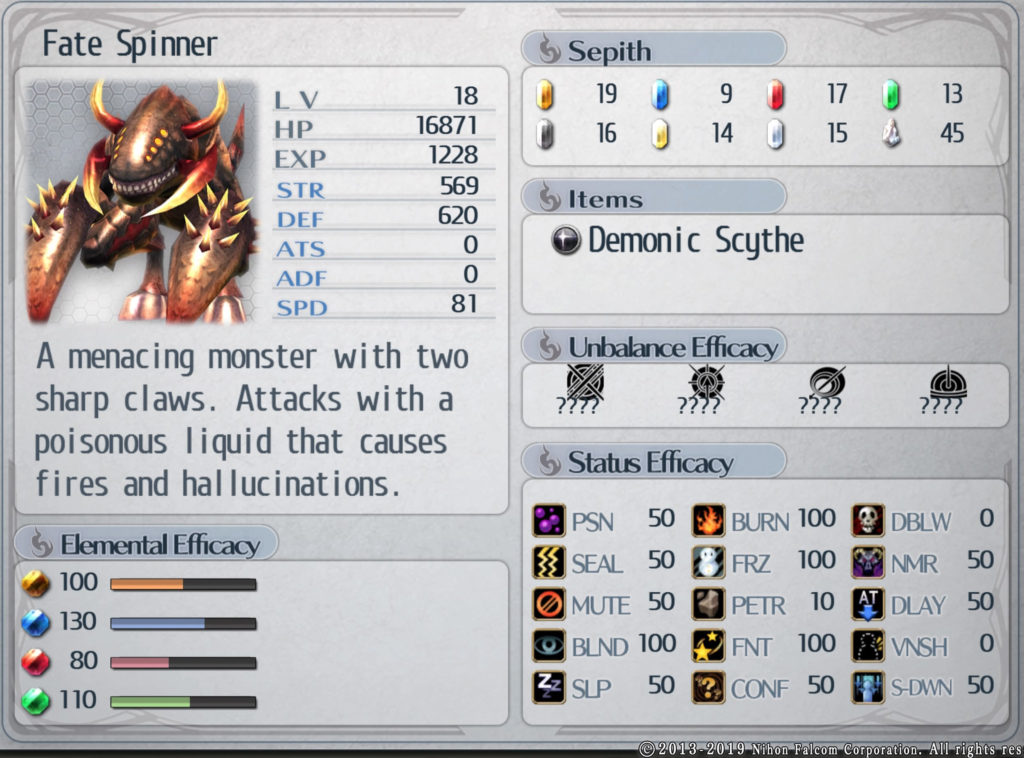
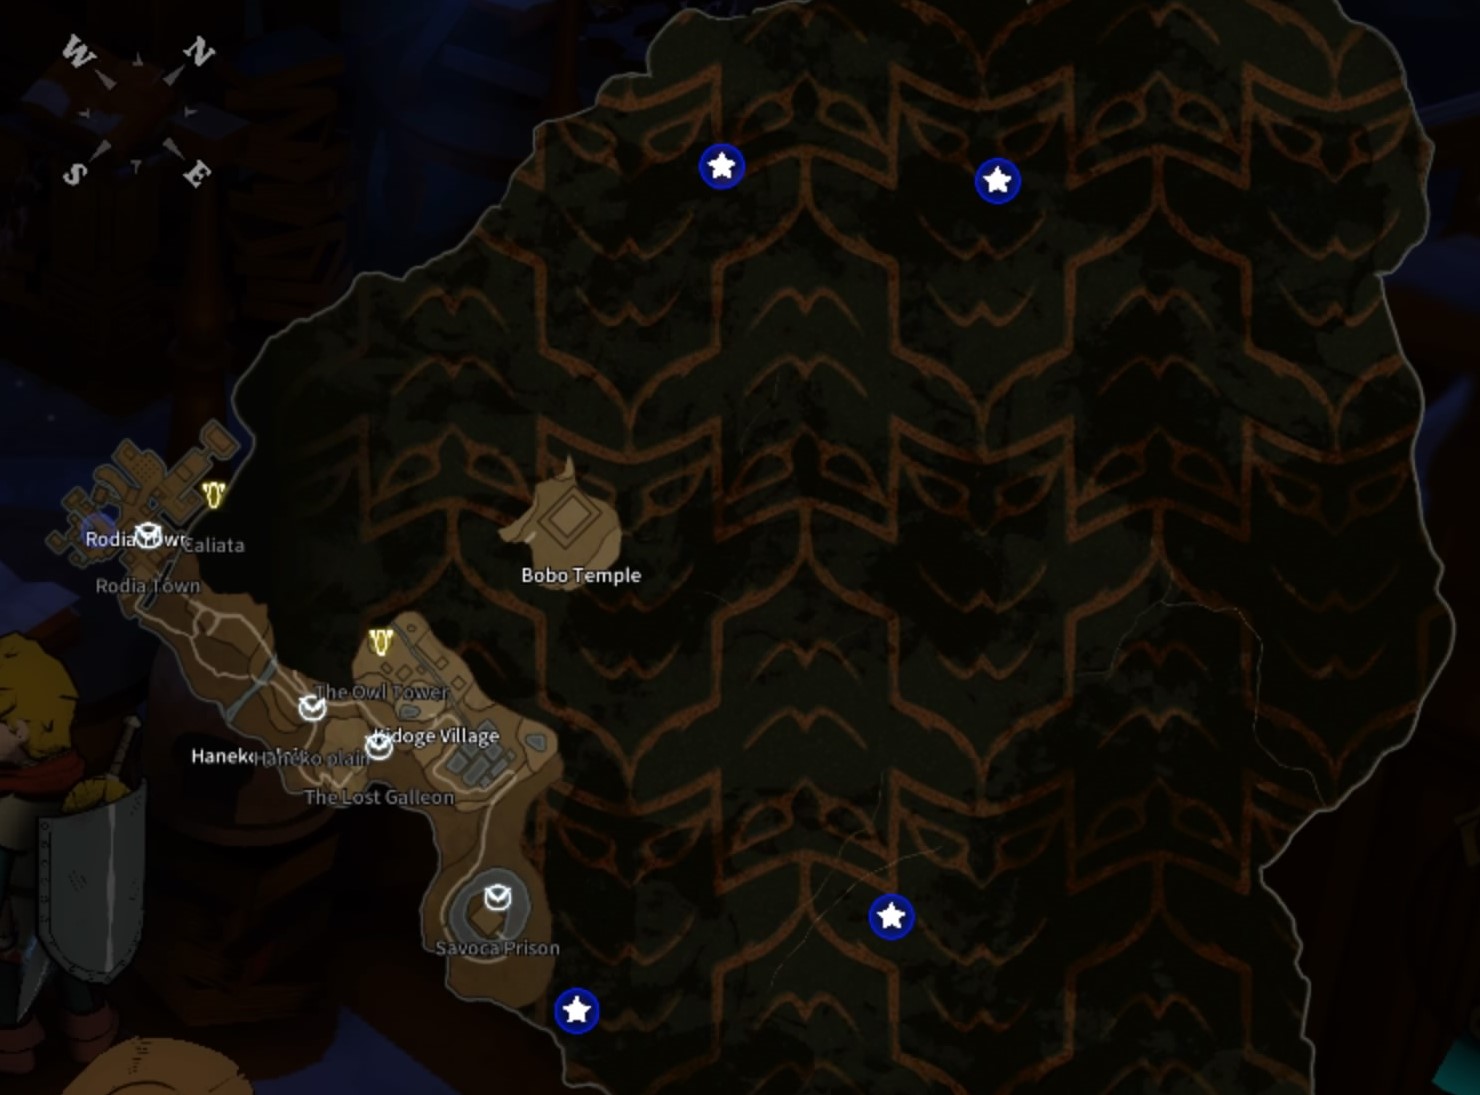
Kangmis, and where to find them

Kangmis are huge, dangerous creatures. These monstrous beasts are exceptionally hard to kill. They live in the… Leone Heights, and only the brave and well prepared stand a chance against them. Their fur is perfect for making a special coat to protect the wearer from the cold. They’re hard to track down, but it’s said they can be found in the areas marked on the map. Preparation is key to defeating a yeti: yeti hunters will need a good, strong iron shield. Iron shields are available in Rodia and at Moiro’s Carnival. It won’t make the task easy, by any means, but with the right shield and skill, the Kangmi can be beaten.


Maneko The Witch

Maneko, the third witch triplet, has set up her home in a remote area… in the Solino Valley, where she prepares magic potions with her apprentices, Camuria the son of the King of the cats, and Maria. They prepare invisibility potions and freeze potions. The latter are available for purchase at any time, but invisibility potions require particular ingredients before they can be prepared.


Naneko Town, and where to find it

There’s a place called Naneko Town where cats live peacefully ahem, far from humans and other creatures. It’s located… in the northwest of Dry Land. Cats don’t usually talk to humans, but Maneko the witch may have a solution for that.


Orbs, and where to buy them

Orbs are available throughout the land. You can find them almost everywhere, but there’s only one place where you can buy them if you run out:… it the Bobo Woods. Just go into the Bobo Woods and follow the upper ring: the shop is on the bottom left side.


Owl Towers

Built in a long-forgotten time, the Owl Towers stand everywhere throughout the land. Legend has it that they were built to house the powerful… runes of the Guardian Owls. The Wise Owls created 6 different weapons long ago. 4 pieces of the same rune are required to restore power to the related weapon. The owls still have some of the weapons, but others have been lost, or are in the hands of traders. Each weapon has great powers, and increases the skill of the warrior who wields them.


Rodia Tower Tour

There’s an ancient Owl Tower in Rodia. You can admire it from Odessa’s house, near the statue of Cacia. It was there before Rodia was built, and it’s difficult to get to, but there is a way to visit it… The fisherman of Rodia organize a tour to the Owl Tower. You just need to buy a ticket from the ticket seller on the dock and bring it to the fisherman’s shop at the end of the dock. He takes passengers to the Tower on his boat.


The God of the Forest

This is a land of many legends. While some are just rumors, others seem to have an element of truth. The most famous legend tells of RAMO, the God of the Forest, an ancient creature who… protects the woods and the creatures who dwell therein. He has been alive since the dawn of time, borne witness to countless events, and fought endless battles to maintain the balance of all things in nature. He lives on top of the mountain next to the Owl Village in the Pansa Hills. You can find him by following the blue butterflies you can see on the way to the Dinna mountains. He is Flora’s father, and is privy to her secrets.


The Owl Village

There’s a secret place where the Guardian Owls lived at the dawn of time. It’s situated… at the top of the Pansa Hills on a cold mountain. The village is hidden from human eyes, but its location can be revealed by finding the 2 Owl Keys and putting them in the right place. Legend has it that one of the keys was entrusted to the Royal Family, and is held in their castle for protection, hidden behind the wall of knowledge.


The Royal Family & the Princess

Rodia is the largest town in the land, and it is ruled over by princess… Luna, descendant of the Royal Family of Maluna, the great Queen. This family traces its roots back to the days when the Guardian Owls lived amongst the humans. The Royal army helped the Owls defeat the no-heart creature, Naroco. When the battle was over, the Owls entrusted the family with a wealth of precious items and weapons, to be kept secret and far from prying eyes. Princess Luna lives in the new castle behind the garden.


The Runes of Power

The Guardian Owls created these runes to increase the strength of the warrior who collects them. The runes can be found in… caves or wells throughout the land. You need 3 pieces to increase your energy by one unit. Find them and bring them back to the Wise Owl in the Owl Village, who knows how to manipulate them to turn them into an extra heart for your energy.


The Takame Shield

This is the ultimate shield. It was made with the shell of the legendary tortoise Ruga, who lived many years ago. It was thought to be lost forever but… Conci, the shield seller of Kidoge, found it a long time ago in the depths of the Gaziri Swamp. Its powers are dormant at the moment, but there is a way to reactivate them: you need to collect all 4 pieces of the Takame Shield rune. 3 are hidden in the Owl Towers that can be found throughout the land, but 1 piece was found by Conci’s cousin in Rodia. Her shield shop is in the center of the town. Try reading rare books to find out where the 3 lost runes might be located.


The Three Witch Sisters

Rodia has a long history of witches, who would offer their services to the local population. The most famous living witches are the Three Sisters:… Odessa, Ursula, and Maneko. They are each skilled in different arts. Odessa is a herbalist: she knows all about growing magical flowers and plants. Ursula is a miller: she lives in Solino Valley, and specializes in the creation of precious magical powders that make even rare and mysterious plants grow and bloom in an instant. Maneko is an animal witch: she creates magical potions and a variety of concoctions, some of which make people invisible for a short period of time. She lives in the northeast of Solino Valley, far away from people, as she prefers the company of animals and magical creatures.


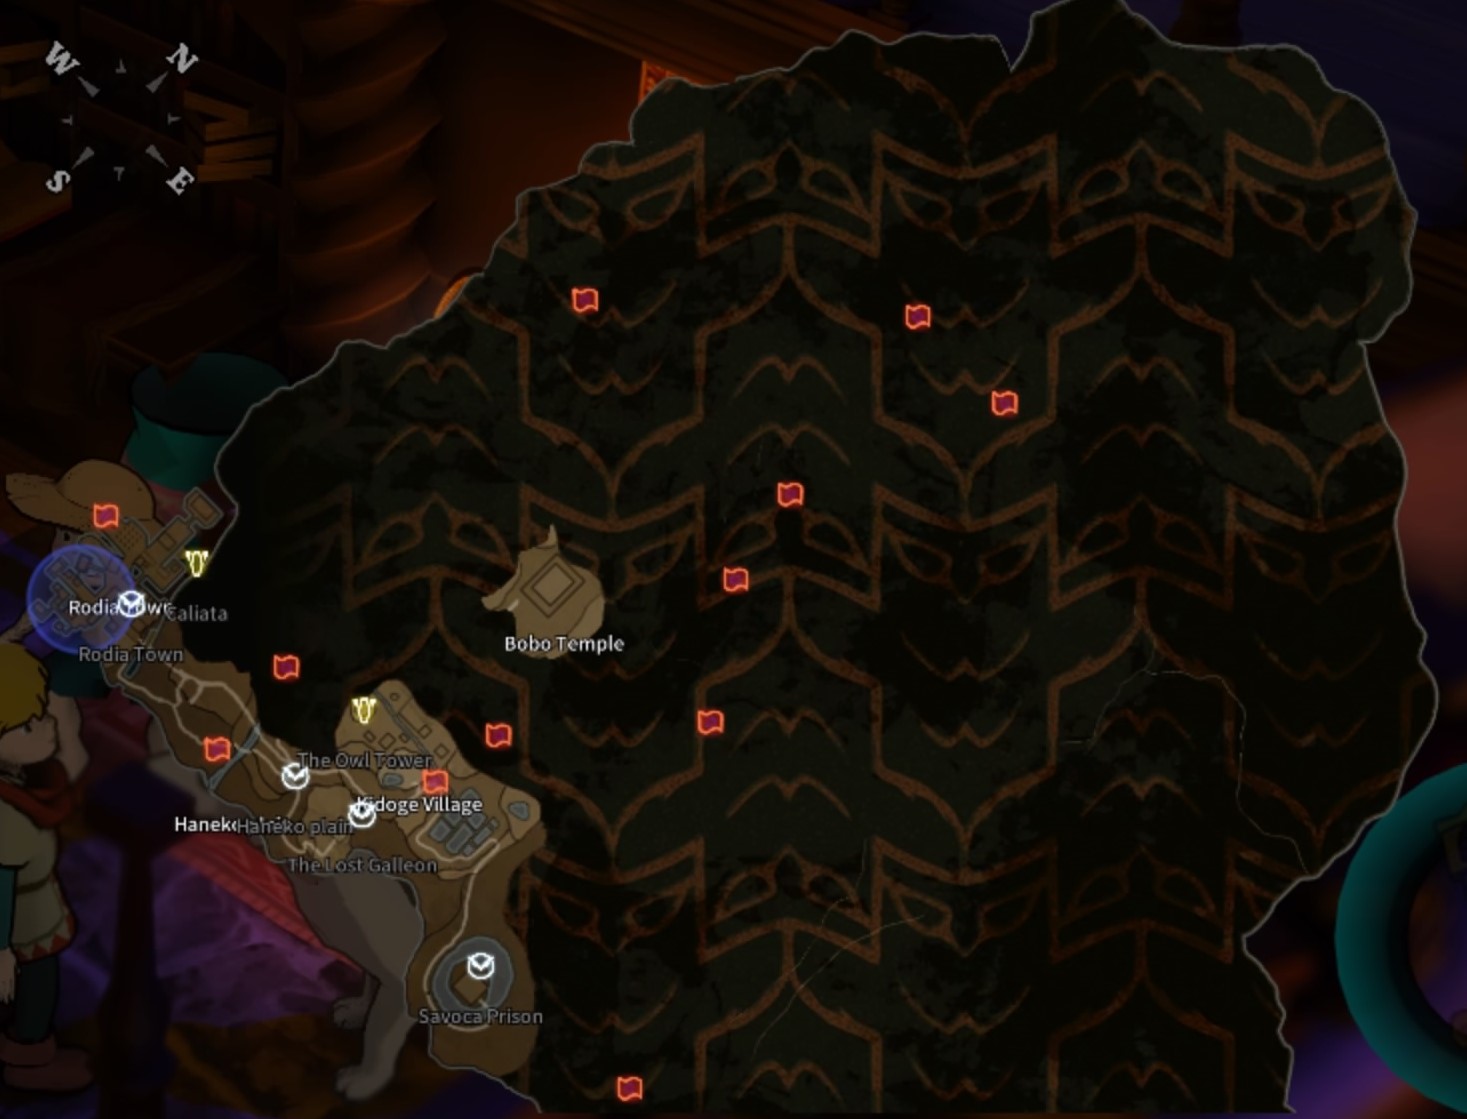
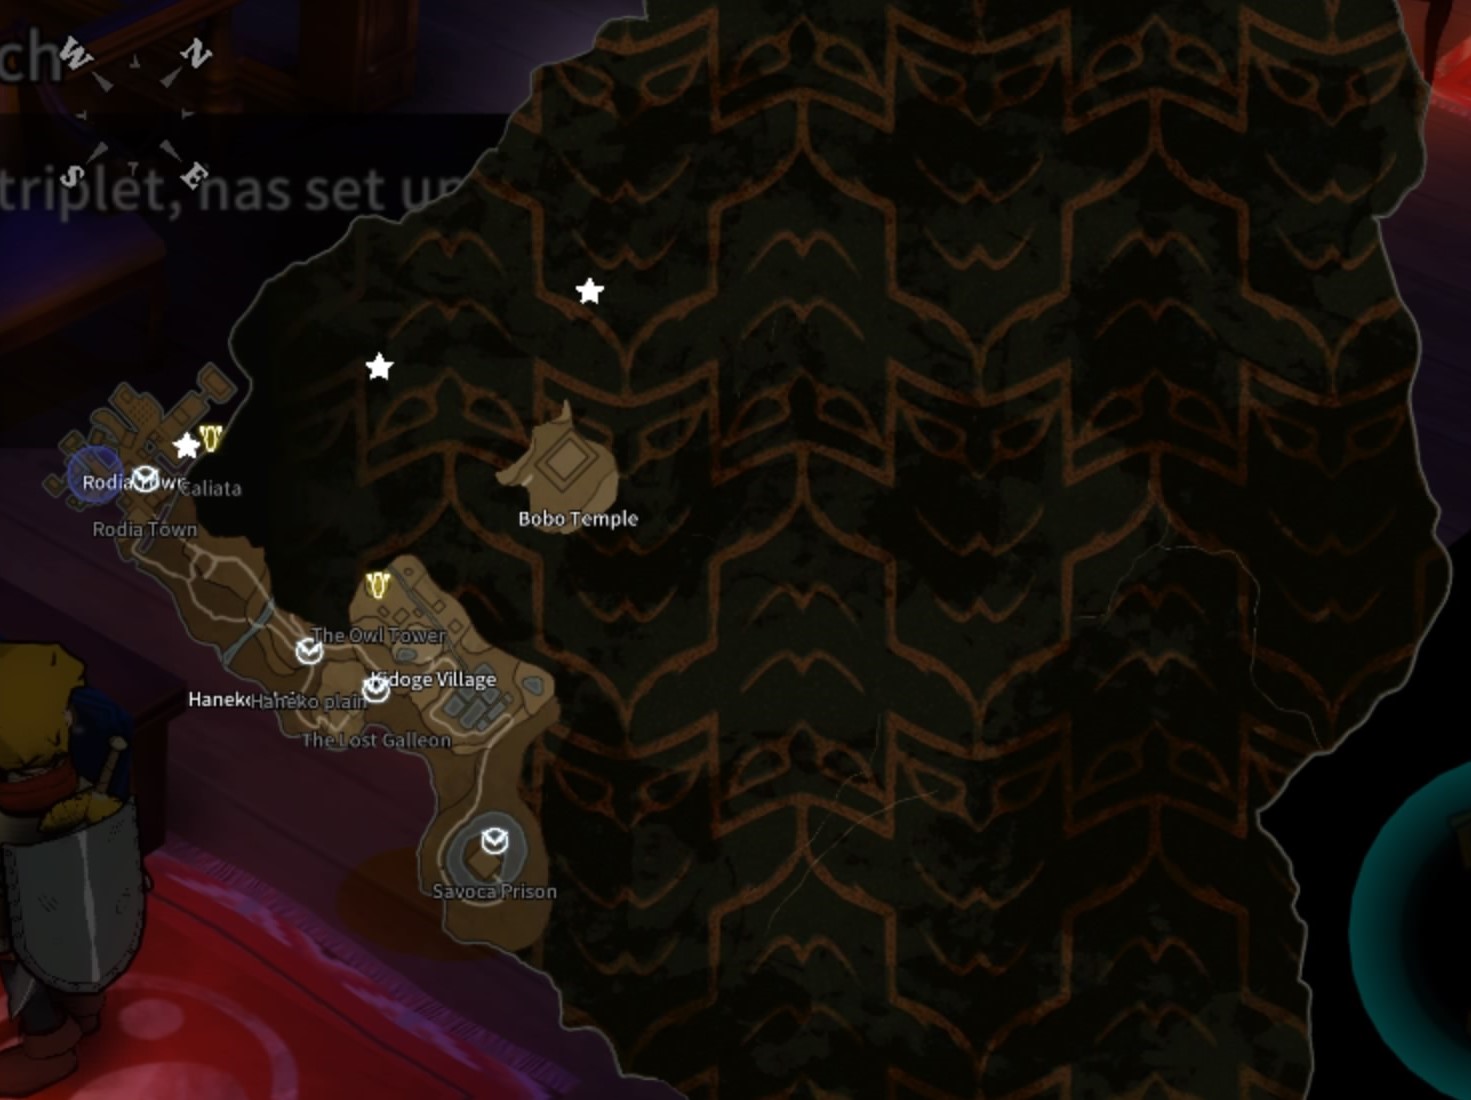
Windmills, and where to find them

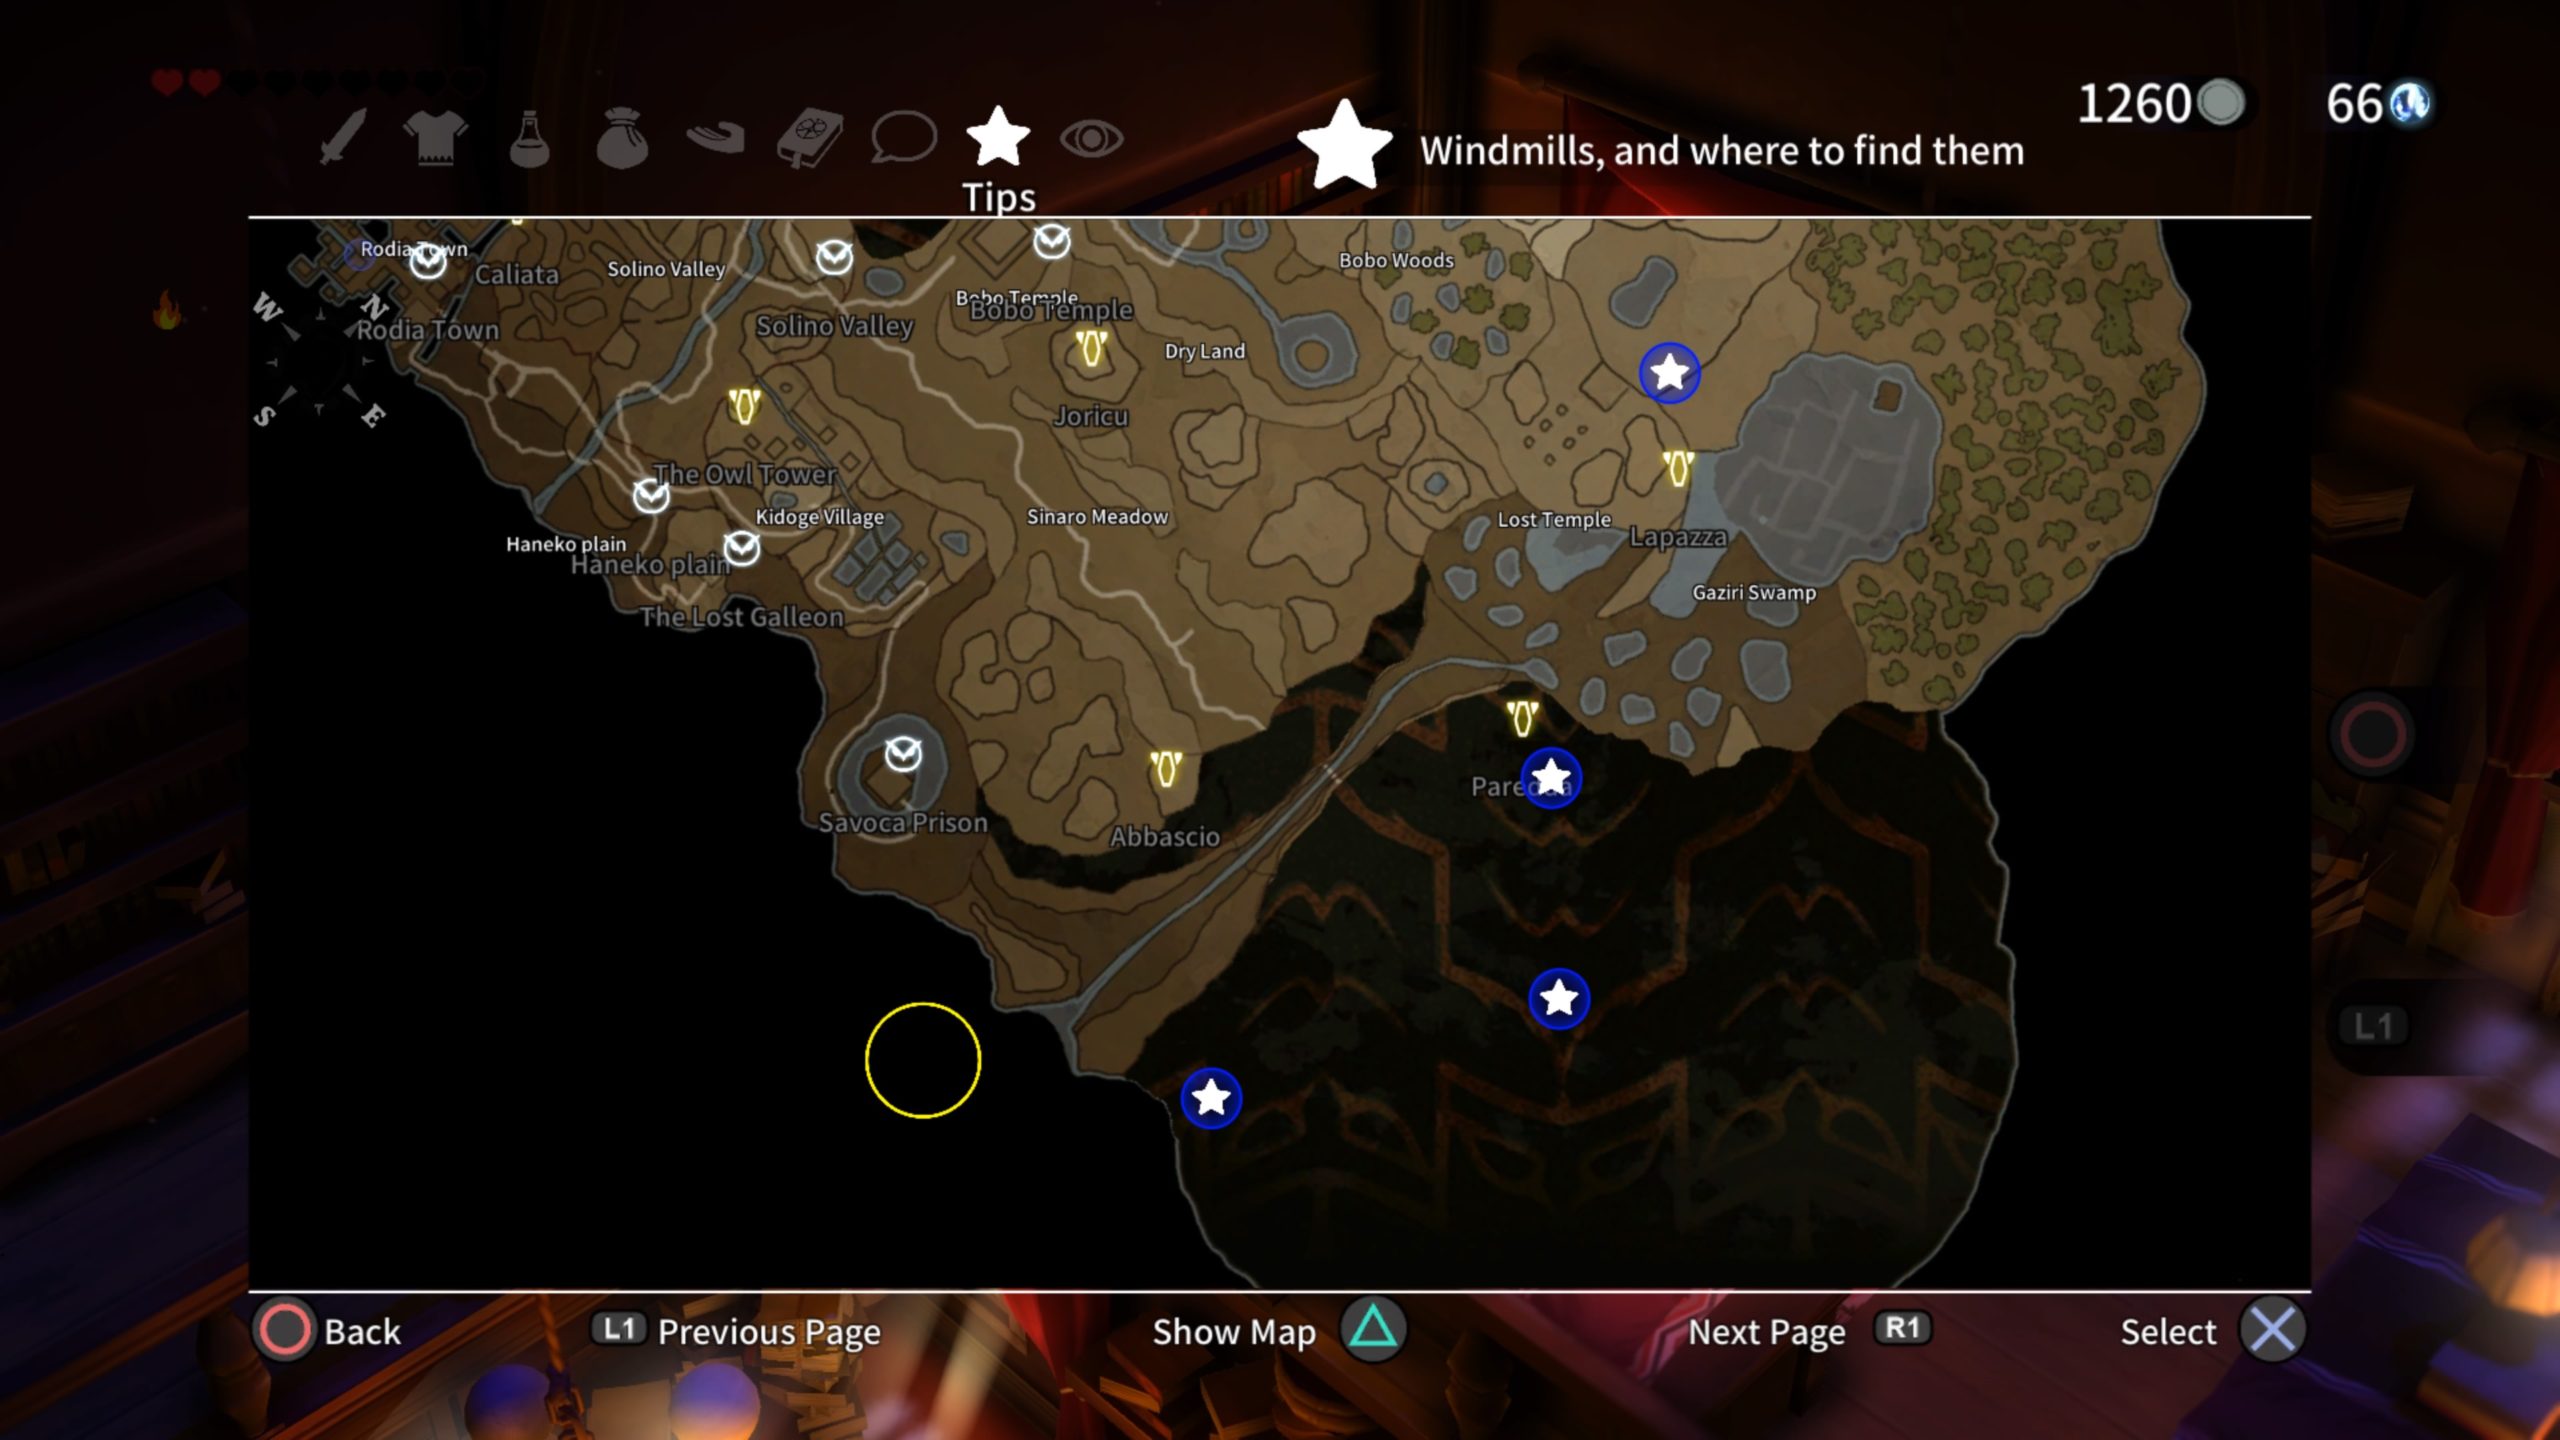
There are windmills scattered throughout the land. Some of them are quite well hidden, but there’s… a map you can consult to find them all.


The below are the books found through the door on the second floor of the library. They are all tips for the Savoca Prison dungeon!
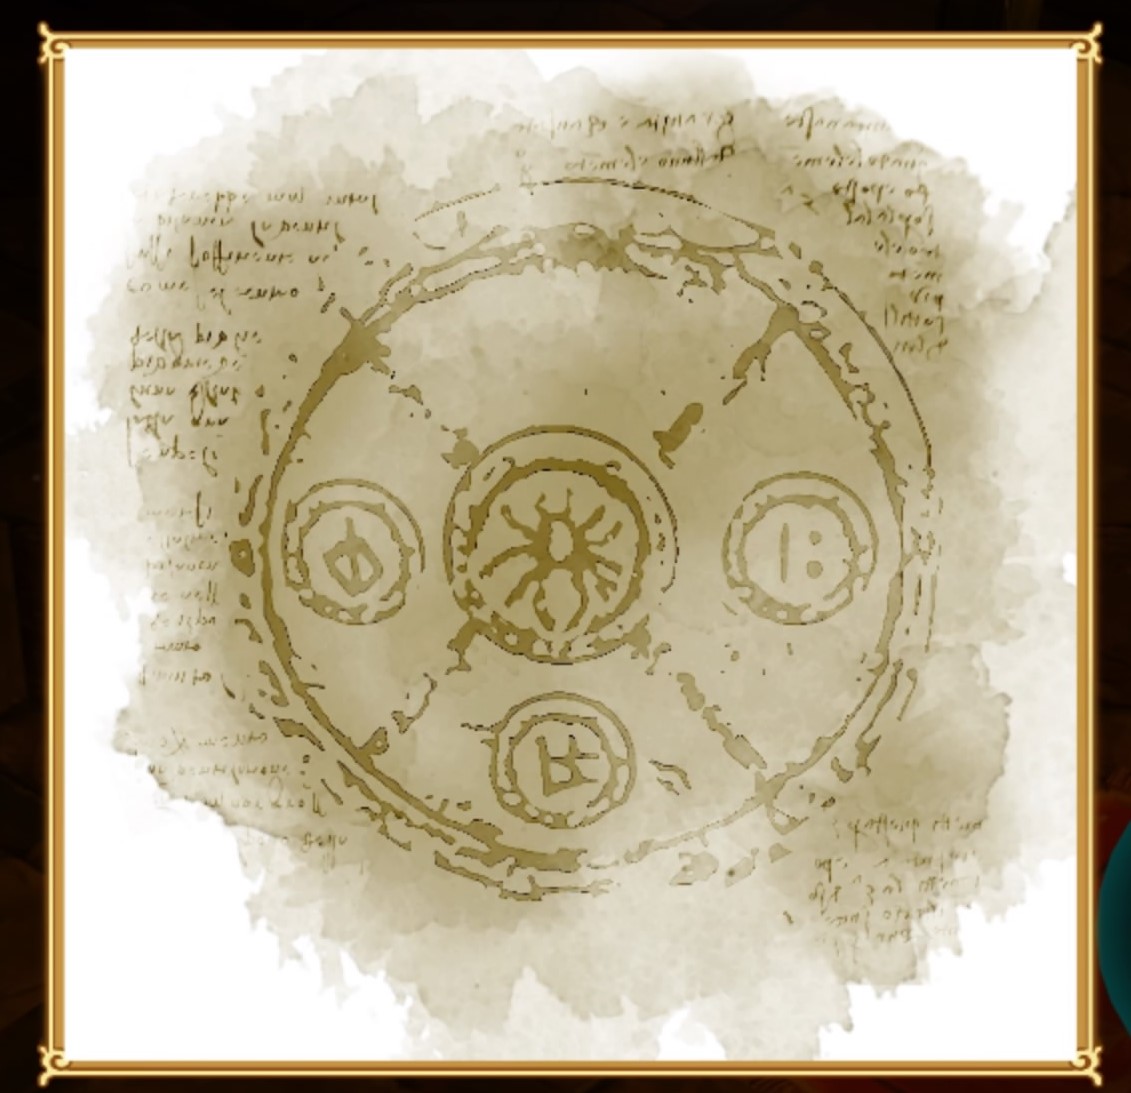
 

Symbols

In the prison, there are different symbols… near the entrance. They are important to ensure everything is in the right place. There are 3 symbols, on the first floor of the prison and on the ground of the hidden rooms near the entrance.


The Bobo Statue of Fire

Everything needs to be in the right place to solve the mystery of this room… The statue needs to be placed by the correct symbols to access the triangle key that is in the chest at the top of the stairs.


The Lost Bobos

There are 3 lost bobos in a room… they’re keeping an important secret: if you revert them to their original form, a chest with a key will be revealed.


The Switch and the Gates

In the deepest depths of Savoca Prison there’s a room with a river, and cages hanging above, with four switches on the ground… There’s only one way to solve the puzzle: all the switches need to be turned the right way.


The Three Cages

There are a lot of rooms in Savoca Prison, but only one has 3 open cages… where the skeletons of dead prisoners return from the afterlife in perpetuity: keep them locked in their cages to unlock the room.


The Water

Some sections of the prison are submerged under water… the water level can be controlled with a lever, situated in the east side of the Prison Changing the water level allows access to rooms of the prison that would otherwise be inaccessible, including the room where the Sacred Fire is stored. Remember, sometimes making an area accessible means another area will become inaccessible – like the room where the triangle key is stored.


To reach the below book, you must have acquired the Sacred Fire from Savoca’s Prison. Use the fire to burn the webs.


Aratna, the Savoca Prison Guardian

Aratna is located in the depths of Savoca Prison. She is an enormous, terrifying creature, who protects the secrets of the Prison. She is difficult to kill, but there is a way to do it… she isn’t afraid of fire, but a large blaze can hurt her. You need to pull down her web-nest and light the brazier near the door: the resulting inferno will hurt her if she gets close to it.


To access this part of the library, head up to the second level and light the brazier using your fire.

This will reveal a hidden entrance behind the bookshelf. Head through it and follow the path to reach the section of the library containing the following books:


Cacia, the Great Architect

Cacia the architect who was responsible for designing and constructing most of the buildings in Rodia Town. A statue near Odessa’s house was erected in his honor. He hasn’t been seen since… he was spotted near the Bobo Temple outside Rodia Town in Sinaro Meadow at night, accompanied by his daughter.


Cacia’s Assistant

Cacia had an assistant called… Topazzo, a citizen of Jacu Oasis, a tribe of builders and explorers who live at an oasis in the middle of the Marui Desert. Getting through the desert isn’t easy: it’s hot during the day and cold at night. Topazzo’s daughter lives and works in the southeast of Jacu Oasis, and can often be found walking around the village at night.


Flora, the Spirit of the Forest, and where to find her

There are many legends about the spirits of the land, and the ancient creatures living there. One such legend tells of the spirit of the forest, Flora. She is… kind and compassionate, and her task is to maintain the balance of nature energy. She is the mother of the bobos, and she takes care of every living creature in the land. She lives in the Bobo Woods, but you can find her in other places as well: legend has it that wherever there are blue butterflies, Flora will be nearby.


Horbia Tree

Muccia Forest, the Lost Woods


Saraia, how to bring her back to life

Before disappearing long ago, Saraia, whose ghost haunts the Bobo Temple, used to play in the… Rodia cemetery with Tero. Legend has it that lights appear on the graves of Rodia at night: turning the lights on in the same pattern in The Misty woods temple will bring Saraia’s spirit back to life.


Saraia, the Ghost of the Bobo Temple

Legend tells of the ghost of Saraia, Cacia’s daughter. Her ghost has frequently been sighted at… the Bobo Temple. Tero the grave keeper was a good friend of hers when he was a child, and he has always remembered how much she loved blue flowers.


Secrets of The Misty woods

The Misty woods are located on the west side of the Bobo Temple, and are full of secrets. In the woods there’s a… temple, with a mysterious maze that holds an important item used to increase your strength. The only way in is by ringing the bells at the entrance of the temple in the right order.


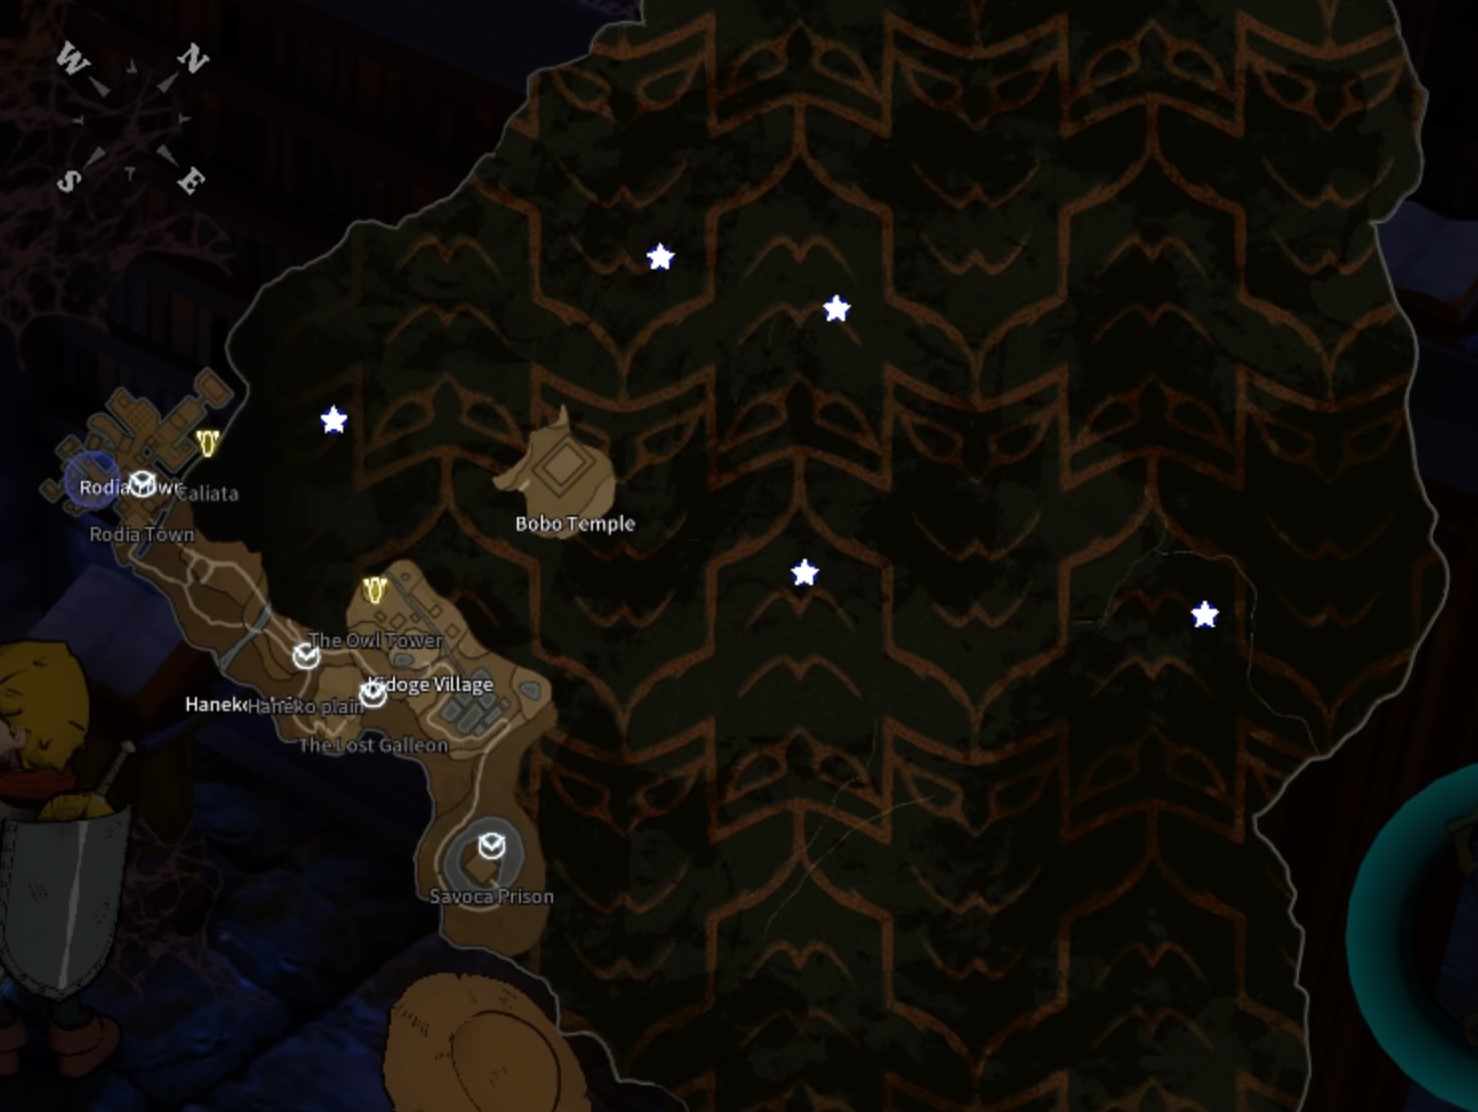
Symbols of the Sewers

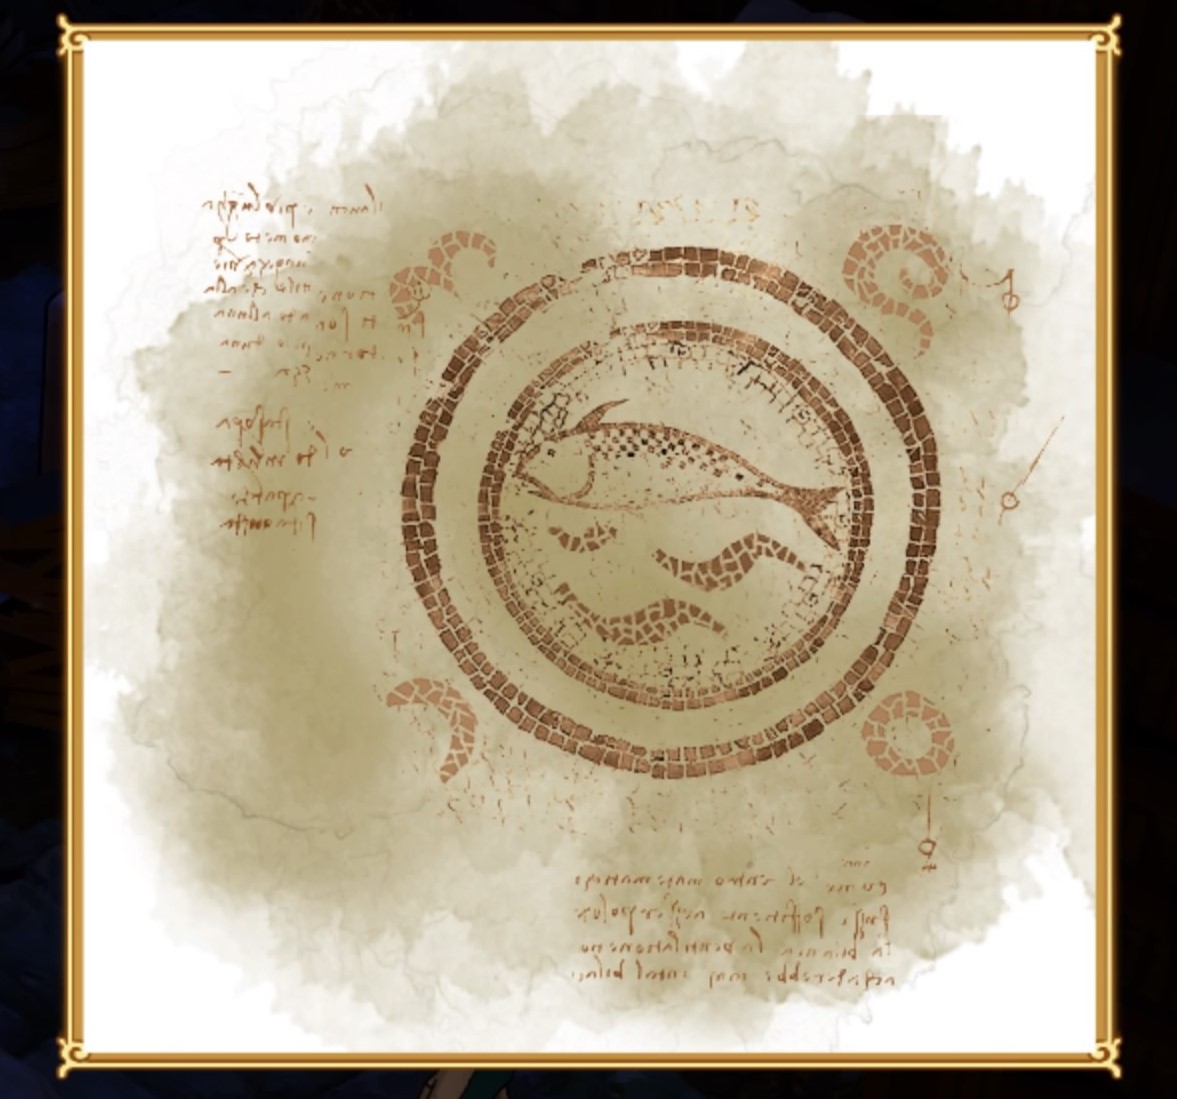
Only those who know the right symbol can enter the final section of the sewers, and the symbol is… reported here.


The Bobo Temple

Just outside Rodia there’s an abandoned Bobo Temple, dedicated to the spirits of the forest. It’s situated at… the entrance to Sinaro Meadow. The entrance of the Bobo Temple was locked a long time ago to protect the site from treasure hunters.


The Bobo Temple and the Crypt Entrance

The Bobo Temple has another level underground, where many secrets are hidden. There’s only one way in: at… night, turn the mirrors to redirect the moonlight onto the right spot on the statue to reveal the switch that opens the way to the crypt. Be warned: no humans can press this switch.


The Lost Temple

The chronicles speak of an ancient temple lost in a remote part of this land. You can find a map for it in one of Minisio’s Map Shops, but reports say it was located in… the northeast side of Sinaro Meadow. Two brothers from Kidoge found the ruins a long time ago, and they know the location. It is said that the temple hidden within can’t be opened without a key, which may be in the possession of one of the brothers.


The Path to The Misty woods Temple

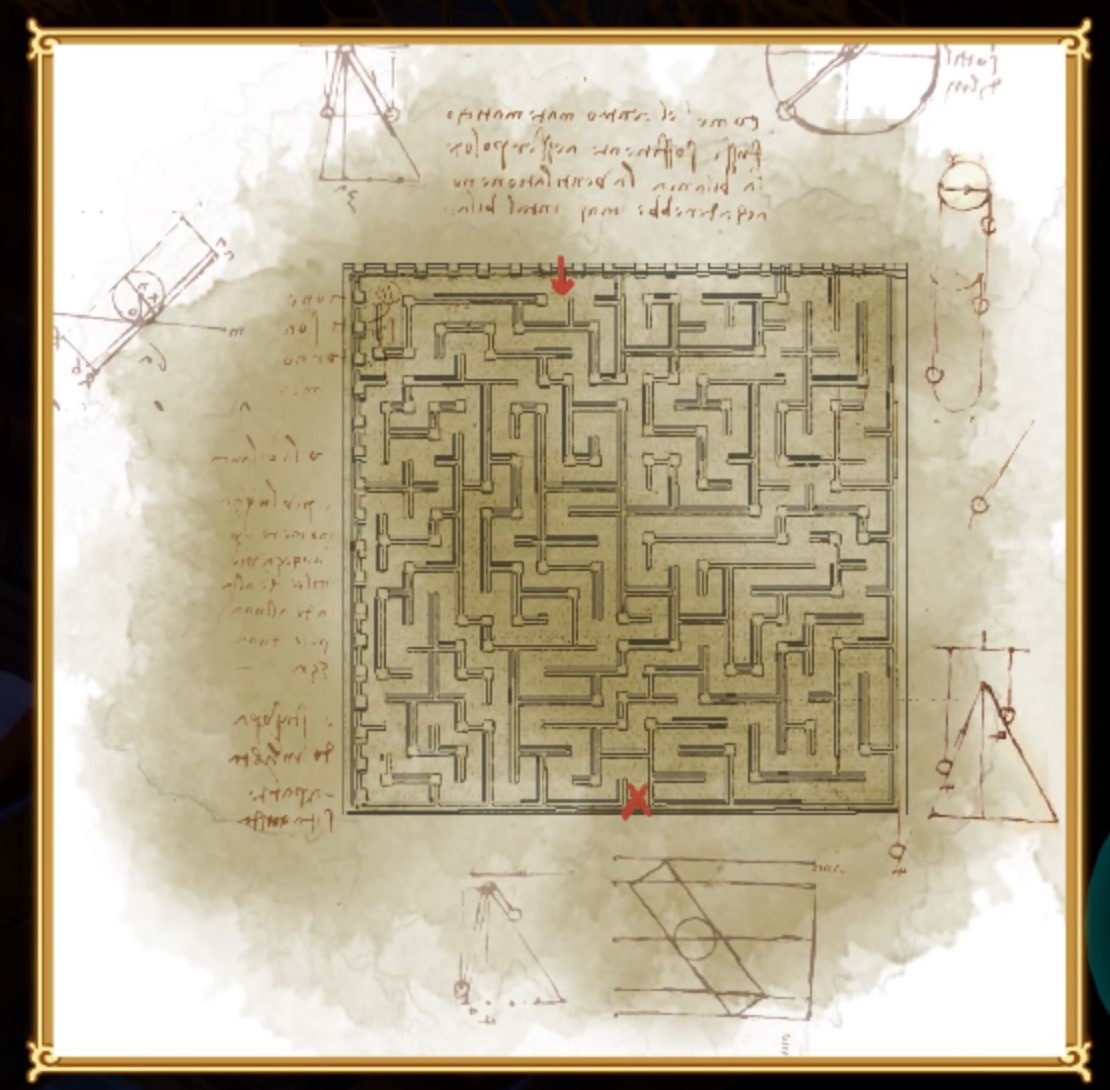
It’s always hard to find the right way through a maze, and easy to get lost at every turn. That’s why a map was drawn up to… help locate the most important secret within. Morse secrets appear every time you go in, but nobody knows where or when you’ll find them.


The Sewers, an intricate web of secrets

During the construction of Rodia, or perhaps dating back even earlier, an intricate network of tunnels was built, linking various locations inside and outside of Rodia town…Everybody knows that the well outside Rodia leads to the sewers, and then on to the center of the town, but there’s also a hidden underground passage leading from just behind Odessa the Herbalist’s house to the garden of the Royal Castle. Ancient texts speak of another secret tunnel from the Bobo Temple to Rodia, and a path that leads from the center of Rodia to the gardens behind the Castle of Rodia, offering access to the Abandoned Royal Mansion. Some of these secret paths allowed members of the Royal family to sneak in and out of the castle without being noticed.


Water Levels and Crates

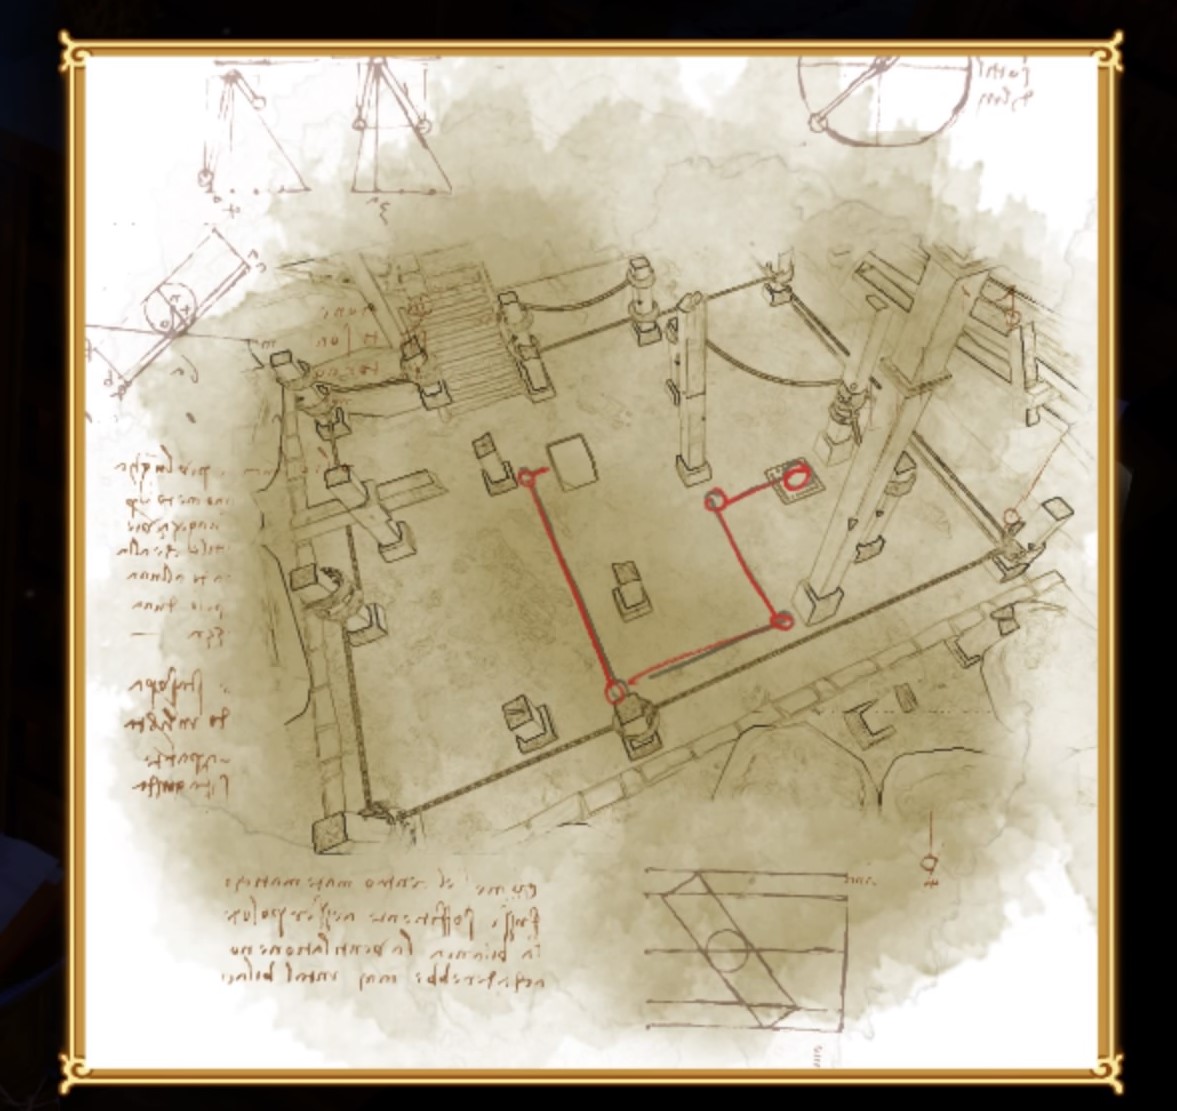
Some sections of the sewers are water storage tanks, but these tanks can also be used to… create a route to different sections of the labyrinthine sewers. The main tank is controlled by a lever that moves the water up and down into the two secondary tanks. Lower the water level to use the crate to reconnect the sewer sections, following this diagram.


To reach the next area, push the stone to the west to reveal a hidden entrance behind a nearby bookshelf.

You’ll find the following books:


Desert Clothes

It’s hard to explore the Marui Desert during the day, due to the searing heat, so you have to be well prepared. There is something that can help: a special item of clothing… This garment is made by the denizens of Jacu, great explorers, but also renowned as exceptional tailors. Their clothes are highly resistant to heat, but you can only buy them in Jacu Oasis. They aren’t cheap, but members of the exclusive Jacu Oasis Club have access to special discounts.


Diamonds

An explorer in Jacu Oasis is looking for diamonds, and there’s only one way to collect them: by… defeating the dangerous Rock Demons you encounter throughout the land. These are the places where they can be found.


Flora: where she could be without her powers

Flora is extremely powerful, but she can be deprived of her power if she’s imprisoned in… a place far from the forest and close to the sea. For example, the Rodia Lighthouse. Arturo was a great friend of hers, and despite it being a dangerous place for her, she used to go there to talk to him when he was alive.


Inside the Lighthouse, the Hidden Key

At the top of the Lighthouse stairs there’s a room. You need the key to get in, and the lighthouse keeper used to… hide it inside one of the jars in one of the rooms near the main entrance to the lighthouse.


Jacu Oasis Club

The citizens of Jacu take their exploration abilities extremely seriously. You’ll need to prove your skills before being accepted as a member of the exclusive Jacu Oasis Club. There’s only one way… to prove yourself: locate the bones of the ancient desert snake. It is said that they lie somewhere in the Marui Desert to the south of Jacu Oasis, and can be found by following the dark stones on the sand. If you manage to find them, activate the teleport to prove it.


Need for Cheese

The citizens of Jacu Oasis just can’t get enough cheese, but they aren’t able to produce their own, because farming is so difficult in the desert. However,… there is a way to help them get the cheese they love so much. Buy eggs in Kidoge, or come across them elsewhere if you’re lucky, and bring them to the dairy in Rodia near the dock: they trade eggs for cheese.


Rodia Owl Tower

The Owl Tower Museum of Rodia stands at the end of the longest bridge on the west side of the center of town. It was the house of the king of the owls, Gokuro, and… there’s a secret path that leads into the tower. Legend has it that, at night, the moonlight coming through the windows shines on the floor, revealing the way to open it.


Rodia: the Order of the Jars

In the center of Rodia there’s a man trying to put the jars in the right order, but… he carries one with him, so it’s impossible to solve this puzzle during the day when he’s around. At night, all the jars are available to be placed on the correct places on the ground. You have to place a jar on each tile with a triangle symbol.


Secondary Castle Garden

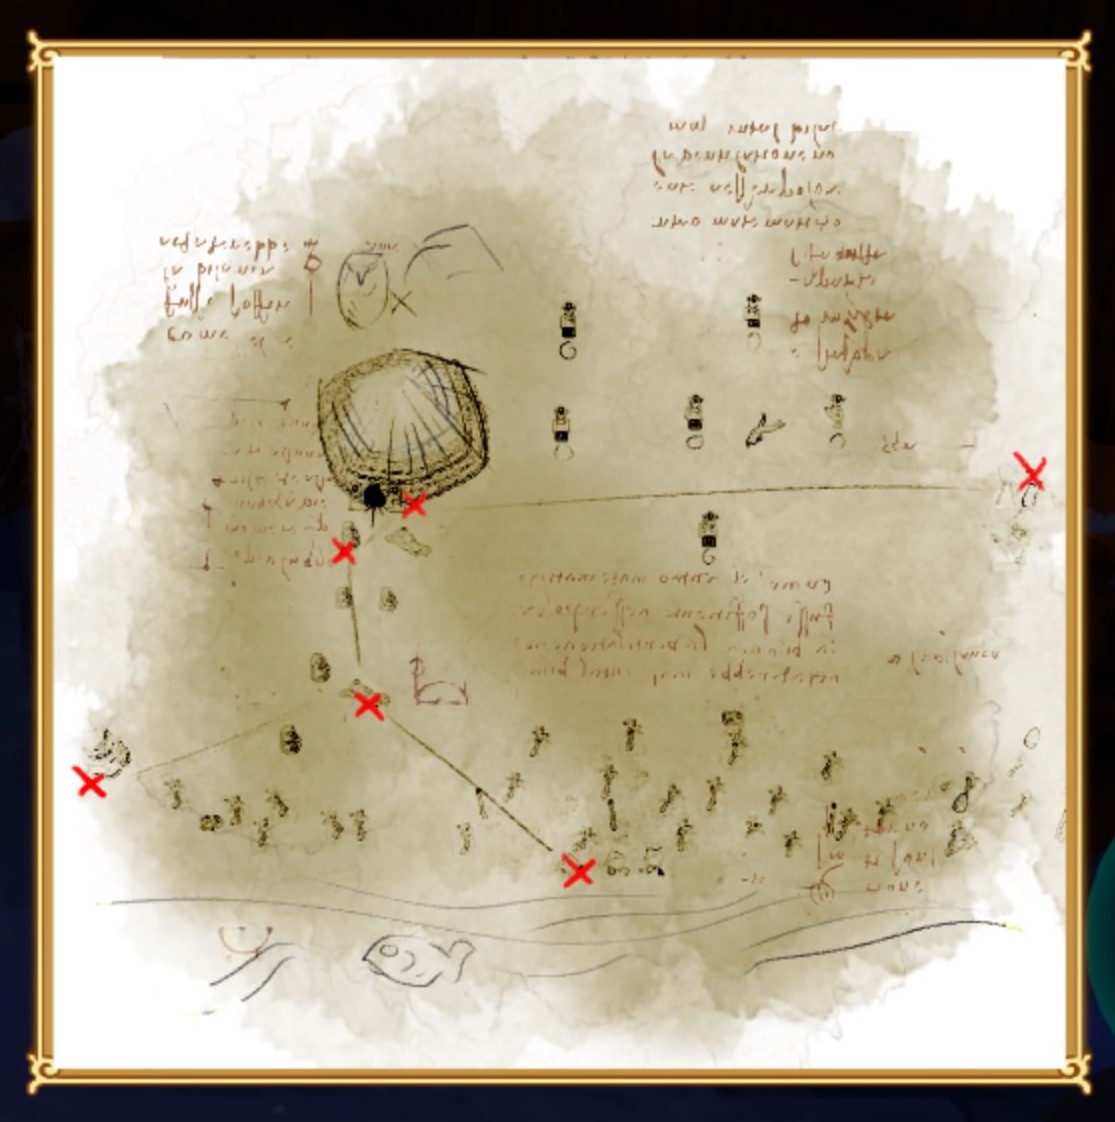
Rodia castle has two gardens, one in front and one at the back. It isn’t possible to access the rear garden from the front, but… there’s a secret passage leading to the center of the garden. During the day there are no guards, so you can study the route carefully, but the entrance to the Abandoned Royal Mansion is always protected at night. These guards don’t follow a set route, but you can distract them at night by throwing a jar, and then sneaking past, into the Abandoned Royal Mansion.


The 4 Living Suits of Armor

There’s a room in the Abandoned Royal Mansion with 4 differently colored suits of armor that come to life when you turn the lights on. You can’t destroy them… at radom: you have to follow the correct order. There’s a room with statues the same colors as the 4 suits of armor. Move the statues to reveal the correct order, which is as follows: Blue, Black, Green, Red.


The Abandoned Royal Mansion: the Hidden Path of the Tiles

The Abandoned Royal Mansion holds more than its fair share of secrets and puzzles: one of the trickiest is finding the right path over the tiles. You can… follow the pattern on the floor of a balcony outside, or you can use this diagram.


The Abandoned Royal Mansion: What’s Behind the Mirrors?

The Abandoned Royal Mansion is a dangerous place, with twisted rooms that aren’t always as they first appear. It’s important to… keep an eye on the reflection of the mirrors in the twisted rooms. That which can’t be seen with the naked eyes is always present in the mirrors.


The Blacksmith’s Basement

In Rodia there’s a skilled blacksmith. He normally works tirelessly, but these days he can’t seems to light his furnace… The two burners in the basement have been turned off somehow, and he can’t fix them because it’s a two-man job, one has to be upstairs to take care of the furnace, the other one downstairs to turn them on. When they’re both working, direct the flow of both flames along the primary duct into the pipe room, or the main burner won’t be activated.


The Light Keeper

Rodia has a famous Lighthouse situated on the west side of the dock. It was run by Arturo, the old keeper. He died recently, and… his grave is under Rodia cemetery, in pride of place, surmounted by a fountain. He was a member of one of the oldest families of Rodia. Move the stones near the fountain to find a way to get into his tomb, but he won’t appear until you have his family crest, which he gave to RAMO a long time ago.


The Marui Desert: the 4 pillars

In the southwest of the Marui Desert there’s a square on the ground with 4 pillars surmounted with balls. You need… to place the Owl jar in the center. Here’s a map to located the nearest jar.


The Marui Desert: the 6 Statues

In the southwest of the Marui Desert there are 6 bobo statues that need… to be completed with the nearby Owl jar. Some of them are hard to find: here’s a map.


The Sacred Owl Temple

The Guardian Owls built their most important, most majestic temple in a remote location, far from civilization. It’s… in the northeast of the Marui Desert. Records suggest it can be found by going east from Jacu Oasis and following the signs.


The Secret of the Abandoned Royal Mansion

There’s a powerful ancient item in the Abandoned Royal Mansion behind the Castle. The King hid a special weapon there, called… the Owl Bomb. This sphere is a technological marvel. The wise owls crafted it to create explosive bombs using the energy of the Orb. It can break crumbly rocks and some wooden obstacles, damage enemies, and move levers at a distance. It is hidden in the depths of the Abandoned Royal Mansion.


The Sun Umbrella Business

A businessmouse in Jacu Oasis had an idea: rent sun umbrellas to mice all across the land. This is where… they are situated.


The Top of the Lighthouse

There’s only one way to open the final… passage to where Flora is imprisoned: turn the 3 levers in the right order.


The two brothers of Kidoge

These two brothers are famous for discovering a… lost temple. There were explorers, but now they’re old and their memory is fading. One brother still lives in Kidoge, but the other one ended up living in Rodia, because he forgot how to get back home. Every night he waits for his brother at the central fountain. Show him the way home with a Minisio map of Kidoge, and then meet the two brothers again in Kidoge, at the fountain.


To reach the next area of the library, you’ll need to have the Owl Bomb. Throw the bomb at the broken section of wall on the western side of the room to find the following books: 


Bakery & Rats

Rats are everywhere, especially under the bakery, but they’re difficult to deal with down there, because… there are holes in the walls that allow them to keep reappearing. You need to cover every single hole in the room to stop the rats getting in.


Camuria the Apprentice

Camuria is Maneko’s apprentice, but he’s also the Prince of the cats, so he’s been targeted by the rat tribe that lives… under the bakery in the center of Rodia. The entrance to their headquarters is usually covered by a crate. The King in Naneko Town knows the reason for the feud between rats and cats.


The Bobo Pit: Giant Leaves

When you’re activating the main switch, if you want to reach the end of the Pit, you have to… place the bomb under the switch and run away to the other side before it explodes. This will change the status of the leaves on the lower floor and allow you to reach places that were previously impossible to get to, and let you restore a path that otherwise could not be taken.


The Bobo Pit: The Blue Ghost Light

There is a room on the south side of the upper circle room where there is a blue ghost light when you enter. It’s vital that you… don’t kill any bobos in this room until you’ve put the gravestone back in its original place, and the first Bobo Ghost appears.


The Bobo Pit: The Interior Wind Switch

The Pit is an intriguing labyrinth of rooms and floors. It isn’t easy to find your way around, but it’s really important to understand that… turning the wind on and off alters the giant leaves, changing the available routes. The main switch in the Pit is in the room above, and you need to place the statue in the correct position.


The Bobo Pit: The Lower Bridges

Down in the depths of the Pit there’s a room with suspension bridges and giant leaves. You need to… turn off the wind, push the statue in front of the big hole, and then turn the wind on again. The wind will push the block down and open the gate.


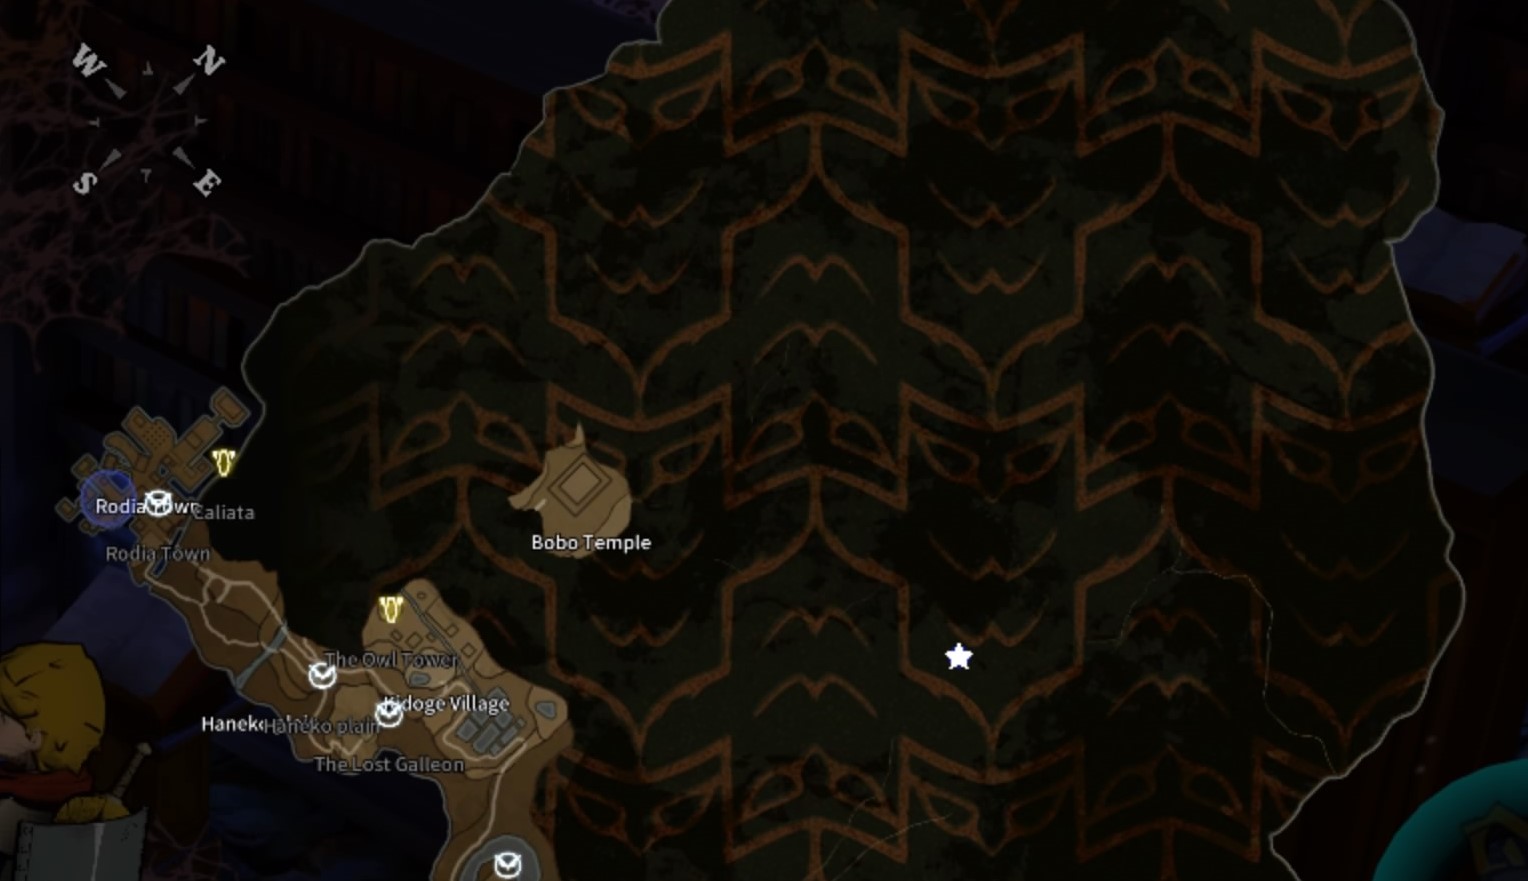
The Gokuro Tower: How to Get In

As the guardian says, the earthquake blocked the entrance, but there’s another little-known way in. On the path that leads to the… Library, there’s a crate under the Moon sign, concealing the secret entrance to The Gokuro Tower.


The Gokuro Tower: Suspension Bridges

There’s a room that can be accessed by turning the large wooden structure. In this room there are suspension bridges and levers that can alter the path. You have to… find the jar that needs to be placed on the switch to solve the room puzzle.


The Gokuro Tower: The Final Path

To enter the final room at the top of the tower, you need to… set the number 3 lever that turns the 3 wooden turnstiles to allow you to reach the entrance. These levers are made available by solving the 3 rooms that can be accessed by turning the large wooden structure.


The Gokuro Tower: The Night and its Secrets

The time of day is important in The Gokuro Tower. Place… the statue in the center of the room at the top of the tower to reflect the moonlight and release the trapped King Gokuro.


The Owl Village, the Path of Fire

There’s a room in the Owl Village temple were braziers have to be lit in the right order. Very few people know where to find the right order, which will… unlock the final room. During the day, place the statue in the room at the top of The Gokuro Tower, so that it reflects the sunlight, revealing the passage to the secret room where you can find the correct order to activate the path of fire.


The Pure Flower

In the depths of the Bobo Woods, there are what are known as Pure Flowers. They don’t grow easily, only Odessa in Kidoge has a Pure Flower, but… her flower is too young, and it won’t be able to restore the balance in its current state. To get it to bloom you need the Dust of Renewing, ground by Ursula the miller in the Solino Valley. She’ll need at least one Pocan to grind to make the Dust of Renewing. Read the book about Horbia Trees to locate them, if you don’t know where to find them.


Guides

Trails of Cold Steel IV – 9/1 Walkthrough

by Chappie in


Below is a walkthrough of 9/1 during Finale: Scattered Petals, Dying Flames in Trails of Cold Steel IV.


Courageous II

Books

  • Black Records 13
    • Obtained automatically as part of the story
  • Imperial Chronicle – Special Joint Issue
    • Purchase from Becky Association for 100 mira

Character Profiles

  • Prince Olivert Reise Arnor
    • True Feelings – Obtained as part of the story
  • Scherazard Harvey
    • Proposal – Obtained as part of the story
  • Elise Schwarzer
    • Homecoming – Speak with her on the Courageous II 4F Bridge
  • Gaius Worzel
    • Family Ties – Speak with him twice on the Courageous II 4F Bridge
  • Major Michael Irving
    • A Duty of Care – Speak with him on the Courageous II 4F Bridge
  • Sidney
    • Ah, Youth – Speak with him on the Courageous II 3F
  • Viscount Victor S. Arseid
    • Ancestor – Speak with him in the Courageous II 3F Recreation Room
  • Margarita
    • Through Thick & Thin – Speak with her in the Courageous II 2F Cafeteria and select one of the first 2 options
  • Freddy
    • The Freddy Special – Speak with him in the Courageous II 2F Cafeteria
  • Tatiana
    • Read All About It – Speak with her in the Courageous II 2F Reference Room
  • Rex
    • Special Edition – Speak with him twice in the Courageous II 2F Terminal Room
  • Stark
    • A New Challenger – Complete the Showdown of the Decade quest


Pom! Pom! Party! Opponents

  • Musse
    • Speak with her in the 2F Cafeteria


Quests

  • Showdown of the Decade
    • Obtained: Speak with Stark on the deck
    • Objective: Play Crow in Vantage Masters
    • Reward: +2 AP for winning and and 10,000 mira


Vantage Masters

  • Musse
    • Win against Musse in the 2F Cafeteria to receive an assortment of items


Crossbell

Character Profiles

  • Grace Lynn
    • Groundbreaker – Speak with her in Long Lao Tavern & Inn on East Street
  • Second Lieutenant Kaela
    • Backroom Deals – Speak with her in the Heiyue Trading, Ltd. in the Harbor District
  • Jona Sacred
    • Got Your Back – Speak with him in Geofront X Sector computer room in the Entertainment District


Misc.

  • Black Zemurian Ore Shard
    • Speak with Jona in the Geofront X Sector computer room to unlock the way to Orchis Tower in Geofront X Sector 2. Take the elevator to the roof to find the ore shard.


Pom! Pom! Party! Opponents

  • Tio
    • Speak with her at Old Special Support Section in Central Square after completing the Missing Person Report quest


East Crossbell Highway 1

Character Profiles

  • Renne Bright
    • Another Life – Speak with her on East Crossbell Highway 1


East Crossbell Highway 3

Character Profiles

  • Bridget
    • Together Forever – Complete the Saving Officer Alan quest
  • Warrant Officer Alan
    • Facing the Truth – Complete the Saving Officer Alan quest


Quests

  • Saving Officer Alan
    • Obtained: Courageous II terminal
    • Objective: Help save Alan
      • Travel to the Boathouse on East Crossbell Highway 3 then follow the path east to find Alan.
      • Head to the Field Exercise Camp on Ursula Road and speak with Patrick.
      • Defeat the Divine Knights.
    • Reward: 10,000 mira


Field Exercise Camp (Ursula Road)

Character Profiles

  • Ada Grant
    • Main Campus Pride – Speak with her at Field Exercise Camp on Ursula Road
  • Fritz Geithner
    • A Team Effort – Speak with him at Field Exercise Camp on Ursula Road
  • Second Lieutenant Emily
    • Lacrosse Teammates – Speak with her in Derfflinger Car 3 at Ursual Road Field Ex. Camp
  • Second Lieutenant Theresia
    • Former Vice Prez – Speak with her in Derfflinger Car 3 at Ursual Road Field Ex. Camp


St. Ursula Medical College

Books

  • Three & Nine – Chapter 10
    • Speak with Kargo outside the St. Ursula Medical College


Lake Elm Wetlands 1

Landscape Photos

  • Take a photo of the sword and helmet.


Stella Sanctuary – Altar

Misc.

  • Black Zemurian Ore Shard
    • The ore shard can be found at the altar.


Stargazer’s Tower

Trial Chests

  • Rean/Ash/Laura/Gaius – Monster Level 138


Stargazer’s Tower 1

Battle (Monsters)

  • Speculo I
  • Speculo II
  • Octogeist
  • Fyeye
  • Death Slugger
  • Living Armor


Treasure Chests

  • Brave Seed
  • Genbu
  • 200 of each Sepith
  • Passionate Rouge


Stargazer’s Tower 2

Treasure Chests

  • U-Material x5
  • Umbral Gyre


Stargazer’s Tower 3

Treasure Chests

  • Zeram Powder


Stargazer’s Tower Rooftop

Battle (Monsters)

  • Loa Phantasma


Mishelam

Fish

  • Grand Lakelord
    • After you’ve caught 29 of the 30 fish, travel to Lakeside Beach for a special event where you will catch the 30 fish.


Misc.

  • Black Zemurian Ore Shard
    • Fortune-teller’s Room in the Castle of Mirrors


Leeves

Character Profiles

  • Rosine
    • For the Kids – Speak with her outside Leeves Chapel


Thors Branch Campus

Character Profiles

  • Beryl
    • One Last Prophecy – Speak with her on the Thors Branch Campus Main Building Rooftop
  • Edel
    • Hunger Relief – Speak with her in the Thors Branch Campus Main Building


Landscape Photos

  • Take the photo at the Main Building – Rooftop next to Beryl.


Quests

  • Einhel Keep Monster
    • Obtained: Courageous II terminal
    • Objective: Defeat Sneak Gunner G48C
      • Travel to the Einhel Keep LVX – Depths to defeat the enemy.
    • Reward: 10,000 mira


Recipes

  • Filling Thors Lunch
    • Purchase from Cafeteria for 3,000 mira


Milsante

Character Profiles

  • Lloyd Bannings
    • The SSS Returns – Complete the Missing Person Report quest
  • Elie MacDowell
    • Diana – Complete the Missing Person Report quest


Quests

  • Missing Person Report
    • Obtained: Speak with Meyer and Harche in the Diana’s General Store
    • Objective: Find the missing Diana
    • *Randy and Juna must be in the party* 
      • Travel to Tallys’ General Store in Crossbell and speak with Elsa.
      • Speak with witnesses around town
        • Central Square – Lenalee
        • East Street – Roy
        • Entertainment District Grante Jazz Bar – Eric
      • Answer questions
        • When did the disappearances take place?
          • Yesterday morning
        • Who’s behind the disappearances?
          • Some supernatural being
        • Where were the victims being led to?
          • Station Street
      • Travel to Geofront from Crossbell City Station.
      • Work your way through the Geofront F Sector and defeat the Vargem as you encounter them.
      • When you reach the end, defeat Laomedeia Scylla and 2 Oozetilus.
    • Reward: +2AP for answering questions correctly and 10,000 mira


Geofront F Sector 1

Battle (Monsters)

  • Shadow Spirit
  • Vargem
  • Regenenkopf Type-0


Treasure Chests

  • 200 of each Sepith
  • Amberl Gem
  • Tear All Balm
  • Abyss Shadow


Geofront F Sector 2

Treasure Chests

  • Celestial Balm EX
  • U-Material x5
  • EP Charge IV
  • Solar Gyre
  • Emergency Puppet
  • Spirit Incense


Ordis

Recipes

  • Shrimp Cutlet Sandwich
    • Purchase from Miranda’s Tavern for 2,500 mira


Alster

Character Profiles

  • Sandy
    • Harvest Festival – Complete The Alster Harvest Festival quest
  • Prince Olivert Reise Arnor
    • His Mother’s Son – Complete The Alster Harvest Festival quest


Quests

  • The Alster Harvest Festival
    • Obtained: Courageous II terminal
    • Objective: Meet Sandy at Sunny Spot Inn
      • Travel to the Sunny Spot Inn in Alster and speak with Sandy.
      • Head to North Street in Ordis and speak to Glycine at the flower shop.
      • Travel to Bryonia Island Village Remains to find the Sunny Lillies.
      • Head to Crossbell and speak with Pack to purchase Galegte Flour for 500 mira.
      • Travel to the Recette Bakery & Cafe in Leeves and speak with Liza.
      • Head to Thors Branch Campus garden to collect Maple Basil.
      • Travel to Alster.
    • Reward: 10,500 mira


Bryonia Island

Misc.

  • Black Zemurian Ore Shard
    • Travel to the Near Statue and climb up two sets of ladders to find the ore shard near a trail chest.


Osgiliath Basin

Misc.

  • Black Zemurian Ore Shard
    • This ore shard is located in the center of the Depths.


Juno Naval Fortress (West Lamare Highway)

Landscape Photos

  • Take a photo near the bridge leading to the fortress.


Saint-Arkh

Character Profiles

  • Fiona Craig
    • Power of Music – Speak with her at Marquis Hyarms’ Mansion in Saint-Arkh


Dreknor Fortress

Character Profiles

  • Lt. Colonel Neithardt
    • Your Own Choice – Head to Dreknor Fortress for a sub event


Draco Sanctuary – Altar

Misc.

  • Head to the altar and interact with it to obtain a Black Zemurian Ore Shard!


Hamel

Cards (Vantage Masters)

  • Xenofiend x3
    • Win against Joshua after completing the Ghosts of Hamel quest


Character Profiles

  • Joshua Bright
    • Burying the Past – Complete the Ghosts of Hamel quest
  • Josette Capua
    • Capua Pride – Speak with her after completing the Ghosts of Hamel quest


Quests

  • Ghosts of Hamel
    • Obtained: Visit Renne on East Crossbell Highway 1 then interact with the group by the airship on Parm Byroad 1
    • Objective: Pay respects in Hamel
    • *Must have Ash and Tita in party!*
      • Work your way to Hamel.
      • When you reach the sword, you’ll need to defeat Plutus Bennu and the Angry Maggots.
    • Reward: 10,000 mira


Courageous II

Cards (Vantage Masters)

  • Tyrant
    • Win against Viscount Arseid in the Courageous II 3F Recreation Room. *You can only challenge him if you have obtained all the other Vantage Masters cards.*


Character Profiles

  • KeA
    • Causality – Obtained after receiving the ??? quest
  • Toval Randonneur
    • Holy Beast’s Trial – Complete the ??? quest


Master Quartz

  • Woden
    • Win Vantage Masters against Viscount Arseid in the Courageous II 3F Recreation Room


Misc.

  • Black Zemurian Ore
    • Report all the book notes


Quests

  • ???
    • Obtained: After gathering all the Lost Arts Quartz and completing all the other quests in the Finale chapter
    • Objective: Find the sacred shrine
    • NOTE: This quest is required to obtain the game’s true ending! 
      • Travel to the Sanctus Shrine located in the southern part of Auros Coastal Road 2 in West Lamare.
      • Speak with Toval.
      • Head to the end of the shrine and defeat the Holy Beast of Earth.
    • Reward: 10,000 mira


POINT OF NO RETURN!!


Salt Pale A

Battle (Monsters)

  • Abyss Sprite
  • Wormhood
  • Nastilus
  • Monides
  • Scyllamarme
  • Aion-y ‘Umbra’


Treasure Chests

  • U-Material x10
  • Tear All Balm
  • Spirit Incense
  • Power Potion II / Shield Potion II / Mind Potion II


Salt Pale B

Battle (Monsters)

  • Rostrum Bug
  • Dragdroc – Sword
  • Dragdroc – Staff
  • Murder Scales
  • Ol-Gadia
  • Rostrum
  • Belis-Agruga


Treasure Chests

  • 200 of each Sepith
  • Brave Seed
  • Zeram Powder
  • EP Charge IV


Salt Pale C

Battle (Monsters)

  • Man o’ War
  • Easy Trigger S
  • Mein Gada S
  • Proto Tron S
  • Aurgelmir
  • Bennu Nucleus
  • Aion-B ‘Fulgor’


Treasure Chests

  • EP Charge IV
  • Zeram Capsule
  • Celestial Balm EX
  • Vitality Droplet / Power Droplet / Fortitude Droplet / Magic Droplet / Spirit Droplet


Salt Pale D

Battle (Monsters)

  • Oberon
  • Yyd Vats
  • Marble Doll
  • Spiral Norn
  • Maddened Delf
  • Yyd Vanas
  • Necrovaris


Treasure Chests

  • 200 of each Sepith
  • Celestial Balm EX
  • Brave Soul
  • Power Potion II / Shield Potion II / Mind Potion II


Salt Pale E

Battle (Monsters)

  • Basilisk Starer
  • Uriel
  • Matriel
  • Samael
  • Thousand-Strong
  • Great Zan Su
  • Aion-a ‘Potentia’


Treasure Chests

  • U-Material x10
  • Tear All Balm
  • Vitality Droplet / Power Droplet / Fortitude Droplet / Magic Droplet / Spirit Droplet
  • Dragon Incense


Emp. Fortress – Outer Wall

Misc.

  • Black Zemurian Ore Shard
    • This shard can be found on the northwestern side of the map.


Emp. Fortress – Entrance

Battle (Monsters)

  • Gust Inferno
  • Goliath Lugh


Treasure Chests

  • Spirit Incense
  • Brave Seed


Emp. Fortress – Hall A

Battle (Monsters)

  • Rostrum Pallas
  • Queen Rostrum


Treasure Chests

  • Diabolos Gem
  • Celestial Balm EX
  • Arkas


Emp. Fortress – Hall A End

Battle (Monsters)

  • Major Claire
  • Major Lechter


Character Profiles

  • Major Claire Rieveldt
    • After the Twilight – Obtained as part of the story
  • Major Lechter Arundel
    • Resolution – Obtained as part of the story


Emp. Fortress – Hall B

Battle (Monsters)

  • Demonfloat
  • Curascylla


Treasure Chests

  • Tear All Balm
  • Repair Stone / Rise Stone / Brave Stone / Resurrect Stone
  • Radiant Armor Norun
  • Grail Locket
  • Zeram Capsule


Emp. Fortress – Hall B End

Battle (Monsters)

  • Shirley the Sanguine Ogre
  • Crown Prince Cedric


Character Profiles

  • Kurt Vander
    • True Friendship – Obtained as part of the story


Misc.

  • Black Zemurian Ore Shard
    • This shard can be found behind where you fought Shirley the Sanguine Ogre and Crown Prince Cedric


Emp. Fortress – Hall C

Battle (Monsters)

  • Deomonglare
  • Nyarlathotep
  • Findias Nuada
  • Xanthu the Dark


Treasure Chests

  • Flash Armor Oze
  • Tear All Balm
  • Sevenfold Gem
  • Dragon Incense
  • Callisto


Emp. Fortress – Hall C Mid

Battle (Monsters)

  • Mein Gada
  • Campanella the Fool
  • Mariabell the Wellspring


Character Profiles

  • Juna Crawford
    • Heart and Soul – Obtained as part of the story


Emp. Fortress – Hall C Tower

Battle (Monsters)

  • Cursed Looper
  • Alucard Bennu


Treasure Chests

  • Brave Soul
  • Repair Stone / Rise Stone / Brave Stone / Resurrect Stone
  • Spirit Incense
  • Fenrir Gem
  • Zeram Capsule


Emp. Fortress – Hall C End

Battle (Monsters)

  • Black Alberich
  • Governor General Rufus


Character Profiles

  • Alisa Reinford
    • A Ray of Hope – Obtained as part of the story
  • Jusis Albarea
    • Rufus’ Mistakes – Obtained as part of the story


Misc.

  • Black Zemurian Ore Shard
    • This shard can be found in the middle of the room near Rufus.


Emp. Fortress – Core

Battle (Monsters)

  • Mach Vats
  • Amon
  • Aka Manah
  • Mach Vanas
  • Unsurtr Maris


Treasure Chests

  • Celestial Balm EX
  • Zeram Powder
  • EP Charge IV
  • Brave Seed
  • Dragon Incense


Emp. Fortress – Core Mid

Battle (Monsters)

  • Overlord McBurn


Character Profiles

  • Emma Millstein
    • Divergent Laws – Obtained as part of the story


Emp. Fortress – Garden

Character Profiles

  • Crow Armbrust
    • Moving On – Speak with him after defeating McBurn


Emp. Fortress – Core Depths

Treasure Chests

  • Brave Soul
  • Zeram Capsule
  • Dragon Incense
  • Repair Stone / Rise Stone / Brave Stone / Resurrect Stone


Emp. Fortress – Sanctum

Character Profiles

  • Rean Schwarzer
    • Class VII – Obtained as part of the story
  • Sara Valestein
    • Best There Is – Obtained as part of the story


Guides

Trails of Cold Steel IV – 8/31 Walkthrough

by Chappie in


Below is a walkthrough of 8/31 during Eventide: Night of Promises in Trails of Cold Steel IV.


Mishelam

Bonding Gifts

  • Gilded Ultramarine Cameo (Aurelia)
    • Purchase from Cendrillon at Mishelam Center for 3,000 mira


Books

  • A Coco Panda’s Tale – Part 3
    • Purchase from Cendrillon at Mishelam Center for 500 mira
  • Crossbell Times – Special Issue
    • Purchase from Cendrillon at Mishelam Center for 100 mira


Cards (Vantage Masters)

  • Spirit
    • Win against Millium at Lakeside Beach
  • Tentarch x3
    • Win against Lieutenant General Cassius at Restaurant Fortuna in Mishelam Center. *Turn down his request first in order to play against him!*


Character Profiles

  • Millium Orion
    • Here in Spirit – Obtained as part of the story
  • George Nome
    • Third Disciple – Obtained as part of the story
  • Roselia Millstein
    • Dearest Friend – Obtained as part of the story
  • Duvalie the Swift
    • Farewell, My Lord – Obtained as part of the story
  • Linde
    • Compatibility – Speak with her on the Wharf
  • Kenneth Lakelord
    • A New Journey – Speak with him on the Wharf
  • Toval Randonneur
    • Solidarity – Speak with him in the Mishelam Center near the information desk
  • Mint
    • Wedding Bells – Speak with her in the Mishelam Center near the information desk
  • Tita Russell
    • Frustration – Speak with her in the Mishelam Center across from the Boutique Colserica
  • Vivi
    • Journalist’s Pride – Speak with her in Restaurant Fortuna at the Mishelam Center
  • Maya 
    • Paradise – Speak with her at Restaurant Fortuna in the Mishelam Center
  • Patrick T. Hyarms
    • ‘Young’ No Longer – Speak with him in Hotel Delphinia in the Mishelam Center
  • Second Lieutenant Theresia
    • Independence – Speak with her in Hotel Delphinia in the Mishelam Center
  • Altina Orion
    • Swimming Club – Speak with her outside Cendrillon in the Mishelam Center
  • Fiona Craig
    • Lovers’ Parting – Speak with her at Cendrillon in Mishelam Center
  • Becky
    • Lively Debate – Speak with her at Cendrillon in Mishelam Center
  • Jusis Albarea
    • Just for Tonight – Speak with him at Lakeside Beach
  • Sara Valestein
    • Drinking Contest – Complete the Ladies’ Night quest
  • Machias Regnitz
    • Old Friends – Speak with him at MWL Entrance Plaza
  • Jessica
    • A Test of Mettle – Speak with her near the Haunted Villa at MWL Entrance Plaza
  • Estelle Bright
    • Bright Family – Speak with her in MWL Entrance Plaza near the Castle of Mirrors
  • Vincent Florald
    • Love is Blind – Speak with him at MWL Entrance Plaza near the Castle of Mirrors
  • Randy Orlando
    • Mireille – Speak with him at MWL Ferris Wheel
  • Tio Plato
    • Mishy Lore – View the Mishy special event near the MWL Ferris Wheel
  • Towa Herschel
    • One for All – Speak with her at MWL Ferris Wheel
  • Bridget
    • Saving Alan – Speak with her at the Castle of Mirrors Entrance
  • Rean Schwarzer
    • Divine Blade – Defeat Cassius
  • Lt. General Cassius Bright
    • True Successor – Defeat Cassius
  • Sharon Kreuger
    • I Believe in You – Speak with her at Lakeside Beach in Mishelam after your duel with Cassius
  • Major Claire Rieveldt
    • No Atonement – After calling it a night on 8/31, you’ll get a message from Claire if you bought her the Chrome Blue Harmonica bonding gift in Crossbell. Exit to the Lake Elm Wetlands 2 through the Lakeside Beach in Mishelam to see the sub event.


Extra Tickets

  • Mishelam Center
    • Win against Toval in Vantage Masters. Toval is near the information desk.
  • Lakeside Beach
    • Complete the Ladies’ Night quest
    • Speak with Anton after his sub event with Sharon. This is unlocked after dueling Cassius.
  • Wharf
    • Give Elizabeth the cat a Rainbow Trout


Landscape Photos

  • Take a picture along the shore of Lakeside Beach
  • Take a picture near the MWL Ferris Wheel


Pom! Pom! Party! Opponents

  • Prince Olivert
    • Speak with him at MWL Ferris Wheel
  • Renne
    • Speak with her in MWL Entrance Plaza near the Castle of Mirrors


Quests

  • Ladies’ Night
    • Obtained: Speak with Sara and Sharon at Lakeside Beach
    • Objective: Find challengers for drinking contest
      • Lakeside Beach – Cecile
      • Hotel Delphinia – Aurelia
      • Hotel Delphinia – Edel
      • Mishelam Center near Information Counter – Lucy
      • Mishelam Center in Restaurant Fortuna – Roselia and Duvalie
      • MWL Ferris Wheel – Scherazard
    • Reward: 9,000 mira
  • ???
    • Obtained: Speak with Lieutenant General Cassius at Restaurant Fortuna in Mishelam Center after using some event tickets
    • Objective: Use each of Rean’s crafts.
    • Reward: Rean’s Breaking Dawn S-Craft


Recipes

  • Imperial Tea
    • Purchase from Restaurant Fortuna in the Mishelam Center for 2,600 mira


Vantage Masters

  • Toval
    • Win against Toval who is in the Mishelam Center near the information desk to receive items


Click here for the final guide on 9/1!


Guides

Trails of Cold Steel IV – 8/30 Walkthrough

by Chappie in


Below is a walkthrough of 8/30 during Act 3: Seekers of the Dawn in Trails of Cold Steel IV.


Orchis Tower 

Battle (Monsters)

  • Titania
  • Clay Doll
  • RBF-AL-OO
  • RBF-SL-DD
  • RBF-CN-ZZ
  • Spiral Clotho
  • Divine Delf
  • McBurn the Blazing Demon
  • Viscount Arseid


Character Profiles

  • Elliot Craig
    • Multitalented – Obtained as part of the story
  • Vita Clotilde
    • Grand Return – Obtained as part of the story on 8/30
  • Sully Atraid
    • Star Princess – Obtained as part of the story
  • Laura S. Arseid
    • True Mastery – Obtained as part of the story
  • Viscount Victor S. Arseid
    • Father & Daughter – Obtained as part of the story
  • Lt. Colonel Mueller Vander
    • Evil Exterminator – Obtained as part of the story


Treasure Chests

  • Core (Low)
    • Celestial Balm EX
    • 150 of each Sepith
    • Gyrfalcon Armor
    • Silver Hair – Sharon
  • Outer Wall (Low)
    • EP Charge IV
    • Tear All Balm
    • U-Material x5
    • Sirius Armored Boots
    • 150 of each Sepith
  • Outer Wall (Mid)
    • Power Potion II / Shield Potion II / Mind Potion II
    • U-Material x5
    • Byakko
    • Tear All Balm
    • Spirit Breaker III
    • Brave Seed
    • Deep Ocher
    • Celestial Balm EX
  • Core (High)
    • Spirit Incense
    • Zeram Powder


Courageous II

Cards (Vantage Masters)

  • Disaster x3
    • Win against Crow on Courageous II 3F


Character Profiles

  • Louise
    • Daddy’s Girl – Speak with her on Courageous II 4F Bridge
  • Valerie
    • Courage – Speak with her on 2F across from the elevator
  • Dorothee
    • Over-Stimulated – Speak with her in the Courageous II 2F Medical Office


Pom! Pom! Party! Opponents

  • Altina
    • Speak with her in the 2F Cafeteria


Vantage Masters

  • Altina
    • Win against her in the Courageous II 2F Cafeteria for a variety of items


St. Ursula Medical College

Fish

  • Flamear Ojo (Speak with Kenneth in Le Lectier Inn to obtain fishing spot)


Lake Elm Wetlands 1

Battle (Monsters)

  • Eunoira
  • Metal Monsilo
  • Dimensional Bug
  • Nightmare Frog
  • Tiamat


Fish

  • Pearlglass


Treasure Chests

  • Suzaku
  • Brave Soul
  • 150 of each Sepith
  • Tearal SR


Stella Sanctuary

Battle (Monsters)

  • Star Cryon
  • Skullscythe
  • Dancing Maiden
  • Ruin Spinner
  • Crescent Knight
  • Sleipnir F2-0
  • Ines the Stout
  • Ennea the Sharp
  • Arianrhod the Steel Maiden


Treasure Chests

  • Zeram Capsule
  • Celestial Balm EX
  • Black Panther Armor
  • Demon Armored Boots
  • Repair Stone / Rise Stone / Brave Stone / Resurrect Stone
  • U-Material x5
  • Esmelas Gem
  • Dragon Incense


Trial Chests

  • Juna/Ash/Elliot/Randy – Monster Level 136


Click here for the next guide on 8/31!


Guides

Trails of Cold Steel IV – 8/29 Walkthrough

by Chappie in


Below is a walkthrough of 8/29 during Act 3: Seekers of the Dawn in Trails of Cold Steel IV.


Courageous II

Bonding Events

  • Alisa
  • Altina
  • Ash
  • Crow
  • Duvalie
  • Elise (after completing Operation: Free Eryn quest)
  • Emma
  • Fie
  • Juna


Bonding Gifts

  • Wishing Star Bell (Celine)
    • Purchase from Becky Association for 2,500 mira
  • Oriana Bangle (Musse)
    • Exchange an Alster Risotto and a Miranda’s Paella for the item. You can get the Alster Risotto from the Sunny Spot Inn in Alster for 800 mira and the Miranda’s Paella can be bought from Miranda’s Tavern in the Harbor District of Ordis for 800 mira.


Books

  • Imperial Chronicle – Issue 9
    • Purchase from Becky Association for 100 mira


Cards (Vantage Masters)

  • Ma-gorb x3
    • Win against Sharon in the Courageous II 2F Cafeteria


Character Profiles

  • Fie Claussell
    • A Father’s Pride – Obtained as part of the story
  • Becky
    • Friends & Rivals – Speak with her at Becky Association
  • Gustaf
    • Skilled Engineer – Speak with him on Courageous II in the bridge
  • Ash Carbide
    • Johan & Miguel – Complete his bonding event
  • Crow Armbrust
    • Atonement – Complete his bonding event
  • Wayne
    • A Clear Mind – Complete the Persistent Study quest
  • Sidney
    • True Gentleman – Complete the Herbal Supplements quest
  • Kairi
    • Inner Strength – Complete the Herbal Supplements quest


Pom! Pom! Party! Opponents

  • Gaius
    • Speak with him on the Courageous II 3F – Training Sector


Quests

  • Herbal Supplements
    • Obtained: Speak with Stark in the Courageous II 3F
    • Objective: Rendezvous with the other students
      • Kairi – Hamel Road 1
        • Head towards the objective and defeat Magic Knight Sigheim
      • Sidney – Parm Byroad 2
        • Head towards the objective and defeat Queen Kumanba and her minions.
    • Reward: 8,000 mira
  • Persistent Study
    • Obtained: Speak with Jessica and Wayne in the Courageous II 3F – Training Room
    • Objective: Train with Jessica and Wayne
      • Battle Duvalie and Laura.
    • Reward: +2 AP if win and 8,000 mira


Alster

Character Profiles

  • Hugo Kleist
    • Superior’s Duty – Complete the Alster Assistance quest


Quests

  • Alster Assistance
    • Obtained: Courageous II terminal
    • Objective: Help out Kai and Tilia
      • Speak with Kai and Tilia at their home.
      • Information around town
        • Speak to Auch near the Site of the Lenheim Family Residence memorial.
        • Speak with Gilda in the Sunny Spot Inn.
        • Speak with Mayor Mathim who is walking around the town.
        • Speak with Blanc near the Steinrose Distillery.
        • Speak with Father Nogaro in the Alster Chapel.
      • Return to Kai and Tilia’s House and speak with them.
        • What about the monster is particularly strange?
          • That is showed up now.
        • What is the reason behind the monster’s behavior?
          • It’s being controlled by people.
        • What could be the goal of someone controlling the monster?
          • Something else.
        • Who knows what’s really going on?
          • Mayor Mathim.
      • Speak with Kai and Tilia to begin the operation.
      • Defeat Gespard Gerrod and his minions.
    • Reward: +2 AP if all answers are correct and 8,000 mira


Ordis

Character Profiles

  • Princess Alfin Reise Arnor
    • Father’s Recovery – Triggers by entering Cayenne Mansion
  • Lucy Seiland
    • Eyes & Ears – Triggers by entering Cayenne Mansion in Ordis
  • Leonora
    • Sea Jaeger – Complete the Super Swimming Showdown quest


Quests

  • Super Swimming Showdown
    • Obtained: Speak with Miranda in Miranda’s Tavern in the Harbor District
    • Objective: Check on Leonora
      • Head to the Central Dock in the Harbor District to find Leonora.
      • Participate in the swimming contest.
    • Reward: +2 AP if win and 8,000 mira


Languedoc Canyon – North

Battle (Monsters)

  • Bloody Fang
  • Deathstench
  • Dark Widow
  • Yyd Vats
  • Yyd Vanas


Landscape Photos

  • Take a picture in the north central part of the map.


Quests

  • N. Languedoc Canyon Monster
    • Obtained: Courageous II terminal
    • Objective: Find and defeat Yyd Vanas
      • Head to the northern part of the map to find Yyd Vanas. Defeat it!
    • Reward: 8,000 mira


Treasure Chests

  • 150 of each Sepith
  • Nightmare III


Trial Chests

  • Alisa/Sharon – Monster Level 131


West Lamare Highway

Character Profiles

  • Ferris Florald
    • Financial Aid – Speak with her at Lamare – Field Ex. Camp


Leeves

Character Profiles

  • Second Lieutenant Emily
    • Sisterly Love – Speak with her at Recette Bakery & Cafe


Eryn

Battle (Monsters)

  • Blade Cougar
  • Enhanced Jaeger – Rifle
  • Enhanced Jaeger – Greatsword
  • Gespard Gerrod
  • Achtzen
  • Gilbert’s Apache
  • Gilbert

Character Profiles

Agate Crosner

  • Rescue Mission – Complete Operation: Free Eryn quest


Quests

  • Operation: Free Eryn
    • Obtained: Fast travel to Eryn
    • Objective: Liberate Eryn Village from the enhanced jaegers
      • Exit Phase 1 to reach Saint-Gral – Entrance.
      • Defeat the enemies.
      • Head into Eerie Woods.
      • Defeat enemies along the way as you head to the objective-marked teleportation stone.
      • Turn off the device.
      • Teleport to Eryn Village.
      • Defeat even more enemies as you make your way to the red device in the center of the village.
      • Defeat the enemies that appear nearby.
      • Defeat Gilbert and his tank.
    • Reward: 8,000 mira


Crossbell

Bonding Gifts

  • Chrome Blue Harmonica (Claire)
    • Purchase from Imelda’s Antique Shop in the Entertainment District for 2,500 mira
  • Glittering Brooch (Sharon)
    • Trade at Barca Casino in the Entertainment District for 500 tokens
  • Star Sphere Earring (Elise)
    • Purchase at the Business Owner’s Association on East Street for 2,500 mira
  • Light Beam Rosary (Alisa)
    • Exchange for it at Ninvalli Exchange on East Street for 1 Crunchy Melon Bun and 1 Bellberry Ice Cream. You can get the Crunchy Melon Bun at Morges Bakery on West Street for 600 mira and the Bellberry Ice Cream from Sophie’s Ice Cream (ice cream stand) in the Entertainment District for 800 mira.


Books

  • If You Said Goodbye – Part 3
    • Exchange it at Ninvalli Exchange on East Street for 1 Vingt-Sept Hamburg Steak. You can purchase the Vingt-Sept Hamburg Steak from Vingt-Sept Cafe in Central Square for 800 mira.
  • Three & Nine – Chapter 9
    • Speak with Sammie outside of Villa-Raisins Apartments on West Street


Cards (Vantage Masters)

  • Greon x3
    • Win against Branch Manager Cao at Heiyue Trading, Ltd. in the Harbor District


Character Profiles

  • Mint
    • Debut Flautist – Speak with her at the Garante Jazz Bar in the Entertainment District of Crossbell
  • Tio Plato
    • Influencer – Speak with her at the Old Special Support Section in Central Square
  • Jona Sacred
    • Elite Hacker – Speak with him at the Old Special Support Section in Central Square
  • Jingo
    • Paying Dividends – Speak with her at Neinvalli Exchange on East Street
  • Munk
    • Rising Auteur – Speak with him in the Long Lao Tavern & Inn on East Street


Recipes

  • Cheesy Penne Gratin
    • Purchase from Vingt-Sept Cafe in Central Square for 2,100 mira
  • Addictive Mapo Tofu
    • Purchase from Long Lao Tavern & Inn on East Street for 2,300 mira


Geofront X Sector 1

*NOTE: To enter Geofront X Sector 1, head through Barca Casino in the Entertainment District of Crossbell.

Quests

  • Geofront X Sector Monster
    • Obtained: Interact with the Dimension Destroyer in the eastern part of the map
    • Objective: Defeat the enemy
      • Defeat the Dimension Destroyer. When the enemy drops below 50% health, you have 5 turns to beat it before it wipes the party.
    • Reward: 8,500 mira


Click here for the next guide on 8/30!


Guides

Trails of Cold Steel IV – 8/28 Walkthrough

by Chappie in


Below is a walkthrough of 8/28 during Act 3: Seekers of the Dawn in Trails of Cold Steel IV.


Gargantua – Ship’s Hold

Battle (Monsters)

  • Easy Trigger
  • Proto Tron
  • Hecatoncheir
  • Oz Mirage “Crimson”
  • Oz Mirage “Cobalt”
  • Emily
  • Theresia


Treasure Chests

  • Power Potion II / Shield Potion II / Mind Potion II
  • Shining SR
  • Spirit Incense


Gargantua – Corridor

Battle (Monsters)

  • Diver Bit G
  • Stratos Diver G


Treasure Chests

  • Brave Seed
  • Sword Breaker III
  • Zeram Powder


Gargantua – Core

Battle (Monsters)

  • Easy Trigger G
  • Copper Georg
  • Kreuger the Severing Eclipse


Courageous II

Cards (Vantage Masters)

  • Beast
    • Win against Sara on 4F


Character Profiles

  • Alisa Reinford
    • Family Quarrel – Obtained as part of the story
  • Angelica Rogner
    • Not on My Watch – Obtained as part of the story
  • Dorothee
    • Role Model – Speak with her in the Courageous II 2F Reference Room
  • George Nome
    • To the Bitter End – Obtained as part of the story
  • Professor G. Schmidt
    • Next Generation – Obtained as part of the story
  • Sharon Kreuger
    • One of the Family -Obtained as part of the story
  • Stark
    • New Horizons – Speak with him at Becky’s Shop on the Courageous II 2F
  •  Valerie
    • Potential – Speak with her in the Courageous II 2F Medical Office
  •  Vivi
    • Mold Breaker – Speak with her on the Courageous II 2F near the central vending machine
  • Wayne
    • Honor Students – Speak with him on the Courageous II 2F Cafeteria


Draco Sanctuary


Battle (Monsters)

  • Salamandragon
  • Genbu Draco
  • Dracol – Sword
  • Dracol – Staff
  • Astral Domina
  • Twin Bite
  • Judgment Javelin (summoned by Xeno)
  • Trap Master Xeno
  • Leonidas the Behemoth
  • Jaeger King Rutger


Treasure Chests

  • Composure Shawl
  • Repair Stone / Rise Stone / Brave Stone / Resurrect Stone
  • Crimson Sun Shoes
  • Zeram Capsule
  • Passion Leggings
  • White Night Garment
  • Dragon Incense
  • Seiryuu


Trial Chests

  • Gaius/Jusis – Monster level 128


Click here for the next guide on 8/29!


Guides

Trails of Cold Steel IV – 8/21 Walkthrough

by Chappie in


Below is a walkthrough of 8/21 during Act 2: Guiding Starlight in Trails of Cold Steel IV.


West Lamare Highway 2

Battle (Monsters)

  • Creepy Sheep
  • Silver Drome
  • Fell Broodmother
  • Hinomikoto
  • Hornbore


Treasure Chests

  • Leg Breaker III
  • Fresh Egg x5 / Fresh Milk x5 / Mature Cheese x5
  • 100 of each Sepith


Trial Chests

  • Rean/Altina – Monster Level 96


West Lamare Highway 1

Battle (Monsters)

  • Omegacean


Treasure Chests

  • U-Material x5
  • Cross Crusade R
  • Fresh Herb x5 / Crisp Onion x5 / Flaky Potato x5


Trial Chests

  • Ash/Kurt/Emma/Sara – Monster Level 96


Ordis

Bonding Gifts

  • Cypher Graph (for Machias)
    • Purchase from RF Store on the second level of Kleist Mall in the Business District for 950 mira
  • Chevalier Gloves (for Kurt)
    • Purchase from Riviera Court in the Harbor District for 1,000 mira
  • Teal Anklet (for Fie)
    • Purchase from Strauss Orbal Factory on North Street for 1,000 mira


Books

  • If You Said Goodbye – Part 2
    • Purchase from Manista’s Bookstore in Kleist Mall at the Business District for 475 mira
  • Three & Nine – Chapter 5
    • Speak with Sailor Basani, who is walking around in the Harbor District


Cards (Vantage Masters)

  • Tarbyss x3
    • Win against Vincent at the Riviera Court in the Business District after completing the Riviera Runaround quest.


Character Profiles

  • Vincent Florald
    • Surviving – Complete the Riviera Runaround quest
  • Margarita
    • Lovers at Last – Complete the Riviera Runaround quest


Fish

  • Pink Azelfish (Harbor District)


Quests

  • Riviera Runaround
    • Obtained: Enter Riviera Court in the Business District
    • Objective: Look for the business permit
      • Investigate the cash register in the back.
      • Speak with Capo.
      • Interact with the basket display near the entrance.
      • Interact with the table near the drug store.
      • Head to the Noble District then go into the Ordis-Mansion.
      • Speak with Butler Oliver.
      • Head to North Street and speak with Glycine in front of the flower shop.
      • Head to Kleist Mall to speak with Herman to find the permit.
    • Reward: 5,000 mira


Recipe

  • Bittersweet Tomato Gelato
    • Purchase from the Ice Cream & Crepes stand in the Business District for 1,300 mira
  • Sea Breeze Bouillabaisse
    • Purchase from the Sea Breeze Tavern & Inn on North Street for 1,400 mira


Ordis Waterway 1

Battle (Monsters)

  • Tomb Bettle
  • Red Hammerhead
  • Murder Organ
  • Absorbling
  • IDF Member (blond)
  • IDF Member (brunette)


Treasure Chests

  • 100 of each Sepith
  • Energy Bandanna
  • Brave Seed
  • Galion Fort R


Ordis Waterway 2

Treasure Chests

  • Spirit Incense
  • Tearal R
  • Blind II
  • Zeram Powder


Trial Chests

  • Machias/Crow – Monster Level 97


Click here for the next guide on 8/22!


Guides

Trails of Cold Steel IV – 8/7 Walkthrough

by Chappie in


Below is a guide on the collectibles that can be obtained on 8/7 during Act 1: The Trials of Class VII in Trails of Cold Steel IV.


Eryn

Books

  • Imperial Chronicle – Issue 2
    • Can be purchased from Lemuric General Goods for 100 Mira
  • Three & Nine – Chapter 1
    • Speak with Sigyn in the Fortune-teller’s Home at Eryn


Character Profiles

  • Randy Orlando
    • Intensive Regimen – Obtained in Eryn as part of the story


Fish

  • Kasagin
    • Near Monument in Eryn


Recipes

  • Tasty Potato Chowder
    • Speak to Liese at the Lux Lunae Inn in Eryn as part of the story


Eerie Woods – South

Battle (Monsters)

  • Astral Butterfly
  • Sleepfrog
  • Silver Fang
  • Devil Flower
  • Sylvan Banshee


Treasure Chests

  • Power Potion / Shield Potion / Mind Potion
  • Luminous Glasses
  • 50 of each Sepith
  • Soul Blur R


Isthmia Great Forest

Battle (Monsters)

  • Astral Butterfly
  • Sleepfrog
  • Devil Flower
  • Dedigaga
  • Starer
  • Great Zan Su


Fish

  • Snow Crab
    • Near map transition to West Sutherland Highway


Quests

  • Isthmia Great Forest Monster
    • Obtained: As part of story
    • Objective: Defeat Great Zan Su
      • Can be found next to a small pond in the Isthmia Great Forest near the West Sutherland Highway map transition
    • Reward: 2,000 mira


Treasure Chests

  • Force Seal
  • Fresh Egg x5 / Fresh Milk x5 / Mature Cheese x5
  • U-Material x5
  • Curia R


West Sutherland Highway

Battle (Monsters)

  • Simiamanita
  • Brockary
  • Hypnotoad


Treasure Chests

  • Teara Balm / EP Charge II / Celestial Balm
  • Green Pendulum
  • 50 of each Sepith


Saint-Arkh

Book

  • The Chosen One – Part 1
    • Purchase for 500 mira from Ernool Used Books on the second floor of Albion Garden Dept. Store in Cathedra Square of Saint-Arkh


Master Quartz

  • Moebius
    • Purchase for 2000 mira from Chamber’s Orbal Factory in the Residential District of Saint-Arkh


Recipe

  • Delicate Millefeuille
    • Purchase for 500 mira from April Cafe & Inn in the Residential District of Saint-Arkh


South Sutherland Highway 1

Battle (Monsters)

  • Pom
  • Vampskipper
  • Jeweled Ripper
  • Rhinocider
  • Magic Knight Sigheim


Fish

  • Red Perch
    • Along the river in the northeastern side of the map


Treasure Chests

  • Fresh Herb x5 / Crisp Onion x5 / Flaky Potato x5
  • Breath R
  • Fire Bold R
  • U-Material x5


South Sutherland Highway 2

Battle (Monsters)

  • Feathered Guest
  • Neo Mantis
  • Fat Pom (Trial Chest)


Fish

  • Red Perch
    • Near the central western part of the area


Treasure Chests

  • Earth Pulse R
  • Blue Pendulum
  • 50 of each Sepith


Trial Chest

  • Juna/Kurt – Monster Level 55


Parm

Cards (Vantage Masters)

  • Dullmdalla
    • Win against Pablo at Jerome’s General Store


Book

  • Three & Nine – Chapter 2
    • Speak with Lakelord II on the second floor of the White Footpath Tavern & Inn


Fish

  • Carp
    • On a bridge between Jerome’s General Store and Vander Training Hall


Quest

  • Substitute Medicine Ingredients
    • Obtained: Speak with Father Hobbins in the Parm Chapel
    • Objective: Gather Ingredients
      • Rainbow Rubia
        • Speak with the shop at Sterry Farm Luxury Foods in the Cathedral Square at Saint-Arkh
        • Travel to central West Sutherland Highway to find the ingredient guarded by a Hypnotoad
      • Healing Herb
        • Speak with Archbishop Ramsen in the Cathedral at Saint-Arkh
    • Reward: 2,000 mira


Old Agria Road

Battle (Monsters)

  • Egg-Guard Snake
  • Fanged Wolf
  • Emperor Sparrow
  • Crimowl
  • Fell Hydra


Fish

  • Cangiru
    • At a pond in the southern part of the map


Quest

  • Draco Shrine Exploration *Please see Draco Shrine section below*
    • Obtained: Enter Draco Shrine
    • Objective: Investigate the ruins
    • Reward: 2,000 mira


Treasure Chests

  • Poison
  • 50 of each Sepith
  • Starberry x5 / Acerbic Tomato x5 / Honey Syrup x5
  • Cooling Belt
  • Air Strike R


Draco Shrine

Battle (Monsters)

  • Adamanclion
  • Wyvern Warrior
  • Wyvern Wizard
  • Petrifying Hydra
  • Stone Domina


Quest

  • Draco Shrine Exploration
    • Obtained: Enter Draco Shrine
    • Objective: Investigate the ruins
      • Explore the ruins and defeat the boss, Stone Domina, at the end.
    • Reward: 2,000 mira


Master Quartz

  • Beowulf
    • Obtained from a treasure chest


Treasure Chests

  • Beowulf
  • U-Material x5
  • Soft Stole
  • 50 of each Sepith
  • Nemesis Arrow R


Trial Chests

  • ???/??? – Monster Level 96


Parm Byroad 1

Battle (Monsters)

  • Kumanba
  • Forest Mosquito
  • Tagamemnon
  • Queen Kumanba


Fish

  • Cangiru (near Parm map transition)
  • Snow Crab (near Parm map transition)


Treasure Chests

  • U-Material x5
  • Aqua Bleed R
  • Teara Balm / EP Charge II / Celestial Balm
  • 50 of each Sepith


Trail Chest

Altina/Juan – Monster Level 57


Parm Byroad 2

Battle (Monsters)

  • Kumanba
  • Forest Mosquito
  • Ogrefly
  • Tagamemnon
  • Doom Spinner
  • Queen Kumanba


Fish

  • Carp (near a bridge south of the Parm Byroad 1 map transition)


Treasure Chests

  • Power Potion / Shield Potion / Mind Potion
  • Holy Sphere
  • Curia Balm x3 / S-Tablet x3
  • Coarse Rock Salt x5 / Assorted Grains x5 / Healthy Liquor x5
  • Golden Sphere R


Titus Gate

Landscape Photos

  • Investigate the area by the fuel container to the left of the gate to take the landscape photo. Send it to Rex using your Arcus to receive a photo of Elise.


Recipe

  • Luxurious Cheese Doria
    • Purchase for 600 mira from Titus Gate Rest Area


Hamel Road 1

Battle (Monsters)

  • Bite Plant
  • Bomb Grass
  • Feeler Blob
  • Hamel Kong


Fish

  • Tiger Arowan


Treasure Chests

  • Impede 1
  • Brave Seed
  • Orange Cape
  • Spirit Incense
  • Saintly Force R


Hamel Road 2

Battle (Monsters)

  • Bite Plant
  • Bomb Grass
  • Feeler Blob
  • King Snail
  • Hamel Kong
  • Bite Plant King


Fish

  • Tiger Arowan


Treasure Chests

  • Repair Stone / Rise Stone / Brave Stone / Resurrect Stone
  • 50 of each Sepith
  • Heat Up R
  • Zeram Powder


Hamel Village

Battle (Monsters)

  • Blade Cougar
  • Enhanced Jaeger – Rife
  • Enhanced Jaeger – Greatsword
  • Gilbert
  • Trap Master Xeno
  • Leonidas the Behemoth
  • Jaeger King Rutger


AP Bonus

  • Reduce the HP of each of the bosses below a certain point


Click here for the next guide on 8/9!


Guides

Trails of Cold Steel – Chapter 2: 5/29 Sat Bareahard Field Study Day 1 Guide

by Chappie in


Books

  • Imperial Chronicle – Issue 2
    • Fortnum Books in Christie’s Galleria for 100 mira
  • Carnelia Reprint – Chapter 3
    • Fortnum Books in Christie’s Galleria for 100 mira
  • Carnelia Reprint – Chapter 4
    • Fortnum Books in Christie’s Galleria for 100 mira
  • Red Moon Rose – Chapter 4
    • Talk to Fumy in the Crescent Moon


Character Profiles

  • Jusis
    • Bastard Son – Automatically acquired on 5/29 as part of the story


Fish

  • Bareahard Central Plaza
    • Anor Carp
    • Swordtail
  • North Kreuzen Highway
    • Rockeater
    • Kasagin


Master Quartz

  • Davos’ Factory
    • Scepter
      • Can buy for 2,000 mira
    • Wing
      • Can buy for 4,000 mira


Monsters and Treasure Chests

North Kreuzen Highway

  • Monsters
    • Egg Snake
    • Man Trap
    • Green Raccoon
  • Treasure Chests
    • 150 of each Sepith
    • Reviving Balm
    • Recuria


Aurochs Canyon Path 1

  • Monsters
    • Stealth Turtle
    • Anteater
  • Treasure Chests
    • Curia Balm


Aurochs Canyon Path 2

  • Monsters
    • War Mantis
    • Zwordar
    • Stealth Turtle
    • Anteater
    • Attack Dog
    • Hornteater
  • Treasure Chests
    • 150 of each Sepith
    • Breeze (Monster Chest)
    • Blind


Aurochs Canyon Path 3

  • Monsters
    • War Mantis
    • Attack Dog
    • Zwordar
    • Stealth Turtle
  • Treasure Chests
    • Groundbait
    • Mind 2


Recipes

  • Savory Herb Tea
    • Talk to Lorna at Bareahard Residence 2 in the Noble District of Bareahard


Quests

Aurochs Canyon Monster

  • Objective: Defeat the Fate Spinner along the Aurochs Canyon Path
    • Head to the quest marker in the center of Aurochs Canyon Path 2
    • Defeat the Fate Spinner
    • Report to the soldiers at Aurochs Fort
  • Reward: Spark Arrow
*Hard Mode Stats

Fate Spinner Attacks

  • Wondrous Vomit
    • AOE attack that can confuse anyone hit by it
  • Pincer Attack
    • Attacks the target using its pincers
  • Pounce
    • Jumps up in the air and lands on the target
  • Weakness
    • Weak to water and wind arts
    • S-Craft with Fie then swapped in Emma to heal
    • Breath on Jusis and Rean
  • Have to use Machias and Jusis in party

I started this fight off with Rean, Fie, Machias and Jusis as the game forces you to use Machias and Jusis. The first move I made was using Fie’s S-Craft to deal some massive damage to the Fate Spinner, then I swapped her out for Emma. My strategy for this fight was to use Rean to tank the boss while Jusis and Machias provided support leaving Emma to focus on healing and casting arts as needed. The two main attacks you need to look out for are Wondrous Vomit and Pounce. Make sure to use water and earth arts as the Fate Spinner is weak to both. I also put Breath on both Rean and Jusis for extra AOE healing if needed.


Put a Ring on It

  • Objective: Find a semi-precious stone for Bruc
    • Talk to Bruc in Turner’s Jewelers on Artisans’ Street
    • Head to the North Kreuzen Highway via Station Street
    • Follow the quest marker to the middle to the map and inspect the tree
    • Return to Bruc
  • Reward: Luck


Addicted to Bath Salts

  • Objective: Procure more bath salts for the Voltaire Family
    • Talk to Hasan next to Sorciere Restaurant
    • Make your way to Aurochs Canyon Path 3 and head for the quest objective on the south side of the map
      • Note: You will have to defeat the Fate Spinner to gain access to Path 3
    • Collect the Pink Salts
    • Return to Hasan
  • Reward: Silver Hourglass