The Pale Elf is the companion quest for Astarion in Baldur’s Gate III. You’ll receive this quest automatically after allowing this dashing nobleman to join your party shortly after escaping from the Nautiloid.
Where to Find Astarion
To find Astarion you’ll need to head west from the beach where your character wakes up and through the Nautiloid wreckage. He’ll be standing along a dirt path there near the coordinates X:183 Y:272.
Approach him to trigger a cutscene leading to a little tussle with him. Pretty much all of the options end with the Intellect Devourer connecting you both together stopping the fight. You’ll then be able to recruit him or tell the guy to hit the road. Choosing the latter results in you not getting this quest.
Continue traveling with Astarion
When you first get his quest, there isn’t much you can do with it yet. You’ll need to rest a couple of times to learn more about Astarion. One time he can be seen sneaking away and another he’ll try to bite your neck revealing himself to be a vampire. You’ll be given two options: To talk through it or to try passing a skill check where you’ll stab him through the heart with a stake. Doing the latter will result in him dying thus completing the quest.
If you take the first route, you can ask him some questions about his affliction. He will even suggest that you let him drink some of your blood so he can be stronger for the fights ahead. If you agree to this, you’ll have 2 chances to pass a skill check otherwise Astarion will drain the life from you. You’ll also get the bloodless debuff that gives you -1 to Attack Rolls, Saving Throws and Ability Checks. Do this or saying no will end the day. Speak with him again in camp to see the rest of the group’s reactions to learning what he really is.
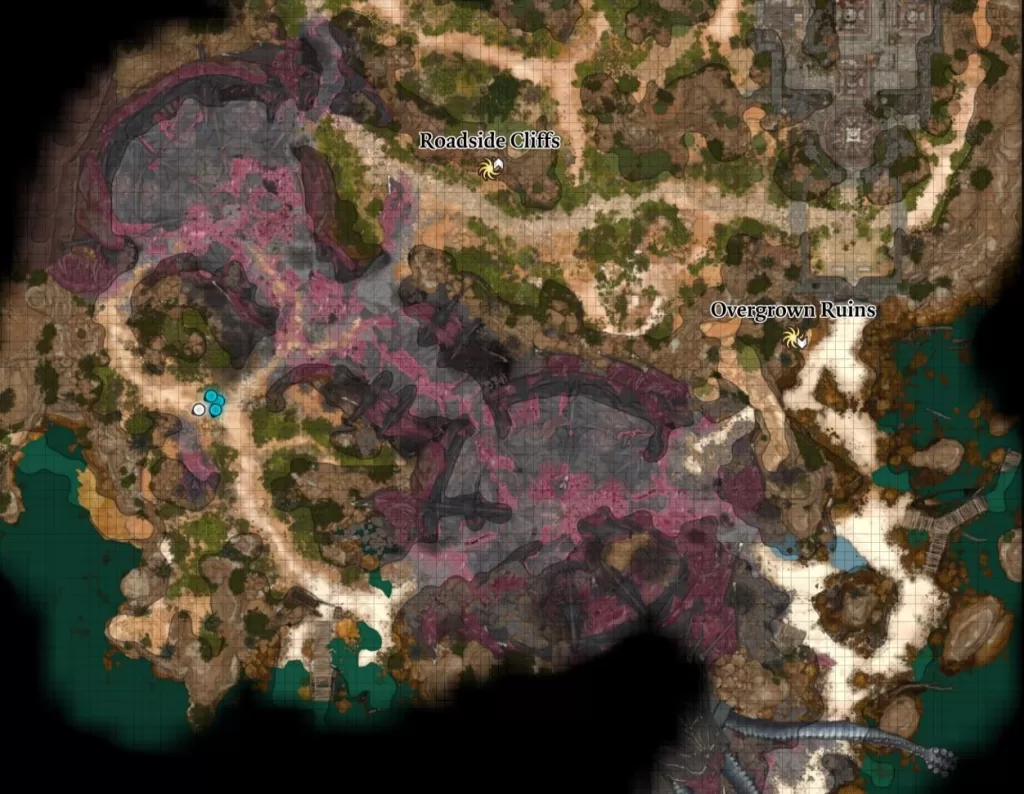
if you travel to the Riverside Teahouse where Auntie Ethel calls home, you’ll meet a monster hunter named Gandrel. If you can pass a persuasion or intimidation skill check, you’ll learn that he is hunting Astarion. If you press him as to why, he’ll say that their children were stolen by vampires and that Astarion knows about it. You’ll have a choice. You can tell him where to find Astarion or protect the team’s resident vampire. When pressed, the option to attack also becomes available. For this playthrough, we chose to tell the man that Astarion was under our protection. Speak with Astarion the next time you’re in camp and mention Gandrel to learn a bit more about him.
In Act II when you’re nearing Moonrise Towers, the Grand Mausoleum will be nearby. Bring Astarion with you as you approach the area (I was controlling him). You’ll run into Rapahel there and the two will have a conversation. Astarion has some infernal runes carved into his back and would like to know what they say. Raphael said he would tell Astarion, but first, he would need to do him a favor by killing an Orthon.
Kill the Orthon
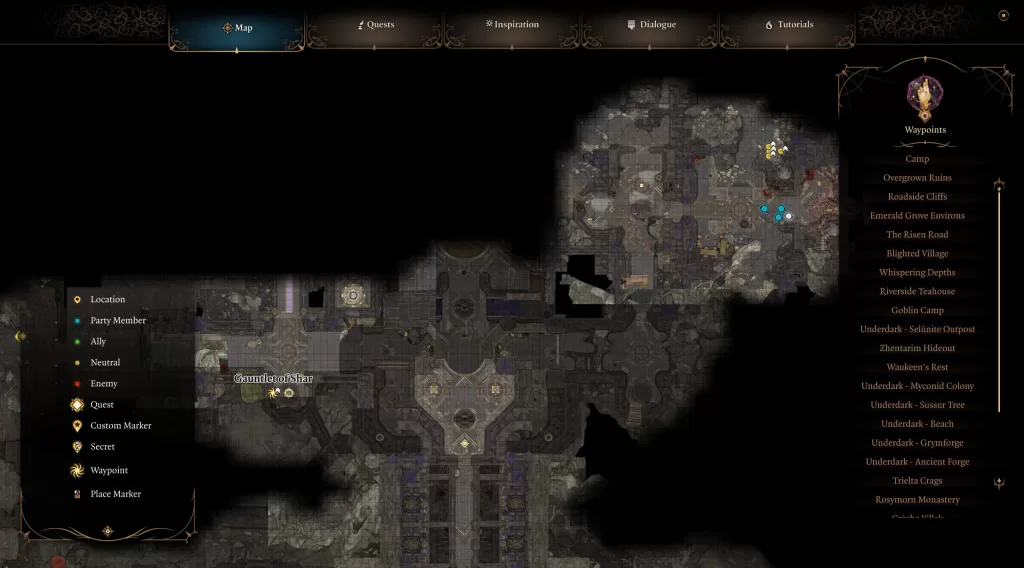
Head into the Grand Mausoleum and work your way to the Gauntlet of Shar, specifically the Gaunlet of Shar Ancient Sigil Circle. From there follow the path heading east then northeast to reach the domain of Yurgir. Follow the Displacer Beast there to find Yurgor, the Orthon we’ve been sent to hunt. He’ll smell Raphael on you and demand to know where the devil is. This will present you with a couple of options. You can attack him (and his followers) leading to a tough fight, offer to help him break free of the curse or persuade him to kill all of his followers and them himself. (We chose the last one!). Once the demon is dead, this objective will be completed.
Await Raphael’s Next Appearance
With the Orthon dead, it’s time to meet with Raphael. You can do this by heading back to camp and taking a long rest. This will trigger a cutscene where the devil will show up and tell you about the runes on Astarion’s back. Please note that you might have to do a few long rests for this cutscene to trigger.
Travel the road to Baldur’s Gate
After learning about the runes on his back, Astarion is ready to take Cazador out of the picture. Speak with him at the beginning of Act III before reaching the city in camp and he’ll tell you that we should seek out his fellow spawn to learn about Cazador’s plans.
Reach Cazador’s Palace
In Act III when you reach Rivington, head northeast of Arfur’s Mansion to find a camp (and make sure to bring Astarion with you). Speak with Ulma there and she will ask that Astarion save their children from his old master. You can make whatever choice you like, but we told Astarion that he owes them revenge if nothing else. You’ll also gain the Investigate Cazador’s Palace quest.
Next stop on the tour to head to Fraygo’s Flophouse across from the South Span of Wyrm’s Crossing. Again make sure you have Astarion in your party then go up to the second floor. You’ll find Dalyria and Pale Petras there. Interact with them to learn Cazador is hiding. Please note that if you rest a couple of days Astarion’s siblings will show up in the middle of the night and try to take him by force. This of course leads to a battle no matter what choices you make during their conversation!
To reach Cazador’s Palace, travel to the Lower City Central Wall waypoint in the Lower City of Baldur’s Gate. Enter the Central Watch Tower building that the waypoint rests on then climb up the stairs to reach the top of the wall. Follow it north to reach Cazador’s Palace. Along the way, you’ll run into some guards. If you tell them that you’re there to kill their master, they will of course attack you! To avoid combat, opt for the intimidation or deception checks. Afterwards, you’ll be able to continue. If you chose to fight the guards, make sure to loot the key from one of their corpses. Keep following the path to reach Szarr Palace.
Once inside, follow the red carpet through the curtain doorway. You’ll then reach the Sinister Door. Interact with this door to get a couple of skill checks. Passing them will tell you that there is a small slot in the door that something can fit in. From this point, feel free to explore the rooms. To continue the quest, you’ll need to head to the Door to the Kennel on the lower level. Head inside for Astarion to begin a conversation with Godey. You’ll need to defeat Godey then loot the Szarr Family Ring. This is the ring that you’ll need to insert into the Sinister Door to open it. Another thing to note is that there is a book in the guest room on the south side of the hallway from the kennel. It will be admitting a necrotic aura. You’ll need to get past the aura by jumping then loot the Mahogany Wardrobe to the left of the bed to receive the Kozakuran Dictionary which might help you understand the Sinister Door.
After opening the Sinister Door, you’ll enter the throne room immediately triggering a fight against some giant rats, bats, wolves and werewolves. If any of the thralls are nearby, they will join in the fight, too. Once you defeat everyone, you can explore the area or head directly to the Office Hall, which is on the southwestern side of the throne room. This will bring you to the Dais. Use this to descend under the palace to Cazador’s Dungeon.
Upon entering Cazador’s Dungeon, follow the hallway north. When you get to the end, there will be 3 doors. Head through the one on the left then cross over the bridge and interact with the glowing door. Use the ring to unlock it then head inside. Straight ahead you’ll see a skull on a pillow. Interact with it. During the interaction, you’ll need to pass multiple skill checks. When you’re done, you’ll receive the Black Mass Scroll. Make sure to read it to learn about the ritual that Cazador is trying to complete.
Next, return to the hallway with 3 doors then head through the northern door, which you’ll need to unlock using the ring. When you reach about halfway to the next door, a cutscene will trigger with a prisoner. After the cutscene, interact with the gate on the other side to find the Hunter kids.
Afterwards, continue north to find Cazador. Approach him to trigger a cutscene. If you brought Astarion, he’ll be captured and you’ll have 3 turns to free him using the Help command before he’s disintegrated and Cazador ascends. If you want to make the fight easier, bring some that knows telekinesis and throw Cazador into the abyss surrounding the area. This will finish him instantly, allowing you to focus on all the other enemies. Once Cazador’s HP goes to 0, he’ll be sent to the coffin in the middle of the arena. Approach the coffin as Astarion to trigger an event.
During this event, you’ll need to make a choice on whether to let Astarion complete the ritual or not. If you would like to talk about it, you’ll need to pass a persuasion check. If Astarion is prevented from ascending, he becomes happier. If he ascends, he’ll become cruel and unfriendly.
Next, you’ll need to make a choice about Cazador’s staff and the cells it controls. You can either kill the people in the cells, release them or leave them. If you release them, they will be sent to the Underdark where they’ll be free to live without harming the souls of Baldur’s Gate. Astarion will later tell you that he feels this option is the correct choice and it’s hinted that he might potentially become their leader/protector after the Absolute is dealt with. The Hunters will not be happy about this choice but they will back off once you mention that their children are among those sent to the Underdark. If you leave them there, then the Hunters will come in and take care of them all. If you kill them, then Astarion will regret the choice but the Hunters will say you did the right thing. This choice will complete The Pale Elf! On the way out, you’ll run into Ulma and the rest of the Hunters who will make a comment on your choice.
