The Githyanki Warrior is the companion quest for Lae’zel in Baldur’s Gate III. You’ll receive this quest automatically after allowing the bossy frog lady to join your party shortly after escaping from the Nautiloid.
Where to Find Lae’zel
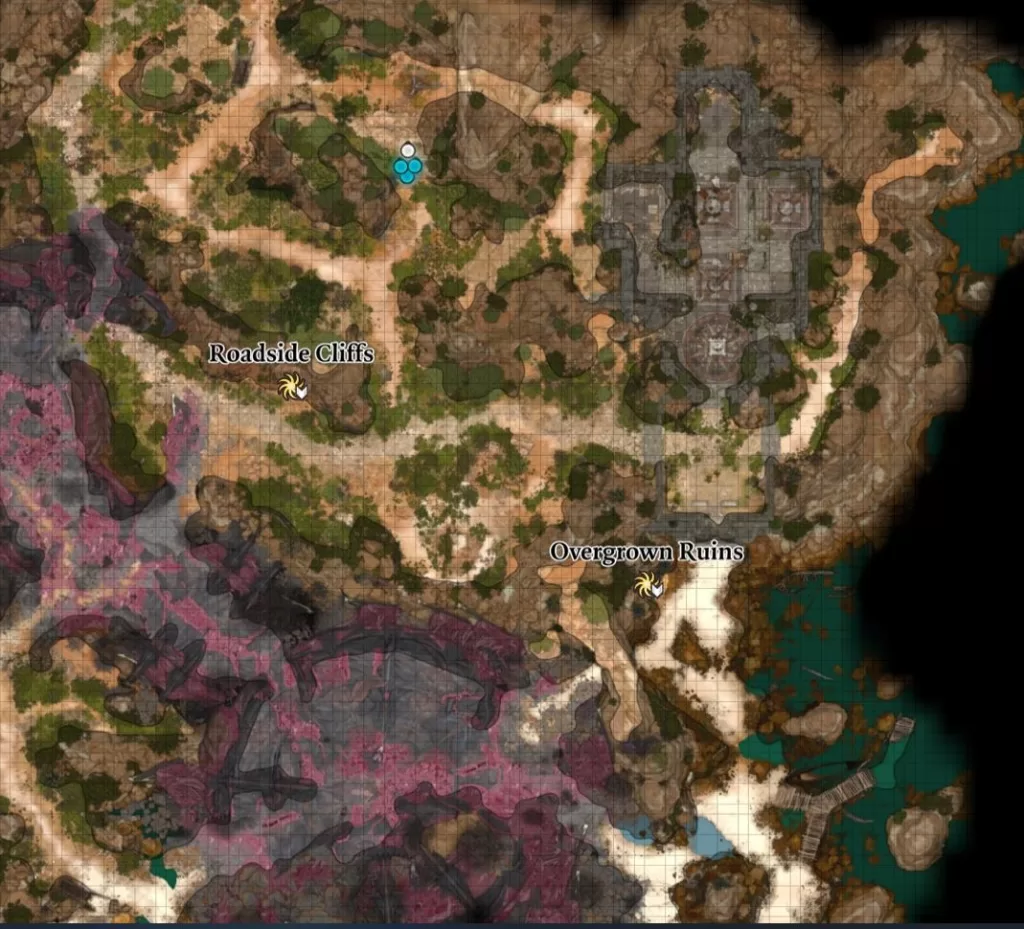
To find Lae’zek, make your way to the dirt path directly north of the Roadside Cliffs Ancient Sigil Circle at roughly coordinates X: 240 Y: 354. There you’ll find two tieflings that have her captured in a cage.
Approach them to trigger a cutscene where she will ask you to free her. You’ll then be presented with a number of options. Check out the table below to see what happens with each. If you can convince the tieflings to leave peacefully by using the first option on the table, you’ll get a persuasion check for a lead on a healer nearby.
| Option | Result |
|---|---|
| [DECEPTION] This creature is dangerous. Get out of here – leave it to me! | The tieflings leave Gale approves |
| [PERSUASION] Shoot down the trap. We must kill it before it harms someone. | You Fight Lae’zel Shadowheart approves |
| [BARD][DECEPTION] Oh, gods! You’ve caught a scout; the gith invasion force is right behind me – save yourselves! | Gales approves |
| Attack the tieflings. | You attack the tieflings Astarion approves Shadowheart disapproves |
| Leave. | You will have to fight the tieflings |
Getting the tieflings to leave either way on their own will bring this option.
| Option | Result |
|---|---|
| Now that they’re out of earshot, sure. | You are free to cut Lae’zel down… or not. |
| Say ‘please’. | You are free to cut Lae’zel down… or not. Astarion approves Shadowheart approves |
| Leave. | You are free to cut Lae’zel down… or not. |
You’ll also need to use a ranged weapon to shoot the bottom of the cage causing Lae’zel to fall out. Speak with her and you’ll have the option for her to join your party or you can tell her to eff off. Letting her join the party adds the option to seek out her comrades in arms to be purified! Adding her to the party or sending her to your camp will get a Gale approves and Shadowheart’s disapproves. If you tell her to get lost, you will lose out on this quest. The game does give you the option to still talk with her afterward to change your mind.
Find Zorru
While freeing Lae’zel from the tieflings, they mentioned that a guy named Zorru’s unit was taken out by a group of Githyanki. Lae’zel wants to track this guy down to get the details. Head for the Emerald Grove which is home to a local group of druids and make your way to the Hollow. Zorru can be found on the northern side near the prison cells. When you speak with him, make sure that Lae’zel is in the party. For this conversation, Lae’zel will try to lead the interrogation. If you back her up, you’ll get a couple of Lae’zel approves while Shadowheart disapproves. Conversely, if you lead the conversation you’ll get a couple of Shadowheart approves and Lae’zel dislikes. After getting the information, a ! will appear over Lae’zel’s head. Speak with her to have a quick chat. This will go one of two ways depending on if you let her do the interrogation or not.
Search for Signs of a Githyanki Creche
Now that we have an idea where the Githyanki might be, it’s time to head northwest to the mountain pass (west of Waukeen’s Rest). When you reach, approach the bridge near the objective to trigger a cutscene. After it ends, follow Lae’zel down to meet with her comrades. For the best outcome, let Lae’zel do the talking. When the dragon rider tells her to report to her creche, use persuasion to tell Lae’zel to play along. If you don’t you’ll have to fight off a squad of Githyanki. Regardless of what happens, you’ll need to travel to the Mountain Pass to locate the Creche.
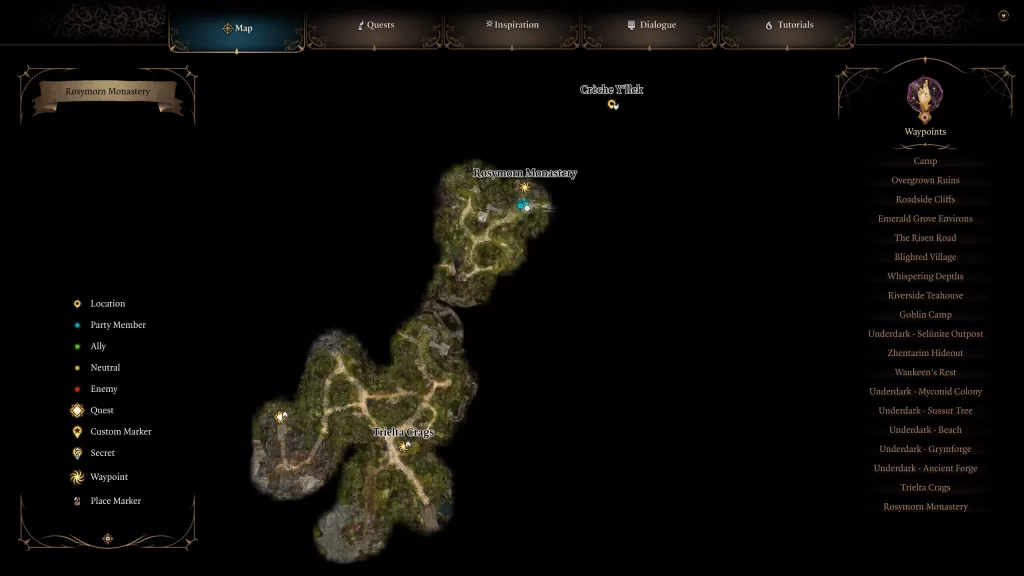
Once you reach the Mountain Pass, head to the northwestern part of the area to find the Rosymorn Monastery. Follow that path leading into the monastery to trigger a cutscene. Afterward, you’ll want to enter the monastery through one of the ways listed below:
- Lockpick the main door
- Climb down onto a ledge overlooking the cliff and follow it east
- Climb up the vines near the fast travel point
Next, look for the basement in the northern part of the building to reach the Creche. Go inside and then approach the group of Githyanki to start a conversation. After being asked a question, if you let Lae’zel answer and Shadowheart is in the party, she will disprove. You can also show them the artefact or pass a series of skill checks to gain entry.
Make your way to the infirmary on the west side of the building then speak with Ghustil Stornugoss and tell her about the tabpole. She’ll ask you how long you’ve been infected then send you to the Zaith’isk to have the little bugger removed. Interact with the machine and you’ll get the option to investigate it pending a skill check. If Lae’zel is with you, she will demand to go first. You can let her or make her wait on you. Either way, you’ll need to pass a series of skill checks to learn that the purification device is actually a murder weapon and to free yourself/Lae’zel from it pissing off the doctor. You can tell her that the parasite saved Lae’zel or convince her that it’s dead. Choosing to tell her the parasite saved Lae’zel with cause the doctor to run out of the room to get her tools while locking the party in the room. If you pick the lock or wait for the doctor to come back, then you’ll be attacked by a group of Githyanki. If you choose to tell her the parasite died, you’ll have to pass a Deception skill check. Doing this will result in the doctor letting you go. You’ll then need to bring Lae’zel to speak with the inquisitor.
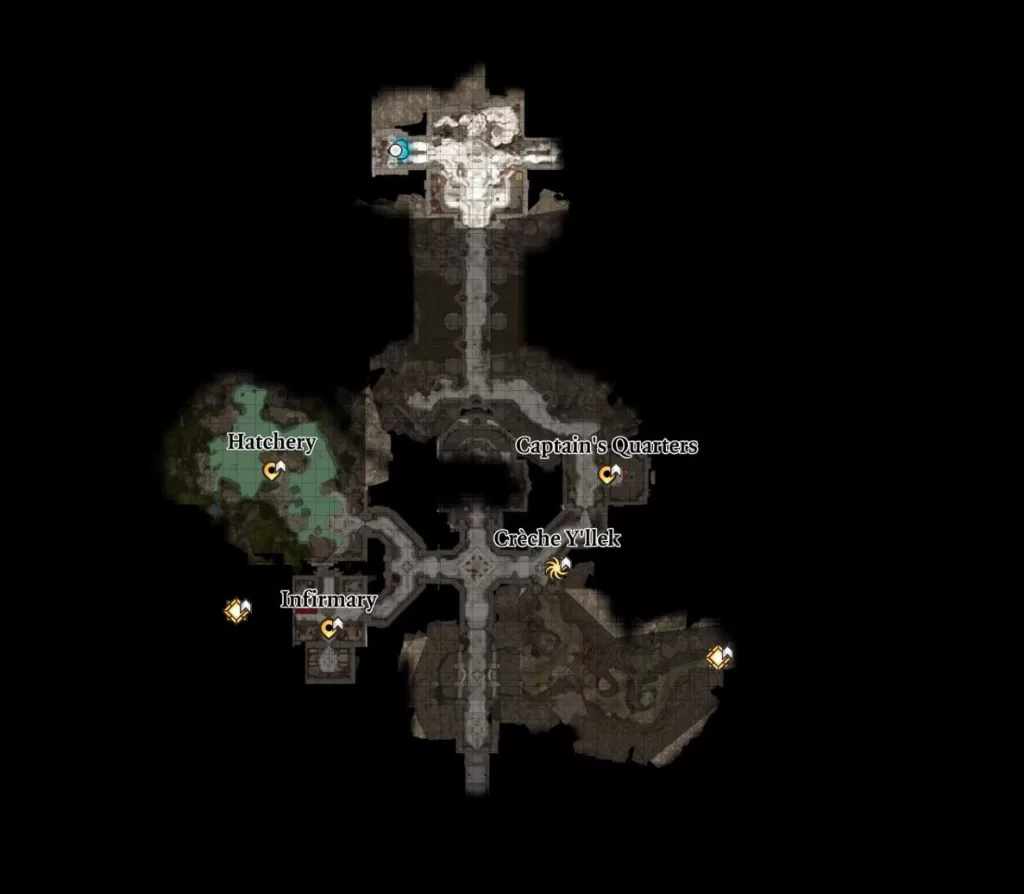
When you’re ready to proceed, head to the Captain’s Quarters and speak with her. Ask about the object they are seeking prompting you to make a face and her to ask if you have it. You’ll then have to pass a deception check to say no resulting in you not being granted an audience with the inquisitor. If you say you have it but won’t give it to her then you’ll have to fight a group of the Githyanki. You can then loot a Gith Shard from the Captain to lower the barrier allowing you to reach the inquisitor. If you say yes and hand over the artefact, she will take the object from you only for it to return on its own. She’ll then send you to talk with the Inquisitor a little deeper in the monastery. Speak with him and he too will ask for the artefact.
If you hand it over to him, the queen will make an appearance and ask that you kill the blight (aka your dream visitor) tainting it. If you agree, you’ll have to enter the relic. Approach the Beckoning Cave for the Dream Visitor to speak with you. They’ll ask to talk alone and offer you the choice to kill them or not. If you tell them you’re not there to kill them, they will say their trust was well placed in you and will tell you a secret about the queen. If you do choose to kill them, they don’t actually die and will heal saying that you broke their trust. Exit the Astral Prism after making either choice to be attacked by the inquisitor and his underlings. After dealing with them speak with Lae’zel who will be a tad bit confused by the series of events.
If you choose to deny his request, Lae’zel will threaten to show you her wrath. If you saved her from the purification process, you can use that as an option to get her to follow your lead, otherwise, you’ll need to pass a skill check (or open up a can of whoop ass on her). This also results in a battle with the inquisitor and his squad. After taking them all down, the queen will show up and try to get you to enter the artefact to deal with the Dream Visitor. It will play out similarly to the above paragraph minus the inquisitor and his goons attacking you afterward since they have already been dealt with. Another option here is to not enter the artefact and just walk away. If you do that, then you will not complete the personal quest to learn more about the artefact.
Regardless of the option you pick, all of the Githyanki will be hostel towards you now. If you return to the hallway outside the Captain’s Quarters, you’ll be able to fast travel again. Exit the Creche when you are aready.
Give Lae’zel Time to Think
After the events of the Creche, travel to a different area where you’ll be forced to rest at your camp. Interact with your bed to trigger a cutscene where Kith’rak Voss will show up at the camp claiming that the artefact is the key to liberating the Githyanki. He will then offer his aid and ask that you meet him at Baldur’s Gate. You can lead the conversation or allow Lae’zel to do so. You’ll also have the option to kill him or not. For now, we chose to let him live and agreed to meet at Baldur’s Gate. After the conversation, you’ll need to speak with Lae’zel in camp before resting.
Talk to Lae’zel about Orpheus
After the events at the beginning of Act III and exiting the Astral Plane, speak with Lea’zel in camp to learn more about Orpheus. You’ll both come to the conclusion that Voss was not lying.
Find Voss at Sharess’ Caress
In Act III you’ll start in the area of Rivington. Head to the northern part of the map and pass through the South Span Checkpoint. Continue heading forward and Sharess’ Caress will be on your right. Enter the building then go to the Upper Floor and enter the Devi’s Den. This leads to a conversation with Voss and Raphael. During the dialog with Raphael, he’ll tell you how to free Prince Orpheus and provide the means to do so asking for the crown controlling the Elder Brain in exchange. If you make the deal, then you’ll have to deliver on your promise (or betray Raphael later). If you decide to turn down the offer (you can come back and accept it later), there is a way to still get what you need and not side with the devil. That’s the path that were are going to follow for this guide.
Head down into the Sharess’ Caress and speak with Voss. You can lie and tell him you took the deal or be truthful and say you’re doing things another way. Voss will then say he’s forced to trust you and says he’ll be waiting in the underground once we get the Orphic Hammer.
NOTE: Doing a full rest will trigger a conversation with the queen who will make Lae’zel her chosen if she slays Orpheus. She intends to betray the queen, but you can persuade her not to if you wish. We are not going to side with the queen for this guide.
Retrieve the Orphic Hammer from the House of Hope
Travel to the Devil’s Fee in the Lower City of Baldur’s Gate. Once inside, take the stairs in the back of the room up. At the top of the second flight, interact with the Thirsty Ward on the wall to the right. This will prompt you to give it something to drink, whether it be water or beer. Satisfying its thirst will dispel the trap allowing you to then lock pick the door. Head inside and go to the left side of the room to find a pentagram on the ground. Once a character mentions something about it, head downstairs and speak with Helsik. Choose the persuasion option to acquire her help sneaking into the House of Hope. You can either pay or persuade her…