Welcome to our collectibles walkthrough on C’s Route: Act 4 Elysium in The Legend of Heroes: Trails into Reverie! In this walkthrough, we’ll cover enemies you can scan, noteworthy items, character notes, shops and treasure chest locations.
Beyond the Forest
Knox Forest
Enemies to Scan
Army Chameleon
Murder Scales
Homing Mold
Habanalien GG
Tainted Stallion
EDF Soldier – Sword
EDF Soldier – Rife
EDF Soldier – Sword
Duvalie the Swift
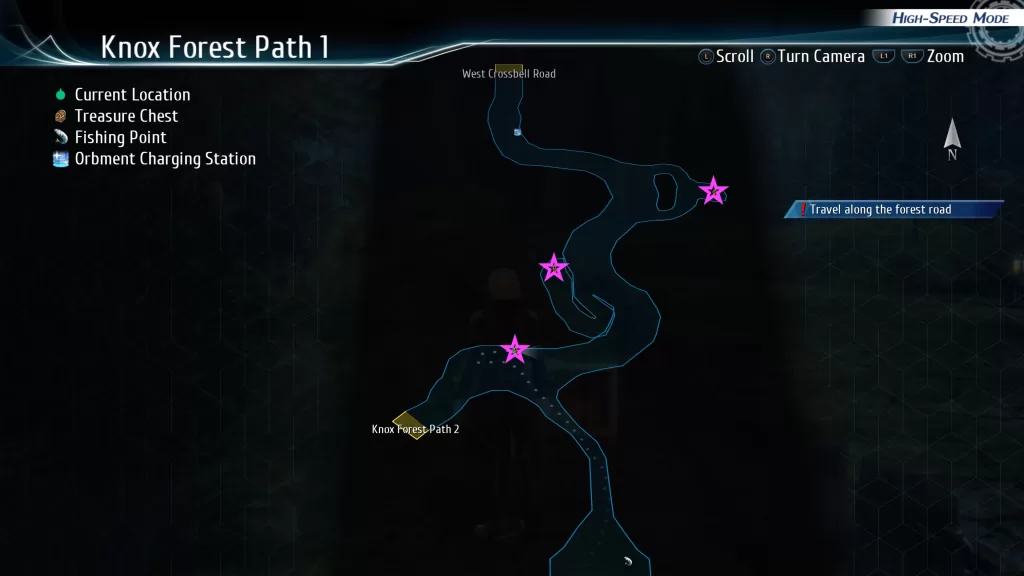
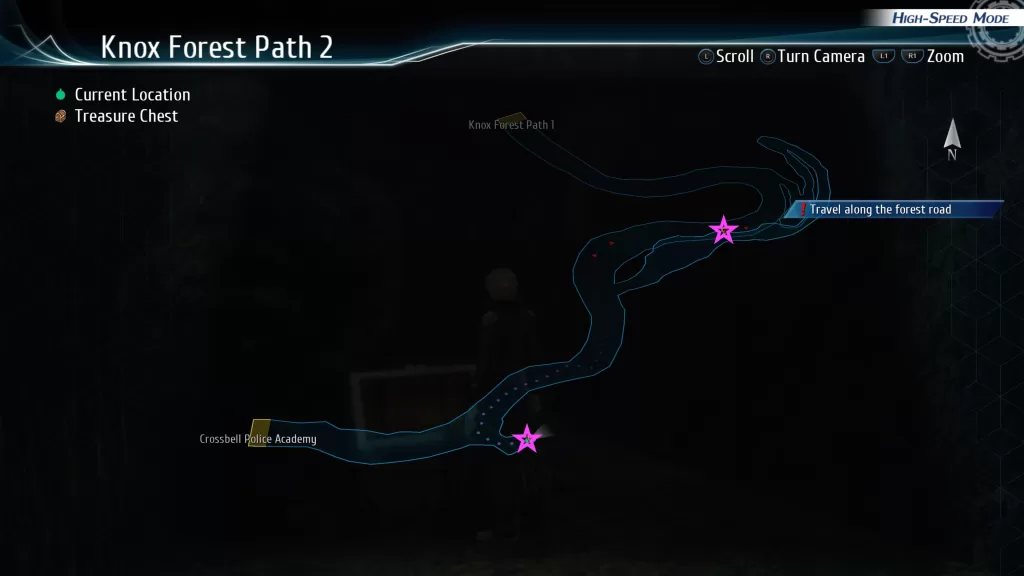
Chests
Location
Loot
Path 1 – Eastern nook along the edge of the map
Still Blue
Path 1 – Guarded by a Tainted Stallion on the western edge
Zero Hour Puppet
Path 1 – Behind a fence near Knox Forest Path 2 map transition
Tear All Balm
Path 2 – Along the main path on top of a cliff near a Tainted Stallion
Aeolus Gem
Path 2 – Southern edge along main path
Coarse Rock Salt x5 Healthy Liquor x5 Starberry x5 Honey Syrup x5
Path 1
Path 2
Character Note
Automatically as part of the story after fighting her:
Duvalie the Swift
Fishing
This fishing point can be found on the southern edge of Path 1.
Quicksilver Carp
Noble Carp
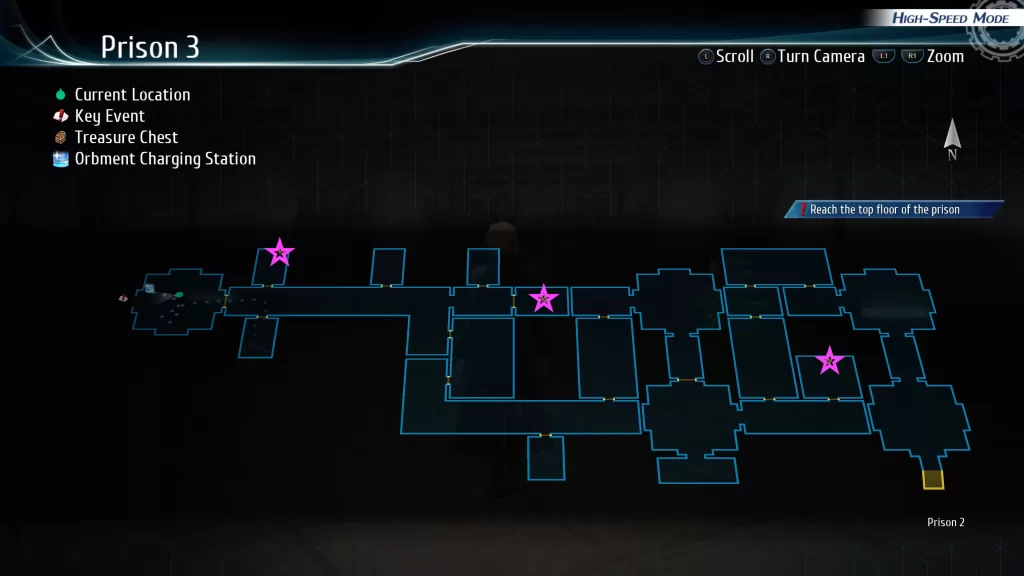
Prison
Enemies to Scan
Divine Blade of Wind? (You’ll actually fight them when you arrive at the Crossbell Police Academy!)
Vampskipper
Proto Tron
Thunder Doven
Gun Buster Type-B
Lantern Spider
Regenenkopf Type-II
Super Regenenkopf
Shigure Satellite
Emperor Dogma
Emperor Dogma
Noteworthy Items
Recipe: Prison Food – Loot the chest containing the Manly Munchies – Prison Food (see below)
Chests
Location
Loot
1 – In a cell near the map transition to Crossbell Police Academy
EP Charge IV
1 – In a cell on the southeastern side
True Gladiator Belt
1 – In a cell in the central part of the area
Recuria Balm
1 – In a cell along the northern edge of the area
Force Crown
2 – In the northwestern hallway
Manly Munchies – Prison Food
2 – In a cell along the south central area
Hyoushou Gem
2 – In southeastern room
Tearal Balm Celestial Balm EP Charge III
2 – Southeastern room
Genbu
2 – Eastern area behind a door that unlocks by using a lever
Welcome to our collectibles walkthrough on C’s Route: Act 3 Light in the Dark in The Legend of Heroes: Trails into Reverie! In this walkthrough, we’ll cover enemies you can scan, noteworthy items, character notes, shops and treasure chest locations.
Aboard the Argo
Argo
Character Notes
After the cutscene at the start of the act, you’ll receive the following character notes:
Rufus 1
Jingo
Crow
Jusis 1
Infiltrating Crossbell
Crossbell City – Station Street
Character Notes
Rufus 2 – Automatically as part of the story
Crossbell City – West Street
Noteworthy Items
Recipe: Devil’s Food Cornet – Purchase the recipe for 1,400 mira from Morges Bakery
Crossbell City – East Street
Noteworthy Items
Book: Manly Munchies – Berry Ice Cream – In Bargain Bin at Neinvalli Exchange
Welcome to our collectibles walkthrough on Rean’s Route: Act 1 As the Snow Thaws in The Legend of Heroes: Trails into Reverie! In this walkthrough, we’ll cover enemies you can scan, noteworthy items, character notes, shops and treasure chest locations.
Homecoming
Baron Schwarzer’s mansion
Character Notes
You’ll obtain the following character notes from speaking with Rean’s parents as part of the main story.
Rean
Kurt
Altina
Musse
Ash
Major Rieveldt
Ymir
Character Notes
Juna 1 – Speak with her in Plover Goods & Souvenirs
Altina 1 – Speak with the duo in the hot spring foot bath as part of the story
Musse 1 – Speak with the duo in the hot spring foot bath as part of the story
Noteworthy Items
Book: Moonless Morn – Chapter 3 – Purchase from Camilla at Plover Goods & Souvenirs for 100 mira
Book: Moonless Morn – Chapter 4 – Purchase from Camilla at Plover Goods & Souvenirs for 100 mira
Recipe: Tri-Color Onigiri – Speak with Gerald in the Valley’s Echo Tavern
Shops
For a guide on what items can be purchased at the below shops, click here!
Plover Goods & Souvenirs
Valley’s Echo Tavern
Vanquishing the Valley
Ymir Valley
You’ll come to this area when you start the objective to trek through Ymir Valley! Explore to find the below.
Enemies to Scan
Snow Feline
Mist Flower
Icicoon
Pestcargot
Sasquatch
Major Rieveldt
Thunder God Matteus (actually listed twice under the Eisengard Range location)
Chests
For the map locations of the treasure chests found in this chapter, see under the table!
Location
Loot
Ymir Valley 1 – From Ymir, take the first right to find this chest at the dead end.
Smoke Grenade x5 Battle Scope x5
Ymir Valley 1 – Central eastern side of the area
Red Pendulum
Ymir Valley 1 – Northwestern dead end
Teara Balm x3 Reviving Balm x3 EP Charge II x3
Ymir Valley 2 – Along the main path just north of the Ymir Valley 1 map transition
Curia Balm x3 S-Tablet x3
Ymir Valley 2 – Along the main path in the northern part of the area
Coral Ring
Ymir Valley 2 – Eastern dead end
Ivy Nail UR
Ymir Valley 1
Ymir Valley 2
Fishing
This fishing point can be found in the northern part of the map near the Ymir Valley 2 map transition.
Snow Crab
Carp
Character Notes
Beat the Thunder God during the main story for the following character notes:
Thunder God Matteus
Major Rieveldt 1
Ash 1
Kurt 1
Matteus’ Trial
Eisengard Range
Enemies to Scan
Thunder God Matteus (see above under Ymir Valley enemies to scan)
Iron Vise
Gregor Spinner
Magic Knight Isra-Zamiel
Chests
For the map locations of the treasure chests found in this chapter, see under the table!
Location
Loot
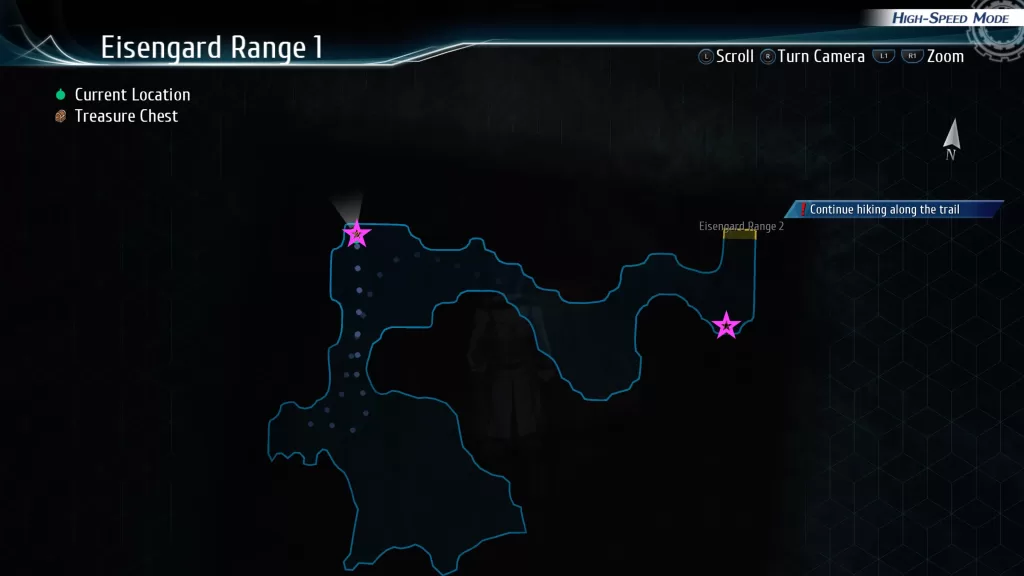
Eisengard Range 1 – Northwestern corner of the area
Brave Seed
Eisengard Range 1 – Near the Eisengard Range 2 map transition
Zeram Powder
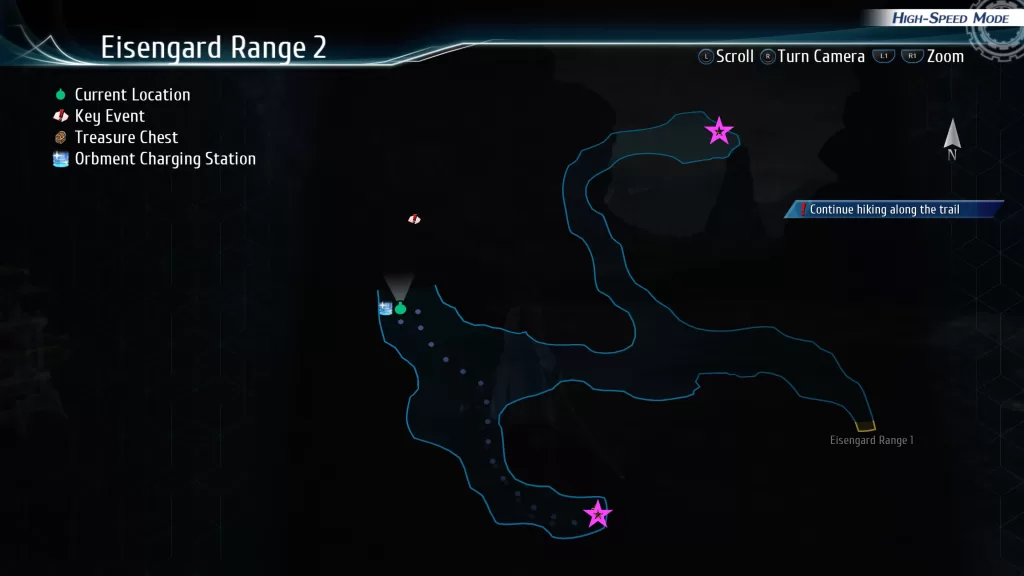
Eisengard Range 2 – Northern dead end
Gladiator Headband
Eisengard Range 2 – Southern dead end
Curia UR
Eisengard Range 1
Eisengard Range 2
To Each Their Own Thoughts
Ymir
During the objective to take another look around Ymir, you’ll visit the hot spring again to take a bath. Afterwards, you can explore to find the below.
Character Notes
After the hot spring bath you’ll receive the following character notes:
Thunder God Matteus 1
Rean 1
Scherazard
Prince Olivert
Speak with Kurt during the objective to “Take another look around Ymir”
Kurt 2
During the objective to “Take another look around Ymir”, you’ll speak with Major Rieveldt in Baron Schwarzer’s Mansion. At this point, the game will lock you out of Rean’s story progression so switch over to Lloyd’s Route! For more guides on The Legend of Heroes: Trails Into Reverie, click here! After you finish Lloyd’s Route: Act 1, you’ll be able to continue with Rean’s story! Shortly after the cutscene, this Act will end!
Welcome to our collectibles walkthrough on Lloyd’s Route: Act 1 Signing Ceremony in The Legend of Heroes: Trails into Reverie! In this walkthrough, we’ll cover enemies you can scan, noteworthy items, character notes, shops and treasure chest locations.
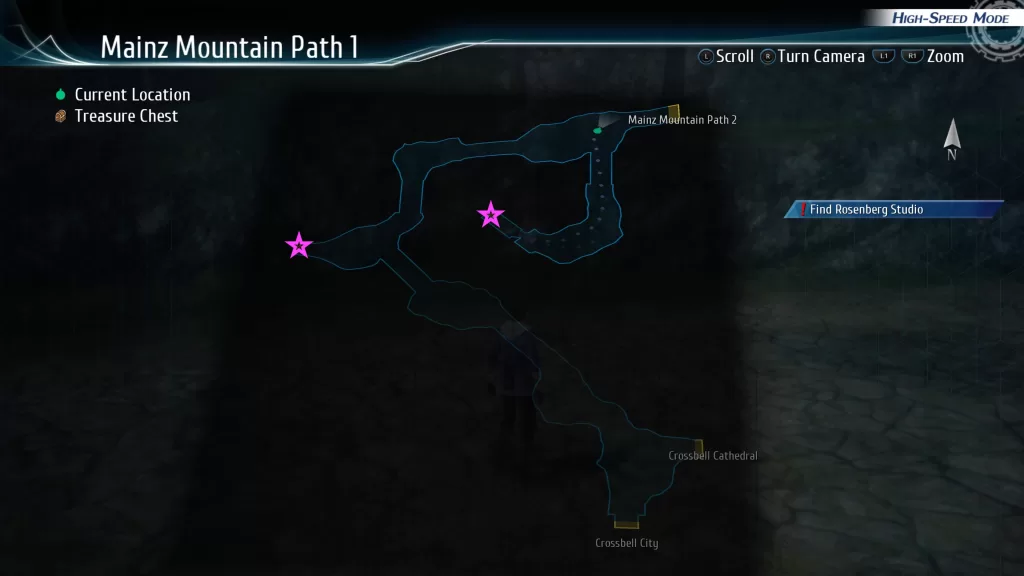
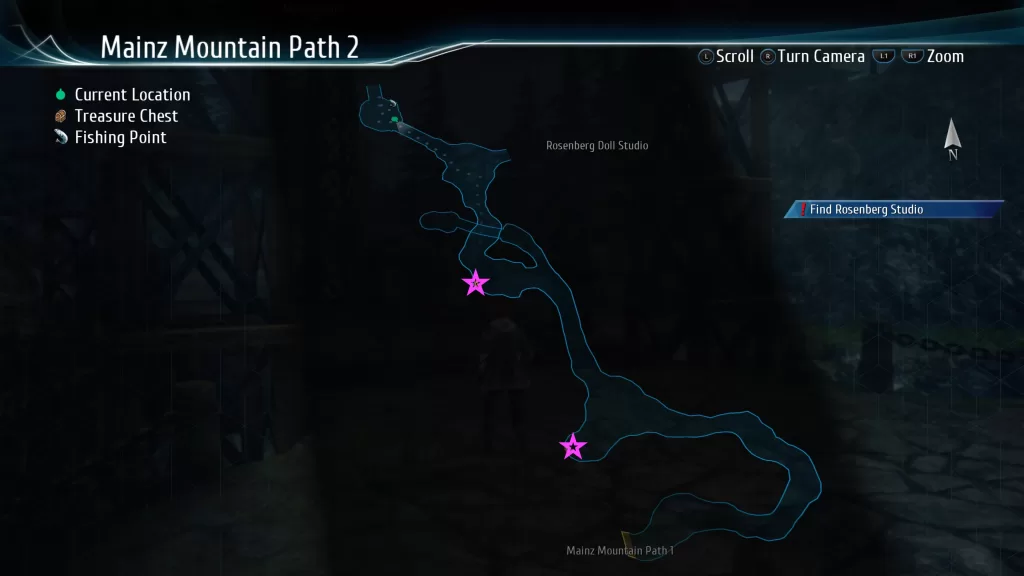
Retaking Orchis Tower
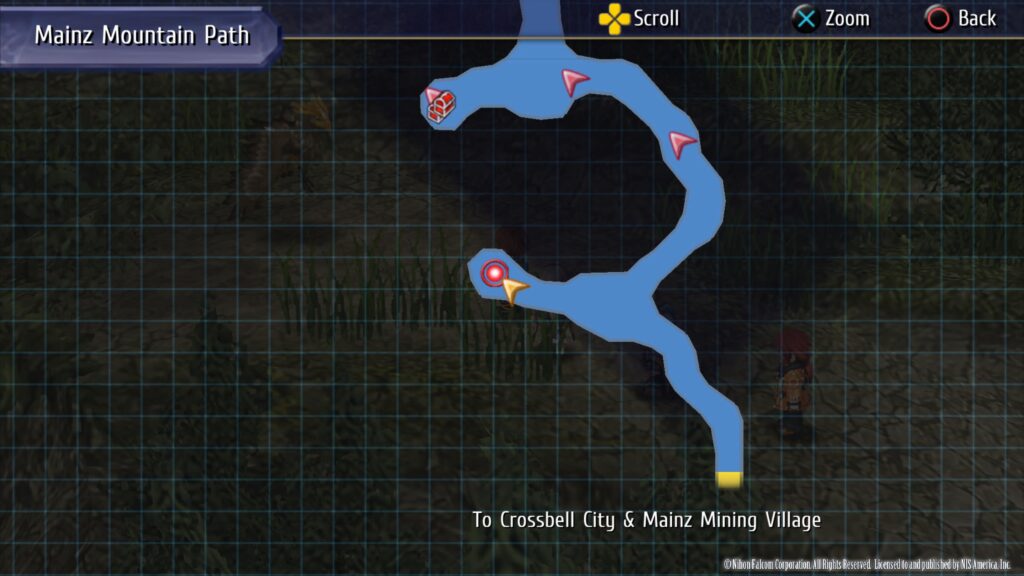
Mainz Mountain Path
On your way to patrol around Crossbell City, you’ll pass through the Mainz Mountain Path.
Enemies to Scan
Petro Drome
Dong
Crossbell City – West Street
Character Notes
Randy 1 – Speak with Randy outside Morges Bakery
1st Lt. Mireille – Speak with Mireille outside Morges Bakery
Noteworthy Items
Independence Roll x3 – Speak with Oscar in Morges Bakery
Book: Crossbell Times – Independence Special – Purchase from Tallys’ General Store for 100 mira
Shops
For a guide on what items can be purchased at the below shops, click here!
Morges Bakery
Tallys’ General Store
Crossbell City – Entertainment District
Character Notes
Ilya – Speak with the trio in the Arc en Ciel Theater
Sully – Speak with the trio in the Arc en Ciel Theater
Rixia – Speak with the trio in the Arc en Ciel Theater
Noteworthy items
Recipe: Impromptu Potato Salad – Purchase the recipe at the Garante Jazz Bar for 500 mira
Shops
For a guide on what items can be purchased at the below shops, click here!
Sophie’s Ice Cream
Barca Casino
Garante Jazz Bar
Imelda’s Antique Shop
Crossbell City – Central Plaza
Character Notes
Sergei Lou – Speak with the duo in the SSS Building
Commander Baelz – Speak with the duo in the SSS Building
Noteworthy Items
Book: Moonless Morn – Chapter 1 – Purchase from Southwark General Store for 100 mira
Book: Moonless Morn – Chapter 2 – Purchase from Southwark General Store for 100 mira
Shops
For a guide on what items can be purchased at the below shops, click here!
Baker’s Accessories
Genten Orbal Store
Gironde’s Armory
Legion’s Foods
Lucca Boutique
Southwark General Store
Strega Shop
Vingt-Sept Cafe
Crossbell City – Station Street
Character Notes
Rex – Speak with Rex in front of the station!
Crossbell City – East Street
Character Notes
Michel – Enter the Bracer’s Guild
Shizuku – Enter the Bracer’s Guild
Arios – Enter the Bracer’s Guild
Squire Wald – Enter the Long Lao Tavern & Inn
Noteworthy Items
Recipe: Blazing Mapo Tofu – Purchase for 300 mira from the Long Lao Tavern & Inn
Shops
For a guide on what items can be purchased at the below shops, click here!
Business Owners’ Association
Fisherman’s Guild – CB Branch
Long Lao Tavern & Inn
Marte’s Fish Stall
Neinvalli Exchange
P&R Company
Tucker’s Vegetable Stall
Crossbell City – Harbor District
Character Notes
Tio 1 – Speak with Agate in IBC Building
Tita – Speak with Agate in IBC Building
Agate – Speak with Agate in IBC Building
Professor Russell – Speak with Agate in IBC Building
Fish
This fishing point can be found on the eastern dock near the lighthouse.
Kasagin
Sky Gill
Shops
For a guide on what items can be purchased at the below shops, click here!
IBC Counter
Ozelle’s Noodle Stand
Vending Machines
Crossbell City – Administrative District
Character Notes
Joshua – Speak with the duo near the fountain
Estelle – Speak with the duo near the fountain
Detective Dudley – Enter the Crossbell Police Department
Machias – Enter the Crossbell Police Department
Sharon – Speak with the group having a tea party in the Civic Center
Towa – Speak with the group having a tea party in the Civic Center
Alisa – Speak with the group having a tea party in the Civic Center
Elie 1- Speak with the group having a tea party in the Civic Center
Shops
For a guide on what items can be purchased at the below shops, click here!
Chroma’s Juice Stall
Vending Machine (In Crossbell Police Department)
Independence Reasserted
After finishing the exploration of Crossbell City and reaching the objective “Enter the Abandoned Law Office”, we’ve stopped this route as the tutorial suggested and switched to Rean’s Route: Act 1! For more guides on The Legend of Heroes: Trails Into Reverie, click here! After being locked out of Rean’s Route, you’ll return to Lloyd’s to continue his story progression so make your way to the Abandoned Law Office and speak with Pete inside! Head through the unlocked door where you’ll receive the following prompt: Upon beginning your investigation of the Geofront, you will no longer be able to patrol Crossbell. When you’re ready, make your way to the Geofront.
Guardians of the Geofront
Geofront B Sector S-II
Enemies to Scan
Needle Rat
Torso Mk. III S
Superior Mosquito
Grand Mosquito
Habanalien G
Gundharva
Chests
For the map locations of the treasure chests found in this chapter, see under the table!
Location
Loot
1 – At the first split, head left
Brave Seed
1 – When you reach the Superior Mosquito, take the vent to the right and follow it to the chest.
Septium Vein
1 – From the last chest, follow the path north and climb up a ladder
Zeram Powder
2 – Up a ladder near the end of the area
Blue Pendulum
2 – At the very bottom of the level on the west side
Floral Bottle
2 – South central part of the area
Spirit Incense
2 – Southeastern corner of the area near the controls to lower the bridge
Silver Thorn UR
1
2
Signing Ceremony & What Comes After
Crossbell
When you return to Crossbell for the signing, a surprise guest will interrupt the ceremony.
Welcome to our guide on where to purchase items from the shops in The Legend of Heroes: Trails into Reverie!
Crossbell City – Administrative District
Chroma’s Juice Stall
Items
Mira
Acerbic Tomato Shake
500
Orange Juice
300
Vending Machine
Items
Mira
Canned Juice
100
Energy Drink
300
Crossbell City – Central Plaza
Baker’s Accessories
Items
Mira
Mischneider Goggles
1000
Yellow Pendulum
5000
Blue Pendulum
5000
Red Pendulum
5000
Green Pendulum
5000
Dark Pendulum
6000
Genten Orbal Store
Items
Mira
Mischneider Watch
500
EP Charge I
200
EP Charge II
600
EP Charge III
1200
Insulating Tape
40
Gironde’s Armory
Items
Mira
changes
Shield Tonfa
9000
Added during the Final Preparation Period on 3/22
Bullfighter
1500
Licht Armor
3400
Added during the Final Preparation Period on 3/22
Licht Grieves
1700
Added during the Final Preparation Period on 3/22
Fiber Jacket
400
Not available C’s Route: Act 3 on 3/19
Strega Tough
200
Not available C’s Route: Act 3 on 3/19
Plate Guard
1600
Only available C’s Route – Act 3 on 3/19
Metal Boots
800
Only available C’s Route – Act 3 on 3/19
Silver Earring
600
Coral Ring
600
Marble Ring
600
White Glasses
600
Black Bangle
800
Cool Necklace
800
Lighter
800
Stone Brooch
800
Citrus Bottle
800
Floral Bottle
800
Holy Chain
1000
Force Seal
1000
Leather Watch
1000
Proxy Puppet
1000
Legion’s Foods
Items
Mira
Hot Chili Pecky
400
Fresh Egg
40
Fresh Milk
40
Mature Cheese
40
Fresh Herb
40
Crisp Onion
40
Flaky Potato
40
Starberry
80
Acerbic Tomato
200
Honey Syrup
20
Coarse Rock Salt
20
Assorted Grains
100
Healthy Liquor
100
Lucca Boutique
Items
Mira
Silver Silk
600
Energy Bandanna
3200
Cooling Belt
3200
Cozy Socks
3200
Soft Stole
3200
Orange Cape
3200
Prismatic Cape
3200
Southwark General Store
Items
Mira
Changes
Mishy Tail
10000
Crossbell Times – Emergency Special
100
Available during the Final Preparation Period on 3/22
Crossbell Times – Independence
100
Not available C’s Route – Act 3 on 3/19
Crossbell Times – Special Issue
100
Available C’s Route – Act 3 on 3/19
Moonless Morn – Chapter 1
100
Moonless Morn – Chapter 2
100
Moonless Morn – Chapter 15
100
Available during the Final Preparation Period on 3/22
Moonless Morn – Chapter 16
100
Available during the Final Preparation Period on 3/22
Moonless Morn – Chapter 17
100
Available during the Final Preparation Period on 3/22
Tear Balm
200
Teara Balm
600
Tearal Balm
1200
EP Charge I
200
EP Charge II
600
EP Charge III
1200
Reviving Balm
800
Celestial Balm
2400
Antidote
40
Relaxant
40
Insulating Tape
40
Eye Drop
40
Mint Drop
40
Cooling Spray
40
Warmer
40
Softening Ointment
40
Stimulant
40
Sedative
40
S-Tablet
100
Curia Balm
400
Smoke Grenade
100
Battle Scope
100
Strega Shop
Item
Mira
Winged Stregas
300
Strega Tough
200
Vingt-Sept Cafe
Items
Mira
Vingt-Sept Hamburg Steak
400
Blended Coffee
300
Crossbell City – East Street
Business Owners’ Association
Items
Mira
Kagemaru Strap
500
Fresh Egg
40
Fresh Milk
40
Mature Cheese
40
Fresh Herb
40
Crisp Onion
40
Flaky Potato
40
Starberry
80
Acerbic Tomato
200
Honey Syrup
20
Coarse Rock Salt
20
Assorted Grains
100
Healthy Liquor
100
Fisherman’s Guild – CB Branch
Items
Mira
changes
Fishing Bait
400
Custom Handle
2400
RF’s Zero Bearing
10000
Available C’s Route – Act 3 on 3/19
Long Lao Tavern & Inn
Items
Mira
Blazing Mapo Tofu
300
Dragon Fried Rice
400
Marte’s Fish Stall
Items
Mira
Salmon Pecky
400
Neinvalli Exchange
The Neinvalli Exchange is a bit different than an ordinary shop. Instead of purchasing items using mira, you’ll need to trade items! The Neinvalli Exchange does offer a bargain bin and items in that section can be purchased using mira.
Alterna Bookstore (Plaza Bifrost Department Store)
items
Mira
Kagemaru Bookmark
1000
Imperial Chronicle – Special Issue
Moonless Morn – Chapter 5
100
Moonless Morn – Chapter 6
100
Chris the Newsboy
Item
Mira
Imperial Chronicle – Special Issue
100
Flint’s Drugstore (Plaza Bifrost Department Store)
Items
Mira
Herb Pecky
400
Tear Balm
200
Teara Balm
600
Tearal Balm
1200
EP Charge I
200
EP Charge II
600
EP Charge III
1200
Reviving Balm
800
Celestial Balm
2400
Antidote
40
Relaxant
40
Insulating Tape
40
Eye Drop
40
Mint Drop
40
Cooling Spray
40
Warmer
40
Softening Ointment
40
Stimulant
40
Sedative
40
S-Tablet
100
Curia Balm
400
Smoke Grenade
100
Battle Scope
100
Keith’s Fish Stall
Item
Mira
Fish ‘n’ Tartar Time
300
Le Sage Boutique
Items
Mira
Nomadic Coat
900
Nomadic Boots
600
Energy Bandanna
3200
Cooling Belt
3200
Cozy Socks
3200
Soft Stole
3200
Orange Cape
3200
Prismatic Cape
3200
Lepanto & Co. (Plaza Bifrost Department Store)
Items
Mira
Prismatic Macarons
500
Yellow Pendulum
5000
Blue Pendulum
5000
Red Pendulum
5000
Green Pendulum
5000
Dark Pendulum
6000
Yellow Emblem
20000
Blue Emblem
20000
Red Emblem
20000
Green Emblem
20000
Dark Emblem
24000
Lumiere Orbal Factory
Items
Mira
Mischneider Light
1500
EP Charge I
200
EP Charge II
600
EP Charge III
1200
Insulating Tape
40
Mimosa Cafe (Plaza Bifrost Department Store)
Item
Mira
Imperial Tea
300
Watson’s Weapons & Armor
Items
Mira
Dark Papillon
4000
Ceramic Coat
1000
Ceramic Spikes
500
Silver Earring
600
Coral Ring
600
Marble Ring
600
White Glasses
600
Black Bangle
800
Cool Necklace
800
Lighter
800
Stone Brooch
800
Citrus Bottle
800
Floral Bottle
800
Holy Chain
1000
Force Seal
1000
Leather Watch
1000
Proxy Puppet
1000
Weston House General Foods (Plaza Bifrost Department Store)
Items
Mira
Orange Pecky
400
Fresh Egg
40
Fresh Milk
40
Mature Cheese
40
Fresh Herb
40
Crisp Onion
40
Flaky Potato
40
Starberry
80
Acerbic Tomato
200
Honey Syrup
20
Coarse Rock Salt
20
Assorted Grains
100
Healthy Liquor
100
Heimdallr – Dreichels Plaza
Jasmine’s Ice Cream Stall
Item
Mira
Very Berry Ice Cream
1000
Roscoe’s Juice Stall
Item
Mira
Orange Juice
300
Heimdallr – Garnier District
Corba’s Crepe Stall
Item
Mira
Strawberry Crepe
300
San Corries Jewelers
Items
Mira
Mishette Tiara
1000
Silver Chain
2400
Coral Bracelet
2400
Marble Bracelet
2400
Luminous Glasses
2400
Holy Sphere
4000
Deep Ocher
80000
Still Blue
80000
Passionate Ring
80000
Evergreen
80000
Abyss Shadow
96000
Reverie Corridor
Millennial Trove
Since this shop has A LOT of items, we’ve broken it apart from this guide and placed it in its own. To access all the items from the Millennial Trove, click here!
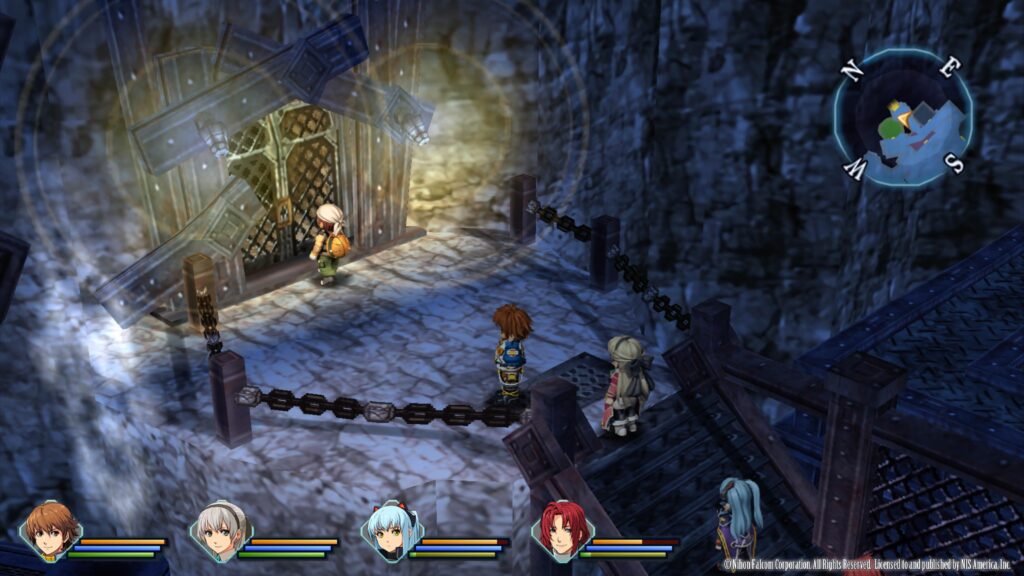
Welcome to our collectibles walkthrough on the Prologue – Operation: Liberate Crossbell in The Legend of Heroes: Trails into Reverie! In this walkthrough, we’ll cover enemies you can scan and treasure chest locations.
Orchis Tower
Enemies to Scan
At the start of Trails into Reverie, you’ll receive 10 Battle Scopes that you can use to scan enemies. You can also use Tio’s Analyze craft to scan the enemies!
IDF Soldier – Rifle
IDF Soldier – Greatsword
Doven Kaiser
Kazakh Doven
Asmodyne
Chests
For the map locations of the treasure chests found in the Prologue, see under the table!
Welcome to our The Legend of Heroes: Trails into Reverie Guides and Walkthroughs page! Here you’ll find all of our guides for Trails into Reverie such as collectibles and walkthroughs.
Below is a walkthrough for the Testaments Training support request in The Legend of Heroes: Trails from Zero. You can pick up this request from the terminal in Chapter 2.
Client: Abbas
Salary: 2000 mira
Head on over to the Downtown District then make your way to Trinity. Speak with Abbas who is behind the counter to accept his request. A fight will then trigger against 4 Testaments (make sure to scan each one!). After you defeat them, you’ll then take on 4 members of the Saber Vipers (make sure to scan each one!). Once you defeat this lot, you’ll then have to defeat all 8 of the bickering clans! Defeat them all to complete the request!
First thing’s first, finish the Hunting for Ingredients support quest. Please note that it’s important to speak with Bennett in Morges on West Street first before speaking with Oscar behind the counter! Give her the eggs first then speak with Oscar! Once you complete the quest, turn it in at the terminal.
After you report the above requests at the terminal, head to the Fisherman’s Guild on East Street and speak with Branch Manger Cerdan to check your rank. If you caught all of the above fish, you’ll be a Professional Fisher now and will receive Hare quartz.
While on East Street, head to Long Lao Tavern & Inn. Enter the room on the left side of the inn. In the hallway with the giant cat statue, take the first door and speak with Lars inside. You’ll get the following support request:
Complete this support request and turn it in at the terminal. If you’ve completed all the support requests up to this point, you’ll receive a Septium Vein quartz!
When you’re ready to progress the story, travel to the Residential District and take the northern exit to the Mainz Mountain Path.
Mainz Mountain Path
Area 1
Head forward a short way to trigger a cutscene. When it ends, you can explore the path to the northeast leading to the Crossbell Cathedral if you wish, however, there are no collectibles there. Instead, head to the western path.
Area 2
Explore this area to find the below.
Treasure Chests
Blind Quartz
Enemies
Rock Rat
Humming Gator
Earth Drome
Ale Slime
Fish
Snow Crab (Novice Rod, Earthworm)
Area 3
Explore this area to find the below. When you head uphill on the path, a cutscene will trigger. After it ends, continue along the path.
Treasure Chests
Time, Space and Mirage Sepith x50
Luminous Glasses
Enemies
Humming Gator
Ale Slime
Nepenthes
Rock Rat
Earth Drome
Area 4
Explore this area to find the below.
Treasure Chests
When you interact with this different colored chest on the western side of the area, you’ll sense that powerful monsters are in the chest and will have the option to challenge them. If you begin the fight, you’ll face 2 Level 35 Armored Hydra. Since you’ll do no damage against them, leave this chest unopened for now!
Enemies
Ale Slime
Nepenthes
Humming Gator
Earth Drome
Rock Rat
When you head under the bridge, a cutscene will trigger. Afterwards, take the northeastern path.
Area 5 (Northeastern path from bus stop in Area 4)
Once you enter this area, a cutscene will trigger. You won’t be able to do anything here so return to Area 4 with the bus stop. Proceed up the northwestern path.
Mainz Mountain Path – Tunnel
Explore this area to find the below.
Treasure Chests
Earth, Water, Fire and Wind Sepith x50
Interact with the different colored chest to begin a fight against 6 Mottled Killers. Defeat them all to receive Engineer Boots.
Enemies
Killer Cricket
Mottled Killer (tan spider)
Mottled Murder (red spider)
Rocktopus
Mainz Mountain Path – After Tunnel
Enter the next area to trigger a cutscene. Choose the following:
Why was that wolf not the culprit?
The howl
The appearance
Both howl and appearance
Afterwards, continue along the path to find the following:
Treasure Chests
Reviving Balm
Enemies
Rozu
Rocktopus
Ale Slime
Mainz Mining Village
Once inside the village, head directly to the far east side and enter the large circular building (mayor’s house) to trigger a cutscene. Afterwards, head to the right side (when facing the mayor’s house) and go down the stairs, speaking with everyone you find (including those in the buildings). Return to the mayor’s house to trigger a cutscene. Return to the mayor’s house to trigger another cutscene. When prompted select the following:
What has yet to be confirmed?
Monsters’ identity
Monsters’ lair
Monsters’ objective
Which one corresponds to the ‘Culprit’?
Black Wolves
Unknown
Wolves’ Abilities
Property Damage/Injuries
Which one corresponds to the ‘Objective’?
Black Wolves
Unknown
Wolves’ Abilities
Property Damage/Injuries
Which one corresponds to the ‘Means’?
Black Wolves
Unknown
Wolves’ Abilities
Property Damage/Injuries
Which one corresponds to the ‘Result’?
Black Wolves
Unknown
Wolves’ Abilities
Property Damage/Injuries
What’s the name of the witness?
Harold Hayworth
Lytton
Shizuku MacLaine
Noel Seeker
Don’t interact with the table just quite yet. Instead, exit the inn then head down the stairs to the right of the mayor’s house. Enter the circular house on the southern side of the village and speak with Miner Max in bed to receive the below book.
Books
Back Alley Doctor Glenn – Ch. 3
Next, speak with the person (Mine Chief Hoffman) in front of the entrance to the mine on the northern side of town to the right of the general store.
During the cutscene, he will unlock the mine allowing us entry.
Mainz Mine
Head inside and explore to find the below!
Treasure Chests
Teara Balm
HP 2
Reviving Balm
Martial Arts Uniform
Enemies
Sticky Slug
Once you’ve explored everything, return to the entrance and exit the mine.
Mainz Mining Village
When you’re ready, interact with the table in your room at the inn and “stand by until midnight”. After the cutscene, a fight will trigger with 3 Doven Kaiser. Defeat them all to trigger a cutscene. When this cutscene completes, another fight will trigger. This time you’ll have to defeat Mafioso – Machete, Mafioso – Pistol and their 3 Doven Kaiser. Defeat them to complete this chapter!
Below is a walkthrough for the Mainz Mountain Path Monster Extermination support request in The Legend of Heroes: Trails from Zero.
Client: State Government
Salary: 2000 mira
When you reach the Mainz Mountain Path bus stop in area 4, take the northeastern path. In the next area, take the first path on the left.
At the dead end, approach the Fall Eagle and select to exterminate it.
This will begin a fight against 2 Fall Eagles. Defeat both of them to complete the quest! Make sure to report it to the terminal!
Search
This site uses cookies. By continuing to use this website, you are giving consent to cookies being used. For more information on cookies, view our Privacy Policy.OkPrivacy Policy