In Like a Dragon: Ishin, you can complete various substories for rewards and virtue points. This guide covers the 4 Gion substories!
Finders Weepers
Obtained: Interact with the book lying on the ground next to a gate in the southeastern part of the area.
When you pick up the book, you’ll discover it’s a diary. Peek inside to be posed with a question. The correct answers are listed below. Once you respond, physically leave Gion then return to check on the diary. You’ll be presented with a new question!
All love is precious.
Try getting to know him.
Better to be simple and direct.
After responding with the last answer, return one more time and approach the two people in front of the shrine. When the cutscene finishes, so will the substory.
Soft and Supple
Obtained: Speak with the man near the Palanquin Bearers in the northern part of the area
When you’re ready, tell him “Fine” to meet a gorgeous creature. You’ll need to choose between the following options:
Someone diligent and tireless.
Someone deft at giving pleasure.
Someone with a perfect body.
You’re option doesn’t matter as you’ll be greeted by a sumo wrestler! Surprise!! Not quite what you were thinking, eh? You’ll then be asked to fork over 10 ryo or battle 3 sumo wrestlers. We chose to fight our way out! Afterwards, the substory ended.
Reward: 3 ryo
The Revolutionary Chef
Obtained: Approach the man just west of Kasuga
He’ll want a dish made by your own hand. Head to Ryoma’s villa and scrounge up a dish in your kitchen. Any meal will do. Once you’ve created one, return to the Chef and hand it over to complete the substory.
Reward: Bond with Revolutionary Chef
The Sexy Madam
Obtained: Speak with Sexy Madam outside of Kitchen Aoba.
When you speak with the suggestive lady, give her a cucumber. You can either grow and harvest one at Ryoma’s villa or purchase it. For a listing of where to purchase cucumbers, click here! Once you have a cucumber, hand it to her to complete the substory!
In like a Dragon: Ishin, you can form bonds with the people and animals in the towns. You’ll need to complete all Bonds for the Everybody Loves Ryoma trophy. This is a guide on who has bonds, where to find them, how to unlock them and how to complete them! Happy bonding!
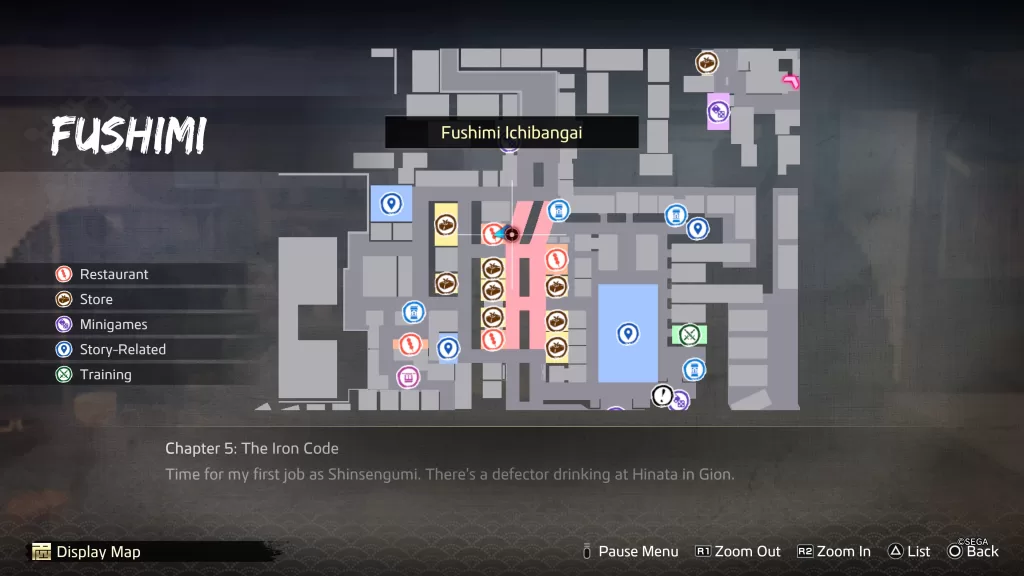
Fushimi
Desperate Fisherman
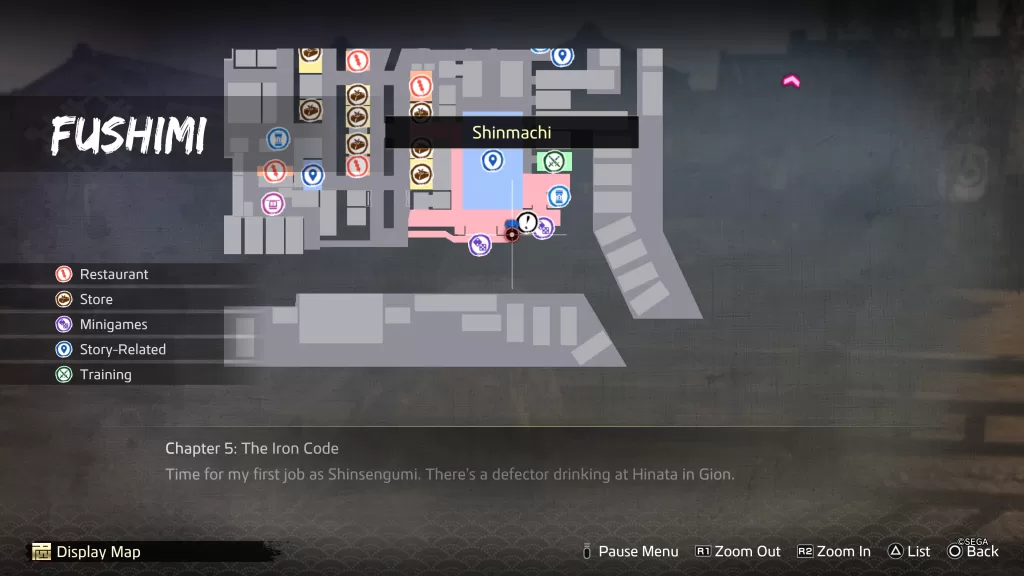
Location: Shinmachi – Along the river just south of Teradaya
To bond with the Desperate Fisherman, complete The Desperate Fisherman substory. Once the bond has been formed, visit the fisherman regularly and hand over a fish you’ve caught. When you max out his bond, you will not receive any items.
Filthy Cat
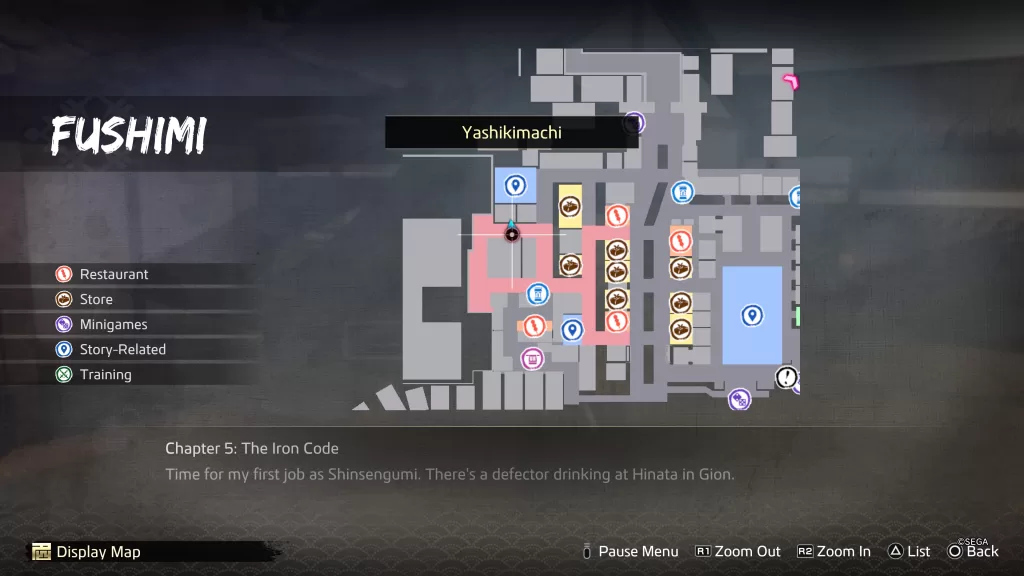
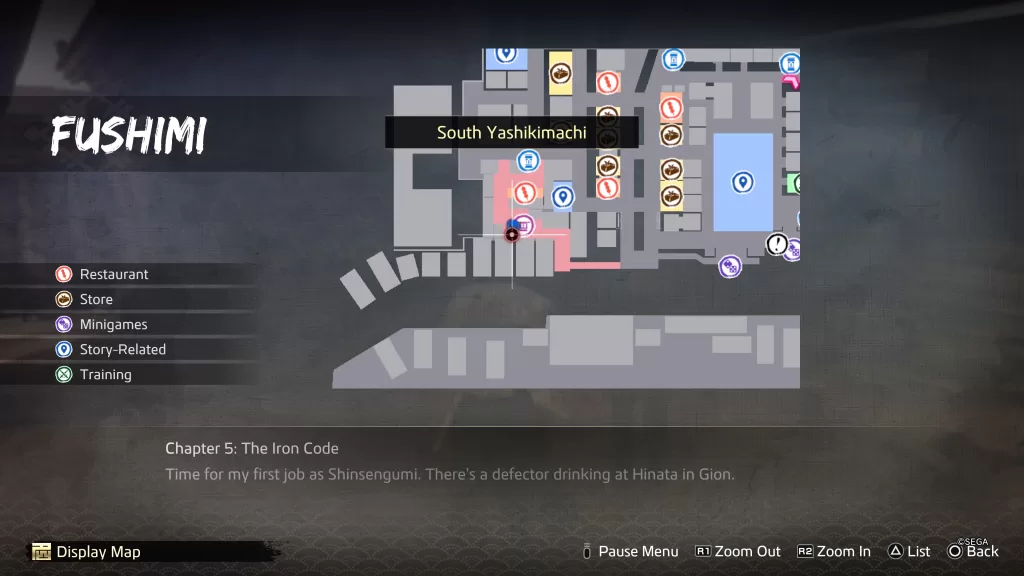
Location: South Yashikimachi – On the dock next to the boatman who takes you to Ryoma’s villa on the southwestern side of Fushimi
To bond with the Filthy Cat, you’ll need to complete The Filthy Cat substory. Once the bond has been formed, you’ll need to visit the cat regularly, giving it baths. When you max out your bond, you’ll get to name the cat and take it home with you!
Frequently Lost Courier
Location: Shinmachi – Along the river in the southeastern corner of Fushimi near a jizo statue
To bond with the Frequently Lost Courier, you’ll need to complete The Frequently Lost Courier substory. Once the bond has been formed, check in on the courier regularly and help him make his deliveries. Check out The Frequently Lost Courier substory guide for the locations of the deliveries.
Fukufuku Pub Owner
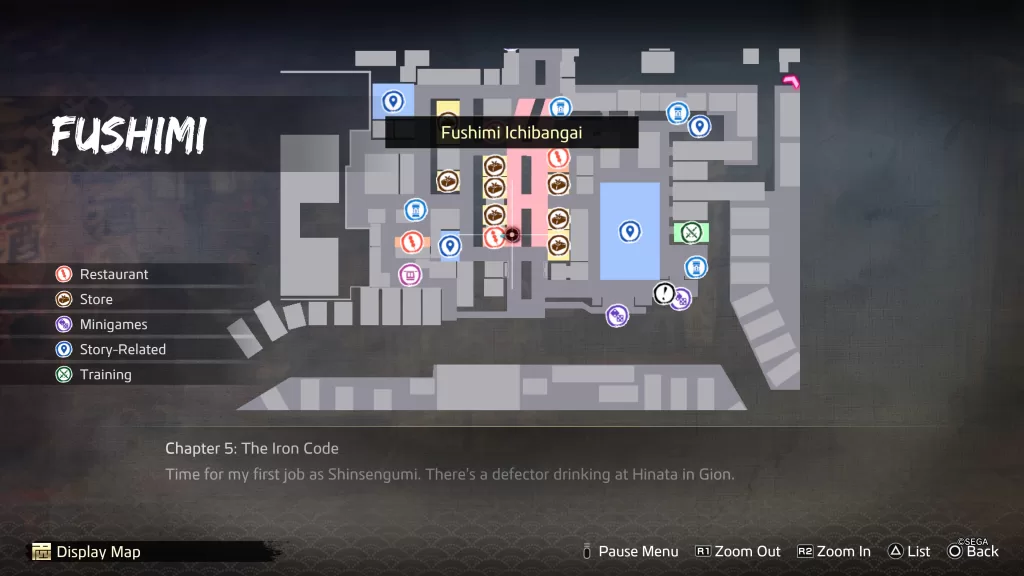
Location: Fushimi Ichibangai – At Fukufuku Pub
To bond with the Fukufuku Pub Owner, purchase something from his restaurant. Once the bond has been formed, return regularly and purchase a dish. About halfway through, a cutscene will trigger during which you’ll invite the owner to drink with you. After the scene is through, wait some time then return to the restaurant. As you approach, a cutscene will trigger. Afterwards, speak with the owner sitting at a table. As a reward for maxing out his bond, you’ll receive Nada Refined Sake
Greengrocer
Location: Fushimi Ichibangai – At Greengrocer
To bond with the Greengrocer, purchase something from his shop. Once the bond has been formed, return regularly and purchase items. When you get close to maxing out his bond, he’ll ask you for 10 carrots. Grow them at Ryoma’s villa then deliver them to the Greengrocer. As a reward, you’ll receive a Sturdy Lumber.
Ichikura Owner
Location: Fushimi Ichibangai – At Ichikura General Goods
To bond with the Ichikura Owner, purchase something from his shop. Once the bond has been formed, return regularly and purchase items. When it comes time to max out this bond, you’ll have to engage in a chase. Capture the shoplifter. As a reward, you’ll receive a Crystal.
Junk Boy
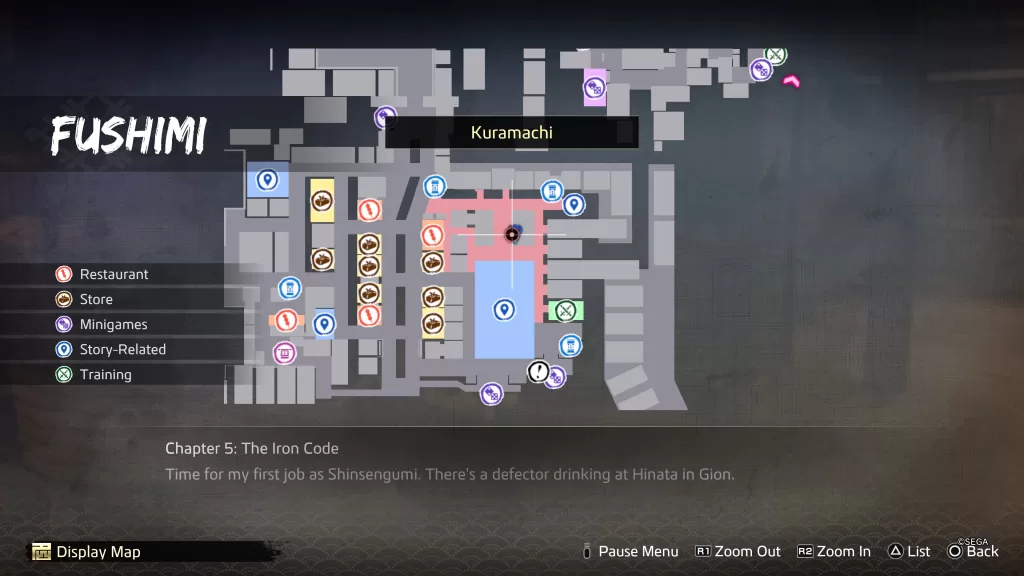
Location: Kuramachi – In alley just north of Teradaya
To bond with the Junk Boy, you’ll need to complete The Junk Boy substory. Once the bond has been formed, visit the boy regularly and hand him something. When you max out his bond, you will not receive any items.
Palanquin Bearer
Location: Any Palanquin Bearer
To bond with the Palanquin Bearer, use their services. Once the bond has been formed, continue using their services! About halfway through, cutscene will trigger during which the Palanquin Bearer will mention that bandits have been attacking Palanquin Bearers recently. Take another ride to trigger a cutscene where scary men will show up. This will lead to a fight against them. Afterwards, their bond will max out and the Rakugai on Kamo River becomes a location that the Palanquin Bearers can now take you to!
Patient Dog
Location: Yashikimachi – Just south of Dojo
To bond with the Patient Dog, you’ll need to complete The Patient Dog substory. Once the bond has been formed, return regularly to the dog and feed it a meal. When you max out its bond, you’ll get to name the dog and bring it home with you.
Udon Shop Owner
Location: Fushimi Ichibangai – At Umai Udon
To bond with the Udon Shop Owner, order a meal at Umai Udon. Once the bond has been formed, you’ll be able to complete the All in the Hips substory. Doing so unlocks the cooking minigame. Return regularly to pitch in at the shop! When you max out the bond, you will not receive any items.
Wood Cutter
Location: South Yashikimachi – Next to the Palanquin Bearers just south of Hanako
To bond with the Wood Cutter, you’ll need to complete The Wood Cutter substory. Once the bond has been formed, you’ll need to visit the man regularly and help him chop wood.
Gion
Anna
Location: At Yamabuki
To bond with Anna, visit Yamabuki and pay 1 ryo to enter. Afterwards, play the drinking minigame. Once the bond has been formed, return regularly to the brothel and play. You won’t receive anything but Virtue for maxing out her bond. No items or special cutscenes.
Kasuga Okami
Location: At Kasuga restaurant
To bond with Kasuga Okami, eat a meal at Kasuga. Once the bond has been formed, return regularly to eat here. When it’s time to max out her bond, you’ll need to fight a drunk customer. Deal with him to receive a Fine Silk Fabric.
Kitchen Aoba Chef
Location: At Kitchen Aoba
To bond with the Kitchen Aoba Chef, eat a meal at his restaurant. Once the bond has been formed, return regularly to eat here. About halfway through, he’ll ask you what your favorite kind of food is. You’ll be able to choose from the following:
Food that warms me up inside.
Food with lots of ingredients.
Food that’s simple to eat.
We chose “Food that’s simple to eat.” Return to the restaurant and speak with the chef. You won’t receive any items for maxing out his bond!
Revolutionary Chef
Location: West of Kasuga
To bond with the Revolutionary Chef, complete The Revolutionary Chef substory. Once the bond has been formed, visit him regularly bringing him home cooked meals. When you max out his bond, you’ll learn how to cook the Revolutionary Croquettes.
Sexy Madam
Location: In front of Kitchen Aoba
To bond with the Sexy Madam, complete The Sexy Madam substory. Once the bond has been formed, wait awhile then return to where she was. She’ll want the below vegetables. You can either grow them on your farm or purchase them.
Carrot – Reward: Passion Pill
Eggplant – Reward: All-Purpose Medicine
Daikon – Reward: Deluxe Vitality Pill
Pumpkin – Reward: Gold Plate
When it comes time to maxing her bond out, you will not receive any additional items.
Mibu
Veggie-Loving Boy
Location: Far eastern side of Mibu near the map transition
To bond with the Veggie-Loving Boy, complete The Boy Who Loves Veggies substory. Once the bond has been formed, you’ll need to visit him regularly and give him vegetables that you either grow at Ryoma’s villa or purchase. To max out his bond, you’ll be asked to make a Refreshing Vegetable Salad. Head to Ryoma’s Villa to make it! You’ll need Turnip x2, Eggplant x2, Onion x2, Carrot x2 and Spinace x2. Return to the boy once you have it and hand over the salad. Speak with him once more to fully max him out. You will not receive any items for doing this.
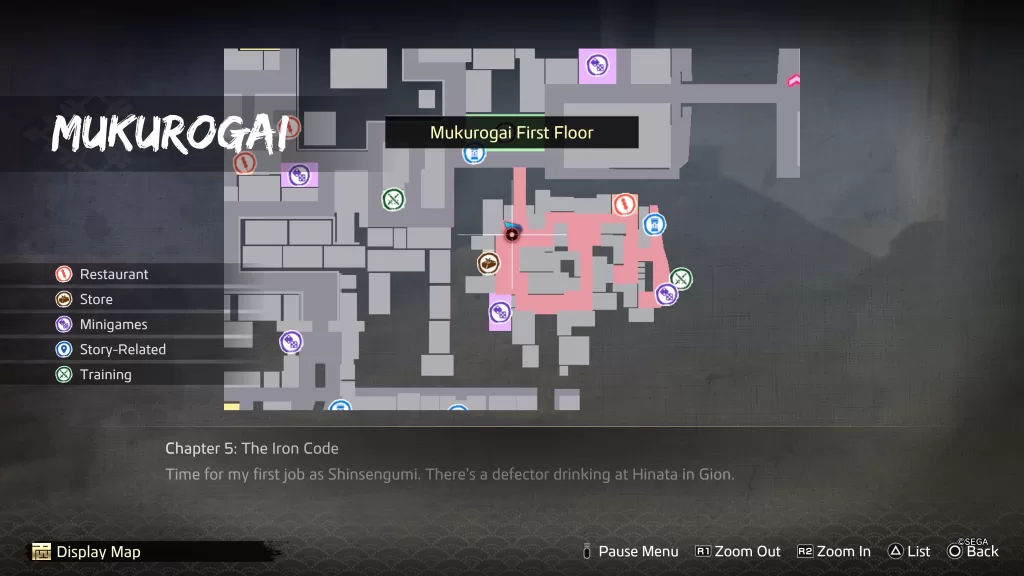
Mukurogai
Injured Dog
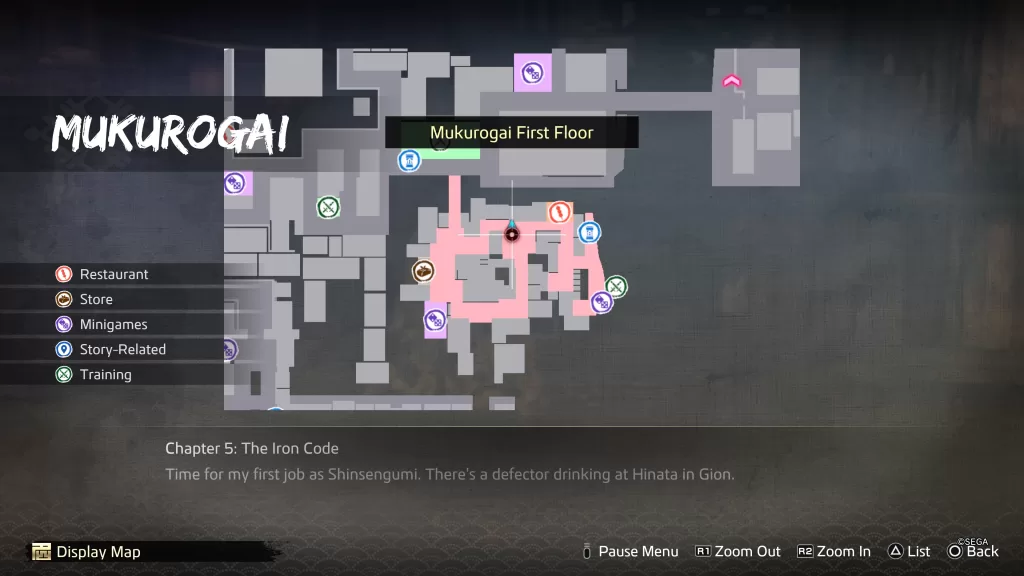
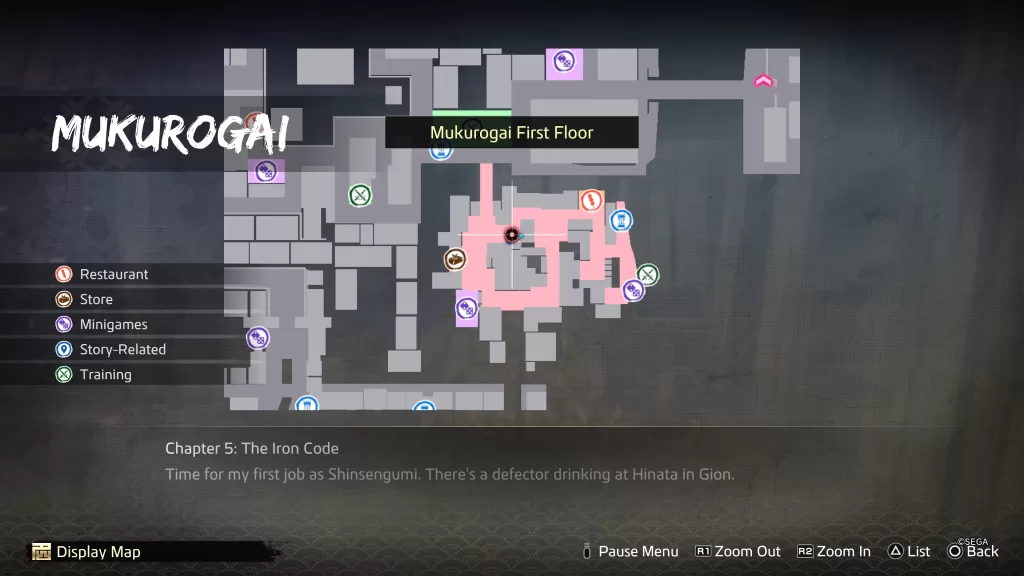
Location: Mukurogai First Floor – Just west of Paradise
To bond with the Injured Dog, complete The Injured Dog substory. Once the bond has been formed, visit the pup regularly and give it medicine (All-Purpose Medicine, Ointment, etc.). When you max out its bond, you’ll get to name it and bring it home.
Servile Beggar
Location: Mukurogai First Floor – Near the entrance/exit
To bond with the Servile Beggar, complete The Servile Beggar substory. Once the bond has been formed, return regularly and feed him food. To max out his bond, meet him on the northwestern side of the Scarecrow Chateau in Rakugai. He’ll thank you and hand over the Precise Machinery as a reward.
Trash Dealer
Location: Mukurogai First Floor – Standing next to the entrance/exit
To bond with the Trash Dealer, complete The Trash Dealer substory. Once the bond has been formed, visit him regularly and give him something. When it comes time to max out his bond, you will not receive any items.
Path to ?
(Reachable via bridge East of Rakugai)
Amnesiac
Location: Found lying on the ground
To bond with the Amnesiac, interact with him lying on the ground. Once the bond has been formed, give him some medicine (Ointment, All-Purpose Medicine, etc.). Once you’ve fully healed him, he’ll wake up. As a reward, you’ll receive a Solid Wood.
Check back in with him later. Again, he’ll be out cold and you’ll need to keep giving him medicine. Do so until he is fully healed to receive a Sturdy Lumber.
Once again, wait awhile then check back with him. You’ll need to fork over some more medicine to fully heal him. When you do, you’ll receive a Thousand-Year Tree Branch.
Once more you’ll need to wait awhile then return to him. You’ll finally found out the cause of his falls. For maxing out his bond, you’ll receive a Sacred Wood.
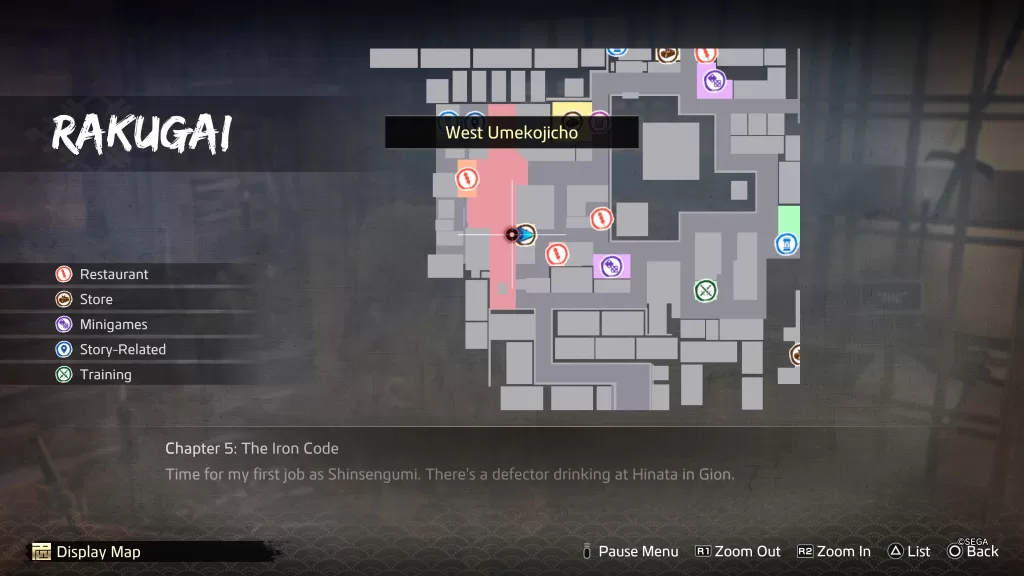
Rakugai
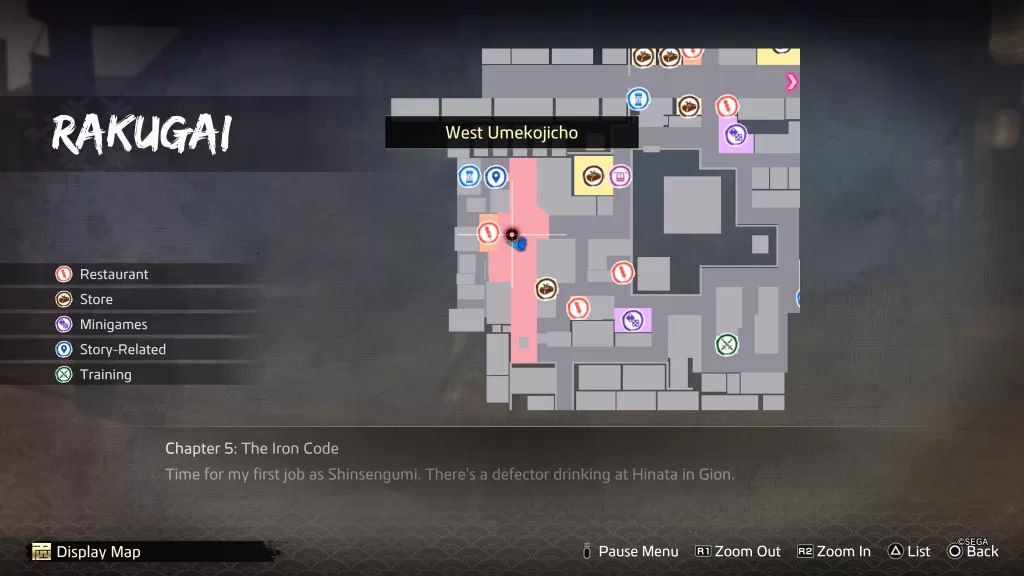
Arms Dealer
Location: West Umekojicho – At Rakugai Arms Dealer
To bond with the Arms Dealer, purchase something from his shop. Once the bond has been formed, you’ll need to return regularly and purchase something. About halfway through with the bonding, a cutscene will trigger during which he’ll ask you what living means. Choose “We live so that we can die.” Purchase some more items. He’ll eventually ask you what your greatest weapon is. Choose “Honor and chivalry.” As a reward for maxing out his bond, you’ll receive a Dragon Fang and he’ll open up his special stock to you! You’ll now be able to purchase a Worn Sword.
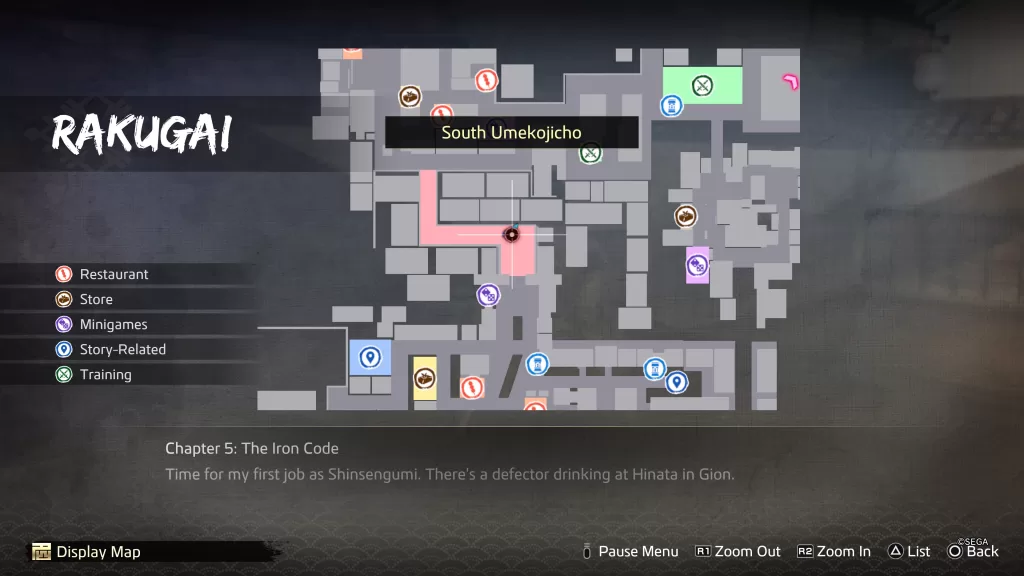
Battered Defender
Location: South Umekojicho – On street northeast of Utamaruya
To bond with the Battered Defender, complete The Battered Defender substory. Once the bond has been formed, visit him regularly and give him medicine (All-Purpose Medicine, Ointment, etc.). You will not receive any items from maxing out his bond.
Chicken Race Receptionist
Location: Umekojicho – At Chicken Racing
To bond with the Chicken Race Receptionist, complete your first chicken race. Once the bond has been formed, visit him regularly and play the minigame. Win or lose you’ll still earn bond points! When it’s time to max out his bond, you’ll have to select a chicken for him. It’s either Wondercrest or Tosan Pride. We chose Wondercrest and he won! As a reward, you’ll receive a Broken Compass.
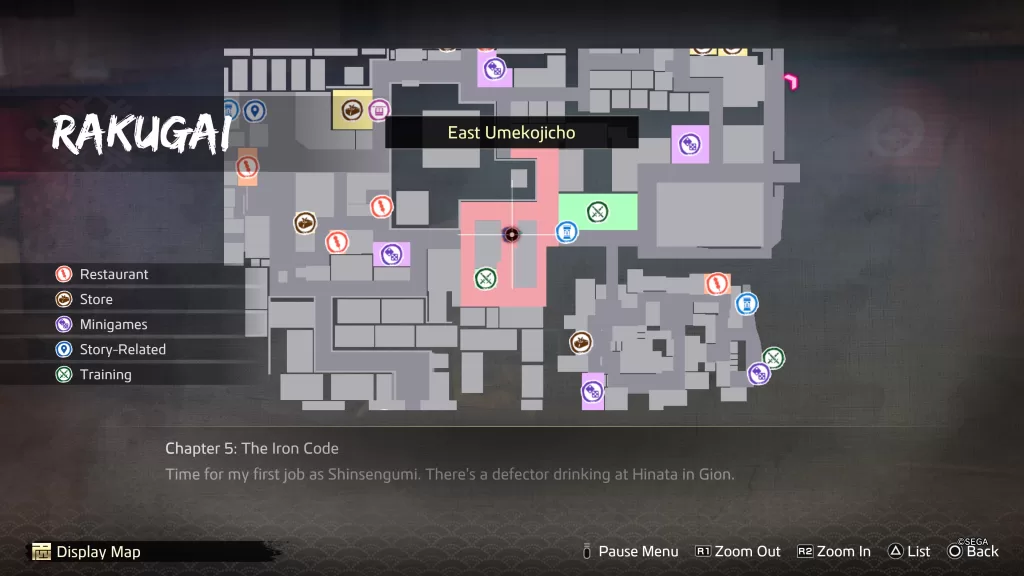
Hungry Cat
Location: East Umekojicho – On the northeastern side of Unyuan
To bond with the Hungry Cat, complete The Hungry Cat substory. Once the bond has been formed, visit the cat regularly and feed it fish. About halfway through, the cat will start to become picky about what fish it wants.
Sea Bream – Purchase from Uorin Fish Market in Fushimi for 2200 mon or catch yourself while fishing (Take Sea Fishing boat south of Teradaya in Fushimi to Fishing Banks. We caught several using Peerless Pole.)
Tuna – Fish for it. Take Sea Fishing boat south of Teradaya in Fushimi to East Coast. The Bluefin Tuna is a large shadow. (Not as big as the Great White Shark…next size down!) We caught it using the Peerless Pole.
Once the bond has been maxed out, you’ll get to name the cat and bring it home with you!
Mysterious Merchant
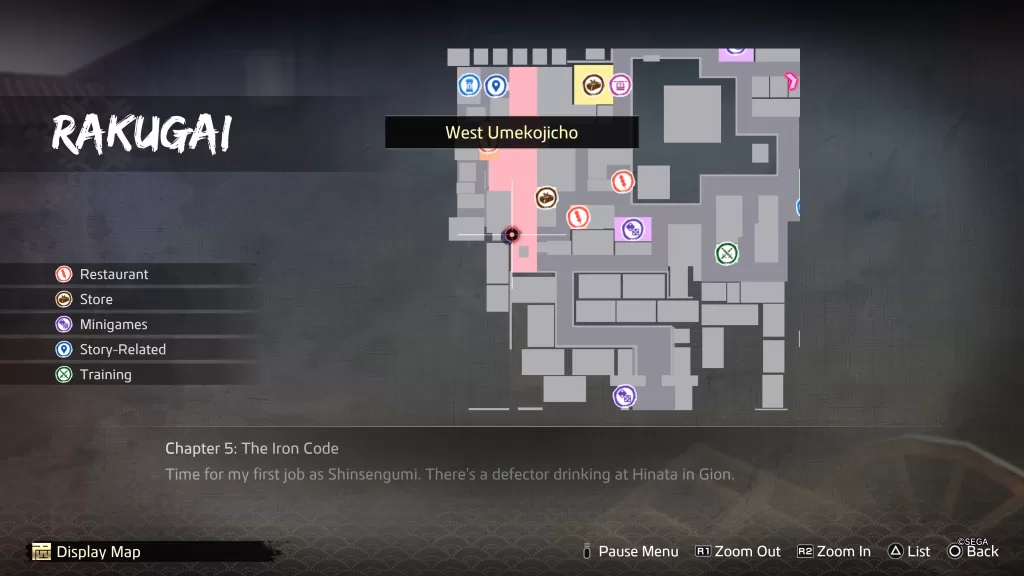
Location: West Umekojicho – Southwest of Rakugai Arms Dealer
To bond with the Mysterious Merchant, you’ll need to complete The Mysterious Merchant substory. Once the bond has been formed, you’ll need to visit the man regularly and give him what he requires.
Loincloth – You can purchase a Loincloth from the Rakuagai Arms Dealer for 1000 mon. As a reward for handing it over, you’ll receive 2 ryo.
Scrap Paper – You can get Scrap Paper by turning in Prize Tickets to the prize place in Fushimi. As a reward, you’ll receive 1 ryo.
Natto – Purchase at Fermented Goods or Rice Shop in Rakunai for 100 mon. As a reward, you’ll receive 3 ryo.
Ginseng – Purchase at General Goods in Rakunai for 1 ryo or grow it at Ryoma’s villa.
After you max out his bond, he’ll set up a shop there where you can purchase items!
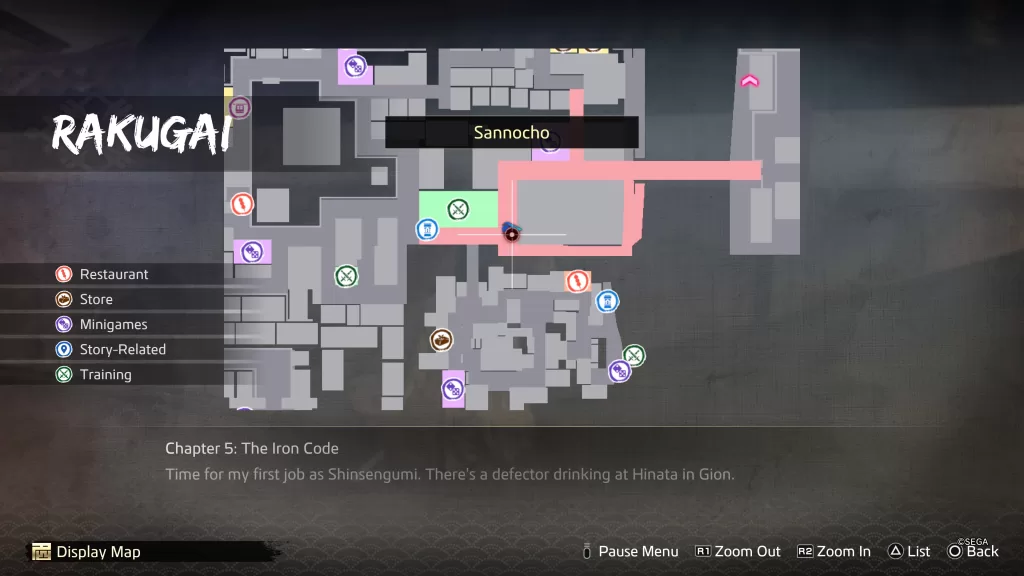
Sword Nut
Location: Sannocho – On the southeastern side of Scarecrow Chateau
To bond with the Sword Nut, complete The Sword Nut substory. Once the bond has been formed, he’ll want you to bring him the below swords. You can craft these swords at Kurogane Smithing. For where to find the items needed to craft these swords, click here!
Ebony Sword
Yaksha Blade
Vulpecula
King of Beasts
Once you show him all the swords, you’ll receive the Tunasmith (sword) as a reward.
Uji Tea Parlor Girl
Location: West Umekojicho – At Uji Tea Parlor
To bond with the Uji Tea Parlor Girl, purchase an item from Uji Tea Parlor. Once the bond has been formed, you’ll need to visit her regularly and purchase something. About three fourths of the way through, a cutscene will trigger during which she’ll tell you of troubles she’s been having with her scamming boyfriend. Wait awhile then return to her to see how it played out. As you approach, a cutscene will trigger followed by a fight. Defeat Shinsuke to max out her bond! You won’t receive any additional items for doing so.
Rakunai
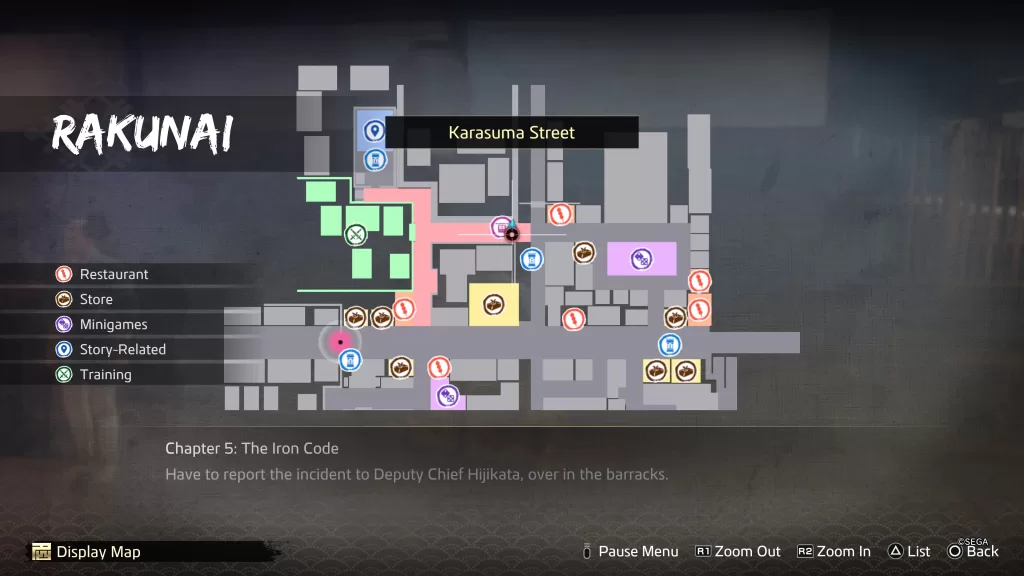
Akari
Location: Karasuma Street – At shrine north of Ginryu Dojo
To bond with Akari, speak with her at the shrine. Once the bond has been formed, return to the shrine maiden regularly and speak with her. Eventually, she’ll need some medicine. Hand over the All-Purpose Medicine. When you max out her bond, you’ll receive Akari’s Omusubi.
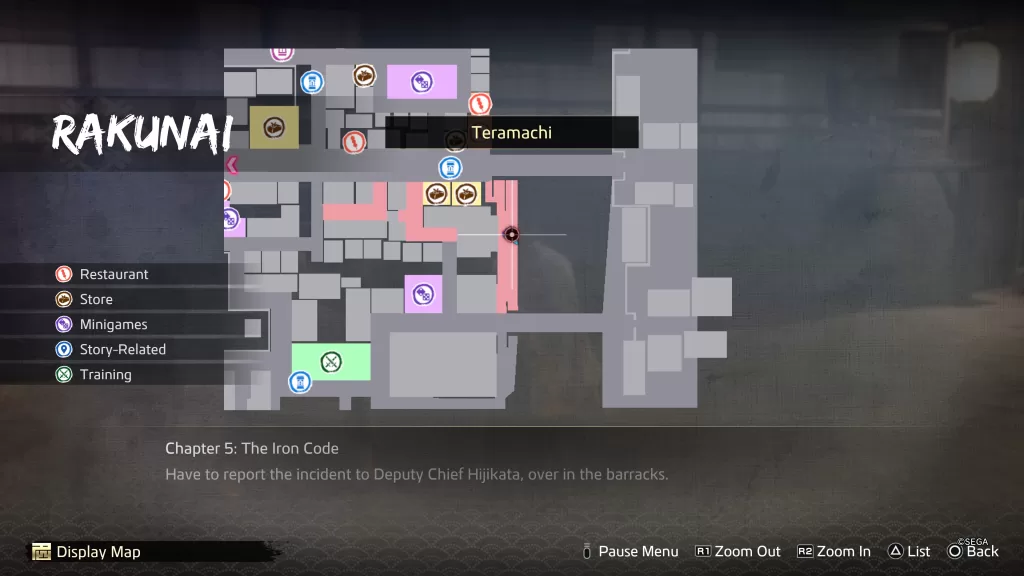
Barking Dog
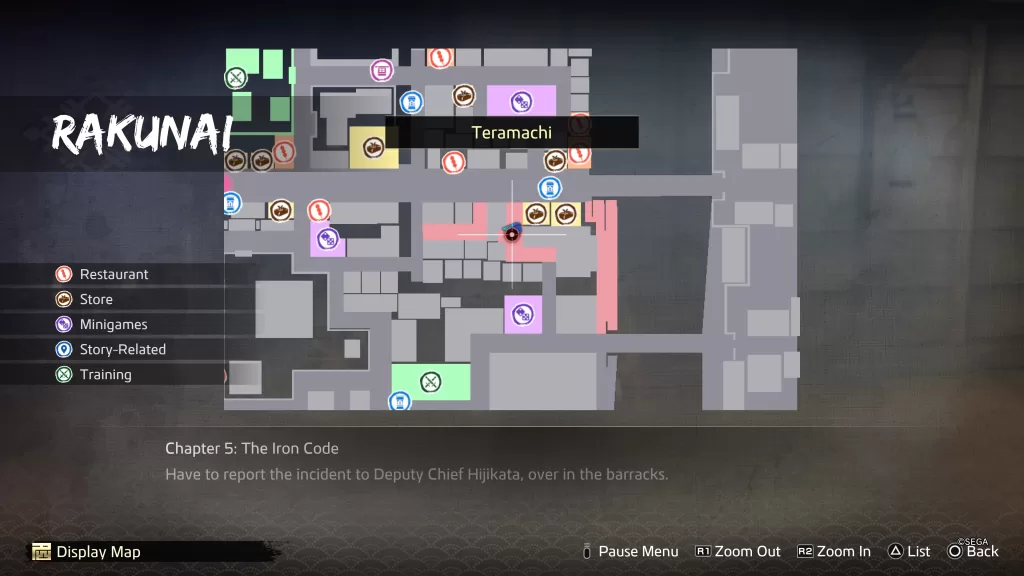
Location: Teramachi – On the southwestern side of Ebisu Pawn Rakunai
To bond with the Barking Dog, complete The Barking Dog substory. Once the bond has been formed, return regularly to give the dog a bone. When you max out its bond, you’ll get to name the dog and bring it home!
Don Quijote Employee
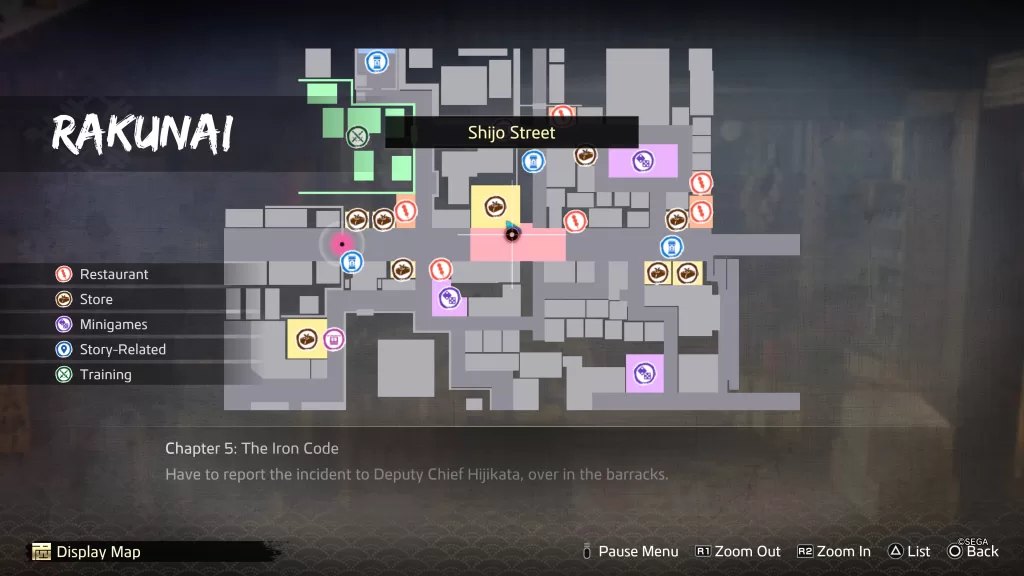
Location: Shijo Street – At Don Quijote
To bond with the Don Quijote Employee, purchase something from Don Quijote. Once the bond has been formed, return regularly and purchase something. About 3/4ths of the way through, he’ll tell you that he’s out of change. Attempt to exit the shop to trigger a cutscene. Exit the store then take a right and approach the side to find the rice bales. Head back inside and speak with the employee. For maxing out his bond, you’ll receive a Gold Plate.
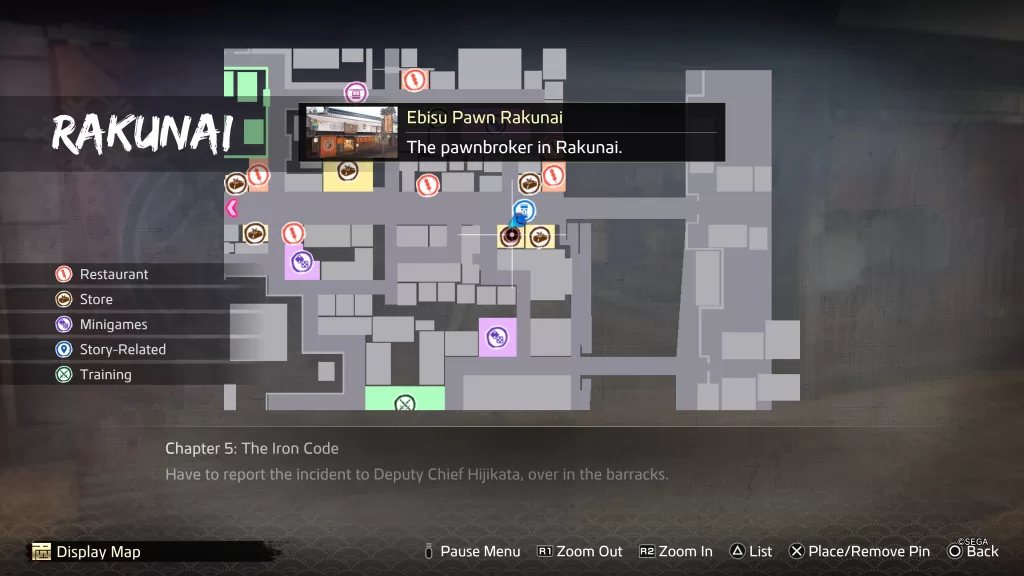
Ebisu Pawn Employee
Location: East Shijo Street – At Ebisu Pawn Rakunai
To bond with the Ebisu Pawn Employee, purchase something from Ebisu Pawn Rakunai. Once the bond has been formed, return regularly and purchase something from the Pawnbroker. About halfway through you’ll need to find someone for him. Speak with the Worn-Out Man on the west side of the Shogi Parlor in Rakunai. Return to the Pawnbroker to receive a Platinum Chunk.
Ecchudo Apothecary
Location: Kawaramachi – At Ecchudo Pharmarcy
To bond with the Ecchudo Apothecary, purchase something from the store. You’ll agree to test out his medicine. Speak with him and select the option to test out his medicine. Keep returning regularly and agree to test out his medicine. When you max out his bond, you’ll receive a Longevity Pill. He’ll also start selling them at his store!
Hanamaru Udon Employee
Location: East Shijo Street – At Hanamaru Udon
To bond with the Hanamaru Udon Employee, purchase a meal at Hanamaru Udon. Once the bond has been formed, you’ll need to visit this restaurant regularly and purchase something. When you max out his bond, a new item of Beef Udon will be added to his menu. You can purchase it for 500 mon.
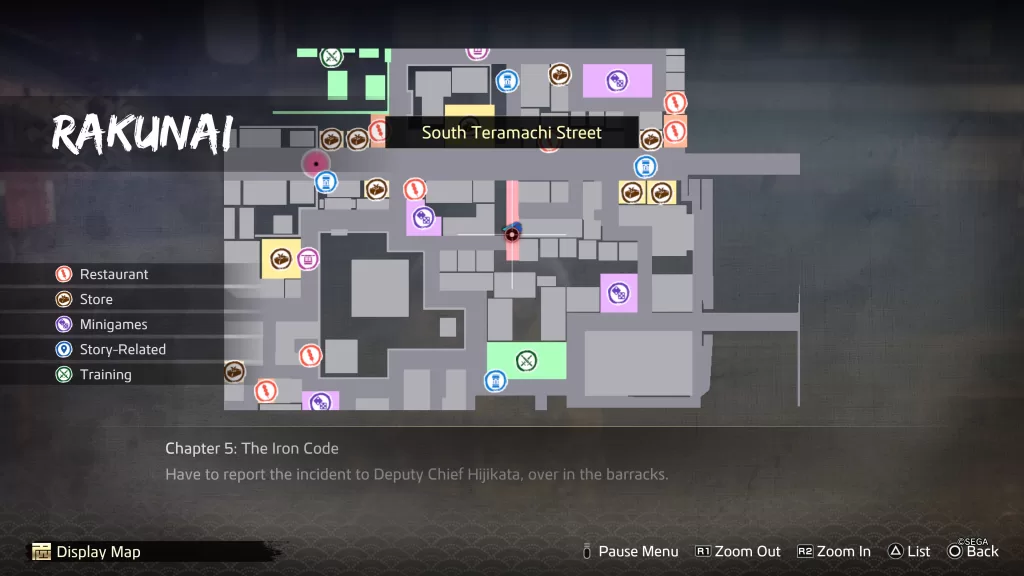
Hungry Sumo Wrestler
Location: South Teramachi Street – East of the Shogi Parlor
To bond with the Hungry Sumo Wrestler, complete The Hungry Sumo Wrestler substory. Once the bond has been formed, return regularly to feed him. When you max out his bond, you won’t receive any items.
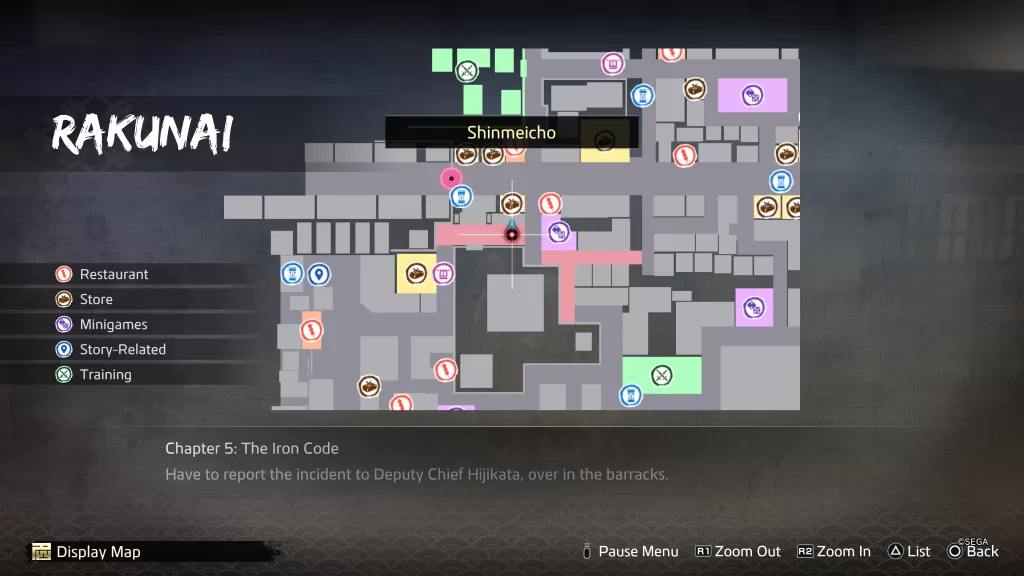
Injured Grandma
Location: Shinmeicho – Just south of Fermented Goods
To bond with the Injured Grandma, complete The Injured Grandma substory. Once the bond has been formed, you’ll need to visit her regularly and complete her tasks.
Yokan – She’ll give you 1,000 mon and ask you to pick some up for her. Purchase it from Don Quijote in Rakunai for 500 mon.
You will not receive any items for maxing out her bond.
Love-Starved Husband
Location: Teramachi – Along the river southeast of the General Goods store
To bond with the Love-Starved Husband, complete The Love-Starved Husband substory. Once the bond has been formed, visit him regularly and bring him dishes to eat. When you max out the bond, you won’t receive any items.
Lucky Cat
Location: Karasuma Street – On the northeastern side of Ginryu Dojo
To bond with the Lucky Cat, complete The Lucky Cat substory. Once the bond has been formed, return regularly to the cat and give it money. In return it will give you items!
2000 mon – Sober Capsule
3000 mon – Shunga
5000 mon – 4000 mon
1 ryo – You’ll follow the cat then fight the scammers. Afterwards, you’ll receive 5 ryo!
When its bond maxes out, you’ll be able to name the cat and take it home!
Maijo-sensei
Location: Kawaramachi – At Nichibuza
To bond with Maijo-Sensei, head into the school and play the dancing minigame! Once the bond has been formed, return regularly and dance your heart out! When you max out her bond, you’ll receive a Solid Wood.
Momokawa Brothers
Location: East Shijo Street – At Shippoku Momokawa
To bond with the Momokawa Brothers, purchase a dish from Shippoku Momokawa. Once the bond has been formed, return regularly and purchase a dish. A little over halfway through, they’ll ask you to judge their cooking competition. Keep eating at the restaurant until they have finished preparing for the competition. You’ll have to make a choice between the Japanese, Chinese or Western dish. No matter your choice the other brother will speak up about his dish and you’ll need to reconsider, choosing one of the two remaining options. Again make your selection for the third brother to speak up. You’ll need to pick the remaining dish. Continue with the dialog prompts. As a reward for maxing out their bond, you’ll receive a Broken Compass.
Oblivious Woman
Location: Karasuma Street – Next to the Palanquin Bearers just west of Sushi Zanmai
To bond with the Obvious Woman, complete The Oblivious Woman substory. Once the bond has been formed, visit her regularly and give her some vegetables. When you max out her bond, you’ll receive 3 ryo!
Shinto Priest
Location: Karasuma Street – At shrine north of Ginryu Dojo
To bond with the Shinto Priest interact with him at the shrine. Once the bond has been formed, visit him regularly to purchase his items. When it comes time to max out his bond, you’ll have to perform a chase. During this chase the man will hide in a barrel and you’ll need to find him before time runs out! For us, he was in the barrel by the udon shop. You won’t receive any items for maxing out his bond.
Sushi Zanmai Chef
Location: Kawaramachi – At Sushi Zanmai
To bond with the Sushi Zanmai Chef, purchase a dish from Sushi Zanmai. Once the bond has been formed, return regularly and purchase an item. When you max out his bond, you will not receive any additional items.
In Like a Dragon: Ishin, you can complete various substories for rewards and virtue points. This guide covers the 8 Mukurogai substories!
The Bad Side of Town
Obtained: Approach area near the arms dealer
After the cutscene, defeat the ruffians to complete the substory.
Brawler for Hire
Obtained: Approach the man standing near a torch in the northern part of Mukurogai
The cutscene will lead to a fight against the troublesome man as the Corrupt Official once again has someone else fighting his battles for him. Defeat Sumi to complete the quest.
Brawler Incarnate
Obtained: During Chapter 6, approach the tattooed brawler in the northern part of Mukurogai First Floor
When the cutscene plays out, speak with Sumi Bozu and accept his challenge. Afterwards, defeat him in battle! Afterwards, the substory will end.
Brawler Enlightened
Obtained: Speak with the tattoed brawler in the northern part of Mukurogai First Floor
Speak with the brawler when you’re ready to fight him. Defeat him in battle to end the substory.
Reward: Berserker Charm
Fallen Warrior’s Ghost
Obtained: During Chapter 6, approach the pair on the eastern side of Mukurogai First Floor
At night scope out the eastern side of Mukurogai along the river. When you approach the area, a cutscene will trigger leading to a fight. Defeat the ghost to complete the substory.
The Servile Beggar
Obtained: Speak with the Beggar between the arms dealer and Paradise
The Beggar requires food. We offered him a Sweet Potato to complete the substory.
Reward: Bond with Servile Beggar
The Trash Dealer
Obtained: Speak with the Suspicious Man standing near the northwestern entrance
The Trash Dealer will require some of your junk. Hand over whatever you’d like to complete the substory!
Reward: Bond with Trash Dealer
The Injured Dog
Obtained: Approach the injured dog in the northern part of Mukurogai, west of the Paradise restaurant
To heal the injured pup, we gave it All-Purpose Medicine.
In Like a Dragon: Ishin, you can complete various substories for rewards and virtue points. This guide covers the 7 Other substories!
It’s What’s on the Inside
Obtained: Head through the arch west of the Otake Tea Parlor in Mibu
After witnessing the act of the Wandering Samurai, speak with him. Afterwards, follow him east into Rakunai. Continue heading to the eastern side of Rakunai where you’ll end up in Teramachi, which is just east of the General Goods store. Approach the river to find Suzu. You’ll need to encourage Aguri by saying “Have faith in Suzu”.
After witnessing the disturbing words of the scorned man, return to Mibu and make your way to the far western side of the area. When you approach the group, a cutscene will trigger followed by a fight against Ikesugi’s men. Defeat them all to complete the substory.
Reward: Gion Hood
Hope Blossoms Again
Obtained: Approach the elderly couple being confronted by the warrior to the west of Otake Tea Parlor in Mibu
After witnessing the despicable act of the warrior, the elderly man and woman will task you with finding a cherry blossom tree. Head to the boat in the southwestern corner of Fushimi and take it to Ryoma’s villa. Interact with the dead tree next to the jizo statue then return to the elderly couple in Mibu. Afterwards, the substory will complete.
A Warlord’s Ambition
Obtained: Cook 10 meals in Ryoma’s villa to trigger a cutscene
Agree to cook this warlord a meal then play the minigame to cook the fish. (We made two attempts at this substory. The first time we were just so-so for all 3 fish and were great each time for the second. The reward did not change!) After you finish cooking, the substory will complete!
Reward: Dragon Whisker
The Boy Who Cried Bear
Obtained: Approach the boy and his dad talking near the shrine on the western side of Mibu
After hearing their conversation, speak with the Bear Boy. A fight will then trigger. Dispatch of the bear to complete the substory.
Reward: Inviting Hat
Mama Ryoma
Obtained: Approach the group of 3 kids in Mibu
To stop their crying, agree to play house. As the mom, select the following options:
Vegetables, potatoes, and tofu
How was work?
When the “samurai” shows up, things get dark awfully fast. After the 2 kids take off, one will stay behind to talk to you. Defeat the Warrior to complete the substory.
The Amnesiac
Obtained: Approach the Incapacitated Man along the path leading to the Kiyomizu Temple
For this substory, you’ll need to give the man an item. We gave him the All-Purpose Medicine to complete the substory.
Reward: Dead Branch and form bond with the Amnesiac
The Boy Who Loves Veggies
Obtained: Speak with the boy to the east of the Otake Tea Parlor in Mibu
If you don’t have any veggies on you, head to the boat in the southwestern corner of Fushimi and take it to Ryoma’s villa. Plant and harvest some crops then return to the Veggie-Loving Boy in Mibu. We gave him Daikon, which he loved, and the substory completed.
In Like a Dragon: Ishin, you can complete various substories for rewards and virtue points. This guide covers the 12 Rakugai substories!
The Reclusive Son
Obtained: Look at the man and woman east of the Creepy Bar
After listening to the mother and son’s argument, speak with the woman to make sure she’s okay. Agree to speak with her son. Select whichever options you’d like! After the conversation, you’ll leave and Uchitaro will show up to save the day. Fight the scary men with Uchitaro to complete the substory.
Reward: Iron Gauntlets and Platinum Chunk
Palanquin Paladin
Obtained: During Chapter 6, approach the old man in front of the 2 Palanqin Bearers just south of the Shady Bar
When you’re ready, agree to keep Sayoko safe. You’ll then need to guard the Palanquin until it reaches its destination. You will fail if the Palanquin loses all durability so protect it well. When you reach the bridge, a cutscene will trigger during which Hayakaze will show up. Defeat him to complete the substory.
Reward: Crimson Bead
Can I Quote You on That?
Obtained: Approach the street just northwest of the Scarecrow Chateau
When you approach the area, a cutscene will trigger followed by a fight. Defeat the enemies then travel to Mibu near Shinsengumi Barracks. You’ll be asked several questions. The answers are as follows:
It’s my duty, nothing more.
Go home and be family men.
Someone I get along with.
It’s a path for true strength.
Maintain your innocence.
After the interview ends, so will the substory.
Sonno Joui
Obtained: Listen to the student and his foreign teacher speaking up the street north of the Shady Bar
After listening to their conversation, follow after the foreigner. You’ll find him near a shrine on the eastern side of Rakugai. Approach him to learn that his name is Creek. After the introductions are made, defeat the ruffians. Creek will then leave. You’ll find him in Mukurogai! More specifically, make your way to the upper east side of the area to find him staring at a wall. Speak with him for another altercation to trigger. Defeat the enemies once again to complete the substory.
Ee Ja Not Ka
Obtained: Approach the dancing group on Central Street
When you approach the group, a cutscene will trigger with an Old Woman. A fight will ensue with 6 ruffians. Take them all down to complete this substory!
Reward: Vermilion Fabric
Bluffin’ Up the Wrong Alley
Obtained: After progressing to Chapter 6, approach the men harassing the gambler in front of the Gambling Den on Sannocho Street.
When you approach the troublesome ronin, agree to step in. The cutscene will play out and everyone will disperse. Wait awhile then check back in with the gambler. After speaking to him, head south into Mukurogai. Speak with the gambler again near the entrance. Take out the group of enemies that appear. With some smart thinking on Haraguchi’s part, you’ll be saved! When the cutscene concludes, so will the substory.
The Panthers’ Playmaker
Obtained: After completing The Panthers’ Leading Man substory, return to Ryoma’s villa to receive a letter.
The letter will contain a challenge. Travel to the bridge east of the Gambling Den in Rakugai to find the Black Panthers. Approach the group and speak with them when you’re ready to begin. After you successfully deliver all the letters the quickest, the substory will end.
The Sword Nut
Obtained: Approach the Odd Man on the east side of the Scarecrow Chateau
Speaking with him will complete the substory. You’ll learn that if you bring him swords, he’ll reward you! He wants to first see an Ebony Sword.
Reward: Bond with Sword Nut
The Battered Defender
Obtained: Speak with the Suspicious Man standing on South Umekojicho street, which is just north of Utamaruya
This man will jump to save the cute woman from disgrace. Unfortunately, he’s not a great fighter and gets hurt in the process. Hand over some medicine to help him to complete the substory.
Reward: Bond with Battered Defender
The Mysterious Merchant
Obtained: Approach the wall southwest of the Rakugai Arms Dealer
A man will speak to you from behind the wall and requests that you get him 10 tomatoes. These tomatoes can be harvested at Ryoma’s villa. To unlock tomatoes, you’ll need to spend your virtue points at a shrine. Tomatoes cost 1000 virtue to unlock. Once you can grow tomatoes, head to the hoes next to the field and interact with them to begin your Farm Management. Select a dirt square then choose tomatoes to plant them. Since the tomatoes take up a large area, you might need to pull the other crops you have planted first. Once you have 10 tomatoes, return to the Mysterious Merchant to hand them over to complete the substory.
Reward: 2 ryo and bond with Mysterious Merchant
The Hungry Cat
Obtained: Interact with the black cat just northeast up the street from Unyuan in East Umekoicho
This poor kitty is hungry so feed it! You can either purchase fish from a store or fish for one yourself! We were able to give it a Freshwater Eel or Rainbow Trout. After feeding the cat, the substory will complete.
Reward: Bond with Hungry Cat
The Spitfire Town Protector
Obtained: Pass by the arguing couple on Umekojicho street
After the cutscene, a woman will show up to save her client. You’ll of course help so defeat the ruffians to learn the truth of Bunkichi and Okiku’s situation. Yae will scold her client then speak with you to complete the substory.
In Like a Dragon: Ishin, you can complete various substories for rewards and virtue points. This guide covers the 22 Fushimi substories!
Death of the Author
Obtained: Enter the inn and make your way up the stairs. Head right, passing your room and follow the hallway. Enter the room at the end where a man is shouting.
For this substory, you’ll be asked to choose between a cat, underdog or a pig. Choose “cat”!
You’ll then be kicked out of the room as he has become inspired! Check back on him after some time passes. Natsumi will give you a reward for the success of his novel! This time he’ll ask you for the nickname of his schoolteacher character. Choose “Botch-chan”!
Once again you’ll leave then wait for some time to pass then tie in with him. He had another runaway success! You’ll receive another reward! For the next idea, he’ll ask you to come up with the title for the book. Choose “Heart”!
Yet again, wait for some time to pass then check back on the author. He’ll give you another reward and the substory will complete.
Reward: Broken Compass, Fine Silk Fabric, European Fabric
A Clean Streak
Obtained: Approach the bathhouse across the street from Fukufuku Pub
Agree to head inside the bathhouse. When you’re done with your soak, you’ll find your clothes stolen! Chase after the thief and capture him. Due to a misunderstanding, you’ll need to run back to the bathhouse without being captured yourself! Do so to complete the substory.
Reward: Crystal
A Man and His Sack
Obtained: Look at the people lined up for sushi across the street from General Goods
Wait in line to see what’s so great about the inari sushi. It will sell out before it’s your turn so wait some time then return. Again a line will have formed. Wait in it again. When it finally reaches your turn, they’ll have sold out again! NOOOOO!!! Once again, wait for some time to pass then check back. Wait in line when you’re able. You’ll finally receive your sushi sack!! Unfortunately a thief has other plans for it. Chase after and capture him. He’s a bit tricky to snag. You must time it when you press X (your sprint button)! Once you capture him, the substory will finally complete!
All in the Hips
Obtained: Purchase food at Umai Udon. Afterwards, speak with the shop owner and order udon.
Once you begin this substory, you’ll partake in a minigame. When you complete the game, the substory will end.
Reward: 10% of sales you earned
Invasion of the Black Ships?
Obtained: During Chapter 6, approach the pair on the dock in the southern part of the area
When you approach the pair, you’ll learn about black ships that are causing absolute chaos. Leave then return to the spot to find some commotion occurring at the dock. When you learn the man from the black boat is seasick, speak with the onlooker wearing a blue top. Afterwards, speak with the man from the black ship and give him sake. Since that idea didn’t work, speak with the woman onlooker near the waterwheel. She’ll suggest exercising the seasick man. Return to the man from the black ship and help him sweat it out. For this, you’ll need to defeat him in battle. For the next suggestion from an onlooker, head east and speak with the old man. He’ll suggest umeboshi as the cure for seasickness. If you don’t have any on you, you can head to the Ichikura General Goods store in Fushimi and purchase some for 800 mon. Return to the man from the boat and give him the umeboshi. Finally something that worked!! During the long cutscene, you’ll need to fight a group of extremists that show up. Once you do, the substory will complete.
Reward: Precise Machinery
It’s a Long Story
Obtained: Approach the two women standing on the west side of Hanako
When you’re ready, speak with Sakiko and agree to hear her out. The answers to her quiz are as follows:
Bamboo shoots
Outside a tea shop
Of course – it’s Sakiko
Once you answer all the questions, the substory will complete!
Reward: Gold Seal
It’s a Long Story: The Final Chapter
Obtained: Speak with Sakiko standing on the west side of Hanako
Once you speak with her, she’ll begin talking again. The answers to her quiz are as follows:
Red, white, and green
Amazake
Sumire
When you answer all the questions, the substory will complete!
Reward: Tear of the Dragon
It’s a Long Story: Epilogue
Obtained: Speak with Sakiko standing on the west side of Hanako
Once you speak with her, she’ll begin talking again. The answers to her quiz are as follows:
A scarecrow
Pickled daikon
A tuna
When you answer all the questions, the substory will complete!
Reward: Golden Medicine Case
Scented Water
Obtained: Speak with the Lovestruck Woman next to the ferryman south of Komaki Dojo
Offer to purchase the perfume in her steed. She’ll thank you and give you 3 ryo for the perfume. Travel to Mukurogai. Once there, head to the southeastern side of the upper level to trigger a cutscene where you find a man who could potentially be the merchant who sells the perfume. Speak with him then defeat him in battle. Afterwards, you’ll be given the perfume for free but will need to run away!! Follow the pink dots on the minimap until you make your way all the way back to the woman. If you get nabbed, follow the prompts to break free! When you reach the woman, the substory will complete!
Reward: 3 ryo
Ee Ja Nai Ka
Obtained: Approach the large group of dancers outside of Ebisu Pawn Fushimi
When you approach the social protestors, a cutscene will trigger followed by a fight against the Troublesome Men, Nakamura and Maeda. Defeating them will complete the substory!
Reward: Exquisite Cogwheel
The Way of the Sammerai
Obtained: Approach the men in front of the Dojo in Yashikimachi
You’ll find Tom, an American, who wants to learn the way of the samurai. Agree to train him then beat him up! Tom decides that he truly does want to become a samurai so check back with him after some time passes to see how he has progressed with his training. When he appears in front of the Dojo, speak with him and agree to train. Once again, defeat him in combat then wait awhile and return to check on Tom. Some kids will be making fun of him but he’s still ready to train so spar with him. Doubt will creep back up in Tom and says he won’t return for awhile. Head to the southern part of Fushimi near the fish market to find a samurai harassing a group of children. Tom will jump in to save them. A horde of troublemakers will back up the child-hating samurai so we’ll cut in to even the odds. Dispatch of the men to complete the substory
Last Stand of the Panthers
Obtained: Approach the Black Panther standing on the southern side of Teradaya
Just like all the other substories of this questline, you’ll need to complete the deliveries before the Black Panther. Do so to complete the substory.
Reward: Great Serpent Skin
The Desperate Fisherman
Obtained: Approach the Fisherman by the water south of Teradaya
This poor guy made a promise to his wife that he’d stop fishing if he didn’t bring anything home. To help him, you can either purchase a fish from the fish market or fish for one yourself. Once you’ve gotten one, hand it over to complete the substory.
Reward: Bond with Desperate Fisherman
The Junk Boy
Obtained: Approach the boy talking to himself on Kuramachi Street just north of Teradaya during Chapter 4
The boy will ask you for something he can have to exchange with his friends for the spinning top. Agree to hand something over and you’ll be able to select an items from your inventory. We gave him a Konpeito as it is a sugar candy that is quite popular among children. He was extremely happy then ran off to show his friends and the substory ended.
Reward: Bond with Junk Boy
The Wood Cutter
Obtained: Interact with the old man sitting by the wood chopping station
Agree to help the old man out with chopping wood. You’ll only need to chop 20 wood in the minigame, however, there are Diligence Records for doing more (100 & 300)! Whenever you’re ready to stop, press O. The substory will then complete!
Reward: Bond with Wood Cutter
The Frequently Lost Courier
Obtained: Speak with the man standing next to the jizo statue south of Komaki Dojo
This courier was looking for directions to Fushimi Ichibangai. After instructing him on how to get there, he’ll run off. Wait some time then return to this spot. He’ll be back so speak with him to learn that he got lost again. You’ll instruct him again. Wait awhile then come back to this spot to check up on the courier. He made it thankfully but is worried about all the other packages he has to deliver. To help him avoid damaging his family’s reputation, we agree to assist with the deliveries. You’ll receive the Courier’s Parcel and will be instructed to deliver the package to Kankichi in Yashikimachi. The substory will then complete!
If you deliver the package to the man, you’ll receive 5,000 mon as a reward! He can be found by the jizo statue just north of Hanako. After delivering the package, make sure to report back to the courier.
You’ll receive another package. This time, it’ll be going to Yakichi in North Umekojicho in Rakugai. You can find Yakichi just east of the Uji Tea Parlor. Hand him the parcel to receive 6,000 mon. Just like before, report back to the courier when you’re done!
Once again, you’ll have another delivery to make. This time it’s to Hatsutaro in Umekojicho. He can be found at the Shady Bar in Rakugai. Hand him the parcel to receive 6,000 mon. As always, report back to the courier when you’re done!
For the next delivery, you’ll need to find Kimi in Sannocho. She can be found on the east side of the Scarecrow Chateau in Rakugai. Hand her the parcel to receive 8,000 mon. Report back to the courier when you’re able.
For this delivery, travel to the second floor of Mukurogai and look for Kyuzo. He can be found standing south of the Tachibanagumi HQ. Hand him the parcel to receive 1 ryo. Report back to the courier when you’re done!
This next delivery will have you traveling along the riverside in Mukurogai. You can find Sadakichi standing next to the river on the first level of Mukurogai near the cannon guy. Hand him the parcel to receive 7000 mon. Report back to the courier when you’re done! Afterwards, the bond will max out. You will not receive any additional items.
Reward: Bond with Frequently Lost Courier
The Patient Dog
Obtained: Interact with the dog lying down just south of the Dojo
After you interact with the dog, feed it. If you don’t have anything on you, head to the General Store nearby and pick up a dish. After feeding the dog, the substory will complete.
Reward: Bond with Patient Dog
The Filthy Cat
Obtained: Look at the white cat sitting on the dock next to the boat in the southwestern corner of Fushimi that takes you to Ryoma’s villa
After interacting with the cat, the substory will end.
Reward: Bond with Filthy Cat
The Captain and the Curious
Obtained: Approach the Carefree Foreigner just northeast of the Umai Udon restaurant
For this substory, agree to have a drink. You’ll be introduced to Ernest Satow during the long cutscene that follows. When the cutscene completes, you’ll have to fight Kawakami Gensai. Once you defeat him, Satow will give you the Writings of an Amateur Historian. He’ll then ask us to find him memoirs, journals, etc.
In Like a Dragon: Ishin, you can complete various substories for rewards and virtue points. This guide covers the 19 Rakunai substories!
Nichibuza’s Newest Fan
Obtained: Approach the entrance of Nichibuza
After the brief cutscene, speak with the woman being harassed by the bandit near the entrance of Nichibuza. You’ll then need to defeat the ruffians. After doing so, the bandit and his associates will run away. Maijo will then invite you to a trial class. To pass, you’ll need to rack up 6,000 points during the minigame.
Deceitful Deity
Obtained: Approach the man on Karasuma Street near the Ginryu Dojo
Doshin will ask you to track down the Dark Ebisu who has been preying on the elderly. You can find the Dark Ebisu with an elderly person on Teramachi Street, which is the street south of Hanamaru Udon. After approaching the pair, a cutscene will trigger followed by a fight. Upon defeating the Dark Ebisu the substory will complete!
Who’s Entertaining Who?
Obtained: Speak with the woman in front of Shikokuya
Agree to entertain Kanda then travel to Watami, which is the restaurant west of Don Quijote. To entertain the man, you’ll start off by serenading him with a song. Play the minigame. Afterwards, he’ll ask how the picture spoke to you. Tell him “It was bold and virile.” You’ll then need to play the dancing minigame. He’ll then ask you what you find amazing. Say “It’s bold, yet elegant.” Afterwards, a fight will break out. Defeat the enemies to complete the substory.
Reward: Ancient Amulet
I’ll Miss You, Miho
Obtained: Approach the Ecchudo Pharmacy
As you approach the pharmacy, a boy will run into you then rush off to meet a girl nearby. When you gain control, approach the pair across the street to learn that Miho is moving. Once her father is finished speaking to her, talk to her to make sure she’s okay. She’ll ask a favor of you. Head off towards the temple in the northwest to find Shinta. Speak with him next to the shrine. Tell him you think she meant, “Thank you for caring about her.” and “You’re important to her.” Return to Miho’s house for the sendoff. You’ll engage in a chase to catch the palanquin. If you lose sight of it, check your mini map for the red arrow! After the kids farewell, the substory will complete.
Reward: Rainbow Fabric
Global Fraud
Obtained: Approach the west side of Teramachi street to trigger this substory during Chapter 3
For this substory, you’ll need to answer all the questions the students present you with. The answers are as follows:
Japan
The Great Qing
Country 4
After you answer all the questions, the substory will complete!
Reward: European Fabric
Talkin’ Tosa
Obtained: Speak with the man standing in the corner behind Nichibuza
For this substory, agree to help the man translate the letter. The correct translations are as follows:
It’s been a while
I
She means “you”
After the letter has been fully translated, you’ll be rewarded with Fine Silk Fabric! You’ll need to check back with him later after some time passes to continue the substory. He’ll have another letter to translate. The correct translations are as follows:
She means “is that every day?”
Her heart aches.
Meet soon
Once again, you’ll need to wait some time then check back in with him. He’ll have another letter. The correct translations are as follow:
Stumble and fall
Cowardly men
Tell her how you feel
With the final letter translated, Fujie’ll run off to Tosa to proclaim his love. Once more wait some time then check on him. You’ll learn that he’s getting hitched and the substory will complete! Make sure to collect the shiny object on the ground where Fujie was standing to receive An Account from Tosa.
Reward: Fine Silk Fabric, Platinum Chunk, Phoenix Feather
The Mochi Mystery
Obtained: Speak with the man addressing a group of people
After speaking with the Doshin, you’ll learn that two of the men in the group of five ate his delicious mochi. It’s up to you to determine who the culprits were! Speak with all 5 men and listen to their testimonies. Report back to the Doshin and tell him that you figured it out. The culprits are Higashihara and Minamino! After the cutscene, the substory will complete.
Reward: Godslayer’s Talisman
Ee Ja Nai for Justice
Obtained: Approach the dancing protestors on Shinmeicho Street
When you approach the noisy protestors, a cutscene will trigger with a Corrupt Official. The official of course will run off leaving you to deal with his body guards. Defeat them to complete the substory.
Reward: Tranquil Towel
The Unwilling Courier
Obtained: Approach the bridge east of the General Goods store
During a cutscene, a courier will yell at you to get out of the way. We stood firm and he of course ran into us. Afterwards, we agreed to deliver his last 6 letters to help him out. You’ll then go into a mini game where you have to make the 6 deliveries before time runs out. Once you complete it successfully, the substory will end.
Reward: Gold Seal
Enter the Black Panther Couriers
Obtained: Head to the center of the bridge east of the General Goods store
For this substory, you’ll need to deliver 10 letters before the other guy does. Keep in mind that when you get to a recipient, you can just press O then peace out! You don’t have to sit there until they finish their conversation. X is also helpful to sprint! Once you are successful, the substory will end.
The Panthers’ Leading Man
Obtained: Listen to the conversation between Kiyokawa and the Black Panther on the west side of Sushi Zanmai
Just like before, you’ll need to deliver 10 letters the fastest. Do so to complete the substory!
The Hungry Sumo Wrestler
Obtained: Approach the man lying down blocking the South Teramachi Street, which is southeast of Don Quijote
Upon approaching the man, you’ll learn that he is hungry. Hand over something for him to eat. If you don’t have anything on you, you can always run up the street to Don Quijote and purchase something. Once he eats, you’ll learn of his situation and the substory will complete.
Reward: Bond with Hungry Sumo Wrestler
The Love-Starved Husband
Obtained: Approach the man next to the river just west of the General Goods store
After starting this substory, eat a meal that you’ve prepared at your villa. Afterwards, the substory will complete.
Reward: Bond with Love-Starved Husband
The Oblivious Woman
Obtained: Approach the woman standing against a building next to the Palanquin Bearer on Karasuma Street, which is just west of Sushi Zanmai
After learning that the woman lost her purse, you’ll agree to give her some food. Speak with her again then hand over some food. We gave her a Sweet Potato! She liked it and the substory completed!
Reward: Vitality Pill and Bond with Oblivious Woman
The Injured Grandma
Obtained: Approach the elderly woman on the ground near the water on the eastern side of Rakunai
For this substory, select to carry her home. After the cutscene, the substory will complete.
Reward: Bond with Injured Grandma
The Barking Dog
Obtained: Approach the dog in the alley to the west of Ebisu Pawn Rakunai
After listening to the tale of the barking dog, you’ll be tasked with trying to stop it from barking. To do this, offer the pup a bone. If you don’t have one on you, check out our guide here on where you can purchase one.
Reward: Bond with Barking Dog
The Lucky Cat
Obtained: Speak with the cat near the dojo
After talking to the Lucky Cat, give it 1000 mon. It will run off then bring you back some Whitebait. You’ll give the Whitebait back to the cat and the substory completes.
Reward: Bond with Lucky Cat
The Spitfire Debt Collector
Obtained: Speak with Yae in front of the blacksmith’s shop
Once you speak with her, she’ll ask you for help in retrieving the ill woman’s husband. When you’re ready to help, speak with her again in front of the blacksmith’s. After a lengthy cutscene, you’ll have to fight the Scary Men. Once you defeat this group of enemies, Yae will free Zenji and the substory will complete.
Reward: 3 ryo
The Spitfire Lie Detector
Obtained: Approach Yae in front of the blacksmith’s shop after some time passes from completing The Spitfire Debt Collector
When you’re ready to jump into the action, speak with Yae. You’ll then begin a boss fight against Shinohara and his minions. Defeat them all to trigger a short cutscene. Afterwards, another boss fight will trigger. Defeat Ide and his minions. Another cutscene will follow triggering the completion of this substory.
In Like a Dragon: Ishin, you can eat at various restaurants around the world. For the I’ll Have One of Everything trophy, you’ll need to order at least one item at every restaurant! This is a guide on what food and drinks you can purchase from restaurants! Please note that the towns are listed in alphabetical order. For a guide on what items the stores sell, click here!
Fushimi
Hanako
This restaurant can be found on the southwestern side of town.
Item
Mon
Beer
630
Sake Hanako Muso
875
Red Wine with Ice
580
Green Tea
380
Split and Dried Mackerel
990
Dried Salmon Fillets
590
Broiled Saffron Cod
690
Shoyu and Bonito Onigiri
390
Chilled Tofu with Wasabi
490
Sake Steamed Clams
690
Bukkake Ikura Bowl
1290
Rolled Omelette
650
Fukufuku Pub
This restaurant can be found along the southern side of town.
Item
Mon
Doburoku
300
Fushimi Sake
600
Nada Sake
750
Potato Stew
280
Pickles
400
Boiled Tofu
580
Sobagaki
500
Umai Udon
This restaurant can be found in the central part of town.
Item
Mon
Tempura Udon
400
Tsukimi Udon
350
Kitsune Udon
300
Tanuki Udon
250
Daruma Eatery
This restaurant can be found on the northeastern side of town.
Item
Mon
Tosa Sake
500
Chestnut Shochu
450
Saijo Sake
700
Potato Sake
250
Inari Sushi
300
Katsuo Tataki
700
Whole Mackerel Sushi
700
Platter Dish
1500
Thieves’ Porridge
300
Pickled Eggplant
300
Chestnut Manju
300
Kuzukiri
380
Gion
Kasuga
Item
Mon
Fushimi Sake
600
Nada Sake
750
Saijo Sake
700
Satsuma Shochu
680
Grape Wine
2000
Tofu Dengaku
450
Grilled Conger
680
Pickles
400
Boiled Tofu
580
Kitchen Aoba
Item
Mon
Fushimi Sake
600
Nada Sake
750
Saijo Sake
700
Tofu Dengaku
450
Grilled Conger
680
Boiled Tofu
580
Sobagaki
500
Mibu
Otake Tea Parlor
Item
Mon
Amazake
250
Doburoku
300
Zenzai
400
Three Color Dango
300
Grilled Dango
300
Yomogi Manju
200
Warabimochi
400
Mukurogai
Paradise
Item
Mon
Pooled Sake
80
Doburoku
300
Monkey Booze
100
Ladies’ Sake
50
Mystery Meat Stew
80
Black Dango
50
Grilled Bugs
40
Fainting Stew
50
Secret Stew
100
Rakugai
Shady Bar
Item
Mon
Doburoku
300
Pooled Sake
80
Pickles
400
Mystery Meat Stew
80
Creepy Bar
Item
Mon
Potato Sake
250
Pooled Sake
80
Secret Stew
100
Mystery Meat Stew
80
Uji Tea Parlor
Item
Mon
Amazake
250
Zenzai
400
Three Color Dango
300
Ohagi
400
Kuzukiri
380
Rakunai
Watami
Item
Mon
Beer
513
Umeshu
418
Watami Sake
523
Watami Special Shochu
313
Green Tea
313
Pickled! Grilled! Thrilled! Mackerel
523
9-Piece Sashimi Meal
1498
Seared Squid
418
Wasabi and Cucumber Octopus
313
Stubborn as a Mule! Tofu
313
Fresh Vegetables with Special Wasabi Miso
418
Rolled Omelette
418
Grilled Chicken Skewers Platter
733
Kamatora
Item
Mon
Kamatora Mixed Pot
1480
Chicken Kamameshi
1280
Premium Kamameshi
1580
Unagi Mabushi
1980
Clam Kamameshi
1380
Sea Bream Kamameshi
1480
Hanamaru Udon
Item
Mon
Fresh-Out-the-Pot Udon
400
Bukkake Udon with Grated Daikon
400
Bukkake Udon with Soft-Boiled Egg
400
Kake Udon
230
Kitsune Udon
400
Oroshi Shoyu Udon
300
Sesame Inari
300
Sushi Zanmai
Item
Mon
Bluefin Five Ways Sushi
598
Seafood Chirashi Bowl
1554
Special Tuna Bowl
2940
Special Sushi Zanmai
3150
Tuna Zanmai
3150
Fish Market Platter
3129
Miso-Marinated Black Cod
840
Chawanmushi
525
Simmered Red Bream
1029
Fuji Soba
Item
Mon
Red Fuji Soba
270
Curry Katsudon
270
Red Ginger Tempura Soba
350
Croquette Soba
360
Tempura Soba
430
Special Fuji Soba
400
Niboshi Ramen
390
Katsudon
460
Shippoku Momokawa
Item
Price
Shippoku Matsu Set
2 ryo 0000 mon
Shippoku Take Set
1 ryo 8000 mon
Shippoku Ume Set
1 ryo 5000 mon
Tosa
Hama Tea Parlor
This restaurant can be found on the southwestern side of town.
Item
Mon
Chestnut Manju
300
Kuzukiri
380
Whole Mackerel Sushi
700
Yoi-Yoi
This restaurant can be found on the southern side of town.
In Like a Dragon: Ishin, you can purchase items from various shops around the world. This is a guide on where you can purchase items, materials and food! Please note that the towns are listed in alphabetical order. For a guide on what food the restaurants have, click here!
Fushimi
Ebisu Pawn Fushimi
This shop can be found on the northwestern side of town.
Item
Price
Sweet Potato Shochu
1000 mon
Iron Scrap
480 mon
Daifuku Mochi
300 mon
Dried Rice
150 mon
Nigirimeshi
200 mon
Ointment
300 mon
General Goods
This shop can be found south of Ebisu Pawn Fushimi on the western side of town.
Item
Price
Ointment
300 mon
Sober Capsule
2000 mon
Doburoku
800 mon
Yokan
500 mon
Ginkgo
200 mon
Fushimi Bar
This store can be found in the central part of town.
Item
Price
Shaoxing Wine
2000 mon
Fushimi Refined Sake
1300 mon
Itami Sake
1500 mon
Ichikura General Goods
This store can be found in the central part of town.
Item
Price
Exquisite Cogwheel
3750 mon
Precious Steel
1920 mon
Vitality Pill
1000 mon
Ointment
300 mon
Sober Capsule
2000 mon
Bait
500 mon
Quality Bait
1000 mon
Iron Scrap
480 mon
Misshapen Screw
600 mon
Grape Wine
5000 mon
Doburoku
800 mon
Sweet Potato Shochu
1000 mon
Umeboshi
800 mon
Hattai
100 mon
Ohagi
150 mon
Udon Flour
300 mon
Egg
200 mon
Flour Miller
This store can be found in the central part of town.
Item
Price
Udon Flour
300 mon
Tasshado Pharmacy
This store can be found on the eastern side of town.
Item
Price
Vitality Pill
1000 mon
Passion Pill
500 mon
All-Purpose Medicine
2000 mon
Sober Capsule
2000 mon
Fertilizer
500 mon
Udon Flour
300 mon
Egg
200 mon
Greengrocer
This store can be found on the southeastern side of town.
Item
Price
Cucumber
100 mon
Potato
150 mon
Onion
250 mon
Eggplant
300 mon
Green Onion
250 mon
Ginger
350 mon
Hot Pepper
500 mon
Strawberry
1000 mon
Uorin Fish Market
This store can be found on the southeastern side of town.
Item
Price
Sweetfish
400 mon
Squid
400 mon
Freshwater Eel
1000 mon
Electric Catfish
750 mon
Thread-Sail Filefish
300 mon
Tiger Prawn
500 mon
Common Octopus
600 mon
Conger Eel
900 mon
Scorpionfish
700 mon
Righteye Flounder
900 mon
Softshell Turtle
1500 mon
Rainbow Trout
1600 mon
Salmon
1500 mon
Sea Bream
2200 mon
Stringfish
4500 mon
Mukurogai
Arena
Item
Points
Vitality Pill
200
Bronze Hammer
4,800
Silver Hammer
30,000
Grinding Stone
500
Solid Wood
500
Silver Scrap
1,000
Lime Powder
1,000
Soft Lumber
1,000
Sturdy Lumber
2,000
Pearl
3,500
Driftwood
4,500
Carved Wooden Bear
5,000
Aquamarine
8,000
Killer’s Handcuffs
10,000
Thousand-Year Tree Branch
10,000
Marksman’s Fan
10,000
Gold Plate
30,000
Alertness Hood
50,000
Ebisu’s Eboshi
75,000
Golden Sword
125,000
Mahjong Spot
Item
Points
Ointment
300
Platinum Plate
150,000
Gold Plate
100,000
Silver Plate
13,000
Bronze Plate
1,000
Iron Plate
100
Doburoku
800
Mukurogai Arms Dealer
Item
Price
Nameless Sword
1000 mon
Ivory Sword
5500 mon
Missilecutter
3 ryo 3000 mon
Light of Heaven
8 ryo 47000 mon
Cannon
1000 mon
Odachi
1000 mon
Battle-axe
3 ryo 3000 mon
Domestic Revolver
1000 mon
Watershot
5500 mon
Cloudy Skies
5500 mon
Flame Rounds
1000 mon
Loincloth
1000 mon
Rakugai
Gambling Den
Item
Points
Ointment
3
Platinum Plate
1,500
Gold Plate
1,000
Silver Plate
130
Bronze Plate
130
Iron Plate
1
Silver Hammer
1,500
Jelly Blade
50,000
Golden Gun
100,000
Wooden Gun
10,000
Rakugai Arms Dealer
Item
Price
Bundle Blade
1000 mon
Handy Blade
5500 mon
Radiant Drunkard
1 ryo 3750 mon
Straight Spear
1000 mon
Important Revolver
1000 mon
High Revolver
5500 mon
White Headband
1000 mon
Leather Breastplate
1000 mon
Loincloth
1000 mon
Leather Gauntlets
1000 mon
Mysterious Merchant Shop
Location: West Umekojicho – Southwest of the Rakugai Arms Dealer
*The Mysterious Foreigner’s shop does not show up on the map and only becomes available after maxing out his bond.
Item
Price
Inari Sushi
200 mon
Grape Wine
5000 mon
Shunga
100 mon
Picture of a Ghost
2700 mon
Firework Ball
1200 mon
Elegant Hair Ornament
7500 mon
Tunasmith
1000 mon
Doll on a Stick
1000 mon
Cannon
1000 mon
Horsechopper
3 ryo 3000 mon
Peashooter
1 ryo 3750 mon
Herculean Strength Emblem
3 ryo 3000 mon
Loincloth
1000 mon
Rakunai
Kurogane Smithing
Item
Price
Iron Scrap
480 mon
Misshapen Screw
600 mon
Dead Branch
840 mon
Quality Hide
720 mon
Iron Hammer
2800 mon
Volcanic Rock Fragment
1200 mon
Lime Powder
2700 mon
Crooked Magnet
1200 mon
Lead Chunk
4800 mon
Fermented Goods
Item
Price
Umeboshi
800 mon
Natto
100 mon
Brewery
Item
Price
Itami Sake
1500 mon
Itami Morohaku
1800 mon
Rice Shop
Item
Price
Dried Rice
150 mon
Nigirimeshi
200 mon
Ohagi
150 mon
Natto
100 mon
Don Quijote
Item
Price
Sweet Potato Shochu
1000 mon
Nada Refined Sake
1500 mon
Itami Sake
1500 mon
Fushimi Refined Sake
1300 mon
Doburoku
800 mon
Vitality Pill
1000 mon
Ointment
300 mon
Sober Capsule
2000 mon
Daifuku Mochi
300 mon
Yomogi Manju
250 mon
Konpeito
500 mon
Bento Lunch Set
1000 mon
Koshi Bento
300 mon
Inari Sushi
200 mon
Dried Rice
150 mon
Hattai
100 mon
Ohagi
150 mon
Rakugan
400 mon
Yokan
500 mon
Orange
50 mon
Persimmon
60 mon
Fig
80 mon
Roasted Chestnut
100 mon
Egg
200 mon
Honey
500 mon
Ginkgo
200 mon
Out-of-season Plum
600 mon
Umeboshi
800 mon
Precious Steel
1920 mon
Exquisite Cogwheel
3750 mon
Iron Scrap
480 mon
Misshapen Screw
600 mon
Charcoal
300 mon
Ceramic Sake Bottle
1200 mon
Ecchudo Pharmacy
Item
Price
Vitality Pill
1000 mon
Deluxe Vitality Pill
1500 mon
Passion Pill
500 mon
Deluxe Passion Pill
1000 mon
All-Purpose Medicine
2000 mon
Deluxe All-Purpose Medicine
3500 mon
Sober Capsule
2000 mon
Shogoin Yatsuhashi
Item
Price
Shogin Yatsuhashi (with Signature Handbag)
525 mon
Shogin Yatsuhashi (48 pieces)
1050 mon
Shogin Shimo No Hashi (with Signature Handbag)
525 mon
Shogoin Manju (6 pieces)
630 mon
General Goods
Item
Price
Hattai
100 mon
Rakugan
400 mon
Orange
50 mon
Persimmon
60 mon
Fig
80 mon
Roasted Chestnut
100 mon
Ginseng
1 ryo 0000 mon
Ebisu Pawn Rakunai
Item
Price
Nada Refined Sake
1500 mon
Iron Scrap
480 mon
Konpeito
500 mon
Precious Steel
1920 mon
Ointment
300 mon
Special Bait
2000 mon
Top-grade Bait
5000 mon
Bone
100 mon
Tosa
Chitose Provisions
This store can be found on the southern side of town.
Item
Price
Ointment
300 mon
Dried Rice
150 mon
Nigirimeshi
200 mon
Doburoku
800 mon
Uomi Fish Market
This store can be found on the southern side of town.
Click here for a guide on the food and drinks each restaurant sells! For the I’ll Have One of Everything trophy, you’ll need to order at least one item at every restaurant!
Stores
Click here for a guide on the items each store sells!
Substories
In Like a Dragon: Ishin, you can complete various substories for rewards and virtue points. Below are guides on all of these substories!
This site uses cookies. By continuing to use this website, you are giving consent to cookies being used. For more information on cookies, view our Privacy Policy.OkPrivacy Policy