Welcome to NGB and our Baldur’s Gate III walkthrough for The Blade of Frontiers quest! This guide will cover everything you need to know so you can easily complete the quest.
If you need help with a specific objective, please refer to our Quick Links section to quickly find the information you need!
BG3 Quick Links
- How to Begin The Blade of Frontiers Quest
- The Blade of Frontiers Walkthrough
- Additional Baldur's Gate III Guides
How to Begin The Blade of Frontiers Quest
The Blade of Frontiers is Wyll’s companion quest in Baldur’s Gate III. You’ll receive this quest automatically after allowing the famous hero to join your party when encountering him at the Druids’ Grove, provided he survived the initial goblin attack at the front gates.
How to Recruit Wyll

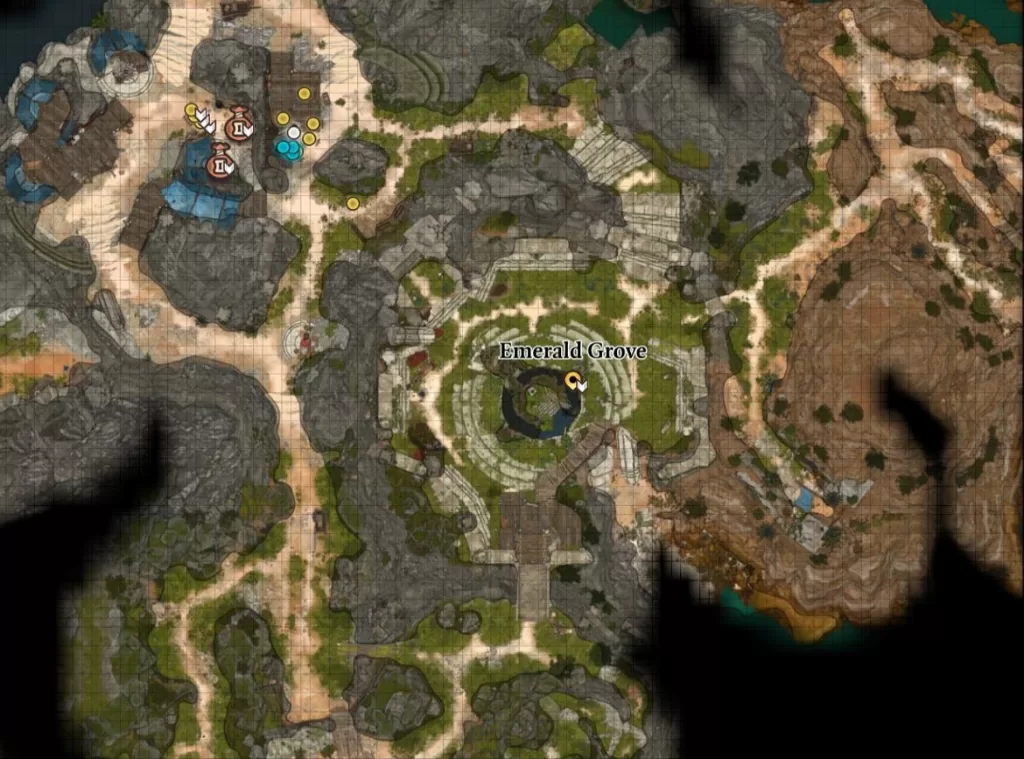
You’ll most likely meet Wyll at the Emerald Grove during the goblin attack upon your initial arrival. He’s the one who jumped off the gate to enter the fray. The first thing you’ll need to do if you want to recruit Wyll is make sure he doesn’t die during the battle.
When that’s done, you can find him in the hollow of the grove training some young tieflings.
Alternatively, if you found Karlach first, Wyll will show up to end her. You can then convince him to stop and join you there, too.
Speak with him to trigger another mind-melding session. You can then probe him for info on a devil he’s tracking and ask if he wants to join you to find a cure for the mind flayer in your head.
The Blade of Frontiers Walkthrough
Hunt Down Karlach
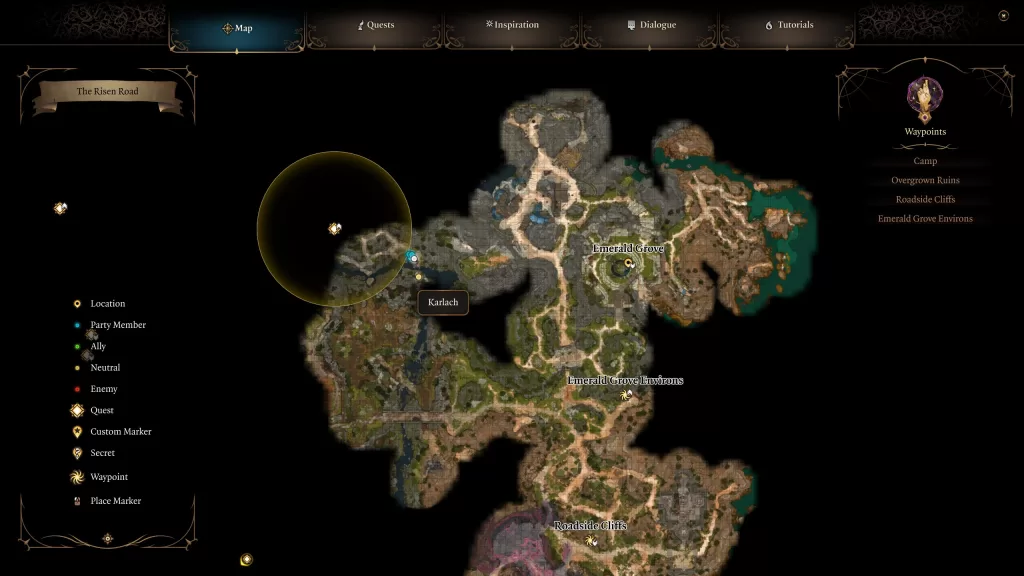
As Wyll mentioned previously, he is on a quest to hunt down and kill the devil, Karlach. You’ll want to head west of Emerald Grove to The Risen Road to find her. She’ll be standing on a rock across a fallen tree bridge along the river.

Speak to her while Wyll is in the party to start up a conversation. You’ll learn that Karlach was forced to serve against her will and wants to go home. You’ll then have a choice to make. You can let Wyll kill her, which leads to a fight against Karlach, or you can convince him to stay his blade.
Doing so will present you with the opportunity to recruit Karlach. Either way, speak with him afterward. (We chose to recruit Karlach).
Rest at Camp
Head back to camp and do a Full Rest. This will trigger an event where a devil will appear in the camp. She’ll introduce herself as Mizora, Wyll’s patron, and come to punish him for not killing Karlach.
If you stand up for Karlach, you’ll get approval from almost everyone. Mizora will then leave the camp, giving you time to speak with Wyll.

The Grand Duke
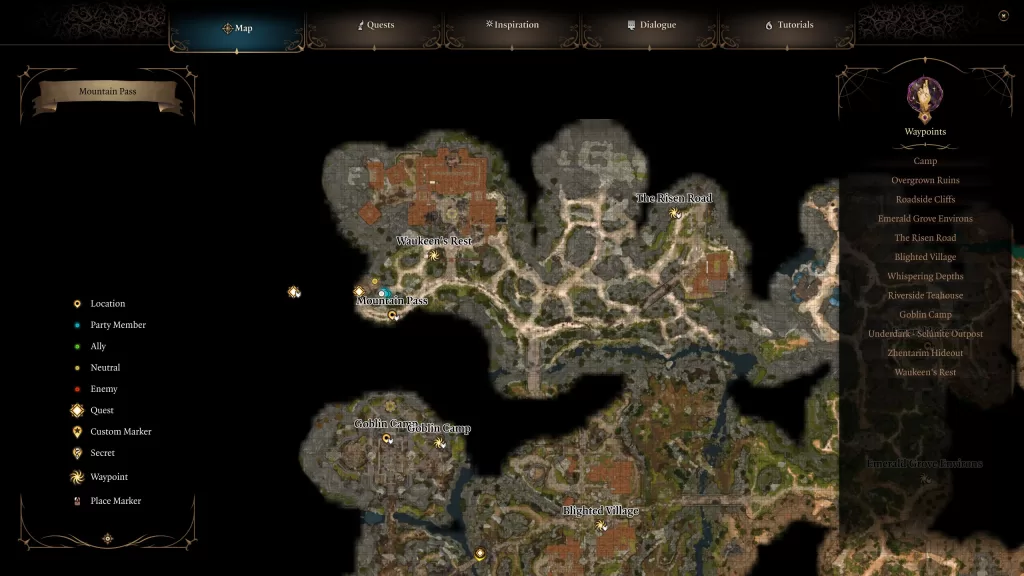
You’ll need to travel to Waukeen’s Rest to receive this objective. You can find it on the northwestern part of the map west of the Risen Road.

Once there, speak with Gauntlet Dain and persuade her to tell you what happened. She’ll respond that the Grand Duke was taken and the place burned to the ground. (When I did this Wyll was not in my party).
Travel back to the camp and speak with Wyll. Mention the duke, and he will freak out, then tell you that the Grand Duke is his father. You can ask him more about his background, but promise you’ll look for him.
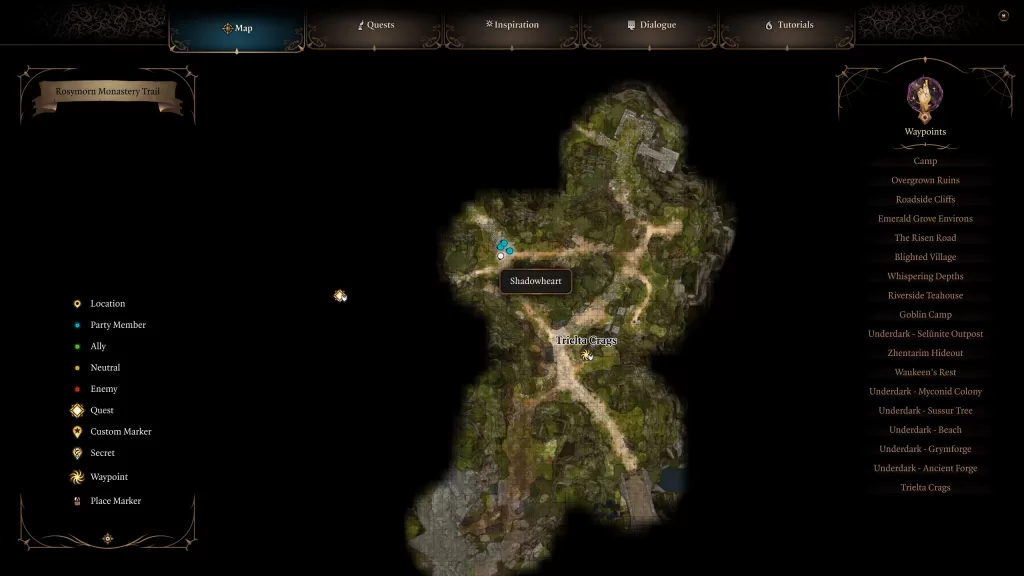
Once you reach the mountain pass, some corpses will be on the ground north of the Trielta Crags fast travel point.

Interact with them to find a Missive from Moonrise stating that the duke is being delivered to Moonrise Towers. Wyll was not in my party when I found this note, so I had to speak with him at the camp about the note for some dialog.
You can’t do the next part of this quest until you’re on the Defeat Ketheric Thorm Act II main quest towards the end of the act. During the quest, you’ll learn the Duke is being taken to Baldur’s Gate. After dealing with Thorm, you’ll be free to pursue him.
You’ll need to reach Act II before progressing the objectives below.
Rescue Zariel’s Asset from Moonrise Towers
Continue traveling with Wyll until Act II, when you reach Last Light Inn.
After speaking with Jaheira in the inn, rest at your camp to be visited by Mizora. She will task Wyll with freeing a demon trapped at Moonrise Towers. If you pass a perception check, you’ll pick up on her needing this mission to be a success.
You can then use this opportunity to have her release Wyll from his pact. If you pass a skill check, she will amend the contract after completing the job. Speak with Wyll afterward in camp.
This objective cannot be completed until you reach the Defeat Ketheric Thorm main quest towards the end of Act II.
You must reach Act III before progressing any of the objectives below.
Attend Gortash’s Ordination Ceremony
Once you reach Wyrm’s Rock Fortress in Baldur’s Gate, head to the right side to find the doors leading to the Audience Hall. Mizora can be found there near the doors. Speak with her and then attend the ceremony.
Afterward, return to Mizora and speak with her once more. She’ll then travel to camp where you can speak with her thrice by resting. During this conversation, she will offer Wyll a deal. She will tell him where to find his father, and in return, he will serve her eternally, or she will break his pact but not tell him where to find his father. (For our playthrough, we are going to break the pact and still save Wyll’s dad.)
Continue Forth with Wyll
To progress Wyll’s questline, add him to the party, and then you’ll want to pick up the quest Avenge the Drowned in Lower City of Baldur’s Gate. You can see how to do that in our Baldur’s Gate Quests guide. During the quest, you’ll have to track down a beast that killed a follower of Umberlee.
While speaking with him, he’ll tell you about the Iron Throne. You can also procure his services to take you there. When ready, hop into the submersible to travel to the Iron Throne.
As you arrive at the Iron Throne, Gortash will contact you, saying you need to leave or he’ll blow the facility. You’ll need to choose to enter the facility, which will cause it to blow. This will give you 6 turns to save everyone inside and return to the submersible before it’s destroyed. You can only visit the Iron Throne while Gortash is still alive. Once he dies, the Iron Throne will become inaccessible.
Once the time starts ticking, you’ll have many people to save in the eastern, western, and southern hallways. Specifically, Wyll’s dad can be found down the east hallway. He’ll also be wounded, so you may want to send someone with Dimension Door to help move him along.
Additionally, enemies will continue to spawn, so you’ll want to focus on freeing the prisoners first and only fighting the enemies you have to.
Once Wyll’s dad makes it to the central chamber, Mezora will appear and summon exploding spiders around the Duke. You’ll need to either teleport him away or out-heal the damage they do to keep him alive long enough to reach the sub.
After the final turn ends, a cutscene will trigger, and the survivors will return to Flymm Cargo’s Basement.
Talk to Ravengard
Make your way back to camp, and then locate and speak with Duke Ulder Ravengard. You can run through the dialog options, but it’s best to let the parasites do their thing to show each other what really happened. This will lead to the two making up and us learning about a new powerful ally to help combat the absolute. You’ll receive the Legend of Ansur. Read it to continue the quest.
Find the Wyrmway
To locate the Wyrmway, travel to Wyrm’s Rock Fortress and head for the western room with the Wrym’s Rock waypoint. You’ll want to take the passageway on the west side of the room down to the prison. If you haven’t been here yet, you’ll have to deal with a few guards first. The first one will have the key to unlock the door leading to the cells.
From the Prison Entrance Door, you’ll want to head east to the end of the hallway, then look to the left. There, you’ll spot two Dragon Head Torches. Use them to turn them off, and then hit each one with lightning using a spell or item (we used an arrow of lightning). After that, use each of the Dragon Head Torches again to turn them back on. This time, they will have a different colored flame. When both are activated, a secret door will reveal itself, which you’ll want to head on through and follow the path to reach the Wrymway.
You’ll need to progress through the Wyrmway once the entrance reveals itself. If you bring someone to cast the spell and then leave to switch them out, the way will close. You’ll then have to follow the same process as before to reopen it.
Explore the Wyrmway
Now that you’re in the Wyrmway, approach the door next to the statue to trigger an event. You’ll want to select the option “I am worthy. Open the way.” This statue will open the door, much to the Emperor’s dismay. Follow the path to reach some Double Iron Doors with a dragon on it, surrounded by a pair of statues on both sides. As you approach, one of the statues will speak, telling you that you’ll need to pass its trials to open the doors.
Chamber of Courage
From the dragon door, head east to reach the Chamber of Courage. You’ll want to interact with the touch in front of the statue to start the challenge there. You’ll have to survive for four turns while being attacked by water and air elementals and myrmidons. You’ll pass the trial if you’re still standing after the 4th turn.
Chamber of Strategy
When facing the dragon door, head down the stairs to the right. Once you pass through the door, destroy the Attuned Crystal with a character using a two-handed weapon. Interact with the Statue of Balduran.
Next, you’ll need to solve the chess puzzle. We recommend splitting whoever you use for the puzzle from the group so no one gets in the way. For our puzzle we grabbed the White Queen Piece and moved it all the way to the right to take the Black Pawn Piece. Next, take the White Queen Piece and move it diagonally to take the Black Pawn Piece in front of the king. This will get you checkmate.
We’re not sure you’ll get the same puzzle as us. If you bring Gale, he’ll mention that he’s adept at chess and will guide you on what moves to make.
Chamber of Insight
From the dragon door, head between the two statues on the left and across the invisible bridge to enter the Chamber of Insight. Enter through the door and speak with the Statue of Balduran on the right.
For this challenge, you’ll have three spirits. One of them does not have the city’s best interest at heart. You’ll need to determine which spirit this is. Unfortunately, you won’t be able to speak with them, so read the books flying around the room to get clues. You’ll have to pass the Sleight of Hand checks or use something to knock them down without damaging the books. You’ll learn that Suleto was kicked out of the city and became a not-so-nice person. Head over to him and attack him to complete the trial.
Chamber of Justice
Head west from the dragon door to enter the Chamber of Justice and interact with the Statue of Balduran. He’ll talk to you about making sure justice is served. If Wyll is with you, he’ll comment on how the right path usually lies between the two extremes.
For this puzzle, circle the room interacting with all the paintings to understand what is happening. Next, head to the middle of the room, where you’ll find the judge with three more paintings shrouded to the point of where you cannot read them. To clear the shroud, cast Remove Curse on the judge, which will make him disappear, allowing you to read the paintings. To complete the trial, grab “The Cell” and place it on The Waiting of Judgment pedestal.
Proceed to Ansur’s Lair
Now that you’ve passed the trials, it is time to head through the double iron doors to reach the Dragon’s Sanctum. Speak with the Statue of Balduran then head down the newly opened path and examine Ansur, the dragon, to trigger a cutscene.
When it ends, you’ll face the Level 17 Ansur, who will be accompanied by two Level 11 Water Myrmidons. For the first turn, you’ll have an opportunity to deal as much damage as you can before the two Water Myrmidons show up and start helping in battle. When the dragon’s turn comes around, it will begin hoarding energy, powering up for a super strong attack. You will have one more turn before it unleashes a lightning attack that can KO most of your party members.
Return to Ravengard
After you defeat the dragon, speak with Wyll, assuming you brought him, and return to camp. When you arrive, speak with Duke Ulder Ravengard about your battle with Ansur. During the conversation, you’ll have the option to weigh in on Wyll’s future. You can push him to stay the Blade of the Frontier or to become a Grand Duke. Alternatively, you can let Wyll decide his own fate.
After your decision, The Blade of the Frontiers quest will complete!
Additional Baldur’s Gate III Guides
For more content on Baldur’s Gate III, be sure to check out our Baldur’s Gate III Guides and Walkthroughs page.

