Below are the answers to the questions of Bracer Guild – Receptionist Michel’s Test in The Legend of Heroes: Trails from Zero. This test is available during the Prologue after speaking with Grace but before returning to the SSS to speak with Chief Sergei in his office.
How long ago did the Orbal Revolution occur?
Approximately 50 years ago
Who invented the orbment?
Professor C. Epstein
What is another name for sepith?
Septium fragments
What type of symbol can be found on Erebonia’s emblem?
The golden stallion
The name of the Republic-based manufacturer is…
Verne Company
Which faction put an end to the Dark Ages?
Septian Church
Which organization within the Septian Church handles ceremonial rituals?
Congregation for Divine Worship
Where are the Bracer Guild Headquarters located?
Leman State
What is the nickname of the infamous Erebonian thief?
Phantom Thief B
What was the name of the treaty signed by the three nations?
Non-Aggression Pact
As a reward for getting all the answers right, you’ll receive an Action 1.
Below is a walkthrough for the Midgardian Studies 2 subquest in Valkyrie Elysium.
Obtained: Interact with the white orb in the library at Valhalla after completing Chapter 6
Objective: Purify the Undead
After you load into the area, head to the end of the bridge then defeat the dragon and its lackies. After your glorious victory, press on through the doorway and down the stairs to reach the town. Fight your way through the undead to reach the beam of light in the alley. Interact with it to be transported to another area where you’ll again have to fight off waves of enemies. After you defeat them, the quest will clear.
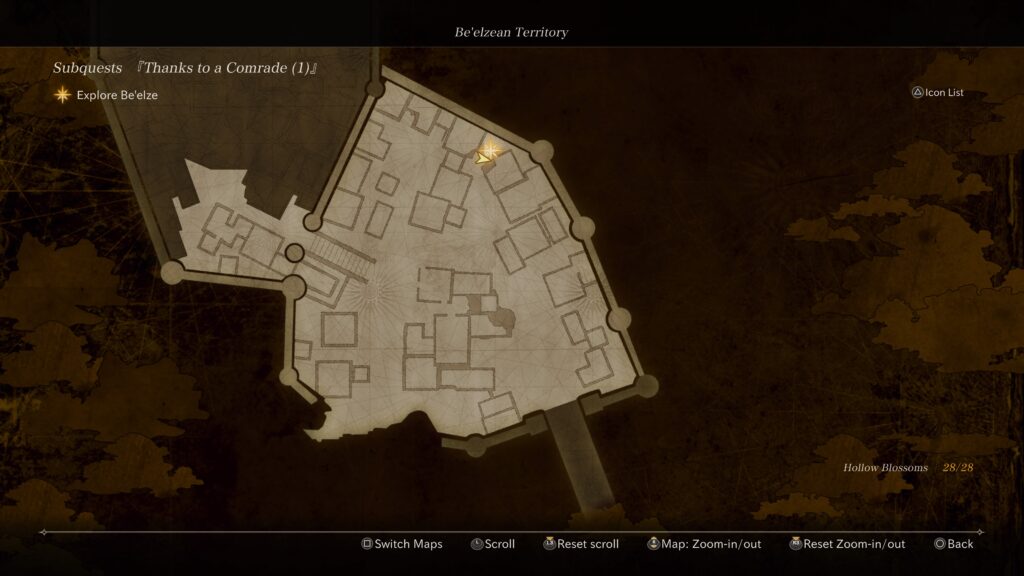
Below is a walkthrough for the Thanks to a Comrade 3 subquest in Valkyrie Elysium.
Obtained: Speak with Eygon in Valhalla after completing the Thanks to a Comrade 2 subquest.
Objective: Head to Be’elze Castle
Follow the objective a short way to trigger a cutscene leading to a boss fight against a harder version of Naglfar Eygon. Defeat it to clear the quest.
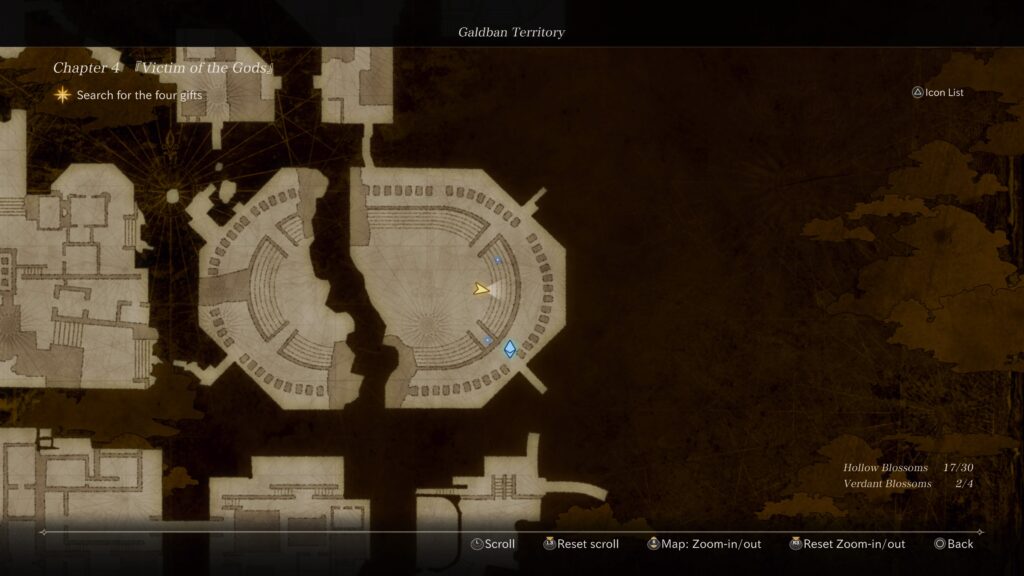
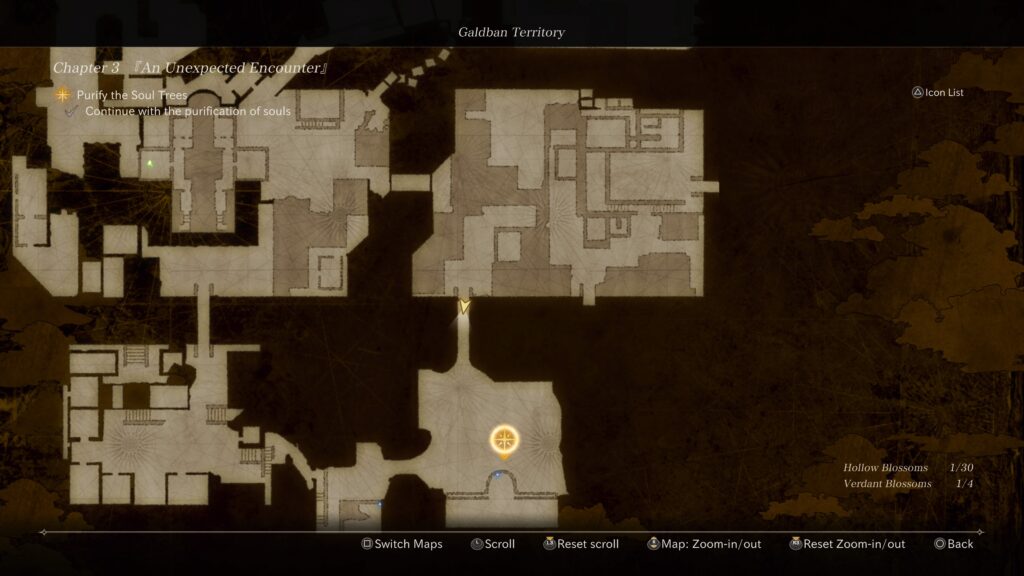
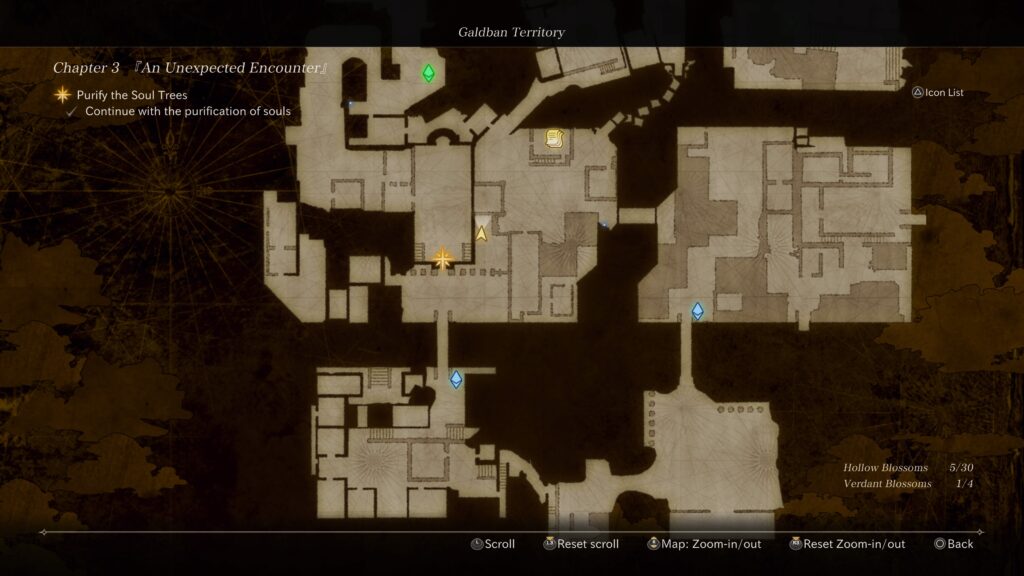
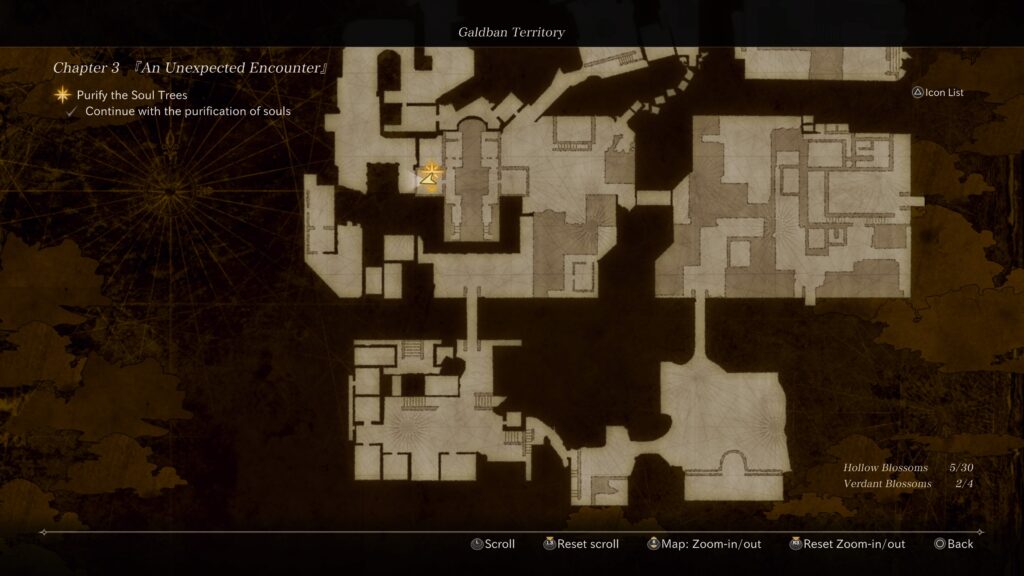
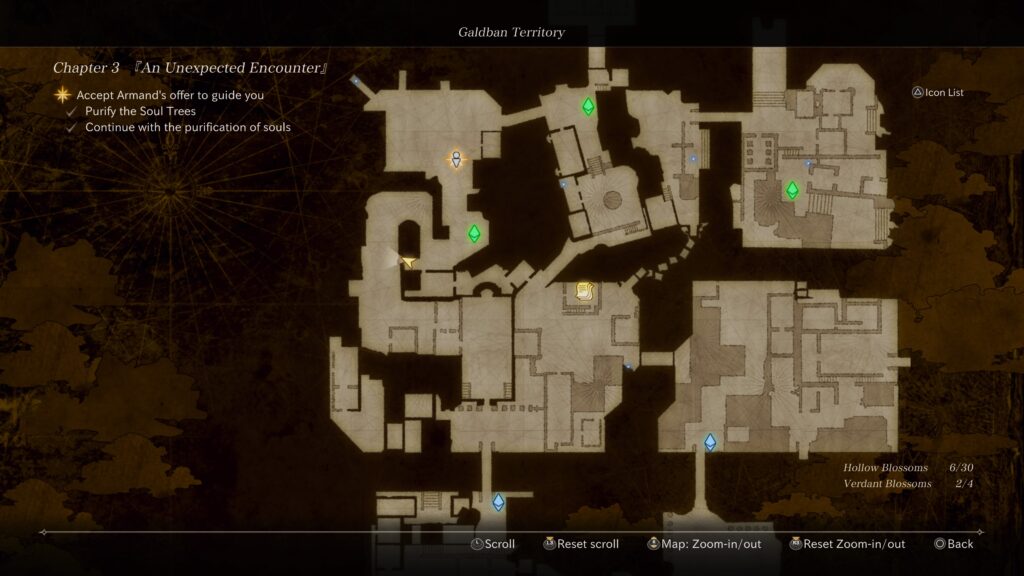
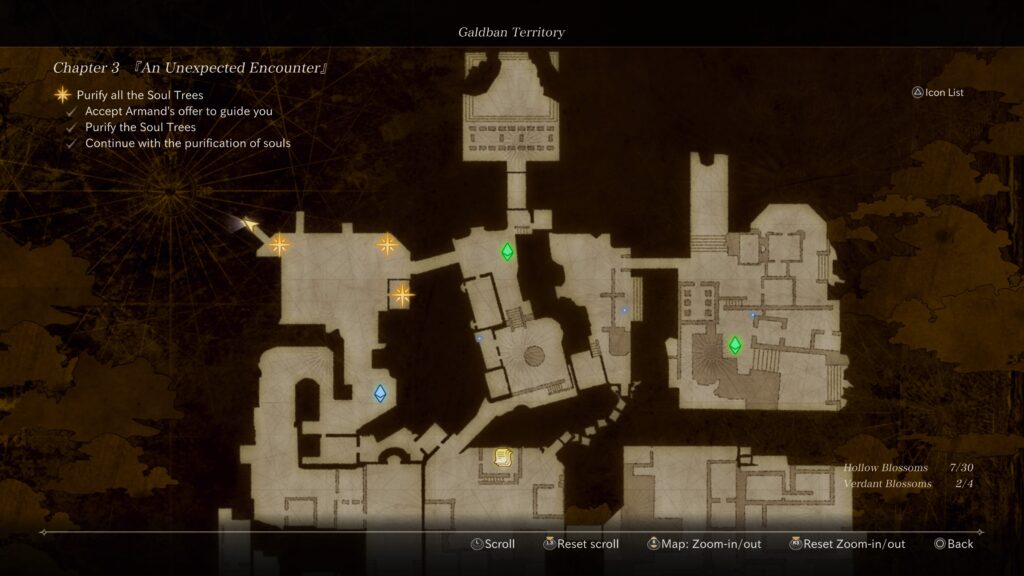
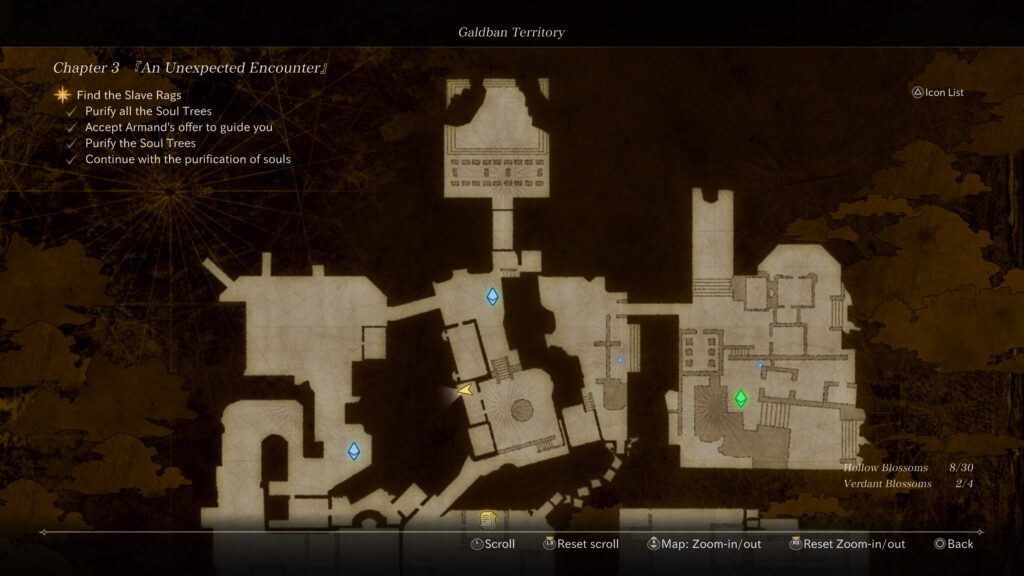
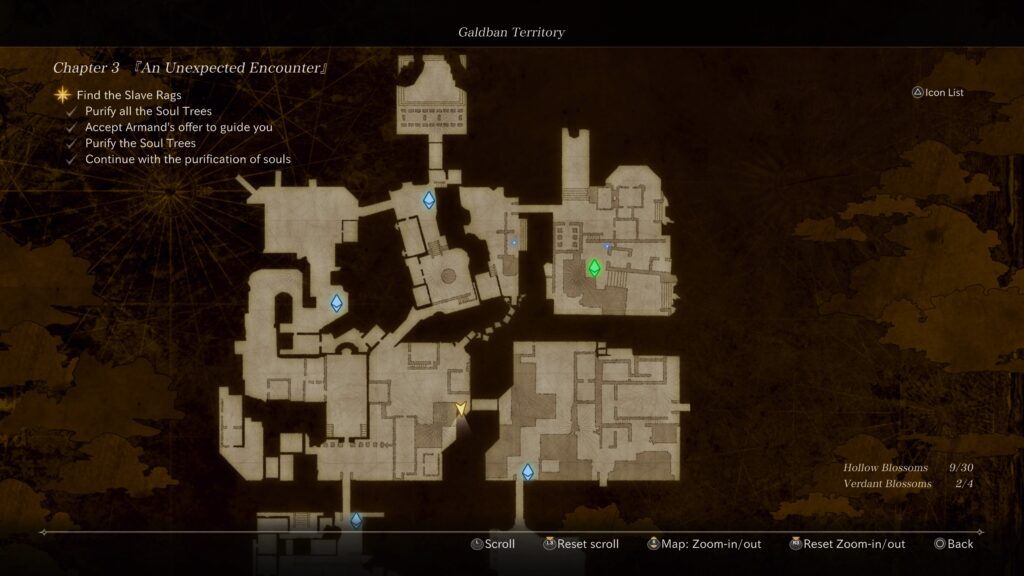
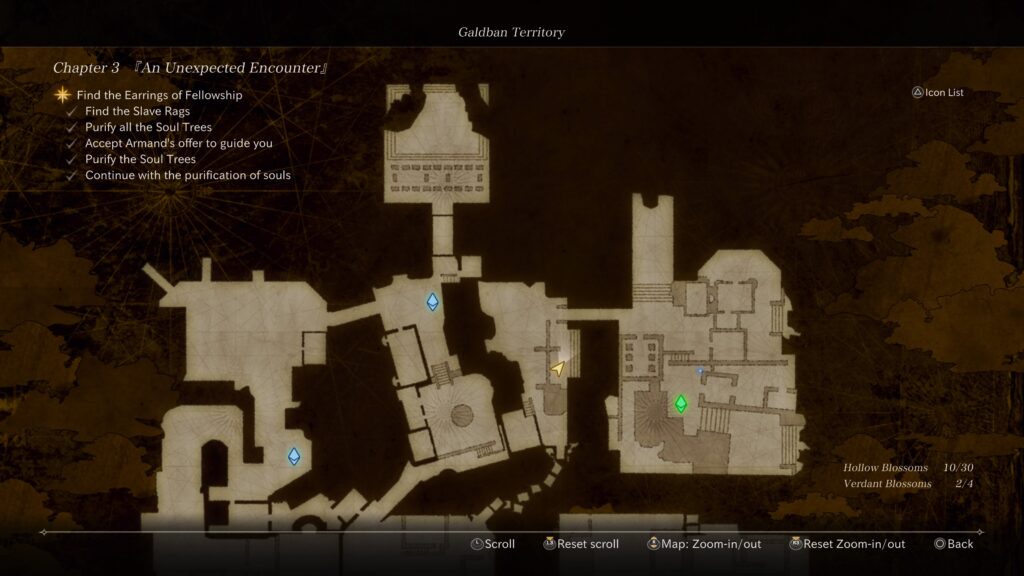
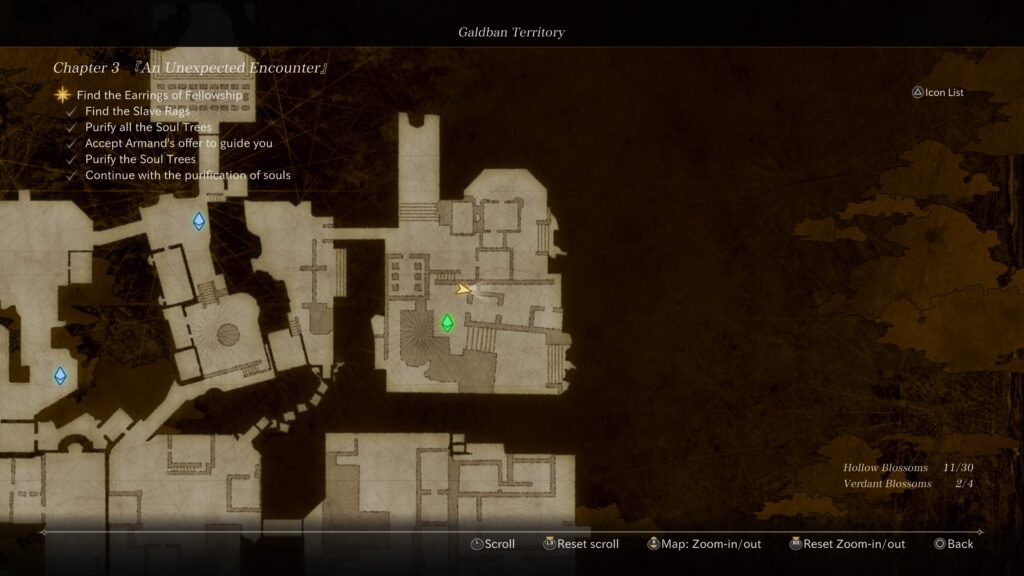
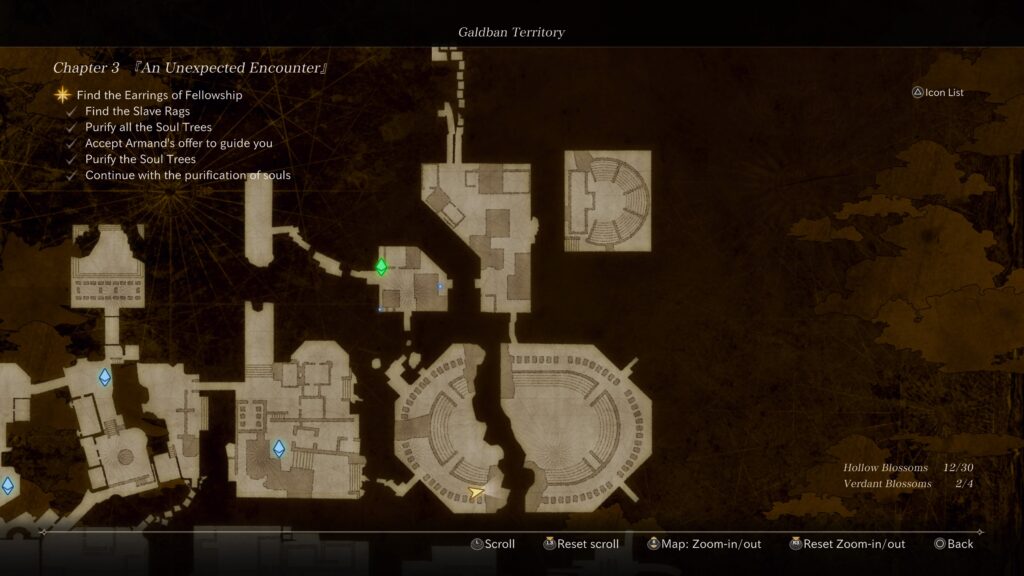
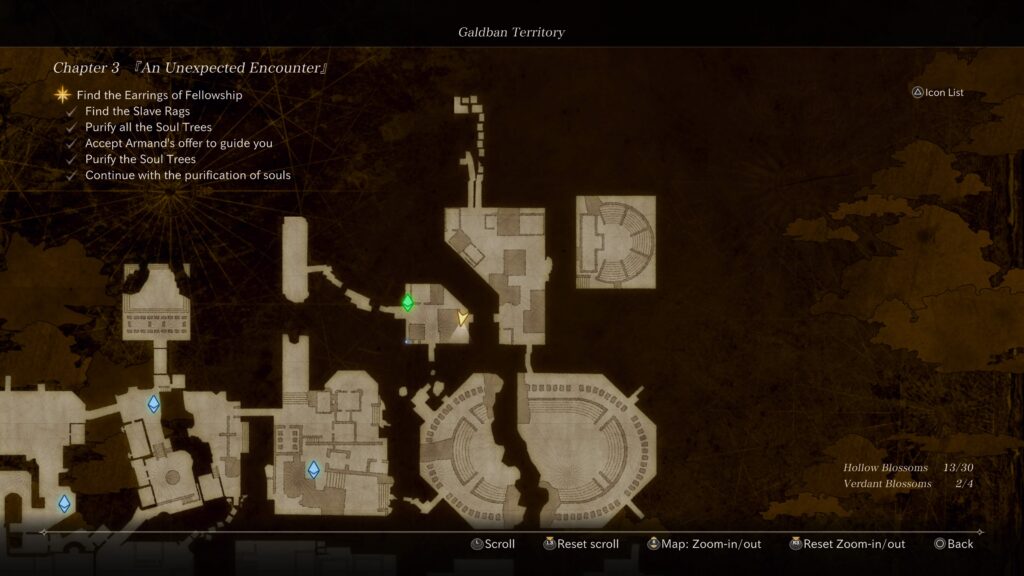
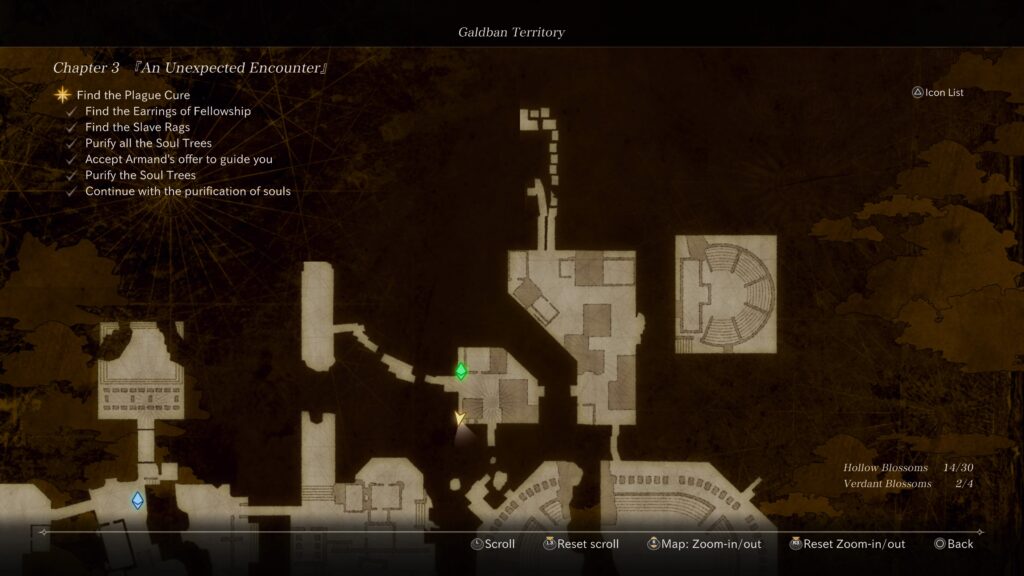
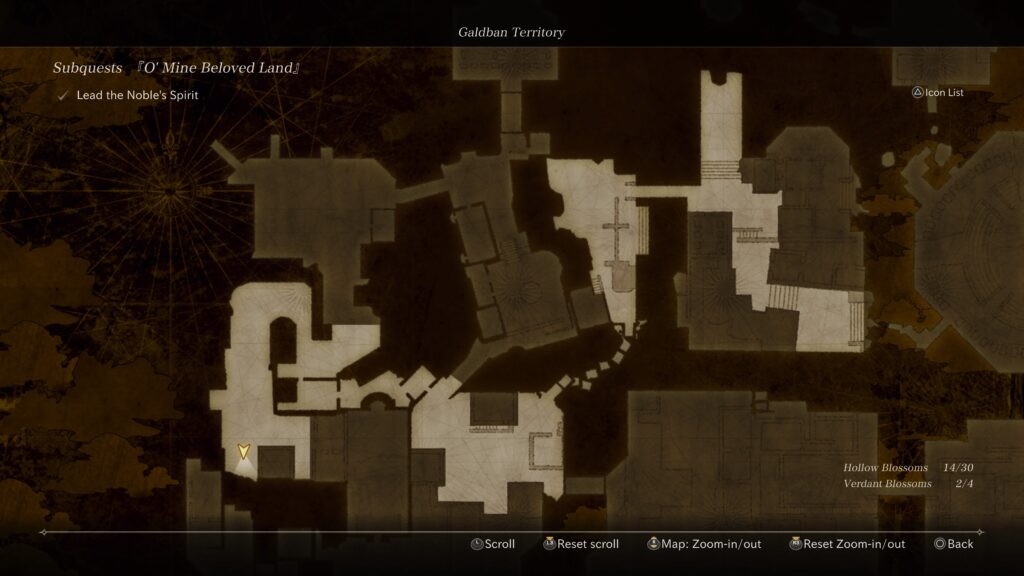
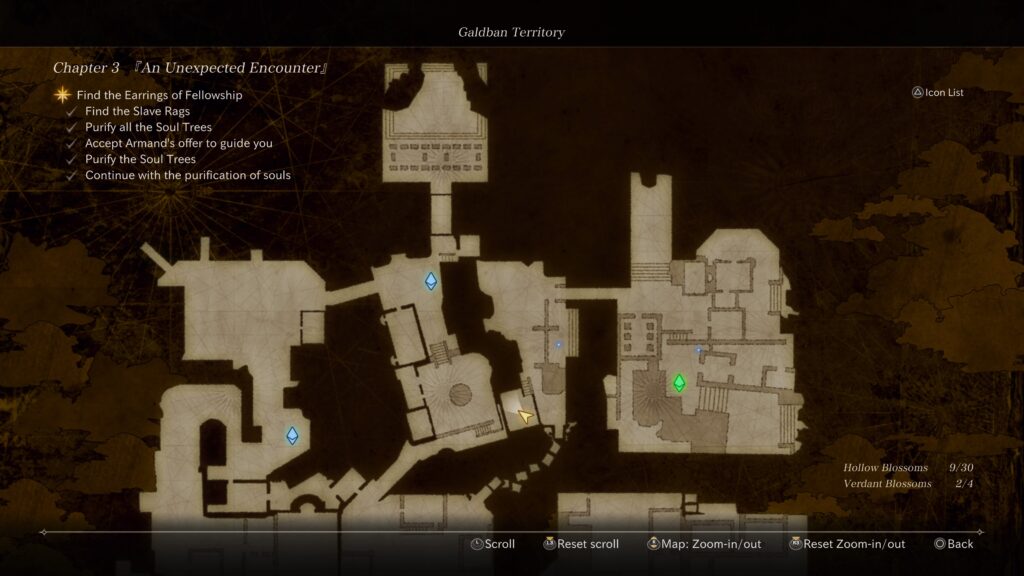
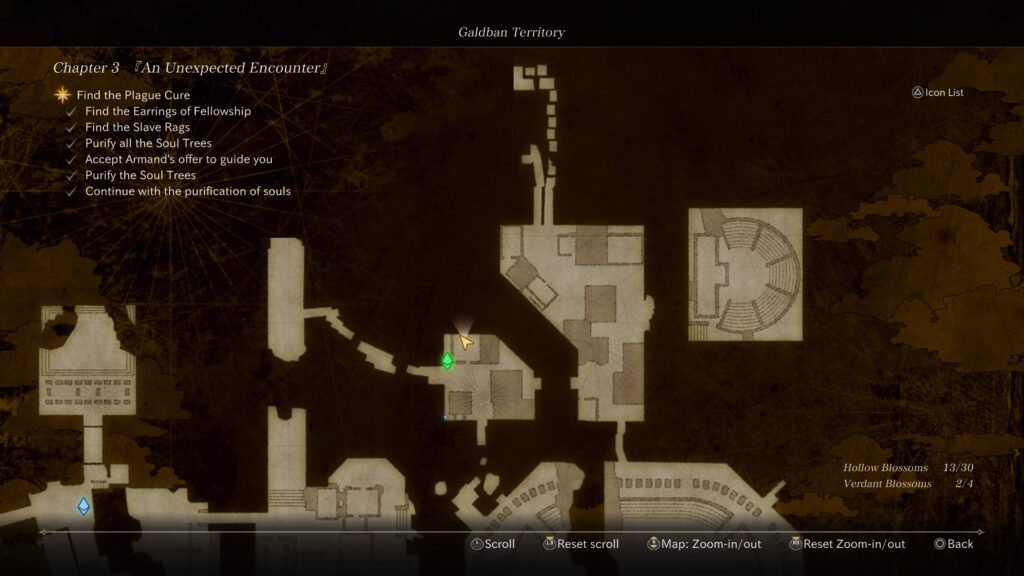
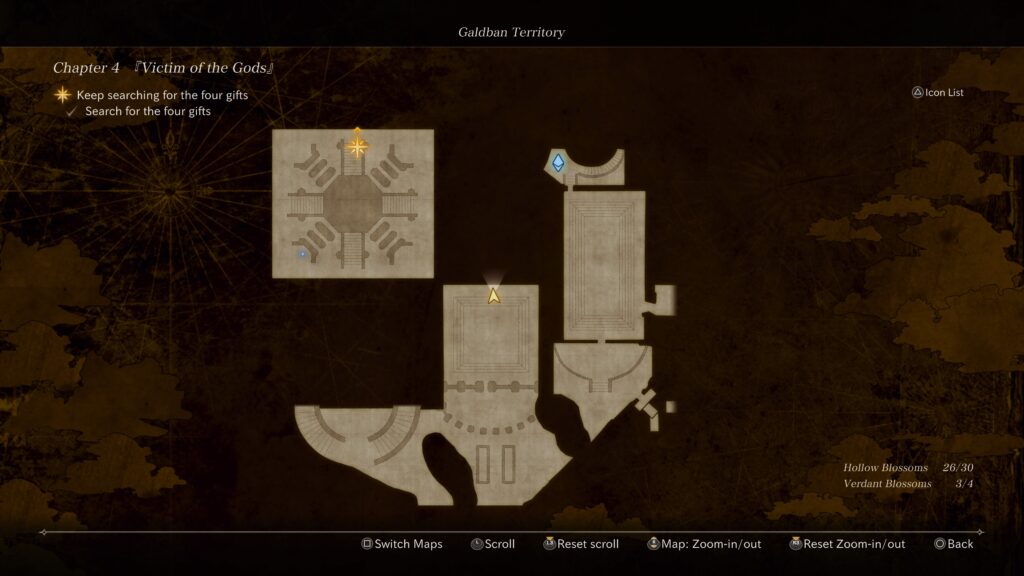
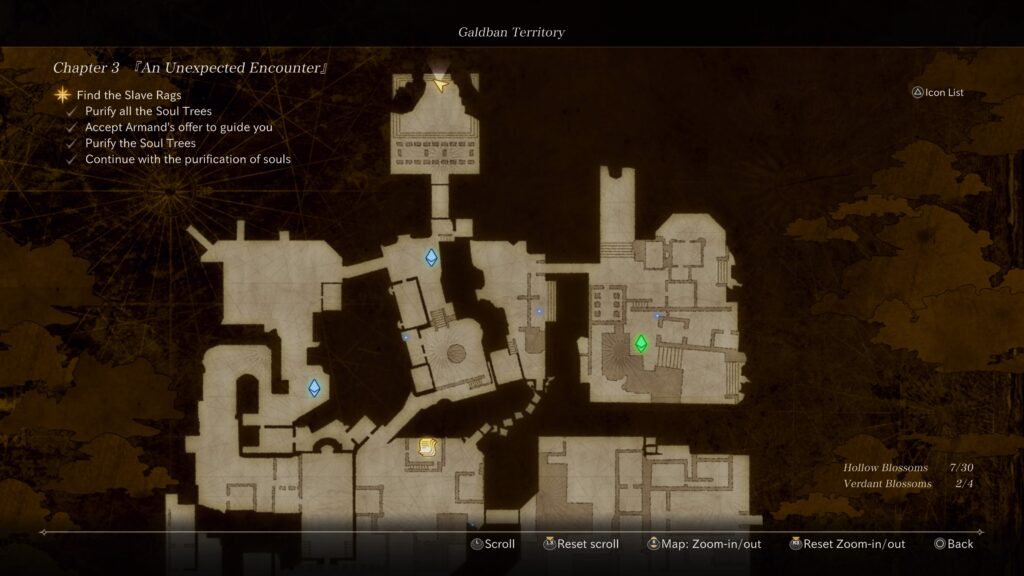
Below is a guide on where to find the hollow and verdant blossoms around the Galdban Territory in Valkyrie Elysium. For the purpose of this guide, all of the blossoms were obtained during the Chapter 3: An Unexpected Encounter and Chapter 4: Victim of the Gods main quests.
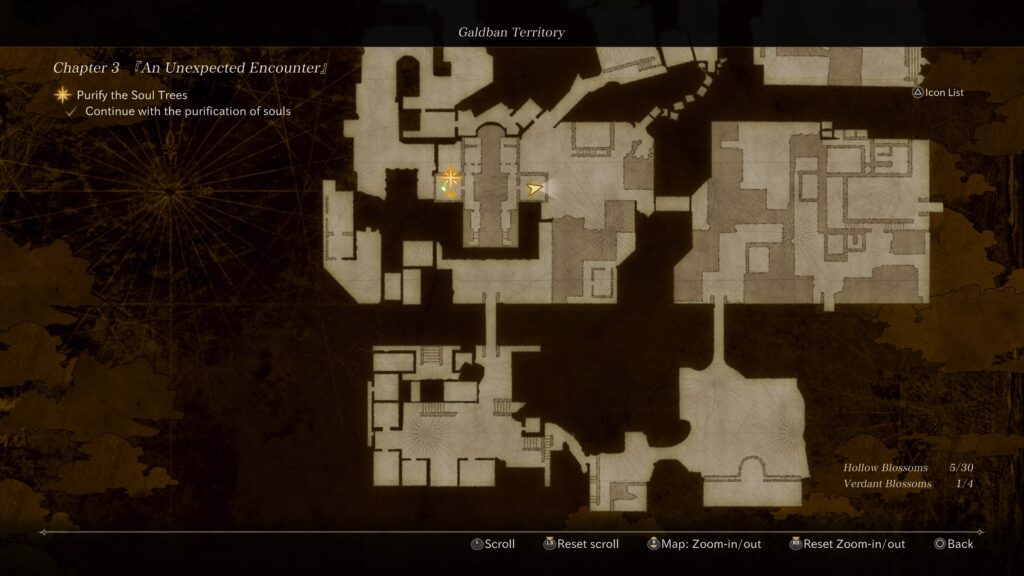
Chapter 3: An Unexpected Encounter
Well-Informed Strategist
This blossom can be found along the building immediately to the left of the starting area past the railing.
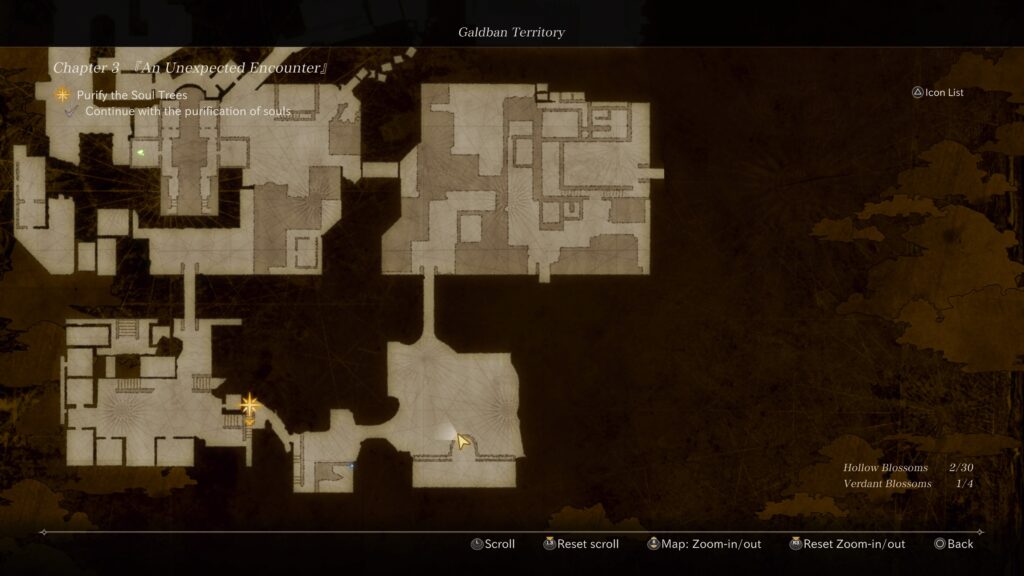
Verdant Blossom
This blossom can be found on a bridge just past the first Storage Camp.
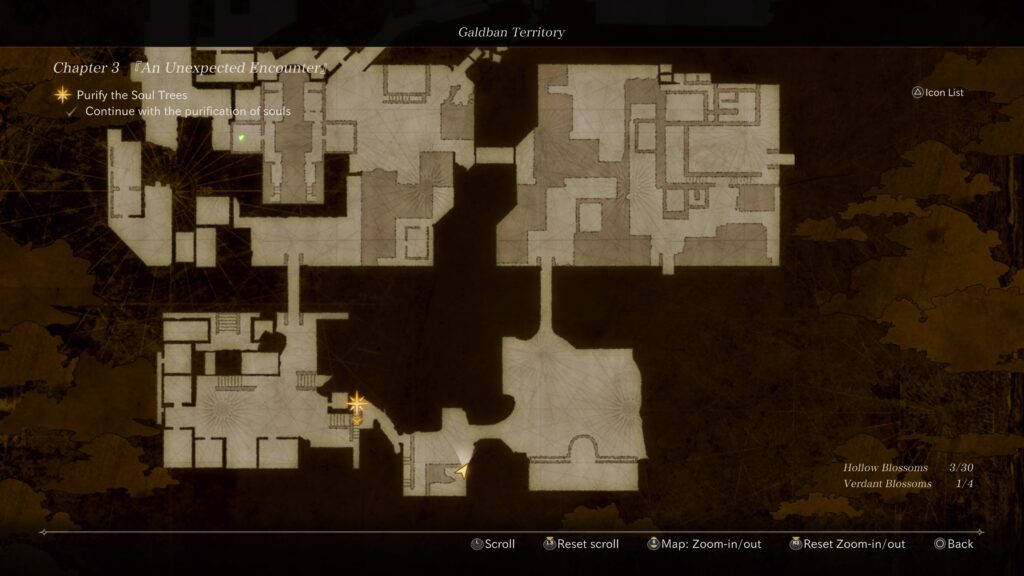
Young Stable Boy
This blossom can be found on a balcony overlooking the second Soul Tree you come across just past the first Storage Camp.
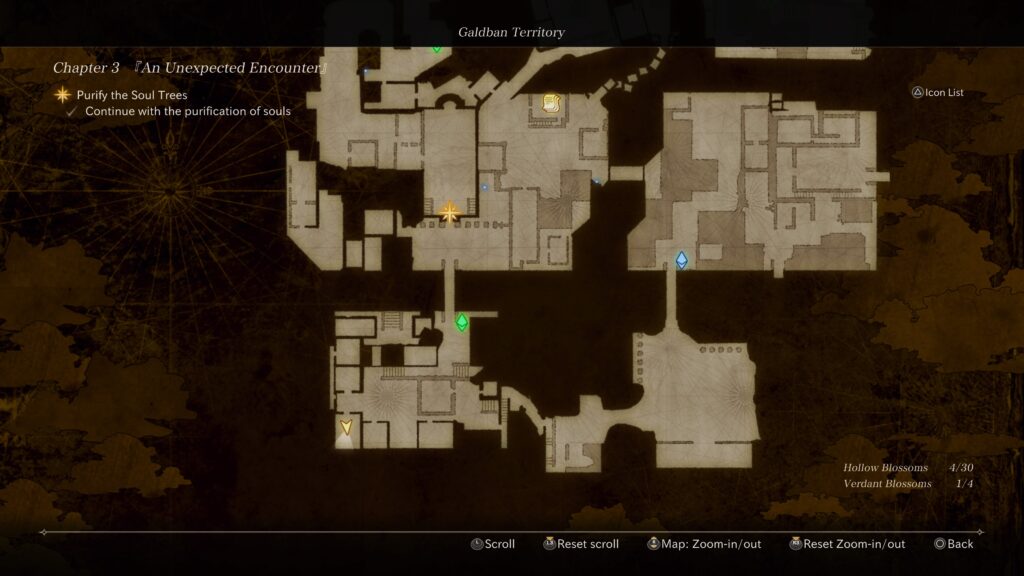
Arrogant Noble
This blossom can be found in the southcentral part of the map.
Girl Who Believed in the Future
This blossom can be found in the southwest building near a Soul Tree.
Suspicious Jeweler
This blossom can be found over the bridge from the second Storage Camp in a room on the right side.
Verdant Blossom
This blossom can be found on the upper level of the church on the left side.
Boastful Wife
This blossom can be found just before the third Storage Camp next to the columns of a building.
People-Loving Prince
This blossom can be found on the northwestern side of the large area just past the third Storage Camp on a dock.
History Buff Jester
This blossom is located in a building up the stairs south of the fourth Storage Camp.
Weak-Willed Carpenter
This blossom is located near the drawbridge south of the fourth Storage Camp.
Brave General
This blossom is found after the fourth Storage Camp near the bridge leading to the fifth Storage Camp.
Backroad Sage
This blossom can be found next to the fifth Storage Camp.
New Recruit Fitz
This blossom can be found in the area between the fifth and sixth Storage Camp.
Stubborn Fortune Teller
This blossom is located east of the sixth Storage Camp.
Solitary Jailer
This blossom can be found directly south of the sixth Storage Camp.
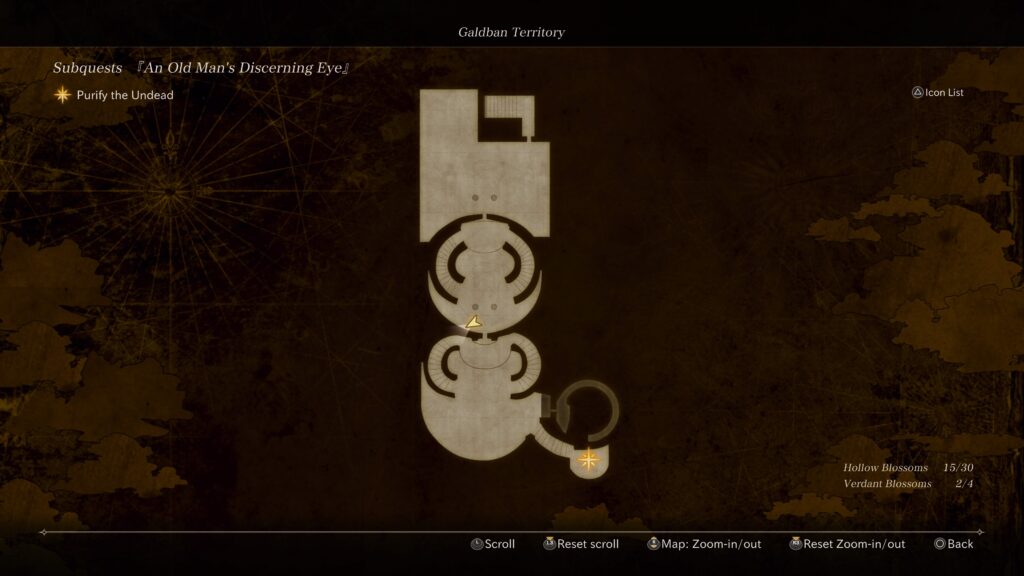
Large Man with Wounded Cheek
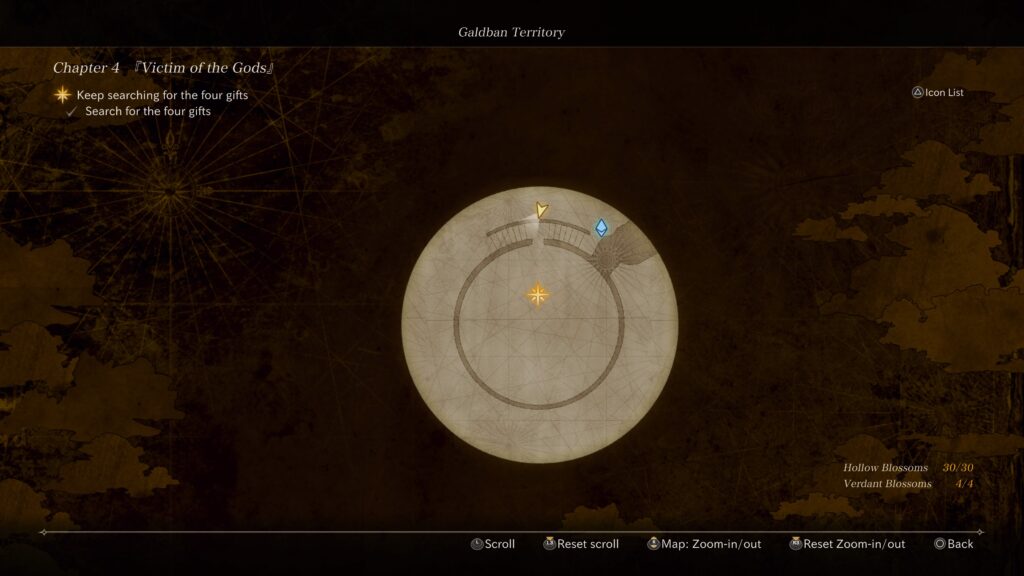
This blossom is tricky to reach and can be found on an interior platform with a chest across from a grand staircase in the palace during An Old Man’s Discerning Eye subquest. To reach it, equip the Baleygrspear. Stand on either side of the stairs (about 5 steps up from the bottom) then double jump towards the platform with the chest. At the tallest point of the second jump, hit the regular attack button followed by the heavy attack button. With the spear, this will cause you to lunge up onto the platform. It took us multiple tries before we finally made it but it is possible!
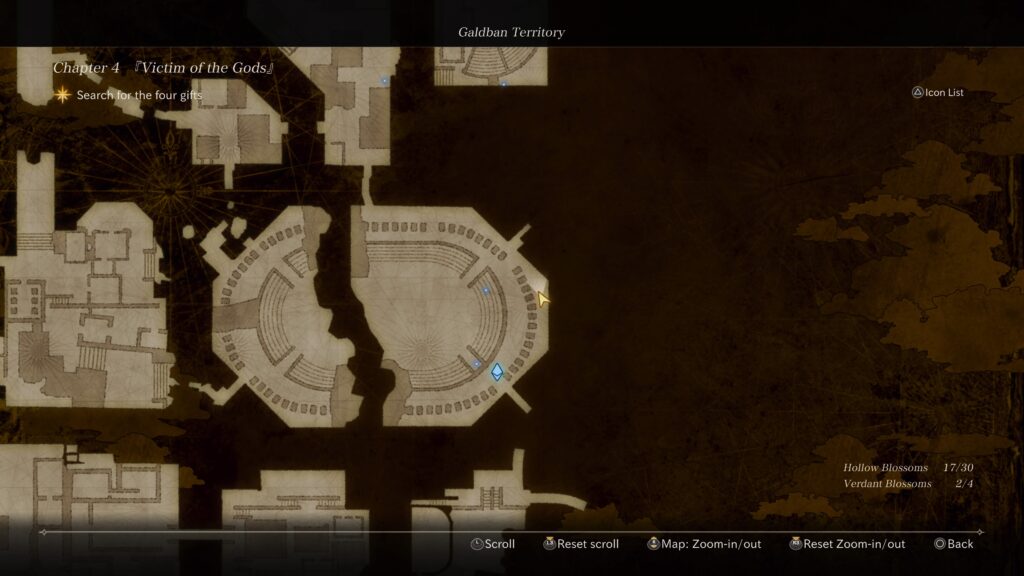
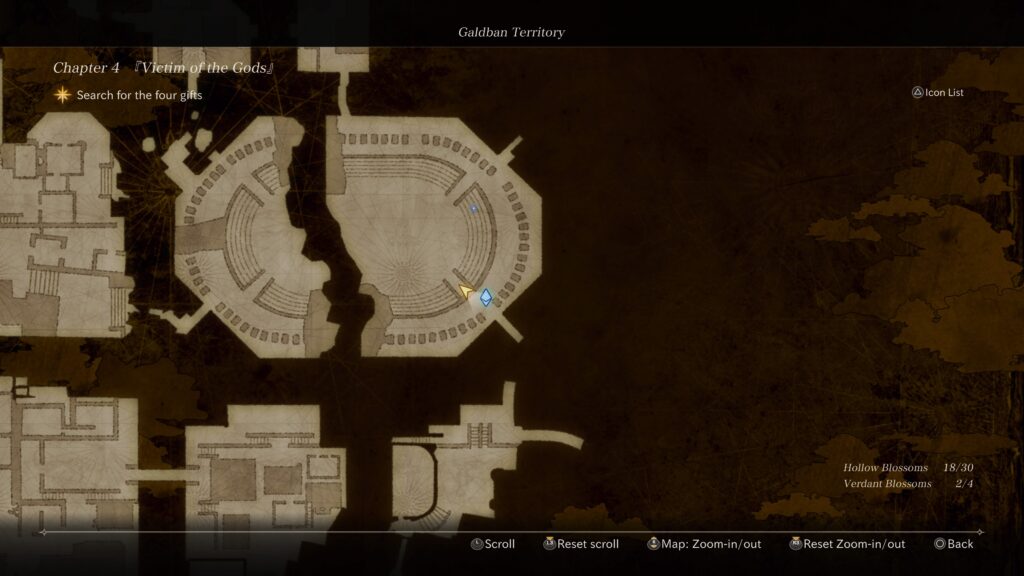
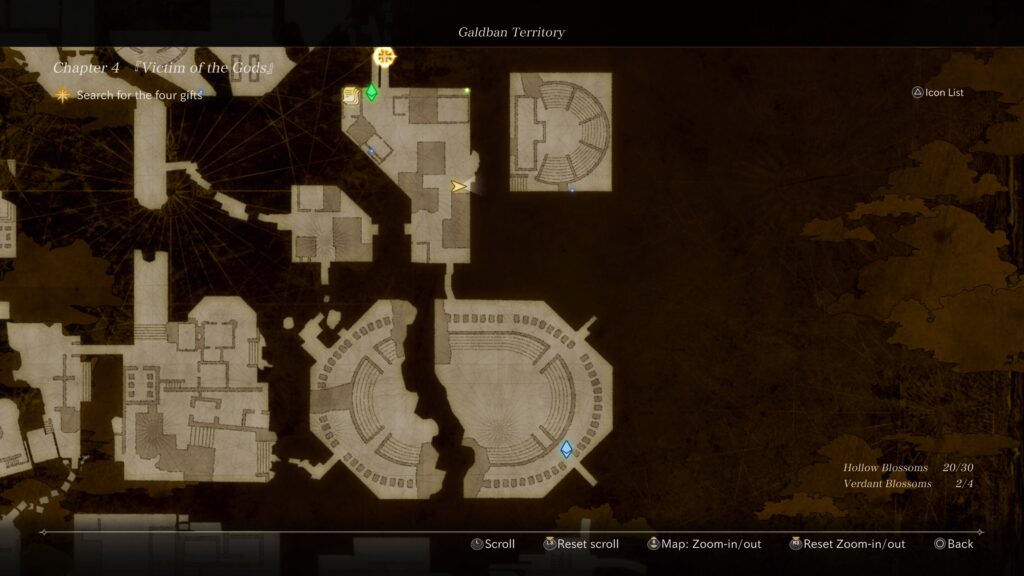
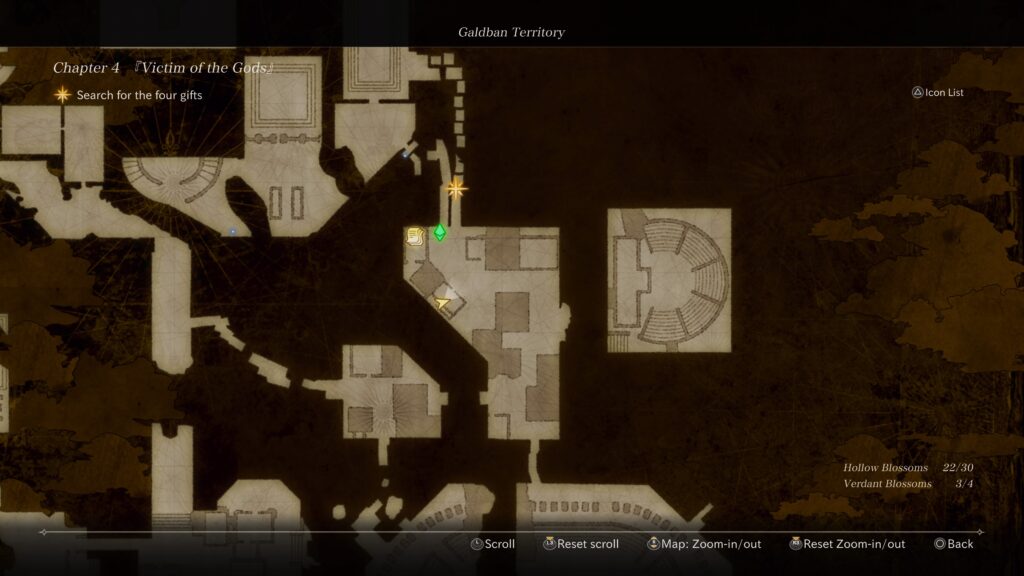
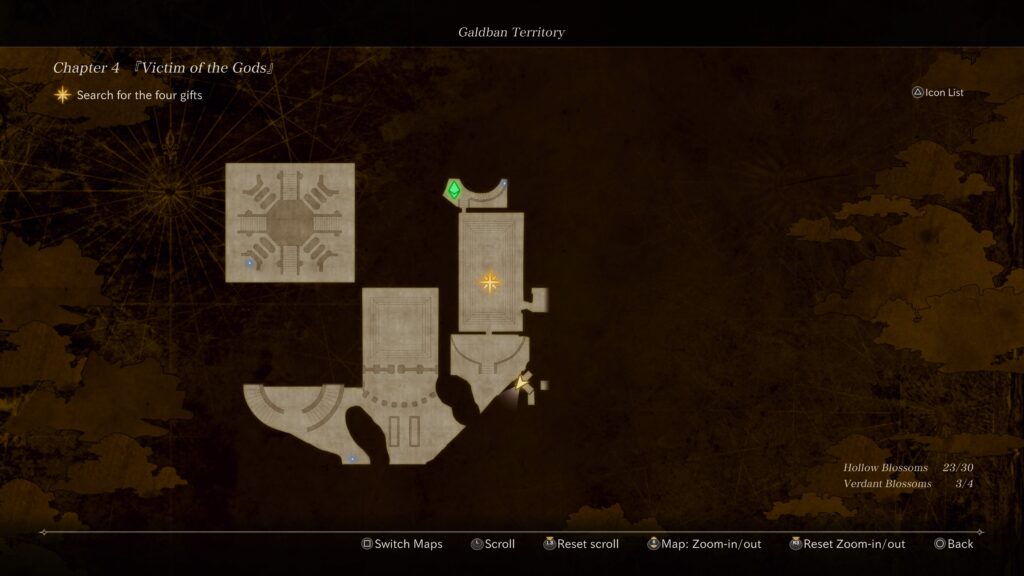
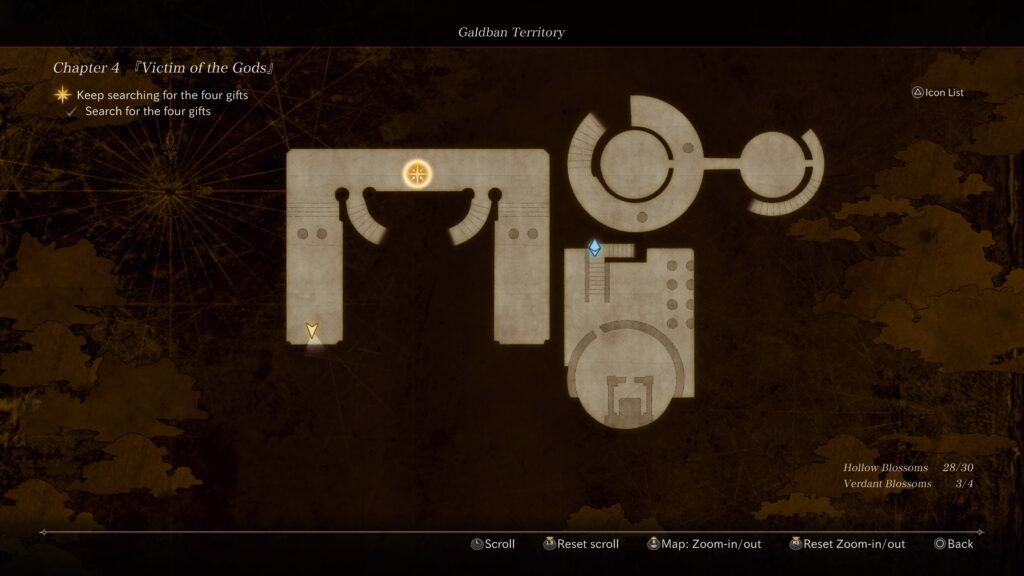
Chapter 4: Victim of the Gods
Unkept Bearded God
At the start of the chapter, head directly west up flight of stairs to find it on a balcony.
Frigid Wind Storyteller
From the first Storage Camp, head right to find it along the railing overlooking the water.
Servant Einar
This blossom can be found in the stadium near the first Storage Camp.
Dusty Broker
This blossom can be found near the above blossom in the stands.
Theologian Fredrick
This blossom can be found southeast of the second Storage Camp.
Old Lodgings Landlady
This blossom can be found on the outside of the amphitheater east of the second Storage Camp.
Verdant Blossom
This blossom can be found directly east of the second Storage Camp.
High-Spirited Girl
This blossom can be found on a second level of the building directly south of the second Storage Camp.
Troubled Clergyman
This blossom can be found on a higher wooden platform north of the second Storage Camp. You’ll need to use a Soul Chain to reach it.
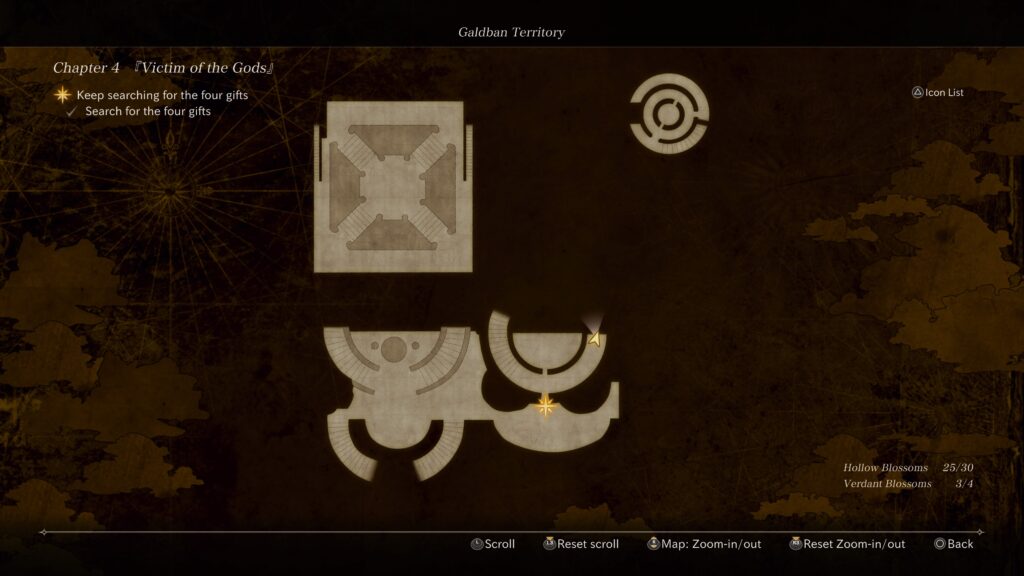
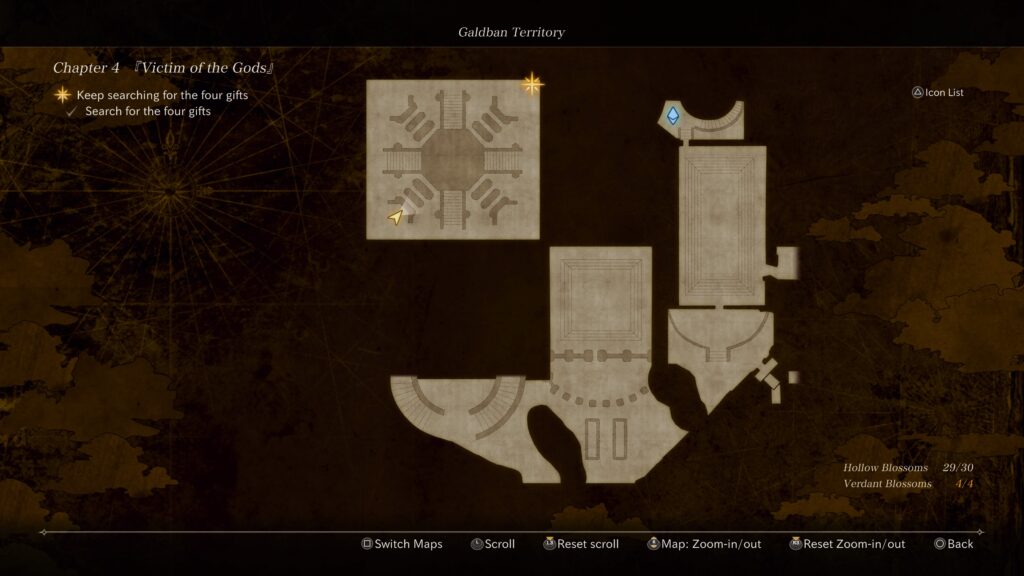
Big-Town Haberdashery
This blossom is located under the stairs next to the third Storage Camp just after the Hilde boss fight.
Girl Who Believed in the Future
From the fourth Storage Camp, head down the stairs and enter the building at the end. Ride the elevator down. Exit the elevator and turn right. Head down the stairs and keep following the room, ignoring the exit to the right, to find the blossom.
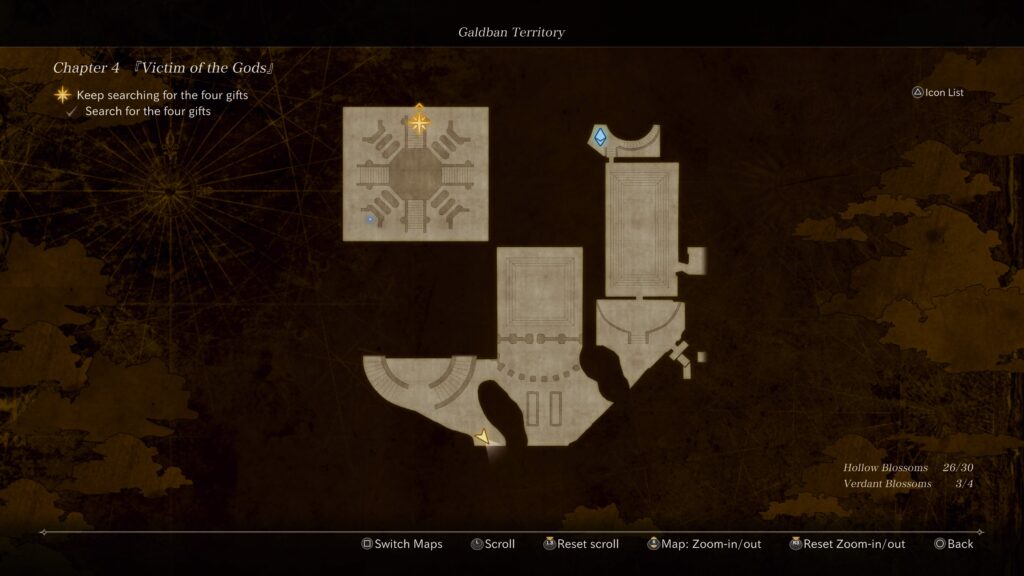
Mountain Pass Asbjorn
From the previous blossom, exit the building and take a right. Head down the stairs on the left. At the bottom of the stairs, take a left and the blossom will be on the right between some debris.
The Red Scale’s Head Accountant
From the doors of the banquet hall, head south to exit this building then take a right. Head west to find another doorway. The blossom will be in this room behind a wooden table.
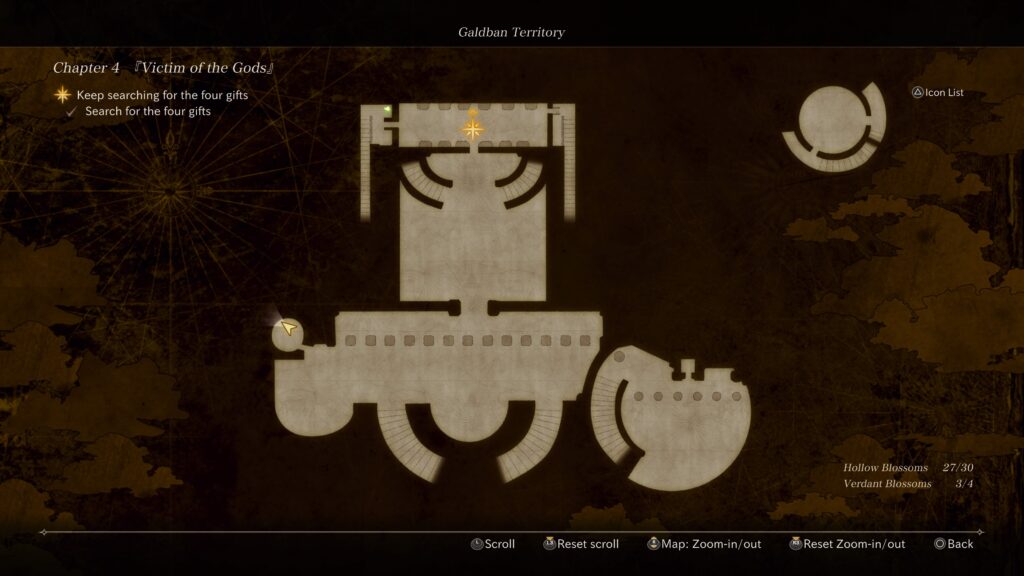
A Certain High-Level God
When facing the door of the banquet hall, head up the left set of stairs then follow the hallway left to find it at the end.
Verdant Blossom
When you enter the banquet hall, take a right and head down a small flight of stairs then a bigger flight of stairs. At the bottom of the stairs, follow the room to the right, keeping along the wall. This will bring you to another set of stairs on the west side of the room. Head up the stairs to find the item.
Dark Slate Faerie
This blossom can be found on the lower level of the banquet hall.
Crowned Battle Maiden
This blossom can be found after taking the elevator in the banquet hall down to the Underground Shrine of the palace.
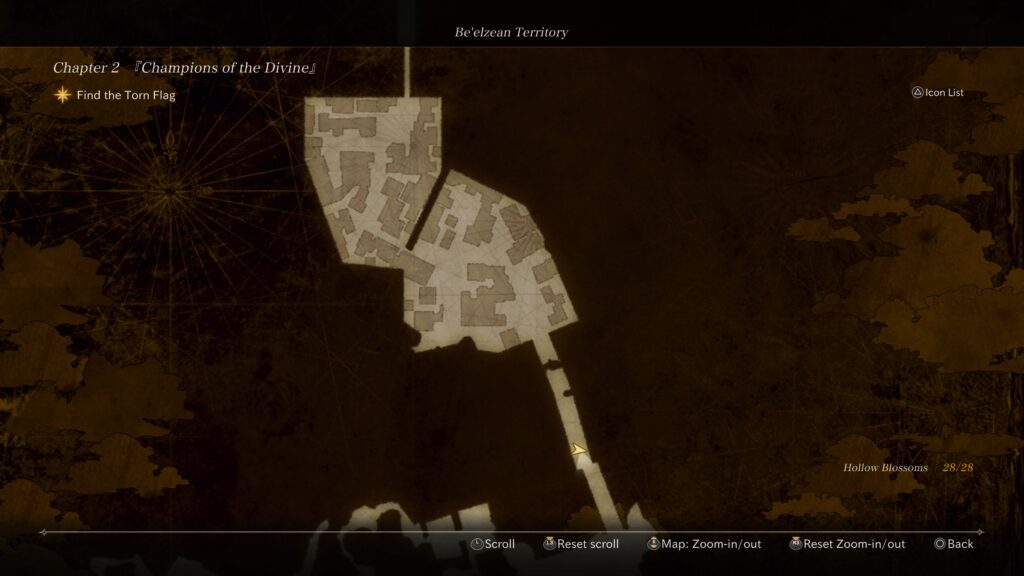
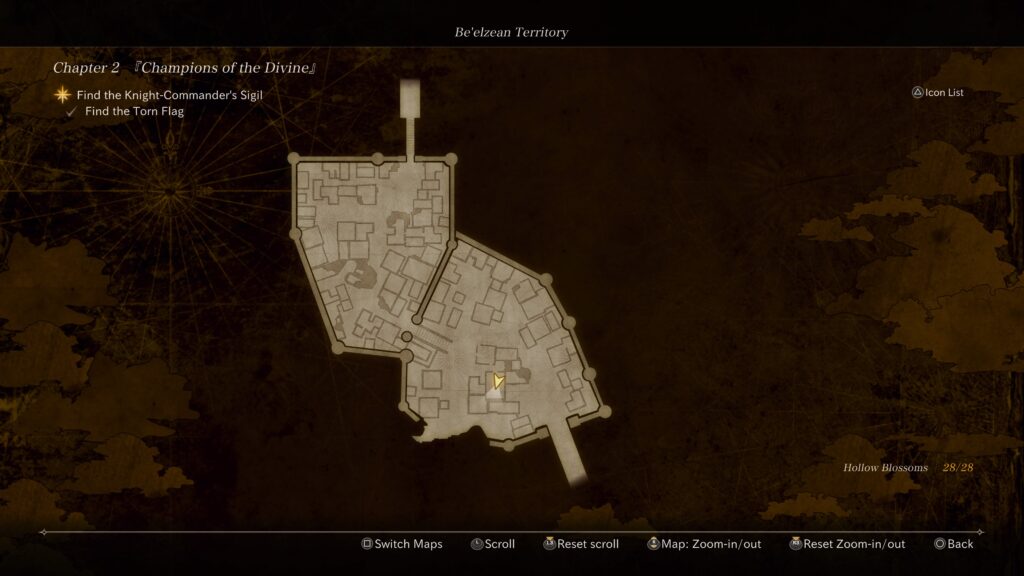
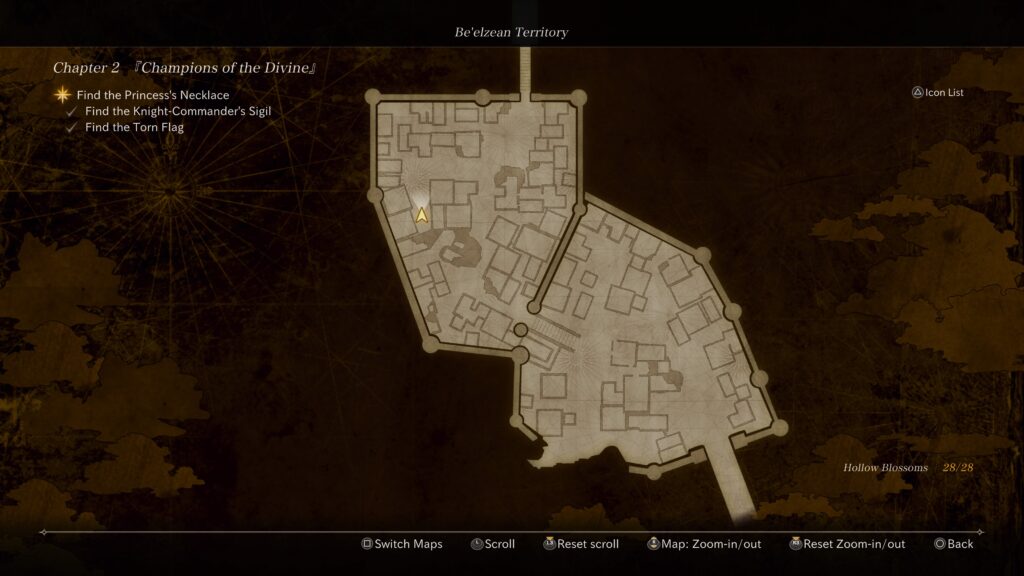
Below is a walkthrough for the objectives in Chapter 2 of Valkyrie Elysium.
Find the Torn Flag
The Torn Flag relic can be found on the bridge southeast of the city.
Find the Knight-Commander’s Sigil
The Knight-Commander’s Sigil relic can be found in the southcentral part of town at the top of a tower.
Find the Princess’s Necklace
The Princess’s Necklace can be found near the northwestern side of the map in an alley.
Pursue Eygon
After obtaining the third relic, head to the castle then fight a group of enemies in the entrance hall. Defeat them then head to the hallway off of the entrance hall. Make sure to grab the chest containing an ambrosia before enter the room at the end of the hallway. Enter this room when your ready then defeat the enemies inside. Afterwards, you’ll be able to get the Broken Greatsword relic. Once you retrieve this item, a cutscene will trigger.
Head outside the castle
Exit the castle to trigger a cutscene leading to a boss battle. Defeat this enemy then grab the chest to receive the Fire Storm I art!
This is a guide on all of the runes found in Valkyrie Elysium.
Arts Gauge Restoration Boost I
From the fourth Storage Camp, head down the stairs and enter the building at the end. Ride the elevator down. Exit the elevator and turn right. Head down the stairs. Exit the building and take a right. Head down the stairs on the left. At the bottom of the stairs, take a left and the rune can be found in the room guarded by some enemies.
Arts Gauge Restoration Boost II
You’ll receive this rune as a reward for completing the Village Request 1 subquest.
Arts Gauge Restoration Boost III
This is a reward for completing the Combat Training for Taika training ground subquest.
Magic Attack Boost I
After recruiting Eygon, replay Chapter 1. Make your way through the level until you reach the circular room with the chains hanging down from the center. From the entrance, head left and take the spiral staircase up to the top. At the top, there will be a wall for Eygon to break revealing a hidden room. Defeat the enemies in this room to access the chest containing the rune.
Magic Attack Boost II
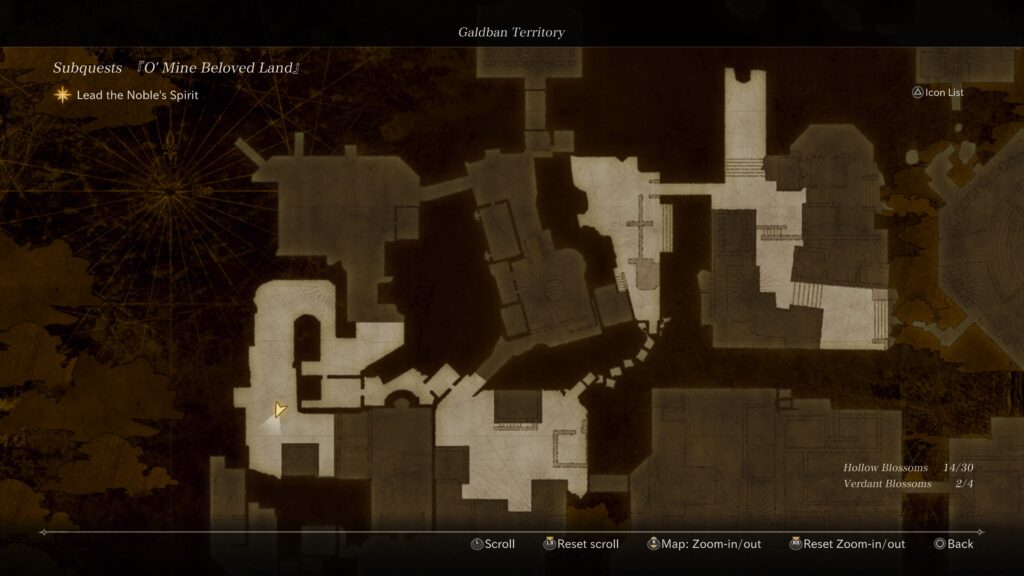
This rune is a reward from completing the O’ Mine Beloved Land subquest.
Magic Attack Boost III
This is a reward for completing the Advice for Cypher training ground subquest.
Magic Damage Reduction I
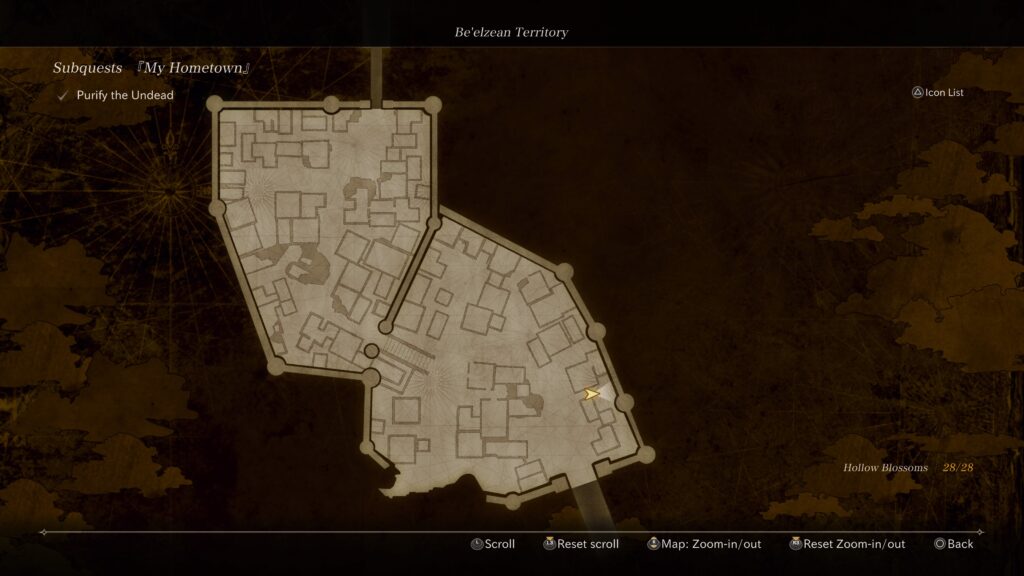
This rune is a reward for completing the My Hometown subquest.
Magic Damage Reduction II
This rune is a reward for completing The Unfinished Masterpiece subquest.
Magic Damage Reduction III
This is a reward for completing the Training Duel with Eygon Training Ground subquest.
Physical Attack Boost I
Chapter 3: This rune can be found in a chest at the beginning of Chapter 3 as part of the story.
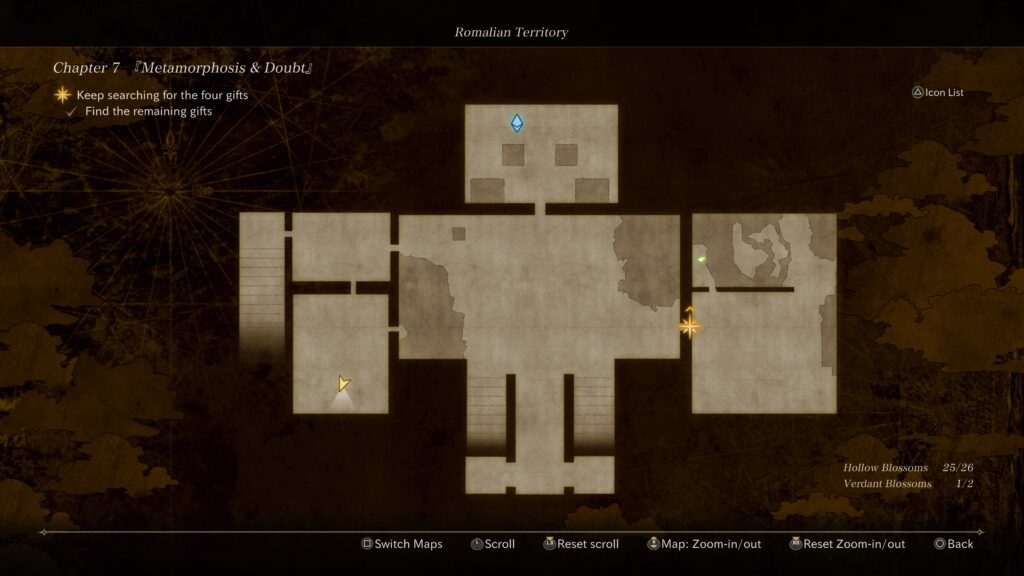
Physical Attack Boost II
Chapter 7: From the palace entrance, head right going west through the doorway. Keep heading west to reach a flight of stairs heading up. Enter the room at the top of the stairs then drop through the hole in the floor to find the chest containing the rune.
Physical Attack Boost III
This is a reward for completing the Midgardian Studies 3 subquest.
Physical Damage Reduction I
Chapter 3: This rune is located in the very northern part of the area past of the fourth Storage Camp. You’ll have to pull the lever of a drawbridge then cross.
Physical Damage Reduction II
Chapter 6: This rune can be found in a chest west of the sixth Storage Camp (Central Temple Bridge) in the village after jumping off a roof.
Physical Damage Reduction III
After finishing Chapter 5: This is a reward for completing the Midgardian Studies 1 subquest.
Soul Gauge Restoration Boost I
Chapter 5: This can be found in a chest on the east side of the throne room just north of the fourth Storage Camp (Main Gate).
Soul Gauge Restoration Boost II
This rune is a reward for completing the Village Request 2 subquest.
Soul Gauge Restoration Boost III
This is a reward for completing the A Bout with Kristoffer training ground subquest.
Search
This site uses cookies. By continuing to use this website, you are giving consent to cookies being used. For more information on cookies, view our Privacy Policy.OkPrivacy Policy