Guides

Tears of the Kingdom – Serenade to Cotera

by NightlyGamingBinge in

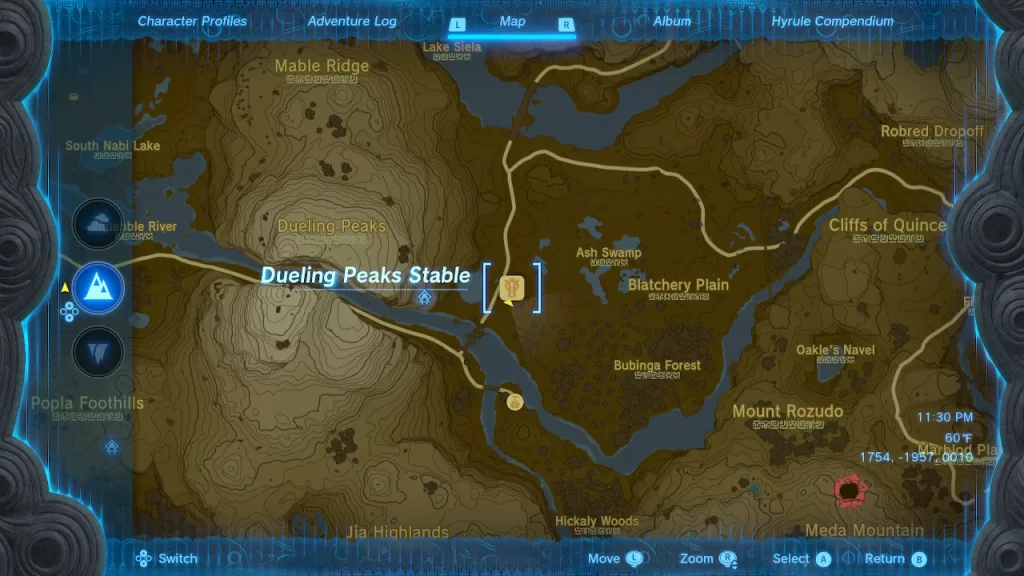
To obtain the Serenade to Cotera side adventure in The Legend of Zelda: Tears of the Kingdom, speak with Mastro at Dueling Peaks Stable.

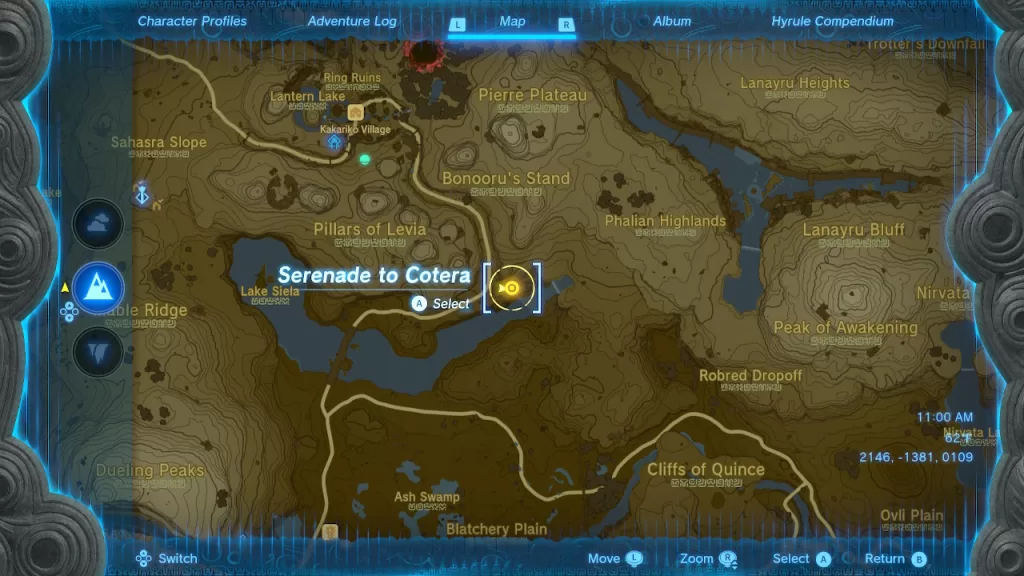
For this quest, you’ll need to find Beetz. Make your way north along the main road and cross the bridge. When the road curves north, you’ll find Beetz drumming after emerging from a short tunnel near the eastern side of Lake Siela.

After speaking with Beetz, you’ll being the Honey, Bee Mine side adventure. For this quest, you’ll need to find Beetz 3 combs of courser bee honey. He’ll give you a hint that there are beehives around Kakariko Village near the huge hole. If you don’t already have some on you, make your way there to collect the honey. As a reward for handing over the honey, you’ll receive a silver rupee!

With the Honey, Bee Mine side adventure complete, return to Mastro at the Dueling Peaks Stable. To reach the Great Fairy, you must now build a boat to carry the wagon across the water to the Great Fairy Cotera. You’ll find supplies near the destroyed bridge.

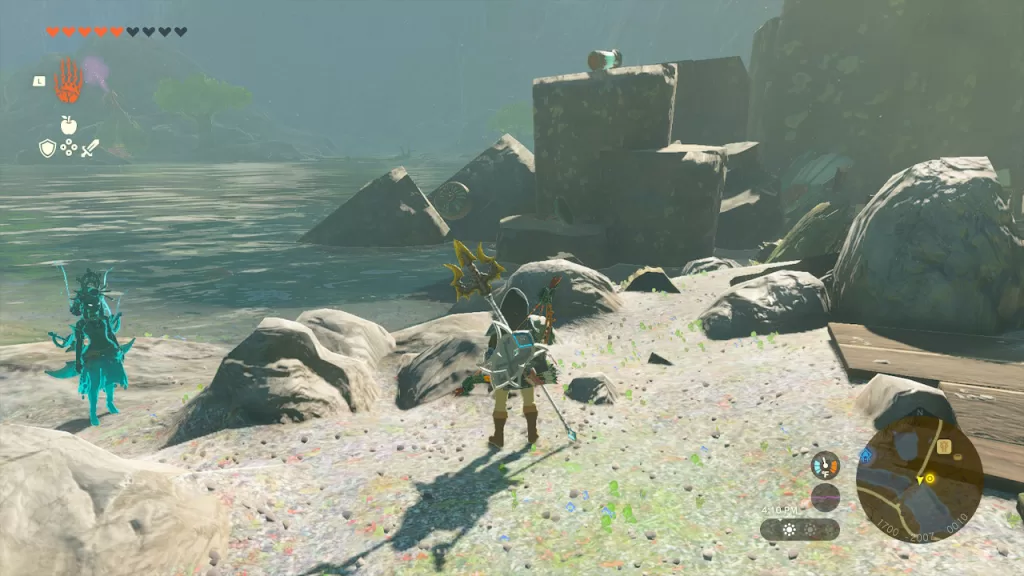
Once you’ve crafted a boat, speak with Mastro and tell him to hop in then steer it to the Great Fairy. As a reward, you’ll receive a silver rupee!

Guides

Tears of the Kingdom – Marakuguc Shrine Guide

by NightlyGamingBinge in

The Marakuguc Shrine can be found in Goron City on top of a mountain.

To clear the shrine, you’ll need to complete the Wheeled Wonders challenge. Begin by heading down the stairs then drop down into the pit. Use Ultrahand to fix the bridge then use the ladder to climb out of the pit.

Cross the bridge to come to the next puzzle. Move the wheeled platform in front of the unconnected bridge. Attach the bridge to the cart then hit a wheel to activate it. It’ll traverse the lava pit.

Walk across the bridge to reach the other side. On the other side, there will be two sets of wheels. Connect them together to make a vehicle. Jump on it then hit a wheel to ride across the lava pits.

On the other side, head under the overhang then Ascend through it to reach the upper level. Take out the enemy there then use the ramp in this room to reach a chest on a ledge in the corner containing a Strong Construct Bow.

Next, you’ll need to herd all the little balls into the pit. You can make a plow by connecting the ramp to the front of the vehicle.

Once all the balls are in the pit, the gate will open allowing you access to the altar. Interact with this altar to receive a Light of Blessing.

Click here for more guides and walkthroughs on The Legend of Zelda: Tears of the Kingdom!

Guides

Tears of the Kingdom – The North Necluda Sky Crystal

by NightlyGamingBinge in

To obtain The North Necluda Sky Crystal shrine quest in The Legend of Zelda: Tears of the Kingdom, interact with the Josiu Shrine at the North Necluda Sky Archipelago.

A mysterious voice will tell you to follow the ray of light to find a crystal to offer at the shrine. Follow the light to find a small arch up a small flight of stairs. Use Ultrahand on the small arch to cause the big one to move. Move it to the position shown in the image below.

Once it’s been moved, head down the stairs, passing the shrine on the right. Jump to where the 3 stone pillars are then head up the stairs. This will bring you to another platform that has a giant circle in the middle with a concrete launcher on it. Turn the launcher so it is facing the southeastern platform. Once correctly aligned, use it to launch yourself to the next island.

Make your way to the giant archway you previously moved. Follow the path to reach the crystal. Grab the crystal then move it to the moveable archway. Backtrack all the way back to the archway controller and turn the archway so you can retrieve the crystal. Be careful not to dump the crystal off the archway! Once again, grab the crystal then bring it to the shrine to complete the quest.

For more guides on The Legend of Zelda: Tears of the Kingdom, click here!

Guides

Tears of the Kingdom – Mired in Muck

by NightlyGamingBinge in

The Mired in Muck side quest in The Legend of Zelda: Tears of the Kingdom can be found by interacting with Bazz at the Upland Zorana Skyview Tower. You’ll find him stuck in the sludge, unable to move. To free him, you’ll need to splash some water on the sludge to make it disappear.

If you have a weapon with a hydrant attached you can use that. Alternatively, there will be some Slash Fruit growing nearby. Pick some of those then attach it to an arrow and shoot it at the sludge. This will wash it away! The Blue Chuchu Jelly will also have the same effect.

Once freed, speak with Bazz. As a reward, you’ll receive a Zora Spear! If your inventory is full, you won’t be able to receive this new weapon. Once you have the weapon, the quest will complete!

Guides

Tears of the Kingdom – Mogawak Shrine Guide

by NightlyGamingBinge in

The Mogawak Shrine in The Legend of Zelda: Tears of the Kingdom can be found in eastern Hyrule at Zora’s Domain under the walkways in the water.

Enter the shrine to begin The Power of Water challenge. Head down the stairs. Once at the bottom there will be an elevator straight ahead that leads up to the altar. Grab the battery on the ground in front of it using Ultrahand then bring it up the ramp and place it on the pedestal.

Along the wall you’ll see a cylinder with a board stuck to the side. Under it there will be an additional board. Stick that board on the opposite side of the one already on the cylinder.

You’ll then need to turn the whole thing so that one of the boards is in the water. This will cause it to spin, powering up the battery. While here, use Ultrahand to drag out the chest in the water. Inside this chest you’ll find a Magic Scepter!

Grab the charged battery then head down the ramp and go straight across to the other side to find another pedestal. Place the battery on the ground next to this pedestal. Activate your Ultrahand and drag the balls in the water as close as you can to each other in the middle of the pool. Next, place the battery on the pedestal to electrify the water and power the gate on the other side.

Jump in and quickly make your way across the electrified water to reach the chest containing an Opal. After making your way back across the water, bring the battery back to the other side and place it on the pedestal to charge it up again. Once charged, take the battery up the stairs next to the elevator.

Hop in the elevator then place the battery on the pedestal. This will power the elevator, allowing you to reach the altar where you’ll receive a Light of Blessing.

Guides

Tears of the Kingdom – Jirutagumac Shrine Guide

by NightlyGamingBinge in

The Jirutagumac Shrine shrine is located in the death star floating around the Lanayru Sky Archipelago which is almost directly above the Upland Zorana Skyview Tower in eastern Hyrule.

To reach you, use the tower to launch yourself into the air then glide over. There is a floating section near it you may want to stop at as the entrance to the death star is constantly moving, so you’ll need to wait for it to get in position to glide in.

Once you enter the giant sphere, head into the shrine to being the A Flying Device challenge. The first platform you start at will have three runways heading right, left and straight. The left and right platforms will have wings parked at the top while the middle one will keep spawning and launching them. You’ll want to start by moving the left wing onto the runway, sending it to the next platform on the left. Jump off the platform and glide after it.

On the next platfrom, grab the wind and carry it up the ramp to where the carts spawn. Attach the wing on top of the cart and send it down the ramp to the adjacent platform. Glide over there after it.

Carry the wing/cart up the ramp and place it on the runway pointing in the direction of the altar. Attach the beraby fan to the the back of the wing then hop on and strike the fan to take off on Airway Link.

Once you’re in the air, where you stand on the wing will determine its path. Move between the wings to keep it steady while staying towards the back to keep the nose of the wing pointed up. When you near the altar, you can move to the nose to try and land or just jump off and glide down bringing you to your destination. You can now grab your Light of Blessing and be on your way. We hope you enjoyed you time with us on Airway Link!

Guides

Tears of the Kingdom – Kadaunar Shrine Guide

by NightlyGamingBinge in

This shrine can be found on a sky island in the South Eldin Sky Archipelago west of the Eldin Canyon Skyview Tower.

You’ll have to overcome the Water Makes A Way challenge to reach the altar. in the first room, there will be water shooting out of a spigot on the wall to the right. Use your Ultrahadn ability to move the stone under the water to the other side of the little fence. This will cause another stone to be created. Keep attaching stones to make a bridge for you to cross the lava.

Once you’re on the other side, look to the left side of the room (opposite the cracked wall) to find a chest up on a ledge above some more lava. Add a couple more pieces of stone to your bridge and move it over to the ledge using it as a ramp to reach the chest.

Return to the cracked wall and break it using a blunt weapon. If you don’t have one, you can grab the Rusty Claymore on the left of the cracked wall and fuse it with one of the stone blocks from the lava. You can then use it to break the cracked wall heading through afterward.

When you reach the bridge over the lava, look to the left to spot the altar. Return to the chest in the previous room and grab your ramp using it to cross the lava lake reaching the altar. It will take 6 sections of rock slab to reach the other side where you can grab your Blessing of Light.

One random thing to note, there are a couple of hydrants throughout the level. You can fuse them with your weapons to add a water effect!

Guides

Tears of the Kingdom – Sinakawak Shrine Guide

by NightlyGamingBinge in

The Sinakawak Shrine in The Legend of Zelda: Tears of the Kingdom is located in the North Hyrule Plain.

Head inside the shrine to begin its challenge where you’ll have to construct a floating device ride up each level eventually making it to the altar. For the first level, get the square board and put one of the flame candles in the middle of it. You can then attach the balloon to the top of the candle and hop on quickly to reach the next level.

On the 2nd level, place a candle in the center of the door then attach the balloon to the top of it. The will send the balloon up pushing a button above the door opening the gate. Head through the doorway to reach the next area.

In the next area, glide down to the bottom level and grab the square board. Stick one of the candles to three corners of the board then facing the missing section of wall, head right to find a side area with a giant ball in the center of pillars of fire. Grab the ball and stick it to the center of the board then attach the three balloons to the candles. This will cause the board to rise bringing the ball with it.

Head to the gap in the wall and use the Ascend power reach the above platform. You can then grab the giant ball from the floating device and put it into the big hole. This will open the door revealing a chest containing an Opal.

Make sure to pull off one of the balloons from the platform and drop it down below. Next follow it down and grab the small ball placing just in front of the gap in the wall. Attach a candle to it and a balloon to that causing it rise into the air. It’s okay if the candle falls over while still attached to the ball, as long as the balloon is attached to the flame it will still go up.

Now use Ascend in the missing section of wall to rise to the above platform where you’ll grab the small ball from under the candle and place it in the small hole to unlock the door to the altar. If the balloon gets to high before you are ready, you can use Recall on it to bring it back down. Once you pass through the door and receive the Light of Blessing, the shrine will complete.

Guides

Tears of the Kingdom – Pony Points Rewards

by NightlyGamingBinge in

While adventuring around Hyrule in The Legend of Zelda: Tears of the Kingdom, you’ll come across many stables. Resting at these stables and registering new horses there will earn you pony points. Below are the rewards you can earn with your pony points! To receive these rewards, interact with the ledger in the stable once you have enough points!

Total PointsRewards
3Towing Harness
5Horse-God Fabric
7Malanya Bed
10Register 1 Additional Horse
13Traveler’s Saddle and Traveler’s Bridle
16Mane-Restyling Service
20Register 1 Additional Horse
23Knight’s Saddle and Knight’s Bridle
26Extravagant Saddle and Extravagant Bridle
30Register 1 Additional Horse