Welcome to NGB and our guide on where to locate the Scroll of Heaven during Kurtz’s side quest in Eiyuden Chronicle: Hundred Heroes.
Starting Kurtz’s Side Quest
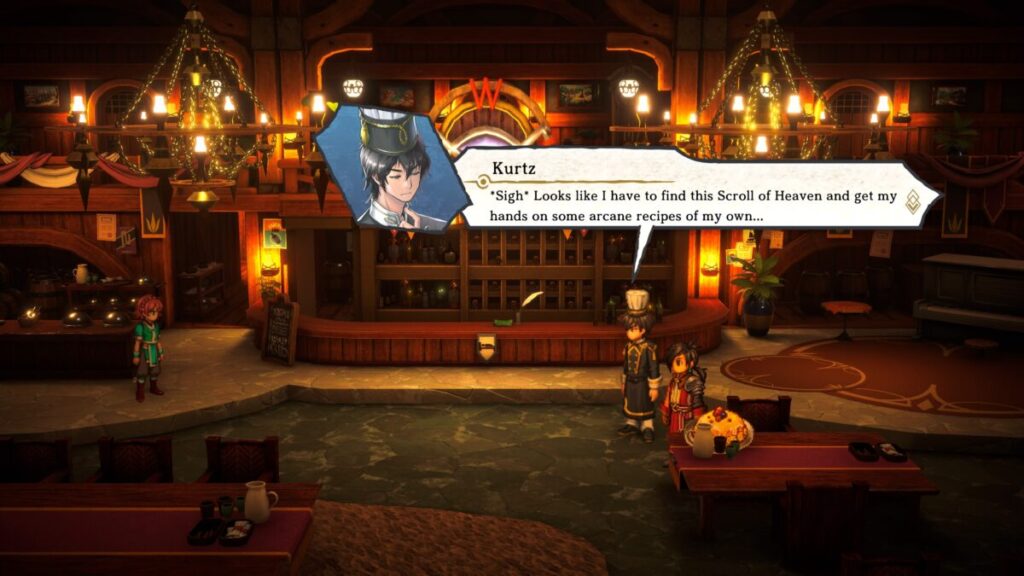
To kick off Kurtz’s side quest in Eiyuden Chronicle Hundred: Heroes, you’ll need to keep battling chefs in The Hero’s Den just outside your HQ. After a while, Trey will finally appear. This triggers Kurtz’s desire to get the Scroll of Heaven, as he’s eager to acquire some arcane recipes to compete with and hopefully beat Trey during the next cook-off.
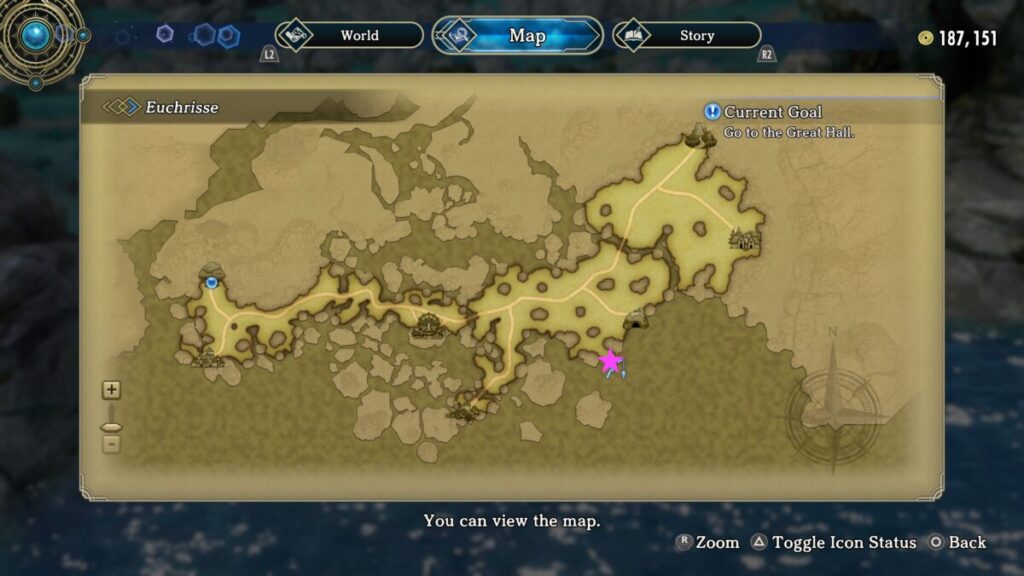
Scroll of Heaven Location
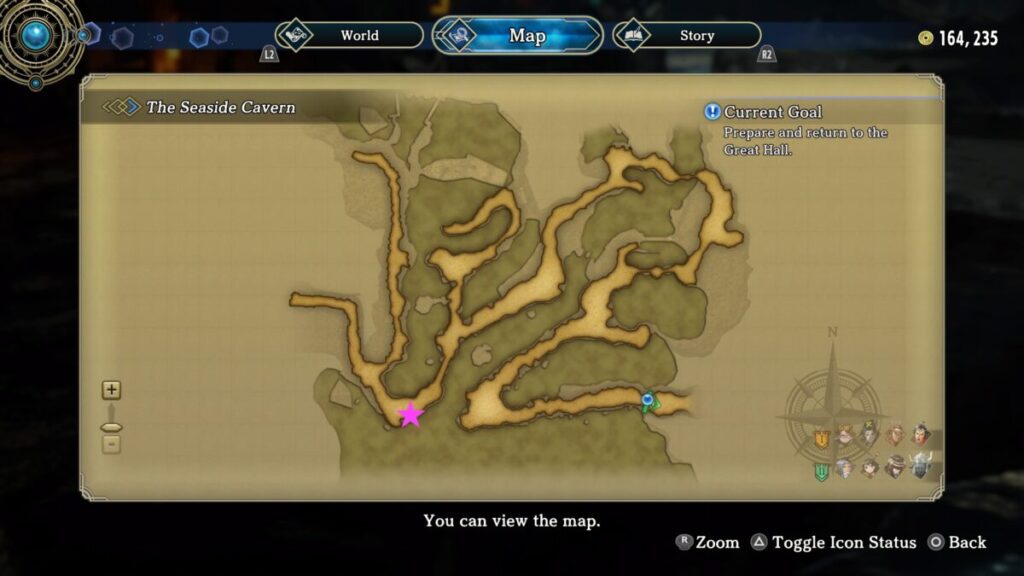
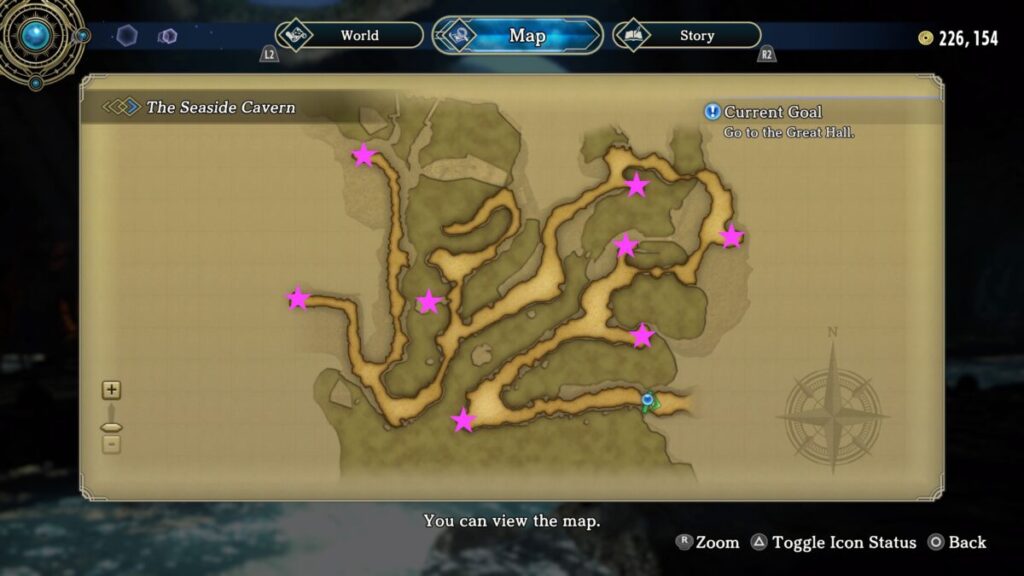
Now, to track down the mighty Scroll of Heaven, head straight to The Seaside Cavern, which can be found east of Hishahn. Navigate through the cavern following along the main path until you find the spot marked on the map below. You’ll then be able to interact with and pick up the scroll located right next to an ore collection point.
Once you’ve located the fabled Scroll of Heaven, return to Kurtz in the Hero’s Den outside your HQ to hand it over! He’ll be extremely happy and will get to work learning the recipes!
Eiyuden Chronicle Hundred Heroes Guides and Walkthroughs
For more Eiyuden Chronicle: Hundred Heroes guides and walkthroughs, click here!
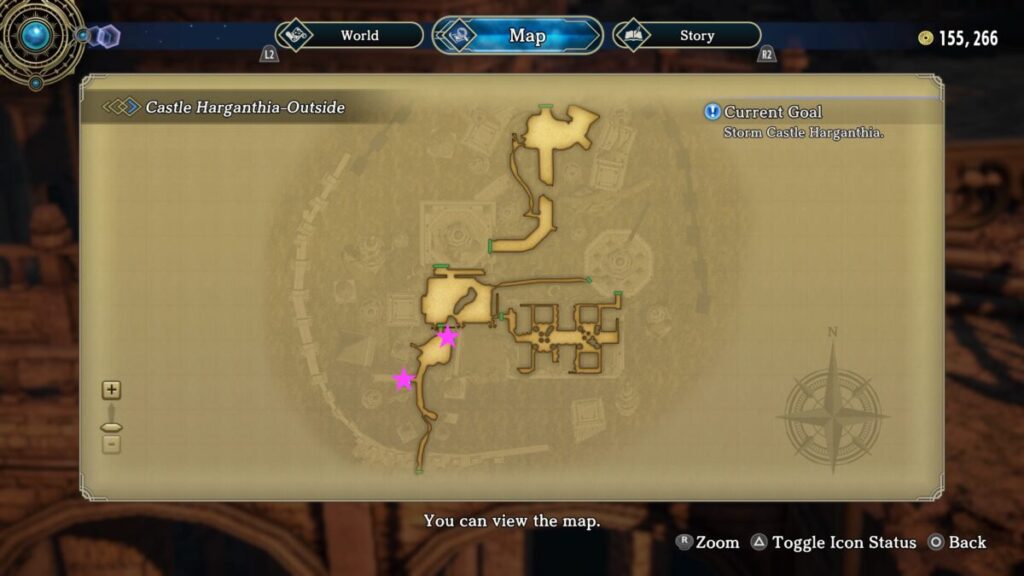
Welcome to NGB and our Eiyuden Chronicle: Hundred Heroes walkthrough for the Storming Castle Harganthia main quest. Here you’ll find everything you’ll need to breeze through this quest.
Enter your room to rest. Since you can’t sleep, leave your room and head up to the roof where you’ll find Yaelu and Seign. After Yaelu leaves, speak with Seign then head back down the stairs then enter Perrielle’s room on the east side of the floor. You’ll discover that she’s not there. Make your way out into the open area of the floor to encounter Euma who will wonder where Perrielle went. Head down to 2F and go to the balcony to find Hildi. On the western side of 2F, approach Lian and Mio. Enter the western room to find Melridge then approach your bedroom to encounter Garr. Following Garr’s instruction, head to your room.
Eiyuden Chronicle Hundred Heroes Guides and Walkthroughs
For more Eiyuden Chronicle: Hundred Heroes guides and walkthroughs, click here!
Welcome to NGB and our Eiyuden Chronicle: Hundred Heroes walkthrough for the An Unexpected Ally main quest. Here you’ll find everything you’ll need to breeze through this quest.
At the start of the An Expected Ally story, you’ll need to head to the Great Hall where Markus will join your allies. Give the word if you’re ready then make your party formation. Marisa, Wayve and Markus will be required. Once you arrive at the site, head to the castle via the chains to trigger a cutscene.
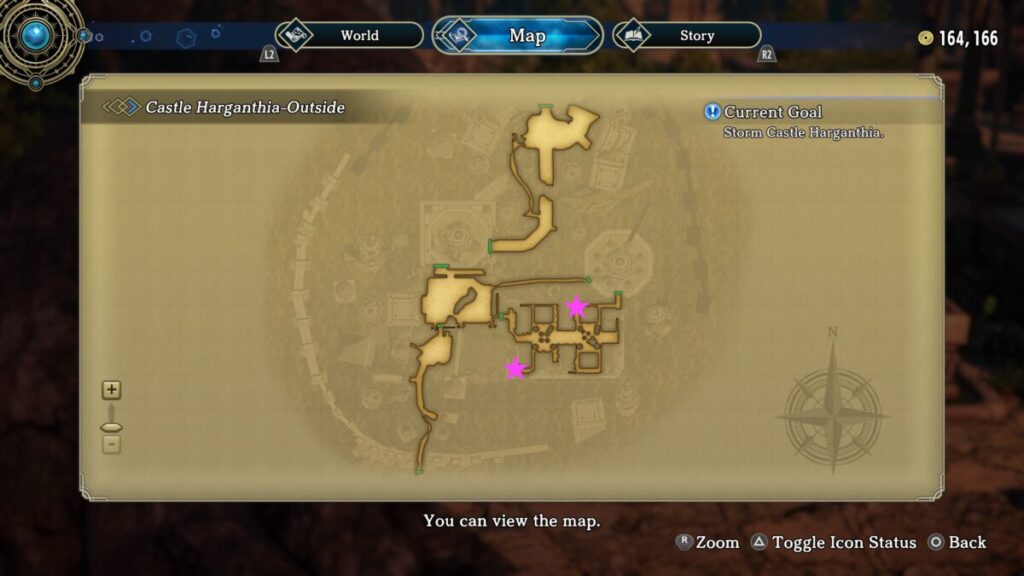
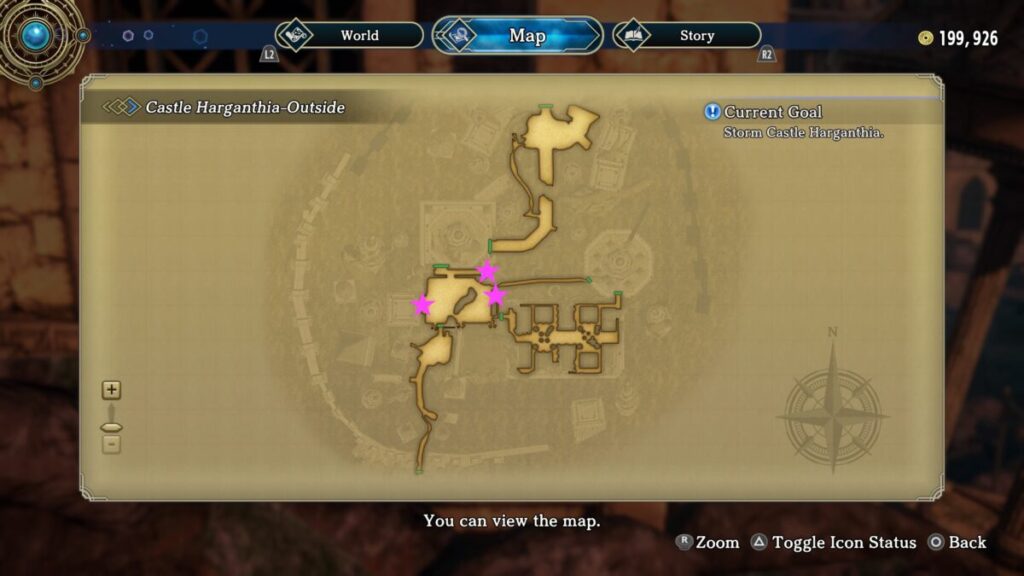
Castle Harganthia Collectibles
Enemies
Balor
Corpse Rider
Evil Spirit
Hell Guard
Hell Knight
Hellflower
Lilith
Petit Gargoyle
Soul Reaper
Torasampe
Xibalba
Collectible Materials
Lumber
Sacred Tree Chip
Chests
Pearl Bangle
Rune of Impassable Resistance
Anti-Seal Scarf
Rune of Arcane Magic
Warded Ribbon
Faded Book, Chapter 9
Rune of SP Charge
Mystical Bangle
Turquoise Bangle
Tanzanite Bangle
Rune of Rapid Shot
Rune of Runeshard Studies
Elemental Symbol
Material Symbol
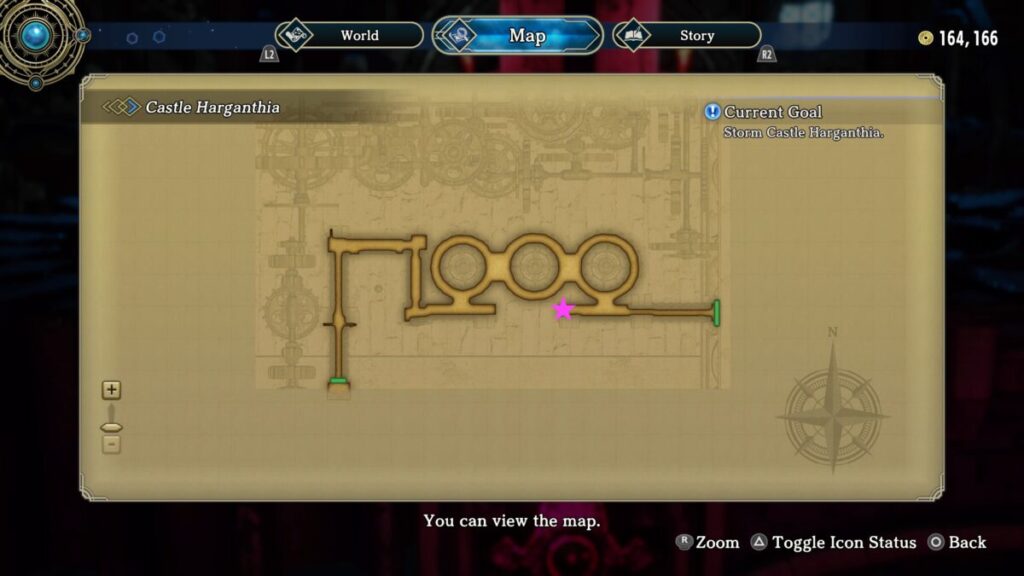
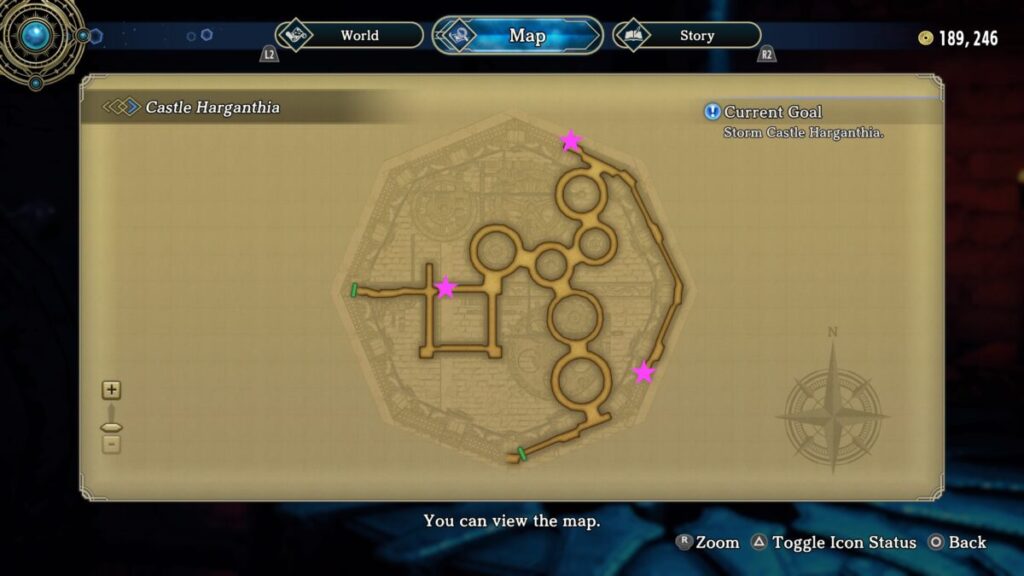
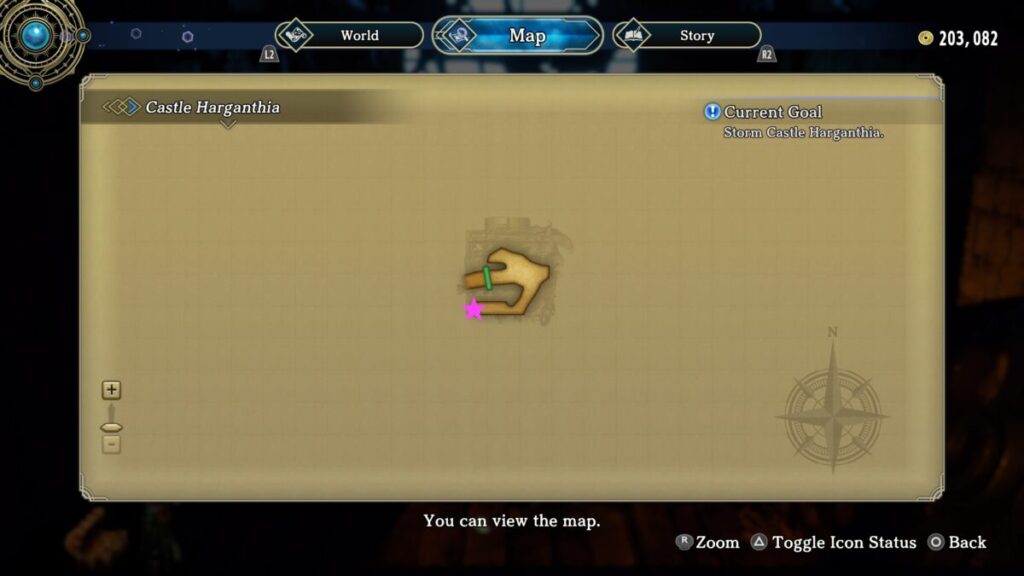
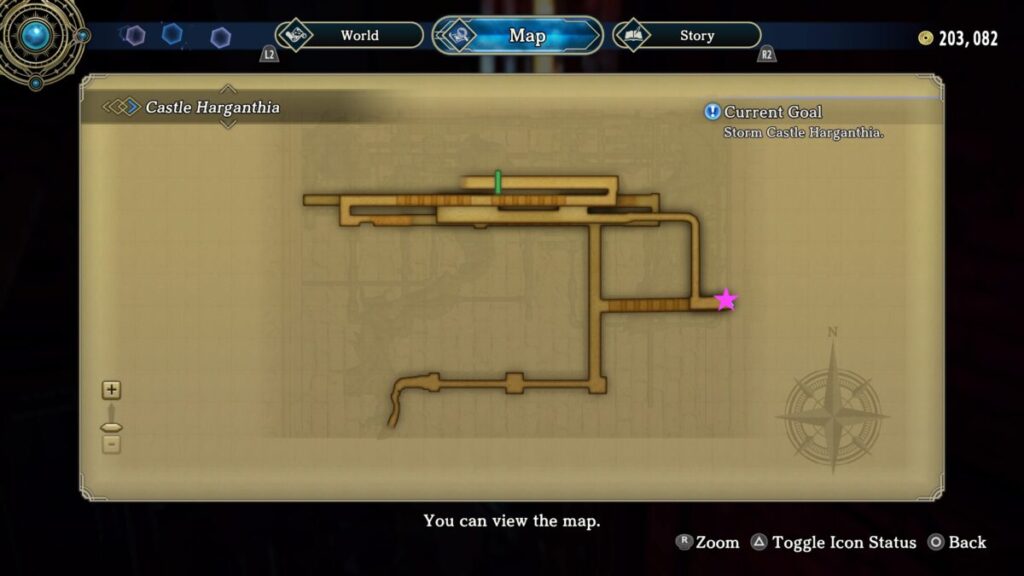
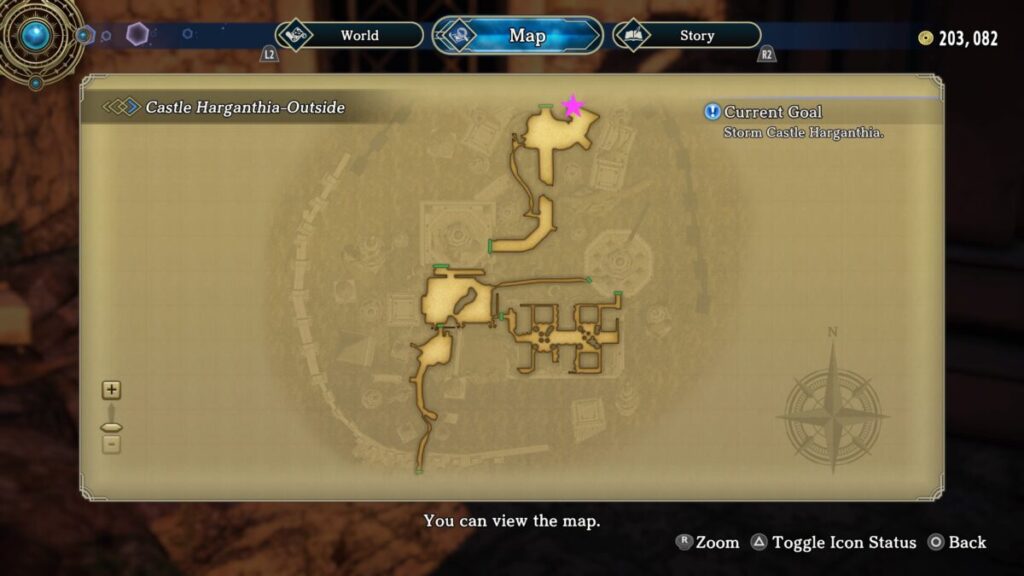
Storm Castle Harganthia
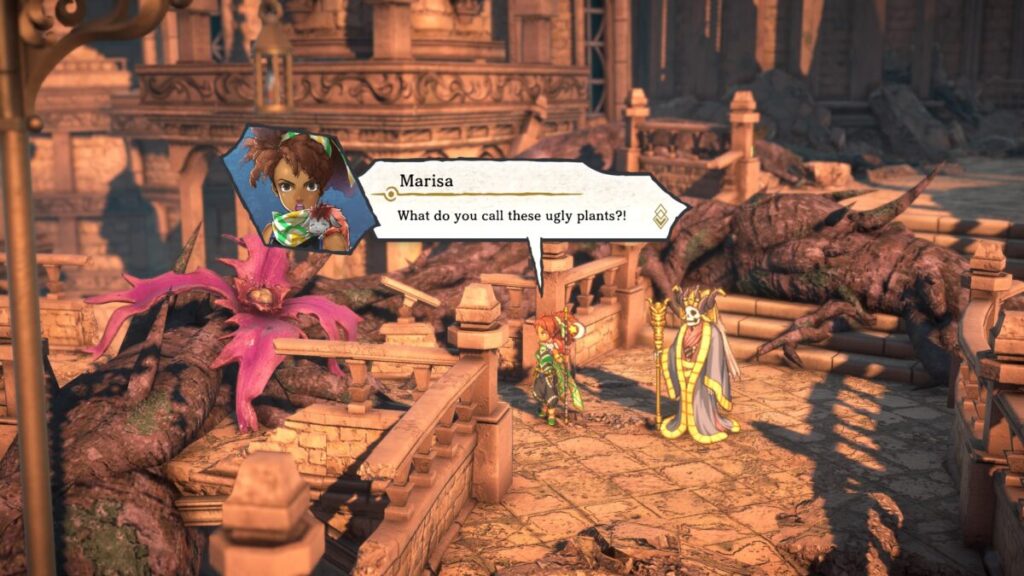
When you gain control of Marisa, approach the pink flower on the vine to trigger a cutscene where Markus will tell you to hit the flower.
Doing so will make the vine disappear! As you make your way through the castle, you’ll need to continue destroying the flowers to remove the vines, allowing you to continue on. When you reach the end, you’ll face off against the Dead Countess. During this fight, Samurai-Revenant, Maiden-Revenant and Spookybear-Revenant will join her. After you take her down, you’ll face off in a duel with Diradhe and Marisa.
Go to the Great Hall
After the battles, you’ll find yourself back in HQ. Make your way to the Great Hall! Lakian will join your party during the cutscene!
Eiyuden Chronicle Hundred Heroes Guides and Walkthroughs
For more Eiyuden Chronicle: Hundred Heroes guides and walkthroughs, click here!
Welcome to NGB and our Eiyuden Chronicle: Hundred Heroes walkthrough for The Next Steps main quest. Here you’ll find everything you’ll need to breeze through this quest.
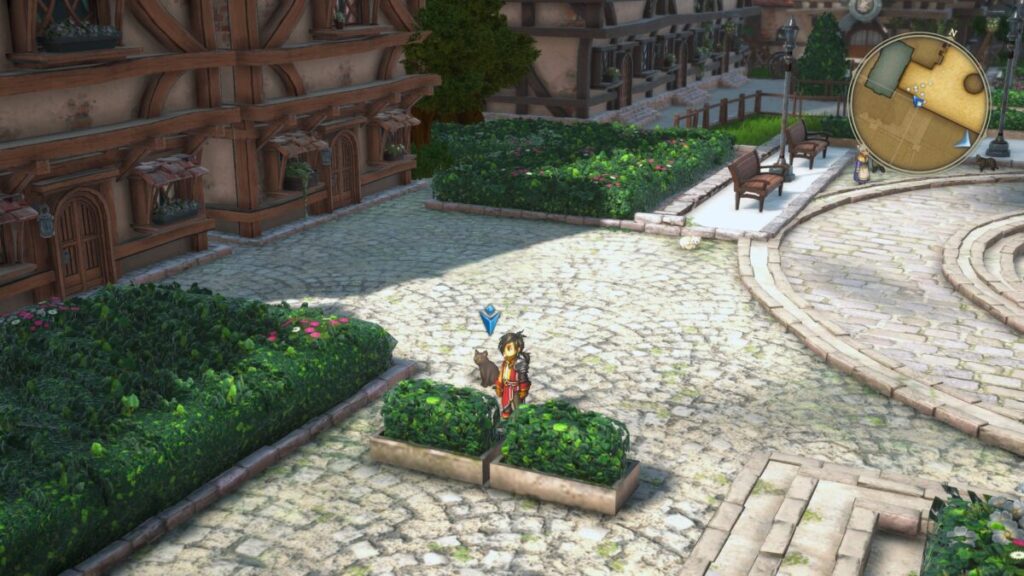
For this task, you’ll need to travel around the world in Eiyuden Chronicle: Hundred Heroes to find and recruit more allies! Before setting out, make sure to set up your party! Afterwards, explore the area outside your HQ to find the following:
Blue Impact Curry Recipe – Speak with Chef Forreger in the inn for a cooking battle. When you win, you’ll receive recipe.
Rune of Radiance – Speak with Sayid Ali in the northwestern corner of the area surrounding your HQ.
When you’re ready to set out into the world, approach the southern exit of your HQ to trigger a cutscene with Markus. Afterwards, The Next Steps story will complete! Now is a good time to clean up some allies that can be recruited from the areas you’ve previously been to along with recipes.
Fort Xialuke
Galactic Meat Recipe – Speak with the Traveler inside the fort.
Eltisweiss
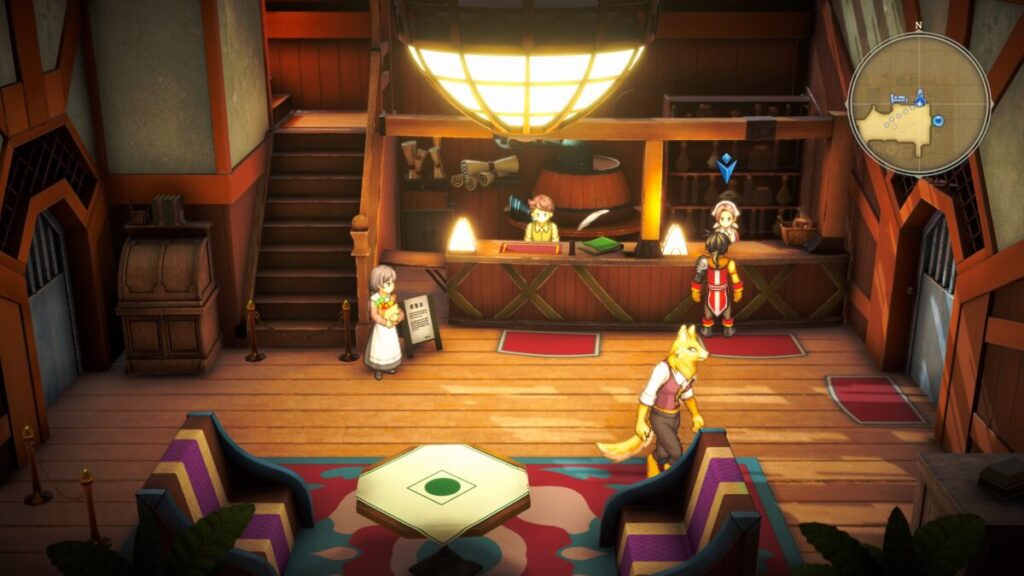
Larla – Speak with her in the Hero’s Den. To recruit her, you’ll need to first have the Mission Guild in your HQ unlocked (see Fume below in Dappled Forest section). Once you have the Mission Guild, you’ll need to get an “Epic Success” on a mission. Do do this, form the Mission Party with the highest overall rating by paying attention to the character’s Mission Aptitude! Once you get an Epic Success, return to Larla and she’ll join you!
Isha – Speak with Isha in the southeastern corner of town to learn that she is looking for a black cat with a slinky walk. You’ll find this cat in the southwestern corner of town.
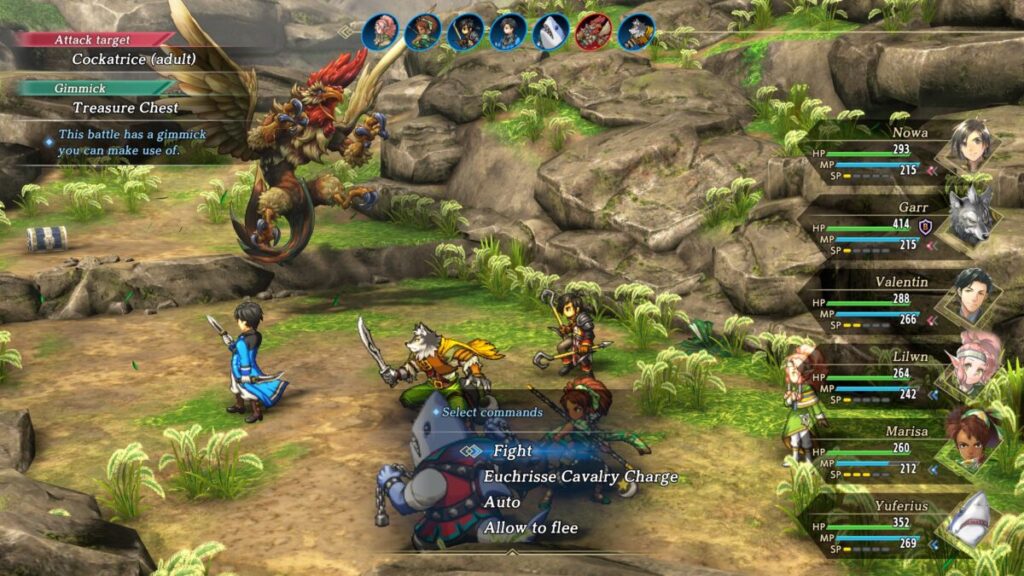
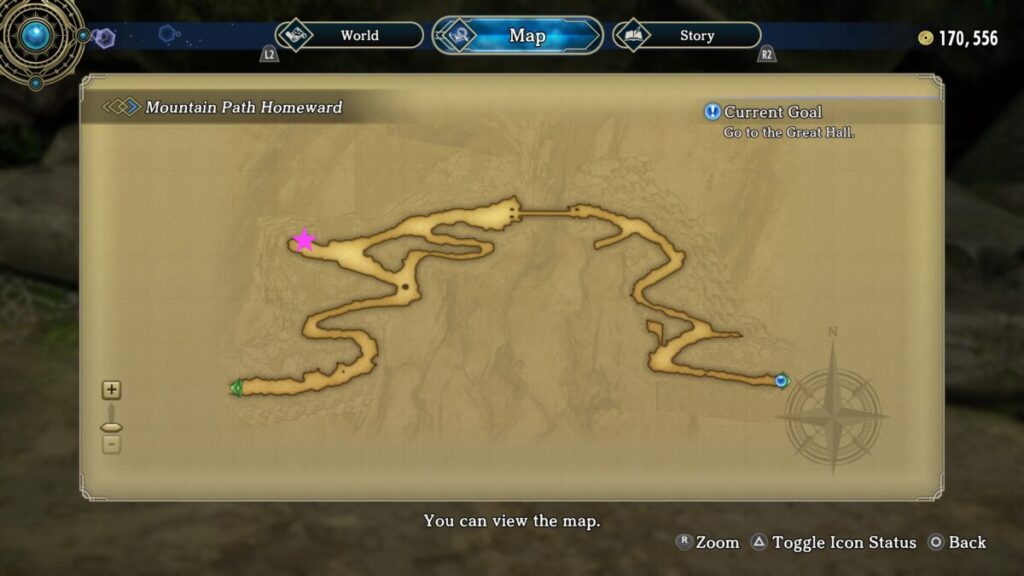
Once you find it, Isha will give you a Stamp Card. She’ll then want some cockatrice eggs which can be found in the Mountain Path Homeward, which is to the northwest of town on the way to Nowa’s hometown. This egg will come from fighting an adult cockatrice that just randomly spawns as you’re walking around.
Please note that it may take some time for this creature to show up! Once you have the egg, return to Isha to hand it over. Lastly, she’ll want you to deliver a package to Arenside. Once in Arenside, enter the inn and hand the package over to the woman behind the counter (right side). Afterwards, return to Isha for your third stamp and she’ll join you!
Shooting Star Recipe – Speak with the man in the northeastern house.
Douglas – Speak with him in the smithy. In order to get him to join, you’ll need to give him 10 Iron Ore.
Faded Book, Chapter 20 – Approach him in the southwestern corner to learn about beigoma. Afterwards, head east passing the shops and enter the house to find Dr. Corque. You’ll then have Beigoma Battle with Reid! Follow the tutorial! Before leaving this building, make sure to loot the chest in the back to get the Faded Book, Chapter 20!
Altverden Village
Pancakes Recipe – Speak with the lady in the house east of the inn.
Werne Village
Pieter – Speak with him tending the field in the northwestern corner of town.
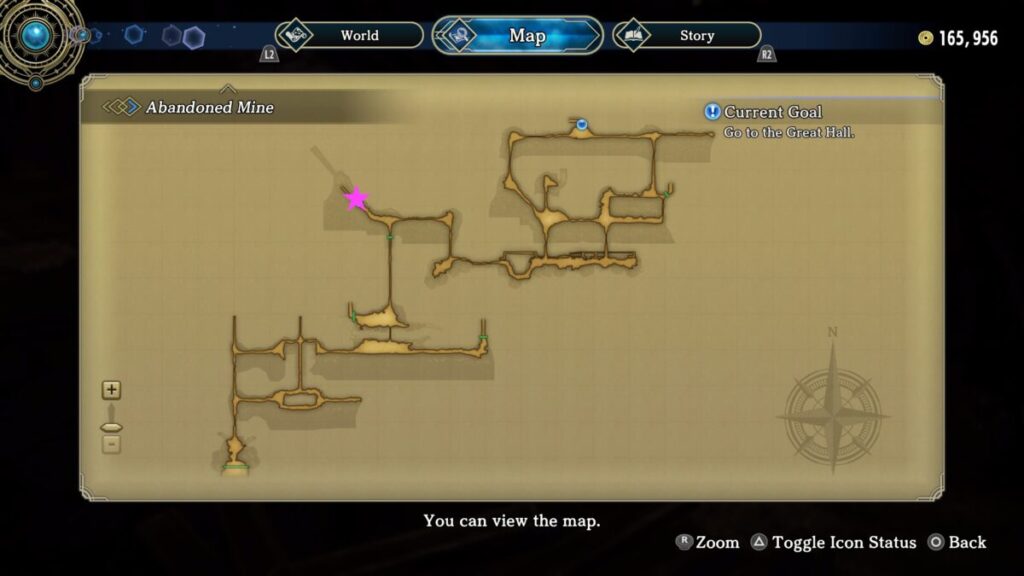
Abandoned Mine
Galdorf – At the entrance, speak with Galdorf who is looking for palenight mail. You’ll find this equipment laying around near where you find Ormond along the western path just after the Abandoned Mine 2 save point (see map below). Return this mail to Galdorf to get him to join your alliance!
Hiro – Speak with Hiro (the merchant) in the second area of the mine. He will then join your party!
Ormond – Make your way past the Abandoned Mine 2 save point then take the first path to the west. Speak with Ormond to learn that he wants 3 Iron Ore. Bring him this ore then he’ll join you!
Mountain Path Homeward
Maureus – Speak with Maureus who will want to see some with “muscle points”. We had Yuferius in our party and this was acceptable! After you show him someone, he’ll join you!
Kyshiri Village
Tomato and Cheese Sandwich Recipe – Speak with the woman in the house just north of the inn.
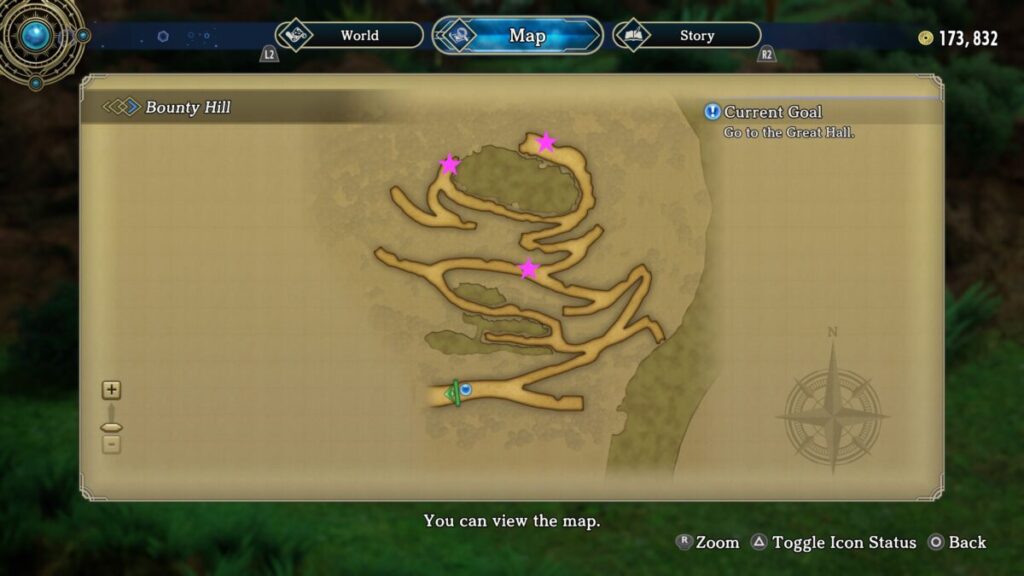
Bounty Hill
Enemies
Gold Bug
Hippogriff
Qualasmi
Collectible Materials
Dire Beastbone
Legend Beast Horn
Chests
Scallop Lunch Set Recipe
4000 Baqua
Mixed Fruit Recipe
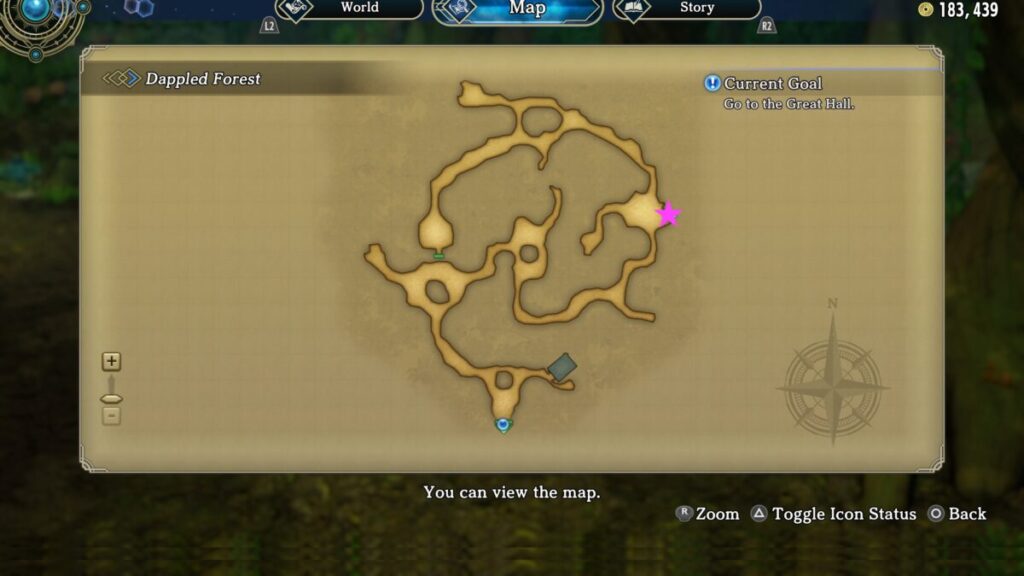
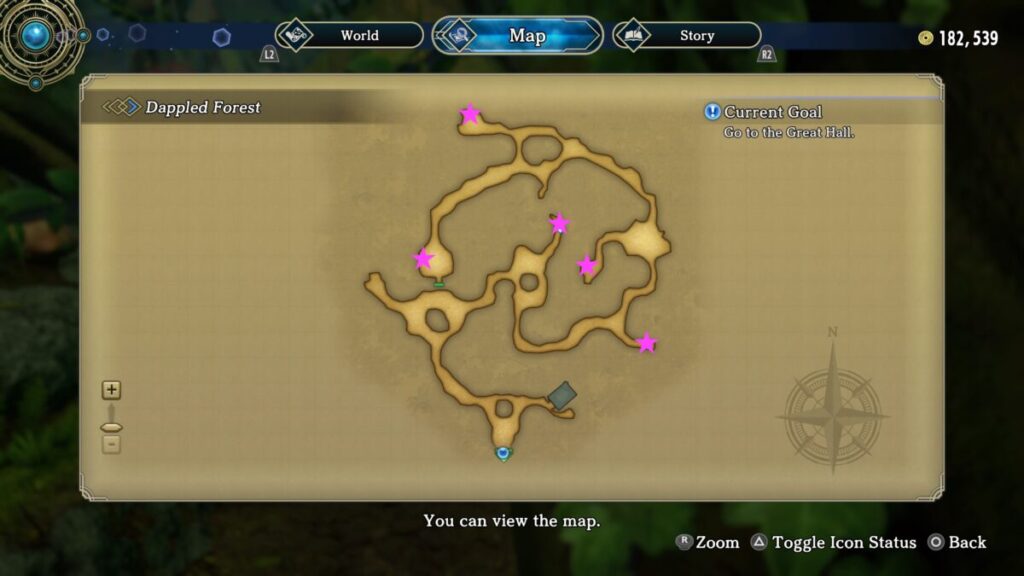
Dappled Forest
Fume – To get him to join, you must first upgrade your HQ to Level 2 then recruit Huang (see Hishahn below). In your HQ you’ll then be able to unlock the Guild Missions on the blueprint. Speak with him after you do this and he will join.
Enemies
Forest Ruler
Phantombird
Red Wyvern
Seed Conqueror
Collectible Materials
Excellent Laquer
Mystic Lumber
Chests
Rune of Power Smash
Vegetable Milk Soup Recipe
Magic Holy Water
Sautéed Chicken Breast Recipe
Magic Holy Water
The Treefolk Village
Squash – To get him to join, you’ll need to fight Phantombirds in the Dappled Forest until one drops a Sparklestone.
Hishahn
Huang – To get him to join, give him a wheel-eye bream which can be obtained from a fishing spot south of The Seaside Cavern which is east of Hishahn.
Cold Pho Recipe – Speak with the woman in the house west of the smithy.
Syd – To get him to join, he’ll need an iron ore, mystic lumber and dire beastbone.
Jorhan – To get him to join, you must first have Perrielle in your party to learn that he is looking for a treasure that is dropped from the Scarabs in the Eastern Desert (fast travel to Dabavin and you’ll be there!). Specifically, you’ll need to keep fighting the Scarabs until you receive an Unknown Antique. Bring this to an appraiser. Hopefully it will be a Yellow Rose Censer! If not, keep fighting the Scarabs until you get another Unknown Antique then bring it back to the appraiser. Once you get a Yellow Rose Censer, return to Jorhan and he’ll join the Alliance.
Aire – Speak with her on the southwestern side of town and agree to race her! If you loose, equip any speed increasing items that you have then try again! Once you win, Aire will join you!
Momo – Approach the southeastern side of the area to cause Momo to stop you. Agree to depart with her and you’ll find yourself in the Seaside Cavern. At the end of the area by the second save point, you’ll find a seal and a cutscene will trigger. After Momo breaks the seal, continue deeper into the area to find the boss, Kraken. For this battle, you can use the gimmick called “Open the Floodgates”. To use the gimmick, you’ll need to attack the lever on the right wall twice to cause the flood gate to open and the water level to lower. Next, use the “Load the Harpoon Gun” gimmick, by interacting with the harpoon on the left side of the Kraken. Once loaded you can then use the “Fire Harpoon Gun” gimmick to deal massive damage! After defeating the Kraken, Momo will join the Alliance!
The Seaside Cavern
Enemies
Sahagin
Savage Crab
Sea Slater
Shell Octopus
Collectible Materials
Iron Ore
Stone
Chests
Rune of Water Enchantment
Mint Chocolate Ice Cream Recipe
Unknown Pocket-Watch
Faded Book, Chapter 6
2500 Baqua
Blue Symbol
Lucky Badge
Rune of SP
Daphan Village
Herb Tea Recipe – Speak with the musician to the left of the entrance of town.
Enoe – Speak with him in the southwestern corner of town and he’ll join your cause if you’ve recruited Fume (see above under Dappled Forest section).
Hakugin – With Mio in your party, speak with her and she’ll join you.
Code L – With a Rune of Currents in your inventory, speak with Code L in the Rune Shop and he’ll join you!
B’baba – Speak with B’baba in the northwestern house and she’ll join you!
Impershi’arc
Cabana – Speak with him and he’ll join you!
Ardinale City
Clarke – First, purchase The Star-Cross’d Lovers Script for 5,000 baqua from the General Store in the lower southwestern corner of the city (commoner’s section). Afterwards, speak with Clarke by the water fountain in the noble’s section of the city and he’ll join the Alliance.
Athrabalt
Foxiel – After speaking with Fox, head to your HQ approach Kurtz in the inn and he’ll give you Vegetable Milk Soup. Return to Fox and she will join the Alliance!
Your HQ
Faye – Once you’ve recruited B’baba (see Daphan Village section above) approach B’baba’s new shop on the eastern side of 1F to trigger a cutscene. Next, head all the way up to the roof to find Faye with Yusuke. She’ll run away again so speak with B’baba again to learn her next location. This time, exit B’baba’s room and enter the western room on 1F to find Faye with Francesca. Yet again, she’ll run away and you’ll need to return to B’baba. For the last time, make your way to 2F and you’ll find Faye with Yume and her friend in the center of the area near the stairs leading up to the 3rd floor. The Mighty Faye will then join the Alliance!
In the Hero’s Den, speak with Allaby and she’ll join you!
In the Hero’s Den, interact with Chef Sears and win the cook-off to get the Roast Beef Recipe.
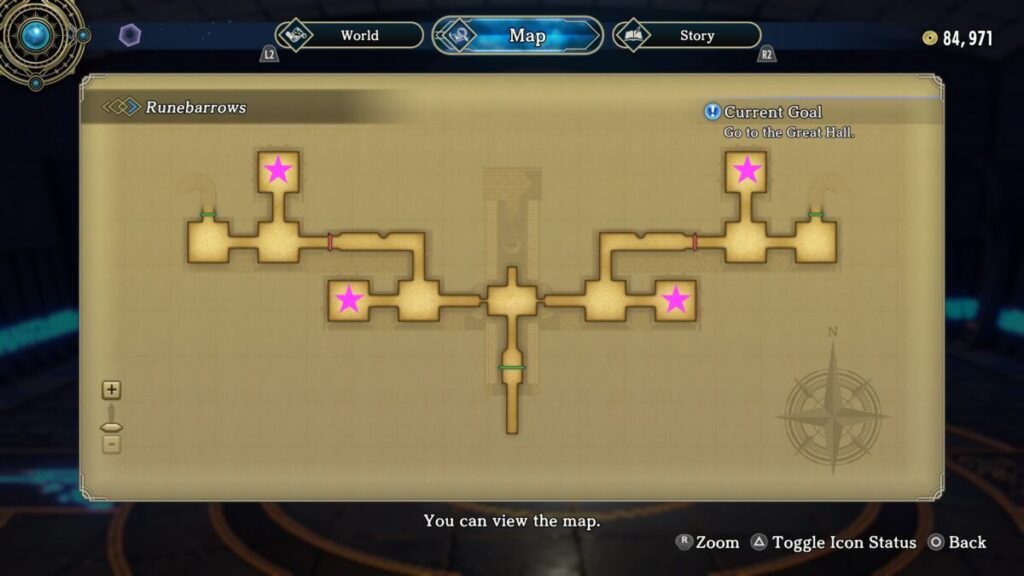
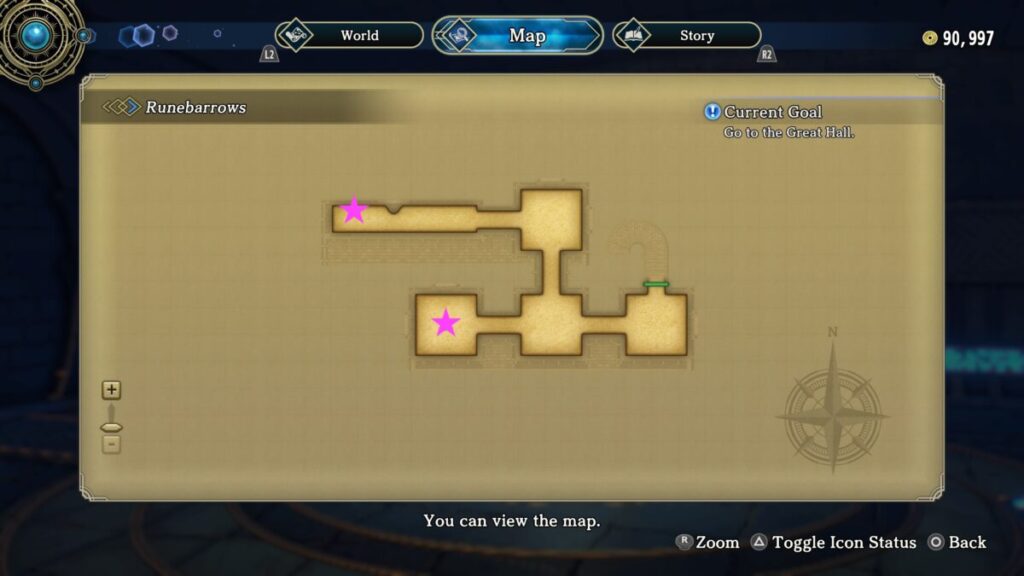
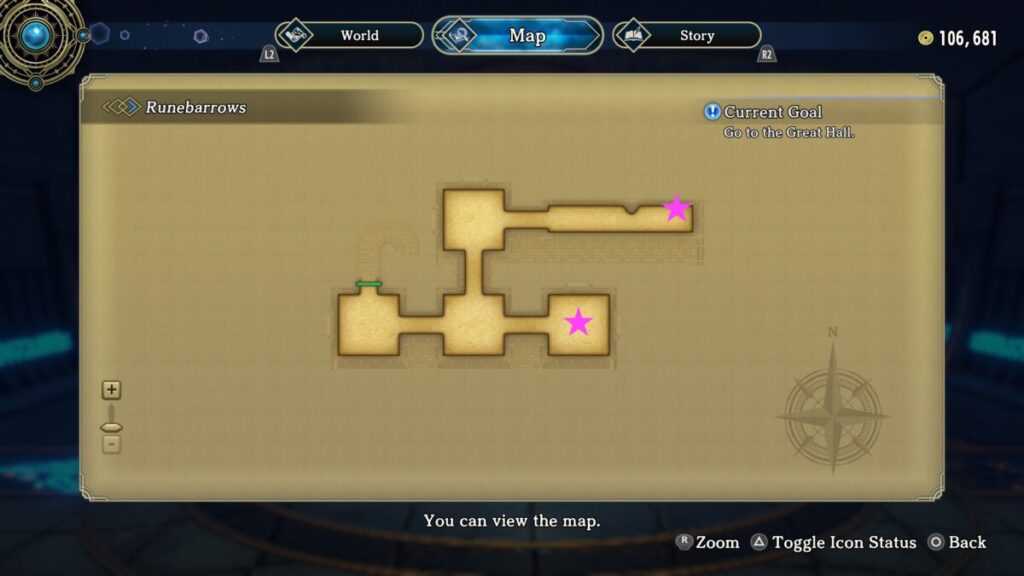
CJ – Head to the southern exit to trigger a cutscene with CJ who is looking for Isha and Garoo. Afterwards, set Isha and Garoo in your party then set off for the Barrows east of Arenside. After the reunion, you’ll face the boss, Prometheus! During the fight, you’ll be told to flee so do that! Afterwards, step on the right platform to open the door then follow the path to reach a device that will teleport you. Interact with the device again to get it to move forward onto the red circle. Continue following the path deeper into the Runebarrows to check for more. As you come across the devices, solve the Runebarrows puzzles to disengage all 4! Once all have been disengaged, you’ll automatically be put back into battle with the rune golem. Take it down and CJ will join you!
Runebarrows (East of Arenside)
Enemies
Borschy
Darkcat
Earthcat
Firecat
Lightcat
Orbguard
Trovegeist
Watercat
Windcat
Chests
Wealth Badge
Faded Book, Chapter 8
Super Lucky Badge
Nanami Ice Cream Recipe
Dark Chocolate Cake Recipe
Rune of the Warrior’s Pinnacle
Monster Repel Charm
Rune of the Warrior’s Path
Eiyuden Chronicle Hundred Heroes Guides and Walkthroughs
For more Eiyuden Chronicle: Hundred Heroes guides and walkthroughs, click here!
Welcome to NGB and our Eiyuden Chronicle: Hundred Heroes walkthrough for The Generals’ Decision main quest. Here you’ll find everything you’ll need to breeze through this quest.
Once in Norristar, head east to Twinhorne. You’ll have to huff it as you can’t fast travel! When you arrive at Twinhorne, you’ll need to form your team consisting of Nowa, Seign and Marisa. After you make the additions to your team, head north to find yourself facing Experimental Specimen A_0099. Take it out then approach the broken ships straight ahead to trigger a cutscene. Afterwards, The Generals’ Decision story will end.
Eiyuden Chronicle Hundred Heroes Guides and Walkthroughs
For more Eiyuden Chronicle: Hundred Heroes guides and walkthroughs, click here!
Welcome to NGB and our Eiyuden Chronicle: Hundred Heroes walkthrough for The Threat of the Empire main quest. Here you’ll find everything you’ll need to breeze through this quest.
Once the meeting is over, head down and rest at the inn.
Go to the castle
Afterwards, head back up to the castle and enter the meeting room. You’ll then begin the war battle. After war, you’ll be treated to another cutscene. You’ll need to first form a party with Seign, Hildi, Valentin and Pohl.
Hurry to the west gate
With your party formed, head to the western gate of Athrabalt. Along the way, you’ll fight Corpse Riders. When you reach the gate, you’ll fight Maiden-Revenant.
Hurry to the east gate
After your battle with the Maiden-Revenant, you’ll immediately be thrown into a cutscene during which you’ll become Nowa. After selecting your team, head to the eastern gate. Along the way you’ll fight Corpse enemies! Once you reach the eastern gate, you’ll face Samurai-Revenant.
Hurry to the south gate
After your battle with the Samurai-Revenant, you’ll immediately switch over to Marisa and her required team members of Wayve, Lilwn, Nil and Alwe. After selecting the rest of your team, head to the southern gate. Along the way you’ll fight some Corpse enemies! Upon reaching the southern gate, you’ll face Spookybear-Revenant and 2 Corpse Knights. Immediately after this fight, you’ll face Spookybear-Revenant again. This time, however, it will be by itself.
Eiyuden Chronicle Hundred Heroes Guides and Walkthroughs
For more Eiyuden Chronicle: Hundred Heroes guides and walkthroughs, click here!
Welcome to NGB and our Eiyuden Chronicle: Hundred Heroes walkthrough for the A Secret Plan main quest. Here you’ll find everything you’ll need to breeze through this quest.
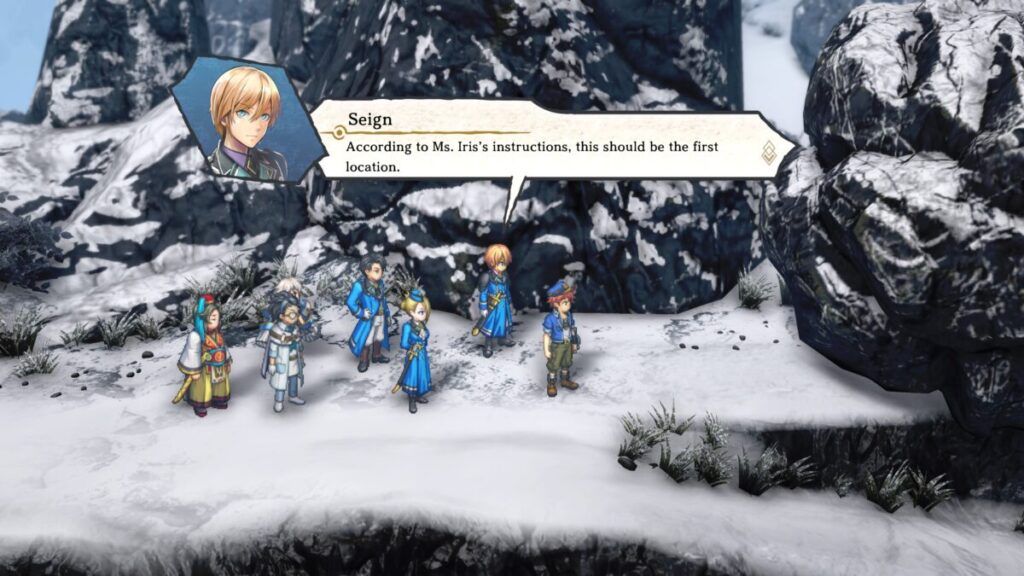
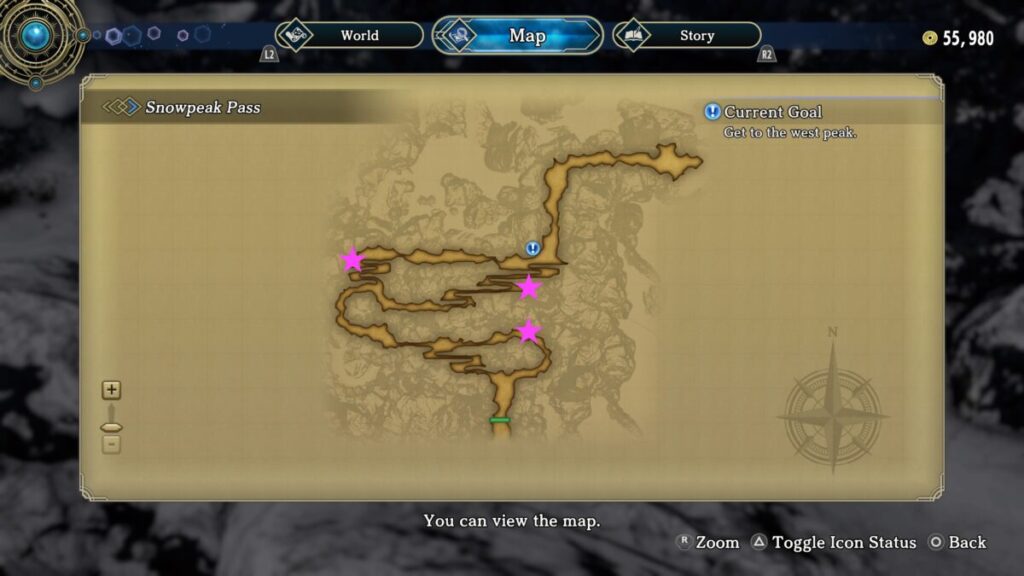
Once in the Snowpeak Pass, you’re party will split into 3. For the first team, you’ll be required to have Seign, Valentin, Pohl and Hildi. Be mindful of the other party members that you choose to complete this team as you will not be able to use them for Nowa or Marisa’s teams! Seign’s team will be the first team that you’re going to play as! As Seign, take the western path. Make your way up to the northern part of the area to find a giant boulder blocking the path. The game will then switch over to Marisa’s team.
Western Snowpeak Pass Collectibles
Enemies
Frost Shell
Jotunn
Snow Boxer
Collectible Materials
Pelt
Chests
Anti-Blind Scarf
Wyvern Leather Shoes
Peridot Brooch
Go to the east peak
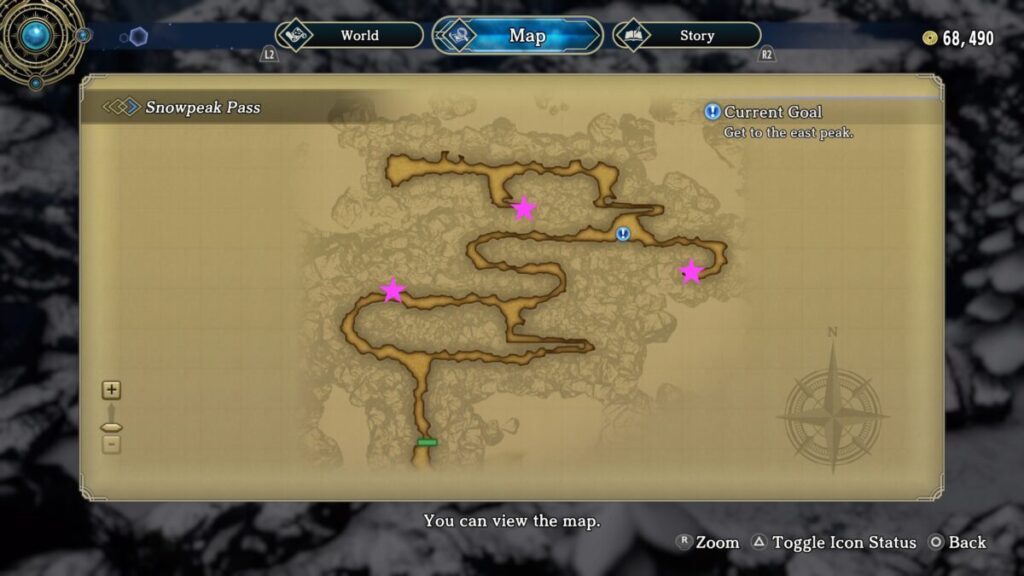
For Marisa’s team, you’ll be required to have Marisa, Wayve and Nil! After selecting your party, set out for the eastern path! Leene will want to join your party so you’ll need to boot someone or add her as an attendant! When you reach the northwestern corner of the area, it’ll be Nowa’s turn to take over!
Eastern Snowpeak Pass Collectibles
Enemies
Frost Boar
Jellysalis
Snow Boxer
Collectible Materials
Legend Beast Horn
Pelt
Chests
Magic Holy Water
Elemental Crystal
Opal Bangle
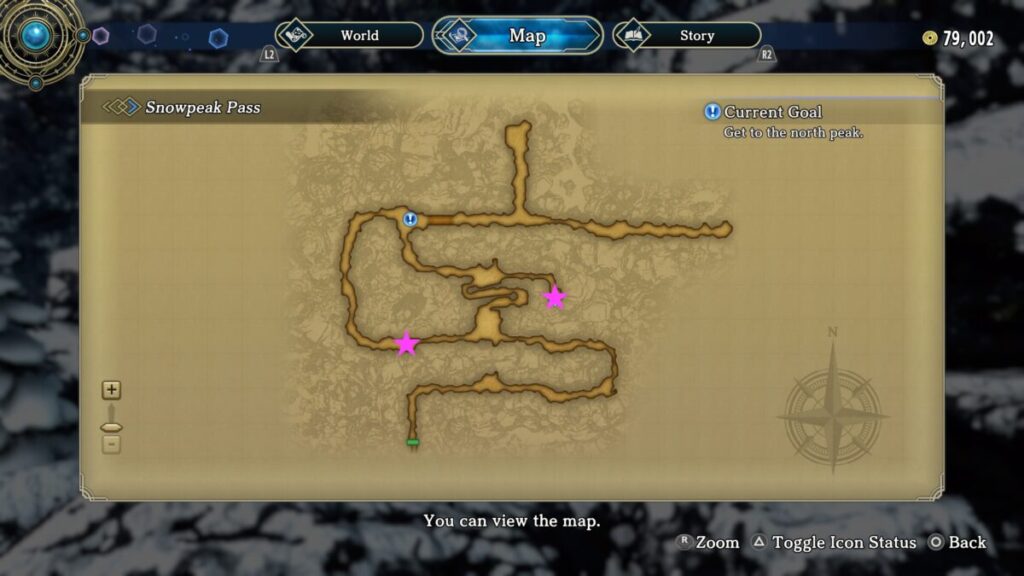
Go to the north peak
For Nowa’s team, you’ll be required to have Nowa, Garr, Mio and Lian. After selecting your party, head north to reach the north peak. When you reach the midpoint where the ! is, you’ll switch over to Seign’s team! Finish heading north through the Snowpeak Pass.
Northern Snowpeak Pass Collectibles
Enemies
Assault Tiger
Frost Shell
Snow Boxer
Sonic Wolf
Collectible Materials
Legend Beast Horn
Pelt
Chests
Rune of the Sniper’s Pinnacle
Anti-Sleep Scarf
Reach the north peak runic bomb site
As Nowa’s team, you’ll need to keep pressing through the area to reach the northeastern side where you’ll find a save point.
Return to Athrabalt
Head all the way back down to the beginning to trigger a cutscene followed by a boss fight against Heinrich. After you win the bout, the explosives will trigger causing the avalanche.
Hurry back to Athrabalt
Continue making your way back to Athrabalt! When you arrive, head north to the castle.
Eiyuden Chronicle Hundred Heroes Guides and Walkthroughs
For more Eiyuden Chronicle: Hundred Heroes guides and walkthroughs, click here!
Welcome to NGB and our Eiyuden Chronicle: Hundred Heroes walkthrough for The Coming Storm main quest. Here you’ll find everything you’ll need to breeze through this quest.
Before setting out to Yarnaan, make your way to the inn at your HQ to find Simmere, the chef. Speak with her to begin the cook-off. Once you win this one, you’ll receive the Pot-au-feu Recipe!
When you’re ready to progress the story, head to Yarnaan then make your way up to 3F to trigger a cutscene.
Hold off the revenants until the villagers escape
Take the platform down to 1F then approach the eastern exit for another cutscene during which Lilwn Rowad Fawud will join you! Afterwards, you’ll need to defeat numerous waves of Corpse Guards and Corpse Witches.
Turn back to Athrabalt
Once you’re finally done fending off all the waves, you’ll find yourself in Norristar. Head on down to Athrabalt.
Go to the castle
After the quick cutscene with Maxim, head north to the castle to meet with Perrielle. Euma Siarith and Kassius will join you!
Rest at the inn
Do as the objective says and rest at the inn!
Go to Melridge in the castle
When you awake, visit Melridge in the castle to learn the plan he’s cooked up!
Head for Snowpeak Pass
When you’re ready, exit town and head north to find Snowpeak Pass.
Eiyuden Chronicle Hundred Heroes Guides and Walkthroughs
For more Eiyuden Chronicle: Hundred Heroes guides and walkthroughs, click here!
Welcome to NGB and our Eiyuden Chronicle: Hundred Heroes walkthrough for the In the Land of Snow main quest. Here you’ll find everything you’ll need to breeze through this quest.
When the cutscene ends, exit the town then head to the northwestern part of Norristar to reach Skriss Village.
Skriss Village Collectibles
Chili con Carne Recipe – Speak with the adult in the house to the west of the inn.
Curry Recipe – In the same house as the above, speak with the kid.
Hurry to the cave north of the village
Before leaving town, head to the southwestern corner to find Sayid Ali wandering around. Speak with him twice and he’ll disappear yet again!
When you’re ready to proceed, head to the northern part of town to find the Ice Cave.
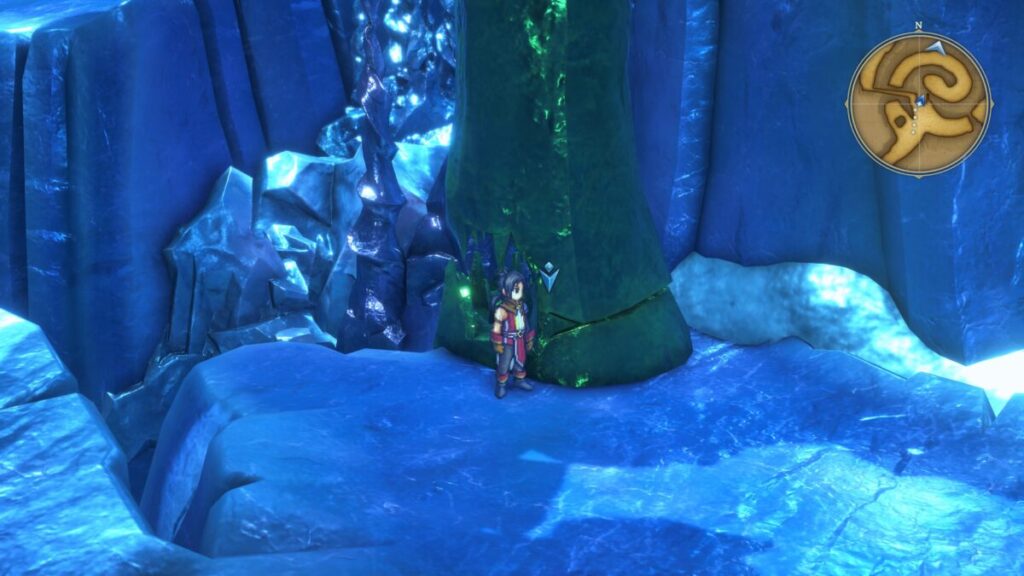
The Ice Cave Collectibles
Enemies
Carbuncle
Frost Slime
Ice Golem
Ice-soul
Snow Wolf
Collectible Materials
Platinum Ore
Stone
Chests
Rune of Quick Slash
Ancient Shield
Blue Symbol
Rune of Currents
Anti-Paral Scarf
3200 Baqua
Eyepatch
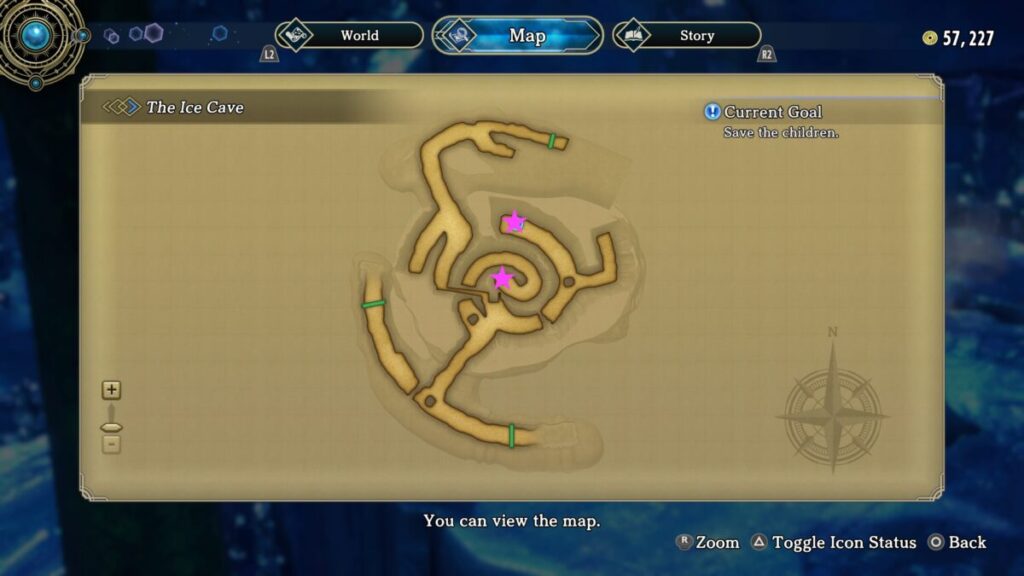
Save the children
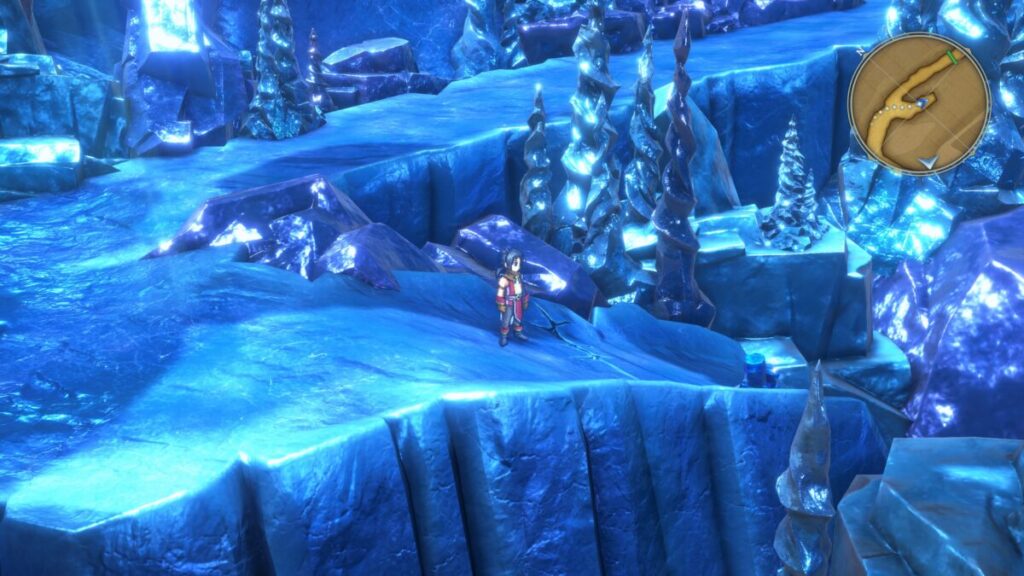
In the cave, had north to trigger a cutscene as you approach the save point. During the cutscene, you’ll learn that there are 3 missing children still in the cave that are in need of rescuing!
1st Missing Child – Livvie
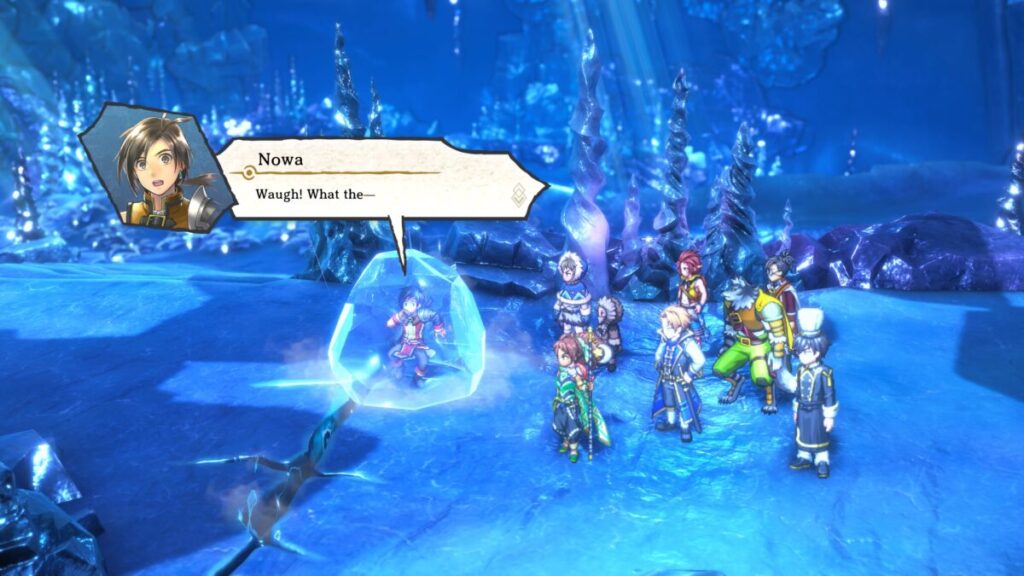
Follow along the path to receive a tutorial on how to encase your self in ice to slide down the path, jumping over the cracks. When you attempt this, you’ll crash land to the center of the area. Head along the path a short way until you spot a greenish icicle with a crack in it.
Your party will remark that if you have enough momentum in the ice ball, you’ll be able to break it! Head south and take the map transition to the next area. You’ll find yourself on the western side of the map near the starting point. Trap yourself in ice to make the jump then head down the stairs to reach the spot where you first encased yourself in ice and went for your first joy ride! This time, you’ll want to make the jump in your ice ball then crazily wiggle your left thumb stick side to side to break the ball. This way you can stop the ride and reach the chest! Keep following the path then ice yourself. After the jump, stop the ride yet again then take the northern path. Incase yourself in ice to make the jump. Head towards the ! to trigger a cutscene where you’ll find the first child, Livvie!
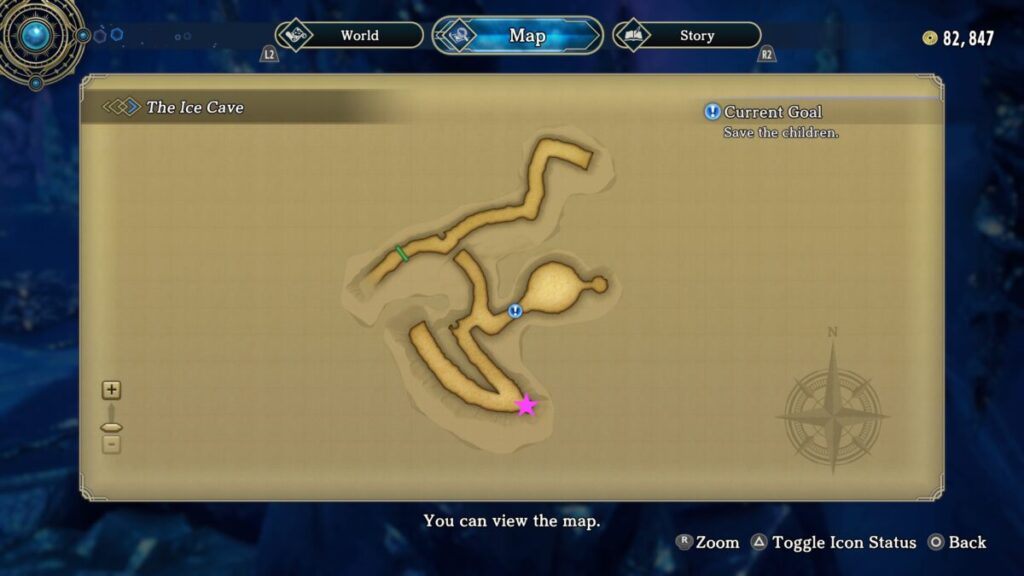
2nd Missing Child – Arlo
Pass through all the icy wind walls then head south and encase yourself in ice. You’ll ride down the path and crash into that cracked crystal you previously saw. Take the new path to reach the second save point. Follow the path north and just before the map transition, you’ll find a small path.
Encase yourself using the icy wind then you’ll slide down off the cliffside. Follow the new path to find Arlo!
3rd Missing Child – Tomas
Backtrack to the south and take the map transition. Become an iceball to jump the gap then head north to the icicle bridge. Take the bridge across then make your way down the path southwest of the second save point. Get into your ball then enjoy the ride to the next area. Follow the path to reach the third save point. Head to the ! to trigger a cutscene followed by the boss fight against Fenrir. The gimmick in this fight is to target the giant icicle above Fenrir with a ranged attacker, causing it to fall and deal massive damage. The icicle will reappear after several turns! After you defeat the boss, Tomas will appear and you’ll be teleported out of the cave to the town. During the cutscene, Rudy will join your party!
Return to Athrabalt
Travel back to Athrabalt to trigger a cutscene.
Eiyuden Chronicle Hundred Heroes Guides and Walkthroughs
For more Eiyuden Chronicle: Hundred Heroes guides and walkthroughs, click here!
Welcome to NGB and our Eiyuden Chronicle: Hundred Heroes walkthrough for the To Norristar, the Western Nation main quest. Here you’ll find everything you’ll need to breeze through this quest.
Go to the secret entrance of the forest to the southwest
Before setting out, make your way over to the inn and speak with Chef Dinah, who of course is another assassin with the Dark Dragon Syndicate. Begin the cooking battle and win! Afterwards, a Masked Woman will show up and you’ll receive the Hot Sandwich Recipe.
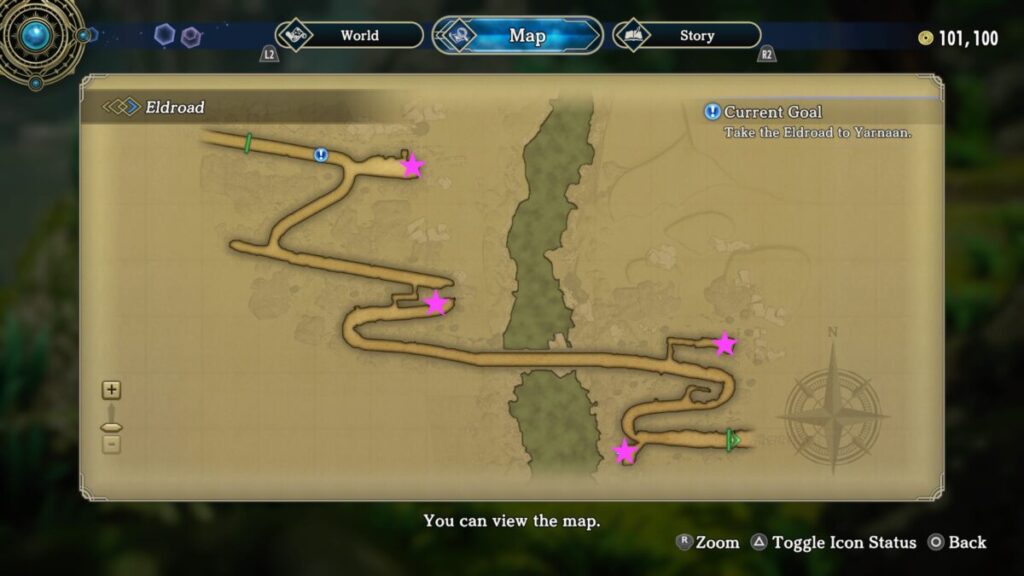
Now that you’re ready to set out, make your way to the open world. Once in Near HQ, head to the objective on the western side of the map to reach Eldroad.
Eldroad Collectibles
Enemies
Bushtamer
Cockatrice (adult)
Corpse Knight (story)
Dragon Viper
Elder Dragon (story)
Toadstool
Tyrant Tortoise
Collectible Materials
Excellent Lacquer
Lumber
Chests
Anti-Petrify Scarf
Dragon Doria Recipe
Bloodstained Helmet
Faded Book, Chapter 15
Once in Eldroad, continue along the path. When you reach the bridge just past the second save point, a cutscene will trigger followed by a fight against Elder Dragon. Take it out then continue along the path. When you reach the !, a quick cutscene will trigger. Afterwards, continue along the path to reach Yarnaan.
Yarnaan Collectibles
Fishing spot – 1F – Northwestern side of town
Sasa Dango Recipe – 2F – Speak with the Resident on the eastern side of town.
Rubber Duckie – 2F – In Wayve’s Room on second level of southwestern house
New Recruit – Goldsmid – 2F – Just south of the General Store
Hurry to the south of the square
Once in Yarnaan, head south to trigger a cutscene with Wayve and Markus. You’ll then fight 4 Corpse Knights. Take them out!
Go to the Grandwarden’s house
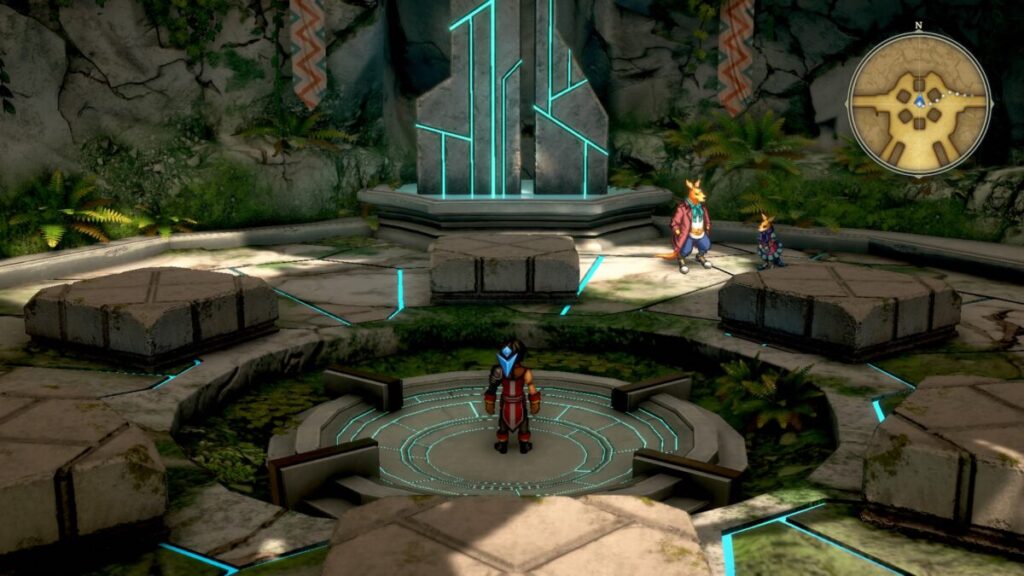
Stand on the north central platform then interact with it to move to 3F. Head to the eastern side of 3F to find Sayid Ali wandering around. Speak with him then head to the north central building to trigger a cutscene with the Elder. During this cutscene, Alwe Arkathies Fawud and Nil will join you!
Head for Athrabalt, the capital of Norristar
Exit the inn then head on down to 1F. Take the western exit to reach Norristar! Once in Norristar, head south along the road to reach Athrabalt.
Norristar Collectibles
Enemies
Carbuncle
Snow Wolf
Tundra Bat
Collectible Materials
Fishing Spot
Go to the castle
In Athrabalt, head to the northern part of town to trigger a cutscene with the soldiers.
Athrabalt Collectibles
Brew Bar Satay Recipe – Speak with Resident in the house to the east of the Appraiser Shop.
Faded Book, Chapter 1 – Speak with the Resident n house to the west of the Smithy.
Eiyuden Chronicle Hundred Heroes Guides and Walkthroughs
For more Eiyuden Chronicle: Hundred Heroes guides and walkthroughs, click here!
Search
This site uses cookies. By continuing to use this website, you are giving consent to cookies being used. For more information on cookies, view our Privacy Policy.OkPrivacy Policy