Welcome to our Digimon Story Time Stranger Shinjuku Underground Waterway Guide! In this walkthrough, we’ll cover everything you need to know about exploring Shinjuku Underground Waterway.
You’ll find a full list of treasure chests, wild Digimon spawns, and collectibles hidden throughout the area. We’ll also provide strategies for defeating any bosses you encounter and offer tips to make your journey smoother. Whether you’re hunting for new partners or aiming for 100% completion, this guide will keep you on track.
Quick Links
Shinjuku Underground Waterway Area Guide
Area Info
The Shinjuku Underground Waterway is an underground sewer system comprising two areas: the South Block and the North Block.
Shinjuku Underground Waterway
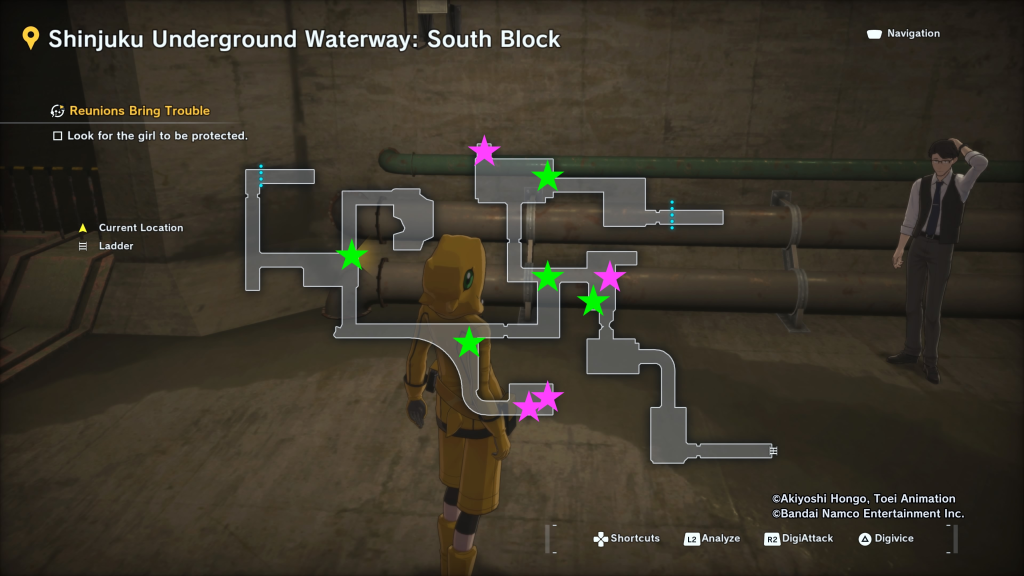
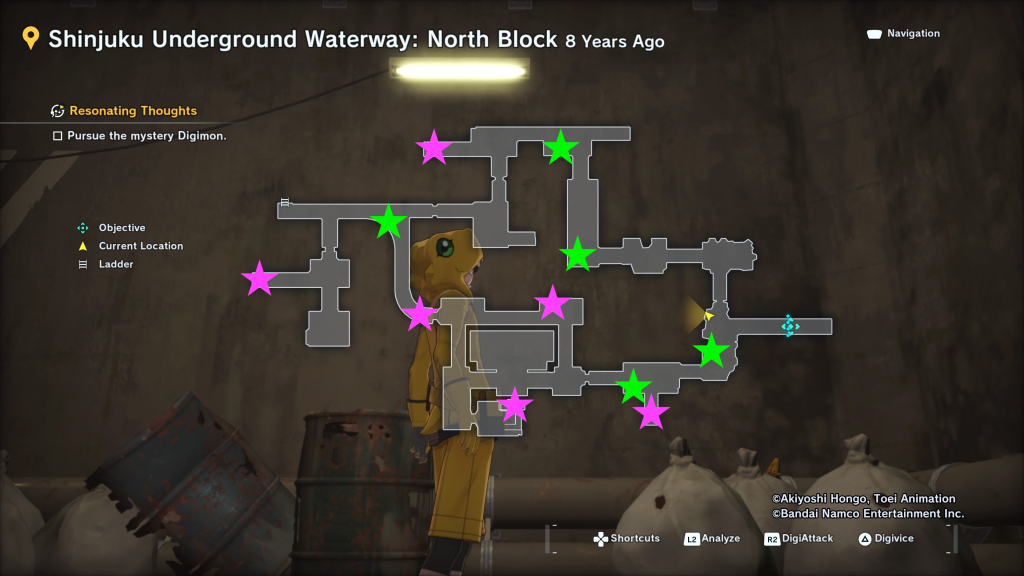
In the sections below, you’ll find maps marked with different colored stars indicating where you can find items. The pink stars indicate where you can find chests, while the green stars mark the location of objects you’ll need to destroy with your Digimon to loot their contents.
If you’re looking for more information about the Digimon found in this area, be sure to check out our Digimon Story Time Stranger Digimon Field Guide. It lists all of the Digimon found in the game and will route you to a dedicated page for each Digimon containing information about them. This includes their skills and what they Digivolve into.
South Block (8 Years Ago)
You’ll come to South Block on your first visit to the Shinjuku Underground Waterway. It will be the only section of this area that you’ll be able to visit until you push the story a bit.
Scannable Digimon
| Digimon | Gen | Attribute / Type |
|---|---|---|
| Betamon | Rookie | Virus / Amphibian |
| Biyomon | Rookie | Vaccine / Baby Bird |
| Bukamon | In-Training II | No Data / Lesser |
| Muchomon | Rookie | Data / Bird |
| Numemon | Rookie | Virus / Mollusk |
| Nyaromon | In-Training II | No Data / Lesser |
| Pagumon | In-Training II | No Data / Lesser |
| Tapirmon | Rookie | Vaccine / Holy Beast |
| Wormmon | Rookie | Free / Larva |
Obtainable Items
- Pearl
- Can be sold for a high price
- HP Capsule I
- Target: 1 ally – Recovers HP by 500
- Multi Boost
- Target: 1 ally – Boosts all stats by 20% for 3 turns
- HP Spray I
- Target: All allies – Recovers HP by 400
- Revival Capsule
- Target: 1 ally – Revives from KO and moderately recovers HP
- SP Capsule I
- Target: 1 ally – Recovers SP by 300
- SPI Attachment I
- SPI +50
- Courage Revival
- Target: All allies – Revives from KO and slightly recovers HP
- SPI Augment Chip I
- Increases a Digimon’s cumulative SPI by 30
Boss Fight – Raremon
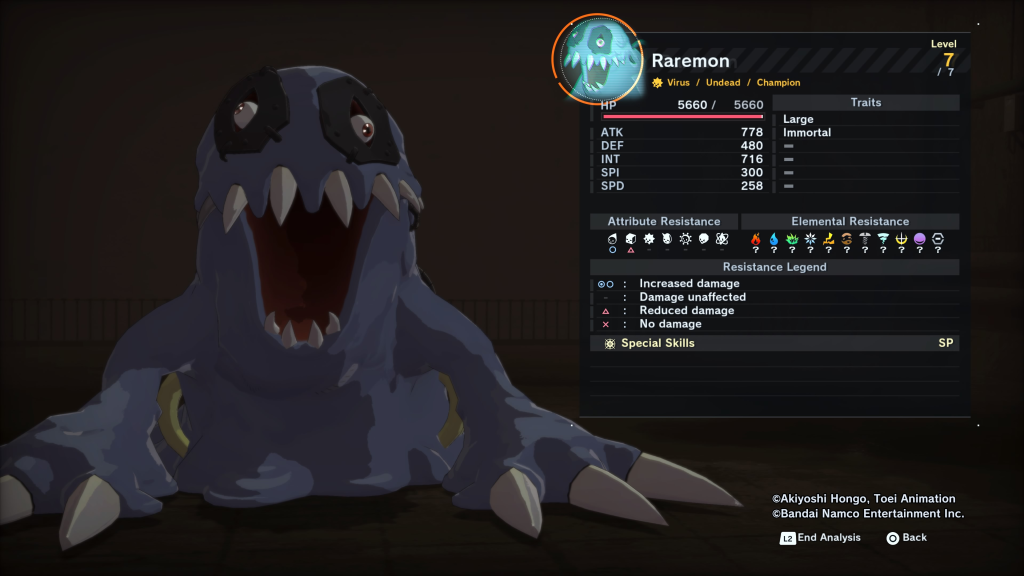
While exploring the Shinjuku Underground Waterway: South Block during the main story, you’ll find yourself facing the Raremon: A level 7 champion gen undead Virus Digimon. Being a Virus attribute, it’s weak to Vaccine Digimon. Additionally, it has a weakness to Fire and receives two attacks per round. It also likes to inflict status ailments like poison on the party, and another that will prevent you from using items on a Digimon for a couple of turns.
Digimon that will aid in this fight are Vaccine Digimon and those that possess fire skills. Agumon fits that description perfectly. You may also want to bring a Digimon with the Mediator skill, which removes status abnormalities.
You’ll want to keep an eye out for the following attacks:
- Sludge – inflicts poison while lowering DEF and SPI
- Lunatic Gate II – targets the whole party for moderate damage
- Hell Crusher II – targets the whole party with Dark magic attack
- Mental Breath – Lowers SPI
North Block (8 Years Ago)
On your second visit to the Shinjuku Underground Waterway, you’ll come to this area.
Scannable Digimon
| Digimon | Gen | Attribute / Type |
|---|---|---|
| Betamon | Rookie | Virus / Amphibian |
| Chuumon | Rookie | Virus / Beast |
| Dracmon | Rookie | Virus / Undead |
| Falcomon | Rookie | Vaccine / Bird |
| Geremon | Champion | Virus / Mollusk |
| Lopmon | Rookie | Data / Beast |
| Tokomon | In-Training II | No Data / Lesser |
| Tsunomon | In-Training II | No Data / Lesser |
Obtainable Items
- HP Spray I x2
- Target: All allies – Recovers HP by 400
- Stat Recovery
- Target: 1 ally – Removes stat debuffs
- Poison Wall I
- Nullifies poison
- Attack Attachment I
- ATK +50
- CRT Boost
- Target: 1 ally – Boosts CRT Rate by 20% for 3 turn(s)
- Sprite Recovery
- Target: 1 ally – Removes Crystallization
- SP Capsule I
- Target: 1 ally – Recovers SP by 300
- Dispel
- Target: 1 ally – Removes stat debuffs
- HP Capsule
- Target: 1 ally – Recovers HP by 500
- Attack Bind
- Target: 1 ally – 100% chance of 20% reduction to ATK for 3 turn(s)
- SP Augment Chip I
- Increases a Digimon’s cumulative SPI by 30
Related Digmon Story Time Stranger Content
- Complete Digimon Guide: Explore our Digimon Story Time Stranger Digimon Field Guide to view every Digimon, their stats, skills, digivolutions, and more!
- Personality Type Guide: View our Digimon Time Stranger Digimon Personality Guide to learn more about Digimon Personality Types!
- Main Page: Visit our Digimon Story Time Stranger Guides and Walkthroughs hub for all our latest content!
- Official Website: Check out the official Digimon Story Time Stranger website for news and updates!