Welcome to NGB and our Like a Dragon Infinite Wealth Miss Match Sophie guide. Here we’ll go over how to set up your profile so that it matches Sophie’s 100%, which will net you extra points via an “Excellent” rating! In addition, we’ll go over the correct responses to give Sophie when chatting her up!
Miss Match Subscription Level
Gold
Ichiban’s Profile
You’ll need to update Ichiban’s profile to reflect the choices in the table below to 100% match Sophie’s profile!
Keyword
Option
Style
Gentleman
Job
A doctor
Personality
Serious
Hobbies
Listening to Music
Hobbies
Cafe-Hopping
Final Thought
Deep Talk
Chatting
Segment of Date
Correct Response
Introductions
This is Kasuga. I’m also hoping to find someone with whom to appreciate the finer things in life.
Occupation
I’m a doctor. Very busy. In surgery right now, actually.
Hobbies
Well, music. Soundtrack to my life and all.
A Woman of the People
I’d say it makes you unique. I admire your elegance, actually.
The Princess’s Dilemma
Count on me to give your world some color whenever you need!
A Thousand Words…
I’m in love!
For the last segment “Shoot your shot”, you’ll need to hit the button prompts as fast as possible. Afterwards, you’ll be able to meet your dream match!
Welcome to our Like a Dragon Infinite Wealth Miss Match Kaoru guide. Here we’ll go over how to set up your profile so that it matches Kaoru’s 100%, which will net you extra points via an “Excellent” rating! In addition, we’ll go over the correct responses to give Kaoru when chatting her up!
Miss Match Subscription Level
Basic
Ichiban’s Profile
You’ll need to update Ichiban’s profile to reflect the choices in the table below to 100% match Kaoru’s profile!
Keyword
Option
Style
Fuckboy
Job
A Gunrunner
Personality
Hot-Blooded
Hobbies
You-Know-What
Hobbies
Staying In
Final Thought
Physical Affection
Chatting
Segment of Date
Correct Response
Introductions
Name’s Kasuga. I can assure you, I’m up to the task.
Occupation
You’re not a cop, right? I’m a weapons dealer. Shhh.
Hobbies
The shared bliss of sensuality.
Measuring One’s Manhood
I’m a specimen, baby. You won’t find a man with a manlier manhood.
The S to My M
Ho ho, you’re insatiable! I’ll teach you some manners.
A Thousand Words…
I’m in love!
For the last segment “Shoot your shot”, you’ll need to hit the button prompts as fast as possible. Afterwards, you’ll be able to meet your dream match!
Welcome to our Like a Dragon Infinite Wealth Miss Match Kano guide. Here we’ll go over how to set up your profile so that it matches Kano’s 100%, which will net you extra points via an “Excellent” rating! In addition, we’ll go over the correct responses to give Kano when chatting her up!
Miss Match Subscription Level
Basic
Ichiban’s Profile
You’ll need to update Ichiban’s profile to reflect the choices in the table below to 100% match Kano’s profile!
Keyword
Option
Style
Regular Guy
Job
A Hero
Personality
Kind
Hobbies
Staying In
Hobbies
Listening to Music
Final Thought
Serious Relationship
Chatting
Segment of Date
Correct Response
Introductions
Kasuga. Talking sucks most of the time anyway.
Occupation
I’m a hero! I’m gonna level up! Be the best that I can be!
Hobbies
Um, I like staying inside.
Terrible, horrible things
I hope every one of those human lice gets theirs.
The outside
I’ll be your reason! Ha, I’ll yank you outside myself if I have to!
A thousand words…
I’m in love!
For the last segment “Put it all on the line”, you’ll need to hit the button prompts as fast as possible. Afterwards, you’ll be able to meet your dream match!
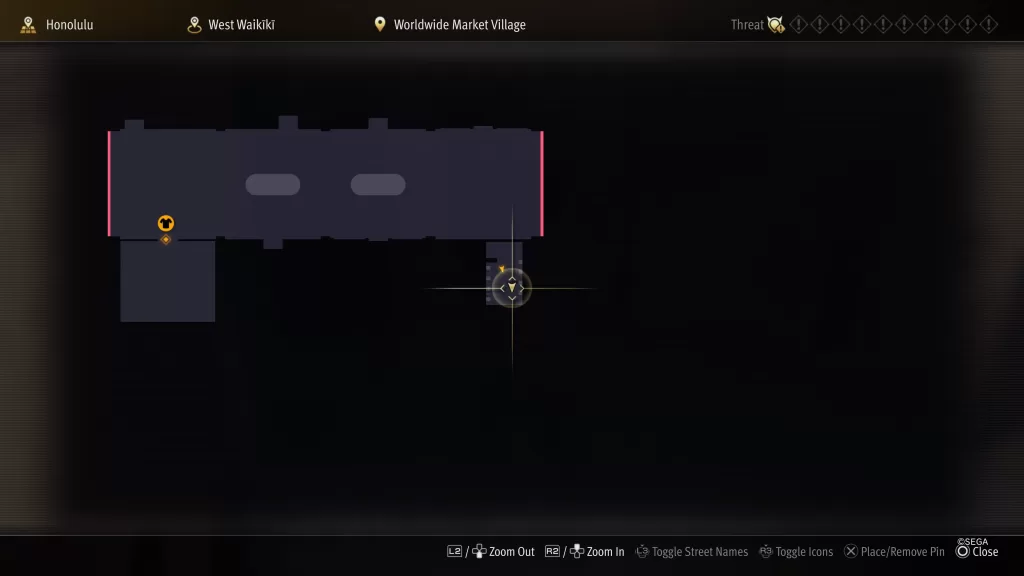
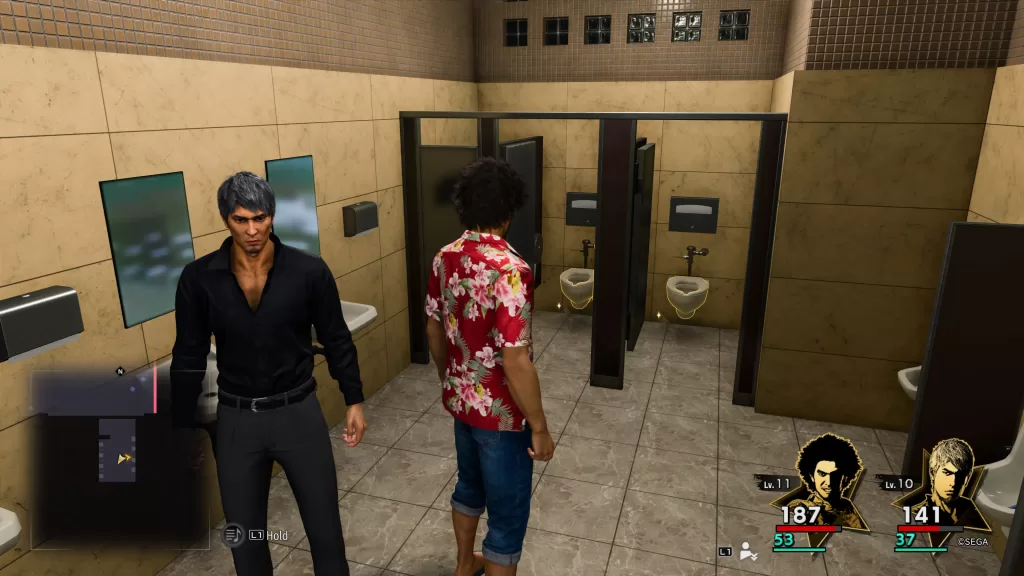
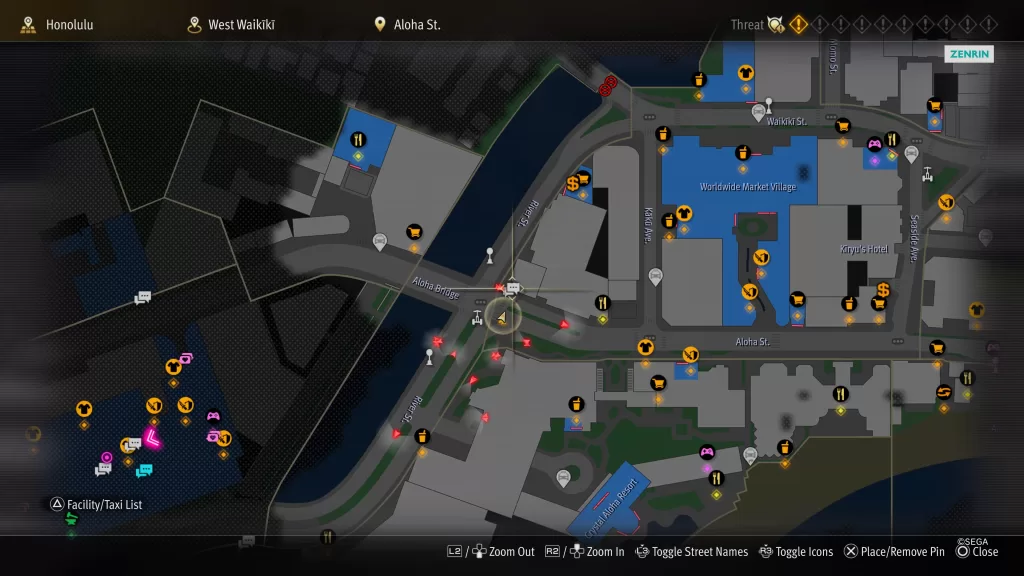
Welcome to our guide on how to obtain the Not a Total Waste trophy in Like a Dragon Infinite Wealth. To acquire this trophy, you’ll need to obtain an item from a toilet bowl. We found our glowing toilets in the men’s restroom in West Waikiki at the Worldwide Market Village just east of White Shore Boutique.
Once you find the glowing toilet, interact with it to retrieve the item and the Not a Total Waste trophy will pop!
Welcome to NGB and our Wait for Me Substory guide in Like a Dragon Infinite Wealth. Here we’ll cover how you can start the Wait for Me substory along with what you’ll need to do to perfectly complete it! Ding Ding! Food’s Up!!
How to Start the Wait for Me Substory
The Wait for Me substory becomes available during Chapter 3: The Fool after leaving the Revolve Bar. From Tsubaki St. head north to Sakura St then follow it west. The substory should then trigger as you approach the restaurant called Tropical.
Stand in as a Waiter
During the initial cutscene, the chef will mistake Kasuga for an employee that he interviewed online. After clearing up the mix up, the chef will then ask if Ichi can help out at the restaurant for the day. If you agree to help him, the substory will procced with Kasuga being taught how to welcome people in addition to learning about the restaurant’s menu. Once that’s done, it’s time to wait on some customers!
Greet the Customers
To greet the customers, you’ll need to use the L thumb stick to fill the gauge up to the desired greeting. Once you’ve reached the correct greeting, you’ll need to press the X button to confirm your choice!
Customer
Greeting
Reward
Cheerful Customer
Friendly (about 1/2)
Passion Increase
Elegant Customer
Refined (about 1/4)
Style
Family with an Excited Child
Friendly (about 3/4)
Passion
Take Those Orders!
Once all of the customers have been seated, it’s time to start taking orders! Speak with the Cheerful Customer who will order an ahi poke along with 3 haupias for dessert. Talk with the nearby Customer in Black who will order an acai bowl and the lau lau. Head to the Elegant Customer next for a chat who will order the mahi mahi. Once you spoke with all of three of them, report back to Obi with the orders. Select the options below to successfully place and deliver all 3 orders.
Cheerful Customer
One ahi poke and three haupias
Elegant Customer
Mahi mahi
Customer in Black
Acai bowl and lau lau
Order Up!
Once you’ve served all 3 customers, Obi will ask Kasuga to run an order of lau lau to the table with the family. You’ll then presented three dishes and have to pick the right one. For this choice choose the “The left dish” option. When you return, Obi will ask Ichi to take the kalua pig to the family’s table next. Choose the “The center dish” option. After this last dish has been delivered, the family will call Ichi over and ask to speak with the owner then ask for his name. Choose the “Obispo” option. This will lead to the conclusion of the substory.
Wait for Me Substory Rewards
For completing the substory, you’ll receive an Employee Meal that restores 300 HP, The Epicurean’s Epithet which increases your job rank as a Chef by 1 level and $300 (a bonus for being perfect). Ichiban’s Passion will also increase for completing this substory.
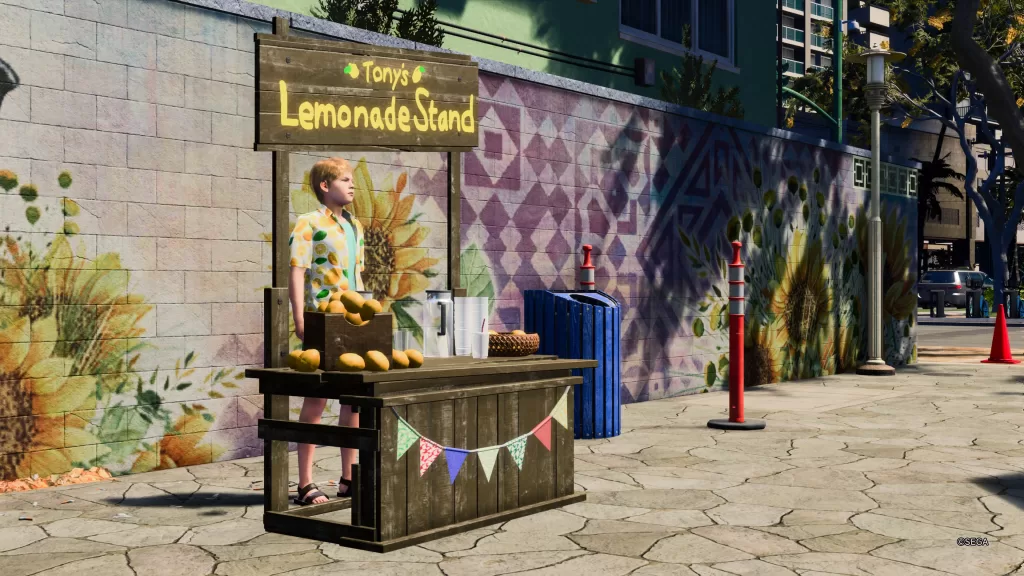
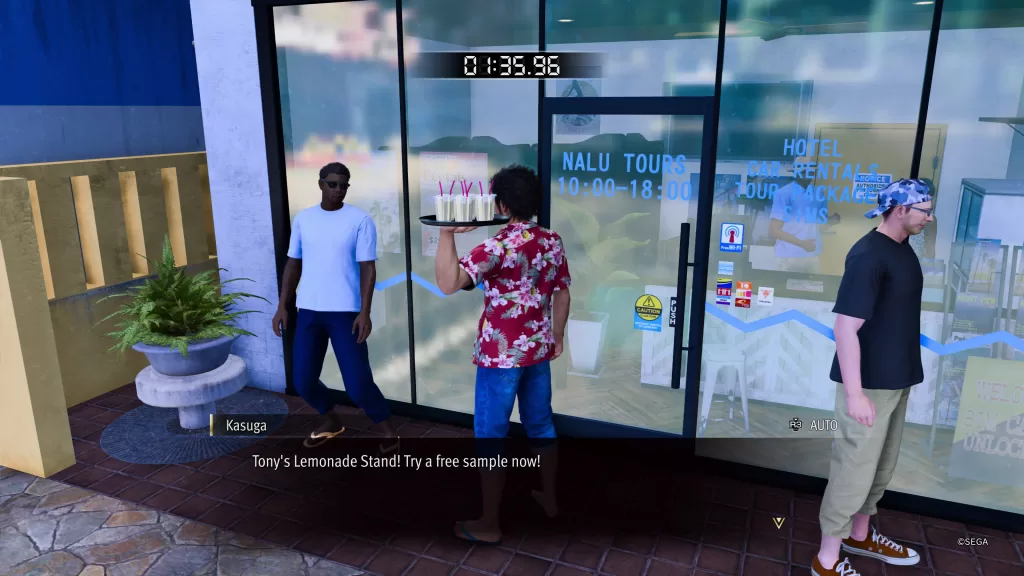
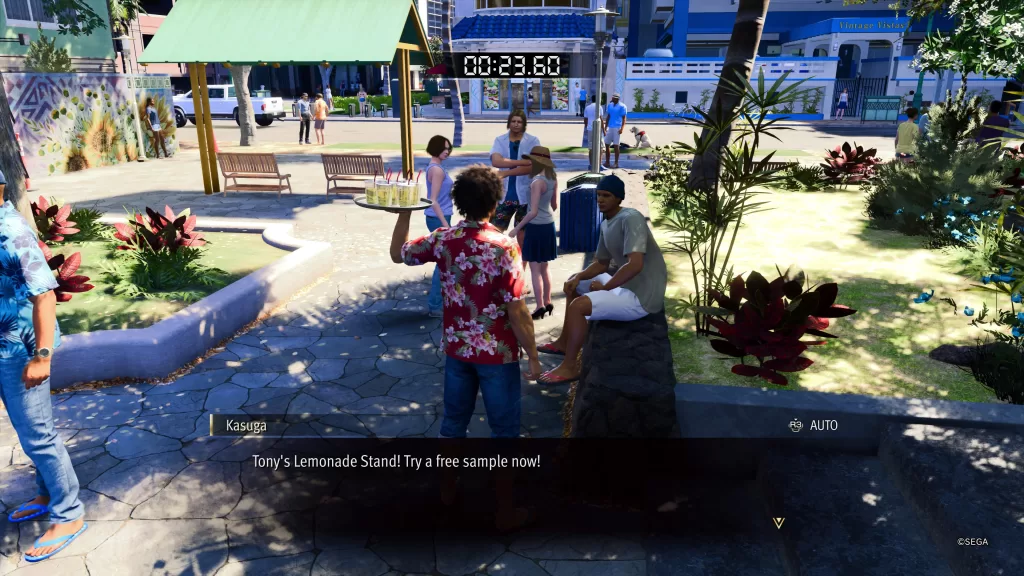
Welcome to our walkthrough for the A Love as Sweet as Lemons substory in Like a Dragon Infinite Wealth! You can begin this substory by approaching Tony’s Lemonade Stand then purchasing a lemonade.
A Love as Sweet as Lemons Part 1
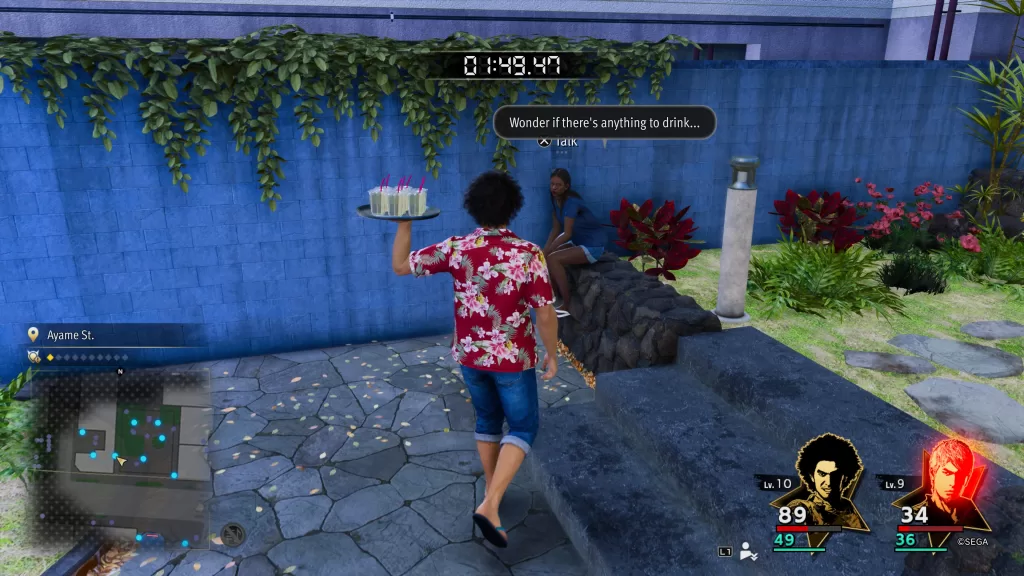
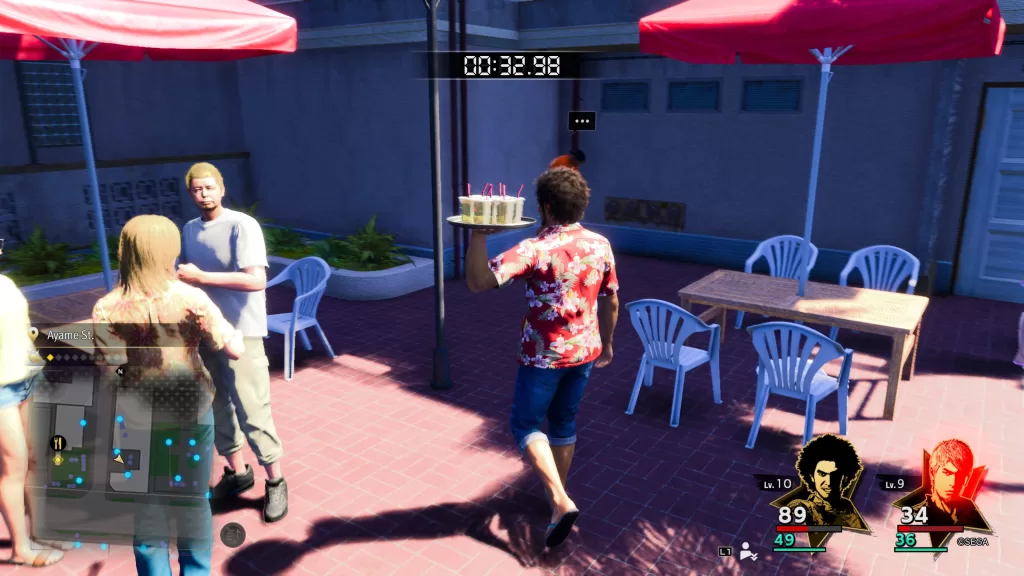
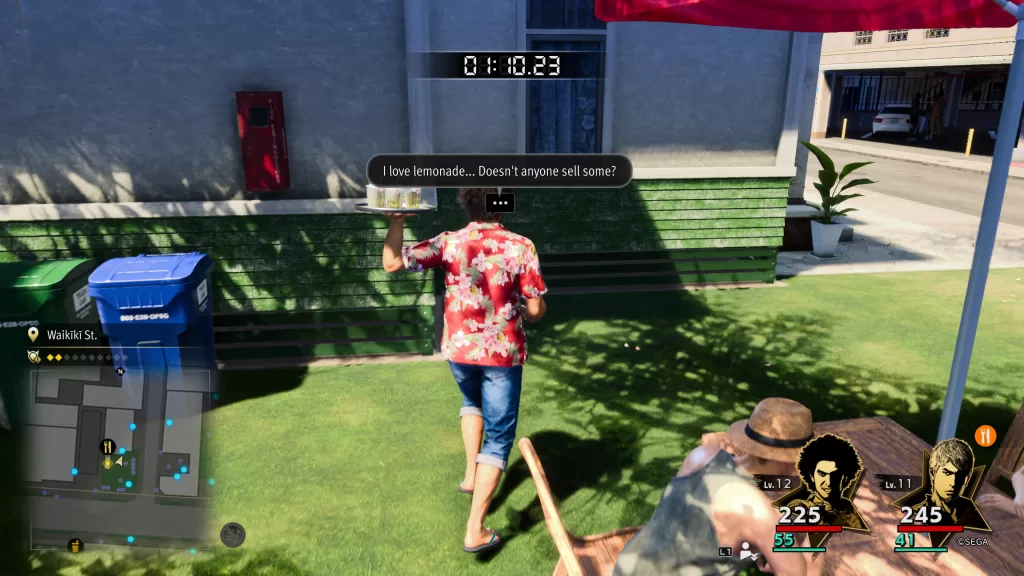
After you hear Tony’s tale, agree to help him out. This of course is a timed challenge! Distribute the lemonade to 4 people while moving carefully around people or objects to prevent spillage. Look for people who mention that they’re thirsty! The first woman is in a blue shirt sitting on a stone wall straight ahead and to your right.
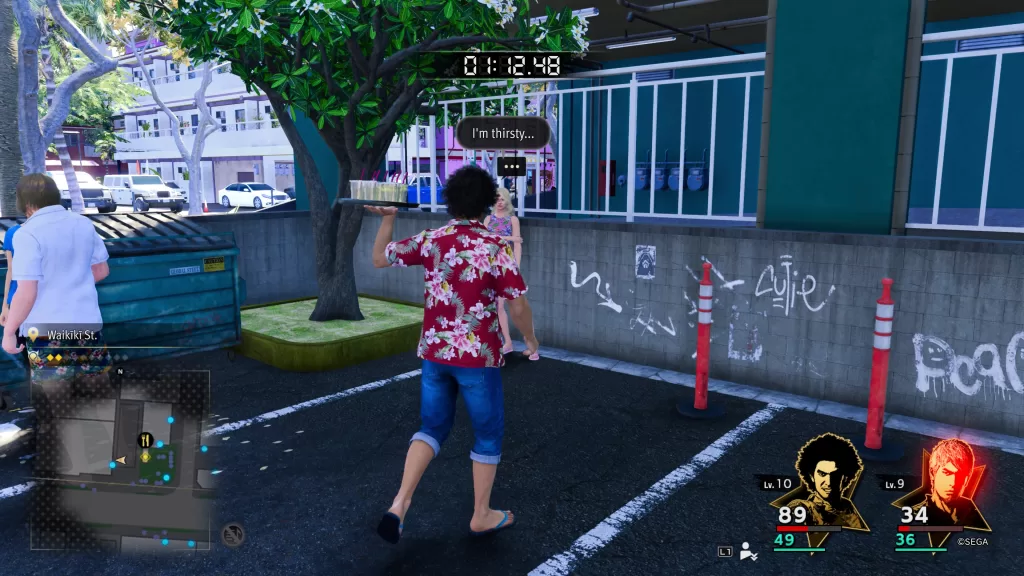
The second lady who is wearing a dress can be found by continuing along the sidewalk. She will be past the food area on the right by a tree against the building.
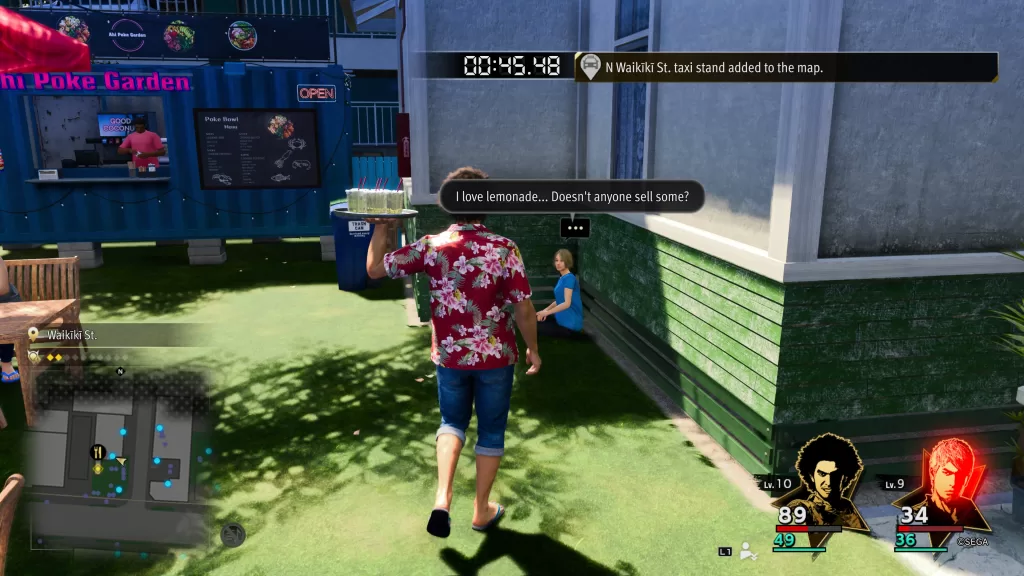
The third lady can be found sitting against a wall to the right of the picnic tables by the Ahi Poke Garden food truck.
The fourth is a guy can be found across the street from the above lady hidden behind all the people in the corner.
Once you’ve found all the thirsty people, you’ll automatically report back to Tony. As a reward, you’ll receive Hawaiian Pizza, which restores 260 HP!
A Love as Sweet as Lemons Part 2
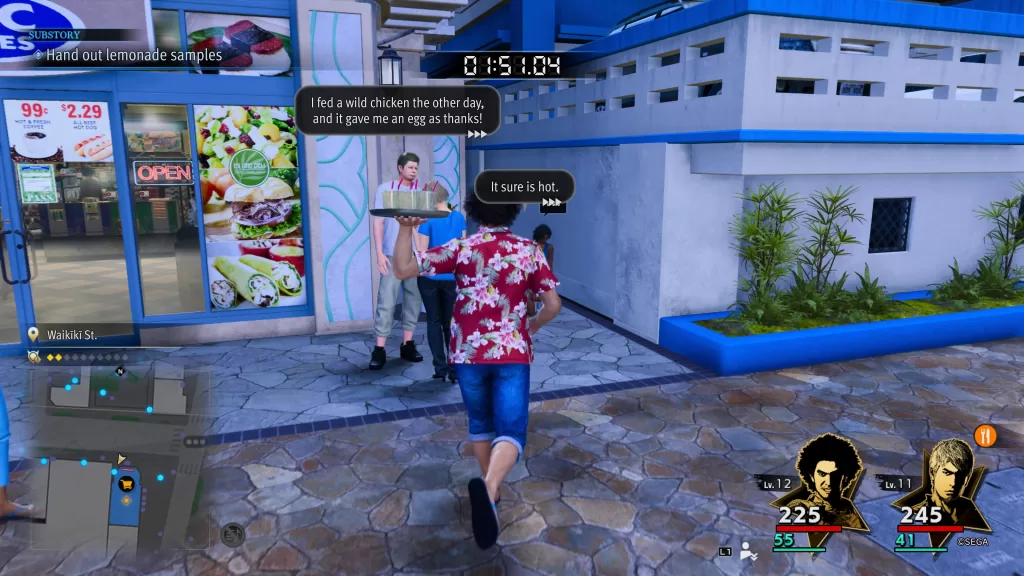
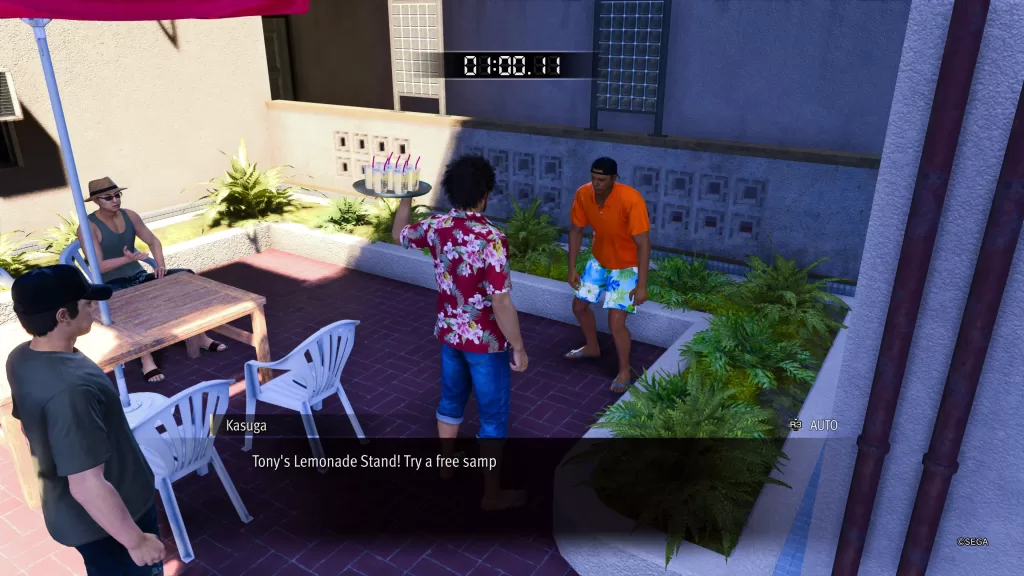
Wait for some time to pass then check back on Tony to see if you can lend another hand! You’ll know it’s time when the conversation bubble turns blue on the map! When you’re ready to help out tell him “I can hand out free samples!”. This time you’ll need to hand out 6 samples to thirsty potential customers. Once you’ve accomplished this task, you’ll be rewarded with a Hand-Mixed Fruit Cup, which restores 400 HP for everyone in your party.
A Love as Sweet as Lemons Part 3
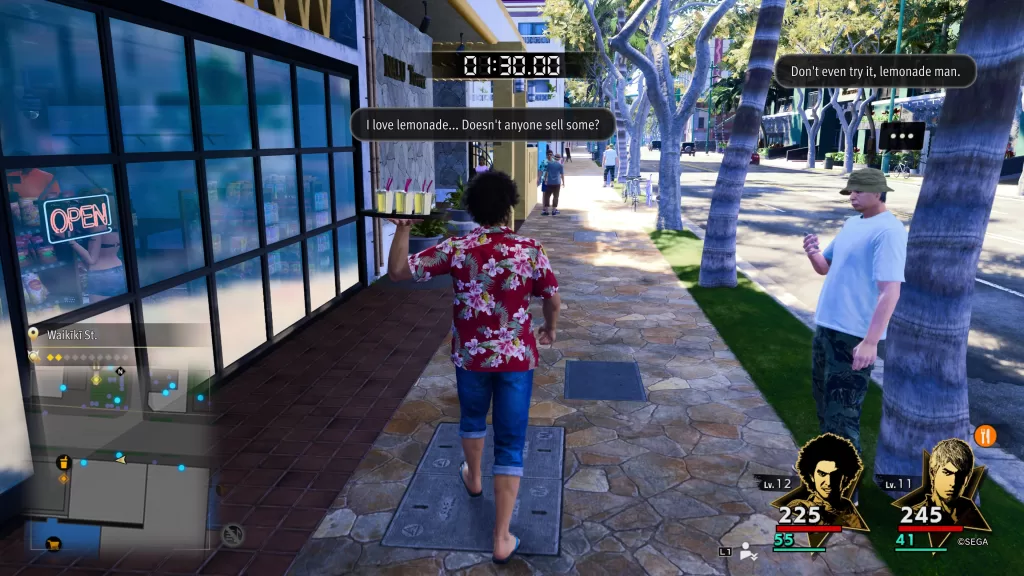
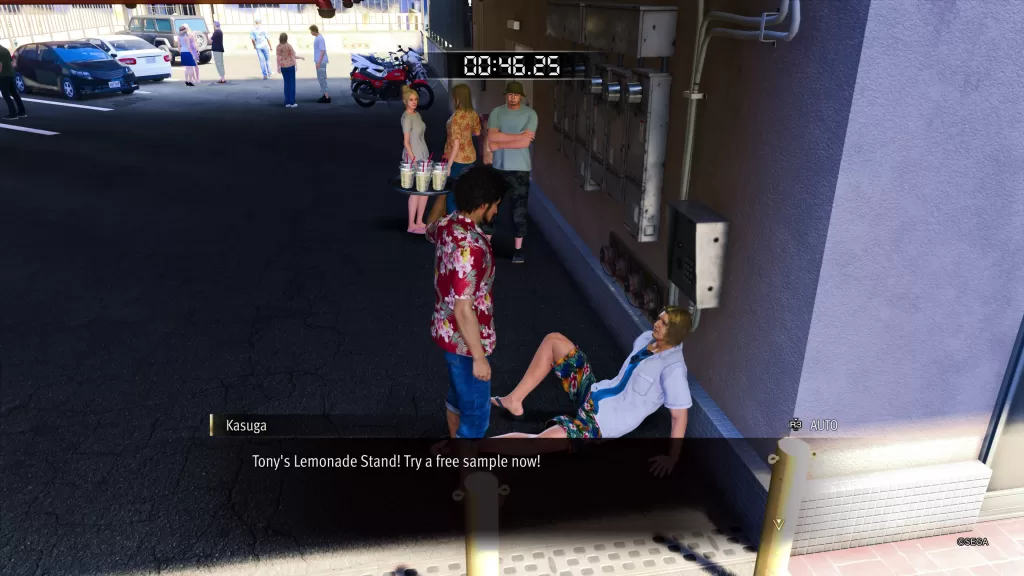
Again, you’ll need to wait for more time to pass. Once the conversation bubble turns blue, return to Tony and agree to hand out free samples! This time you’ll need to hand out a whopping 8 cups within the 2 minute window! For this one, you’re going to do a big circle. Start out by crossing the street to the left. You’ll find 3 people along the sidewalk.
Next, cut back across the street and head for the lady sitting down by the food truck.
Afterwards, cross the small road to reach the guy in orange along the back wall.
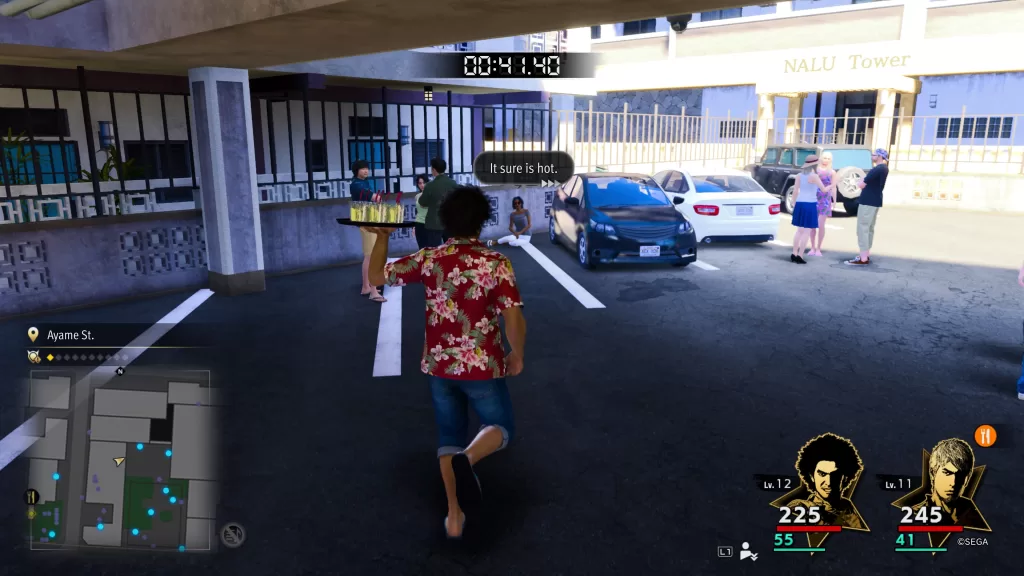
Turn around and take a right along the road then another right into the parking area. There will be 2 people in this parking lot.
Exit the parking lot and head towards the lemonade stand. There will be a guy sitting on the stone wall to your right.
Once you’ve successfully handed out all the drinks, a cutscene will trigger. After it completes, you’ll need to wait for some more time to pass.
A Love as Sweet as Lemons Part 4
When you see the blue conversation bubble, head back to the lemonade stand and take a look at what’s happening! Once the cutscene concludes, head north to Fuji St. to check on Tony. You’ll witness a scene which will immediately be followed up with a fight. Take out the human to knock some sense into him then wait awhile until you see the blue bubble.
A Love as Sweet as Lemons Part 5
For A Love as Sweet as Lemons Part 5, you’ll find the blue conversation bubbles between Purple Dolphins and Morning Joe’s on Aloha St. in East Waikiki. Make your way there to find Tony standing in front of Good Jewelry. Interact with him for a touching scene. Afterwards, the A Love as Sweet as Lemons substory will complete!
Welcome to our walkthrough for the Welcome to Hawaii MFer! substory in Like a Dragon Infinite Wealth. The Welcome to Hawaii, MFer! substory will automatically trigger after you leave Revolve Bar during Chapter 3. You’ll be given a tutorial on Timed Selections, which essentially means that you must choose an answer or not within a given amount of time. She’ll then ask “Oh, are you a customer? Aloha!” and you’ll have 3 responses:
Response
Outcome
Aloha!
Increase in Charisma
Um, lovely day today, huh?
Nothing
…….
Nothing
After you’ve made your selection, she’ll install the Aloha Links app on your smartphone. Aloha Links users are marked with a special icon over their heads. By using emotes to engage with these characters, you can become friends with them. The friend gauge serves as an indicator of your bond. Once it’s maxed, you and your friend become best buddies. As you gain more of these, your personality will improve, so try and make lots of friends!
Afterwards, the bartender will come out. Press square to greet the bartender and you’ll gain Confidence. Next, you’ll become friends with Kei and will gain Charisma. Now you can begin your friendship journey by setting out in search of new friends! Keep in mind that sometimes you’ll need to use actions such as giving them gifts or patronizing their business to befriend more people!
Welcome to our Like a Dragon Infinite Wealth Sujimon Sujidex guide! Here you’ll find out how to obtain all Sujimon. Please note that you will not receive an entry for a Sujimon until you defeat it in battle! Also, you might be able to find the below Sujimon at other locations. We just listed where we found ours! Happy hunting! Gotta Catch ‘Em All, Sujimon!
Infinite Wealth Sujimon
Burnout Bully – Japan / Isezaki Ijincho / Red Light District & Commercial District
Capitalist Punisher – Japan / Isezaki Ijincho / Bar District
Hammered Man – Japan / Isezaki Ijincho / East Jinnai Station
Knight of the Cask – Japan / Isezaki Ijincho / Commercial District / Central St.
Urbane Legend – Japan / Isezaki Ijincho / Commercial District / E Tsurukame Alley (Keeper of the City)
Battle Bum – Japan / Isezaki Ijincho
Hungry Hungry Homeless – Japan / Isezaki Ijincho / Commercial District / Central St.
Welcome to NGB and our Like a Dragon Infinite Wealth Puzzle Shogi guide. Here we’ll cover how to complete all 10 of the shogi puzzles that you can start by speaking to the Outdoor Shogi Player near the Homeless Camp in Isezaki Ijincho then selecting “Play puzzle shogi”.
The default settings for each puzzle will have Take Backs on and the Time Limit off. If you turn off Take Backs each time, you’ll gain an additional 100 Shogi Points per puzzle. This will allow you to quickly farm 250 Shogi Points per puzzle after completing it the initial time. The rewards below will reflect this setting being turned off!
Infinite Wealth Puzzle Shogi Solutions
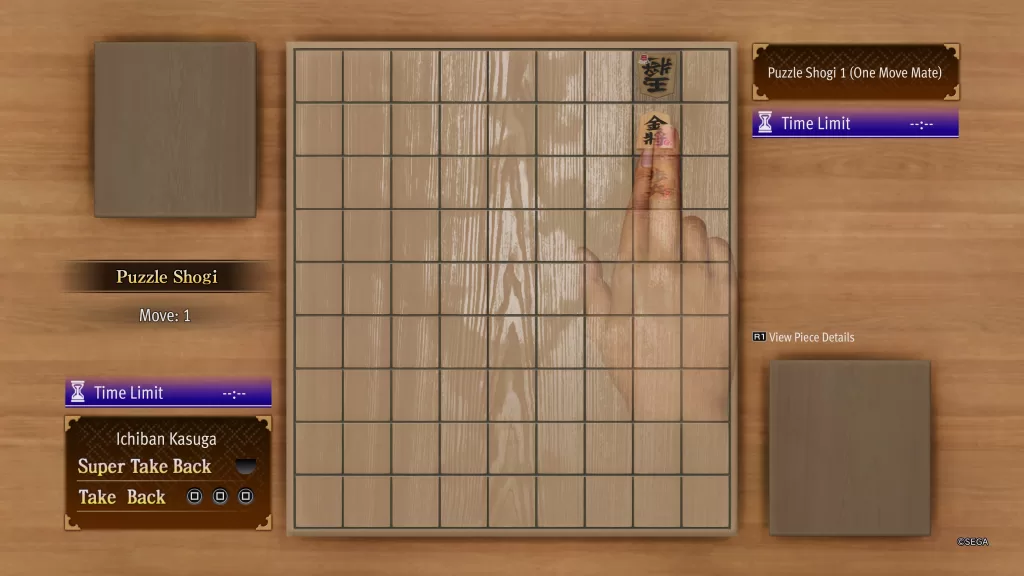
Infinite Wealth Puzzle Shogi 1
For Puzzle Shogi 1, grab the Gold General from the capture area on the right side of the board and place it on the board between your pawn and the opponent’s king. This will result in a checkmate completing the puzzle.
Rewards: 350 Shogi Points the first time / 250 Shogi Points each time after that
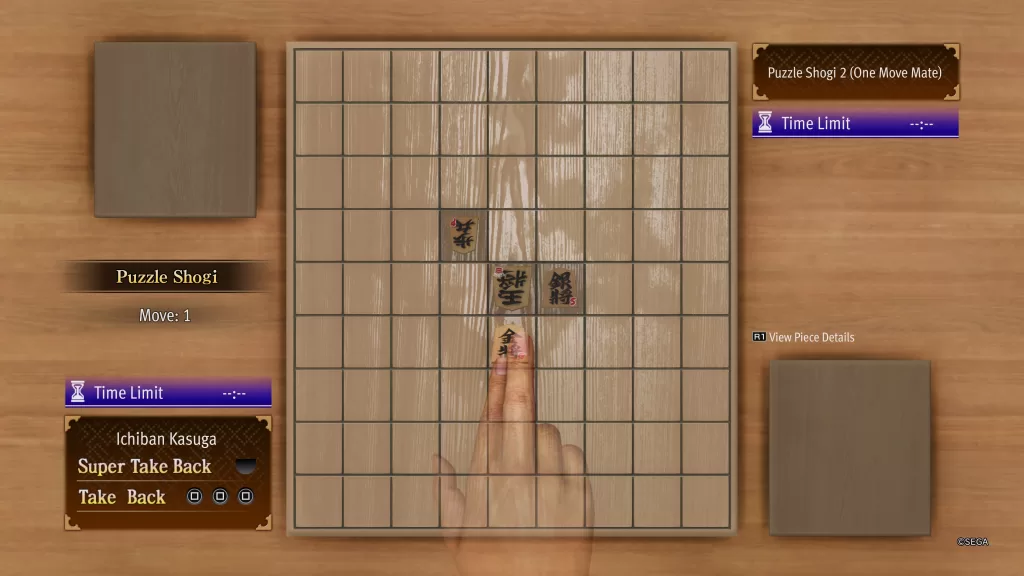
Puzzle Shogi 2
For Puzzle Shogi 2, grab the Gold General form the capture area on the right side of the board and place it on the square under the opponent’s king. This will result in a checkmate completing the puzzle.
Rewards: 550 Shogi Points the first time / 250 points each time after that
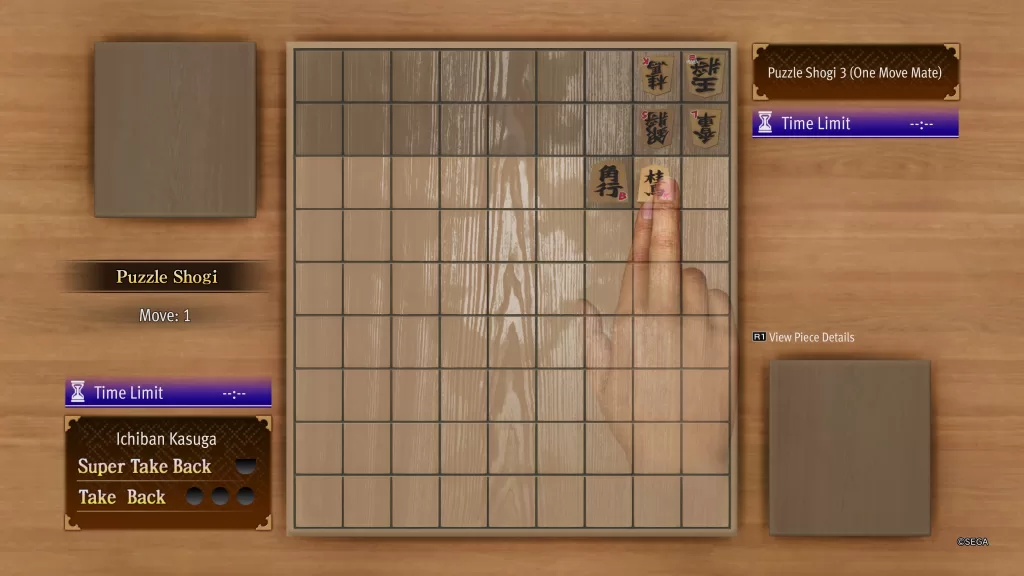
Puzzle Shogi 3
For Puzzle Shogi 3, grab the Knight from the capture area on the right side of the board and place it on the square to the right of your Bishop. This will result in a checkmate completing the puzzle.
Rewards: 750 Shogi Points the first time / 250 points each time after that
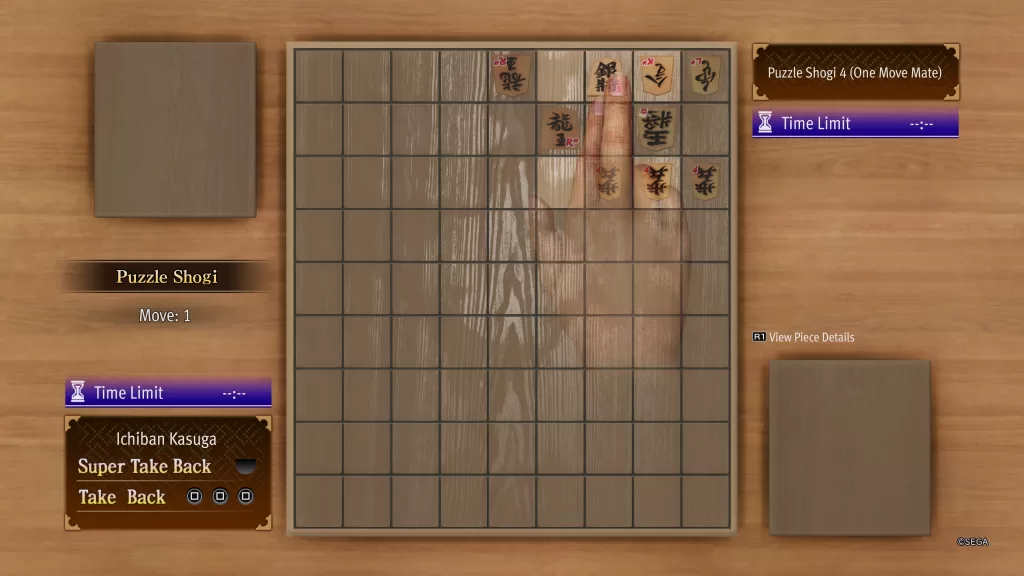
Infinite Wealth Puzzle Shogi 4
For Puzzle Shogi 4, grab the Silver General and move it up to the next square choosing “Don’t Promote”. This will result in a checkmate completing the puzzle.
Rewards: 950 Shogi Points the first time / 250 points each time after that
Puzzle Shogi 5
For Puzzle Shogi 5, grab the Bishop on the right side and move diagonally northwest 4 squares. This will result in a checkmate completing the puzzle.
Rewards: 1150 Shogi Points the first time / 250 points each time after that
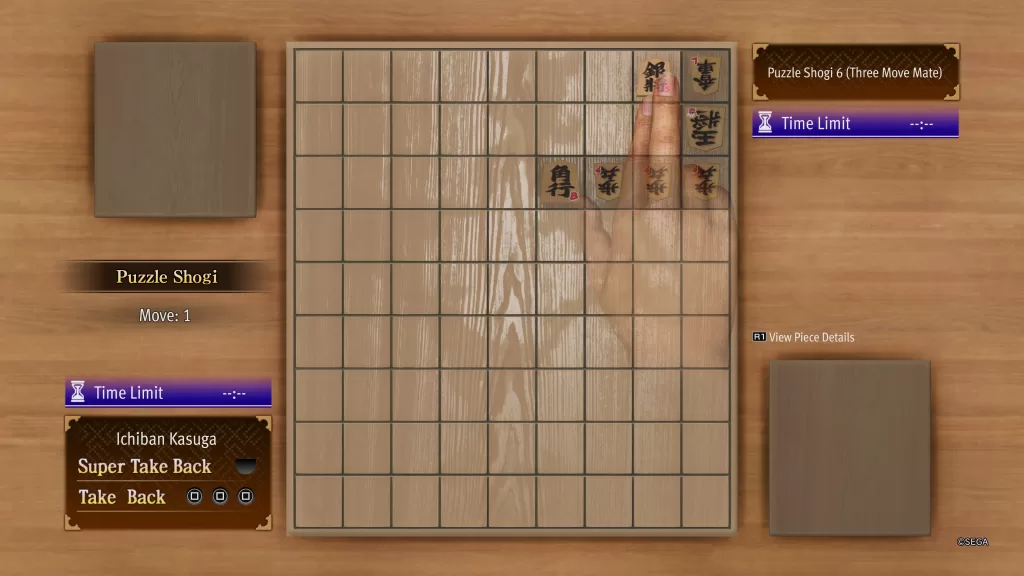
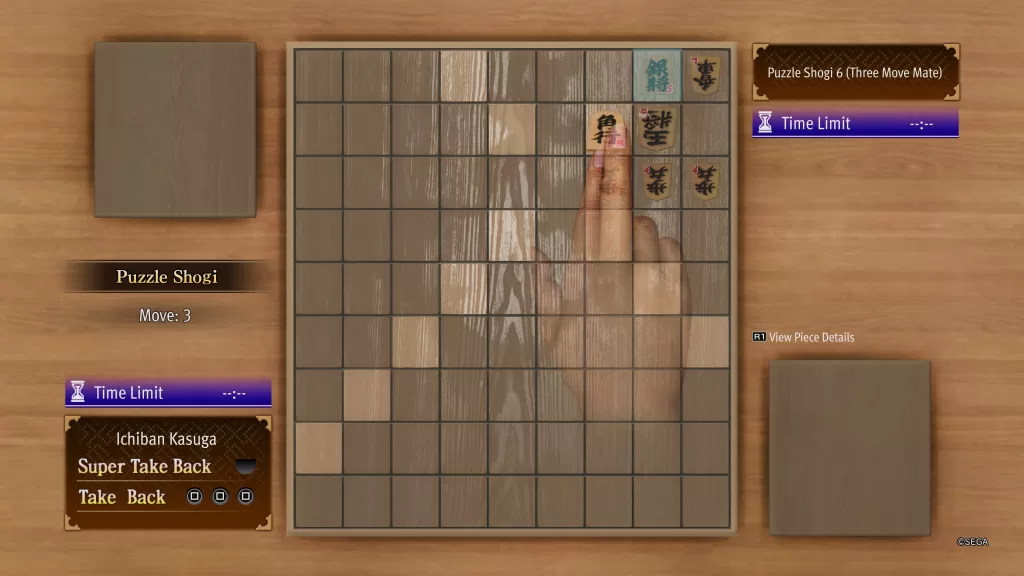
Puzzle Shogi 6
For Puzzle Shogi 6, grab the Silver General from the capture area on the right side of the board and place it on the square to the left of the opponent’s Lance putting the King in Check.
The opponent will then move their King one square to the left. Counter that by moving your Bishop diagonally to the square on the King’s left and promote it. This will result in a checkmate completing the puzzle.
Rewards: 1750 Shogi Points the first time / 250 points each time after that
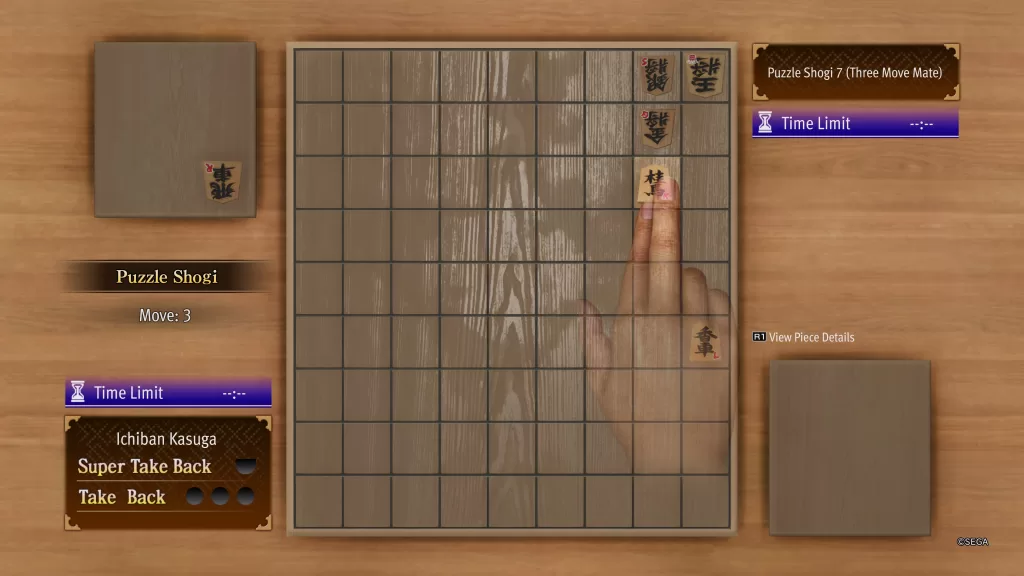
Infinite Wealth Puzzle Shogi 7
For Puzzle Shogi 7, start by grabbing the Rook from the capture area on the right side of the board and placing it in the top right corner of the board between the opponent’s Silver General and King to place the King in check.
Your opponent will then take the Rook using the King. Counter this by moving you’re Knight on the square in front of the opponent’s Gold General and choose “Don’t Promote”. This will result in a checkmate completing the puzzle.
Rewards: 2250 Shogi Points the first time / 250 points each time after that
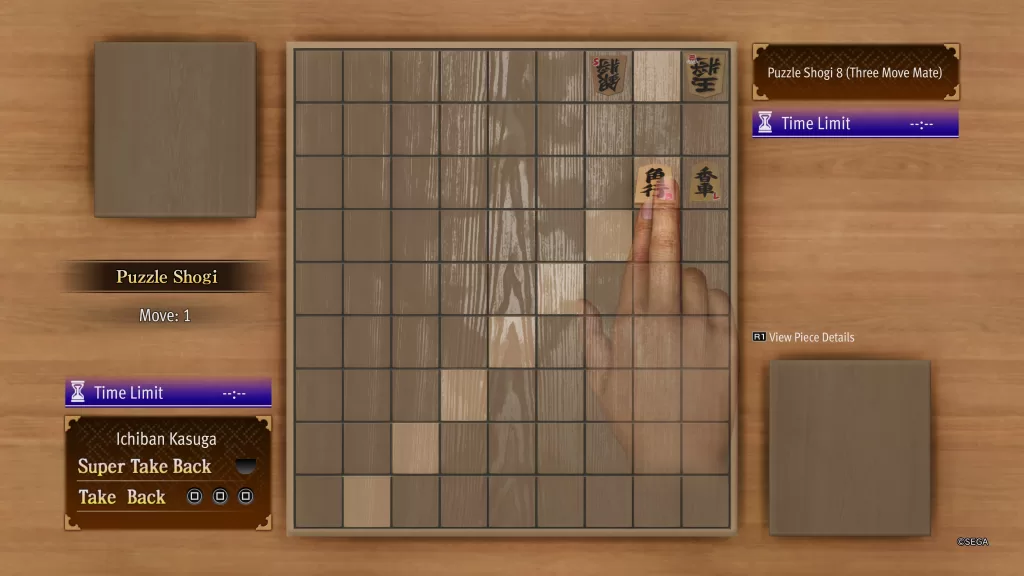
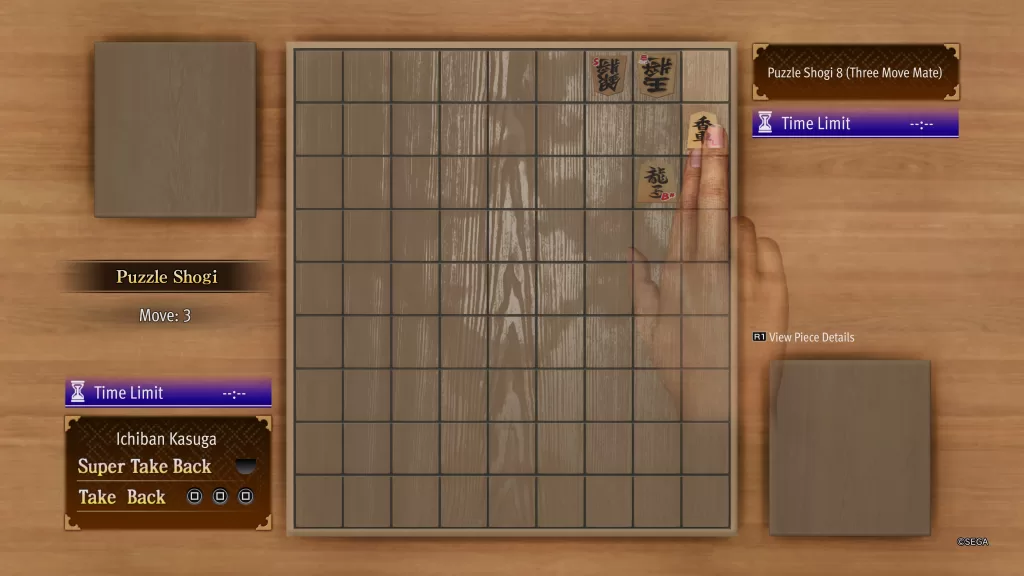
Puzzle Shogi 8
For Puzzle Shogi 8, grab your Bishop and move it to the square left of your Lance choosing to promote the piece putting the opponent’s King in Check.
This will cause your opponent to move the King one square to the left. Counter this by grabbing your Lance and moving it to the next square choosing to promote. This will result in a checkmate completing the puzzle.
Rewards: 2750 Shogi Points the first time / 250 points each time after that
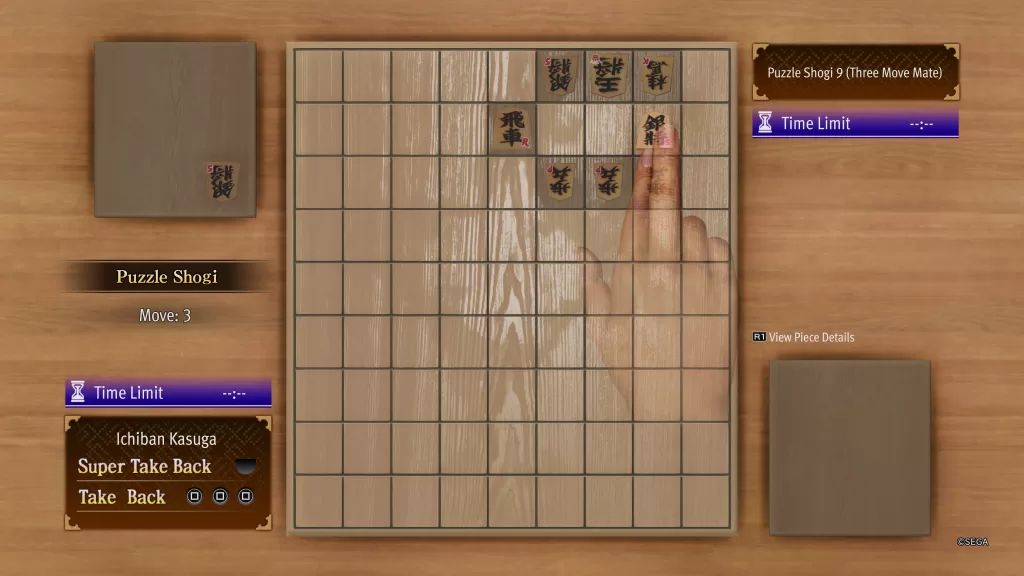
Puzzle Shogi 9
For Puzzle Shogi 9, grab your Silver General and move it to the square between the opponent’s Knight, Silver General and King choosing to promote it putting the opponent’s King in check.
They will then use their King to take your Silver General. Counter that by grabbing the Silver General in the capture area on the right side of the board and place it on the square between the opponent’s Pawn and Knight. This will result in a checkmate completing the puzzle.
Rewards: 3250 Shogi Points the first time / 250 points each time after that
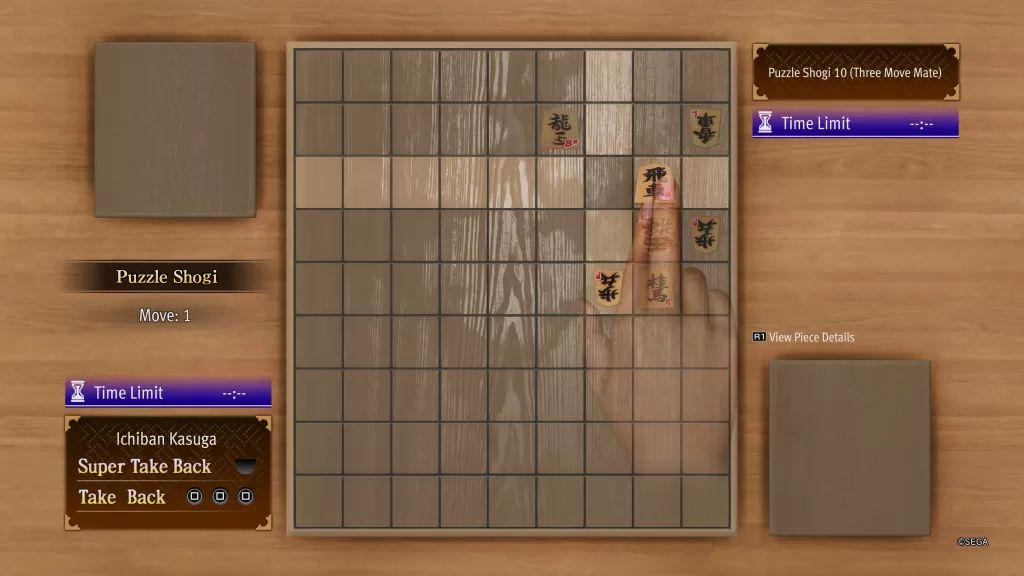
Infinite Wealth Puzzle Shogi 10
For Puzzle Shogi 10, grab your Rook and move it to the square on the right above your opponent’s King choosing to promote putting the King in check.
You’ll opponent will respond by taking your Rook with their King. Counter by moving your Bishop to the square on the left of the King. This will result in a checkmate completing the puzzle.
Rewards: 4250 Shogi Points the first time / 250 points each time after that
Welcome to our Like a Dragon Infinite Wealth Substories guide! Here you’ll find how to start and complete the Like a Dragon Infinite Wealth substories! Please click on the link in the table below for a walkthrough on the specific substory.
The Radio Active substory will automatically trigger as part of the main story when you approach the homeless camp to give chief a bottle of sake during Chapter 1. During this substory, a group of Pick-Up Artists will assault a TV Announcer. Defeat the 3 goons in battle to end this substory. Afterwards, the playlist app will be installed on your smartphone and you’ll receive a tutorial on how to use it. Make sure to tune in each chapter as the show changes topics.
2 Sujimon, Generation II
The Sujimon, Generation II substory will automatically begin after you exit your apartment and head towards the taxi near the station during Chapter 2. After encountering the Degenerate, you’ll need to battle him. Once you defeat the Creep, a familiar professor will show up and install the Sujidex on your smartphone. The Sujidex is an app that records data about the Sujimon once you’ve defeated it in battle. Afterwards, the substory will end.
3 Crazy Money
The Crazy Money substory will be started automatically during the main story in Chapter 3 while trying to raise money to pay for Jeff’s services at Jeff’s Tacos. Travel to East Aloha Beach to trigger a cutscene where you’ll be introduced to Charlie. When it concludes, you’ll be thrown into a Crazy Eats tutorial going over the controls then be turned lose to earn some money! Afterwards another cutscene will trigger completing the subquest.
Reward: $30 and Charlie will be available as a Poundmate.
4 Busted!
The Busted! substory will automatically begin during Chapter 3 after visiting Jeff’s Tacos. During this substory, you’ll be given a tutorial on Poundmates and will then need to fight a group of enemies using Chitose Buster Holmes to try it out. After defeating the group, the substory will end.
6 Surfin’ the Streets
To start the Surfin’ the Streets substory, approach the corner of Aloha St. and Seaside Ave in West Waikiki to trigger a cutscene with Oka who will introduce Kasuga to the Street Shark. When you’re ready to try out the death trap on wheels, speak Oka telling him you’re ready to take it for a spin. This will start a tutorial on how to control the machine after which you’ll then be able to drive it. Head straight down the road. When you reach Oka another cutscene will trigger leading to a fight with a pair of level 10 local thugs. Defeat them to trigger one last cutscene where Kasuga will sign up to join the club gaining him access to the Street Surfer. He’ll also receive the Street Surfer Battery Pack a.
7 Miss Match
To being the Miss Match substory, approach the park between Waikiki St. and Seaside Ave in West Wakiki to trigger a cutscene where Kasuga will meet Miss Match. After being emasculated by her, he’ll agree to try the app and follow her to her office in the nearby Cream & Berry café. Speak with Machiko-san there to create a dating profile for Ichi. Edit the profile setting it up how you like then select “Find a Match!”. This will pair him up with a handful of matches that you’ll be able to select one of. Check out our guides below to find out exactly how to setup Kasuga to match perfectly with the profiles! We’ve also included the correct responses to net you the most points!
Once you make your choice, you’ll begin a chat session with that person. You’ll then have to fill up the match meter by using both your and their profiles to successfully answer questions. To respond to their questions, select the appropriate response then press the buttons presented before the time runs out. After a few rounds, you’ll then be prompted to send them an emoji. There will be a handful of them on a spinning roulette. The quicker you pick, the better the result, however picking a bad emoji could hurt you, too. As they are signing off, you’ll have one last chance to spam as many messages as possible by inputting the correct buttons as prompted before the time runs out. If you’ve managed to get the match meter past the heart, then you’ll meet your match face to face. Once that’s done, a cutscene will trigger leading the substory to complete.
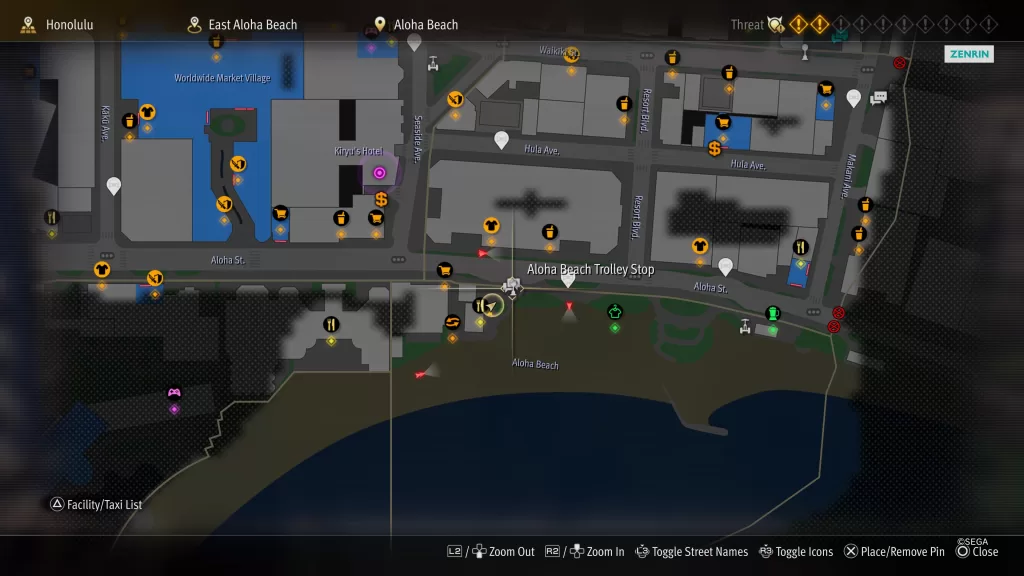
8 Snap Those Sickos!
Location: Honolulu – East Aloha Beach at the Aloha Beach Trolley Stop
Once at the Aloha Beach Trolley Stop, interact with the stop to wait for the trolley then board when it arrives. This will trigger a cutscene where Kasuga will meet Kuroki who likes to ride the trolley taking pictures. Ichi will ask him if he can look at his pictures to which Kuroki agrees. This of course leads to the Sicko Snap side game where you’ll need to capture images of Sickos committing sick acts throughout the city while riding the trolley. You’ll need to get a score of 4000 to complete the side game. Once the ride is over, another cutscene will trigger completing the substory.
Rewards: You’ll receive a Rejuvenation Bolus that revives a fallen ally with full HP and MP. You’ll also receive a camera unlocking the side game at all of the trolley stops.
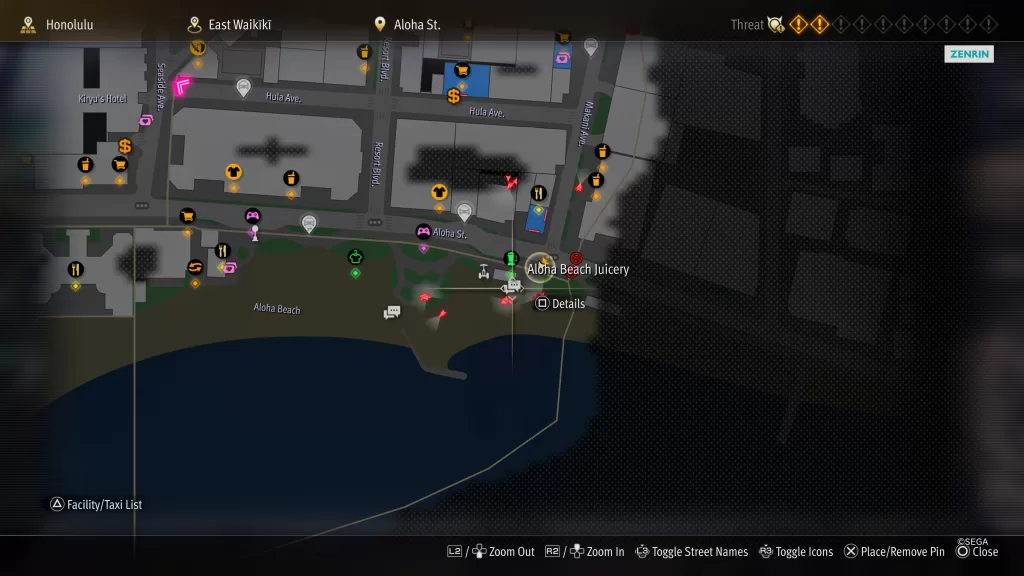
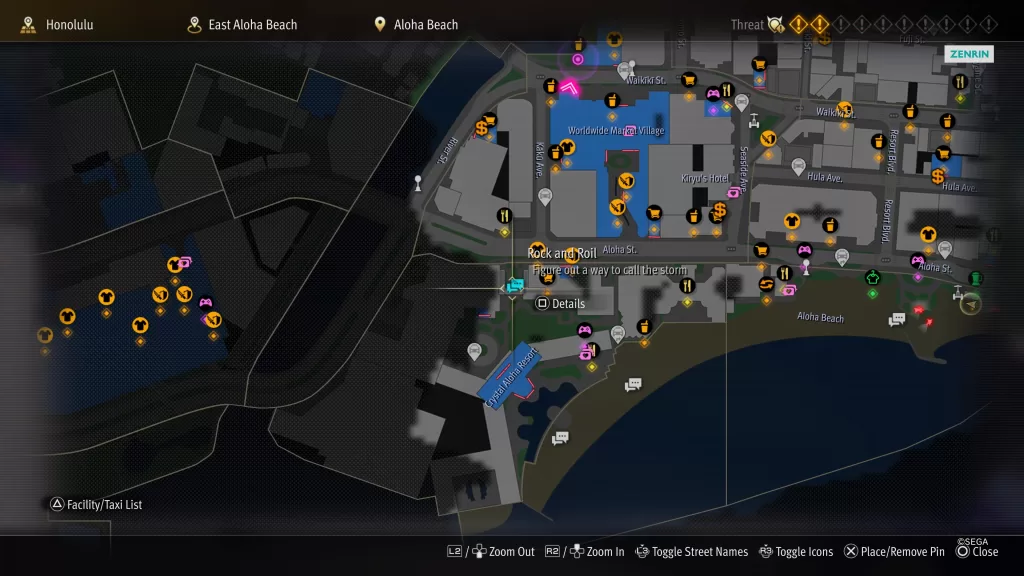
13 Rock and Roil
Location: Honolulu / East Aloha Beach at the Aloha Beach Juicery
Head over to Aloha Beach Juicery on the eastern side of East Aloha Beach and you’ll spot a group of guys fanning another guy in the middle. Interact with the Flashy Guy in the middle and choose “See what’s up” when prompted to start the substory. This substory becomes available during the main story objective to earn money to pay for Jeff’s services.
The Flashy Man introduces himself as Kazami Evolution, GOD OF ROCK!!! and he’s trying to shoot his new music video. After explaining the issue, he asks Kasuga to help out by keeping an eye out for something that can conjure up a storm. To assist them, head up to Aloha St and follow it west to reach Mahelona Mall. Walk under the walkway to trigger a cutscene where Ichi helps a man with an injured back named Thomas. Further speaking with him reveals that Thomas is a shaman specializing in wind. Ichi then asks him for a favor. When prompted, select “Ask the spirits for a storm!” Thomas agrees to help but only if Ichi does the ritual in his place.
Return to Kazami at the beach and interact with him choosing “Tell him” when prompted. Kasuga will then tell him about and introduce him Thomas, the Lord of the Winds! Once everyone is acquainted, Ichi will suit up and the ritual will commence. Follow the shaman’s instructions to perform the ritual summoning a powerful storm. Once completed, a cutscene will trigger leading to the end of the subquest.
Rewards: You’ll receive the Def Boom Box accessory as a reward and Kazami Evolution becomes available as a Poundmate
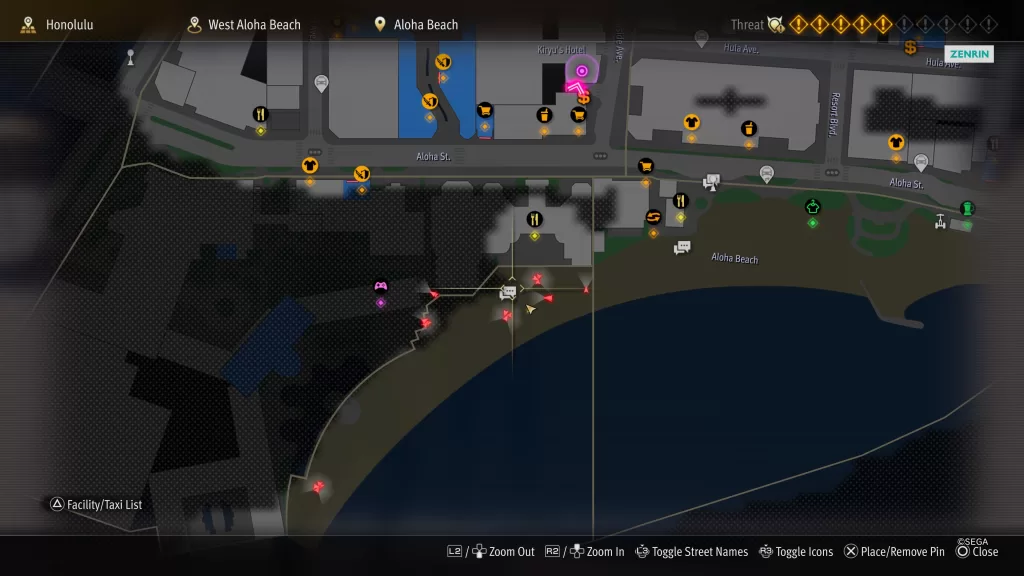
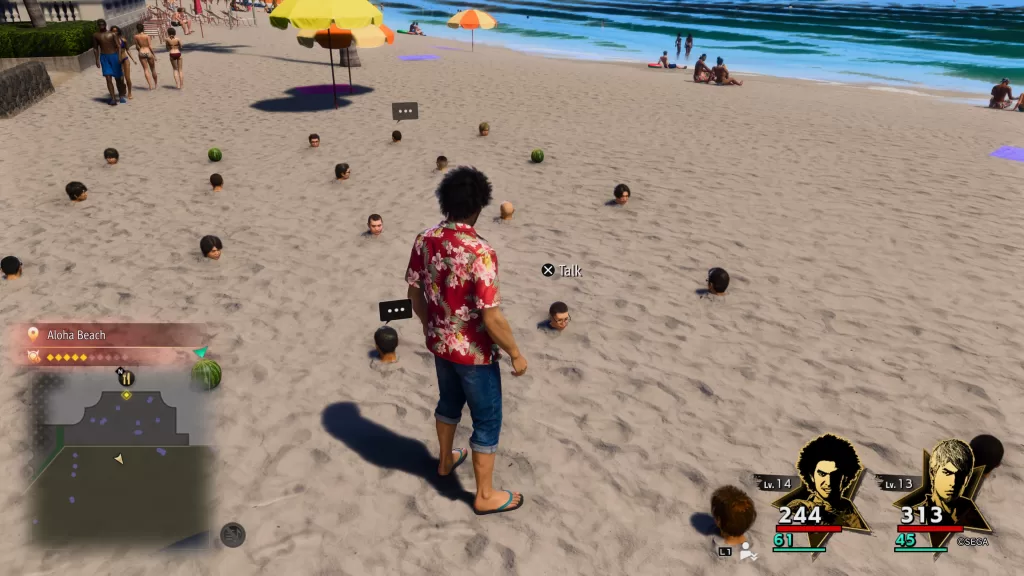
14 Neck-Deep in Love
Location: Honolulu – West Aloha Beach south and slightly west of Soleil
While walking along the beach, Kasuga will spot a girl hiding behind some surfboards. Interact with her to start a cutscene then choose “Talk to her” when prompted. After speaking with the girl, Ichi gets roped into delivering her love letter to classmate Tanabe. You’ll then be prompted to verify the boy’s name before setting out on your quest. Make sure to choose “Tanabe-kun?”. This will give Kasuga some points in Intellect. Hitomi will then hand over a picture of the target.
As Ichi wanders over to where Tanabe is, he’ll come to an area filled with people buried in the sand. There will be 5 students you’ll need to speak with to deduce Tanabe’s location. Once you have all the clues, when facing the ocean, head between the last two rows on the right. Tanabe will be the second from the ocean in the left row. Speak with him to deliver the love letter trigger another cutscene leading to the completion of the substory.
Rewards: You’ll receive the Courage Pendant accessory which nullifies the fear status ailment.
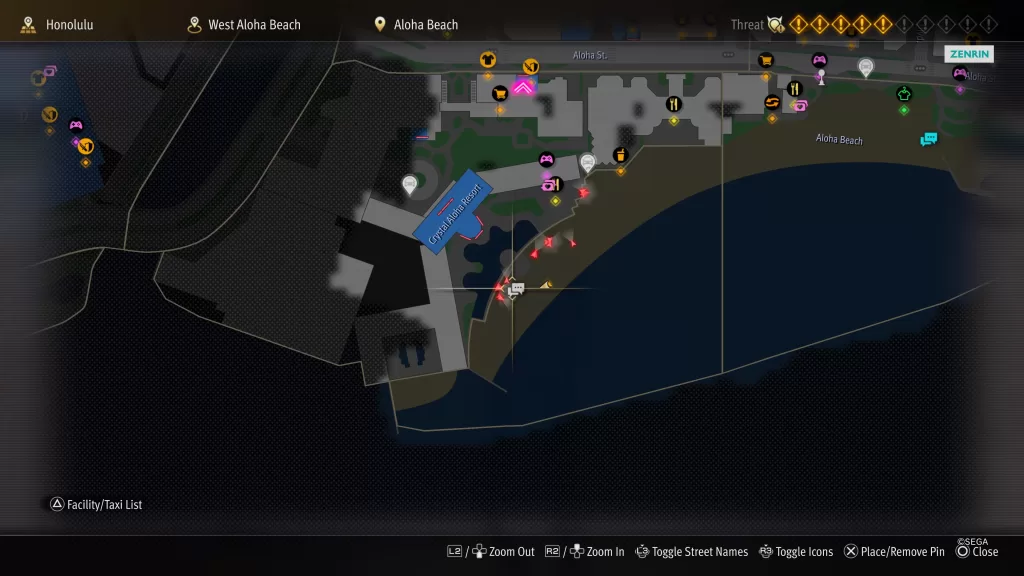
15 Samurai, May We Walk Together?
Location: Honolulu / West Aloha Beach south of Kana’s Coconut Juice Stand
Follow along Aloha Beach heading west to reach West Aloha Beach. After passing Kana’s Coconut Juice Stand, a cutscene will trigger as you near the lifeguard station. During Ichi will be on his way to enjoy the beach when he notices two guys harassing a lady. Being the hero that he is, Kasuga gets involved leading to a fight with 2 level 9 Pick-Up Artists. Defeat them to scare them away trigger another cutscene. Ichiban will then be swarmed by a group of guys calling him a samurai. Eventually, they will then ask Ichi to let them interview him. Select “All right, I guess” to get it started.
Nathan will give Kasuga a rundown of the show then ask Kasuga if he’s ready to get started. Select “Okay, I’ll do my best” to start the show! Next Ichi will be put in a number of different scenarios where he’ll have to choose something from a group of objects.
Correct Choice
Reward
Rice and Millet?
Confidence
…The hat
Kindness
Shuriken (any one)
None
For the last segment, the crew returns to the beach so Kasuga can breathe underwater using a bamboo shoot. When you get there, a cutscene will trigger with Nathan’s rival, James. Naturally this leads to a fight where Kasuga has to lay the smack down on a group of 4 level 9 a-holes! Defeat them for one last cutscene leading to the completion of the subquest.
Rewards: Bright Yellow Sweets that heal 300 HP and 100 MP and Nathan will be available to summon with Poundmates. You’ll receive a second Bright Yellow Sweets set if you choose all the Japanese options during the choices.
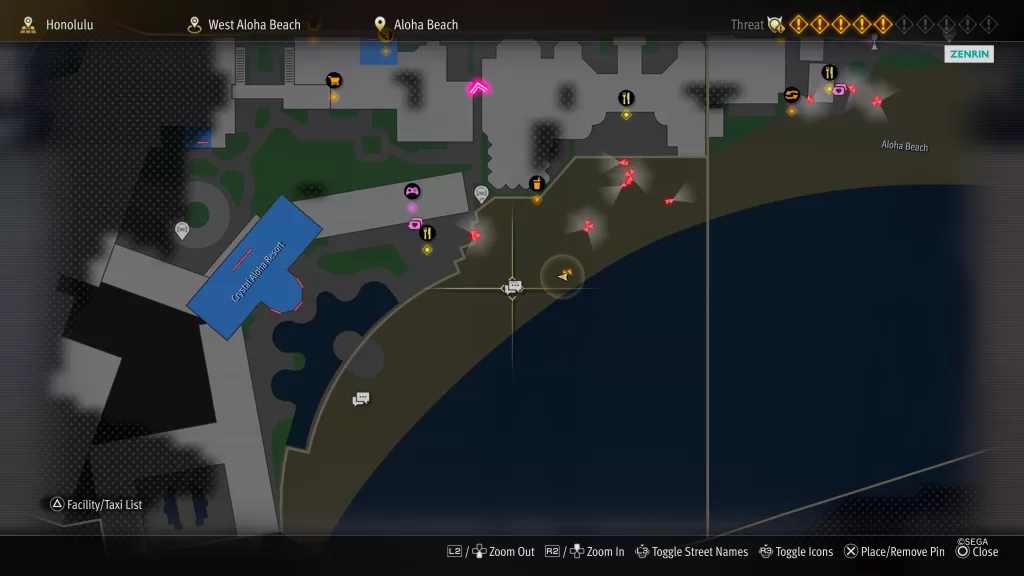
19 Home to Roost
Location: Honolulu / West Aloha Beach near the Crystal Aloha Resort
This substory becomes available once you unlock Poundmates. Head over to the western part of West Aloha Beach, near the Crystal Aloha Resort, and look for a group of red umbrellas along the beach. The leftmost group of umbrellas will have one with an open beach chair. Interact with it, then select “Look out, chair!” to start napping. When you wake up, Kasuga will feel a bit heavier kicking off the substory.
After you regain control of Kasuga, take Joesph to the ABC store before time runs out. Head east along the beach, then go north through the Sumos and follow the resort to the road. Cross there to reach the ABC store and start a cutscene. After it ends, you’ll have to fight a pair of level 9 poachers. Once you take them down, another cutscene will trigger completing the substory.
20 A Better Bat
The A Better Bat substory is started automatically during the story in Chapter 4. You’ll be sent to Julie’s Gearworks to get Kasuga’s bat repaired which also introduces the crafting mechanic in Like a Dragon Infinite Wealth. You’ll get 5 Electric Fragments to use on crafting the Hero’s Bat. After doing that, a cutscene will trigger leading to a battle to try out your newly upgraded weapon against a Level 11 Troublesome Customer. Defeating him triggers another cutscene that will complete out the substory.
Rewards: Crafting will be unlocked
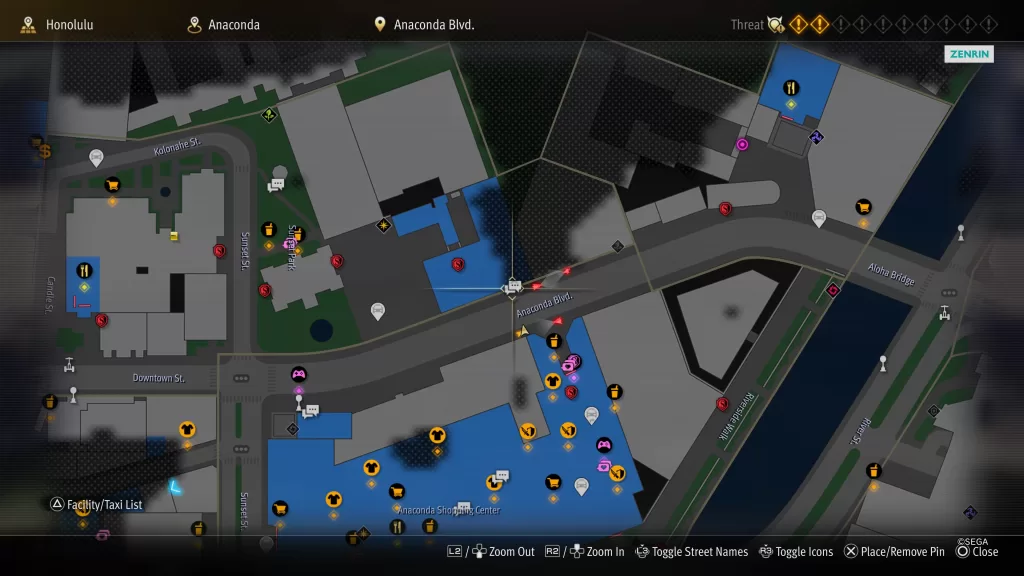
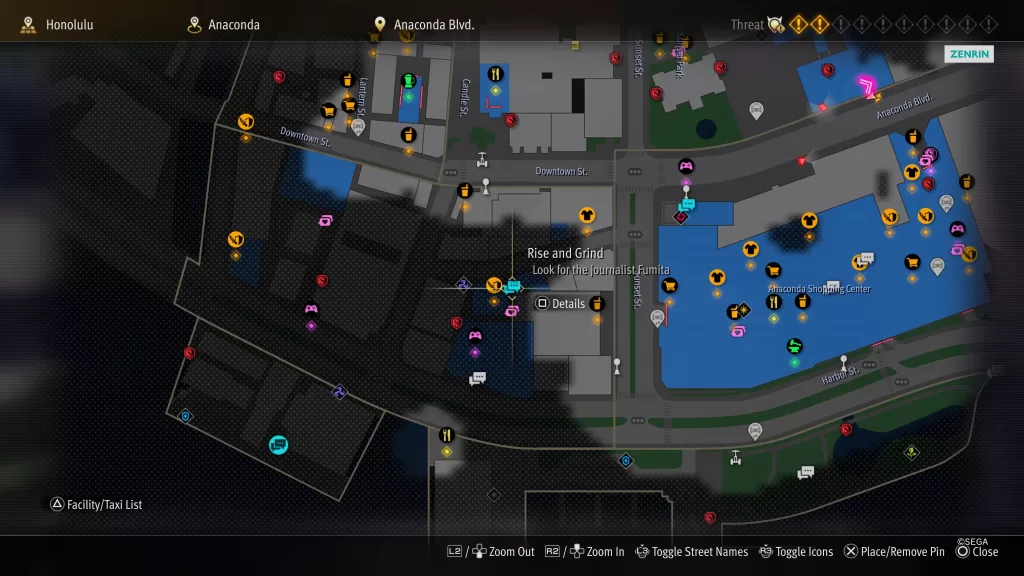
22 Rise and Grind
Location: Honolulu / Anaconda – along Anaconda Boulevard on the north side across from the Anaconda Shopping Center
Head over to Cafe Soramame and interact with the three people at the entrance. Choose “Knock it off, guys” when prompted to start a fight with a pair of level 13 local thugs. After defeating them, you’ll meet Mameoka, who will share his story with Kasuga over a cup of coffee. After some time passes, return to Cafe Soramane to trigger a cutscene by interacting with the crowd at the entrance. After the cutscene, head west down Anaconda Blvd, then southwest at the trolley stop to reach Twilight Dr in the Cultural District.
Go west down the street and turn left into an alley just before the Hyper Ecstasy Adult Shop. Speak with the journalist there which will lead to a fight against a group of 4 level 19 enemies. Choose “Sorata” after the fight to trigger another cutscene and close out the substory.
Rewards: You’ll unlock Mameoka in Poundmates
23 The More, the Plumeria
Location: Honolulu / Downtown at the gazebo in Sunset Park
Head over to the gazebo at Sunset Park, then go to the tree with the blooming flowers on the right. Kasuga will comment on them. After that, make your way to Anaconda Harbor Park, south of Anaconda Shopping Center. You’ll find another one of the trees there near a cow. Approach it again for Kasuga to make a comment about it.
Next head to West Waikiki and make your way to the corner of Waikiki St and Momo St across the road from Seaworthy Treasures. Locate Palm Tree Emporium and interact with the couple standing out front there.
After the scene plays out, head east down Waikiki St to find the girl looking at some blue flowers. Interact with her then select “Talk to her” when prompted to finally officially start the substory also kicking off a cutscene. You’ll want to select “Yup, let’s go” to head off in search of the flower when prompted. This will lead into another cutscene that ends with a fight between 2 Level 17 Honolulu Sumos. Defeat them then when the cutscene ends, head to Downtown north of the Anaconda Shopping Center to find another Plumeria tree in Sunset Park. Interact with the tree to receiver a call from Aina to learn that Jesse is leaving this evening. Travel to the Art Walls in the Cultural District near Psychedelic Coffee while keeping an eye out for enemies. If you are doing this early on in Chapter 4, they might be a bit higher level than you. Speak with Aina when you get there to begin constructing the lei. During this event, you’ll have a personality chance. Check out the list below to see which stats are increased with which choice. You can pick any choice you want, but the “Age isn’t everything” goes more with the substory than the others. Either way, then the cutscene ends the substory will be completed.
Travel to West Waikiki and go to the corner of Waikiki St and Momo St, across from Seaworthy Treasures. Look for Palm Tree Emporium and talk to the couple out front. After that, go east down Waikiki St and find the girl checking out some blue flowers. Interact with her and choose “Talk to her” when prompted to officially start the substory and trigger a cutscene. Choose “Yup, let’s go” to start looking for the flower, leading to another cutscene and a fight with 2 Level 17 Honolulu Sumos.
Once you defeat them, head to Downtown north of the Anaconda Shopping Center to find another Plumeria tree in Sunset Park. Interact with the tree to get a call from Aina, learning that Jesse is leaving this evening. Travel to the Art Walls in the Cultural District near Psychedelic Coffee, being mindful of any enemies as they will probably be at a higher level than you are depending how far you are in the game. Speak with Aina to start making the lei. During this event, you’ll have a personality chance. Check below to see which stats are increased with each choice.
Personality Chance
Adults are just sexier. – Style
No, younger girls are great. – Confidence
Age isn’t everything. – Kindness
After the cutscene, the substory will be completed.
Rewards: Pareo of Happiness accessory
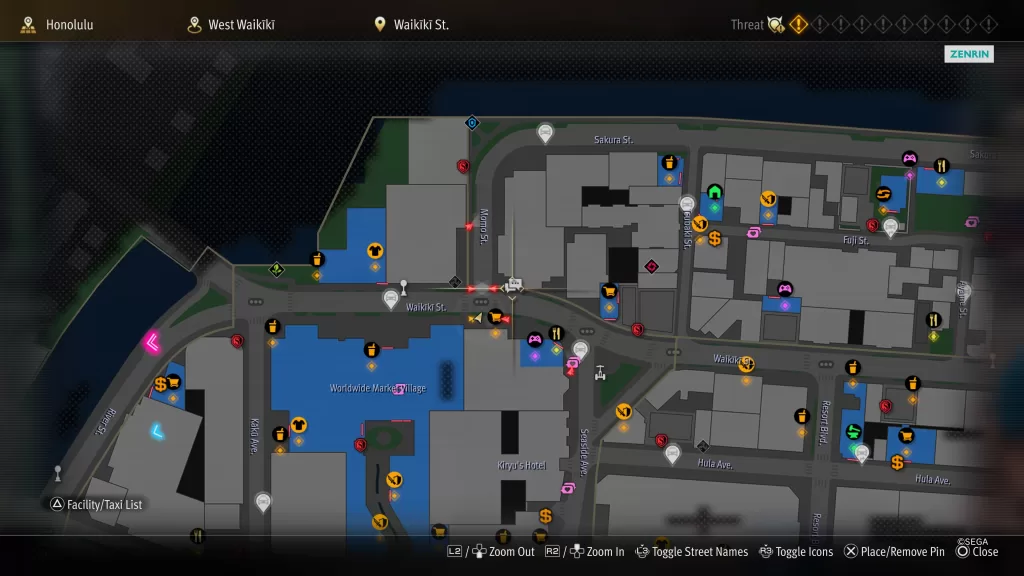
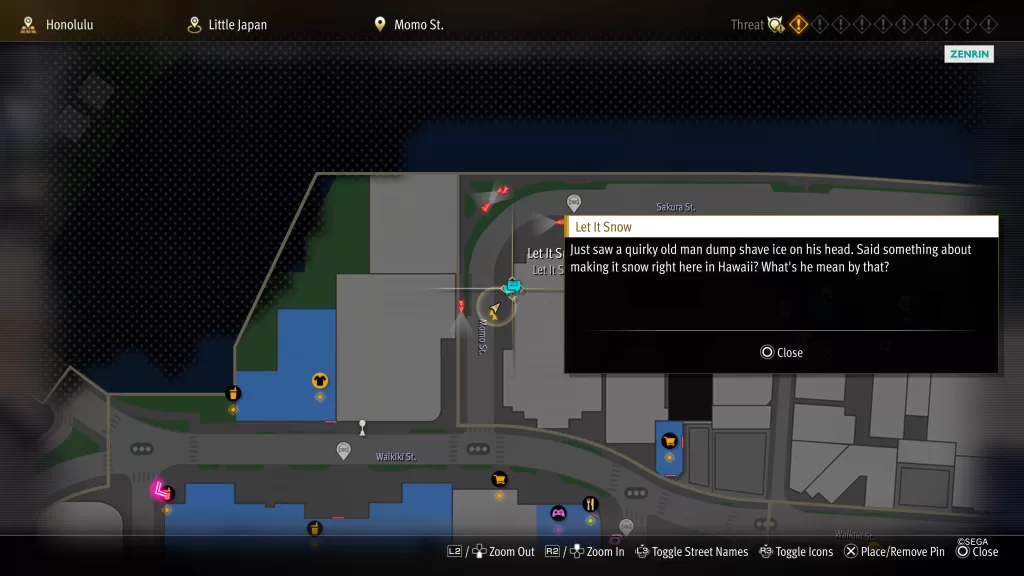
24 Let It Snow
Location: Honolulu / West Waikiki in front of Mohala Shave Ice
Approach Mohala Shave Ice along Aloha St to trigger a cutscene where a desperate old man will order a large shaved ice with no flavoring and throw it onto his head. Kasuga, concerned about the man, decided to check up on him. Follow the man to Momo St. in northwestern Little Japan where he is trying to purchase more ice. Speak with him to learn more about his situation. Ichi will then offer to help out.
To find out how to make it snow, you’ll need to progress far enough in the story to reach the Anaconda Shopping Center. Once you’re there, head for the escalators near the Hilo Hattie store on the 1st floor of the shopping center. A cutscene will trigger when you get close enough leading to a chase sequence. Once you catch the target, a fight will ensue against a trio of Level 17 enemies due to a misunderstanding. Defeat them to trigger another cutscene.
After it concludes, set out for the hotel across from Kiryu’s to meet up with our old friends. Speak with Gondawara there and select “Ready.” when prompted. This will trigger one last cutscene leading to the completing of the substory.
Rewards: Patriarch Gondawara will become available in Poundmates.
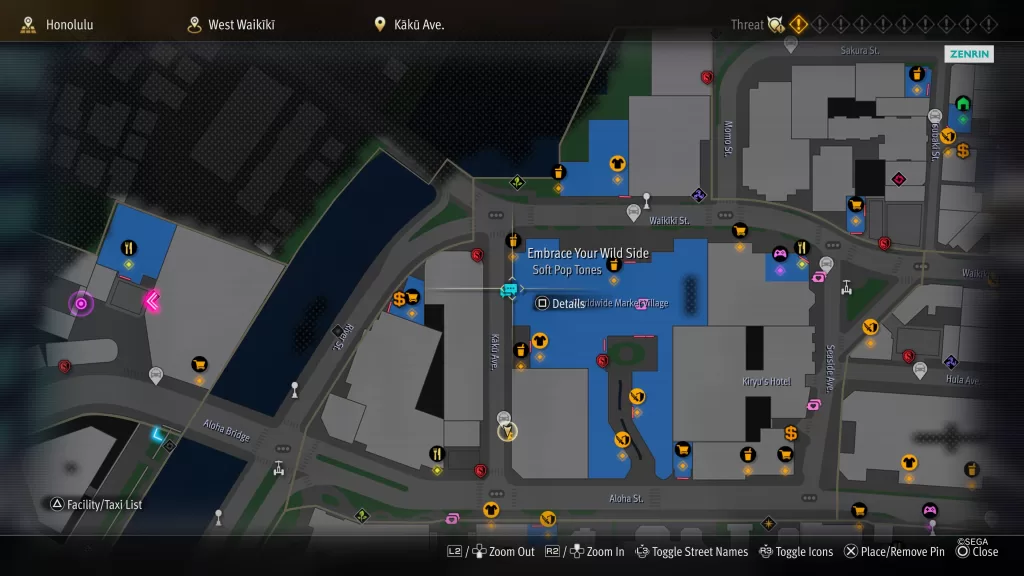
25 Embrace Your Wild Side
Location: Honolulu / Anaconda in the Anaconda Shopping Center
Head up to the 2nd floor of the Anaconda Shopping Center, then go to the center of the area. Once there, find the stage with the giant flamingos and approach it to start an event. Then, go over to the crowd and interact with them to listen in on the concert. This will lead to a cutscene where Kasuga meets the artist.
After a while, go to the western area of Worldwide Market Village in West Waikiki and stroll along the sidewalk. This will trigger another cutscene where Matt gets asked for an autograph.
After that, go back to the Anaconda Shopping Center and head up to the second floor near the stage. You’ll spot Matt near one of the pillars. Approach him and interact with the group to see another cutscene, but this time you’ll have to battle 3 level 12 Threatening Men. Once you defeat them, Matt will invite Kasuga out for drinks (he’s buying) to talk about some things that have been bothering him.
Head to Fancy Cookies on River St in the Aloha Bridge area and walk south along the sidewalk. This will trigger another cutscene where Kasuga runs into Matt. Then, go to the northeastern part of Japantown at the corner of Sakura St and Makani Ave. Visit Barnesby Family Care to find the kid from the last cutscene. Interact with him to learn more before speaking with him on the nearby bench.
After talking with the kid, go to Treasure Select Pawn in Chinatown at the northwestern corner of Honolulu. Head inside and speak with Matt there.
Travel to East Aloha Beach and visit Aloha Beach Juicery. Look for Pete west of the building and talk to him. Choose “Yeah, let’s go” when prompted. This will trigger a final cutscene, completing the substory.
Rewards: Signed Golem T-Shirt
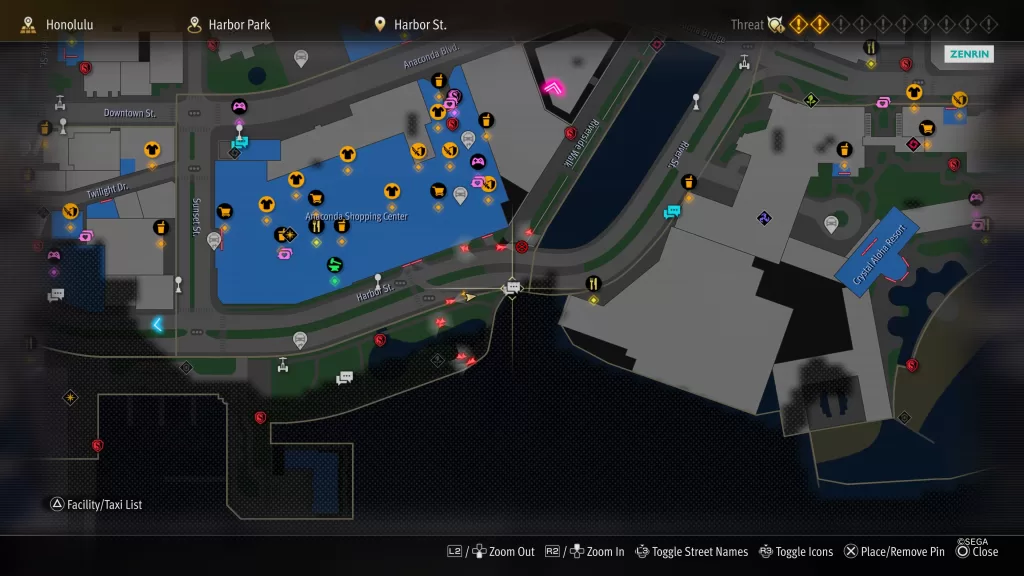
27 The Pursuit of Realism
Location: Honolulu / Harbor Park at the eastern end of Harbor St
Head to the bridge at the east end of Harbor St and a cutscene will trigger where Kasuga sees two guys threatening an old man. He’ll show off his skills and sprint across the road to battle two Level 12 Menancing Men. After taking care of them, the old man will tell Kasuga that he is what his film needs! When prompted, choose “Let’s roll!” then “How does this work?” to get the party started! For his scene, Kasuga will have to run down the road while avoiding cars and explosions before the time runs out. You’ll have 3 chances to pull this off if you want to earn the Reflex Booster, a bonus reward. After crossing the finish line, a last cutscene will trigger, completing the substory.
Rewards: Kaiser’s Change Holder accessory, a Reflex Booster (increases base Agility), and Bony Kashiwa will become available in Poundmates
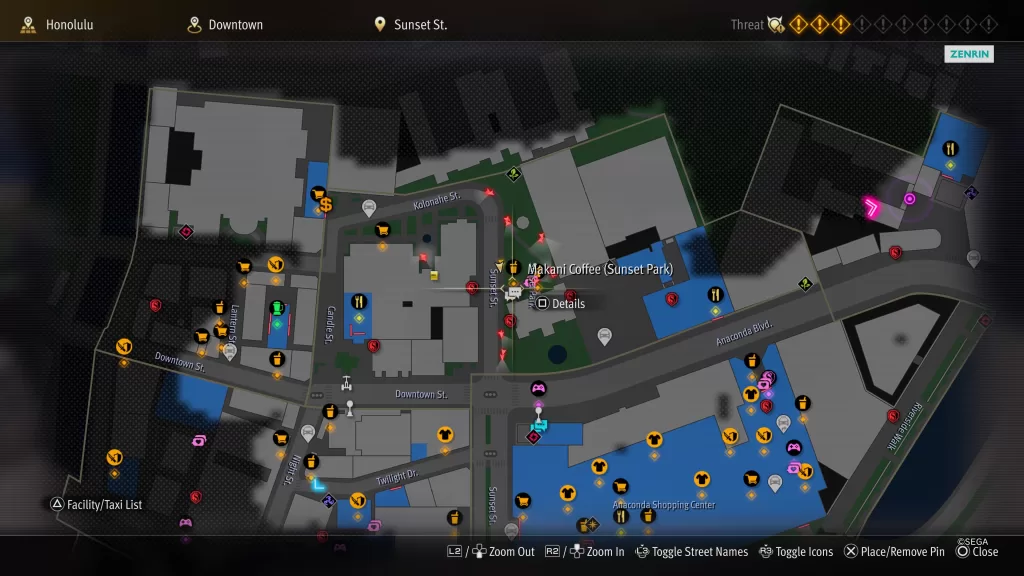
28 An Authentic Blockbuster
Location: Honolulu / Downtown along Sunset St near Makani Coffee
To start this substory, complete substory 15 “Samurai, May We Walk Together?” and substory 27 “The Pursuit of Realism.” Then, go to the location and approach the bench where James is sitting looking mopey. Kasuga will offer to help him. Choose “Bony Kashiwa” when prompted to gain points in Intellect. Kasuga will then assume the role of a stuntman once again. When ready, select “Fine… I’ll help” and then “I’ll go with you” to begin. This will be similar to the Pursuit of Realism, but this time you’ll be dodging semi-trucks. You’ll need to reach the goal in 40 seconds without getting hit, and you’ll have 3 chances to do it. Once you succeed, another cutscene will trigger, completing the substory.
Rewards: Modified Rocket Launcher (does 600 fire damage)
30 Close Encounters of the Bird Kind
Location: Honolulu / West Waikiki at the corner of Kaku Ave and Waikiki St
Approach the Pacific Mansions building to trigger a cutscene with a lady talking to a cop about her chicken getting abducted by a UFO. When the conversation ends, head to Worldwide Market Village via the northern entrance and speak with the girl who’ll be sitting on a bench and choose “Get involved” to join Karen on a stakeout for UFOs.
Wait until the next night then Karen should be back at Worldwide Market Village. Head there and speak with her choosing “Let’s go” when prompted. This will trigger a cutscene leading to a choice. Make sure to choose “Go big or go home, I guess.” to get a boost in Confidence. You’ll then want to move the slider so the bar is halfway full and says “Right there”. This will reward you some Passion points too.
Bringing it down leads to a battle against the Level 29 UFO. The UFO itself is weak to gun and fire attacks while its charger is weak to electric attacks. You’ll want to destroy the charger first then focus on the UFO. Once you defeat the UFO a cutscene will end leading to the completion of the substory.
Rewards: Antique Coin Accessory for the Desperados job, Hibiscus Hair Band accessory for the Geodancer job and the UFO becomes available in Poundmates
31 Let’s Get Alo-Happy!
Location: Honolulu / West Waikiki – At Alo-Happy Tours in Worldwide Market Village
This substory starts automatically during the main story in Chapter 5 after you reach the travel agency. It’s a tutorial that teaches you how to change jobs and includes some extra activities the party can do. In this substory, we’ll be doing the Diving Tour with Kasuga during which he’ll unlock the Aquanaunt job. After completing the tutorial, the substory will be completed.
Rewards: Job changing is unlocked and you’ll be able to participate in activities to gain new jobs
32 Tropical Photo Rally
Location: Honolulu / West Waikiki – At Alo-Happy Tours in Worldwide Market Village
This substory starts automatically in chapter 5 as part of the main story after you finish substory 31Let’s Get Alo-Happy! You’ll receive clues about items you need to find and take pictures of. Once the talking palm tree disappears, take a photo of the palm tree man cutout in front of Alo-Happy Tours. Show it to Alo-Happy to finish the side quest.
Rewards: You can participate in the Tropical Photo Rally for additional rewards
33 The Island at Rock Bottom
This substory starts automatically during the main story in chapter 6. You’ll be taken to Dondoko Island, where you’ll meet its mascots, Gachapin and Mukku. The owner, Matayoshi, will then appear and explain the island’s situation to you. Feeling sorry for them, Kasuga decides to help out. First, you’ll have to destroy 10 piles of trash with your bat. Once that’s done, some pirates will show up to interfere with your progress. Defeat them by hitting them with your bat to trigger a cutscene leading to the end of the substory.
Rewards: Dondoko Island is unlocked
34 Legend of the Labyrinth
This substory automatically starts during the main story in chapter 5 as a tutorial for dungeons. While helping patrol the Riverside Walk, the group stumbles upon a labyrinth. A Labyrinth Bum then appears and explains the labyrinth, asking for a tip afterwards. Giving him money boosts Kasuga’s confidence, and the more you pay, the more confidence you’ll gain. After talking to him, the party will enter the dungeon. Inside, you’ll need to fight your way through the enemies, moving floor by floor until you reach the boss room. There, you’ll have to battle 3 clowns on stilts (1 level 19 and 2 level 18). You can deal massive damage using electric attacks as that’s their weakness. Once they go down, the group will rescue the captive and bring him back topside, completing the substory.
Rewards: Jet Surfboard and the Labyrinth Dungeon is unlocked
36 Relics from the Past
To begin the Relics from the Past substory, interact with the excavators on West Aloha Beach during Chapter 13. Afterwards, head east along the beach and approach the mother and girl next to a man wearing a top hat. During the cutscene, you’ll meet a blast from the past who is now setting up an aquarium. You’ll need to leave the area then return to the spot you spoke with Yasuda. This time he’ll run up to you carrying electrified buckets. Before catching up to Yasuda, make sure to save as you’re about to fight the 2 excavators! Both are Level 31 and are weak to water! Defeat the machines to complete the substory!
Rewards: Gorgeous Rubber Gloves
37 Choosing Your Starter
You’ll start this substory automatically in chapter 4 while visiting the Anaconda Shopping Center during the main story. Kasuga will get a message from the Sujimon Sensei saying that he’s in Hawaii and has something to show us. Make your way to the PC shop on the 2nd floor of the mall to find him. Approach the sensei to trigger a cutscene that leads to Ichi participating in a Sujimon battle where the game will walk you through how it works.
After the battle, the Sujimon Sensei will then show Kasuga how to capture Sujimon by using Suji Gifts. Ichi will then be able to pick one of 3 Sujimon to raid against and capture!
Once you’ve done that, another cutscene will trigger leading to the end of the substory.
Rewards: The Sujimon League is unlocked
43 A Man Named Asakura
Location: Honolulu / West Waikiki at the corner of Aloha St and River St
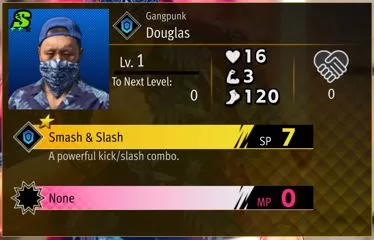
As soon as you approach the location for this substory, a cutscene will trigger with Asakura. Unlike other substories, you won’t get the option to start it later. Instead, you’ll be thrown into a fight with a level 12 Asakura using only Kasuga. Once you defeat him another cutscene will trigger and the substory will complete.
Rewards: Kasuga learns the skill Merciless Melee
44 A Changed Man
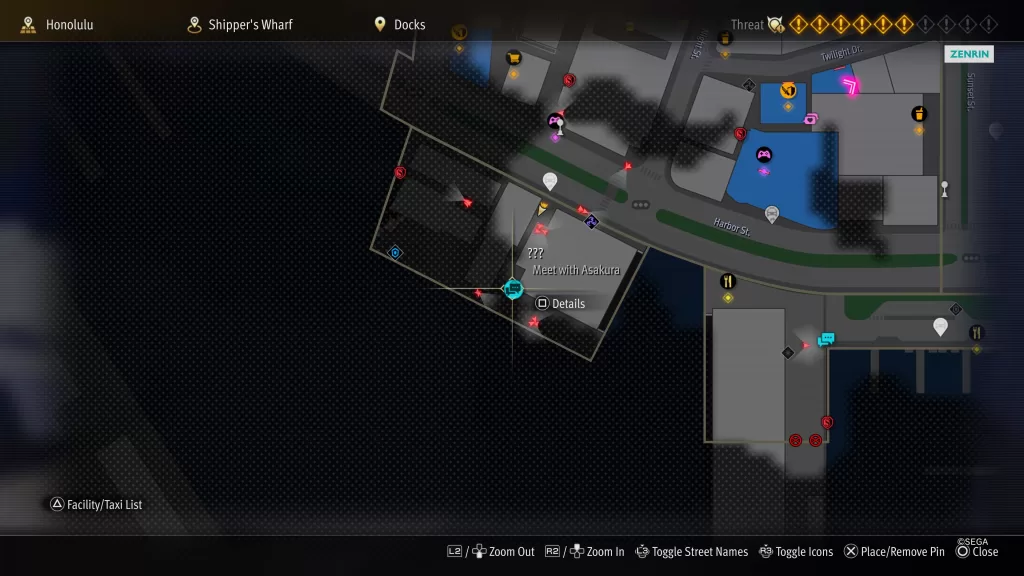
Location: Honolulu / Shipper’s Wharf at the Docks
To unlock this substory, complete substory 43 “A Man Named Asakura” first. Then, wait for some time to pass. Asakura will message Kasuga about a rematch. Head to Shipper’s Wharf, located in the southwestern part of the map, south of the Cultural District. Go to the docks to find Asakura and speak with him. Choose “Ready when you are” to start the fight against a level 26 Asakura, using only Kasuga. Beat him to trigger another cutscene that concludes the substory.
Rewards: Kasuga will learn the Heart of a Champion skill
45 The Final Showdown for Real
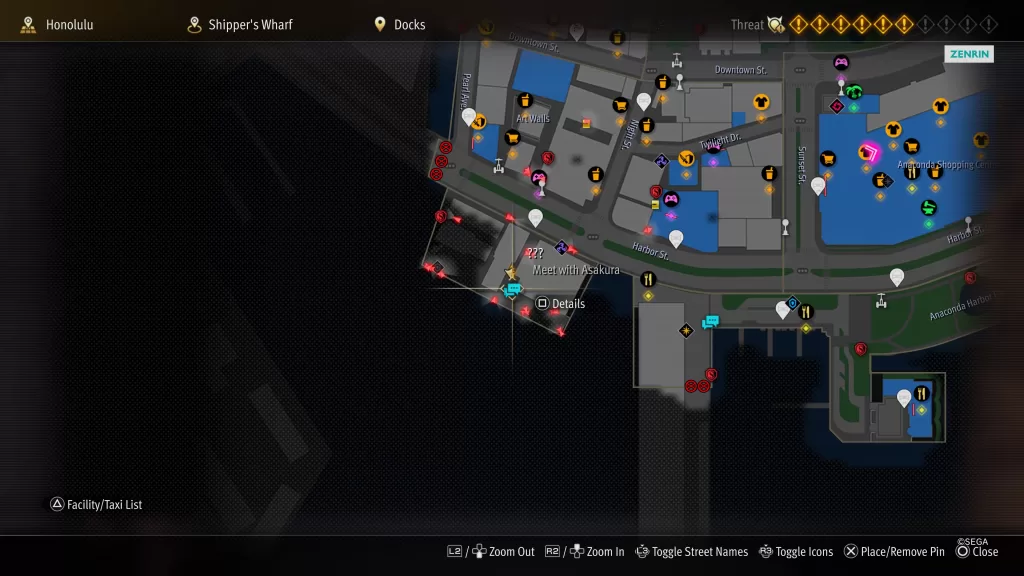
Location: Honolulu / Shipper’s Wharf on the docks
In order to unlock this substory, you’ll first need to complete Substory 44 A Changed Man. Once that’s been done, wait for some time to pass then Asakura will message Kasuga that he’s ready for one last showdown. Head to the docks in Shipper’s Wharf (same place as before) to find Asakura, but he’s not alone. Interact with him to observe his conversation with the group. This will lead to Asakura and Kasuga’s fight. Select “Bring it on” when prompted to begin. This time around, you’ll be facing a Level 33 Asakura. He’ll occasionally use a skill to boost his Crit Chance, but besides that, it’s mainly the same as the last fight. Once he goes down, a cutscene will trigger leading to the completion of the substory.
Rewards: Knockout Combo Skill for Kasuga
46 A Man Facing the Future
Location: Honolulu / Shipper’s Wharf on the docks
In order to unlock this substory, you’ll first need to complete Substory 45 The Final Showdown for Real. After doing that, wait for some time to pass and you’ll get a message from Asakura asking Kasuga to meet him at the docks. Head there and speak with him to trigger a cutscene during which you’ll learn it was a setup to get you both here. You’ll then be thrown into battle against 3 waves of Level 43 enemies. After defeating the last three, another cutscene will trigger finally ending this substory chain for good.
Rewards: Brawler God’s Mouthguard and Asakura becomes available in Poundmates.
This site uses cookies. By continuing to use this website, you are giving consent to cookies being used. For more information on cookies, view our Privacy Policy.OkPrivacy Policy