Welcome to NGB and our Baldur’s Gate III guide on the Defeat Ketheric Thorm quest. Defeat Ketheric Thorm is the final story quest for Act II in Baldur’s Gate. During this quest, you’ll need to discover where the boss man fled and end his reign of tyranny for good!
If you need help with a specific quest objective, please refer to our Quick Links section to quickly reach the information you’re looking for!
Defeat Ketheric Thorm Quick Links
Defeat Ketheric Thorm Walkthrough
Follow Ketheric Thorm
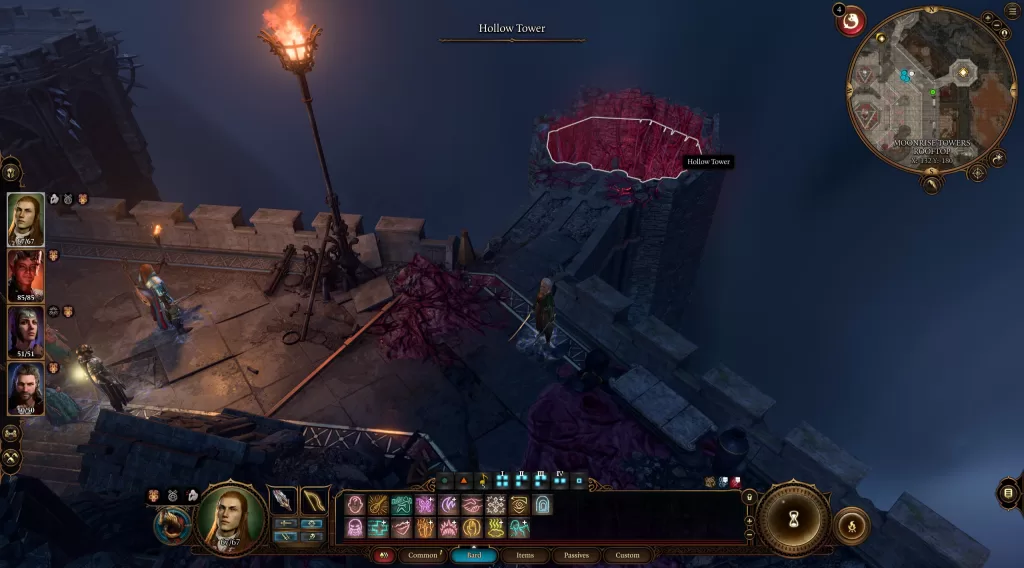
Still on the Moonrise Towers Rooftop after Thorm fled, head to the northeastern tower where the tentacle came from to find Jajeira. Speak with her there, and you’ll once again be able to get her to join the party if you want. It’s also worth noting that you can rest now on the rooftop. You also may want to bring Wyll with you as the next area is where the demon and possibly the Grand Duke can be found. When you are ready to pursue Throm, interact with the Hollow Tower near Jaheira and select yes when prompted to leap in.
Search the Colony for Ketheric
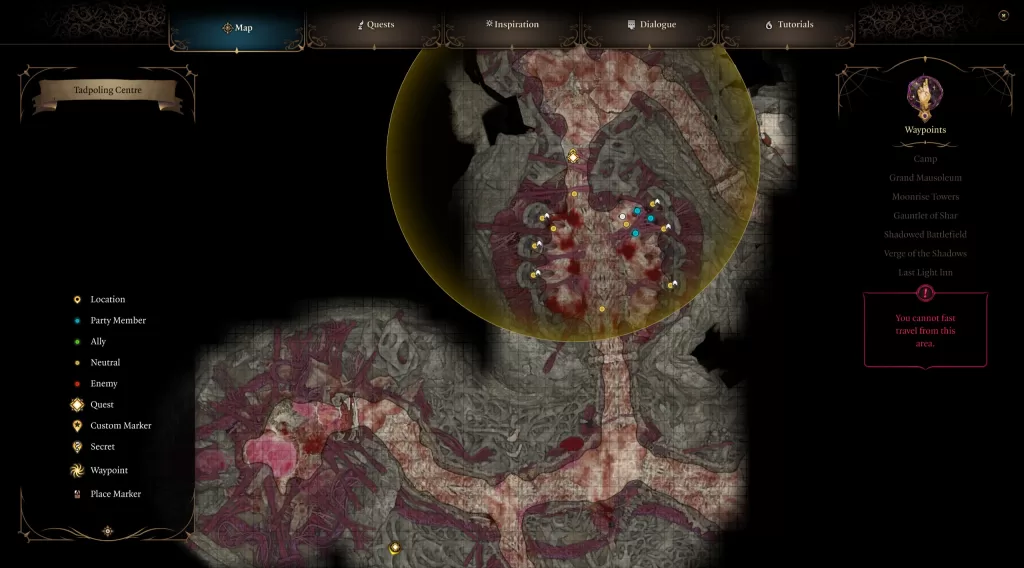
You’ll be in the Mind Flayer Colony when you regain control of your party. There are a couple of things to do before pursuing Thorm, which will be listed below. Another thing to keep in mind is that if you follow that path east from where you started, you’ll end up by an elevator leading forward for the story quest. Near it will be a Restoration device that will heal your party to full health and restore their spell slots. You can use this device as many times as needed.
The Blade of Frontiers – Rescue the Asset / Find Zevlor in the Tadpoling Centre
The first stop on our trip to the colony is the Tadpoling Centre. To reach it, head east from where you start in the area and take the first left (after keeping left at the fork). Interact with the Neural Apparatus in the room to learn that some pods have Mind Flayers while others have captives yet to be implanted. To save them (and the asset for Wyll), you’ll need to release the pods and fight off a horde of Mind Flayers and Intellect Devourers. Luckily, the other captives will join the fight and aid you. A word of caution: the Mind Flayers swarmed my party, ignoring the others. so you have that to look forward to. After defeating them, you’ll begin a conversation with Zevlor. Regardless of your option, he will help survivors escape, and the Find Zevlor side quest will be completed.
Before leaving the room, head to the northern section to find Mizora in a pod. Interact with the pod (while Wyll is in the party) to learn that she is the asset you were sent to free. You’ll then have to pass a Strength skill check to smash the pod or connect your mind to the machine. If you choose the device on the left, Mizora will be purged, and Wyll and she will be killed. Activating the device on the right will free her from the pod. She’ll then tell Wyll she will free him within six months per his contract. If you pass the Persuasion skill check asking for a reward, Mizora will give Wyll the very rare Infernal Rapier. You’ll then want to speak with him afterward.
Deal with Kressa and her Goons
Head east of the Tadpoling Centre to find Kressa giving her goons a pep talk. Approach her to trigger a dialog event where you can convince her you were sent to help if you pass a Deception skill check. After that, you can attack her and get extra exp.
Deal with the Death Shepard in the Necrotic Laboratory
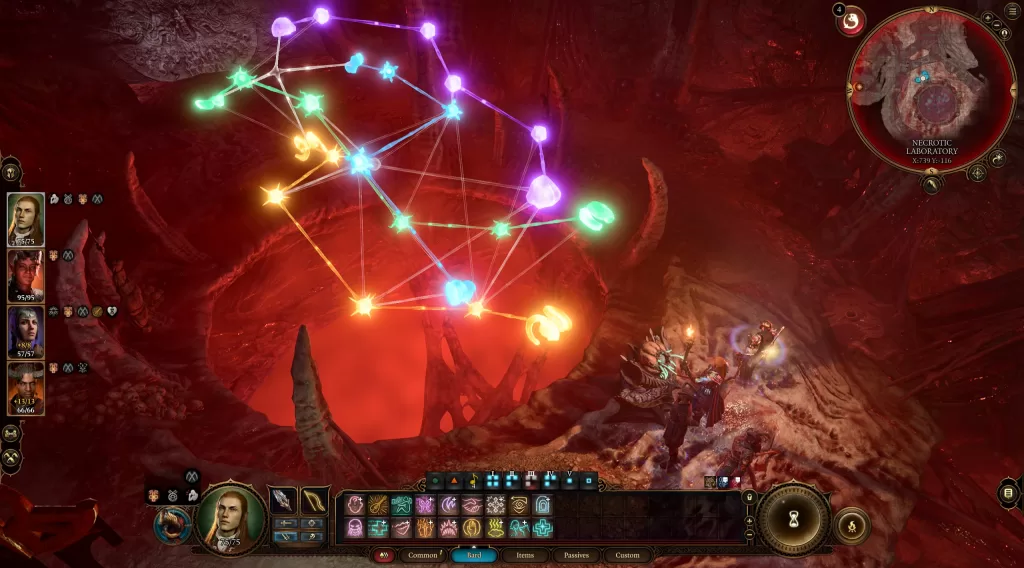
You can find the Death Shepard in the southcentral area of the colony. You’ll be thrown into combat upon entering the room it’s in with the Death Shepard, a few Winged Horror, and many zombies. The Death Shepard will also keep spawning enemies each turn as well. Once you defeat them all, head to the southwestern part of the room (you’ll have to jump twice to reach it). Interact with the console, and then solve the brain puzzle. You’ll have to link each brain to its counterpart at the other end. Doing so will open a door, allowing you to interact with the Desecrated Relief.
Free Us
Remember when you could pull the brain out of the body at the beginning of the game? Well, if you did (and weakened it to make it subservient), you can find the little guy locked in a cage heading south down the path where you started on the ship.

Speak to Us, and it will ask for help freeing it from its cage. To do this, take care of Chop (who has the key), and the immediate intellect devours. You can then use the key to open the cage, freeing Us. It will then join you as a Summonable Cantrip.
Kill Ketheric Thorm
When you’re done exploring, head to the elevator mentioned in the guide’s first section and use it to descend. Follow that path at the bottom to reach a door, and beyond it, the Absolute! After a very interesting cutscene, approach Thorm to trigger a conversation. If you can pass a persuasion check, he’ll off himself, bringing you to phase two of the fight. If not, you’ll have to face him and his army of Mind Flayers, Necromites, and Intellect Devourers. To damage him, you’ll need to free Nightsong from her chains by running over to her and helping her up. Once he’s dealt with, a level 11 Apostle of Myrkul will enter the fray. If you convinced Ketheric to off himself, you’ll skip right to the Apostle and still have to free Nightsong to damage it. The fight will end as soon as the Apostle of Myrkul goes down, triggering a cutscene. You’ll then be able to loot Ketheric and grab the stone he was wearing to trigger another cutscene with the Dream Visitor. Loot Ketheric again after the cutscene, then use the portal to return to the surface. This will complete the Defeat Ketheric Thorm quest.
Additional Baldur’s Gate III Guides and Walkthroughs
For more content on Baldur’s Gate III, be sure to check out our Baldur’s Gate III Guides and Walkthroughs page.